

Mountain Buggy urban elite, breeze, terrain, double terrain, urban Instructions Manual
...
English
1
Welcome
Congratulations on your purchase of a Mountain Buggy.
We know how precious and inspiring a new little person can be in your
world. It’s so important to be able to show your baby to the world and
just as important to show the world to your baby.
At Mountain Buggy you and your baby matter to us. That’s why we
have spent years researching and developing a product that is safe,
comfortable and in tune with modern parents’ needs. We want you to be
able to live your new family lifestyle with all the freedom and satisfaction
you have always experienced.
We also know that many parents use strollers incorrectly and as a result
may put their children at risk. Please take the time to read through this
manual carefully. Your Mountain Buggy will provide you with optimum
safety if you follow the instructions as detailed.
If you have any concerns, questions or comments about your Mountain
Buggy or how to use it, please do not hesitate to contact us. We’d love to
hear from you.

2
Important: read instructions carefully, follow them strictly and keep this booklet for
future reference. Your child’s safety is your responsibility.
Capacity
• For all models, the seat is suitable for children from newborn up to 4 years old. For use
with a newborn (0-6 months) the seat should be reclined fully. It is recommended that a
newborn headrest or similar is used for babies 0-3 months.
Other newborn options include:
1. Mountain Buggy® Carrycot (available for all models except Swift)
2. Mountain Buggy® Carseat Adapter (available for all single models, except Swift).
• Maximum seat loading for all model Single strollers is 35kg/77lb, and 25kg/55lb per seat
on Double and Triple versions. This seat is for a child of 100cm maximum height. Maximum
loading for the storage basket is 5kg/11lb. Maximum loading for the pocket on storage
basket is 300gm/10.5oz (ie only small items such as keys, wallets).
Important Use Information
• This stroller is designed for one child in each seat.
• Passenger should remain seated (no standing in the stroller).
• To prevent the stroller from becoming unstable, do not place parcels or accessory items
anywhere except in the storage basket and pockets provided. Do not hang items such as
shopping bags from the frame.
• Overloading and incorrect folding may damage or break this stroller.
• Accessories or replacement parts that are not approved by the manufacturer or distributor
should not be used.
• Excessive weight may create hazardous unstable conditions.
• Do not use near an open fire or exposed flame.
Essential Warnings
WARNING: Never leave your child unattended.
WARNING: Prevent serious injury to your child by using the harness at all
times. Always use the crotch strap in combination with the
waist belt.
WARNING: Do not carry extra children or bags on this stroller.
WARNING: The stroller should not be used unassisted on stairs or
escalators.
WARNING: Take care when folding or unfolding the stroller to prevent
your fingers being entrapped.
WARNING: Any load attached to the handle affects the stability of the stroller.
WARNING: Make sure children are clear of any moving parts when you
adjust this stroller, otherwise they may be injured.
WARNING: Put on all brakes whenever you park the stroller.
WARNING: This product is not suitable for running or skating.
WARNING: Use the safety wrist strap at ALL times the stroller is in use.
WARNING: Avoid serious inju ry from falling or sliding out. Always use seat belt.
WARNING: (Terrain model only) This seat is not suitable for children under
6 months.
FoR thE sAkE oF YoUR pRECIoUs pAssENGER, plEAsE REAd thEsE
WARNINGs bEFoRE UsING YoUR MoUNtAIN bUGGY.
English
3
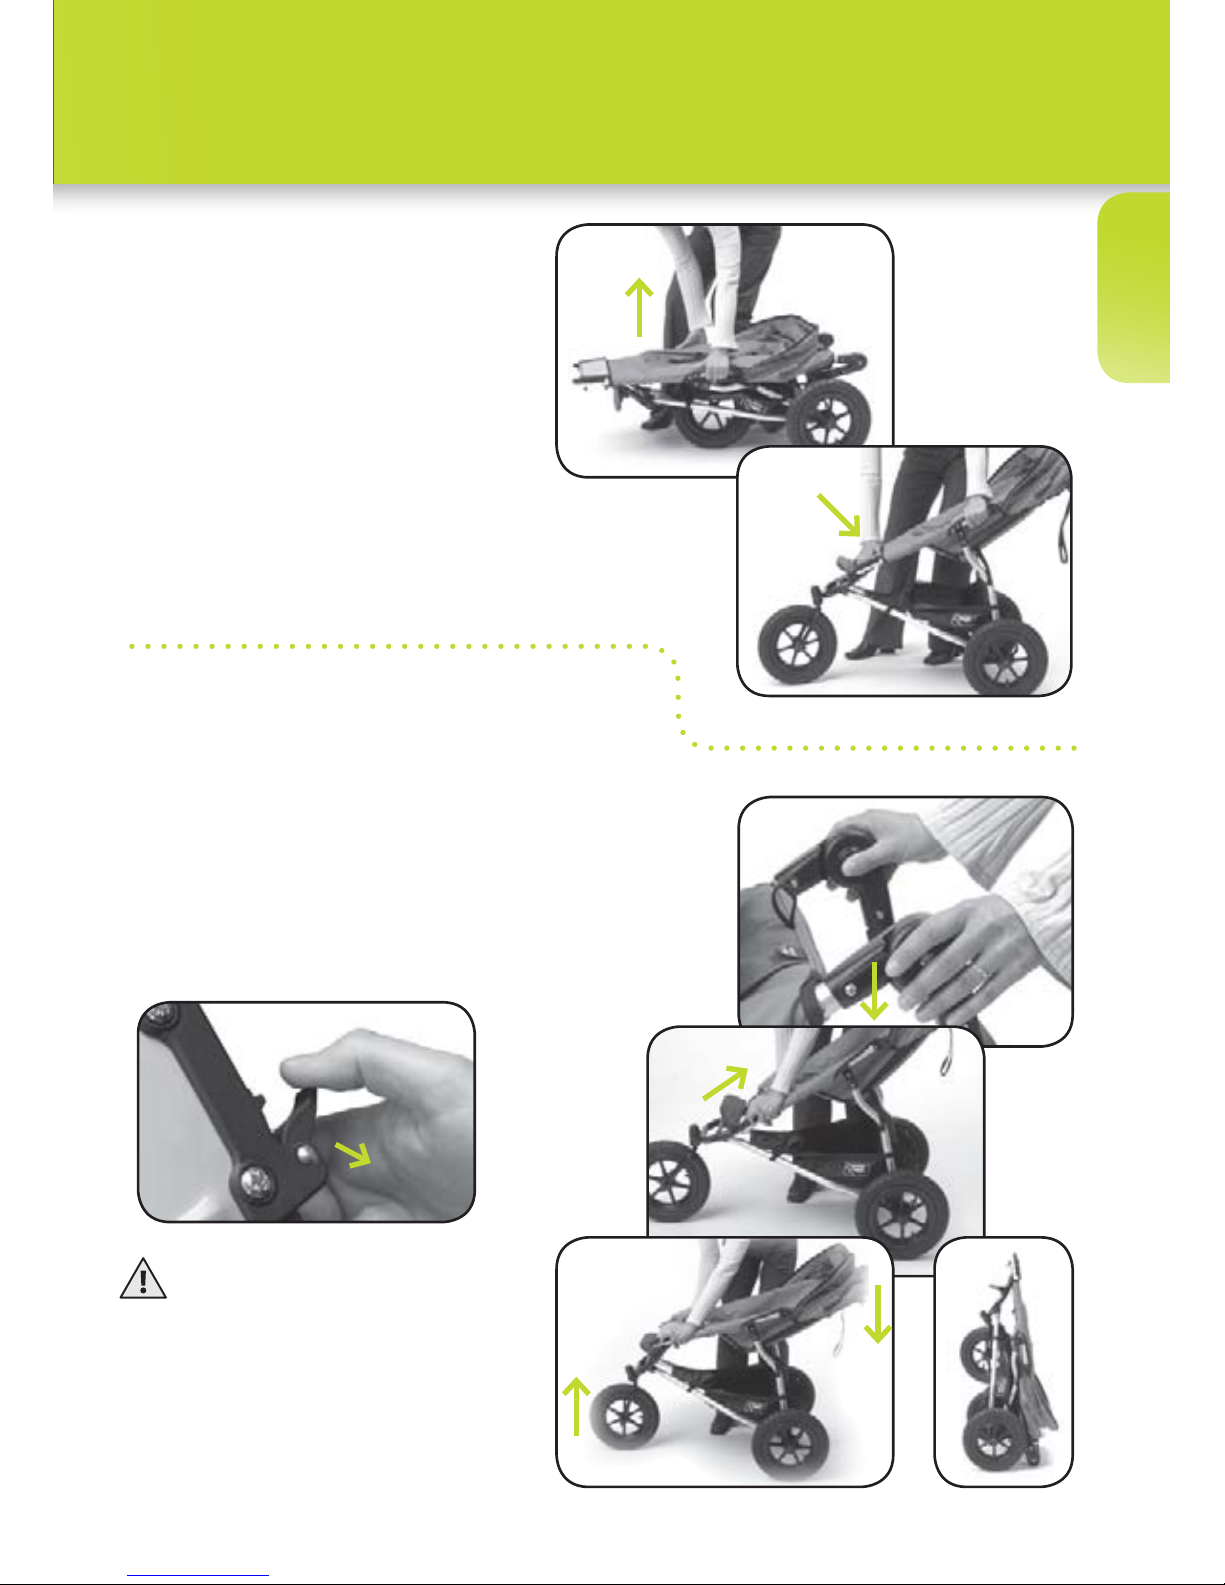
Erecting and Folding the Stroller
Folding your stroller
1. Fold adjustable handle under
(if applicable).
2. Flick the lock guard out and pull up the
sliding lock on both sides of the heel rest.
NotE: On Urban and Swift model strollers,
ensure front wheels are unlocked
and rotated forward before folding.
WARNING:
Check that all locking
devices engage correctly
and are not damaged
before use.
putting up your stroller
When you first receive your stroller,
remove it from the box, remove the
black caps on the rear axles (not on
Urban Single or Swift) and plastic
outer wrapping. Dispose of plastic
wrapping safely to avoid a child
suffocating.
1. Grip stroller near sunhood
joints, and lift.
2. Place pressure on heel rest to ensure
sliding locks are fully engaged.
1.
2.
3.
4.
5.
4
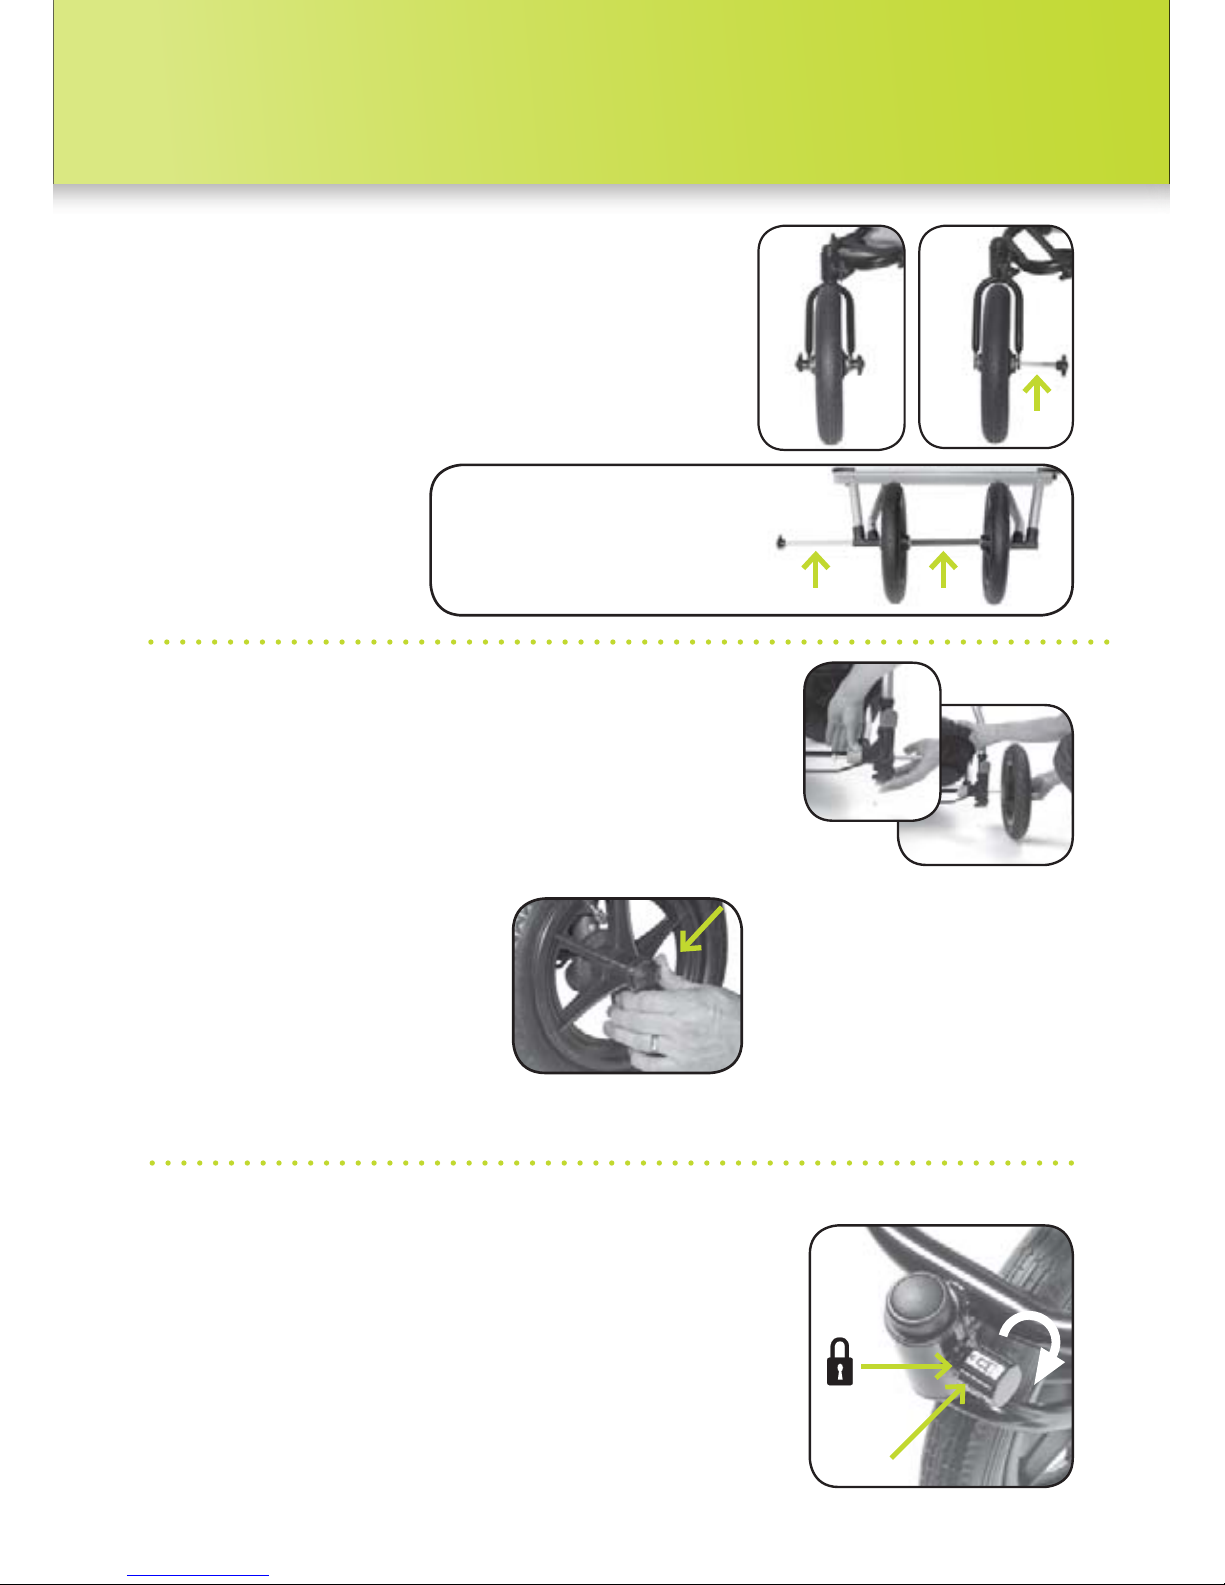
Front Wheel Assembly
1. Holding both knobs at the same time,
unscrew and pull out the front axle.
2. Insert the front wheel.
3. Re-insert the axle and tighten both knobs
by hand to secure wheel in place.
to remove
Repeat above in reverse.
Front swivel Wheel (Urban and swift models)
Locking the front wheel swivel(s) is recommended
for use on uneven ground.
to lock: pull knob out and turn it so the ‘locked’
symbol is at the top. Then swivel front
wheel under stroller until it locks into place.
to unlock: pull knob out and turn it 1/4 of a turn
so the ‘unlocked’ symbol is at the top.
Rear Wheel Assembly
1. For Urban and swift singles with push-in axle:
• Pushforwardonthegreyaxlerelease
tab and push the axles out slightly
and release the tab.
• Pushtheaxleoutfurtheruntilyouhearaclick.
2. For all buggies:
• Slidewheels(withbrake
cog facing inwar ds)
onto the axles.
• Pusheachwheelonuntil
it clicks into plac e . P ull on
the wheel to ensure it is secure.
knob
Wheel Assembly
axle
to remove
Depress quick release clip and
slide wheel off axles. Urban
Single and Swift axles can
be pushed in to reduce the
total folded size. Push the axle
release tab and push the axles
in until they click into place.
spaceraxle
Nb: On Terrain Double
remember to insert
the spacer between
the front wheels.
English
5
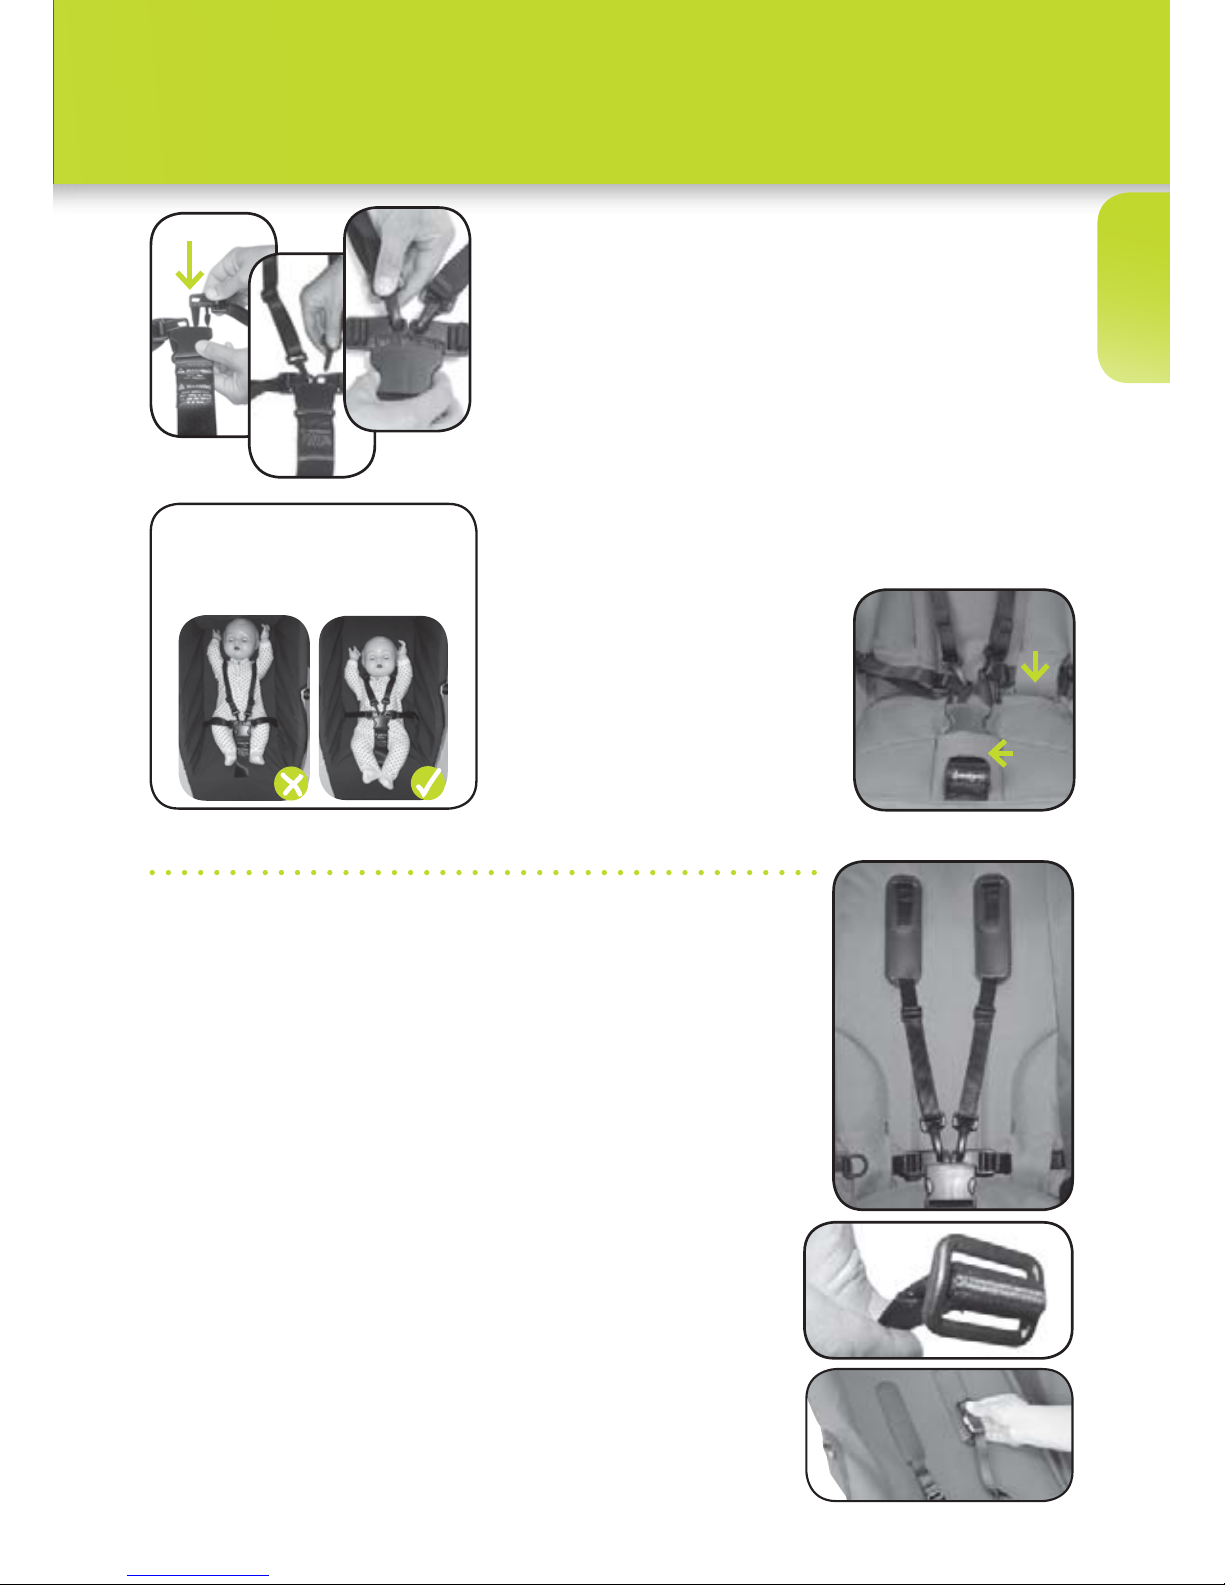
Safety Harness
to fasten
1. Clip shoulder straps to waist strap buckles.
2. Push both waist buckle ends into crotch strap.
to release the harness
1. Squeeze the tabs on either side of the main
buckle with thumb and forefinger.
to adjust width for a new born
1. Unclip all straps from the main buckle.
2. Thread the main buckle and crotch strap
through the centre fabric slot on the seat.
3. Thread the side straps through the side fabric
slots.
to adjust
1. Adjust slid ing buckles so
harness straps fit firmly .
shoulder straps
The stroller comes with the shoulder straps set in the newborn
position. Shoulder strap height should be located just below or
level with a child’s shoulders. The older the child, the further up
the seat the straps need to be.
to adjust:
1. Locate buckle by slipping hand up the inside back of the
seat.
2. Push the rectangular shaped buckle through the in sertion
slot on an angle , pu s h i ng the corner of the buckle first.
3. Re-thread the corner of the buckle through the most
suitable height in sertion slot for y our ch ild.
4. Once the buckle is through the slot, twist it so it is
flat against the seat back and then check it is secure by
pulling on strap.
Nb: Initial adjustment from newborn position requires you to follow
points 1 and 2, then continue to unthread until the shoulder strap
is completely out of the hammock. Then rethread the shoulder
strap at the right height as per the instructions 3 and 4.
Nb: Make sure baby is
positioned down as
far as possible in seat.
1
2
3
Centre
fabric
slot
Side
fabric
slot
Nb: a separate safety harness
conforming to British Standard
BS6684 may be attached to
the two ‘D’ rings located at the
insertion of the waist harness.
 Loading...