

Page 1
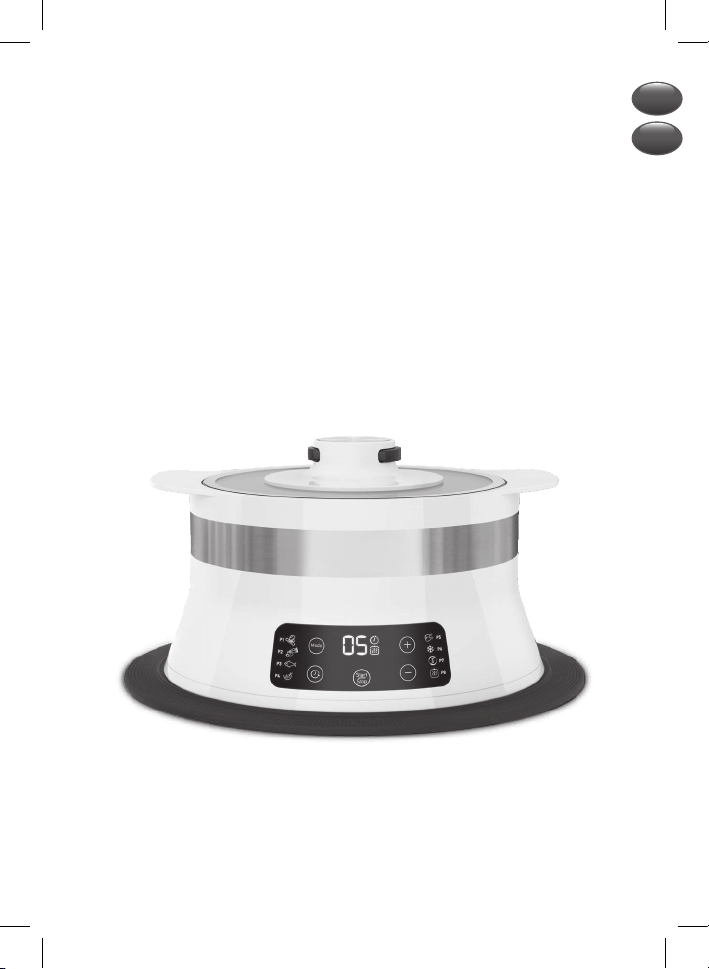
Steam’up steamer
FR
EN
Page 2
A
1
1 2 3
4 5 6
7 8 9
10 11 12
C
B
D
E
I J K
L
H H
M N O L
P
B
F
G
Q
Page 3

1
1 2 3
4 5 6
7 8 9
10 11 12
3
Page 4
2
H: 12 cm MAX
Ø 16 - 28 cm
OK
27
30
25 26
28 29
MAX
0.7L
151413
4
BEEP
16
19
22 23
17 18
20 21
20 min
24
Page 5
2
OK
H: 12 cm MAX
Ø 16 - 28 cm
25 26
27
30
28 29
5
Page 6
4
20 min
46
454443
47 48
3
×3
BEEP
MAX
0.7L
31 32 33
34 35 36
37 38 39
40 41 42
6
Page 7
20 min
454443
4
46
47 48
7
Page 8
5
6
BEEP
MAX
0.7L
60 61 62
63 64 65
67 6866
70 7169
49 50 51
52 53 54
8
55
58 59
56 57
Page 9
6
MAX
0.7L
60 61 62
63 64 65
67 6866
BEEP
70 7169
9
Page 10

8
×6
9
0.3L
MAX
0.7L
12h
86
81 82 83
84 85
78 79 80
72
75
73 74
7
76 77
10
Page 11
8
×6
0.3L
MAX
0.7L
12h
78 79 80
9
81 82 83
84 85
86
11
Page 12
10
87
88 89
12
Page 13

FR
RECOMMANDATIONS IMPORTANTES
CONSIGNES DE SÉCURITÉ
Lire attentivement ces instructions et les
conserver soigneusement.
• Cet appareil peut être utilisé par des enfants âgés d’au moins
8 ans, à condition qu’ils bénéficient d’une surveillance ou
qu’ils aient reçu des instructions quant à l’utilisation de
l’appareil en toute sécurité et qu’ils comprennent bien les
dangers encourus. Le nettoyage et l’entretien par l’utilisateur
ne doivent pas être effectués par des enfants, à moins qu’ils
ne soient âgés de plus de 8 ans et qu’ils soient sous la
surveillance d’un adulte. Conserver l’appareil et son câble
hors de portée des enfants âgés de moins de 8 ans.
• Cet appareil peut être utilisé par des personnes dont les
capacités physiques, sensorielles ou mentales sont réduites
ou dont l’expérience ou les connaissances ne sont pas
suffisantes, à condition qu’ils bénéficient d’une surveillance
ou qu’ils aient reçu des instructions quant à l’utilisation
de l’appareil en toute sécurité et en comprennent bien les
dangers potentiels.
• Les enfants ne doivent pas utiliser l’appareil comme un jouet.
• Cet appareil n’est pas prévu pour être utilisé par des personnes
(y compris les enfants) dont les capacités physiques,
sensorielles ou mentales sont réduites ou des personnes
dénuées d’expérience ou de connaissance sauf si elles ont pu
bénéficier par l’intermédiaire d’une personne responsable de
13
Page 14

leur sécurité, d’une surveillance ou d’instructions préalables
concernant l’utilisation de l’appareil.
• Il convient de surveiller les enfants pour s’assurer qu’ils ne
jouent pas avec l’appareil.
• Cet appareil a été conçu pour un usage domestique
uniquement.
• Il n’a pas été conçu pour être utilisé dans les cas suivants qui
ne sont pas couverts par la garantie :
– dans les coins cuisines réservés au personnel dans des
magasins, bureaux et autres environnements professionnels
– dans des fermes
– par les clients des hôtels, motels et autres environnements
à caratère résidentiel
– dans des environnements de type chambre d’hôtes.
• Si le câble d’alimentation est endommagé, il doit être
remplacé par le fabricant, son service après-vente ou des
personnes de qualification similaire afin d’éviter un danger.
• Ne jamais plonger l’appareil dans l’eau.
• Utiliser un chiffon humide ou une éponge avec du liquide
vaisselle pour nettoyer les accessoires et les parties en
contact avec les aliments. Rincer avec un chiffon ou une
éponge humide. Sécher les accessoires et les parties en
contact avec les aliments avec un chiffon sec.
• Si le symbole est indiqué sur l’appareil, ce symbole
signifie “Attention : La température des surfaces accessibles
peut être élevée lorsque l’appareil est en fonctionnement. Ne
pas toucher les surfaces chaudes de l’appareil.“
14
Page 15

FR
• Attention : la surface de l’élément chauffant est soumise à la
chaleur résiduelle après utilisation.
• Attention : risque de blessure en cas de mauvaise utilisation
de l’appareil.
• Toujours débrancher l’appareil :
– aussitôt après utilisation
– pour le déplacer
– avant chaque entretien ou nettoyage.
• Des brûlures peuvent être occasionnées si l’on touche les
surfaces chaudes de l’appareil, l’eau chaude, la vapeur ou les
aliments.
• Ne pas toucher l’appareil lorsqu’il produit de la vapeur et
utiliser des gants de protection pour retirer le couvercle et
l’accessoire vapeur.
• Cet appareil peut être utilisé jusqu’à une altitude de 4000
mètres.
Recommandations sur les récipients à utiliser
• Grâce à son anneau silicone, l’appareil s’adapte sur tout type
de récipient d’un diamètre de 16 cm à 28 cm. Vérifiez que le
diamètre du plat est plus petit que l’anneau silicone avant
utilisation.
• La hauteur maximum du récipient ne doit pas dépasser
12 cm.
• Steam’up s’utilise sur tout récipient résistant à la chaleur
et l’humidité (aluminium, inox, verre, céramique, …). Ne
jamais utiliser l’appareil sur des récipients en plastique.
15
Page 16

• Les récipients peuvent être des bols, saladiers, plats,
casseroles, poêles, sauteuses, wok… de toutes formes.
• Privilégiez un récipient stable. Pour l’utilisation de
l’accessoire vapeur, choisissez un récipient adapté. Vérifiez
la stabilité de l’appareil posé sur le récipient avant de lancer
une cuisson.
• De la vapeur peut s’échapper entre l’appareil et le plat, mais
cela n’affecte pas la qualité de cuisson des ingrédients.
• Pour votre sécurité, cet appareil est conforme aux normes
et réglementations applicables (Directives Basse Tension,
compatibilité Electromagnétique, matériaux en contact des
aliments, environnement…).
• Vérifier que la tension du réseau correspond bien à celle indiquée sur l’appareil (courant
alternatif).
• Compte tenu de la diversité des normes en vigueur, si l’appareil est utilisé dans un autre pays
que celui de l’achat, le faire vérifier par une station service agréée.
• Ne pas placer l’appareil près d’une source de chaleur ou sur une plaque chauffante sous peine
de le déteriorer gravement.
• N’utilisez pas de rallonge. Si vous en prenez la responsabilité, n’utilisez qu’une rallonge en bon
état reliée à la terre et adaptée à la puissance de l’appareil.
• Ne pas placer l’appareil près d’un mur ou d’un placard : la vapeur produite pouvant endommager
les éléments.
• Les temps de cuisson sont donnés à titre indicatif.
• Ne pas laisser pendre le cordon.
• Toujours brancher l’appareil sur une prise reliée à la terre.
• Utiliser une surface de travail stable, plane, à l’abri des projections d’eau.
• Ne pas débrancher l’appareil en tirant sur le cordon.
Attention lors du déplacement de l’appareil à ne pas renverser le liquide contenu.
• Ne pas utiliser l’appareil si :
– celui-ci ou son cordon est défectueux
– l’appareil est tombé et présente des déteriorations visibles ou des anomalies de
fonctionnement
Dans ces cas, l’appareil doit être envoyé à une Station de Service agréée la plus proche de
votre domicile
• Ne jamais démonter l’appareil vous-même.
16
Page 17
FR
• Toute utilisation professionnelle, non appropriée ou non conforme au mode d’emploi n’engage
ni la responsabilité, ni la garantie du constructeur.
• Pour tout problème, contacter votre service après-vente ou l’adresse internet : groupeseb.com.
Protection de l’environnement
• Votre appareil est prévu pour fonctionner durant de longues années. Toutefois, le jour où vous
envisagez de remplacer votre appareil, n’oubliez pas de penser à la contribution que vous
pouvez apporter à la protection de l’environnement.
• Avant mise au rebut de votre appareil, la pile du minuteur doit être retirée et déposée dans un
centre de collecte spécialisé ou un centre de service agréé (selon modèle).
• Les Centres de Services agréés vous reprendront vos appareils usagés afin de procéder à leur
destruction dans le respect des règles de l’environnement.
Participons à la protection de l’environnement !
Votre appareil contient de nombreux matériaux valorisables ou recyclables.
Confiez celui-ci dans un point de collecte pour que son traitement soit effectué.
17
Page 18
DESCRIPTION
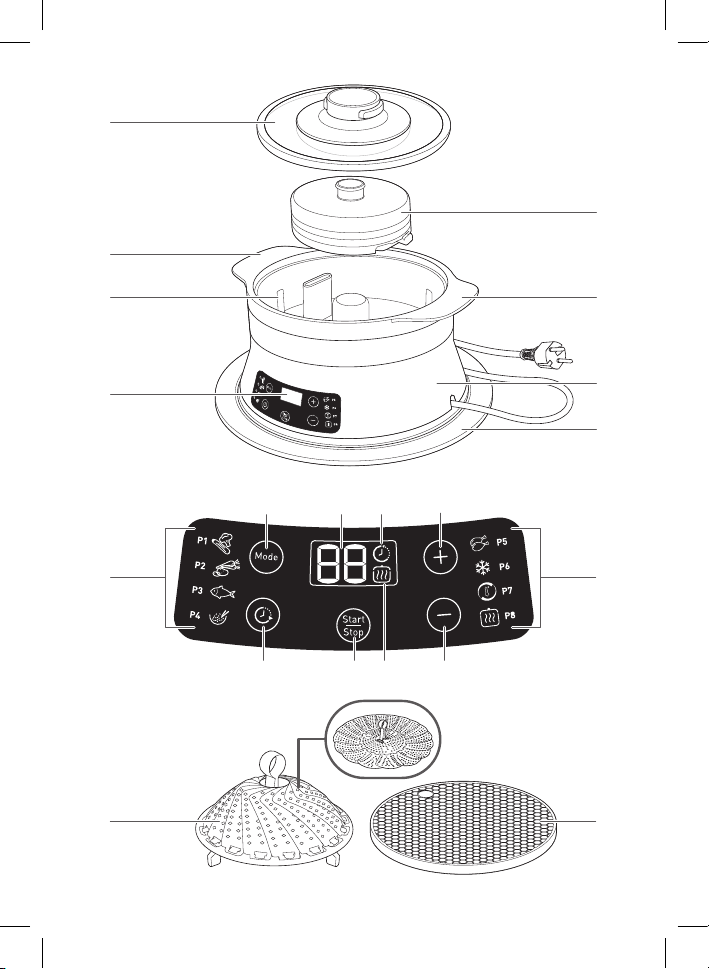
A Couvercle
B Poignées
C Couronne turbo
D Réservoir d’eau
E Panneau de contrôle
F Base électrique
G Anneau en silicone
H Programmes
I Touche Mode
J Ecran d’affichage
K Indicateur de fonction “Départ différé”
L Touches de réglages +/-
M Touche “Départ différé”
N Touche Start/Stop
O Indicateur de fonction “Maintien au chaud”
P Accessoire vapeur
Q Dessous de plat
UTILISATION
1. Avant utilisation
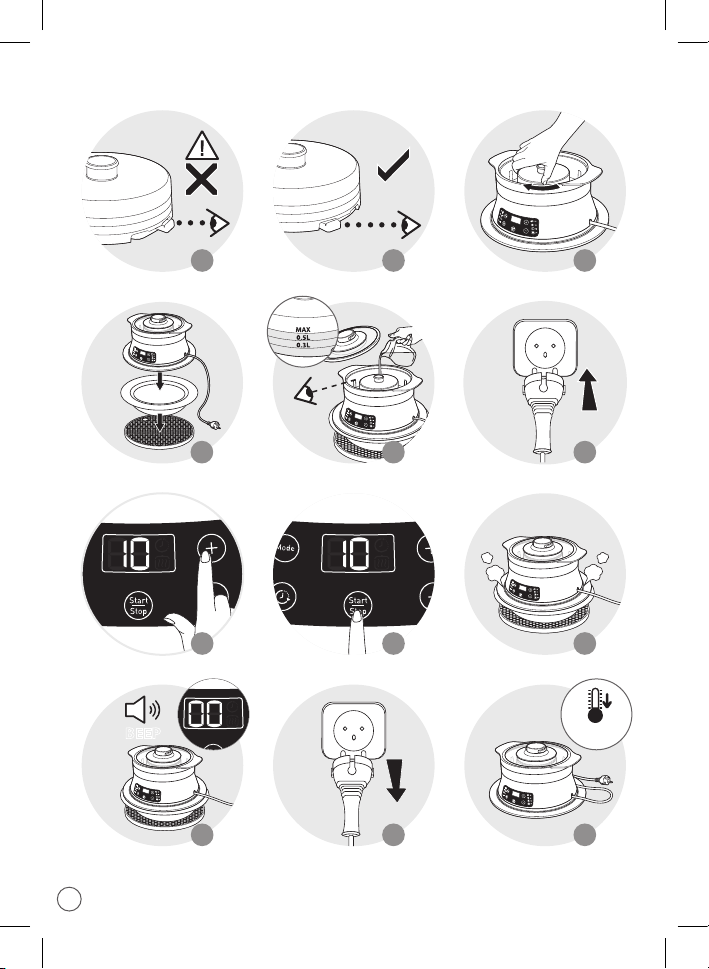
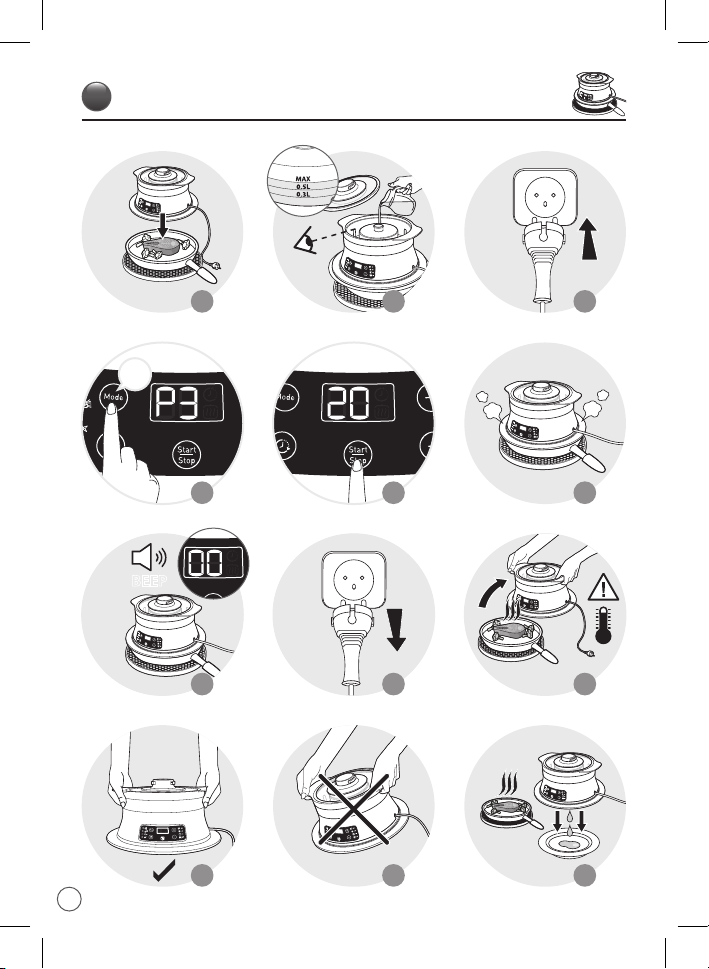
• Soulevez le couvercle – fig. 1.
• Retirez la couronne turbo pour le nettoyage –fig. 2, 3.
• Déverrouillez l’anneau silicone – fig. 4, 5.
• Passez une éponge non-abrasive humidifiée pour nettoyer le réservoir à eau, la base et sous
l’appareil – fig. 6.
• Lavez toutes les pièces amovibles (couvercle, couronne turbo, anneau en silicone, verrou et
accessoire vapeur) à l’eau tiède avec du liquide vaisselle, rincez et séchez – fig. 7, 9.
• Verrouillez l’anneau silicone – fig. 10, 11, et remettez en place la couronne turbo – fig. 12 à 15.
• Posez Steam’up sur un récipient, lui-même placé sur un dessous de plat – fig. 16.
• Remplissez le réservoir d’eau jusqu’au niveau MAX – fig. 17.
• Branchez l’appareil – fig. 18 et lancez 3 cycles de cuisson à vide consécutifs de 10 minutes
- fig. 19, 20.
• A la fin de chaque cycle, videz l’eau du réservoir et la remplacer jusqu’au niveau MAX pour le
prochain cycle.
• Ne jamais utiliser l’appareil sans l’anneau silicone ni la couronne turbo.
• Ne jamais immerger l’appareil dans l’eau – fig. 8.
2. Recommandations sur les récipients à utiliser
• Grâce à son anneau silicone, Steam’up s’adapte sur tout type de récipient d’un diamètre de 16 cm
à 28 cm. Vérifiez que le diamètre du plat est plus petit que l’anneau silicone avant utilisation.
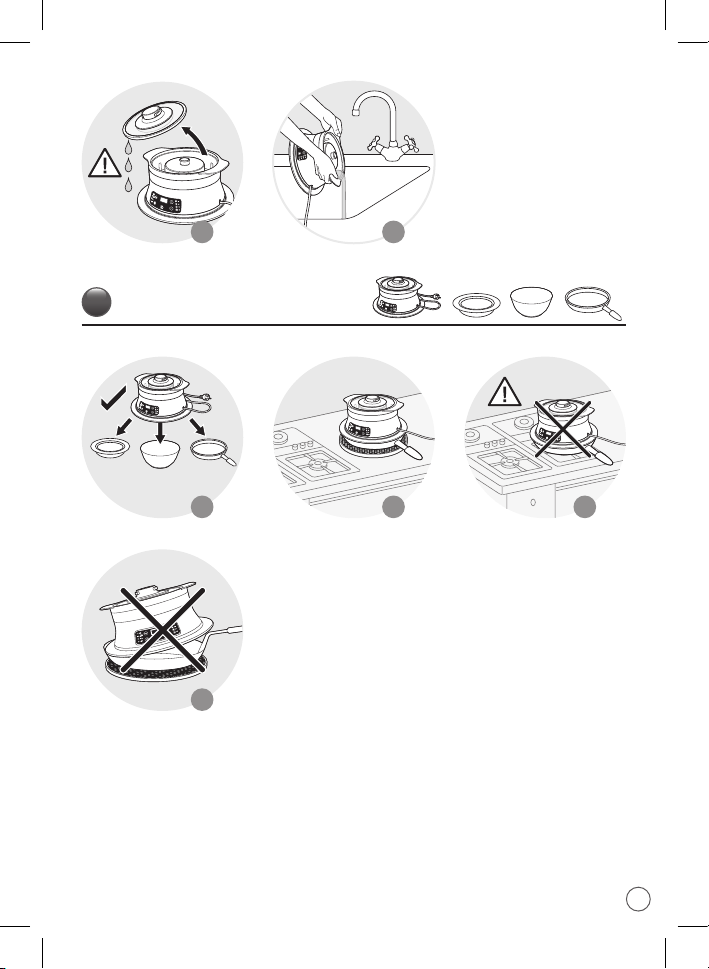
• La hauteur maximum du récipient ne doit pas dépasser 12 cm – fig. 27.
• Steam’up s’utilise sur tout récipient résistant à la chaleur et l’humidité (aluminium, inox, verre,
céramique, …). Ne jamais utiliser l’appareil sur des récipients en plastique.
• Les récipients peuvent être des bols, saladiers, plats, casseroles, poêles, sauteuses, wok… de
toutes formes.
• Privilégiez un récipient stable. Pour l’utilisation de l’accessoire vapeur choisissezun récipient
adapté.
• Vérifiez la stabilité de l’appareil posé sur le récipient avant de lancer une cuisson - fig. 30.
• De la vapeur peut s’échapper entre l’appareil et le plat, mais cela n’affecte pas la qualité de
cuisson des ingrédients.
18
Page 19
FR
3. Cuisson
N’utilisez pas d’assaisonnement ou de liquide autre que de l’eau dans le réservoir. Assurezvous de la présence d’eau dans le réservoir avant la mise en marche.
• Disposez les ingrédients ou la recette cuisinée dans un récipient adapté.
• Placez le récipient sur le dessous de plat.
• Posez l’appareil sur le récipient - fig. 31.
• Versez de l’eau dans le réservoir grâce à un pichet jusqu’au niveau MAX - fig 32.
• Renouvelez l’eau à chaque utilisation et vérifiez que le réservoir est rempli jusqu’au niveau
MAX.
• Vérifiez la stabilité de l’ensemble à savoir l’appareil posé sur le récipient avant de lancer un
cycle de cuisson.
• Branchez l’appareil – fig. 33.
REMARQUE : N’utilisez jamais l’appareil avec son récipient sur une plaque de cuisson ou
toute surface chaude – fig. 29.
4. Sélectionnez les programmes de cuisson automatiques
• Appuyez sur la touche Mode jusqu’à ce que le programme souhaité (P1 à P8) s’affiche - fig. 34.
• Il est possible d’ajuster le temps de cuisson en utilisant les touches +/- (se reporter aux
tableaux de cuisson et aux recettes).
• Pour lancer la cuisson, appuyez sur la touche - fig. 35.
5. Sélectionnez le mode manuel
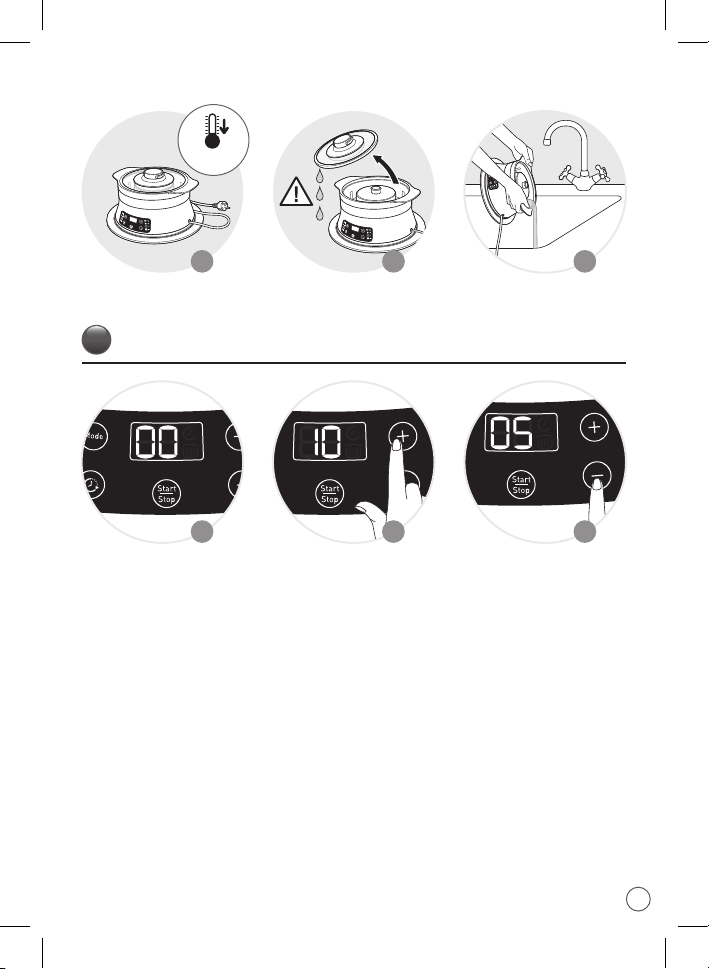
• Programmez le temps de cuisson en utilisant les touches +/- - fig. 47, 48. (se reporter aux
tableaux de cuisson et aux recettes).
• Pour lancer la cuisson, appuyez sur la touche .
REMARQUES:
• Le temps de cuisson restant s’affiche sur l’écran. Le temps est affiché en minutes, seul le temps
restant de moins d’une minute sera affiché en secondes.
• Le temps de cuisson peut être modifié à tout moment pendant la cuisson en utilisant les
touches +/-.
• Un appui prolongé sur la touche + ou - vous permet d’augmenter ou de diminuer plus
rapidement le temps de cuisson.
6. Pendant la cuisson
• Pendant la cuisson, si vous devez remplir le réservoir d’eau, manipulez le couvercle avec
précaution. La condensation de vapeur provoque la formation de gouttes d’eau – fig. 44.
• L’appareil peut être mis en pause en effectuant un appui court sur . Posez l’appareil sur
un autre récipient qui supporte la chaleur et l’humidité lorsque vous vérifiez la cuisson ou
complétez la recette. Appuyez de nouveau sur pour relancer la cuisson.
• Si le réservoir d’eau est vide, l’appareil n’émet plus de vapeur. L’appareil reste chaud.
Ne pas toucher aux surfaces chaudes de l’appareil et du récipient pendant la cuisson.
Utilisez une manique.
• Veillez à transporter l’appareil à l’horizontal grâce aux poignées pour éviter que la condensation
tombe sur le plan de travail – fig. 40, 41.
19
Page 20
UTILISATION DE L’ACCESSOIRE VAPEUR
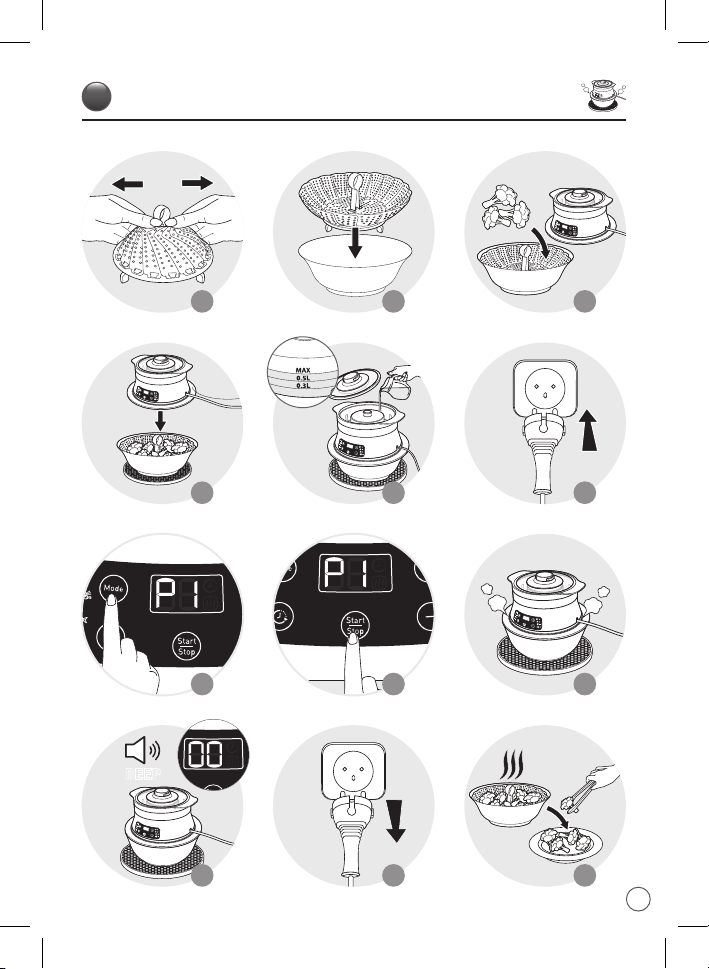
Privilégiez l’accessoire vapeur pour les légumes et les ingrédients surgelés ou selon votre
convenance.
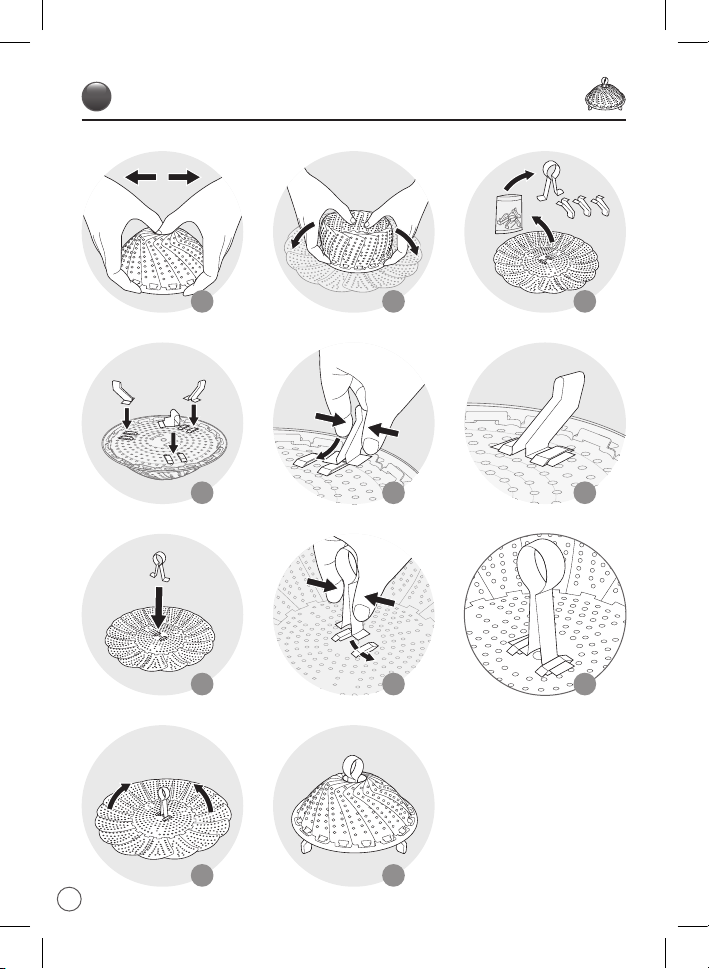
• Avant la première utilisation de l’accessoire, il est nécessaire d’assembler les éléments contenus
dans le sac à l’intérieur de l’accessoire – fig. 49 à 59.
• Avant la première utilisation, nettoyez l’accessoire à l’eau tiède avec du liquide vaisselle, rincez
et séchez.
• Cet accessoire s’adapte dans tout type de récipient résistant à la chaleur et l’humidité, d’un
diamètre de 16cm à 28 cm – fig. 61.
• Utilisez une manique pour manipuler l’accessoire vapeur du récipient après cuisson – fig. 72.
• Après utilisation, nettoyez l’accessoire à l’eau tiède avec du liquide vaisselle, rincez et séchez
– fig. 73, 74.
DÉPART DIFFÉRÉ
Choisissez le programme de cuisson ou réglez le temps de cuisson avant de programmer le
départ différé.
• Appuyez sur la touche - fig. 76. Le symbole clignote sur l’écran.
• Réglez le temps de la mise en marche différée avec les touches +/- – fig. 77. Le temps se règle
par intervalle de 15 minutes puis ensuite par heure.
• Appuyez sur . Le compte à rebours sera lancé et la cuisson commencera une fois que la
minuterie aura atteint 00.
Le temps du départ différé peut être modifié à tout moment.
DÉCONGÉLATION
• Nous vous conseillons d’utiliser l’accessoire vapeur (se référer au paragraphe d’utilisation de
l’accessoire).
• Assurez-vous que le réservoir d’eau est rempli avant de lancer le programme.
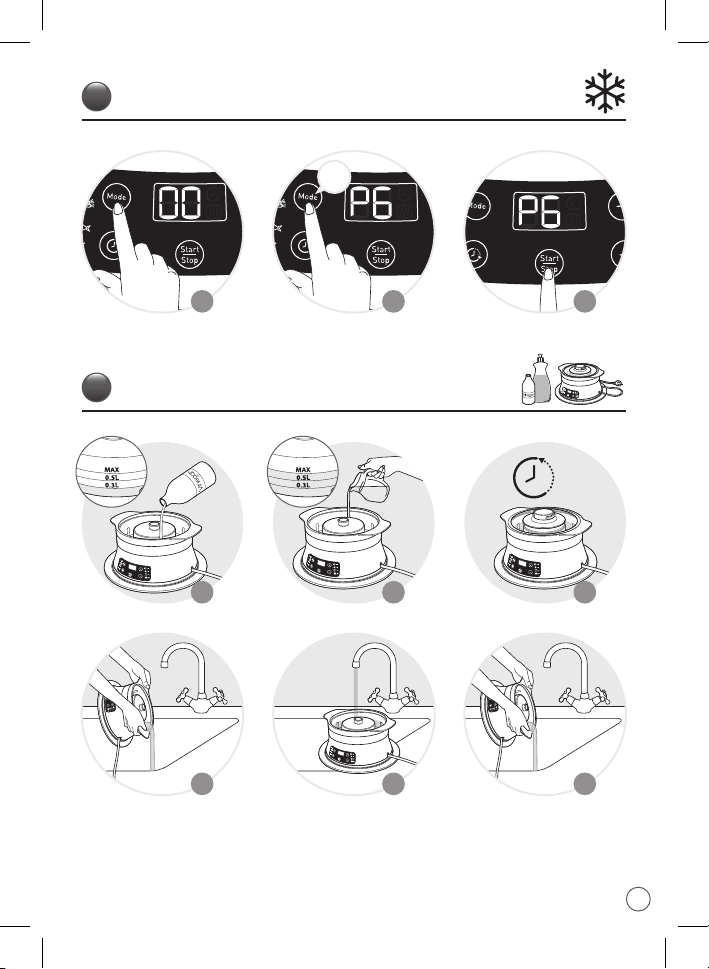
• Sélectionnez le programme P6 en appuyant sur la touche Mode jusqu’à ce que P6 apparaisse
sur l’écran - fig. 79.
• Appuyez sur pour lancer le programme – fig. 80.
• La durée programmée est de 30 minutes. Vous pouvez ajuster le temps en utilisant les touches +/- .
MAINTIEN AU CHAUD
• Assurez-vous que le réservoir d’eau est rempli avant de lancer le programme.
• Pour activer la fonction « Maintien au chaud », sélectionnez le programme P8 en appuyant
sur la touche Mode jusqu’à ce que P8 apparaisse sur l’écran. Le symbole s’affiche sur l’écran.
• Appuyez sur pour lancer le programme.
• La durée programmée est de 30 minutes. Vous pouvez ajuster le temps en utilisant les touches +/- .
20
Page 21
FR
RÉCHAUFFAGE
• Assurez-vous que le réservoir d’eau est rempli avant de lancer le programme.
• Vous pouvez réchauffer les aliments en lançant le programme P7 en appuyant sur la touche
Mode jusqu’à ce que P7 s’affiche sur l’écran.
• La durée programmée est de 10 minutes. Vous pouvez ajuster le temps en utilisant les touches +/- .
FIN DE LA CUISSON
• Une fois la cuisson terminée, l’appareil s’arrête automatiquement.
• La minuterie émet un bip sonore et l’écran affiche 00 – fig. 37.
• Pour arrêter volontairement l’appareil, exercez un appui long sur la touche .
• Vérifiez la cuisson. Posez l’appareil sur un autre récipient résistant à la chaleur et l’humidité et
vérifiez les ingrédients – fig. 42.
• Si les ingrédients ne sont pas encore prêts, vérifiez que le réservoir a suffisamment d’eau,
ajustez le niveau d’eau si nécessaire, et relancez la cuisson.
• Lorsque la cuisson est terminée, la minuterie émet un bip sonore et l’appareil s’arrête
automatiquement.
• Débranchez l’appareil – fig. 38.
• Posez l’appareil sur un autre récipient.
• Laissez refroidir l’appareil 20 minutes – fig. 43.
• En cas de cuissons consécutives, et à la fin d’un programme de cuisson, placez l’appareil sur
une autre récipient résistant à la chaleur et l’humidité. Ajustez le niveau d’eau du réservoir si
nécessaire. Relancez une cuisson.
• ATTENTION ! Pour éviter tout risque de brûlure, déplacez l’appareil à l’horizontal grâce aux
poignées. L’appareil est chaud et des gouttes d’eau peuvent tomber - fig. 40, 41.
• Posez l’appareil sur un autre récipient qui supporte la chaleur et l’humidité – fig. 42.
• ATTENTION! Manipulez le couvercle avec précaution lorsque vous le retirez. La
condensation de vapeur provoque la formation de gouttes d’eau – fig. 44.
21
Page 22
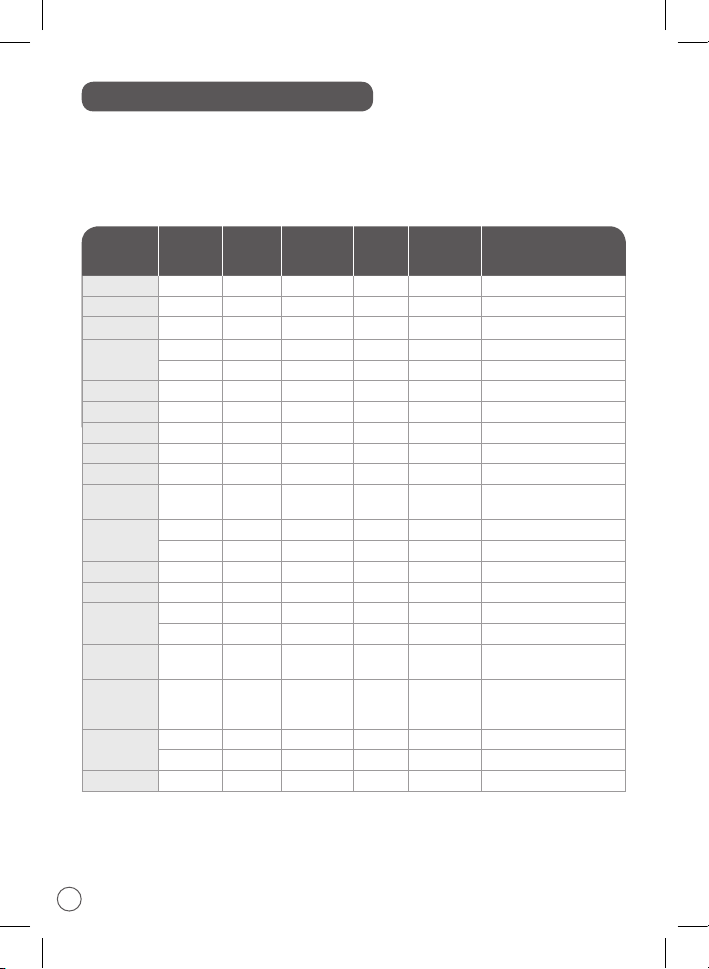
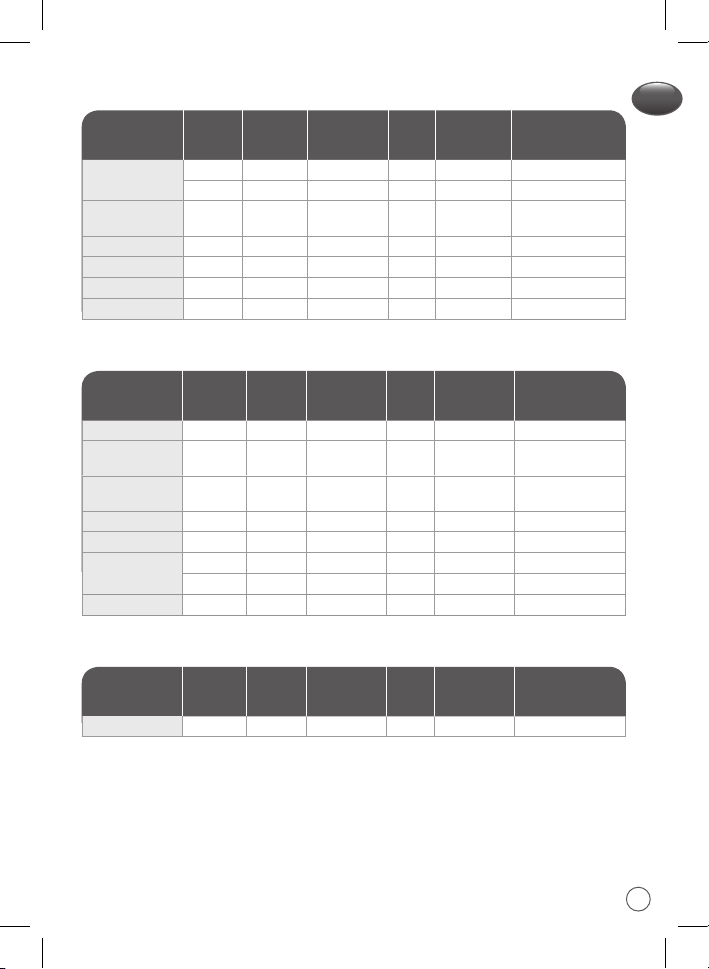
TABLEAU DE TEMPS DE CUISSON
Les temps sont donnés à titre indicatif. Ils peuvent varier en fonction de la taille des aliments,
de l’espace laissé entre les aliments, des quantités et du goût de chacun.
Ajustez le temps de cuisson en fonction de la quantité des aliments utilisés.
Légumes
Préparation Type Quantité
Artichaut frais 3 40-45 min P2 petits artichauts
Asperges fraîches 500 g 30-35 min P2
Aubergine fraîche 400 g 15-20 min P1 • En rondelles (1 cm)
Brocolis
Carottes fraîches 300 g 20-25 min P1 • Émincées finement (3 mm)
Choux frais 600 g 30-35 min P2 • Quartiers d’environ 80 g
Choux-fleur frais 1 moyen 30-35 min P2 • Coupé en fleurettes
Courgettes fraîches 600 g 20-25 min P1 • Émincées
Endives fraîches 4 20-25 min P1 • Coupées en 2
Maïs
Haricots
verts
Poireaux frais 500 g 35-40 min P2 •
Champignons frais 500 g 15-20 min P1 • Émincés
Petits pois
Pommes de
terre
Petits
oignons
blancs
Epinards
Poivrons frais 250 g 20-25 min P1 • Coupés en quartiers
frais 500 g 30-35 min P2 • Coupé en fleurettes
fraîches 400 g 25-30 min P2 •
frais
entier
frais 450 g 30-35 min P2 •
surgelés 400 g 30-35 min P2 •
frais 300 g 30-35 min P2 •
surgelés 300 g 30-35 min P2 •
fraîches 600 g 40-45 min P2 •
frais 250 g 15-20 min P1 •
frais 300 g 15-20 min P1 •
surgelés 300 g 15-20 min P1 •
Temps de
cuisson
(min)
500 g 40-45 min P2 • Entières
Mode
Accessoire
vapeur
Recommandations
Coupées en morceaux
22
Page 23
FR
Poissons - Crustacés
Préparation Type Quantité
Filet de poisson
Poisson entier Frais
Filet de saumon Frais 600 g 15-20 min P3
Moules Fraîches 1500 g 25-30 min P3
Gambas Fraîches 8 10-15 min P3 •
Crevettes Fraîches 200 g 20-25 min P3 •
Frais 3 10-15 min P3
Surgelés 3 15-20 min P3
400 g
(2 truites)
Temps de
cuisson
(min)
25-30 min P3
Mode
Accessoire
vapeur
Viandes - Volailles
Préparation Type Quantité
Cuisses de poulet Fraîches 4 35-40 min P5 •
Filets de poulet Frais 4 20-25 min P5 •
Filets de dinde Frais 4 20-25 min P5 •
Filets de porc Frais 600 g 30-35 min P5 •
Saucisses Fraîches 6 15-20 min P5
Boulettes de
bœuf
Viande hachée Fraîche 350 g 20-25 min P5
Surgelées 8 15-20 min P5 •
Fraîches 8 15-20 min P5 •
Temps de
cuisson
(min)
Mode
Accessoire
vapeur
Oeufs
Préparation Type Quantité
Œufs durs - 6 15-20 P3 •
Temps de
cuisson
(min)
Mode
Accessoire
vapeur
Recommandations
Recommandations
Privilégiez des filets
épais
Privilégiez des filets
épais
Recommandations
23
Page 24
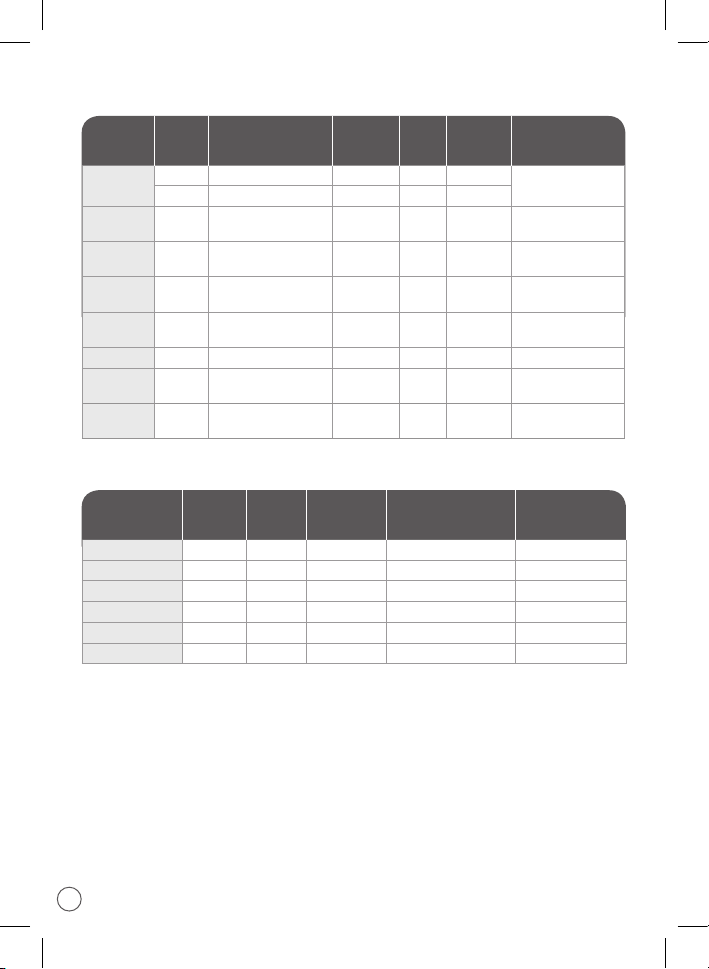
Riz - Céréales - Légumineuses
Préparation Type Quantité
Riz blanc
basmati
Semoule 125 g + 200 ml eau 10-15 min P1
Quinoa 125 g + 200 ml eau 40-45 min P2
Boulgour 125 g + 200 ml eau 15-20 min P1
Blé 125 g + 200 ml eau 25-30 min P4
Pâtes Fraîches 250 g + 200 ml eau 15-20 min
Gnocchi
Lentilles
corail
125 g + 200 ml eau 25-30 min P4
250 g + 400 ml eau 30-35 min P4
Prêt à
cuire
650 g 15-20 min P4
200 g + 300 ml eau 40- 45 min P4
Temps de
cuisson
(min)
Mode
Accessoire
vapeur
Recommandations
Utilisez une
casserole.
Utilisez une
casserole.
Utilisez une
casserole.
Utilisez une
casserole.
Utilisez une
casserole.
Fruits
Préparation Type Quantité
Pommes Fraîches 4 20-25 min • Entières
Bananes Fraîches 4 10-15 min • Entières
Pêches Fraîches 4 15-20 min •
Poires Fraîches 4 30-35 min • Entières
Ananas Frais 1 15-20 min • Coupé en rondelles
Fruits rouges Frais 400 g 5-10 min •
Temps de
cuisson
(min)
Accessoire vapeur Recommandations
24
Page 25

FR
ENTRETIEN ET NETTOYAGE
Nettoyez l’appareil
• Après chaque utilisation, débranchez l’appareil.
• Laissez refroidir complètement avant le nettoyage.
• Vérifiez que l’appareil soit suffisamment refroidi avant de vider le réservoir d’eau.
• Retirez la couronne turbo – fig. 2,3.
• Déverrouillez l’anneau silicone – fig. 4, 5.
• Passez une éponge non-abrasive humidifiée pour nettoyer le réservoir à eau, la base et sous
l’appareil – fig. 6.
• Lavez toutes les pièces amovibles (couvercle, couronne turbo, anneau en silicone, verrou et
accessoire vapeur) à l’eau tiède avec du liquide vaisselle, rincez et séchez – fig. 7, 9.
• N’immergez jamais l’appareil dans l’eau.
• N’utilisez jamais de produits nettoyants abrasifs.
Détartrez l’appareil
Pour un fonctionnement optimal de votre appareil, détartrez votre appareil après 10 utilisations.
Pour cela:
• Versez du vinaigre blanc dans le réservoir jusqu’au trait indiqué 0,3L. – fig. 81.
• Complétez avec de l’eau jusqu’au niveau MAX – fig. 82.
• Laissez agir à froid pendant la nuit - fig. 83.
• Videz le réservoir contenant l’eau et le vinaigre – fig. 84.
• Rincez le réservoir plusieurs fois avec de l’eau tiède – fig. 85.
• N’utilisez jamais de produits nettoyants abrasifs.
Rangez l’apareil
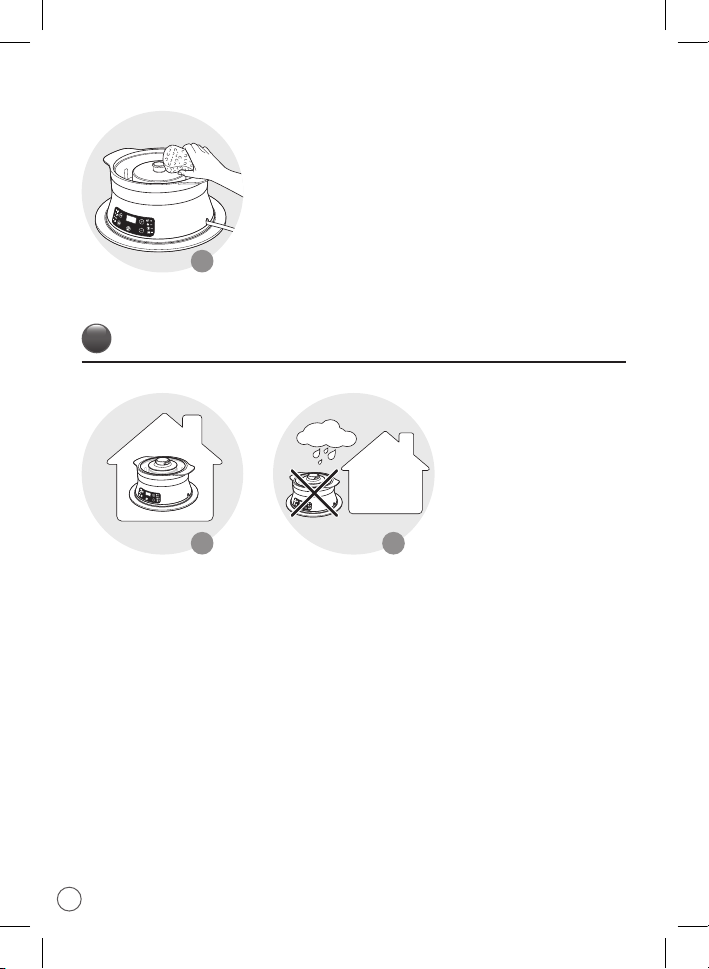
• Assurez-vous que toutes les pièces sont propres et sèches.
• Rangez dans un endroit sec, propre et stable.
25
Page 26
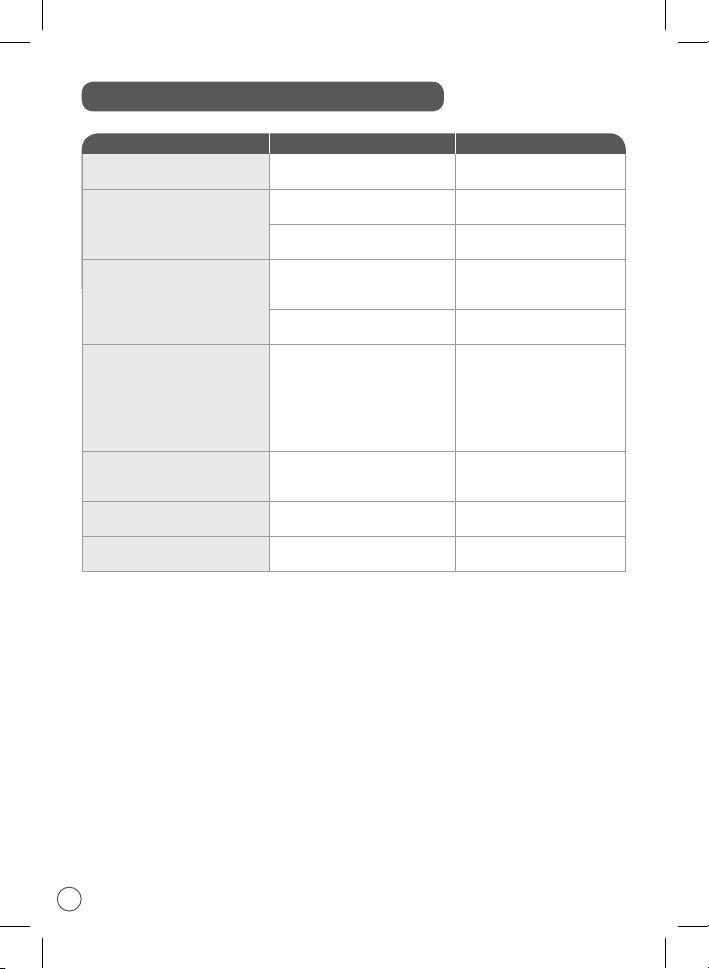
TABLEAU DE LOCALISATION DES PANNES
Panne Raison Solution
L’appareil ne fonctionne pas.
L’appareil ne chauffe pas.
De la vapeur s’échappe entre le
couvercle et le produit.
Les aliments ne sont pas cuits.
De la vapeur s’échappe entre
l’anneau silicone et le récipient.
De l’eau coule du socle.
De l’eau sort du produit.
L’appareil n’est pas correctement
branché.
Vous n’avez pas appuyé sur la
touche START/STOP.
Le réservoir d’eau n’est pas rempli.
La couronne turbo n’est pas bien
mise en place.
Le couvercle n’est pas bien en
place.
Il n’y a pas d’eau ou pas assez d’eau
dans le réservoir.
L’appareil n’est pas stable sur
le récipient (du à la forme du
récipient ou sa poignée).
Fuite au niveau de l’élément
chauffant.
L’eau déborde de la cheminée de
vapeur.
Vérifiez que l’appareil est
correctement branché.
Appuyez sur la touche START/
STOP.
Remplissez le réservoir d’eau
jusqu’au MAX.
Vérifiez que la couronne turbo
est correctement mise en place
et verrouillée.
Vérifiez que le couvercle est
correctement mis.
Avant et pendant la cuisson,
vérifiez le niveau d’eau du
réservoir.
S’il n’y a plus d’eau pendant la
cuisson, l’appareil ne produit
plus de vapeur et ne cuira pas
les aliments.
Vérifiez la stabilité du produit
sur le récipient avant de lancer
une cuisson.
Contactez notre service après
ventes.
Respectez le niveau maximum
d’eau dans le réservoir.
26
Page 27

EN
IMPORTANT SAFEGUARDS
SAFETY INSTRUCTIONS
Read and follow the instructions for use. Keep
them safe.
• This appliance can be used by children aged
from 8 years and above if they have been given
supervision or instruction concerning use of the
appliance in a safe way and if they understand the
hazards involved.Cleaning and user maintenance
shall not be made by children unless they are older
than 8 and supervised. Keep the appliance and
its cord out of reach of children aged less than 8
years.
• Appliances can be used by persons with reduced
physical, sensory or mental capabilities or lack
of experience and knowledge if they have been
given supervision or instruction concerning use of
the appliance in a safe way and understand the
hazards.
• Children shall not play with the appliance.
• This appliance is not intended for use by persons
(including children) with reduced physical,sensory
or mental capabilities, or lack of experience
and knowledge, unless they have been given
supervision or instruction concerning use of the
appliance by a person responsible for their safety.
27
Page 28

• Children should be supervised to ensure that they
do not play with the appliance.
• As this appliance is for household use only, it is
not intended for use in the following applications
and the guarantee will not apply for:
–staff kitchen areas in shops, offices and other
working environments
–farm houses
–by clients in hotels, motels and other residential
type environments
–bed and breakfast type environments.
• If the power cord is damaged, it must be replaced
by the manufacturer, the manufacturer's after-sales
service department or similarly qualified persons,
so as to avoid danger.
• The appliance must not be immersed in water or
any other liquid.
• Use a damp cloth or sponge with diswashing liquid
to clean the accessories and parts in contact with
the aliments. Rince with a damp cloth or sponge.
Drying accessories and parts in contact with food
with a dry cloth.
• The temperature of accessible surfaces may
be high when the appliance is operating. Do not
touch the hot surfaces of the appliance.
28
Page 29

EN
• Caution: the surface of heating element is subject
to residual heat after use.
• Caution: risk of injury due to improper use of the
appliance.
• Always unplug the appliance:
–immediately after use
–when moving it
–prior to any cleaning or maintenance.
• There is a risk of burns if you touch the hot surfaces
of the appliance, hot water, steam or the food.
• Do not touch the appliance while it is producing
steam and use oven gloves to remove the lid and
the steam accessory.
• The appliance can be used up to an altitude of
4000 m.
Recommendation on containers to use
• Steam’up fits any heat-resistant containers, from
16cm to 28cm wide thanks to its silicone ring.
Check that the dish diameter is smaller than the
silicone ring before using the appliance.
• The maximum height of the container must not
exceed 12 cm.
• They can be aluminum, stainless steel, glass or
terracotta containers. Never use the appliance on
plastic containers.
29
Page 30

• They can be bowls, dishes, pots, pans, … of all
shapes.
• Prefer a stable container. For the use of the steam
accessory, use a suitable container.
• Check the stability of the appliance above the
container before starting the cooking cycle - fig. 30.
• Steam may escape between the appliance and the
dish but it cannot be detrimental to the cooking
quality of food.
• For your safety, this appliance complies with
the safety regulations and directives in effect at
the time of manufacture (Low-voltage Directive,
Electromagnetic Compatibility, Food Contact
Materials Regulations, Environment…).
• Check that the power supply voltage corresponds to that shown on the appliance (alternating current).
• Given the diverse standards in effect, if the appliance is used in a country other than that in
which it is purchased, have it checked by an approved service centre.
• Do not place the appliance near a heat source or in a hot oven, as serious damage could result.
• Do not use an extension lead. If you accept liability for doing so, only use an extension lead
which is in good condition, has an earthed plug and is suited to the power of the appliance.
• Do not place the appliance near a wall or cupboard: the steam produced by the appliance can
cause damage.
• The cooking times are for information purposes only.
• Do not leave the cord hanging.
• Always plug the appliance into an earthed socket.
• Use a flat, stable, heat-resistant work surface away from any water splashes.
• Do not unplug the appliance by pulling on the cord.
Take care when moving the appliance not to spill the liquid.
• Do not use the appliance if:
– the appliance or the cord is damaged
– the appliance has fallen or shows visible damage or does not work properly
In the event of the above, the appliance must be sent to an approved Service Centre. Do not
take the appliance apart yourself.
30
Page 31
EN
• Do not disassemble the appliance yourself.
• This appliance is designed for domestic use only. In case of professional use, inappropriate
use or failure comply with the instructions, the manufacturer accepts no responsibility and the
guarantee does not apply.
• For any problems or queries please contact our Customer Relations Team or consult our web
site.
Protect the environment
• Your appliance has been designed to run for many years. However, when you decide to replace
it, remember to think about how you can contribute to protecting the environment.
• Before discarding your appliance you should remove the battery from the timer and dispose of
it at a local civic waste collection centre (according to model).
• The Approved Service Centres will take back any old appliances you may have so that they can
be disposed of in accordance with environmental regulations.
Environment protection first!
Your appliance contains valuable materials which can be recovered or recycled.
Leave it at a local civic waste collection point.
31
Page 32
DESCRIPTION
A Lid
B Handles
C Turbo ring
D Water tank
E Display
F Body
G Silicone ring
H Programs
I Mode touchpad
J Screen
K Indicator for Delayed start
L +/- touchpads
M Delayed start touchpad
N Start/Stop touchpad
O Indicator for Keep warm
P Steam accessory
Q Hot pad
INSTRUCTIONS FOR USE
1. Before first use
• Remove the lid - fig.1.
• Remove the turbo ring for cleaning - fig. 2, 3.
• Unlock the silicone ring - fig. 4, 5.
• Clean the water tank, the body and below the product using a damp, non-abrasive sponge –
fig. 6.
• Wash all removable parts (lid, turbo ring, silicone ring, lock) using warm water and washing up
liquid, rinse and dry - fig. 7, 9.
• Lock the silicone ring - fig. 10, 11, and put in place the turbo ring - fig. 12-15.
• Place the Steam’up on a container which must be laid on a hot pad - fig. 16.
• Fill the tank with water to the maximum level - fig. 17.
• Plug the appliance - fig. 18, and start 3 consecutive cooking cycles of 10 minutes, with no
ingredients - fig. 19, 20.
• At the end of each cycle, empty the tank water and replace it to the MAX level for the next
cycle.
• Never use the appliance without the silicone ring or the turbo ring.
• Never immerse the product in water - fig 8.
2. Recommendation on containers to use
• Steam’up fits any heat-resistant containers, from 16cm to 28cm wide thanks to its silicone ring.
Check that the dish diameter is smaller than the silicone ring before using the appliance - fig. 27.
• The maximum height of the container must not exceed 12 cm - fig. 27.
• They can be aluminum, stainless steel, glass or terracotta containers. Never use on plastic
containers.
• They can be bowls, dishes, pots, pans, … of all shapes.
• Prefer a stable container. For the use of the steam accessory, use a suitable container.
• Check the stability of the appliance above the container before starting the cooking cycle - fig. 30.
• Steam may escape between the appliance and the dish but it cannot be detrimental to the
cooking quality of food.
32
Page 33
EN
3. Use of the appliance
Do not use seasoning, herbs or any liquid other than water in the water tank. Ensure that
the water tank is filled with water to the maximum level before using the steamer.
• Put your ingredients or your cooked recipe in a suitable container.
• Place the container on the hot pad.
• Place the appliance on a container - fig. 31.
• Pour water with the help of a pot into the water tank up to the maximum level - fig. 32.
• Use fresh water for each use.
• Check the stability of the appliance above the container before starting the cooking cycle.
• Plug the appliance - fig. 33.
NOTE : Never use the appliance and the container on a hotplate or any hot surface - fig. 29.
4. Choose the automatic cooking mode
• To select the cooking mode, press the Mode touchpad until the required mode (P1 to P8) is
displayed - fig. 34.
• You can adjust cooking time using +/- touchpads. (see cooking table or recipes)
• Press key to launch the cooking - fig. 35.
5. Choose the manual mode
• Set the cooking time in minutes by using the +/- touchpads - fig. 47, 48. (see cooking table
or recipes).
• Press key to launch the cooking.
NOTE:
• The selected time will be displayed and a minute by minute countdown will begin. Time is
selected and displayed in minutes. Only time remaining under 1 minute will be displayed in
seconds.
• The time can be changed at any time during cooking by using the +/- touchpads.
• A long press on the + or – touchpads allows you to increase or decrease the cooking time
more quickly.
6. During cooking
• During cooking, if you need to refill the water tank, be careful when you open the tank lid.
• The appliance can be paused by simply press shortly key. Place the appliance on another
container during the time you check the cooking of the ingredients or you complete the recipe.
Pressing the key will restart cooking.
• If the water tank is empty, the steamer stops generating steam. The appliance remains
hot. Do not touch hot surfaces of the product and container or hot food during cooking.
Use oven gloves.
• Transport the appliance flat while holding the handles - fig.40, 41.
33
Page 34
USE OF THE STEAM ACCESSORY
Use the steam accessory for vegetables and frozen ingredients and as you like.
• Before the first use of the Steam accessory, it is necessary to assemble all the parts which are
inside the bag in the accessory – fig. 49 to 59.
• Before first use, wash the accessory using warm water and washing-up liquid, rinse and dry.
• This accessory can be used inside heat-resistant container from 16cm to 28cm wide - fig. 61.
• Use an oven glove to carry and remove the steam accessory from the container - fig. 72.
• After use, wash the accessory using warm water and washing-up liquid, rinse and dry - fig. 73-74.
DELAYED START
Select the cooking mode or set the manual cooking settings before scheduling the delayed
start.
• Press the touchpad - fig. 76. The programming symbol flashes on the screen.
• Select the delayed start time using the +/- buttons - fig. 77. When selecting the time you can
increase it by 15 minute periods and then by the hour.
• Press Start, and the delayed start timer will begin to count down. The appliance will
automatically start the cooking cycle when the delayed start timer reaches 00.
The delayed start time can be changed at any point.
DEFROSTING
• We advise you to use the Steam accessory (see Use of the Steam accessory section).
• Make sure the tank is full of water before starting the program.
• Select program P6 for Defrosting program by pressing Mode button until P6 appears on the
screen - fig. 79.
• Press key to launch the program - fig. 80.
• The automatic set time is 10 minutes. You can adjust this timing using +/- touchpads.
KEEP WARM FUNCTION
• Make sure the tank is full of water before starting the program.
• To activate « Keep warm » function, select program P8 by pressing Mode button until P8
appears. The symbol appears on the screen.
• The automatic set time is 30 minutes. You can adjust this timing using +/- touchpads.
REHEATING
• Make sure the tank is full of water before starting the program.
• You can warm food by selecting P7 program .
• Press key to launch the program.
• The automatic set time is 10 minutes. You can adjust this timing using +/- touchpads.
34
Page 35

EN
END OF COOKING
• Once cooking is completed, the appliance stops automatically.
• The timer beeps and 00 is displayed on the screen - fig. 37.
• To voluntarily stop the appliance, long press key.
• Check if the food is ready. Place the appliance on another container. Check the food.
• If the food is not ready yet, make sure the water tank is full of water and relaunch the cooking.
• Once the cooking is completed, the appliance beeps and stops automatically - fig. 22.
• Unplug the appliance - fig. 38.
• Wait about 20 minutes until the appliance cools down - fig. 43.
• In case of consecutive cooking sessions, and at the end of a cooking program, place the
appliance on another container. Adjust the water level in the tank to the MAX level. Launch
the cooking.
• WARNING! To avoid any risk of burns, carry the appliance flat while holding the handles.
The appliance is hot and hot water drops may fall.
• Carry the appliance upright to prevent condensation drops on the worktop - fig. 40,41.
• Place the appliance on another container that supports heat and moisture - fig. 42.
• WARNING! Carry the lid carefully when you open it. The condensation of vapor causes the
formation of drops of water - fig. 44.
35
Page 36
TABLE OF COOKING TIMES
Cooking times are approximate and may vary depending on the size of the food, the space
between the food, the amount of food, individual preferences, and the mains voltage.
Vegetables
Food Type Quantity
Artichoke Fresh 3 40-45 min P2 3 small artichokes
Asparagus Fresh 500 g 30-35 min P2
Aubergine
Brocolis
Carotts Fresh 300 g 20-25 min P1 • Thinly sliced (3 mm)
Cabbage Fresh 600 g 30-35 min P2 • Quarters of around 80 g
Cauliflower Fresh 1 medium 30-35 min P2 • Small florets
Courgette Fresh 600 g 30-35 min P1 • Sliced
Chicory Fresh 4 20-25 min P1 • cut in 2
Corn in the
cob
Green beans
Leeks Fresh 500 g 35-40 min P2 •
Mushrooms Fresh 500 g 15-20 min P1 • Sliced
Peas
Potatoes Fresh 600 g 40-45 min P2 • Cut into pieces
Smal white
onions
Spinach
Sweet
peppers
Fresh 400 g 15-20 min P1 • Sliced (1 cm)
Fresh 500 g 30-35 min P2 • Small florets
Frozen 400 g 25-30 min P2 •
Fresh 500 g 40-45 min P2 • Whole
Fresh 450 g 30-35 min P2 •
Frozen 400 g 30-35 min P2 •
Fresh 300 g 30-35 min P2 •
Frozen 300 g 30-35 min P2 •
Fresh 250 g 15-20 min P1 •
Fresh 300 g 15-20 min P1 •
Frozen 300 g 15-20 min P1 •
Fresh 250 g 20-25 min P1 • Cut into quarters
Cooking
time
Mode
Use of steam
accessory
Recommendations
36
Page 37
EN
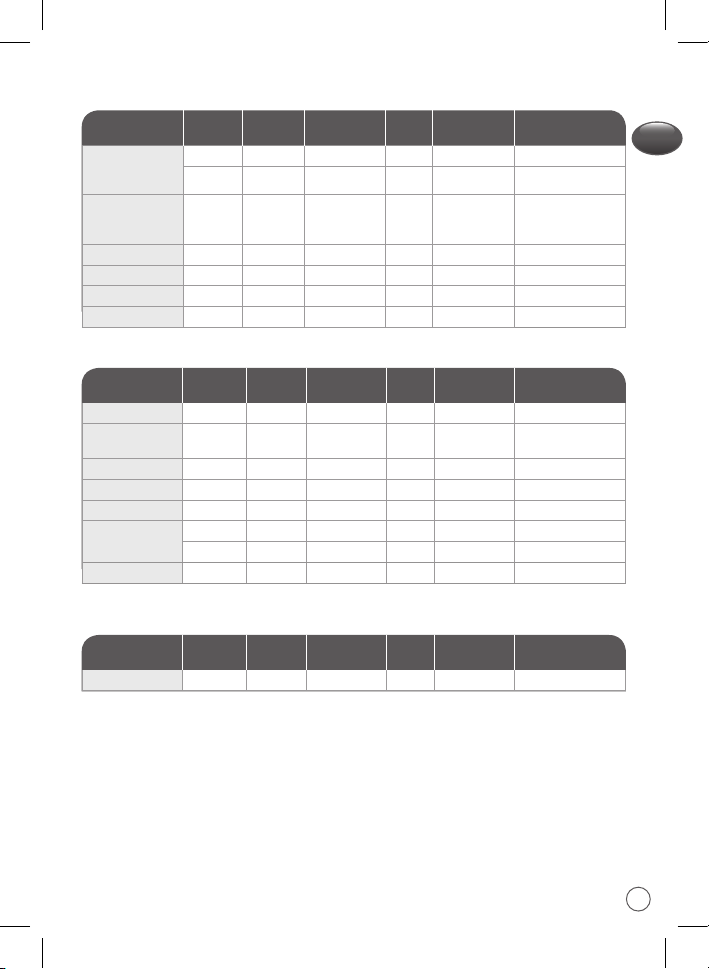
Fish - Shellfish
Preparation Type Quantity Cooking time Mode
Thin fish fillets
(cod, haddock,
plaince, sole…)
Whole fish (trout,
salmon trout, sea
bass…)
Salmon fillet Fresh 600 g 15-20 min P3
Mussels Fresh 1500 g 25-30 min P3
Prawns Fresh 8 10-15 min P3 •
Shrimps Fresh 200 g 20-25 min P3 •
Fresh 3 10-15 min P3
Frozen 3 15-20 min P3
Fresh 400 g 25-30 min P3
Use of steam
accessory
Recommendations
Meat - Poultry
Preparation Type Quantity Cooking time Mode
Chicken thigh Fresh 4 35-40 min P5 •
Chicken breast
(boneless)
Turkey escalope Fresh 4 20-25 min P5 • Prefer thick fillets.
Pork fillet Fresh 600 g 30-35 min P5 •
Frankfurters Fresh 6 15-20 min P5
Meatballs
Minced meat Fresh 350 g 20-25 min P5
Fresh 4 20-25 min P5 • Prefer thick fillets.
Fresh 8 15-20 min P5 •
Frozen 8 15-20 min P5 •
Use of steam
accessory
Recommendations
Eggs
Preparation Type Quantity Cooking time Mode
Hard egg - 6 15-20 P3 •
Use of steam
accessory
Recommendations
37
Page 38
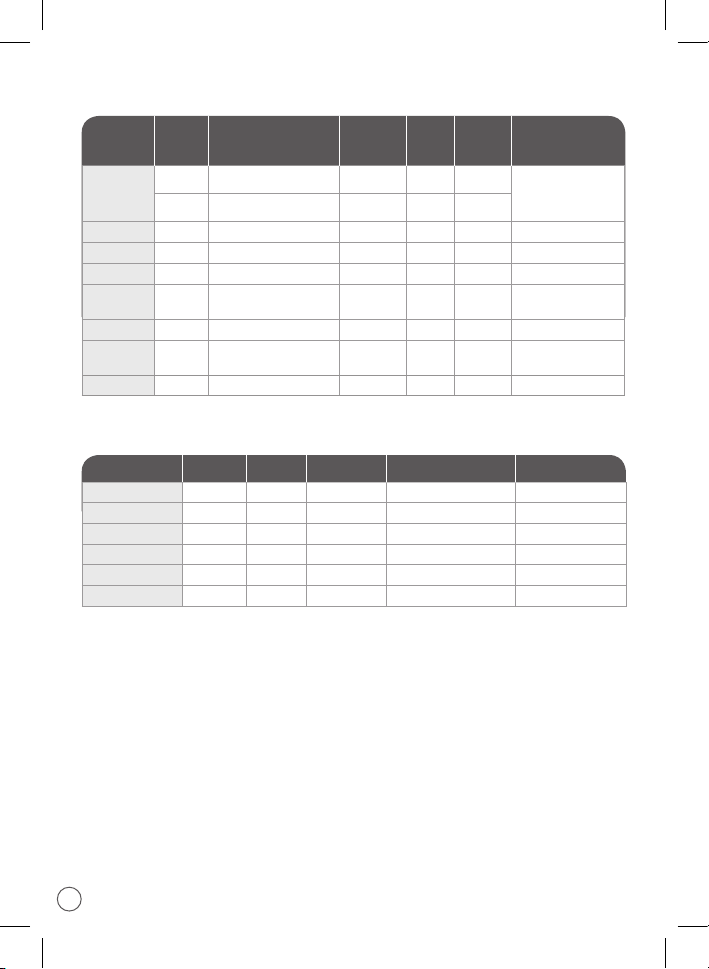
Rice - Cereals - Legumins
Preparation Type Quantity
White long
grain or
basmati rice
Semolina 125 g + 200 ml of water 10-15 min P1 Use a pan.
Quinoa 125 g + 200 ml of water 40-45 min P2 Use a pan.
Bulgur 125 g + 200 ml of water 15-20 min P1 Use a pan
Precooked
wheat
Pasta Fresh 250 g + 200 ml of water 15-20 min
Gnocchi
Coral lentils 200 g + 300 ml of water 40- 45 min P4
125 g + 200 ml of water 25-30 min P4
250 g + 400 ml of water 30-35 min P4
125 g + 200 ml of water 25-30 min P4
Ready to
cook
650 g 15-20 min P4
Cooking
time
Mode
Use of
steam
accessoy
Recommendations
Wash rice well before
cooking. Use a pan
with hot water.
Fruits
Preparation Type Quantity Cooking time Use of steam accessoy Recommendations
Apples Fresh 4 20-25 min • Quartered
Bananas Fresh 4 10-15 min • Whole
Peaches Fresh 4 15-20 min •
Pears Fresh 4 30-35 min • Whole or halved
Pineapple Fresh 1 15-20 min • Sliced
Red fruits Fresh 400 g 5-10 min •
38
Page 39

EN
MAINTENANCE AND CLEANING
Cleaning the steamer
• Unplug the appliance.
• Allow it to cool completely before cleaning.
• Check that the steamer has cooled completely before emptying the water tank.
• Remove the turbo ring - fig. 2, 3.
• Remove the lock - fig. 4, 5.
• Clean the water tank, the body of the product and below the product using a damp, non-
abrasive sponge – fig. 6.
• Wash all removable parts (lid, turbo ring, silicone ring, lock) using warm water and washing-up
liquid, rinse and dry - fig. 7.
• Do not immerse the product in water - fig. 8.
• Do not use abrasive cleaning products.
Descaling your steamer
For best results, descale the steamer after every 10 uses.
To do this :
• Pour white vinegard until the mark 0,3L in the tank - fig. 81. (available from hardware stores)
• Complete by adding cold water into the water tank until the MAX level - fig. 82.
• Leave it to descale overnight - fig. 83.
• Empty the water and vinegar - fig. 84.
• Rinse out the inside of the water tank several times using warm water - fig. 85.
• Do not use other scale removing products.
Storage
• Make sure all parts are clean and dry.
• Store in a dry, clean and stable place.
39
Page 40
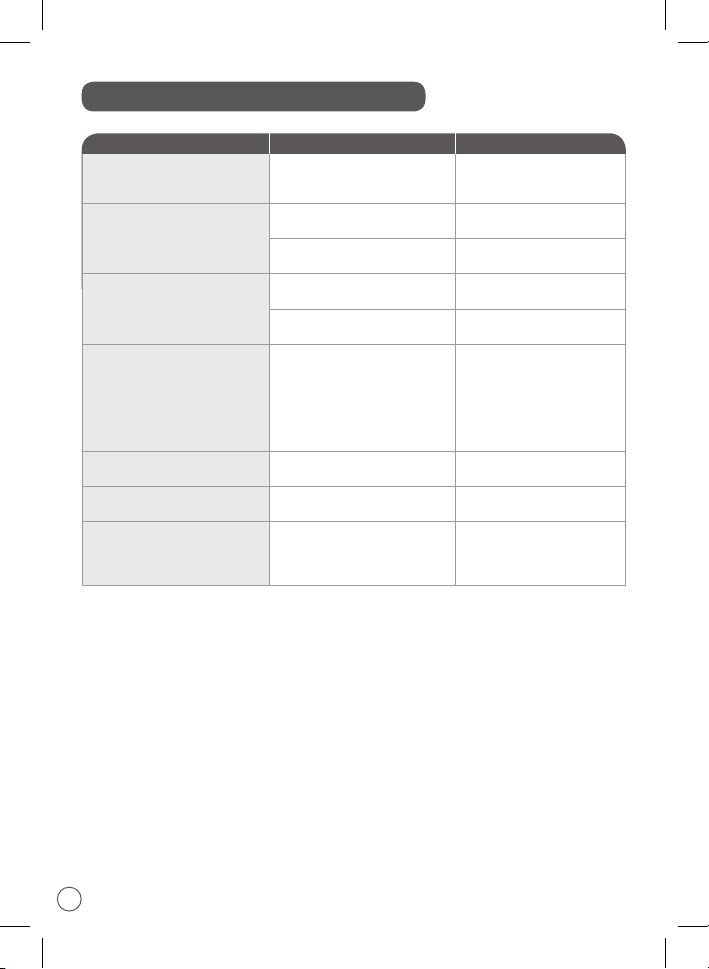
TECHNICAL TROUBLESHOOTING GUIDE
Problem Cause Solution
The appliance does not work.
The appliance is not heating.
There is steam escaping between
the lid and the body.
The food is not cooked.
Water is coming out of the
appliance.
Water is coming out of the body.
There is steam leakage between
silicon ring and container.
The appliance is not plugged
properly.
You have not pressed the start/
stop button.
You have not fill the tank.
The turbo ring not correctly locked.
The lid is not in place.
There is no water or not enough
water in the tank.
Water is overflowing by the steam
chimney.
There might be a water leak around
the heating element.
The appliance is not stable on the
container (due to the shape of
the container or the handle of the
container).
Make sure that the appliance is
properly plugged into a main
power socket.
Press the start/stop button.
Fill the tank with water to the
maximum level.
Check that the turbo ring
correctly locked.
Check that the lid is correctly
in place.
Before and during the cooking,
check the water level.
If there is no more water during
cooking, the appliance will not
produce steam anymore and
will no longer continue to cook
the food.
Make sure to respect the
maximum level of water.
Take the appliance to an
approved Service Centre.
Make sure that the appliance is
stable before launch cooking.
40
Page 41
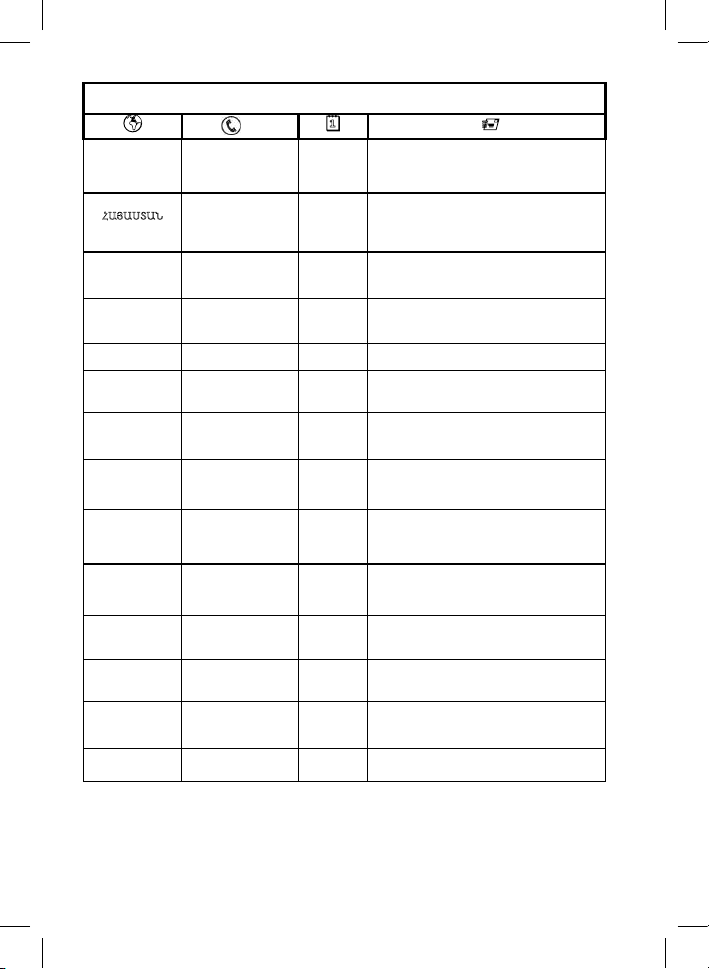
ARGENTINA
GROUPE SEB ARGENTINA S.A.
Capital Federal Buenos Aires
نيرحبلا
BAHRAIN
ЗАО «Группа СЕБ-Восток», Москва, 125171,
помещение XII
2 years
Info-linija za
GROUPE SEB CHILE Comercial Ltda
Santiago
2 godine
INTERNATIONAL GUARANTEE COUNTRY LIST
SMALL HOUSEHOLD APPLIANCES
ՀԱՅԱՍՏԱՆ
ARMENIA
AUSTRALIA
ÖSTERREICH
AUSTRIA
БЕЛАРУСЬ
BELARUS
BELGIQUE
BELGIE
BELGIUM
BOSNA I
HERCEGOVINA
BRASIL
BRAZIL
БЪЛГАРИЯ
BULGARIA
CANADA
CHILE
COLOMBIA
HRVATSKA
CROATIA
0800-122-2732
010 55-76-07
2 años
2 years
2 տարի
2 years
1300307824 1 year
01 890 3476
2 Jahre
2 years
17716666 1 year
017 2239290
2 года
2 years
070 23 31 59
potrošače
033 551 220
2 godine
2 years
11 2915-4400
0700 10 330
2 години
2 years
1-800-418-3325
02 2 884 46 06
018000520022
01 30 15 294
2 años
2 years
2 años
2 years
2 years
Billinghurst 1833 3°
C1425DTK
«SEB Ուկրանիա խումբ» ընկերություն
Խարկովի խճուղի, 201-203, 3-րդ հարկ
Կիեվ, 02121 Ուկրաինա
2 տարի
Groupe SEB Australia
PO Box 404
North Ryde, NSW, 1670
GROUPE SEB DEUTSCHLAND GmbH
Theodor-Stern-Kai 1
60596 Frankfurt
www.tefal-me.com
Ленинградское шоссе, д.16А, строение 3,
2 ans
2 jaar
1 ano
1 year
1 an
1 year
GROUPE SEB BELGIUM SA NV
25 avenue de l'Espérance - ZI
6220 Fleurus
SEB Developpement
Predstavništvo u BiH
Valtera Perića 6/I 71000 Sarajevo
Seb Comercial gAv Jornalista Roberto Marinho,
85, 19º andar 04576 – 010 São Paulo - SP
Груп Себ България ЕООД
бул. България 58 С, ет 9, офис 30
1680 София
Groupe SEB Canada Inc.
36 Newmill Gate, Unit 2
Scarborough, ON M1V 0E2
Avenida Santa María 0858, Providencia -
GROUPE SEB COLOMBIA
Apartado Aereo 172, Kilometro 1
Via Zipaquira Cajica Cundinamarca
SEB mku & p d.o.o.
Sarajevska 29, 10000 Zagreb
Page 42
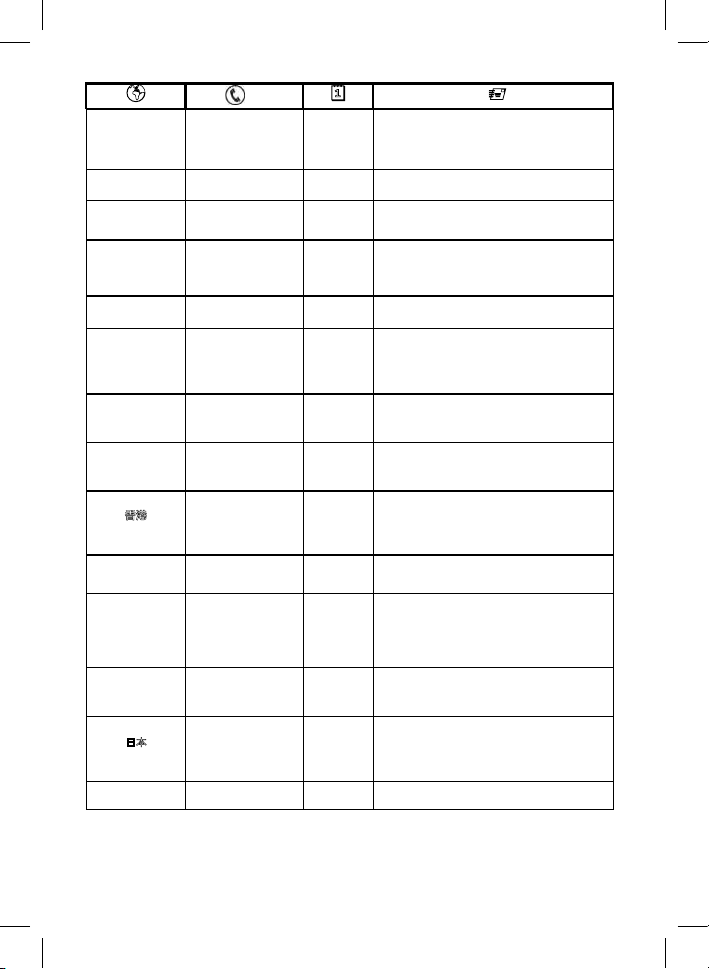
ČESKÁ
REPUBLIC
DENMARK
2 år
2 years
Tempovej 27 2750 Ballerup
:
Groupe SEB Polska Sp. z o.o.
00-189 Warsaw
SUOMI
2 vuotta
2 years
Groupe SEB Finland OY
ندرا
JORDAN
INTERNATIONAL GUARANTEE COUNTRY LIST
SMALL HOUSEHOLD APPLIANCES
REPUBLIKA
CZECH
DANMARK
رصم
EGYPT
EESTI
ESTONIA
731 010 111
44 66 31 55
16622
668 1286
2 roky
2 years
1year
2 aastat
2 years
Futurama Business Park (budova A)
Sokolovská 651/136a
186 00 Praha 8
GROUPE SEB NORDIC AS
:
ul. Inflancka 4C
FINLAND
FRANCE Continentale
+ Guadeloupe,
Martinique, Réunion,
St-Martin
DEUTSCHLAND
GERMANY
ELLADA
GREECE
香
港
HONG KONG
MAGYARORSZÁG
HUNGARY
INDONESIA
ITALIA
ITALY
日
本
JAPAN
09 8946 150
09 74 50 47 74
0212 387 400
2106371251
2 ans
2 years
2 Jahre
2 years
2 years
8130 8998 1 year
06 1 801 8434
2 év
2 years
+62 21 5793 7007 1 year
1 99 207 354
0570-077772
2 anni
2 years
1年
1 year
5665505 1 year
Pakkalankuja 6 01510 Vantaa
GROUPE SEB France
Service Consommateur Tefal
112 Ch. Moulin Carron, TSA 92002
69134 ECULLY Cedex
GROUPE SEB DEUTSCHLAND GmbH
Theodor-Stern-Kai 1
60596 Frankfurt
SEB ASIA Ltd.
9/F, South Block, Skyway House
3 Sham Mong Road, Tai Kok Tsui, Kowloon
GROUPE SEB CENTRAL-EUROPE Kft.
2040 Budaörs, Puskás Tivadar út 14
GROUPE SEB INDONESIA (Representative
Sudirman Plaza, Plaza Marein 8th Floor
Hong-Kong
office)
JL Jendral Sudirman Kav 76-78,
Jakarta 12910, Indonesia
GROUPE SEB ITALIA S.p.A.
Via Montefeltro, 4
20156 Milano
株式会社グループセブジャパン
〒144-0042
東京都大田区羽田旭町11-1
羽田クロノゲート事務棟5F
www.tefal-me.com
Page 43
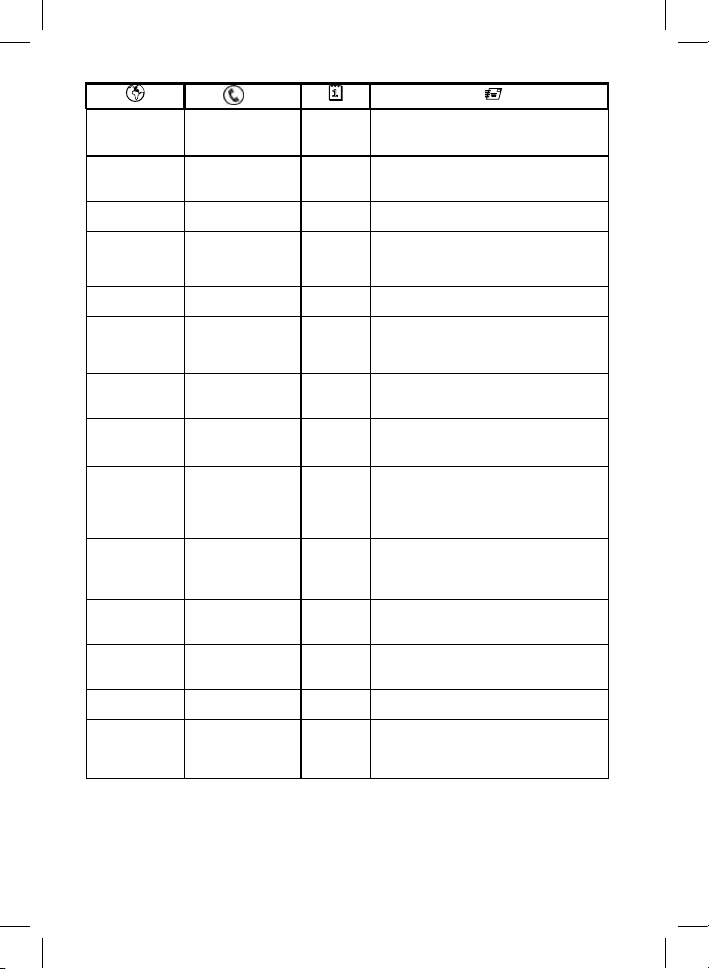
KUWAIT
Groupe SEB Polska Sp. z o.o.
00-189 Warsaw
LEBANON
Groupe SEB Polska Sp. z o.o.
OMAN
INTERNATIONAL GUARANTEE COUNTRY LIST
SMALL HOUSEHOLD APPLIANCES
KAZAKHSTAN
한국어
KOREA
727 378 39 39
2 жыл
2 years
080-733-7878 1 year
1807777 Ext :2104 1 year
ЖАҚ "ГРУППА СЕБ-ВОСТОК", Мәскеу,
125171, Ленинград тас жолы, 16А үй, 3-
құрылыс, XII-ғимарат
(유)그룹 세브 코리아 서울특별시 종로구 종로1길
50, 더케이트윈타워 B동 14층 03142
www.tefal-me.com
LATVJA
LATVIA
LIETUVA
LITHUANIA
LUXEMBOURG
MACEDONIA
MALAYSIA
MEXICO
MOLDOVA
NEDERLAND
The Netherlands
POLSKA
POLAND
6 616 3403
2 gadi
2 years
4414727 1 year
5 214 0057
0032 70 23 31 59
(02) 20 50 319
2 metai
2 years
2 years
2 години
2 years
603 7802 3000 2 years
(55) 52839354
22 224035
0318 58 24 24
1 year
2 роки
2 years
2 years
24703471 1 year
801 300 420
koszt jak za
połączenie lokalne
2 years
Gdański Business Center II D
ul. Inflancka 4C
www.tefal-me.com
Gdański Business Center II D
ul. Inflancka 4C
00-189 Warsaw
2 ans
1 año
2 jaar
2 lata
GROUPE SEB BELGIUM SA NV
25 avenue de l'Espérance - ZI
6220 Fleurus
Груп Себ България ЕООД
бул. България 58 С, ет 9, офис 30
1680 София
GROUPE SEB MALAYSIA SDN. BHD
Unit No. 402-403, Level 4, Uptown 2,
No. 2, Jalan SS21/37, Damansara Uptown,
47400, Petaling Jaya, Selangor D.E Malaysia
Groupe Seb México S.A. de C.V.
Calle Boulevard Miguel de Cervantes,
Saavedra No 169 Piso 9, Col Ampliación
Granada, C.P. 11520, Ciudad de México
ТОВ «Груп СЕБ Україна»
02121, Харьківське шосе, 201-203, 3 поверх,
Київ, Україна
GROUPE SEB NEDERLAND B.V.
De Schutterij 27
3905 PK Veenendaal
www.tefal-me.com
Groupe SEB Polska Sp. z o.o.
Gdański Business Center II D
ul. Inflancka 4C
00-189 Warsaw
Page 44
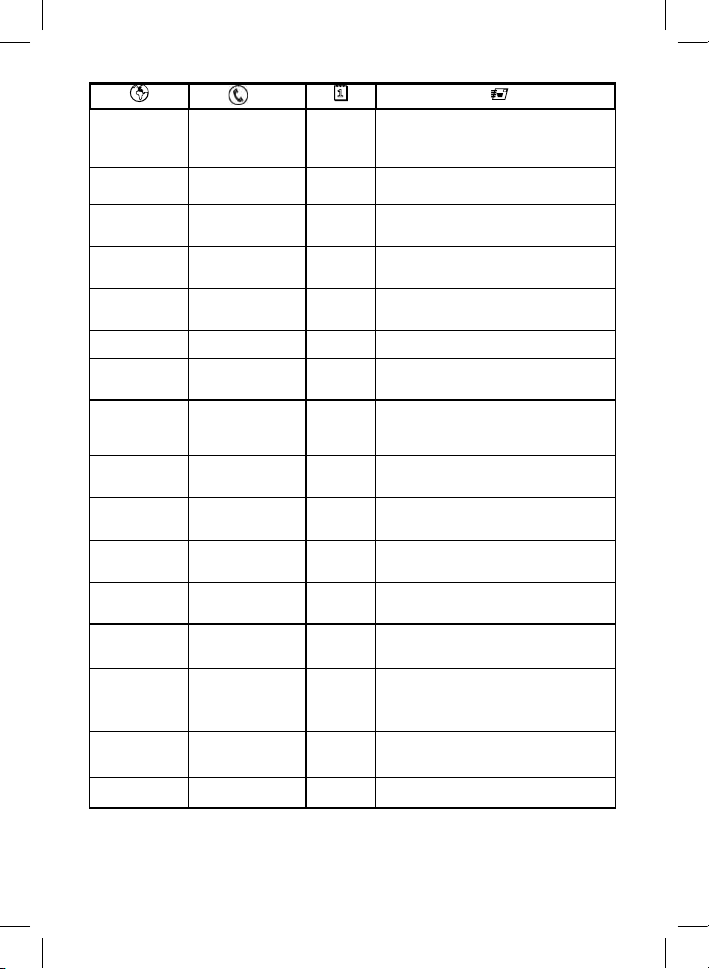
PORTUGAL
Bloco1 - 3° B/D 1950 - 327 Lisboa
GROUPE SEB IRELAND
Road, Rathcoole, Co. Dublin
GROUPE SEB ROMÂNIA
011881 Bucureşti
ЗАО «Группа СЕБ-Восток», Москва, 125171,
помещение XII
SAUDI ARABIA
SEB Developpement
11070 Novi Beograd
GROUPE SEB (Singapore) Pte. Ltd.
Singapore 609935
GROUPE SEB Slovensko, spol. s r.o.
821 04 Bratislava
GROUPE SEB Slovensko, spol. s r.o.
821 04 Bratislava
GROUPE SEB IBÉRICA S.A.
C/ Almogàvers, 119-123, Complejo Ecourban
08018 Barcelona
TEFAL - OBH Nordica Group AB
172 66 Sundbyberg
2 ans
2 years
GROUPE SEB SCHWEIZ GmbH
UAE
INTERNATIONAL GUARANTEE COUNTRY LIST
SMALL HOUSEHOLD APPLIANCES
QATAR
REPUBLIC OF
IRELAND
ROMANIA
RUSSIA
SRBIJA
SERBIA
808 284 735
2 anos
2 years
44485555 1 year
01 677 4003
0 21 316 87 84
495 213 32 30
2 years
2 years
2 года
2 years
920023701 2 years
060 0 732 000
2 godine
2 years
2 ani
GROUPE SEB IBÉRICA SA
Urb. da Matinha
Rua Projectada à Rua 3
www.tefal-me.com
Unit B3 Aerodrome Business Park, College
Str. Ermil Pangratti nr. 13
Ленинградское шоссе, д.16А, строение 3,
www.tefal-me.com
Đorđa Stanojevića 11b
SINGAPORE
SLOVENSKO
SLOVAKIA
SLOVENIJA
SLOVENIA
ESPAÑA
SPAIN
SVERIGE
SWEDEN
SUISSE SCHWEIZ
SWITZERLAND
ประเทศไทย
THAILAND
TÜRKIYE
TURKEY
6550 8900 2 years
232 199 930
02 234 94 90
933 06 37 65
08 629 25 00
044 837 18 40
02 765 6565 2 years
444 40 50
8002272 1 year
2 roky
2 years
2 leti
2 years
2 años
2 years
2 år
2 years
2 Jahre
2 YIL
2 years
3A International Business Park
#12-04/05, ICON@IBP
Cesta na Senec 2/A
Cesta na Senec 2/A
Löfströms Allé 5
Thurgauerstrasse 105
8152 Glattpark
GROUPE SEB THAILAND
2034/66 Italthai Tower, 14th Floor, n° 14-02,
New Phetchburi Road,
Bangkapi, Huaykwang, Bangkok, 10320
GROUPE SEB ISTANBUL AS
Dereboyu Cd. Bilim Sk. Sun Plaza No:5 K:2
Maslak 34398 Istanbul
www.tefal-me.com
Page 45
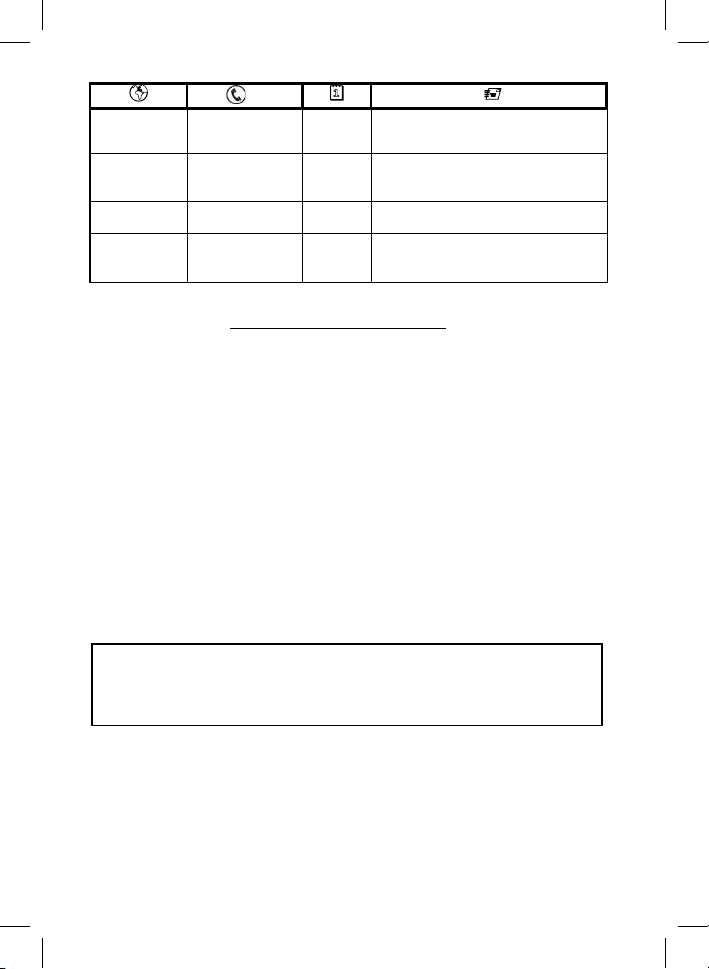
Date of purchase / Date d’achat / Fecha de compra / Købsdato / Ostopäivä / Kjøpsdato / Inköpsdatum / Ostukuupäev /
Product reference / Référence produit / Referencia del producto / Refer encenummer / Tuotenumero / Artikkelnummer
Retailer name and address / Nom et adresse du revendeur / Nombre y dirección del minorista / Forhandler navn &
Distributor stamp / Cachet / Sello del distribuidor / Forhandler stempel / Jälleenmyyjän leima / Forhandler stempel /
INTERNATIONAL GUARANTEE COUNTRY LIST
SMALL HOUSEHOLD APPLIANCES
Україна
UKRAINE
UNITED
KINGDOM
U.S.A.
VIETNAM
044 300 13 04
0345 602 1454
800-395-8325 1 year
1800-555521
2 роки
2 years
2 years
2 năm
2 years
INTERNATIONAL GUARANTEE
Pirkuma datums / Įsigijimo data / Data zakupu / Datum izročitve blaga / Datum kupovine / Vásárlás dátuma / Data
achiziţiei / Дата на закупуване / Дата продажу / Վաճառքի օր. / Дата продажи / Сатылған күні / 購入日 /
/ 구입일자 / Датум на купување :
/Produktreferens / Toote viitenumber / Produkta atsauces numurs / Gaminio numeris / Referencja produktu / Oznaka
proizvoda / Tip aparata / Készülék típusa / Cod produs / Модел / Модель / Մոդել. / Модель / Үлгісі /
製品リファレンス番号 / / 제품명 / Податоци за производот:
adresse / Jälleenmyyjän nimi ja osoite / Forhandler navn og adresse / Återförsäljarens namn och adress / Müüja kauplus
ja aadress / Veikala nosaukums un adrese / Parduotuvės pavadinimas ir adresas / Nazwa i adres sprzedawcy / Naziv i
adresa prodajnog mjesta / Naziv in naslov trgovine / Forgalmazó neve és címe / Numele şi adresa vânzătorului /
Търговки обект / Назва та адреса продавця / Կազմակերպության անվանում և հասցե. / Название и адрес
продавца / Сатушының атауы мен мекен-жайы / 販売店名、住所 / / / 소매점
이름과 주소 / Име и адреса на продавач :
Återförsäljarens stämpel / Tempel / Zīmogs / Antspaudas / Pieczęć sprzedawcy / Pečat distributera / Pečat trgovine /
Forgalmazó pecsétje / Ştampila vânzătorului / Печат на търговския обект / Печатка продавця / Կնիք. / Печать
продавца / Сатушының мөрі / 販売店印 / / / 소매점 직인 / Печат на дистрибутер :
ТОВ «Груп СЕБ Україна»
02121, Харківське шосе, 201-203, 3 поверх,
2121 Eden Road Millville, NJ 08332
25 Nguyen Thi Nho Str, Ward 9, Tan Binh Dist,
Київ, Україна
GROUPE SEB UK LTD
Riverside House, Riverside Walk
Windsor, Berkshire, SL4 1NA
GROUPE SEB USA
Vietnam Fan Joint Stock Company
HCM city
24/10/2018
Page 46

FR p. 13 – 26
EN p. 27 – 40
1520007590
 Loading...