

Page 1
max
FR
EN
TR
AR
FA
www.moulinex.com
MO_8080012363-01-Middle East_IM_FR_EN_TR_AR_FA_V8.indd 1 22/02/2013 6:10 PM
Page 2
A
E
F
F7
F8
F5
F1
F6
F4
H
H1
H2
H3
H4
H6
H5
F3 F2
G
G4
G6
G2
G1
G5
G3
B
A5
A4
A3
A6
A2
A1
C
C1
B2
B1
A7
max
D
D3
D2
C2
C3
MO_8080012363-01-Middle East_IM_FR_EN_TR_AR_FA_V8.indd 2 22/02/2013 6:10 PM
D1
2
Page 3
E
G
F6
F5
F4
F
F7
F8
F1
F3 F2
H
G6
H1
G2
G5
G1
G4
H2
H3
H5
H4
G3
MO_8080012363-01-Middle East_IM_FR_EN_TR_AR_FA_V8.indd 3 22/02/2013 6:10 PM
H6
3
Page 4
1.1a
22
1
2
2.1c
3.1a
3.1b
3.2a
3.2b
3.3a
3
4
1
2
1
2
3
4
5
1
2
44
3
1
2
2
1
1
1.1b
1.1c
1
2
2
4
1
3
1.1d
2
1
2.1a
4
2.1b
MO_8080012363-01-Middle East_IM_FR_EN_TR_AR_FA_V8.indd 4 22/02/2013 6:11 PM
Page 5
4
1
2
3
4
5
1
2
44
3
1
2
2
1
3
1
2
2.1c
3.1b
3.1a
3.2a
3.2b
3.3a
5
MO_8080012363-01-Middle East_IM_FR_EN_TR_AR_FA_V8.indd 5 22/02/2013 6:11 PM
Page 6

1
2
1
2
44
3
1
2
5.1c
5.2a
5.2b 5.2c
6
1
2
2
1
3
1
2
5
3.3b
4.1b
4
3
5.1b
2
1
4.1a
4.1c
4
3
2
2
1
3
5.1a
MO_8080012363-01-Middle East_IM_FR_EN_TR_AR_FA_V8.indd 6 22/02/2013 6:11 PM
5
5.1c
5.1b
6
Page 7
2
1
3
1
2
5
5.1c
5.2a
2
1
5.2b 5.2c
6
MO_8080012363-01-Middle East_IM_FR_EN_TR_AR_FA_V8.indd 7 22/02/2013 6:11 PM
7
Page 8

FR
Nous vous remercions d’avoir choisi un appareil de la gamme MOULINEX exclusivement prévu pour la préparation des
aliments, à usage domestique à l’intérieur de la maison.
DESCRIPTION
a - Bloc moteur
a1 Variateur électronique de vitesse
a2 Bouton de déverrouillage de la tête
multifonctions (a3)
a3 Tête multifonctions
a4 Sortie rapide (bol mixeur / centrifugeuse /
broyeur)
a5 Trappe de sécurité
a6 Sortie accessoires mélangeurs (pétrin, fouet
multibrins, malaxeur)
a7 Range-cordon
b - Ensemble bol
b1 Bol inox
b2 Couvercle
c - Accessoires mélangeurs
c1 Pétrin
c2 Malaxeur
c3 Fouet multibrins
d - Bol mixeur (selon modèle)
d1 Bol
d2 Couvercle
d3 Bouchon doseur
e - Adaptateur (selon modèle)
f - Tête hachoir (selon modèle)
f1 Corps métal
f2 Vis
f3 Couteau
f4 Grille gros trous
f5 Grille petits trous
f6 Ecrou
f7 Poussoir
f8 Plateau
g - Coupe-légumes (selon modèle)
g1 Magasin tambour
g2 Poussoir
g3 Tambour A trancher
g4 Tambour C râpé gros
g5 Tambour D râpé n
g6 Tambour E reibekuchen
h - Centrifugeuse (selon modèle)
h1 Poussoir
h2 Couvercle
h3 Filtre rotatif
h4 Corps réceptacle
h5 Bec verseur
h6 Levier de verrouillage
CONSEILS DE SECURITE
• Lisez attentivement le mode d’emploi avant la première utilisation de votre appareil : une utilisation non conforme
au mode d’emploi dégagerait le fabricant de toute responsabilité.
• Cet appareil n’est pas prévu pour être utilisé par des personnes (y compris les enfants) dont les capacités physiques,
sensorielles ou mentales sont réduites ou des personnes dénuées d’expérience ou de connaissance, sauf si elles ont
pu bénécier, par l’intermédiaire d’une personne responsable de leur sécurité, d’une surveillance ou d’instructions
préalables concernant l’utilisation de l’appareil. Il convient de surveiller les enfants pour s’assurer qu’ils ne jouent
pas avec l’appareil.
• Vériez que la tension d’alimentation de votre appareil correspond bien à celle de votre installation électrique. Toute
erreur de branchement annule la garantie.
• Votre appareil est destiné uniquement à un usage domestique et culinaire et à l’intérieur de la maison.
• Débranchez toujours l’appareil dès que vous cessez de l’utiliser et lorsque vous le nettoyez.
• N’utilisez pas votre appareil s’il ne fonctionne pas correctement ou s’il a été endommagé. Dans ce cas, adressez-vous
à un centre agréé (voir liste dans le livret service).
• Toute intervention autre que le nettoyage et l’entretien usuel par le client doit être effectuée par un centre agréé
(voir liste dans le livret service).
• Ne mettez pas l’appareil, le câble d’alimentation ou la che dans l’eau ou tout autre liquide.
• Ne laissez pas le câble d’alimentation pendre à portée de mains des enfants, être à proximité ou en contact avec les
parties chaudes de l’appareil, près d’une source de chaleur ou sur un angle vif.
• Si le câble d’alimentation ou la che sont endommagés, n’utilisez pas l’appareil. An d’éviter tout danger faites-les
obligatoirement remplacer par un centre agréé (voir liste dans le livret service).
• Ne passez pas les accessoires au micro-ondes.
• Pour votre sécurité, n’utilisez que des accessoires et des pièces détachées adaptés à votre appareil, vendus en centre
agréé.
• Retirez toujours le bol mixeur (d) ou la centrifugeuse (h) avant d’actionner le bouton de déverrouillage (a2) de la
tête multifonctions (a3).
• Avec l’accessoire tête hachoir (f), utilisez toujours le poussoir (f7) pour guider les aliments dans la cheminée, jamais
les doigts, ni fourchette, ni cuillère, ni couteau ou tout autre objet.
• Ne touchez jamais les pièces en mouvement et attendez l’arrêt complet de l’appareil avant d’enlever les accessoires.
8
MO_8080012363-01-Middle East_IM_FR_EN_TR_AR_FA_V8.indd 8 22/02/2013 6:11 PM
Page 9

• Des précautions doivent être prises lors de la manipulation des couteaux affutés (d, f, g) lorsqu’on vide les bols et
lors du nettoyage : ils sont extrêmement coupants.
• Ne touchez ni les fouets, ni le pétrin lorsque l’appareil est en fonctionnement.
• Ne laissez pas pendre les cheveux longs, écharpes, cravates etc.. au-dessus de l’appareil en fonctionnement.
• N’introduisez jamais d’ustensiles (cuillère, spatule ...) par la cheminée des couvercles (b2), (d2) ou (h2) ainsi que du
magasin tambour (g1).
• Ne faites pas fonctionner le bol mixeur (d1) sans couvercle (d2).
• N’utilisez qu’un accessoire à la fois.
• N’utilisez pas les bols (b1, d1) comme récipients (congélation, cuisson, stérilisation, …)
• Ne pas utiliser l’accessoire centrifugeuse si le ltre rotatif (h3) est endommagé.
• Mettre l’appareil à l’arrêt et le déconnecter de l’alimentation avant de changer les accessoires ou d’approcher les
parties qui sont mobiles lors du fonctionnement.
MISE EN SERVICE
• Avant la première utilisation, lavez toutes les pièces des accessoires à l’eau savonneuse (sauf l’adaptateur (e) : voir
§ nettoyage) Rincez et séchez.
• Placez l’appareil sur une surface plane, propre et sèche, assurez-vous que le bouton variateur (a1) est bien en
position « 0 » puis branchez votre appareil.
• Pour mettre en marche, vous avez plusieurs possibilités :
- Marche intermittente (pulse) : Tournez le bouton variateur (a1) sur la position « pulse » par impulsions
successives pour un meilleur contrôle des préparations.
- Marche continue : Tournez le bouton variateur (a1) sur la position désirée de « 1 » à « max » selon les
préparations effectuées.
Vous pouvez la modier en cours de préparation.
• Pour arrêter l’appareil, ramenez le bouton (a1) sur le « 0 ».
Important : L’appareil ne pourra démarrer que si la trappe (a5) et la tête (a3) sont verrouillées. Si vous
déverrouillez la trappe (a5) et/ou la tête (a3) en cours de fonctionnement, l’appareil s’arrêtera aussitôt.
Reverrouillez la trappe et/ou la tête, revenez en position « 0 » sur le bouton de commande (a1), puis procédez
normalement pour la mise en marche de l’appareil en sélectionnant la vitesse souhaitée.
Votre appareil de cuisine est équipé d’un micro processeur qui contrôle et analyse la puissance en fonctionnement.
En cas de charge trop importante, votre appareil s’arrêtera tout seul. Pour redémarrer votre appareil, ramenez votre
bouton rotatif (a1) sur la position «0» et retirez une partie de vos ingrédients. Laissez votre appareil reposer quelques
minutes. Vous pouvez alors sélectionner la vitesse souhaitée pour terminer votre préparation.
FR
La numérotation des paragraphes est en correspondance avec la numérotation des schémas encadrés.
1 - MÉLANGER / PÉTRIR / BATTRE / ÉMULSIONNER / FOUETTER
Selon la nature des aliments, le bol inox (b1) et son couvercle (b2) vous permettent de préparer jusqu’à 1,8 kg de pâte.
ACCESSOIRES UTILISES :
- Bol inox (b1).
- Couvercle (b2).
- Pétrin (c1) ou malaxeur (c2) ou fouet multibrins (c3).
1.1 - MONTAGE DES ACCESSOIRES
• Appuyez sur le bouton (a2) pour déverrouiller la tête multifonctions (a3) et levez-la jusqu’en butée.
• Verrouillez le bol inox (b1) (sens horaire) sur l’appareil et mettez les ingrédients.
• Insérez l’accessoire désiré (c1, c2 ou c3) sur la sortie (a6), enfoncez et donnez un quart de tour dans le sens
antihoraire pour bloquer l’accessoire dans son logement.
• Ramenez la tête multifonctions (a3) en position horizontale : appuyez sur le bouton (a2) et baissez manuellement la
tête multifonctions (a3) jusqu’à ce qu’elle se verrouille (retour du bouton (a2) dans sa position initiale).
• Glissez le couvercle (b2) sur le bol inox (b1).
Remarque : L’utilisation du couvercle n’est pas obligatoire. Il permet d’éviter le risque d’éclaboussure ou de
projection.
• Assurez-vous que la trappe (a5) est bien verrouillée (sens horaire) sur la sortie rapide (a4).
1.2 - MISE EN MARCHE
Démarrez en tournant le bouton variateur (a1) sur la position désirée selon la recette.
9
MO_8080012363-01-Middle East_IM_FR_EN_TR_AR_FA_V8.indd 9 22/02/2013 6:11 PM
Page 10

FR
• L’appareil se met aussitôt en fonctionnement.
Vous pouvez ajouter des aliments par l’orice du couvercle (b2) au cours de la préparation.
• Pour arrêter l’appareil, ramener le bouton (a1) sur « 0 ».
Conseils :
- Pétrir
- Utilisez l’accessoire pétrin (c1) à la vitesse « 1 ».
Vous pouvez pétrir jusqu’à 500g de farine (ex : pain blanc, pain aux céréales, pâte brisée, pâte sablée, …).
- Mélanger
- Utilisez le malaxeur (c2) à une vitesse entre « 1 » et « max ».
- Vous pouvez mélanger jusqu’à 1,8 kg de pâte légère (quatre-quarts, biscuits…).
- N’utilisez jamais le malaxeur (c2) pour pétrir les pâtes lourdes.
- Battre / émulsionner / fouetter
- Utilisez le fouet multibrins (c3) à une vitesse entre « 1 » et « max ».
- Vous pouvez préparer : mayonnaise, aïoli, sauces, blancs en neige (jusqu’à 8 blancs d’oeufs),
chantilly (jusqu’à 500 ml)…
- N’utilisez jamais le fouet multibrins (c3) pour pétrir des pâtes lourdes ou mélanger des pâtes légères.
1.3 - DEMONTAGE DES ACCESSOIRES
• Attendez l’arrêt complet de l’appareil.
• Retirez le couvercle (b2).
• A l’aide du bouton (a2), déverrouillez la tête multifonctions (a3) et levez-la en position haute.
• Débloquez l’accessoire (c1), (c2) ou (c3) de la tête multifonctions en poussant l’accessoire vers la tête et en lui
faisant effectuer un quart de tour dans le sens horaire.
• Retirez le bol inox.
2 - HOMOGÉNÉISER / MÉLANGER / MIXER (SELON MODÈLE)
Selon la nature des aliments, le bol mixeur (d) vous permet de préparer jusqu’à 1.5l de mélanges épais et 1.25l de
mélanges liquides.
ACCESSOIRES UTILISES :
- Bol mixeur (d).
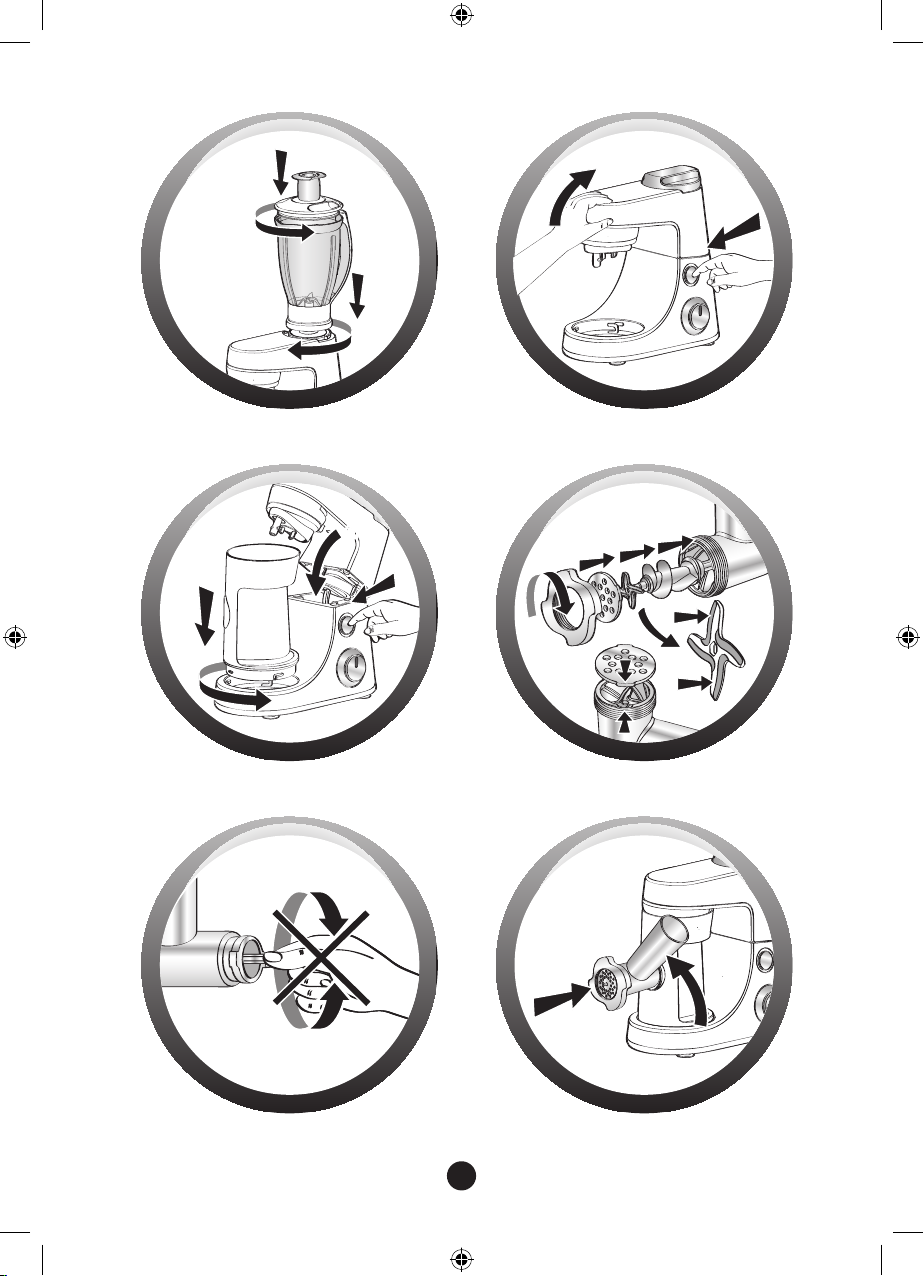
2.1 - MONTAGE DES ACCESSOIRES
• Amenez la tête multifonctions (a3) en position horizontale : appuyez sur le bouton (a2) et baissez manuellement la
tête multifonctions (a3) jusqu’à ce qu’elle se verrouille (retour du bouton (a2) dans sa position initiale).
• Déverrouillez la trappe de sécurité (a5) de la sortie rapide (a4) en la tournant dans le sens antihoraire puis ôtez-la.
• Assurez-vous que l’appareil est bien à l’arrêt avant de verrouiller le bol mixeur (d).
• Verrouillez le bol mixeur (d) sur la sortie (a4) en le tournant dans le sens horaire.
• Mettez les aliments dans le bol mixeur, et verrouillez le couvercle (d2) muni du bouchon doseur (d3), en le tournant
dans le sens antihoraire.
2.2 - MISE EN MARCHE
• Démarrez en tournant le bouton variateur (a1) sur la position désirée selon la recette. Pour un meilleur contrôle du
mixage et une meilleure homogénéisation de la préparation, utilisez la position «Pulse».
Vous pouvez ajouter des aliments par l’orice du bouchon doseur (d3) en cours de préparation.
• Pour arrêter l’appareil, ramener le bouton (a1) sur « 0 ».
Conseils :
Vous pouvez préparer :
- des potages nement mixés, des veloutés, des compotes, des milk-shakes, des cocktails.
- des pâtes légères (crêpes, beignets, clafoutis, far ...).
- Lors du mixage, si les ingrédients restent collés aux parois du bol, arrêtez l’appareil, retirez le bol mixeur, faites
tomber les ingrédients sur les lames, puis repositionnez votre bol mixeur pour poursuivre votre préparation.
• Ne remplissez jamais le bol mixeur avec un liquide bouillant.
• N’utilisez pas le bol mixeur à vide.
• Utilisez toujours le bol mixeur avec son couvercle.
• N’enlevez jamais le couvercle avant l’arrêt complet de l’appareil.
10
MO_8080012363-01-Middle East_IM_FR_EN_TR_AR_FA_V8.indd 10 22/02/2013 6:11 PM
Page 11

• Dans le bol mixeur, mettez toujours les ingrédients liquides avant les ingrédients solides.
2.3 - DEMONTAGE DE L’ACCESSOIRE
• Attendez l’arrêt complet de l’appareil pour retirer le bol mixeur en le déverrouillant dans le sens antihoraire et
remettez en place la trappe (a5) en la verrouillant sur la sortie (a4) (sens horaire).
3 - HACHER (SELON MODÈLE)
ACCESSOIRES UTILISES :
- Adaptateur (e)
- Tête hachoir assemblée (f)
3.1 - MISE EN PLACE DE L’ADAPTATEUR
• Appuyez sur le bouton (a2) pour déverrouiller la tête multifonctions (a3) et levez-la jusqu’en butée.
• Positionnez l’adaptateur (e) et verrouillez-le dans le sens antihoraire de manière à avoir la sortie dans le
prolongement de l’appareil.
• Ramenez la tête multifonctions (a3) en position horizontale en appuyant de nouveau sur le bouton (a2).
3.2 - ASSEMBLAGE DE LA TETE HACHOIR
• Prenez le corps (f1) par la cheminée en plaçant l’ouverture la plus large vers le haut.
• Introduisez la vis (f2) (axe long en premier) dans le corps (f1).
• Positionnez le couteau (f3) sur l’axe court qui dépasse de la vis (f2) en dirigeant les arêtes tranchantes vers
l’extérieur.
• Placez la grille choisie (f4 ou f5) sur le couteau (f3) en faisant correspondre les deux ergots avec les deux encoches
du corps (f1).
• Vissez fortement l’écrou (f6) sur le corps (f1) dans le sens horaire, sans toutefois le bloquer.
• Vériez le montage. L’axe ne doit ni avoir de jeu, ni pouvoir tourner sur lui-même. Dans le cas contraire,
recommencez les opérations précédentes.
3.3 - MISE EN PLACE DE LA TETE HACHOIR SUR L’APPAREIL
• Présentez la tête hachoir assemblée (f) inclinée vers la droite, face à la sortie de l’adaptateur (e), faites correspondre
les deux baïonnettes de la tête hachoir avec les deux encoches de l’adaptateur. Engagez à fond la tête hachoir dans
l’adaptateur puis ramenez la cheminée de la tête hachoir à la verticale jusqu’au blocage en tournant dans le sens
antihoraire.
• Placez le plateau amovible (f8) sur la cheminée.
3.4 - MISE EN MARCHE, CONSEILS ET DEMONTAGE
• Assurez-vous que la trappe de sécurité (a5) est bien verrouillée (sens horaire) sur la sortie rapide (a4).
• Placez un récipient pour recueillir la préparation devant l’appareil.
• Mettez en marche en tournant le variateur (a1) sur la vitesse « 3 » ou « 4 ».
• Introduisez la viande dans la cheminée morceau par morceau à l’aide du poussoir (f7). Ne poussez jamais
l’ingrédient avec les doigts ou avec des ustensiles dans la cheminée.
• Pour arrêter l’appareil, tournez le variateur sur la vitesse « 0 » et attendez l’arrêt complet de l’appareil.
• Déverrouillez la tête hachoir dans le sens inverse du montage.
Conseils :
- Préparez toute la quantité d’aliments à hacher (pour la viande, éliminez les os, cartilages et nerfs et coupez-la en
morceaux de 2x2cm environ).
- Assurez-vous que votre viande soit bien décongelée.
- En n d’opération, vous pouvez faire passer quelques petits morceaux de pain an de faire sortir tout le hachis.
4 - RAPER / TRANCHER (SELON MODÈLE)
ACCESSOIRES UTILISES :
- Adaptateur (e)
- Coupe-légumes assemblé (g)
- Tambours (selon modèle)
4.1 - MONTAGE DES ACCESSOIRES
• Appuyez sur le bouton (a2) pour déverrouiller la tête multifonctions (a3) et levez-la jusqu’en butée.
FR
11
MO_8080012363-01-Middle East_IM_FR_EN_TR_AR_FA_V8.indd 11 22/02/2013 6:11 PM
Page 12

FR
• Positionnez l’adaptateur (e) et verrouillez-le dans le sens antihoraire de manière à avoir la sortie dans le
prolongement de l’appareil.
• Ramenez la tête multifonctions (a3) en position horizontale en appuyant de nouveau sur le bouton (a2).
• Assurez-vous que la trappe de sécurité (a5) est bien verrouillée (sens horaire) sur la sortie rapide (a4).
• Présentez le magasin tambour (g1) incliné vers la droite, face à la sortie de l’adaptateur (e), faites correspondre
les deux baïonnettes du magasin tambour avec les deux encoches de l’adaptateur. Engagez-le à fond et ramenez la
cheminée du magasin à la verticale jusqu’au blocage en tournant dans le sens antihoraire.
• Insérez dans le magasin le tambour choisi, et assurez-vous qu’il est intégralement rentré dans le magasin.
4.2 - MISE EN MARCHE ET CONSEILS
• Placez un récipient pour recueillir la préparation devant l’appareil.
• Mettez en marche en tournant le variateur (a1) sur la vitesse « 3 » pour trancher et sur la vitesse « 4 » pour râper.
• Introduisez les aliments dans la cheminée du magasin et guidez-les à l’aide du poussoir (g2). Ne poussez jamais
l’ingrédient avec les doigts ou avec des ustensiles.
• Pour arrêter l’appareil, tournez le variateur sur la vitesse « 0 » et attendez l’arrêt complet de l’appareil.
• Déverrouillez le magasin tambour dans le sens inverse du montage.
• Vous pouvez préparer avec les tambours :
- Râper gros C (g4) / râper n D (g5) : carottes, céleri-rave, pommes de terre, fromage,…
- Trancher épais A (g3) : pommes de terre, carottes, concombres, pommes, betteraves,…
- Reibekuchen E (g6): pommes de terre, parmesan …
5 - CENTRIFUGER FRUITS ET LEGUMES (SELON MODELE)
ACCESSOIRES UTILISES :
- Centrifugeuse assemblée (h).
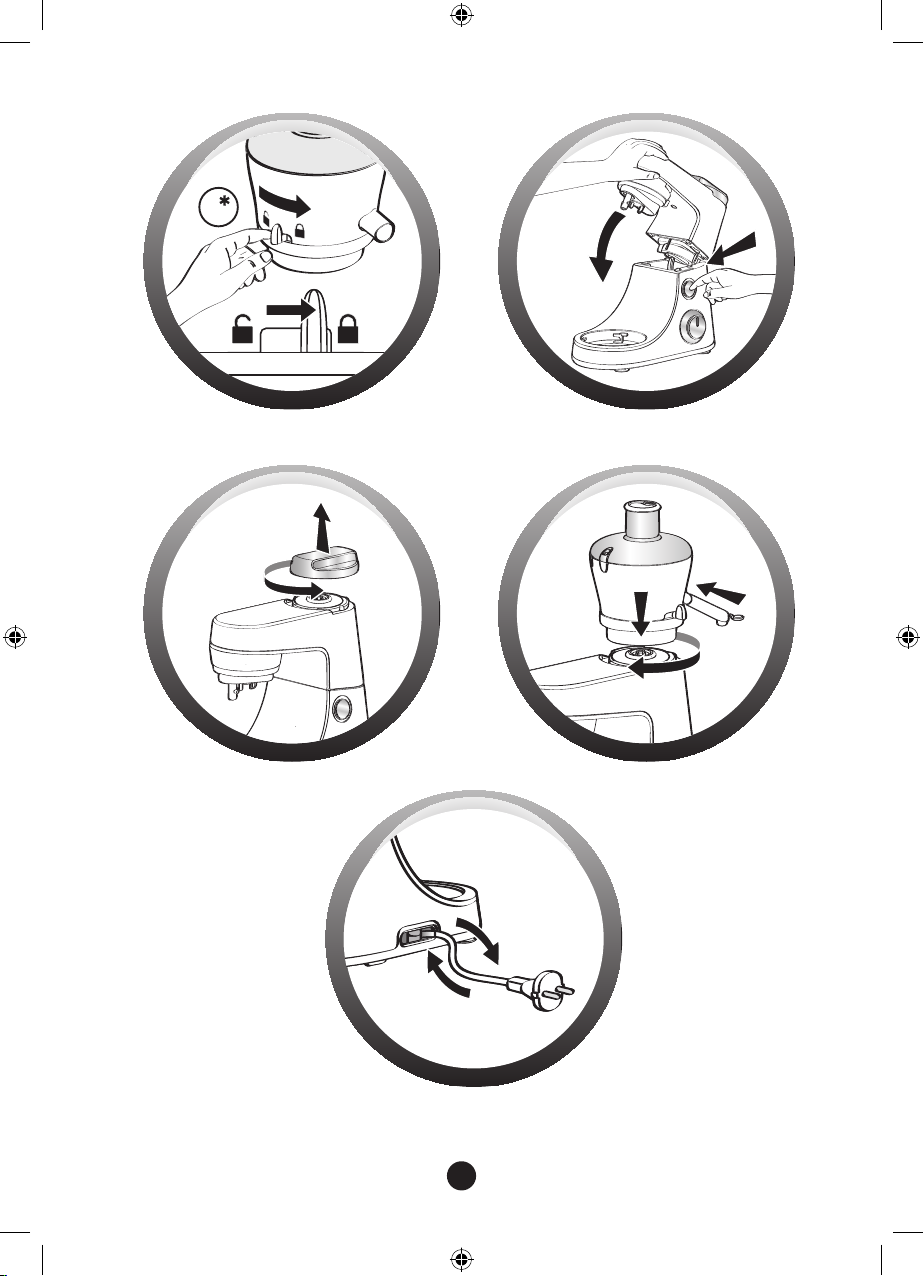
5.1 - ASSEMBLAGE DE LA CENTRIFUGEUSE
• Placez le ltre (h3) au centre du corps réceptacle (h4).
• Verrouillage du couvercle : tournez en sens antihoraire et verrouillez le couvercle (h2) sur le corps réceptacle (h4)
(position cadenas fermé).
• Verrouillage global : poussez le levier de verrouillage (h6) en position cadenas fermé.
5.2 - MISE EN PLACE DE LA CENTRIFUGEUSE SUR L’APPAREIL
• Amenez la tête multifonctions (a3) en position horizontale : appuyez sur le bouton (a2) et baissez manuellement la
tête multifonctions (a3) jusqu’à ce qu’elle se verrouille (retour du bouton (a2) dans sa position initiale).
• Déverrouillez et ôtez la trappe (a5) de la sortie (a4) en la tournant dans le sens antihoraire.
• Assurez-vous que l’appareil est bien à l’arrêt avant de verrouiller la centrifugeuse (h).
• Verrouillez la centrifugeuse assemblée sur la sortie (a4) en la tournant dans le sens horaire, de manière à avoir la
sortie pour le bec verseur dans l’alignement de l’appareil.
• Emboitez le bec verseur (h5) sur le corps réceptacle (h4).
5.3 - MISE EN MARCHE ET CONSEILS
• Mettez un grand verre sous le bec verseur (h5).
• Mettez en marche en tournant le variateur (a1) sur la vitesse « 3 ».
• Coupez les fruits et/ou légumes en morceaux.
• Introduisez-les dans la cheminée du couvercle (h2) et poussez-les lentement à l’aide du poussoir (h1). Ne poussez
jamais avec-les doigts ou avec des ustensiles.
• Ne pas traiter plus de 5 fois 500g d’aliments en continu, sans laisser votre appareil reposer complètement.
• Pour obtenir un meilleur rendement, nettoyez le ltre tous les 300 g d’ingrédients.
• Important : Lorsque le corps réceptacle à pulpe est plein, arrêtez l’appareil et videz le corps réceptacle.
• Pour arrêter l’appareil, tournez le variateur sur la vitesse « 0 » et attendez l’arrêt complet de l’appareil.
• Attendez l’arrêt complet du filtre rotatif avant de retirer l’ensemble de l’appareil.
• Pour retirer la centrifugeuse, déverrouillez-la en la tournant dans le sens antihoraire.
• Positionnez le levier de verrouillage (h6) en position cadenas ouvert. Ouvrez le couvercle (position cadenas ouvert).
Vous pouvez alors retirer le ltre (h3) pour le nettoyer et vider le corps réceptacle (h4).
Conseils :
• Vous pouvez réaliser des jus tels que : carottes, tomates, pommes, raisins, framboises,…
• Pelez les fruits à peau épaisse, retirez les noyaux, ôtez la partie centrale des ananas.
• Il est impossible d’extraire le jus de certains fruits et légumes : bananes, avocats, mûres, etc…
12
MO_8080012363-01-Middle East_IM_FR_EN_TR_AR_FA_V8.indd 12 22/02/2013 6:11 PM
Page 13

• Vous pouvez préparer des jus avec différents fruits et légumes sans nettoyer à chaque fois la centrifugeuse, les
saveurs ne se mélangent pas, il suft juste de passer un peu d’eau dans la centrifugeuse en la faisant fonctionner
pour la rincer entre chaque jus différent.
• Consommez rapidement les jus après leur préparation, et ajoutez du jus de citron pour les conserver quelques heures
au frais.
6 - MISE A LONGUEUR DU CORDON
Pour une utilisation plus confortable ou pour le rangement, vous pouvez réduire la longueur du cordon
en le poussant à l’intérieur du bloc moteur (a) par l’ouverture située à l’arrière (a7).
7 - HACHER TRÈS FINEMENT DES PETITES QUANTITÉS (SELON MODÈLE)
ACCESSOIRE UTILISE :
- Broyeur assemblé.
Vous pouvez avec le broyeur :
- Hacher en quelques secondes en pulse: gues sèches, abricots secs…
Quantité / temps maxi : 100g / 5 s
Ce broyeur n’est pas prévu pour des produits durs comme le café.
NETTOYAGE
• Débranchez l’appareil.
• Ne plongez pas le bloc moteur (a) ni l’adaptateur (e) dans l’eau ou sous l’eau courante. Essuyez-les avec un chiffon
sec ou à peine humide.
• Pour un nettoyage plus facile, rincez rapidement les accessoires après leur utilisation. Démontez complètement
l’accessoire tête hachoir. Manipulez toutes les lames avec précautions, elles peuvent vous blesser.
• Lavez, rincez et essuyez les accessoires : ils passent au lave-vaisselle à l’exception de l’ensemble des composants
métalliques de la tête hachoir : corps (f1), vis (f2), couteau (f3), grilles (f4 et f5), écrou (f6).
• Les grilles (f4) et (f5) ainsi que le couteau (f3) doivent rester gras. Enduisez-les d’huile alimentaire an de les
préserver.
Astuces :
• En cas de coloration de vos accessoires par les aliments (carottes, oranges, …) frottez-les avec un chiffon imbibé
d’huile alimentaire puis procédez au nettoyage habituel.
• Bol mixeur (d) : versez de l’eau chaude additionnée de quelques gouttes de savon liquide dans le bol mixeur. Fermez
le couvercle. Mettez-le en place sur l’appareil et donnez quelques impulsions. Une fois enlevé, rincez le bol à l’eau
courante et laissez sécher (bol renversé).
FR
RANGEMENT
Ne rangez pas votre appareil dans un environnement humide.
SI VOTRE APPAREIL NE FONCTIONNE PAS, QUE FAIRE ?
Si votre appareil ne fonctionne pas, vériez :
- Le branchement de votre appareil.
- Le verrouillage de chaque accessoire.
- La présence et le verrouillage de la trappe de sécurité (a5) lorsque la sortie rapide (a4) n’est pas utilisée.
- Le verrouillage horizontal de la tête multifonctions (a3).
Votre appareil de cuisine est équipé d’un micro processeur qui contrôle et analyse la puissance en fonctionnement.
En cas de charge trop importante, votre appareil s’arrêtera tout seul. Pour redémarrer votre appareil, ramenez votre
bouton rotatif (a1) sur la position «0» et retirez une partie de vos ingrédients. Laissez votre appareil reposer quelques
minutes. Vous pouvez alors sélectionner la vitesse souhaitée pour terminer votre préparation.
Votre appareil ne fonctionne toujours pas ? Adressez-vous à un centre agréé (voir liste dans le livret service).
13
MO_8080012363-01-Middle East_IM_FR_EN_TR_AR_FA_V8.indd 13 22/02/2013 6:11 PM
Page 14
FR
ELIMINATION DES MATERIAUX D’EMBALLAGE ET DE L’APPAREIL
L’emballage comprend exclusivement des matériaux sans danger pour l’environnement, pouvant être jetés
conformément aux dispositions de recyclage en vigueur.
Pour la mise au rebut de l’appareil, se renseigner auprès du service approprié de votre commune.
PRODUITS ELECTRONIQUES OU ELECTRIQUES EN FIN DE VIE
Participons à la protection de l’environnement !
Votre appareil contient de nombreux matériaux valorisables ou recyclables.
Conez celui-ci dans un point de collecte pour que son traitement soit effectué.
ACCESSOIRES
Vous pouvez personnaliser votre appareil et vous procurer auprès de votre revendeur habituel ou d’un centre service
agréé les accessoires suivants :
Bol inox
Couvercle de bol inox
Pétrin
Malaxeur
Fouet multibrins
Bol mixeur
Centrifugeuse
Broyeur
Attention : aucun accessoire ne pourra vous être vendu sans présentation de votre notice d’utilisation ou de
votre appareil.
Thank you for choosing an appliance from the MOULINEX range, which is intended exclusively for the preparation of
EN
food and is only for indoor, domestic use.
Adaptateur
Coupe légumes :
- A : trancher
- C : râper gros
- D : râper n
- E : reibekuchen
Kit pâtes fraîches
Accessoire à coulis
Laminoir à pâtes
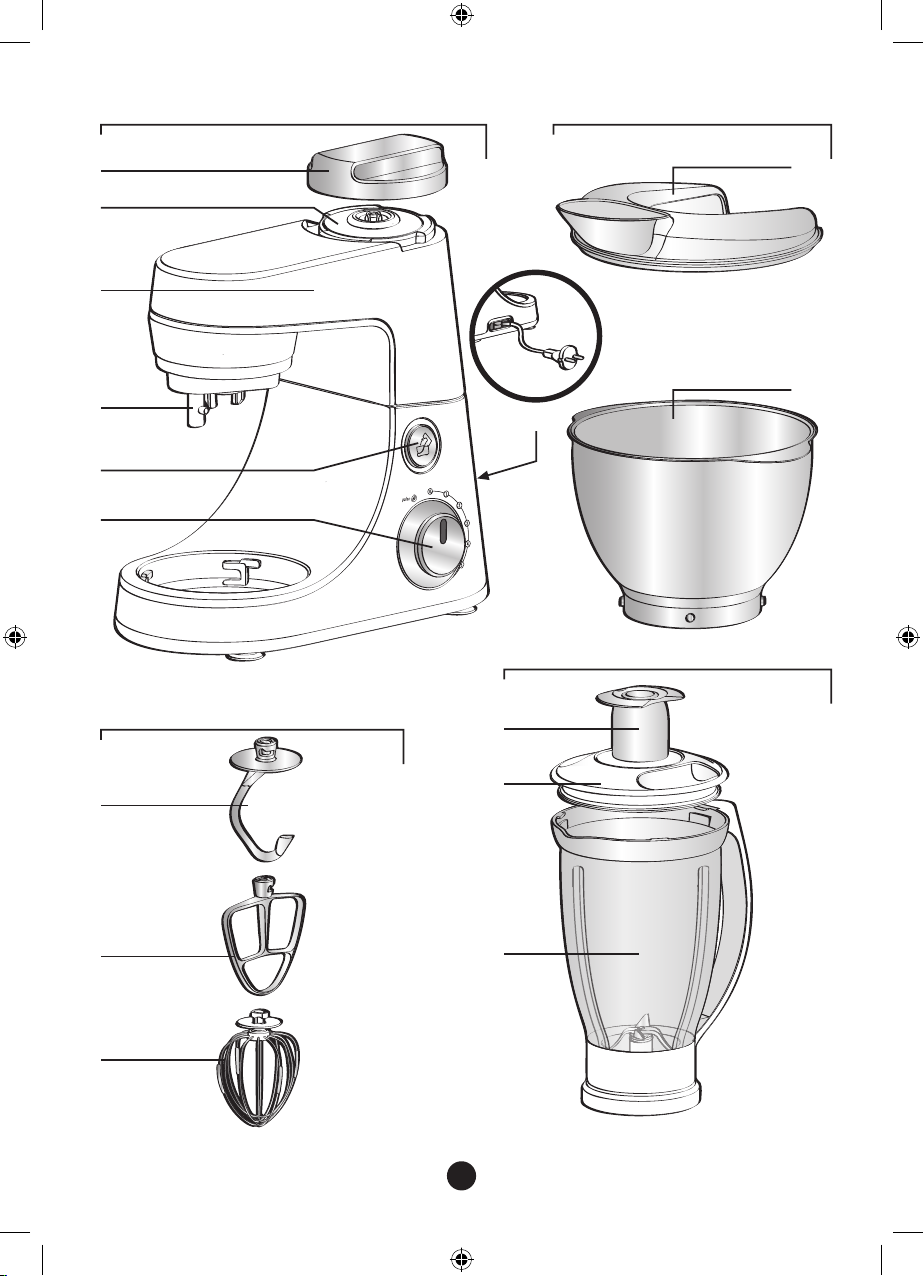
DESCRIPTION
a - Motor unit
a1 Electronic speed selector
a2 Multi-function head (a3) release button
a3 Multi-function head
a4 High speed outlet
(blender jug / juice / extractor / grinder)
a5 Safety cover
a6 Mixer accessories outlet
(kneader, balloon whisk, mixer)
a7 Power cord storage
b - Bowl assembly
b1 Stanless steel bowl
b2 Lid
c - Mixer accessories
c1 Kneader
c2 Mixer
c3 Balloon whisk
d - Blender jug (depending on model)
d1 Jug
d2 Lid
d3 Measuring cup
e - Attachment holder (depending on model)
MO_8080012363-01-Middle East_IM_FR_EN_TR_AR_FA_V8.indd 14 22/02/2013 6:11 PM
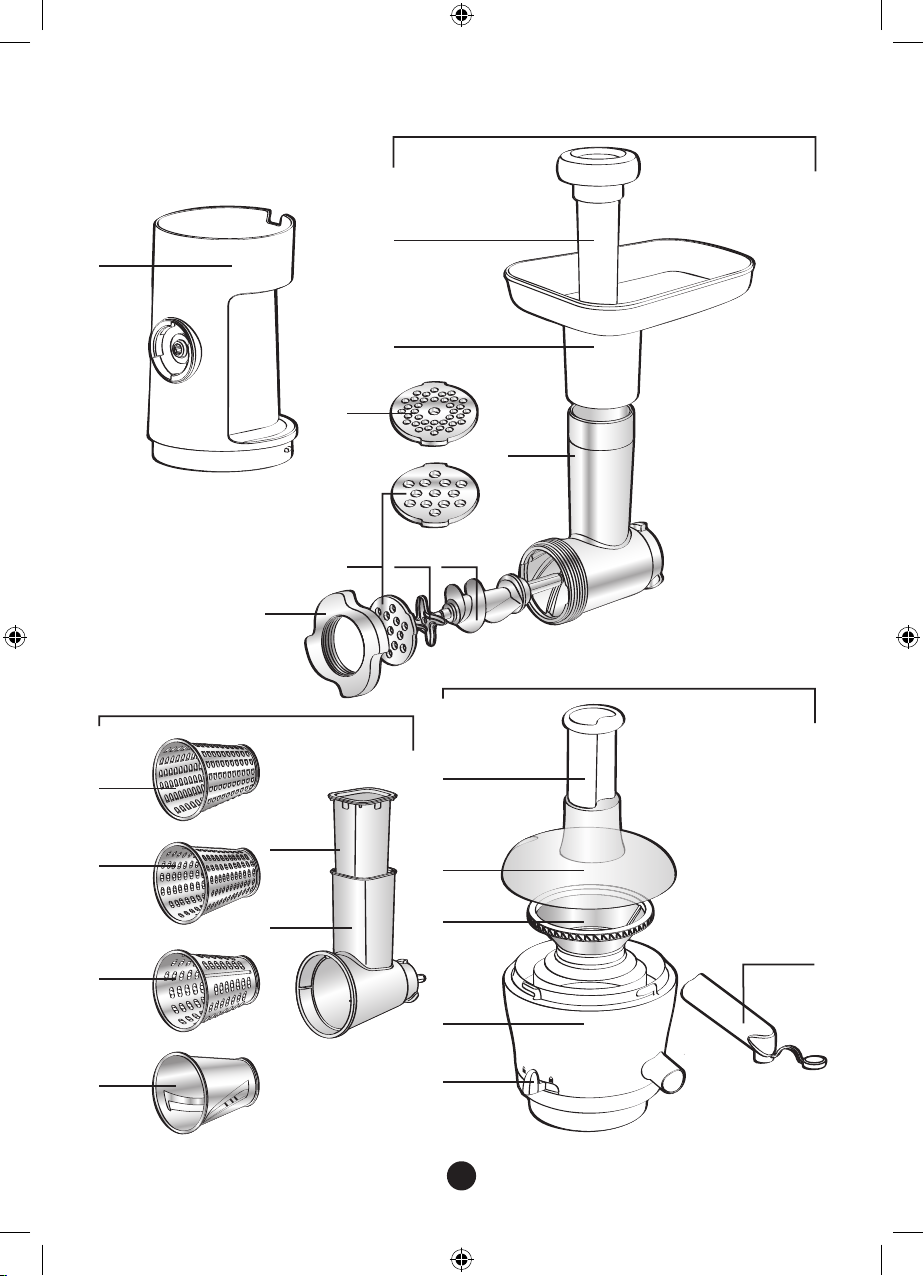
f - Mincer head (depending on model)
f1 Metal body
f2 Feed screw
f3 Blade
f4 Large-hole screen
f5 Small-hole screen
f6 Nut
f7 Pusher
f8 Tray
g - Vegtable slicer (depending on model)
g1 Drum body
g2 Pusher
g3 Slicer drum A
g4 Coarse grater drum C
g5 Fine grater drum D
g6 Reibekuchen drum E
h - Juice extractor (depending on model)
h1 Pusher
h2 Lid
h3 Rotary lter
h4 Juice collector
h5 Pouring spout
h6 Locking lever
14
Page 15

SAFETY INSTRUCTIONS
• Read the instructions for use carefully before using your appliance for the rst time: the manufacture shall accept no
liability in the event of any use that does not comply with the instructions.
• This appliance is not designed to be used by persons (including children) with reduced physical, sensorial or mental
capacities, or by people with no prior knowledge or experience, except where they have beneted from supervision
or previous instructions relating to the use of the appliance, from a person responsible for their safety. Children must
be supervised to ensure that they do not play with the appliance.
• Check that the power rating of your appliance corresponds to your electrical supply. Any connection fault
invalidates the warranty.
• Your appliance is intended only for domestic culinary use, in an indoor setting and under supervision.
• Always unplug the appliance as soon as you have nished using it and when you are cleaning it.
• Do not use the appliance if it is not working properly or if it has been damaged. Contact an authorised service centre
(see list in the service booklet).
• Any maintenance other than routine cleaning and upkeep by customers must be carried out by an approved service
centre (see list in the service booklet).
• Do not place the appliance, the supply cable or the plug in water or any other liquid.
• The power cord must be kept out of the reach of children and must not be placed near or come into contact with the
hot parts of the appliance, sources of heat or sharp corners.
• If the power cable or the plug are damaged, do not use the appliance. To maintain safety, these parts must be
replaced by an approved service centre (see list in the service booklet).
• Do not place the accessories in a microwave oven.
• For your own safety, use only accessories and spare parts designed for your appliance and sold in an approved
service centre.
• Always remove the blender (d) or the juice extractor (h) before pressing the multi-function head (a3) release button (a2).
• Always use the pusher (f7) with the mincer head accessory (f), to guide food in the feed tube. Never use your
ngers, a fork, a spoon, a knife or any other object.
• Never touch any moving parts. Wait for the appliance to come to a complete stop before removing accessories.
• Handle the sharp blades (d, f, g) carefully when emptying the bowls and when cleaning: they are extremely sharp.
• Do not touch the whisks or the kneader when the appliance is running.
• Do not allow long hair, scarves, ties etc. to dangle over the appliance during operation.
• Never insert utensils (spoon, spatula, etc.) through the feed tube in the lids (b2), (d2) or (h2) in the drum body (g1).
• Do not run the blender jug (d1) without its lid (d2).
• Use only one accessory at a time.
• Do not use the bowls (b1, d1) as containers for freezing, cooking or sterilisation.
• Do not use the juice extractor if the rotary lter (h3) is damaged.
• Switch off the appliance and unplug from the mains supply before changing accessories or handling any parts that
move during use.
EN
BEFORE FIRST USE
• Before using for the rst time, wash all accessory parts in soapy water (except for the attachment (e): see §
Cleaning) Rinse and dry.
• Place the appliance on a at, clean and dry surface. Make sure that the selector button (a1) is in “0” position and
plug in your appliance.
• You have several options for starting your appliance:
- Intermittent operation (pulse): Turn the selector button (a1) to the “pulse” position. Using a succession of
pulses can give you better control when preparing certain foods.
- Continuous operation: Turn the selector button (a1) to the desired position from “1” to “max” depending on the
food you are preparing.
You can change it as required during preparation.
• To stop the appliance, turn the button (a1) to “0”.
Important: The appliance will start only if the cover (a5) and the head (a3) are locked. The appliance will stop
immediately if you unlock the cover (a5) and/or the head (a3) during operation. Lock the cover and/or the
head, turn the control button (a1) to the “0” position, and then start the appliance normally by selecting the
desired speed.
Your appliance comes with a microprocessor that controls and analyses the operating power. If the load becomes
too high, your appliance will stop automatically. To restart your appliance, turn the rotary button (a1) to the “0”
position and remove some of your ingredients. Allow your appliance to cool down for a few minutes. You can then
select the desired speed to complete your preparation.
15
MO_8080012363-01-Middle East_IM_FR_EN_TR_AR_FA_V8.indd 15 22/02/2013 6:11 PM
Page 16

EN
The paragraph numbering corresponds to the numbers in the diagrams.
1 - MIXING / KNEADING / BEATING / EMULSIFYING / WHISKING
You can prepare up to 1,8 kg of dough using the stainless steel bowl (b1) and its lid (b2) depending on the food.
ACCESSORIES USED:
- Stainless steel bowl (b1).
- Lid (b2)
- Kneader (c1) or mixer (c2) or balloon whisk (c3)
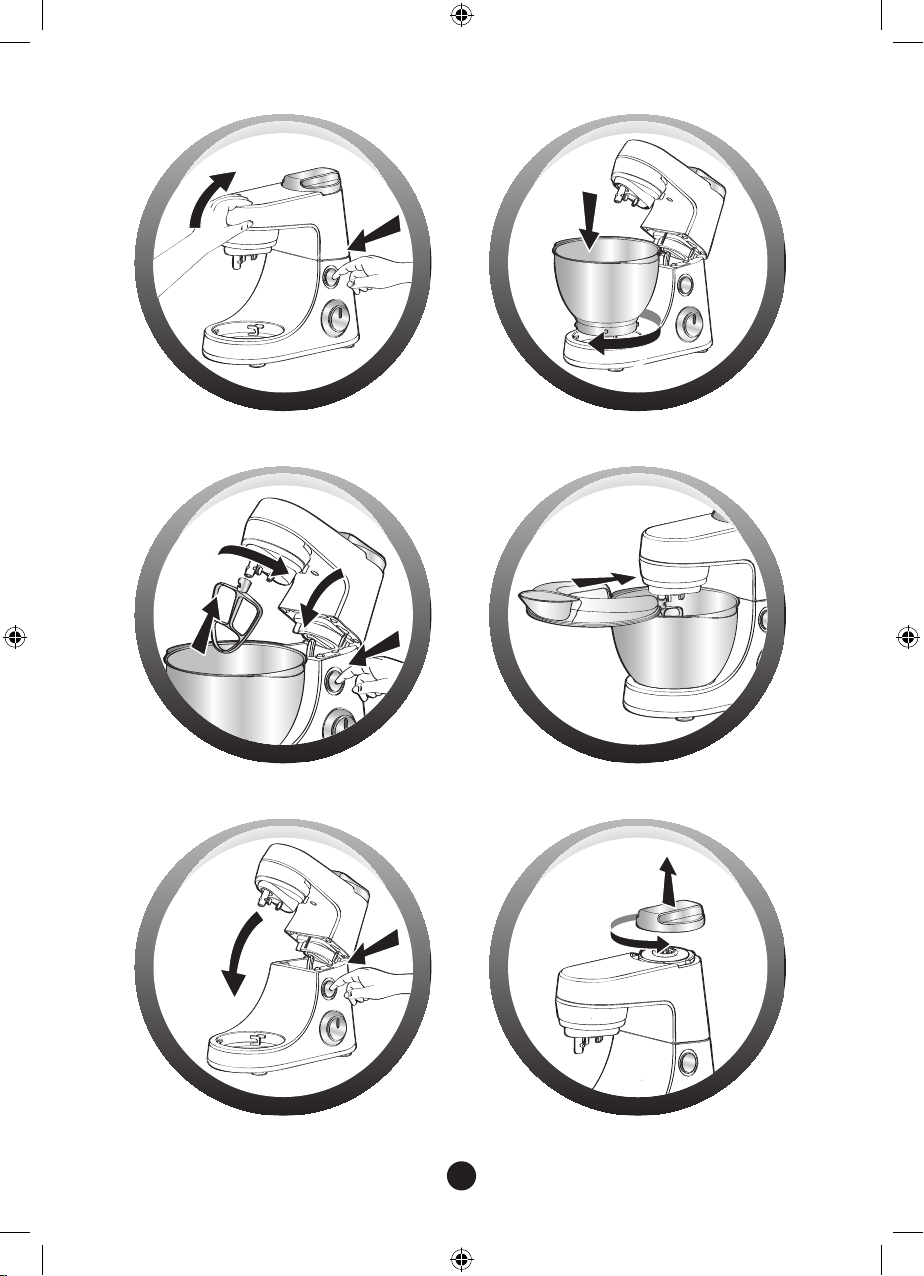
1.1 - ASSEMBLING THE ACCESSORIES
• Press the button (a2) to release the multi-function head (a3) and raise it until it locks in place.
• Lock the stainless steel bowl (b1) (clockwise) on the appliance and put in the ingredients.
• Insert the desired accessory (c1, c2 or c3) on the outlet (a6), push and rotate it anti-clockwise a quarter turn to
lock the accessory in its housing.
• Place the multi-function head (a3) to the horizontal position: press the button (a2) and manually lower the multifunction head (a3) until it locks (the button (a2) returns to its initial position).
• Slide the lid (b2) over the stainless steel bowl (b1).
Note: It is not essential to use the lid but it prevents splashing.
• Make sure that the cover (a5) is locked correctly (clockwise) on the high-speed outlet (a4).
1.2 - USAGE
Start by turning the selector button (a1) to the desired position according to the recipe.
• The appliance starts running immediately.
You can add food through the hole in the lid (b2) during preparation.
• To stop the appliance, turn the button (a1) to “0”.
Tips:
- Kneading
- Use the kneader accessory (c1) at speed “1”.
You can knead up to 500 g of our (e.g. white bread, grain bread, short crust pastry, etc.).
- Mixing
- Use the mixer (c2) at speed “1” to “max”.
You can mix up to 1,8 kg of light dough (light cake mixture, sponge cake, biscuit or cookie dough).
- Never use the mixer (c2) to knead heavy dough.
- Beating / emulsifying / whisking
- Use the balloon whisk (c3) at speed “1” to “max”.
- You can prepare: mayonnaise, aioli, sauces, whisked egg whites (up to 8 egg whites), whipped cream
(up to 500 ml), meringues etc.
- Never use the balloon whisk (c3) to knead heavy dough or mix light dough.
1.3 - DISMANTLING THE ACCESSORIES
• Wait for the appliance to come to a complete stop.
• Remove the lid (b2).
• Using the button (a2), release the multi-function head (a3) and raise it to the upper position.
• Release the accessory (c1), (c2) or (c3) from the multi-function head by pushing the accessory into the head and
rotating it clockwise a quarter turn.
• Remove the stainless steel bowl.
2 - BLENDING/MIXING (DEPENDING ON MODEL)
Depending on the nature of the food, you can use the blender (d) to prepare up to 1.5 L of thick mixtures
and 1.25 L of liquid mixtures.
ACCESSORIES USED :
- Blender jug (d)
2.1 - ASSEMBLING THE ACCESSORIES
16
MO_8080012363-01-Middle East_IM_FR_EN_TR_AR_FA_V8.indd 16 22/02/2013 6:11 PM
Page 17

• Place the multi-function head (a3) in the horizontal position: press the button (a2) and manually lower the multifunction head (a3) until it locks (the button (a2) returns to its initial position).
• Unlock the safety cover (a5) from the high-speed outlet (a4) by rotating it anti-clockwise and then remove it.
• Make sure that the appliance is switched off before locking the blender (d).
• Lock the blender jug (d) on the outlet (a4) by rotating it clockwise.
• Place the food in the blender jug, and lock the lid (d2) tted with the measuring cap (d3), by rotating it anticlockwise.
2.2 - USAGE
• Start by turning the selector button (a1) to the desired position according to the recipe.
Use the “Pulse” position for better mixing control and for a better blending of your preparation.
You can add food through the hole in the measuring cap (d3) during preparation.
• To stop the appliance, turn the button (a1) to “0”.
Tips :
You can prepare:
- nely blended soups, cream soups, stewed fruit, milkshakes and cocktails.
- liquid batter (pancake, fritters, Yorkshire pudding, wafes, clafoutis and custard ans).
If ingredients stick to the sides of the bowl when mixing, stop the appliance. Remove the blender, and push the food
down onto the blades and put your blender back to continue your preparation.
• Never ll the blender jug with boiling liquid. Only use liquids or foods at simmering temperatures or below.
• Never run the blender jug empty.
• Always use the blender jug with its lid.
• Never remove the lid before the blades have stopped completely.
• Always pour liquid ingredients into the blender jug rst before adding solid ingredients.
2.3 - DISMANTLING THE ACCESSORY
• Wait for the appliance to come to a complete stop before removing the blender by unlocking it in the anti-clockwise
direction and put back the cover (a5) by locking it on the outlet (a4) (clockwise).
3 - MINCING (DEPENDING ON MODEL)
ACCESSORIES USED :
- Attachment holder (e)
- Assembled mincer head (f)
3.1 - FITTING THE MINCER ATTACHMENT
• Press the button (a2) to release the multi-function head (a3) and raise it until it locks in place.
• Place the attachment (e) and lock it in the anti-clockwise direction such that the outlet is in alignment with the appliance.
• Place the multi-function head (a3) in the horizontal position by pressing the button (a2) once again.
3.2 - ASSEMBLING THE MINCER HEAD
• Hold the body (f1) by the feed tube, with the wider opening uppermost.
• Insert the feed screw (f2) (long shaft rst) into the body (f1).
• Fit the blade (f3) onto the short shaft protruding from the feed screw (f2) with the cutting edges facing outwards.
• Fit the chosen screen (f4 or f5) on the blade (f3), aligning the two lugs with the two notches in the body (f1).
• Screw the nut (f6) home on the body (f1) in the clockwise direction, without locking it.
• Check the assembly. The shaft should have no play, neither should it be able to turn on its own. Otherwise, repeat
the assembly procedure.
3.3 - FITTING THE MINCER HEAD ON THE APPLIANCE
• Facing the attachment outlet (e), insert the assembled mincer head (f) inclined to the right, aligning the two
bayonets in the mincer head with the two notches in the attachment. Push the mincer head home into the
attachment and turn the mincer head anti-clockwise until it latches with the feed tube in the vertical position.
• Place the removable tray (f8) on the feed tube.
3.4 - USAGE, TIPS AND DISMANTLING
• Make sure that the safety cover (a5) is locked correctly (clockwise) on the high-speed outlet (a4).
• Place a container to collect the preparation in front of the appliance.
• Run the appliance by turning the selector (a1) to speed “3” or “4”.
EN
17
MO_8080012363-01-Middle East_IM_FR_EN_TR_AR_FA_V8.indd 17 22/02/2013 6:11 PM
Page 18

EN
• Push the meat, piece by piece, down the feed tube, using the pusher (f7). Never push the ingredients down the
feed tube with your fingers or any other utensil.
• To stop the appliance, turn the selector to “0” speed and wait for the appliance to come to a complete stop.
• Unlock the mincer head in the reverse order of the assembly.
Tips :
- Prepare all of the foodstuffs to be minced (for meat, remove the bones, gristle and tendons and cut it into pieces of
approximately 2 x 2 cm).
- Make sure that frozen meat is thoroughly thawed.
- At the end of the operation, you can feed a few small pieces of bread into the feed tube to clear any meat remaining
in the machine.
4 - GRATING / SLICING (DEPENDING ON MODEL)
ACCESSORIES USED :
- Attachment holder (e)
- Assembled vegetable slicer (g)
- Drums (depending on model)
4.1 - ASSEMBLING THE ACCESSORIES
• Press the button (a2) to release the multi-function head (a3) and raise it until it locks in place.
• Place the attachment (e) and lock it in the anti-clockwise direction such that the outlet is in alignment with the
appliance.
• Place the multi-function head (a3) in the horizontal position by pressing the button (a2) once again.
• Make sure that the safety cover (a5) is locked correctly (clockwise) on the high-speed outlet (a4).
• Facing the attachment (e) outlet, insert the drum body (g1) inclined to the right, aligning the two bayonets in
the drum body with the two notches in the attachment. Push the drum body home and turn the drum body anticlockwise until it latches with the feed tube in the vertical position.
• Insert the chosen drum into the body, and make sure that it is fully engaged in the body.
4.2 - USAGE AND TIPS
• Place a container to collect the preparation in front of the appliance.
• Run the appliance by turning the selector (a1) to speed “3” to slice and to speed “4” to grate.
• Place the food in the feed tube on the body and press down with the pusher (g2). Never push the ingredients with
your fingers or any other utensil.
• To stop the appliance, turn the selector to “0” speed and wait for the appliance to come to a complete stop.
• Unlock the drum body in the reverse order of the assembly.
• Use the drums to :
- Grate coarsely C (g4) / grate nely D (g5): carrots, celery, potatoes, cheese, etc.
- Slice thickly A (g3): potatoes, carrots, cucumbers, apples, beetroot, etc.
- Reibekuchen E (g6): potatoes, parmesan, etc.
5 - EXTRACTING JUICE FROM FRUITS AND VEGETABLES (DEPENDING ON MODEL)
ACCESSORIES USED :
- Assembled juice extractor (h).
5.1 - ASSEMBLING THE JUICE EXTRACTOR
• Place the lter (h3) in the middle of the juice collector (h4).
• Lock the lid: turn it anti-clockwise and lock the lid (h2) on the juice collector (h4) (closed padlock position).
• General locking: push the locking lever (h6) to closed padlock position.
5.2 - FITTING THE JUICE EXTRACTOR ON THE APPLIANCE
• Place the multi-function head (a3) in the horizontal position: press the button (a2) and manually lower the multifunction head (a3) until it locks (the button (a2) returns to its initial position).
• Unlock and remove the cover (a5) from the outlet (a4) by turning it anti-clockwise.
• Make sure that the appliance is switched off before locking the juice extractor (h).
• Lock the assembled juice extractor on the outlet (a4) by turning it clockwise, so as to have the outlet for the
pouring spout aligned with the appliance.
• Fit the pouring spout (h5) on the collector (h4).
18
MO_8080012363-01-Middle East_IM_FR_EN_TR_AR_FA_V8.indd 18 22/02/2013 6:11 PM
Page 19

5.3 - USAGE AND TIPS
• Place a large glass under the pouring spout (h5).
• Run the appliance by turning the selector (a1) to speed “3”.
• Cut the fruits and/or vegetables into pieces.
• Insert them down the feed tube in the lid (h2) push them slowly using the pusher (h1). Never push the ingredients
with your fingers or any other utensil.
• Do not process 500 g of food more than 5 times continuously, without allowing your appliance to cool down
completely.
• For best results, clean the lter after every 300 g of ingredients.
• Important: When the pulp collector is full, stop the appliance and empty the collector.
• To stop the appliance, turn the selector to “0” speed and wait for the appliance to come to a complete stop.
• Wait until the rotary filter comes to a complete stop before removing the assembly from the appliance.
• To remove the juice extractor, unlock it by turning it anti-clockwise.
• Place the locking lever (h6) in the open padlock position. Open the lid (open padlock position). You can then
remove the lter (h3) to clean it and empty the collector (h4).
Tips :
• You can make juice from: carrots, tomatoes, apples, grapes, raspberries, etc.
• Peel fruits with thick skins; remove stones and the core of pineapples.
• It is not possible to extract juice from certain fruits and vegetables: bananas, avocado pears, blackberries, etc.
• You can prepare juices with different fruits and vegetables without having to clean the juice extractor every time,
the avours will not be mixed. Just run the extractor with a little water to rinse it between two different juices.
• Drink the juices immediately after preparation, and add lemon juice to keep them in the fridge for a few hours.
6 - ADJUSTING THE CORD LENGTH
For more comfortable use or for storage, you can reduce the cord length by pushing it inside the motor unit (a) via the
opening on the rear (a7).
7 - FINELY CHOPPING SMALL QUANTITIES (DEPENDING MODEL)
ACCESSORY USED :
- Assembled grinder.
You can use the grinder to :
- Chop in a few seconds by pulsing: dried gs, dried apricots, etc.
Quantity / max time: 100g / 5s
This grinder is not designed for hard products like coffee beans or hard spices.
EN
CLEANING
• Unplug the appliance.
• Do not immerse the motor unit (a) or the attachment (e) in water or under running water. Wipe them with a dry or
slightly damp cloth.
• For easier cleaning, rinse the accessories quickly after use. Dismantle the mincer head assembly fully. Handle the
blades with care to prevent injury.
• Wash, rinse and dry the accessories: they are dishwasher-safe, except for all the metal components in the mincer
head: body (f1), feed screw (f2), blade (f3), screens (f4 and f5), nut (f6).
• The screens (f4) and (f5) as well as the blade (f3) must remain greased. Coat them with cooking oil.
Tips :
• In the event any of your accessories are coloured by food (carrots, oranges, etc.), rub with a cloth soaked in cooking
oil and then clean them as usual.
• Blender jug (d): pour some hot water containing a few drops of washing up liquid into the blender. Close the lid.
Place it on the appliance and pulse a few times. After removing it, rinse the bowl in running water and allow to dry
(bowl upside down).
19
MO_8080012363-01-Middle East_IM_FR_EN_TR_AR_FA_V8.indd 19 22/02/2013 6:11 PM
Page 20

EN
STORAGE
Do not store your appliance in a humid environment.
WHAT TO DO IF YOUR APPLIANCE DOES NOT WORK
If your appliance does not work, check:
- that it is plugged in correctly.
- that the accessories are correctly locked.
- that the safety cover (a5) is present and locked when the high-speed outlet (a4) is not used.
- that the multi-function head (a3) is locked horizontally.
Your appliance comes with a microprocessor that controls and analyses the operating power. If the load becomes too
high, your appliance will stop automatically. To restart your appliance, turn the rotary button (a1) to the “0” position
and remove some of your ingredients. Allow your appliance to cool down for a few minutes. You can then select the
desired speed to complete your preparation.
Your appliance still does not work? Contact an authorised service centre (see the list in the service booklet).
DISPOSAL OF PACKAGING AND THE APPLIANCE
The packaging is comprised exclusively of materials that present no danger for the environment and
which may therefore be disposed of in accordance with the recycling measures in force in your area.
For disposing of the appliance itself, please contact the appropriate service of your local authority.
END-OF-LIFE ELECTRICAL OR ELECTRONIC PRODUCTS
Think of the environment!
Your appliance contains valuable materials which can be recovered or recycled.
Leave it at a local civic waste collection point.
ACCESSORIES
You can customise your appliance and obtain the following accessories from your usual retailer or an authorised
service centre:
Stainless steel bowl
Stainless steel bowl lid
Kneader
Mixer
Balloon whisk
Blender jug
Juice extractor
Grinder
Attachment holder
Caution: you can purchase an accessory only when you present your instruction leaflet or your appliance.
Mincer head
Vegetable slicer:
- A: Slicer
- C: Coarse grating
- D: ne grating
- E: reibekuchen
Pasta shaping kit
Coulis attachment
Pasta rolling mill
20
MO_8080012363-01-Middle East_IM_FR_EN_TR_AR_FA_V8.indd 20 22/02/2013 6:11 PM
Page 21

MOULINEX ürünlerinden birini seçtiğiniz için teşekkür ederiz cihazınız yalnızca evde kullanılmak ve yiyecek
hazırlamak üzere tasarlanmıştır.
AÇIKLAMA
TR
a - Motor ünitesi
a1 Elektronik hız seçici
a2 Çok fonksiyonlu başlığı (a3) çıkarma düğmesi
a3 Çok fonksiyonlu başlık
a4 Yüksek hız çıkışı (mikser haznesi / katı meyve
sıkacağı / öğütücü)
a5 Güvenlik kapağı
a6 Mikser aksesuarları çıkışı (yoğurucu, balon
çırpıcı, karıştırıcı uçlar)
a7 Güç kordonu saklama bölümü
b - Hazne grubu
b1 Paslanmaz çelik hazne
b2 Kapak
c - Mikser aksesuarları
c1 Yoğurucu
c2 Mikser
c3 Balon çırpıcı
d - Blender haznesi (modele göre değişir)
d1 Hazne
d2 Kapak
d3 Ölçme kabı
e - Aksesuar tutucu (modele gore)
f - Kıyma başlığı (modele göre değişir)
f1 Metal gövde
f2 Besleme vidası
f3 Bıçak
f4 Büyük delikli kıyma diski
f5 Küçük delikli kıyma diski
f6 Somun
f7 İtici
f8 Tepsi
g - Sebze dilimleyici (modele göre değişir)
g1 Silindir gövde
g2 İtici
g3 Dilimleme silindiri A
g4 Kalın rendeleme silindiri C
g5 İnce rendeleme silindiri D
g6 Reibekuchen (patates rendeleme) silindiri E
h - Katı meyve sıkacağı (modele göre değişir)
h1 İtici
h2 Kapak
h3 Döner ltre
h4 Meyve suyu haznesi
h5 hazne ağzı
h6 kilit kolu
GÜVENLİK ÖNERİLERİ
• Bu cihazı ilk kez kullanıyorsanız önce kullanma talimatlarını dikkatle okuyun: cihazın talimatlara uyulmadan
kullanılması durumunda üretici sorumluluk kabul etmez.
• Cihaz bedensel, duyusal veya zihinsel engeli olan kişiler (ve çocuklar) tarafından ya da daha önce cihaz hakkında
bilgisi veya deneyimi olmayan kişiler tarafından kullanılmak üzere de tasarlanmamıştır. Kişinin güvenliğinden
sorumlu birinin gözetimi altında veya cihazın kullanımına ilişkin talimatlar sağlandıktan sonra kullanılabilir. Cihazla
oynamadıklarından emin olmak için, çocukların gözetim altında tutulması tavsiye edilir.
• Cihazın çalışma voltajının elektrik tesisatınıza uygun olduğundan emin olun. Hatalı elektrik bağlantısından
kaynaklanan tüm arızalar garanti kapsamı dışındadır.
• Cihazınız yalnızca evde, mutfakta ve iç mekanda gözetim altında kullanılmak üzere tasarlanmıştır.
• Cihazı kullandıktan hemen sonra ve temizlerken prizden çekin.
• Düzgün çalışmıyorsa veya hasar görmüşse cihazı kullanmayın. Yetkili servis ile iletişim kurun (servis kitapçığındaki
listeye bakın).
• Müşteriler tarafından gerçekleştirilen rutin temizleme ve bakım dışındaki işlemler yetkili bir servis tarafından
yapılmalıdır (servis kitapçığındaki listeye bakın).
• Cihazı, kordonu veya şi suyla veya herhangi başka bir sıvıyla temas ettirmeyin.
• Güç kordonunun çocukların erişiminden, cihazın ısınan parçalarından, herhangi bir ısı kaynağından ve sivri
köşelerden uzak tutulması gerekir.
• Güç kablosu veya şi hasarlıysa cihazı kullanmayın. Güvenliği sağlamak için bu parçaların yetkili servis tarafından
değiştirilmesi gerekir (servis kitapçığındaki listeye bakın).
• Aksesuarları mikrodalga fırında kullanmayın.
• Güvenliğiniz için yalnızca cihazınıza uygun ve yetkili servis merkezinde satılan yedek parça ve aksesuarları kullanın.
• Çok fonksiyonlu başlığı (a3) çıkarma düğmesine (a2) basmadan önce blenderi (d) veya katı meyve sıkacağını (h)
her zaman çıkarın.
• Kıyma başlığı aksesuarıyla (f) besleme borusundaki yiyeceği yönlendirmek için daima iticiyi (f7) kullanın, asla
parmaklarınızı, çatal, kaşık, bıçak veya başka bir nesne kullanmayın.
• Cihazın hareket eden parçalarına asla dokunmayın aksesuarları çıkarmadan önce cihazın tamamen durmasını
bekleyin.
21
MO_8080012363-01-Middle East_IM_FR_EN_TR_AR_FA_V8.indd 21 22/02/2013 6:11 PM
Page 22

TR
• Hazneleri boşaltırken veya temizlik sırasında bıçakları (d, f, g) tutarken dikkatli olun: çok kesicidirler.
• Cihaz çalışırken çırpıcı veya yoğurucu uçlara dokunmayın.
• Çalışırken saç, eşarp, kravat veya herhangi başka bir şeyin blender ile temas etmesinden kaçının.
• Silindir gövdede (g1) bulunan (b2), (d2) veya (h2) kapaklarındaki besleme borusundan içeri hiçbir nesne (kaşık,
spatula, vs.) sokmayın.
• Blender haznesini (d1) kapaksız (d2) çalıştırmayın.
• Her seferde sadece bir aksesuar kullanın.
• Hazneleri (b1, d1) dondurma, pişirme veya sterilizasyon işlemlerinde kap olarak kullanmayın.
• Döner ltre (h3) hasar görmüşse katı meyve sıkacağını kullanmayın.
• Aksesuarları değiştirmeden veya kullanım sırasında hareket eden parçaları tutmadan önce cihazı kapatın ve
prizden çekin.
İLK KULLANIMDAN ÖNCE
• İlk kez kullanmadan önce tüm aksesuar parçalarını ılık ve sabunlu suyla yıkayın ((e) takma ünitesi dışında: bkz. §
Temizleme) Durulayın ve kurutun.
• Cihazınızı düz, temiz ve kuru bir yüzeye yerleştirin. Seçme düğmesinin (a1) "0" konumunda olduğundan emin olun
ve cihazınızı şe takın.
• Cihazınızı çalıştırmak için birçok seçeneğe sahipsiniz:
- Aralıklı çalıştırma (anlık çalıştırma): Seçme düğmesini (a1) "pulse" konumuna getirin. Bazı yiyecekleri
hazırlarken art arda anlık çalıştırma daha iyi bir kontrol sağlayabilir.
- Sürekli çalıştırma: Hazırladığınız yiyeceğe göre seçme düğmesini (a1) "1" konumundan "max" konumuna dek
istenilen bir pozisyona getirin.
Hazırlama sırasında istediğiniz gibi değiştirebilirsiniz.
• Cihazı durdurmak için düğmeyi (a1) "0" konumuna getirin.
Önemli: Kapağın (a5) ve başlığın (a3) kilitlenmesi koşuluyla cihaz çalışmaya başlar. Çalışırken kapağın (a5)
ve/veya başlığın (a3) kilidini açarsanız cihaz hemen duracaktır. Başlığı ve/veya kapağı kilitleyin, kontrol
düğmesini (a1) "0" konumuna getirin ve istediğiniz hızı seçerek cihazı normal olarak çalıştırın.
Mutfak cihazınız çalıştırma gücünü denetleyen ve analiz eden bir mikro işlemciye sahiptir. Yük çok artarsa,
cihazınız otomatik olarak durur. Cihazınızı tekrar başlatmak için döner düğmeyi (a1) "0" konumuna getirin ve
malzemelerin bir kısmını çıkarın. Birkaç dakika cihazınızın soğumasını bekleyin. Sonra yiyecek hazırlamaya devam
etmek için istenilen hızı seçebilirsiniz.
Paragraf numaraları şemalardaki numaralara karşılık gelir.
1 - KARIŞTIRMA / YOĞURMA / ÇIRPMA / AKICI HALE GETİRME
Yiyeceğin türüne uygun paslanmaz çelik hazneyi (b1) ve kapağını (b2) kullanarak 1,8 kg hamur hazırlayabilirsiniz.
KULLANILAN AKSESUARLAR:
- Paslanmaz çelik hazne (b1).
- Kapak (b2)
- Yoğurucu (c1), mikser (c2) veya balon çırpıcı (c3)
1.1 - AKSESUARLARIN MONTE EDİLMESİ
• Çok fonksiyonlu başlığı (a3) çıkarmak için düğmeye (a2) basın ve yerine kilitlenene kadar kaldırın.
• Paslanmaz çelik hazneyi (b1) çevirerek (saat yönünde) cihazın üzerine kilitleyin ve malzemeleri içine koyun.
• İstenilen aksesuarı (c1, c2 or c3) çıkışa (a6) takın, itin ve saat yönünün tersine çeyrek tur çevirerek aksesuarı yerine
kilitleyin.
• Çok fonksiyonlu başlığı (a3) yataykonumda yerleştirin: düğmeye (a2) basın ve manuel olarak çok fonksiyonlu
başlık (a3) yerine kilitleninceye kadar bastırın (düğme (a2) önceki durumuna döner).
• Kapağı (b2) paslanmaz çelik haznenin (b1) üzerinden kaydırın.
Not: Kapağı kullanmak zorunlu değildir. Sıçramayı önler.
• Yüksek hız çıkışındaki (a4) kapağın (a5) doğru bir şekilde kilitlendiğinden emin olun (saat yönünde).
1.2 - KULLANIM
Tarife göre seçme düğmesini (a1) istenilen konuma getirerek başlayın.
22
MO_8080012363-01-Middle East_IM_FR_EN_TR_AR_FA_V8.indd 22 22/02/2013 6:11 PM
Page 23

• Cihaz hemen çalışmaya başlar.
Hazırlama işlemi boyunca kapaktaki (b2) delikten yiyecek ekleyebilirsiniz.
• Cihazı durdurmak için düğmeyi (a1) "0" konumuna getirin.
İpuçları:
- Yoğurma
- Yoğurma aksesuarını (c1) "1" hızında kullanın.
500 gr unu yoğurabilirsiniz (örn. beyaz ekmek, tahıllı ekmek, tart hamuru, turta hamuru, vs.).
- Karıştırma
- Mikser aparatını (c2) "1" ile "max" konumu arasında kullanın.
En fazla 1,8 kg ağırlığında yumuşak hamur (kek, kurabiye, vs.) karıştırabilirsiniz.
- Sert hamur yoğurmak için asla mikser aparatını (c2) kullanmayın.
- Çırpma / akıcı hale getirme
- Balon çırpıcıyı (c3) "1" ile "max" konumu arasında kullanın.
- Şunları hazırlayabilirsiniz: mayonez, aioli, soslar, çırpılmış yumurta beyazı (en fazla 8 yumurta beyazı), kremşanti,
(en fazla 500 ml), vs.
- Balon çırpıcıyı (c3) asla sert hamur yoğurmak veya yumuşak hamur karıştırmak için kullanmayın.
1.3 - AKSESUARLARI SÖKME
• Cihazın tamamen durmasını bekleyin.
• Kapağı çıkarın (b2).
• Düğmeyi (a2) kullanarak çok fonksiyonlu başlığı (a3) çıkarın ve yukarıya kaldırın.
• (c1), (c2) veya (c3) aksesuarlarını başlığın içine itip saat yoÅNnünde çeyrek tur doÅNndürerek çok fonksiyonlu başlıktan çıkarın.
• Paslanmaz çelik hazneyi çıkarın.
2 - BLENDER/KARIŞTIRMA (MODELE GÖRE DEĞİŞİR)
Yiyeceğin yapısına göre 1,5 l. yoğun ve 1,25 l. akıcı karışım hazırlamak için blender (d) aparatını kullanabilirsiniz.
KULLANILAN AKSESUARLAR:
- Blender haznesi (d).
2.1 - AKSESUARLARIN MONTE EDİLMESİ
• Çok fonksiyonlu başlığı (a3) yataykonumda yerleştirin: düğmeye (a2) basın ve manuel olarak çok fonksiyonlu başlık
(a3) yerine kilitleninceye kadar bastırın (düğme (a2) önceki durumuna döner).
• Yüksek hız çıkışındaki (a4) güvenlik kapağının (a5) kilidini saat yönünün tersine çevirerek açın ve çıkarın.
• Blender (d) aparatını yerine kilitlemeden önce cihazın kapalı olduğundan emin olun.
• Blender haznesini (d) saat yönünde döndürerek çıkış (a4) üzerine kilitleyin.
• Yiyeceği blender haznesine koyun ve ölçekli kapağın (d3) takıldığı kapağı (d2) yerleştirip saat yönünün tersine
döndürerek kilitleyin.
2.2 - KULLANIM
• Tarife göre seçme düğmesini (a1) istenilen konuma getirerek başlayın.
Karışımı daha iyi kontrol edebilmek ve daha iyi karıştırmak için "Pulse" kademesini kullanın.
Hazırlık sırasında ölçekli kapaktaki (d3) delikten malzeme ekleyebilirsiniz.
• Cihazı durdurmak için düğmeyi (a1) "0" konumuna getirin.
İpuçları:
Şunları hazırlayabilirsiniz:
- blender'dan geçirilmiş çorbalar, veloutés (valut soslar), kompostolar, milkshake ve kokteyller.
- sıvı hamur (pancake, kızartma hamuru, clafoutis ve krem karameller).
- Karıştırma sırasında malzemeler haznenin kenarlarına yapışırsa cihazı durdurun. Blender haznesini çıkarın, yiyeceği
bıçaklara doğru itin, blender haznesini yerine takın ve hazırlık işlemine devam edin.
• Blender haznesini asla kaynar sıvıyla doldurmayın.
• Blender haznesini asla boşken çalıştırmayın.
• Bıçaklar tamamen durmadan asla kapağı açmayın.
• Katı malzemeleri eklemeden önce her zaman ilk olarak sıvı malzemeleri blender haznesine koyun.
2.3 - AKSESUARI SÖKME
• Blender haznesinin kilidini saat yönünün tersine döndürerek açmadan önce cihazın tamamen durmasını bekleyin
TR
23
MO_8080012363-01-Middle East_IM_FR_EN_TR_AR_FA_V8.indd 23 22/02/2013 6:11 PM
Page 24

TR
ve kapağı (a5) çıkışa (a4) kilitleyerek yerine takın (saat yönünde).
3 - KIYMA (MODELE GÖRE DEĞİŞİR)
KULLANILAN AKSESUARLAR:
- Aksesuar tutucu (e)
- Monte edilmiş kıyma başlığı (f)
3.1 - ADAPTÖRÜ TAKMA
• Çok fonksiyonlu başlığı (a3) çıkarmak için düğmeye (a2) basın ve yerine kilitlenene kadar kaldırın.
• Takma ünitesini (e) yerleştirin ve cihaz ile çıkış aynı hizaya gelecek şekilde saat yönünün tersine kilitleyin.
• Çok fonksiyonlu başlığı (a3) düğmeye (a2) bir kez daha basarak yatay konumda yerleştirin.
3.2 - ET KIYMA BAŞLIĞININ MONTE EDİLMESİ
• Gövdeyi (f1) besleme tüpünden, geniş ağız kısmı yukarı gelecek şekilde tutun.
• Besleme vidasını (f2) (uzun kısmı önce gelecek şekilde) gövdeye (f1) takın.
• Bıçağı (f3) besleme vidasının uzantısı olan kısa kola (f2) kesici kenarları dışarı gelecek şekilde takın.
• Seçilen diski (f4 veya f5) bıçağın üstüne (f3), iki kulbunu gövdedeki (f1) uygun girintilere hizalayarak takın.
• Somunu (f6) gövdedeki (f1) yerine saat yönünde kilitlemeden yerleştirin.
• Grubu kontrol edin. Mil kendi başına dönmemeli ve hareket etmemelidir. Aksi halde monte etme işlemini tekrarlayın.
3.3 - KIYMA BAŞLIĞININ CİHAZ ÜZERİNE YERLEŞTİRİLMESİ
• Takma ünitesi çıkışına (e) dönük, monte edilmiş kıyma başlığını(f) başlıktaki iki kesiciyle aparat üzerindeki girintileri
aynı hizaya getirerek sağa doğru eğimli olacak şekilde yerleştirin. Kıyma başlığını aparattaki yerine doğru itin ve
besleme borusuyla yatay konumda birbirlerini kavrayıncaya kadar başlığı saat yönünün tersine döndürün.
• Çıkarılabilir tepsiyi (f8) besleme borusuna yerleştirin.
3.4 - KULLANIM, İPUÇLARI VE SÖKME
• AYüksek hız çıkışındaki (a4) güvenlik kapağının (a5) doğru bir şekilde kilitlendiğinden emin olun (saat yönünde).
• Karışım için kullanacağınız kabı cihazın önüne yerleştirin.
• Seçicinin (a1) hızını "3" veya "4" kademesine getirerek cihazı çalıştırın.
• İticiyi (f7) kullanarak parçalara ayırdığınız eti besleme borusundan itin. Malzemeleri besleme borusundan
iterken asla parmaklarınızı veya herhangi başka bir nesne kullanmayın.
• Cihazı durdurmak için seçiciyi "0"konumuna getirin ve tamamen durmasını bekleyin.
• Kıyma başlığını birleştirirken takip ettiğiniz adımları, tersinden izleyerek kilidi açın.
İpuçları:
- Kıyılacak tüm yiyecekleri hazırlayın (etin kemiklerini, kıkırdaklarını ve sinirlerini ayırın ve yaklaşık 2 x 2 cm boyunda kesin).
- Etin tamamen çözüldüğünden emin olun.
- Uygulama sonunda makinenin içinde kalan kıyma parçalarını çıkarmak amacıyla birkaç dilim ekmeği makinede
çekebilirsiniz.
4 - RENDELEME/DİLİMLEME (MODELE GÖRE DEĞİŞİR)
KULLANILAN AKSESUARLAR:
- Aksesuar tutucu (e)
- Monte edilmiş sebze dilimleyici (g)
- Silindirler (modele göre değişir)
4.1 - AKSESUARLARIN MONTE EDİLMESİ
• Çok fonksiyonlu başlığı (a3) çıkarmak için düğmeye (a2) basın ve yerine kilitlenene kadar kaldırın.
• Takma ünitesini (e) yerleştirin ve cihaz ile çıkış aynı hizaya gelecek şekilde saat yönünün tersine kilitleyin.
• Çok fonksiyonlu başlığı (a3) düğmeye (a2) bir kez daha basarak yatay konumda yerleştirin.
• Yüksek hız çıkışındaki (a4) güvenlik kapağının (a5) doğru bir şekilde kilitlendiğinden emin olun (saat yönünde).
• Takma ünitesi (e) çıkışına dönük, silindir gövdeyi (gl), üzerindeki iki kesiciyle aparattaki girintiler aynı hizaya
gelecek şekilde yerleştirin. Silindir gövdeyi cihazdaki yerine itin ve besleme borusuyla yatay konumda birbirlerini
kavrayıncaya kadar gövdeyi saat yönünün tersine döndürün.
• Seçilen silindiri gövdeye takın ve tamamen kavrandığından emin olun.
4.2 - KULLANIM VE İPUÇLARI
24
MO_8080012363-01-Middle East_IM_FR_EN_TR_AR_FA_V8.indd 24 22/02/2013 6:11 PM
Page 25

• Karışım için kullanacağınız kabı cihazın önüne yerleştirin.
• Seçiciyi (a1) dilimlemek için "3" ve rendelemek için "4" konumuna getirerek cihazı çalıştırın.
• Gövdedeki besleme borusuna yiyeceği koyun ve iticiyle (g2) aşağı itin. Malzemeleri kesinlikle parmaklarınızı
veya başka bir aleti kullanarak itmeyin.
• Cihazı durdurmak için seçiciyi "0"konumuna getirin ve tamamen durmasını bekleyin.
• Silindir gövdeyi birleştirirken takip ettiğiniz adımları, tersinden izleyerek kilidi açın.
• Silindirleri şu işlemler için kullanabilirsiniz:
- Kalın rendeleme C (g4) / ince rendeleme D (g5): havuç, kereviz, patates, peynir, vs.
- Kalın dilimleme A (g3): patates, havuç, salatalık, elma, pancar, vs.
- ReibekuchenE (patates rendeleme) (g6): patates, parmesan, vs.
5 - MEYVE VE SEBZE SUYU SIKMA (MODELE GÖRE DEĞİŞİR)
KULLANILAN AKSESUARLAR:
- Monte edilmiş katı meyve sıkacağı (h).
5.1 - KATI MEYVE SIKACAĞINI MONTE ETME
• Filtreyi (h3) meyve suyu haznesinin (h4) ortasına yerleştirin.
• Kapağı kilitleyin: saat yönünün tersine döndürün ve kapağı (h2) meyve suyu haznesinin (h4) üzerine kilitleyin (kapalı kilit
konumu).
• Genel kilitleme: kilit kolunu (h6) kilit konumu kapalıya gelecek şekilde itin.
5.2 - KATI MEYVE SIKACAĞININ CIHAZA MONTE EDİLMESİ
• Çok fonksiyonlu başlığı (a3) yataykonumda yerleştirin: düğmeye (a2) basın ve manuel olarak çok fonksiyonlu başlık
(a3) yerine kilitleninceye kadar bastırın (düğme (a2) önceki durumuna döner).
• Kilidi açın ve saatin tersi yönünde döndürerek kapağı (a5) çıkıştan (a4) çıkarın.
• Katı meyve sıkacağını (h) yerine kilitlemeden önce cihazın kapalı olduğundan emin olun.
• Monte edilen katı meyve sıkacağını saat yönünde döndürerek çıkış (a4) üzerine kilitleyin, böylece hazne ağzı ve
cihaz aynı hizaya gelir.
• Hazne ağzını (h5) hazneye (h4) takın.
5.3 - Kullanım ve ipuçları
• Hazne ağzının (h5) altına büyük bir bardak yerleştirin.
• Seçicinin (a1) hızını "3" konumuna getirerek cihazı çalıştırın.
• Meyveleri ve/veya sebzeleri parçalara ayırın.
• Parçaları kapaktaki (h2) besleme borusundan içeri atın ve iticiyi (h1) kullanarak yavaşça itin. Malzemeleri
kesinlikle parmaklarınızı veya başka bir aleti kullanarak itmeyin.
• 500gr. yiyeceği 5 defadan fazla cihazınızın tamamen soğumasına izin vermeden, durmaksızın işlemeyin.
• En iyi sonuçları almak için ltreyi her 300 gr. yiyecek hazırladıktan sonra temizleyin.
• Önemli: Posa haznesi dolduğunda cihazı durdurun ve hazneyi boşaltın.
• Cihazı durdurmak için seçiciyi "0"konumuna getirin ve tamamen durmasını bekleyin.
• Grubu cihazdan çıkarmadan önce döner ltrenin tamamen durmasını bekleyin.
• Katı meyve sıkacağını çıkarmadan önce saat yönünün tersine döndürerek kilidi açın.
• Kilit kolunu (h6) açık kilit konumunda yerleştirin. Kapağı açın (açık kilit konumu) Şimdi ltreyi (h3) temizlemek için
çıkarabilirsiniz ve hazneyi (h4) boşaltabilirsiniz.
İpuçları:
• Şunların suyunu sıkabilirsiniz: havuç, domates, elma, üzüm, frambuaz, vs.
• Kalın kabuklu meyvelerin kabuğunu soyun ve çekirdeklerini çıkarın.
• Belirli meyvelerin ve sebzelerin suyunu çıkarmak mümkün değildir: muz, avokado, böğürtlen, vs.
• Her defasında katı meyve sıkacağını temizlemeden farklı meyvelerin ve sebzelerin sularını hazırlayabilirsiniz,
lezzetler birbirine karışmaz. Sadece katı meyve sıkacağını farklı iki malzeme arasında besleme borusundan biraz su
akıtarak çalıştırın.
• Suyu sıkar sıkmaz için veya birkaç saat buzdolabında bekletecekseniz içine biraz limon suyu ekleyin.
6 - KORDON BOYUNU AYARLAMA
Kolay kullanım veya saklama için motor ünitesindeki (a) açık bölmenin (a7) içine iterek kordonu kısaltabilirsiniz.
TR
25
MO_8080012363-01-Middle East_IM_FR_EN_TR_AR_FA_V8.indd 25 22/02/2013 6:11 PM
Page 26

TR
7 - KÜÇÜK MİKTARLARDA KESME (MODELE GÖRE DEĞİŞİR)
KULLANILAN AKSESUAR:
- Monte edilmiş öğütücü.
Öğütücüyü şu işlemler için kullanabilirsiniz:
- Anlık çalıştırarak birkaç saniyede şunları kıyabilirsiniz: kuru incir ve kuru kayısı, vs.
Miktar / maks. süre: 100gr. / 5s
Bu öğütücü, kahve gibi sert ürünler için tasarlanmamıştır.
TEMİZLEME
• Cihazı şten çekin.
• Motor ünitesini (a) veya takma ünitesini (e) suyun içinde yıkamayın veya akan suya tutmayın. Bunları kuru veya nemli bir
bezle silin.
• Daha kolay temizlemek için kullandıktan sonra aksesuarları yıkayın. Kıyma başlığı grubunu tamamen sökün.
Yaralanmayı engellemek için bıçakları tutarken dikkatli olun.
• Aksesuarları yıkayın, durulayın ve kurulayın: kıyma başlığındaki tüm metal aksamlar dışındaki aksesuarlar bulaşık
makinesinde yıkanabilir: gövde (f1), besleme vidası (f2), bıçak (f3), diskler (f4 ve f5), somun (f6).
• (f4) ve (f5) disklerinin yanı sıra bıçak (f3) yağlı kalmalıdır. Bu parçaları yemeklerde kullandığınız sıvı yağ ile yağlayın.
İpuçları:
• Aksesuarlar yiyeceklerle boyanırsa (havuç, portakal vb.) sıvı yağ damlattığınız bir bezle ovun ve her zamanki gibi
temizleyin.
• Blender haznesi (d): birkaç damla bulaşık deterjanı damlattığınız sıcak suyu blender haznesinin içine dökün. Kapağı
kapatın. Cihaz üzerine yerleştirin ve birkaç defa anlık çalıştırın. Yerinden çıkardıktan sonra, hazneyi akan suyla durulayın ve
kurumaya bırakın (hazneyi başı aşağı kurutun).
SAKLAMA
Cihazınızı nemli bir ortamda saklamayın.
CİHAZINIZ ÇALIŞMIYORSA NE YAPMANIZ GEREKİR?
Cihazınız çalışmıyorsa:
- şe doğru takılıp takılmadığından
- aksesuarların doğru kilitlendiğinden
- güvenlik kapağının (a5) takılı olduğundan ve yüksek hız çıkışı (a4) kullanılmadığında kilitli olduğundan
- çok fonksiyonlu başlığın (a3) yatay konumda kilitli olduğundan emin olun.
Mutfak cihazınız çalıştırma gücünü denetleyen ve analiz eden bir mikro işlemciye sahiptir. Yük çok artarsa, cihazınız
otomatik olarak durur. Cihazınızı tekrar başlatmak için döner düğmeyi (a1) "0" konumuna getirin ve malzemelerin bir
kısmını çıkarın. Birkaç dakika cihazınızın soğumasını bekleyin. Sonra yiyecek hazırlamaya devam etmek için istenilen
hızı seçebilirsiniz.
Cihazınız hâlâ çalışmıyor mu? Yetkili servisle iletişim kurun (servis kitapçığındaki listeye bakın).
CİHAZINIZ ÇALIŞMIYORSA NE YAPMANIZ GEREKİR?
Ambalaj, çevre için tehlike barındırmayan malzemelerden üretilmiştir ve yaşadığınız yerde geçerli olan
geri dönüşüm tedbirleri doğrultusunda atılabilir.
Cihazın atılması ile ilgili olarak, bulunduğunuz bölgedeki yetkili servisten bilgi alınız.
KULLANIM ÖMRÜ SONA EREN ELEKTRİKLİ VE ELEKTRONİK ÜRÜNLER
AÇevreyi koruyun!
Cihazınız çok sayıda yeniden üretilebilen veya geri dönüştürülebilen parça içerir.
Lütfen atık geri dönüştürme merkezlerine götürün.
26
MO_8080012363-01-Middle East_IM_FR_EN_TR_AR_FA_V8.indd 26 22/02/2013 6:11 PM
Page 27

ASESUARLAR
Cihazınızı ihtiyacınıza göre özelleştirebilir ve satıcınızdan veya yetkili servisten şu aksesuarları tedarik edebilirsiniz:
TR
Paslanmaz çelik hazne
Paslanmaz çelik hazne kapağı
Yoğurucu
Mikser
Balon çırpıcı
Blender haznesi
Katı meyve sıkacağı
Öğütücü
Dikkat: Bir aksesuar satın alırken talimat kitapçığınızı veya cihazınızı göstermeniz gerekir.
Aksesuar tutucu
Kıyma başlığı
Sebze dilimleyici:
- A: dilim
- C: Kalın rende
- D: ince rende
- E: reibekuchen
Makarna seti
Sos/püre aksesuarı
Makarna aksesuarı
GARANTİ BELGESİ
GARANTİ İLE İLGİLİ OLARAK DİKKAT EDİLMESİ GEREKEN HUSUSLAR
Groupe Seb İstanbul tarafından verilen bu garanti, ürünün kullanma kılavuzunda yer alan hususlara aykırı
kullanılmasından doğacak arızaların giderilmesini kapsamadığı gibi, aşağıdaki durumlar garanti dışıdır.
1. Kullanma hatalarından meydana gelen hasar ve arızalar.
2. Hatalı elektrik tesisatı kullanılması nedeniyle meydana gelebilecek arıza ve hasarlar.
3. Tüketici ürünü teslim aldıktan sonra, dış etkenler nedeniyle (vurma, çarpma, vs.) meydana gelebilecek hasarlar.
4. Garantili onarım için yetkili servise başvurulmadan önce Groupe Seb yetkili personeli veya yetkili servis personeli
dışında birinin, cihazı onarım veya tadiline kalkışması durumunda.
5. Üründe kullanılan aksesuar parçalar. Yukarıda belirtilen arızaların giderilmesi ücret karşılığı yapılır.
GARANTİ ŞARTLARI
Bu ürün ev kullanımı için tasarlanmıştır. Profesyonel kullanım için uygun değildir.
1. Garanti Süresi, ürünün teslim tarihinden itibaren başlar ve 2 yıldır.
2. Ürünün bütün parçaları dahil olmak üzere tamamı rmamızın garantisi kapsamındadır.
3. Ürünün garanti süresi içinde arızalanması durumunda, tamirde geçen süre garanti süresine eklenir.
4. Ürünün tamir süresi en fazla 30 iş günüdür. Bu süre, ürünün servis istasyonuna, servis istasyonunun olmaması
durumunda, ürünün satıcısı, bayii, acentası, temsilciliği, ithalatçısı veya imalatçısından birine bildirim tarihinden
itibaren başlar.
5. Sanayi ürününün arızasının 15 iş günü içerisinde giderilmemesi halinde, imalatçı veya ithalatçı; ürünün tamiri
tamamlanıncaya kadar, benzer özelliklere sahip başka bir sanayi ürününü tüketicinin kullanımına tahsis etmek
zorundadır.
6. Ürünün garanti süresi içerisinde, gerek malzeme ve işçilik, gerekse montaj hatalarından dolayı arızalanması
halinde, işçilik masrafı, değiştirilen parça bedeli ya da başka herhangi bir ad altında hiçbir ücret talep etmeksizin,
tamiri yapılacaktır.
7. Ürünün:
- Teslim tarihinden itibaren garanti süresi içinde kalmak kaydıyla bir yıl içerisinde, aynı arızayı ikiden fazla
tekrarlaması veya farklı arızaların dörtten fazla veya belirlenen garanti süresi içerisinde farklı arızaların toplamının
altıdan fazla olması unsurlarının yanı sıra, bu arızaların üründen yararlanmamayı sürekli kılması,
- Tamiri için gereken azami sürenin aşılması,
- Servis istasyonunun mevcut olmaması halinde sırasıyla satıcısı, bayii, acentası, temsilciliği, ithalatçısı veya
imalatçısından birinin düzenleyeceği raporla arızanın tamirinin mümkün bulunmadığının belirlenmesi
durumlarında, ücretsiz olarak değiştirme işlemi yapılacaktır.
8. Ürünün kullanma kılavuzunda yer alan hususlara aykırı kullanılmasından kaynaklanan arızalar garanti kapsamı
dışındadır.
9. Garanti süresi içerisinde, servis istasyonları tarafından yapılmasının zorunlu olduğu, imalatçı veya ithalatçı
tarafından şart koşulan periyodik bakımlarda; verilen hizmet karşılığında tüketiciden işçilik ücreti veya benzeri bir
ücret talep edilemez.
10. Garanti belgesi ile ilgili olarak çıkabilecek sorunlar için T.C. Sanayi ve Ticaret Bakanlığı Tüketicinin ve Rekabetin
Korunması Genel Müdürlüğü’ne başvurulabilir.
27
MO_8080012363-01-Middle East_IM_FR_EN_TR_AR_FA_V8.indd 27 22/02/2013 6:11 PM
Page 28

TR
Bu Garanti Belgesi’nin kullanılmasına 4077 sayılı Kanun ile bu Kanun’a dayanılarak yürürlüğe konulan Garanti Belgesi
Uygulama Esaslarına Dair Tebliğ uyarınca, T.C. Sanayi ve Ticaret Bakanlığı Tüketicinin ve Rekabetin Korunması Genel
Müdürlüğü tarafından izin verilmiştir.
İMALATÇI VEYA İTHALATÇI FİRMANIN:
Ünvanı : Groupe SEB İstanbul Ev Aletleri Tic. A.Ş.
Adresi : Beybi Giz Plaza Dereboyu Cad. Meydan sok. No:28 Kat:12 34398 Maslak/İstanbul
DANIŞMA HATTI: 444 40 50
FİRMA YETKİLİSİNİN:
MALIN :
Markası : Moulinex
Cinsi : Mutfak Robotu
Modeli : QA40
Belge İzin Tarihi : 08.04.2009
Garanti Belge No : 67728
Azami Tamir Süresi : 30 iş günü
Garanti Süresi : 2 yıl
Kullanım Ömrü : 7 yıl
SATICI FİRMANIN
Ünvanı :
Adresi :
Tel-Telefax :
Fatura Tarih ve No :
Teslim Tarihi ve Yeri :
TARİH-İMZA-KAŞE :
Size en yakın servisimizi 444 40 50 numaralı Tüketici Danışma Hattımızdan öğrenebilirsiniz.
AR
«∞∑‡‡ª‡‡‡e¥‡‡‡s
ô ¢ÔªeÒÊ «∞LM∑Z ≠w °OµW ¸©∂W.
±U–« ¢HFq ≠w •U‰ ¢uÆn «∞LM∑Z ´s «∞FLq ?
≈–« ¢uÆn «∞LM∑Z ´s «∞FLq, ¥Ôd§v «∞∑QØb :
- «≤t ±uÅu‰ °AJq Å∫O` °U∞∑OU¸ «∞JNd°Uzw.
- «Ê «∞LK∫IU‹ ±IHKW ≠w ±JU≤NU «∞B∫O`.
- ¨DU¡ «_±UÊ (5a) ±u§uœ Ë ±IHq °OMLU ¥JuÊ ±MHc «∞ºd´W «∞IBuÈ (4a) ∞Of ÆOb «ùß∑FLU‰.
- «∞d√” «∞L∑Fbœ «∞u™Uzn (3a)±ÔIHq °AJq «≠Iw.
¥Q¢w ±Ô∫Cd «∞DFU ≥c« ±l "±OJdË°dËߺu¸" «∞∑w ¢∑∫Jr °Iu… «∞FLKOW Ë¢∫KKNU. ≈–« ØUÊ «∞∫Lq £IOöÎ, ßu· ¥∑uÆn «∞LM∑Z √Ë¢u±U¢OJOUÎ. ù´Uœ… ¢AGOq «∞LM∑Z , •uÒ‰ “¸
«ù≤∑IU¡ (1a) «∞v «∞LuÆl "0", ±l ≈“«∞W °Fi ±s ±Ju≤U‹ «∞DFUÂ. «¢d„ «∞LM∑Z ∞Jw ¥∂dœ ∞∂Cl œÆUzo. £r °Fb –∞p ¥LJMp «î∑OU¸ «∞ºd´W «∞∑w ¢d¥b ∞∑JLKW «∞FLKOW.
≥q ±U“«‰ «∞LM∑Z ô ¥FLq ? ¥Ôd§v «ù¢BU‰ ±dØe îb±W ±ÔF∑Lb («≤Ed «∞IUzLW ≠w Ø∑OV «ùß∑FLU‰).
∞DKV «∞LºU´b… :
≈–« ØU≤X ∞b¥p √Í ±AJKW √Ë «ß∑HºU¸ ´s «∞LM∑Z , ¥Ôd§v «ù¢BU‰ °Hd¥o «∞FöÆU‹ «∞FU±W ∞K∫Bu‰ ´Kv «∞LºU´b… Ë«∞MBO∫W.
«∞∑ªKh ±s «∞LM∑Z Ë ±u«œ «∞∑GKOn «∞∑U°FW ∞t
«∞∑GKOn ±R∞n ±s ±u«œ îUÅW ô ¢ÔAJq îDd«Î ´Kv «∞∂OµW, Ë«∞∑w ¥LJs «∞∑ªKh ±MNU °Lu§V ≈§d«¡«‹ «∞∑bË¥d Ë≈´Uœ… «∞∑BMOl ≠w ±MDI∑p .
∞K∑ªKh ±s «∞πNU“ °∫b –«¢t. ¥Ôd§v «ù¢BU‰ °LdØe îb±W ±ÔF∑Lb √Ë ¢ºKOLt ∞KIºr «∞Lª∑h ≠w «∞∂Kb¥W «∞L∫KOW ≠w °Kb„.
±ÔM∑Z «∞J∑dË≤w √Ë ØNd°Uzw ±ÔM∑Nw «∞Bö•Ot
28
MO_8080012363-01-Middle East_IM_FR_EN_TR_AR_FA_V8.indd 28 22/02/2013 6:11 PM
Page 29

AR
•LU¥W «∞∂OµW √Ëô Î !
¥∫∑uÍ ≥c« «∞LÔM∑Z ´Kv ±u«œ ÆOÒLW ÅMU´OUΠ˥LJs ≈´Uœ… ¢BMOFNU.
√Ëœ´NU ≠w ±d«Øe ¢πLOl «∞LNLö‹ «∞LÔª∑BW.
«∞LK∫IU‹
¥ÔLJMp ¢Fb¥q ≥c« «∞LM∑Z Ë«∞∫Bu‰ ´Kv «∞LK∫IU‹ «∞∑U∞OW ±s °Uzl «∞∑πezW √Ë ±s ±dØe îb±W ±ÔF∑Lb.
•U±KW «∞LÔK∫IU‹
¸√” «∞LHd±W
ÆDU´W «∞ªCU¸ :
- A : ÆDU´W
- C : °Ad îAs
- D : °Ad ≤U´r
- E : ¸¥∂OJu¢As
©Ir «∞LFJdË≤W
±ÔK∫o «∞Ju∞Of
±D∫MW ∞HUzn «∞LFJdË≤W
Ë´U¡ ±s «ùß∑U≤Kf ß∑Oq
¨DU¡ ±s «ùß∑U≤Kf ß∑Oq
´πÒUÊ
îö◊
±ªHIW «∞∂U∞uÊ
Ë´U¡ «∞ªö◊
´BU¸… «∞∫LCOU‹
±D∫MW
¢M∂Ot : ¥LJMp ®d«¡ √Í ±K∫ o ´Mb±U ¢Ô∂d“ ≤Ad… «ù®U¸œ«‹ «∞∑U°FW ∞KLÔM∑Z , √Ë «∞LM∑Z ≤Hºt.
3\5 - «ùß∑FLU‰ Ë«∞MBUz`
• {l Ë´U¡ “§U§w Ø∂Od ¢∫X ≠uÒ≥W «∞ºJV (5h)
• ®GÒq «∞LM∑Z °∑∫u¥q «∞LM∑Iw (1a) «∞v «∞ºd´W "3".
• ÆDÒl «∞Hu«Øt Ë /√Ë «∞ªCU¸ «∞v ÆDl.
• √œîq ≥cÁ «∞IDl ≠w «≤∂u» «∞∑KIOr ≠w «∞GDU¡ (2h), Ë«œ≠FNr °∂Dv¡ °Uß∑FLU‰ «∞b≠U‘ (1h). ô ¢b≠l «∞LJu≤U‹ ≠w «≤∂u»
«∞∑KIOr °u«ßDW «_ÅU°l √Ë °QÍ «œ«… ±D∂a.
• ô ¢ÔAGÒq «∞LM∑Z ∞JLOW ±s «∞LJu≤U‹ °u“Ê 005 §d«Â √Ë √Ø∏d ∞Lb… ¢e¥b ´s 5 œÆUzo ±∑u«ÅKW, œËÊ «∞ºLUÕ ∞KLM∑Z √Ê ¥∂dœ ¢LU±UÎ.
• ∞K∫Bu‰ ´Kv ≤∑UzZ ±∏U∞OW, ¥Ôd§v ¢MEOn «∞HK∑d °Fb Øq 003 §d«Â ±s «∞LJu≤U‹.
≥‡‡‡‡U : ´Mb±U ¥L∑Kv¡ ±ÔπLÒl «∞KV , √ËÆn «∞LM∑Z ´s «∞∑AGOq Ë√≠d⁄ «∞LÔπLÒl.
ù¥IU· «∞LM∑Z ´s «∞∑AGOq , •u‰ «∞LM∑Iw «∞v «∞ºd´W "0" Ë«≤∑Ed «∞v √Ê ¥∑uÆn «∞LM∑Z ´s «∞∫dØW ¢LU±UÎ.
∞Jw ¢HBq ´BU¸… «∞∫LCOU‹ , •d¸≥U °∑bË¥d≥U °FJf «¢πUÁ ´IU¸» «∞ºU´W.
{l ¸«≠FW «ùÆHU‰ (6h) ≠w ±uÆl «∞H∑` . «≠∑` «∞GDU¡ (±uÆl «∞H∑`). ¥LJMp ´Mbzc ≠Bq «∞HK∑d (3h) ∞∑MEOHt, Ë¢Hd¥m «∞LÔπLÒl (4h).
≤‡‡‡BU z‡‡` :
• ¥LJMp ´Bd : «∞πe¸, «∞DLU©r, «∞∑HUÕ, «∞FMV, «∞∑u‹, .. «∞a
• ¥πV ¢IAOd «∞Hu«Øt –«‹ «∞IAd… «∞ºLOJW ; ¢Ôe«‰ ±MNU «∞∂c˸, Ë∞V «_≤U≤U”.
• ô ¥LJs ´Bd °Fi √≤u«Ÿ «∞Hu«Øt Ë«∞ªCU¸ : «∞Lu“, «ü≠uØU¢u «∞JL∏dÍ Ë«∞FKOo .. «∞a.
• ¥LJMp ¢∫COd ´BUzd ∞Lª∑Kn «∞Hu«Øt Ë«∞ªCU¸ œËÊ ¢MEOn «∞FBU¸… ≠w Øq ±d…, ∞s ¢ª∑Kj «∞MJNU‹. ≠Ij ®Gq «∞FBU¸… ±l «∞IKOq ±s «∞LU¡ ∞GºKNU °Os Øq ≤u´Os
±ª∑KHOs ±s «∞Hu«Øt.
• ¥Ôº∑∫ºs ¢MUˉ «∞FBOd ±∂U®d… °Fb «∞FBd, Ë ¥ÔCU· ´BOd «∞KOLuÊ ù°IU¡ «∞FBOd ≠w «∞∏ö§W ∞∂Cl ßU´U‹ ≈{U≠OW.
6 - ¢Fb¥q ©u‰ «∞ºKp «∞JNd°Uzw
∞KLe¥b ±s «∞d«•W ≠w «ùß∑FLU‰, ¥LJMp ¢IBOd ©u‰ «∞ºKp «∞JNd°Uzw °b≠Ft «∞v Ë•b… «∞L∫d„ (a) ´∂d «∞H∑∫W ≠w «∞LRîd… (7a).
7 - «∞Hd «∞MU´r °∂JLOU‹ «∞IKOKW (•ºV «∞Luœ¥q)
«∞LK∫IU‹ «∞LÔº∑FLKW :
- ±D∫MW ±ÔdØ∂W.
¥LJMp «ß∑FLU‰ «∞LD∫MW ∞LU ¥Kw:
«∞Hd ∞∂Cl £u«Ê °u«ßDW «∞∑AGOq «∞L∑IDl : «∞∑Os «∞LπHn, «∞LALg «∞LπHn. «∞a.
«∞JLOW/«∞uÆX «_ÆBv : 001 §d«Â / 5£u«Ê.
∞r ¢ÔBLr ≥cÁ «∞LD∫MW ∞KLM∑W«‹ «∞BK∂W ±∏q «∞∂s.
«∞∑‡M‡E‡‡O‡‡n
• «≠Bq «∞LM∑Z ´s «∞∑OU¸ «∞JNd°Uzw.
• ô ¢GLd Ë•b… «∞L∫d„ (a) √Ë «∞LK∫IU‹ (e) ≠w «∞LU¡ , √Ë ¢∫X «∞LU¡«∞πU¸¥W , ¥LJs ≠Ij ±º∫Nr °u«ßDW ÆDFW ÆLU‘ §U≠W √Ë ¸©∂W ÆKOöÎ.
• ¢ºNOöÎ ∞FLKOW «∞∑MEOn, ¢ÔGºq «∞LK∫IU‹ °ºd´W °Fb «ùß∑FLU‰. ¢ÔHp ¢dØO∂W ¸√” «∞LHd±W ´s ¬îd≥U .
¥Ôd§v «∞∑FU±q ±l «∞AHd«‹ _≤NU •Uœ… §b«Î
• ¨ºq, Ë¢πHOn «∞LÔK∫IU‹: «≤NU ¬±MW «∞∑MEOn ≠w §ö¥W «∞B∫uÊ, ±U ´b« «_§e«¡ «∞LFb≤OW ≠w ¸√” «∞LHd±W : «∞NOJq (1f) Ë (5f) ËØc∞p «_±d °U∞Mº∂W ∞KAHd«‹ (3f)
¥πV √Ê ¢∂Iv ±e¥Ò∑W. ¥LJs ¢GKOHNU °e¥X «∞DNw.
29
MO_8080012363-01-Middle East_IM_FR_EN_TR_AR_FA_V8.indd 29 22/02/2013 6:11 PM
Page 30

AR
≤‡‡‡BU z‡‡` :
• ≈–« ¢KDªX «_§e«¡ «∞∂öß∑OJOW °Q∞u«Ê «∞DFU («∞πe¸, «∞∂d¢IU‰) ¥LJs ±º∫NU °u«ßDW ÆDFW ÆLU‘ ±Ô∂KKW °U∞e¥X «∞M∂U¢w, £r ¥LJs ¢MEOHNU ØU∞LF∑Uœ.
• Ë´U¡ «∞ªö◊ (d) : «ßJV «∞IKOq ±s «∞LU¡ «∞ºUîs ¥∫∑uÍ ´Kv °Fi ≤IU◊ ±s ßUzq «∞∑MEOn ≠w «∞u´U¡ «∞ªö◊.
«¨Ko «∞GDU¡. {Ft ≠u‚ «∞LM∑Z, Ë®Gq «∞∑AGOq «∞L∑IDl °Cl ±d«‹. °Fb ≤e´t, «¨ºq «∞u´U¡, °U∞LU¡ «∞πU¸Í , Ë«¢dØt ∞Jw ¥πn ¢LU±UÎ .(«∞u´U¡ ±IKu°UÎ ¸√ßUÎ ´Kv ´IV).
≤‡‡‡BU z‡‡` :
- ¢∫COd §LOl ±Ju≤U‹ «∞DFU «∞∑w ≥w °Bbœ «∞Hd («∞K∫uÂ, ¥πV ≤eŸ «∞FEUÂ, «∞GCU¸¥n Ë«_´BU», Ë¢ÔIDÒl ±ÔJF∂U‹, °∫πr 2 ßM∑r * 2ßM∑r ¢Id¥∂UÎ).
- ¥Ôd§v «∞∑QØb °UÊ «∞K∫LW ±Ôc«» ´MNU «∞πKOb ¢LU±UÎ.
- ≠w ≤NU¥W «∞FLKOW, ¥LJMp Ë{l °Cl ÆDl ±s «∞ª∂e ≠w «≤∂u» «∞∑KIOr ∞Jw ¢ÔMEÒn ±U ¢∂Iv ≠Ot ±s °IU¥U «∞K∫LW .
4 - «∞∂Ad / «∞∑IDOl ®d•U‹ (•ºV «∞Luœ¥q)
«∞LK∫IU‹ «∞LÔº∑FLKW :
- •U±KW «∞LÔK∫IU‹ (e)
- ÆDÒU´W îCU¸ ±ÔdØ∂W (g)
- «ßDu«≤U‹ (•ºq «∞Luœ¥q).
1\4 - ¢dØOV «∞LK∫IU‹
• «{Gj ´Kv «∞e¸ (2a) ∞∑∫d¥d «∞d√” «∞L∑Fbœ «∞u™Uzn (3a), Ë«¸≠Ft «∞v √Ê ¥IHq ≠w ±JU≤t.
• {l «∞LK∫o (e) Ë«ÆHKt °U∞∑bË¥d °FJf «¢πUÁ ´IU¸» «∞ºU´W, °∫OY ¥ÔB∂` «∞Lªdà ´Kv îj Ë«•b ±l «∞LM∑Z.
• {l «∞d√” «∞L∑Fbœ «∞u™Uzn (3a) ≠w ±u{l «≠Iw : «{Gj ´Kv «∞e¸ (2a) ±d… £U≤OW.
• ¥Ôd§v «∞∑QØb °QÊ ¨DU¡ «∞∫LU¥W (5a) ±IHöÎ °AJq Å∫O` (°U¢πUÁ ´IU¸» «∞ºU´W) ≠w ±MHc «∞ºd´W «∞IBuÈ (4a).
• ≠w ±u«§NW «∞Lªdà ∞KLK∫o (e), √œîq «∞πºr «_ßDu«≤w (lg) ±UzöÎÎ «∞v §NW «∞OLOs, Ë°L∫U–«… «∞FdË¢Os ≠w «∞πºr «_ßDu«≤w °U∞M∑uzOs ≠w «∞LK∫o. «œ≠l «∞πºr
«_ßDu«≤w «∞v œ«îq «∞LK∫o Ë«œ¸ «∞πºr «_ßDu«≤w °FJf «¢πUÁ ´IU¸» «∞ºU´W «∞v √Ê ¥Me∞Z ±l «≤∂u» «∞∑KIOr ≠w «∞u{l «∞FLuœÍ.
• √œîq «_ßDu«≤W «∞∑w ¢d¥b≥U ≠w «∞πºr «_ßDu«≤w, Ë¢QØb °Q≤NU ±ÔdØ∂W ¢LU±UÎ ≠w «∞πºr.
2\4 - «ùß∑FLU‰ Ë «∞MBUz`
• {l ≠w ±u«§NW «∞LM∑Z Ë´U¡ ∞∑πLOl «∞∑∫COd«‹.
• ®GÒq «∞LM∑Z °∑∫u¥q «∞LM∑Iw (1a) «∞v «∞ºd´W "3" ∞K∑IDOl , Ë«∞ºd´W "4" ∞K∂Ad.
• {l «∞DFU ≠w «≤∂u» «∞∑KIOr Ë«{Gj °U∞b≠U‘ (2g) «∞v «_ßHq. ô ¢b≠l «∞DFU ≠w «≤∂u» «∞∑KIOr °UÅU°Fp «°b«Î, Ëô °QÍ √œ«… √îdÈ.
• ∞∑uÆOn «∞LM∑Z ´s «∞∑AGOq, •uÒ‰ “¸ «ù≤∑IU¡ «∞v «∞LuÆl "0", Ë«≤∑Ed «∞v √Ê ¥∑uÆn «∞LM∑Z ´s «∞∫dØW ¢LU±UÎ.
• ≠Jp «∞πºr «_ßDu«≤w °FJf îDu«‹ «∞dØOV .
• ¥Ôº∑FLq «_ßDu«≤w ∞Ku™Uzn «∞∑U∞OW :
- °Ad îAs c (4g) / °Ad ≤U´r D (5g): «∞πe¸, «∞Jd≠f, «∞∂DU©f, «∞π∂MW .. «∞a.
- ®d•U‹ ßLOJW A (3g) : °DU©f, §e¸, îOU¸, ¢HUÕ, ®LMb¸.. «∞a.
- ¸¥∂OJOu¢As E (6g) : °DU©f, °U¸±Oe«Ê , .. «∞a.
5 - «ß∑∫ö» «∞FBUzd ±s «∞Hu«Øt Ë«∞ªCU¸ (•ºV «∞Luœ¥q)
«∞LK∫IU‹ «∞LÔº∑FLKW :
- ´BÒU¸… •LCOU‹ (h)
1\5 - ¢dØOV ´BÒU¸… «∞∫LCOU‹
• {l «∞HK∑d (3h) ≠w Ëßj ´BU¸… «∞∫LCOU‹ (4h)
∞IHq «∞GDU¡ : «œ¸Á °FJf «¢πUÁ ´IU¸» «∞ºU´W Ë«ÆHKt (2h) ´Kv ´BU¸… «∞∫LCOU‹ (4h) (±uÆl «ùÆHU‰).
ÆHq ´U : «œ≠l ¸«≠FW «ùÆHU‰ (6h) ≤∫u ±uÆl «ùÆHU‰.
2\5 - ¢dØOV ´BÒU¸… «∞∫LCOU‹ ´Kv «∞LM∑Z
• {l «∞d√” «∞L∑Fbœ «∞u™Uzn (3a) ≠w ±u{l «≠Iw : «{Gj ´Kv «∞e¸ (2a) Ë«îHi ¥bË¥UÎ «∞d√” «∞L∑Fbœ «∞u™Uzn (3a) «∞v √Ê ¥IHq. (¥Fuœ °Fb –∞p «∞e¸ (2a)
«∞v ±uÆFt «_ÅKw).
• ≠p ¨DU¡ «∞∫LU¥W (5a) ±s ±MHc «∞ºd´W «∞IBuÈ (4a) °∑bË¥dÁ °FJf «¢πUÁ ´IU¸» «∞ºU´W, £r «≠BKt.
• ¥Ôd§v «∞∑QØb °QÊ «∞LM∑Z ±ÔDHQ, Æ∂q ≈ÆHU‰ ´BU¸… «∞∫LCOU‹ (h).
• «ÆHq ¢dØO∂W ´BU¸… «∞∫LCOU‹ ´Kv «∞LMHc (4a) °Sœ«¸¢NU °U¢πUÁ ´IU¸» «∞ºU´W , °∫OY ¥JuÊ ±MHc ≠u≥W «∞ºJV ≠w ±Ô∫U–«… «∞LM∑Z.
• ¸ØV ≠uÒ≥W «∞ºJV (5h) ´Kv ±ÔπLÒl «∞FBUzd (4h).
• ù¥IU· «∞LM∑Z, •uÒ‰ «∞e¸ (1a) ≤∫u «∞LuÆl "0"
≤‡‡‡BU z‡‡` :
¥LJMp ¢∫COd:
- ±e¥Z «∞Au¸°W «∞ªHOHW, ≠OKu¢Ot, ≠u«Øt ±DNuÒ…, ±OKJAOp Ë«∞JuØ∑Oö‹.
- «∞FπOMW «∞ºUzKW, («∞∂U≤JOp, Øö≠u¢Of, Ë≠DOd… «∞JUß∑dœ).
≈–« «∞∑BIX «∞LJu≤U‹ ´Kv §u«≤V «∞u´U¡ √£MU¡ «∞ªKj, «ËÆn «∞LM∑Z. «¸≠l «∞ªö◊ , Ë«œ≠l «∞DFU «∞LK∑Bo «∞v «_ßHq ≤∫u «∞AHd«‹, £r «´b «∞ªö◊ Ë¢U°l ´Lq «∞∑∫COd.
• ô ¢Lú Ë´U¡ «∞ªö◊ °U∞ºu«zq ßUîMW °b¸§W «∞GKOUÊ.
30
MO_8080012363-01-Middle East_IM_FR_EN_TR_AR_FA_V8.indd 30 22/02/2013 6:11 PM
Page 31

AR
• ô ¢ÔAGq «∞LM∑Z ≈–« ØUÊ «∞u´U¡ ≠U¸¨UÎ
• «ß∑FLq Ë´U¡ «∞ªö◊ ±l ¨DUzt.
• ô ¢d≠l «∞GDU¡ Æ∂q √Ê ¢∑uÆn «∞AHd«‹ ¢LU±UÎ ´s «∞∫dØW.
«ßJV œ«zLU «∞LJu≤U‹ «∞ºUzKW ≠w Ë´U¡ «∞ªö◊ √ËôÎ Æ∂q ≈{U≠W «∞LJu≤U‹ «∞πU±b….
3\2 - ¢HJOp «∞LK∫IU‹
• «≤∑Ed «∞v √Ê ¥∑uÆn «∞LM∑Z ´s «∞∫dØW ¢LU±UÎ Æ∂q ≠Bq «∞ªö◊ °u«ßDW ¢∫d¥dÁ °U∞∑bË¥d °U¢πUÁ ´IU¸» «∞ºU´W, £r {l «∞GDU¡ (5a) °SÆHU∞t ´Kv «∞Lªdà (4a)
(°U¢πUÁ ´IU¸» «∞ºU´W).
3 - «∞Hd (•ºV «∞Luœ¥q)
«∞LK∫IU‹ «∞LÔº∑FLKW :
- •U±KW «∞LÔK∫IU‹ (e)
- ¸√” «∞Hd «∞LÔdØV (f)
1\3 - ¢dØOV ±ÔK∫o «∞LHd±W
• «{Gj ´Kv «∞e¸ (2a) ∞∑∫d¥d «∞d√” «∞L∑Fbœ «∞u™Uzn (3a), Ë«¸≠Ft «∞v √Ê ¥IHq ≠w ±JU≤t.
• {l «∞LK∫o (e) Ë«ÆHKt °U∞∑bË¥d °FJf «¢πUÁ ´IU¸» «∞ºU´W, °∫OY ¥ÔB∂` «∞LMHc ´Kv îj Ë«•b ±l «∞LM∑Z.
• {l «∞d√” «∞L∑Fbœ «∞u™Uzn (3a) ≠w ±u{l «≠Iw : «{Gj ´Kv «∞e¸ (2a) ±d… £U≤OW.
2.3 - ¢dØOV ¸√” «∞LHd±W
• «•Lq «∞NOJq (1f) °u«ßDW «≤∂u» «∞∑KIOr, °∫OY ¢JuÊ «∞H∑∫W «∞u«ßFW «∞v «_´Kv.
• «œîq °d¨w «∞∑KIOr (2f) («∞FLuœ «∞Du¥q √ËôÎ) ≠w «∞NOJq (1f)
• ¸ØV «∞AHd… (3f) ´Kv «∞FLuœ «∞IBOd °U¸“… ´s °d¨w «∞∑KIOr (2f), Ë°∫OY ¢JuÊ «∞∫U≠W «∞IU©FW ±Ô∑πNW «∞v «_´Kv.
• ¸ØV «∞A∂JW (4f √Ë5f) ´Kv «∞AHd… (3f), •OY ¢JuÊ «∞FdË¢Os ´Kv ≤Hf «∞ªj ±l «∞∑πu¥HOs «∞Lu§uœ¥s ≠w «∞NOJq (1f)
• £∂ÒX «∞BU±u∞W (6f) ≠w ±JU≤NU ´Kv «∞NOJq °∑bË¥d≥U °U¢πUÁ ´IU¸» «∞ºU´W , œËÊ #≈ÆHU∞NU.
• ¢QØb ±s «∞∑dØOV. «∞FLuœ «_ßUßw ¥πV √Ê ô ¥KFV, Ëô ¥πV √Ê ¥JuÊ •d«Î °U∞∑∫d„ ∞u•bÁ. Ë≈ô ¥Ôd§v ≈´Uœ… îDu«‹ «∞∑dØOV ±d… £U≤OW.
3.3 - ¢dØOV ¸√” «∞LHd±W ´Kv «∞LM∑Z
• ≠w ±u«§NW «∞LMHc ∞KLK∫o (e), √œîq ¸√” «∞LHd±W «∞LÔdØV (f), ±UzöÎÎ «∞v §NW «∞OLOs, Ë°L∫U–«… «∞FdË¢Os ≠w ¸√” «∞LHd±W °U∞M∑uzOs ≠w «∞LK∫o. «œ≠l ¸√” «∞LHd±W
«∞v œ«îq «∞LK∫o Ë«œ¸ ¸√” «∞LHd±W °FJf «¢πUÁ ´IU¸» «∞ºU´W «∞v √Ê ¥Me∞Z ±l «≤∂u» «∞∑KIOr ≠w «∞u{l «∞FLuœÍ.
• {l «∞BOMOW «∞L∑∫dØW (8f) ≠w ±JU≤NU ´Kv «≤∂u» «∞∑KIOr.
4.3 - ««ùß∑FLU‰, «∞MBUz` Ë «∞∑HJOp
• ¥Ôd§v «∞∑QØb °QÊ ¨DU¡ «∞∫LU¥W (5a) ±IHöÎ °AJq Å∫O` (°U¢πUÁ ´IU¸» «∞ºU´W) ≠w ±MHc «∞ºd´W «∞IBuÈ (4a).
• {l ≠w ±u«§NW «∞LM∑Z Ë´U¡ ∞∑πLOl «∞∑∫COd«‹.
• ®GÒq «∞LM∑Z °∑∫u¥q «∞LM∑Iw (1a) «∞v «∞ºd´W "3" √Ë "4".
• «œ≠l ÆDl «∞K∫r ÆDFW °Fb ÆDFW ≠w «≤∂u» «∞∑KIOr (7f). ô ¢b≠l «∞LJu≤U‹ ≠w «≤∂u» «∞∑KIOr °u«ßDW «_ÅU°l √Ë °QÍ «œ«… ±D∂a.
• ∞∑uÆOn «∞LM∑Z ´s «∞∑AGOq, •uÒ‰ “¸ «ù≤∑IU¡ (1a) «∞v «∞LuÆl "0", Ë«≤∑Ed «∞v √Ê ¥∑uÆn «∞LM∑Z ´s «∞∫dØW ¢LU±UÎ.
≠p ¸√” «∞LHd±W °FJf îDu«‹ «∞∑dØOV «∞LcØu¸….
• •dÒ„ «∞GDU¡ (2b) «≤eôÆOUÎ ´Kv Ë´U¡ «ùß∑U≤Kf ß∑Oq (1b)
±‡‡‡ö•‡‡E‡‡‡‡W : ∞Of ±s «∞CdË¸Í «ß∑FLU‰ «∞GDU¡ , «≤t ¥LMl îdËà «∞d–«–.
¥Ôd§v «∞∑QØb °QÊ «∞GDU¡ (5a) ±IHq °AJq Å∫O` (°U¢πUÁ ´IU¸» «∞ºU´W) ´Kv ±MHc «∞ºd´W «∞IBuÈ (4a)
2\1 - «ù߇‡‡‡∑F‡‡L‡‡U‰
≈°b√ °Sœ«¸… «∞e¸ (1a) ≤∫u «∞LuÆl «∞cÍ ¢d¥bÁ •ºV ±Ô∑DK∂U‹ ËÅHW «∞DNw.
• ¥∂b√ «∞LM∑Z °U∞∑AGOq ≠u¸«Î
¥LJMp ≈{U≠W «∞DFU ±s îö‰ «∞H∑∫W «∞Lu§uœ… ≠w «∞GDU¡ (2b) √£MU¡ «∞∑AGOq.
• ù¥IU· «∞LM∑Z, •uÒ‰ «∞e¸ (1a) ≤∫u «∞LuÆl "0"
≤‡‡‡BU z‡‡` :
- «∞Fπs
- «ß∑FLq «∞LK∫o (1c) ´Kv «∞ºd´W "1"
¥LJMp ´πs 005 §d«Â ±s «∞D∫Os (±∏öÎ: ∞Kª∂e «_°Oi, î∂e «∞∫∂u», ´πOMW «∞∫Ku¥U‹, «∞FπOMW «∞NAÒW.. «∞a).
- «∞ªKj
- «ß∑FLq «∞ªö◊ (2c) ´Kv «∞ºd´W "1" «∞v «∞ºd´W "xam"
¥LJMp îKj ∞GU¥W 8,1 ØKZ ±s «∞FπOMW «∞ªHOHW (´πOMW «∞JOp, «∞JuØOe.. «∞a).
31
MO_8080012363-01-Middle East_IM_FR_EN_TR_AR_FA_V8.indd 31 22/02/2013 6:11 PM
Page 32

AR
ô ¢º∑FLq «∞ªö◊ (2c) ∞ªKj «∞FπOMW «∞ºLOJW.
- «∞Cd»/«ùß∑∫ö»/«∞ªHo.
- «ß∑FLq îHUÆW «∞∂U∞uÊ (3c) ´Kv «∞ºd´W "1" «∞v «∞ºd´W "xam"
¥ÔLJMp ¢∫COd : «∞LU¥u≤Oe,, «¥KOu, «∞BKBU‹, «∞∂Oi «∞LªHu‚ (∞GU¥W 8 °OU{U‹ °Oi), Ød¥LU «∞AU≤∑OOt (∞GU¥W 005 ±KK∑d) .. «∞a.
ô ¢º∑FLq îHUÆW «∞∂U∞uÊ (3c) ∞Fπs «∞FπOMW «∞ºLOJW, √Ë îKj «∞FπOMW «∞ªHOHW.
3\1 - ¢HJOp «∞LK∫IU‹
• «≤∑Ed «∞v √Ê ¥∑uÆn «∞LM∑Z ´s «∞∫dØW ¢LU±UÎ.
• «≤eŸ «∞GDU¡ (2b).
• °Uß∑FLU‰ «∞e¸ (a2), •d¸ «∞d√” «∞L∑Fbœ «∞u™Uzn (3a), £r «¸≠FW «∞v «∞LuÆl «∞FKuÍ.
• •d¸ «∞LK∫o (1c), (2c) √Ë (3c) ±s «∞d√” «∞L∑Fbœ «∞u™Uzn °b≠l «∞LK∫o «∞v œ«îq «∞d√” Ë¢bË¥dÁ °U¢πUÁ ´IU¸» «∞ºU´W ¸°l œË¸….
• «≠Bq Ë´U¡ «ùß∑U≤Kf ß∑Oq.
2 - «∞Leà / «∞ªKj (•ºV «∞Luœ¥q)
¥LJMp •ºV ©∂OFW «∞DFUÂ, ¥LJMp «ß∑FLU‰ «∞ªö◊ (d) ∞∑∫COd ±e¥Z ßLOp ∞GU¥W 5,1 ∞∑d, ˱e¥Z îHOn ∞GU¥W 58,1 ∞∑d.
«∞LK∫IU‹ «∞LÔº∑FLKW :
- Ë´U¡ «∞ªö◊ (d)
1\2 - ¢dØOV «∞LK∫IU‹
• {l «∞d√” «∞L∑Fbœ «∞u™Uzn (3a) ≠w Ë{l «≠Iw : «{Gj ´Kv «∞e¸ (2a) Ë «îHi ¥bË¥UÎ «∞d√” «∞L∑Fbœ «∞u™Uzn (3a) «∞v √Ê ¥IHq (¥Fuœ °Fb –∞p «∞e¸ (2a) «∞v
±uÆFt «_ÅKw)
• ≠p ¨DU¡ «∞∫LU¥W (5a) ±s ±MHc «∞ºd´W «∞IBuÈ (4a) °∑bË¥dÁ ´Jf «¢πUÁ ´IU¸» «∞ºU´W, £r «≠BKt.
• ¥Ôd§v «∞∑∫Io ±s √Ê «∞LM∑Z ±ÔDHQ Æ∂q ≈ÆHU‰ «∞ªö◊ (d)
• {l «∞DFU ≠w Ë´U¡ «∞ªKj, £r «ÆHq «∞GDU¡ (2d), «∞LÔeËÒœ °u´U¡ ∞KIOU” (3d) °∑bË¥dÁ ´Jf «¢πUÁ ´IU¸» «∞ºU´W
2.2 - «ùß∑FLU‰
≈°b√ °Sœ«¸… «∞e¸ (1a) ≤∫u «∞LuÆl «∞cÍ ¢d¥bÁ •ºV ±Ô∑DK∂U‹ ËÅHW «∞DNw.
«ß∑FLq ±uÆl "eslup" ∞K∑∫Jr °AJq «≠Cq °Leà «∞∑∫COd«‹.
¥LJMp ≈{U≠W «∞DFU ±s îö‰ «∞H∑∫W «∞Lu§uœ… ≠w Ë´U¡ «∞IOU” (3d) √£MU¡ «∞∑AGOq.
• «ß∑FLq œ«zLUÎ «∞b≠U‘ (7f) ±l ¸√” «∞LHd±W (f) ∞∑u§Ot «∞DFU ≠w «≤∂u» «∞∑KIOr, ô ¢º∑FLq «ÅU°Fp «°b«Î, Ëô ¢º∑FLq ®uØW √Ë ±KFIW , √Ë ßJOs √Ë √Í √œ«… «îdÈ.
• ô ¢KLf «_§e«¡ «∞L∑∫dØW , «≤∑Ed «∞v √Ê ¥∑uÆn «∞LM∑Z ´s «∞∫dØW ¢LU±UÎ Æ∂q ≠Bq «∞LK∫IU‹.
• ¥Ôd§v «∞∑FU±q ±l «∞AHd«‹ (g,f ,d) °FMU¥W ≠UzIW √£MU¡ «∞ºJV √Ë ¢Hd¥m «∞Ib¸ √Ë √£MU¡ «∞∑MEOn : ≥cÁ «∞AHd«‹ •Uœ… §b«Î.
• ô ¢KLf «∞ªHUÆU‹ √Ë «∞FπÒUÊ ´Mb±U ¥JuÊ «∞LM∑Z ÆOb «∞∑AGOq.
• ô ¢ºL` ∞KAFd «∞Du¥q , ¸°DU‹ «∞FMo, «_Ë®∫W ±s «∞∑b∞w ≠u‚ «∞LM∑Z √£MU¡ «∞∑AGOq.
• ô ¢Ôbîq √œË«‹ «∞LD∂a (±ö´o, ß∂U¢uô, ˨Od≥U) ≠w «≤∂u» «∞∑KIOr √Ë ≠w «∞GDU¡ (2b) √Ë (2h) ≠w «∞πºr «ùßDu«≤w (1g).
• ô ¢ÔAGÒq «∞ªö◊ œËÊ Ë§uœ «ù≤U¡ (1d) ±l ¨DUzt (2d).
• «ß∑FLq ±K∫o Ë«•b ≠Ij ≠w Øq ±d…
• ô ¢º∑FLq «∞u´U¡ (1d,1b) ØP≤OW ∞∑ªe¥s «∞DFU «∞LÔ∏KÒZ, √Ë ∞KDNw √Ë ∞K∑FIOr.
• ô ¢º∑FLq ´BÒU¸… «∞∫LCOU‹ ≈–« ØUÊ «∞HK∑d «∞bËÒ«¸ (3h) ¢U∞HU
• √ËÆn ¢AGOq «∞LM∑Z, Ë«≠BKt ´s ±Qîc «∞∑OU¸ «∞JNd°Uzw, Æ∂q ¢GOOd «∞LK∫IU‹, Ë Æ∂q «ùÆ∑d«» ±s «_§e«¡ «∞L∑∫dØW ≠w «∞LM∑Z.
Æ∂q «ùß∑FLU‰ ∞KLd… «_Ë∞v
• Æ∂q «ùß∑FLU‰ ∞KLd… «_Ë∞v, ¥Ôd§v ¢MEOn §LOl «∞LK∫IU‹ °U∞LU¡ Ë«∞BU°uÊ (±U ´b« «∞LK∫o (e): «≤Ed «∞v ≠Id… «∞∑MEOn) . «¨ºq £r §Hn.
• {l «∞LM∑Z ≠u‚ ßD` ±º∑u, ≤EOn, §U·. ¥Ôd§v «∞∑QØb °QÊ “¸ «ù≤∑IU¡ (1a) ´Kv «∞LuÆl "0" £r √ËÅq «∞LM∑Z °U∞∑OU¸.
• ∞b¥p ´b… îOU¸«‹ ∞K∂b¡ °∑AGOq «∞LM∑Z :
- «∞∑AGOq «∞LÔ∑IDl (≤∂CU‹) : •uÒ‰ “¸ «ù≤∑IU¡ (1a) «∞v «∞LuÆl "eslup". °Uß∑FLU‰ ßKºKW ±s «∞M∂CU‹ (eslup), ¥LJMp «∞∫Bu‰ ´Kv ¢∫Jr √Ø∏d √£MU¡ ¢∫COd
°Fi √≤u«Ÿ ±Ô∫bœ… ±s «∞DFUÂ.
- «∞∑AGOq «∞LÔº∑Ld : •uÒ‰ “¸ «ù≤∑IU¡ (1a) «∞v «∞LuÆl «∞cÍ ¢d¥bÁ, ±s "1" «∞v "xam", •ºV «∞DFU «∞cÍ ¢Iu °∑∫COdÁ.
∞∑uÆOn «∞LM∑Z ´s «∞∑AGOq, •uÒ‰ “¸ «ù≤∑IU¡ (1a) «∞v «∞LuÆl "0".
≥‡‡‡‡‡U : ∞s ¥LJs ¢AGOq «∞LM∑Z ≈–« ∞r ¥Js «∞GDU¡ (5a), √Ë «∞d√” (3a) ±IHöÊ. ßu· ¥∑uÆn «∞LM∑Z ´s «∞∑AGOq ≠u¸ ≠∑` «∞GDU¡ (5a) Ë/√Ë (3a)
√£MU¡ «∞∑AGOq. «ÆHq «∞GDU¡/√Ë «∞d√”, •uÒ‰ “¸ «ù≤∑IU¡ (1a) «∞v «∞LuÆl "0", £r «°b√ °∑AGOq «∞LM∑Z °AJq ´UœÍ °Uî∑OU¸ «∞ºd´W «∞∑w ¢d¥b≥U.
¥Q¢w ±Ô∫Cd «∞DFU ≥c« ±l "±OJdË°dËߺu¸" «∞∑w ¢∑∫Jr °Iu… «∞FLKOW Ë¢∫KKNU. ≈–« ØUÊ «∞∫Lq £IOöÎ, ßu· ¥∑uÆn «∞LM∑Z √Ë¢u±U¢OJOUÎ. ù´Uœ… ¢AGOq «∞LM∑Z , •uÒ‰
“¸ «ù≤∑IU¡ (1a) «∞v «∞LuÆl "0", ±l ≈“«∞W °Fi ±s ±Ju≤U‹ «∞DFUÂ. «¢d„ «∞LM∑Z ∞Jw ¥∂dœ ∞∂Cl œÆUzo. £r °Fb –∞p ¥LJMp «î∑OU¸ «∞ºd´W «∞∑w ¢d¥b≥U ùß∑JLU‰ «∞FLKOW.
«_¸ÆU «∞u«¸œ… ≠w «∞HId… ≥w √¸ÆU ¢U°FW ∞ú¸ÆU «∞Lu§uœ… ≠w «∞dßu±U‹ «∞∑u{O∫OW
1- îKj / ´πs / {d» / «ß∑∫ö» / îHo.
¥LJMp ¢∫COd ∞GU¥W 8,1 ∞∑d ±s «∞FπOs °Uß∑FLU‰ Ë´U¡ «ùß∑U≤Kf ß∑Oq (1b) ˨DUzt (2b), •ºV ≤u´OW «∞DFUÂ.
32
MO_8080012363-01-Middle East_IM_FR_EN_TR_AR_FA_V8.indd 32 22/02/2013 6:11 PM
Page 33

AR
«∞LK∫IU‹ «∞LÔº∑FLKW :
• - Ë´U¡ «ùß∑U≤Kf ß∑Oq (1b)
- «∞GDU¡ (2b)
- «∞FπÒUÊ (1c) √Ë «∞ªö◊ (2c) √Ë ±ªHIW «∞∂U∞uÊ (3c)
1.1 - ¢dØOV «∞LK∫IU‹
• «{Gj ´Kv «∞e¸ (2a) ∞∑∫d¥d «∞d√” «∞L∑Fbœ «∞u™Uzn (3a) Ë«¸≠Ft «∞v √Ê ¥ÔIHq ≠w ±JU≤t.
• «ÆHq Ë´U¡ «ùß∑U≤Kf ß∑Oq (1b), (°U¢πUÁ ´IU¸» «∞ºU´W) ´Kv «∞LM∑Z , Ë{l «∞LJu≤U‹.
• «œîq «∞LK∫o «∞cÍ ¢d¥bÁ (3c,2c ,1c) ≠w «∞Lªdà (6a), «œ≠l Ë«œ¸ «∞LK∫o °FJf «¢πUÁ ´IU¸» «∞ºU´W ¸°l œË¸… ùÆHU∞t ≠w «∞LJUÊ «∞LªBh.
• {l «∞d√” «∞L∑Fbœ «∞u™Uzn (3a) ≠w ±u{l «≠Iw : «{Gj ´Kv «∞e¸ (2a) , «îHi «∞d√” «∞L∑Fbœ «∞u™Uzn (3a) ¥bË¥UÎ «∞v √Ê ¥∑r ≈ÆHU∞t (¥Fuœ °Fb –∞p «∞e¸
(2a) «∞v ±uÆFt «_ÅKw).
®Jd«Î ùî∑OU¸Ør √•b «∞LM∑πU‹ ±s ¢AJOKW ±u∞OMJf, «∞LÔFb Ë«∞LªBh ∞∑∫COd «∞DFUÂ, Ë∞ûß∑FLU‰ «∞LMe∞w ≠Ij.
ËÅn √§e«¡ «∞LM∑Z
f - ¸√” «∞LHd±W (•ºV «∞Luœ¥q)
1f ≥OJq ±Fb≤w
2f °d¨w «∞∑KIOr
3f ®Hd…
4f ®∂JW °∏Iu» Ë«ßFW
5f ®∂JW °∏Iu» ÅGOd…
6f ÅU±u∞W
7f œ≠U‘
8f ÅOMOW
g - ÆDU´W ∞KªCU¸ (•ºV «∞Luœ¥q)
1g ≥OJq «ßDu«≤w
2g œ≠U‘
3g ÆDU´W «ßDu«≤OW A
4g ±∂Ad… îAMW «ßDu«≤OW C
5g ±∂Ad… ≤U´LW «ßDu«≤OW D
6g «ßDu«≤W ¸¥∂OJu¢As E
h - ´BU¸… •LCOU‹ (•ºV «∞Luœ¥q)
1h œ≠U‘
2h ¨DU¡
3h ≠K∑d œËÒ«¸
4h ±ÔπLl «∞FBOd
5h ≠uÒ≥W «∞ºJV
6h ∞ºUÊ «∞IHq
a - Ë•b… «∞LÔ∫d„
1a ±ÔM∑Iw «∞ºd´W «ù∞J∑dË≤w
2a ¸√” ±Ô∑Fbœ «∞u™Uzn (3a) “¸ «∞∑∫d¥d
3a ¸√” ±Ô∑Fbœ «∞u™Uzn
4a ±MHc ßd¥l (Ë´U¡ «∞LeÃ/«∞FBd/«∞D∫s)
5a ¨DU¡ ∞ú±UÊ
6a ±MHc ±K∫IU‹ «∞ªö◊ («∞FπUÊ/«∞ªHU‚/«∞ªö◊)
7a ±ªeÊ ∞KºKp «∞JNd°Uzw
b - ¢dØOV «∞u´U¡
1b Ë´U¡ ±s «ùß∑U≤Kf ß∑Oq
2b ¨DU¡
c - ±K∫IU‹ «∞ªö◊
1c ´πÒUÊ
2c îö◊
3c îHUÆW °U∞uÊ
d - «°d¥o «∞ªö◊ (•ºV «∞Luœ¥q)
1d Æb¸
2d ¨DU¡
3d Ë´U¡ ∞KIOU”
e - •U±KW «∞LÔK∫IU‹ (•ºV «∞Luœ¥q)
≈¸®Uœ«‹ ±s √§q «∞ºö±W
• ¥Ôd§v Æd«¡… ≈¸®Uœ«‹ «ùß∑FLU‰ °FMU¥W Æ∂q «ß∑FLU‰ «∞LM∑Z ∞KLd… «_Ë∞v: ∞s ¢∑∫LÒq «∞AdØW «∞LÔBMÒFW √¥W ±ºRË∞OW ≠w •U‰ «ùß∑FLU‰ «∞cÍ ô ¥∑IOb °Uù¸®Uœ«‹
«∞Ld≠IW.
• ∞r ¥ÔFb ≥c« «∞LM∑Z ∞Oº∑FLq °u«ßDW √®ªU’ (°Ls ≠ONr «_©HU‰) ±Ls ô ¥∑L∑FuÊ °Ib¸«‹ °b≤OW Ë•ºOW Ë´IKOW ØU≠OW, √Ë √®ªU’ ∞OºX ∞b¥Nr «∞ª∂d… √Ë «∞LFd≠W , ±U
∞r ¥∑r ±d«Æ∂∑Nr, Ë≈¸®Uœ≥r ´s ØOHOW «ß∑FLU‰ «∞LM∑Z °u«ßDW ®ªh ±ºRˉ ±s √§q «∞ºö±W. ¥πV ±d«Æ∂W «_©HU‰ ∞K∑QØb °Q≤Nr ô ¥F∂∏uÊ °U∞LM∑Z.
• ¢QØb √Ê «∞∑OU¸ «∞JNd°Uzw ∞LM∑πp ¥∑DU°o ±l ¢OU¸ «∞A∂JW «∞JNd°UzOW ´Mb„. √Í îDQ ≠w «∞∑uÅOq ¥RœÍ «∞v ≈∞GU¡ «∞CLU≤W.
• ÅÔLÒr ≥c« «∞LM∑Z ∞ûß∑FLU‰ «∞LMe∞w ≠Ij, œ«îq «∞LMe‰ Ë¢∫X «∞FMU¥W «∞Ab¥b….
• ¥Ôd§v ≠Bq «∞LM∑Z ´s «∞∑OU¸ «∞JNd°Uzw œ«zLUÎ °LÔπdœ «≤∑NUzp ±s «ß∑FLU∞t, Ë´Mb «∞IOU °∑MEOHt.
• ô ¢º∑FLq «∞LM∑Z ≈–« ∞LºX ÆBu¸«Î ≠w √œ«zt, √Ë ≈–« «ÅOV °FDV. ¥Ôd§v «ù¢BU‰ °LdØe îb±W ±ÔF∑Lb («≤Ed «∞IUzLW ≠w Ø∑OÒV «ùß∑FLU‰).
• ¥I∑Bd ¢bîKp °U∞LM∑Z ´Kv «∞∑MEOn Ë«∞BOU≤W «ù´∑OUœ¥W, √±U «∞ªb±U‹ «_îdÈ ≠ö ¥Iu °NU «ô ±dØe îb±W ±ÔF∑Lb. («≤Ed «∞IUzLW ≠w Ø∑OÒV «ùß∑FLU‰).
• ô ¢GLd «∞LM∑Z, √Ë «∞ºKp «∞JNd°Uzw √Ë «∞IU°f «∞∑U°l ∞t °QÍ ßUzq ±s «∞ºu«zq.
• ô ¢∑d„ «∞ºKp «∞JNd°Uzw «∞∑U°l ∞KLM∑Z ≠w ±∑MUˉ «_©HU‰, Ëô Æd¥∂UÎ ±s √Í ±Bb¸ •d«¸Í, Ëô ¥Ld ´Kv √§e«¡ «∞LM∑Z «∞ºUîMW, √Ë ≠u‚ •u«· •Uœ….
• ≈–« ØUÊ «∞ºKp «∞JNd°Uzw √Ë «∞IU°f «∞∑U°l ∞t ¢U∞HUÎ, ≠ö ¢º∑FLq «∞LM∑Z. ∞K∫HUÿ ´Kv «∞ºö±W ¥πV «ß∑∂b«‰ ≥cÁ «_§e«¡ °u«ßDW ±dØe îb±W ±ÔF∑Lb. («≤Ed «∞IUzLW ≠w
Ø∑OÒV «ùß∑FLU‰).
• ô ¢Cl «∞LK∫IU‹ ≠w ≠dÊ «∞LOJdËË¥n.
• ±s √§q ßö±∑p, «ß∑FLq ≠Ij «∞LK∫IU‹ ËÆDl «∞GOU¸ «∞∑w ¢MUßV «∞LM∑Z «∞cÍ ∞b¥p, Ë«∞∑w ¢Ô∂UŸ ≠w ±dØe «∞ªb±W «∞LF∑Lb.
• ¥Ôd§v ≠Bq «∞ªö◊ (d) œ«zLUÎ √Ë «∞FBU¸… (h) Æ∂q «∞CGj ´Kv «∞d√” «∞L∑Fbœ «∞u™Uzn (3a) °u«ßDW “¸ «∞∑∫d¥d (2a).
33
MO_8080012363-01-Middle East_IM_FR_EN_TR_AR_FA_V8.indd 33 22/02/2013 6:11 PM
Page 34

FA
≤‡‡‡~‡‡N‡‡‡‡‡b«¸È
œß∑~UÁ îuœ ¸« œ¸ ±∫q ±d©u» Æd«¸ ≤b≥}b.
«Öd œß∑~UÁ ®LU ØU¸ ≤Jdœ Çt ØU¸ °U¥b Ødœ
«Öd œß∑~UÁ ®LU ØU¸ ≤Jdœ , ØM∑d‰ ≤LUzOb:
- Øt ∞u«“ ¬Ê œ¸ßX ÆHq ®bÁ °U®Mb.
- Øt œ¸Äu‘ «¥LMv (5a) °d ¸ËÈ œß∑~UÁ «ßX Ë ÆHq ®bÁ «ßX ≥M~U±v Øt îd˧v ßd´X °Uô (4a) «ß∑HUœÁ ≤LOAuœ.
- Øt ßdÈ ÇMb ØU¸Á (3a) °Du¸ «≠Iv ÆHq ®bÁ °U®b.
œß∑~UÁ ®LU °U |J‡ ±OJdËÄdËߺu¸ Øt Æb¸‹ œß∑~UÁ ®LU ¸« ØM∑d‰ Ë ¬“±U¥g ±OJMb ±πNe ®bÁ «ßX . ÇMU≤ât œß∑~UÁ °Og «“ •b Äd ®uœ , °Du¸ «¢u±U¢OJ‡ ±∑uÆn
±OAuœ . °d«È œË°U¸Á °JU¸ «≤b«î∑s œß∑~UÁ , œØLt œË¸«≤v (1a) ¸« °d ¸ËÈ Ë{F}X "0" Æd«¸ œ≥}b Ë ±Ib«¸È «“ ±u«œ îuœ ¸« îU¸Ã ØM}b. «§U“Á œ≥}b œß∑~UÁ °d«È
ÇMb ∞∫Et îMJ‡ ®uœ . ßáf ±O∑u«≤Ob ßd´X ±u¸œ ≤Ed ¸« «≤∑ªU» ØdœÁ Ë ±ªKu◊ îuœ ¸« ¬±UœÁ ≤LUzOb.
œß∑~UÁ ®LU ≥LâMUÊ ØU¸ ≤LOJMb? °U ¥Jv «“ ±d«Øe îb±U‹ ±πU“ ¢LU” °~Od|b (∞}ºX «ßU±v œ¸ œ≠∑dÇt îb±U‹).
îj ¢KHs ØLv ¸ßU≤v:
ÇMU≤ât °U ≥dÖu≤t «®JU‰ Ë ßu«‰ œ¸ ¸«°Dt °U ±∫Bu‰ ±u«§t ®b¥b , îu«≥ALMb «ßX §NX ØLJ‡ ¢ªBBv «°∑b« °U ¢}r ¸Ë«°j ´Lu±v îb±U‹ ±Bd· ØMMbÁ ¢LU” •UÅq ≤LUzOb:
«“ ¸œÁ îU¸Ã ØdœÊ °º∑t °MbÈ Ë œß∑~UÁ
°º∑t °MbÈ «≤∫BU¸«Î ®U±q ±u«œÈ ±}∂U®Mb Øt ≥Oâ~u≤t îDdÈ °d«È ±∫}j “|ºX ≤b«¸≤b Ë °U «|s ˧uœ ±}∑u«≤Mb ©∂o Æu«≤}s °U“|U≠X œ¸ ±MDIt ®LU
°U“|U≠X ®u≤b.
°d«È «“ ¸œÁ îU¸Ã ØdœÊ îuœ œß∑~UÁ, îu«≥ALMb «ßX °U ±d«Øe ±πU“ îb±U¢v ±MDIt îuœ ¢LU” °~}d|b.
«“ ¸œÁ îU¸Ã ØdœÊ °º∑t °MbÈ Ë œß∑~UÁÄU|UÊ ´Ld ±∫Buô‹ «∞J∑d¥Jv ¥U «∞J∑dË≤OJv
°t ±∫}j “|ºX ≠Jd ØMOr!
œß∑~UÁ ®LU •UËÈ ±u«œ °U «¸“®v «ßX Øt ÆU°q ¢d±Or ¥U °U“¥U≠X ±O∂U®Mb.
¬≤d« œ¸ ±∫q ±ªBu’ §Ll ¬Ë¸È “°U∞t œ¸ ®Nd Æd«¸ œ≥}b.
∞u«“Â §U≤∂v
®LU ±}∑u«≤}b §NX ¢N}t ∞u«“ “|d °t ≠dË®~U≥NUÈ ´UœÈ Ë ¥U ±d«Øe îb±U‹ ±πU“ ßHU¸‘ œ≥}b:
≤~Nb«¸≤bÁ {L}Lt
ßdÈ îdœ Øs
ß∂eÈ îdœ Øs:
- A : îdœ Øs
- C : îdœØ‡s œ¸®X
- D : îdœ Øs ¸¥e
- E : ¸«¥∂JuØs
°º∑t ÄUß∑U
{L}Lt Øu∞}f
¬ß}U» Ä}â}bÊ ÄUß∑U
ØUßt «ß∑MKf «ß∑Oq
œ¸» ØUßt «ß∑MKf «ß∑Oq
îLOd “Ê
±ªKu◊ Øs
≥LeÊ °UœØMJw
¢M@ ±ªKu◊ Øs
¬°LOuÁ ÖOdÈ
¬ß}U»
¢u§t : ®LU ¢MNU “±U≤v ÆUœ¸ °t îd|b ∞u«“ §U≤∂v °d«È Ëß}Kt îuœ ±O∂U®Ob Øt œ≠∑dÇt ¸«≥MLU Ë ¥U œß∑~UÁ ¸« «¸«zt œ≥Ob.
3\5 - ØU¸°dœ≥U Ë ≤JU‹
• ¥J‡ ∞Ou«Ê °e¸¯ ¸« “|d œ≥U≤t ¸¥e‘ (5h) Æd«¸ œ≥Ob.
• °U Æd«¸ œ«œÊ ¢MEOr Ë{FOX (1a) °d ¸ËÈ ßd´X "3" œß∑~UÁ ¸« °JU¸ «≤b«“¥b.
• ±OuÁ ≥U Ë ß∂e¥πU‹ ¸« °t ¢Jt ≥UÈ ØuÇJ‡ îdœ ØMOb.
• ¬≤NU ¸« œ«îq ∞u∞t ¢Gc¥t Øt °d ¸ËÈ œ¸» (2h) Æd«¸ œ«¸œ °d|e|b Ë °uß}Kt ≠AU¸È (1h) ¬≤NU ¸« ¬¸«Â °t œ«îq ≥q œ≥}b. ≥}â~UÁ ±u«œ ¸« °U «≤~A∑UÊ |U ≥d Öu≤t Ëß}Kt
œ|~dÈ °t œ¸ËÊ ∞u∞t ¢Gc|t ≥q ≤b≥}b.
• Ä}g «“ ¬≤Jt «§U“Á œ≥Ob œß∑~UÁ ØU±ö îMJ‡ ®uœ, «“ 005 Öd ±UœÁ ¨c«¥v °}g «“ 5 °U¸ °d«È œß∑~UÁ «ß∑HUœÁ ≤MLUz}b.
• °d«È ≤∑}πt °N∑d, Äf «“ ≥d 003 Öd ±u«œ ≠}K∑d ¸« ¢L}e ØMOb.
• ±‡‡‡N‡‡‡‡‡r : ≥M~U±v ±∫q §Ll ®bÊ ¢HU∞t Äd ®bÁ «ßX, œß∑~UÁ ¸« ±∑uÆn ≤LUzOb Ë ¬≤d« îU∞v ≤LUz}b.
• °d«È ±∑uÆn ØdœÊ œß∑~UÁ, «≤∑ªU» ØMMbÁ ¸« ¸ËÈ Ë{F}X "0" °âdîU≤}b Ë Å∂d ØMOb ¢U œß∑~UÁ ØU±ö «“ •dØX °U¥º∑b.
• Æ∂q «“ °dœ«®∑s «¥s ±πLu´t «“ ¸ËÈ œß∑~UÁ Å∂d ØMOb ¢U ≠OK∑d œË«¸ ØU±ö «“ •dØX °U¥º∑b .
• °d«È °dœ«®∑s ¬°L}uÁ Ö}dÈ , °U ÇdîU≤bÊ ¬Ê °dîö· §NX ´Id°t ≥UÈ ßU´X ÆHq ¬≤d« °U“ ØMOb.
34
MO_8080012363-01-Middle East_IM_FR_EN_TR_AR_FA_V8.indd 34 22/02/2013 6:11 PM
Page 35

FA
• «≥d±NUÈ ÆHq ØMMbÁ (6h) ¸« œ¸ Ë{FOX °U“ ÇHX Æd«¸ œ≥Ob. œ¸» ¸« °U“ ØMOb (ÇHX ¬≤d« °U“ ØMOb). ßáf ±O∑u«≤Ob ≠OK∑d (3h) ¸« îU¸Ã ØdœÁ Ë ¬≤d« ¢LOe ≤LUzOb Ë
§Ll ØMMbÁ ¬°LOuÁ (4h) ¸« îU∞v ≤LUz}b.
≤‡‡‡J‡‡‡‡U‹ :
• ®LU ±}∑u«≤}b ¬» «|s ±u«œ ¨c«zv ¸« °~}d|b: ≥u|Z, Öu§t ≠d≤~v, ß}V, «≤~u¸, ¢LAJ‡ Ë ¨OdÁ.
• ±OuÁ ≥U|v Øt ÄußX ßH∑v œ«¸≤b ÄußX °~}d|b; ≥º∑t ≥U ¸« œ¸ ¬Ë¸|b Ë ÆºLX ±}U≤v ¬≤U≤U” ¸« §b« ≤LUz}b.
• «“ °dîv ±}uÁ ≥U Ë ß∂e|πU‹ îU’ ≤L}∑u«≤}b ¬°L}uÁ ¢N}t ≤LUz}b: ±u“, ¬Ë«ØUœË, Öö°v, ®UÁ ¢u‹ Ë ¨}dÁ.
• ±}∑u«≤}b °bËÊ ≤}U“ °t ¢L}e ØdœÊ «°L}uÁ Ö}dÈ œ¸ ≥d ±d•Kt ¬» ±}uÁ ≥UÈ ±ª∑Kn ¸« ¢N}t ≤LUz}b. ©Fr ±}uÁ ≥U °U |Jb¥~d ±ªKu◊ ≤ªu«≥b ®b. ¢MNU ØU≠v «ßX °}s œË ±}
uÁ ±∑HUË‹ «“ ±Ib«¸ ØLv ¬» °d«È ¬°JAv ¬Ê «ß∑HUœÁ ≤LUz}b.
* ¬°L}uÁ ¬±UœÁ ®bÁ ¸« ßd|FU «ß∑HUœÁ ≤LUz}b, Ë ±Ib«¸È ∞}Lu °t °I}t ¬Ê «{U≠t ≤LUz}b ¢U œ¸ |ªâU‰ ÇMb ßU´X ≤~Nb«¸È ≤LUz}b.
6 - ¢MEOr ØdœÊ ©u‰ ßOr
°d«È ¸«•∑v °}A∑d œ¸ «ß∑HUœÁ |U ≤~Nb«¸È, ±}∑u«≤}b ©u‰ ß}r ¸« °U °U“ ØdœÊ ƺLX ÄAX (7a) °t ƺLX ±u¢u¸ (a) ≠AU¸ œ≥Ob.
7 - ¸¥e ØdœÊ °d«È ±IUœ¥d Ør (°d ©∂o ±b‰)
∞u«“ ±u¸œ «ß∑HUœÁ :
- ¬ßOU» ≤BV ®bÁ.
±}∑u«≤}b «“ ¬ß}U» °d«È «|s ±u«¸œ «ß∑HUœÁ ≤LUz}b :
- °uß}Kt Ë{F}X ÄU∞f ±}∑u«≤}b œ¸ ÇMb £U≤}t îdœ ØMOb : «≤~u¸ îAJ‡, °dÖt “¸œ¬∞uË, ¨OdÁ.
±Ib«¸ / •b«Ø∏d “±UÊ: 001 Öd / 5 £U≤Ot
«¥s ¬ßOU» °d«È ±u«œ ߪ∑v ±U≤Mb ÆNuÁ ©d«•v ≤AbÁ «ßX.
¢‡‡L‡}‡‡e ؇‡‡‡dœÊ
• œß∑~UÁ ¸« «“ °d‚ °JAOb.
• ƺLX ±u¢u¸ (a) ¥U ∞u«“ (e) ¸« œ¸ ¬» ≠dË≤JMOb Ë ¬≤NU ¸« “¥d §d¥UÊ ¬» ≤~Od¥b. ¬≤NU ¸« °U¥J‡ œß∑LU‰ îAJ‡ ¥U ØLv ±d©u» ÄU؇ ØMOb.
• °d«È ¸«•X ¢d¢LOe ØdœÊ, ∞u«“ ¸« ßd¥FUÎ Äf «“ «ß∑HUœÁ ¬°JAv ≤LUz}b. ßdÈ îdœ Øs ¸« ØU±ö «“ ≥r §b« ØMOb. °d«È §KuÖ}dÈ «“ ≥d Öu≤t §d«•X ¢}Gt ≥U
¸« °U œÆX •Lq ≤LUz}b.
• ∞u«“ ¸« °Auz}b, ¬°JAv ≤LUz}b Ë îAJ‡ ØMOb : ∞u«“ ¸« œ¸ ±U®Os ™d≠Au¥v ±}∑u«≤}b °Auz}b °t ¨}d «“ ƺL∑NUÈ ≠KeÈ °d ¸ËÈ ßdÈ îdœ Øs: °b≤t (1f) , ∞u∞t ¢Gc¥t
(2f) , ¢OGt (3f) , ÅH∫t ≥U (4f Ë5f) , ±NdÁ (6f) .
• ÅH∫t ≥UÈ (4f) Ë (5f) Ë ¢OGt (3f) °U¥b ØU±ö ¸Ë¨MJU¸È ®u≤b . ¬≤NU ¸« °U ¸Ë¨s îu¸«Øv Çd» ØMOb.
≤‡‡‡J‡‡‡‡U‹ :
• œ¸ Åu¸¢OJt ≥d ¥J‡ «“ ËßU¥q œß∑~UÁ °U ±u«œ ¨c«¥v ¢G}}d ¸≤@ œ«œ (≥u|Z, Äd¢IU‰, ¨}dÁ), ¬≤NU ¸« °U |J‡ œß∑LU‰ ¬¨A∑t °t ¸Ë¨s îu¸«Øv ¢L}e ≤LUz}b Ë ßáf ©∂o
¸Ë«‰ ´UœÈ ¢L}e ≤LUz}b.
• ¢M@ ±ªKu◊ Øs (d) :±Ib«¸È ¬» œ«⁄ ≥Ld«Á °U ÇMb ÆDdÁ ±U¥l ™d≠Au¥v œ«îq ¬Ê °d|e|b. œ¸» ¸« °∂Mb¥b. ¬≤d« °d ¸ËÈ œß∑~UÁ Æd«¸ œ≥}b Ë °d«È ÇMb ∞∫Et «“ Ë{F}
X ÄU∞f «ß∑HUœÁ ≤LUz}b. Äf «“ °dœ«®∑s ¬Ê, ØUßt ¸« “¥d §d¥UÊ ¬» ¬°JAv ≤LUz}b Ë «§U“Á œ≥}b ¢U îAJ‡ ®uœ (ØUßt Ë«¸Ë≤t)
≤‡‡‡‡J‡‡‡‡‡U‹ :
- ¢LU±v ±u«œÍ Øt ±O∂U¥ºX îdœ ®u≤b ¸« ¬±UœÁ ≤LUzOb (°d«È Öu®X, «ß∑ªu«≤NU, ¨CdË≠NU Ë ¸¯ Ë ¸¥At ≥U ¸« §b« ØMOb Ë ¬≤d« °t ÆDFU¢v •bËœ 2 ßU≤∑}L∑d œ¸ 2
ßU≤∑}L∑d °∂d|b).
- «©L}MUÊ •UÅq ≤LUz}b |a Öu®X ®LU ØU±ö ¬» ®bÁ °U®b.
- œ¸ ÄU¥UÊ ¢NOt ±ªKu◊ ±O∑u«≤Ob «“ ÇMb ¢Jt ≤UÊ °d«È îU¸Ã ØdœÊ ¢LU±v ±u«œ °UÆ}LU≤bÁ œ¸ËÊ ±U®}s «ß∑HUœÁ ≤LUz}b.
4 - ¸|eØdœÊ / ¢Jt ØdœÊ (°d©∂o ±b‰)
∞u«“ ±u¸œ «ß∑HUœÁ :
- ≤~Nb«¸≤bÁ {L}Lt (e)
- ß∂eÈ îdœ Øs (g)
- «ß∑u«≤t (°d ©∂o ±b‰).
1\4 - ¢dØOV «∞LK∫IU‹
• œØLt (2a) ¸« ≠AU¸ œ≥Ob ¢U ßdÈ ÇMbØU¸Á (3a) ¸≥U ®uœ Ë ¬≤d« °Uô °∂d¥b ¢U œ¸ §UÈ îuœ ÆHq ®uœ.
• Ëß}Kt (e) ¸« §U °e≤}b Ë ¬≤d« °d îö· §NX ´Id°t ≥UÈ ßU´X ÆHq ≤LUz}b ¢U îd˧v ¬Ê œ¸ §NX œß∑~UÁ °U®b.
• °U ≠AU¸ œ«œÊ œØLt (2a) °d«È |J∂U¸ œ¥~d ßdÈ ÇMb ØU¸Á (3a) ¸« °t •U∞X «≠Iv §U °e≤}b.
• «©L}MUÊ •UÅq ≤LUz}b œ¸Äu‘ «|LMv (5a) °d ¸ËÈ îd˧v ßd´X °Uô (4a) (œ¸ §NX ´Id°t ≥UÈ ßU´X) °b¸ß∑v ÆHq ®bÁ °U®b.
• îd˧v ËßU|q (e) ±IU°q ®LU °U®b , °b≤t «ß∑u«≤t «È (lg) ¸« ±U|q °t ßLX Çé Ë«¸œ ≤LUz}b, °d¬±bÖ}NUÈ ¸ËÈ °b≤t «ß∑u«≤t «È ¸« °U œË ®}U¸ ¸ËÈ ÆDFt ¢ME}r
ØMOb. °b≤t «ß∑u«≤t «È ¸« œ«îq Ëß}Kt ØMOb Ë °b≤t «ß∑u«≤t «È ¸« °dîö· §NX ´Id°t ≥UÈ ßU´X °âdîU≤}b ¢U °U ∞u∞t ¢Gc|t œ¸ •U∞X ´LuœÈ ÆHq ®uœ.
• «ß∑u«≤t «≤∑ªU°v ¸« œ«îq °b≤t ØMOb Ë «©LOMUÊ •UÅq ≤LUzOb °t œ¸ß∑v °U °b≤t œ¸Ö}d ®bÁ «ßX.
35
MO_8080012363-01-Middle East_IM_FR_EN_TR_AR_FA_V8.indd 35 22/02/2013 6:11 PM
Page 36

FA
2\4 - ØU¸°dœ≥U Ë ≤JU‹
• ™d≠v ¸« §KuÈ œß∑~UÁ Æd«¸ œ≥}b ¢U ±u«œ ¬±UœÁ ®bÁ œ¸ ¬Ê ¸|ª∑t ®uœ.
• °U ÇdîU≤bÊ «≤∑ªU» Ë{F}X (1a) °d ¸ËÈ ßd´X "3" °d«È ¸≤bÁ œ¸®X Ë ßd´X "4" °d«È ¸≤bÁ ¸|e œß∑~UÁ ¸« °JU¸ «≤b«“¥b.
• ¨c« ¸« °ußOKt ≠AU¸È (2g) °t œ¸ËÊ ∞u∞t ¢Gc|t °d ¸ËÈ °b≤t ≥b«|X ØMOb. ≥Oâ~UÁ ±u«œ ¸« °U «≤~A∑UÊ ¥U ≥d Öu≤t ËßOKt œ¥~dÈ °t œ¸ËÊ ∞u∞t ¢Gc|t ≥q ≤b≥}b.
• °d«È ±∑uÆn ØdœÊ œß∑~UÁ, «≤∑ªU» ØMMbÁ ¸« ¸ËÈ Ë{F}X "0" °âdîU≤}b Ë Å∂d ØMOb ¢U œß∑~UÁ ØU±ö «“ •dØX °U¥º∑b.
• ßdÈ îdœ Øs ¸« °d îö· §NX ßu«¸ ØdœÊ ¬Ê °U“ ØMOb.
• «“ «ß∑u«≤t °d«È «|s ±u«¸œ «ß∑HUœÁ ≤LUz}b :
- ¸≤bÁ œ¸®X (4g( C / ¸≤bÁ ¸|e D (5g( : ≥u|Z , Ød≠f, ßOV “±OMv, ÄMOd Ë ¨OdÁ.
- ¢Jt ≥UÈ œ¸®X A (3g( : ß}V “±OMv, ≥u|Z, î}U¸, ß}V, ÇGMb¸ Ë ¨}dÁ.
- ¸«|∂JuØs E (6g( : ßOV “±OMv, ÄU¸±e«Ê Ë ¨}dÁ..
5 - Öd≠∑s ¬» ±}uÁ ≥U Ë ß∂e|πU‹ (°d ©∂o ±b‰)
∞u«“ ±u¸œ «ß∑HUœÁ :
- ¬°L}uÁ Ö}dÈ ≤BV ®bÁ (h)
1\5 - §U “œÊ ∞u«“ ¬°LOuÁ Ö}dÈ
• ≠OK∑d (3h) ¸« œ¸ ƺLX ±OU≤v ±∫q §Ll ¬Ë¸È ¬°L}uÁ (4h) §U °e≤}b.
• œ¸» ¸« ÆHq ≤LUz}b: œ¸» (2h) ¸« °d îö· §NX ´Id°t ≥UÈ ßU´X °d ¸ËÈ §Ll ¬Ë¸È ¬°L}uÁ (4h) ÆHq ØM}b (ÆHKNUÈ ¬Ê ÇHX ®bÁ °U®Mb)
• ÆHq ØKv: «≥d ÆHq (6h) ¸« °d«È ÇHX ¸œÊ ¬Ê ≠AU¸ œ≥}b.
2\5 - §U“œÊ ¬°L}uÁ Ö}dÈ °d ¸ËÈ œß∑~UÁ
• ßdÈ ÇMb ØU¸Á (3a) ¸« œ¸ •U∞X «≠Iv §U °e≤}b: œØLt (2a) ¸« ≠AU¸ œ≥}b Ë ßdÈ ÇMb ØU¸Á (3a) ¸« °Du¸ œß∑v ÄU|}s °}U˸|b ¢U ÆHq ®uœ (œØLt (2a) °t Ë{F}
X «Ë∞}t îuœ °U“±}~dœœ).
• œ¸Äu‘ «|LMv (5a) ¸« °U ÇdîU≤bÊ °d îö· §NX ´Id°t ≥UÈ ßU´X «“ ¸ËÈ îd˧v ßd´X °Uô (4a) îU¸Ã ≤LUz}b.
• Æ∂q «“ ÆHq ØdœÊ ¬°LOuÁ Ö}dÈ (h) «©L}MUÊ •UÅq ≤LUz}b œß∑~UÁ îU±u‘ °U®b.
• ¬°L}uÁ Ö}dÈ ≤BV ®bÁ ¸« °U ÇdîU≤bÊ œ¸ §NX ´Id°t ≥UÈ ßU´X °d ¸ËÈ îd˧v (4a) §U °e≤}b, ¢U îd˧v œ≥U≤t ¸|e‘ ¬°L}uÁ Ö}dÈ ±DU°o °U œß∑~UÁ Æd«¸ °~}dœ.
• œ≥U≤t ¸|e‘ (5h) ¸« °d ¸ËÈ §Ll ¬Ë¸È ¬°L}uÁ (4h) §U °e≤}b.
• °d«È ±∑uÆn ØdœÊ œß∑~UÁ, œØLt (1a) ¸« °t ßLX Ë{FOX "0" °âdîU≤Ob.
≤‡‡‡J‡‡‡‡‡‡U‹ :
®LU ±O∑u«≤Ob ¬±UœÁ ØMOb:
- ßuÄNUÈ °º}U¸ ≤d ®bÁ, Äu¸Á ≥U, ØLáu¢NUÈ ±}uÁ, ±}KJ‡ ®OJNU, Ë ØuØ∑KNU.
- îLOd≥UÈ ±U|l ( Äs ØOJ‡, ≠d¥∑d, Øö≠u¢Oe, ØUß∑U¸œ).
«Öd œ¸ ≥M~U ¢NOt ±u«œ °t ØMU¸Á ≥UÈ ™d· Ǻ∂}b , œß∑~UÁ ¸« ±∑uÆn ≤LUz}b. ±ªKu◊ Øs ¸« îU¸Ã ØMOb , Ë ±u«œ ¸« °t ßLX ÄU¥Os ¢OGt ≥U ≥q œ≥Ob ßáf ±ªKu◊ Øs ¸«
œË°U¸Á °t §UÈ îuœ °U“Ödœ«≤}b ¢U °I}t ±d«•q ¢N}t «≤πU Äc|dœ.
• ≥Oâ~UÁ ¢M@ ±ªKu◊ Øs ¸« °U ±U¥FU‹ œ¸ •U‰ §u‘ Äd ≤JMOb.
• ≥Oâ~UÁ ¢M@ ±ªKu◊ Øs îU∞v ¸« °JU¸ ≤OMb«“¥b.
• ≥LOAt ¢M@ ±ªKu◊ Øs ¸« °U œ¸» ¬Ê «ß∑HUœÁ ≤LUzOb.
• ≥Oâ~UÁ Æ∂q «“ ±∑uÆn ®bÊ ØU±q ¢OGt ≥U œ¸» ¸« °d≤b«¸¥b.
• ≥LOAt ±U¥FU‹ ¸« Æ∂q «“ ±u«œ §U±b °t ¢M@ ±ªKu◊ Øs «{U≠t ≤LUzOb.
3\2 - ÄOUœÁ ØdœÊ ∞u«“Â
• Æ∂q «“ °dœ«®∑s ±ªKu◊ Øs °U ÇdîU≤bÊ ¬Ê °d îö· §NX ´Id°t ≥UÈ ßU´X Ë Æd«¸ œ«œÊ œ¸» (5a) °U ÆHq ØdœÊ ¬Ê °d ¸ËÈ îd˧v (4a) ( œ¸ §NX ´Id°t ≥UÈ
ßU´X) Å∂d ≤LUz}b ¢U œß∑~UÁ ØU±ö ±∑uÆn ®uœ
3 - ßdÈ îdœ Øs (°d ©∂o ±b‰)
∞u«“ ±u¸œ «ß∑HUœÁ :
- ≤~Nb«¸≤bÁ {L}Lt (e)
- ßdÈ îdœ Øs (f)
1\3 - ≤BV {L}Lt îdœ Øs ¸|e
• œØLt (2a) ¸« ≠AU¸ œ≥Ob ¢U ßdÈ ÇMbØU¸Á (3a) ¸≥U ®uœ Ë ¬≤d« °Uô °∂d¥b ¢U ¢U œ¸§UÈ îuœ ÆHq ®uœ.
• Ëß}Kt (e) ¸« §U °e≤}b Ë ¬≤d« °dîö· §NX ´Id°t ≥UÈ ßU´X , °t ©u¸È Øt îd˧v ≥r ßD` œß∑~UÁ ®uœ ÆHq ≤LUz}b.
• ßdÈ ÇMb ØU¸Á (3a) ¸« °U ¥J∂U¸ œ¥~d ≠AU¸ œ«œÊ œØLt (2a) œ¸ Ë{FOX «≠Iv §U °e≤}b.
2\3 - ßu«¸ ØdœÊ ßdÈ îdœ Øs
• °b≤t (1f) ¸« °ußOKt ∞u∞t ¢Gc¥t ¬Ê °Du¸¥Jt ßdÈ ÄNs ¢d ¬Ê °t ßLX °Uô °U®b °~}d|b.
• ∞u∞t ¢Gc|t (2f) ¸«(«°∑b« ±∫u¸ °KMb¢d) Ë«¸œ °b≤t (1f) ØMOb.
• ¢OGt (3f) ¸« °d ¸ËÈ ±∫u¸ Øu¢U≥v Øt «“ ∞u∞t ¢Gc¥t (2f) °OdËÊ ¬±bÁ, °Du¸¥Jt ∞∂t ≥UÈ °d≤bÁ ¬Ê °t ßLX °}dËÊ °U®Mb, §U °e≤}b.
• ÅH∫t ≥UÈ «≤∑ªU°v (4f |U 5f) ¸« °d ¸ËÈ ¢}Gt (3f) §U °e≤}b , °Du¸|Jt œË °d¬±bÖv ¬Ê °U ¢u ¸≠∑~}NUÈ ¸ËÈ °b≤t (1f) ≥r ßD` ®uœ.
• ±NdÁ (6f) ¸« œ¸ §NX ´Id°t ≥UÈ ßU´X, °bËÊ ÆHq ØdœÊ °t §U¥~UÁ îuœ œ¸ ¸ËÈ °b≤t (1f) §U °e≤}b.
36
MO_8080012363-01-Middle East_IM_FR_EN_TR_AR_FA_V8.indd 36 22/02/2013 6:11 PM
Page 37

FA
• §U “œÊ ÆDFU‹ ¸« ØM∑d‰ ≤LUzOb . ±∫u¸ ≤∂U¥b •dØX ØMb Ë ≥LâMOs ≤∂U¥b œ¸ §UÈ îuœ °âdîb. œ¸ ¨Od «|s Åu¸‹, ±d«•q ßu«¸ ØdœÊ ÆDFU‹ ¸« œË°U¸Á ¢Jd«¸ ØMOb.
3\3 - ßu«¸ ØdœÊ ßdÈ îdœ Øs °d ¸ËÈ œß∑~UÁ
• îd˧v ∞u«“ (e) ¸Ë°dËÈ ®LU °U®b, ßdÈ ßu«¸ ®bÈ îdœ Øs (f) ¸« °t ßLX ¸«ßX ±U¥q ØMOb , °d¬±bÖONUÈ ¸ËÈ ßdÈ îdœ Øs ¸« °U œË ®OU¸ ¸ËÈ ÆDFt ¢MEOr
ØMOb. §U¥~UÁ ßdÈ îdœ Øs ¸« œ«îq ËßOKt ØMOb Ë ßdÈ îdœ Øs ¸« °dîö· §NX ´Id°t ≥UÈ ßU´X °âdîU≤}b ¢U °U ∞u∞t ¢Gc|t œ¸ •U∞X ´LuœÈ ÆHq ®uœ.
• ß}Mv §b« ®u≤bÈ (8f) ¸« °d ¸ËÈ ∞u∞t ¢Gc|t §U °e≤}b.
4.3 - ØU¸°dœ, ≤JU‹ Ë ÄOUœÁ ØdœÊ ÆDFU‹
• ©LOMUÊ •UÅq ≤LUzOb œ¸Äu‘ «¥LMv (5a) (œ¸ §NX ´Id°t ≥UÈ ßU´X) °t œ¸ß∑v °d ¸ËÈ îd˧v ßd´X °Uô (4a) ÆHq ®bÁ °U®b.
• ™d≠v ¸« §KuÈ œß∑~UÁ Æd«¸ œ≥}b ¢U ±u«œ ¬±UœÁ ®bÁ œ¸ ¬Ê ¸|ª∑t ®uœ.
• °U ÇdîU≤bÊ «≤∑ªU» ØMMbÁ (1a) °d ¸ËÈ ßd´X "3" |U "4" œß∑~UÁ ¸« ¸Ë®s ØMOb.
• °ußOKt ≠AU¸È (7f) , Öu®X ¸« ¢Jt ¢Jt °t œ¸ËÊ ∞u∞t ¢Gc¥t ßd«“¥d ØMOb. ≥Oâ~UÁ ±u«œ ¸« °U «≤~A∑UÊ ¥U ≥d Öu≤t ËßOKt œ¥~dÈ °t œ¸ËÊ ∞u∞t ¢Gc|t
≥q ≤b≥}b.
• °d«È ±∑uÆn ØdœÊ œß∑~UÁ, «≤∑ªU» ØMMbÁ ¸« ¸ËÈ Ë{F}X "0" °âdîU≤}b Ë Å∂d ØMOb ¢U œß∑~UÁ ØU±ö «“ •dØX °U¥º∑b.
• ßdÈ îdœ Øs ¸« °d îö· §NX ßu«¸ ØdœÊ ¬Ê °U“ ØMOb.
• œ¸» (2b) ¸ËÈ ØUßt «ß∑MKf «ß∑Oq (1b) ßd œ≥Ob .
¢‡‡‡u§‡‡‡‡t : «ß∑HUœÁ «“ œ¸» «∞e«±v ≤L}∂U®b . «“ ¢d®` §KuÖ}dÈ ±}MLUz}b .
• «©L}MUÊ •UÅq ≤LUz}b œ¸Äu‘ (5a) °t œ¸ß∑v °d ¸ËÈ îd˧v ßd´X °Uô (4a) ÆHq ®bÁ °U®b (œ¸ §NX ´Id°t ≥UÈ ßU´X).
2\1 - ؇‡‡‡U¸°‡‡‡‡dœ
°d«È ®dËŸ, °d ©∂o œß∑u¸ ¢N}t «≤∑ªU°v, «≤∑ªU» ØMMbÁ (a1) ¸« °d ¸ËÈ Ë{F}X œ∞ªu«Á °âdîU≤}b.
• œß∑~UÁ ßd|FU ®dËŸ °t ØU¸ îu«≥b Ødœ.
œ¸ ©u‰ ¢NOt ±ªKu◊ ±u¸œ ≤Ed ±O∑u«≤Ob «“ ©d¥o œ¸¥ât «È Øt °d ¸ËÈ œ¸» (2b) ±}∂U®b ±u«œ ¸« «{U≠t ≤LUz}b.
• °d«È ±∑uÆn ØdœÊ œß∑~UÁ, œØLt (1a) ¸« °d ¸ËÈ Ë{F}X "0" Æd«¸ œ≥}b.
≤‡‡‡‡J‡‡‡‡‡U‹:
- îLOd “≤v
- Ëß}Kt îL}d “≤v (1c) ¸« °d ¸ËÈ ßd´X "1" «ß∑HUœÁ ≤LUz}b.
®LU ±}∑u«≤}b ¢U 005 Öd ¬¸œ ¸« îL}d ØMOb Ë °e≤Ob (±∏U‰: ≤UÊ ßHOb, ≤UÊ ß∂u” œ«¸, îLOd ßUœÁ, îLOd ≥UÈ ¢dœ, ¨OdÁ).
- ±ªKu◊ ØdœÊ
- ±ªKu◊ Øs (2c) ¸« °d ¸ËÈ ßd´X "1" °U •U∞X "xam" «ß∑HUœÁ ≤LUz}b.
®LU ±}∑u«≤}b ¢U 8,1 ØOKuÖd îLOd ß∂J‡ ±ªKu◊ ≤LUzOb (ØKuÇt, °OºJuzOX, ¨OdÁ.).
- ≥Oâ~UÁ «“ ±ªKu◊ Øs (2c) °d«È “œÊ îL}d≥UÈ ßM~}s «ß∑HUœÁ ≤MLUz}b.
- “œÊ / ¢FK}o / ≥r “œÊ
- «“ ≥LeÊ °UœØMJv (3c) °d ¸ËÈ ßd´X "1" °U •U∞X "xam" «ß∑HUœÁ ≤LUz}b.
- ±O∑u«≤}b «|s ±u«œ ¸« ¬±UœÁ ØMOb : ±U¥u≤e, ±U¥u≤e ßOd œ«¸, ߺNU, ßHObÁ ¢ªr ±d⁄ “œÁ ®bÁ (ßHObÁ ¢U 8 ´bœ ¢ªr ±d⁄) îU±t “œÁ ®bÁ (¢U 005 ±OKw ∞O∑d), ¨OdÁ.
- ≥Oâ~UÁ «“ ≥LeÊ °UœØMJv (3c) °d«È “œÊ îL}d≥UÈ ßM~}s Ë |U ±ªKu◊ ØdœÊ îLOd≥UÈ ß∂J‡ «ß∑HUœÁ ≤MLUzOb.
3\1 - ÄOUœÁ ØdœÊ ∞u«“Â
• Å∂d ≤LUzOb ¢U œß∑~UÁ ØU±ö ±∑uÆn ®uœ.
• œ¸» (2b) ¸« °dœ«¸¥b.
• °U «ß∑HUœÁ «“ œØLt (2a) , ßdÈ ÇMb ØU¸Á (3a) ¸« ¸≥U ØMOb Ë ¬≤d« ¢U °Uô¢d¥s •U∞X °KMb ØMOb.
• ÆDFt ≥UÈ (2c( ,(1c) |U (3c) ¸« °U ≠AU¸ œ«œÊ ¬Ê °t œ«îq ßdÈ Ë |J‡ ÇNU¸Â ÇdîU≤bÊ ¬Ê œ¸ §NX ´Id°t ≥UÈ ßU´X «“ ¸ËÈ ßdÈ ÇMb ØU¸Á ¸≥U ØMOb.
• ØUßt «ß∑MKf «ß∑Oq ¸« îU¸Ã ØMOb.
2 - ±ªKu◊ ØdœÊ/ ≥r “œÊ (°d ©∂o ±b‰)
°º∑t °t ≤uŸ ¨c«, ±O∑u«≤Ob «“ «“ ±ªKu◊ Øs (d) °d«È ¬±UœÁ ØdœÊ ¢U 5,1 ∞O∑d ±ªKu◊ ¨KOk Ë 52,1 ∞O∑d ±ªKu◊ ±U¥l «ß∑HUœÁ ≤LUzOb.
∞u«“ ±u¸œ «ß∑HUœÁ :
- ¢M@ ±ªKu◊ Øs (d)
1\2 - ßu«¸ ØdœÊ ÆDFU‹
• ßdÈ ÇMb ØU¸Á (3a) ¸« °d ¸ËÈ Ë{F}X «≠Iv Æd«¸ œ≥}b: œØLt (2a) ¸« ≠AU¸ œ≥Ob Ë ßdÈ ÇMb ØU¸Á (3a) ¸« °Du¸ œß∑v ÄU|}s °}U˸|b ¢U ÆHq ®uœ (œØLt (2a)
°t Ë{FOX «Ë∞}t îuœ °U“±}~dœœ).
• œ¸Äu‘ «|LMv (5a) ¸« °U ÇdîU≤bÊ °d îö· §NX ´Id°t ≥UÈ ßU´X «“ ¸ËÈ îd˧v ßd´X °Uô (4a) îU¸Ã ≤LUz}b.
• Æ∂q «“ ÆHq ØdœÊ ±ªKu◊ Øs (d) «©LOMUÊ •UÅq ≤LUzOb œß∑~UÁ îU±u‘ °U®b.
• ¢M@ ±ªKu◊ Øs (d) ¸« °U ÇdîU≤bÊ œ¸ §NX ´Id°t ≥UÈ ßU´X °d ¸ËÈ îd˧v (4a) ÆHq ≤LUz}b.
• ¨c« ¸« œ¸ ¢M@ ±ªKu◊ Øs °d¥e¥b, œ¸» (2d) ¸«Øt °U œ¸Äu‘ «≤b«“Á ÖOdÈ (3d) ±πNe ®bÁ °U ÇdîU≤bÊ ¬Ê °dîö· §NX ´Id°t ≥UÈ ßU´X ÆHq ØMOb.
2\2 - ØU¸°dœ
• °d«È ®dËŸ, °d ©∂o œß∑u¸ ¢N}t «≤∑ªU°v, «≤∑ªU» ØMMbÁ (1a) ¸« °d ¸ËÈ Ë{F}X œ∞ªu«Á °âdîU≤}b.
37
MO_8080012363-01-Middle East_IM_FR_EN_TR_AR_FA_V8.indd 37 22/02/2013 6:11 PM
Page 38

FA
.°d«È ØM∑d‰ ¸«•∑∑d Ë °N∑d ±ªKu◊ ØdœÊ ±ªKu◊ îuœ ±O∑u«≤Ob «“ ÄU∞f «ß∑HUœÁ ≤LUzOb.
œ¸ ©u‰ ¢NOt ±ªKu◊ ±u¸œ ≤Ed ±O∑u«≤Ob «“ ©d¥o œ¸Äu‘ «≤b«“Á ÖOdÈ (3d) ±u«œ ¸« «{U≠t ≤LUz}b.
• ≥L}At °d«È ßdÈ ÇdŒ Öu®X(f) «“ ≠AU¸È(7f) «ß∑HUœÁ ≤LUz}b, °d«È ≥q œ«œÊ ¨c« °t ∞u∞t ¢Gc|t, ≥}â~UÁ «“ «≤~A∑UÊ îuœ, ÇM~U‰, ÇUÆu, ÆU®o |U ≥d Ëß}Kt
œ|~dÈ «ß∑HUœÁ ≤MLUz}b.
• ≥}â~UÁ ƺL∑NUÈ ±∑∫d؇ ¸« ∞Lf ≤JMOb Ë Æ∂q «“ §b« ØdœÊ ∞u«“ ±M∑Ed °LU≤Ob ¢U œß∑~UÁ ØU±ö ±∑uÆn ®uœ .
• ≥M~U îU∞v ØdœÊ ØUßt Ë ¢LOe ØeœÊ ±d«ÆV ¢OGt ≥UÈ ¢}e (g ,f ,d) °U®}b: «|s ÆDFU‹ °ºOU¸ ¢Oe ±O∂U®Mb .
• ≥M~U±v Øt œß∑~UÁ œ¸ •U‰ ±U¸ «ßX °t ≥LeÊ Ë îLOd “Ê œßX ≤e≤Ob .
• ≥M~U ØU¸ ØdœÊ œß∑~UÁ ±d«ÆV °U®Ob Øt ±u≥UÈ °KMb, ¸ËßdÈ, Ød«Ë«‹ Ë «±∏U‰ ¬≤NU °U ƺL∑NUÈ ±∑∫d؇ œß∑~UÁ ¢LU” ≤b«®∑t °U®b.
• ≥Oâ~UÁ ∞u«“ œ¥~dÈ ( ÆU®o , ØH~Od, ¨OdÁ) ¸« œ«îq ∞u∞t ¢Gc¥t °d ¸ËÈ œ¸» (2b) , (2d) Ë |U (2h) °d ¸ËÈ °b≤t «ß∑u«≤t «È(g1) Ë«¸œ ≤JMOb.
• «“ ØUßt ±ªKu◊ Øs (1d) °bËÊ œ¸» (2d) «ß∑HUœÁ ≤MLUzOb .
• ≠Ij «“ ¥J‡ ËßOKt œ¸ ¥J∂U¸ ØU¸Ødœ «ß∑HUÁ ≤LUzOb.
• «“ ØUßt (1d ,1b) °t ´Mu«Ê ™d≠v °d«È ĪX Ë Äe , «ß∑d¥q ØdœÊ Ë œ«îq ≠d¥e Öc«®∑s «ß∑HUœÁ ≤MLUzOb.
• «Öd ≠OK∑d œË«¸ (3h) ¬ßOV œ¥bÁ «“ ¬°LOuÁ ÖOdÈ «ß∑HUœÁ ≤LUzOb
• Æ∂q «“ ´u÷ Ød œÊ ËßU¥q ¥U ƺL∑NUÈ ÆU°q «ß∑HUoeÁ, oeß∑~UÁ ¸« îU±u‘ ≤LuoeÁ Ë «“ ±M∂l °d‚ ¸ßU≤v îU¸Ã ØMOb.
Æ∂q «“ «Ë∞Os «ß∑HUœÁ
• Æ∂q «“ «Ë∞Os «ß∑HUœÁ «“ œß∑~UÁ , ¢LU±v ÆDFU‹ ¸« °U ¬» Ë ÅU°uÊ °Auz}b
(¨}d «“ ∞u«“ ƺLX (e): °t ƺLX ¢LOe ØdœÊ ±d«§Ft ≤LUzOb) ¬°JAv ≤LUz}b Ë îAJ‡ ØMOb.
• œß∑~UÁ ¸« °d ¸ËÈ |J‡ ßD` ÅU· , ¢LOe Ë îAJ‡ Æd«¸ œ≥Ob . «©LOMUÊ •UÅq ≤LUzOb «≤∑ªU» ØMMbÁ °dÆv ßd´X (1a) °d ¸ËÈ Ë{F∂X "0" °U®b ßáf ßOr
œß∑~UÁ ¸« °t °d‚ ËÅq ≤LUzOb .
• °d«È ®dËŸ ØU¸ œß∑~UÁ ÇMb¥s «≤∑ªU» œ«¸¥b :
- ´LKJdœ ±∑MUË» ( ÄU∞f): «≤∑ªU» ØMMbÁ °dÆv ßd´X (1a) °d ¸ËÈ Ë{F}X " ÄU∞f" Æd«¸ œ≥}b . ÄU∞f ≥UÈ ±∑MUË» ±}∑u«≤b °d«È ®LU «±JUÊ ¸«•∑∑d ØM∑d‰ ØdœÊ
°dîv ¨c«≥UÈ îU’ ¸« ≠d«≥r ØMb .
- ´LKJdœ ±b«Ë : «≤∑ªU» ØMMbÁ °dÆv ßd´X (1a) °d ¸ËÈ Ë{F}X œ∞ªu«Á «“ "1" ¢U " "xam" °d ©∂o ¨c«È ±u¸œ ¢N}t ¢ME}r ≤LUz}b.
œ¸ ©u‰ ¢N}t ¨c«È ±u¸œ ≤Ed œ¸ Åu¸‹ ∞eË ±}∑u«≤}b ¬≤d« ´u÷ ≤LUz}b .
• °d«È ±∑uÆn ØdœÊ ´LKJdœ œß∑~UÁ , «≤∑ªU» ØMMbÁ (1a) ¸« °d ¸ËÈ "0" Æd«¸ œ≥Ob .
±‡‡‡N‡‡‡‡‡r : œß∑~UÁ œ¸ Åu¸¢v ®dËŸ °t ØU¸ îu«≥b Ødœ Øt œ¸Äu‘ «¥LMv (5a) Ë ßdÈ (3a) ÆHq ®bÁ °U®b . ÇMU≤ât œ¸ ©u‰ ØU¸ ÆHq œ¸Äu‘ «¥LMv
(5a) Ë/ |U ßdÈ (3a) ¸« °U“ ØMOb œß∑~UÁ ßd¥FUÎ ±∑uÆn îu«≥b ®b . œ¸Äu‘ Ë/ ¥U ßdÈ ¸« ÆHq ØMOb , «≤∑ªU» ØMMbÁ (1a) ¸« °d ¸ËÈ Ë{F}X "0"
Æd«¸ œ≥Ob , Ë ßáf °Du¸ ´UœÈ °U «≤∑ªU» ßd´X œ∞ªu«Á œß∑~UÁ ¸« œË°U¸Á ¸Ë®s ØMOb .
œß∑~UÁ ®LU °U ¥J‡ ±OJdËÄdËߺu¸ Øt Æb¸‹ œß∑~UÁ ®LU ¸« ØM∑d‰ Ë ¬“±U¥g ±OJMb ±πNe ®bÁ «ßX . ÇMU≤ât œß∑~UÁ °Og «“ •b Äd ®uœ , °Du¸ «¢u±U¢OJ‡ ±∑uÆn
±OAuœ . °d«È œË°U¸Á °JU¸ «≤b«î∑s œß∑~UÁ , œØLt œË¸«≤v (1a) ¸« °d ¸ËÈ Ë{F}X "0" Æd«¸ œ≥Ob Ë ±Ib«¸È «“ ±u«œ îuœ ¸« îU¸Ã ØMOb. «§U“Á œ≥Ob œß∑~UÁ °d«È
ÇMb ∞∫Et îMJ‡ ®uœ . ßáf ±O∑u«≤Ob ßd´X ±u¸œ ≤Ed ¸« «≤∑ªU» ØdœÁ Ë ±ªKu◊ îuœ ¸« ¬±UœÁ ≤LUzOb.
«_¸ÆU «∞u«¸œ… ≠w «∞HId… ≥w √¸ÆU ¢U°FW ∞ú¸ÆU «∞Lu§uœ… ≠w «∞dßu±U‹ «∞∑u{O∫OW
1- ±ªKu◊ ØdœÊ / îLOd “≤v / “œÊ / ¢FK}o / ≥r “œÊ
°uß}Kt ØUßt «ß∑MKf «ß∑Oq (1b) Ë œ¸» (2b) ¬Ê °º∑t °t ¨c«È ±u¸œ ¢N}t ±}∑u«≤}b ¢U 8,1 ØOKuÖd îLOd ¢NOt ØMOb .
ÆDFU‹ ±u¸œ «ß∑HUœÁ :
- ØUßt «ß∑MKf «ß∑Oq (1b) .
- œ¸» (2b)
- îLOe “Ê (1c) ¥U ±ªKu◊ Øs (2c) ¥U ≥LeÊ °UœØMJv (3c)
1\1 - ßu«¸ ØdœÊ ÆDFU‹
• œØLt (2a) ¸« ≠AU¸ œ≥Ob ¢U ßdÈ ÇMb ØU¸Á (3a) ¬“«œ ®uœ ßáf ¬≤d« °Uô °JAOb ¢U œ¸ §UÈ îuœ ÆHq ®uœ .
• ØUßt «ß∑MKf «ß∑Oq (b1) ¸« ( œ¸ §NX ´Id°t ≥UÈ ßU´X ) °d ¸ËÈ œß∑~UÁ ÆHq ØMOb Ë ±u«œ ¸« œ¸ËÊ ¬Ê °d¥e¥b .
• ÆDFU‹ ±u¸œ ≤OU“ (3c ¥U 2c ,1c) ¸« œ«îq îd˧v (6a) ≤LUz}b , ≠AU¸ œ≥}b Ë °d îö· ´Id°t ≥UÈ ßU´X °t «≤b«“Á ¥J‡ ÇNU¸Â °âdîU≤Ob ¢U ËßOKt œ¸ §UÈ îuœ
ÆHq ®uœ .
• ßdÈ ÇMb ØU¸Á (3a) ¸« œ¸ Ë{FOX «≠Iv Æd«¸ œ≥}b : œØLt (2a) ¸« ≠AU¸ œ≥Ob Ë °Bu¸‹ œß∑v ßdÈ ÇMb ØU¸Á (3a) ¸« ÄU¥Os °OU˸¥b ¢U ÆHq ®uœ (œØLt (2a) °t
•U∞X «Ë∞Ot îuœ °U“±O~dœœ).
°U ¢AJd «“ ®LU °d«È «≤∑ªU°v œ¥~d «“ ÖdËÁ ±u∞OMJf, «¥s ±∫Bu‰ Åd≠UÎ §NX «ß∑HUœÁ œ¸ ¬®áeîU≤t ±Me‰ ®LU œ¸ ≤Ed Öd≠∑t ®bÁ.
38
MO_8080012363-01-Middle East_IM_FR_EN_TR_AR_FA_V8.indd 38 22/02/2013 6:11 PM
Page 39

FA
®dÕ œß∑~UÁ
f - ßdÈ îdœ Øs ( °d ©∂o ±b‰)
1f °b≤t ≠KeÈ
2f ∞u∞t ¢Gc¥t
3f ¢OGt
4f ÅH∫t °U ßu¸«îNUÈ °e¸¯
5f ÅH∫t °U ßu¸«îNUÈ ØuÇJ
6f ±NdÁ
7f ≠AU¸È
8f ßOMv
g - ß∂eÈ îdœ Øs ( °d ©∂o ±b‰)
1g b≤t «ß∑u«≤t «È
2g ≠AU¸È
3g «ß∑u«≤t îdœØs A
4g «ß∑u«≤t îdœ Øs œ¸®X C
5g «ß∑u«≤t îdœ Øs ¸¥e D
6g «ß∑u«≤t ßOV “±OMv îdœ Øs E
h - ¬°LOuÁ ÖOdÈ ( °d ©∂o ±b‰)
1h ≠AU¸È
2h œ¸»
3h ≠OK∑d œË«¸
4h §Ll ¬Ë¸È ¬°LOuÁ
5h œ≥U≤t ¸¥e‘
6h «≥d ÆHq ØdœÊ
a - ƺLX ±u¢u¸
1a «≤∑ªU» ØMMbÁ °dÆv ßd´X
2a œØLt ¸≥U ØMMbÁ ßdÈ ÇMb ØU¸Á (3a)
3a ßdÈ ÇMb ØU¸Á
4a îd˧v ßd´X °Uô ( ¢M@ ±ªKu◊ Øs/¬°LOuÁ
ÖOdÈ/¬ß}V)
5a œ¸Äu‘ «¥LMv
6a îd˧v ∞u«“ ±ªKu◊ Øs (îLOd “Ê, ≥LeÊ
°UœØMJv, ±ªKu◊ Øs)
7a ±∫HEt ≤~Nb«¸È ßOr °d‚
b - u≤∑U˛ ØUßt
1b ØUßt «ß∑MKf «ß∑Oq
2b œ¸»
c - ∞u«“ ±ªKu◊ Øs
1c îLOe “Ê
2c ±ªKu◊ Øs
3c ≥LeÊ °UœØMJv
d - ¢M@ ±ªKu◊ Øs ( °d ©∂o ±b‰)
1d ØUßt
2d œ¸»
3d œ¸Äu‘ «≤b«“Á ÖOdÈ
e - ≤~Nb«¸≤bÁ {L}Lt ( °d ©∂o ±b‰)
œß∑u¸«‹ «¥LMv
• Æ∂q «“ ØU¸°dœ œß∑~UÁ °d«È «Ë∞}s °U¸, œß∑u¸«∞FLKNU ¸« °t œÆX ±DU∞Ft ≤LUz}b. ≥d Öu≤t «ß∑HUœÁ ≤Uœ¸ßX Ë °d îö· ≤JU‹ «¥LMv –Ød ®bÁ œß∑~UÁ ¸« «“ ÖU¸«≤∑v
îU¸Ã îu«≥b Ødœ, Ë ßU“≤bÁ ±ºµu∞O∑v œ¸ Æ∂U‰ ¬Ê ≤L}ác|dœ.
• «|s œß∑~UÁ °d«È «ß∑HUœÁ «≠d«œÈ (®U±q ØuœØUÊ) Øt œ«¸«È ≤U¸ßUzv ≥UÈ §ºLv, ≠JdÈ Ë ¸Ë«≤v ±}∂U®Mb Ë≤}e «®ªU’ °bËÊ ¢πd°t Ë ¬ÖU≥v ßUî∑t ≤AbÁ «ßX
, ±~d ¢∫X ≤EU¸‹ ≠dœÈ Øt ±ºµu‰ ±d«Æ∂X Ë «¥LMv ¬≤NU °uœÁ Ë œß∑u¸«‹ ô“ §NX «ß∑HUœÁ «“ œß∑~UÁ ¸« °t ¬≤NU œ«œÁ °U®b. ±d«ÆV ØuœØUÊ °U®Ob ¢U «“ œß∑~UÁ °t
´Mu«Ê ËßOKt °U“È «ß∑HUœÁ ≤JMMb.
• «©LOMUÊ •UÅq ≠d±U¥Ob °d‚ ±Me∞∑UÊ , ±DU°o °U Ë∞∑U˛ Ë °d‚ ±u¸œ «ß∑HUœÁ œß∑~U≥∑UÊ °U®b. ≥d Öu≤t ¬ßOV œ¥bÖv °d «ßU” ´b ¢DU°o °d‚ ±u¸œ «ß∑HUœÁ œ¸
œß∑~UÁ Ë ®∂Jt ®NdÈ, œß∑~UÁ ¸« «“ ÖU¸«≤∑v îU¸Ã îu«≥b Ødœ.
• œß∑~UÁ ®LU ≠Ij §NX «ß∑HUœÁ îU≤~v, œ¸ ¬®áeîU≤t, Ë ¢∫X ØM∑d‰ ≠dœ °U¢πd°t ßUî∑t ®bÁ «ßX.
• Äf «“ «¢LU ØU¸ °U œß∑~UÁ «°∑b« œË®Uît ¸« «“ Äd¥e îU¸Ã ØMOb, ßáf «Æb«Â °t ¢LOe ØdœÊ ¬Ê ≤LUzOb.
• œ¸ Åu¸‹ ±AU≥bÁ ≥d Öu≤t «®JU‰ œ¸ ØU¸Ødœ œß∑~UÁ Ë ¥U ≥d Öu≤t ¬ßOV «“ ¬Ê «ß∑HUœÁ ≤MLUzOb, Ë ≥d Çt ßd¥F∑d °U ¥Jv «“ ≤LU|MbÖ}NUÈ ±πU“ ±u∞}MJf ¢LU”
•UÅq ≠d±UzOb («ßU±v ≤LU°MbÖv ≥U œ¸ œ≠∑dÇt îb±U‹).
• ≥d Öu≤t ¢FL}d«¢v ¨}d «“œß∑u¸≥UÈ «|LMv –Ød ®bÁ Ë ¥U ¢LOe ØdœÊ Ë ≤~Nb«¸È œß∑~UÁ ¸« °U ≤LU|MbÖv ±πU“ œ¸ ±}UÊ °~c«¸|b («ßU±v ≤LU|MbÖv ≥U œ¸ œ≠∑dÇt
îb±U‹).
• «“ ¢LU” œß∑~UÁ , ß}r °d‚ Ë |U œË®Uît ¬Ê °U ¬» Ë ±U|FU‹ œ|~d§b«Î §KuÖ}dÈ ≤LUz}b .
• ß}r °d‚ ¸« «“ œß∑d” ØuœØUÊ œË¸ ≤~t œ«¸|b. ßOr œß∑~UÁ ≤∂U|b ≥}â~UÁ °U ƺL∑NUÈ œ«⁄ œß∑~UÁ , ËßUzq œ«⁄ Ë |U ¢}e ¢LU” |U°b .
• œ¸ Åu¸‹ ±AU≥bÁ ≥d Öu≤t «®JU‰ œ¸ ßOr °d‚ œß∑~UÁ, «“ ¬Ê «ß∑HUœÁ ≤MLUz}b Ë œ¸ «Ë∞Os ≠dÅX , §NX §KuÖOdÈ «“ îDd«‹ «•∑LU∞v, °U ¥Jv «“ ≤LU¥MbÖv ≥UÈ
±πU“ ßdË|f Ë îb±U‹ ±∫Buô‹ ±u∞}MJf ¢LU” •UÅq ≠d±UzOb («ßU±w ≤LU¥MbÖv ≥U œ¸ œ≠∑dÇt îb±U‹).
• ∞u«“ §U≤∂v ¸« œ¸ËÊ ±U|JdËË¥u Æd«¸ ≤b≥Ob .
• §NX «¥LMv îuœ , ¢MNU «“ ÆDFU‹ Ë ∞u«“ §U≤∂v ±u∞}MJf Øt œ¸ ±d«Øe îb±U‹ ±πU“ °t ≠dË‘ ±Odßb °d«È œß∑~U≥∑UÊ «ß∑HUœÁ ≤LUz}b.
• ≥LOAt Æ∂q «“ ≠AU¸ œ«œÊ ¸≥U ØMMbÁ (2a) ßdÈ ÇMb ØU¸Á (3a), ±ªKu◊ Øs (d) ¥U ¬°LOuÁ ÖOdÈ (h) ¸« îU¸Ã ≤LUz}b.
39
MO_8080012363-01-Middle East_IM_FR_EN_TR_AR_FA_V8.indd 39 22/02/2013 6:11 PM
Page 40

www.moulinex.com
(010) 55-76-07
2 YEARS (տարի)
2 YEARS (Jahre) 01 866 70 299 00
Info-linija za potrošače
033 551 220
1 YEAR (ano) 0800-119933
1 YEAR 852 8130 8998
COUNTRY LIST
:
ՓԲԸ “Գրուպպա ՍԵԲ”,125171, Մոսկվա, Լենինգրադյան խճուղի, 16А, շին.3
SEB ÖSTERREICH HmbHCampus 21 - Businesspark Wien Süd,
INTERNATIONAL GUARANTEE
ALGERIA CIJA9 rue Puvis de ChavannesSaint Euquene Oran 1 YEAR (0)41 28 18 53
ARGENTINA GROUPE SEB ARGENTINA S.A., Billinghurst 1833 3°, C1425DTK Capital Federal, Buenos Aires 2 YEARS (años) 0800-122-2732
ARMENIA (ՀԱՅԱՍՏԱՆ)
Liebermannstr. A02 7022345 Brunn am Gebirge
AUSTRALIA GROUPE SEB AUSTRALIA, PO Box 7535, Silverwater, NSW 2128 1 YEAR 02 97487944
AUSTRIA (ÖSTERREICH)
BELGIUM (BELGIQUE / BELGIE) GROUPE SEB BELGIUM SA NV25 avenue de l’Espérance - ZI6220 Fleurus 2 YEARS (ans) 070 23 31 59
BELARUS (БЕЛАРУСЬ) ЗАО «Группа СЕБ-Восток», 125171, Москва, Ленинградское шоссе, д. 16А, стр. 3 2 YEARS (года) 017 2239290
433/437/447, Pompéia, São Paulo/SP
BOSNA I HERCEGOVINA SEB Développement, Predstavništvo u BiH, Vrazova 8/II, 71000 Sarajevo 2 YEARS (godine)
BRAZIL (BRASIL) SEB COMERCIAL DE PRODUTOS DOMÉSTICOS LTDA, Rua Venâncio Aires,
BULGARIA (БЪЛГАРИЯ) ГРУП СЕБ БЪЛГАРИЯ ЕООД, Ул. Борово 52 Г, ет. 1, офис 1, 1680 София 2 YEARS (години) 0700 10 330
CANADA GROUPE SEB CANADA, 345 Passmore Avenue, Toronto, ON M1V 3N8 1 YEAR (an) 800-418-3325
CHILE GROUPE SEB CHILE Comercial Ltda, Av. Providencia, 2331, piso 5, ocina 501, Santiago 2 YEARS (años) 12300 209207
COLOMBIA GROUPE SEB COLOMBIA, Apartado Aereo 172, Kilometro 1Via ZipaquiraCajica, Cundinamarca 2 YEARS (años) 18000919288
CROATIA (HRVATSKA) SEB Developpement S.A.S.Vodnjanska 26, 10000 Zagreb 2 YEARS (godine) 01 30 15 294
GROUPE SEB ČR spol. s, r .o.Jankovcova, 1569/2c170 00, Praha 7 2 YEARS (roky) 731 010 111
CZECH REPUBLIC
(ČESKÁ REPUBLIK)
DENMARK (DANMARK) GROUPE SEB NORDIC, ASTempovej 27, 2750 Ballerup 2 YEARS (år) 44 663 155
GERMANY (DEUTSCHLAND) GROUPE SEB DEUTSCHLAND GmbH / KRUPS, GmbHHerrnrainweg 5, 63067 Offenbach 2 YEARS (Jahre) 0212 387 400
ESTONIA (EESTI) GROUPE SEB POLSKA Sp. z, o.o.ul. Bukowińska 22b02-703, Warszawa 2 YEARS (aasta) 5 800 3777
FINLAND (SUOMI) GROUPE SEB FinlandKutojantie 7, 02630 Espoo 2 YEARS (Vuotta) 09 622 94 20
GROUPE SEB FRANCE Service, Consommateur MoulinexBP, 1569131 ECULLY CEDEX 1 YEAR (an) 09 74 50 10 14
Guadeloupe, Martinique,
Réunion, Saint Martin
(France continentale)
GREECE (ΕΛΛΑΔΑ) SEB GROUPE ΕΛΛΑΔΟΣ Α.Ε.Οδός Καβαλιεράτου 7Τ.Κ., 145 64 Ν. Κηφισιά 2 YEARS (χρόνια) 2106371251
SEB ASIA Ltd., Room 903, 9/F, South Block, Skyway House3 Sham Mong Road,
Tai Kok Tsui, Kowloon, Hong Kong
HONG KONG (香港)
40
MO_8080012363-01-Middle East_IM_FR_EN_TR_AR_FA_V8.indd 40 22/02/2013 6:11 PM
Page 41

www.moulinex.com
1 YEAR +62 21 5793 6881
1 YEAR 0570-077772
1 YEAR 1588-1588
2 YEARS (години) (0)2 2050 022
1 YEAR (año) 65 6550 8900
2 YEARS (años) (01800) 112 8325
koszt jak za połączenie lokalne
0801 300 423
COUNTRY LIST
:
GROUPE SEB INDONESIA, (Representative ofce) Sudirman Plaza,
Plaza Marein 8th FloorJL Jendral Sudirman Kav 76-78,Jakarta 12910, Indonesia
GROUPE SEB JAPAN Co. Ltd.,1F Takanawa Muse Building,
INTERNATIONAL GUARANTEE
HUNGARY (MAGYARORSZÁG) GROUPE SEB CENTRAL-EUROPE, Kft.Távíró köz 4, 2040 Budaörs 2 YEAR (év) 06 1 801 8434
INDONESIA
3-14-13, Higashi Gotanda,Shinagawa-Ku,Tokyo 141-0022
ITALY (ITALIA) GROUPE SEB ITALIA, S.p.A., Via Montefeltro, 420156 Milano 2 YEARS (anni) 1 99 207 892
JAPAN
KAZAKHSTAN (ҚАЗАҚСТАН) ЖАҚ «Группа СЕБ- Восток»125171, Мәскеу, Ленинградское шоссесі,16А, 3 үйі 2 YEARS (жыл) 727 378 39 39
KOREA (한국어) (유)그룹 세브 코리아서울시 종로구 서린동 88 서린빌딩 3층, 110-790
LATVIA (LATVJA) GROUPE SEB POLSKA, Sp. z o.o.ul., Bukowińska 22b02-703, Warszawa 2 YEARS (gadi) 6 716 2007
LITHUANIA (LIETUVA) GROUPE SEB POLSKA, Sp. z o.o.ul., Bukowińska 22b02-703, Warszawa 2 YEARS (metai) 6 470 8888
LUXEMBOURG GROUPE SEB BELGIUM, SA NV25 avenue de l’Espérance - ZI6220, Fleurus 2 YEARS (ans) 0032 70 23 31 59
Groupe SEB Bulgaria, EOODOfce 1, oor 1, 52G Borovo St., 1680 Soa - Bulgaria
ГРУП СЕБ БЪЛГАРИЯ ДООЕЛУл. Борово 52 Г, сп. 1, офис 1, 1680 София, България
GROUPE SEB MALAYSIA SDN., BHDUnit No. 402-403, Level 4, Uptown 2, No. 2, Jalan SS21/37,
Damansara Uptown, 47400, Petaling Jaya, Selangor D.E Malaysia
Groupe.S.E.B. México, S.A. DE C.V. Goldsmith 38 Desp. 401, Col.
PolancoDelegación, Miguel Hildalgo11, 560 México D.F
GROUPE SEB NEDERLAND, BVGeneratorstraat, 63903 LJ Veenendaal 2 YEARS (jaar) 0318 58 24 24
MACEDONIA
MALAYSIA
MEXICO
MOLDOVA ТОВ «Груп СЕБ Україна»02121, Харківське шосе, 201-203, 3 поверх, Київ, Україна 2 YEARS (ani) (22) 929249
THE NETHERLANDS
(NEDERLAND)
NEW ZEALAND GROUPE SEB NEW ZEALAND, Unit E, Building 3, 195 Main Highway, Ellerslie, Auckland 1 YEAR 0800 700 711
NORWAY (NORGE) GROUPE SEB NORDIC, ASTempovej, 272750 Ballerup 2 YEARS (år) 815 09 567
PERU Groupe SEB Perú, Av. Camino Real N° 111 of. 805 B, San Isidro - Lima 1 YEAR (año) 441 4455
POLAND (POLSKA) GROUPE SEB POLSKA, Sp. z o.o.ul. Bukowińska 22b02-703, Warszawa 2 YEARS (lata)
PORTUGAL GROUPE SEB IBÉRICA, SAUrb. da MatinhaRua Projectada à Rua 3Bloco1 - 3° B/D 1950 - 327 Lisboa 2 YEARS (años) 808 284 73
REPUBLIC OF IRELAND GROUPE SEB IRELAND, Unit B3 Aerodrome Business Park, College Road, Rathcoole, Co. Dublin 1 YEAR 01 677 4003
ROMANIA (ROMÂNIA) GROUPE SEB ROMÂNIA, Str. Daniel Constantin nr., 8010632 Bucuresti 2 YEARS (ani) 0 21 316 87 84
RUSSIA (РОССИЯ) ЗАО «Группа СЕБ-Восток», 125171, Москва, Ленинградское шоссе, д. 16А, стр. 3 2 YEARS (години) 495 213 32 29
41
MO_8080012363-01-Middle East_IM_FR_EN_TR_AR_FA_V8.indd 41 22/02/2013 6:11 PM
Page 42

www.moulinex.com
+84-8 38644037
+84-8 38645830
COUNTRY LIST
:
2 YEARS 662 351 8911
GROUPE SEB THAILAND, 2034/66 Italthai Tower, 14th Floor, n° 14-02,
New Phetchburi Road, Bangkapi, Huaykwang, Bangkok 10320
2 YEARS (años) 0800-7268724
GROUPE SEB VENEZUELA, Av Eugenio Mendoza, Centro Letonia,
Torre ING Bank, Piso 15, Ofc 155Urb. La Castellana, Caraca
SERBIA (SRBIJA) SEB Developpement, Đorđa Stanojevića, 11b11070 Novi Beograd 2 YEARS (godine) 060 0 732 000
SINGAPORE GROUPE SEB SINGAPORE Pty Ltd., 59 Jalan Pemipin, #04-01/02 L&Y Building, Singapore 577218 1 YEAR 65 6550 8900
SLOVENSKO (SLOVENSKO) GROUPE SEB Slovensko, spol. s r.o.Rybničná 40, 831 06 Bratislava 2 YEARS (roky) 233 595 224
SLOVENIA (SLOVENIJA) SEB d.o.o Gregorčičeva ulica, 62000 MARIBOR 2 YEARS (leti) 02 234 94 90
SPAIN (ESPAÑA) GROUPE SEB IBÉRICA S.A.C/ Almogàvers, 119-123, Complejo Ecourban, 08018 Barcelona 2 YEARS (años) 902 31 22 00
SWEDEN (SVERIGE) TEFAL SVERIGE SUBSIDIARY OF GROUP SEB NORDIC, Truckvägen 14 A, 194 52 Upplands Väsby 2 YEARS (år) 08 594 213 30
SWITZERLAND (SUISSE CHWEIZ) GROUPE SEB SCHWEIZ GmbH, Thurgauerstrasse, 1058152 Glattbrugg 2 YEARS (ans / Jarhre) 044 837 18 40
TAIWAN (台灣) SEB ASIA Ltd., Taiwan Branch, 4F., No. 37 Dexing W. Rd.,Shilin Dist., Taipei City 11158,Taiwan (R.O.C.) 1 YEAR 886-2-2833 3716
THAILAND
TURKEY (TÜRKIYE) GROUPE SEB ISTANBUL, ASBeybi Giz Plaza Dereboyu, Cad.Meydan Sok.No: 28 K.12 Maslak 2 YEARS (YIL) 216 444 40 50
U.S.A. GROUPE SEB USA, 2121 Eden Road, Millville, NJ 08332 1 YEAR (an) 800-395-8325
UKRAINE (Україна) ТОВ «Груп СЕБ Україна»02121, Харківське шосе, 201-203, 3 поверх, Київ, Україна 2 YEARS (роки) 044 492 06 59
UNITED KINGDOM GROUPE SEB UK LTD, Riverside House, Riverside WalkWindsor, Berkshire, SL4 1NA 1 YEAR 0845 602 1454
VENEZUELA
INTERNATIONAL GUARANTEE
VIETNAM Vietnam Fan Joint Stock Company, 25 Nguyen Thi Nho Str, Ward 9, Tan Binh Dist, HCM city 1 YEAR
42
MO_8080012363-01-Middle East_IM_FR_EN_TR_AR_FA_V8.indd 42 22/02/2013 6:11 PM
Page 43

43
MO_8080012363-01-Middle East_IM_FR_EN_TR_AR_FA_V8.indd 43 22/02/2013 6:11 PM
Page 44

FR
EN
TR
AR
FA
P.8-14
P.14-20
P.21-28
P.33-28
P.39-34
Ref. 8080012363-01
MO_8080012363-01-Middle East_IM_FR_EN_TR_AR_FA_V8.indd 44 22/02/2013 6:11 PM
 Loading...