

Page 1
Page 2
a
a5
b C
Recette
a1
a2
a6
a4
d1
d2
d
e1
AutoC
Manuel
COK
a3
h1
h2
h3
h4
h
b1
b2
c
b4
b4.1
b3
k2
k1
k
2
k3
e
f
g
g2
h4.1
e2
i2
f1
i3
1
i1
k3
l1
l3
l
l2
i
f2
g1
j
g3
i4
i5
j3
j1
m
n
j2
Page 3
1 2
b3.1
b3.2
b3.3
3
5
b4.1
4
1
2
4
3
4
2
3
3
1
2
1
5
2
6
3
1
1
2
Page 4
87
1
2
1
3
2
10
9
2
1
2
2
1
1
1
1
Page 5

Français p. 6
English p. 17
Deutsch S. 27
Nederlands p. 39
Italiano p. 50
Русский c. 61
5
Page 6

Nous vous remercions d’avoir choisi un produit de la gamme Moulinex exclusivement
prévu pour la préparation des aliments.
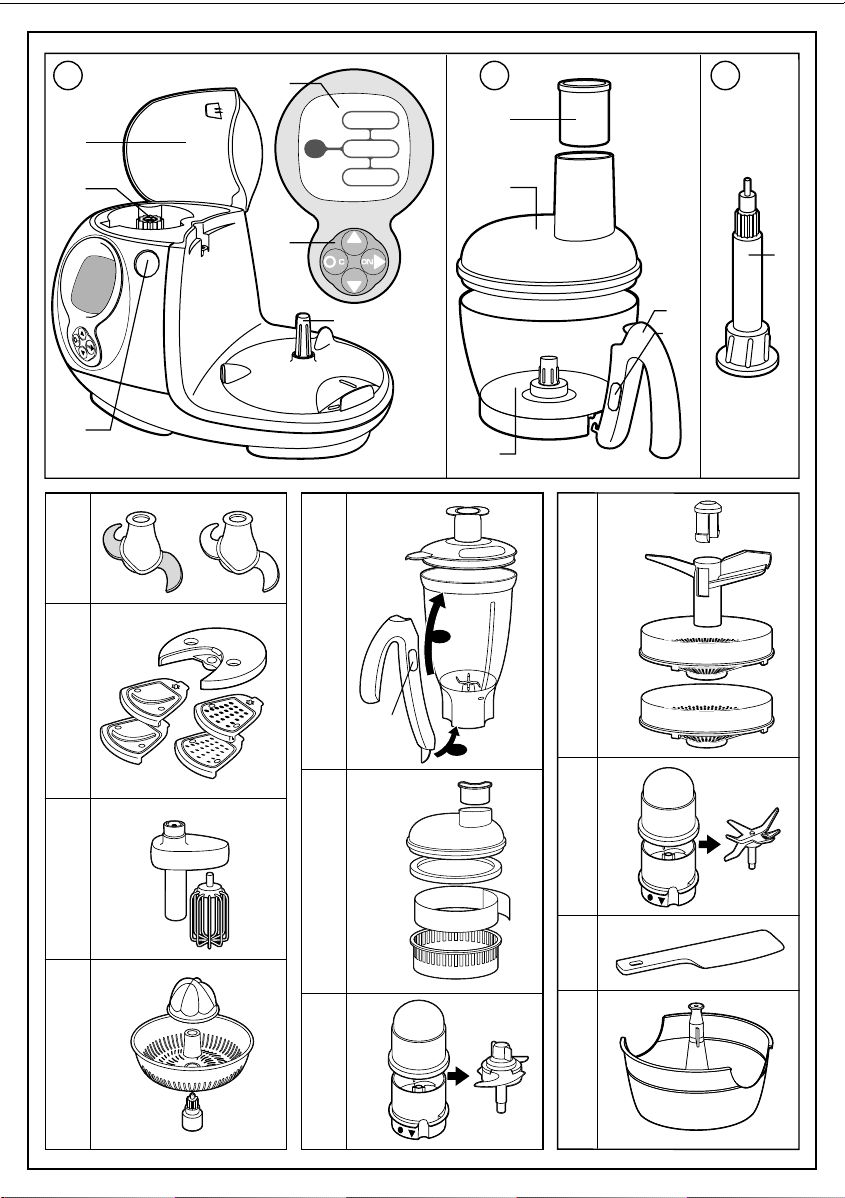
Description
a Bloc moteur
a1 capot de sortie haute
a2 sortie haute
a3 sortie basse
a4 touche d’ouverture du capot (a1) et de
déclipsage de l’accessoire positionné
sur la sortie haute
a5 écran graphique : affichage des mo-
des de fonctionnement, recettes…
a6 clavier muni de touches multifonctions
: permettent de naviguer dans les différents modes.
b Ensemble bol hachoir
b1 poussoir doseur
b2 couvercle à cheminée
b3 bol
b3-1 entraîneur
b3-2 joint en caoutchouc
b3-3 écrou
b4 poignée démontable
b4-1 bouton de déclipsage de la
poignée
c Tige d’entraînement
ACCESSOIRES SELON MODÈLE
d Couteaux
d1 couteau métal
d2 couteau pétrin
e Coupe - légumes
e1 disque - support des secteurs
e2 6 secteurs possibles:
. râpé fin (A)
. tranché fin (D)
. râpé épais (C)
. tranché épais (H)
. reibekuchen ( parmesan, noix de
coco) (G)
. coupe frites (E)
f Batteur
f1 boîtier d’entraînement
f2 fouet
g Presse-agrumes
g1 cône
g2 panier filtre
g3 entraîneur
h Bol mixer
h1 bouchon doseur
h2 couvercle
h3 bol
h4 poignée démontable
h4-1 bouton de déclipsage de la
poignée
i Centrifugeuse
i1 poussoir
i2 couvercle
i3 collerette
i4 bande filtrante
i5 porte-filtre
j Mini-hachoir
j1 couvercle
j2 bol
j3 couteau
k “Maxipress”
k1 palette
k2 clips de la palette
k3 2 grilles ( petits trous / grands trous )
l Broyeur
l1 couvercle
l2 bol
l3 couteau
m Spatule
n Panier de rangement : pour le coupe-
légumes (e), les secteurs (e2), le couteau métal (d1) et la tige d’entraînement (c).
Conseils de sécurité
- Lisez attentivement le mode d’emploi
avant la première utilisation de votre
appareil : une utilisation non conforme
au mode d’emploi dégagerait Moulinex de
toute responsabilité.
- Ne laissez pas l’appareil à la portée des
enfants sans surveillance. L’utilisation de
cet appareil par des jeunes enfants ou
des personnes handicapées doit être
faite sous surveillance.
- Vérifiez que la tension d’alimentation de
votre appareil correspond bien à celle de
votre installation électrique.
Toute erreur de branchement annule la
garantie.
- Votre appareil est destiné uniquement à un
usage domestique, à l’intérieur de la maison,
et uniquement pour un usage culinaire.
- Votre appareil ne doit pas fonctionner sans
surveillance.
- Débranchez votre appareil dès que vous
cessez de l’utiliser (même en cas de coupure
de courant) et lorsque vous le nettoyez.
- N’utilisez pas votre appareil s’il ne fonctionne
pas correctement ou s’il a été endommagé.
Dans ce cas, adressez-vous à un centre
service agréé Moulinex (voir liste dans le
livret service).
6
Page 7
- Toute intervention autre que le nettoyage et
l’entretien usuel par le client doit être
effectuée par un centre service agréé
Moulinex (voir liste dans le livret service).
- Ne mettez pas l’appareil, le câble
d’alimentation ou la fiche dans l’eau ou tout
autre liquide.
- Ne laissez pas pendre le câble
d’alimentation à portée de mains des
enfants.
- Le câble d’alimentation ne doit jamais être
à proximité ou en contact avec les parties
chaudes de votre appareil, près d’une source
de chaleur ou sur un angle vif.
- Si le câble d’alimentation ou la fiche sont
endommagés, n’utilisez pas l’appareil. Afin
d’éviter tout danger, faites-les
obligatoirement remplacer par un centre
service agréé Moulinex (voir liste dans le
livret service).
- Ne pas utiliser l’appareil si le porte-filtre de
la centrifugeuse est endommagé.
- Pour votre sécurité, n’utilisez que des
accessoires et des pièces détachées
Moulinex adaptés à votre appareil.
- Utilisez toujours les poussoirs pour guider
les aliments dans les cheminées, jamais les
doigts, ni fourchette, ni cuillère, ni couteau
ou tout autre objet.
- N’introduisez jamais d’ustensiles (cuillère,
spatule ...) par la cheminée du couvercle.
- N’enlevez les accessoires que lorsque
l’appareil est à l’arrêt complet.
- Ne passez aucun ustensile comportant du
métal dans un four à micro-ondes.
- N’utilisez qu’un accessoire à la fois.
- Manipulez le couteau et les lames avec
précaution : ils sont extrêmement coupants.
- Vous devez obligatoirement retirer les
couteaux (d) et la tige d’entraînement (c)
avant de vider le bol de son contenu.
- Videz le contenu du bol hachoir ou du bol
mixer avant de démonter la poignée.
- Ne touchez jamais les pièces en
mouvement.
- Ne faites pas fonctionner votre appareil à
vide.
- Ne laissez pas pendre les cheveux longs,
les écharpes, les cravates, etc… au dessus
des accessoires en fonctionnement.
Mise en service
- Avant une première utilisation, lavez toutes
les pièces des accessoires à l’eau chaude
savonneuse (attention le boîtier
d’entraînement du batteur (f1) ne passe pas
au lave vaisselle). Rincez et séchez.
- Placez le bloc moteur sur une surface plane,
propre et sèche.
- Branchez votre appareil. L’écran graphique
s’allume. Vous allez pouvoir vous laisser
guider par le Digital assistance.
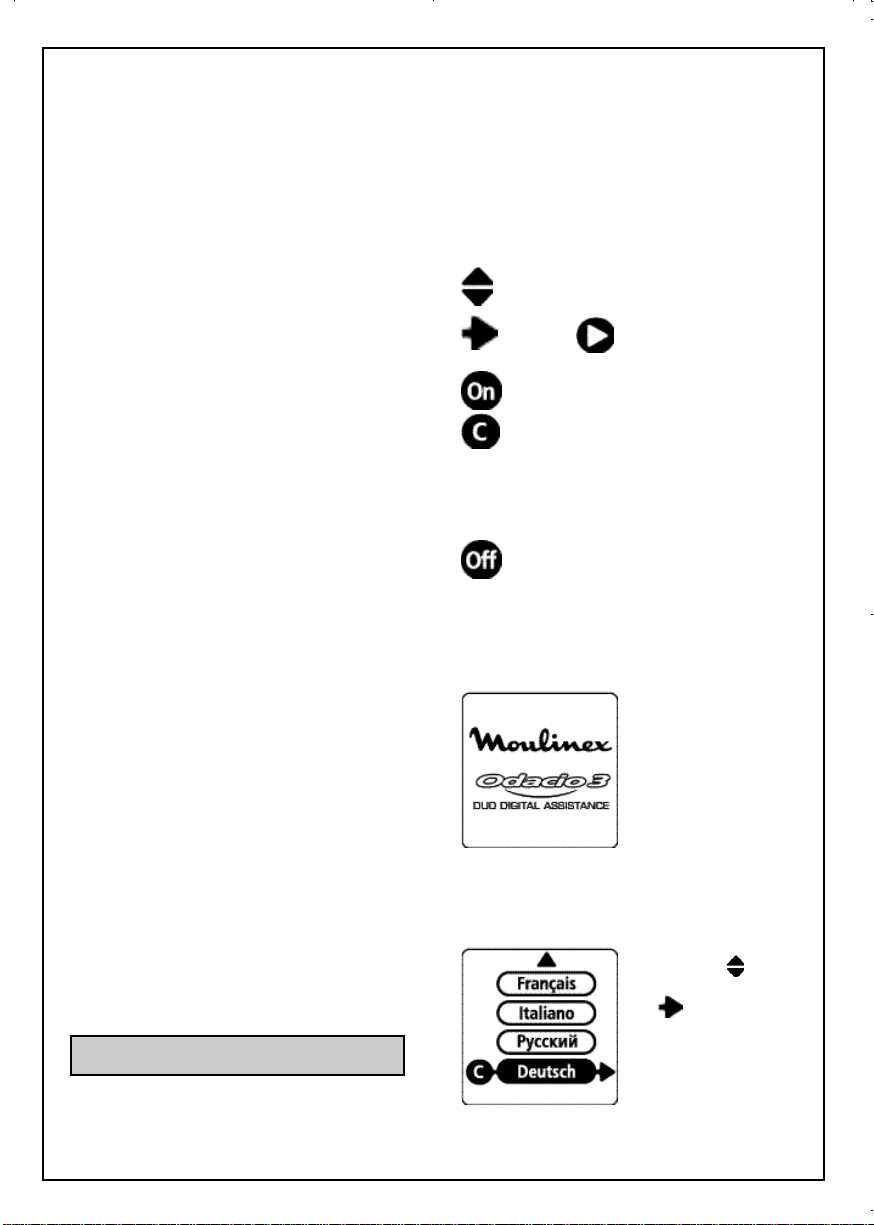
Utilisation des touches du navigateur
(a6):
: Flèches verticales
pour sélectionner
l’option souhaitée
ou : Flèche droite pour
valider l’option choisie.
: Mise en marche du
moteur.
: Un appui court sur
«C» permet le retour
à la page précédente.
Un appui long (2s)
sur «C» permet le
retour au début du
menu.
: Arrêt du moteur
Digital Assistance:
A la mise sous tension du robot : l’écran
d’accueil apparaît :
Ensuite, à la première utilisation, un écran
vous invite au réglage de la langue que vous
souhaitez utiliser :
Sélectionnez votre langue à l’aide des flèches
verticales , puis
validez en appuyant
sur . La langue que
vous venez de choisir
reste en mémoire dans
votre appareil, même
après débranchement.
Toutefois si vous souhaitez modifier le choix
de votre langue, repor-
7
Page 8
tez-vous au
paragraphe
« Réglage du contraste
de l’écran et
modification de la
langue».
Après cette opération, le menu principal
s’affiche :
Votre robot possède 3 modes de
fonctionnement :
- Mode Recettes : Déroulement complet
de recettes, étape par
étape, pour une réus-
site totale de vos en-
trées, plats, desserts…
- Mode Auto : Utilisation des acces-
soires avec des fonc-
tions pré-program-
mées (séquences et
vitesses réglées pour
un résultat fonctionnel
optimal).
- Mode Manuel : Utilisation totalement
libre de votre appareil :
réglage des vitesses
et du temps d’utilisa-
tion selon votre conve-
nance.
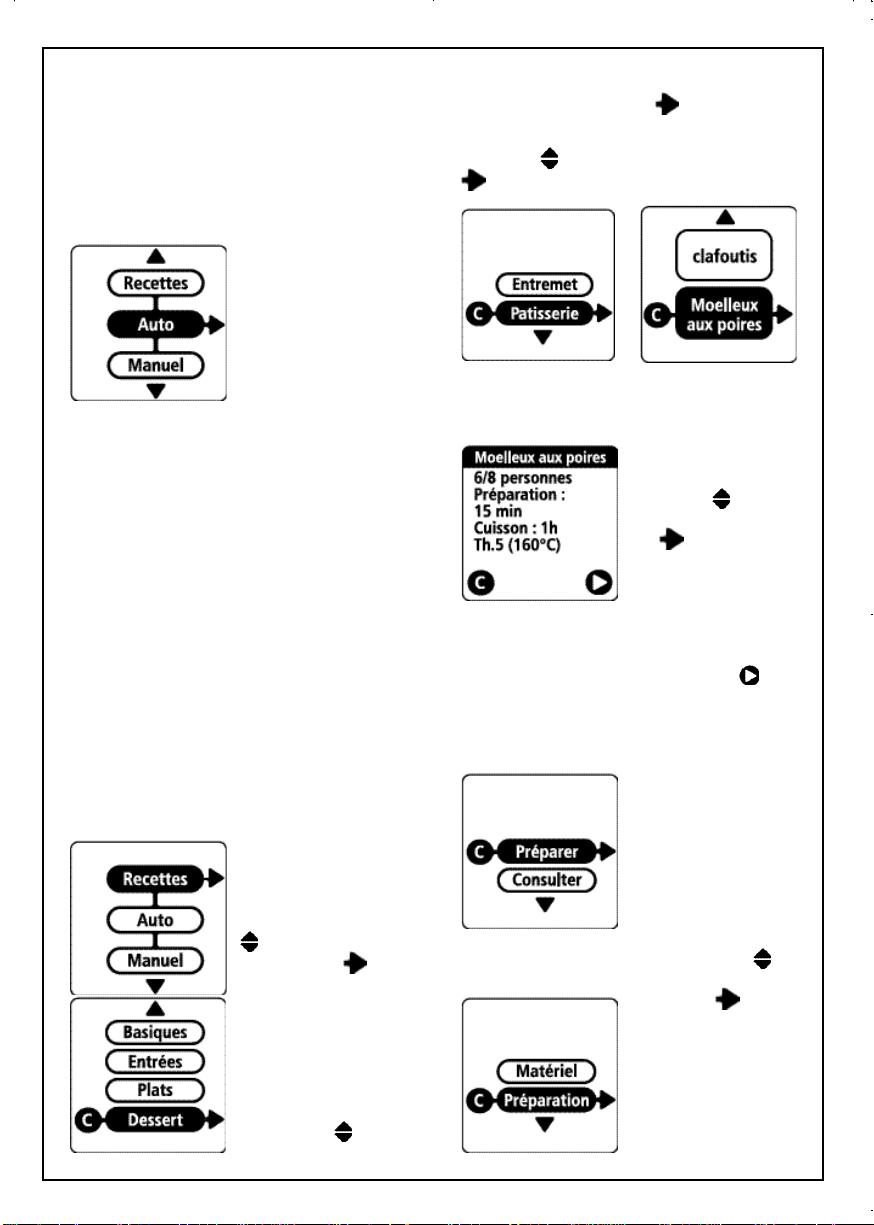
Mode Recettes :
A partir du menu prin-
cipal, sélectionnez le
mode Recettes à l’aide
des flèches verticales
, puis validez en
appuyant sur .
Sélectionnez la caté-
gorie de recette
souhaitée (Basiques,
Entrées, Plats, Des-
serts, Boissons) à
l’aide des flèches
verticales , puis
validez en appuyant
sur .
Sélectionnez la recette à l’aide des flèches
verticales , puis validez en appuyant sur
.
Dans certaines recettes, vous avez le choix
entre 2/4 personnes
ou 6/8 personnes. Sélectionnez votre choix
à l’aide des flèches
verticales , puis
validez en appuyant
sur .
Vous obtenez les informations concernant la recette : nombre de personnes,
temps de préparation,
temps de cuisson...
Appuyez sur pour
continuer.
Vous avez le choix
entre :
- Préparer directement
la recette étape par
étape
- ou consulter la recette
pour connaître les
ingrédients, le
déroulement de la
recette.
Sélectionnez votre
choix à l’aide des flèches verticales ,
puis validez en appuyant sur .
Chaque recette est
détaillée, étape par
étape, pour que celleci soit le plus facilement réalisable.
8
Page 9
Sélectionnez votre
choix à l’aide des flè-
ches verticales ,
puis validez en ap-
puyant sur .
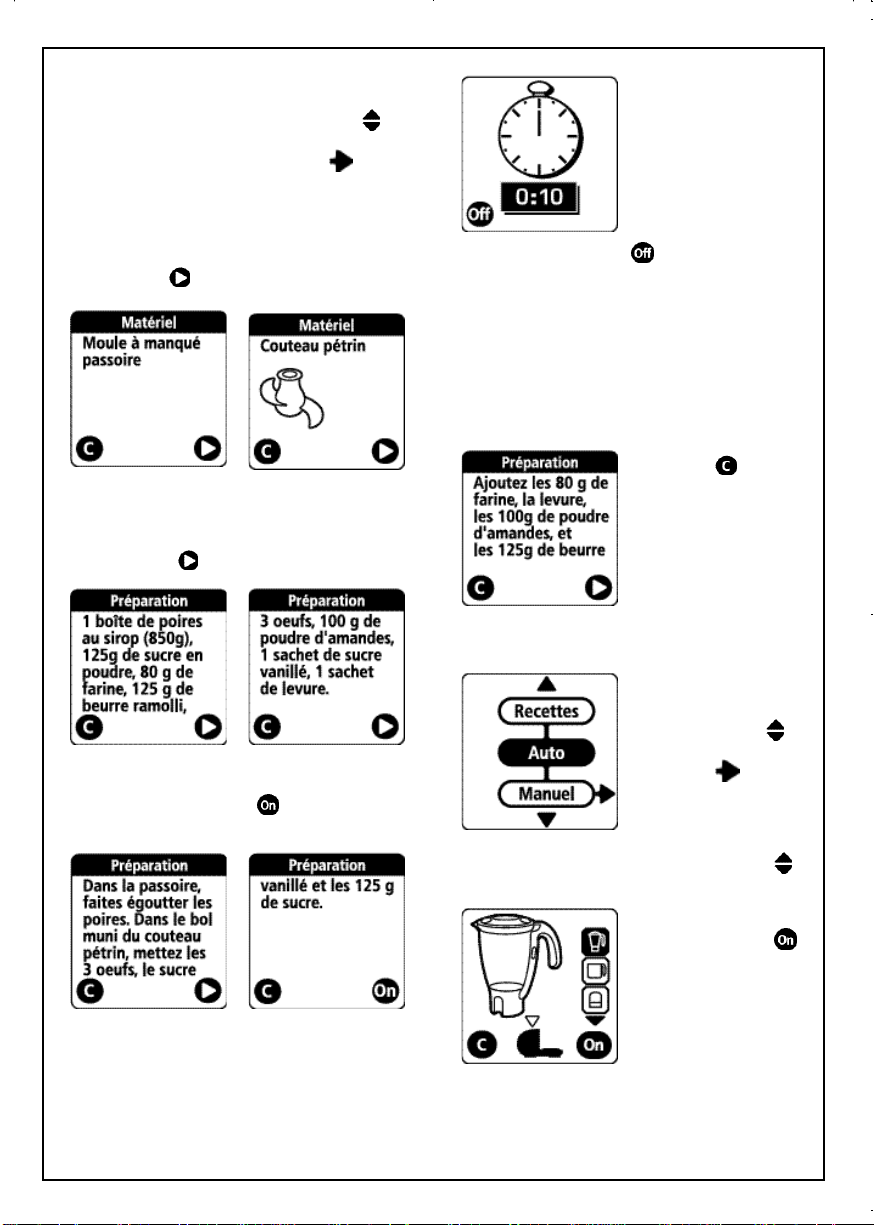
Le matériel nécessaire pour la recette est listé
dans ce paragraphe.
S’il ne vous manque rien, continuez en
appuyant sur pour accéder à la préparation
de la recette.
La liste des ingrédients nécessaires est
précisée au début de la réalisation de la recette.
Préparer les ingrédients et, continuez en
appuyant sur .
Suivez les instructions en respectant les
accessoires utilisés et les quantités indiquées.
Appuyez sur la touche pour mettre en
marche.
Le moteur se met en
fonctionnement : la vi-
tesse et le temps sont
programmés par le ro-
bot.
Un décompte du temps
apparaît sur votre
écran.
L’arrêt du moteur est
automatique à la fin du
temps de fonctionnement.
Si vous appuyez sur
pendant le
fonctionnement : vous
stoppez le moteur et
un écran vous invite
soit à:
- reprendre le fonctionnement, là où vous
vous êtes arrêté.
- retourner à l’écran
précédent.
La touche permet
de retourner à l’écran
précédent et donc de
prolonger le temps de
fonctionnement si cela
s’avère nécessaire.
Suivez les différentes
instructions jusqu’à la
fin de la recette.
Mode AUTO :
A partir du menu principal, sélectionnez le
mode Auto à l’aide des
flèches verticales
puis validez en appuyant sur .
Sélectionnez l’accessoire souhaité avec les
flèches verticales .
L’accessoire sélectionné apparaît alors
sur votre écran. Appuyez sur la touche
pour mettre en marche (la vitesse du
moteur est pré-réglée
pour un résultat fonctionnel optimal).
La flèche clignotante
en bas, vous indique
sur quelle sortie (haute
ou basse) vous devez
positionner votre accessoire.
9
Page 10

La touche permet
de retourner à l’écran
précédent.
Pour les accessoires fonctionnant sur la sortie
basse, sélectionnez le bol hachoir (b3), puis
l’accessoire souhaité avec les flèches
verticales .
Appuyez sur la touche pour mettre en
marche
Un appui prolongé sur permet de retourner
au menu principal.
Vous pouvez ajuster la
vitesse de l’accessoire
avec les flèches verticales de votre
clavier (a6).
L’arrêt du moteur est
obtenu par appui sur
la touche .
Pendant le fonctionnement du moteur, la
touche droite permet
d’accéder au mode
Turbo par un appui
continu, afin d’avoir le
maximum de puissance de votre robot.
L’arrêt du moteur est
obtenu par appui sur
la touche .
Lorsque le moteur est
à l’arrêt, le mode Pulse
(marche intermittente,
permettant une
meilleure finition de
votre préparation) est
accessible en sélectionnant la vitesse la
plus basse à l’aide de
la touche . Le fonctionnement Pulse est
obtenu par appui sur
flèche droite de votre
clavier (a6).
Réglage du contraste de l’écran et
modification de la langue choisie
initialement.
A la mise sous tension du robot, lorsque
l’écran d’accueil apparaît, appuyez
simultanément sur la touche du bas.
Vous accédez à l’écran suivant :
Mode Manuel :
A partir du menu principal, sélectionnez le
mode Manuel à l’aide
des flèches verticales
puis validez en
appuyant sur .
Sélectionnez la vitesse
souhaitée avec les flèches verticales .
Appuyez sur la touche
pour mettre en marche.
La touche permet
de retourner à l’écran
précédent.
Sélectionnez le mode
que vous voulez modifier et procédez au réglage.
Défauts de fonctionnement :
Si votre appareil ne fonctionne pas, le Digital
Assistance vous indique par des flèches
clignotantes les points à vérifier:
Votre robot ne fonctionne pas avec le bol
hachoir :
Vérifiez le positionnement du bol, du couvercle et de la poignée.
10
Page 11

Sinon vérifiez que le
capot de sortie haute
(a1) est bien fermé.
Votre robot ne fonctionne pas avec le bol
mixer:
Vérifiez le positionnement du bol et de la
poignée, ainsi que le
verrouillage du couvercle.
Votre robot ne fonctionne pas avec le minihachoir:
Vérifiez le positionnement du bol, ainsi que
le verrouillage du couvercle.
Au bout de 16 minutes d’inactivité, l’écran se
met en veille. Un simple appui sur une touche
du clavier (a6) le remet en fonctionnement.
Vous connaissez maintenant l’ensemble des
fonctions du DIGITAL ASSISTANCE.
Vous pouvez effectuer l’ensemble des recettes
intégrées dans votre robot.
Les recettes sont classées suivant plusieurs
catégories, en voici le détail :
POTAGES
Velouté de champignons
Soupe paysanne
Gaspacho
Velouté d’asperges
Velouté de poireaux
PLATS
VIANDES
Filet mignon de porc au curry
Moussaka
Tomates farcies
Hachis parmentier
Steak tartare
Osso Bucco
POISSONS
Tarte au saumon
Tartare de saumon
Crevettes aux petits légumes
Brandade de morue
Noix de St Jacques sur lit de poireaux
LEGUMES
Gratin dauphinois
Gratin de courgettes
Purée de carottes
Petits soufflés de pommes de terre
Purée de lentilles
DESSERT
BASIQUES :
PATES SAUCES
Pâte à pain blanc A l’avocat
Pâte brisée Mayonnaise
Pâte à crêpes Aïoli
Pâte à brioche Coulis de tomates
Pâte sablée Guacamole
Pâte à pizza
Pâte à choux
ENTREES
TARTES
Quiche lorraine
Cake aux champignons
Tarte provençale
Tourte fondante
SOUFFLES
Soufflé au saumon
Flan d’asperges
Terrine de poisson
Soufflé au fromage
ENTREMET PATISSERIE
Glacé à la framboise Gâteau au yaourt
Mousse au chocolat Clafoutis
Tiramisu Moelleux aux poires
Crème chantilly Quatre-quarts
Tarte Tatin
BOISSON
Cocktail fraîcheur
Café frappé
Cocktail énergie
Cocktail fruité
Milkshake aux fruits
Les fonctions de votre
robot
1
MONTAGE DES PARTIES AMOVIBLES
. MONTAGE / DÉMONTAGE DU BOL (b3)
Le bol est utilisé avec les accessoires suivants:
- couteaux (d), coupe-légumes (e), batteur (f),
presse-agrumes (g), centrifugeuse (i),
«Maxipress» (k).
11
Page 12

- Positionnez le joint (b3-2) sur le fond du bol.
La lèvre du joint doit être orientée vers le
haut.
- Positionnez l’entraîneur (b3-1).
- Verrouillez l’ensemble avec l’écrou (b3-3)
jusqu’à la butée.
- Démontez l’ensemble et nettoyez-le après
chaque utilisation.
. MONTAGE / DÉMONTAGE DES POIGNÉES (b4)
DU BOL HACHOIR ET DU BOL MIXER (h4)
Pour une facilité de nettoyage et de rangement,
la poignée (b4) du bol hachoir et (h4) du bol
mixer sont démontables.
- Pour monter la poignée, positionnez la
poignée en face des ergots du bol.
- Faites coulisser la poignée du bas vers le
haut. La poignée est correctement montée
lorsque vous entendez un clic.
- Pour démonter la poignée, appuyez sur le
bouton de déverrouillage (b4-1) ou (h4-1) et
faites-la coulisser du haut vers le bas.
(attention, il est nécessaire de déverrouiller le
couvercle du bol mixer pour pouvoir démonter
la poignée (h4)).
ATTENTION :La poignée (b4) doit être
présente sur le bol hachoir pour pouvoir
verrouiller le capot de sortie haute (a1).
2
MELANGER/MIXER/HACHER/PETRIR
ACCESSOIRES UTILISÉS
- Ensemble bol hachoir (b), tige
d’entraînement (c), et couteaux (d) :
. couteau métal (d1) pour mixer, hacher.
. couteau pétrin (d2) pour pétrir ou mélanger.
MONTAGE DES ACCESSOIRES
Appuyer sur la touche d’ouverture (a4) pour
ouvrir le capot de sortie haute (a1).
- Positionnez le bol (b3) sur la sortie basse
(a3).
- Positionnez la tige d’entraînement (c) sur
l’entraîneur du bol (b3-1).
- Faites coulisser le couteau métal (d1) ou le
couteau pétrin (d2) sur la tige d’entraînement
(c), jusqu’au fond du bol.
- Mettez les ingrédients dans le bol.
- Placez le couvercle (b2) sur le bol.
- Rabattez le capot de la sortie haute (a1).
Vous devez entendre un « clic ».
Pour le déverrouillage des couteaux (d) de la
tige d’entraînement (c) :
- Posez l’ensemble sur une surface stable.
- Tournez la tige d’entraînement (c) dans le
sens des aiguilles d’une montre en
maintenant le couteau (d) par la partie
supérieure.
MISE EN MARCHE ET CONSEILS
Mixer
- En mode Manuel : Réglez la vitesse de “3 à
5” et appuyer sur pour mettre en marche.
- En mode Auto : Sélectionnez l’accessoire
puis et appuyez sur .
Vous pouvez mixer jusqu’à 1 litre de potage,
soupe, compote en 20 s.
Hacher
- En mode Manuel : Réglez la vitesse sur “5”
et appuyer sur pour mettre en marche.
- En mode Auto : Sélectionnez l’accessoire
puis et appuyez sur .
En 15 à 30 s, vous hachez jusqu’à 600 g
d’aliments :
. des produits durs : fromage, fruits secs,
certains légumes (carottes, céleri...).
. des produits tendres : certains légumes
(oignons, épinards ...).
. des viandes crues ou cuites (désossées,
dénervées, et coupées en dés).
. des poissons crus ou cuits...
Pétrir/mélanger
- En mode Manuel : Réglez la vitesse sur “5”
et appuyer sur pour mettre en marche.
- En mode Auto : Sélectionnez l’accessoire
puis et appuyez sur .
Vous constatez la formation de la boule de
pâte.
Vous pouvez :
. pétrir jusqu’à 1,2 kg de pâte lourde (sablée,
brisée, à pain) en 60 s environ.
. mélanger jusqu’à 1 litre de pâte à crêpes, à
gaufres, etc. en 1 min à 1 min 30.
. mélanger 1,5 kg de pâte légère (biscuit,
quatre-quarts) en 1 min 30 à 3 min 30.
RAPER/TRANCHER
3
ACCESSOIRES UTILISÉS
- Ensemble bol hachoir (b), tige
d’entraînement (c), et coupe-légumes (e)
MONTAGE DES ACCESSOIRES
Appuyer sur la touche d’ouverture (a4) pour
ouvrir le capot de sortie haute (a1).
- Positionnez le bol (b3) sur la sortie basse
(a3).
- Emboîtez le secteur désiré (e2) sur le
disque-support (e1).
- Enfoncez le disque-support (e1) sur la tige
d’entraînement (c) jusqu’en butée.
Placez l’ensemble sur l’entraîneur du bol
(b3-1).
- Placez le couvercle (b2) sur le bol.
- Fermez le capot de la sortie haute (a1). Vous
devez entendre un « clic ».
12
Page 13

MISE EN MARCHE ET CONSEILS
- Introduisez les aliments dans la cheminée
et guidez-les à l’aide du poussoir (b1).
Pour râper :
- En mode Manuel : Réglez la vitesse sur “5”
et appuyer sur pour mettre en marche.
- En mode Auto : Sélectionnez l’accessoire
puis et appuyez sur .
Pour trancher :
- En mode Manuel : Réglez la vitesse sur “2”
et appuyer sur pour mettre en marche.
- En mode Auto : Sélectionnez l’accessoire
puis appuyez sur .
. tranché épais (H) / tranché fin (D) : pommes
de terre, oignons, concombres, betteraves,
pommes, carottes, choux...
. râpé épais (C) / râpé fin (A) : céleri-rave,
pommes de terre, carottes, fromage...
. reibekuchen (G) : parmesan , noix de coco,
chocolat.
4
BATTRE/FOUETTER/EMULSIONNER
ACCESSOIRES UTILISÉS
- Ensemble bol hachoir (b) et batteur (f)
MONTAGE DES ACCESSOIRES
Appuyer sur la touche d’ouverture (a4) pour
ouvrir le capot de sortie haute (a1).
- Positionnez le bol (b3) sur la sortie basse
(a3).
Avec le batteur (f) :
- Placez-le sur l’entraîneur du bol (b3-1).
Puis :
- Mettez les ingrédients dans le bol.
- Placez le couvercle (b2) sur le bol.
- Rabattez le capot de la sortie haute (a1).
Vous devez entendre un « clic ».
- En mode Manuel : Réglez la vitesse de “ 1 à
5” suivant les préparations et appuyer sur
pour mettre en marche.
- En mode Auto : Sélectionnez l’accessoire
puis et appuyez sur .(une montée
en vitesse par palier est programmée).
- N’utilisez jamais ces accessoires pour pétrir
des pâtes lourdes ou mélanger des pâtes
légères.
Vous pouvez préparer : mayonnaise, aïoli,
sauces, blancs en neige (1 à 7), crème fouettée,
chantilly (jusqu’à 0,5 litre).
5
PRESSER LES AGRUMES
ACCESSOIRES UTILISÉS
- Bol (b3) et presse-agrumes (g)
MONTAGE DES ACCESSOIRES
Appuyer sur la touche d’ouverture (a4) pour
ouvrir le capot de sortie haute (a1).
- Positionnez le bol sur la sortie basse (a3).
- Positionnez l’entraîneur (g3) du presseagrumes sur l’entraîneur du bol.
- Placez le panier filtre (g2) sur le bol.
- Placez le cône (g1) dans l’orifice du panier
filtre.
- Fermez le capot de la sortie haute (a1). Vous
devez entendre un « clic ».
MISE EN MARCHE ET CONSEILS
- Positionnez une moitié d’agrume sur le cône
(g1).
- En mode Manuel : Réglez la vitesse sur “1”
et appuyez sur pour mettre en marche.
- En mode Auto : Sélectionnez l’accessoire
puis et appuyez sur .
Vous pouvez réaliser jusqu’à 1 litre de jus
sans vider le bol.
HOMOGENEISER/MELANGER/MIXER
6
TRES FINEMENT
ACCESSOIRE UTILISÉ
- Bol mixer (h)
MONTAGE DE L’ACCESSOIRE
Appuyez sur la touche d’ouverture (a4) pour
ouvrir le capot de sortie haute (a1).
- Mettez les ingrédients dans le bol mixer (h3),
puis verrouillez le couvercle (h2) sur le bol.
- Placez le bol mixer (h) sur la sortie haute
(a2) (clic audible). Vous pouvez aussi remplir
le bol mixer une fois qu’il est positionné sur
la sortie haute (a2).
S’il y a absence du couvercle ou si celui-ci
est mal positionné, le robot ne fonctionne
pas.
MISE EN MARCHE ET CONSEILS
- En mode Manuel : Réglez la vitesse de “ 1 à
5” et appuyer sur pour mettre en marche.
- En mode Auto : Sélectionnez l’accessoire
et appuyez sur .
Vous pouvez ajouter des ingrédients par
l’orifice du bouchon doseur (h1) en cours de
préparation.
- Ne remplissez jamais le bol mixer avec un
liquide bouillant.
- Ne jamais utiliser le bol mixer avec des
produits secs ( noisettes, amandes,
cacahuètes …).
Vous pouvez :
- préparer jusqu’à 1,5 litre de potage finement
mixé, de velouté, de crème, de compote, de
milk-shake, de cocktail.
13
Page 14

- mélanger toutes les pâtes fluides (crêpes,
beignets, clafoutis, far).
- piler de la glace en vitesse ‘’5’’.
Pour retirer le bol mixer, prenez-le par la
poignée et appuyez sur la touche d’ouverture
(a4).
7
CENTRIFUGER FRUITS ET LEGUMES
ACCESSOIRES UTILISÉS
- Bol (b3), tige d’entraînement (c) et
centrifugeuse (i)
MONTAGE DES ACCESSOIRES
Appuyer sur la touche d’ouverture (a4) pour
ouvrir le capot de sortie haute (a1).
- Positionnez le bol (b3) sur la sortie basse
(a3).
- Placez la tige d’entraînement (c) sur
l’entraîneur du bol.
- Faites coulisser le porte-filtre assemblé
(i3+i4+i5) sur la tige d’entraînement (c).
- Placez le couvercle (i2) sur le bol.
- Rabattez le capot de la sortie haute (a1).
Vous devez entendre un « clic ».
MISE EN MARCHE ET CONSEILS
- En mode Manuel : Réglez la vitesse sur “ 5”
et appuyer sur pour mettre en marche.
- En mode Auto : Sélectionnez l’accessoire
puis et appuyez sur .
- Introduisez les aliments dans la cheminée
et pressez lentement à l’aide du poussoir
(i1).
- Videz fréquemment les déchets du portefiltre et nettoyez la bande filtrante.
- Ne dépassez pas 250 g d’ingrédients pour
chaque opération.
8
HACHER TRES FINEMENT DES PETITES
QUANTITES
ACCESSOIRE UTILISÉ
- Mini-hachoir (j) ou Broyeur (l)
MONTAGE DE L’ACCESSOIRE
Appuyez sur la touche d’ouverture (a4) pour
ouvrir le capot de sortie haute (a1).
- Mettez les ingrédients dans le bol (j2 ou l2),
puis verrouillez le couvercle (j1 ou l1) sur le
bol.
- Placez l’accessoire sur la sortie haute (a2)
(clic audible).
S’il y a absence du couvercle ou si celui-ci
est mal positionné, le robot ne fonctionne
pas.
MISE EN MARCHE ET CONSEILS
- En mode Manuel : Réglez la vitesse sur “5”
et appuyer sur pour mettre en marche.
- En mode Auto : Sélectionnez l’accessoire
et appuyez sur .
Vous pouvez avec le mini-hachoir :
. hacher en quelques secondes : gousses
d’ail, fines herbes, persil, fruits secs, pain,
biscottes pour chapelure, jambon, ...
. préparer des purées pour bébé : 120g.
Quantité maximum fruits secs (noisettes,
amandes, ...) : 80 g.
Ce mini-hachoir n’est pas prévu pour des
produits durs comme le café.
Vous pouvez avec le broyeur :
. hacher en quelques secondes : coriandre,
poivre, piment de Cayenne, abricots secs,....
. Quantité/Temps maximum
abricots secs : 140 g / 10s : en mode Manuel
: Réglez la vitesse sur “ 5 ”
Pour retirer l’accessoire, appuyez sur la touche
d’ouverture (a4).
9
MOULINER/PRESSER/ECRASER (selon
modèle)
ACCESSOIRES UTILISÉS
- Ensemble bol hachoir (b), tige
d’entraînement (c), et «Maxipress» (k)
MONTAGE DE L’ACCESSOIRE
Appuyer sur la touche d’ouverture (a4) pour
ouvrir le capot de sortie haute (a1).
- Positionnez le bol (b3) sur la sortie basse
(a3).
- Positionnez la tige d’entraînement (c) sur
l’entraîneur du bol (b3-1).
- Positionnez la palette (k1) dans le trou central
de la grille (k2) et enfoncez-la jusqu’au clic.
- Faites coulisser l’ensemble sur la tige
d’entraînement (c) en tournant légèrement
pour que les encoches sous la grille viennent
en butée contre les nervures intérieures du
bol (b3).
- Placez le couvercle (b2) sur le bol.
- Fermez le capot de la sortie haute (a1). Vous
devez entendre un clic.
MISE EN MARCHE ET CONSEILS
- Introduisez les aliments coupés en
morceaux.
- En mode Manuel : Réglez la vitesse sur “1”
et appuyer sur pour mettre en marche.
- En mode Auto : Sélectionnez l’accessoire
puis et appuyez sur .
Vous pouvez préparer avec la grille :
. Gros trous : des purées (jusqu’à 1 kg de
légumes ou fruits cuits) : pommes de terre,
carottes, chou-fleur.
14
Page 15

. Petits trous : des coulis ou compotes de fruits
dénoyautés (jusqu’à 500 g) : tomates,
raisins, fraises, framboises, groseilles,
abricots, pêches.
Remarque : si la palette ne parvient pas à
écraser les aliments, vérifiez que celle-ci est
bien clipsée sur la grille.
10
NETTOYAGE ET DÉMONTAGE DU
«MAXIPRESS»
- Soulevez l’ensemble tige d’entraînement /
palette (k1) / grille (k2) par la tige
d’entraînement (c).
- Otez l’ensemble grille / palette de la tige
d’entraînement (c).
- Appuyez sur les clips de chaque côté de la
palette pour libérer la grille.
Nettoyage
- Débranchez l’appareil.
- Pour un nettoyage plus facile, rincez
rapidement les accessoires après leur
utilisation.
- Lavez et essuyez les accessoires (ils
passent au lave-vaisselle à l’exception du
boîtier d’entraînement du batteur (f1)).
- Versez de l’eau chaude additionnée de
quelques gouttes de savon liquide dans le
bol mixer. Fermez le couvercle. Donnez
quelques impulsions en appuyant sur la
touche pulse. Débranchez l’appareil. Rincez
le bol sous l’eau courante et laissez-le
sécher.
- Le bol (b3) est équipé d’un joint. Pour le
nettoyer, vous pouvez passer le bol au lave-
vaisselle ou bien le laver avec de l’eau
chaude. Pour remonter le joint sur le bol,
vérifiez que la lèvre du joint soit toujours
orientée vers le haut.
- Pour faciliter le nettoyage et le rangement,
la poignée du bol hachoir (b4) et celle du
bol mixer (h4) sont démontables et passent
au lave-vaisselle.
- En cas de coloration de vos accessoires par
des aliments (carottes, oranges...), frottez-
les juste après utilisation avec un chiffon
imbibé d’huile alimentaire, puis procédez au
nettoyage habituel.
- Ne mettez pas le bloc moteur (a), ni le boîtier
d’entraînement du batteur (f1) dans l’eau ni
sous l’eau courante. Essuyez-les avec une
éponge humide.
- Les lames des accessoires sont très
affûtées. Manipulez-les avec précaution.
Rangement
Votre robot Odacio est muni :
- d’un panier de rangement (n), qui vient se
positionner à l’intérieur de l’ensemble bol
hachoir (b). Vous pouvez y ranger les
secteurs coupe-légumes (e2), le disquesupport (e1), le couteau métal (d1), ainsi que
la tige d’entraînement (c).
- d’un range cordon placé dans le bloc moteur
: rangez et réglez la longueur du câble
d’alimentation comme vous le désirez en
poussant ou tirant le cordon.
Si votre appareil ne
fonctionne pas que faire
- Vérifiez :
. le branchement
. que les accessoires sont correctement
positionnés sur le bloc moteur.
. que les couvercles sont correctement
positionnés.
. lors de l’utilisation de l’ensemble bol hachoir
(b), que le capot de sortie haute (a1) est bien
fermé.
Votre appareil ne fonctionne toujours
pas ? Adressez-vous à un centre service
agréé Moulinex (voir liste dans le livret
“Moulinex Service”).
Accessoires
Vous pouvez personnaliser votre appareil et
vous procurer auprès de votre revendeur
habituel ou d’un centre service agréé Moulinex,
les accessoires suivants :
Accessoires Centre service agrée Moulinex
Secteur coupe-frites (E) 5980678
Secteur Reibekuchen ( noix de coco, 5980679
parmesan) (G)
Secteur, râpé épais (C) 5966358
Secteur, râpé fin (H) 5966356
Secteur , râpé fin (A) 5980676
Secteur, tranché fin (D) 5980677
Broyeur 5909800
Mini-hachoir 5909801
Batteur 5980652
Couteau pétrin 5980640
15
Page 16

Presse-agrumes 5909802
Bol mixer 5909803
Couteau métal A11D09
Centrifugeuse 0697254
Spatule 4909610
Panier de rangement 5909804
Maxipress 5980671
Bol hachoir 5909808
Poignée bol hachoir 0697271
Poignée bol mixer 0697272
Participons à la protection de
l’environnement !
i
Votre appareil contient de nombreux matériaux
valorisables ou recyclables.
Ü
Confiez celui-ci dans un point de collecte ou à
défaut dans un centre service agrée pour
que son traitement soit effectué.
Samen het milieu beschermen.
i
Uw toestel bevat meerdere recycleerbare
materialen.
Ü
Breng deze naar een containerpark of naar een
erkend service center, bevoegd voor de recyclage.
16
Page 17

Thank you for choosing an appliance from the
Moulinex range, which is intended exclusively for food preparation.
Description
a Motor unit
a1 Top power outlet cover
a2 Top power outlet
a3 Bottom power outlet
a4 Release button for cover (a1) and for
accessory fitted on upper power outlet
a5 Graphic display, showing operating
modes, recipes, etc.
a6 Keypad with multi-function keys for
navigating the various modes
b Chopping bowl assembly
b1 Pusher / measure
b2 Cover with feed tube
b3 Bowl
b3-1 Driver
b3-2 Rubber ring
b3-3 Nut
b4 Detachable handle
b4-1 Handle release button
c Drive shaft
ACCESSORIES ACCORDING TO MODEL
d Blades
d1 Metal blade
d2 Plastic kneader
e Grating/slicing discs
e1 Sector holder disc
e2 Choice of 6 sectors:
. Fine grater (A)
. Thin slicer (D)
. Coarse grater (C)
. Thick slicer (H)
. Special reibekuchen grater
(parmesan, coconut) (G)
. Chip cutter (E)
f Whisk
f1 Drive box
f2 Whisk
g Citrus press
g1 Cone
g2 Strainer
g3 Driver
h Liquidiser
h1 Measuring stopper
h2 Cover
h3 Jug
h4 Detachable handle
h4-1 Handle release button
i Juice Extractor
i1 Pusher
i2 Cover
i3 Collar
i4 Filter strip
i5 Filter holder
j Small mincer
j1 Cover
j2 Bowl
j3 Blade
k “Maxipress”
k1 Blade unit
k2 Blade unit clip
k3 2 grids (small holes / large holes)
l Grinder
l1 Cover
l2 Bowl
l3 Blade
m Spatula
n Storage basket for the grating/slicing
discs (e), the sectors (e2), the metal
blade (d1) and the drive shaft (c).
Safety instructions
- Read the instructions carefully before
using your appliance for the first time;
any use that does not conform to the instructions for use will absolve Moulinex
from any liability.
- Do not leave the appliance unattended
within the reach of children. The use of
this appliance by children or by disabled
persons must be supervised at all times.
- Check that the power rating of the appliance
does in fact match that of your electrical
system.
- Check that the voltage rating of your
appliance corresponds to that of your
household electrical wiring system.
This appliance is manufactured to conform to
the Low Voltage Electrical Equipment (Safety)
Regulations 1989 and is designed to comply
with BS 3456. It complies with the requirements
of the EEC Directive (89/336/EEC).
Any connection fault invalidates the guarantee.
- Your appliance is intended only for indoor,
domestic use, for culinary purposes only.
- Your appliance must not be left running unattended.
- Unplug your appliance as soon as you have
finished using it, when you are cleaning it or
in the event of a power cut.
- Do not use your appliance if it is not working
correctly or if it has been damaged. If this is
the case, contact a Moulinex approved service centre (see list in service booklet).
17
Page 18

- Any intervention, apart from cleaning and
normal maintenance by the customer, must
be carried out by an approved Moulinex service centre (see list in the service booklet).
- Do not immerse the appliance, the supply
cable or the plug in water or in any other
liquid.
- Do not allow the power cord to hang down
within reach of children.
- The supply cable must never be close to or
in contact with the hot parts of your appliance or any other source of heat and should
be kept away from sharp edges.
- If the supply cable or the plug is damaged,
do not use the appliance. To avoid any risk,
these must be replaced by an approved
Moulinex service centre (see list in the service booklet).
- Do not use the appliance if the filter holder
of the juice extractor is damaged.
- For your own safety, use only the appropriate Moulinex accessories and spare
parts for your appliance.
- Always use the pushers to feed food items
down the feed tubes; never use the fingers
or cutlery or any other implement.
- Never insert utensils (spoon, spatula etc.)
through the feed tube of the cover.
- Never remove accessories unless the appliance is completely stopped.
- Never introduce a utensil containing metal
into a microwave oven.
- Only use one accessory at a time.
- Handle the cutter and blades with care - they
are extremely sharp.
- You must remove the blades (d) and the
drive shaft (c) before emptying the bowl.
- Empty the chopping bowl or liquidiser before detaching the handle.
- Never touch the moving parts.
- Do not operate your appliance when empty.
- Do not allow long hair, scarves, ties, etc. to
dangle over accessories during operation.
Using your appliance for
the first time
- Before using your appliance for the first time,
wash all the accessory parts in hot, soapy
water (NOTE: the drive box for the whisk (f1)
is not dishwasher-proof). Rinse and dry.
- Place the motor unit on a flat, clean and dry
surface.
- Plug in your appliance. The display will light
up. You can follow the guidance given by
the Digital Assistant.
Using the navigation keys (a6):
: Vertical arrows to se-
lect the desired option
or : Right arrow to con-
firm your selection
: Starting the motor
: Press “C” briefly to
go back to the previous page
Hold “C” down for
longer (2 s) to go back
to the start of the
menu
: Stopping the motor
Digital Assistant:
When the processor is switched on, the start
screen appears:
When you first use the appliance, this will be
followed by a screen asking you to choose the
language that you wish to use:
Select your language
by means of the vertical arrows , then confirm your selection by
pressing .
Your language choice
will remain in the
memory, even once
the appliance is
switched off.
If, however, you wish
to change your language choice, refer to
the section “Adjusting
display contrast and
changing language
selection”.
18
Page 19

When this operation is completed, the main
menu appears:
Your food processor has 3 operation
modes:
- Recipe mode: step-by-step display of
recipes for perfect success in preparing your
starters, main courses,
desserts etc.
- Auto mode: use of accessories with
pre-programmed functions (sequences and
speeds adjusted for
optimum results).
- Manual mode: completely free use of
your appliance with adjustment of speeds and
timing to suit you.
Recipe Mode:
In the main menu, select Recipe mode using the vertical arrows
, then confirm your
selection by pressing
.
Select the required
recipe category (Basic
recipes, Starters, Main
courses, Desserts,
Drinks) using the vertical arrows , then
confirm your choice by
pressing .
Select the recipe using the vertical arrows ,
then confirm your choice by pressing .
For some recipes, you
have the choice of 2/4
persons or 6/8 persons. Select the
number of servings
using the vertical arrows , then confirm
your choice by pressing .
You will then be given
information regarding
the recipe: number
served, preparation
time, cooking time, etc.
Press to continue.
You have the choice
of: step by step, or
- going straight on to
prepare the recipe
- reading through the
recipe to ascertain the
ingredients and method.
Select your choice using the vertical arrows
, then confirm your
choice by pressing .
Each recipe is dis-
played step by step to
make its preparation as
easy as possible.
Make your selection
using the vertical arrows , then confirm
your choice by pressing .
The equipment required for the recipe is listed
in this section.
If you have everything ready, continue by
pressing to start viewing the preparation
instructions.
19
Page 20

The preparation instructions begin with the list
of ingredients required.
Prepare the ingredients and continue by press-
ing .
Follow the instructions, taking care to use the
accessories and quantities specified.
Press to start the processor.
The motor will start.
The speed and time
are pre-programmed.
A countdown of the
time appears on the
display.
The motor stops automatically at the end of
the preset time.
If you press while
the machine is running,
the motor will stop and
the display will offer the
following options:
- continue at the point
where you left off,
- go back to the previous screen.
The button can be
used to go back to the
previous screen and
run the machine for
longer if necessary.
Follow the instructions
until you reach the end
of the recipe.
AUTO Mode:
In the main menu, select Auto mode using
the vertical arrows
, then confirm your
choice by pressing .
Select the desired accessory using the vertical arrows .
The selected accessory will be shown on
the display. Press
to start the processor
(the motor speed is
pre-adjusted for optimum results).
The flashing arrow towards the bottom of the
display shows the
power outlet (upper or
lower) to be used.
The button can be
used to go back to the
previous screen.
For the accessories operating from the lower
power outlet, select the chopping bowl (b3),
followed by the desired accessory, using the
vertical arrows .
Press to start the processor.
Hold the button down for 2 seconds to go
back to the main menu.
20
Page 21

You can adjust the
speed of the accessory
using the vertical arrows on the keypad
(a6).
the button is used
to select the lowest
speed. Pulse mode
operation is obtained
by pressing the right
arrowon your keypad
(a6).
Manual Mode:
The motor can be
stopped by pressing
.
In the main menu, select Manual mode using the vertical arrows
, then confirm your
choice by pressing .
Select the desired
speed using the vertical arrows .
Press to start the
processor.
The button can be
used to go back to the
previous screen.
The Turbo mode can
be accessed when the
motor is running by
continuously holding
down the button on the
right; this allows the
machine to run at maximum power.
The motor can be
stopped by pressing
.
Adjusting display contrast and changing
language selection.
On switching on the processor, when the start
screen appears, press simultaneously on the
bottom button.
The following screen will appear:
Select the mode that
you wish to modify and
proceed with the
change.
Functional faults
If your appliance fails to work, the Digital
Assistant indicates the points to be checked
with flashing arrows:
Your processor is not
working with the chopping bowl:
check the positioning
of bowl, cover and handle;
otherwise, check that
the cover of the upper
power outlet (a1) is
properly closed.
Your processor is not
working with the liquidiser:
check the positioning
of bowl and handle and
that the cover is properly latched.
While the motor is
stopped, Pulse mode
(intermittent operation
to give your preparation a better finish) becomes available when
21
Page 22

Your processor is not
working with the small
mincer:
check the position of
the bowl and the latching of the cover.
After 16 minutes of inactivity, the display goes
into standby. Pressing one of the keys on the
keypad (a6) will restore the display.
You now know all the functions of the DIGITAL
ASSISTANT.
You can prepare all the recipes programmed
into your food processor.
These recipes are classified in a number of
categories, as follows:
BASIC RECIPES:
DOUGHS SAUCES
White bread dough Avocado sauce
Short-crust pastry Mayonnaise
Pancake batter Aïoli
Brioche dough Tomato coulis
Rich short-crust pastry Guacamole
Pizza dough
Choux pastry
STARTERS
MAIN COURSES
MEATS DISHES
Filet mignon pork curry
Moussaka
Stuffed tomatoes
Lincolnshire pie
Steak tartare
Osso Bucco
FISH DISHES
Salmon tart
Salmon tartare
Prawns with baby vegetables
Cod brandade
Scallops with Noilly-Prat
VEGETABLES
Gratin dauphinois
Courgette gratin
Carrot purée
Potato soufflé
Lentil purée
DESSERTS
ENTREMETS CAKES
Raspberry ice Yoghurt gateau
Chocolate mousse Clafoutis
Tiramisu Pear moelleux
Chantilly cream Pound cake
Apple tarte Tatin
FLANS
Quiche lorraine
Mushroom cake
Provençale Tart
Fondante flan
SOUFFLES
Salmon soufflé
Asparagus flan
Fish terrine
Cheese soufflé
SOUPS
Cream of mushroom
Farmhouse soup
Gaspacho
Creamed asparagus
Creamed leek
DRINKS
Refreshing cocktail
Iced coffee
Energy cocktail
Fruit cocktail
Fruit shake
The functions of your food
processor
1
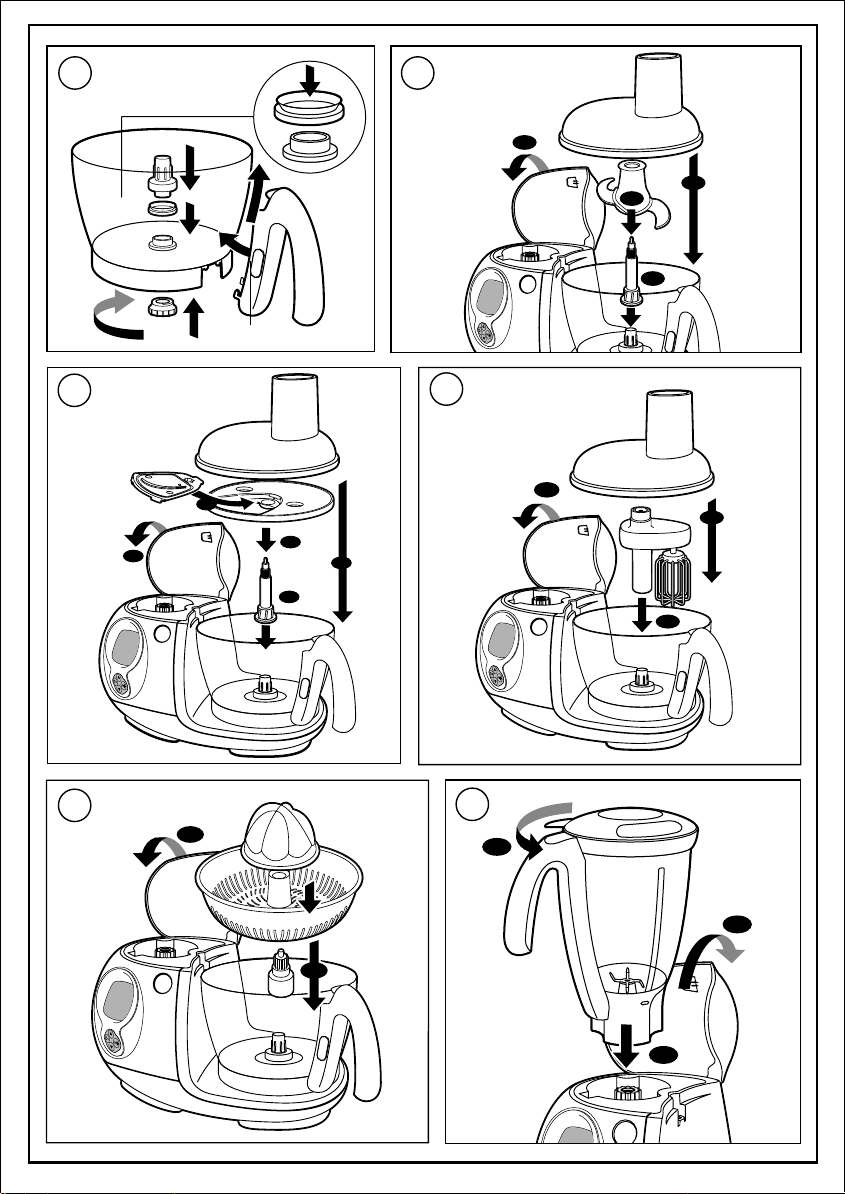
FITTING DETACHABLE PARTS
. FITTING / DETACHING THE BOWL (B3)
The bowl is used with the following accessories:
- blades (d), grating/slicing discs (e), whisk (f);
citrus press (g), juice extractor (i),
“Maxipress” (k).
- Fit the rubber ring (b3-2) at the bottom of
the bowl. The lip of the ring should point
upwards.
- Fit the driver (b3-1).
22
Page 23

- Fit the nut (b3-3) and tighten it to lock the
assembly.
- Dismantle the assembly for cleaning after
each use.
. FITTING/DETACHING THE CHOPPING BOWL HAN-
DLE (b4) AND THE LIQUIDISER HANDLE (h4)
For ease of cleaning and storage, the chopping bowl handle (b4) and liquidiser handle
(h4) are detachable.
- To fit the handle, position it against the lugs
of the bowl/jug.
- Slide the handle upwards. The handle is
correctly fitted when you hear a click.
- To detach the handle, press the release button (b4-1 or h4-1) and slide the handle downwards.
(Note: the lid of the liquidiser must be unlocked in order to be able to detach the handle (h4)).
NOTE: the handle (b4) must be fitted to the
chopping bowl in order to be able to lock
the upper power outlet cover (a1).
2
MIXING/LIQUIDISING/CHOPPING/
KNEADING
ACCESSORIES USED
- Bowl assembly (b), drive spindle (c) and
blades (d):
. metal blade (d1) for liquidising and chopping,
. plastic kneader (d2) for kneading or mixing.
FITTING ACCESSORIES
Press the release button (a4) to open the
upper power outlet cover (a1).
- Fit the bowl (b3) on the lower power outlet
(a3).
- Fit the drive spindle (c) on the bowl driver
(b3-1).
- Slide the metal blade (d1) or the plastic
kneader (d2) onto the drive shaft (c) down
to the bottom of the bowl.
- Place the ingredients in the bowl.
- Fit the lid (b2) on the bowl.
- Close the top outlet cover (a1). You should
hear a click.
To release the blades (d) from the drive shaft
(c):
- Place the assembly on a stable surface.
- Turn the drive shaft (c) clockwise while holding the upper part of the blade (d).
USAGE AND PRACTICAL TIPS
Liquidising
- In manual mode: set the speed between 3
and 5 and press to start the appliance.
- In Auto mode: select the accessory then
and press .
You can liquidise up to 1 litre of soup or
compote in 20 s.
Chopping
- In manual mode: set the speed to 5 and
press to start the appliance.
- In Auto mode: select the accessory then
and press .
In 15 to 30 s, you can chop up to 600 g of food:
. hard produce: cheese, dried fruit, certain
vegetables (carrots, celery, etc.).
. soft produce: certain vegetables (onions,
spinach, etc.).
. raw or cooked meats (boned, trimmed of
gristle and diced).
. raw or cooked fish.
Kneading/mixing
- In manual mode: set the speed to 5 and
press to start the appliance.
- In Auto mode: select the accessory then
and press .
When kneading, stop the appliance as soon
as you see the dough form a ball.
You can:
. knead up to 1.2 kg of heavy dough (short-
bread, short-crust, bread) in about 60 s.
. mix up to 1 litre of batter for pancakes, waf-
fles etc. in 1 min to 1 min 30 s.
. mix 1.5 kg of light dough (sponge cake,
pound cake) in 1 min 30 s to 3 min 30 s.
3
GRATING/SLICING
ACCESSORIES USED
- Chopping bowl assembly (b), drive spindle
(c) and grating/slicing discs (e).
FITTING ACCESSORIES
Press the release button (a4) to open the
upper power outlet cover (a1).
- Fit the bowl (b3) on the lower power outlet
(a3).
- Fit the desired sector (e2) in the holder disc
(e1).
- Push the holder disc (e1) fully home on the
drive shaft (c).
- Place the assembly on the bowl driver
(b3-1).
- Fit the lid (b2) on the bowl.
- Close the upper outlet cover (a1). You should
hear a click.
USAGE AND PRACTICAL TIPS
- Insert the food in the feed tube and feed it
into the mechanism by means of the pusher
(b1).
To grate:
- In manual mode: set the speed to 5 and
press to start the appliance.
23
Page 24

- In Auto mode: select the accessory then
and press .
To slice:
- In manual mode: set the speed to 2 and
press to start the appliance.
- In Auto mode: select the accessory then
and press .
. thick slicing (H) / thin slicing (D): potatoes,
onions, cucumbers, beetroot, apples, carrots, cabbage, etc.
. coarse grating (C) / fine grating (A): celeriac,
potatoes, carrots, cheese, etc.
. Special reibekuchen grater (G): parmesan,
coconut, chocolate.
BEATING/EMULSIFYING/WHIPPING
4
ACCESSORIES USED
- Chopping bowl assembly (b) and whisk (f).
FITTING ACCESSORIES
Press the release button (a4) to open the
upper power outlet cover (a1).
- Fit the bowl (b3) on the lower power outlet
(a3).
With the whisk (f):
- place it on the bowl driver (b3-1),
then:
- Place the ingredients in the bowl.
- Fit the lid (b2) on the bowl.
- Close the top outlet cover (a1). You should
hear a click.
- In manual mode: set the speed between 1
and 5, according to the preparation in hand,
and press to start the appliance.
- In Auto mode: select the accessory then
and press (the speed is programmed
to increase in steps).
- Never use these accessories to knead heavy
dough or to mix light dough.
You can prepare: mayonnaise, aïoli, sauces,
whipped egg whites (1 to 7), whipped cream,
chantilly (up to 0.5 litres).
PRESSING CITRUS FRUIT
5
ACCESSORIES USED
- Bowl (b3) and citrus press (g)
FITTING ACCESSORIES
Press the release button (a4) to open the
upper power outlet cover (a1).
- Fit the bowl on the lower power outlet (a3).
- Fit the drive spindle (g3) for the citrus press
on the bowl driver.
- Fit the strainer (g2) on the bowl.
- Fit the cone (g1) through the hole in the
strainer.
- Close the upper outlet cover (a1). You should
hear a click.
USAGE AND PRACTICAL TIPS
- Hold one half of the fruit on the cone (g1).
- In manual mode: set the speed to 1 and
press to start the appliance.
- In Auto mode: select the accessory then
and press .
You can squeeze up to a litre of juice without
emptying the bowl.
HOMOGENISING/MIXING/VERY FINE
6
LIQUIDISING
ACCESSORY USED
- Liquidiser (h)
FITTING THE ACCESSORY
Press the release button (a4) to open the
upper power outlet cover (a1).
- Place the ingredients in the liquidiser (h3)
then lock the cover (h2) on the jug.
- Fit the liquidiser (h) on the upper power out-
let (a2) (audible click). You can also fill the
liquidiser after it is fitted on the upper power
outlet (a2).
If the cover is not correctly fitted on the
jug, the appliance will not start.
USAGE AND PRACTICAL TIPS
- In manual mode: set the speed between 1
and 5 and press to start the appliance.
- In Auto mode: select the accessory and
press .
During preparation, you can add ingredients
through the measuring stopper (h1) hole.
- Never fill the liquidiser with boiling liquid.
- Never use the liquidiser with dry produce
(hazelnuts, almonds, peanuts, etc.).
You can:
- prepare up to 1.5 litres of finely chopped
soup, crème soup, cream, compote,
milkshake or cocktail,
- mix all kinds of batter (pancake, doughnut,
clafoutis, custard cake),
- crush ice at speed 5.
To remove the liquidiser from the appliance,
grasp it by the handle and press the release
button (a4).
7
SQUEEZING FRUIT AND VEGETABLES
ACCESSORIES USED
- Bowl (b3), drive shaft (c) and juice extractor
(i).
24
Page 25

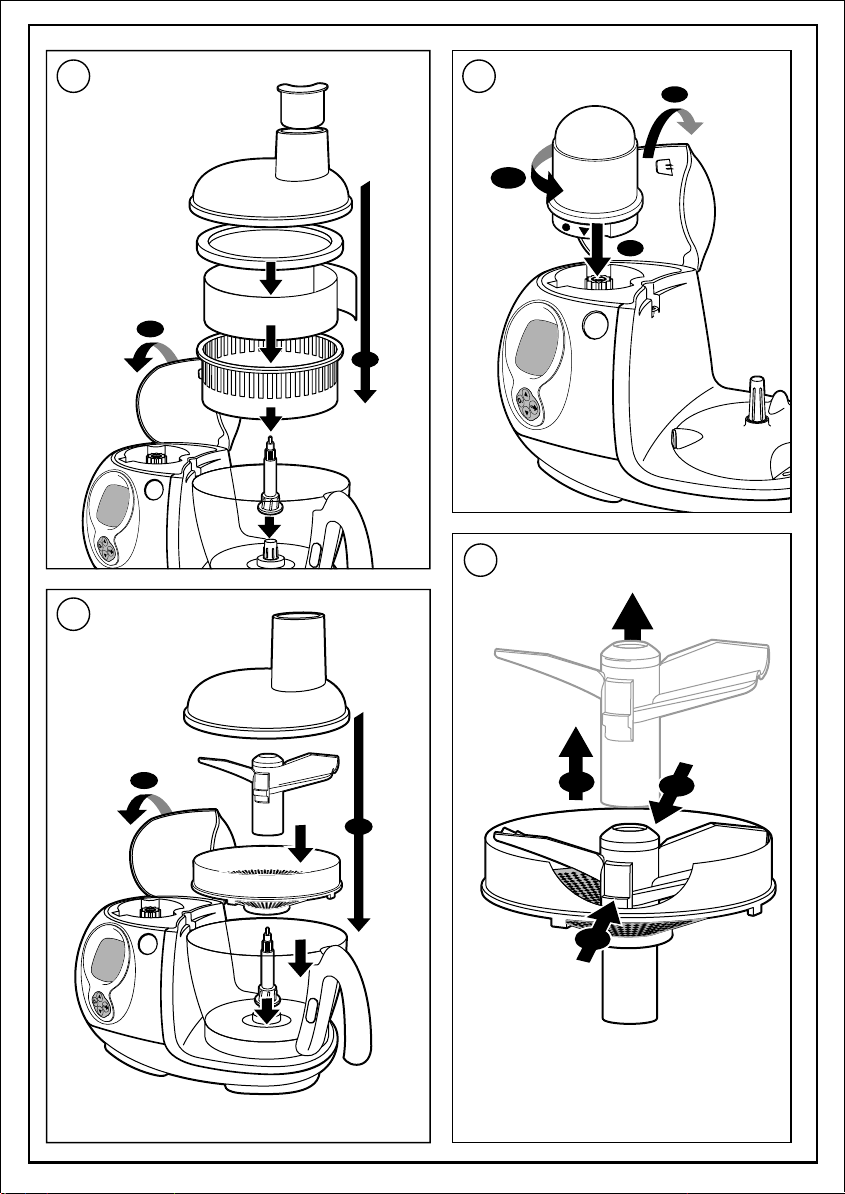
FITTING ACCESSORIES
Press the release button (a4) to open the
upper power outlet cover (a1).
- Fit the bowl (b3) on the lower power outlet
(a3).
- Fit the drive spindle (c) on the bowl driver.
- Slide the assembled filter holder (i3+i4+i5)
onto the drive shaft (c).
- Fit the lid (i2) on the bowl.
- Close the top outlet cover (a1). You should
hear a click.
USAGE AND PRACTICAL TIPS
- In manual mode: set the speed to 5 and
press to start the appliance.
- In Auto mode: select the accessory then
and press .
- Insert the food in the feed tube and feed it
into the mechanism by means of the pusher
(i1).
- You should empty residues from the filter
holder and clean the filter strip at frequent
intervals.
- Do not exceed 250 g of ingredients for each
operation.
8
CHOPPING SMALL QUANTITIES VERY
FINELY
ACCESSORY USED
- Small-mincer (j) or grinder (l).
FITTING THE ACCESSORY
Press the release button (a4) to open the
upper power outlet cover (a1).
- Place the ingredients in the bowl (j2 or l2)
then lock the cover (j1 or l1) on the bowl.
- Fit the accessory on the upper power outlet
(a2) (audible click).
If the cover is not correctly fitted, the appliance will not start.
USAGE AND PRACTICAL TIPS
- In manual mode: set the speed to 5 and
press to start the appliance.
- In Auto mode: select the accessory and
press .
With the small mincer, you can:
. chop cloves of garlic, mixed herbs, parsley,
dried fruit, bread, rusk for breadcrumbs, ham
etc. in a few seconds.
. prepare baby-food purées: 120 g.
Maximum quantity of dried fruit/nuts (hazelnuts, almonds etc.): 80 g.
This small mincer is not intended for hard
produce, such as coffee.
With the grinder, you can:
. chop coriander, pepper, cayenne pepper,
dried apricots etc. in a few seconds.
. Maximum quantity/time,
dried apricots: 140 g / 10 s. In manual mode:
set the speed to 5.
To remove the accessory from the appliance,
press the release button (a4).
MILLING/PRESSING/CRUSHING (de-
9
pending on model)
ACCESSORIES USED
- Chopping bowl assembly (b), drive spindle
(c) and “Maxipress” (k).
FITTING THE ACCESSORY
Press the release button (a4) to open the
upper power outlet cover (a1).
- Fit the bowl (b3) on the lower power outlet
(a3).
- Fit the drive spindle (c) on the bowl driver
(b3-1).
- Fit the blade unit (k1) in the central hole in
the grid (k2) and press down until it clicks.
- Slide this assembly onto the drive spindle
(c), turning slightly so that the notches of the
grid come up against the ridges on the in-
side of the bowl (b3).
- Fit the lid (b2) on the bowl.
- Close the upper outlet cover (a1). You should
hear a click.
USAGE AND PRACTICAL TIPS
- Chop the food into chunks before process-
ing.
- In manual mode: set the speed to 1 and
press to start the appliance.
- In Auto mode: select the accessory then
and press .
Selecting the grid:
. Large holes: for purées (up to 1 kg of cooked
vegetables or fruit) - potatoes, carrots, cauliflower.
. Small holes: for coulis or compotes of stoned
fruit (up to 500 g) - tomatoes, grapes, strawberries, raspberries, redcurrants, apricots,
peaches.
Note: if the blade unit fails to crush the food,
check that it is properly clipped into the grid.
DISMANTLING AND CLEANING THE
10
“MAXIPRESS”
- Lift out the assembly of drive spindle / blade
unit (k1) / grid (k2) by grasping the drive spin-
dle (c).
- Remove the grid / blade unit assembly from
the drive spindle (c).
- Press on the clips on either side of the blade
unit to release it from the grid.
25
Page 26

Cleaning
- Disconnect your appliance.
- For ease of cleaning, quickly rinse the accessories immediately after use.
- Wash and wipe the accessories (except for
the drive box for the whisk (f1), they can be
put in the dishwasher).
- Pour hot water with a few drops of washing
up liquid into the liquidiser. Close the cover.
Press the pulse button to give it a few pulses.
Disconnect your appliance. Rinse the jug
under running water and leave it to dry.
- The bowl (b3) is fitted with a rubber ring. To
clean it, you can put the bowl through the
dishwasher or wash it in hot water. When
refitting the rubber ring to the bowl, ensure that the lip of the ring points upwards.
- For ease of cleaning and storage, the chopping bowl handle (b4) and the liquidiser handle (h4) are detachable and dishwasher
proof.
- If your accessories are discoloured by the
food (carrots, oranges etc.), rub them immediately after use with a cloth to which you
have applied some cooking oil and then
clean in the usual way.
- Never immerse the motor unit (a) or the
whisk drive box (f1) in water or put them
under running water. Wipe them with a damp
sponge.
- The accessory blades are very sharp.
Handle them with caution.
Storage
Your Odacio food processor is equipped with:
- a storage basket (n), which fits inside the
chopping bowl (b). You can store the grating/slicing sectors (e2), the holder disc (e1),
the metal blade (d1) and the drive shaft (c)
in it.
- a cable tidy, built into in the motor unit - store
the supply flex and adjust it to the required
length by pushing it into or pulling it out of
the base.
. that the covers are correctly fitted,
. when using the chopping bowl (b), that the
top power outlet cover (a1) is properly
closed.
Your appliance still does not work? If this is
the case, contact a Moulinex approved service centre (see list in the “Moulinex Service”
booklet).
Accessories
To equip your appliance as you require, you
can obtain the following accessories from your
usual dealer or from a Moulinex approved
service centre:
Accessories (Moulinex approved service centre)
Chip cutter sector (E) 5980678
Special reibekuchen grater sector
(parmesan, coconut) (G) 5980679
Coarse grater sector (C) 5966358
Thick slicer sector (H) 5966356
Fine grater sector (A) 5980676
Thin slicer sector (D) 5980677
Grinder 5909800
Small mincer 5909801
Whisk 5980652
Plastic kneader 5980640
Citrus press 5909802
Liquidiser 5909803
Metal blade A11D09
Juice extractor 0697254
Spatula 4909610
Storage basket 5909804
Maxipress 5980671
Chopping bowl 5909808
Chopping bowl handle 0697271
Liquidiser handle 0697272
What to do if your appliance
does not work
- Check:
. that the appliance is properly connected,
. that the accessories are correctly fitted on
the motor unit,
26
Environnement protection first !
i
Your appliance contains valuable materials which
can be recovered or recycled.
Ü
Leave it at a collection point.
Page 27

DFC8 F/UK/D/Nl/I/Ru 0827 327-A
 Loading...