

Page 1

www.moulinex.com
NC00013526 • 10/2009
Türkçe p. 2 - 21
English p. 22 - 41
JPM & Associés • marketing-design-communication
NoticeBaguette&Co_NC00013526:Mise en page 1 22/10/09 15:19 Page A
Page 2
TR
EN
JPM & Associés • marketing-design-communication
NoticeBaguette&Co_NC00013526:Mise en page 1 22/10/09 16:33 Page B
Page 3
22
4.a5
4.a4
4.a1
4.a2
4.a3
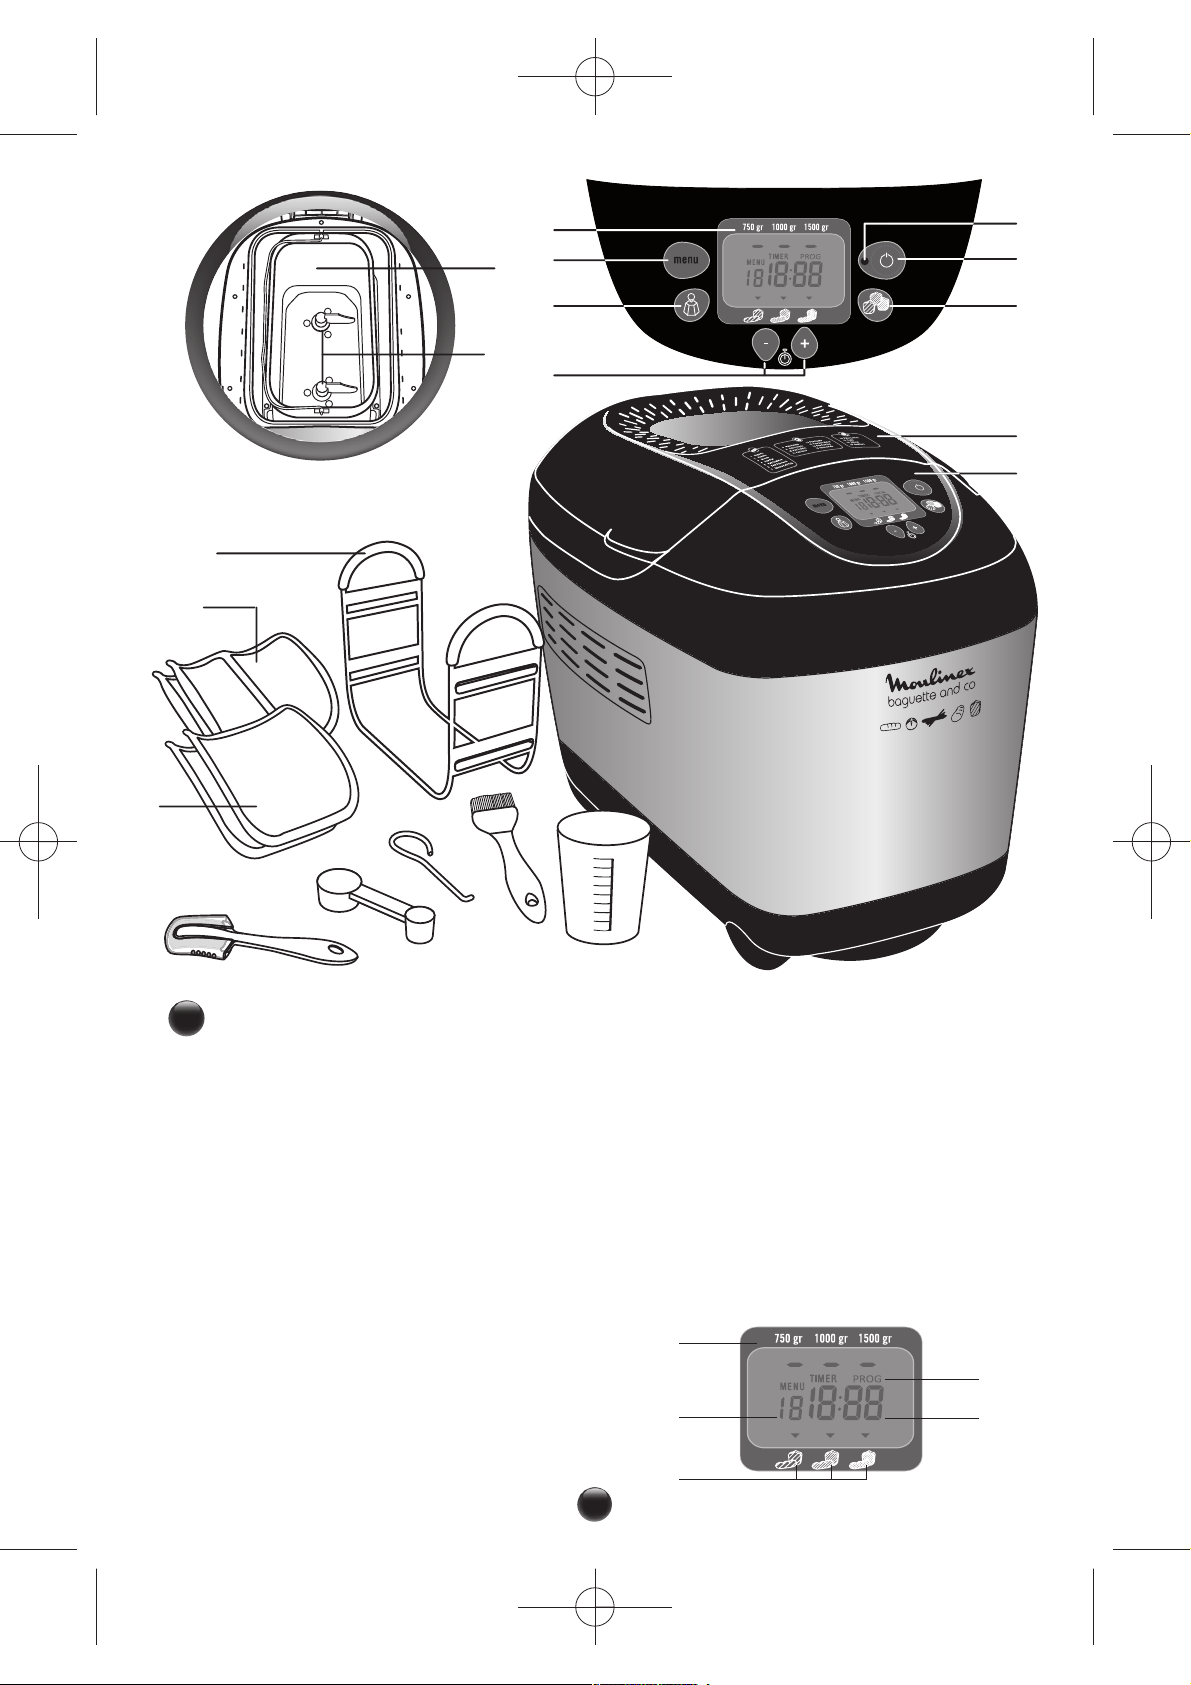
Bread pan
Kneading paddles
Lid with window
Control panel
a. Display screen
a1. Weight indicator
a2. Programme display
a3. Crust colour
a4. Delay start
a5. Timer display
b. Choice of programmes
c. Weight selection
d. Buttons for setting the delayed start
and setting the time for programmes
7 and 15
e. Operating indicator light
f. On/off button
g. Select crust colour
1.
2.
3.
4.
Baking tray
2 non-stick baguette baking trays
2 non-stick trays for individual loaves
Accessories:
Slitter
a. Tablespoon measure
b. Teaspoon measure
Hook for lifting out kneading paddles
Brush
Graduated beaker
5.
6.
7.
8.
9.
10.
11.
12.
1
Description
5
4a
4b
4c
4d
4
3
4f
4g
4e
6
8
9b
9a
10
11
12
7
1
2
NoticeBaguette&Co_NC00013526:Mise en page 1 22/10/09 15:20 Page 22
Page 4

Important safeguards
For your safety, this appliance conforms with applicable standards and regulations (Directives on
low voltage, electromagnetic compatibility, materials in contact with foodstuffs, environment, etc.)
• This appliance is not intended to be operated using an external timer or separate remote control
system.
• All appliances undergo strict quality control. Practical usage tests are performed on randomly
selected appliances, which would explain any slight traces of use.
• These instructions have not been adapted for the UK market and use certain ingredients and different
types of flours and yeasts that are not available in the UK and therefore bread making results may not
be as expected.
Conditions of use
This appliance is not designed to be used by people (including children) with a physical, sensory or
mental impairment, or people without knowledge or experience, unless they are supervised or
given prior instructions concerning the use of the appliance by someone responsible for their
safety.
Children must be supervised to ensure that they do not play with the appliance.
• Your appliance is designed for indoor home use only.
• This appliance is intended to be used in household only. It is not intended to be used in following
applications, and the guarantee will not apply for:
– staff kitchen areas in shops, offices and other working environments;
– farm houses;
– by clients in hotels, motels and other residential type environments;
– bed and breakfast type environments.
• All interventions other than cleaning and everyday maintenance by the customer must be performed
by an authorised service centre.
• The measured noise level of this product is 55 dBA.
Important
• Be very careful, steam can be released when you open the lid at the end of or during the programme.
• When using programme No. 19 (jam, compotes) watch out for steam and hot spattering when
opening the lid.
• - do not exceed the quantities indicated in the recipes.
- do not exceed 1,500 g of dough in the bread machine and a total of 900 g on the trays,
- do not exceed 450 g of flour and 2.5 teaspoons of yeast for bread roll recipes,
- do not exceed 900 g of flour and 5 teaspoons of yeast for conventional bread recipes.
Do
• Unplug the appliance when you have finished using it and when you clean it.
• Use on a flat, stable heat-resistant work surface, away from any contact with water and never use
underneath a built in kitchen alcove.
• The knife supplied has a very sharp blade. Please ensure the sheath is put on again after use and that
the knife is put away in a safe place.
• At the end of the programme, always use oven gloves to handle the pan or hot parts of the
appliance. The appliance and baguette accessory become very hot during use.
Do not
• Do not use the appliance if:
- the supply cord is defective or damaged,
- the appliance has fallen to the floor and shows visible signs of damage or does not function
correctly.
In either case, the appliance must be sent to the nearest approved service centre to eliminate any
2
Safety recommendations
23
NoticeBaguette&Co_NC00013526:Mise en page 1 22/10/09 15:20 Page 23
Page 5

risk. See the guarantee documents.
• If the supply cord is damaged, it must be replaced by the manufacturer, its service agent or similary
qualified persons in order to avoid a hazard.
• Do not immerse the appliance, power cord or plug in water or any other liquid.
• Do not leave the power cord hanging within reach of children.
• Don not place the baking tray in an oven.
• Never move the appliance while it is in use.
• Do not touch the viewing window during and just after operation. The window can reach a high
temperature.
• Do not place the appliance on other appliances.
• Do not use the appliance as a source of heating.
• Never use the appliance to cook preparations other than bread and jam.
• Do not place paper, card or plastic in the appliance and place nothing on it.
• Should any part of the appliance catch fire, do not attempt to extinguish it with water. Unplug the
appliance. Smother flames with a damp cloth.
• For your safety, only use accessories and spare parts designed for your appliance.
• Never obstruct the air vents.
Electrical supply and power cord
• Make sure that the power it uses corresponds to your electrical supply system. Any error in
connection will cancel the guarantee.
• You appliance must be plugged into an earthed socket. If this is not the case, an electric shock may
be received, possibly causing serious lesions. For your safety, earthing must correspond to the
electrical system standards applicable in your country.
• Do not pull on the supply cord to unplug the appliance.
• Only use an extension lead which is in good condition and which has an earth plug, and ensure that
the lead wire has a cross section at least equal to that supplied with the product.
• The power cord must never be close to or in contact with the hot parts of your appliance, near a
source of heat or over a sharp corner.
Repairs
• Repairs should only be carried out by specialists using original replacement parts. It is dangerous to
try to repair an appliance yourself.
3
Before using for the first time
1. Remove packaging
• Take your appliance out of its packaging. Keep your
warranty card and carefully read the operating
instructions before using your appliance for the first time
• Install your appliance on a stable surface. Remove the
accessories and any stickers either inside or on the outside
of the appliance.
24
NoticeBaguette&Co_NC00013526:Mise en page 1 22/10/09 15:20 Page 24
Page 6

Warning
•
This scoring tool is very
sharp. Handle it with care.
NO OK
2. Cleaning the pan
• Clean the pan of the
appliance with a damp
cloth. Dry thoroughly. A
slight odour may be
given off when used for
the first time.
4
Using
1. Before using
your appliance
• Tilt the bread tank slightly
to the side then unclip to
remove it.
• Fit the kneading paddles.
The kneading is
improved if the
kneading blades are
set facing each other.
2. Add the ingredients
• Put the ingredients in the pan in exactly the order
recommended (see useful tips on page 33).
• Make sure that all ingredients are weighed with
precision.
25
NoticeBaguette&Co_NC00013526:Mise en page 1 22/10/09 15:20 Page 25
Page 7
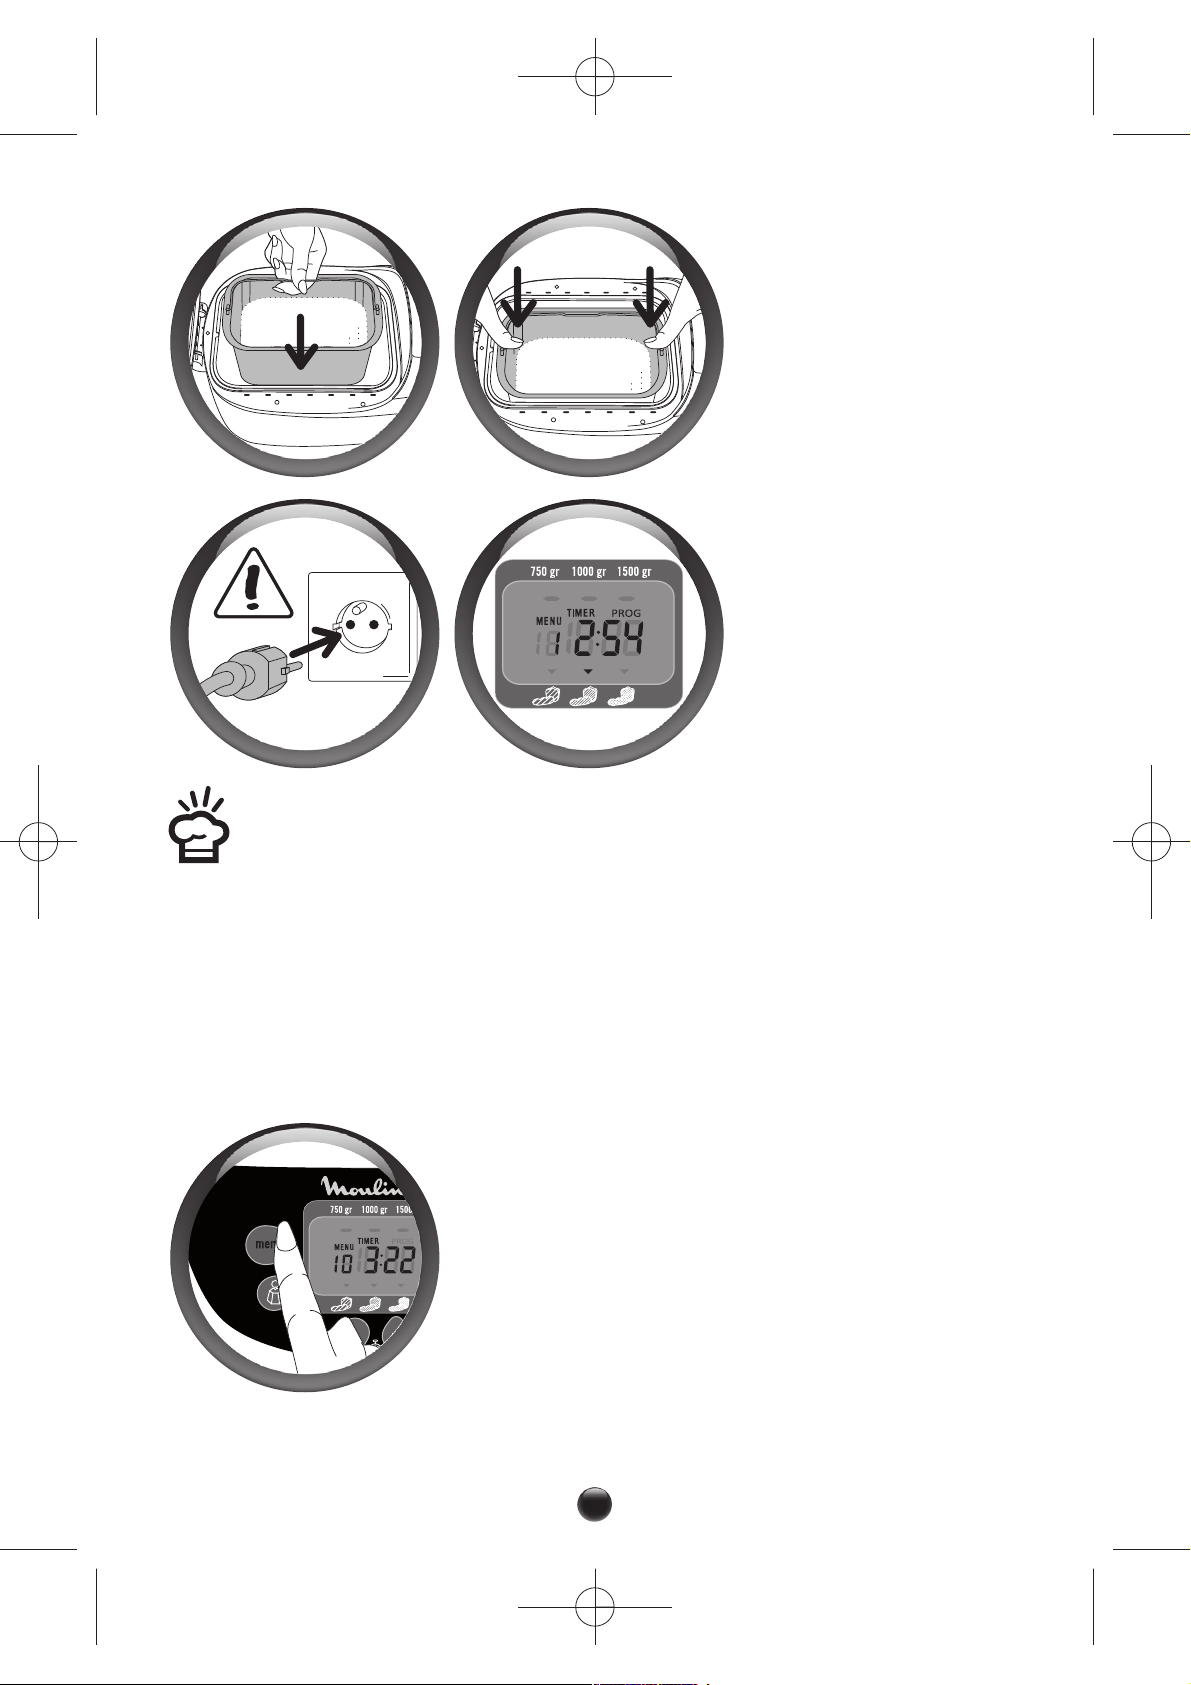
3. Starting up
• Place the bread pan in the
breadmaker.
• Replace the bread trough
and press on one side then
the other to engage the
mixer drives and clip it in
on both sides.
1 2
• Unwind the cord and plug
it into an earthed electrical
outlet.
• After the beep, programme
1 and medium browning
are displayed by default.
To get acquainted with your breadmaker, we suggest you try the recipe for BASIC
BREAD for your first ever loaf. See the sheet "BASIC BREAD PROGRAMME" on
page 37.
4. Select a programme (See details in the table below)
• A default setting is displayed for each programme. You will therefore have to select the
desired settings manually.
• Choosing a programme triggers a series of steps which are carried out automatically one
after another.
• Press the “menu” button to choose from a variety of
different programmes. To scroll through programmes 1 to
19, successively press the “menu” button.
• The time corresponding to the programme selected is
automatically displayed.
26
NoticeBaguette&Co_NC00013526:Mise en page 1 22/10/09 15:20 Page 26
Page 8

27
PROGRAMMES
AVAILABLE
IN THE MENU
FEATURES
LOAVES
To help you make individual loaves which correspond to programmes 1 to 6, you will nd an additional
shaping guide with your breadmaker. These loaves are made in several stages and the baking cycle
occurs after the loaves have been shaped.
1. Savoury Baguettes
& Rolls
The baguette programme allows you to make your own crusty baguettes
and small rolls.
2 . Italian Bread
Programme 2 will help you make Italy's best-known bread, with its soft
uy centre, an excellent base for small sandwiches.
3. Bread Sticks
The grissini programme allows you to male these very long, thin and dry
breadsticks.
4. Flat Bread
Programme 4 is designed for making chewy and airy at breads, such as
Pide (Turkish pita), great for making sandwiches.
5. Burger Buns
Programme 5 is ideal for 8 small white buns, round and soft with a light
texture.
6. Sweet Baguettes
& Buns
Programme 6 helps you to make little buns with a light consistency, such
as Spanish ensaimada brioche.
7. Small Bread Cooking
Programme 7 is designed for heating and cooking, in 10 to 35 minutes, all the
loaves made using programmes 1 to 6.
Adjustable in groups of 5 minutes. The breadmaker should not be left
unattended when using programme 7.
To stop the cycle before the end, stop the programme manually by pressing
button for a long time.
TRADITIONAL LOAVES
8. Basic White Bread
This programme allows you to make most white bread recipes using
wheat our.
9. French Bread
Programme 9 is for traditional French white bread recipes airy in the
middle.
10. Wholemeal Bread
Programme 10 is selected when using our for wholemeal bread.
11. Sweet Bread
Programme 11 is suited to recipes which contain more fat and sugar. If you
use ready made mixes for making brioches or milk loaves, do not exceed
1000 g of dough in total. We suggest LIGHT browning for your rst brioche
recipe.
12. Super Fast White
Bread
Programme 12 is specic to the QUICK bread recipe which you will nd in
the recipe book supplied with the appliance. The water for this recipe must
be 35°C maximum.
13. Gluten Free Bread
This kind of bread is suitable for people who cannot digest the gluten
(coeliac disease) in several grains (wheat, barley, rye, oats, kamut, spelt,
etc.). The tank should always be cleaned so that there is no risk of
contamination with other ours. In the case of a strict gluten-free diet,
make sure that the yeast used is also gluten free. The consistency of
gluten-free ours means they do not mix as well. The dough therefore has
to be folded in from the edges during the kneading process with a exible
plastic spatula. Gluten-free bread is thicker in consistency and lighter in
colour than normal bread.
14. Salt Free Bread
Reducing salt consumption can help reduce the risks of cardio-vascular
problems.
NoticeBaguette&Co_NC00013526:Mise en page 1 22/10/09 15:20 Page 27
Page 9

15 . Loaf Cooking
This baking programme enables you to cook for 10 to 70 minutes only,
which time can be adjusted by groups of 10 minutes, for light, medium or
dark browning. It can be selected on its own and used:
a) in association with the raised dough programme,
b) to heat or crisp up bread that has already been cooked and which has
cooled
c) to nish baking in the event of a prolonged power cut during a baking
cycle. This programme cannot be used to bake individual loaves. The
breadmaker should not be left unattended when using programme
15. To stop the cycle before the end, stop the programme manually by
pressing the button for a long time.
16. Bread Dough
The Leavened Dough programme does not bake. It is a kneading and rising
programme for all leavened doughs such as pizza dough, rolls, sweet buns.
17. Pasta Dough
Programme 17 only kneads. It is for unleavened pasta, like noodles for
example.
18. Cake
Program 18 makes it possible to make pastries and cakes using baking
powder. For this programme, only the 1000g weight is available.
19. Jam
Programme 19 automatically cooks jam in the tank. The fruit must be
roughly chopped and pitted.
5. Selecting the bread weight
• The bread weight is set by default at 1000 g. This weight is
shown for informational purposes.
• Refer to the recipe details for more information.
• The setting of the weight is not available for
programmes 1 to 7 and 13 15 16 17 18 19.
• Press the button to set the chosen product – 750 g,
1000 g or 1500 g - fig. 9. The indicator light against the
selected setting comes on.
6. Selecting the crust colour
•
The crust colour is set to medium by default.
• The browning setting is not available for programmes 7 15 16
17 19. Three choices are possible: LIGHT / MEDIUM / DARK.
• If you want to change the default setting, press the button
until the indicator light facing the desired setting comes on
.
7. Starting a programme
• To start the selected programme, press the button .
The operating indicator light comes on and the 2 dots on
the timer start blinking. The programme starts. The time
corresponding to the programme appears. The successive
stages automatically follow one another.
28
NoticeBaguette&Co_NC00013526:Mise en page 1 22/10/09 15:20 Page 28
Page 10

8. Using the delay start programme
• You can programme the appliance up to start 15 hours in advance to have your
preparation ready at the time you want. The delay start programme is not available
for programmes 1 to 7 and 12 13 15 16 17 18 19.
This step comes after selecting the programme, browning level and weight. The programme
time is displayed. Calculate the time difference between the moment when you start the
programme and the time at which you want your preparation to be ready. The machine
automatically includes the duration of the programme cycles. Using the ( ) and ( )
buttons, display the calculated time ( up and down). Short presses change the time by
intervals of 10 min. Holding the button down gives continuous scrolling of 10-min intervals.
For example : it is 8 pm and you want your bread to be ready for 7 am the next morning.
Programme 11:00 using the and buttons. Press the button. A beep is emitted.
PROG is displayed and the 2 dots on the timer blink. The countdown begins. The ON light
switches on.
If you make a mistake or want to change the time setting, hold down the button until it
makes a beep. The default time is displayed. Start the operation again.
With the delayed start programme do not use recipes which contain fresh milk, eggs,
soured cream, yoghurt, cheese or fresh fruit as they could spoil or stale overnight.
9. Stopping a programme
• At the end of the cycle, the programme stops
automatically; 0:00 appears. Several beeps are emitted
and the operating indicator light blinks.
• To stop the programme underway or cancel the delayed
start, press and hold the button 5 sec.
10. Taking your bread
out of the pan
(This step does not
concern the "individual
loaves")
•
Unplug the breadmaker at
the end of the cooking or
warming cycle.
• Tilt the bread tank slightly
to the side then unclip to
remove it. Always use oven
gloves as the pan handle is
hot, as is the inside of the
lid.
29
NoticeBaguette&Co_NC00013526:Mise en page 1 22/10/09 15:20 Page 29
Page 11

• Turn out the hot bread and
place it on a rack for at least
1 hour to cool.
• It may happen that the
kneading paddles remain
stuck in the loaf when it is
turned out.
In this case, use the hook
accessory as follows:
> once the loaf is turned
out, lay it on its side while
still hot and hold it down
with one hand, wearing an
oven glove,
> with the other hand,
insert the hook in the axis of
the kneading paddle and
pull gently to release the
kneading paddle,
> repeat for the second
kneading paddle,
> turn the loaf upright and
stand on a grid to cool.
• To preserve the pan’s non-
stick qualities, do not use
metallic utensils to turn out
the bread.
5
Cleaning and maintenance
• Unplug the device and leave it to cool with the lid open.
• Remove the lid, if you need to turn the product over.
• Clean the outside and inside of the appliance with a damp
sponge. Dry carefully.
• Wash the tank, the mixing blades, the baking tray and the
non-stick plates with hot soapy water.
• If the kneading blades stay in the mixing bowl, soak for
5 to 10 minutes.
> 10 min.
• If necessary, remove the lid
to clean it with hot water.
30
NoticeBaguette&Co_NC00013526:Mise en page 1 22/10/09 15:20 Page 30
Page 12

• Do not wash any part in a dishwasher.
• Do not use household cleaning products, scouring pads or
alcohol. Use a soft, damp cloth.
• Never immerse the body of the appliance or the lid.
• Do not store the baking tray and the non-stick plates in the
bread machine as this could scratch its coating.
Kneading: the dough is in the 1st or 2nd kneading cycle or in a stirring period between
rising cycles.
During this cycle, except for programmes 7 13 15 16 17 19, you can add ingredients:
dried fruit, olives, bacon bits, etc. A series of beeps tell you when you can add them.
Do not put more additives than is indicated in the recipe, and make sure they do not
fall outside the baking tray or the bowl.
See the summary table of preparation times below and in particular the column
"Time displayed at the ingredients signal". This column gives the time displayed on
the screen of your device when the beeps are heard. In order to establish more
precisely after how long the beeps will be heard, you simply need to subtract the
time in the "time displayed at the ingredients signal" column from the total baking
time.
E.g.: "Time displayed at the ingredients signal" = 2:51 and "Total Time" = 3:13, the
ingredients can be added after 22 min.
Rising: the dough is in the 1st, 2nd or 3rd rising cycle.
Baking: the bread is in the final baking cycle.
Warming: for programmes 8, 9, 10, 11, 12, 13, 14, 18, you can leave your preparation in the
appliance. A one-hour warming cycle automatically follows baking.
The display remains at 0:00 during keeping warm hour. The operating indicator light flashes.
A beep is heard at regular intervals.
At the end of the cycle the appliance stops automatically and beeps several times.
6
Cycles
• A table on the next page describes the breakdown of the various programme cycles.
Kneading > Rest > Rising > Baking > Warming
For forming
the dough’s
structure so
that it can
rise better.
Allows the
dough to rest
to improve
kneading
quality.
Time during
which the
yeast works
to let the
bread rise
and to
develop its
aroma.
Transforms
the dough
into bread
and gives it a
golden,
crusty crust.
Keeps the bread
warm after baking.
It is recommende
that the bread
should be turned
out promptly after
baking, however.
31
NoticeBaguette&Co_NC00013526:Mise en page 1 22/10/09 15:20 Page 31
Page 13

Note: total time does not include the keep hot time.
Programmes
Weight
(g)
Total
programme
time (h)
Dough
preparation time
(kneading-
resting-rising)
Baking 1
(h)
Baking 2
(h)
Time
displayed
at the
ingredients
signal (h)
Keeping
warm
(h)
1 - 2:39 1:10 0:47 0:42 2:19 -
2 - 2:30 1:20 0:35 0:35 2:10 -
3 - 2:24 1:20 0:32 0:32 2:06 -
4 - 1:25 0:35 0:25 0:25 1:12 -
5 - 2:30 1:20 0:40 0:30 2:15 -
6 - 2:52 1:25 0:47 0:40 2:34 -
7 -
10 to 35 min,
in 5 min
increments
-
10 to 35
min
- - -
8
750 3:12
2:17
0:55 - 2:54
1:001000 3:17 1:00 - 2:59
1500 3:22 1:05 - 3:04
9
750 3:19
2:24
0:55 - 3:03
1:001000 3:24 1:00 - 3:08
1500 3:29 1:05 - 3:13
10
750 3:17
2:12
1:05 - 2:59
1:001000 3:22 1:10 - 3:04
1500 3:27 1:15 - 3:09
11
750 3:15
2:15
1:00 - 2:51
1:001000 3:20 1:05 - 2:56
1500 3:25 1:10 - 3:01
12
750 1:30
0:35
0:55 - 1:23
1:001000 1:35 1:00 - 1:28
1500 1:40 1:05 - 1:33
13 1000 1:42 0:47 0:55 - - 1:00
14
750 2:41
1:41
1:00 - 2:23
1:001000 2:46 1:05 - 2:28
1500 2:51 1:10 - 2:33
15 -
10 to 70 min,
in 10 min
increments
-
10 to 70
min
- - -
16 - 1:25 1:25 0:00 - - -
17 - 0:15 0:15 0:00 - - -
18 1000 1:29 0:09 1:20 - 1:23 1:00
19 - 1:05 0:15 0:50 - - -
LOAVESTRADITIONAL LOAVES
32
NoticeBaguette&Co_NC00013526:Mise en page 1 22/10/09 15:20 Page 32
Page 14

7
Pratical advice
1. Preparing the recipes
• All ingredients used must be at room temperature (unless otherwise indicated) and must
be weighed exactly.
Measure liquids with the graduated beaker supplied. Measure liquids with the
graduated beaker supplied. Use the double doser supplied to measure teaspoons on
one side and tablespoons on the other. All spoon measures are level and not heaped.
Incorrect measurements give bad results.
• Follow the preparation order.
> Liquids (butter, oil, eggs, water, milk)
> Salt
> Sugar
> Flour, first half
> Powdered milk
> Specific solid ingredients
> Flour, second half
> Yeast
• It is important to measure the quantity of flour precisely. That is why you should weigh out
flour using a kitchen scale. Use packets of flaked dried yeast (sold in the Uk as Easy Bake or
Fast Action Yeast). Unless otherwise indicated in the recipe, do not use baking powder.
Once a packet of yeast has been opened, it should be sealed, stored in a cool place and
used within 48 hours.
• To avoid spoiling the proving of the dough, we advise that all ingredients should be put in
the bread pan at the start and that you should avoid opening the lid during use (unless
otherwise indicated). Carefully follow the order of ingredients and quantities indicated in
the recipes. First the liquids, then the solids. Yeast should not come into contact with
liquids, sugar or salt.
• Bread preparation is very sensitive to temperature and humidity conditions. In case of
high heat, use liquids that are cooler than usual. Likewise, if it is cold, it may be necessary
to warm up the water or milk (never exceeding 35°C).
• It can also sometimes be useful to check the state of the dough during the second
kneading: it should form an even ball which comes away easily from the walls of the pan.
> if not all of the flour has been blended into the dough, add a little more water,
> if the dough is too wet and sticks to the sides, you may need to add a little flour.
Such corrections should be undertaken very gradually (no more than 1 tablespoon at a
time) and wait to see if there is an improvement before continuing.
• A common error is to think that adding more yeast will make the bread rise more. Too
much yeast makes the structure of the bread more fragile and it will rise a lot and then fall
while baking. You can determine the state of the dough just before baking by touching it
lightly with your fingertips: the dough should be slightly resistant and the fingerprint
should disappear little by little.
• When shaping the dough, do not work it for too long because you may not get the
expected result after cooking.
2. Using your bread machine
• If there is a power cut: if, during the cycle, the programme is interrupted by a power cut
or mishandling, the machine has a 7-min protection time during which the settings are
saved. The cycle starts again where it stopped. Beyond that time, the settings are lost.
• If you do make two loaves in succession with the traditional Loaf programme, wait
1 hour before starting the second loaf. Otherwise the error code E01 is displayed.
33
NoticeBaguette&Co_NC00013526:Mise en page 1 22/10/09 15:20 Page 33
Page 15

8
Preparation and production of individual loaves
The steps below are common to all individual loaves: programme from 1 to 6.
Kneading and rising
of the dough
• Press the "menu" button and
choose the desired programme.
• Select the crust colour.
• Press button . The operating light comes on and the
2 timer dots start blinking.
• The dough kneading cycle starts up, followed by the rising cycle. These 2 steps will be
carried out automatically.
• During the kneading stage, it is normal for the dough not to be evenly blended.
After the dough kneading and rising stages, you must use your dough within an
hour of hearing the beeps. Beyond that, the machine resets and the programme
is lost. In this case, we recommend that you use programme 7 which is the
programme for baking individual loaves.
• When the preparation is complete, the breadmaker goes
into sleep mode for 1 H. Several beeps indicate that the
kneading and rising of the dough have ended. The time
remaining is displayed and operating indicator light flashes.
• Remove the bowl from the machine.
34
NoticeBaguette&Co_NC00013526:Mise en page 1 22/10/09 15:20 Page 34
Page 16

Production of
individual loaves
Baking
1st Cycle
To help you through those steps, refer to the baguette shaping guide supplied. We
are showing you what a baker does, but after a few trials, you will be able to create
your own shapes. Whatever you do, the result is guaranteed.
• Sprinkle a little flour on your work surface.
• Remove the dough from the pan and put it on your work surface.
IMPORTANT The length obtained for the various loaves should match the size
of the non-stick plate (about 18 cm).
To garnish loaves with seeds, wrap them in a damp cloth (or a paper towel) and
then roll them in the seeds.
For lighter bread, leave the uncooked loaves to rise for five minutes before
shaping them.
•
Once the loaves have been shaped,
place them on the non-stick plates
and then on the baking tray.
1
2
• Place the baking tray inside the breadmaker, in place of the
tank.
• Press the button again to restart the programme and
start baking the bread.
• At the end of the 1st baking cycle, the machine goes into
sleep mode for 30 min. Several beeps are emitted and the
operating indicator light blinks.
• Remove the baking tray. Always use oven gloves because
the tray is very hot.
• Remove the loaves from the plates and leave them to cool
on a wire cooling rack.
Programmes of 1 to 6 are designed to carry out 2 successive bakings. However, if you
only want to bake once, you must stop the machine manually by pressing for a long
time.
35
NoticeBaguette&Co_NC00013526:Mise en page 1 22/10/09 15:20 Page 35
Page 17

Run the plates under cold water (to cool them down) and dry them before using
them for the 2nd baking operation.
Baking
2nd Cycle
• Leave the lid open so that the machine can cool down
sufficiently before starting the 2nd round of baking.
• Arrange the remaining loaves on the non-stick plates and
then on to the baking tray. Place inside the machine.
• Press the button to start the second baking cycle.
• At the end of the cycle, the programme stops automatically.
Several beeps are emitted and the operating indicator light
blinks. Unplug the breadmaker.
• Remove the baking tray. Always use oven gloves because
the tray is very hot.
• Remove the loaves from the non-stick plates and leave them
to cool on a wire cooling rack.
36
NoticeBaguette&Co_NC00013526:Mise en page 1 22/10/09 15:20 Page 36
Page 18

1. RECIPES FOR TRADITIONAL LOAVES
9
The recipes
Basic White Bread
(programme 8)
tsp > Teaspoon
tbsp > Tablespoon
Crust colour > Medium
Weight > 1000 g
Time > 3 : 17
Ingredients
Oil > 2 tbsp
Water > 350 ml
Salt > 2 tsp
Sugar > 2 tbsp
Powdered milk > 2,5 tbsp
White bread our > 600 g
Yeast > 1,5 tsp
IMPORTANT Using the same principle
you can make other traditional loaves:
French bread, brown bread, sweet
bread, quick bread, gluten-free bread,
salt-free bread; to do so, simply select
the corresponding programme using
the menu button.
The bread hasn't
turned out as you
hoped? This table
should help you to
improve things
RESULTS
Bread rises
too much
Bread falls
after rising
too much
Bread does
not rise
enough
Crust not
golden
enough
Sides
brown but
bread not
fully
cooked
Top
and sides
oury
POSSIBLE CAUSES
The button was
pressed during baking
Not enough our
Too much our
Not enough yeast
Too much yeast
Not enough water
Too much water
Not enough sugar
Poor quality our
Wrong proportions
of ingredients
(too much)
Water too hot
Water too cold
Wrong programme
Guide for improving your conventional bread recipes
37
NoticeBaguette&Co_NC00013526:Mise en page 1 22/10/09 15:20 Page 37
Page 19

2. RECIPES FOR INDIVIDUAL LOAVES
Savoury Baguettes & Rolls
(programme 1): for 8 80 g baguettes
tsp > Teaspoon
tbsp > Tablespoon
Ingredients
Water > 255 ml
Salt > 1½ tsp
T55 our > 420 g
Dried yeast > 2 tsp
Accessories
1 baking tray (5)
2 non-stick baguette plates (6)
1 scorer (8)
1 brush (11)
To make your baguettes even softer, add one tbsp of
oil to your recipe. If you want to give more colour to
your baguettes, add 2 tsp of sugar to your
ingredients.
The 2 stages, the kneading and rising of the dough, are
carried out automatically and last a total of 1h 10 (25 min of
kneading followed by 45 min. for the rising of the dough).
Begin to shape 4 dough pieces and cover the 4 other dough
pieces with a cloth or clinglm.
You can vary the avours by garnishing your bread. To
do this, simply moisten and then roll the dough pieces
in sesame or poppy seeds.
For best results, score a
1 cm diagonal slit
across the baguettes
using a serrated knife
or the supplied scorer.
You can vary the presentation of your baguettes by
scoring slits along the length of the baguette.
With the kitchen brush provided, generously moisten the
top of the baguettes, taking care not to get too much water
on the non-stick trays.
IMPORTANT The seam of the baguettes must be
underneath
2cm
1cm
Italian Bread
(programme 2): for 4 ciabattas
tsp > Teaspoon
tbsp > Tablespoon
Ingredients
Water > 360 ml
Salt > 2 tsp
T55 our > 500 g
Dried yeast > 2 tsp
Accessories
1 baking tray (5)
2 non-stick trays for individual loaves (7)
1 brush (11)
The 2 stages, the kneading and rising of the
dough, are carried out automatically and last a
total of 1h 20 (25 min. of kneading followed by
55 min. for the rising of the dough).
Begin to shape 2 dough pieces and cover the
2 other dough pieces with a cloth or clinglm.
With the kitchen brush, spread a little olive oil
over the ciabatta.
38
NoticeBaguette&Co_NC00013526:Mise en page 1 22/10/09 15:20 Page 38
Page 20

2. RECIPES FOR INDIVIDUAL LOAVES
Bread Sticks
(programme 3): for 20 grissini
tsp > Teaspoon
tbsp > Tablespoon
Ingredients
Water > 125 ml
Salt > ½ tsp
Olive oil > 2 tsp
T55 our > 210 g
Dried yeast > 1 tsp
Accessories
1 baking tray (5)
2 non-stick trays for
individual loaves (7)
1 brush (11)
This recipe cannot be made
with smaller quantities.
The 2 stages, the kneading and rising of the
dough, are carried out automatically and
last a total of 1h 20 (30 min of kneading
followed by 50 min. for the dough to rise).
Begin to shape 10 grissini and cover the
10 other grissini with a cloth or clinglm.
To prevent the breadsticks from
breaking, stretch them out in 2 stages.
Burger Buns
(programme 5): for 8 sandwich loaves
tsp > Teaspoon
tbsp > Tablespoon
Ingredients
Water > 215 ml
Milk powder > 10 g
Oil > 3 tsp
Salt > 1 tspn
Sugar > 2.5 tsp
T55 our > 360 g
Dried yeast > 2 tsp
Accessories
1 baking tray (5)
2 non-stick trays for
individual loaves
for individual
loaves (7)
1 brush (11)
The 2 stages, the kneading and rising of the
dough, are carried out automatically and
last a total of 1h 20 (25 min of kneading
followed by 55 min. for the dough to rise.
Begin to shape 4 dough pieces and cover
the other 4 dough pieces with a cloth or
clinglm.
Once they are placed on the trays, and to
keep the round shape, atten the dough
pieces lightly with the palm of your hand
to prevent them from rising too much.
Flat Bread
(programme 4): for 4 flat loaves
tsp > Teaspoon
tbsp > Tablespoon
Dough
ingredients
T55 our > 250 g
Salt > ½ tsp
Water > 150 g
Dried yeast> 2 tsp
Ingredients
for the "glaze"
Cold water > ¼ cup
Flour > ¼ cup
Very hot water > ½
cup
The 2 stages, the kneading and rising of the
dough, are carried out automatically and
last a total of 35 min (20 min of kneading
followed by 15 min. for the dough to rise).
Begin to shape 2 dough pieces and cover
the 2 other dough pieces with a cloth or
clinglm.
Prepare the "glaze" by mixing together cold
water and our. Then add very hot water to
this mixture. Spread the glaze over the
loaves with your hands. Do not use all of
the mixture.
For more crusty loaves, replace the
"glaze" with an egg yolk that you
can spread using the brush. Then
press with your ngertips around
the edges of the loaves.
Accessories
1 baking tray (5)
2 non-stick trays for individual loaves (7)
1 brush (11)
39
NoticeBaguette&Co_NC00013526:Mise en page 1 22/10/09 15:20 Page 39
Page 21

2. RECIPES FOR INDIVIDUAL LOAVES
Sweet Baguettes & Buns
(programme 6): For 8 small buns
tsp > Teaspoon
tbsp > Tablespoon
Ingredients
Egg > 1
Milk > 110 ml
Oil > 2.5 tsp
Butter > 65 g
Salt > 1 tsp
Sugar > 4.5 tsp
T55 our > 300 g
Dried yeast > 2 tsp
Accessories
1 baking tray (5)
2 non-stick trays for
individual loaves (7)
1 brush (11)
The 2 stages, the kneading and rising of the
dough are carried out automatically and
last (30 min. of kneading followed by 55
min. for the dough to rise).
Begin to shape 4 dough pieces and cover
the other 4 dough pieces with a cloth or
clinglm.
To give a shiny appearance, use the brush
to brush with a mixture of egg and water, in
equal proportions.
Guide for improving your individual loaf recipes
The bread hasn't
turned out as you
hoped? This table
should help you to
improve things
POSSIBLE CAUSE SOLUTION
The dough is sticky.
There is too much water in the
mixture.
- Reduce the amount of water.
- Flour your hands before shaping the dough.
The dough tears
easily.
The our does not have enough
gluten.
- Choose a pastry our (T 45).
The dough is too hard. - Leave to rest for 10mn before shaping.
The shapes are irregular.
- Weigh the dough pieces to ensure they are
the same size.
The dough is
compact.
There is too much our in the
mixture.
- Pre-shape roughly and leave to rest before
the nal shaping.
- Add a little water at the beginning of the
kneading.
The dough is overworked.
- Leave to rest for 10mn before shaping.
- Flour the work surface as little as possible.
- Shape by working the dough as little as possible.
The buns touch
and are not baked
enough.
Badly positioned on the plates.
- Space the dough pieces when arranging them
on the plates.
Dough too runny.
- Measure all liquid carefully
-
Recipes designed for eggs of 50 g, if the eggs are
bigger reduce the amount of water by as much.
The buns stick to the
plate and are burnt.
Too much browning.
- Choose a lower browning setting.
- Ensure the browning does not run onto the plate.
The buns are
dull after baking.
Lack of moisture at the start of
baking.
- Use the brush to apply a glaze of egg
and water before baking.
The buns have
not risen enough.
Not enough yeast. - Use more yeast.
Dough has been overworked.
- Leave to rest for 10mn before shaping.
- Shape the dough by working it as little as possible.
The buns have
risen too much.
Too much yeast. - Use less yeast.
Risen too much.
- Flatten the loaves slightly once they are
placed on the plates.
40
NoticeBaguette&Co_NC00013526:Mise en page 1 22/10/09 15:20 Page 40
Page 22

10
Technical troubleshooting guide
PROBLEMS SOLUTIONS
The kneading paddles remain stuck in the
bread trough.
• Let it soak before removing it.
The kneading paddles remain stuck in the
loaf.
• Use the accessory to turn out the loaf page 30.
After pressing on nothing happens.
• The machine is too hot. Wait 1 hour between 2 cycles.
• A delayed start has been programmed.
After pressing on the motor is on but no
kneading takes place.
• The pan has not been correctly inserted.
• Kneading paddle missing or not installed properly.
After a delayed start, the bread has not
risen enough or nothing happens.
• You forgot to press on after programming.
• The yeast has come into contact with salt and/or water.
• Kneading paddle missing.
Burnt smell.
• Some of the ingredients have fallen outside the pan: let the
machine cool down and clean the inside of the machine
with a damp sponge and without any cleaning product.
• The preparation has overowed: the quantity of
ingredients used is too great, notably liquid. Follow the
proportions given in the recipe.
11
Warranty
• This product has been designed for domestic use only. Any professional use, innapropriate
use or failure to comply with the instructions, the manufacturer accepts no responsibility
and the guarantee will not apply.
• Read the instructions for use carefully before using your appliance for the first time: any use
which does not conform to these instructions will absolve Tefal from any liability.
12
Environment
• In accordance with current regulations, before disposing of an appliance no longer needed,
the appliance must be rendered inoperative (by unplugging it and cutting off the supply
cord).
Environment protection rst!
Your appliance contains valuable materials which can be recovered or recycled.
Leave it at a local civic waste collection point.
For a detailed video on the shaping of the baguettes, download the lmed
instructions on the following internet site:
www.moulinex.com /
41
NoticeBaguette&Co_NC00013526:Mise en page 1 22/10/09 15:20 Page 41
 Loading...