

Page 1
AHK1
Mode d’emploi, Gebruiksaanwijzing, Bedienungsanleitung,
Libretto di istruzioni,
Instructions for use,
Instrucciones de uso, Guia do utilizador,
Brugsanvisning.
Page 2
*
*
*
* selon modèle, afhankelijk van het model, je nach Modell, a seconda del modello, según modelo, consoante o
modelo, according to model, afhængig af model.
2
Page 3
A B C D
E F G H
I J K L
M N O P
Q R S T
U V
3
Page 4

FRA
PRÉCAUTIONS IMPORTANTES
Prenez le temps de lire toutes les instructions et reportez-vous au “Guide de l’utilisateur”.
Cet appareil est conforme aux règles et conditions de sécurité en vigueur ainsi qu’aux
directives :
- Directive Compatibilité Electromagnétique 89/336/CEE modifiée par les Directives
92/31/CEE et 93/68/CEE.
- Directive Basse Tension 73/23/CEE modifiée par la Directive 93/68/CEE.
Comme pour tout appareil de cuisson, assurez une étroite surveillance, utilisez et rangez
l’appareil hors de la portée des enfants.
Compte-tenu de la diversité des normes en vigueur, si cet appareil est utilisé dans un
pays différent de celui où il a été acheté, faites-le vérifier par une station service
agréée.
Ne placez pas l’appareil à proximité d’une source de chaleur.
Cet appareil n’est pas conçu pour être encastré.
Placez l’appareil sur un plan de travail stable et à l’abri des projections d’eau.
Ne pas déplacer l’appareil pendant son utilisation.
Vérifiez que la tension du réseau correspond bien à celle indiquée sur l’appareil (courant alternatif seulement).
Ne laissez pas le cordon pendre ou toucher les parties chaudes du four.
Ne débranchez pas l’appareil en tirant sur le cordon.
Débranchez l’appareil dans le cas d’un nettoyage important et en cas d’orage.
Branchez toujours l’appareil sur une prise reliée à la terre (16A).
N’utilisez qu’une rallonge en bon état, avec une prise reliée à la terre, et avec un fil
conducteur de section au moins égale au fil fourni avec le produit.
Assurez-vous que l’installation électrique est suffisante pour alimenter un appareil de
cette puissance.
Cet appareil électrique fonctionne avec des températures élevées qui pourraient
occasionner des brûlures. Ne pas toucher les parties métalliques de votre four.
La température de la porte et de la surface extérieure est élevée lorsque l’appareil
fonctionne. Utilisez les poignées et boutons. Utilisez des gants, si nécessaire.
Afin d’éviter les chocs électriques, ne plongez pas le fil électrique, la prise de courant
ou l’appareil dans l’eau ou un autre liquide.
rivait que certaines parties du produit s’enflamment, ne tentez jamais de les
S’il ar
éteindre avec de l’eau. Débranchez l’appareil et étouffez les flammes avec un linge
humide.
Ne rangez pas de produits inflammables à proximité ou sous le meuble où est placé
l’appareil.
4
Page 5
Ne pas utiliser l’appareil si :
- celui-ci a un cordon défectueux,
- l’appareil est tombé et présente des détériorations visibles ou des anomalies de
fonctionnement.
Dans chacun de ces cas, l’appareil doit être envoyé au centre de service après-vente
agréé le plus proche afin d’éviter tout danger (liste jointe).
Ne faites pas fonctionner l’appareil sous un meuble mural, une étagère, ou à proximité de matériaux inflammables tels que stores, rideaux, tentures…
N’utilisez pas l’appareil comme source de chaleur.
Ne placez jamais de papier, carton ou plastique dans l’appareil et ne posez rien dessus
(ustensiles, grilles, objets…).
Ne pas enlever les boutons de commande du tableau de bord lors de son nettoyage.
N’introduisez rien dans les ouïes de ventilation, ne les obstruez pas.
Pour votre sécurité, ne démontez jamais l’appareil par vous-même ; faites appel à un
centre de service agréé.
Selon modèle :
Utilisation de la minuterie : Pour les temps inférieurs à 25 minutes, tournez le
bouton jusqu’à 30 minutes et revenez en arrière sur le temps désiré.
Participons à la protection de l’environnement !
Votre appareil contient de nombreux matériaux valorisables ou recyclables.
Confiez celui-ci dans un point de collecte ou à défaut dans un centre service
agréé pour que son traitement soit effectué.
FRA
Cet appareil a été conçu pour un usage domestique uniquement, toute utilisation
professionnelle, non appropriée ou non conforme au mode d’emploi n’engage ni
la responsabilité, ni la garantie du fabricant.
Ne jamais poser de papier aluminium sur les parois intérieures de votre four.
CONSERVEZ CES INSTRUCTIONS
5
Page 6

FRA
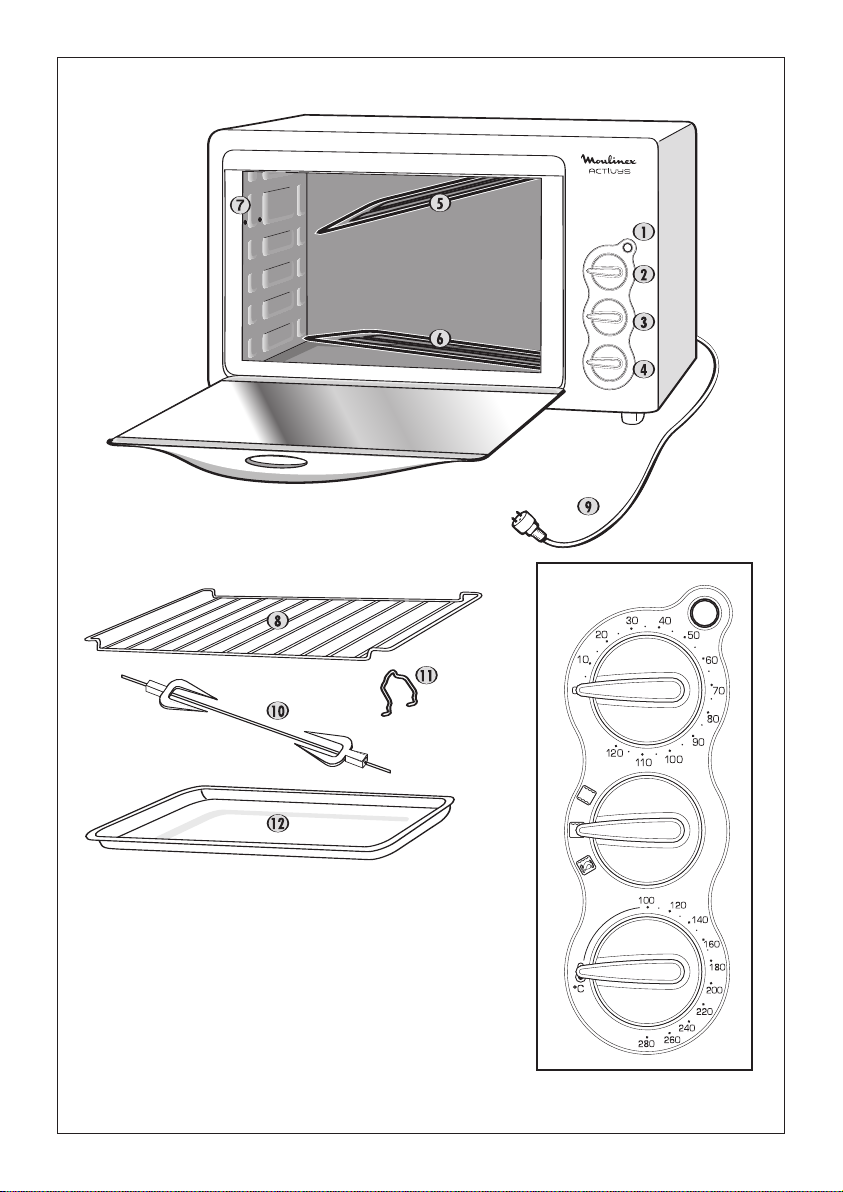
CARACTERISTIQUES DE L’APPAREIL
1 Voyant de fonctionnement
2 Bouton de réglage de la minuterie (0 à 120 minutes)
3 Bouton de sélection de fonctions : Four
Gril
Gril + Tournebroche
4 Bouton de réglage du thermostat de 100° C à 280°C
5 Résistance de gril rabattable
6 Résistance de sole relevable*
7 Trous de fixation du support broche*
8 Grille réversible
9 Cordon fixe
10 Kit tournebroche* (1broche, 2 fourches)
11 Support broche*
12 Plat lèche-frite*
UTILISATION
Avant toute utilisation, lire la page “PRÉCAUTIONS IMPORTANTES”.
Avant la première utilisation
Mettez votre four sur une surface stable.
Enlevez tous les autocollants et protections à l’intérieur et à l’extérieur de votre four.
L’emballage est recyclable, mais il peut être utile pour transporter ou retourner le
four à une station service agréée.
Retirez tous les accessoires* du four (grille, broche,…).
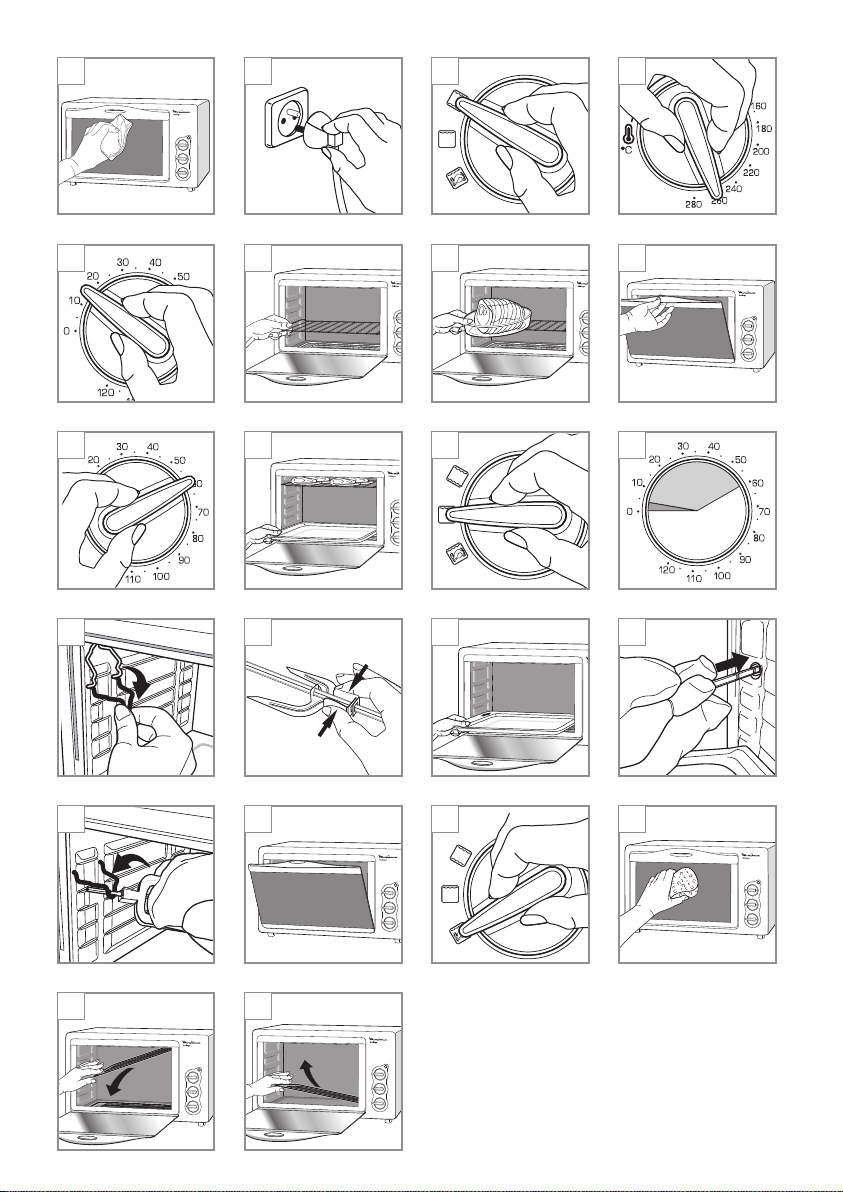
Nettoyez le four et les accessoires avec un linge humide. Bien sécher. (Fig A)
Fermez la porte en saisissant uniquement l’anse de la poignée. (Fig H)
Branchez le cordon sur une prise électrique reliée à la terre. (Fig B)
Positionnez le sélecteur de fonction sur la position “four” (Fig C)
Réglez le thermostat du four sur 280°C. (Fig D)
Réglez la minuterie à 15 minutes. (Fig E)
Le four se met en marche.
Un léger dégagement de fumée peut se produire, ce phénomène est tout à fait
normal et disparaîtra rapidement à l’usage.
Toute manipulation de la porte doit se faire en saisissant l’anse de la poignée.
6
*selon modèle
Page 7

FRA
Arrêt du four
Quel que soit le mode de cuisson utilisé, le four peut être arrêté avant la fin du temps de
cuisson. Pour cela, ramenez le temps de cuisson à 0 grâce à la minuterie.
Cuisson au four *
Insérez la grille à la hauteur souhaitée. (Fig F)
Posez votre plat avec sa préparation sur la grille et fermez le four. (Fig G) - (Fig H)
Réglez le bouton sélection sur la fonction “four” *(Fig C)
Réglez le thermostat sur la température désirée en fonction de votre recette. (Fig D)
Réglez le temps de cuisson grâce à la minuterie. (Fig I)
La cuisson commence.
A la fin du temps de cuisson, le four s’arrête automatiquement.
Vous pouvez arrêter le four avant la fin du temps de cuisson en ramenant le temps de cuisson à 0 grâce à la minuterie.
Votre four est puissant et rapide. Le préchauffage n’est pas toujours nécessaire.
La température est élevée sur la porte et les parois lorsque le four fonctionne.
Utilisez des gants.
Pour certaines préparations nous vous recommandons :
- de contrôler la cuisson et ne pas manger des aliments frits s’ils sont brûlés.
Préférez une friture légèrement dorée, notamment pour les frites cuites dans
votre four
- d’avoir un régime équilibré et varié comportant beaucoup de fruits et légumes
Cuisson au gril *
Pour griller et gratiner toutes vos préparations.
Préchauffer environ 4 minutes.
Posez votre plat ou vos viandes sur la grille le plus près possible de la résistance de gril
sans que vos aliments ne touchent la résistance. (Fig J)
Mettez le plat lèche-frite avec un peu d’eau directement sur la résistance de sole qui ne
chauffe pas afin de recueillir la graisse ou le jus de cuisson. (Fig J)
Laissez la porte entrouverte. (Fig R)
Positionnez le sélecteur de fonction sur la position “gril” . (Fig K)
Réglez le temps de cuisson désiré grâce à la minuterie. (Fig L)
Le four se met en marche.
Pour vos viandes, il est nécessaire de retourner les aliments à griller à mi-cuisson (saucisses,
côtes de porc…).
A la fin du temps de cuisson, le four s’arrête automatiquement.
*selon modèle
7
Page 8

FRA
Cuisson au gril avec tournebroche *
Pour cuire au tournebroche volaille et viande.
Mise en place de la broche :
Pour installer le tournebroche, mettez en place le support de la broche dans les trous de
la paroi gauche. (Fig M)
Glissez une fourche le long de la broche en appuyant sur son extrémité. Relâchez la pression
pour fixer la fourche.(Fig N)
Ficelez bien volailles ou viandes, embrochez-les. Glissez la seconde fourche aussi profondément que possible, pour que la pièce à rôtir soit bien maintenue. Relâchez la pression
pour fixer la seconde fourche.
Déplacez si nécessaire la 1ère fourche pour recentrer la pièce sur la broche.
Retirez la grille et introduisez le plat lèche-frite dans le four en position basse (flèches
d’orientation sur le plat). (Fig O)
Introduisez l’extrémité pointue de la broche dans l’ouverture d’entraînement située sur la
paroi droite du four et engagez-la à fond. (Fig P)
Positionnez l’autre extrémité de la broche dans le support. (Fig Q)
Laissez la porte entrouverte. (Fig R)
Mettez le sélecteur en position “gril/tournebroche” *(Fig S).
Réglez le temps de cuisson désiré grâce à la minuterie.
La cuisson commence, la broche commence à tourner.
A la fin du temps de cuisson, le four s’arrête automatiquement.
Laissez toujours la porte entrouverte lorque vous utilisez la fonction gril.
NETTOYAGE ET ENTRETIEN
Ne laissez pas la graisse s’accumuler dans l’appareil.
Avant tout entretien ou nettoyage, laissez refroidir le four.
Un simple coup d’éponge suffit pour nettoyer l’extérieur de l’appareil.
Nettoyez la porte, les surfaces émaillées ou laquées et les pièces translucides avec une
éponge humide additionnée de détergent doux. (Fig T)
N’utilisez ni produit d’entretien agressif (notamment les décapants à base de soude),
ni éponge grattoir, ni tampon abrasif.
our faciliter le nettoyage des parois autonettoyantes après une cuisson grasse, faites chauf
P
fer le four à vide, thermostat en position maximum pendant 10 minutes, porte fermée.
La résistance de gril est rabattable mais non amovible*.(Fig U)
Le four est équipé d’une résistance de sole relevable (Fig V) (non amovible).
8
*selon modèle
-
Page 9

FRA
Pour les traces adhérentes, utilisez éventuellement un tampon métallique doux non abrasif.
Ne forcez jamais pour manipuler les résistances.
Tous les accessoires* (grille, plat, kit tournebroche) se nettoient à l’eau additionnée de
détergent ou peuvent être mis au lave-vaisselle.
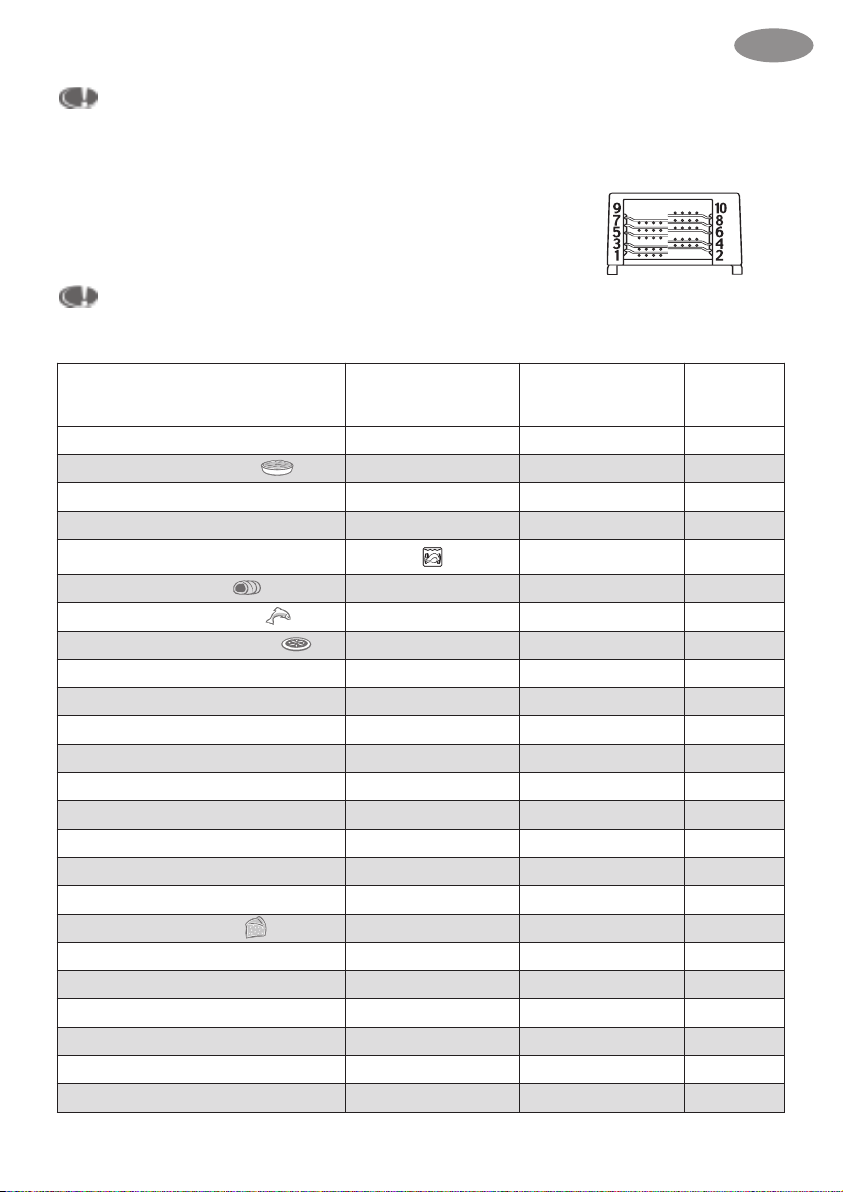
Position de la grille
TABLEAU DE CUISSON
Les temps de cuisson ci-après sont donnés à titre indicatif. Ils peuvent varier en fonction
de la taille, de l’épaisseur, de la fraîcheur et de la température initiale de l’aliment à
cuire.
Préparations Position de réglage Temps de cuisson
Endives au jambon
Gratin dauphinois
Rôti de porc
Gigot d'agneau
Poulet 1,5 kg 80mn
Rosbif
Filet Poisson au vin blanc
Pizza pâte fine surgelée
Soufflé au fromage
Bouchée à la reine
Tourte individuelle
Quiche Lorraine
Frites surgelées 300g
Cuisses de poulet
Tomates farcies
Brioche
Palets au raisin
Gâteau mousseline
Crème renversée
Clafoutis
Tarte Tatin
Cake
Tarte aux pommes
Gâteau marbré
*selon modèle
200/220ºC
220ºC
240ºC
240ºC
240ºC
240ºC
240ºC
220ºC
180ºC
180/200ºC
240ºC
260ºC
240ºC
220/240ºC
180ºC
180ºC
180ºC
240ºC
180ºC
260ºC
180ºC
260ºC
180ºC
20mn 3
70mn 3
75mn 3
60/70mn 2
35/40mn 3
15mn 3
12mn 5
25/30mn 2
33/35mn 3
30mn 4
20/25mn 4
14/16mn 5
25/30mn 4
35/40mn 2
30/35mn 2
10/15mn 4
32/35mn 2
30/35mn 2
40/45mn 3
20/25mn 4
40/45mn 2
23/25mn 4
35/40mn 2
Position de
la grille
Porte
entrouverte
9
Page 10

ENG
IMPORTANT PRECAUTIONS
Take the time to read all the instructions and refer to the User Guide.
This appliance complies with the regulations and safety conditions in force and with the
directives:
- Electromagnetic Compatibility Directive 89/336/EEC as modified by 92/31/EEC
and 93/68/EEC.
- Low-Voltage Directive 73/23/EEC as modified by Directives 93/68/EEC.
As for any cooking appliance, do not leave it unattended when in use and keep it out of
reach of children at all times.
Given the diversity of applicable standards, if this appliance is to be used in a country
other than that in which it is purchased, you should have it checked by an approved service centre.
Do not place the appliance close to a source of heat.
This appliance is not designed to be built in.
Place the appliance on a solid work surface away from water splashes.
Do not carry or move the appliance during use.
Check that the supply voltage matches that indicated on the appliance (alternating current only).
Do not allow the supply cord to hang down or to touch the hot parts of the oven.
Do not pull on the supply cord to unplug the appliance.
Unplug the appliance before any major cleaning or in the event of a thunderstorm.
Always connect the appliance to an earthed socket (16 A).
Only use an extension cable that is in good condition, has an earthed socket and a
conductor cross-section at least equal to that of the cord supplied with the appliance.
Check that the electrical system is able to supply an appliance of this rated power.
This electrical appliance operates with high temperatures that could cause
burns. Do not touch the metal parts of your oven.
The door and outer surface temperatures are high when the appliance is operating.
Use the handles and knobs. Use oven gloves if necessary.
To avoid electric shock, never immerse the supply cord, the socket or the appliance
in water or in any other liquid.
Should any part of the appliance catch fire, do not attempt to extinguish it with water.
Disconnect the appliance and smother the flames with a damp cloth.
Do not store inflammable materials in the vicinity of the appliance or under the surface on which it is installed.
40
Page 11

Never use the appliance if:
- the supply cord is defective,
- lthe appliance has fallen to the floor and shows visible signs of damage or does
not function correctly.
In either case, the appliance must be sent to the nearest KRUPS approved service
centre to eliminate any risk (list attached).
In order to avoid any risk of fire, do not operate the appliance under a wall cupboard,
a shelf or near to inflammable materials such as blinds, curtains, hangings, etc.
Do not use the appliance as a source of heating.
Do not place paper, card or plastic in the appliance and place nothing on it (utensils,
grids, objects, etc.).
Do not remove the control knobs from the control panel when cleaning it.
Do not insert anything in the ventilation slots and do not obstruct them.
For your own safety, never dismantle the appliance yourself; contact an approved
Service Centre for repairs.
Depending on model :
Timer : For times less than 25 minutes, turn the button to 30 minutes and come back
to the required time.
Environment protection first !
Your appliance contains valuable materials which can be recovered or recycled.
Leave it at a local civic waste collection point.
ENG
This appliance is designed solely for domestic use; any professional or inappropriate use or use not in accordance with these instructions renders the manufacturer’s liability and guarantee null and void.
Never line the inside of your oven with aluminium foil.
KEEP THESE INSTRUCTIONS
41
Page 12

ENG
APPLIANCE CHARACTERISTICS
1 Main indicator lamp
2 Timer setting knob (0 to 120 minutes)
3 Function select knob: Oven
Grill
Grill + Rotisserie
4 Temperature setting knob (100°C to 280°C)
5 Hinged grill element
6 Hinged bottom element*
7 Spit support fixing hole*
8 Reversible shelf
9 Fixed cord
10 Rotisserie kit* (1 spit, 2 spit forks)
11 Spit support*
12 Drip pan*
USING THE APPLIANCE
Before using your appliance, read the page, “IMPORTANT
PRECAUTIONS”.
Before using for the first time
Place your oven on a stable surface.
Remove all self-adhesive labels and protection from inside and outside your oven.
The packaging is recyclable but can be useful to transport the oven or return it to an
approved service centre.
Remove the accessories* from the oven (shelf, spit etc.).
Clean oven and accessories with a damp cloth. Dry thoroughly. (Fig A)
Close the door using the handle only. (Fig H)
Connect the cord to an earthed socket. (Fig B)
Set the function selector switch to “oven”(Fig C)
Set the oven thermostat to 280°C. (Fig D)
Set the timer to 15 minutes. (Fig E)
The oven will start.
Some smoke may be produced. This is quite normal and will soon disappear with use.
Always use the handle when opening or closing the door
42
*according to model
.
Page 13

ENG
Stopping the oven
Whatever cooking mode is being used, the oven can be stopped before cooking has finished. To do this, set the cooking time to 0 using the timer.
Oven cooking *
Insert the shelf at the desired height. (Fig F)
Place your prepared dish of food on the shelf and close the oven. (Fig G) - (Fig H)
Turn the selector knob to “oven” *(Fig C)
Turn the thermostat knob to the desired temperature according to your recipe. (Fig D)
Set the timer knob to the desired cooking time. Fig I)
Cooking will start.
At the end of the cooking time, the oven will turn off automatically.
You can stop the oven before the end of the cooking time by setting the timer to 0.
Your oven is powerful and fast. Preheating is not always necessary.
The door and outer wall temperatures are high when the oven is operating.
Use gloves
For certain dishes, we recommend that:
- you keep a check on the cooking and do not eat fried food if it is burned; fried
food should be just lightly browned, especially chips cooked in your oven,
- you eat a balanced, varied diet, including large amounts of fruit and vegetables
Grilling *
To grill or prepare gratins.
Allow about 4 minutes for preheating.
Place your dish or your meat on the shelf as close as possible to the grill element without
the food touching it. (Fig J)
Place your dish or your meat on the shelf as close as possible to the grill element without
the food touching it.(Fig J)
Leave the door ajar. (Fig R)
Set the function selector switch to “grill” *. (Fig K)
Set the timer knob to the desired cooking time. (Fig L)
The oven will start.
Meat should be turned halfway through grilling (sausages, pork chops etc.).
At the end of the cooking time, the oven will turn off automatically.
*according to model
43
Page 14

ENG
Spit roasting under the grill *
To cook poultry or meat on the spit.
Fitting the spit:
To install the spit, fit the spit support in the holes on the left wall. (Fig M)
Slide one spit fork along the spit by pressing on its end. Release the end to lock the spit fork
in place. (Fig N)
Truss poultry and meat tightly, then skewer them on the spit. Slide the second spit fork
into the meat as far along as possible, so that the meat to be roasted is held securely in
place. Release the end to lock the second spit fork in place.
Move the first spit fork, if necessary, in order to centre the meat on the spit, and lock the
2 forks in place.
Remove the shelf and insert the drip pan in the oven in the lowest position (guide
arrows on the pan). (Fig O)
Insert the pointed end of the spit into the drive hole in the right wall of the oven and
push it home. (Fig P)
Fit the other end of the spit in the support. (Fig Q)
Leave the door ajar. (Fig R)
Set the selector to the position, “grill/rotisserie”
Set the timer knob to the desired cooking time.
Cooking will start, and the spit will begin to turn.
At the end of the cooking time, the oven will turn off automatically.
Always leave the door ajar when using the grill function.
*
(Fig S).
CLEANING AND CARE
Do not allow grease to accumulate in the appliance.
Before cleaning or care, allow the oven to cool.
A quick wipe with a sponge is sufficient to clean the outside of the appliance.
Clean the door, enamelled or lacquered surfaces and translucent parts with a damp sponge
and a mild detergent. (Fig T)
Do not use aggressive cleaning products (especially soda-based oven cleaners), scouring sponges or abrasive pads.
o facilitate cleaning of the self-cleaning sides after cooking fatty food, heat the empty oven
T
for ten minutes with the thermostat at its maximum setting and with the door closed.
The grill element is hinged but cannot be removed*.(Fig U)
The oven has a hinged bottom element
44
*according to model
(Fig V) (not removable) .
Page 15
ENG
Never attempt to move the heating elements by force.
All accessories* (shelf, pan, rotisserie kit) can be cleaned with water and detergent or put in
the dishwasher.
Shelf position
COOKING TABLE
The cooking times below are given by way of indication. They can vary depending
on the size, thickness, freshness and initial temperature of the item to be cooked.
Dish
Chicory with ham
Gratin dauphinois
Roast pork
Leg of lamb
Chicken (1.5 kg) 80mn
Roast beef
Fish in white wine
Frozen thin crust pizza
Cheese soufflé
Vol-au-vents
Individual pies
Quiche Lorraine
Frozen chips 300g
Chicken drumsticks
Stuffed tomatoes
Brioche
Raisin cookies
Sponge cake
Crème caramel
Clafoutis
Tarte tatin
ruit cake
F
Apple tart
Marble cake
Temperature
setting
200/220ºC
220ºC
240ºC
240ºC
240ºC
240ºC
240ºC
220ºC
180ºC
180/200ºC
240ºC
260ºC
240ºC
220/240ºC
180ºC
180ºC
180ºC
240ºC
180ºC
260ºC
180ºC
260ºC
180ºC
Cooking time
20mn 3
70mn 3
75mn 3
60/70mn 2
35/40mn 3
15mn 3
12mn 5
25/30mn 2
33/35mn 3
30mn 4
20/25mn 4
14/16mn 5
25/30mn 4
35/40mn 2
30/35mn 2
10/15mn 4
32/35mn 2
30/35mn 2
40/45mn 3
20/25mn 4
40/45mn 2
23/25mn 4
35/40mn 2
Shelf
position
Door
ajar.
*according to model
45
 Loading...