

Page 1
1 5
3
1
2
4
3
1
2
4
3
4
5
b1
b4
b2
b
b3
b3.1
a2.1
a2.2
b3.2
h2
h1
a3
b3.3
h
a2
a1
a3
2 3 4
c1
c2
e
d1
b2
b3
d
2
1
Page 2
5
6
g3
7
f5
f1
3
8
g2
g1
f2
2
1
b3.1
2
2
1
1
1
1
9
4
f1
f2
f3
f4
10
b3.2
i
b3.3
j
Page 3

English
Thank you for choosing a Moulinex appliance,
which is exclusively designed for domestic
food preparation indoors.
The label on the packaging shows the
accessories that are sold with this model.
You can purchase other accessories to
add to your appliance’s functions (see
“Accessories” paragraph).
- Do not run the blender when empty.
- Close the hatch (a3) when not using the
blender.
- Always use the blender with its lid.
- When you want to grate or slice foods,
always use the pusher (b1) to guide them
into the feeder tube, never use your fingers
or other utensils. Never touch moving parts.
- Never use the bowls as containers (for
freezing, cooking or sterilisation).
Starting up
Safety Recommendations
- Read the instructions for use carefully before
using your appliance for the first time:
- This product has been designed for domestic
use only. Any commercial use, inappropriate
use or failure to comply with the instructions,
the manufacturer accepts no responsibility
and the guarantee will not apply.
- Do not leave the appliance running without
supervision, notably when young children or
handicapped persons are present.
- Make sure that you have the right voltage.
Any error in connection renders the
warranty invalid.
- Always unplug the appliance when not in
use, when cleaning it or when there is a
power cut.
- Do not use your appliance if it is not operating
properly, if it is damaged or if the power cord
or plug is damaged. To avoid any danger,
you must have them replaced by an
authorized Moulinex service centre (see the
list in the service booklet).
- All maintenance other than cleaning and
normal user maintenance should be carried
out by an authorized Moulinex service
centre.
- Never place the appliance, the power cord
or the plug in a liquid.
- Never leave the power cord hanging where
it can be reached by children, near or in
contact with the hot parts of the appliance,
near a source of heat or over a sharp corner.
Use the cord holder during storage.
- For your safety, only use Moulinex
accessories and spare parts adapted to your
appliance.
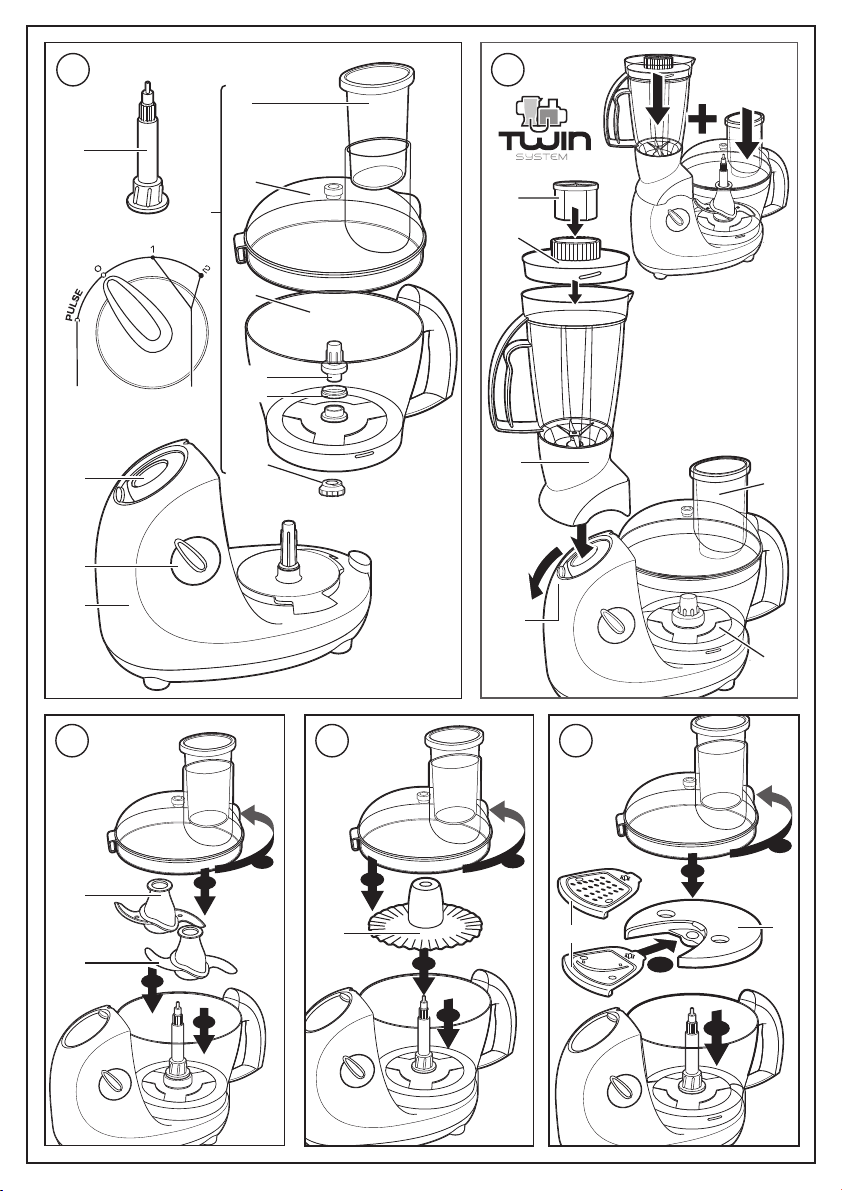
- Handle the chopper blade (c1), the blender
blade and all other blades with caution; they
are extremely sharp. You must remove the
blade from its spindle (b4) before emptying
the contents from the bowl.
- Remove the accessories from their
packaging and clean them with hot water.
- Place the motor unit (a1) on a clean, dry flat,
stable surface and connect your appliance.
. Using the control knob (a2):
1
. Pulse button (a2-1) for better control and for
blending certain preparations better.
. Use continuous operation (a2-2) by turning
to position 1 (slow speed) or 2 (fast speed).
. To unlock the lid, you must return to
position 0. Turn the lid to the right to
unlock it.
Recommendations for use
Your Food Processor enables you prepare
from 150 to 1000 g maximum – Total volume
of the chopping bowl: 2.2 litres. Total volume
of the mixing bowl: 1.25 litres.
Main bowl (b3)
- If not already in place, position the seal
(b3-2) on the bottom of the bowl. The lip of
the seal must be turned upwards. Next,
position the spindle (b3-1). Then lock the set
by turning the locking ring (b3-3) all the way
to the stop. Remove the whole unit and clean
it after each use (see “cleaning” paragraph).
- Lock the bowl (b3) onto the base of the food
processor (a1).
- Install the desired accessory.
- Install the lid (b2) and lock it on.
- Check that the hatch (a3) is closed properly.
- Switch on.
Blender (h)
- Lock the bowl (b3) onto the base of the food
processor (a1) (makes sure that the bowl is
empty and does not contain any
accessories).
- Put the lid (b2) on and lock it in place.
- Open the hatch (a3).
10
Page 4

- Place your blender (h) on the open hatch
with its lid (h1) and cap (h2).
- Switch on.
Caution: Never use the emulsifying disk (e)
to knead dough or to mix pastry.
Maximum running time: 4 minutes.
TWIN SYSTEM : (b+h)
You can combine food preparation using the
blender and the main bowl at the same time.
Spatula (j)
- Helpful when pouring your mixtures into
serving dishes.
2
.KNEADING/MIXING/CHOPPING/
BLENDING DEPENDING ON MODEL
- Lower the spindle (b4) onto the spindle drive
(b3-1).
- You can insert the metal chopper blade (c1)
or kneader (c2) onto the spindle (b4).
- Place the ingredients in the bowl.
- Put the lid on and lock into place.
Preparations
. Mix
- You can mix 1000g of ingredients (biscuits,
pound cake) in 1 to 1 1/2 minutes.
. Knead
- You can knead up to 800g of dough
(shortbread, shortcrust pastry, bread) in
40 seconds.
Caution: Stop the appliance once you see
that the ball of dough has been formed.
. Chop (c1)
You can chop 150 to 350g of food in 15 to
20 seconds: hard products (cheeses, nuts),
hard vegetables (carrots, celery, etc.), tender
vegetables (onions, spinach, etc.), raw and
cooked meat (de-boned, cut into cubes, with
tendons removed), raw or cooked fish. Do
not chop products that are too hard (ice,
sugar) or which require fine grinding (wheat,
coffee).
. Blend in the main bowl (b3)
- You can blend up to 0.5L of soup or stewed
fruit in 20 sec.
Caution: Never pour boiling liquid into the
bowl.
3
. BEATING/EMULSIFYING/WHISKING
- Lower the spindle (b4) onto the spindle drive
(b3-1).
- Place the emulsifying disk (e) on the spindle
(b4).
- Place the ingredients in the bowl.
- Put the lid on and lock it in place.
Preparations
- You can prepare 2 to 4 egg whites and up to
0.3 litres of fresh cream.
4
. GRATING/SLICING DEPENDING ON MODEL
- Lower the spindle (b4) onto the spindle drive
(b3-1).
- Insert the desired blade (d1) into the support
disc (d).
- Place this assembly on the spindle (b4) all
the way to the stop.
- Put the lid on and lock it in place.
- Insert the food through the feeder tube and
guide it with the pusher (b1), never with your
fingers nor with a utensil.
Preparations
. Blade C (Coarse grating): carrots, gruyere,
celery, grated foods, etc.
. Blade H (Thick slicing): potatoes for
scalloped potatoes, carrots, cucumbers, etc.
. Blade A (Fine grating): carrots, gruyere,
celery, grated foods, etc.
. Blade D (Fine slicing): potatoes for crisps,
etc.
. Blade G (Parmesan): potatoes, parmesan
cheese, coconut, etc.
. Blade E (Chips): potatoes for chips, etc.
- Prepare up to 700g of food at a time (no meat
or cold pork cuts).
. HOMOGENISING/MIXING/FINE
5
BLENDING
Depending on the kind of food, you can use
the blender (h) to process up to 1 litre of liquid.
To operate the blender (h), you must first lock
in place the chopping main bowl (b3) with its
lid (b2) on.
- Open the cover (a3).
- Place the blender (h) on the open hatch
cover (a3).
- Place the food in the blender (h), close the
lid (h1) with the cap (h2) in place.
- Never fill the blender with hot liquid or with
dry ingredients alone. Wait until the blender
comes to a complete stop before removing
it.
Preparations
You can:
- prepare up to 1 litre of finely blended soups,
sauces creams, stewed fruit, milkshakes,
smoothies or cocktails.
- mix batters (crêpes, doughnuts, pancakes,
porridges, etc.).
Maximum run time: 2 minutes
11
Page 5

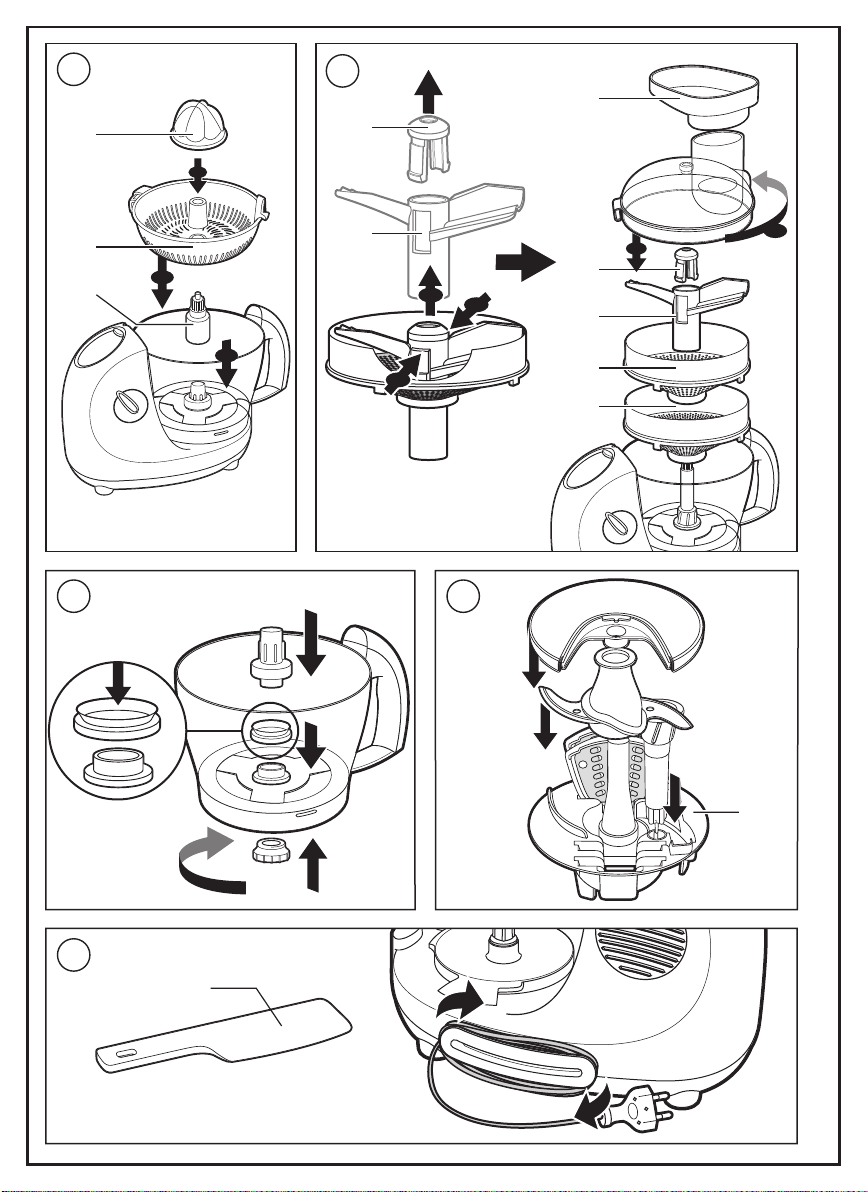
. JUICER DEPENDING ON MODEL
6
- Position the spindle (g1) on the spindle drive
(b3-1).
- Position the filter basket (g2), turning it to
the locked position. The lock pin on the filter
basket should press up against the stop at
the bottom of the locking slot. You do not
need the lid (b2).
- Insert the cone (g3) into the hole in the filter
basket.
- Hold one half of a fruit on the cone.
- Set the speed on 1.
Preparations
- You can obtain up to 0.8 litres of juice without
emptying the bowl.
- Rinse the filter basket (g2) every 0.5 litres.
. GRIND/PRESS/CRUSH DEPENDING ON
7
MODEL
Lower the spindle (b4) onto the spindle drive
(b3-1).
- Insert the desired grate:
. Large holes (f3): you can prepare purées
(up to 500g of cooked vegetables or fruit)
using potatoes, carrots, cauliflower.
. Small holes (f4): you can prepare fine purées
or stewed pitted fruit (up to 300g), using
tomatoes, grapes, strawberries, raspberries,
gooseberries, apricots or peaches.
- Position the blade (f2) with its clip (f1) and
press until it clicks.
- Depending on the model, place the funnel
(f5) on the feeder tube in the lid to guide the
ingredients more easily.
- Insert the food cut into pieces.
- Set the speed on 1.
If the blade comes unclipped from the disc,
check that the disc has been positioned
properly for your preparation, your food has
been thoroughly thawed and is thoroughly
cooked.
Cleaning/Maintenance/
Storage
- Unplug the appliance, remove and take the
accessories apart.
- Pour hot water with a few drops of washing
up liquid into the blender jug. Close the lid.
Press the pulse button a few times to spin.
Unplug the appliance. Rinse the jug with tap
water and let leave to dry.
. The bowl (b3) is equipped with a seal (b3-2)
8
which can be washed in the dishwasher or
by hand. To remove it, remove the screw
(b3-3). When reassembling, make sure that
the lip points upwards. To increase the
lifetime of this seal, you can place a small
amount of cooking oil on the lip of the seal
before reassembling.
- Wash, rinse and dry the accessories as well
as the bowl, jug and lids (you can put them
in the dishwasher).
- Do not use abrasive sponges or objects with
metal components.
- Never put the motor unit (a1) in water. Wipe
it clean with a dry or slightly damp cloth.
- If your accessories become discoloured by
the food (carrots, oranges, etc.), wipe them
with a kitchen paper towel or cloth moistened
with cooking oil and then clean them as
indicated.
-The chopper blade (c1), blender blade (h)
and other blades (d1) must be handled with
caution; care they are extremely sharp.
Storage
Your food processor is equipped with:
9
- a storage accessory (i) which is goes inside
the bowl (b3). This can be used for storing
the cutting accessories (chopper blade c1,
blades d1), the blade support disc (d) and
the spindle (b4).
- a cord holder on the back of the appliance
10
for storing and adjusting the power cord to
the desired length.
What do I do if my
appliance doesn’t work?
First make sure that it is plugged in properly,
then:
- that the bowl (b3) is positioned correctly, that
the lid (b2) is locked in place, that the
accessories are inserted correctly, that the
control knob (a2) is in the right position.
- The bowl (b3) and the lid (b2) are locked in
place before operating the blender (h).
Your appliance is equipped with a protection
system. If your appliance stops while being
operated, unplug it and let it cool down for
30 minutes before continuing with your initial
preparation.
If you have carefully followed all of these
instructions and your appliance still doesn’t
work, contact our Helpline or an authorised
Moulinex centre (see the list in the “Moulinex
Service” booklet).
12
Page 6

Accessories
Deutsch
You can add to your food processor’s functions
with the following accessories which can be
bought from an authorised Moulinex service
centre:
- Fine grating blade (A): MS-5 980 676
- Thin slicing blade (D): MS-5 980 677
- Chip-slicing blade (E): MS-5 980 678
- Coarse grating blade (C): MS-5 966 358
- Thick slicing blade (H): MS-5 966 356
- Parmesan blade (G): MS-5 980 679
- Bowl seal: MS-0 698 381
- Plastic kneader: MS-5 966 340
- Maxi press accessories: MS-0697 557 256
- Juicer: MS-578 557 5256
- Grinder accessory: MS-5785576
Environment
protection first!
i Your appliance contains valuable materials
which can be recovered or recycled.
Ü Leave it at a local civic waste collection
point.
Wir freuen uns, dass Sie sich für ein Gerät von
Moulinex entschieden haben. Dieses Gerät
ist ausschließlich für die Zubereitung von
Lebensmitteln, für den Hausgebrauch und
zum Betrieb in geschlossenen Räumen
bestimmt.
Auf dem Verpackungsetikett sind die
mitgelieferten Zubehörteile abgebildet.
Sie können weitere Zubehörteile für
andere Funktionen dazukaufen (siehe
Abschnitt „Zubehörteile”).
Sicherheitsbestimmungen
- Lesen Sie die Betriebsanleitung vor der
ersten Benutzung aufmerksam durch: bei
Benutzung entgegen der Betriebsanleitung
übernimmt Moulinex keinerlei Haftung.
- Das Gerät darf besonders in Anwesenheit
von kleinen Kindern und Behinderten nur
unter Aufsicht benutzt werden.
- Überprüfen Sie, dass die Gerätespannung
mit der Ihres Stromnetzes übereinstimmt.
Bei falschem Anschluss erlischt die Garantie.
- Stecken Sie das Gerät, wenn Sie es nicht
mehr benutzen oder reinigen sowie bei
Stromausfall stets aus.
- Benutzen Sie das Gerät nicht, wenn es nicht
korrekt funktioniert oder beschädigt ist oder
wenn das Netzkabel oder der Stecker
beschädigt sind. Wenden Sie sich in solchen
Fällen aus Sicherheitsgründen stets an den
Moulinex-Kundendienst (siehe Liste im
Serviceheft).
- Alle Arbeiten an dem Gerät außer der
Reinigung und der normalen Pflege durch
den Kunden müssen vom MoulinexKundendienst ausgeführt werden.
- Tauchen Sie das Gerät, das Netzkabel und
den Stecker niemals in Flüssigkeiten.
- Lassen Sie das Netzkabel nicht in
Reichweite von Kinderhänden
herunterhängen oder in die Nähe oder in
Kontakt mit den heißen Teilen des Gerätes,
einer Hitzequelle oder einer scharfen Kante
geraten. Benutzen Sie zum Verstauen des
Netzkabels den Kabelaufroller.
- Zu Ihrer eigenen Sicherheit sollten Sie nur
original Moulinex Zubehör- und Ersatzteile
passend zu Ihrem Gerät verwenden.
13
 Loading...