

Page 1
FR
EN
DE
NL
ES
PT
IT
TR
AR
FA
TH
MX
Page 2

Page 3
Page 4

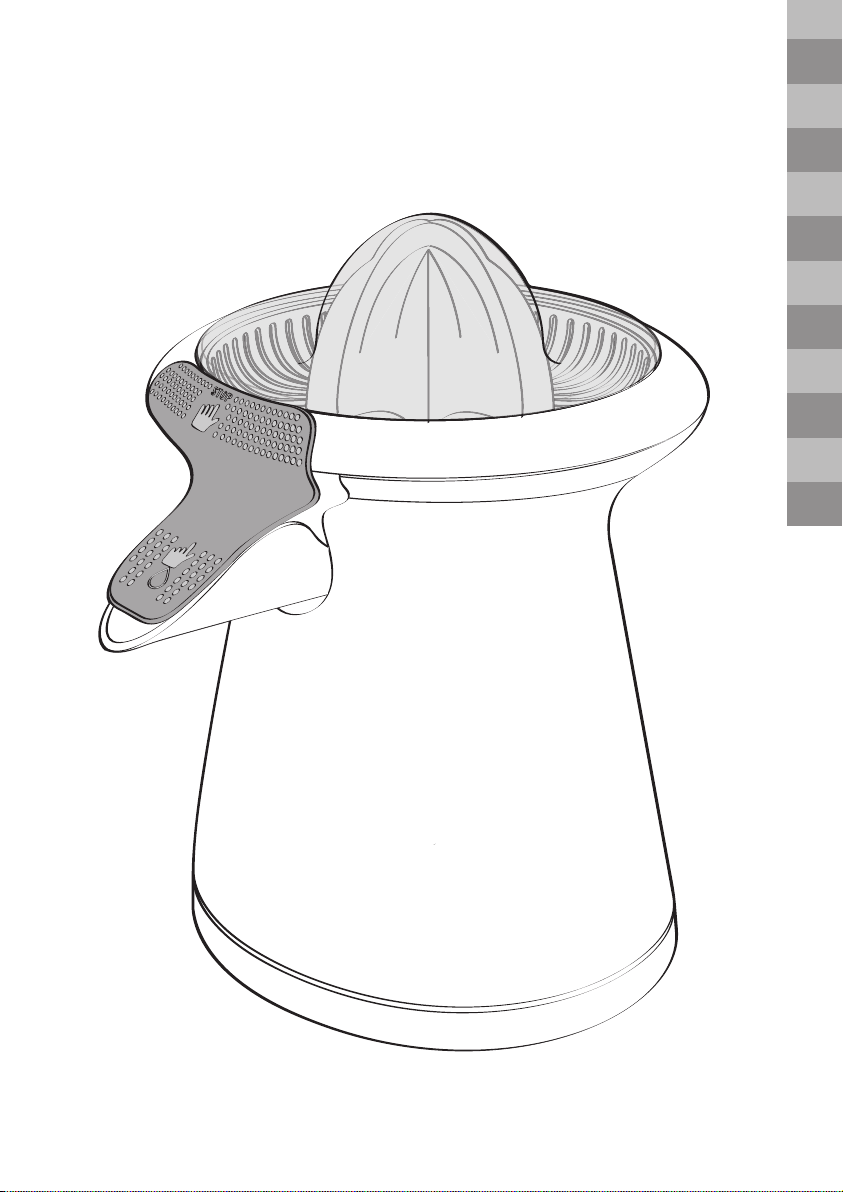
DESCRIPTION
FR
A Bloc moteur
B Entraîneur
C Collecteur de jus
D Système stop-gouttes
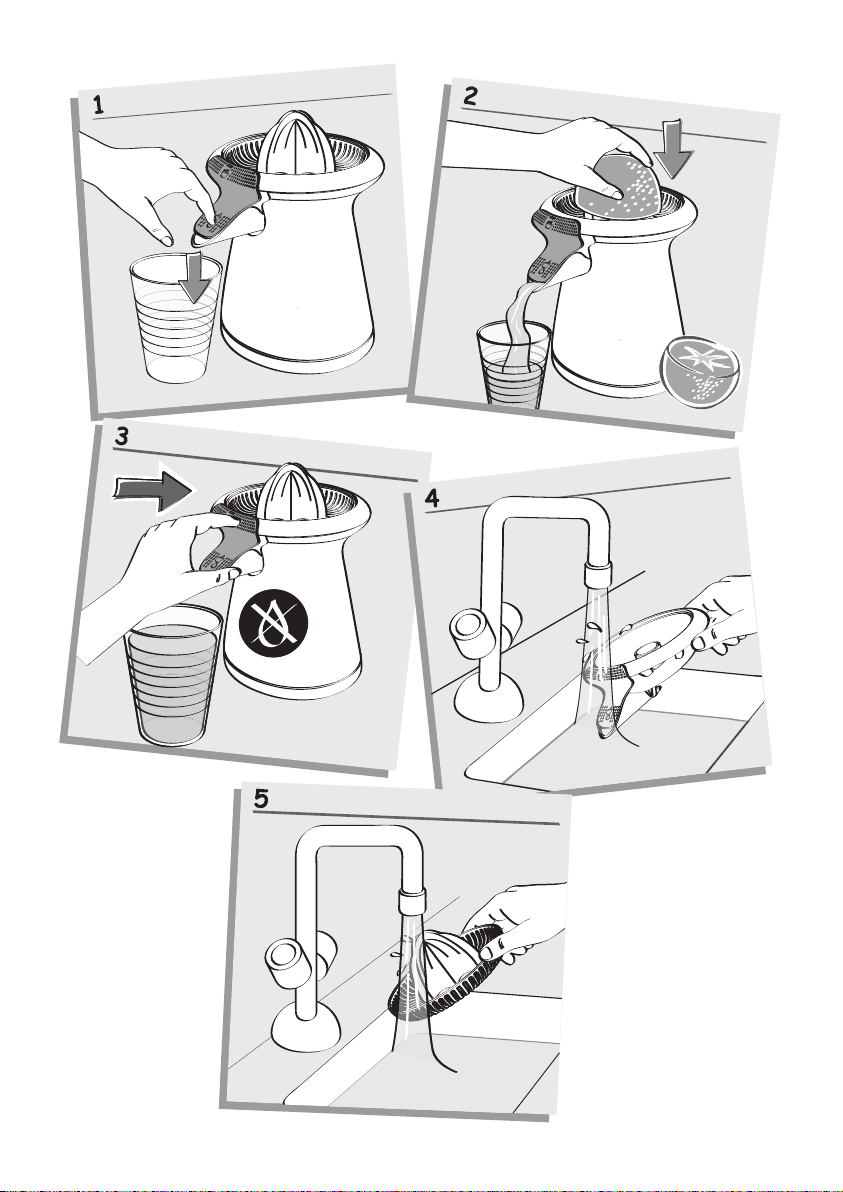
UTILISATION
Avant la première utilisation, lavez les pièces qui
seront en contact avec les aliments
• Coupez l’agrume en deux.
• Branchez l’appareil.
• Posez un verre sous le bec verseur
• Enlevez le couvercle de protection
• Appuyez sur du système stop-gouttes
pour laisser le jus s’écouler (fig. 1).
(C &F)
(E)
.
(G)
.
.
(D)
NETTOYAGE
• Débranchez toujours l’appareil avant de
nettoyer le bloc moteur
• Ne pas immerger le bloc moteur
passer sous l’eau. Nettoyez le bloc moteur
l’aide d’un chiffon humide. Séchez-le
soigneusement.
• Nettoyez immédiatement le collecteur de jus
(C)
et le filtre plastique
éviter que la pulpe ne colle (fig. 4 & fig. 5).
(A)
.
(A)
, ne pas le
(F)
après utilisation pour
(A)
E Bec verseur
F Cône avec grille plastique
G Couvercle de protection
H Range cordon
• Placez le fruit découpé sur le cône
appuyez doucement pour la mise en marche
(fig. 2).
• Lorsque le fruit n’est plus en contact avec le
cône, l’appareil s’arrête automatiquement.
• Cet appareil est équipé d’un système stopgouttes
Appuyez sur avant de retirer votre verre pour
arrêter l’écoulement du jus (fig. 3).
• Ne pas utiliser d’eau de javel ou une éponge
abrasive.
• Le collecteur de jus
à
plastique
peuvent passer au lave-vaisselle dans le panier
du haut en utilisant le programme «ECO» ou
«PEU SALE».
(D)
. Après la réalisation de votre jus,
(C)
(F)
et le couvercle de protection
, le cône avec grille
(F)
et
(G)
PROBLEMES ET ACTIONS CORRECTIVES
PROBLEME CAUSE SOLUTION
* La prise n’est pas branchée.
* La tension n’est pas celle qui est
L’appareil ne
fonctionne pas
Si vous avez suivi ces instructions et que votre appareil ne fonctionne toujours pas, adressez-vous à un
centre de service agréé (voir liste dans le livret de service).
requise par l’appareil.
* Le moteur ne se met pas en
marche à cause d’un mauvais
contact entre le cône et le
contact.
Branchez l’appareil sur une prise à la
bonne tension.
Vérifiez la tension.
Essayez d’appuyer sur le cône.
1
Page 5

DESCRIPTION
EN
A Drive unit
B Drive rod
C Juice collector
D Non-drip system
USE
Prior to first use, wash the parts that are in contact
with the food
• Cut the fruit into two pieces.
• Plug in the appliance.
• Place a glass under the spout
• Remove the safety cover
• Press of the non-drip system
flow (fig. 1).
(C&F)
.
(E)
(G)
.
.
(D)
to let the juice
CLEANING
• Always unplug the appliance before cleaning
the drive unit
• Do not immerse the drive unit
under running water. Clean the drive unit
with a damp cloth. Dry carefully.
• Clean the juice collector
(F)
filter
(A)
.
immediately after use to avoid the pulp
(A)
, or place it
(C)
and the plastic
(A)
E Spout
F Cone with plastic grid
G Safety cover
H Power cord
• Place the halved fruit onto the cone
press it gently to start the appliance (fig. 2).
• When the fruit is no longer in contact with the
cone, the appliance will stop automatically.
• This appliance is fitted with a non-drip system
(D)
.
When your juice is ready, press before
removing the glass to stop the juice flowing (fig.
3).
from sticking to them (fig. 4 & fig. 5).
• Do not use bleach or abrasive sponges.
• The juice collector
the safety cover
dishwasher in the top tray using the "ECO" or
"SLIGHTLY DIRTY" programmes.
(C)
, the plastic filter
(G)
may be cleaned in the
(F)
(F)
and
and
TROUBLESHOOTING
PROBLEM CAUSE SOLUTION
* It is not plugged in.
* The voltage is unsuitable for the
The appliance
will not work
If you have followed these instructions and your appliance still won't work, contact an Approved Service
centre (see list in the service booklet).
appliance.
* The motor will not start due to a
false contact between the cone
and the contact.
Plug in the appliance to a mans socket
with the correct voltage.
Check the voltage.
Try pressing the cone.
2
Page 6

BESCHREIBUNG
A Motorblock
B Spindel
C Saftauffangbehälter
D Tropfen-Stop-System
GEBRAUCH
DE
E Ausgussschnabel
F Presskegel mit Plastikgitter
G Schutzkappe
H Kabelfach
Reinigen Sie vor der ersten Inbetriebnahme die
Teile, die mit Lebensmitteln in Berührung kommen
(C & F)
.
• Schneiden Sie die Zitrusfrucht entzwei.
• Schließen Sie das Gerät an.
• Stellen Sie ein Glas unter den Ausgussschnabel
(E)
.
• Nehmen Sie die Schutzkappe
• Drücken Sie das Symbol des Tropfen-Stop-
Systems
• Setzen Sie die entzweigeschnittene Frucht auf
(D)
, damit der Saft abläuft (Abb. 1).
(G)
ab.
den Presskegel
nach unten, um das Gerät in Betrieb zu setzen
(Abb. 2).
• Sobald sich die Frucht nicht mehr in Kontakt mit
dem Presskegel befindet, schaltet sich das Gerät
automatisch aus.
• Dieses Gerät ist mit einem Tropfen-Stop-System
(D)
ausgestattet. Drücken Sie nach der
Zubereitung des Safts das Symbol , bevor Sie
Ihr Glas entnehmen, um den Saftfluss zu stoppen
(Abb. 3).
(F)
und drücken Sie sie leicht
REINIGUNG
• Stecken Sie das Gerät vor der Reinigung des
Motorblocks
• Tauchen Sie den Motorblock
Wasser und halten Sie ihn nicht unter fließendes
Wasser. Reinigen Sie den Motorblock
einem feuchten Tuch. Trocknen Sie ihn
anschließend sorgfältig.
• Der Saftauffangbehälter
(F)
müssen sofort nach der Benutzung gereinigt
(A)
stets aus.
(A)
niemals ins
(C)
und der Plastikfilter
(A)
werden, um zu vermeiden, dass das
Fruchtfleisch haften bleibt (Abb. 4 & Abb. 5).
• Verwenden Sie kein Bleichwasser und keine
Scheuerpads.
• Der Saftauffangbehälter
mit
und die Schutzkappe
„ECO“ oder dem „LEICHT VERSCHMUTZT“
Programm im oberen Korb der Spülmaschine
gereinigt werden.
(C)
, der Plastikfilter
(G)
können mit dem
PROBLEME UND MASSNAHMEN ZU IHRER BEHEBUNG
PROBLEM MÖGLICHE URSACHE MASSNAHME ZUR BEHEBUNG
Schließen Sie das Gerät an eine
Steckdose mit der korrekten Spannung
an.
Vergewissern Sie sich, dass die Spannung
der Elektroinstallation mit der auf dem
Typenschild des Gerätes angegebenen
Versorgungsspannung übereinstimmt.
Netzspannung: 220-240V~/ 50/60Hz.
Versuchen Sie, Druck auf den Presskegel
auszuüben.
Das Gerät
funktioniert nicht
* Der Stecker ist nicht
angeschlossen.
* Die Stromspannung entspricht
nicht den Anforderungen des
Geräts.
* Der Motor springt nicht an, weil
zwischen dem Presskegel und
dem Kontakt ein Fehlkontakt
besteht.
(F)
Wenn Sie sich an diese Anweisungen gehalten haben und Ihr Gerät immer noch nicht funktioniert,
wenden Sie sich bitte an ein zugelassenes Kundendienstcenter (siehe Liste im Serviceheft).
3
Page 7

BESCHRIJVING
A Motorblok
B Aandrijfas
C Sapcollector
D Druppelstopsysteem
GEBRUIK
NL
E Schenktuit
F Perskegel met kunststof zeef
G Beschermdeksel
H Snoeropbergmogelijkheid
Was voor het eerste gebruik de delen die met de
voedingsmiddelen in contact zullen komen
(C &F)
.
• Snij de citrusvrucht in twee stukken.
• Sluit het apparaat aan.
• Plaats een glas onder de schenktuit
• Verwijder het beschermdeksel
• Druk op de van het druppelstopsysteem
om het sap uit te laten stromen (fig. 1).
(G)
(E)
.
.
(D)
REINIGING
• Trek altijd de stekker uit het stopcontact voordat
u het motorblok
• Dompel het motorblok
niet onder stromend water? Reinig het
motorblok
vervolgens zorgvuldig af.
• Reinig de sapcollector
kunststof zeef
(A)
reinigt.
(A)
niet onder, was het
(A)
met een vochtige doek. Droog
(C)
(F)
onmiddellijk na gebruik om te
en de perskegel met
STORINGEN EN OPLOSSINGEN
• Plaats een halve vrucht op de perskegel
druk hier zacht op om het apparaat in te
schakelen (fig. 2).
• Wanneer de vrucht niet langer met de kegel in
contact is stopt het apparaat automatisch.
• Dit apparaat is voorzien van een
druppelstopsysteem
het sap en voordat u uw glas wegneemt op
om het uitstromen van het sap te doen
stoppen (fig. 3).
voorkomen dat het achtergebleven vruchtvlees
aankoekt (fig. 4 & fig. 5).
• Gebruik geen bleekwater of schuurspons.
• De sapcollector
(F)
zeef
bovenste korf van de vaatwasmachine wassen
waarbij u het programma « ECO » of « LICHT
VERVUILD » gebruikt.
en het beschermdeksel
(D)
. Druk na het persen van
(C)
, de perskegel met kunststof
(G)
(F)
en
kunt u in de
STORING OORZAAK OPLOSSING
* De stekker zit niet in het
stopcontact.
Het apparaat
doet het niet.
Indien u deze instructies heeft opgevolgd en uw apparaat het toch niet doet dient u contact op te
nemen met een erkend service centrum (zie lijst in het serviceboekje).
* De spanning is niet voor het
apparaat geschikt.
* De motor draait niet als gevolg
van een slecht contact tussen de
perskegel en de aandrijfas.
Steek de stekker in een stopcontact dat
de juiste spanning levert.
Controleer de netspanning.
Probeer op de kegel te drukken.
4
Page 8

DESCRIPCIÓN
ES
A Bloque motor
B Eje de arrastre
C Recogedor de zumo
D Sistema antigoteo
UTILIZACIÓN
Antes de usar este aparato por primera vez, lavar
las piezas que van a estar en contacto con los
alimentos
• Cortar el cítrico en dos.
• Conectar el aparato.
• Colocar un vaso debajo del pico de vertido
• Retirar la tapa de protección
• Presionar del sistema antigoteo
dejar pasar el zumo (fig. 1).
(C &F)
.
(E)
(G)
.
(D)
para
LIMPIEZA
• Desenchufar siempre el aparato antes de
limpiar el bloque motor
• No sumergir el bloque motor
bajo agua corriente. Limpiar el bloque motor
(A)
con un paño húmedo. Secarlo
cuidadosamente.
• Limpiar inmediatamente el recogedor de zumo
(C)
y el filtro de plástico
(A)
.
(F)
(A)
, no ponerlo
después de su
E Pico de vertido
F Exprimidor con rejilla de plástico
G Tapa de protección
H Recogedor del cable
• Colocar la pieza de fruta cortada sobre el
exprimidor
ponerlo en marcha (fig. 2).
• Cuando la fruta ya no está en contacto con el
exprimidor, el aparato se parará
automáticamente.
.
• Este aparato está provisto de un sistema
antigoteo
zumo, presionar antes de retirar el vaso para
detener el paso del zumo (fig. 3).
utilización para evitar que la pulpa se pegue
(figs. 4 y 5).
• No utilizar lejía o una esponja abrasiva.
• El recogedor de zumo
y la tapa de protección
el lavavajillas, en la cesta superior, utilizando el
programa «ECO» o «POCO SUCIO».
(F)
y presionar suavemente para
(D)
. Después de haber hecho el
(C)
, el filtro de plástico
(G)
pueden lavarse en
(F)
PROBLEMAS Y ACCIONES CORRECTORAS
PROBLEMA CAUSA SOLUCIÓN
* El aparato no está enchufado.
* La tensión no es la requerida por
El aparato no
funciona
Si se han seguido estas instrucciones y el aparato sigue sin funcionar, consultar a un servicio técnico
autorizado (ver lista en el folleto de servicio).
el aparato.
* El motor no se pone en marcha
debido a un mal contacto entre
el exprimidor y el contacto.
Enchufar el aparato a una toma de
corriente con una tensión correcta.
Compruebe el voltaje.
Intentar presionar el exprimidor.
5
Page 9

DESCRIÇÃO
PT
A Bloco do motor
B Eixo do motor
C Colector de sumo
D Sistema anti-pingos
UTILIZAÇÃO
Antes da primeira utilização, lave as peças que
estarão em contacto com os alimentos
• Corte o citrino ao meio.
• Ligue o aparelho.
• Coloque um copo por baixo do bico
• Retire a tampa de protecção
• Carregue em do sistema anti-pingos
deixar o sumo correr (fig. 1).
(G)
.
(C e F)
(E)
.
(D)
para
LIMPEZA
Desligue sempre o aparelho antes de limpar
•
o bloco do motor (A)
• Não mergulhe o bloco do motor em água
nem o passe por água. Limpe o bloco do motor
(A)
com a ajuda de um pano húmido. Seque-o
cuidadosamente.
• Limpe imediatamente o colector de sumo
e o filtro de plástico
evitar que a polpa fique colada (fig. 4 e fig. 5).
.
(F)
após a utilização, para
(A)
(C)
E Bico para verter
F Cone com grelha de plástico
G Tampa de protecção
H Enrolador do cabo
• Coloque o fruto cortado sobre o cone
.
carregue lentamente para a colocação em
funcionamento (fig. 2).
• Quando a fruta deixa de estar em contacto
com o cone, o aparelho pára
automaticamente.
• Este aparelho está equipado com um sistema
anti-pingos
carregue em antes de retirar o copo para
parar a extracção do sumo (fig. 3).
• Não utilize lixívia nem uma esponja abrasiva.
• O colector de sumo
a tampa de protecção
na máquina da loiça, no cesto de cima,
utilizando o programa «ECONÓMICO» ou
«POUCO SUJO».
(D)
. Uma vez o sumo extraído
(C)
, o filtro de plástico
(G)
podem ser lavados
(F)
(F)
e
e
PROBLEMAS E ACÇÕES CORRECTIVAS
PROBLEMA CAUSA SOLUÇÃO
* A ficha não está ligada.
* A tensão não corresponde à do
O aparelho não
funciona
Se tiver seguido estas instruções e o aparelho continuar sem funcionar, dirija-se a um Serviço de
Assistência Técnica autorizado (ver a lista no folheto dos serviços).
aparelho.
* O motor não funciona por causa
de um mau contacto entre o
cone e o contacto.
Ligue o aparelho a uma tomada com a
tensão correcta.
Verifique a tensão.
Tente carregar sobre o cone.
6
Page 10

DESCRIZIONE
A Blocco motore
B Cilindro guida
C Raccoglitore di succo
D Sistema ferma-gocce
UTILIZZO
IT
E Beccuccio erogatore
F Cono con griglia in plastica
G Coperchio di protezione
H Avvolgi cavo
Al primo utilizzo, lavare i componenti che saranno
a contatto con gli alimenti
• Tagliare in due parti l'agrume.
• Inserire la spina.
• Posizionare un bicchiere sotto il beccuccio
erogatore
• Rimuovere il coperchio di protezione
• Premere il tasto del sistema ferma-gocce
per consentire l'erogazione del succo (fig. 1).
(E)
.
(C& F)
.
(G)
.
• Posizionare il frutto tagliato sul cono
premere delicatamente per avviare (fig. 2).
• Quando il frutto non è più a contatto con il
cono, l'apparecchio si ferma automaticamente.
• Questo apparecchio è dotato di un sistema
ferma-gocce
premere il tasto prima di rimuovere il
bicchiere per arrestare l'erogazione del succo
(D)
(fig. 3).
(D)
. Dopo la spremitura del succo,
PULIZIA
• Spegnere sempre l'apparecchio e staccare la
spina prima di pulire il blocco motore
• Non immergere né sciacquare sotto l'acqua il
blocco motore
con l'aiuto di un panno umido. Asciugarlo con
cura.
• Pulire subito il raccoglitore di succo
in plastica
(A)
. Pulire il blocco motore
(F)
dopo l'utilizzo per evitare che la
(C)
(A)
.
e il filtro
(A)
polpa si attacchi (fig. 4 & fig. 5).
• Non utilizzare candeggina né spugne abrasive.
• Il raccoglitore di succo
e il coperchio di protezione
lavati in lavastoviglie nel cestello in alto
utilizzando il programma « ECO » o « POCO
SPORCO ».
PROBLEMI E AZIONI CORRETTIVE
PROBLEMA CAUSA SOLUZIONE
(C)
, il filtro in plastica
(G)
possono essere
(F)
e
(F)
* La spina non è stata inserita.
* La tensione non è conforme a
L'apparecchio non
funziona
Se sono state seguite le indicazioni precedenti e l'apparecchio continua a non funzionare, rivolgersi
ad un Centro Assistenza Autorizzato (vedere l'elenco nel manuale di istruzioni).
quella richiesta dall'apparecchio.
* Il motore non si avvia a causa
del mancato contatto tra il cono
e il contatto.
Collegare l'apparecchio ad una presa
di corrente elettrica.
Verificare la tensione.
Premere maggiormente sul cono.
7
Page 11

TÜRKÇE KULLANMA ve TANITMA KILAVUZU
(PC105131)
TANIM
A Motor bloğu
B Bağlantı çubuğu
C Meyve suyu haznesi
D Damlama önleyici sistem
KULLANIM
TR
E Boşaltma ucu
F Plastik ızgaralı koni
G Koruyucu kapak
H Kordon sarma bölümü
İlk kullanımdan önce, besinlerle temas edecek olan
parçaları yıkayın (C & F).
• Narenciyeyi ikiye bölün.
• Cihazın fişini elektrik prizine takın.
• Boşaltma ucu (E) bir bardak yerleştirin.
• Koruyucu kapağı (G) çıkarın.
• Meyve suyunun akmasını sağlamak için damlama
önleyici sistem (D) üzerinde üzerine basın (şekil 1).
• Kesilmiş olan meyveyi koni (F) üzerine yerleştirin ve
çalıştırmak için hafifçe bastırın (şekil 2).
• Meyve koni ile temas halinde olmadığında, cihaz
otomatik olarak durur.
• Bu cihaz bir damlama önleyici sistem ile
donatılmıştır (D). Meyve suyunuzun
hazırlanmasından sonra, meyve suyunun akmasını
durdurmak için bardağınızı çekmeden önce
üzerine basın (şekil 3).
TEMİZLEME
• Motor bloğunu (A) temizlemeden önce her zaman
cihazın fişini elektrik prizinden çekin.
• Motor bloğunu (A) suya batırmayın, suyun altına
tutmayın. Motor bloğunu (A) nemli bir bez yardımı ile
temizleyin. Özenle kurutun.
• Posanın yapışmaması için meyve suyu haznesini (C)
ve plastik filtreyi (F) kullanımın hemen ardından
temizleyin (şekil 4 & şekil 5).
• Çamaşır suyu veya aşındırıcı bir sünger kullanmayın.
• Meyve suyu haznesi (C), plastik filtre (F) ve koruyucu
kapak (G), üst sepete konularak ve «ECO» veya
«AZ KİRLİ» programında bulaşık makinesinde
yıkanabilir.
SORUNLAR VE DÜZELTME EYLEMLERİ
PROBLEM SEBEP ÇÖZÜM
* Fiş prize takılı değil.
* Gerilim cihazın uygun olduğu
Cihaz çalışmıyor
Eğer bu talimatları uygulamanıza rağmen cihazınız hala çalışmıyorsa, yetkili bir servis merkezine müracaat edin
(servis kitapçığındaki listeye bakınız).
gerilimden farklı.
* Koni ile kontak arasındaki kötü bir
temas nedeniyle motor çalışmaya
başlamıyor.
Cihazı doğru elektrik geriliminin olduğu bir
prize bağlayın.
Voltajı kontrol edin.
Koninin üzerine basmayı deneyin.
İthalatçı Firma:
GROUPE SEB İSTANBUL A.Ş.
Dereboyu cad. Meydan sokak
No:1 Beybi Giz Plaza Kat:12
Maslak/İSTANBUL
0850 222 40 50
444 40 50
Üretici Firma:
GROUPE SEB International
Chemin du Petit Bois Les 4 M-BP 172
69134 ECULLY Cedex –FRANCE
Tel: 00 33 472 18 18 18
Fax: 00 33 472 18 16 55
www.groupeseb.com
8
TÜKETİCİ HİZMETLERİ DANIŞMA HATTI
0850 222 40 50
444 40 50
KULLANIM ÖMRÜ: ÜTÜLER 7 YIL
Page 12

DESCRIPCIÓN
MX
A Bloque motor
B Eje del motor
C Recolector de jugo
D Sistema antigoteo
UTILIZACIÓN
Antes de usar este aparato por primera vez, lavar
las piezas que van a estar en contacto con los
alimentos
• Cortar el cítrico en dos.
• Conectar el aparato.
• Colocar un vaso debajo del pico de vertido
• Retirar la tapa de protección
• Presionar del sistema antigoteo
dejar pasar el jugo (fig. 1).
(C &F)
.
(E)
(G)
.
(D)
para
LIMPIEZA
• Desconectar siempre el aparato antes de
limpiar el bloque motor
• No sumergir el bloque motor
bajo agua corriente. Limpiar el bloque motor
(A)
con un paño húmedo. Secarlo
cuidadosamente.
• Limpiar inmediatamente el recolector de jugo
(C)
y el filtro de plástico
(A)
.
(F)
(A)
, no ponerlo
después de su
E Pico de vertido
F Exprimidor con rejilla de plástico
G Tapa de protección
H Pestañas para guardar cable
• Colocar el cítrico cortado sobre el exprimidor
(F)
y presionar suavemente para ponerlo en
marcha (fig. 2).
• Cuando la fruta ya no está en contacto con el
exprimidor, el aparato se parará
automáticamente.
.
• Este aparato está provisto de un sistema
antigoteo
jugo presionar antes de retirar el vaso para
detener el paso del jugo (fig. 3).
utilización para evitar que la pulpa se pegue
(figs. 4 y 5).
• No utilizar cloro o una esponja abrasiva.
• El recolector de jugo
y la tapa de protección
el lavavajillas, en la cesta superior, utilizando el
programa «ECO» o «POCO SUCIO».
(D)
. Después de haber hecho el
(C)
, el filtro de plástico
(G)
pueden lavarse en
(F)
PROBLEMAS Y ACCIONES CORRECTORAS
PROBLEMA CAUSA SOLUCIÓN
* El aparato no está conectado.
* La tensión no es la requerida por
El aparato no
funciona
Si se han seguido estas instrucciones y el aparato sigue sin funcionar, consultar a un servicio técnico
autorizado (ver lista en el folleto de servicio).
el aparato.
* El motor no se pone en marcha
debido a un mal contacto entre
el exprimidor y el contacto.
Conectar el aparato a una toma de
corriente con una tensión correcta.
Compruebe el voltaje.
Intentar presionar el exprimidor.
9
Page 13

CERTIFICADO DE GARANTÍA
Nombre del comprador:
odelo del aparato:
M
Marca del aparato:
echa de entrega:
F
-------------------------------------------------------------------------------------------------------------------------------------------------------
-----------------------------------------------------------------------------------------------------------------------------------------------------------
-
-------------------------------------------------------------------------------------------------------------------------------------------------------------
-
ombre de la tienda:
----------------------------------------------------------------
-
N
-------------------------------------------------------------
-
CONDICIONES QUE REGULAN LA GARANTÍA
1. Para hacer efectiva la garantía totalmente gratuita, ofrecida en los productos comercializados legalmente por
Groupe Seb México S.A de C.V es indispensable presentar el producto junto con el Certificado de Garantía, debidamente
sellada y llenada por la tienda.
2. Groupe Seb México S.A de C.V garantiza por UN AÑO este producto en todas sus partes contra cualquier defecto de
fabricación y funcionamiento, a partir de la fecha de entrega, incluyendo la reparación o reposición del producto sin cargo, así
como las piezas y mano de obra necesaria, para su diagnostico y reparación.
3. Si su aparato llegase a necesitar de nuestro servicio de garantía, le rogamos llamar a nuestros teléfonos de atención a
clientes, donde le orientarán, informarán y podrá recibir este servicio. Además podrá adquirir partes, componentes,
consumibles y accesorios, que usted necesite.
O bien puede enviarlo a nuestro Centro de Servicio, siguiendo las siguientes instrucciones.
a) Empaquételo con cuidado y proteja su aparato con cualquier relleno. Asegúrelo con cinta canela o cordel. La garantía no ampara
daños ocasionados en tránsito.
b) Escriba en la parte exterior del paquete, la dirección exacta de la central de servicio. No olvide anotar su nombre y dirección com-
pleta a la cuál regresará el producto.
c) Cuando envíe un aparato a reparación, no incluya partes sueltas o accesorios.
La empresa se hace responsable de los gastos de transportación razonablemente erogados que se deriven del
cumplimiento de la presente garantía, dentro de nuestra red de servicio.
4. El tiempo de atención de la garantía, en ningún caso será mayor de 30 días, contados a partir de la fecha de recepción en cualquiera de los productos.
5. La garantía perderá validez en los siguientes casos:
a) Cuando el producto se hubiese utilizado en condiciones distintas a las normales.
b) Cuando el producto no hubiese sido operado de acuerdo con este instructivo de uso.
c) Cuando el producto hubiese sido alterado o reparado por personas no autorizadas por el fabricante nacional,
importador o comercializador responsable respectivo.
ATENCIÓN AL CLIENTE
Tel. 52.83.93.87
Fax. 52.83.93.88
Del interior de la Republíca
CENTRO DE SERVICIO
Goldsmith 38 401 Piso 4
Polanco, Distrito Federal C. P. 11560
Mexico D.F.
Tel. (55) 52 83 93 55
IMPORTADOR Y COMERCIALIZADOR Groupe Seb México S.A de C.V
Calle Goldsmith 38 401 Piso 4
Polanco, Distrito Federal C. P. 11560
Mexico D.F.
Lada 800 sin costo:
01 800 505 45 00
01 800 112 83 25
10
SELLO DE LA TIENDA
Page 14

11AR12
Page 15

FA
Page 16

TH
13
Page 17

FR
p. 1
EN
DE
NL
ES
PT
IT
TR
MX
AR
p. 2
p. 3
p. 4
p. 5
p. 6
p. 7
p. 8
p. 9 - 10
p. 11
FA
TH
p. 12
p. 13
NC00123700
 Loading...