

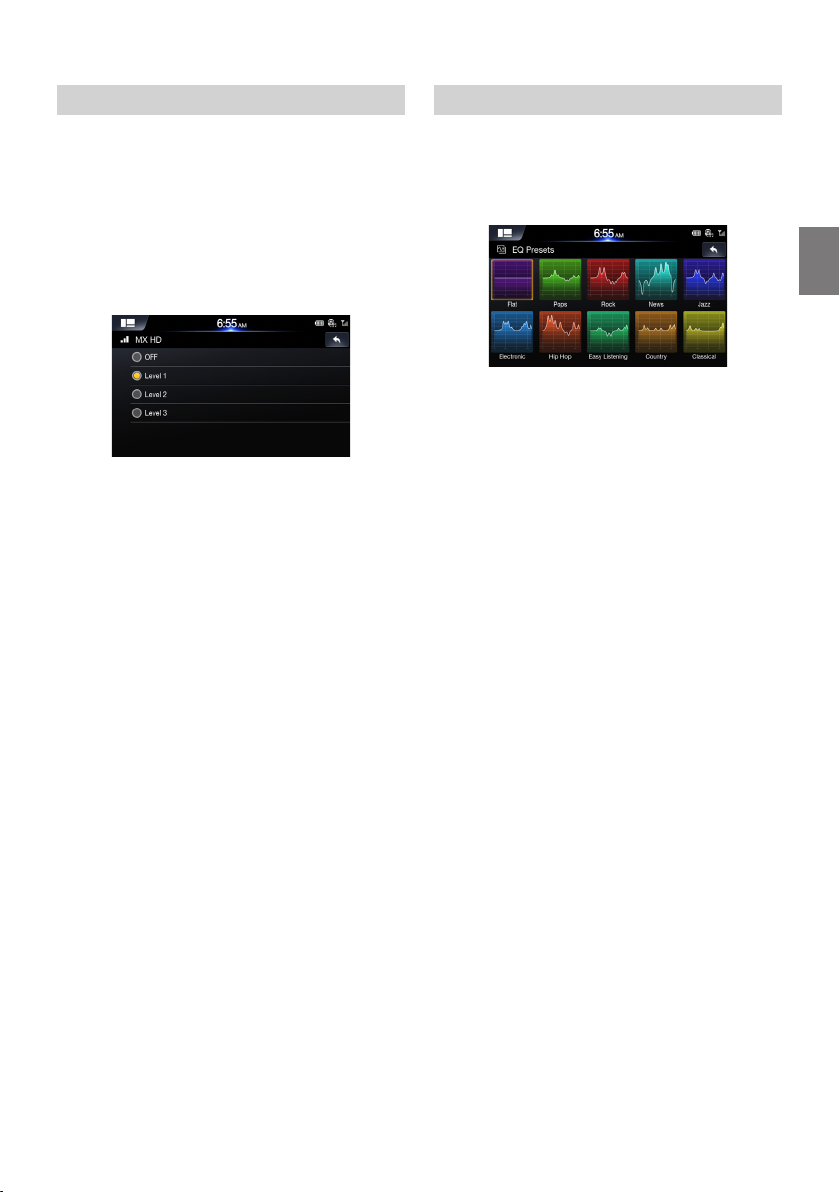
Setting MX HD
Setting EQ Presets
Media Xpander (MX HD) makes vocals or instruments sound distinct
regardless of the music source. The Radio (FM)/DAB, USB Flash
drive and iPod/iPhone, will be able to reproduce the music clearly
even in cars with a lot of road noise.
In the Sounds Settings screen, touch [MX HD].
1
Set the desired option.
2
Media: Off/Level1/Level2/Level3 : The medium to high frequencies
become more clear, and produces well balanced sound in all the
bands.
When AUX is connected, the options will be [Off, Compressed Media
/ Movie / Music].
AUX: Off / Compressed Media / Movie / Music : Choose the MX HD
mode (Compressed Media, Movie, or Music) that corresponds to the
media connected.
• When the Defeat setting is “On,” you cannot perform the set up.
•
The MX HD setting can be performed only when a source is
currently selected.
•
The effectiveness increases as the MX HD setting value increases
Level1 Level2 Level3.
•
Movie: The dialog portion of the video is reproduced more clearly
•
Music: This disc contains a large quantity of data such as music
clip. MX uses this data to reproduce the sound accurately.
10 typical equalizer settings are preset at the factory for a variety of
musical source material..
In the Setup screen, touch [EQ Presets].
1
• Only one type can be set to ON.
•
The EqualizerPresets setting canbe conguredwhen Defeat is
“Off.”
57
-EN
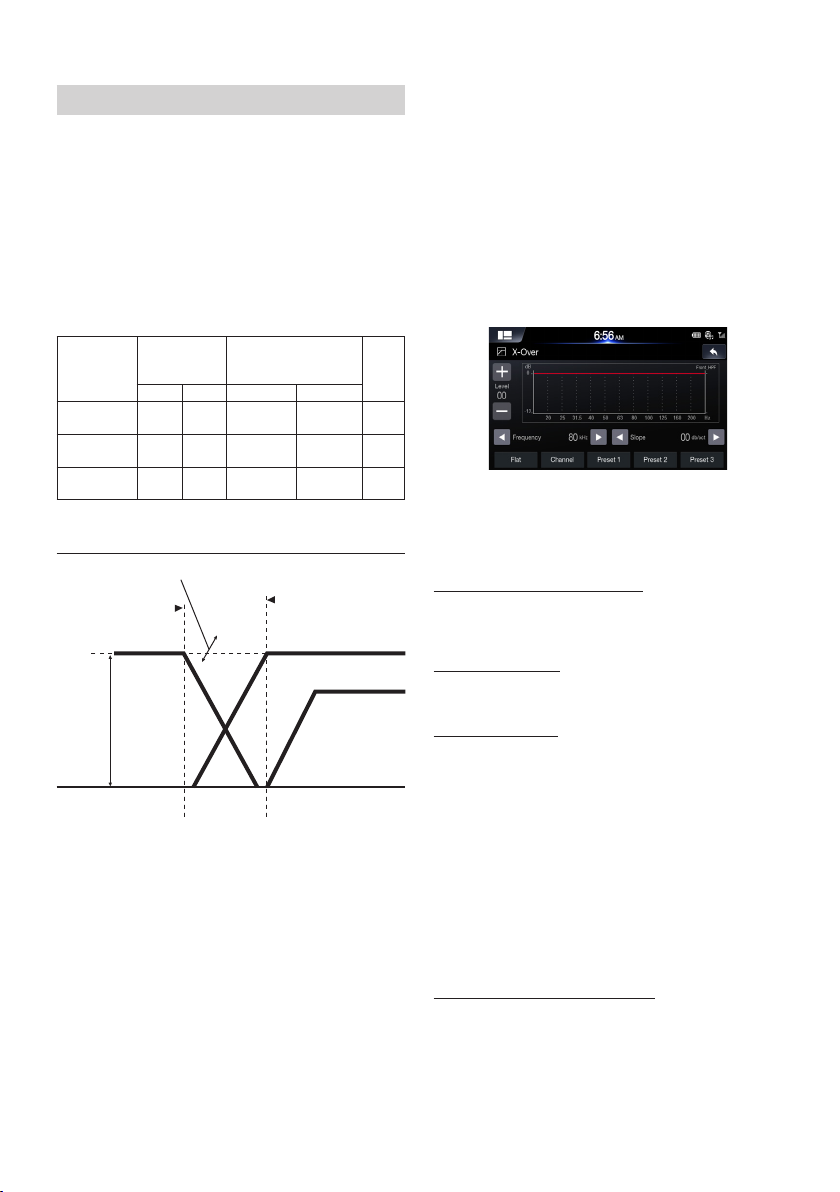
Setting the Crossover Settings (X-Over)
■
About the Crossover
This unit is equipped with an active crossover. The crossover limits
the frequencies delivered to the outputs. Each channel is controlled
independently. Thus, each speaker pair can be driven by the
frequencies for which they have been optimally designed.
Thecrossover adjuststhe HPF (highpass lter)or LPF(low pass
lter)ofeachband,andalsotheslope(howfastthelterrollsoffthe
highs or lows).
Adjustments should be made according to the reproduction
characteristics of the speakers. Depending on the speakers, a
passive network may not be necessary. If you are unsure about this
point, please consult your authorized Alpine dealer.
Cut-off
frequency (1/3
octave steps)
Subwoofer
(LPF)
Rear speaker
(HPF)
Front speaker
(HPF)
Low range
Output frequency
Slope
FLAT
Level
adjusting
(0 to –12
dB)
20 Hz
(Different from
actual display)
• HPF (highpass lter):Cuts the lowerfrequencies andallowsthe
higher frequencies to pass.
•
LPF (lowpass lter):Cutsthe higherfrequencies andallowsthe
lower frequencies to pass.
•
Slope: The level change (in dB) for a frequency change of one
octave.
•
The higher the slope value, the steeper the slope becomes.
•
AdjusttheslopetoFLATtobypasstheHPorLPlters.
• Do not use a tweeter without the HPF on or set to a low frequency,
as it may cause damage to the speaker due to the low frequency
content.
HPF LPF HPF LPF
20 Hz -
---200 Hz
20 Hz -
----
200 Hz
20 Hz -
----
200 Hz
Slope adjusting
range
Subwoofer
LPF cut-off
frequency
----
0, 6, 12, 18,
24 dB/oct.
0, 6, 12, 18,
24 dB/oct.
range
HPF cut-off
frequency
Slope
0, 6, 12, 18,
24 dB/oct.
----
----
Output frequency
Rear speaker
Front speaker
Level
0 to
–12 dB
0 to
–12 dB
0 to
–12 dB
High range
200 Hz
• Adjustment should be made according to the recommended
crossover frequency of the connected speakers. Determine the
recommended crossover frequency of the speakers. Adjusting
to a frequency range outside that recommended may cause
damage to the speakers.
For the recommended crossover frequencies of Alpine speakers,
refer to the respective Owner’s Manual.
We are not responsible for damage or malfunction of speakers
caused by using the crossover outside the recommended value.
1. In the Setup screen, touch [X-Over].
2. Touch [Channel[ to select the channel.
Each time you touch, the channel switches.
• The channel being adjusted is displayed in red.
Front HPF → Rear HPF → Subw. LPF → Front HPF
3. Adjust the crossover to your preference.
Selecting the Cut-Off Frequency
Touch [ ◀] or [ ▶] of “Frequency,” and then select the cut-off
frequency. (20 / 25 / 31.5 / 40 / 50 / 63 / 80(Initial setting) / 100 / 125
/ 160 / 200)
Adjusting the Slope
Touch [ ◀] or [ ▶] of “Slope,” and then adjust the HPF or LPF slope.
(0 (Initial setting) / 6 / 12 / 18 / 24 dB/oct.)
Adjusting the Level
Touch [ ◀] or [ ▶] of “Level,” and then adjust the HPF or LPF level.
(-12 to 0 dB (Initial setting: 0))
4. Repeat steps 1 to 2 to make adjustment to the other
channels.
5. To store the adjusted setting value, touch and hold [Preset 1],
[Preset 2], or [Preset 3] for at least 2 seconds.
• Touch [Flat] to initialise all values.
•
If the Subwoofer setting is “Off,” the Subwoofer setting cannot be
edited.
•
While adjusting the X-OVER you should consider the frequency
response of the connected speakers.
Calling the X-OVER adjusted value
Calling the pre-set X-OVER adjusted value.
Touch [Preset 1], [Preset 2], or [Preset 3] on the X-OVER
screen.
The setting stored in the Preset will be recalled.
58
-EN
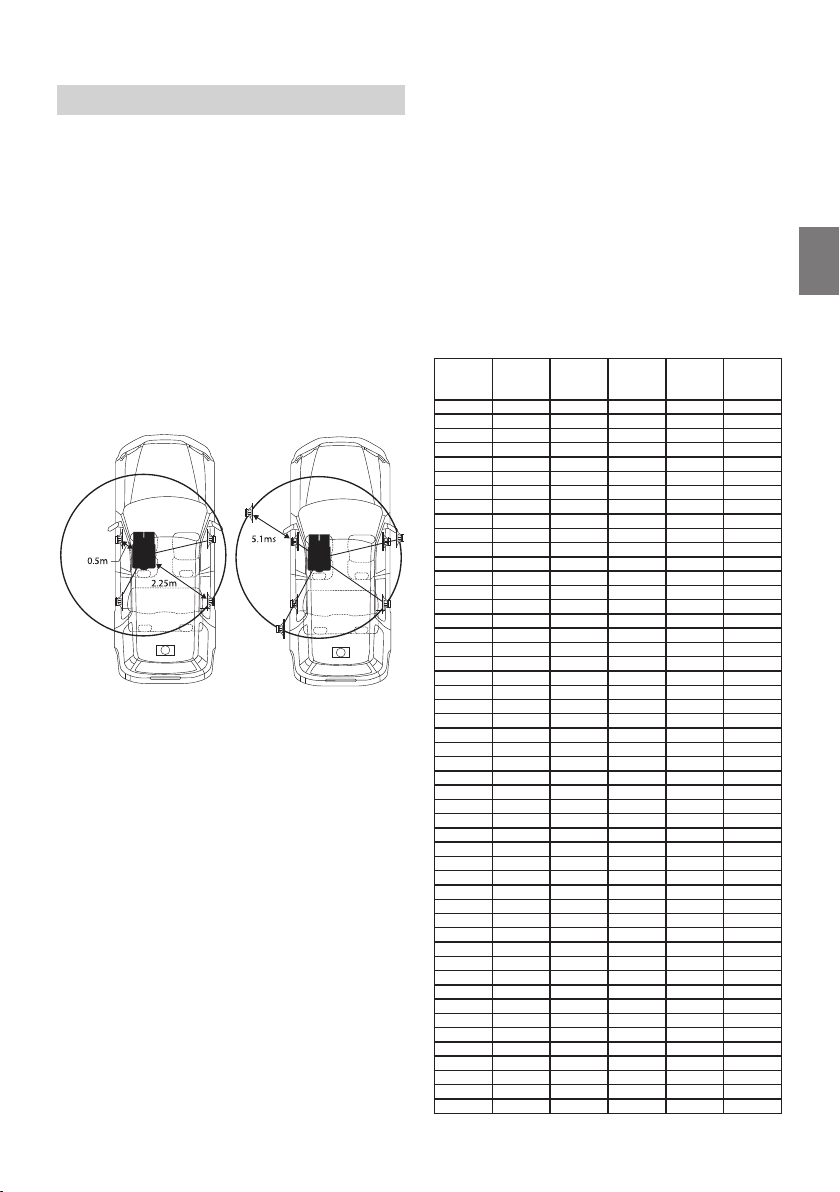
Setting the Time Correction
■
About Time Correction
The distance between the listener and the speakers in a car vary
widely due to the complex speaker placement. This difference in
the distances from the speakers to the listener creates a shift in the
sounds image and frequency characteristics. This is caused by the
time delay between the sound reaching the listener’s right versus the
left ear.
To correct this, this unit is able to delay the audio signal to the
speakers closest to the listener. This effectively creates a perception
of increased distance for those speakers. The listener can be placed
at an equal distance between the left and right speakers for optimum
staging. The adjustment will be made for each speaker in 3.4 cm
steps.
Example 1. Listening Position: Front Left Seat
Adjust the time correction level of the front left speaker to a high
value and the rear right to zero or a low value.
The sound is not balanced because the distance between the
listening position and the various speakers is different.
The difference in distance between the front left speaker and the
rear right speaker is 1.75 m (68-7/8").
Here we calculate the time correction value for the front left speaker
in the diagram on the above.
Conditions:
Farthest Speaker – listening position : 2.25 m (88-9/16") Front
left speaker – listening position : 0.5 m (19-11/16") Calculation:
L = 2.25 m – 0.5 m = 1.75 m (68-7/8")
Time correction = 1.75 ÷ 343* × 1,000 = 5.1 (ms)
* Speed of sound: 343 m/s (765 mph) at 20°C
In other words, giving the front left speaker a time correction value of
5.1 ms makes it seem as if its distance from the listener is the same
as the distance to the farthest speaker.
Time correction eliminates the differences in the time required for the
sound to reach the listening position.
The time of the front left speaker is corrected by 5.1 ms so that its
sound reaches the listening position at the same time as the sound
of other speakers.
Example 2. Listening Position: All Seats
Adjust the time correction level of each speaker to almost the same
level.
1. Sit in the listening position (driver’s seat, etc.) and measure
the distance (in meters) between your head and the various
speakers.
2. Calculate the difference between the distance correction
value to the farthest speaker and the other speakers.
L = (distance to farthest speaker) – (distance to other speakers)
These values are the time correction values for the different
speakers. Setting these values to make each sound reach the
listening position at the same time as the sound of other speakers.
Time Correction Value List
Time
Distance
Difference
(msec)
0.0 0.0 0.0 5.0 170.0 67.0
0.1 3.4 1.3 5.1 173.4 68.3
0.2 6.8 2.7 5.2 176.8 69.7
0.3 10.2 4.0 5.3 180.2 71.0
0.4 13.6 5.4 5.4 183.6 72.4
0.5 17.0 6.7 5.5 187.0 73.7
0.6 20.4 8.0 5.6 190.4 75.0
0.7 23.8 9.4 5.7 193.8 76.4
0.8 27.2 10.7 5.8 197.2 77.7
0.9 30.6 12.1 5.9 200.6 79.1
1.0 34.0 13.4 6.0 204.0 80.4
1.1 37.4 14.7 6.1 207.4 81.7
1.2 40.8 16.1 6.2 210.8 83.1
1.3 44.2 17.4 6.3 214.2 84.4
1.4 47.6 18.8 6.4 217.6 85.8
1.5 51.0 20.1 6.5 221.0 87.1
1.6 54.4 21.4 6.6 224.4 88.4
1.7 57.8 22.8 6.7 227.8 89.8
1.8 61.2 24.1 6.8 231.2 91.1
1.9 64.6 25.5 6.9 234.6 92.5
2.0 68.0 26.8 7.0 238.0 93.8
2.1 71.4 28.1 7.1 241.4 95.1
2.2 74.8 29.5 7.2 244.8 96.5
2.3 78.2 30.8 7.3 248.2 97.8
2.4 81.6 32.2 7.4 251.6 99.2
2.5 85.0 33.5 7.5 255.0 100.5
2.6 88.4 34.8 7.6 258.4 101.8
2.7 91.8 36.2 7.7 261.8 103.2
2.8 95.2 37.5 7.8 265.2 104.5
2.9 98.6 38.9 7.9 268.6 105.9
3.0 102.0 40.2 8.0 272.0 107.2
3.1 105.4 41.5 8.1 275.4 108.5
3.2 108.8 42.9 8.2 278.8 109.9
3.3 112.2 44.2 8.3 282.2 111.2
3.4 115.6 45.6 8.4 285.6 112.6
3.5 119.0 45.9 8.5 289.0 113.9
3.6 122.4 48.2 8.6 292.4 115.2
3.7 125.8 49.6 8.7 295.8 116.6
3.8 129.2 50.9 8.8 299.2 117.9
3.9 132.6 52.3 8.9 302.6 119.3
4.0 136.0 53.6 9.0 306.0 120.6
4.1 139.4 54.9 9.1 309.4 121.9
4.2 142.8
4.3 146.2 57.6 9.3 316.2 124.6
4.4 149.6 59.0 9.4 319.6 126.0
4.5 153.0 60.3 9.5 323.0 127.3
4.6 156.4 61.6 9.6 326.4 128.6
4.7 159.8 63.0 9.7 329.8 130.0
4.8 163.2 64.3 9.8 333.2 131.3
4.9 166.6 65.7 9.9 336.6 132.7
(cm)
Distance
Time
Distance
Difference
(inch)
(msec)
56.3 9.2 312.8 123.3
(cm)
Distance
(inch)
59
-EN
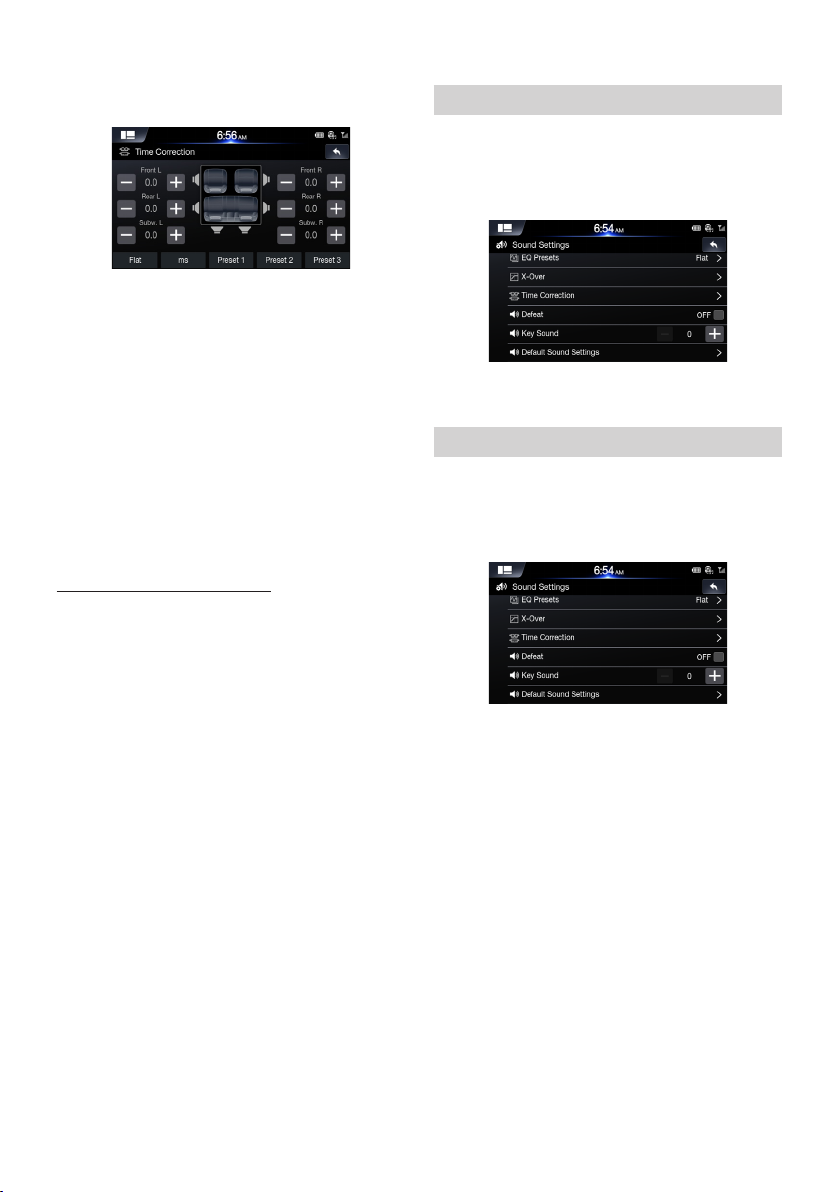
1. In the Setup screen, touch [Time Correction].
2. Touch the Correction Mode button and select the mode.
Each time the button is pressed, mode is changed from ms, inch and
cm.
3. Touch [▲] or [▼] for each speaker to adjust the time or
distance.
0.0 msec to 9.9 msec (0.1 msec/step)
0.0 cm (0.0 inch) to 336.6 cm (132.7 inch) (3.4 cm/step)
All speaker setting values are adjustable in the range of 15 ms or
510 cm.
4. To store the adjusted setting value, touch and hold [Preset 1],
[Preset 2], or [Preset 3] for at least 2 seconds.
• Touch [Flat] to set all values to 0.0.
•
If the Subwoofer setting is “Off,” the Subwoofer setting cannot be
edited.
Calling the Time Correction Value
Calling the pre-set time correction value.
Touch [Preset 1], [Preset 2], or [Preset 3] on the time correction
screen.
The setting stored in the Preset will be recalled.
Setting Defeat
Defeat is “On,” MX HD and Equalizer Presets features are turned off.
This disables any settings made for these functions.
Check the [Off] box to turn the feature on.
Uncheck the [On] box to turn the feature off.
Setting Key Sound
You can change the volume of the sound heard when a button is
touched.
Adjust the sound level from 0 to 6.
60
-EN
Setting Proximity Warning Priority
Visual Settings
Select the desired option from Audio Off and
1
Audio Mixing.
Resetting Sound Settings
This feature is used to restore all sounds settings back to default
state.
In the Sound Settings screen, touch [Default
1
Sound Settings].
Touch [Reset] ▶ [Yes].
2
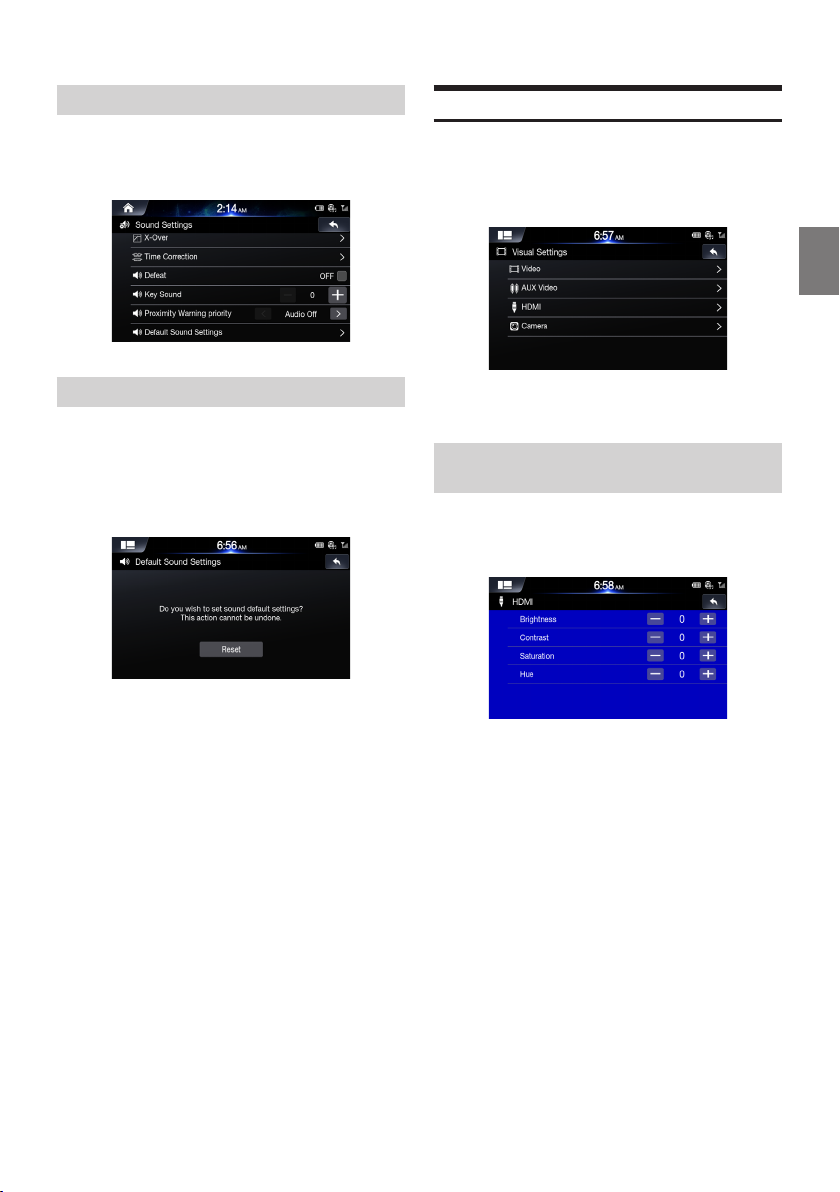
This feature is used to adjust the Brightness, Saturation, Contrast
and Hue levels.
In the Setup screen, touch [Visual].
1
• “Video” can be selected while a video is playing.
Setting Brightness/Contrast/Saturation/
Hue
In the Visual Settings screen, touch the desired
1
menu.
Use [+] and [-] to adjust settings from -5 to +5.
2
• In the Video visual settings, [Hue] is not supported.
61
-EN
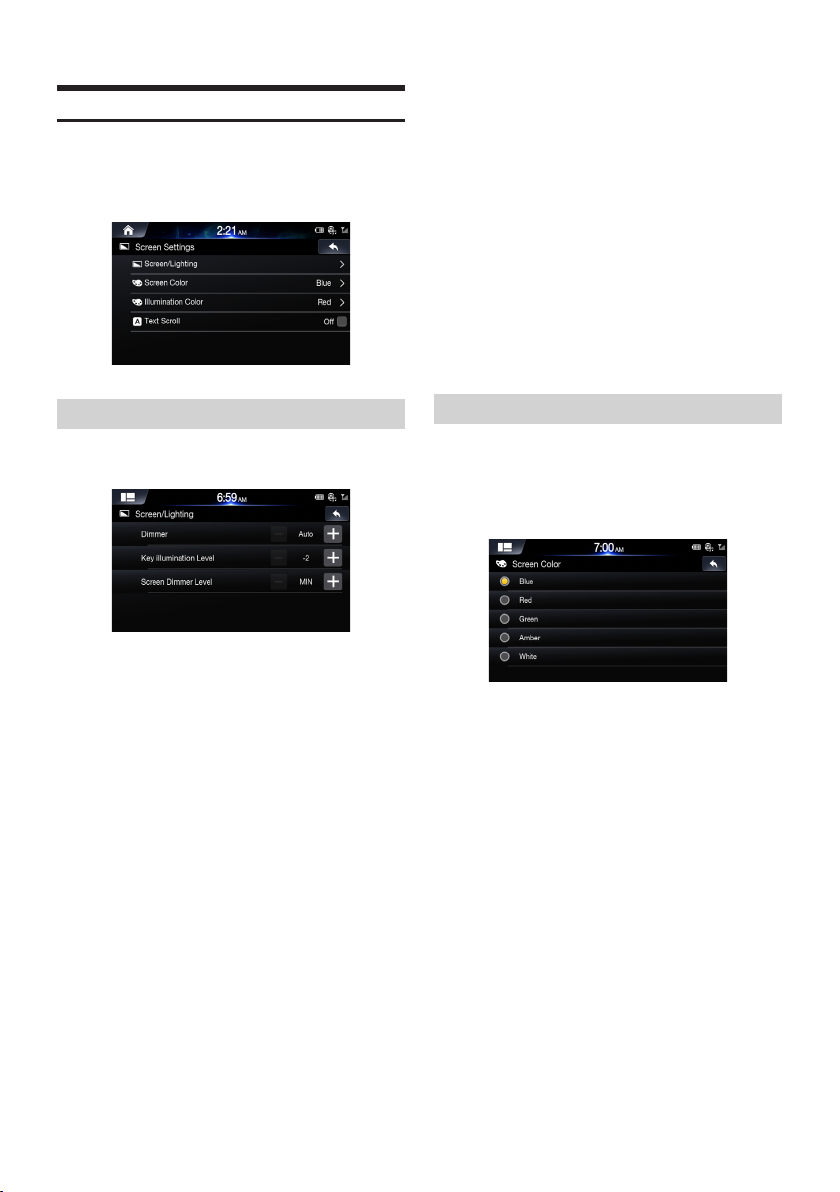
Screen Settings
This menu allows you to set the display settings
for the whole system
In the Setup screen, touch [Screen].
■
Setting Key Illumination Level
You can adjust the brightness of the button lighting at night with the
dimmer.
Adjust the value from -2 to +2.
This setting is only available when “Dimmer” is set to “On.”
■
Setting Screen Dimmer Level
You can adjust the brightness of the backlight. This function could be
used, for instance, to change the screen brightness while travelling
at night.
Adjust the value from -15 to +15.
You can adjust the level between MIN (-15) and MAX (+15). When it
reaches the minimum or maximum point, the display shows “MIN” or
“MAX” respectively.
• This setting is only available when “Dimmer” is set to “On” or “Auto.”
Setting Screen/Lighting
In the Screen Settings screen, touch [Screen/Lighting].
■
Setting Dimmer
Backlighting is provided by LEDs light built into the liquid crystal
panel. The illumination control adjusts the brightness of the
backlighting based on the car ambient lighting for easier viewing.
Set the desired value from Auto, On and Off.
Auto: Adjust the brightness of the background illumination of the
monitor automatically to the brightness of the car interior.
On: Keep the background illumination of the monitor dark.
Off: Deactivate Auto Dimmer mode to keep the background
illumination of the monitor bright.
• The Key Illumination Level and Screen Dimmer Level feature are
unavailable when the Dimmer value is set to “Off”.
Setting Screen Colour
You can choose the screen colour from 5 different colours.
In the Screen Settings screen,
1
touch [Screen Colour].
Select the desired colour.
2
62
-EN

Setting Illumination Colour
You can choose the colour of the Front Panel button from one of 7
colours.
In the Screen Settings screen, touch [Illumination Colour].
General Settings
You can set up items related to the language, etc.
In the Setup screen, touch [General].
Setting Text Scroll
Scrolldisplayisavailable iffoldername,lenameortaginformation
is entered.
Check the [Off] box to turn the feature on.
• Uncheck the [On] box to turn the feature off.
Setting Screen Saver
This feature is used to display a screen saver
when the monitor is off.
In the General Settings screen,
1
touch [Screen Saver].
Select the desired option.
2
• Digital: the screen will display the digital clock and date.
•
Analogue: the screen will display the analogue clock and date.
•
None: the screen will remain off.
63
-EN

Setting Language
This menu allows you to set the language of the system.
In the General Settings screen, touch [Language].
1
Select the desired language.
English / Nederlands / Français / Deutsch / Italiano / Polski /
2
Русский
/Español/SimpliedChinese
Setting Security Code
You can set the system to be unusable without entering a password.
When you turn this setting to “On” and set a password, password
input is required when the system is connected to a battery and
turnedonforthersttime.
■
Setting the security Code
1. Check the [Off] box to turn the feature on and touch [OK].
■
Clearing the security Code
1. Uncheck the [On] box.
The password setting screen is displayed.
2. Enter the password you have set and touch [OK].
The password is cleared and the system returns to the General
Setup Menu screen, then the checkbox of the Security Code is set to
“Off”.
• Input numbers are displayed as “*”.
Viewing System Info
You can view the version information of this product. Make note of
this information and refer to it whenever you contact Alpine Tech
Support or an Alpine-authorized dealer.
In the General Settings screen, touch [System Info].
2. Enter the password and touch [OK].
• Enter the 6~10 digit number.
•
Input numbers are displayed as “*”.
•
Touch [X] to delete an entered number.
3. Enter the same pasword again and touch [OK].
The security code is set and the system returns to the General Setup
Menu screen, then the checkbox of the Security Code is set to “On”.
• If you forget a registered password, you can not use this unit. In
this case, service will be required.
64
-EN

Setting Demo Code
Initializing the System
This unit has a Demonstration feature for the display. When you
install and use the unit for the first time, the unit will enter demo
mode automatically. To quit demo mode, set Demo mode to Off.
Uncheck the [On] box to turn the feature off.
1
Check the [On] box to turn the feature on.
• If you perform an operation during the Demo mode, the
demonstration is temporarily stopped.
You can initialise all data, to restore the factory settings. Remove the
USBashdrive,etc.fromthesystembeforeoperation.
In the General Settings screen,
1
touch [Factory Reset].
Touch [Reset] ▶ [Yes].
2
• Do not turn on/off the power, change the ignition key position or
remove the screen panel until system restart is completed.
65
-EN

Car Settings
AUX Settings
In the Setup screen, touch [Car].
Setting Steering Wheel
Set this item when Android smartphone with Android Auto App is
connected. This feature is available only in Android Auto.
Select the desired option from Left and Right.
Setting Installation Status
Vehicle Setup enables you to check the connection status of
Reverse Lead/Parking Brake Lead.
In the Car Settings screen, touch [Installation Status].
You can set up the items related to the Auxiliary device.
In the Setup screen, touch [AUX].
• This setting cannot be changed while the AUX source is being
selected.
•
This setting is only available when “AUX” is set to “On”.
Turning AUX On/Off
Check the [Off] box to turn the feature on.
Uncheck the [On] box to turn the feature off.
66
-EN

Setting AUX Name
Setting Signal
In the AUX Settings screen, touch [AUX Name].
1
Select the desired name.
AUX / AUX DVD / GAME / External DVD / DVD Changer /
2
DVB-T / TV / USB Player
Using Remote Control
기능 설명
Check the [Off] box to turn the feature on.
1
You can switch the visual input signal system.
Select the desired option.
• Auto: the video input signal type (NTSC or PAL) will be
automatically selected.
•
NTSC/PAL: choose the video input signal type manually.
HDMI Settings
You can set the name of an external device connected via HDMI.
In the Setup screen, touch [HDMI].
1
Uncheck the [On] box to turn the feature off.
2
On:
Off:
Select the desired name.
• HDMI: set when a smartphone is connected via HDMI.
2
• DVD: set when an external DVD player is connected.
• This setting cannot be changed while the HDMI source is being
selected.
67
-EN

Camera Settings
You can set up items related to the Camera.
In the Setup screen, touch [Camera].
Setting Camera Status
You can set the camera input.
In the Camera Settings screen,
1
touch [Camera Status].
Setting Camera Signal
You can switch the video input signal system.
Select the desired option.
NTSC/PAL
Setting Camera Guideline
The camera guideline can be changed when connected to Rear
View Camera.
This item cannot be selected when the rear camera status is set to
“Off” or “Other”.
In the Camera Settings screen,
1
touch [Guideline Adjustment].
Set whether to use rear camera or other cameras.
• Rear: Rear camera
2
• Other: Side camera, Room camera, etc.
68
-EN
Touch the guideline you intend to adjust.
Guideline can also be selected by touching [∧,∨].
2
• You cannot adjust the position of the yellow guide line in the centre
independently.
It is controlled by a system to be the centre of the two yellow guide
lines on the left and right, or the central green line and red guide
line.
Touch [∧,∨, <, >] to adjust the position of the
3
guideline.
• Touching [Clear] clears adjustments and returns to the setting
before guide line alteration.
After the adjustment is completed, touch [Set].
4

■
Turning Guideline Display On/Off
1. Select the guideline.
2. Touch [On/Off].
The currently selected guide will turn off.
3. To turn the guideline on, touch [On/Off] again.
• Guidelines that are turned off are still adjustable.
■
Returning Guideline to Default
1. Touch [Default]
Connectivity Settings
This menu allows you to set the car connectivity of your system.
In the Setup screen, touch [Connectivity].
Setting Android Auto
In the Connectivity Settings screen, touch
1
[Android Auto].
2. Touch [OK].
Adjusted values will return to default settings
■
Setting Hitch Guideline
1. In the Camera Settings screen, touch [Hitch Guideline
Adjustment].
2. Touch the guideline you intend to adjust.
Guideline can also be selected by touching [∧,∨].
3. Touch [∧,∨, <, >] to adjust the position of the guideline.
4. After the adjustment is completed, touch [Set].
Check to use your Android phone with Android
2
Auto.
If Android Auto is checked, you can use the functions of your Android
phone with a USB cable and Bluetooth connected. It enables the
Android Auto functions.
• While Android Auto is running, you cannot use any of Bluetooth
Audio.
69
-EN

Setting Apple CarPlay
This menu allows you to set connectivity When iPhone is connected
using a USB cable.
In the Connectivity Settings screen,
1
touch [Apple CarPlay].
Select the desired option.
• Apple CarPlay: uses your iPhone with Apple CarPlay
2
• Bluetooth Phone/Audio and iPod: uses your iPhone in
Bluetooth/iPod mode.
• This setting is invalid for music playing of iPhone 4S and iPod.
Date/Time Settings
This feature is used to set the time and date shown within the
system.
In the Setup screen, touch [Date/Time].
1
• The Date/Time feature is unavailable when GPS time is being
used. To change the date/time manually, turn off the [GPS Time]
feature.
Adjust the date and time.
• DD/MM: displays the date in order of day > month
2
• MM/DD: displays the in order of month > day.
Receiving GPS Time
Check the [GPS Time] box to display the received GPS Time.
• The Date/Time feature is unavailable when GPS time is being
used.
Converting Time Format
70
-EN
Check/uncheck the [24 Hours] box to convert the digital clock
display to 24 or 12 hours.
Turing Daylight Savings Time On/Off
Check the [Daylight Savings Time ] box to turn the feature on.

Camera Operation
When an optional camera is connected, the view video of camera
can be output to the monitor.
Front camera or Rear camera can be connected to this unit.
Make the Camera Status Setting (Rear or Other) according to your
connected camera.
Rear camera:
If an HCE-C127D/HCE-C157D/HCE-C252RD, etc., camera is
connected, when the vehicle is reversed, the rear camera view
(guide marks for vehicle width and available distance) is displayed
automatically on the screen of this unit.
Other camera:
Set when connecting to a camera other than the Rear camera, such
as a front camera.
You can adjust the quality of the camera image. Setting
items: Brightness / Colour / Contrast/Hue. Refer to “Visual
Settings”.
Rear Camera Operation
Displaying the Rear Camera Image from
the Menu screen
Displaying the rear view video while the
car is in reverse
1. Shift the gear lever to the reverse (R) position.
The rear view image is displayed while the car remains in
reverse.
2. If you shift the gear lever to a position other than reverse (R),
the monitor returns to the previous screen.
• Never depend solely on the camera when backing up. Always turn
and look and only use the camera for additional assistance.
•
This function is effective when the reverse wire is properly
connected.
•
You can perform a Guideline Adjustment. For details, see “Setting
Camera Guideline”.
Guideline Display ON/OFF
1. Touch the screen when the image from the camera is
displayed.
The operation screen is displayed on the screen.
• After a 5-second time-out, the operation screen returns to the
camera display screen.
2. Touch [Guide Off] on the Rear camera display screen.
The guide disappears, and then the [Guide Off] switch changes
to [Guide On].
3. Touch [Guide On] to turn on the guide.
Press [Menu] button.
Or in the Home screen, touch [All Menu].
1
Touch [Camera].
2
• Touch [←] to return the previous screen.
•
You can perform a Guideline Adjustment. For details, see “Setting
Camera Guideline”.
Hitch Guideline Display On/OFF
1. Touch the screen when the image from the camera is
displayed.
The operation screen is displayed on the screen.
• After a 5-second time-out, the operation screen returns to the
camera display screen.
2. Touch [Hitch Guide On] on the Rear camera display screen.
The hitch guideline is displayed, and then the [Hitch Guide On]
switch changes to [Hitch Guide Off].
3. Touch [Hitch Guide On] to turn on the guide.
Switching the Front Camera image
1. Touch the screen when the image from the camera is
displayed.
The operation screen is displayed on the screen.
• After a 5-second time-out, the operation screen returns to the
camera display screen.
2. Touch [Other View] on the Rear camera display screen.
The Front Camera View is displayed, and then the [Other View]
switch changes to [Rear View].
3. Touch [Rear View] to display the Rear Camera View.
71
-EN

About the Rear Camera Guideline
To display the guideline, turn guideline on. Also, to adjust the guide,
see “Setting Camera Guideline”.
You can also turn off the guideline in the Rear camera display
screen.
■
Indication mark meaning
When the car is put into reverse gear, the monitor switches to the
rear view camera image. Guides appear to help visualise the car’s
width and distance from the rear bumper.
1. Car width extension marks (red, yellow and green in order of
distance)
If properly calibrated, the marks indicate the car’s width. This
helps guide the car’s path when backing up in a straight line.
The marks represent the distance from the rear of the car (from
the rear end of the bumper).
The marks do not move in synchronisation with the steering wheel.
Set the marks to suit the car’s width.
2. Distance guidance marks
The marks represent the distance from the rear of the car (from
the rear end of the bumper).
• The marks do not move in synchronisation with the steering
wheel.
• We recommend that you measure the actual distance to the
marks when parked on a level surface.
• Depending on the condition of the car or road surface, the range
of vision may vary.
•
The camera has a limited range of vision. Objects at extreme
angles to the camera (e.g. under the bumper or at opposite ends
ofthebumper)maynotbeintheitseld-of-vision.
• The rear camera image may have a tint which is different from the
actual surroundings.
•
Depending on the car, the guidance may deviate to the right or
left. This is not a malfunction.
■
Distance guidance mark
The distance guides represent the ground level distance from the
rear bumper. It is difficult to accurately estimate the distance to
objects above ground level.
In the following example, the distance to A is 0.5 m and the distance
to B is 1 m.
<Screen>
C
B
A (about 0.5 m)
<Positions of A, B and C>
about 1 m
In the screen, according to the distance guidance marks, the truck
seems to be parked about 1 m away (at the position B). In actual
fact, however, if you reversed to position A, you would collide with
the truck.
In the screen, positions A, B and C seem to be located in order of
proximity. However, in actual fact, the position A and C are the
same distance, and B is farther away than positions A and C.
• The car width extension mark represents the distance to the road
surface. The distance to an object on the road is not accurately
represented by the guides.
Error between the screen and the actual road surface
In the following conditions, errors are produced between the screen
guidance and the actual road surface. (The illustrations represent a
case when the camera is installed in the standard position.)
■
When there is a steep upward slope behind the car
(example)
<Screen>
72
Distance guidance marks
-EN

<Situation of the car>
Actual distances
Error Error
Thedistance guidancemarkrepresents thedistance toa atroad
surface. Therefore in the case of an upward slope behind the car,
the distance guides are displayed closer to the rear bumper than the
actual distance. For example, if there is an obstacle on the upward
slope, it may appear farther away than its actual position.
Also, an error may occur between the guidance and the actual path
of the car on the road surface.
■
When there is a steep downward slope behind the
car (example)
<Screen>
<Situation of the car>
Error Error
In the case of a downward slope behind the car, the distance guides
are displayed farther from the rear bumper than the actual distance.
If there is an obstacle on the downward slope, it seems closer than
its actual position.
Also, an error may occur between the guidance and the actual path
of the car on the road surface.
73
-EN
 Loading...