

Motorola Mobility T6KW1 User Manual

motorola
Quick Start Guide
H790


your headset
your headset
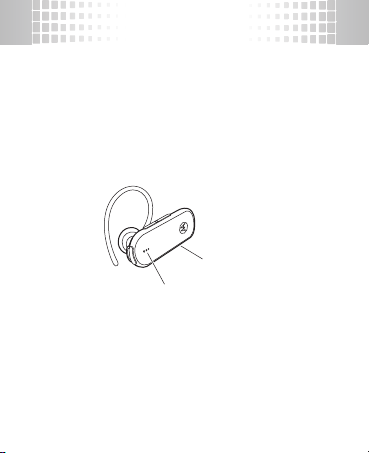
Take a moment to familiarize yourself with your
new Motorola H790 Headset.
Volume
Earhook
Buttons
Ear
Speaker
Charging
Port
Call
Button
Microphone
Power
Switch
Indicator
Light
1

charge it
charge it
Charge your headset before using it.
The indicator light is red or yellow while the
battery is charging. When the battery is fully
charged, the indicator light turns green.
Note:
Headset is not functional while charging.
Note:
Your battery is designed to last the life of
your product. It should only be removed by a
recycling facility. Any attempt to remove or
replace your battery will damage your headset.
2

pair & connect
pair & connect
Once charged, let’s get your headset paired and
connected to your Bluetooth phone(s).
pair & connect first phone
1
Turn off any Bluetooth devices previously
paired with your headset.
2
Turn on the Bluetooth feature on your
phone.
3
Put headset on your ear (see “wear it” on
page 8 for help).
4
Turn on your headset (see “turn on” on
page 9 for help).
The indicator light becomes steadily lit in
blue and you hear
“ready to pair”
.
3

pair & connect
5
Follow voice prompts to connect your phone
to your headset.
Note:
When prompted for the passkey,
0000
enter
When your headset successfully pairs with your
phone, you hear
connected, you hear
and see the indicator light rapidly flash in blue
and purple.
pair & connect second phone
(optional)
1
Turn off first phone and any other Bluetooth
devices previously paired with your headset.
2
Turn your headset off (see “turn off” on
page 9 for help).
4
.
“pairing complete”
“phone 1 connected”
. When

pair & connect
3
Turn on the Bluetooth feature on your
phone.
4
Put headset on your ear.
5
Turn on your headset.
The indicator light becomes steadily lit in
and
you hear
blue
6
Follow voice prompts to connect your phone
to your headset.
When your headset successfully pairs with your
phone, you hear
connected, you hear
see the indicator light rapidly flash in blue and
purple.
To connect to both phones, simply turn on the first
phone while the second phone is connected.
When you hear
“ready to pair”.
“pairing complete”
“phone 1 connected”
“phone 2 connected”
. When
and
, your
5

pair & connect
headset is connected to both phones. The last
paired phone (your second phone) is now your
primary phone (or “phone 1”) for voice dial
functionality.
test your connection
1
Place the headset on your ear.
2
On one phone, dial the number you want to
call and press
second phone.
If your phones and headset are successfully
connected, you hear ringing on the headset.
For daily use, make sure your headset is turned
on, and your phone’s Bluetooth feature is on.
Your headset and phone will connect
automatically.
6
Call/Send
key. Repeat for the
put it on
put it on
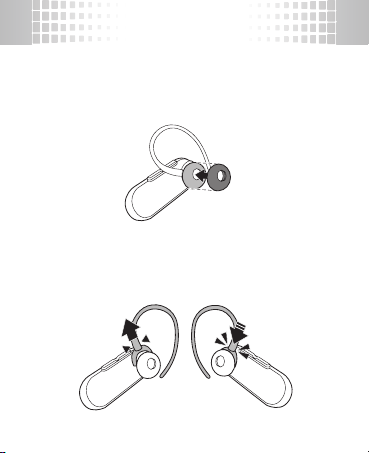
choose an earbud
To get the best headset performance, try out all
the supplied ear cushions to get a good fit.
choose an ear
Your headset comes ready for the right ear. To
change for the left ear:
7
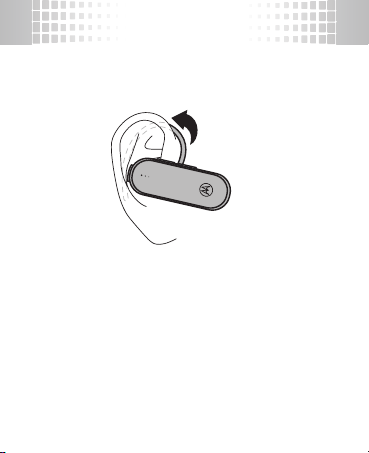
put it on
wear it
Flex the ear hook and loop it over your ear.
Tip:
For optimal audio performance and comfort,
be sure to position the ear cushion into your ear
canal and point the headset microphone towards
your mouth.
8
turn on & off
turn on & off
turn on
Slide the Power switch to the on position (no red
is shown under the switch)
flashes blue three times, then flashes in blue and
purple (if connected with a device) or is steadily
blue (if ready to be paired).
turn off
Slide the Power switch to the off position (red is
shown under switch). The indicator light flashes
three times then turns off.
.
The indicator light
Power
Switch
Indicator
Light
9
 Loading...