

Motorola Talkabout T5603 User Manual
Setting the Volume
listening level.
1. Rotate clockwise to increase the volume.
2. Rotate counterclockwise to decrease the volume.
Do not hold the radio close to your ear. If the volume is set to an
uncomfortable level, it could hurt your ear.
Model T5603 series
Safety and General Information
Display Screen Guide
KEM-PK14190-21A
Important Information on Safe and Efficient Operation
Read This Information Before Using Your Radio.
The information provided in this document supersedes the general safety
information in user guides published prior to December 1, 2002.
Transmit and Receive Procedure
Your two-way radio contains a transmitter and a receiver. To control
your exposure and ensure compliance with the general. population/
uncontrolled environment exposure limits, always adhere to the
following procedure:
• Transmit no more than 50% of the time.
• To receive calls, release the PTT button.
• To transmit (talk), press the Push to Talk (PTT) button.
Transmitting 50% of the time, or less, is important because the radio
generates measurable RF energy exposure only when transmitting (in
terms of measuring standards compliance).
Exposure to Radio Frequency Energy
Your Motorola two-way radio complies with the following RF energy
exposure standards and guidelines:
• United States Federal communications Commission, Code of Federal
Regulations; 47CFR part 2 sub-part J.
• American National Standards Institute (ANSI)/Institute of Electrical
and Electronic Engineers (IEEE) C95. 1-1992.
• Institute of Electrical and Electronics Engineers (IEEE) C95.1-1999
Edition.
• International Commission on Non-Ionizing Radiation Protection
(ICNIRP) 1998.
Getting Started
Talking and Listening
To communicate, all radios in your group must be set to the same
channel and Interference Eliminator Code.
1. To talk, press and hold .
2. When you are finished talking, release .
For maximum clarity, hold the radio two to three inches away from your
mouth and speak directly into the microphone. Do not cover the
microphone while talking.
Talk Range
Your radio is designed to maximize performance and improve
transmission range. Do not use the radios closer than five feet apart.
Monitor Button
volume level of the radio when you are not receiving. This allows you
activity on the current channel before you talk.
To prevent accidental transmissions and save battery life, the radio
emits a continuous warning tone and stops transmitting if you press
for 60 continuous seconds.
Menu Options
Selecting a Channel
Your radio has 8 channels. All are 0.5 watt.
1. With the radio on, press . The current channel flashes.
2. Press or to select a channel.
3. Press to confirm your selection or to continue set up.
For further information, you may call at (65) 6841 2668
Setting and Transmitting Call Tones
Your radio can transmit different call tones to other radios in your group
so you can alert them that you want to talk. You have 10 call tones from
which to choose.
To set a call tone:
flashes and CA appears.
2. Press or to change and hear the call tone.
To transmit your call tone to other radios set to the same channel and
Interference Eliminator Code as your radio, press .
Note:Setting the call to 0 disables the call tone feature.
Interference Eliminator Code
Interference Eliminator Codes help minimize interference by blocking
transmissions from unknown source. Your radio has 38 Interference
Eliminator Codes.
2. Press or to select the code.
You can set a different code for each channel using this procedure. An
Interference Codes rapidly so you can quickly reach the code you want.
Note: You must set the Interference Eliminator Code to 0 on a radio that
uses Interference Eliminator Codes to communicate with radios that do
not have Interference Eliminator Codes. Select 0 for " no tone, no code".
• Ministry of Health (Canada) Safety Code 6. Limits of Human Exposure
to Radiofrequency Electromagnetic Fields in the Frequency Range from
3 KHz to 300 GHz, 1999.
• Australian communications Authority Radiocommunications
(Electromagnetic Radiation—Human Exposure) Standard, 2003.
• ANATAL ANNEX to Resolution No. 303 of July 2, 2002 “Regulation of
limitation of exposure to electrical, magnetic and electromagnetic
fields in the radio frequency range between 9 KHz and 300GHz” and
“Attachment to resolution #303 from July 2, 2002”.
To assure optimal radio performance and make sure human exposure
to radio frequency electromagnetic energy is within the guidelines set
forth in the above standards, always adhere to the following procedures.
Portable Radio Operation and EME Exposure
Antenna Care
Use only the supplied or an approved replacement antenna. Unauthorized
antennas, modifications, or attachments could damage the radio and may
violate regulations.
Do NOT hold the antenna when the radio is “IN USE.” Holding the antenna
affects the effective range.
Body-Worn Operation
To maintain compliances with RF exposure guidelines, if you wear a radio
on your body when transmitting, always place the radio in a Motorolasupplied or approved clip holder, holster, case or body harness for this
product. Use of non-Motorola-approved accessories may exceed RF
exposure guidelines.
If you do not use one of the Motorola-supplied or approved body-worn
accessories and are not using the radio held in the normal use position,
ensure the radio and its antenna are at least 1 inch (2.5 cm) from
your body when transmitting.
Battery Charger Safety Instructions:
pocket, purse or other container with metal objects.
Save these Instructions
1. Do not expose the charger to rain or snow.
2. Do not operate or disassemble the charger if it has received a sharp
blow, or has been dropped or damaged in any way.
3. Never alter the AC cord or plug provided with the unit. If the plug will
not fit the outlet, have the proper outlet installed by a qualified
electrician. An improper condition can result in a risk of electric
shock.
4. To reduce the risk of damage to the cord or plug, pull the plug rather
than the cord when disconnecting the charger from the AC receptacle.
5. To reduce the risk of electric shock, unplug the charger from the outlet
before attempting any maintenance or cleaning.
6. Use of an attachment not recommended or sold by Motorola may
result in a risk of fire, electric shock or personal injury.
7. Make sure the cord is located so it will not be stepped on, tripped over
or subjected to damage or stress.
8. An extension cord should not be used unless absolutely necessary.
Use of an improper extension cord could result in a risk of a fire
and/or electric shock. If an extension cord must be used, make sure
that:
• The pins on the plug of the extension cord are the same number, size
and shape as those on the plug of the charger.
• The extension cord is properly wired and in good electrical condition.
• The cord size is 18 AWG for lengths up to 100 feet, and 16 AWG for
lengths up to 150 feet.
9. The supply cord of this charger cannot be replaced. If the cord is
damaged, please refer to Warranty section.
Potentially Explosive Atmospheres
Turn off your radio prior to entering any area with a potentially explosive
atmosphere. Only radio types that are especially qualified should be
used in such areas as “Intrinsically Safe.” Do not remove, install or
charge batteries in such areas. Sparks in a potentially explosive
atmosphere can cause an explosion or fire resulting in bodily injury or
even death.
Note:
The areas with potentially explosive atmospheres referred to
above include fueling areas such as below decks on boats, fuel or
chemical transfer or storage facilities, areas where the air contains
chemicals or particles (such as grain, dust or metal powders) and any
other area where you would normally be advised to turn off your vehicle
engine. Areas with potentially explosive atmospheres are often—but not
always—posted.
Blasting Caps and Areas
To avoid possible interference with blasting operations, turn off your
radio when you are near electrical blasting caps, in a blasting area, or in
areas posted “Turn off two-way radios.” Obey all signs and instructions.
Operational Cautions
Antennas
Do not use any portable radio that has a damaged antenna. If a damaged
antenna comes into contact with your skin, a minor burn can result.
Batteries
All batteries can cause property damage and/or bodily injury such as
burns if a conductive material—like jewelry, keys or beaded chains—
touch exposed terminals. The conductive material may complete an
electrical circuit (short circuit) and become quite hot. Exercise care in
handling any charged battery, particularly when placing it inside a
Data Operation
If applicable, when using any data feature of the radio with or without
an accessory cable, position the radio and its antenna at least one
inch (2.5 cm) from the body.
Approved Accessories
For a list of approved Motorola accessories, visit our Web site at
www.motorola.com
Electromagnetic Interference/Compatibility
Note: Nearly every electronic device is susceptible to electromagnetic
interference (EMI) if inadequately shielded, designed or otherwise
configured for electromagnetic compatibility. Operation is subject to the
following two conditions:
1. This device may not cause harmful interference; and
2. This device must accept any interference received, including
interference that may cause undesired operation.
Facilities
To avoid electromagnetic interference and/or compatibility conflicts,
turn off your radio in any facility where posted notices instruct you to
do so. Hospitals or health care facilities may be using equipment that is
sensitive to external RF energy.
Aircraft
When instructed to do so, turn off your radio when onboard an aircraft.
Any use of a radio must be in accordance with applicable regulations
per airline crew instructions.
Medical Devices – Pacemakers
The Advanced Medical Technology Association recommends that a
minimum separation of 6 inches (15 cm) be maintained between a
handheld wireless radio and a pacemaker. These recommendations are
consistent with the independent research by and recommendations of
the U.S. Food and Drug Administration.
People with pacemakers should:
• ALWAYS keep the radio more than 6 inches (15 cm) from their
pacemaker when the radio is turned ON.
• Not carry the radio in the breast pocket.
• Use the ear opposite the pacemaker to minimize the potential for
interference.
• Turn the radio OFF immediately if there is any reason to suspect that
interference is taking place.
Medical Devices – Hearing Aids
Some digital wireless radios may interfere with some hearing aids. In
the event of such interference, you may want to consult your hearing
aid manufacturer to discuss alternatives.
Other Medical Devices
If you use any other personal medical device, consult the manufacturer
of your device to determine if it is adequately shielded from RF energy.
Your physician may be able to assist you in obtaining this information.
Safety and General Use While Driving
Check the laws and regulations regarding the use of radios in the area
where you drive, and always obey them. If you do use your radio while
driving, please:
• Give full attention to driving and to the road.
• Use hands-free operation, if available.
• Pull off the road and park before making or answering a call if driving
conditions so require.
Do not place a portable radio in the area over an air bag or in the air
bag deployment area. Air bags inflate with great force. If a portable
radio is placed in the air bag deployment area and the air bag inflates,
the radio may be propelled with great force and cause serious injury to
occupants of the vehicle.
Turn clockwise to turn the radio on and counterclockwise to turn
PTT
Push to Talk Timeout Timer
PTT
PTT
PTT
PTT
–
+
–
+
extended press of or allows you to scroll through the
–
+
+
MENU
MENU
MENU
MENU
MENU
– Battery Meter
Numbers for
Channel,
Call Tone
Numbers for
Codes
– Scan
– Hands-Free (VOX)
– Vibrate
– Lock
– Talk Confirmation Tone
(Roger Beep)
Channels and Frequencies
T5603
Continued on back
MON
MON
MON
to adjust the volume, if necessary. You can also use to check for
Turning Your Radio On and Off
the radio off.
1.
In the ON position
the radio chirps and briefly shows all features icons
your radio available on.
2. The display screen then shows the current channel, code and features
that are selected.
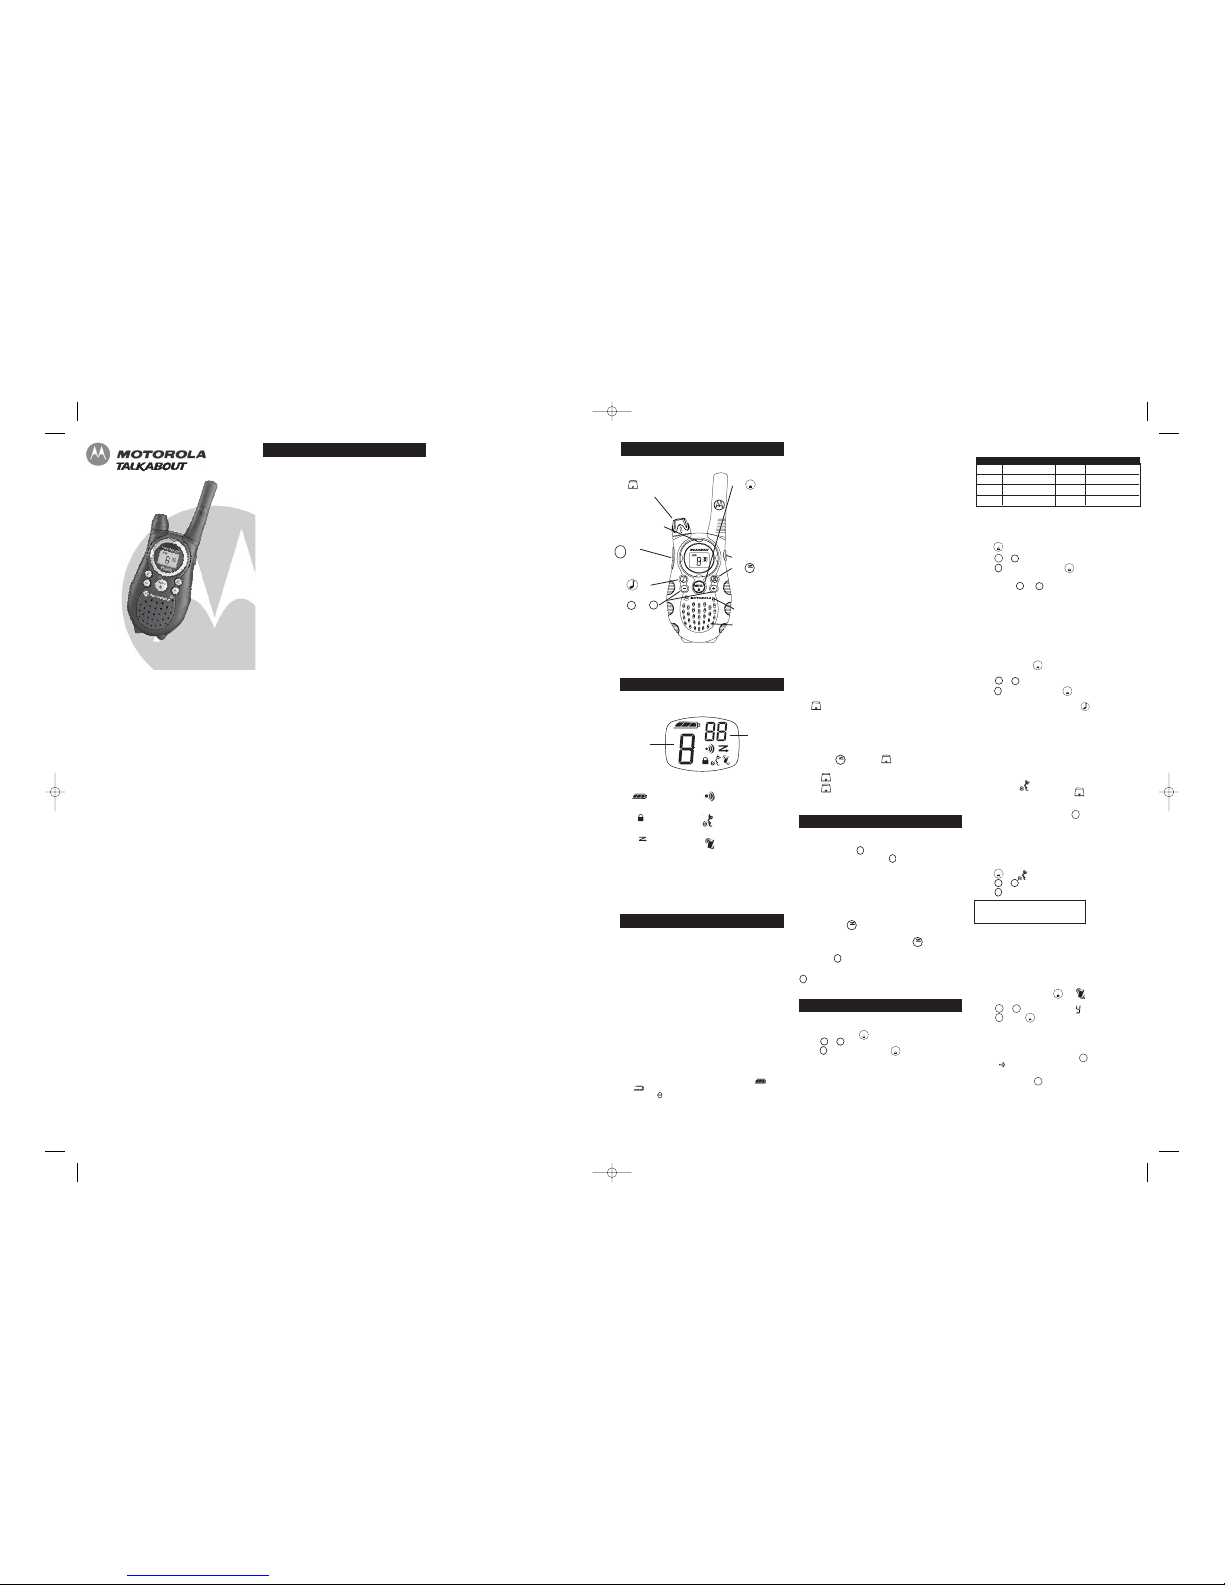
Control Buttons
Microphone
Accessory Jack
to:
• Scroll through
menus
–
+
MENU
• Select Menu options
• Exit the Menu
(when pressed
while in a Menu)
• Lock and unlock
the keypad (when
held down and
not in a Menu)
LED Indicator Light
Use Push to Talk
to:
•
Talk
• Save a setting
Use to:
•
Transmit call tone
Speaker
PTT
Use to:
•
Turn radio on/off.
•
Increase or
decrease volume
Use to:
• Monitor channel activity
• Scan to see if anyone is
on the selected
channel
MON
Two-Way Radio
User’s Guide
Hands-Free Use With Accessories (VOX)
You can transmit hands-free with the use of optional headse t accessories.
Once VOX is turned on, the radio detects your voice and transmits when
you speak.
1. Turn the radio off and plug the VOX accessory into the accessory jack.
before placing the accessory on your head or in your ear.
4.
To transmit, speak into accessory microphone.
5.To receive,stop talking to turn VOX off, press or remove the audio accessory.
Note:
There is a short delay between the time you start talking and
when the radio transmits. There is a short delay before the transmission
is completed.
3. Adjust the volume appropriately by rotating .Lower the volume
Using Audio Accessories
Many accessories (sold separately) are available for you radio. For
more information, visit our Web site at www.motorola.com.
Setting the Sensitivity Level
Adjusting the radio’s sensitivity level helps minimize the possibility of
unintended noises triggering a transmission and helps the radio pick up
soft voices.
2. Press or to select the sensitivity level.
3. Press to set.
PTT
–
+
MENU
3 =
High Sensitivity for quiet environments
2 =
Medium Sensitivityfor most environments
1 =
Low Sensitivityfor noisy environments
Note:
When you connect a headset,the radio is automatically
set to the last chosen sensitivity level.
–
PTT
MENU
T5603_R8.qxd 9/29/06 3:22 PM Page 1
®
For More Information
2. Turn the radio on. shows on the display.
The use of a two-way radio while engaged in activities requiring concentration
may cause distraction or otherwise impair your ability to safely participate in
such activities. Always use technology safely.
Exercise care when removing NiMH or AA batteries. Do not use sharp
or conductive tools to remove either of these batteries.
T5603
Use and
Use to:
Installing the NiMH Rechargea ble Batte ry Pack
1. Turn the radi o off.
2. With th e back of the radio facing yo u, lift t he batter y cover la tch up an d
remove t he cover.
3. Remove th e battery pack fro m the clea r plastic bag (Do not disa ssemble
or unwra p the bat tery pack ).
4. Insert the NiMH battery p ack with the diagra m facing you.
5. Reposit ion the b attery cove r and pre ss down to secure.
Radio Batt ery Meter
Installing the Batteries
Each radio uses 1 NiMH rechargeable battery pack or 3 AA alkaline batteries and
beeps when the batteries are low.
Installing the Three AA Alkaline Batteries
1. Turn the radio off.
2. With the back of the radio facing you, lift the battery cover latch up and remove
the cover.
3. Insert the three AA alkaline batteries with + and - polarity as shown inside.
4. Reposition the battery cover and press down to secure.
empty . When the radio has one segment left, the radio chirps periodically
or after releasing (Low Battery Alert).
The radio battery icon shows the battery charge level, from full to
Removing th e NiMH Ba ttery Pack
1. Turn the radi o off.
2. With th e back of the radio facing yo u, lift t he batter y latch u p to rele ase the
batter y cover and remove the cover.
3. Gently remove the NiMH batt ery.
4. Reposit ion the b attery cove r and pre ss down to secure.
Pressing and holding for three seconds allows you to listen to the
Removing th e Three AA Batterie s
1. Turn the radi o off.
2. With th e back of the radio facing yo u, lift t he batter y latch u p to rele ase the
batter y cover and remove the cover.
3. Gently remove each battery by easing each batt ery out i ndividual ly.
4. Reposit ion the b attery cove r and pre ss down to secure.
Notes
• Exercise care when removing N iMH or AA batterie s. Do not use sharp or
conduct ive tools to remove e ither of these bat teries.
• Remove the batterie s before storing yo ur radio f or extend periods of time.
Batteri es corrode over time and may c ause perm anent dam age to you r radio.
Using the Battery C harger
The batter y charger provides d rop-in cha rging conve nience fo r NiMH ba tteries a nd
can be pla ced on any flat sur face, such as a des k or workb ench. Cha rge the Ni MH
battery over night (at least 16 hours) b efore usin g it for the first time. Afte r the
initial ch arge, an em pty batte ry is ful ly charged within 1 4 hours.
1. Follow th e steps a bove to in stall a N iMH Batte ry Pack.
2. Plug th e AC power s upply co rd into th e jack on the desk stand.
3. Plug th e AC power s upply int o a stan dard wall o utlet.
4. With a radio faci ng forward , slide i t into on e of the charging p ockets.
Notes
• The red l ight will glow cont inuously to indica te the ra dio is cor rectly co nnected
and cha rging. The light wi ll remain red after the batte ry pack i s fully c harged.
• When movi ng between hot and cold temp eratures, d o not cha rge the ba ttery unt il
the bat tery temp erature acc limates ( usually a bout 20 m inutes).
• For optim al batter y life, rem ove the rad io from th e charger within 16 hours. Do
not sto re the radi o in the ch arger.
• Turn radio off while in charging tray.
Attaching an d Removin g the Bel t Clip
1. Attach b elt clip to pocket or belt s trap.
2. Align t he belt c lip post with the hole in t he back o f the radi o.
3. Gently push unti l the cli p clicks i n place.
To Remove
1. Push dow n on the release ta b at the top of th e belt cl ip to rele ase the c atch.
2. Pull th e belt cl ip away from the back of the ra dio.
Press and hold while rotating until you reach a comfortable
PTT
Channel Frequency (MHz) Channel Frequency (MHz)
1 446.00625
2 446.01875
3 446.03125
4 446.04375
7 446.08125
6 446.06875
5 446.05625
8 446.09375
1. press until the code starts to flash.
1. With the radio on, press thr ee times. The current call tone setting
VibraCall™ Alert
VibraCall™ is a vibrating alert that notifies you that your radio is
receiving a message. This is useful in noisy environments. When the
alert is on, the radio vibrates when you receive a message on the
channel and code you set. A 30 second period is necessary to reset the
VibraCall™ Alert timer.
1. To turn vibrating alerts on, press until is displayed. The
current setting will flash.
2. Press or to change the setting to and – .
3. Press to set or to continue set up.
PTT
–
+
+
+
MENU
MENU
3. Press to save the code setting or to continue set up.
3. Press to set the new call tone or to continue set up.
PTT
1. press until appears.
• To turn talk confirmat ion tone on, press and hold wh ile you tu rn the
radio on.
Transmitting a Talk Confirmat ion Tone
You can set yo ur radio t o transmi t an uniq ue tone w hen you fi nish trans mitting.
It's like s aying “rog er” or “ove r” to let others kn ow you are finished talking.
displays .
• To turn talk confirmat ion tone off, turn your radio off and then back on
while pressing a nd holdin g .

Special Features
Keypad Lock
To avoid accidentally changing your radio settings:
1. Press until displays.
2. When in lock mode, you can turn the radio on and off, adjust the
volume, receive, transmit, send a call tone, and monitor channels. All
other functions are locked.
MENU
T5603
Warranty
Consumer Two-Way Radio Products and Accessories
purchased in Singapore
What Does this Warranty Cover?
This Limited Warranty is a consumer’s exclusive remedy, and applies as
follows to new Motorola branded products, accessories and software
manufactured, distributed and sold by Giant International Ltd. Alcom is
the local distributor in Singapore, and warrants Motorola Two-Way
Radio Products and Accessories (collectively "Equipment') purchased in
Singapore against defects in material and workmanship under normal
use and service, for the following periods of time:
Proof of Purchase:You are required to provide proof of purchase as a
condition of receiving warranty services. You are entitled to a
replacement or repair according to the terms and conditions of this
Limited Warranty if your product is found to be faulty within the
Warranty Period. This Limited Warranty extends to the original
purchaser only and is not transferable.
Who is covered?
This Limited Warranty applies only to the original consumer purchaser
of the Equipment, and is not transferable.
What will Alcom Electronics do?
Alcom Electronics, at its option, will at no charge either repair, or
replace any defective Equipment during the applicable Warranty
Period. Alcom Electronics may use functionally equivalent,
reconditioned, refurbished, pre-owned or new Equipment or parts at its
discretion. No data, software or applications added to Equipment,
including but not limited to personal contacts, games and ringer tones,
will be reinstalled. To avoid losing such data, software and
applications, customers are advised to create a back up prior to
requesting service.
You will receive instructions on how to ship the Equipment, at your
expense, to an authorized repair centre. To obtain warranty service, you
must provide Alcom Electronics with: (a) a copy of your purchase
receipt, bill of sale or other comparable proof of purchase for the
Equipment; (b) a written description of the problem; (c) the name and
location of the installation facility (if applicable) and (e) your postal
address and contact telephone number. Alcom Electronics will be the
sole determinant as to whether the Equipment is defective.
What Other Limitations Are There?
TO THE EXTENT PERMITTED BY LAW, ALL CONDITIONS, WARRANTIES
AND TERMS NOT EXPRESSLY CONTAINED IN THIS LIMITED WARRANTY
ARE EXCLUDED.
ANY IMPLIED WARRANTIES, INCLUDING WITHOUT LIMITATION THE
IMPLIED WARRANTIES OF MERCHANTABILITY AND FITNESS FOR A
PARTICULAR PURPOSE, SHALL BE LIMITED TO THE DURATION OF THIS
LIMITED WARRANTY, OTHERWISE THE REPAIR, REPLACEMENT, OR
REFUND AS PROVIDED UNDER THIS EXPRESS LIMITED WARRANTY IS
THE EXCLUSIVE REMEDY OF THE CONSUMER, AND IS PROVIDED IN LIEU
OF ALL OTHER WARRANTIES, EXPRESS OF IMPLIED. IN NO EVENT SHALL
MOTOROLA. GIANT INTERNATIONAL LTD. OR ALCOM ELECTRONICS PTE
LTD BE LIABLE, WHETHER IN CONTRACT OR TORT (INCLUDING
NEGLIGENCE) FOR DAMAGES IN EXCESS OF THE PURCHASE PRICE OF
THE EQUIPMENT, OR ANY SOFTWARE, OR FOR ANY INDIRECT,
INCIDENTAL, SPECIAL OR CONSEQUENTIAL DAMAGES OF ANY KIND, OR
LOSS OF REVENUE OR PROFITS, LOSS OF BUSINESS, LOSS OF
INFORMATION OR DATA, SOFTWARE OR APPLICATIONS OR OTHER
FINANCIAL LOSS ARISING OUT OF OR IN CONNECTION WITH THE
ABILITY OR INABILITY TO USE THE EQUIPMENT, OR ANY SOFTWARE, TO
THE FULL EXTENT THESE DAMAGES MAY BE DISCLAIMED BY LAW.
Some states and jurisdictions do not allow the limitation or exclusion of
incidental or consequential damages, or limitation on the length of an
implied warranty, so the above limitations or exclusions may not apply to
you. This Limited Warranty gives you specific legal rights, and you may
also have other rights that vary from state to state or from one
jurisdiction to another.
Hotline: (65) 6841 2668
snoisulcxEdoireP ytnarraWderevoC stcudorP
Equipment
as defined above,
unless otherwise provided for
below.
1. Decorative Accessories and
Cases.Decorative covers,
bezels, PhoneWrap covers and
cases.
2. Consumer Two-Way Radio
Accessories.
3. Products and Accessories that
are Repaired or Replaced.
ºOne (1) yearfrom the date of
purchase by the original consumer
purchaser of the Equipment unless
otherwise provided for below.
1. Limited lifetime warrantyfor the
lifetime of ownership by the
original consumer purchaser of
the decorative accessory or
case.
2. Thirty (30) daysfrom the date of
purchase by the original
consumer purchaser of the twoway rdio accessory.
3. The balance of the original
warranty or for thirty (30) days
from the date the products or
accessories are returned to the
consumer, whichever period is
longer.
Normal W
ear and T
ear: Periodic maintenance, and repair and
replacement of parts due to normal wear and tear, are not covered by
this Limited Warranty.
Batteries: Motorola supplied batteries will be replaced free of charge
within the first six (6) months of the date of purchase of the Equipment if
the capacity of the batteries falls below 80% of their rated capacity, or if
the batteries develop a leak.
Abuse & Misuse: Defects or damage that result from: (a) improper
operation, storage, misuse or abuse, accident or neglect, such as
physical damage (cracks, scratches, etc.) to the surface of the
Equipment resulting from misuse; (b) contact with liquid, water, rain,
extreme humidity or heavy perspiration, sand, dirt or the like, extreme
heat, or food; (c) use of the Equipment for commercial purposes or
subjecting the Equipment to abnormal usage or conditions; or (d) other
acts which are not the fault of Motorola, Giant International Ltd. Or
Alcom Electronics, are not covered by this Limited Warranty.
Use of Non-Motorola branded Products and Accessories: Defects or
damage that result from the use of non-Motorola branded or certified
products, accessories, software or other peripheral equipment are not
covered by this Limited Warranty.
Unauthorized Service or Modification: Defects or damages resulting
from service, testing, adjustment, installation, maintenance, alteration, or
modification in any way by someone other than Motorola, Giant
International Ltd., Alcom Electronics or their authorized service centres,
are not covered by this Limited Warranty.
Altered Equipment:Equipment with (a) serial numbers or date tags that
have been removed, altered or obliterated; (b) broken seals or seals that
show evidence of tampering; (c) mismatched board serial numbers; or (d)
nonconforming or non-Motorola branded housings, or parts, are not
covered by this Limited Warranty.
Communication Services:
Defects, damage, or failure of the Equipment
due to any communication service or signal you may subscribe to or use
with the Equipment are not covered by this Limited Warranty.
Equipment Purchased Outside of Singapore: This Limited Warranty
does not extend to any Equipment which was purchased outside of
Singapore.
Singapore
How do we obtain Warranty Service or Other Information?
To obtain warranty service or information, please call:
Manufactured, distributed and sold by Giant International Ltd., official
licensee of the Equipment. Motorola, the Motorola logo trademarks
and the Motorola trade dress are owned by Motorola, Inc. and are
used under license from Motorola, Inc. Alcom Electronics Pte Ltd. is
the local distributor of the Equipment in Singapore. Please contact the
customer service hotline at (65) 6841 2668 for questions/comments,
warranty issues, support, or service related to the Equipment.
MOTOROLA and the Stylized M Logo are registered in the U.S. Patent
& Trademark Office. All other product or service names are the
property of their respective owners.
©
Motorola, Inc. 2007.
Patent and Copyright Information
T5603_R8.qxd 9/29/06 3:22 PM Page 2
MENU
To unlock the radio, press until is no longer displayed.
PTT
Scanning C hannels
Use scanni ng to mon itor chan nels and codes for transmiss ions or t o find
someone in your group who has accidenta lly chang ed channe ls.
To start scanni ng
1. Briefly press . Th e scan will appear i n the dis play,and the radio will
begin to scroll through th e channel and code combinat ions.
2. When th e radio de tects cha nnel acti vity matc hing the channel a nd code
combin ation, it stops sc rolling an d you can hear the transmiss ion.
3.To respond and talk to the person transmitt ing, pres s within fi ve seconds
after t he end of the trans mission.
4.
The radio w ill resum e scrollin g through the chan nels five seconds a fter the end
of any re ceived ac tivity.
5.To stop scann ing, brie fly press the key.
To start Advanced Scanning :
1. Set the Interfere nce Elimi nator Cod e to "Zero ".
2.Briefly press the key. T he scan ind icator wi ll appear in the d isplay,
and the radio wil l begin t o scroll t hrough th e channel s. No Inte rference
Elimina tor Code that may be in use by that p arty will be detec ted and
displayed .
3.When the radio det ects chan nel activ ity with ANY code (or NO co de), it s tops
scrollin g and you can hear the tra nsmission . Any Int erference Eliminato r
Code th at may be in use by that part y will be detected and disp layed.
4.
To respond and t alk to t he person transmitt ing, press within fi ve seconds
of the end of th e transmis sion. The radio wil l transmi t using t he newly
detecte d Interfe rence Elim inator C ode.
5.
The radio w ill resume scrollin g through the chann els five s econds af ter the e nd
of any re ceived ac tivity.
6.To stop scann ing, brie fly press the key.
Removing Ch annels fro m the Sca n List (N uisance D elete Feat ure)
To remove a channe l so the radio doe s not sto p on it w hile scan ning, pres s
and hold or fo r at leas t 3 secon ds, then re lease. Thi s temporar ily
removes the channel f rom the sc an list.
To restore the ch annel, tu rn the rad io off an d then ba ck on.
Scanning N otes :
You cannot rem ove the ch annel your radio was set to wh en you st arted the
scan (call ed your ho me channe l).
PTT
–
+
MON
MON
MON
MON
 Loading...