

Motorola TalkAbout T340 User Manual
Model T340
FLEX™ Technology
User's Guide
WORD MESSAGE PAGER
CONTENTS
Introduction
Effective Use of YourPager ..........1
Getting Started
Installing/Replacing the Battery .....2
Controls .........................................3
Turning the Pager On/Off ..............4
Sending a Test Page to Yourself...5
Backlight ........................................6
Time and Date
Setting the Time and Date.............7
Messages
Types of Messages........................8
Choosing the ScrollSpeed............9
Receiving/Reading Messages .......9
Duplicate Messages....................11
Alerts
Choosing the Alert Mode.............12
Choosing a PleasingAlert ...........13
Alarms
Reminder Alarm...........................14
General Alarms............................15
Event Al arms...............................18
Message Features
Storing Messages ....................... 23
Deleting Messages...................... 23
Automatic Message Deletion ...... 24
Locking/Unlocking Messages...... 24
Locking Messages ...................... 25
Unlocking Messages................... 26
Information Services
Reading Information Service
Messages............................... 27
Turning the Alert On/Off.............. 29
Deleting an InformationService
Message................................. 29
Phone Directory
Entering a PhoneDirectory
Entry ...................................... 30
Adding a Received Message ...... 33
Deleting a Phone Directory
Entry....................................... 34
Optional Features.......................... 34
Special Pager Displays ................. 40
Use andCare.................................. 41
1
Congratulations on purchasing the Motorola®Talkabout™ T340 Word Mes sage
Pager.The TalkaboutT340 Word Message Pager incorporatesthe latest in paging
technology.Motorola FLEX™ protocol-based pagers offer extended battery life
and improv edreliability.
This compactpager combines messaging and time keepingfunctions in a
package thatis convenient to carry. Full understanding of what this product offers
begins with readingthis user’s guide.
This user’s guide includes a detachable Quick Reference Card onthe back
cover.
Effective Use of Your Pager
Your pager canhelp you keep in contactwith everyone important to you. By giving
your pagernumber to your business associates, family,and friends,you can be
contacted when necessary.
If you have a cellular phone, give yourpager numberinstead of your cellular
number. Then you can decidewho to call back on your cellularphone without
paying for incoming calls.
INTRODUCTION
2
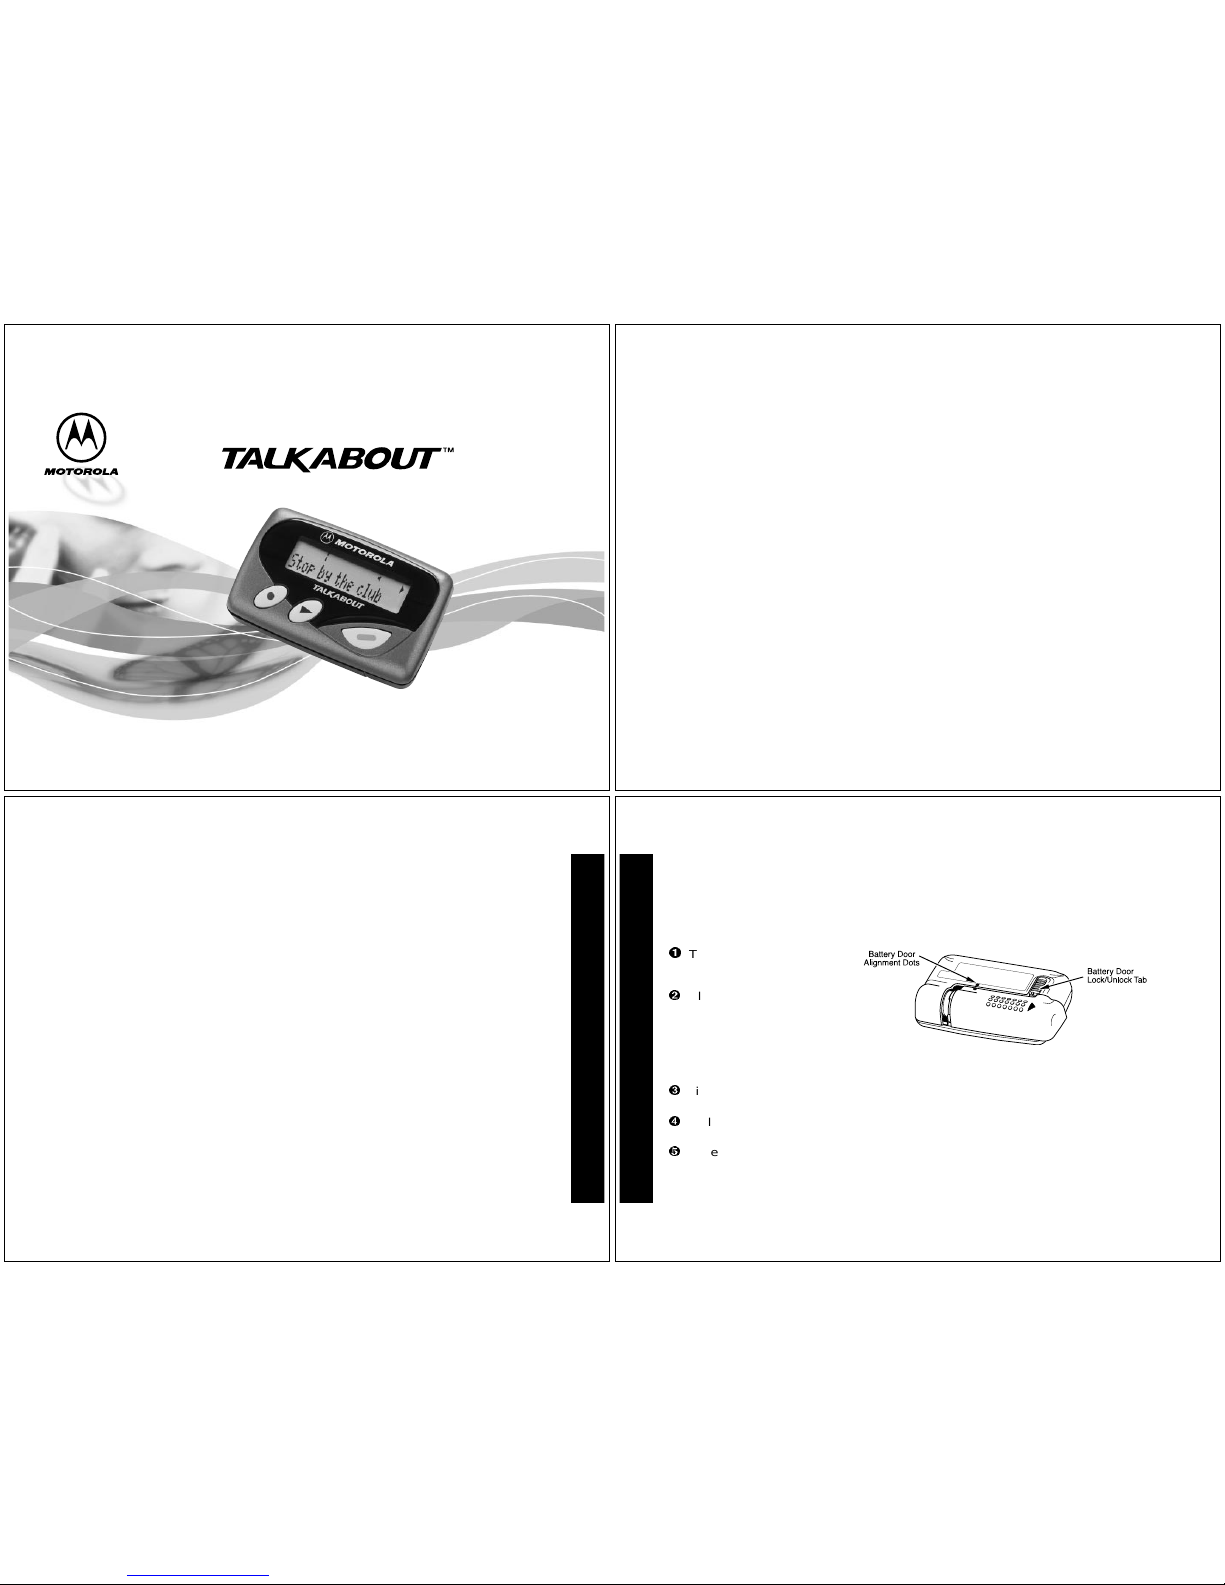
Battery Information
Y ourT alkabout T340 Word Mes sage Pager operateswith oneAAA-size alkaline
battery. Carbon zinc batteries are not recommended.
Installing/Replacingthe Battery
Note:
T urn the pager off before changing the batteryto save messages.
Turnoff the pager. Refer to
“Turning the Pager On/Off”
on page 4.
SlidetheLock/Unlocktab
away from the battery door
to unlock the door. Hold the
pager in both handsand
slide thedoor until the
locking tabs release andthe Battery Door Al ignmentDots align. Lift the door until
it is free of the hous ing.Remove the battery.
Align thenew battery matchingthe illustration on the insideof the battery cham-
ber. Insert the battery.
Replace the batterydoor byaligning the grooves on the door with the grooves on
the housing.
Slide thebattery door until it is fully closed. Lock the battery door by sliding the
Lock/Unlock Tab on the housing toward thebattery door.
GETTING STARTED
3
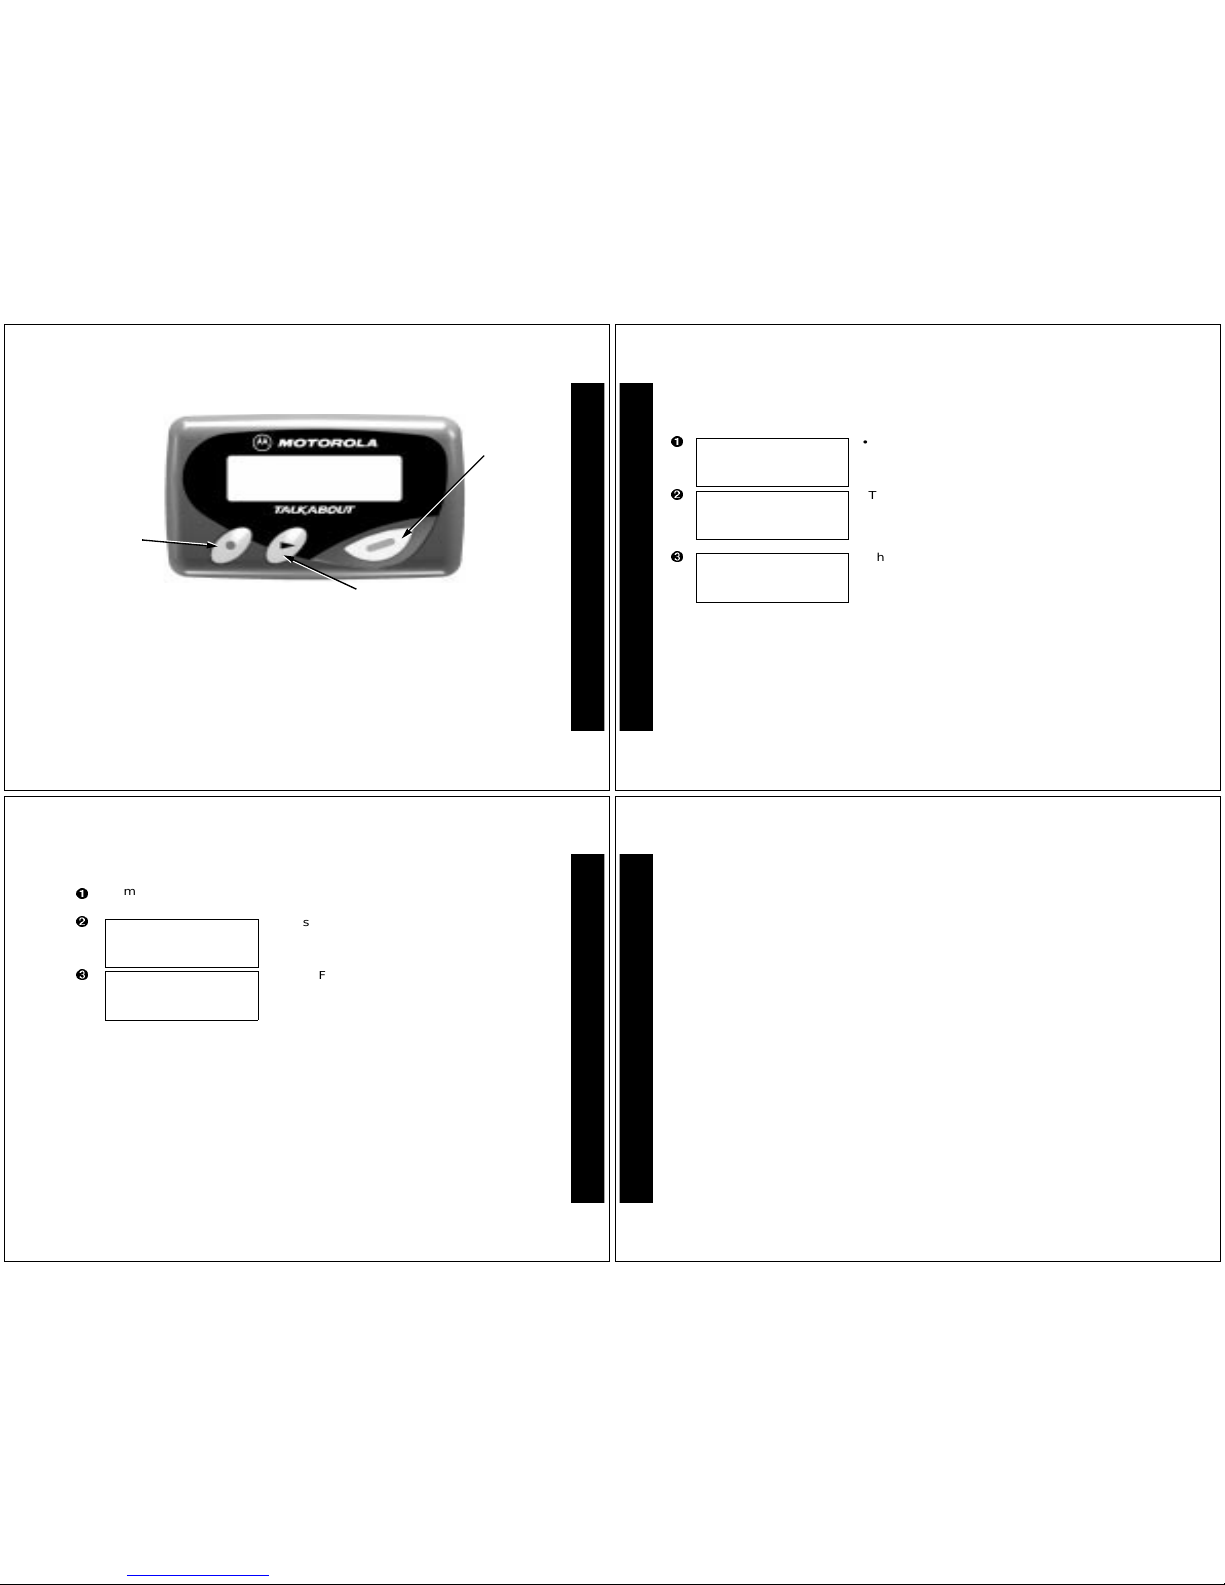
Controls
*
The Mode button can be pressed repeatedly (or pressed and held) to scroll
through available choices and to increment a value.
+
The Select button is used to select and confirm a value.
)
The Read/Power On buttonis used to read a message, to save a setting, to
turn on the pager, or to turn on the backlighting.
1
Stop by the club
Q
Read/
Power On
Button
H
Mode
Button
GETTING STARTED
Select Button
4
Turning the Pager On/Off
To Turn On
•From theOFF mode,press ).
•This Startupscreendisplays momentarilyandthe
pager either alerts audiblyor vi brates.
Note:
The Startup alertcan be skipped by
pressing ).
•The Standby screen displays the time, date and
the AUDIBLEalert iconH(or VIBRATE alert
iconG).
12:00 A 1/01
H
MOTOROLA
H
12:00 A 1/01
GETTING STARTED
5
To Turn Off
Sending a Test Page to Yourself
It’s a good idea to test your pager and serviceby sending a page to yours elf .Start
by using the phone number, web site or email address (andPIN, if required)your
service provider gave you, then enter a short message.
If you are sending a wordmessage from a phone , an oper atorwill assist you;
otherwise press the phonebuttons to enter a numeric message or type a
message and send it.
From the Standby screen, press and release * untilCONTROLS? displays.
Press+ to enter the CONTROLS menu.
•Press + to set the pager to OFF mode.
•The OFFscreen displayswithout any alert icon.
H
OFF? d
12:00 A 1/01
GETTING STARTED
6
While you are waiting for themessage toreach your pager, refer to page 9 for
more information about how to read a message.
If your pager does not receive themessage within a few minutes, contactyour
service provider. After you’ve tested your pager, read the rest of this guide to learn
about the many useful features of your new pager.
Backlight
Press andhold) for one second or more to activate the LCD screen back light.
When youhave finished reading your messages and the Standb yscreen is
displayed, the backlight remains on for four seconds before automatically turning
off.
GETTING STARTED

7
Setting the Time and Date
From the Standby screen, pressand release* until CONTROLS? displays. Press
+ to enterthe CONTROLSmenu. Then press *+ to enter TIME–DATE
mode.
•Press * to set the hour to the desired value.
•Move to the Minute, A.M./P.M., Date and Month
fields by pressing +, then press * to set the
value for each field.
Note:
To display a 24-hour clock, set the AM/
PM fieldto _.
•Press ) from any field to setand exit.
12:00 A 1/01
TIME AND DATE
8
Types of Messages
The message indicators define the typeof messagereceived and flash until the
message is read.
Message Type Unselected Selected
Personal §$
Phone Directory
Information Services
when received
º&
when selecting
when chirp is on
j>
~
- !
MESSAGES
9
Choosing the Scroll Speed
You can choose the speed at whi ch your messages scroll, or read them li ne by
line.
Receiving/Reading Messages
When a message is received, the pager eitheralerts audibly (AUDIBLE, CHIRP,
ESCALERT and all PLEASING modes except NO ALERT) or vibrates (VIBRATE
mode).
If the NO ALERT modeis selec ted, no alert occurs for normal messages. The
unread message indicator § (normal message) flashes. The slot number ofthe
latest message displays on top.
From the Standby screen, pressand release* until CONTROLS? displays. Press
+ to enter the CONTROLS menu, thenpress **+ to enter theSCROLL
SPEED menu.
•Press * to choose the SCROLL SPEED you
desire.
•Press ) toset and exit.
Note:
There are four scroll speeds:LINE-BY-
LINE, SLOW, ME DIUM and FAST.
H
LINE BY LINE =
MESSAGES
10
•Press ) todisplay t he message statusscreen.
Press) to read the latest message.
Note:
The flas hingunread message indicator
§ changes to $ whenit is selected. To read a
different message, press + to select the
message slot number, then press ).
•The first screen of the message displays. If the
message is longer than one screen display, a
message continued indicator Q appears on the
top line unti lthe lastscreen is displayed.
•If the pager is set to scrollthe message
automatically (SLOW, MEDIUM or FAST scroll
speeds) the remainder of the message is
displayed at that speed.
•If the scroll speed is set to LINE-BY-LINE,the
remaining screens will automatically display one
line at a time every few seconds.
Note:
To pause the message in any scroll
mode, press ). Press again to continue. In
LINE-BY -LINE mode, continue pressing )
until the lastscreen isdisplayed.
4H
§§§$
4HQ
DINNER AT 7:30PM
4HQ
MEET AT THE CLUB
MESSAGES
11
Duplicate Messages
•The las tscreen displays the time and date the
message was rec eived. After an interval,the
pager returnsto thestandby screen.
Note:
If a message is unread and audiblealerts are chosen, the pager gives a
periodic alert until all unread messages are read. This alert will continue for up
to 30 minutes. A message is considered read if any partof themessage is
displayed.
•If a duplicate personal messageis received, the
Duplicate icon ¶ displaysontop.
•Press ) toview the duplicate message.
•The wordDUPLICATE displays before the duplicate
message is displayed.
4H
3:51P 9/29
4H¶
§§§$
4H¶Q
DUPLICATE 1
MESSAGES
12
Choosing the Alert Mode
Y oucan chooseone of four alert modes: AUDIBLE, VIBRATE, CHIRP, or
ESCALERT.
Note:
In ESCALER Tmode, the alertgrows increasingly louder. InAUDIBLE
mode you can set a PLEASING alert or NO ALERT.
From the Standby screen, press and release *until ALERTS? displays.Press
+ to enter the ALERTS menu. Press + againto enterthe ALERT MODE
menu.
•Press * until the desired alert mode displays
(e.g. VIBRATE).
•The pager gives off a sample of each dis played
alert.
•Press ) to set and exit.
•The Standbyscreen displays with either H (the
audible alert icon)or G (thevibrate alerticon),
depending on whichalert modewas chosen.
H
AUDIBLE? w
G
VIBRATE? x
G
9:05 P 9/28
ALERTS
13
Choosing a Pleasing Alert
If you select the AUDIBLE alertmode, you can choose the standard alert, NO
ALERT,oroneofeightPLEASINGalerts.
Note:
If you choose NO ALERT or VIBRATE, the pager gives off an audiblealert
only ifa priority alert is received. To stop an alert, press any button.
From the Standby screen, press and release *until ALER TS? displays. Press
+ to enterthe ALERTS menu.
•Press *+ to enter the PLEASING alert
menu.
•Press * until the desired alert mode displays
(e.g. ARPEGGIO).
•The pagergives off a sample of eachdisplayed
alert. Press ) to set and exit.
•The Standbyscreen displays with the Audible
alert icon H.
H
PLEASING? j
H
ARPEGGIO? T
H
9:05 P 9/28
ALERTS
14
Setting Alarms
There are three typesofalarms: REMINDER, GENERAL and EVENT.Ifthe pager
is inOFF mode when an alarm expires, it turnson, alerts according to the alert
mode, and remai ns on. If the pager is in NO ALERT mode, an alarm causes an
audible alert.
REMINDER Alarm
A singleREMINDER alarm can be set to expire within 60 minutesor less .
From the Standby screen, press and release * until ALARMS? displays.Press
+ to enter the ALARMS menu. Press + againto enter the REMINDER
menu.
•Press * to set the alert time. In thisexample,
the pageris set to alert 45 minutesfrom thetime
the alarm is set.
Note:
When setti ngthe alert time, the value
starts with OFF, then 1 through 60, thenOFF
again.
•Press ) to set and exit.
H I
REMIND OFF
H J
REMIND 45 MIN
ALARMS
15
GENERAL Alarms
You can set one GENERAL alarm. This can beset to alert on a daily basis or onetime only.
•The Standbyscreen displays with the Alarm
icon J.
•When a REMINDER alarm expires, this screen
displays and the pager alerts. Press any button
once to stop the alarm, and again to clear the
message.
•If the alarm is not stopped during activation, the
Alarm iconflashes. Press anybutton once to
read the message,and press againto clear.
From the Standby screen, press and release * until ALARMS? displays. Press
+ to enterthe ALARMS menu. Press *+ toenter GENERAL alarms
mode.
H J
9:00 P 9/28
H J
REMINDER s
H J
9:45 P 9/28
ALARMS
16
•Press +, then press * until .,(the enable
alarm icon)displays. Press + to move to the
next field.
•Press * untilJ (the enablealert icon)
displays. Press + to move tothe next field.
•Press * to set the hour to the desired value,
then press + to move to the Minutefield.
•Press * to set the minutes to the desired
value. Move to the A.M./P.M., Day andMonth
fields by pressing +, then press * to set the
value for each field.
•Press ) in any field to set and exit.
Note:
To alert on a daily basis set the Day
and Monthto --/--.
•The Standby screen displays with J (the enable
alert icon).
H I
9:05 P 9/28
01 . , H I
9:05 P 9/28
H J
10:00 A 9/30
H J
9:05 P 9/28
ALARMS
17
Note:
Y oucan temporarilyturn off a daily alert(for example, on a week end).
Toturn of fthe alert, follow these steps.
1. From the Standby sc reen,press and release * until ALARMS? displays. Press
+ to enter the ALARMS menu. Press *+ to enter GENERAL alarms
mode.
2. Press ++to move to the alertenable/disable field.
3. Press * until I (the disable alert icon) displays.
4. Press ) to set and exit. The
alarm
remains set and turned on,butthe
alert
won’t occur until it is turnedon again.
•When a GENE RALalarm expires, this screen
displays and thepager alerts.
•Press any button onceto stop the alarm, and
again toclear the message.
•If theGENERAL alarmis notstopped during
activation, the ALARM icon flashes.
•Press any button onceto read the message,
and press againto clear.
H J
GENERAL t 1
H J
10:00 A 9/30
ALARMS
18
To turn onthe alert again, follow these steps.
1. From the Standby screen, pressand release*until ALARM S? displays. Press
+ to enter the ALARMS menu. Press *+ to enter GENERAL alarms
mode.
2. Press ++to move to the alert enable/disablefield. Press * untilJ (the
enable alerticon) displays.
3. Press ) to set and exit.
To turn off (erase) thealarm settings, follow thesesteps.
1. From the Standbyscreen, press and release*until ALA RMS? displays. Press
+ to enter the ALARMS menu. Press *+ to enter GENERAL alarms
mode.
2. Press +, then press * until -- (the disablealarm icon) displays.Press )
to set and exit.
EVENTAlarms
You can set up to threeEVENT alarms. Each EVENT alarm allows you to keep a
special reminder message that displays when the alarm is activated and the pager
alerts. These can beset to alerteither on a daily basis or one-time only.
ALARMS
 Loading...