

™
®


Motorola, Inc.
Consumer Advocacy Office
1307 East Algonquin Road
Schaumburg, IL 60196
www.hellomoto.com
MOTOROLA and the Stylized M Logo are registered in the US Patent & Trademark Office. The
Bluetooth trademarks are owned by their proprietor and used by Motorola, Inc. under license. All other
product or service names are the property of their respective owners.
© Motorola, Inc., 2005.
Caution:
Changes or modifications made in the phone or Bluetooth unit, not expressly approved by
Motorola, will void the user’s authority to operate the equipment.
Manual Number: 6809494A40-O
D
R
Oakley, Inc.
One Icon
Foothill Ranch, CA 92610
www.oakley.com
© 2005 Oakley, Inc.
Oakley, Ellipse logo, O Matter, Plutonite, Microclear, Razrwire, Unobtainium, and XYZ Optics are
trademarks or registered trademarks of Oakley, Inc. in the United States and other countries. All other
brand and product names listed are trademarks or registered trademarks of their respective holders
and are hereby recognized as such. Sunglasses Made in USA & Bluetooth Unit Made in China.
U.S. Patent Nos. owned by Oakley, Inc.: 5.648.832, 5.689.323, 5.969.789, 6.010.218, 6.168.271 B1,
5.054.903, 5.137.342, 5.054.902. Additional U.S. and international patents pending.
DR
Certain mobile phone features are dependent on the capabilities and settings of your service provider’s
network. Additionally, certain features may not be activated by your service provider, and/or the
provider's network settings may limit the feature’s functionality. Always contact your service provider
about feature availability and functionality. All features, functionality, and other product specifications,
as well as the information contained in this user's guide are based upon the latest available
information and are believed to be accurate at the time of printing. Motorola reserves the right to
change or modify any information or specifications without notice or obligation.
A
F
T
A
F
T

®
TM
Contents
OAKLEY® RAZRWIRE™ is the first eyewear to combine patented Oakley optics
with wireless Bluetooth
hands-free mobile communications anywhere and everywhere you want to be.
Fully integrated electronics let you easily handle incoming and outgoing calls to
your Bluetooth enabled cell phone from a range of up to thirty-three feet. Answer
a call instantly without digging for your cell phone. Carry on a phone conversation
without being tethered by a headset wire. The ultra-lightweight design offers the
comfort, protection and clarity of Oakley optics combined with third-generation
Motorola Bluetooth technology.
RAZRWIRE features Oakley's patented XYZ Optics
maximizes clarity at all angles of vision. The semi-rimless design means there's
no frame rim to block your downward view, and the durable Plutonite
material blocks all UV. For durability and all-day comfort, the frame is made of O
Luminum, an alloy 40% lighter than pure titanium. The adjustable design lets you
reposition the speaker to wherever it is comfortable. Custom engineered spring
hinges provide a secure, adaptable fit, and soft Unobtainium
increase grip with perspiration. You also get the optical precision and impact
protection found in Oakley's premium performance eyewear.
®
technology. It frees you from wires by offering
®
, an innovation that
®
components
®
lens
Package Contents
•
Sunglasses (Eyewear)
•
Bluetooth Unit
•
Wall Charger
•
User’s Guide (this booklet)
•
MicroClear™ bag for cleaning and storage
•
Accessories Card
•
Oakley Registration Card
•
Rx Ready Card
Charging the Unit . . . . . . . . . . . . . . . . . . . . . . . . . . . . . . . . . . . . . . . . . 3
Assembling RAZRWIRE. . . . . . . . . . . . . . . . . . . . . . . . . . . . . . . . . . . . . 3
Mounting the Unit on your Eyewear . . . . . . . . . . . . . . . . . . . . . . . . . . 3
Removing the Unit from your Eyewear. . . . . . . . . . . . . . . . . . . . . . . . 4
Pairing RAZRWIRE with your Phone . . . . . . . . . . . . . . . . . . . . . . . . . . 4
Using RAZRWIRE. . . . . . . . . . . . . . . . . . . . . . . . . . . . . . . . . . . . . . . . . . 5
Adjusting RAZRWIRE for a Comfortable Fit . . . . . . . . . . . . . . . . . . . . 5
Answering & Ending a Call . . . . . . . . . . . . . . . . . . . . . . . . . . . . . . . . . 5
Turning the Unit On & Off . . . . . . . . . . . . . . . . . . . . . . . . . . . . . . . . . . 5
Advanced RAZRWIRE . . . . . . . . . . . . . . . . . . . . . . . . . . . . . . . . . . . . . . 6
Making Calls . . . . . . . . . . . . . . . . . . . . . . . . . . . . . . . . . . . . . . . . . . . . 6
Redialing the Last Dialed Call . . . . . . . . . . . . . . . . . . . . . . . . . . . . . . . 6
Adjusting the Volume . . . . . . . . . . . . . . . . . . . . . . . . . . . . . . . . . . . . . 6
Transferring Calls. . . . . . . . . . . . . . . . . . . . . . . . . . . . . . . . . . . . . . . . . 6
Placing a Call on Mute . . . . . . . . . . . . . . . . . . . . . . . . . . . . . . . . . . . . 6
Toggling Phone Calls . . . . . . . . . . . . . . . . . . . . . . . . . . . . . . . . . . . . . . 6
Mounting the Unit on the Left Side of your Eyewear . . . . . . . . . . . . . 7
RAZRWIRE Indicator Light and Audio Tone States . . . . . . . . . . . . . . 8
Safety and General Information . . . . . . . . . . . . . . . . . . . . . . . . . . . . . .9
Support. . . . . . . . . . . . . . . . . . . . . . . . . . . . . . . . . . . . . . . . . . . . . . . . . . 10
Consumer Warranty . . . . . . . . . . . . . . . . . . . . . . . . . . . . . . . . . . . . . . . 10
2
Charging the Unit
Assembling
TM
Important: Charge the Bluetooth unit for 2.5 hours before using it the first
time.
To charge the unit:
1
Plug the charger plug into a electrical wall outlet.
2
Open the rubber cover on the top part of
the unit and plug the silver side of the
charger cable into the charging port.
Be sure to align the plug correctly. If the
plug does not connect to the unit easily,
try flipping it over and re-inserting.
The indicator light on the unit will be solid
red while it is charging.
3
When the indicator light turns off,
charging is complete.
Note:
With an optional USB Cable sold separately through Oakley dealers, you
can charge the unit by plugging it into any computer USB port. That way, you can
leave the wall charger at home and use the USB Cable at the office, or anywhere
you have access to a computer.
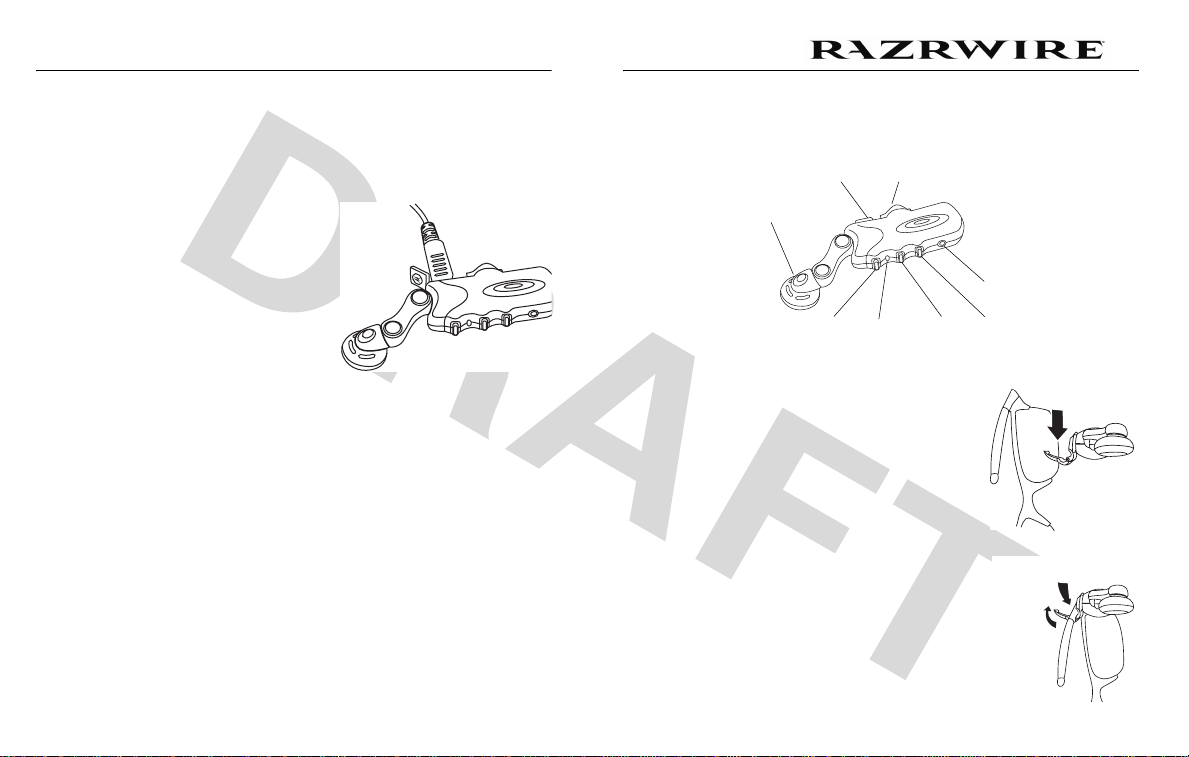
RAZRWIRE includes your Oakley eyewear and a Bluetooth unit. Here’s a quick
anatomy lesson of the unit.
Speaker
Charging
Ear
Multifunction
Button
Attachment
Port
Indicator
Light
Clamp
Volume
Down
Microphone
Volume
Up
Mounting the Unit on your Eyewear
To mount the unit on the right side of your eyewear
frames:
1
With the attachment clamp open, hold the unit in
your right hand.
Note:
If the clamp on your unit is closed, gently
twist the clamp until it snaps open.
2
Hold the right arm of the frames in your left hand.
3
Drop the arm of the frame into the groove of the
attachment clamp.
4
Snap the top of the attachment clamp closed.
Note:
If you need to mount the unit on the left side
of the eyewear frames, see Mounting the Unit on
the Left Side of your Eyewear on page 7.
Step 4
Step 3
3
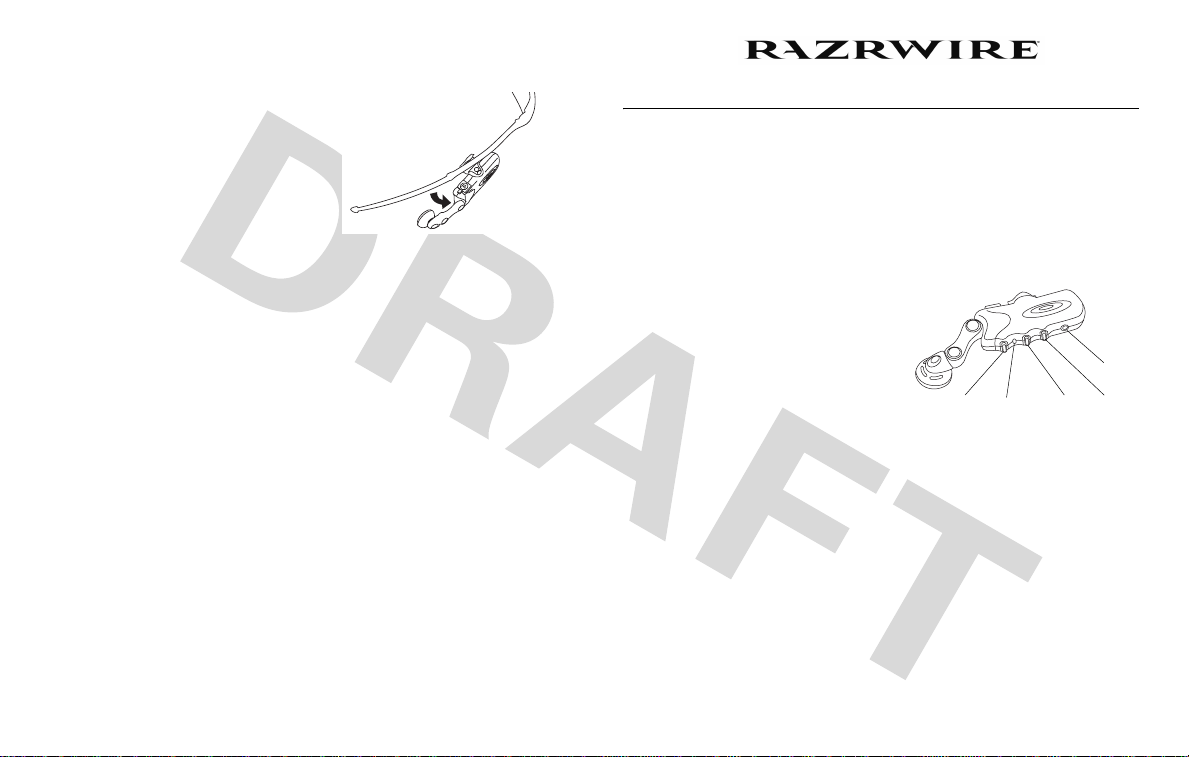
Removing the Unit from your Eyewear
To remove the unit from your frames:
1
Hold the body of the unit in your right
hand.
2
Hold the arm of the eyewear frame that
the unit is attached.
3
Gently twist the unit until the clamp
snaps open and you can remove it from
the frame.
Pairing
TM
with your Phone
You must pair (or bond) your RAZRWIRE unit with your phone before they will
work together. This procedure only needs to be performed once and then the
next time you turn on your RAZRWIRE unit and phone they will automatically pair.
To pair your unit and phone:
1
On your Motorola phone*, select M (Menu) > Settings > Connection > Bluetooth Link >
Handsfree > Look for Devices.
2
With the unit turned off, press and hold
the
Multifunction Button
hear a high-pitched tone in the ear
speaker.
Note:
When the unit is successfully in
pairing mode the indicator light will
remain solidly lit.
3
The phone lists all Bluetooth devices it finds. Select
4
Select OK or
5
Enter the passkey:
Select OK.
6
7
When your RAZRWIRE is successfully paired with your phone, the Indicator
Light flashes ten times and automatically turns on for use.
Note: *
These steps are for most Motorola phones. For other phones, see your
phone user's guide.
until you
Ye s
to pair (bond) the headset.
0000
Multifunction
Indicator
Button
Light
Oakley RAZRWIRE
Volume
Down
Microphone
Volume
Up
.
4

Using
Adjusting RAZRWIRE for a Comfortable Fit
You may need to adjust the position
of the unit so that the speaker fits
comfortably in your ear.
To do so, simply slide the unit
forward or back along the frame
temple.
Answering & Ending a Call
To answer an incoming call:
Press the
To end a call:
Press the
To reject a call:
When the phone rings, press and hold the
medium-pitch tone in the ear speaker.
Multifunction Button
Multifunction Button
until you hear the call is answered.
.
Multifunction Button
TM
until you hear a
Turning the Unit On & Off
To turn the Unit On:
Press and hold the
until the Indicator Light flashed three times.
If you are wearing RAZRWIRE, you will hear
an inclining tone through the ear speaker.
Note:
Once you pair RAZRWIRE unit with
your phone (see Pairing RAZRWIRE with your Phone on page 4), it automatically
pairs each time you turn it on.
To turn the Unit Off:
While not participating in an active call, press and hold the
until you hear low and medium pitch tones, then declining tones through the ear
speaker. The Indicator Light flashes twice upon power down.
Note:
When the unit is activated, it is in "standby" mode, ready for use. The
•
internal rechargeable battery offers approximately 100 hours of standby
time.
•
When RAZRWIRE is turned off, it uses no power. However, the internal
rechargeable battery will naturally wear down over time and eventually
requires charging.
Multifunction Button
Multifunction
Indicator
Button
Light
Multifunction Button
Volume
Down
Microphone
Volume
Up
5

Advanced
TM
Making Calls
While wearing the eyewear and unit, make a call by:
1
On your phone, dial the phone number.
2
On your phone, press
Send
.
You will hear the ringing while waiting for the recipient to answer the call.
Voice Dialing
While wearing the eyewear and unit, make a voice-dial call by:
Note:
In order for this feature to work, your phone must have voice dial
capabilities. See your phone’s user’s guide to set up voice dial recorded names in
your phone book. Once voice dial names are set you can perform Voice Dialing
with RAZRWIRE.
1
Press the
2
Then when you hear a second tone, speak the voice dial name clearly.
You will hear a low-pitch tone in the ear speaker when the call is sent.
Redialing the Last Dialed Call
To redial the last dialed call:
Press and hold the
pitched tone in the ear speaker.
Multifunction Button
Multifunction Button
and listen for a tone.
until you hear a low and medium
Adjusting the Volume
To turn the volume up:
Press the
Volume Up
(front) button
repeatedly to increase the volume.
To turn the volume down:
Press the
Volume Down
(back) button
Multifunction
Button
Indicator
Light
Volume
Down
repeatedly to decrease the volume.
Transferring Calls
To transfer a call from the phone to RAZRWIRE:
When the phone rings indicating an incoming call, on the unit, press the
Multifunction Button
.
To transfer a call from RAZRWIRE to the phone:
While on the call, press and hold the
Volume Up
button until you here a
medium-pitch tone in the ear speaker.
Placing a Call on Mute
While on a call, press and hold the
tone in the ear speaker.
Volume Down
button until you hear a high
Toggling Phone Calls
To place a call on hold:
While on a call, press and hold the
medium-pitch tone in the ear speaker.
To release a call on hold:
With an active call on hold, press and hold the
high-pitched tone in the ear speaker.
Volume Up
button until you hear a
Volume Up
button until you hear a
Microphone
Volume
Up
6

Mounting the Unit on the Left Side of your Eyewear
Since the unit is set to be on your right ear in the package, you’ll need to do a few
extra steps to mount it on the frames for your left ear.
Note:
If you have already mounted the unit onto the right arm of your eyewear
frame and want to remove it, see Removing the Unit from your Eyewear on
page 4.
To mount the unit on your left ear:
1
Twist the attachment clamp on the top side of
the unit until it faces the opposite direction.
2
Fold the ear speaker so it is perpendicular to the
unit.
Note:
When folding and rotating the ear speaker,
do not use excessive force, it could damage the
unit.
3
Gently rotate the speaker down and around until it
snaps into place on the other side.
4
Fold open the ear speaker.
5
Open the attachment clamp and hold
RAZRWIRE in your left hand.
6
Hold the left arm of the frames in your
right hand.
7
Drop the left arm of the frames into the
groove of the attachment clamp.
8
Snap the top of the attachment clamp
closed.
7

Indicator Light and Audio Tone States
The following table explains indicator light and audio tone states.
Function Headset Phone Indicator Light Audio Tone
Power On Off Flashes 3 times while powering on. Four tone scale. Starts at a low-pitch and continues
to high-pitch.
Power Off On Flashes 2 times while powering off. Four tone scale. Starts at a high-pitch and continues
to low-pitch.
Pairing On On Solidly lit during pairing process. Flashes 10 times
when pairing is successful.
Receive Call On On - Ring Flashes slowly while on call. Ring Tone for incoming call.
Reject Call On In - Ring None Single medium-pitched tone.
Transfer Call from Phone to
RAZRWIRE
Transfer Call from RAZRWIRE
to Phone
Dial a Number On On - Dial Flashes slowly while on call. None.
Redial a Number On On Flashes slowly while on call. Single medium-pitched tone.
Voice Dial a Number On On - Idle Flashes slowly while on call. Single low-pitched tone.
Place Active Call On Hold
(Toggle Calls)
End a Call On On - In call None Single low-pitched tone.
Release a Call On Hold On On - In call None Single low-pitched tone.
Mute On On - In call None Single high-pitched tone signals Mute active. Single
On - In call On - In call None Single low-pitched tone.
On On - In call None Single medium-pitched tone.
On On -In call Flashes slowly while on call. Single medium-pitched tone.
Single high-pitched tone.
low-pitched tone repeated every 20 seconds.
8

Safety and General Information
IMPORTANT INFORMATION ON SAFE AND EFFICIENT OPERATION. READ THIS
Safety and General Information
INFORMATION BEFORE USING YOUR DEVICE.
Safety Information: Wireless Devices
Electromagnetic Interference
RF Energy Warning
To avoid electromagnetic interference and/or compatibility conflicts, turn off your device in any
facility where posted notices instruct you to do so. Hospitals or health care facilities may be using
equipment that is sensitive to external radio frequency (RF) energy emitted by your device.
Aircraft
While aboard aircraft, turn off your device when instructed to do so. Any use of the device must be
in accordance with applicable regulations per airline crew instructions.
Medical Devices
Hearing Aids:
interference, you may want to consult with your hearing aid manufacturer to discuss alternatives.
Other Medical Devices:
of your device to determine if it is adequately shielded from RF energy. Your physician may be able
to assist you in obtaining this information.
Electronic Systems
Do not expose RAZRWIRE to strong magnetic fields such as those that surround stereo speakers
and TV picture tubes, in your car or home, without first checking with the manufacturer of those
items.
Some devices may interfere with some hearing aids. In the event of such
If you use any other personal medical device, consult the manufacturer
automobile, motorcycle, equipment or any other motorized mode of transportation to reduce the risk
of accident or injury.
Avoid Hearing Damage
Using the headset at high volume may result in permanent hearing loss. If you experience ringing in
your ear, reduce the volume or discontinue using RAZRWIRE. With continued use at high volume,
your ear may become accustomed to the sound level, which may result in permanent damage to
your hearing. Keep RAZRWIRE volume at a safe level.
Eyewear Use
This eyewear is not designed to protect the wearer from all injury in the event of impact with hard
objects or if the lens or lenses are not properly secured in the frame. Oakley does not recommend
the use of tinted lenses for night driving, or direct viewing of the sun or strong artificial light
sources. Sunglasses are not recommended for industrial protection.
Avoid Moisture
Using RAZRWIRE in or near water or other liquids, or in wet locations, may cause electric shock and
serious injury. The transceiver unit is not waterproof, so follow these safeguards:
•
Do not use RAZRWIRE while swimming or bathing.
•
Do not wear RAZRWIRE in the rain.
•
If any food or liquid is spilled on RAZRWIRE or its power adapter, unplug the charging
cable from RAZRWIRE and unplug the power adapter from the electrical outlet before
drying.
Location of Use
RAZRWIRE is NOT to be used in the vicinity of any explosive or hazardous substances, as it may
become volatile and cause serious injury or death.
See "Electromagnetic Interference" above for restrictions on using RAZRWIRE in medical facilities
and aboard aircraft.
Proper Care of your RAZRWIRE
Safety Information: General Use
USE AT YOUR OWN RISK
Avoid Distraction
Using headsets while operating a motor vehicle, motorcycle or bicycle is dangerous, and is illegal in
some states. Check your local laws. Use caution while using your RAZRWIRE when engaging in
ANY activity that requires your full attention. Avoid placing or receiving calls while driving an
Do Not Modify or Dismantle
Do not attempt to open RAZRWIRE. Doing so may expose you to electric shock and serious injury.
There are no user-serviceable parts inside. Any attempt to alter or repair the unit, except by an
Authorized Oakley Service Facility, will void the limited warranty. Users are not permitted to make
changes or modify the device in any way. Changes and modifications not expressly approved by
Oakley could void the user's authority to operate the device. See 47 CFR Sec. 15.21.
9

Battery
Do not attempt to remove the internal rechargeable battery. Disposal of devices that contain
internal rechargeable batteries must be in accordance with local environmental regulations.
Temperature
•
Do not store or use RAZRWIRE in temperatures lower than -20°C / -4°F or higher than
50°C / 122°F.
•
Do not recharge RAZRWIRE in temperatures lower than 0°C / 32°F or higher than 40°C /
104°F.
•
Conditions inside a parked car can exceed this temperature range. Do not store
RAZRWIRE in a parked car.
•
Do not store RAZRWIRE in direct sunlight.
•
Storing RAZRWIRE fully charged in high temperature conditions may permanently reduce
the life of the internal battery.
•
Battery life may temporarily shorten in low-temperature conditions.
Shockwave
Do not expose RAZRWIRE to excessive force or impact. Be careful not to drop RAZRWIRE.
Charger
Do not force the charging cable connector into the unit port. If the connector won't go into the port,
try flipping the connector 180 degrees. Do not attempt to charge RAZRWIRE with any charger other
than the one designed by Oakley specifically to be used with this product.
Cleaning
To clean the lenses, use the Microclear™ bag that is included with RAZRWIRE, or use a soft cotton
cloth. First, gently brush the cloth across all lens surfaces to remove any grit or particles that might
scratch the lens. Next, gently rub the lenses between the folds of the cloth. When necessary, hand
wash and air-dry the Microclear bag.
When cleaning RAZRWIRE, please note the following:
•
The transceiver unit is not waterproof, and moisture may damage the electronic circuitry.
Do not rinse or immerse any part of the unit. Keep the unit dry at all times.
•
Before cleaning, make sure RAZRWIRE is unplugged from the wall charger.
•
Do not clean the lenses with soaps, detergents, ammonia, alkaline cleaners, abrasive
cleaning compounds or solvents. These substances may damage the lens coatings or leak
into the unit and damage the electronic circuitry.
•
Should a lens become scratched, have it replaced immediately to ensure your vision is not
compromised.
Support
If your RAZRWIRE Bluetooth Accessory Module does not function, please make sure that the
battery is charged, you have followed the instructions to pair your Bluetooth phone to the
RAZRWIRE. In addition, go to www.oakley.com/RAZRWIRE for the latest support information. If
RAZRWIRE Bluetooth Accessory Module still does not function, contact Motorola Product Support
at www.hellomoto.com or 1.877.MOTOBLU.
Consumer Warranty
Oakley Eyewear Warranty Policy
You're now wearing the best eye protection on earth.
Only Oakley utilizes pure Plutonite® lens material, a proprietary synthetic that exceeds the optical
requirements of ANSI Z87.1 standards while inherently blocking 100% of all UVA, UVB, UVC and
harmful blue light. Oakley performance eyewear also takes advantage of patented XYZ Optics®, a
breakthrough that maintains precise clarity at all angles of vision and extends the range of optical
correction to the periphery of dual-spherical eyewear lenses and single-lens sports shields.
All Oakley sunglasses satisfy ANSI Z80.3 & EN 1836 standards for optical and mechanical
performance and are in accordance with the EC Directive 89/686/EEC for the I.P.D. of category I
corresponding to the European Community.
Light transmission ranges from 10% to 39% of available light. All transmission profiles are based
on data obtained according to ANSI Z80.3 and EN 1836 test protocols.
10

How to keep the best at their best
All Oakley Lenses:
new eyewear comes with a specially-woven electrostatic Microclear™ bag for cleaning and
storage. Using it will preserve the superior optical quality of Oakley's pure Plutonite lenses. Hand
wash and air-dry the Microclear bag regularly.
Iridium® Lenses:
An array of available tints allows the wearer to balance light transmission in any light condition.
The 12-micron jacket of Iridium must be treated with special care to avoid scratching. Never use
cleaning solutions. Use only mild soap and water, and dry by gently blotting with the Microclear bag
provided.
To help maintain the High Definition Optics® (HDO®) of Oakley lenses, your
Oakley Iridium lens coating is engineered to reduce glare and improve contrast.
Oakley Warranty Policy
All Oakley eyewear is warranted against breakage due to defects in material or workmanship for
one year from the date of purchase (two years in the EEC). This warranty is valid only with proof of
purchase from an Authorized Oakley Dealer. Oakley does not warrant any lens against scratches.
Alteration, misuse or abuse of any Oakley product will void its warranty. Legal rights under
applicable national law governing the sale of consumer goods are not affected by this warranty. (EE
DIRECTIVE 1999/44/EC).
How to make a warranty claim
Within the United States, telephone our Global Headquarters at 1 (800) 403-7449 with your
purchase information. Customers outside the United States should contact their local Authorized
Oakley Dealer or visit our website at http://www.oakley.com for the phone number of the nearest
Oakley Distributor.
Customers outside the United States should contact their local Authorized Oakley Dealer or visit our
website at http://www.oakley.com for the number to your nearest Oakley Distributor.
Lens tint transmission profiles
Light grey 39%
Protection Index: 2
G30 30%
Protection Index: 2
VR28 28%
Protection Index: 2
Slate Iridium 23%
Protection Index: 2
Bronze 22%
Protection Index: 2
Grey 18%
Protection Index: 2
Gold Iridium 12%
Protection Index: 3
Black Iridium 10%
Protection Index: 3
The sunglass lens type is printed on the package. The corresponding protection index can be found
in the Lens Tint Transmission Profiles chart above.
Protection Index (in compliance with the standard EN 1836)
Index 0:
Aesthetic, very low protection
Index 1:
For weak sun luminosity
Index 2:
For average sun luminosity
Index 3:
For strong sun luminosity
Motorola Bluetooth Accessory Module Limited
Warranty
What Does this Warranty Cover?
States and Canada
Subject to the exclusions contained below, Motorola warrants the Bluetooth module accessory
according to the "MOTOROLA LIMITED WARRANTY" and Motorola software contained on
CD-ROMs or other tangible media and sold for use with these Products (“Software”) to be free from
defects in materials and workmanship under normal consumer usage for the period(s) outlined
below. This limited warranty is a consumer's exclusive remedy, and applies as follows to new
Motorola Products, Accessories and Software purchased by consumers in the United States or
Canada, which are accompanied by this written warranty. Oakley warrants the eyewear according
to the Eyewear Warranty Policy.
Products and Accessories
Products Covered Length of Coverage
Products and Accessories
defined above, unless otherwise
provided for below.
Decorative Accessories and Cases.
Decorative covers, bezels,
PhoneWrap™ covers and cases.
Monaural Headsets.
boom headsets that transmit mono
sound through a wired connection.
Consumer and Professional
Two-Way Radio Accessories.
as
Ear buds and
One (1) year
consumer purchaser of the product unless otherwise
provided for below.
Limited lifetime warranty
ownership by the first consumer purchaser of the
product.
Limited lifetime warranty
ownership by the first consumer purchaser of the
product.
Ninety (90) days
first consumer purchaser of the product.
from the date of purchase by the first
for the lifetime of
for the lifetime of
from the date of purchase by the
11

Products Covered Length of Coverage
Products and Accessories that are
Repaired or Replaced.
The balance of the original warranty or for
ninety (90) days
consumer, whichever is longer.
from the date returned to the
Exclusions
Normal Wear and Tear.
wear and tear are excluded from coverage.
Batteries.
Only batteries whose fully charged capacity falls below 80% of their rated capacity and
batteries that leak are covered by this limited warranty.
Abuse & Misuse.
abuse, accident or neglect, such as physical damage (cracks, scratches, etc.) to the surface of the
product resulting from misuse; (b) contact with liquid, water, rain, extreme humidity or heavy
perspiration, sand, dirt or the like, extreme heat, or food; (c) use of the Products or Accessories for
commercial purposes or subjecting the Product or Accessory to abnormal usage or conditions; or
(d) other acts which are not the fault of Motorola, are excluded from coverage.
Use of Non-Motorola Products and Accessories.
of Non-Motorola branded or certified Products, Accessories, Software or other peripheral
equipment are excluded from coverage.
Unauthorized Service or Modification.
adjustment, installation, maintenance, alteration, or modification in any way by someone other than
Motorola, or its authorized service centers, are excluded from coverage.
Altered Products.
removed, altered or obliterated; (b) broken seals or that show evidence of tampering; (c)
mismatched board serial numbers; or (d) nonconforming or non-Motorola housings, or parts, are
excluded from coverage.
Communication Services.
due to any communication service or signal you may subscribe to or use with the Products
Accessories or Software is excluded from coverage.
Periodic maintenance, repair and replacement of parts due to normal
Defects or damage that result from: (a) improper operation, storage, misuse or
Defects or damage that result from the use
Defects or damages resulting from service, testing,
Products or Accessories with (a) serial numbers or date tags that have been
Defects, damages, or the failure of Products, Accessories or Software
Software
Products Covered Length of Coverage
Software.
Applies only to physical defects in the
media that embodies the copy of the software (e.g.
CD-ROM, or floppy disk).
Ninety (90) days
purchase.
from the date of
Exclusions
Software Embodied in Physical Media.
requirements or will work in combination with any hardware or software applications provided by
third parties, that the operation of the software products will be uninterrupted or error free, or that
all defects in the software products will be corrected.
Software NOT Embodied in Physical Media.
(e.g. software that is downloaded from the internet), is provided “as is” and without warranty.
No warranty is made that the software will meet your
Software that is not embodied in physical media
Who Is Covered?
This warranty extends only to the first consumer purchaser, and is not transferable.
What Will Motorola Do?
Motorola, at its option, will at no charge repair, replace or refund the purchase price of any
Products, Accessories or Software that does not conform to this warranty. We may use functionally
equivalent reconditioned/refurbished/pre-owned or new Products, Accessories or parts. No data,
software or applications added to your Product, Accessory or Software, including but not limited to
personal contacts, games and ringer tones, will be reinstalled. To avoid losing such data, software
and applications please create a back up prior to requesting service.
How to Obtain Warranty Service or Other Information
USA Phones:
Canada All Products:
TTY
For
Accessories
product with which they are used.
You will receive instructions on how to ship the Products, Accessories or Software, at your expense,
to a Motorola Authorized Repair Center. To obtain service, you must include: (a) a copy of your
receipt, bill of sale or other comparable proof of purchase; (b) a written description of the problem;
(c) the name of your service provider, if applicable; (d) the name and location of the installation
facility (if applicable) and, most importantly; (e) your address and telephone number.
and
1-800-331-6456
Pagers:
1-800-548-9954
Two-Way Radios and Messaging Devices:
1-800-461-4575
1-888-390-6456
Software
, please call the telephone number designated above for the
1-800-353-2729
12

What Other Limitations Are There?
ANY IMPLIED WARRANTIES, INCLUDING WITHOUT LIMITATION THE IMPLIED WARRANTIES OF
MERCHANTABILITY AND FITNESS FOR A PARTICULAR PURPOSE, SHALL BE LIMITED TO THE
DURATION OF THIS LIMITED WARRANTY, OTHERWISE THE REPAIR, REPLACEMENT, OR REFUND
AS PROVIDED UNDER THIS EXPRESS LIMITED WARRANTY IS THE EXCLUSIVE REMEDY OF THE
CONSUMER, AND IS PROVIDED IN LIEU OF ALL OTHER WARRANTIES, EXPRESS OR IMPLIED. IN
NO EVENT SHALL MOTOROLA BE LIABLE, WHETHER IN CONTRACT OR TORT (INCLUDING
NEGLIGENCE) FOR DAMAGES IN EXCESS OF THE PURCHASE PRICE OF THE PRODUCT, ACCESSORY
OR SOFTWARE, OR FOR ANY INDIRECT, INCIDENTAL, SPECIAL OR CONSEQUENTIAL DAMAGES OF
ANY KIND, OR LOSS OF REVENUE OR PROFITS, LOSS OF BUSINESS, LOSS OF INFORMATION OR
DATA, SOFTWARE OR APPLICATIONS OR OTHER FINANCIAL LOSS ARISING OUT OF OR IN
CONNECTION WITH THE ABILITY OR INABILITY TO USE THE PRODUCTS, ACCESSORIES OR
SOFTWARE TO THE FULL EXTENT THESE DAMAGES MAY BE DISCLAIMED BY LAW.
Some states and jurisdictions do not allow the limitation or exclusion of incidental or
consequential damages, or limitation on the length of an implied warranty, so the above
limitations or exclusions may not apply to you. This warranty gives you specific legal
rights, and you may also have other rights that vary from state to state or from one
jurisdiction to another.
Laws in the United States and other countries preserve for Motorola certain exclusive rights for
copyrighted Motorola software such as the exclusive rights to reproduce and distribute copies of
the Motorola software. Motorola software may only be copied into, used in, and redistributed with,
the Products associated with such Motorola software. No other use, including without limitation
disassembly of such Motorola software or exercise of the exclusive rights reserved for Motorola, is
permitted.
Wireless Phone Safety Tips
Wireless Phone Safety Tips
Check the laws and regulations on the use of wireless phones and their accessories in
the areas where you drive. Always obey them. The use of these devices may be
prohibited or restricted in certain areas. Contact www.motorola.com/callsmart for more
information.
Your wireless phone lets you communicate by voice and data—almost anywhere, anytime,
wherever wireless service is available and safe conditions allow. When driving a car, driving is your
first responsibility. If you choose to use your wireless phone while driving, remember the following
tips:
Drive Safe, Call Smart SM
• Get to know your Motorola wireless phone and its features such as speed dial
and redial.
attention off the road.
• When available, use a handsfree device.
convenience to your wireless phone with one of the many Motorola Original™ handsfree
accessories available today.
• Position your wireless phone within easy reach.
phone without removing your eyes from the road. If you receive an incoming call at an
inconvenient time, if possible, let your voice mail answer it for you.
• Let the person you are speaking with know you are driving; if necessary,
suspend the call in heavy traffic or hazardous weather conditions.
snow, ice, and even heavy traffic can be hazardous.
• Do not take notes or look up phone numbers while driving.
list or going through your address book takes attention away from your primary
responsibility—driving safely.
• Dial sensibly and assess the traffic; if possible, place calls when your car is not
moving or before pulling into traffic.
few numbers, check the road and your mirrors, then continue.
• Do not engage in stressful or emotional conversations that may be distracting.
Make people you are talking with aware you are driving and suspend conversations that
can divert your attention away from the road.
• Use your wireless phone to call for help.
in the case of fire, traffic accident, or medical emergencies.
• Use your wireless phone to help others in emergencies.
accident, crime in progress, or other serious emergency where lives are in danger, call
9-1-1 or other local emergency number, as you would want others to do for you.
• Call roadside assistance or a special non-emergency wireless assistance
number when necessary.
broken traffic signal, a minor traffic accident where no one appears injured, or a vehicle
you know to be stolen, call roadside assistance or other special non-emergency wireless
number.
If available, these features help you to place your call without taking your
If possible, add an additional layer of
Be able to access your wireless
Jotting down a “to do”
If you must make a call while moving, dial only a
Dial 9-1-1 or other local emergency number
If you see a broken-down vehicle posing no serious hazard, a
1
1.Wherever wireless phone service is available.
1
If you see an auto
Rain, sleet,
1
13

Industry Canada Notice to Users
Export Law Assurances
Operation is subject to the following two conditions: (1) This device may not cause interference and
Industry Canada Notice to Users
(2) This device must accept any interference, including interference that may cause undesired
operation of the device Ref IC RSS 210 Sec. 5.11. The term “IC:” before the certification/registration
number only signifies that registration was performed based on a Declaration of Conformity
indicating that Industry Canada technical specifications were met. It does not imply that Industry
Canada approved the equipment. See Ref IC Self-Marking 6(f) and RSP-100 Sec. 4.
FCC Notice to Users
Users are not permitted to make changes or modify the device in any way. Changes or modifications
FCC Notice to Users
not expressly approved by the party responsible for compliance could void the user’s authority to
operate the equipment. See 47 CFR Sec. 15.21.
This device complies with part 15 of the FCC Rules. Operation is subject to the following two
conditions: (1) This device may not cause harmful interference, and (2) this device must accept any
interference received, including interference that may cause undesired operation. See 47 CFR Sec.
15.19(3).
This product is controlled under the export regulations of the United States of America and Canada.
Export Law Assurances
The Governments of the United States of America and Canada may restrict the exportation or
re-exportation of this product to certain destinations. For further information contact the U.S.
Department of Commerce or the Canadian Department of Foreign Affairs and International Trade.
14


©2005 OAKLEY, INC. 6809494A40
 Loading...