


APPLICANT: MOTOROLA, INC. FCC ID: IHDT6EL1
INSTRUCTION MANUAL
A preliminary draft copy of the Users Manual follows:
EXHIBIT 8
Welcome
Welcome to the world of Motorola digital wireless
communications! We are pleased that you have chosen the
Motorola A668 wireless phone.
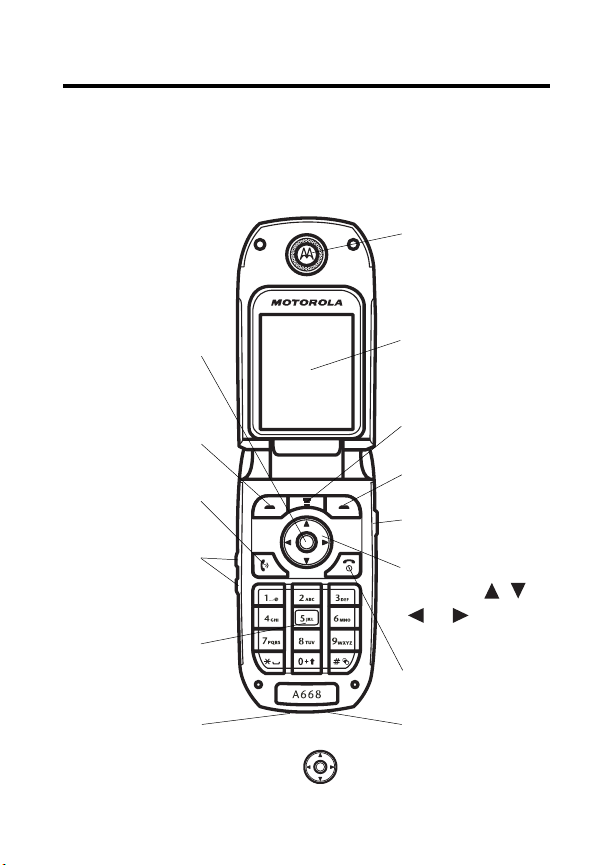
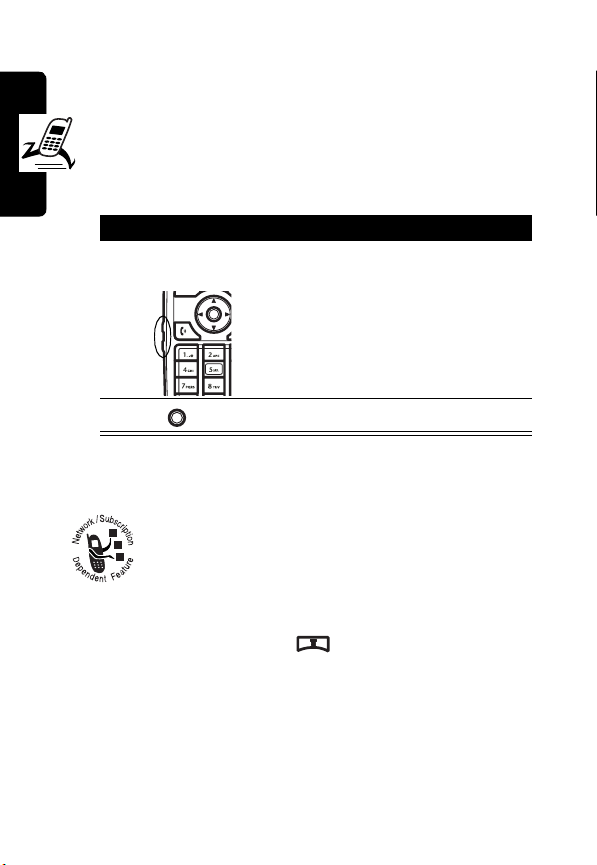
D
Earpiece
R
OK Key: Press to
perform left soft
key function.
Left Soft Key
Send Key
Volume/Voice
Activation/
Camera Key
Keypad
Charger/
Accessory Port
A
F
T
Internal/Main
Display
Menu Key
Right Soft Key
Camera Key
4-Way Navigation
Key: Scroll , ,
, or .
Power/End Key
Microphone
Tip:
The 4-way navigation key also serves as shortcuts
to menu features by setting home keys (see page 107).
1

Personal Communications Sector
600 North U.S. Highway 45
Libertyville, Illinois 60048
1-800-331-6456 (United States)
1-888-390-6456 (TTY/TDD United States)
1-800-461-4575 (Canada)
www.motorola.com
www.motorola.ca
MOTOROLA and the Stylized M Logo are registered in the US Patent &
Trademark Office. Java and all other Java-based marks are trademarks or
registered trademarks of Sun Microsystems, Inc. in the U.S. and other
countries. All other product or service names are the property of their
respective owners.
© Motorola, Inc. 2004.
Software Copyright Notice
The Motorola products described in this manual may include copyrighted
Motorola and third-par ty software stored in semiconductor memories or
other media. Laws in the United States and other countries preserve for
Motorola and third-party software providers certain exclusive rights for
copyrighted software, such as the exclusive rights to distribute or
reproduce the copyrighted software. Accordingly, any copyrighted
software contained in the Motorola products may not be modified,
reverse-engineered, distributed, or reproduced in any manner to the
extent allowed by law. Furthermore, the purchase of the Motorola
products shall not be deemed to grant either directly or by implication,
estoppel, or otherwise, any license under the copyrights, patents, or
patent applications of Motorola or any third-party software provider,
except for the normal, non-exclusive, royalty-free license to use that
arises by operation of law in the sale of a product.
Manual number: ___________
D
(United States)
(Canada)
R
A
F
T
2

Menu Map
You can display your phone’s main menu as icons or as a text
list. Each has its own organization and is different from the
other. By default, your phone displays the main menu as
icons.
To change the menu display mode:
Find the Feature
Note:
organization and feature names may vary on your phone. Not
all features may be available for all users.
Note:
in different regions and nations. Please contact your local
customer service centers, agencies or retailers if you have
any question about the mobile phone functions. Motorola
reserves all rights to revise and change this user's manual
without obligation to notify any person of such revisions or
changes.
D
R
The following is the standard phone menu layout. Menu
>
Settings
>
Menu style
A
The functions available on this mobile phone may vary
F
T
3
Main Menu Display
Msg. center *
• Text messages
• Mult imedi a msgs.
D
• Voice mailbox
• Cell broadcast
• Settings
• Sending history
• Service command
Game s
• Five ball
• Flying
• Popo car
• Sound effect
Alarm cl ock
•On
•Off
Chatroom *
Ouick access
•Browser
• Media center
• Wallpaper selection
• Screen saver
• Add entry to phonebook
•Calculator
• Games
• Meeting mode
• Ringi ng tone
•Edit
Media center
• Photo album
•Picture
• Animation
• Melody
• Voice notes
•Video
•Slide show
• Download media
• View free space
* Optional network, SIM card, or subscription-dependent feature.
# Order of items under this feature is changeable by users.
R
#
A
Tools
• Calendar
•Calculator
•Stopwatch
• Tone editor
• Voice commands
• Video player
• My picture
Java
Settings
• Langua ge
• Backlight
• Adjust contrast
•Clock
• Auto power off
• Display
• External display
•Key lock
• Input mode
• Home keys
• Restore factory settings
•Security
• Call features
•Network
• Serv ice light
• Connection indication
F
• Minute reminder
• Menu style
• Java settings
• Light sensor
Profile
•Normal
• Meeting
• Outdoors
T
•Car
•Customized
•Office
• Handsfree
• Headset
4
Main Menu Display
•Silence
Recent calls
• Missed calls
D
• Received calls
• Dialed calls
•Erase all
• Call time
• Call cost
• GPRS data counter
• GPRS connection time
• In-call count
• Session information
Phonebook
• Search
•Add
•Erase
•Copy
•Option
• Speed dial
• Caller group
• Personal number
• Fixed dial number
•Voice tags
•My Own Card
Ringing style
• Ringi ng volume
• Ringi ng tone
• Incoming call alert
•Vibrating
• Message alert tone
• Key tone vol ume
• Key tone type
• Warning tones
• Startup music
• Flip music
Camera
V. recorder
Browser *
•Home
• Bookmark
•Profiles
R
A
• Appearance settings
• Download settings
• Go to address
• Clear the cache
• Service Inbox
• Certificates
Bookmark *
Voice notes
STK *
Shortcuts
Quickly access menu options:
Press (in idle).
Go to dialed calls list:
Press (in idle).
Use voice
F
commands:
Press and hold
the up or down
voice activation
key (in idle) and
then say a
command into the
T
microphone.
Turn off the ringer:
Press and hold (in idle).
Exit menu system:
Press .
* Optional network, SIM card, or subscription-dependent feature.
5

Contents
Menu Map . . . . . . . . . . . . . . . . . . . . . . . . . . . . . . . . . . . . . . 3
Safety and General Information . . . . . . . . . . . . . . . . . . . 12
Getting Started . . . . . . . . . . . . . . . . . . . . . . . . . . . . . . . . . 19
What’s in the Box? . . . . . . . . . . . . . . . . . . . . . . . . . . . . . 19
About This Guide . . . . . . . . . . . . . . . . . . . . . . . . . . . . . . 19
Installing the SIM Card . . . . . . . . . . . . . . . . . . . . . . . . . . 20
Installing the Battery . . . . . . . . . . . . . . . . . . . . . . . . . . . . 21
Charging the Battery . . . . . . . . . . . . . . . . . . . . . . . . . . . . 23
Battery Use . . . . . . . . . . . . . . . . . . . . . . . . . . . . . . . . . . . 24
Turning On Your Phone. . . . . . . . . . . . . . . . . . . . . . . . . . 25
Adjusting Volume . . . . . . . . . . . . . . . . . . . . . . . . . . . . . . 26
Displaying Your Phone Number . . . . . . . . . . . . . . . . . . . 26
Making a Call . . . . . . . . . . . . . . . . . . . . . . . . . . . . . . . . . 27
Answering a Call . . . . . . . . . . . . . . . . . . . . . . . . . . . . . . . 27
Muting a Call . . . . . . . . . . . . . . . . . . . . . . . . . . . . . . . . . . 28
Learning to Use Your Phone . . . . . . . . . . . . . . . . . . . . . . 29
Using the Internal Display . . . . . . . . . . . . . . . . . . . . . . . . 29
Using Menus . . . . . . . . . . . . . . . . . . . . . . . . . . . . . . . . . . 33
Entering Text . . . . . . . . . . . . . . . . . . . . . . . . . . . . . . . . . . 34
Using the External Display . . . . . . . . . . . . . . . . . . . . . . . 44
Locking and Unlocking Your Phone . . . . . . . . . . . . . . . . 45
Setting and Changing Codes . . . . . . . . . . . . . . . . . . . . . 46
If You Forget Codes . . . . . . . . . . . . . . . . . . . . . . . . . . . . 47
If You Enter the Wrong PIN or PIN2 Code 3 Times
in a Row . . . . . . . . . . . . . . . . . . . . . . . . . . . . . . . . . . . . . 47
Setting Up Your Phone. . . . . . . . . . . . . . . . . . . . . . . . . . . 48
Adjusting the Backlight . . . . . . . . . . . . . . . . . . . . . . . . . . 48
Adjusting Display Contrast . . . . . . . . . . . . . . . . . . . . . . . 48
D
R
A
F
T
6

Adjusting Display Color . . . . . . . . . . . . . . . . . . . . . . . . . 48
Setting Time and Date. . . . . . . . . . . . . . . . . . . . . . . . . . 49
Setting Power-Off Time . . . . . . . . . . . . . . . . . . . . . . . . . 49
Setting a Wallpaper Image . . . . . . . . . . . . . . . . . . . . . . 49
Setting a Screen Saver Image . . . . . . . . . . . . . . . . . . . 50
Customizing Service Light. . . . . . . . . . . . . . . . . . . . . . . 50
Using Anykey Answer . . . . . . . . . . . . . . . . . . . . . . . . . . 51
Using Flip Answer . . . . . . . . . . . . . . . . . . . . . . . . . . . . . 51
Using Ambient Light Sensor . . . . . . . . . . . . . . . . . . . . . 51
Calling Features . . . . . . . . . . . . . . . . . . . . . . . . . . . . . . . 52
Putting a Call on Hold . . . . . . . . . . . . . . . . . . . . . . . . . . 52
Answering a New Call . . . . . . . . . . . . . . . . . . . . . . . . . . 52
Making a New Call . . . . . . . . . . . . . . . . . . . . . . . . . . . . 53
Making an Emergency Call . . . . . . . . . . . . . . . . . . . . . . 54
Selecting a Phone Number to Use . . . . . . . . . . . . . . . . 54
Redialing Automatically . . . . . . . . . . . . . . . . . . . . . . . . . 54
Checking Recent Calls . . . . . . . . . . . . . . . . . . . . . . . . . 55
Erasing Recent Calls. . . . . . . . . . . . . . . . . . . . . . . . . . . 55
Redialing Recent Calls . . . . . . . . . . . . . . . . . . . . . . . . . 56
Saving Recent Calls in Your Phonebook. . . . . . . . . . . . 57
Messages and Chat . . . . . . . . . . . . . . . . . . . . . . . . . . . . 58
Writing an SMS Message . . . . . . . . . . . . . . . . . . . . . . . 58
Sending an SMS Message . . . . . . . . . . . . . . . . . . . . . . 59
Saving an SMS Message as a Draft . . . . . . . . . . . . . . . 60
Activating Your Service Provider to Use MMS . . . . . . . 61
Writing an MMS Message . . . . . . . . . . . . . . . . . . . . . . . 62
Sending an MMS Message . . . . . . . . . . . . . . . . . . . . . . 66
Saving an MMS Message as a Draft . . . . . . . . . . . . . . . 68
Checking a Received SMS/MMS Message. . . . . . . . . . 69
Checking a Sent or Unsent SMS/MMS Message . . . . . 69
Checking a Draft SMS/MMS Message . . . . . . . . . . . . . 70
Managing an SMS/MMS Message . . . . . . . . . . . . . . . . 71
D
R
A
F
T
7

Editing an MMS Template . . . . . . . . . . . . . . . . . . . . . . . . 72
Setting a Voicemail Service Number. . . . . . . . . . . . . . . . 73
Editing a Topic Message . . . . . . . . . . . . . . . . . . . . . . . . . 73
Clearing Sending History . . . . . . . . . . . . . . . . . . . . . . . . 74
Editing a Service Command . . . . . . . . . . . . . . . . . . . . . . 74
Having an Online Chat . . . . . . . . . . . . . . . . . . . . . . . . . . 75
Configuring SMS Settings . . . . . . . . . . . . . . . . . . . . . . . . 78
Configuring MMS Settings . . . . . . . . . . . . . . . . . . . . . . . 78
Selecting Memory for Saving SMS Messages . . . . . . . . 78
Checking SIM Card or Phone Memory for Saving SMS
Messages . . . . . . . . . . . . . . . . . . . . . . . . . . . . . . . . . . . . 79
Checking Phone Memory for Saving MMS Messages . . 79
Setting Up Your Phonebook . . . . . . . . . . . . . . . . . . . . . . 80
Selecting Memory for Saving Your Phonebook. . . . . . . . 80
Checking SIM Card or Phone Memory for Saving Your
Phone Numbers and Notes. . . . . . . . . . . . . . . . . . . . . . . 80
Creating a Phonebook Entry. . . . . . . . . . . . . . . . . . . . . . 81
Using Phonebook Entry Options. . . . . . . . . . . . . . . . . . . 81
Creating a Photo Caller ID . . . . . . . . . . . . . . . . . . . . . . . 84
Sorting Phonebook Entries. . . . . . . . . . . . . . . . . . . . . . . 85
Looking Up Your Phonebook to Make a Call. . . . . . . . . . 85
Using 1-Touch Dials . . . . . . . . . . . . . . . . . . . . . . . . . . . . 86
Renaming a Caller Group . . . . . . . . . . . . . . . . . . . . . . . . 88
Customizing a Caller Group Ring Tone. . . . . . . . . . . . . . 89
Creating a Photo Caller ID for a Caller Group . . . . . . . . 90
Creating Your Personal Phonebook Entries . . . . . . . . . . 92
Using Fixed Dials . . . . . . . . . . . . . . . . . . . . . . . . . . . . . . 94
Using Voice Dials . . . . . . . . . . . . . . . . . . . . . . . . . . . . . . 98
Sending a Phonebook Entry as a Business Card. . . . . 100
Sending an SMS Message from Your Phonebook . . . . 103
Creating Your Personal Profile . . . . . . . . . . . . . . . . . . . 104
D
R
A
F
T
8

Personalizing Your Phone . . . . . . . . . . . . . . . . . . . . . . 106
Selecting a Language . . . . . . . . . . . . . . . . . . . . . . . . . 106
Replacing the Service Provider Name . . . . . . . . . . . . 106
Using Home Keys . . . . . . . . . . . . . . . . . . . . . . . . . . . . 107
Restoring Factory Settings . . . . . . . . . . . . . . . . . . . . . 107
Using Quick Access Shortcuts . . . . . . . . . . . . . . . . . . 107
Using Phone Profiles. . . . . . . . . . . . . . . . . . . . . . . . . . 108
Muting Your Phone . . . . . . . . . . . . . . . . . . . . . . . . . . . 111
Getting More Out of Your Phone . . . . . . . . . . . . . . . . . 112
Sending DTMF Tones . . . . . . . . . . . . . . . . . . . . . . . . . 112
Making a Conference Call . . . . . . . . . . . . . . . . . . . . . . 112
Diverting Calls . . . . . . . . . . . . . . . . . . . . . . . . . . . . . . . 114
Blocking Calls . . . . . . . . . . . . . . . . . . . . . . . . . . . . . . . 114
Using Fax and Data Calls . . . . . . . . . . . . . . . . . . . . . . 114
Connecting to a Service Network Manually or
Automatically . . . . . . . . . . . . . . . . . . . . . . . . . . . . . . . . 115
Using a Voice Call Connection Reminder . . . . . . . . . . 115
Using a Voice Call Timer Reminder . . . . . . . . . . . . . . 115
Checking Your Voice Call Timer . . . . . . . . . . . . . . . . . 116
Checking Your Voice Call Cost Counter . . . . . . . . . . . 116
Displaying the Voice Call Timer and Cost Counter
during a Call . . . . . . . . . . . . . . . . . . . . . . . . . . . . . . . . 117
Displaying the Voice Call Timer and Cost Counter
after a Call . . . . . . . . . . . . . . . . . . . . . . . . . . . . . . . . . . 118
Using STK Services . . . . . . . . . . . . . . . . . . . . . . . . . . 118
Personal Organizer Features . . . . . . . . . . . . . . . . . . . . 119
Using the Alarm Clock. . . . . . . . . . . . . . . . . . . . . . . . . 119
Creating a Calendar . . . . . . . . . . . . . . . . . . . . . . . . . . 120
Sending an SMS Message from Calendar . . . . . . . . . 124
Making a Call from Calendar. . . . . . . . . . . . . . . . . . . . 125
Creating an Account Book. . . . . . . . . . . . . . . . . . . . . . 125
Using the Calculator . . . . . . . . . . . . . . . . . . . . . . . . . . 127
D
R
A
F
T
9

Using the Stopwatch . . . . . . . . . . . . . . . . . . . . . . . . . . . 129
Using Voice Launchers . . . . . . . . . . . . . . . . . . . . . . . . . 131
Displaying World Time . . . . . . . . . . . . . . . . . . . . . . . . . 133
Using the Voice Recorder . . . . . . . . . . . . . . . . . . . . . . . 134
Sending a Voice Note . . . . . . . . . . . . . . . . . . . . . . . . . . 137
Checking a Voice Note . . . . . . . . . . . . . . . . . . . . . . . . . 139
Sorting Voice Notes . . . . . . . . . . . . . . . . . . . . . . . . . . . 140
Security . . . . . . . . . . . . . . . . . . . . . . . . . . . . . . . . . . . . . . 141
Locking and Unlocking the Keypad . . . . . . . . . . . . . . . . 141
Using a Closed User Group . . . . . . . . . . . . . . . . . . . . . 142
News and Entertainment . . . . . . . . . . . . . . . . . . . . . . . . 143
Playing a Game . . . . . . . . . . . . . . . . . . . . . . . . . . . . . . 143
Managing a Photo Album . . . . . . . . . . . . . . . . . . . . . . . 143
Drawing a Picture . . . . . . . . . . . . . . . . . . . . . . . . . . . . . 143
Cropping Photos, Pictures, or Animations . . . . . . . . . . 150
Composing a Melody . . . . . . . . . . . . . . . . . . . . . . . . . . 151
Viewing a Multimedia Object. . . . . . . . . . . . . . . . . . . . . 156
Sending a Multimedia Object . . . . . . . . . . . . . . . . . . . . 157
Renaming a Multimedia Object. . . . . . . . . . . . . . . . . . . 159
Moving a Photo/Picture to Another Photo Album . . . . . 160
Playing a Java Game . . . . . . . . . . . . . . . . . . . . . . . . . . 161
Using the Camera . . . . . . . . . . . . . . . . . . . . . . . . . . . . . 161
Customizing the Camera . . . . . . . . . . . . . . . . . . . . . . . 168
Using the Video Recorder . . . . . . . . . . . . . . . . . . . . . . . 176
Managing a Network Profile . . . . . . . . . . . . . . . . . . . . . 183
Connecting to the Internet . . . . . . . . . . . . . . . . . . . . . . 183
Managing a Bookmark . . . . . . . . . . . . . . . . . . . . . . . . . 185
Downloading Multimedia Objects . . . . . . . . . . . . . . . . . 186
Customizing How Web Pages Are Displayed . . . . . . . . 186
Allowing or Rejecting Cookies . . . . . . . . . . . . . . . . . . . 186
Clearing Cache Memory . . . . . . . . . . . . . . . . . . . . . . . . 187
D
R
A
F
T
10

Reading Your Service Provider or Network
Administrator’s Messages . . . . . . . . . . . . . . . . . . . . . . 187
Reading Certificates . . . . . . . . . . . . . . . . . . . . . . . . . . 187
Troubleshooting . . . . . . . . . . . . . . . . . . . . . . . . . . . . . . 188
Specific Absorption Rate Data . . . . . . . . . . . . . . . . . . 194
Index. . . . . . . . . . . . . . . . . . . . . . . . . . . . . . . . . . . . . . . . 196
D
R
A
F
T
11

Safety and General Information
IMPORTANT INFORMATION ON SAFE AND EFFICIENT OPERATION.
READ THIS INFORMATION BEFORE USING YOUR PHONE.
The information provided in this document supersedes the general safety
information in user guides published prior to December 1, 2002.
Exposure To Radio Frequency (RF) Energy
Your phone contains a transmitter and a receiver. When it is ON, it
receives and transmits RF energy. When you communicate with your
phone, the system handling your call controls the power level at which
your phone transmits.
Your Motorola phone is designed to comply with local regulatory
requirements in your country concerning exposure of human beings to RF
energy.
Operational Precautions
To assure optimal phone performance and make sure human exposure to
RF energy is within the guidelines set forth in the relevant standards,
always adhere to the following procedures.
Internal Antenna Care
Use only the supplied or Motorola-approved replacement antenna.
Unauthorized antennas, modifications, or attachments could damage the
phone.
Do NOT block the internal antenna (which is built-in at the top end of your
phone) when the phone is IN USE. Blocking the internal antenna affects
call quality and may cause the phone to operate at a higher power level
than needed. In addition, use of unauthorized antennas may result in noncompliance with the local regulatory requirements in your country.
D
R
A
F
T
12

Phone Operation
When placing or receiving a phone call, hold your phone as you would a
wireline telephone.
Body-Worn Operation
To maintain compliance with RF energy exposure guidelines, if you wear a
phone on your body when transmitting, always place the phone in a
Motorola-supplied or approved clip, holder, holster, case, or body harness
for this phone, if available. Use of accessories not approved by Motorola
may exceed RF energy exposure guidelines. If you do not use one of the
body-worn accessories approved or supplied by Motorola, and are not
using the phone held in the normal use position, ensure the phone and its
antenna are at least 1 inch (2.5 centimeters) from your body when
transmitting.
Data Operation
When using any data feature of the phone, with or without an accessory
cable, position the phone and its antenna at least 1 inch (2.5 centimeters)
from your body.
Approved Accessories
Use of accessories not approved by Motorola, including but not limited to
batteries and antenna, may cause your phone to exceed RF energy
exposure guidelines. For a list of approved Motorola accessories, visit our
website at
RF Energy Interference/Compatibility
Note:
interference from external sources if inadequately shielded, designed, or
otherwise configured for RF energy compatibility. In some circumstances
your phone may cause interference.
Facilities
Turn off your phone in any facility where posted notices instruct you to do
so. These facilities may include hospitals or health care facilities that may
be using equipment that is sensitive to external RF energy.
D
R
A
F
www.Motorola.com
Nearly every electronic device is susceptible to RF energy
.
T
13

Aircraft
When instructed to do so, turn off your phone when on board an aircraft.
Any use of a phone must be in accordance with applicable regulations per
airline crew instructions.
Medical Devices
Pacemakers
Pacemaker manufacturers recommend that a minimum separation of
6 inches (15 centimeters) be maintained between a handheld wireless
phone and a pacemaker.
Persons with pacemakers should:
•
ALWAYS keep the phone more than 6 inches (15 centimeters) from
your pacemaker when the phone is turned ON.
•
NOT carry the phone in the breast pocket.
•
Use the ear opposite the pacemaker to minimize the potential for
interference.
•
Turn OFF the phone immediately if you have any reason to suspect
that interference is taking place.
Hearing Aids
Some digital wireless phones may interfere with some hearing aids. In the
event of such interference, you may want to consult your hearing aid
manufacturer to discuss alternatives.
Other Medical Devices
If you use any other personal medical device, consult the manufacturer of
your device to determine if it is adequately shielded from RF energy. Your
physician may be able to assist you in obtaining this information.
D
R
A
F
T
Use While Driving
Check the laws and regulations on the use of phones in the area where
you drive. Always obey them.
When using your phone while driving, please:
14

•
Give full attention to driving and to the road.
•
Use hands-free operation, if available.
•
Pull off the road and park before making or answering a call if driving
conditions so require.
Responsible driving best practices may be found at the Motorola website:
www.Motorola.com/callsmart
Operational Warnings
D
.
For Vehicles With an Air Bag
Do not place a phone in the area over an air bag or in the air bag
deployment area. Air bags inflate with great force. If a phone is placed in
the air bag deployment area and the air bag inflates, the phone may be
propelled with great force and cause serious injury to occupants of the
vehicle.
Potentially Explosive Atmospheres
Turn off your phone prior to entering any area with a potentially explosive
atmosphere, unless it is a phone type especially qualified for use in such
areas and certified as “Intrinsically Safe.” Do not remove, install, or charge
batteries in such areas. Sparks in a potentially explosive atmosphere can
cause an explosion or fire resulting in bodily injury or even death.
Note:
The areas with potentially explosive atmospheres referred to above
include fueling areas such as below decks on boats, fuel or chemical
transfer or storage facilities, areas where the air contains chemicals or
particles, such as grain, dust, or metal powders. Areas with potentially
explosive atmospheres are often but not always posted.
Blasting Caps and Areas
To avoid possible interference with blasting operations, turn OFF your
phone when you are near electrical blasting caps, in a blasting area, or in
areas posted “Turn off electronic devices.” Obey all signs and instructions.
R
A
F
T
15
Batteries
Batteries can cause property damage and/or bodily injur y such as burns if
a conductive material such as jewelry, keys, or beaded chains touch
exposed terminals. The conductive material may complete an electrical
circuit (short circuit) and become quite hot. Exercise care in handling any
charged batter y, particularly when placing it inside a pocket, purse, or
other container with metal objects.
and chargers.
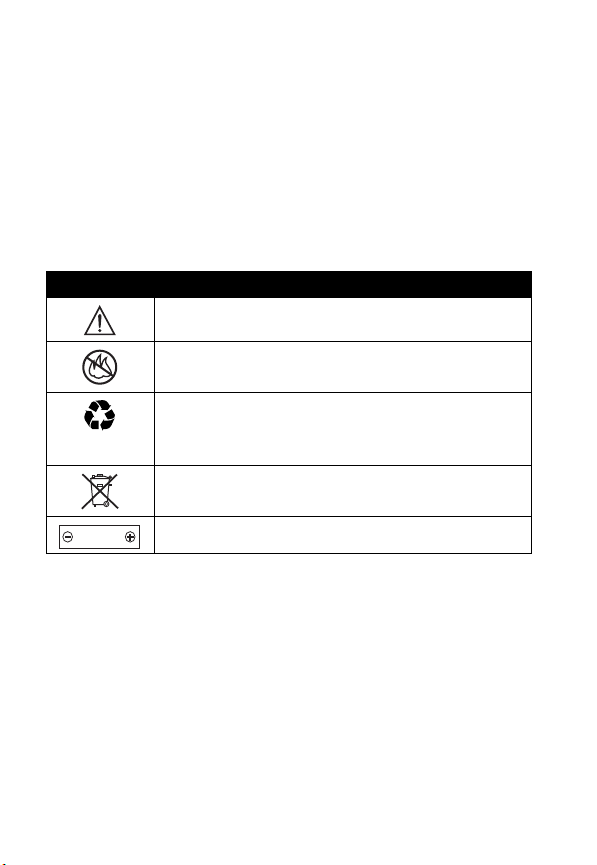
Your battery or phone may contain symbols, defined as follows:
Symbol Definition
LiIon BATT
Seizures/Blackouts
Some people may be susceptible to epileptic seizures or blackouts when
exposed to blinking lights, such as when watching television or playing
video games. These seizures or blackouts may occur even if a person
never had a previous seizure or blackout.
If you have experienced seizures or blackouts, or if you have a family
history of such occurrences, please consult with your doctor before
playing video games on your phone or enabling a blinking-lights feature
on your phone. (The blinking-light feature is not available on all products.)
D
Use only Motorola original batteries
R
Important safety information will follow.
Your battery or phone should not be disposed of in a
fire.
Your battery or phone may require recycling in
accordance with local laws. Contact your local
regulatory authorities for more information.
Your battery or phone should not be thrown in the
trash.
Your phone contains an internal lithium ion battery.
A
F
T
16

Parents should monitor their children's use of video game or other
features that incorporate blinking lights on the phones. All persons should
discontinue use and consult a doctor if any of the following symptoms
occur: convulsion, eye or muscle twitching, loss of awareness, involuntary
movements, or disorientation.
To limit the likelihood of such symptoms, please take the following safety
precautions:
•
•
•
•
Repetitive Motion Injuries
When you play games on your phone, you may experience occasional
discomfort in your hands, arms, shoulders, neck, or other parts of your
body. Follow these instructions to avoid problems such as tendonitis,
carpal tunnel syndrome, or other musculoskeletal disorders:
•
•
•
D
Do not play or use a blinking-lights feature if you are tired or need
sleep.
Take a minimum of a 15-minute break hourly.
Play in a room in which all lights are on.
Play at the farthest distance possible from the screen.
R
A
Take a minimum 15-minute break every hour of game playing.
If your hands, wrists, or arms become tired or sore while playing,
stop and rest for several hours before playing again.
If you continue to have sore hands, wrists, or arms during or after
play, stop playing and see a doctor.
F
T
17
European Union Directives Conformance Statement
Hereby, Motorola declares that this product is in compliance
with
•
The essential requirements and other relevant provisions of
D
Directive 1999/5/EC
•
All other relevant EU Directives
IMEI: 350034/40/394721/9
R
0168
Type: MC2 -41H14
The above gives an example of a typical Product Approval Number.
You can view your product's Declaration of Conformity (DoC) to Directive
1999/5/EC (the R&TTE Directive) at www.motorola.com/rtte - to find your
DoC, enter the product Approval Number from your product's label in the
"Search" bar on the Web site.
A
Product
Approval
Number
F
T
18

Getting Started
What’s in the Box?
Your digital wireless phone comes with a battery and
USB charger. You can purchase other accessories to
customize your phone for maximum performance and
portability.
To purchase Motorola Original™ accessories, contact the
Motorola Customer Call Center at 1-800-331-6456 in the
United States or 1-800-461-4575 in Canada.
About This Guide
Optional Features
provider for more information.
Optional Accessories
D
R
A
This label identifies an optional network, SIM
card, or subscription-dependent feature that
may not be offered by all service providers in all
geographical areas. Contact your service
F
T
This label identifies a feature that requires an
optional Motorola Original™ accessory.
Getting Started
19
Installing the SIM Card
Your Subscriber Identity Module (SIM) card contains
your phone number, service details, and phonebook/
message information.
D
Caution:
exposing your SIM card to static electricity, water, or dirt.
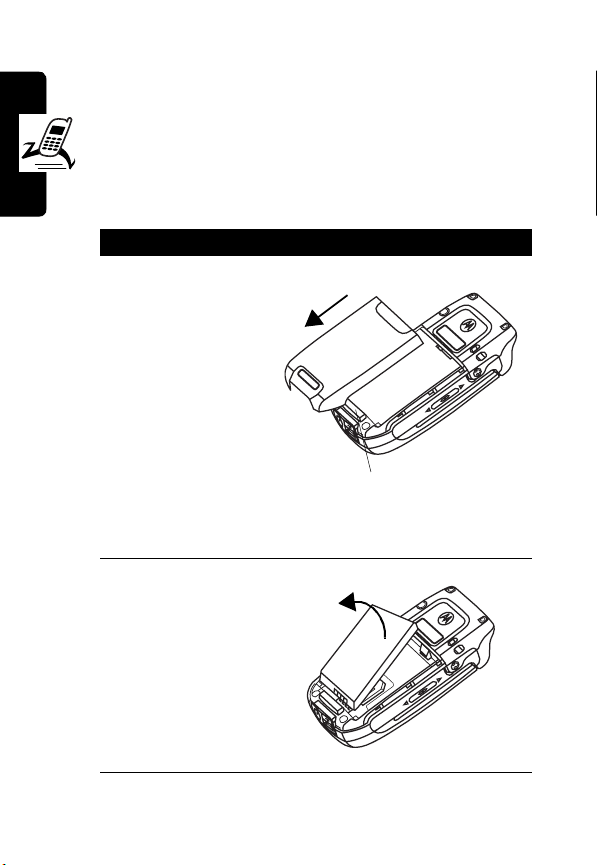
Getting Started
Do not bend or scratch your SIM card. Avoid
Action
1
If the phone’s
R
battery door is
already in place,
press the latch to
remove the
battery door from
your phone.
Note:
your phone every
time when you
remove/insert the
SIM card.
2
Lift the battery up
from the top end
and remove it
from the phone.
A
Tur n o f f
Latch
F
T
20
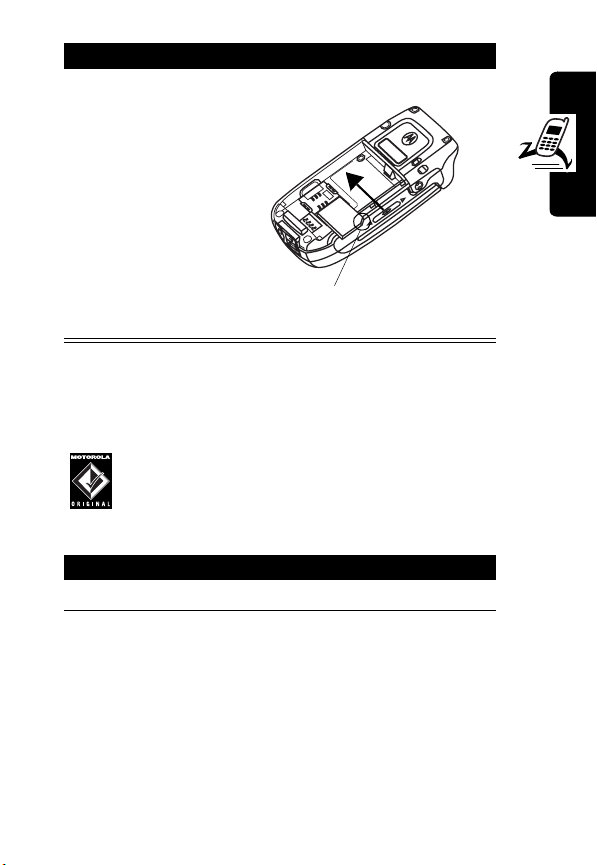
Action
3
Fit the SIM card
into the slot, with
the metal
D
contacts facing
down and the
beveled corner
pointed at the
notch of the slot
(as shown).
Getting Started
R
Beveled corner
Installing the Battery
You must install and charge the battery to use your phone.
Your phone is designed to use only Motorola
Original™ batteries and accessories. We
recommend that you store batteries in their
protective cases when not in use.
Action
1
Remove the battery from the plastic case.
A
F
T
21
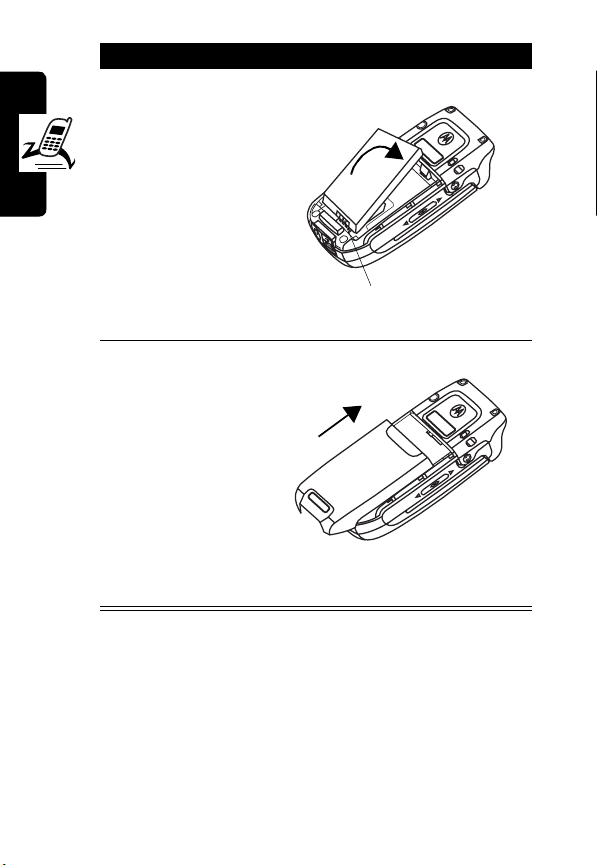
Action
2
Insert the battery
with the metal
contacts on the
D
bottom end in
alignment with
the ones on the
phone. Push the
top end of the
R
battery into the
phone so that it
clicks into place.
3
Getting Started
Place the battery
door back on the
phone, aligning
the tabs on the
battery door with
the groove on the
phone. Slide the
battery door in
the direction
shown until it
locks into place.
A
Metal contacts
F
T
22
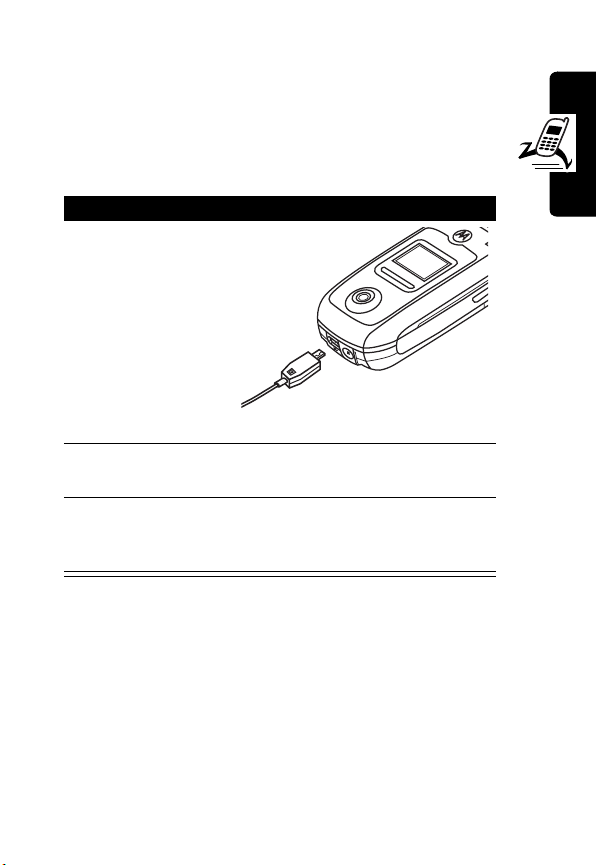
Charging the Battery
New batteries are partially charged. Before using your
phone, charge the battery as described below. Some
batteries perform best after several full charge/
discharge cycles.
D
Action
1
With the phone
facing up, plug in
the USB charger.
Note:
connector is
keyed and can
only be inserted
1 way.
2
Plug the other end into the USB port on your
personal computer.
3
When done charging, unplug the USB charger
from the USB port and then disconnect the USB
charger from your phone.
When you charge the battery, the battery power level
indicator in the external and internal displays shows how
much of the charging process is complete. At least 1
segment of the battery power level indicator must be
visible to ensure full phone functionality while charging.
When battery power is low, your phone will play the
warning tones to warn you (see page 110). Charge the
battery immediately.
R
The charger
A
F
T
Getting Started
23

If battery power runs out, your phone turns off.
Battery Use
To maximize your battery’s performance:
D
•
Always use Motorola Original™ batteries and
battery chargers. The phone warranty does not cover
damage caused from using non-Motorola batteries
and/or battery chargers.
•
Charging begins when the battery power level
indicator appears in both displays. Batteries stored for
a long time may require 10-20 minutes to charge
Getting Started
before the display is turned on.
•
Battery life would be shorter than normal if users play
games or use phones in low signal strength areas.
•
Maintain the battery at or near room temperature
when charging.
•
Do not expose batteries to temperatures below -10°C
(14°F) or above 45°C (113°F). Always take your
phone with you when you leave your vehicle.
•
When you do not intend to use a battery for a while,
store it uncharged in a cool, dark, dry place, such as a
refrigerator.
•
Over time, batteries gradually wear down and require
longer charging times. This is normal. If you charge
your battery regularly and notice a decrease in talk
time or an increase in charging time, then it is
probably time to buy a new battery.
R
A
F
T
24
The rechargeable batteries that power this phone
must be disposed of properly and may need to
be recycled. Contact your local recycling
center for proper disposal methods. Never dispose of
batteries in a fire because they may explode. Refer to
your battery’s label for battery type.
D
Turning On Your Phone
Action
1
Open your phone’s flip.
2
Press and hold to turn on the phone.
3
If necessary, enter your SIM card PIN code and
press
Caution:
times in a row, your phone disables the SIM card
and displays
4
If necessary, enter your 4-digit unlock code and
press
5
Enter the current time according to the 24-hour
format (for example, enter 15:00 instead of 3:00
pm) and press
6
Enter the current date (for example, enter
06/20
Tip:
To reset date and time, press >
>
Set date/time
format, press >
R
OK
( ) to unlock the SIM card.
If you enter an incorrect PIN code 3
OK
( ) to unlock the SIM card.
A
SIM Blocked
.
F
OK
() to confirm.
T
) and press
>
OK
( ) to confirm.
Set the date
and
Set the time
Settings >Clock >Date format
Settings >Clock
. To select a date
Getting Started
2004/
.
25
Your phone starts to connect to your service provider and
then enters the idle display if connection is successfully
established.
D
Adjusting Volume
On the idle display:
Press To
1
up/down volume
R
key
Getting Started
2
OK
()
Displaying Your Phone Number
increase/decrease earpiece
volume during a call
A
save the setting
26
You can display your phone number to people
you call.
Tip:
Scroll to
by your service provider.
Find the Feat ure
F
Preset
to use the settings configured
T
>
Settings
>
Call features
>
Show number>On
Making a Call
On the idle display:
Press To
1
2
3
D
keypad keys enter a phone number
Tip:
If you make a mistake,
press
CLEAR
( ) to clear the
last digit, or press and hold
CLEAR
R
( ) to clear all digits.
make the call
end the call
Getting Started
Tip:
To enter an extension, press and hold to insert a
“P” (pause character) and then enter an extension.
Tip:
To make an international call from the idle display,
press and hold to insert a “+” and then enter the
country code, area code (omitting the starting 0), and
phone number.
Answering a Call
When you receive a call, your phone rings and/or vibrates
and displays an incoming call message.
Press To
1
2
A
F
T
answer the call
end the call
27
Tip:
When
Flip answer
call. (To activate, press >
>
Flip answer > ON
Tip:
When
D
except to answer the call. (To activate,
press >
Note:
If the phone is locked, you must unlock it to answer
calls.
is active, open the phone to answer the
Settings >Call features
.)
Anykey answer
Settings >Call features >Anykey answer > ON
is active, press any of the keys
R
Muting a Call
You can make the 3rd party not hear your voice when a
call is in progress.
Getting Started
.)
28
Press To
1
OPTIONS
2
3
OK
()
A
()
open the options menu
scroll to
mute the call
F
Mute
T
Learning to Use Your
Phone
D
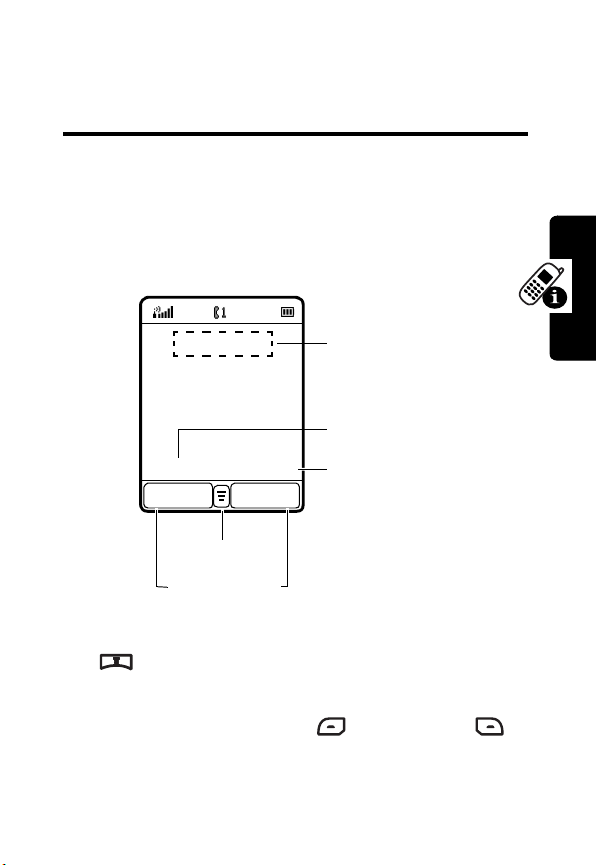
Using the Internal Display
The
idle display
on a call or using the menu.
is the standard display when you are
R
Service Provider Name
not
A
Date
Learning to Use Your Phone
2004/09/10 21:52
CAMERA
MEDIA
Time
F
Menu Indicator
Soft Key Labels
The Menu indicator indicates that you can press the menu
key to display the main menu or options menu.
Labels at the bottom corners show the current soft key
functions. Press the left soft key or right soft key to
perform the function indicated by the left or right soft key
label.
T
29

Press from the idle display to quickly access 4 menu
features. You can also decide which 4 menu features you
would like to quickly access by setting home keys (see
page 107).
At the top of the display are the following status indicators:
D
Icon Name Description
Signal Strength
R
Indicates strength of
signal being received.
The more vertical bars,
the better the reception
(5 bars maximum).
Learning to Use Your Phone
30
A
Battery Power
Level
Roaming
Bars differ in color by
signal strength:
orange > red
Indicates remaining
battery power. The
more bars, the more
F
battery power available
(3 bars maximum). The
icon flashes when
battery power is near
empty.
T
Bars differ in color by
power level:
green > orange > red
Indicates you are on
another network.
green >
.
.

Icon Name Description
Call Connected
New SMS Message
D
R
New Voicemail
Message
New SMS/Voicemail
Message
New SMS and MMS
Message
New MMS Message
MMS Memory Full
MMS Message
Processing
Ringer On
Indicates you are on a
call.
Indicates new unread
SMS message(s). The
icon flashes when the
SMS memory is full.
You must read new
SMS messages to
receive more SMS
messages.
Indicates new unheard
voicemail message(s).
Indicates new unread/
A
unheard message(s).
Indicates new unread
SMS and MMS
message(s).
Indicates new unread
F
MMS message(s).
Indicates the MMS
memory is full. You
must read new MMS
T
messages to receive
more MMS messages.
Indicates you are
receiving/sending MMS
message(s).
Indicates ringer is
turned on.
Learning to Use Your Phone
31

Learning to Use Your Phone
Icon Name Description
Vibrator On
Ringer/Vibrator On
D
Silent
GPRS Mode
R
GPRS Call Connected
Chatroom Mode
A
Line 1/Line 2
Call Waiting
Call Muted
Indicates vibrator is
turned on.
Indicates ringer and
vibrator are turned on.
Indicates ringer is
turned off.
Indicates your service
provider supports
GPRS.
Indicates you are
surfing over the GPRS
network.
Indicates you open
Chatroom
to have an
online chat.
Indicates telephone line
you are using.
F
Indicates a call is
waiting to answer.
Indicates a call is
muted.
T
32

Using Menus
From the idle display, press to display the main
menu.
D
Selecting a Menu Feature
To select a menu feature, starting from the idle display:
Find the Feature
R
Use to scroll, and to select the soft key
functions listed in the bottom left and right corners of the
OK
display.
select
Note:
indicates the feature's position in the main menu.
Entering Feature Information
Some features require you to enter information:
•
•
•
( ) functions the same as the left soft key. To
Add
in a list, you may press .
In this user’s guide, “Find the Feature” always
Enter numbers or text with keypad keys. A flashing
cursor shows where text is entered.
Press left/right to select an option.
If you enter or edit information and do not want to save
changes, press to exit without saving.
>
Phonebook
>
Add
A
F
T
Learning to Use Your Phone
33

Entering Text
Multiple text entry modes make it easy for you to enter
names, numbers, and messages on your phone.
D
Setting Ready-to-Use Text Entry Modes
You can select your custom input modes.
Find the Feat ure
R
Press To
1
2
ON
3
BACK
4
OK
()
()
()
A
>
Settings
>
Input mode
>
Preferred input mode
scroll to the desired text entry
mode
select the text input mode
change the settings
save the settings
F
Choosing a Text Entry Mode
Most text entry screens let you enter letters, numbers, and/
or symbols as required. Press (or >
Learning to Use Your Phone
from a text entry screen to select a text entry mode.
FWR
TAP English
Type letters and numbers by drawing
strokes on the keypad (see page 37).
Type letters, numbers, and symbols by
pressing a key 1 or more times (see
page 40).
T
Input mode
)
34

iTAP English
123
Symbol
Enter symbols only.
Tip:
The text entry mode you select remains active until you
change it by selecting another mode.
To select a text entry mode with ease:
Let the phone predict each word as you
type it (see page 41).
Enter numbers only.
D
Action
Press to insert a space.
FWR
In the
choose among (lower case)/ (upper case)/
abc
(lower case for
In the
TAP English
hold to switch among
capital letters)/
In the
iTAP English
hold to toggle between
(upper case).
Press to select
R
text entry mode, press and hold to
A
iTAP English
text entry mode, press and
ABC
(upper case).
text entry mode, press and
Symbol
).
abc
(lower case)/
F
abc
(lower case)/
.
Abc
ABC
(initial
T
Press and hold to switch between
default text entry mode.
123
and the
Learning to Use Your Phone
35

Setting Words to Complete Automatically
Word completion
you enter the 1st 3 characters.
Find the Feat ure
In the
1
2
3
4
In the
1
Learning to Use Your Phone
allows you to select a word from a list after
D
TAP English
FWR
text entry mode:
R
Press To
keypad keys enter the 1st 3 characters of a
up
OK
()
text entry mode:
Action
Use your finger to scrawl the
1st 3 letters of a word on the
sensible keypad.
>
Settings
>
Input mode
>
Word completion>ON
word
open the possible words list
A
scroll to the desired word
select the word
F
T
36
2
Press up to open the possible words list.
3
Press to scroll to the desired word.

4
Action
Press
OK
( ) to select the word.
Using Finger Writing Recognition (FWR)
Finger Writing Recognition (
recognition technology which enables you to scrawl on the
sensible keypad with finger instead of pen. The new
function allows you to directly write English in lower or
upper case on the sensible keypad by a touch of finger.
Learning to Use Finger Writing Recognition
(FWR)
You can test scrawl on the sensible keypad so that you are
able to use the finger writing technology more smoothly.
Find the Feature
Customizing Finger Writing Recognition (FWR)
You can select a touch alert as scrawling on the sensible
keypad, specify how speed the phone recognizes your
handwriting, determine how sensitive the phone finishes
your handwriting by a double-click on the keypad, display
your handwriting on the screen, and quickly access certain
D
R
A
FWR
) is a new handwriting
>
Tools
>
Finger writing training
F
T
Learning to Use Your Phone
37

phone features using several handwriting command
shortcuts from the idle display (see page 39).
Press >
select
Learning to Use Your Phone
D
R
Find the Feat ure
Input mode
FWR
.
Action
1
Use your finger to scrawl all
the letters of a word 1 by 1 on
the sensible keypad.
Note:
If the letter you input is
not the one which appears on
the screen, press to scroll to the desired
letter from the candidate list and press
to replace the wrong letter. You can also press
the corresponding number key to select a letter
and replace the wrong letter.
Fwr settings
Writing sound
Fwr movement
Ink display
Double click
Quick access
SELECTBACK
>
Settings
>
A
from any text entry screen and
Input mode
>
Fwr settings
F
T
OK
()
38

Action
2
Press
OK
( ) or double click on the keypad to
end your input.
D
Using Finger Writing Commands
You can quickly access certain phone features using
several handwriting command shortcuts from the idle
display. The finger writing commands are described
below.
R
M
S
R
W
G
B
Action
From the idle display, use your
finger to scrawl the desired finger
writing command (
the sensible keypad, and then the
targeted phone feature is
launched.
Open
Ringing style > Ringing tone
phone.
Open
Phonebook > Search
Open
your phone.
Open
message
Open
Open
A
Msg. center > Text messages > Inbox
Msg. center > Text messages > Write
on your phone.
Games
on your phone.
Browser
M/S/R/W/G/B
F
on your phone.
) on
on your
on your phone.
T
Learning to Use Your Phone
on
39

Using Finger Writing Gestures
You can use several finger writing gestures instead of
keypresses to delete a letter or return to the editing mode,
end your handwriting, insert a space, and switch
among (lower case)/ (upper case). The finger
writing gestures are described below.
Using TAP English
D
double-click
a
or
A
Draw from right to left on the
sensible keypad to delete a letter or
R
return to the editing mode.
Double click on the sensible keypad to
finish your finger writing.
Draw on the sensible keypad to
insert a space.
A
Draw a on the sensible keypad to
A
select (lower case); draw
sensible keypad to select (upper
case).
F
on the
Learning to Use Your Phone
40
TAP English
phone.
Press >
select
is the standard mode for entering text on your
TAP English
Press To
1
keypad key 1 or
more times
Input mode
.
T
from any text entry screen and
select a letter, number, or
symbol

Press To
2
keypad keys enter remaining characters
3
OK
()
store text
D
General Text Entry Rules
Press a key repeatedly to cycle through its characters.
•
If you do not press a key for 2 seconds, the
highlighted character is accepted, and the cursor
moves to the next position.
Using iTAP™ Software Predictive Text
Entry Mode
iTAP English
a word using 1 keypress per letter.
R
is a predictive text entry mode that lets you enter
A
Learning to Use Your Phone
Press >
select
iTAP English
Entering Words
Press To
1
keypad key 1
time
Input mode
.
from any text entry screen, and
F
enter the 1st letter of a word
Tip:
The letters associated
with the key are shown at the
bottom of the display.
T
41

Press To
2
keypad keys (1
per letter)
D
3
4
For example, to spell the word “art,” press .
The display shows
OK
()
R
art
enter the rest of a word
Tip:
Alternative words and
letter combinations are
shown at the bottom of the
display. The word choices
update with each keypress.
highlight the word you want
enter the word at flashing
cursor location
Tip:
iTAP English
inserts a space after each
A
word.
.
automatically
Entering Novel Words
You can coin words
Learning to Use Your Phone
42
Action
1
Press
letters until a letter combination matches the
start of a word.
2
Press to highlight the desired letter or letter
combination.
F
iTAP English
CLEAR
( ) 1 or more times to delete
does not recognize.
T

Action
3
Press
OK
( ) to select the letter or letter
combination.
D
4
Press left to move cursor to the left and
“lock” the selected word portion.
5
Continue to enter letters and highlight the letter
combinations you want to spell a word.
R
Your phone stores the unrecognized word and includes
it in the list of alternative word choices. When memory
space for unrecognized words is filled, your phone deletes
the oldest words as it adds new words.
Entering Punctuation
Press To
or
A
enter punctuation
Learning to Use Your Phone
Entering Numbers
Press To
1
keypad key 1
time
2
3
keypad keys enter numbers
4
OK
()
prepare to put
text entry mode
scroll to the number
enter the numbers at flashing
cursor location
F
T
iTAP English
in
123
43

Deleting Letters and Words
With the cursor to the right of the text you want to delete:
Action
D
Press
CLEAR
( ) to delete 1 letter at a time.
CLEAR
Press and hold
( ) to delete the entire line.
Using the External Display
The external display enters the idle mode shortly after
you close the flip, and then it enters the power-saving
mode 5 seconds later. The idle external display shows the
phone status, including network signal and battery power
level, and time as well as date. Press the up or down
volume key to show/hide the current time and date
indicators in the external display. To exit from the power-
saving mode, press and hold the up or down volume key.
R
A
F
21:52
9/10 Fri
Learning to Use Your Phone
Time
Date
T
You can also select a clock style to display in the idle
external display:
Find the Feat ure
>
Settings
>
External display
>
Clock type
44

Press To
1
2
OK
()
D
When you receive an incoming call, the external display
may show the caller’s number and name.
Tip:
To see a caller’s name in the external display, the
caller’s number must match an entry in your
phonebook. To create a phonebook entry, see page 81.
Locking and Unlocking Your
Phone
You can lock your phone manually or set the phone to lock
automatically whenever you turn it off. To use a locked
phone, you must enter the unlock code. A locked phone
still rings and/or vibrates for incoming calls/messages,
you must unlock it to answer/read
You can make emergency calls on your phone even when
it is locked.
Tip:
Contact your service provider for the phone lock/
unlock code.
R
scroll to the desired clock
type,
Digital
or
Analog
select the clock type
A
.
F
T
but
Learning to Use Your Phone
Locking Your Phone Manually
Find the Feature
>
Settings
>
Security
>
Code status>Phone lock
>
Lock now
45

Press To
1
keypad keys enter your phone lock/unlock
code
2
OK
()
D
Locking Your Phone Automatically
To lock your phone every time you turn it off:
lock the phone
Find the Feat ure
Unlocking Your Phone
R
>
Settings
>
Security
>
Code status>Phone lock
>
Automatic lock> ON
A
Press To
1
keypad keys enter your phone lock/unlock
code
2
OK
()
Setting and Changing Codes
You can set and change the following codes that block
Learning to Use Your Phone
other people from using your phone and data in it.
PIN code
PIN2
Phone code
46
Lock your SIM card when you turn off
your phone.
Lock certain subscription-dependent
features every time you use them.
Lock your phone when you turn it off.
unlock the phone
F
T

SIM lock
Tip:
Contact your service provider for those codes.
To set or change codes:
Lock your phone when you insert an
unidentified SIM card.
D
Find the Feature
To activate codes:
Find the Feature
If You Forget Codes
If you forget your codes, contact your service provider.
If You Enter the Wrong PIN or
PIN2 Code 3 Times in a Row
If you enter a wrong PIN or PIN2 code 3 times in a row,
your phone prompts you to enter the PUK or PUK2 code to
unblock your SIM card. For the PUK and PUK2 codes,
contact your service provider.
R
A
>
Settings
>
Security >Change code
>
Settings
>
Security >Code status
F
T
Learning to Use Your Phone
47

Setting Up Your Phone
Adjusting the Backlight
You can set the amount of time that both the display and
the keypad backlights remain on. You may also turn off
backlights to extend battery life.
Adjusting Display Contrast
Adjusting Display Color
Setting Up Your Phone
D
Find the Feat ure
Find the Feat ure
1
2
Find the Feat ure
R
A
Press To
left/right
OK
()
>
Settings
>
Backlight
>
Settings
>
Adjust contrast
scroll to the desired display
contrast
F
select the display contrast
T
>
Settings
>
Display >Color scheme
48

Setting Time and Date
To see time and date in both idle displays, set time and
date 1st:
Find the Feature
You may select a date format:
Find the Feature
To see time and date in both idle displays:
D
R
>
Settings
>
Clock
>
Set the time/Set the date
>
Settings
>
Clock >Date format
Find the Feature
Setting Power-Off Time
You can let your phone turn off automatically in a specified
time.
Find the Feature
Tip:
Press left/right to select a
off time setting.
Setting a Wallpaper Image
You can set a picture or animation as a wallpaper
(background) image in your phone’s internal and external
displays.
A
>
Settings
>
Clock >Show clock>ON
F
>
Settings
>
Auto power off >On
Repeat type
T
for the power-
Setting Up Your Phone
49

Note:
When you set an animation as a wallpaper image,
only the 1st frame of the animation displays.
Find the Feature
D
Setting a Screen Saver Image
You can set a picture or animation as a screen saver
image in your phone’s internal and external displays. The
image displays when no activity occurs in 1 minute (the
default, but it depends on regions).
Find the Feat ure
R
A
Tip:
Scroll to
LCM to extend battery life.
Customizing Service Light
You can specify a service light for use in the moment when
the phone is successfully connected to your service
provider, when you receive incoming calls or the alarm
clock rings, and when you have new events.
Find the Feat ure
Setting Up Your Phone
1
Off
or
Power saving
Press To
>
Settings
>
Display/External display
>
Wallpaper
>
Settings
>
Display/External display
>
Screen saver
to turn off
Screen saver
F
T
>
Settings
>
Service light
scroll to the desired option
or the
50

Press To
2
OK
()
3
4
Using Anykey Answer
D
OK
()
select the option
scroll to the desired service
light
select the service light
Press any keys except to answer calls.
Find the Feature
R
>
Settings
>
Call features
>
Anykey answer>ON
A
Using Flip Answer
You can open the flip to answer incoming calls.
Find the Feature
Using Ambient Light Sensor
The keypad backlight can be turned on automatically when
the surroundings are dark.
Find the Feature
>
Settings
>
Call features
F
>
Flip answer>ON
T
>
Settings
>
Light sensor
Setting Up Your Phone
51

Calling Features
Putting a Call on Hold
When you are on a call, you can put the call on hold.
Answering a New Call
Calling Features
D
Press To
1
OPTIONS
()
R
2
3
OK
()
When you are on a call, you can answer a
new incoming call.
To turn on
Find the Feat ure
Call waiting
open the options menu
scroll to
Tip:
Scroll to
the call on hold.
put the call on hold
A
F
1st:
>
T
>
On
>
Hold
Activate
Settings
Call features
to answer
>
Call waiting
52

To answer a new incoming call:
Press To
1
D
2
Tip:
to answer a new incoming call, you must end the active or
held call to answer the new incoming call. Depending on
your service provider, you can also transfer an incoming
call to another phone number. (To activate, press
() > select
> press .)
Making a New Call
When you are on a call, you can make a new outgoing call.
If you have an active call and a held call, and you want
R
Deflection
put the current call on hold
and answer the new call
end the new call and continue
with the call on hold
OPTIONS
> enter the desired phone number
A
Calling Features
Press To
1
OPTIONS
()
2
OK
()
3
keypad keys enter the phone number
4
F
open the options menu
select
Dial new call
T
dial the phone number
53

Making an Emergency Call
With or without your SIM card installed, you can make an
emergency call to the Emergency phone number your
service provider gave you.
Selecting a Phone Number to
D
Press To
1
keypad keys enter the emergency phone
number
2
R
dial the emergency phone
number
Use
You can select a phone number (line) to make
and receive calls.
Calling Features
Find the Feat ure
Redialing Automatically
You can immediately redial the call you failed to make.
Find the Feat ure
A
F
T
>
Settings
>
Call features >Phone lines
>
Settings
>
Call features
>
Auto redial>ON
54

Checking Recent Calls
You can view your call history on the phone.
Find the Feature
Tip:
displays, press to dial.
D
If the phone number of the selected recent call
>
Recent calls
>
Missed calls/Received calls
Dialed calls
/
R
Erasing Recent Calls
You can erase 1 or all of the recent calls from your phone.
Erasing a Recent Call
Find the Feature
Press To
1
2
3
4
OK
()
A
>
Recent calls
>
Missed calls/Received calls
Dialed calls
scroll to a recent call you
F
want to erase
open the options menu
scroll to
Erase
T
erase the selected recent call
/
Calling Features
55

Erasing
All Recent Calls
Find the Feat ure
>
Recent calls
>
Erase all
D
Redialing Recent Calls
You can redial recent calls if the phone number displays.
Find the Feat ure
R
Press To
1
2
Calling Features
3
4
OK
()
A
>
Recent calls
>
Missed calls/Received calls
Dialed calls
scroll to the desired recent
call
open the options menu
scroll to
make the phone call
Call
F
T
/
56

Saving Recent Calls in Your
Phonebook
You can save recent calls as phonebook entries if the
phone number displays.
Find the Feature
1
2
3
4
5
6
D
>
Recent calls
>
Missed calls/Received calls
Dialed calls
Press To
OK
()
keypad keys enter a name
OK
()
R
scroll to the desired recent
call
open the options menu
A
scroll to
select
save the entry in your
F
phonebook
Save
Save
/
T
Calling Features
57

Messages and Chat
You can write, send, and receive messages, either by
D
Short Messaging Service (SMS) or by Multimedia
Messaging Service (MMS). You can also open a
chatroom to have an online chat.
Writing an SMS Message
You can insert quick notes, phonebook entries (numbers or
names), image objects (pictures or animations), and sound
objects (sounds or melodies) when composing an SMS
message.
Messages and Chat
Find the Feat ure
1
2
3
4
5
6
R
A
Press To
keypad keys enter text
OK
()
OK
()
>
>
>
F
open the options menu
scroll to the desired option
beginning with
T
select the option
scroll to the desired suboption, if necessary
select the sub-option, if
necessary
Msg. center
Text messages
Write message
Insert
58

Press To
7
D
8
OK
()
scroll to the desired object
you want to insert to your
SMS message
select the object
Tip:
Repeat steps 2-8 to insert
more objects, if necessary.
Messages and Chat
Sending an SMS Message
R
To send your SMS message right after you finish
editing it:
A
Press To
select
1
SEND
2
P.BOOK
3
4
OK
5
()
()
F
()
T
SEND
open your phonebook
scroll to the desired entry
select the entry
Tip:
If the entry includes more
than 1 phone numbers,
continue the following steps;
otherwise, repeat steps 3-4 to
add other recipients or go to
steps 8-9 to send your SMS
message immediately.
scroll to the desired phone
number
59

Press To
6
OK
()
7
BACK
()
D
8
BACK
()
R
9
SEND
()
Saving an SMS Message as a
Draft
Messages and Chat
To save your SMS message in the
finish editing it:
Press To
1
2
3
OK
()
4
P.BOOK
()
5
6
OK
()
7
select the phone number
return to the previous menu
Tip:
Repeat steps 3-4 to add
other recipients or continue
the following steps to send
your SMS message.
return to the previous menu
send your SMS message
A
Drafts
folder after you
F
open the options menu
scroll to
select
Save to drafts
Save to drafts
T
select a recipient
scroll to the desired
phonebook entry
select the phonebook entry
scroll to the desired phone
number, if necessary
60

Press To
8
OK
()
9
SAVE
()
D
select the phone number, if
necessar y
save your SMS message
along with recipient(s) in
>
Text messages
center
>
Msg.
Drafts
Activating Your Service
Provider to Use MMS
provider provides. To activate your service provider, follow
the steps:
Find the Feature
Press To
1
2
OK
()
3
OK
()
R
To send/receive MMS messages, you must
subscribe for MMS from your service provider
and then activate your service provider on your
phone. MMS works via GPRS your service
A
>
Browser
>
Profiles
or
F
>
Msg. center
>
Settings >Multimedia msgs.
>
Connection settings
T
scroll to the service provider
you have subscribed for using
MMS
select the service provider
activate the service provider
Messages and Chat
61

Writing an MMS Message
An MMS message may consist of several page sets. A
page set can include an image object (photo/
D
picture/animation/video), a sound object (melody/
voice note), and/or text objects (quick notes/phone
numbers).
Note:
You can insert only 1 image object and 1 sound
object to a page set. To insert more image and sound
objects, press
existed, add to next page?
R
YES
( ) when your phone displays:
.
...
62
Messages and Chat
Find the Feat ure
A
Press To
1
keypad keys enter text
2
3
4
5
6
7
OK
()
OK
()
open the options menu
F
scroll to
select
scroll to the desired option
select the option
scroll to the desired suboption, if necessary
>
Msg. center
>
Multimedia msgs.
>
Write message
Insert object
Insert object
T

Press To
8
OK
()
D
9
10
OK
()
Going to a Page Set
R
select the sub-option, if
necessar y
Tip:
necessar y.
scroll to the desired object
you want to insert to your
MMS message
insert the selected object
Tip:
select
objects.
Tip:
A
insert more objects, if
necessar y.
Repeat steps 7-8, if
Repeat this step if you
Media center
Repeat steps 2-10 to
to choose
Messages and Chat
You can switch between page sets.
Press To
1
2
3
OK
()
4
5
OK
()
F
open the options menu
scroll to
select
scroll to the desired page set
go to the selected page set
Go to...
T
Go to...
63

Viewing an Object
You can view any object in the current page set.
Press To
D
1
2
3
OK
()
4
R
open the options menu
scroll to
select
scroll to the desired object
View object
View object
5
OK
()
Messages and Chat
Deleting an Object
You can delete any object from the current page set.
Press To
1
2
3
OK
()
4
5
OK
()
6
OK
()
view the selected object
A
open the options menu
F
scroll to
select
scroll to the desired object
select the object
delete the selected object
Remove object
Remove object
T
64

Deleting a Page Set
You can delete a page set, including all objects and a page
from it. If there is only 1 page set, you can delete all
objects, not a page from it.
In the current page set (if it is not the only 1):
D
Press To
1
R
2
3
OK
()
In the only 1 page set:
Press To
1
2
3
OK
()
open the options menu
scroll to
delete the selected page set,
including all objects and a
page itself
Delete page
A
open the options menu
F
scroll to
delete all objects, not a page
itself
Delete page
T
Messages and Chat
65

Previewing an MMS Message
You can preview your created MMS message before
sending it.
D
Press To
1
2
3
4
Sending an MMS Message
Messages and Chat
R
OK
()
You can send your MMS message via either
phone number or email address.
open the options menu
scroll to
select
preview the next/previous
page set
Preview
Preview
A
To send via a phone number:
Press To
1
SEND
()
2
P.BOOK
()
3
66
F
select
SEND
open your phonebook
T
scroll to the desired entry

Press To
4
OK
()
D
R
5
6
OK
()
7
BACK
()
8
BACK
()
9
SEND
()
select the entry
Tip:
If the entry includes more
than 1 phone numbers,
continue the following steps;
otherwise, repeat steps 3-4 to
add other recipients or go to
steps 8-9 to send your MMS
message immediately.
scroll to the desired phone
number
select the phone number
return to the previous menu
A
Tip:
Repeat steps 3-4 to add
other recipients or continue
the following steps to send
your MMS message.
return to the previous menu
F
send your MMS message
Messages and Chat
To send via an email address:
Press To
1
SEND
2
3
()
select
open the options menu
scroll to
T
SEND
New e-mail address
67

Press To
select
4
OK
()
5
keypad keys enter an email address
D
6
OK
()
7
SEND
()
R
Saving an MMS Message as a
Draft
New e-mail address
add the email address to the
Recipients
Tip:
other recipients.
send your MMS message
box
Repeat steps 2-6 to add
Messages and Chat
You can save your MMS message in the
you finish editing it.
Press To
1
2
3
OK
()
4
keypad keys enter a name
5
OK
()
6
7
68
A
Drafts
folder after
open the options menu
F
scroll to
select
save the name
open the options menu
scroll to
Set title
Set title
T
Save to drafts

Press To
8
OK
()
D
Checking a Received SMS/
save your MMS message in
Msg. center
Drafts
>
Multimedia msgs.
>
MMS Message
You can view your received SMS/MMS messages in the
respective
Find the Feature
Press To
1
2
OK
()
R
Inbox
folder.
>
Msg. center
>
Text messages
Multimedia msgs.>Inbox
/
A
scroll to the desired message
check the selected message
F
Checking a Sent or Unsent
SMS/MMS Message
You can view the SMS/MMS messages you sent or failed
to send in the respective
Find the Feature
Indicates a sent SMS message.
T
Outbox
folder.
>
Msg. center
>
Text messages
Multimedia msgs.>Outbox
/
Messages and Chat
69

Indicates an unsent SMS message.
Indicates a sent MMS message.
Indicates an unsent MMS message.
D
Press To
1
scroll to the desired message
2
Checking a Draft SMS/MMS
Message
Messages and Chat
You can view the SMS/MMS messages you saved in the
respective
Find the Feat ure
R
OK
()
Drafts
folder.
Indicates a draft SMS message.
Indicates a draft MMS message.
check the selected message
A
>
Msg. center
>
Text messages
F
Multimedia msgs.>Drafts
T
Press To
scroll to the desired message
check the selected message
70
1
2
OK
()
/

Managing an SMS/MMS
Message
You can perform these functions on a SMS/MMS
message stored in your
•
•
•
•
•
•
•
•
•
•
Find the Feature
D
Erase
(to erase the selected message)
Send
(to send the selected message)
Reply
(to reply the selected message)
Forward
Edit
(to edit the selected message)
View
(to display objects in the selected message)/
object
(to read information on objects in the selected
info.
message)
Use address
a URL, or to save a URL as a bookmark from the
selected message)
Detail info.
Callback
Open chatroom
message)
R
(to forward the selected message)
(to save objects in the selected message)/
(to dial/save a phone number, to connect to
(to read information on the selected message)
(to call to the sender of the selected message)
(to chat with the sender of the selected
Inbox, Outbox
A
F
T
>
Msg. center
>
Text messages
Multimedia msgs.
>
Inbox/Outbox/Drafts
, or
Drafts
folder:
/
Messages and Chat
Save
Object
71

Press To
1
scroll to the desired message
2
OK
()
D
3
OPTIONS
or
()
select the message
open the options menu
R
Editing an MMS Template
You can edit an MMS template and save it either in
>
Messages and Chat
Multimedia msgs.
center
>
MMS template
Find the Feat ure
>
Drafts
, or in
Msg. center
.
A
>
Msg. center
>
Multimedia msgs.
>
MMS template
F
T
>
Multimedia msgs.
Msg.
72

Setting a Voicemail Service
Number
Your service provider may set a voicemail service
number before you receive your phone. If not, refer to
the following procedures.
Find the Feature
D
>
Msg. center
>
Voice mailbox
R
Press To
1
keypad keys enter the voicemail service
number your service provider
provided
2
OK
()
Editing a Topic Message
You can edit topic messages you want to receive
from your service provider, such as traffic
reports and today’s news.
Find the Feature
save the setting
A
F
>
Msg. center
>
Cell broadcast
T
Messages and Chat
73

Clearing Sending History
You can erase all the SMS and/or MMS sending history
from the phone memory.
D
Find the Feat ure
Press To
1
2
R
>
Msg. center
>
Sending history > Text
messages/Multimedia msgs.
open the options menu
scroll to
Erase all
3
OK
()
Messages and Chat
Editing a Service Command
You can edit service commands you want your
service provider to operate.
Find the Feat ure
delete all of your SMS/MMS
sending history
A
F
>
Msg. center
>
Service command
T
Press To
1
keypad keys enter the service command
you want your service
74
2
OK
()
provider to operate
send the service command to
your service provider

Having an Online Chat
You can open up to 4 chatrooms and have
an online chat.
D
Find the Feature
Press To
R
1
2
NAMES
()
A
3
4
OK
()
5
6
OK
()
7
OK
()
8
keypad keys enter your nickname
9
OK
()
10
keypad keys enter your instant message
11
SEND
()
>
Chatroom
scroll to any chatroom
select from your phonebook a
person you want to have a
chat with
scroll to the desired entry
select the entry
scroll to the desired phone
number
F
select the phone number
save the setting
save the setting
send your instant message
T
Messages and Chat
75

Adding a Quick Note to Your Instant
Message
Press To
D
1
2
3
OK
()
4
5
OK
()
R
open the options menu
scroll to
select
scroll to the desired quick
note
add the selected quick note to
your instant message
Insert quick note
Insert quick note
Messages and Chat
Adding a Smiley to Your Instant Message
Press To
1
2
3
OK
()
4
5
OK
()
A
open the options menu
scroll to
F
select
scroll to the desired smiley
Insert smiley
Insert smiley
T
add the selected smiley to
your instant message
76

Editing Your Nickname
Press To
1
D
2
3
OK
()
4
keypad keys edit your nickname
5
OK
()
Editing an Instant Message Phone Number
R
open the options menu
scroll to
select
save the setting
Nickname
Nickname
Messages and Chat
Press To
1
2
3
OK
()
4
keypad keys edit an instant message
5
OK
()
A
open the options menu
scroll to
select
Chat Numbers
Chat Numbers
F
phone number
save the setting
T
Checking Old Instant Messages
Press To
1
2
open the options menu
scroll to
View history
77

Press To
3
OK
()
D
Configuring SMS Settings
You can customize SMS settings to suit your needs.
check old instant messages
Find the Feat ure
>
Msg. center
>
Settings >Text messages
R
Configuring MMS Settings
You can customize MMS settings to suit your needs.
Find the Feat ure
Messages and Chat
Selecting Memory for Saving
SMS Messages
You can select either SIM card memory or phone memory
to store your SMS messages.
Find the Feat ure
A
>
Msg. center
>
Settings >Multimedia msgs.
F
>
Msg. center
>
Settings >Memory in use
>
Select SMS memory
T
78

Checking SIM Card or Phone
Memory for Saving SMS
Messages
You can view the details of SIM card memory or phone
memory that saves your SMS messages.
Find the Feature
Checking Phone Memory for
Saving MMS Messages
You can view the details of phone memory that saves your
MMS messages.
Find the Feature
D
R
A
>
Msg. center
>
Settings >Memory in use
>
SMS status
>
Msg. center
>
Settings >Memory in use
>
MMS status
F
T
Messages and Chat
79

Setting Up Your
Phonebook
D
Selecting Memory for Saving
Your Phonebook
You can select either SIM card memory or phone
memory to store your phonebook entries.
Find the Feat ure
Checking SIM Card or Phone
Memory for Saving Your Phone
Numbers and Notes
You can read the details of SIM card memory or phone
memory that saves your phone numbers and notes.
Find the Feat ure
Setting Up Your Phonebook
80
X/100
R
>
Phonebook
>
Option >Memory
A
F
>
Phonebook
>
Option >Memory status
Number (X) of phone numbers in SIM
card memory. You can store up to 100
phone numbers in SIM card memory.
Note:
The capacity of SIM card memory
depends on your service provider
settings.
T

X/300
X/100
Creating a Phonebook Entry
You can add phonebook entries to your phone.
Number (X) of phone numbers in phone
memory. You can store up to 300 phone
numbers in phone memory.
Number (X) of notes in phone memory.
D
You can store up to 100 notes in phone
memory.
R
Find the Feature
Press To
1
keypad keys enter a name
2
OK
()
3
keypad keys enter a phone number
4
OK
()
A
>
Phonebook
>
Add
save the name
save the phone number
F
Using Phonebook Entry Options
You can perform various functions on a phonebook entry.
T
Option Description
Edit
Add voice tag *
edit a phone number/name
record a name command and
use it to dial the
corresponding number by
voice
Setting Up Your Phonebook
81

Option Description
Set as default *
Add number *
D
Change type
Add text *
Change group
Edit name
Speed dial
Send message
Send business card
R
set a phone number to be
called by default
add phone number(s) (up to
4)
change a phone number type
add note(s)
set a caller group
edit the name
create 1-touch dial numbers
using the entries between
and
edit an SMS
A
message and send
it by the default
mobile phone
number
send a phonebook
F
entry as a business
card by SMS or text
Setting Up Your Phonebook
82
Copy
Erase
View
copy/move a phonebook
entry saved on SIM card
T
memory to phone memory
and vice versa
remove phonebook entry(ies)
or note(s)
display the details of
phonebook entry

Option Description
Add picture *
Remove picture *
create a photo caller ID
remove a photo caller ID
D
* The option is available only for the phone number/name
saved on phone memory.
Find the Feature
>
Phonebook
>
Search
R
Press To
1
keypad keys enter the 1st letter(s) of a
name
2
3
4
5
6
OK
()
OK
()
open your phonebook
A
scroll to the desired entry
select the entry
scroll to the name or the
desired phone number/note
F
open the options menu
T
Setting Up Your Phonebook
83

Creating a Photo Caller ID
You can add an image (photo caller ID) to a phonebook
entry. The internal display shows that image when the
caller places a call to you.
Note:
on phone memory.
D
To create photo caller IDs, save phonebook entries
Setting Up Your Phonebook
Find the Feat ure
R
Press To
1
keypad keys enter the 1st letter(s) of a
2
OK
3
4
5
6
7
8
9
10
11
()
OK
()
OK
()
OK
()
A
>
Phonebook
>
Search
name
open your phonebook
scroll to the desired entry
select the entry
scroll to the name
F
open the options menu
scroll to
select
scroll to
example)
select
scroll to the desired folder
Add picture
T
Add picture
Photo album
Photo album
(for
84

Press To
12
OK
()
13
14
15
D
OK
()
OK
()
R
Sorting Phonebook Entries
You can sort your phonebook entries by a desired type.
Find the Feature
Looking Up Your Phonebook to
Make a Call
You can look up your phonebook and then make a call
from the idle display.
select the folder
scroll to the desired photo
select the photo
set the selected photo as a
photo caller ID to the
phonebook entry
>
A
Phonebook
>
Option >Sort by
F
Setting Up Your Phonebook
To turn on
Find the Feature
Dialing number lookup
1st:
T
>
Phonebook
>
Option
>
Dialing number lookup >ON
85

To dial from the idle display:
Press To
1
keypad keys enter the 1st letter(s) of a
D
2
name
scroll to the desired entry
3
make a phone call
R
Using 1-Touch Dials
You can press and hold keys from to to make
phone calls from the idle display.
To turn on
To create 1-touch dials:
Setting Up Your Phonebook
Speed dialing
Find the Feat ure
Find the Feat ure
Press To
1
2
OK
()
3
A
1st:
F
scroll to the desired speed
dial key
open your phonebook
scroll to the desired entry
>
Settings
>
Call features
>
Speed dialing>ON
>
Phonebook
>
Speed dial
T
86

Press To
4
OK
()
assign the speed dial key for
the selected phone number
Checking 1-Touch Dials
Find the Feature
Press To
1
2
or
VIEW
()
3
OK
()
R
A
>
>
scroll to the desired name
open the options menu
or
check the selected
phonebook entry
check the selected
phonebook entry
F
Changing 1-Touch Dials
D
Find the Feature
Press To
1
2
3
>
>
scroll to the desired name
open the options menu
scroll to
Phonebook
Speed dial
Phonebook
Speed dial
T
Change
Setting Up Your Phonebook
87

Press To
4
OK
()
5
D
6
OK
()
Erasing 1-Touch Dials
select
scroll to the desired
phonebook entry
assign the speed dial key for
the selected phone number
R
Find the Feat ure
Press To
scroll to the desired name
1
A
Change
>
Phonebook
>
Speed dial
2
3
4
OK
()
Renaming a Caller Group
Setting Up Your Phonebook
Find the Feat ure
Press To
1
2
OK
()
88
open the options menu
scroll to
erase the speed dial key from
F
the selected phone number
T
scroll to the desired caller
group
select the caller group
Erase
>
Phonebook
>
Caller group

Press To
select
3
OK
()
4
keypad keys enter a new name
5
Customizing a Caller Group
Ring Tone
You can select a ring tone for a caller group to use. The
ring tone plays when 1 of the caller group calls you.
D
OK
()
R
Rename
save the new name
Find the Feature
Press To
1
2
OK
()
3
4
OK
()
5
6
OK
()
>
Phonebook
>
Caller group
A
scroll to the desired caller
group
select the caller group
F
scroll to
select
scroll to the desired ring tone
select the ring tone
Ring tone
Ring tone
T
Setting Up Your Phonebook
89

Creating a Photo Caller ID for a
Caller Group
You can select an image for a caller group to use. The
image displays when 1 of the caller group calls you.
D
Find the Feat ure
To turn on
1
2
3
4
5ON ()
Graphic
R
Press To
OK
()
OK
()
1st:
scroll to the desired caller
group
select the caller group
A
scroll to
select
turn on
>
Phonebook
>
Caller group
Graphic
Graphic
Graphic
F
To use a preset image as a photo caller ID for a caller
group:
Setting Up Your Phonebook
Press To
1
2
OK
()
3
T
scroll to
select
scroll to the desired preset
image
View
View
90

Press To
4
OK
()
select the preset image
To use your own image as a photo caller ID for a caller
group:
1
2
3
4
5
6
7
8
9
10
11
D
Press To
scroll to
R
OK
()
OK
()
OK
()
OK
()
OK
()
OK
()
select
scroll to
select
A
scroll to the desired option
select the option
scroll to the desired folder, if
necessar y
select the folder, if necessary
scroll to the desired object
select the object
set the selected object as the
caller group photo caller ID
View
View
Media center
Media center
F
T
Setting Up Your Phonebook
91

Creating Your Personal
Phonebook Entries
You can save your personal data in phonebook entries.
To create your 1st phonebook entry:
To create other phonebook entries:
Setting Up Your Phonebook
D
Find the Feat ure
R
Press To
1
keypad keys enter your name
2
OK
()
3
keypad keys enter your phone number
4
OK
()
Press To
1
2
3
OK
()
4
keypad keys enter your name
5
OK
()
6
keypad keys enter your phone number
7
OK
()
A
>
Phonebook
>
Personal number
save your name
save your phone number
F
open the options menu
scroll to
select
save your name
save your phone number
Add
Add
T
92

Changing Your Personal Phonebook
Entries
Find the Feature
D
Press To
1
2
EDIT
()
or
3
keypad keys enter your name
4
OK
()
5
keypad keys enter your phone number
6
OK
()
R
>
OK
()
A
>
Phonebook
>
Personal number
scroll to the desired entry
prepare to edit the selected
entry
save your name
save your phone number
F
Erasing Your Personal Phonebook Entries
Find the Feature
Press To
1
>
Phonebook
>
Personal number
T
scroll to the desired entry
Setting Up Your Phonebook
2
3
open the options menu
scroll to
Erase
93

Press To
4
OK
()
erase the selected entry
Using Fixed Dials
To turn on
D
You can restrict outgoing calls to phone
numbers that begin with the same digit(s)
you set on the fixed dialing list.
Tip:
Enter the PIN2 code to use
Find the Feat ure
R
Fixed dial number
A
Press To
1ON ()
2
keypad keys enter the PIN2 code
3
OK
()
To create the 1st fixed dial:
Setting Up Your Phonebook
Press To
1
2
OK
()
3
OK
()
4
keypad keys enter the PIN2 code
1st:
select
turn on
F
scroll to
select
select
Fixed dial number
>
Phonebook
>
Fixed dial number
Enable fixed dialing
Fixed dial number
T
Number list
Number list
Add
.
94

Press To
5
OK
()
6
keypad keys enter a name
7
8
9
D
OK
()
keypad keys enter a phone number
OK
()
confirm the code
save the name
save the phone number
To create other fixed dials:
Find the Feature
Press To
1
2
3
4
OK
()
5
keypad keys enter the PIN2 code
6
OK
()
7
keypad keys enter a name
8
OK
()
9
keypad keys enter a phone number
10
OK
()
R
A
scroll to any fixed dialing
entry
open the options menu
scroll to
F
select
confirm the code
save the name
save the phone number
>
Phonebook
>
Fixed dial number
>
Number list
Add
Add
T
Setting Up Your Phonebook
95

Changing Fixed Dials
Find the Feat ure
D
Press To
1
2
EDIT
()
R
or
>
3
keypad keys enter the PIN2 code
4
OK
()
5
keypad keys enter a name
6
OK
()
7
keypad keys enter a phone number
8
OK
()
Erasing a Fixed Dial
Setting Up Your Phonebook
Find the Feat ure
OK
()
A
>
Phonebook
>
Fixed dial number
>
Number list
scroll to the desired fixed
dialing entry
EDIT/Edit
select
confirm the code
save the name
F
save the phone number
T
>
Phonebook
>
Fixed dial number
>
Number list
96
Press To
1
scroll to the desired fixed
dialing entry

Press To
2
3
4
5
6
7
Erasing All Fixed Dials
Find the Feature
1
2
3
4
5
6
7
D
OK
()
keypad keys enter the PIN2 code
OK
()
OK
()
Press To
OK
()
keypad keys enter the PIN2 code
OK
()
OK
()
R
open the options menu
scroll to
select
confirm the code
erase the selected fixed
dialing entry
A
scroll to any fixed dialing
entry
open the options menu
scroll to
select
confirm the code
erase all fixed dialing entries
Erase
Erase
>
Phonebook
>
Fixed dial number
>
Number list
F
Erase all
T
Erase all
Setting Up Your Phonebook
97

Using Voice Dials
To dial by voice, press and hold the up or down voice
activation key
command
can create up to 10 voice dialing numbers.
Note:
This option is available only for phone numbers saved
on phone memory.
from the idle display until
displays; then say a name into the microphone. You
D
Please say name or
Setting Up Your Phonebook
98
Find the Feat ure
1
2
3
4
5
6
7
8
9
R
Press To
keypad keys enter the 1st letter(s) of a
OK
()
OK
()
OK
()
OK
()
A
>
Phonebook
>
Search
name
open your phonebook
scroll to the desired entry
select the entry
F
scroll to the desired phone
number
open the options menu
scroll to
select
say a name into the
microphone
Tip:
tag saved
Add voice tag
T
Add voice tag
Repeat this step until
displays.
Voice

Playing Voice Dials
Find the Feature
D
Press To
1
2
OK
()
or
Changing Voice Dials
R
>
OK
()
scroll to the desired entry
play the selected entry’s
voice dial command
A
Find the Feature
Press To
1
2
3
4
5
OK
()
OK
()
scroll to the desired entry
open the options menu
scroll to
select
say a name into the
microphone
Tip:
tag saved
>
Phonebook
>
Voice tags
>
Phonebook
>
Voice tags
F
Change
T
Change
Repeat this step until
displays.
Setting Up Your Phonebook
Voice
99
 Loading...