

Page 1

APPLICANT: MOTOROLA, INC. FCC ID: IHDT6EK1
INSTRUCTION MANUAL
A preliminary draft copy of the Users Manual follows:
EXHIBIT 8
Page 2

A1000 Communicator
UMTS
START HERE >
Page 3

Page 4
Welcome
Welcome to world of Motorola digital wireless
communications! We are pleased that you have chosen the
Motorola A1000 multimedia communicator.
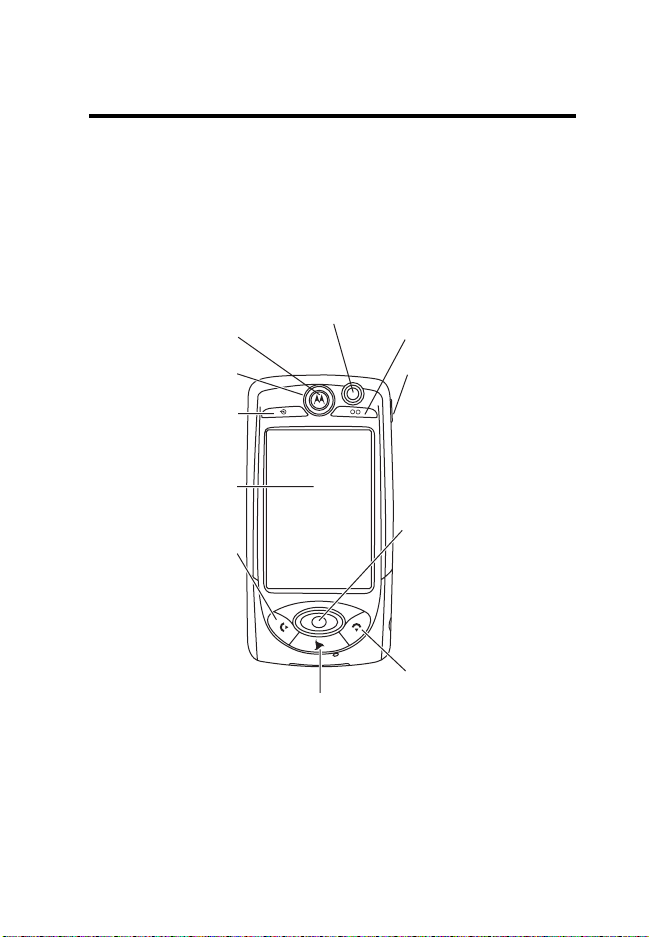
Camera (Point 2 Point)
Two-way video
conferencing
Earpiece
Status Light
Game A Key
Touchscreen
Send Key
Press to make
and answer
voice or video
calls. When not
in a call, press to
display call
history.
ra
D
3 Key
Game Key B
Speakerphone
Key
t
Navigation Key
f
Push center
button left, right,
up, or down to
move through
items. Press
center button to
select
highlighted item.
End Key
Press and
release to end
calls and to
display phone
dial pad.
1
Page 5

Motorola, Inc., Consumer Advocacy Office
1307 East Algonquin Road
Schaumburg, IL 60196
1-800-331-6456 (United States)
1-888-390-6456 (TTY/TDD United States)
1-800-461-4575 (Canada)
www.motorola.com
www.motorola.ca
MOTOROLA and the Stylized M Logo are registered in the US Patent &
Trademark Office. All other product or service names are the property of
their respective owners. The Bluetooth trademarks are owned by their
proprietor and used by Motorola, Inc. under license.
© Motorola, Inc. 2004.
Software Copyright Notice
The Motorola products described in this manual may include copyrighted
Motorola and third party software stored in semiconductor memories or
other media. Laws in the United States and other countries preserve for
Motorola and third party software providers certain exclusive rights for
copyrighted software, such as the exclusive rights to distribute or
reproduce the copyrighted software. Accordingly, any copyrighted
software contained in the Motorola products may not be modified,
reverse-engineered, distributed, or reproduced in any manner to the
extent allowed by law. Furthermore, the purchase of the Motorola
products shall not be deemed to grant either directly or by implication,
estoppel, or otherwise, any license under the copyrights, patents, or
patent applications of Motorola or any third party software provider,
except for the normal, non-exclusive, royalty-free license to use that
arises by operation of law in the sale of a product.
Manual number: 68XXXXXX61
(United States)
(Canada)
Draft
2
Page 6

Contents
Welcome
Contents
Safety and General Information . . . . . . . . . . . . . . . . . . . . 9
European Union Directives
Conformance Statement . . . . . . . . . . . . . . . . . . . . . . . . . 15
Getting Started
What’s in the Box? . . . . . . . . . . . . . . . . . . . . . . . . . . . . . 16
About this Guide . . . . . . . . . . . . . . . . . . . . . . . . . . . . . . . 17
Installing the USIM Card . . . . . . . . . . . . . . . . . . . . . . . . 17
Installing the Memory Card . . . . . . . . . . . . . . . . . . . . . . 19
Battery Use . . . . . . . . . . . . . . . . . . . . . . . . . . . . . . . . . . 20
Installing the Battery . . . . . . . . . . . . . . . . . . . . . . . . . . . . 21
Charging the Battery using the Travel Charger . . . . . . . 22
Charging the Battery using the Desktop
Charging Cradle . . . . . . . . . . . . . . . . . . . . . . . . . . . . . . . 23
Turning Your Communicator On and Off . . . . . . . . . . . . 23
Setting Up Your Communicator for the First Time . . . . . 24
Making and Answering Calls . . . . . . . . . . . . . . . . . . . . . 24
Using Your Communicator
Communicator Display . . . . . . . . . . . . . . . . . . . . . . . . . . 26
Using Touchscreen Control . . . . . . . . . . . . . . . . . . . . . . 27
Using the 8-way Navigation Key . . . . . . . . . . . . . . . . . . . 27
Using the 3 Key . . . . . . . . . . . . . . . . . . . . . . . . . . . . . . . 27
Using the Game Keys . . . . . . . . . . . . . . . . . . . . . . . . . . . 28
. . . . . . . . . . . . . . . . . . . . . . . . . . . . . . . . . . . . . . . 1
. . . . . . . . . . . . . . . . . . . . . . . . . . . . . . . . . . . . . . . 3
. . . . . . . . . . . . . . . . . . . . . . . . . . . . . . . . . 16
Optional Features . . . . . . . . . . . . . . . . . . . . . . . . . . . 17
Optional Accessories . . . . . . . . . . . . . . . . . . . . . . . . . 17
t
f
a
r
D
Making a Call . . . . . . . . . . . . . . . . . . . . . . . . . . . . . . . 25
Answering a Call . . . . . . . . . . . . . . . . . . . . . . . . . . . . . 25
. . . . . . . . . . . . . . . . . . . . . . . . 26
3
Page 7

Game Key A and Game Key B . . . . . . . . . . . . . . . . . . 28
Opening Applications . . . . . . . . . . . . . . . . . . . . . . . . . . . 28
Folders . . . . . . . . . . . . . . . . . . . . . . . . . . . . . . . . . . . . . . 30
Switching Folders . . . . . . . . . . . . . . . . . . . . . . . . . . . . 30
Filing New Entry in Folder . . . . . . . . . . . . . . . . . . . . . 30
Moving Entry to a Different Folder . . . . . . . . . . . . . . . 31
Adding, Renaming, and Deleting Folders . . . . . . . . . . 31
Status Indicators . . . . . . . . . . . . . . . . . . . . . . . . . . . . . . 31
Entering Text . . . . . . . . . . . . . . . . . . . . . . . . . . . . . . . . . 34
Handwriting Recognition . . . . . . . . . . . . . . . . . . . . . . 34
Virtual Keyboard . . . . . . . . . . . . . . . . . . . . . . . . . . . . . . 36
Using AGPS Location Information . . . . . . . . . . . . . . . . . 36
Limitations of AGPS . . . . . . . . . . . . . . . . . . . . . . . . . . . . 36
Home Screen
Displaying the Home Screen . . . . . . . . . . . . . . . . . . . . . 38
Screen Contents . . . . . . . . . . . . . . . . . . . . . . . . . . . . . . 38
Personalizing Home Screen . . . . . . . . . . . . . . . . . . . . . . 40
Calling Features
Opening Phone Application . . . . . . . . . . . . . . . . . . . . . . 41
Displaying Your Phone Number . . . . . . . . . . . . . . . . . . . 42
Using the Internal Speakerphone . . . . . . . . . . . . . . . . . 42
Adjusting the Volume . . . . . . . . . . . . . . . . . . . . . . . . . . . 42
Making a Voice Call . . . . . . . . . . . . . . . . . . . . . . . . . . . . 43
Dialing with the Keypad . . . . . . . . . . . . . . . . . . . . . . . 43
Dialing Stored Phone Numbers . . . . . . . . . . . . . . . . . 43
Redialing Failed Voice Calls . . . . . . . . . . . . . . . . . . . . 43
Making a Video Call . . . . . . . . . . . . . . . . . . . . . . . . . . . . 43
Making a Video Call to Another Phone . . . . . . . . . . . 44
Making a Video Call to a Computer . . . . . . . . . . . . . . 45
Calling an Emergency Number . . . . . . . . . . . . . . . . . . . 46
Using AGPS During an Emergency Call . . . . . . . . . . 46
Dialing the Call . . . . . . . . . . . . . . . . . . . . . . . . . . . . . . 48
. . . . . . . . . . . . . . . . . . . . . . . . . . . . . . . . . . . 38
t
f
. . . . . . . . . . . . . . . . . . . . . . . . . . . . . . . . 41
a
r
D
4
Page 8

Answering Calls . . . . . . . . . . . . . . . . . . . . . . . . . . . . . . . 48
Switching to Airplane Mode . . . . . . . . . . . . . . . . . . . . . . 49
Turning off Call Ringing . . . . . . . . . . . . . . . . . . . . . . . . . 49
Messages and Email
Setting up Messaging Accounts . . . . . . . . . . . . . . . . . . . 50
Email . . . . . . . . . . . . . . . . . . . . . . . . . . . . . . . . . . . . . . 50
MMS and SMS . . . . . . . . . . . . . . . . . . . . . . . . . . . . . . 51
Opening Messaging Application . . . . . . . . . . . . . . . . . . . 52
Creating and Sending Messages . . . . . . . . . . . . . . . . . . 53
Email and SMS . . . . . . . . . . . . . . . . . . . . . . . . . . . . . . 53
MMS . . . . . . . . . . . . . . . . . . . . . . . . . . . . . . . . . . . . . . 54
Receiving and Reading Messages . . . . . . . . . . . . . . . . . 57
Contact List
Opening Contacts Application . . . . . . . . . . . . . . . . . . . . 58
Adding Contacts . . . . . . . . . . . . . . . . . . . . . . . . . . . . . . . 59
Adding New Fields . . . . . . . . . . . . . . . . . . . . . . . . . . . 61
Recording Voice Tags for Contacts . . . . . . . . . . . . . . . . 62
Deleting Voice Tags . . . . . . . . . . . . . . . . . . . . . . . . . . 63
Editing Contacts . . . . . . . . . . . . . . . . . . . . . . . . . . . . . . . 64
Communicating with Contacts . . . . . . . . . . . . . . . . . . . . 64
Using Voice Dialing . . . . . . . . . . . . . . . . . . . . . . . . . . . . 65
Customizing Communicator Settings
Setting the Wallpaper Image . . . . . . . . . . . . . . . . . . . . . 66
Setting the Screen Brightness . . . . . . . . . . . . . . . . . . 66
Setting the Screen Calibration . . . . . . . . . . . . . . . . . . . . 67
Setting the Volume for System Sounds . . . . . . . . . . . 67
Setting a 3 Key Shortcut . . . . . . . . . . . . . . . . . . . . . . . . . 68
Choosing Ring Tones . . . . . . . . . . . . . . . . . . . . . . . . . 68
Choosing Ring Tones for Calls . . . . . . . . . . . . . . . . . . 68
Choosing Ring Tones for Messages . . . . . . . . . . . . . . 69
Choosing a Vibrate Pattern . . . . . . . . . . . . . . . . . . . . . . 69
. . . . . . . . . . . . . . . . . . . . . . . . . . . . . . . . . . . . 58
. . . . . . . . . . . . . . . . . . . . . . . . . . . . . 50
t
f
a
r
D
. . . . . . . . . . . . . . . 66
5
Page 9

Getting More Out of Your Communicator
Installing the A1000 Desktop Suite . . . . . . . . . . . . . . . . 71
Connecting a Bluetooth Device . . . . . . . . . . . . . . . . . . . 72
Changing Your Bluetooth Settings . . . . . . . . . . . . . . . 73
Connecting to a Computer . . . . . . . . . . . . . . . . . . . . . . . 74
Setting Up a USB Cable Connection . . . . . . . . . . . . . 74
Setting Up a Bluetooth Connection . . . . . . . . . . . . . . 74
Using the Desktop Suite . . . . . . . . . . . . . . . . . . . . . . . 75
Using Remote Synchronization . . . . . . . . . . . . . . . . . . . 75
Setting Up Your Account . . . . . . . . . . . . . . . . . . . . . . 75
Configuring the Settings . . . . . . . . . . . . . . . . . . . . . . . 76
Using Picsel Viewer . . . . . . . . . . . . . . . . . . . . . . . . . . . . 77
Opening Documents . . . . . . . . . . . . . . . . . . . . . . . . . . 77
Navigating Documents . . . . . . . . . . . . . . . . . . . . . . . . 78
Setting Preferences . . . . . . . . . . . . . . . . . . . . . . . . . . 80
Personal Organizer Features
Calendar . . . . . . . . . . . . . . . . . . . . . . . . . . . . . . . . . . . . 81
Adding a Calendar Entry . . . . . . . . . . . . . . . . . . . . . . 81
Switching Calendar Views . . . . . . . . . . . . . . . . . . . . . 83
Moving Entries to the To Do Application . . . . . . . . . . . 84
To Do . . . . . . . . . . . . . . . . . . . . . . . . . . . . . . . . . . . . . . . 84
Adding Entries: . . . . . . . . . . . . . . . . . . . . . . . . . . . . . . 85
Marking Tasks as Complete . . . . . . . . . . . . . . . . . . . . . . 86
Deleting Entries . . . . . . . . . . . . . . . . . . . . . . . . . . . . . 87
Moving Entries to Calendar . . . . . . . . . . . . . . . . . . . . 87
Notes . . . . . . . . . . . . . . . . . . . . . . . . . . . . . . . . . . . . . . . 88
Adding Notes . . . . . . . . . . . . . . . . . . . . . . . . . . . . . . . 88
Time . . . . . . . . . . . . . . . . . . . . . . . . . . . . . . . . . . . . . . . . 88
Setting the Time and Date . . . . . . . . . . . . . . . . . . . . . . . 89
Setting Location . . . . . . . . . . . . . . . . . . . . . . . . . . . . . 90
Setting Alarms . . . . . . . . . . . . . . . . . . . . . . . . . . . . . . 91
Responding to Alarms . . . . . . . . . . . . . . . . . . . . . . . . 91
. . . . . . . . . . . . . . . . . . . . . . 81
a
r
D
. . . . . . . . . . . . 71
t
f
6
Page 10

Turning Alarm Sounds Off . . . . . . . . . . . . . . . . . . . . . 92
Calculator . . . . . . . . . . . . . . . . . . . . . . . . . . . . . . . . . . . . 92
Making Voice Recordings . . . . . . . . . . . . . . . . . . . . . . . . 92
Playing a Recording . . . . . . . . . . . . . . . . . . . . . . . . . . 94
Deleting a Recording . . . . . . . . . . . . . . . . . . . . . . . . . 94
Sending a Recording . . . . . . . . . . . . . . . . . . . . . . . . . 94
Security
News and Entertainment
. . . . . . . . . . . . . . . . . . . . . . . . . . . . . . . . . . . . . . . 95
Locking and Unlocking Communicator . . . . . . . . . . . . . . 95
Establishing Password Protection . . . . . . . . . . . . . . . . 95
. . . . . . . . . . . . . . . . . . . . . . . . . 97
Web Browser . . . . . . . . . . . . . . . . . . . . . . . . . . . . . . . . . 97
Setting Up Your Internet Account . . . . . . . . . . . . . . . . 97
Opening Web Browser . . . . . . . . . . . . . . . . . . . . . . . . 97
Opening Web Pages . . . . . . . . . . . . . . . . . . . . . . . . . . 98
Adding Bookmarks . . . . . . . . . . . . . . . . . . . . . . . . . . . 98
Saving Web Pages . . . . . . . . . . . . . . . . . . . . . . . . . . . 99
Downloading Audio, Video, and Pictures . . . . . . . . . . 99
Music . . . . . . . . . . . . . . . . . . . . . . . . . . . . . . . . . . . . . . 100
Opening Music . . . . . . . . . . . . . . . . . . . . . . . . . . . . . 100
Playing an Audio Track . . . . . . . . . . . . . . . . . . . . . . . 101
Managing Music Playlists . . . . . . . . . . . . . . . . . . . . . 103
Playing a Music Playlist . . . . . . . . . . . . . . . . . . . . . . 104
Saving Audio Files . . . . . . . . . . . . . . . . . . . . . . . . . . 106
Camera . . . . . . . . . . . . . . . . . . . . . . . . . . . . . . . . . . . . . 107
Opening Camera Application . . . . . . . . . . . . . . . . . . 107
Using the Front and Back Camera Lens . . . . . . . . . . 108
Using the Camera Control Keys . . . . . . . . . . . . . . . . 108
Taking Still Pictures . . . . . . . . . . . . . . . . . . . . . . . . . . 109
Selecting Camera Settings . . . . . . . . . . . . . . . . . . . . 109
Recording Video Clips . . . . . . . . . . . . . . . . . . . . . . . . . 110
Using Self-Timer . . . . . . . . . . . . . . . . . . . . . . . . . . . . 110
Available Memory Indicator . . . . . . . . . . . . . . . . . . . . 111
r
D
t
f
a
7
Page 11

Switching to Pictures . . . . . . . . . . . . . . . . . . . . . . . . 111
Switching to Video . . . . . . . . . . . . . . . . . . . . . . . . . . 111
Video . . . . . . . . . . . . . . . . . . . . . . . . . . . . . . . . . . . . . . 112
Opening Video . . . . . . . . . . . . . . . . . . . . . . . . . . . . . 112
Playing a Video Clip . . . . . . . . . . . . . . . . . . . . . . . . . 113
Playing Streaming Video and Audio . . . . . . . . . . . . . 114
Saving Video Clips . . . . . . . . . . . . . . . . . . . . . . . . . . 115
Sending Video Clips . . . . . . . . . . . . . . . . . . . . . . . . . 115
Pictures . . . . . . . . . . . . . . . . . . . . . . . . . . . . . . . . . . 116
Opening Pictures . . . . . . . . . . . . . . . . . . . . . . . . . . . 116
Viewing Pictures . . . . . . . . . . . . . . . . . . . . . . . . . . . . 117
Viewing Slideshow . . . . . . . . . . . . . . . . . . . . . . . . . . 118
Editing Pictures . . . . . . . . . . . . . . . . . . . . . . . . . . . . 119
Sending Pictures . . . . . . . . . . . . . . . . . . . . . . . . . . . 119
Specific Absorption Rate Data . . . . . . . . . . . . . . . . . . . 121
Motorola Limited Warranty
for the United States and Canada . . . . . . . . . . . . . . . . 123
Index
. . . . . . . . . . . . . . . . . . . . . . . . . . . . . . . . . . . . . . . . 128
t
f
a
r
D
8
Page 12

Safety and General Information
Safety and General Information
IMPORTANT INFORMATION ON SAFE AND EFFICIENT OPERATION.
READ THIS INFORMATION BEFORE USING YOUR PHONE.
The information provided in this document supersedes the general safety
information in user’s guides published prior to December 1, 2002.
Exposure To Radio Frequency (RF) Energy
Your phone contains a transmitter and a receiver. When it is ON, it
receives and transmits RF energy. When you communicate with your
phone, the system handling your call controls the power level at which
your phone transmits.
Your Motorola phone is designed to comply with local regulatory
requirements in your country concerning exposure of human beings to RF
energy.
Operational Precautions
To assure optimal phone performance and make sure human exposure to
RF energy is within the guidelines set forth in the relevant standards,
always adhere to the following procedures.
External Antenna Care
Use only the supplied or Motorola-approved replacement antenna.
Unauthorized antennas, modifications, or attachments could damage the
phone.
Do NOT hold the external antenna when the phone is IN USE. Holding
the external antenna affects call quality and may cause the phone to
operate at a higher power level than needed. In addition, use of
unauthorized antennas may result in non-compliance with the local
regulatory requirements in your country.
E
R
IMI
L
N
RY
A
P
9
Page 13

Phone Operation
When placing or receiving a phone call, hold your phone as you would a
wireline telephone.
Body-Worn Operation
To maintain compliance with RF energy exposure guidelines, if you wear
a phone on your body when transmitting, always place the phone in a
Motorola-supplied or approved clip, holder, holster, case, or body harness
for this phone, if available. Use of accessories not approved by Motorola
may exceed RF energy exposure guidelines. If you do not use one of the
body-worn accessories approved or supplied by Motorola, and are not
using the phone held in the normal use position, ensure the phone and its
antenna are at least 1 inch (2.5 centimeters) from your body when
transmitting.
Data Operation
When using any data feature of the phone, with or without an accessory
cable, position the phone and its antenna at least 1 inch (2.5 centimeters)
from your body.
Approved Accessories
Use of accessories not approved by Motorola, including but not limited to
batteries and antennas, may cause your phone to exceed RF energy
exposure guidelines. For a list of approved Motorola accessories, visit our
website at
RF Energy Interference/Compatibility
Note:
interference from external sources if inadequately shielded, designed, or
otherwise configured for RF energy compatibility. In some circumstances
your phone may cause interference.
Facilities
Turn off your phone in any facility where posted notices instruct you to do
so. These facilities may include hospitals or health care facilities that may
be using equipment that is sensitive to external RF energy.
10
www.Motorola.com
Nearly every electronic device is susceptible to RF energy
E
R
P
IMI
.
L
A
N
Y
R
Page 14

Aircraft
When instructed to do so, turn off your phone when on board an aircraft.
Any use of a phone must be in accordance with applicable regulations per
airline crew instructions.
Medical Devices
Pacemakers
Pacemaker manufacturers recommend that a minimum separation of
6 inches (15 centimeters) be maintained between a handheld wireless
phone and a pacemaker.
Persons with pacemakers should:
•
ALWAYS keep the phone more than 6 inches (15 centimeters) from
your pacemaker when the phone is turned ON.
•
NOT carry the phone in the breast pocket.
•
Use the ear opposite the pacemaker to minimize the potential for
interference.
•
Turn OFF the phone immediately if you have any reason to suspect
that interference is taking place.
Hearing Aids
Some digital wireless phones may interfere with some hearing aids. In the
event of such interference, you may want to consult your hearing aid
manufacturer to discuss alternatives.
Other Medical Devices
If you use any other personal medical device, consult the manufacturer of
your device to determine if it is adequately shielded from RF energy. Your
physician may be able to assist you in obtaining this information.
Use While Driving
Check the laws and regulations on the use of phones in the area where
you drive. Always obey them.
P
E
R
IMI
L
N
RY
A
11
Page 15

When using your phone while driving, please:
•
Give full attention to driving and to the road.
•
Use handsfree operation, if available.
•
Pull off the road and park before making or answering a call if
driving conditions so require.
Responsible driving best practices may be found in the “Wireless Phone
Safety Tips” at the end of this manual and at the Motorola website:
www.Motorola.com/callsmart
.
Y
Operational Warnings
For Vehicles With an Air Bag
Do not place a phone in the area over an air bag or in the air bag
deployment area. Air bags inflate with great force. If a phone is placed in
the air bag deployment area and the air bag inflates, the phone may be
propelled with great force and cause serious injury to occupants of the
vehicle.
Potentially Explosive Atmospheres
Turn off your phone prior to entering any area with a potentially explosive
atmosphere. Do not remove, install, or charge batteries in such areas.
Sparks in a potentially explosive atmosphere can cause an explosion or
fire resulting in bodily injury or even death.
Note:
The areas with potentially explosive atmospheres referred to above
include fueling areas such as below decks on boats, fuel or chemical
transfer or storage facilities, areas where the air contains chemicals or
particles, such as grain, dust, or metal powders. Areas with potentially
explosive atmospheres are often but not always posted.
Blasting Caps and Areas
To avoid possible interference with blasting operations, turn OFF your
phone when you are near electrical blasting caps, in a blasting area, or in
areas posted “Turn off electronic devices.” Obey all signs and
instructions.
12
P
E
R
IMI
L
N
R
A
Page 16
Batteries
Batteries can cause property damage and/or bodily injury such as burns if
a conductive material such as jewelry, keys, or beaded chains touch
exposed terminals. The conductive material may complete an electrical
circuit (short circuit) and become quite hot. Exercise care in handling any
charged battery, particularly when placing it inside a pocket, purse, or
other container with metal objects.
and chargers.
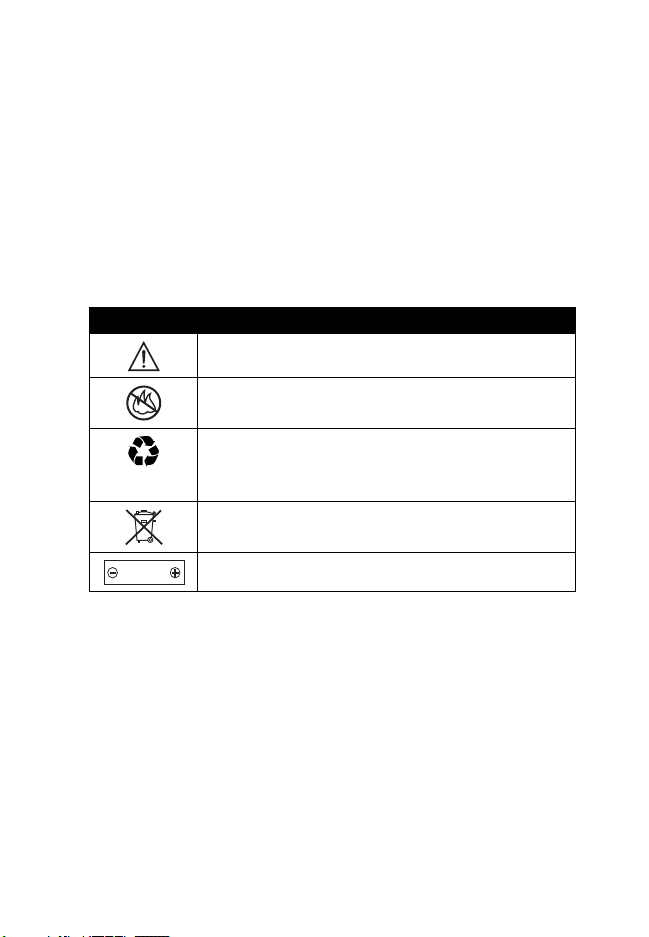
Your battery or phone may contain symbols, defined as follows:
Use only Motorola original batteries
Symbol Definition
Important safety information will follow.
Your battery or phone should not be disposed of in a
fire.
Your battery or phone may require recycling in
accordance with local laws. Contact your local
regulatory authorities for more information.
Your battery or phone should not be thrown in the
trash.
LiIon BATT
Your phone contains an internal lithium ion battery.
N
IMI
RY
A
L
Seizures/Blackouts
Some people may be susceptible to epileptic seizures or blackouts when
exposed to flashing lights, such as when watching television or playing
video games. These seizures or blackouts may occur even if a person
never had a previous seizure or blackout.
If you have experienced seizures or blackouts, or if you have a family
history of such occurrences, please consult with your doctor before
playing video games on your phone or enabling a flashing-lights feature
on your phone. (The flashing-light feature is not available on all products.)
P
E
R
13
Page 17

Parents should monitor their children's use of video game or other
features that incorporate flashing lights on the phones. All persons should
discontinue use and consult a doctor if any of the following symptoms
occur: convulsion, eye or muscle twitching, loss of awareness, involuntary
movements, or disorientation.
To limit the likelihood of such symptoms, please take the following safety
precautions:
•
Do not play or use a flashing-lights feature if you are tired or need
sleep.
•
Take a minimum of a 15-minute break hourly.
•
Play in a room in which all lights are on.
•
Play at the farthest distance possible from the screen.
Repetitive Motion Injuries
When you play games on your phone, you may experience occasional
discomfort in your hands, arms, shoulders, neck, or other parts of your
body. Follow these instructions to avoid problems such as tendonitis,
carpal tunnel syndrome, or other musculoskeletal disorders:
•
Take a minimum 15-minute break every hour of game playing.
•
If your hands, wrists, or arms become tired or sore while playing,
stop and rest for several hours before playing again.
•
If you continue to have sore hands, wrists, or arms during or after
play, stop playing and see a doctor.
IMI
L
A
N
Y
R
14
E
R
P
Page 18
European Union Conformance
European Union Directives
Conformance Statement
Hereby, Motorola declares that this product is in compliance
with
•
The essential requirements and other relevant provisions
of Directive 1999/5/EC
•
All other relevant EU Directives
RY
IMEI: 350034/40/394721/9
A
0168
Type: MC2-41H14
The above gives an example of a typical Product Approval Number.
You can view your product’s Declaration of Conformity (DoC) to Directive
1999/5/EC (to R&TTE Directive) at www.motorola.com/rtte. To find your
DoC, enter the product Approval Number from your product’s label in the
“Search” bar on the web site.
IMI
L
N
R
P
E
15
Page 19

Getting Started
What’s in the Box?
Your multimedia communicator comes with a:
•
Rechargeable battery
•
Rapid charger and regional adapter
•
Desktop charging station
•
Stylus
•
Stereo headset with send/end key
Getting Started
•
CD-ROM with PC sync software, downloadable media
files, utilities, and various applications
•
USB data cable
•
Removable memory card with SD/MMC adapter (see
Note)
•
Protective carrying case (see Note)
•
User documentation
Note:
The in-box items may vary by country. Contact 3 for
more details.
t
f
a
r
D
You can customize your communicator for maximum
performance and portability. To buy Motorola Original
accessories, contact the Motorola Customer Call Center at
1-800-331-6456 in the United States or 1-800-461-4575 in
Canada.
16
™
Page 20
For more information, visit:
www.motorola.com
www.motorola.ca
About this Guide
This user’s guide describes the basic features in your
multimedia communicator.
Note: A More Here
communicator is provided on the in-box CD that describes
your communicator’s features in more detail.
Optional Features
(United States)
(Canada)
reference guide for your
This label identifies an optional network,
USIM, or subscriber-dependent feature
that may not be offered by all service
providers in all geographical areas.
Contact your service provider for more
information.
t
f
a
r
Optional Accessories
This label identifies a feature that requires an
optional Motorola Original™ accessory.
D
Getting Started
Installing the USIM Card
Your USIM (Universal Subscriber Identity Module) card
contains your phone number, service details, and
phonebook/message memory.
17
Page 21
Caution
exposing your USIM to static electricity, water, or dirt.
Getting Started
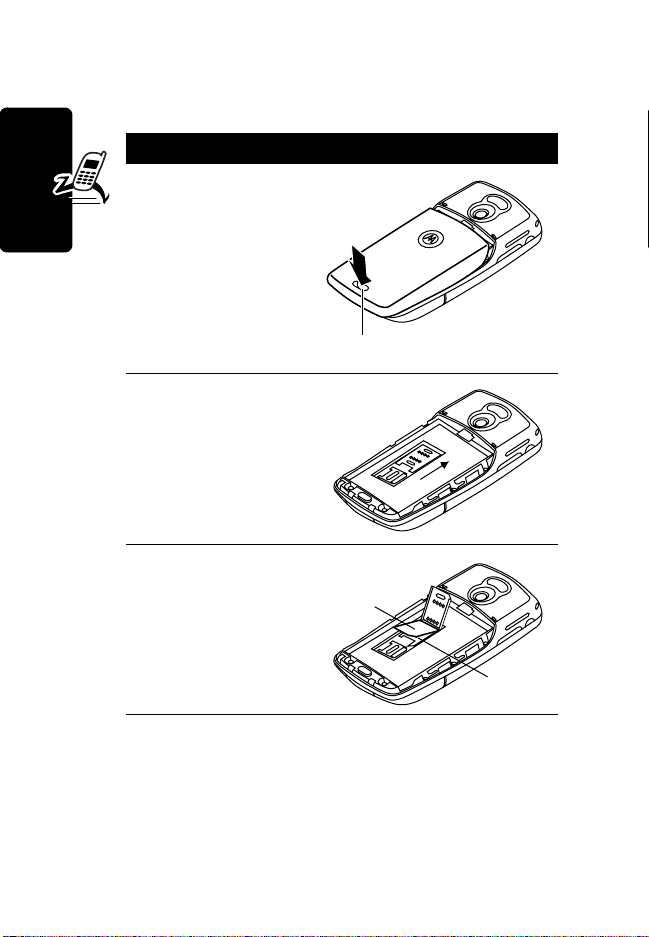
: Do not bend or scratch your USIM card. Avoid
Action
1
Push down the
release latch,
and slide the
back cover down
to remove it.
Release Latch
2
Slide the USIM
card door toward
the top, then lift
upward to open.
t
f
a
r
3
Insert the USIM
card into the tray
(gold plated
contacts facing
down, and notch
to the right).
USIM
D
Card
Notch
18
Page 22
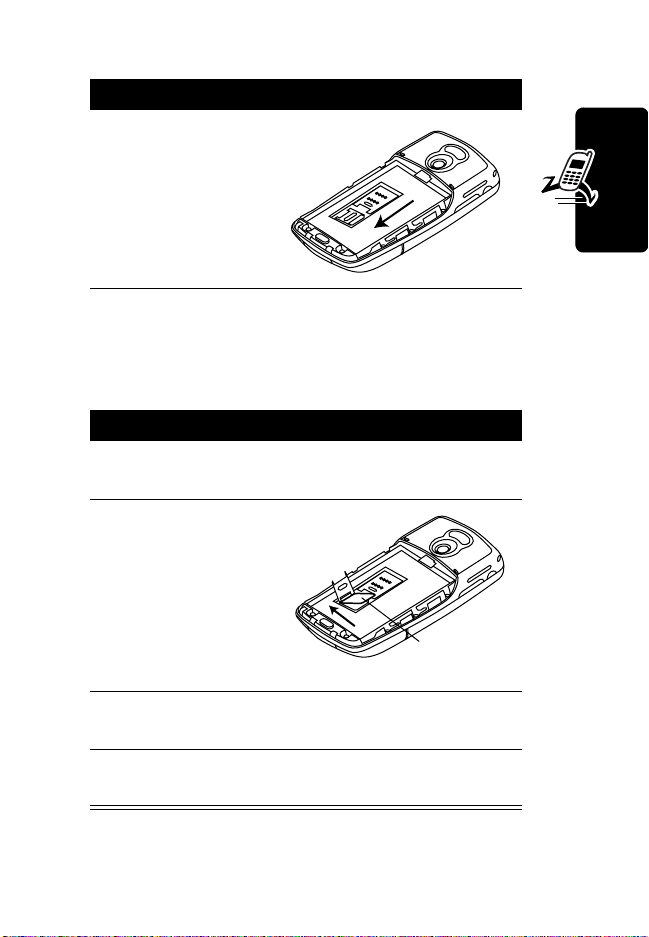
Action
4
Close the USIM
card door, then
slide downward
to lock, as
shown on the
door and in the
illustration.
Installing the Memory Card
The memory card lets you an store multimedia files, such
as audio clips, pictures, and video clips.
Action
1
If back cover is on, remove it as described in the
procedures.
2
Slide the
memory card
door to the left,
as shown in the
illustration, and
lift open.
r
D
t
f
a
Memory
Card
Getting Started
3
Insert the memory card into the tray (gold plated
contacts facing down, and notches to the right).
4
Close the memory card door, then slide
downward to lock it.
19
Page 23

Battery Use
Battery performance depends on many factors including
your wireless carrier’s network configuration; signal
strength; the temperature at which you operate your
phone; the features and/or settings you select and use;
items attached to your phone’s accessory connector
port; your voice, data, and other application usage pattern.
Caution
objects to contact or short-circuit the battery terminals.
To maximize your battery’s performance:
Getting Started
: To prevent injuries or burns, do not allow metal
•
Always use Motorola Original™ batteries and battery
chargers. The phone warranty does not cover damage
caused by using non-Motorola batteries and/or battery
chargers.
•
New batteries or batteries stored for a long time may
require a longer charge time.
•
Maintain the battery at or near room temperature
when charging.
•
Do not expose batteries to temperatures below -10°C
(14°F) or above 45°C (113°F). Always take your
phone with you when you leave your vehicle.
•
When you do not intend to use a battery for a while,
store it uncharged in a cool, dark, dry place, such as a
refrigerator.
•
Batteries gradually wear down and require longer
charging times. This is normal. If you charge your
battery regularly and notice a decrease in talk time or
r
D
t
f
a
20
Page 24
an increase in charging time, then it is probably time
to purchase a new battery.
The rechargeable batteries that power this
phone must be disposed or properly and may
need to be recycled. Refer to your battery’s
label for battery type. Contact your local recycling
center for proper disposal methods.
Warning:
may explode.
Installing the Battery
Never dispose of batteries in a fire because they
Use only Motorola Original™ batteries and
accessories. Store batteries in their protective
cases when not in use.
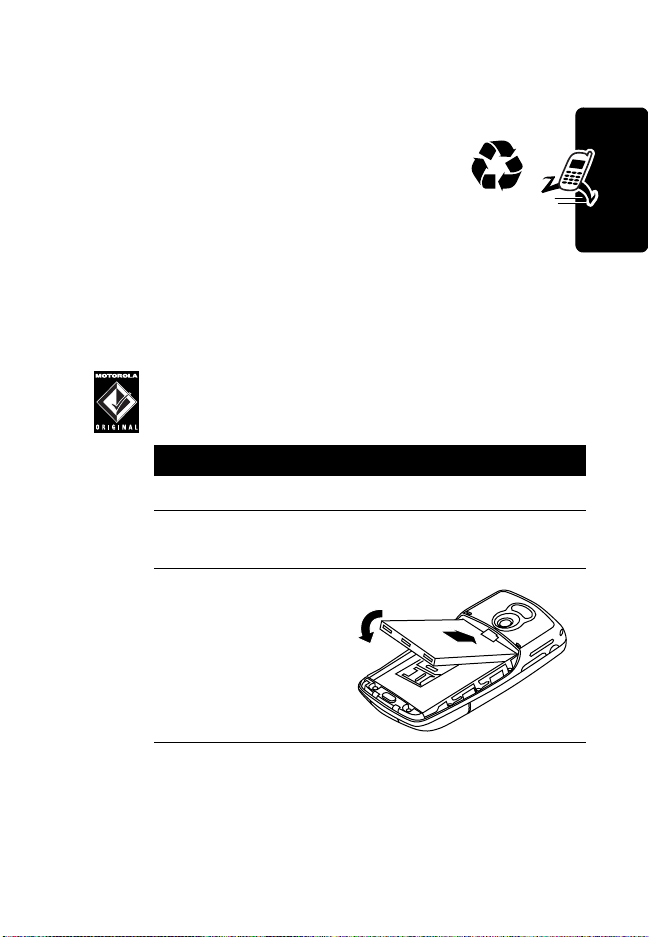
Action
1
Remove the battery from its plastic bag
2
If the back cover is on, remove it as described in
the procedures.
3
Insert the battery
under the tab
and push down.
r
D
t
f
a
Getting Started
21
Page 25
Action
4
Replace back
cover and slide
into place until it
locks.
Charging the Battery using the
Travel Charger
New batteries are shipped partially charged. Before you
Getting Started
can use your communicator, you need to install and charge
the battery, as indicated by the following instructions.
Some batteries perform best after several charge/
discharge cycles.
t
f
a
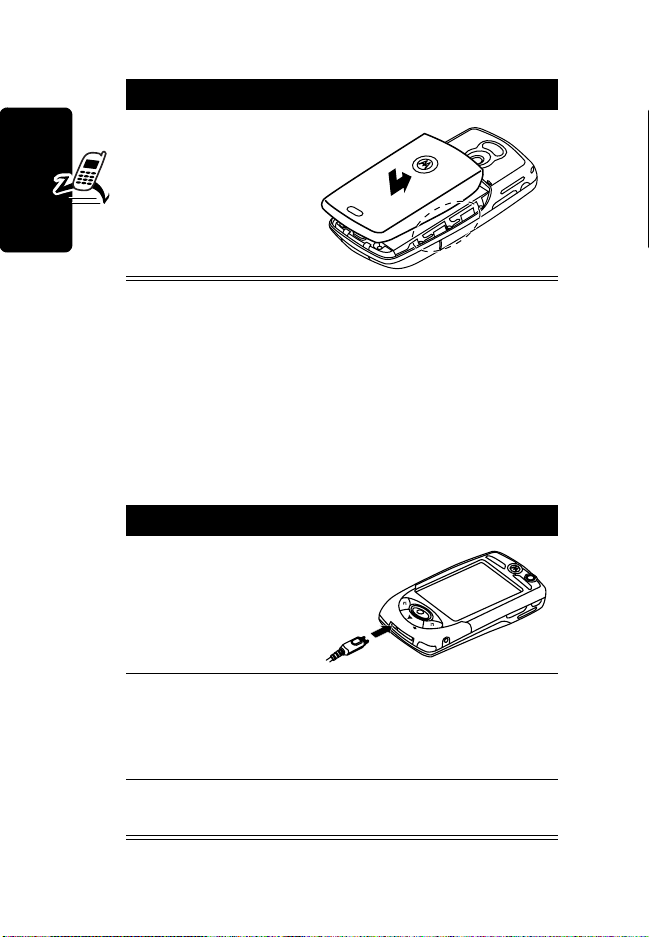
Action
1
Plug the charger
in with the
release tab up.
r
D
22
2
Plug the other end into an electrical outlet. While
the battery is charging,
battery’s current charge level (
display on the screen.
3
When
Charging Complete
release tab and remove the charger.
Charging Battery
Very Low
displays, press the
and the
to
High
)
Page 26
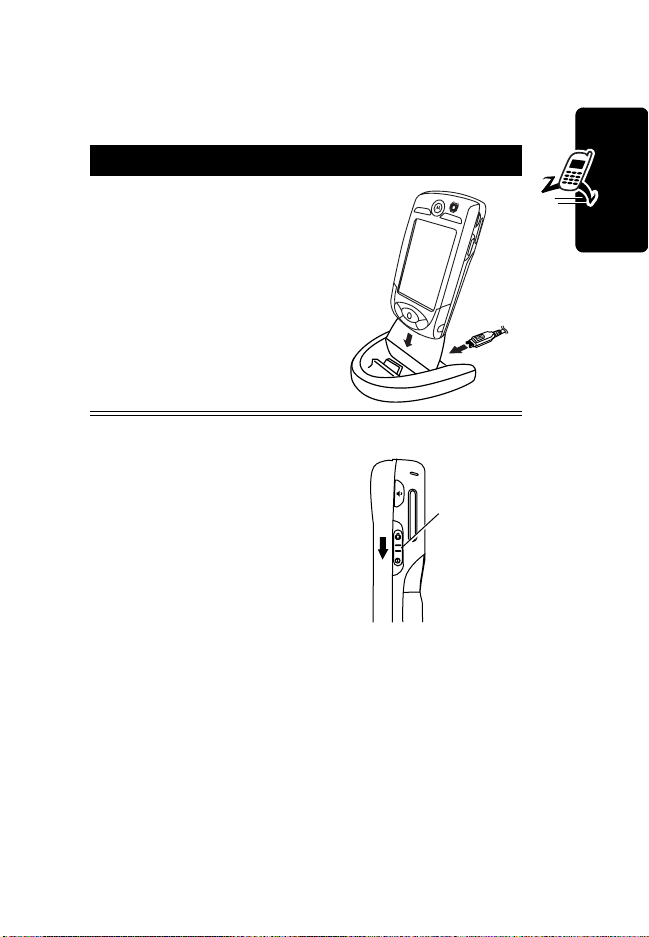
Charging the Battery using the
Desktop Charging Cradle
Action
1
Plug the travel charger,
release tab end, into the
back of the charging
cradle with the release
tab up.
2
Plug the other end into
an electrical outlet.
Getting Started
Turning Your
Communicator On
and Off
After you turn the communicator
on, your personal home page
displays after the startup
sequence (see page 38).
r
D
f
a
t
Slide switch
down for 1
second to turn
on or off.
23
Page 27

Setting Up Your Communicator for
the First Time
When you turn on the communicator for the first time,
you need to:
•
Install the A1000 Desktop Suite from the in-box
CD. See page 72 for set up and installation
procedures.
•
Select primary and secondary languages
•
Calibrate the screen for accurate screen taps (see
page 67).
•
Getting Started
Set time and date (see page 88).
Making and Answering Calls
To make and answer calls, your communicator must:
•
be turned on
•
have a USIM card installed
•
have a network connection with adequate signal
strength
r
D
t
f
a
24
Page 28
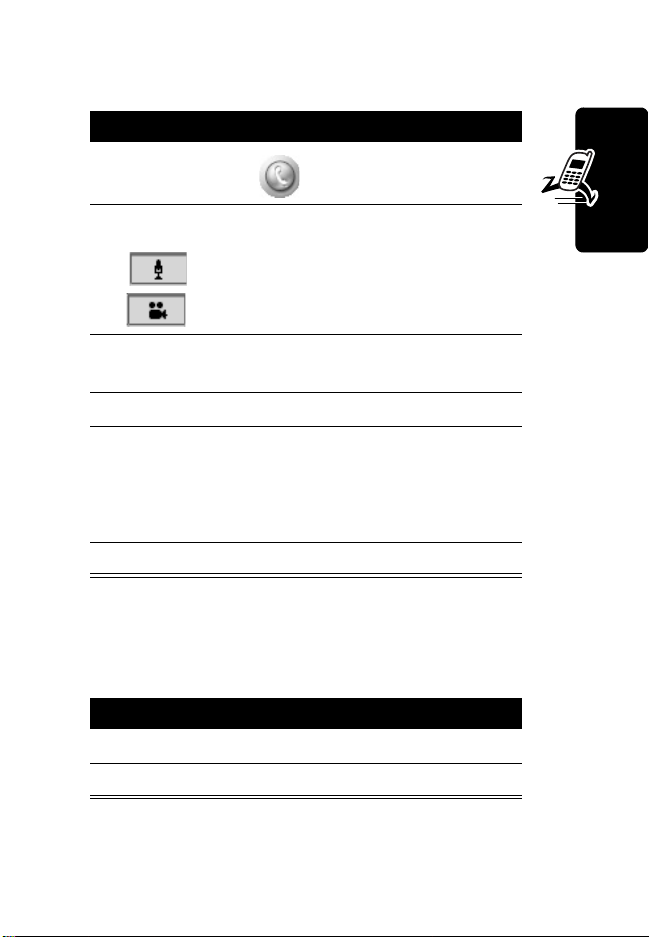
Making a Call
Action
1
PressA or tap .
2
Select a voice or video call by tapping:
voice call
video call
3
Use the stylus to tap the number you want to dial
on the keypad.
4
Press B.
5
Press a to turn on the speakerphone during
the call (see page 42).
Note:
You must be in an active call to use the
speakerphone.
6
To end the call, press A.
Answering a Call
When you receive a call, the communicator rings or
vibrates (unless set to Silent mode).
Action
1
Press B or tap
2
To end the call, press A.
D
Answer
r
.
t
f
a
Getting Started
25
Page 29
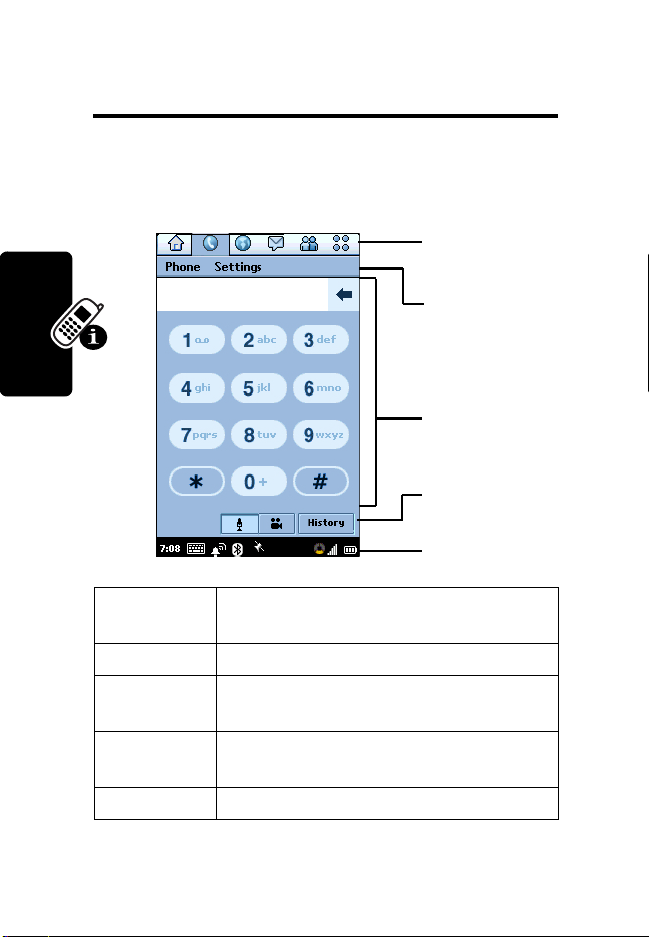
Using Your Communicator
See page 1 for a basic phone diagram.
Communicator Display
Application
Selector Bar
Menu Bar
Application
Space
t
f
Using Your Communicator
26
Application
Selector Bar
Menu Bar
Application
Space
Button Bar
Status Bar
a
r
Shows six icons that allow easy to
access to commonly used applications.
Shows menus for the open application.
Shows the open application.
Shows buttons you can select in the
open application.
Shows communicator status information.
D
Button Bar
Status Bar
Page 30
Using Touchscreen Control
The stylus fits in a compartment
on the side of the communicator.
Using the stylus, tap once on an
icon, text, or on-screen button to
select and open an item.
Using the 8-way
Navigation Key
Yo u c a n press the
Navigation
Key
Note:
This guide describes how to use touchscreen
control to use the features. In most cases, it does not
include the equivalent 8-way Navigation key for using the
feature.
navigation key up, down,
left, or right to highlight an
item. Press the center key to
select the highlighted item.
t
f
a
r
Using Your Communicator
Using the 3 Key
The 3 key (E) provides access
to unique features from 3. See the
3 welcome package for more
details.
•
Press to open the browser.
•
Press and hold for 3 seconds to go to
Note:
The default shortcut is Home. To change the
shortcut, see page 68.
D
My Shortcut
3 Key
.
27
Page 31

Using the Game Keys
Game Key A Game Key B
Game Key A and Game Key B
These keys are used when you play games on your
communication. The action of each key varies
depending on the game being played.
Tip:
You can press Game Key A (A) to open the first
(leftmost) menu in the menu bar. Press
the menu.
t
f
A
again to close
Opening Applications
Your communicator has many built-in applications for
communications, personal organization, and
entertainment. Each application has an associated icon.
a
r
D
You can open an application in the following ways:
Using Your Communicator
•
Select an icon in the Application Selector bar.
•
Select . The Application Launcher displays,
showing icons of all of your communicator’s
applications. Select the application you want to open.
Note:
You don’t have to save and close an application
before going to another. Changes or entries in the opened
application are automatically saved.
28
Page 32

The following icons open the communicator applications:
Calendar
(see page 81)
Calculator
(see page 81)
Desktop Suite
(see page 74)
Contacts
(see page 58)
Control Panel
(see page 66)
Notes
(see page 88)
Music
(see page 100)
Video
(see page 112)
SyncML
(see page 75)
SimApps
(see page 120)
a
r
D
Messaging
(see page 50)
Phone
(see page 41)
Time
(see page 88)
To d o
(see page 84)
Browse
(see page 97)
t
Pictures
f
(see page 116)
Camera
(see page 107)
Home
(see page 38)
Picsel Viewer
(see page 100)
Voice
(see page 92)
Using Your Communicator
29
Page 33

Folders
Many applications include a
group of folders. The current
folder name appears on the
right side of the menu bar at
the top of the screen.
You can use folders to
organize your entries. For
example, you can create
separate folders for
business and personal
entries.
Switching Folders
Tap the current folder name, then select a folder from the
list. To view every entry in every folder, select
t
f
a
Filing New Entry in Folder
Action
1
In the application, select a folder.
2
Using Your Communicator
30
Create a new entry. The entry is automatically
assigned to the folder.
r
D
All
.
Page 34

Moving Entry to a Different Folder
Action
1
Open the entry.
2
Select a different folder. The entry is moved to
the folder.
Adding, Renaming, and Deleting Folders
Action
1
Tap the current folder, then select
2
To add a new folder, tap
To rename a folder, tap
To remove a folder, tap
Add
Rename
Delete
.
.
.
Edit folders
t
f
.
Using Your Communicator
Status Indicators
The status bar at the bottom display the following status
indicators:
Alert
Bluetooth
Mode
Clock
Keyboard
Launcher
Clock –
display the date.
Shows the current time. Tap clock to briefly
Status
Location
Mode
a
r
D
Phone
Network
Message
Battery
Strength
Signal
Strength
31
Page 35

Keyboard Launcher –
keyboard. (The keyboard displays only when the cursor is
in a text-entry field.)
Alert Mode –
Audio: Vibrate: Silent:
The alert mode indicates how the communicator notifies
you of an incoming call or message.
To change the alert mode, tap the indicator, then select
a new setting.
Shows the current alert mode:
Tap to display the on-screen
Bluetooth Status –
status:
On: White Off: Gray
Tip:
You can tap the icon, then select to turn on or turn off
Bluetooth (see page 72).
Location Mode –
System) Location service is off, idle (in standby), or busy
(requesting location information). The color indicates the
Location mode:
Off: Gray Idle: White Busy: Green
Using Your Communicator
To turn the Location service on or off, tap the indicator,
then select the setting you want. The Location service
allows you to track your current location on the
communicator screen.
Phone –
32
Shows the status of an active call:
Connected: Muted:
Shows the current Bluetooth
t
f
Shows if the GPS (Global Positioning
a
r
D
Page 36

When not in an active call:
Voicemail waiting:
Videomail waiting:
Note:
Videomail may not be offered by all
service providers in all geographical areas.
Message –
type of message:
Email: SMS: MMS:
If an MMS or SMS message sender’s phone number is
in your Contact list, the indicator is white. If the sender’s
phone number is not in your Contact list, the indicator is
amber. If multiple types of new messages are available,
displays.
Network –
No service: (gray)
Emergency service: (red)
Connected to GSM home network: (one green
segment)
Connected to GPRS home network: (two green
segments)
Connected to 3G home network: (three green
segments)
Shows that you have a new message and the
t
Shows the type of network service connection:
f
a
r
D
Using Your Communicator
Roaming to non-home type network: (three amber
segments)
Airplane mode (phone disabled):
33
Page 37

To turn Airplane mode on or off, tap the indicator, then
select the setting you want (see page 49).
Signal Strength –
more bars, the stronger the network signal.
Shows the network signal strength. The
Battery Strength –
battery. The more bars, the greater the charge. The
indicator is amber when the communicator is using a large
amount of battery power, such as during a video call.
When displays, the battery is charging, and when
displays, the battery cannot receive a charge.
Entering Text
Two text entry methods make it easy to enter names,
numbers, and text messages on your communicator.
Shows the amount of charge in your
t
f
Handwriting Recognition
Note:
You can use the handwriting pad only when the
screen cursor is in a field that allows you to enter text.
You can use the stylus as a pen to write letters, numbers,
and punctuation. To write with the stylus, tap in the
status bar. The handwriting pad or the keyboard displays
Using Your Communicator
a
r
D
34
Page 38

(depending on which you used last). If the keyboard
displays, tap , then tap
Tap to w ri t e
letters
Tap to w ri te
numbers
Tap to w ri te
special
characters
To write, tap the letter, number, or characters button on the
left side of the handwriting pad. Then use the stylus to
write in one of the two writing spaces. For best
performance, alternate between the writing spaces so
recognition can occur in one while you write in the other.
To enter punctuation marks, special characters, spaces,
and returns, tap the buttons beneath the writing spaces.
Handwriting
Writing spaces
in the popup menu.
t
f
a
r
D
Using Your Communicator
35
Page 39

Virtual Keyboard
Note:
You can use the keyboard only when the screen
cursor is in a field that allows you to enter text.
To use the on-screen keyboard to type text, tap in the
status bar. The handwriting pad or the keyboard displays
(depending on which you used last). If the handwriting pad
displays, tap again, then tap
popup menu.
To type, tap the keyboard keys with the stylus.
Roman Keyboard
in the
t
f
a
Using AGPS Location Information
r
Your communicator can use Assisted Global Positioning
Service (AGPS) to tell the network where you are
physically located.
Using Your Communicator
To change your Location Mode setting, tap the Location
Mode icon ( ) in your communicator’s status bar
(page 32).
Limitations of AGPS
Sometimes adequate signals from multiple satellites are
unavailable, usually because your AGPS phone’s antenna
36
D
Page 40

cannot establish a view of a wide area of open sky. In
these cases, the AGPS feature
situations include, but are not limited to, the following:
•
in underground locations
•
inside of buildings, trains, or other covered vehicles
•
under any other metal or concrete roof or structure
•
between tall buildings or under dense tree cover
•
near a powerful radio or television tower
•
when your AGPS antenna is covered (for example,
by your hand or other object) or facing the ground
•
when there are temperature extremes outside the
operating limits of the phone
Even where location information can be calculated in such
situations, it may take more time than usual, and your
location estimate may not be as accurate. Walking or
driving very slowly may also substantially reduce AGPS
performance.
Even where adequate signals from multiple satellites are
available, your AGPS feature will provide only an
approximate location, often within 150 feet (45 meters) but
sometimes much farther from your actual location.
will not work
a
r
D
. Such
t
f
Using Your Communicator
The satellites used by your phone's AGPS feature are
controlled by the U.S. government and are subject to
changes implemented in accordance with the Department
of Defense AGPS user policy and the Federal Radio
Navigation Plan. These changes may affect the
performance of your phone's AGPS feature.
37
Page 41

Home Screen
The Home screen shows a variety of content. This could
be a summary of your appointments, messages, and
personal links to content such as news, entertainment, and
sports.
Displaying the Home Screen
The Home screen displays after the startup sequence
when you turn on the communicator. You can also display
the Home screen by tapping in the Application
Selector bar.
38
Home Screen
Screen Contents
D
a
r
t
f
Application
Selector Bar
Information
Snacks
Personal
Information
Application
Shortcuts
Page 42

Information Snacks
received information snacks (headlines). Tap a snack to go
to a Web page with more information.
Note:
See the 3 welcome package for information about
information snacks.
– Shows the three most recently
Personal Information
displayed in your Personal Information section. Depending
on the items you select, this section shows the number of
new voicemail, messages, appointments, and active tasks
you have.
Application Shortcuts
your favorite applications.
– Shows information you want
– Shows 3 icons for fast access to
t
f
a
r
D
Home Screen
39
Page 43

Personalizing Home Screen
Action
1
Go to the Home screen (if not already shown).
2
Tap
Note:
tab, then tap
details.
Home Screen
Home>Preferences
3
Tap
Events
tab.
4
Select up to six items you want displayed in the
Personal Information section by tapping the
appropriate checkbox.
Note:
When six items are already selected, the
other items are no longer selectable. To change
or add a selection, you must remove the
checkmark from a currently selected item.
5
Tap
Applications
6
Select the three applications you want displayed
in the Applications Shortcuts section, then tap
Done
.
To receive updated information from 3, tap
Update
. Refer to the 3 package for more
.
tab.
a
r
D
t
f
Contents
40
Page 44

Calling Features
Opening Phone Application
Use the Phone application to make voice and video phone
calls. You can open this application in the following ways:
•
Press B. When the Phone application opens, a list of
the most recently dialed calls displays.
•
Press A or tap in the Application Selector bar
or Application Launcher. When the Phone application
opens, the dialing keypad displays:
Tap to
t
Display
f
erase last
digit
a
Tap ke y s
to dial
number
r
D
Tap to
place
voice call
Calling Features
Tap to place video
call
Tap to switch between
keypad and call list
41
Page 45

Displaying Your Phone Number
Your phone number must be programmed on your USIM
card to use this feature. Tap in the Application
Selector bar. Tap
shows your phone number(s).
Using the Internal
Speakerphone
To turn on the internal
speakerphone during an
incoming or active call,
press
a
.
Phone
>
My line(s)
. The communicator
Speakerphone
Key
Speakerphone
Port
Adjusting the
Volume
Press the top of the volume key
Calling Features
to increase volume or the
bottom of the key to decrease
volume for the earpiece,
speakerphone, or headset
during a call.
42
a
r
D
t
f
Volume
Keys
Page 46

Making a Voice Call
Dialing with the Keypad
Action
1
Tap in the Application Selector bar or
Application Launcher.
2
Select a voice call by tapping ( )
3
Tap the phone number on keypad.
4
If you make a mistake while dialing, tap to
delete the last digit entered. Tap and hold to
delete multiple or all digits.
5
Press B to make the call.
t
f
a
Dialing Stored Phone Numbers
You can automatically dial stored phone numbers (see
page 58)
Redialing Failed Voice Calls
If a voice call fails (busy or not answered),
displays. To redial the call, tap the
Making a Video Call
You can make video calls to other devices that have video
call capabilities.
r
D
Retry
Call Failed
button.
Calling Features
43
Page 47

Making a Video Call to Another Phone
You can make a video call to another phone by dialing the
phone number on the keypad.
Shortcut:
stored phone numbers.
Calling Features
You can automatically place video calls to
Action
1
Tap in the Application Selector bar or
Application Launcher.
2
Position the front camera lens or P2P (point-topoint) lens so that it faces the image you want to
send, (see page 108.)
Note:
The speakerphone automatically turns on
during a video call.
3
Tap the phone number on keypad.
If you make a mistake while dialing, tap to
delete the last digit. Tap and hold to delete
multiple or all displayed digits.
r
t
f
a
D
44
Page 48

Action
4
Ta p .
When the call connects, the screen shows the
remote camera image on top and the local image
on the bottom.
Remote image
t
f
Local image
a
r
Calling Features
Making a Video Call to a Computer
To make a video call to a computer, you
can use:
• Call History List
in your call history list, tap the email
address you want to call.
• Contacts
page 58.
– To call stored phone numbers, see
D
– To call a computer
45
Page 49

• Embedded email address
email address, tap the address in an email, SMS,
MMS, or text message, or an HTML page.
Calling an Emergency Number
Your service provider may program one or more
emergency phone numbers, such as 911 or 112, that you
can call under any circumstances, even when your
communicator is locked or the USIM card is not inserted.
Your service provider can program additional
emergency numbers into your USIM card.
However, your USIM card must be inserted in
your phone in order to use the numbers
stored on it. See your service provider for
additional information on this issue.
Note:
Emergency numbers vary by country. Your
communicator’s preprogrammed emergency number(s)
Calling Features
may not work in all locations, and sometimes an
emergency call cannot be placed due to network,
environmental, or interference
– To call a computer’s
t
f
a
r
issues.
D
Using AGPS During an Emergency Call
When you make an emergency call, your phone's
assisted-Global Positioning System (AGPS) feature can
calculate your approximate location and help emergency
service personnel find you.
46
Page 50

Notes:
•
This feature can work only if the emergency response
center can receive and process location information. If
you are concerned about whether your local
emergency response center can receive AGPS
location information, contact your local authorities.
•
In order for the AGPS feature to work when making
emergency calls, the service must be turned on (see
page 32).
For best results, you should be located where your phone’s
antenna can establish a clear view of the open sky. This
allows your phone to access AGPS satellite signals. Even
under good conditions, it may take 30 seconds or more to
determine your approximate location. This time increases
and the accuracy of the results decreases with reduced
access to satellite signals.
If your communicator does not have access to AGPS
satellite signals, the location of the nearest cell tower in
contact with your phone is automatically provided to the
emergency response center.
r
t
f
a
D
Because of the limitations of the AGPS feature, always
provide your best knowledge of your location to the
emergency response center, just as you would when using
a phone without AGPS capabilities. Also, remain on the
phone for as long as the emergency response center
instructs you.
Calling Features
47
Page 51

Dialing the Call
Action
1
Press keypad keys to dial the emergency
number.
2
Press B to call the emergency number.
Answering Calls
When you receive an incoming voice or video call, the
communicator rings or vibrates (unless set to Silent
mode).
Action
Press B or tap
Note:
Pressato turn on the speakerphone.
Calling Features
If you do not want to accept the call, press
Busy
.
Answer
to answer the call.
r
t
f
a
A
or tap
48
Notes:
Video calls display to the left of the call.
D
Page 52

Switching to Airplane Mode
If you want to use the commuicator’s personal organization
and entertainment features in a situation where telephone
use is not allowed (such as on a plane), switch the
communicator to Airplane mode.
In Airplane mode, you cannot connect to the network to
make phone calls or send messages. Also, Bluetooth and
GPS Location service are not available.
Action
1
Tap the Network indicator ( ) in the Status bar.
2
In the Connection Mode box, tap
3
Ta p
Done
.
displays when the communicator is in
Airplane mode.
4
To return to normal operation, tap , then tap
Handset On
.
a
r
Aeroplane Mode
t
f
.
Calling Features
Turning off Call Ringing
You can turn off ringing for incoming calls by setting the
communicator’s alert mode to vibrate or silent (see
page 32).
D
49
Page 53

Messages and Email
You can create, send, and receive email, MMS (Multimedia
Message Service), and SMS (Short Message Service)
messages.
To send stored audio, video, and picture files with your
email and MMS messages. See the “News and
Entertainment” beginning on page 97.
Setting up Messaging Accounts
Before you can send and receive messages,
you must set up your accounts. Contact your
service provider for account details.
t
f
Email
To send and receive email, you must set up an Internet
account and an email account
The communicator supports IMAP4, POP3, and SMTP
protocols.
To create an Internet account:
Messages and Email
50
Action
1
Open Control Panel application ( ).
2
Tap
Connections
tab.
3
Tap
New
tab >
.
a
r
D
Internet accounts
>
Accounts
Page 54

Action
4
Enter information about your account.
5
Ta p
Done
.
To create an email account:
Action
1
Open Control Panel application ( ).
2
Ta p
Connections
tab.
3
Ta p
New
4
Enter information about your account on the
Basic, Inbox, Outbox
5
Ta p
Done
tab >
Messaging accounts
.
>
Email
t
, and
Advanced
.
tabs.
f
a
Note:
See the A1000
in-box CD for more information.
MMS and SMS
Your service provider should already have set up MMS and
SMS (text messages) accounts on your communicator.
To check account settings:
More Here
r
reference guide on the
D
Messages and Email
Action
1
Open Control Panel application ( ).
2
Ta p
Connections
tab >
Messaging accounts
.
51
Page 55

Action
3
Tap the
Info Service
left and right arrows to move between the
account tabs.
Opening Messaging Application
Use the Messaging application to create, send, and
receive messages.
Action
Tap in the
Application Selector bar
or Application
Launcher. When the
Messaging application
opens, it shows a list of
your established
accounts.
Note:
stores data received
using Bluetooth (see
Messages and Email
page 72).
Email, Text message, Multimedia message
tabs to view account settings. Tap the
t
f
a
r
The account
D
, or
52
Page 56

Creating and Sending Messages
Email and SMS
Action
1
Tap the email or SMS account in the list of
accounts.
2
Ta p
Message
>
New
.
3
Ta p
Text only, Media only
Done
.
4
In the To field, enter the recipient’s address
(email) or phone number (SMS).
, or
Text & media
, then tap
To enter a stored address or phone number from
Contacts, tap
To enter several addresses or phone numbers,
enter a comma between each.
5
In the
Subj
6
In the text area, write the text message.
7
To add an attachment, tap the tab, then tap
Add
.
8
In the
Type
attach, then tap
9
Tap the stored file you want to attach, then tap
Add
.
Note:
that are forward-locked.
10
When message is complete, tap
To
.
field (email only), write a subject line.
r
D
field, select the file type you want to
Done
.
You cannot send or forward media files
f
a
Send
t
.
Messages and Email
53
Page 57

Note:
If you accept a video call while composing an email
or SMS message, the message is automatically saved to
either the email or SMS draft folder.
MMS
You can create and send MMS messages that contain one
or more slides with audio, video, images, and documents.
Action
1
Tap the MMS account in the list of accounts.
2
Tap
Message
>
New
.
3
Tap
Text only, Media only
Done
.
The first slide of the message displays:
, or
Text & media
, then tap
t
f
a
r
Messages and Email
54
D
Duration label
Image area
Text area
Page 58

Action
4
In the To field, enter the recipient’s phone number
or email address. (The recipient must also
subscribe to MMS messaging.)
To enter a stored number from
To enter several phone numbers, enter a comma
between each.
5
Tap to add a sound. You can then record a
new sound or select a stored audio file.
You can add WAV and AMR audio files to an
MMS message.
Note:
You cannot send or forward media files
that are forward-locked.
6
Tap to add an image, then select a stored
image file.
Contacts
f
a
, tap To.
t
r
You can add the following types of stored image
files to an MMS message: BMP, WBMP, GIF,
PNG, JPEG, and TIFF.
Note:
You cannot send or forward media files
that are forward-locked.
7
Tap the text area to place a cursor in the text
area. Enter text with stylus or virtual keyboard.
D
Messages and Email
55
Page 59

Notes:
Messages and Email
Action
8
To set the slide duration, tap the duration label
(
10/10s
). Specify how long (in seconds) you want
the slide to play before automatically advancing
to the next slide in the message.
The first number in the duration label indicates
the duration of the current slide. The second
number indicates the total duration of all slides in
the message.
9
To add another slide to the message, tap .
10
To play the slide presentation, tap
11
When message completes, tap
t
Send
Play
.
.
f
a
•
The maximum file size of an MMS message is 30 KB.
If you exceed this size, a warning message displays.
Remove audio or video files to reduce the file size.
•
If you accept a video call while composing and email
or SMS message, the message is automatically saved
to either the email or SMS draft folder.
r
D
56
Page 60

Receiving and Reading Messages
When a new message is received, a message indicator
displays in the status bar (see page 31).
Action
1
Tap the message indicator in
The Messaging application opens, showing a list
of established accounts. The number of unread
messages displays next to each account.
2
Tap the account containing the message you
want to read.
A list of messages displays. Unread messages
display in bold.
3
Tap the message you want to read.
4
Attachments display with a . Tap the
attachment to open it.
a
r
Status
f
bar.
t
D
Messages and Email
57
Page 61

Contact List
Use the Contacts application to store details such as
names, phone numbers, and email addresses in an
alphabetical list of entries. You can call or send a
message to any stored contact from this list.
Opening Contacts Application
Tap in the Application Selector bar or Application
Launcher. An alphabetical list of stored contacts displays:
Contact List
t
f
a
r
D
The following icons can display next to a contact name:
– Displays if contact has a voice tag assigned to a
phone number (see page 62).
– Displays if contact is saved in the USIM folder.
58
Page 62

To see each contact’s preferred phone number next to their
name, tap
phone number
Adding Contacts
Action
1
2
Edit >Preferences,
tab.
Open the folder in which you want to save the
contact. To store the contact on your USIM card,
open the USIM folder.
Ta p
Contacts >New
to display the
Contact information
form.
then tap the
Show preferred
t
f
a
r
D
Contact List
3
Enter contact name, phone numbers, email
address, and other information.
59
Page 63

Contact List
Action
Note:
If you enter more than one phone number,
(for example, a work and home number), you can
select which number displays in the contact list
as the preferred phone number. To do so, tap
Edit>Preferred number,
preferred phone number from the list.
4
Tap preceding each phone number to select
its communication method: Phone (land line),
Mobile, Email, Web, or Web call (email address
for 2-stage dialing video call).
5
To record a voice tag, refer to “Recording Voice
Tags for Contacts” on page 62.
6
To assign a unique ring tone to the contact, tap
the down arrow, if necessary, then tap the
tone
box.
7
Select a tone from the list. When you receive a
voice or video call from this contact, the selected
ring tone plays.
8
Tap to play the selected ring tone.
9
To add a new field to the contact, tap
Field
. “Adding New Fields” on page 61.
Note:
This step is optional. However, the fields
must be added when entering the contact
information. You can not add new fields after you
save the contact.
then select the desired
t
f
a
r
D
Edit
>
Ring
Add
60
Page 64

Action
10
To add a note to a contact, tap , then enter the
note.
11
You can mark a note as Private. Private notes
are not included when you send or synchronize
contact details.
12
To assign a stored photo or image to the contact,
tap , then , then select the photo or
image.
or
tap to take a photo
Contact List
The contact’s assigned image displays when you
make a call to or receive a call from the contact.
13
When you have entered all contact information,
tap .
The contact now displays in the alphabetical list
of contact names.
Adding New Fields
Action
1
When entering information for a new contact, tap
Edit >Add field
2
Ta p
New Field
.
, then the field from the list.
r
D
t
f
a
61
Page 65

Action
3
Tap
Add
.
The Contact Information form displays and
field)
displays next to the added field.
4
Repeat these steps to add more fields.
Recording Voice Tags for Contacts
You can record a voice tag when adding a new contact
(page 59), or when editing a contact (page 64).
Note:
Contact List
The contact must have at least one phone number
entered to assign a voice tag.
You can record a voice tag for all phone numbers for a
contact. However, each phone number must have a unique
voice tag.
Tip:
Make your recording in a quiet location. Hold the
communicator about 4 inches (10 centimeters) from your
mouth, and speak directly into the communicator in a
normal tone.
r
t
f
a
D
Action
1
When adding or editing a contact, tap the
tag
box under the phone number.
2
When prompted, tap
desired voice tag.
Record
and speak the
(new
Voice
62
Page 66

Action
3
When prompted, tap
voice tag.
A checkmark (
voice tag has been recorded.
4
Tap the field next to the
Voice call
5
Repeat these steps to record additional voice
tags for this contact.
Deleting Voice Tags
Action
or
Video call
o
) in the
Record
.
again and repeat the
Voice tag
box indicates the
Voice tag
box, then select
Contact List
1
Tap in the Application Selector bar or
Application Launcher to display your list of
contacts.
2
Tap a contact in the list.
3
Ta p
Edit >Edit Contact
4
5
Tap the
delete.
Ta p
Yes
Voice tag
.
box for the tag you want to
r
.
D
t
f
a
63
Page 67

Editing Contacts
Action
1
Tap in the Application Selector bar or
Application Launcher to display your list of
contacts.
2
Tap a contact in the list.
3
Tap
Edit >Edit Contact
Note:
Your changes are automatically saved.
Contact List
Communicating with Contacts
.
You can easily phone, email, or send messages to your
stored contacts.
t
f
Action
a
r
D
64
1
In the list of contact
entries, tap the
contact name. The
contact’s defined
phone numbers and
email addresses
display:
Page 68

Action
A phone number or email address might have
additional icons next to it, depending on its
defined communication method.
2
Tap the icon for the call or message you want:
or Voice Call to a phone
Video Call to a phone or computer (for
phone number contacts)
Video Call to a computer (for email address
contacts)
Email message to a phone or computer
MMS message to a phone or computer
SMS message to a phone
t
f
Using Voice Dialing
Press and release a
(speakerphone key) then say
the recorded voice tag within 2
seconds.
a
r
D
Contact List
Speakerphone
Key
Speakerphone
Port
65
Page 69

Customizing Communicator
Settings
Setting the Wallpaper Image
You can set an image to display in the background of the
Application Launcher.
Action
1
Open Application Launcher ( ).
2
Tap
View
>
3
4
Tap
Background
Find image
Tap
Done
Appearance
to select a stored image.
.
.
and select from the list, or select
t
f
a
Setting the Screen Brightness
Action
r
D
1
Open Control Panel application ( ).
Note:
Ta p
Screen
from the
2
Slide the
3
setting.
Tap
Customizing Communicator Settings
Done
Brightness
.
switch button to the desired
Handset
tab.
66
Page 70

Setting the Screen Calibration
Action
1
Open Control Panel application ( ).
2
Ta p
Screen
from the
3
Ta p
Calibrate
4
When prompted, tap the center of points 1, 2,
and 3 to calibrate the screen.
or
Press the center of the screen to reset
calibration to the factory default setting.
or
Press S in any direction to exit without making
changes.
5
Ta p
Done
.
.
Handset
tab.
t
f
a
r
Setting the Volume for System Sounds
Set the volume level for screen taps, button presses,
alerts, and system notices.
Action
D
Customizing Communicator Settings
1
Open Control Panel application ( ).
2
Ta p
Sound
from the
3
Select desired settings for button clicks, screen
taps, ringer, and alert mode.
4
Ta p
Done
.
Handset
tab.
67
Page 71

Setting a 3 Key Shortcut
The 3 key (E) has 1 default shortcut setting, Browser,
and one shortcut that you can customize to open your
favorite application, for example, Camera.
Action
1
Open Control Panel application ( ).
2
Tap
Shortcut key
3
Select an application from the list.
4
Tap
Done
.
from the
Handset
tab.
Choosing Ring Tones
When you set the alert mode to audio, the communicator
rings during an incoming call or message (see page 32).
Personalized ring tones assigned to stored contacts
override the ring tones you select here (see page 59).
t
f
a
r
Choosing Ring Tones for Calls
68
Action
1
Open the Phone application ( ).
2
Tap
Settings
3
Customizing Communicator Settings
Select the ring tones you want for line 1, line 2 (if
applicable), video, voicemail, and videomail.
To hear the selected ring tone, tap .
4
Select a setting for
5
Tap
Done
.
>
D
Tones
.
Keypad
tones.
Page 72

Choosing Ring Tones for Messages
Action
1
Open the Messaging application ( ).
2
Ta p
Edit
>
Preferences
3
Select the ring tones you want for each
messaging account.
To hear the selected ring tone, tap .
4
Ta p
Done
.
.
Choosing a Vibrate Pattern
When you set the alert mode to vibrate, the communicator
vibrates to indicate an incoming call or message. You can
select from the different vibrate patterns provided.
Note:
See page 32 to view and set the alert mode.
t
f
a
r
Action
1
Open Control Panel application ( ).
2
Ta p
General
tab.
3
Ta p
Ringtune Manager
4
Tap the
5
Tap the vibrate pattern you want to use. To test
the pattern, tap the left arrow.
6
Ta p
Done
Vibrate
.
D
.
tab.
Customizing Communicator Settings
69
Page 73

70
t
f
a
r
D
Customizing Communicator Settings
Page 74

Getting More Out of Your
Communicator
Installing the A1000 Desktop Suite
Important:
another device such as a computer or Bluetooth device,
install the A1000 Desktop Suite, located on the in-box CD.
Follow the on-screen prompts for installation instructions.
This program enables you to establish a connection with a
computer or Bluetooth device to:
•
Synchronize email and Calendar, Contacts, and To Do
entries between your communicator and a
computer
•
Back up and restore information between your
communicator and a computer
•
Transfer files between your communicator and a
computer
•
Install applications on your communicator
Before connecting your communicator to
t
f
a
r
D
Getting More Out of Your
Communicator
71
Page 75

Connecting a Bluetooth Device
Important:
Bluetooth device, set up the other device as described in
its user guide.
Communicator
Before connecting your communicator to a
Action
1
Open Control Panel application ( )
2
Tap
Connections
3
Tap the
Your communicator searches for all Bluetooth
enabled devices in the vicinity.
or
Tap
Show
then tap
4
In the list of available devices, tap the one you
want to bond.
If prompted, enter a passkey, then tap
A passkey is a set of numbers or letters (at least
four characters) that you agree to exchange with
the owner of the other device. When the
communicator accepts the passkey, the bonding
process completes.
tab >
Devices
Bluetooth
tab, then tap
.
Add
.
t
, select from the list of available devices,
Refresh
,
f
a
r
Done
D
.
Getting More Out of Your
72
Page 76

Changing Your Bluetooth Settings
Action
1
Open Control Panel application ( )
2
Ta p
Connections
3
To turn on Bluetooth, tap the box next to
on
. A check mark in the box indicates Bluetooth
hardware is turned on.
4
Tap a selection in
5
You can change your
below), and enter a Bluetooth name for your
communicator.
6
Ta p
Done
tab >
Bluetooth >Settings
Visible for other devices
Receiving items
.
settings (see
t
f
tab.
Bluetooth
.
Receiving Items
communicator does when it receives information from
connected Bluetooth devices.
Setting Description
Always receive
Ask first
Never receive
settings determine what your
a
r
D
accepts the information
prompts you to accept the
information
rejects the information
Getting More Out of Your
Communicator
73
Page 77

Connecting to a Computer
Important:
computer, ensure the A1000 Desktop Suite, located on the
in-box CD has been installed.
Setting Up a USB Cable Connection
Connect the USB cable from the accessory port on the
bottom of the communicator to the USB port on the
computer.
To complete the connection, tap (
Application Launcher, then tap
Setting Up a Bluetooth Connection
Communicator
Getting More Out of Your
Before connecting your communicator to a
Desktop Suite
Connect
.
Action
1
Make sure the PC is Bluetooth enabled, then
establish a connection as described on page 72.
2
Open Control Panel application ( )
3
Tap
Connections
4
In the
Link using
5
To s el ec t a
then tap
6
To complete the connection, tap (
Suite
Connect
Preferred PC
Done
.
) in the Application Launcher and tap
.
r
tab >
Desktop Suite
D
, field tap
t
f
a
.
Bluetooth
, tap the box next to it,
.
Desktop
) in the
74
Page 78

Using the Desktop Suite
After connecting your communicator to the computer, start
the A1000 Desktop Suite program on the computer. Refer
to the A1000 Desktop Suite online help for more
information about using the program.
Using Remote Synchronization
The communicator allows you to synchronize Calendar, To
Do, and Contract entries over the air (OTA) with a
synchronization server. It is designed to synchronize with
basic features of the initial release of many popular
Personal Information Management (PIM) software and
hardware products.
t
Setting Up Your Account
To use remote synchronization, contact your service
provider to set up an account. To synchronize over the
Web, you also need an Internet account.
f
a
r
D
Getting More Out of Your
Communicator
75
Page 79

Configuring the Settings
When you have your account information, you can
configure the communicator for remote synchronization.
Action
1
Tap ( ).
2
Tap
Edit >Settings
3
Enter the
4
Tap
Done
.
5
Tap on a task you want to enable.
6
Tap
Enable task
7
Enter the path to the
8
Tap
Done
.
9
Tap
Edit >Settings
10
Tap
Use transporter login
11
12
Enter a
Tap
Done
Username
.
.
Server address, Username
checkbox.
Server database
t
f
, then tap the
a
checkbox.
r
and
Password
.
D
, and
.
Protocol
Password
tab.
.
Communicator
Getting More Out of Your
76
Page 80

Using Picsel Viewer
Picsel Viewer automatically reformats many popular file
formats such as text, presentation, and database
management files, to fit in the display area of your
communicator.
Use Picsel Viewer to open documents from the internet,
received messages, and documents stored on your A1000
communicator or personal computer. The stylus and icons
allow you to open, scroll, zoom, and navigate through
documents with ease.
Opening Documents
Action
1
Open Picsel Viewer ( ).
2
Locate the document from your saved
History
list, folders, or lists.
3
Tap on the document name to open it.
Document
options such as send, delete, rename, view
history, and bookmarks.
options allows you to display and select
r
D
t
f
a
Bookmarks
,
Getting More Out of Your
Communicator
77
Page 81

Navigating Documents
Icons on the navigation bar allows you to easily zoom in
and out, change views, and move to other pages of the
document.
Document
Options
t
Navigation
Icons
f
a
Navigation Icon Description and Procedure
Expand control bar
()
Communicator
Getting More Out of Your
r
Displays thumbnail images of
a document 3 pages at a
D
time. The larger thumbnail
indicates the currently
displayed page. Tap a
thumbnail to display its page.
Tap the left arrow twice to go
to the first page, tap the right
arrow twice to go to the last
page.
78
Page 82

Navigation Icon Description and Procedure
Fit to width ( ) Display a document to the full
width of the viewing area.
Fit to page ( ) Display a document to the full
width and height of the
viewing area.
Zoom in ( ) Increase document size
Zoom out ( ) Decrease document size
Display as actual
size ( )
Full screen
mode ( )
Rotate screen ( ) Rotate screen horizontally.
Go back ( ) Display previous page
Display a document or image
in its full, original size.
Tapping the Expand control
bar displays thumbnails for
easier navigation. Tap and
hold the red box in the
thumbnail to move around the
current screen.
Display a document or image
r
in its full, original size and
hides the status and
application bars.
D
Tap again to go back to
vertical view.
t
f
a
Getting More Out of Your
Communicator
79
Page 83

Setting Preferences
Action
1
Tap
Edit
>
Preferences
2
Make your selections from the list.
Page flick
document by tapping and sliding the stylus
across the bottom of the display.
•
•
Show pictures
documents
Reflow text
of the display.
Keep for
are kept before they are automatically deleted.
Clear history
3
Tap the filename to open the document.
– go to the next or previous page in a
Slide stylus right to go to the previous page
Slide stylus left to go to the next page.
– available only for HTML and PDF
– reformats documents to fit the width
– select the number of days documents
– delete all history documents
.
t
f
a
r
D
Communicator
Getting More Out of Your
80
Page 84

Personal Organizer
Features
Calendar
Use Calendar to schedule and organize events such as
appointments and meetings. You can review your schedule
of events for the day, week, or month, and have the
communicator play a reminder alarm for specific events.
Note:
Ensure the correct time and date are set before
using Calendar (page 88).
Personal Organizer Features
Adding a Calendar Entry
You can enter the following types of Calendar entries:
•
Appointment
example, a meeting)
•
Reminder
example, a birthday)
•
All day event
but no specific times. Use an all day event for an
entry that lasts a whole day or several days (for
example, a conference).
– An entry with a start and end time (for
– An entry that does not need a time (for
– An entry with a start and end date,
r
D
t
f
a
81
Page 85

To add a Calendar entry:
Action
1
Open Calendar ( ).
2
Tap
Calendar
>
The Calendar Entry
form displays.
New.
t
f
82
Personal Organizer Features
3
Use the stylus or virtual keyboard to enter a
description.
4
Select the type of entry.
5
Enter the date, time, and location of the event.
6
Tap the
to sound a reminder alarm for this entry.
The time and date of the alarm display below the
Alarm
tap the time or date.
Alarm
box if you want the communicator
box. To change when the alarm sounds,
a
r
D
Page 86

Action
7
If this entry recurs, tap
interval. Check the
repeat indefinitely.
8
To mark this entry as Private when you
synchronize Calendar entries with a computer,
tap
Private
.
9
To add a note to the entry, tap , then enter the
note.
10
Tap to save the entry.
Repeat
to select a repeat
Forever
box to have the alarm
Personal Organizer Features
Switching Calendar Views
You can see your Calendar entries in several views: Day,
Week, or Month. When you first open Calendar, the Day
view displays.
To switch to Week, tap .
To switch to Month, tap .
To switch back to Day, tap .
To return to the current day in the selected view,
tap .
To see the details of an entry, tap the entry.
r
D
t
f
a
83
Page 87

Moving Entries to the To Do Application
You can move Calendar entries to the To Do application,
which lists tasks you need to complete.
Action
1
Open the entry.
2
Tap
Calendar >Move to To do
.
Notes:
locations, so Calendar entries that you move to To Do lose
this information. If you copy an entry back to Calendar, the
information is not restored. If you move an entry with an
alarm, it sounds in To Do.
To Do entries do not have repeats, times, or
t
To Do
Use the To Do application to list and track tasks you need
to complete. You can set due dates for activities, reminder
Personal Organizer Features
alarms, and mark tasks as completed.
f
a
r
D
84
Page 88

Adding Entries:
Action
1
Open
To do
().
2
Ta p
To do >New
The To Do entry
form displays.
.
t
f
a
r
3
Use stylus or virtual keyboard to enter a
description.
4
Select a priority (1-9, with 1 highest) for the task.
5
Tap the
have a due date.
The current date displays next to the
box. To select a different due date, tap the date,
and select a date from the displayed calendar.
Due date
D
box if you want to this task to
Due date
Personal Organizer Features
85
Page 89

Action
6
Tap the
to sound a reminder alarm for this entry.
The time and date of the alarm displays below
the
or date.
7
To mark this entry as Private when you
synchronize To Do entries with a computer, tap
Private
8
To add a note to the entry, tap and enter the
note.
Alarm
box if you want the communicator
Alarm
box. To change the alarm, tap the time
.
9
Tap to save the entry.
t
f
Marking Tasks as Complete
Personal Organizer Features
When you open To Do, a list of tasks and their due dates
displays.
Action
To mark a task as completed, tap the box next to it.
The due date disappears, indicating the task is
completed.
Note:
To hide completed entries, tap
Preferences
completed
86
, then remove the check from
.
a
r
D
Edit
>
Display
Page 90

Deleting Entries
When you no longer need a record of your completed
entries, delete them.
Action
To delete an individual entry, tap the entry in the list
and tap
To delete all completed entries, in your list of entries,
tap
Moving Entries to Calendar
You can schedule To Do entries on your calendar by
moving them to the Calendar application (page 81).
Action
1
2
Notes:
the communicator uses the current date for the new
entry.
If you move an entry with an alarm, it sounds in
Calendar.
Delete
.
To do
>
Delete completed
.
t
f
Open the entry.
Ta p
To do >Move to Calendar
If you do not set a due date for the To Do entry,
a
.
r
D
Personal Organizer Features
87
Page 91

Notes
Use Notes to write notes and sketch graphics.
Adding Notes
Action
1
Open Notes ( ).
2
Tap
Notes
>
New
.
3
Enter the note using the stylus or virtual
keyboard.
4
To add a graphic to the note, tap .
5
Use the stylus to sketch your graphic.
Use the on-screen buttons to change line width
and color, and erase lines.
Personal Organizer Features
6
Tap to save the note.
a
r
t
f
88
Time
D
Use Time to set the current time and date, and to set
alarms you do not want to include in your Calendar or
To Do list.
Page 92

Setting the Time and Date
If you have not already set the current time and date:.:
Action
1
Open Time ( ). The Date and Time screen
displays:
Current city
Current time and
date
t
Other city time
f
and date
a
Alarm slots
r
Personal Organizer Features
2
Ta p
Time
>
Set time & date
3
Enter the current time and date.
4
To set the time and date format, tap the
tab, then select the format from the lists of
available formats.
5
Ta p
Done
.
D
.
Format
89
Page 93

Setting Location
Time can display time and date information for two
locations:
•
Current
– The place where you are at the moment. The
time and date of your current location display in the
top half of the screen.
•
Other
– A city of your choice. The time and date of this
city displays below the time and date of your current
location. If you are abroad, you can check the time at
home by setting this location to your home city.
Action
1
Tap
Date and Time
2
Select your current location from the
country
and
Note:
Personal Organizer Features
If the city you want is not listed, select another
city in the same time zone.
3
Select another location (optional) from the
country
and
>
Set location
Current city
Other city
lists.
a
r
lists.
.
t
f
D
4
Tap
Done
.
Current
Other
90
Page 94

Setting Alarms
You can use Time as an alarm clock. It is ideal for wake-up
alarms and other regular alarms you do not want to include
in your Calendar or To Do list.
You can set up to three alarms in Time. The alarm slots
display in the lower half of the Time screen.
Action
1
Tap one of the alarm slots.
2
Set the following alarm details:
Time
– time of day you want the alarm to sound.
When
– how often you want the alarm to sound:
once, during the next 24 hours, daily, on
workdays only, or weekly.
Alarm sound
make. Tap to listen to the selected sound.
Message
or enter your own.
3
Ta p
4
Tap the alarm checkbox to turn on the alarm.
Responding to Alarms
When an alarm sounds, the message you selected
displays. Tap the
again in 5 minutes.
Note:
The alarm does not sound while you are making a
phone call or recording a voice note.
– the sound you want the alarm to
– one of several preset alarm messages
Done
.
Snooze
r
D
button to reset the alarm to sound
t
f
a
Personal Organizer Features
91
Page 95

Turning Alarm Sounds Off
To silence an alarm before it sounds, do one of the
following:
•
Uncheck the alarm slot checkbox.
•
Tap the alarm slot, then select
Calculator
To open Calculator, tap in the Application Launcher.
Use the calculator by tapping the on-screen keys.
Making Voice Recordings
Silent
in
Alarm sound
.
You can record personal messages on your communicator.
Note:
Recording of phone calls is subject to varying State
and Federal laws regarding privacy and recording of phone
conversations.
Personal Organizer Features
Tip:
Make your recording in a quiet location. Hold the
communicator about 4 inches (10 centimeters) from your
mouth, and speak directly into the communicator in a
normal tone.
92
r
D
t
f
a
Page 96

Tip:
Adjust your volume setting for playback.
Action
1
Open Voice ( ).
2
Ta p
Voice>New Voice
note
or tap
New
(at
the bottom of the
screen).
3
Tap to begin
recording.
4
Tap to stop
recording.
Personal Organizer Features
t
f
5
Tap to playback the recording.
A counter at the top of the screen indicates the
number of the current recording and the total
number of recordings. For example,
indicates you are on the first of two records.
Tap to pause during playback.
Tap to resume playback.
Tap and slide left to decrease volume or right
to increase volume during playback.
To delete a recording, tap
record.
a
r
D
Delete
1/2
while on the
93
Page 97

Playing a Recording
Action
1
Open Voice ( ).
2
Tap or to go to the recording you want
to play.
3
Tap to play the recording.
Deleting a Recording
Action
94
1
Open Voice ( ).
t
f
2
Tap or to scroll to the recording you
Personal Organizer Features
want to delete, then tap
Delete
(at the bottom of the screen).
Sending a Recording
Action
1
Open Voice ( ).
2
Tap or to scroll to the recording you
want to send, then tap
3
Tap one of the selections in the
press
Done
.
4
Follow the normal procedure for your selection.
a
r
D
Voice
Voice> Delete note
>
Send as
.
Send as
box, then
or tap
Page 98

Security
Locking and
Unlocking
Communicator
You can lock the communicator
so that the touchscreen and
keys do not work. When you
lock the communicator, you
can still use the
keys for incoming phone calls.
Establishing Password Protection
You can establish password protection to prevent
unauthorized access to information in the communicator.
Action
1
Open Control Panel application ( ).
2
On the
3
Tap the
4
Tap in your current security code, then tap
5
Enter a new security code, then tap
Confirm the new security code, then tap
B
Handset
Security
and A
D
tab, tap
tab, then tap
Password
f
a
r
.
Set Security Code
t
Done
Slide up to
lock. Slide
down to
center to
unlock.
.
Done
.
.
Done
.
Security
95
Page 99

Security
Action
6
To set a phone lock code, tap
code
. Enter a lock code, then tap
the lock code, then tap
Tap the
To delete the code, tap
code, then tap
7
If you want the password entry screen to display
owner information:
On
or
Off
button for
Done
.
a
Tap
Owner
.
b
In the
Owner Information
that you want displayed.
c
Tap
Done
.
Phone Lock > Set lock
Done
. Confirm
Done
.
Auto Phone Lock
Clear
, enter your current
box, enter the text
t
f
a
r
D
.
96
Page 100

News and Entertainment
Web Browser
The Web browser lets you open Web
pages and use Web-based applications (such
as on-line banking, shopping, and games) on
your communicator.
Setting Up Your Internet Account
Before you can use the Web browser, you must set up an
Internet account (see page 50).
Opening Web Browser
Tap in the Application Launcher or Application
Selector Bar.
To open the Web browser and go directly to the Hutchison
portal, press
If you have saved bookmarks and/or Web pages, an
alphabetical list of your bookmarks or saved Web pages
displays, depending on which you displayed last.
Note:
Browse
E
.
r
D
If your bookmarks or saved pages do not display, tap
>
Bookmarks
or
Saved pages
t
f
a
.
News and Entertainment
97
 Loading...