

Page 1

APPLICANT: MOTOROLA, INC. FCC ID: IHDT6DF1
INSTRUCTION MANUAL
A preliminary draft copy of the Users Manual follows:
EXHIBIT 8
Page 2
Welcome
Welcome to the world of Motorola digital wireless
communications! We are pleased that you have chosen the
Motorola C210 wireless phone.
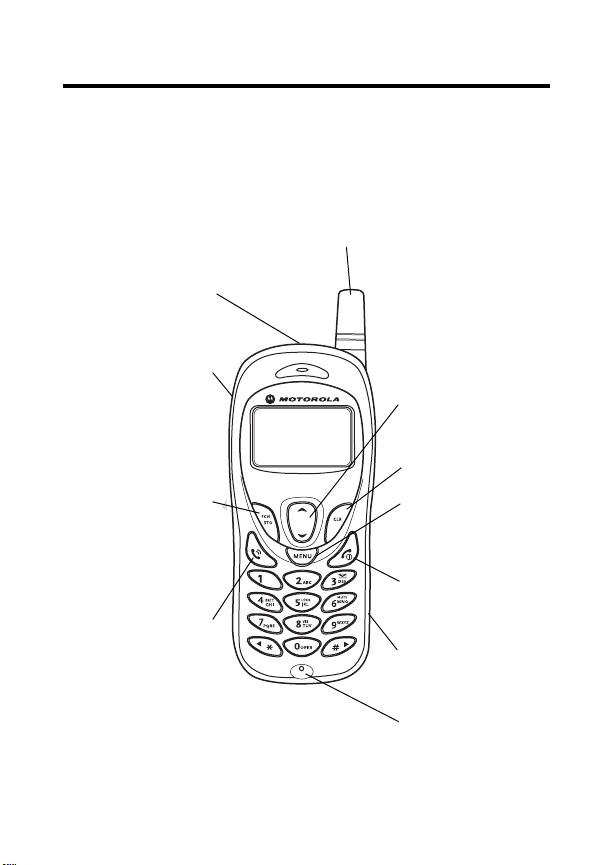
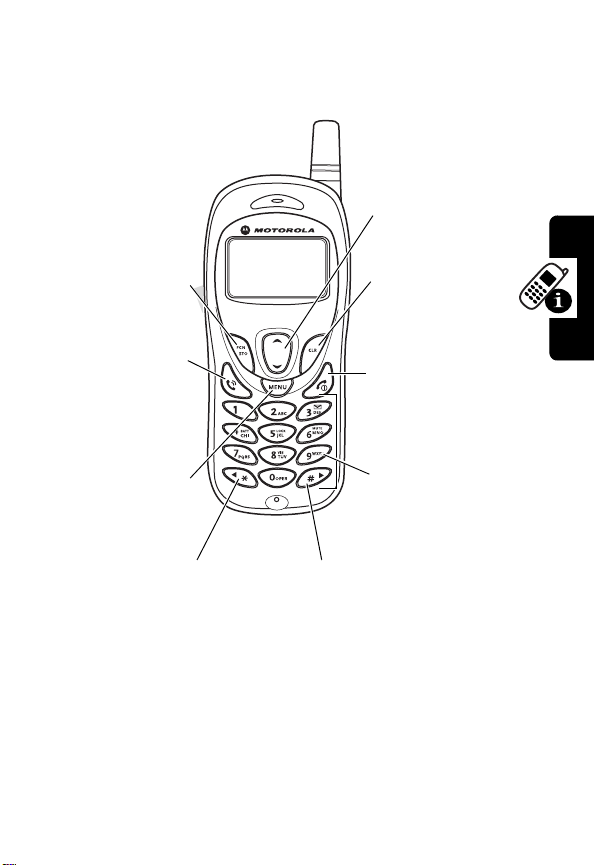
RF Connector
Port
Headset Jack
Insert headset
accessory for
hands-free use.
STO Key
Store numbers
& names,
select menu item.
Send Key
Send and answer
calls, view recent
calls list.
R
D
Antenna
FT
A
Scroll Key
Move through
menus and lists,
adjust earpiece and
keypad volume
CLR Key
Menu Key
Power Key
Power Connector
Port
Microphone
1
Page 3

Personal Communications Sector
600 North U.S. Highway 45
Libertyville, Illinois 60048
1-800-331-6456 (United States)
1-888-390-6456 (TTY/TDD United States)
1-800-461-4575 (Canada)
www.motorola.com
www.motorola.ca
MOTOROLA, the Stylized M Logo and all other trademarks indicated as
such herein are trademarks of Motorola, Inc. ® Reg. U.S. Pat. & Tm. Off.
All other product or service names are the property of their respective
owners.
© 2003 Motorola, Inc. All rights reserved.
Software Copyright Notice
The Motorola products described in this manual may include copyrighted
Motorola and third-party software stored in semiconductor memories or
other media. Laws in the United States and other countries preserve for
Motorola and third-party software providers certain exclusive rights for
copyrighted software, such as the exclusive rights to distribute or
reproduce the copyrighted software. Accordingly, any copyrighted
software contained in the Motorola products may not be modified,
reverse-engineered, distributed, or reproduced in any manner to the
extent allowed by law. Furthermore, the purchase of the Motorola
products shall not be deemed to grant either directly or by implication,
estoppel, or otherwise, any license under the copyrights, patents, or
patent applications of Motorola or any third-party software provider,
except for the normal, non-exclusive, royalty-free license to use that
arises by operation of law in the sale of a product.
Manual number: 6809459A32-O
Cover number: 8988485L51-O
(United States)
(Canada)
T
F
A
R
D
2
Page 4

Menu Map
Main Menu
• Message
•Text msg
•Voice msg
• Page msg
• Phonebook
• Find name
• Find location
• Find group
• Memory Status
• Viewing my number
• Call Log
• Missed
•Received
• Dialed
• Call timer
• Tone Control
• Silent Mode
• Ring or vibrate
• Ring style
• Key tone
• Service tones
• Earpiece volume
• Ringer volume
• Message tone
• Reminder
• DTMF tones*
•Settings
•Call
•Display
• Security
• System
• Voice privacy
•PIMS
•Alarm Clock
• To-Do List
R
D
Note:
This is the standard
phone menu layout. You or
your service provider may
have changes some feature
names. Not all features may
be available for all users.
FT
A
* Not available on all ph one models.
3
Page 5

T
F
A
R
D
4
Page 6

Contents
Welcome
Menu Map
Safety and General Information
Getting Started
What’s in the Box?. . . . . . . . . . . . . . . . . . . . . . . . . . . . . 13
About This Guide. . . . . . . . . . . . . . . . . . . . . . . . . . . . . . 13
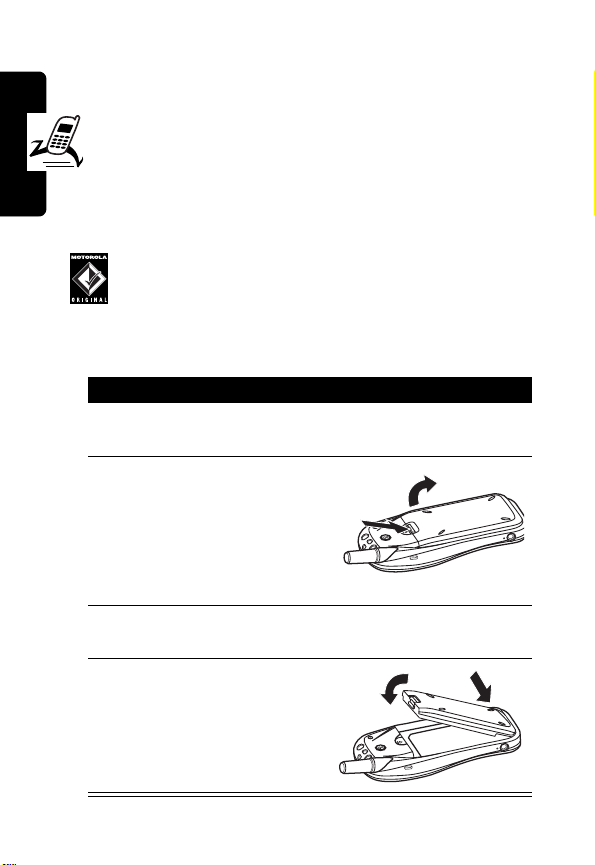
Installing the Battery . . . . . . . . . . . . . . . . . . . . . . . . . . . 14
Charging the Battery . . . . . . . . . . . . . . . . . . . . . . . . . . . 14
Replacing the Battery . . . . . . . . . . . . . . . . . . . . . . . . . . 16
Battery Use . . . . . . . . . . . . . . . . . . . . . . . . . . . . . . . . . . 17
Turning Your Phone On and Off . . . . . . . . . . . . . . . . . . 18
Adjusting Volume. . . . . . . . . . . . . . . . . . . . . . . . . . . . . . 19
Making a Call. . . . . . . . . . . . . . . . . . . . . . . . . . . . . . . . . 19
Answering a Call . . . . . . . . . . . . . . . . . . . . . . . . . . . . . . 20
Viewing Your Phone Number . . . . . . . . . . . . . . . . . . . . 20
Learning to Use Your Phone
Using the Display . . . . . . . . . . . . . . . . . . . . . . . . . . . . . 21
Using Menus . . . . . . . . . . . . . . . . . . . . . . . . . . . . . . . . . 23
How to Enter Text on Your Phone . . . . . . . . . . . . . . . . . 24
Locking and Unlocking Your Phone. . . . . . . . . . . . . . . . 25
Changing Your Phone’s Codes . . . . . . . . . . . . . . . . . . . 26
If You Forget a Code . . . . . . . . . . . . . . . . . . . . . . . . . . . 28
Locking and Unlocking the Keypad . . . . . . . . . . . . . . . . 28
Setting Up Your Phone
Managing Tones . . . . . . . . . . . . . . . . . . . . . . . . . . . . . . 29
Setting Answer Options. . . . . . . . . . . . . . . . . . . . . . . . . 30
Adjusting the Backlight . . . . . . . . . . . . . . . . . . . . . . . . . 32
. . . . . . . . . . . . . . . . . . . . . . . . . . . . . . . . . . . . . . 1
. . . . . . . . . . . . . . . . . . . . . . . . . . . . . . . . . . . . . 3
. . . . . . . . . . . . . . . . . . . . 8
. . . . . . . . . . . . . . . . . . . . . . . . . . . . . . . . 13
FT
A
. . . . . . . . . . . . . . . . . . . . . 21
R
D
. . . . . . . . . . . . . . . . . . . . . . . . . . 29
5
Page 7

Calling Features
Redialing a Number . . . . . . . . . . . . . . . . . . . . . . . . . . . 33
Using Automatic Redial. . . . . . . . . . . . . . . . . . . . . . . . . 33
Using Caller ID . . . . . . . . . . . . . . . . . . . . . . . . . . . . . . . 34
Canceling an Incoming Call . . . . . . . . . . . . . . . . . . . . . 34
Calling an Emergency Number. . . . . . . . . . . . . . . . . . . 34
Viewing Recent Calls . . . . . . . . . . . . . . . . . . . . . . . . . . 35
Returning an Unanswered Call . . . . . . . . . . . . . . . . . . . 38
Using Pause Dialing . . . . . . . . . . . . . . . . . . . . . . . . . . . 38
Calling With Speed Dial . . . . . . . . . . . . . . . . . . . . . . . . 40
Calling With 1-Touch Dial . . . . . . . . . . . . . . . . . . . . . . . 41
Using Voicemail . . . . . . . . . . . . . . . . . . . . . . . . . . . . . . 41
Muting the Phone . . . . . . . . . . . . . . . . . . . . . . . . . . . . . 43
Using Call Waiting. . . . . . . . . . . . . . . . . . . . . . . . . . . . . 43
Forwarding a Call . . . . . . . . . . . . . . . . . . . . . . . . . . . . . 44
Alphanumeric Messages
Sending a Text Message. . . . . . . . . . . . . . . . . . . . . . . . 47
Viewing Outbox Messages . . . . . . . . . . . . . . . . . . . . . . 49
Viewing Saved Messages. . . . . . . . . . . . . . . . . . . . . . . 50
Viewing Sent Messages . . . . . . . . . . . . . . . . . . . . . . . . 52
Receiving a Message . . . . . . . . . . . . . . . . . . . . . . . . . . 53
Deleting Messages . . . . . . . . . . . . . . . . . . . . . . . . . . . . 55
Setting Message Acknowledgment. . . . . . . . . . . . . . . . 57
Sending a Page Message. . . . . . . . . . . . . . . . . . . . . . . 58
Setting Up Your Phonebook
Creating a Phonebook Entry. . . . . . . . . . . . . . . . . . . . . 60
Finding a Phonebook Entry . . . . . . . . . . . . . . . . . . . . . 62
Dialing a Phonebook Entry . . . . . . . . . . . . . . . . . . . . . . 64
Editing a Phonebook Entry . . . . . . . . . . . . . . . . . . . . . . 65
Checking Phonebook Capacity. . . . . . . . . . . . . . . . . . . 65
Personalizing Your Phone
Selecting a Ringer Style . . . . . . . . . . . . . . . . . . . . . . . . 67
6
. . . . . . . . . . . . . . . . . . . . . . . . . . . . . . . 33
T
. . . . . . . . . . . . . . . . . . . . . . . . 47
F
A
R
D
. . . . . . . . . . . . . . . . . . . . . 60
. . . . . . . . . . . . . . . . . . . . . . . 67
Page 8

Setting Keypad Volume . . . . . . . . . . . . . . . . . . . . . . . . . 69
Setting Ringer Volume. . . . . . . . . . . . . . . . . . . . . . . . . . 69
Setting Message Tones . . . . . . . . . . . . . . . . . . . . . . . . . 70
Setting Reminders. . . . . . . . . . . . . . . . . . . . . . . . . . . . . 70
Personalizing the Phone Greeting. . . . . . . . . . . . . . . . . 71
Personalizing Banner Text. . . . . . . . . . . . . . . . . . . . . . . 72
Setting the Menu Language . . . . . . . . . . . . . . . . . . . . . 72
Resetting All Options. . . . . . . . . . . . . . . . . . . . . . . . . . . 73
Clearing All Stored Information . . . . . . . . . . . . . . . . . . . 73
Clearing Selected Information. . . . . . . . . . . . . . . . . . . . 74
Using Shortcuts. . . . . . . . . . . . . . . . . . . . . . . . . . . . . . . 75
Getting More Out Of Your Phone
Restricting Calls . . . . . . . . . . . . . . . . . . . . . . . . . . . . . . 76
Using DTMF Tones . . . . . . . . . . . . . . . . . . . . . . . . . . . . 77
Using Service Tones . . . . . . . . . . . . . . . . . . . . . . . . . . . 78
Monitoring Phone Use. . . . . . . . . . . . . . . . . . . . . . . . . . 79
Adjusting System Options . . . . . . . . . . . . . . . . . . . . . . . 81
Viewing Phone Specifications . . . . . . . . . . . . . . . . . . . . 84
PIMS
. . . . . . . . . . . . . . . . . . . . . . . . . . . . . . . . . . . . . . . . . 86
Alarm Clock. . . . . . . . . . . . . . . . . . . . . . . . . . . . . . . . . . 86
Managing To-Do Lists . . . . . . . . . . . . . . . . . . . . . . . . . . 87
Security
Specific Absorption Rate Data
Product Registration
Export Law Assurances
Additional Health and Safety Information
Warranty
Wireless Phone Safety Tips
. . . . . . . . . . . . . . . . . . . . . . . . . . . . . . . . . . . . . . 90
Activating Voice Privacy . . . . . . . . . . . . . . . . . . . . . . . . 90
. . . . . . . . . . . . . . . . . . . . . . . . . . . . . . . . . . . . 102
R
D
. . . . . . . . . . . . . . . . . . . . . . . . . . . 93
. . . . . . . . . . . . . . . . . . . . . . . . . 93
. . . . . . . . . . . . . . . . . . 76
FT
A
. . . . . . . . . . . . . . . . . . . 91
. . . . . . . . . . 94
. . . . . . . . . . . . . . . . . . . . . 107
7
Page 9

Safety and General Information
IMPORTANT INFORMATION ON SAFE AND EFFICIENT OPERATION.
READ THIS INFORMATION BEFORE USING YOUR PHONE.
The information provided in this document supersedes the general safety
information in user guides published prior to December 1, 2002.
Exposure To Radio Frequency (RF) Energy
Your phone contains a transmitter and a receiver. When it is ON, it
receives and transmits RF energy. When you communicate with your
phone, the system handling your call controls the power level at which
your phone transmits.
Your Motorola phone is designed to comply with local regulatory
requirements in your country concerning exposure of human beings to RF
energy.
Operational Precautions
To assure optimal phone performance and make sure human exposure to
RF energy is within the guidelines set forth in the relevant standards,
always adhere to the following procedures.
External Antenna Care
Use only the supplied or Motorola-approved replacement antenna.
Unauthorized antennas, modifications, or attachments could damage the
phone.
Do NOT hold the external antenna when the phone is IN USE. Holding
the external antenna affects call quality and may cause the phone to
operate at a higher power level than needed. In addition, use of
unauthorized antennas may result in non-compliance with the local
regulatory requirements in your country.
D
RA
F
T
8
Page 10

Phone Operation
When placing or receiving a phone call, hold your phone as you would a
wireline telephone.
Body-Worn Operation
To maintain compliance with RF energy exposure guidelines, if you wear
a phone on your body when transmitting, always place the phone in a
Motorola-supplied or approved clip, holder, holster, case, or body harness
for this phone, where available. Use of accessories not approved by
Motorola may exceed RF energy exposure guidelines. If you do not use
one of the body-worn accessories approved or supplied by Motorola, and
are not using the phone held in the normal use position, ensure the phone
and its antenna are at least 1 inch (2.5 centimeters) from your body when
transmitting.
Data Operation
When using any data feature of the phone, with or without an accessory
cable, position the phone and its antenna at least 1 inch (2.5 centimeters)
from your body.
Approved Accessories
Use of accessories not approved by Motorola, including but not limited to
batteries and antenna, may cause your phone to exceed RF energy
exposure guidelines. For a list of approved Motorola accessories, visit our
website at
RF Energy Interference/Compatibility
Note:
interference from external sources if inadequately shielded, designed, or
otherwise configured for RF energy compatibility. In some circumstances
your phone may cause interference.
Facilities
Turn off your phone in any facility where posted notices instruct you to do
so. These facilities may include hospitals or health care facilities that may
be using equipment that is sensitive to external RF energy.
D
RA
F
www.Motorola.com
Nearly every electronic device is susceptible to RF energy
.
T
9
Page 11

Aircraft
When instructed to do so, turn off your phone when on board an aircraft.
Any use of a phone must be in accordance with applicable regulations per
airline crew instructions.
Medical Devices
Pacemakers
Pacemaker manufacturers recommend that a minimum separation of
6 inches (15 centimeters) be maintained between a handheld wireless
phone and a pacemaker.
Persons with pacemakers should:
•
ALWAYS keep the phone more than 6 inches (15 centimeters) from
your pacemaker when the phone is turned ON.
•
NOT carry the phone in the breast pocket.
•
Use the ear opposite the pacemaker to minimize the potential for
interference.
•
Turn OFF the phone immediately if you have any reason to suspect
that interference is taking place.
Hearing Aids
Some digital wireless phones may interfere with some hearing aids. In the
event of such interference, you may want to consult your hearing aid
manufacturer to discuss alternatives.
Other Medical Devices
If you use any other personal medical device, consult the manufacturer of
your device to determine if it is adequately shielded from RF energy. Your
physician may be able to assist you in obtaining this information.
D
RA
F
T
Use While Driving
Check the laws and regulations on the use of phones in the area where
you drive. Always obey them.
10
Page 12

When using your phone while driving, please:
•
Give full attention to driving and to the road.
•
Use hands-free operation, if available.
•
Pull off the road and park before making or answering a call if driving
D
conditions so require.
Responsible driving best practices may be found in the “Wireless Phone
Safety Tips” at the end of this manual and at the Motorola website:
www.Motorola.com/callsmart
.
Operational Warnings
For Vehicles With an Air Bag
Do not place a phone in the area over an air bag or in the air bag
deployment area. Air bags inflate with great force. If a phone is placed in
the air bag deployment area and the air bag inflates, the phone may be
propelled with great force and cause serious injury to occupants of the
vehicle.
Potentially Explosive Atmospheres
Turn off your phone prior to entering any area with a potentially explosive
atmosphere, unless it is a phone type especially qualified for use in such
areas and certified as “Intrinsically Safe.” Do not remove, install, or
charge batteries in such areas. Sparks in a potentially explosive
atmosphere can cause an explosion or fire resulting in bodily injury or
even death.
Note:
The areas with potentially explosive atmospheres referred to above
include fueling areas such as below decks on boats, fuel or chemical
transfer or storage facilities, areas where the air contains chemicals or
particles, such as grain, dust, or metal powders. Areas with potentially
explosive atmospheres are often but not always posted.
Blasting Caps and Areas
To avoid possible interference with blasting operations, turn OFF your
phone when you are near electrical blasting caps, in a blasting area, or in
RA
F
T
11
Page 13
areas posted “Turn off electronic devices.” Obey all signs and
instructions.
Batteries
Batteries can cause property damage and/or bodily injury such as burns if
a conductive material such as jewelry, keys, or beaded chains touch
exposed terminals. The conductive material may complete an electrical
circuit (short circuit) and become quite hot. Exercise care in handling any
charged battery, particularly when placing it inside a pocket, purse, or
other container with metal objects.
and chargers.
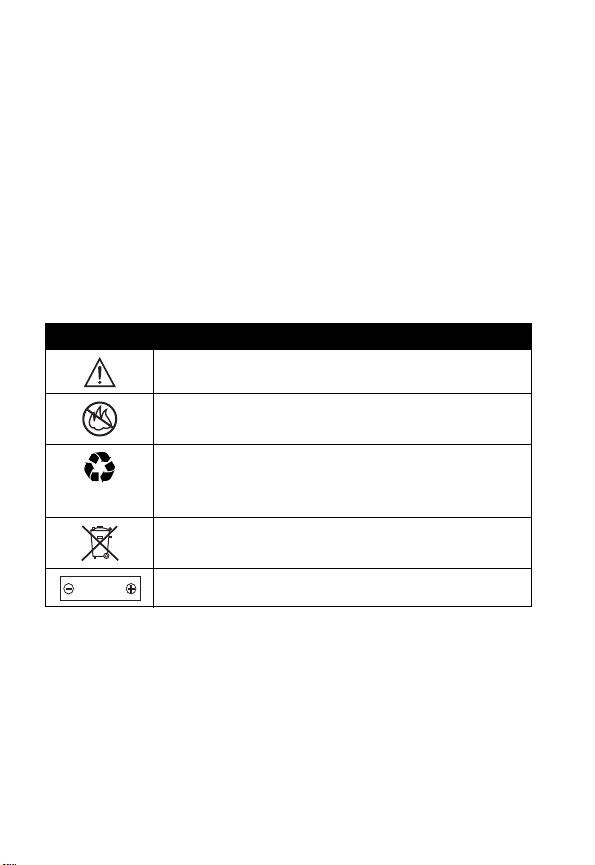
Your battery or phone may contain symbols, defined as follows:
Symbol Definition
LiIon BATT
D
Use only Motorola original batteries
RA
Important safety information will follow.
Your battery or phone should not be disposed of in a
fire.
Your battery or phone may require recycling in
accordance with local laws. Contact your local
regulatory authorities for more information.
Your battery or phone should not be thrown in the
trash.
Your phone contains an internal lithium ion battery.
F
12
T
Page 14

Getting Started
What’s in the Box?
Your wireless phone typically comes equipped with a
battery and a charger. You can purchase other accessory
items can customize to phone for maximum performance
and portability.
D
RA
To purchase Motorola Original™ accessories, contact the
Motorola Customer Call Center at 1-800-331-6456 in the
United States or 1-800-461-4575 in Canada.
About This Guide
This user guide introduces you to your Motorola wireless
phone.
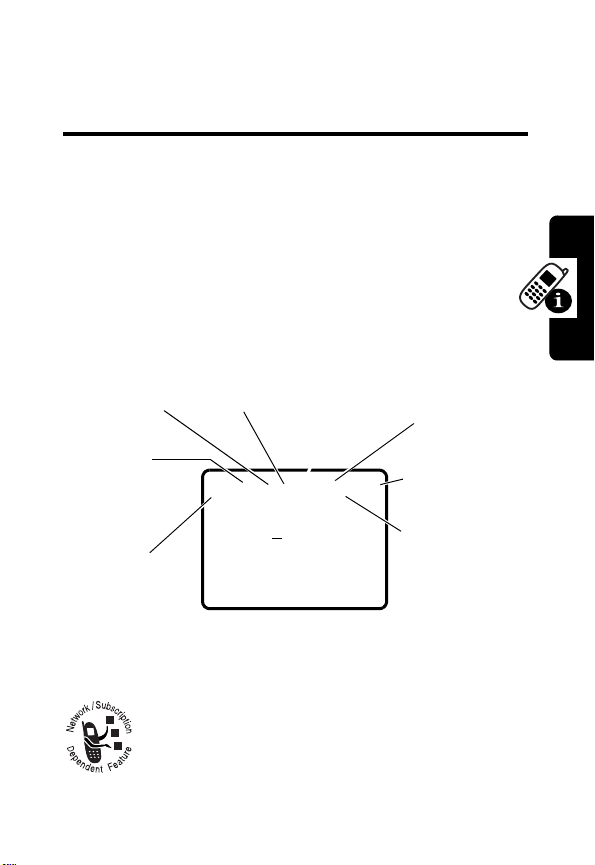
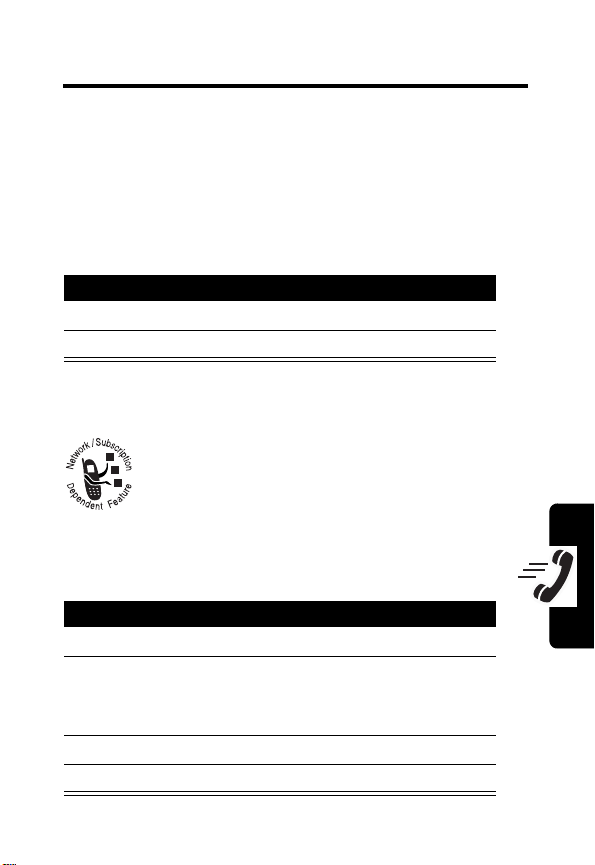
Optional Features
This label identifies an optional network or
subscription-dependent feature that may not be
offered by all service providers in all
geographical areas. Contact your service
provider for more information.
Optional Accessories
This label identifies a feature that requires an
optional Motorola Original
F
T
TM
accessory.
Getting Started
13
Page 15
Installing the Battery
You must install and charge the battery to use your
phone.
D
Your phone is designed to be used only with
Motorola Original batteries and accessories. We
recommend that you store batteries in their
protective cases when not in use.
1
Getting Started
2
3
Action
Remove the new battery from its protective clear
plastic case.
Insert the battery into the lower groove at the back
of the phone.
Push the battery down
until it clicks into place.
RA
F
Charging the Battery
New batteries are shipped partially charged. Before you
can use your phone, charge the battery as described
below. Some batteries perform best after several full
charge/discharge cycles.
Note:
When a charger is not in use, disconnect it from the
power source.
14
T
Page 16
Action
1
Turn the phone on (by pressing and holding O)
before you begin to charge the battery.
D
Note:
If the battery is completely discharged, the
phone may not turn on. If this happens, turn the
phone on after you connect the adapter.
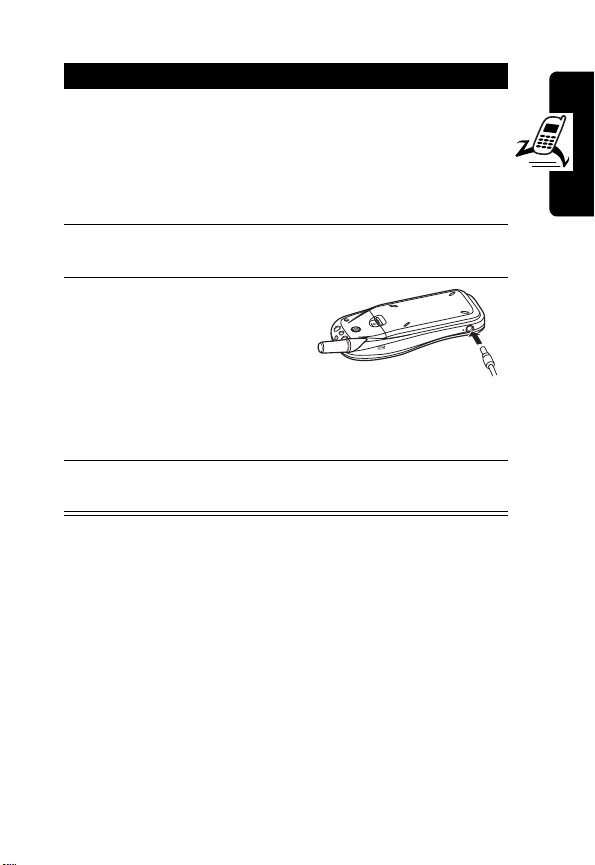
2
Plug the travel charger into the appropriate
electrical outlet.
3
Plug the other end of
the travel charger into
your phone, as shown.
Note:
not installed properly,
the phone displays
Charging Impossible
4
When your phone indicates that it is fully charged
(
Charge Completed
RA
If the battery is
.
), remove the charger.
F
Notes:
•
When you charge the battery, the battery level
indicator blinks and the phone displays
•
Charging stops if you place or receive a call. However,
if the battery isn’t sufficiently charged, the keypad will
not function. The phone operates only if the battery is
charged enough to use the keypad.
•
If you charge the battery for 30 minutes but it does not
have enough power to operate the phone, the battery
no longer works and must be replaced.
T
Charging
Getting Started
.
15
Page 17
•
You can turn off the phone while charging the battery
(by pressing and holding
then
Charging
you will see
D
the adapter before charging is completed, the
phone turns off.)
Replacing the Battery
. When the battery is fully charged,
Charge Completed
O
). You will see
. (If you removed
Motorola
,
Your phone is designed to be used only with
Motorola Original batteries and accessories. We
recommend that you store batteries in their
protective cases when not in use.
Getting Started
Action
1
Turn off the phone (by pressing and holding O)
before removing the old battery.
2
While pressing the
battery release tab,
push the battery toward
the end of the phone.
Then lift the battery off
the phone.
3
Insert the replacement battery into the lower
groove at the back of the phone.
4
Push the battery down
until it clicks into place.
RA
F
T
16
Page 18

Battery Use
Battery performance depends on many factors,
including your wireless carrier’s network configuration;
signal strength; the temperature at which you operate
your phone; the features and/or settings you select and
use; and your voice, data, and other application usage
patterns.
If not used, a fully charged battery will discharge itself over
time. This is normal.
Caution:
objects to contact or short-circuit the battery terminals.
To maximize your battery’s performance:
•
•
•
•
•
•
D
RA
To prevent injuries or burns, do not allow metal
Always use Motorola Original™ batteries and
chargers. The phone warranty does not cover
damage caused from using non-Motorola batteries
and chargers.
New batteries or batteries that have been stored for
long periods of time may require a longer charge time.
Maintain the battery at or near room temperature
when charging.
Do not expose to temperatures below -10°C (14°F) or
above 45°C (113°F). Always take your phone with you
when you leave your vehicle.
When you do not intend to use a battery for a while,
store it uncharged in a cool, dark, dry location, such
as a refrigerator.
Over extended periods, batteries gradually wear down
and require longer charging times. This is normal. If
F
T
Getting Started
17
Page 19

you charge a battery regularly and notice a decrease
in talk time or an increase in charging time, it is
probably time to purchase a new battery.
•
Do not leave a battery connected to a charger for
D
longer than a week, because overcharging may
shorten its life.
The rechargeable batteries that power this
phone must be disposed of properly and may
need to be recycled. Never dispose of batteries
in a fire, because they may explode. Contact your local
recycling center for proper disposal methods. Refer to your
battery’s label for battery type.
Getting Started
Turning Your Phone On and Off
1
2
3
RA
Action
Press and hold O (the Power/End key) for
approximately 2 seconds.
If necessary, enter your four-digit unlock code
and press
Note:
(For more information, see page 26.)
To turn off your phone, press and hold O (the
Power/End key) for more than 2 seconds.
-
The unlock code is originally set to 1234.
F
to unlock your phone.
T
At startup, your phone number appears on the display
briefly, followed by a banner message and the date and
time. You can change the personal banner message. See
“Personalizing Banner Text” on page 72.
18
Page 20

Adjusting Volume
Press the S scroll key up and down to:
•
Increase and decrease earpiece volume during a
D
call
You can also adjust earpiece volume by pressing
M46
•
Increase and decrease the keypad volume setting
when the idle display is visible
Making a Call
Do not block the antenna while you are on a call.
Press To
1
keypad keys dial the phone number
2N make the call
3O end the call and “hang up” the
, pressing S up or down, and pressing -.
RA
Tip:
If you make a mistake,
press
+
to delete the last
digit, or press and hold
F
clear all digits.
phone when you are finished
T
+
to
Getting Started
19
Page 21

Answering a Call
When you receive a call, your phone rings and/or
vibrates and displays an incoming call message.
D
Press To
1
2O end the call and “hang up” the
Getting Started
Note:
answer the call.
N
or
any other key
RA
except
O
If the phone keypad is locked, you must unlock it to
answer the call
phone when you are finished
After you hang up, the call
timer is displayed for
approximately 2 seconds.
F
Viewing Your Phone Number
Action
1
Press M 2 5.
2
Press O to exit.
T
20
Page 22
Learning to Use Your
Phone
See page 1 for a basic phone diagram.
Using the Display
D
RA
The idle display is the standard display you see when
you are not on a call or using the menu. You must be in
the idle display to dial a phone number.
Status indicators are grouped at the top of the display:
3
NoSVC 4 In Use 5 Digital
2
Roam/
Home
abf4ceh
F
02/07/2003
1
RSSI
12:00am
Signal
6
Text
Message
Waiting
7
Battery
Level
8
Voice Mail
T
1 RSSI:
the network connection.
Signal Strength Indicator
Shows the strength of
Learning to Use Your Phone
2
Roam/Home Indicator
phone accesses another network system
outside your home network.
Lights up when your
21
Page 23

3
NoSVC Indicator
or received from your location.
4
In Use Indicator
D
5 Digital Signal Indicator
7
Battery Level Indicator
charge level. Recharge the battery when you see
Low Battery
and hear the low battery alert.
8
Voice Mail Indicator
receive a voicemail message.
Indicates that no calls can be placed
Shows that a call is in progress.
6
Text Message Waiting Indicator
Displays when you receive a text message.
RA
Vertical bars show the battery
Displays when you
F
22
Learning to Use Your Phone
T
Page 24
Using Menus
From the idle display, press M to go to the main menu.
D
Scroll Key
FCN/STO Key
Store numbers
& names;
select menu
Send Key
Send and
answer calls,
view recent
calls list.
Menu Key
Enter menu
system, open
sub-menu.
Scroll up in menus Scroll down in menus.
Selecting a Menu Feature
RA
item.
F
Access emergency
Move through
menus and lists.
CLR Key
Return to
previous menu &
cancel input.
Power/End Key
Cancel input &
return to
previous menu
Number Keys
Select options,
by number,
from menu.
T
number.
Learning to Use Your Phone
•
Press S to scroll up or down to select the item you
want, then press
or
-
.
23
Page 25
•
Press the number key that matches the item you
want.
How to Enter Text on Your Phone
D
•
Enter numbers or text with the keypad.
•
Press a key as many times as necessary to enter a
letter. With each press, the next letter on the key
appears. (See the character chart below.)
•
Press S down to change the character to
RA
lowercase while it is highlighted by the cursor.
•
If you do not press a key for 2 seconds, the
character at the cursor is accepted, and the cursor
moves to the next position.
•
Press the * (left) or # (right) key to move the
cursor left or right.
•
Press 1 to scroll through available punctuation
marks.
•
To delete the character before the cursor, press +.
You can then insert any new characters you require.
To delete all the text, press and hold
Character Chart
Learning to Use Your Phone
Use this chart as a guide for entering characters.
F
T
+
.
24
1
space . 1 @ ? ! , & : ; “ ( ) ‘ ¿ ¡ % $ _
2
A B C 2 À Ã Á Â Ç
3
D E F 3 É È Ê
4
G H I 4 Í
5
J K L 5
Page 26
6
M N O 6 Ñ Ò Õ Ó Ô
7
P Q R S 7
8
T U V 8 Ù Ú Ü
9
W X Y Z 9
D
0
+ - 0 * / = > < # § [ ]
Note:
This chart may not reflect the exact character set
available on your phone.
Locking and Unlocking Your
Phone
You can lock your phone immediately or set the phone to
lock automatically whenever you turn it on. When the
phone is locked, the
of the display.
To use a locked phone, you must enter the unlock code. A
locked phone still rings or vibrates for incoming calls and
you can answer the call without unlocking the phone.
You can make emergency calls even when your phone is
locked. For more information, see page 34.
Locking Your Phone Now
RA
k
indicator appears in the lower right
F
T
Action
1
Press M 5 5.
2
Enter your 6-digit security code.
3
Press 2 1 1.
Learning to Use Your Phone
25
Page 27
Unlocking Your Phone
Tip:
Your phone’s unlock code is originally set to 1234 at
the factory. Many service providers reset the unlock code
to the last 4 digits of your phone number.
When prompted to enter the unlock code:
D
Press To
keypad keys enter your unlock code
RA
Setting Your Phone to Lock
Automatically
You can set your phone to lock every time you turn it off.
Action
1
Press M 5 5.
2
Enter your 6-digit security code.
3
Press S (up or down) or * (left) or # (right) to
select
On
or
Off
.
F
4
Press - to confirm your selection
5
Press O to return to the previous menu.
Learning to Use Your Phone
Changing Your Phone’s Codes
Your phone’s 4-digit unlock code is factory set to 1234. The
6-digit security code is factory set. Your service provider
may reset these numbers before you receive your phone.
If your service provider has not reset these numbers, you
should change them to prevent other users from accessing
your personal information.
26
T
Page 28
Changing Your Lock Code
To change the 4-digit lock code:
Press To
1 M 5
2
3
4
5
6
Changing Your Security Code
D
3
keypad keys enter the 6-digit
2 2
keypad keys enter a new 4-digit lock
-
O
RA
access your phone’s
security settings
security code
select the change lock
option
code
change the lock code
return to the previous
menu
Learning to Use Your Phone
To change the 6-digit security code:
Press To
1
M 5 3
2
keypad keys enter the 6-digit
3
2 3
4
keypad keys enter a new 6-digit
F
access your phone’s
security settings
T
security code
select the change
security code option
security code
27
Page 29

Press To
5
-
6
O
D
If You Forget a Code
change the security
code
return to the previous
menu
If you forget your security code, contact your service
provider.
If you forget your unlock code, try entering 1234 or the
last 4 digits of your phone number.
Locking and Unlocking the
Keypad
You can lock the keypad to prevent accidental key presses
(for example, when carrying your phone in a purse or
pocket).
RA
F
•
To lock the keypad, press and hold * until you see
Keyguard is on
Learning to Use Your Phone
When the keypad is locked, the
the lower right of the display.
•
To unlock the keypad, press M * until you see
Keyguard is off
.
o
indicator appears in
T
.
28
Page 30
Setting Up Your Phone
Managing Tones
Your phone rings or vibrates to notify you of an incoming
call or other event. This ring or vibration is called an alert.
You can select one of these alert types:
The alert type indicator in the display shows the current
alert type.
Selecting Silent Mode
When you select Silent Mode, all tones are silenced.
Your phone will vibrate when you receive an incoming
call or an incoming message if message tones are not set
to
1
2S (up or down)
3
4
D
l
m
Off
.
Press To
M 4 1
*
or
#
-
O
RA
=vibrate
= silent
(left) or
(right)
p
= vibrate and ring
F
select
SilentMode
On
or
select
Off
T
confirm your selection
return to the previous menu
Setting Up Your Phone
29
Page 31

Selecting Ringer or Vibrator
Press To
1
M 4 2
D
2S (up or down)
*
(left) or
or
#
(right)
RA
3
-
4
O
Setting Answer Options
select
Ringer/Vib
scroll to one of these
selections:
•
Ring only
receive a call, phone
rings and its light flashes
•
Vib only
receive a call, phone
vibrates and it light
flashes
•
Vib->Ring
receive a call, phone
vibrates for 2 cycles,
then rings
confirm your selection
return to the previous menu
F
—when you
—when you
—when you
You can use different methods to answer an incoming call.
Setting Up Your Phone
30
T
Page 32

Selecting Any Key Answer
With Any Key Answer set to On, you can answer an
incoming call by pressing any key except
D
Press To
1
M 5 1 2
2S (up or down)
*
(left) or
or
#
(right)
3
-
4
O
Setting Auto Answer
When you set Auto Answer to On, your phone
automatically answers incoming calls after 2 rings.
When Auto Answer is
lower right of the display.
Press To
1
M 5 1 3
2S (up or down)
or
*
#
(right)
3
-
4
O
RA
(left) or
select
AnyKey Ans
On
select
confirm your selection
return to the previous menu
On
, the q indicator appears in the
or
F
select
Auto Ans
On
select
or
T
confirm your selection
return to the previous menu
Off
Off
O
.
Setting Up Your Phone
Note:
It is recommended that you use this feature only
with vehicle hands free accessories or a headset, and with
31
Page 33

your phone’s ringer turned on. Otherwise, your phone can
answer calls in your absence.
Adjusting the Backlight
D
You can set the amount of time that the phone’s backlights
remain on, or turn off backlights completely to extend
battery life.
Press To
1
2S (up or down)
3
4
RA
M 5 2 2
or
*
(left) or
#
(right)
-
O
select
select
or
On
(If you select On, the
backlights are illuminated
whenever the phone is
powered on.)
confirm your selection
return to the previous menu
Lights
Off, 15 secs, 30 secs
,
F
T
Setting Up Your Phone
32
Page 34
Calling Features
For basic instructions on how to make and answer calls,
see page 19.
Redialing a Number
When you hear an ordinary busy signal:
D
RA
Press To
1
O
hang up
2N ,
Using Automatic Redial
the other party answers your call.
To turn automatic redial on or off:
1
2S (up or down)
3
4
N
With automatic redial, your phone automatically
redials a number for the next 4 minutes if it
receives a fast busy signal. When the call goes
through, your phone plays a ring-back tone until
Press To
M 5 1 1
or
*
(left) or
#
(right)
-
O
redial the number
F
select
select
confirm your selection
return to the previous menu
T
AutoRedial
On
or
Off
Calling Features
33
Page 35

Using Caller ID
If Calling line identification (caller ID) is active on
your phone, the phone displays the phone
numbers of incoming calls. The caller’s name is
D
also displayed if it is stored in your phonebook.
Canceling an Incoming Call
While the phone is ringing or vibrating:
RA
Press To
O
The call is stored to your missed call list.
Calling an Emergency Number
Your service provider programs an emergency phone
Calling Features
number that you can call under any circumstances, even
when your phone is locked.
Note:
Emergency numbers vary by country. Your
phone’s preprogrammed emergency number(s) may
not work in all locations, and sometimes an emergency
call cannot be placed due to network, environmental, or
interference issues.
Press To
1
keypad keys dial the emergency number
2N call the emergency number
cancel the incoming call
F
T
34
Page 36

Viewing Recent Calls
Your phone’s Call Log keeps lists of the calls you recently
received and dialed, even if the calls did not connect. The
lists are sorted from newest to oldest entries. The oldest
entries are deleted as new ones are added.
Viewing Missed Calls
You can view a list of the last 10 incoming calls that you
did not answer.
Note:
D
RA
This function must be supported by Caller ID.
Press To
1
M 3 1
2S (up or down)
*
or
#
(right)
3
N
or
-
or
view the list of missed
(left) or
incoming calls
If no missed numbers are
found, you see
numbers
scroll through the list of
F
missed calls
Your phone shows the time
and date each call was
received, along with the
number.
call the currently displayed
number
store the number
No missed
.
T
Calling Features
35
Page 37

Press To
+
, then S (to
select
Yes
) and
-
D
4
O
Viewing Received Calls
You can view a list of the last 10 incoming calls that you
RA
Press To
M 3 2
or
*
(left) or #
(right)
N
or
-
or
view the list of received calls
Calling Features
accepted.
Note:
This function must be supported by Caller ID.
1
2S (up or down)
3
erase the number
return to the previous menu
If no missed numbers are
found, you see
numbers
scroll through the list of
received calls
F
Your phone shows the time
and date each call was
received, along with the
number.
T
call the currently displayed
number
store the number
No received
.
36
Page 38

Press To
+
, then S (to
select
Yes
) and
-
4
Viewing Dialed Calls
You can view a list of the last 10 phone numbers that you
called, successfully or not.
1
2S (up or down)
3
4
D
O
RA
Press To
M 3 3
*
or
#
(right)
N
or
-
O
view the last number you
(left) or
erase the number
return to the previous menu
dialed
If no numbers are found, you
see
No dialed numbers
scroll through the list of dialed
numbers
Your phone shows the time
F
and date each number was
dialed, along with the
number.
call the currently displayed
number
store the number
return to the previous menu
T
.
Calling Features
Shortcut:
number you dialed.
From the idle display, press N to view the last
37
Page 39

Returning an Unanswered Call
Your phone keeps a record of incoming calls that you do
not answer. When you miss incoming calls, your phone
displays
of missed calls.
Using Pause Dialing
When you call automated systems such as voice mail or
bank-by-phone, you are frequently prompted to enter an
identification number (such as a PIN or account number)
before you can proceed.
Calling Features
Pause dialing can make it easier to use these automated
systems. In one memory location on your phone, you can
Missed Call: XX 11:10AM
D
Press To
S
(up or down)
1
RA
2
any key clear the display
store:
•
the phone number to access the automated
system
•
any required PIN numbers or similar security codes
•
special characters—pauses—wherever appropriate
between sets of numbers, that tell your phone to wait
before sending the next set of numbers
, where XX is the number
view the missed incoming
calls
F
T
38
Page 40

Storing a Number with Pauses
Note:
Repeat steps 2 and 3 as many times as necessary.
Press To
1
2S (up)
3
4
5
6
7
8
9S (up or down)
10
11
D
keypad keys enter the phone number you
dial to call the automated
system
insert the pause character
keypad keys enter the next group of
-
keypad keys enter a 2-digit location
-
keypad keys enter a name for the entry
-
-
O
RA
numbers (for example, a
required PIN number)
Note:
If the system requires a
* or #, enter those symbols
too.
complete the entry
save the location number
F
Note:
See “How to Enter Text
on Your Phone” on page 24
for instructions on entering
text.
save the name
view the desired number type
select the number type and
store the entry
return to the previous menu
T
Calling Features
39
Page 41

Calling a Pause Dialing Number
Note:
Repeat step 2 at each pause as necessary.
Press To
D
1
keypad keys enter the memory location of
the desired Pause Dialing
number
2
N
call the phone number
RA
3
O
Calling With Speed Dial
Each entry you store in your phonebook is assigned a
Calling Features
unique speed dial number, a 2-digit number from 10 to 99.
This number identifies the memory location where the
entry is stored. To speed dial a phonebook entry:
Press To
1
keypad keys enter the speed dial number
2N call the entry
Shortcut:
press and hold the 2nd digit. The phone calls the entry for
that location.
40
Enter the 1st digit of the memory location, then
Your phone dials the number,
then waits for your entry
when it reaches the first
pause.
end the call
F
for the entry you want to call
T
Page 42

Calling With 1-Touch Dial
To call phonebook entries 1 through 9, just press and hold
the one-digit speed dial number for 1 second. The call is
placed even if the phone is restricted.
Using Voicemail
additional information about using this feature.
When you receive a voicemail message, your phone
beeps or vibrates and displays the
waiting) indicator.
Listening to Voicemail Messages
To call the voicemail access number:
D
Voicemail messages that you receive are stored
on the network. To listen to your messages, you
RA
must call your voicemail phone number.
Note:
Your service provider may include
c
(voice message
F
Action
Enter the digits of the number and press N.
Calling Features
The phone calls your voicemail phone number. If no
voicemail number is stored, your phone prompts you to
store one.
T
41
Page 43

Viewing the List of Voicemail Messages
Action
Press M 1 2 1.
D
Your phone lists:
• number of new voicemail messages
• number of total messages
• time and date received the voicemail
RA
message was received, as well as a call
back number (if included)
To retrieve the messages, press N or -. Your phone calls
the voicemail access number.
Storing Your Voicemail Number
If necessary, use the following procedure to store your
Calling Features
voicemail access number on your phone. Usually, your
service provider has already done this for you.
Press To
1
M 1 2 2
2
-
or
keypad keys,
then
-
F
view the voicemail access
number
T
store the number that is
displayed
enter and store a new
number
42
Page 44

Muting the Phone
To mute your phone during a call:
Action
Press M 1.
Press - 6.
D
or
RA
Press
M 1
or - 6 again to resume normal
conversation.
Using Call Waiting
When you are on a call, an alert tone sounds to
indicate that you have received a second call.
Set Up Call Waiting
Press To
1
M 5 1 5
2S (up or down)
or
*
(left) or
#
(right), then
-
3
O
F
access
select On, then confirm your
selection
Call wait
T
return to the previous menu
Calling Features
Note:
Call waiting is not available while the phone is
roaming.
43
Page 45

Use Call Waiting During a Call
Action
Press N to answer the new call and automatically
D
place the current call on hold. Press
switch back to the first call.
Cancel Call Waiting
RA
Press To
1
M 5 1 5
2S (up or down)
*
(left) or
or
#
(right), then
-
3
O
Calling Features
access
select
selection
return to the previous menu
N
again to
Call wait
Off
, then confirm your
44
Forwarding a Call
Call forwarding sends your phone’s incoming
calls directly to another phone number.
F
T
Page 46

Set Up Call Forwarding
The forwarding options are:
All calls
If busy
IfNoAnswer
1
2
3S (up or down)
4
5
D
Press To
M 5 1 4
1
or
2
3
or
*
#
(right), then
1
or
2
keypad keys enter the forwarding phone
RA
(left) or
forward all calls
forward calls if your phone is
busy
forward calls if you do not
answer them
access call forwarding
options
select
All calls
select
If busy
select
IfNoAnswer
F
select On, then confirm your
selection
select to forward calls to a
phone
select to forward calls to
voicemail
number
T
Calling Features
45
Page 47

Press To
6
-
7
O
store the number
return to the previous menu
D
Note:
Call forwarding is not available while the phone is
roaming.
Cancel Call Forwarding
RA
Press To
1
M 5 1 4
2
1
or
2
access call forwarding
options
select
All calls
select
If busy
46
Calling Features
3
3S (up or down)
or
*
(left) or
#
(right), then
-
4
O
select
IfNoAnswer
select
Off
F
selection
return to the previous menu
, then confirm your
T
Page 48

Alphanumeric
Messages
D
You can send text messages and receive
alphanumeric messages (text messages or
alphanumeric pages) with your wireless phone.
Sending a Text Message
To send a text message:
Action
1
Press M 1 1 1 to begin writing or editing a
message.
2
Enter the message contents, and press -. (See
“How to Enter Text on Your Phone” on page 24
for instructions on entering text.)
3
Scroll to
Saved message memory) or
4
Enter the destination phone number.
You can enter up to 10 destination numbers.
After each phone number entry, press
down), then enter another number.
When you finish entering phone numbers,
press
RA
Yes
(if you want to store the message to
F
No
, and press -.
T
-
.
S
Alphanumeric Messages
(up or
47
Page 49

Action
5
Enter a call back number and press -.
or
D
Press -. (Your number is automatically entered
as the call back number.)
6
Scroll to the desired priority level and
press
-
.
48
Alphanumeric Messages
7
Select
Send now,
8 to send the message immediately.
or
Select
Send later
date and time (up to 7 days later).
8
Press N to send the message.
• If the message is sent successfully, you see
Sent
and the phone returns to the previous
menu. The sent message is automatically
stored in
then proceed to step
, then enter a deferred delivery
F
Sent Msg
.
T
RA
Page 50

Action
• If the message is not sent successfully, you
see
Resend?
(left) or
D
press
. Press S (up or down) or *
#
(right) to select
-
.
Yes
or No, and
If the resend is successful, you see
the phone returns to the previous menu. The
sent message is automatically stored in
Msg
If the resend is not successful, the message
is automatically stored in the Outbox.
Viewing Outbox Messages
Text messages that fail to send are stored in the
Outbox.The Outbox can store up to 20 messages.
To view Outbox messages:
RA
.
Sent
and
Sent
F
Action
1
Press M 1 1 3 to view a list of headers for
Outbox messages.
2
Press S (up or down) or * (left) or # (right)
to scroll through the list of message headers.
indicates the currently selected message
•
•
#
indicates a protected message
T
Alphanumeric Messages
49
Page 51

Action
3
To select a message and view its contents,
press
-
.
To delete a message, press
D
press
-
.
To lock a message, press
and press
deleted until you unlock it.)
4
If you select to view a message, press S (up or
down) or
the message text.
• To return to the list of message headers,
• To send a message to a number, press
5
Press P to exit.
Alphanumeric Messages
Viewing Saved Messages
Saved message memory can store up to 20 messages,
depending on the size of each message.
-
. (A locked message cannot be
RA
*
(left) or # (right) to scroll through
press
P
.
Edit the received message as desired, then
press
-
. Complete the steps to send the
message just as you do when you send a
new message. (See “Sending a Text
Message” on page 47.)
F
+
, scroll to
-
twice, scroll to
T
Yes
, and
Yes
,
N
.
50
Page 52

To view saved messages:
Action
1
Press M 1 1 4 to view a list of headers for
outgoing messages.
D
2
Press S (up or down) or * (left) or # (right)
to scroll through the list of message headers.
indicates the currently selected message
•
•
#
indicates a protected message
RA
3
To select a message and view its contents,
press
-
.
To delete a message, press
press
-
.
To lock a message, press
press
-
. (A locked message cannot be deleted
until you unlock it.)
4
If you select to view a message, press S (up or
down) or
the message text.
• To return to the list of message headers,
• To send a message to another number,
5
Press P to exit.
*
(left) or # (right) to scroll through
press
P
.
press
N
. Edit the received message as
desired, then press
send the message just as you do when you
send a new message. (See “Sending a Text
Message” on page 47.)
+
, scroll to
-
, scroll to
Yes
Yes
F
T
-
. Complete the steps to
, and
, and
Alphanumeric Messages
51
Page 53

Viewing Sent Messages
Your phone stores messages that have been sent
successfully. The sent message memory can store up to
20 messages.
To view sent messages:
D
Action
1
Press M 1 1 5 to view a list of headers
for sent messages.
RA
2
Press S (up or down) or * (left) or # (right)
to scroll through the list of message headers.
•
indicates the currently selected message
•
#
indicates a protected message
3
To select a message and view its contents,
press
-
.
52
Alphanumeric Messages
To delete a message, press
press
-
.
F
To lock a message, press
press
-
. (A locked message cannot be deleted
until you unlock it.)
-
T
+
, scroll to
, scroll to
Yes
Yes
, and
, and
Page 54

Action
4
If you select to view a message, press S (up or
down) or
the message text.
• To return to the list of message headers,
• To send the message again, press
5
Press P to exit.
*
(left) or # (right) to scroll through
D
press
P
.
N
If the message is sent successfully, you see
RA
Sent
, and the phone returns to the previous
menu. The sent message is automatically
stored in
If the message is not sent successfully, you
see
(left) or
press
Sent Msg
Resend?
. Press S (up or down) or *
#
(right) to select
-
.
.
Yes
or No, and
.
Alphanumeric Messages
Receiving a Message
When you receive a message, your phone:
•
beeps or vibrates
•
displays the d (message waiting) indicator
•
displays
an alphanumeric page)
•
displays the message priority (if urgent or
emergency)
Message!
F
T
(for a text message) or
Page!
(for
53
Page 55

•
displays a call back number, if included
If the received call back number matches the number
of a phonebook entry, the name for that entry is
displayed instead of the call back number.
D
Incoming messages are stored in the Inbox.The Inbox can
store up to 20 messages. Messages in the Inbox are
sorted from newest to oldest.
To view Inbox messages:
RA
Action
1
Press M 1 1 2 to view a list of headers
for received messages.
2
Press S (up or down) or * (left) or # (right)
to scroll through the list of message headers.
•
indicates the currently selected message
•
√
indicates a read message
•
#
indicates a protected message
F
+
, scroll to
T
-
, scroll to
Yes
Alphanumeric Messages
3
To select a message and view its contents,
press
-
.
To delete a message, press
press
-
.
To lock a message, press
press
-
. (A locked message cannot be deleted
until you unlock it.)
Yes
, and
, and
54
Page 56

Action
4
If you select to view a message, press S (up or
down) or
the message text.
• To return to the list of message headers,
• To call the call back number in a text
• To forward the message to an embedded
Deleting Messages
You can delete individual messages or all messages at
once. However, locked messages cannot be deleted until
you unlock them.
*
(left) or # (right) to scroll through
D
press
P
.
message, press
N 1
.
RA
originator number, press
received message as desired, then press
Complete the steps to sent the message just
as you do when you send a new message.
(See “Sending a Text Message” on page 47.)
N 3
. Edit the
-
F
.
T
Alphanumeric Messages
55
Page 57

You can delete individual messages while viewing
message headers.
Press To
1
Alphanumeric Messages
M 1 1 6
D
2
1
or
2
RA
or
3
or
4
or
5
or
6
3S (up or down) or
*
(left) or #
(right)
4
-
5
O
select the delete messages
option
select all read messages
select all Inbox messages
select all Outbox messages
select all saved messages
select all sent messages
F
select all messages
scroll to
confirm your selection
return to the previous menu
Yes
T
or
No
56
Page 58

Setting Message
Acknowledgment
You can choose to receive an acknowledgment
when the message is delivered to the destination user and/
or when the message is read by the destination user.
Setting Delivery Acknowledgment
1
2S (up or down) or
3
4
Setting User Acknowledgment
1
2S (up or down) or
3
4
D
Press To
M 1 1 7
*
(left) or #
(right)
-
O
Press To
M 1 1 7
*
(left) or #
(right)
-
O
RA
1select
scroll to
confirm your selection
return to the previous menu
2select
scroll to
confirm your selection
return to the previous menu
Delivery ack
Yes
or
F
User ack
Yes
or
T
No
No
Alphanumeric Messages
57
Page 59

Sending a Page Message
You can send a page message from your
phone.
To send a page message:
D
Action
1
Press M 1 3 to begin writing a message.
2
Enter the message contents, and press -. (See
RA
“How to Enter Text on Your Phone” on page 24
for instructions on entering text.)
3
Scroll to
Saved message memory) or
4
Enter the destination phone number.
You can enter up to 10 destination numbers.
After each phone number entry, press
down), then enter another number.
When you finish entering phone numbers,
press
5
Enter a call back number and press -.
or
Yes
(if you want to store the message to
No
, and press -.
-
.
F
S
(up or
58
Alphanumeric Messages
Press -. (Your number is automatically entered
as the call back number.)
T
Page 60

Action
6
Scroll to the desired priority level and press -.
7
Press N to send the message.
D
• If the message is sent successfully, you see
Sent
, and the phone returns to the previous
menu. The sent message is automatically
stored in
• If the message is not sent successfully, you
see
(left) or
press
Sent Msg
RA
Resend?
#
-
.
.
. Press S (up or down) or *
(right) to select
Yes
or No, and
If the resend is successful, you see
the phone returns to the previous menu. The
sent message is automatically stored in
Msg
.
If the resend is not successful, the message
is automatically stored in the Outbox.
F
Sent
, and
Sent
T
Alphanumeric Messages
59
Page 61

Setting Up Your
Phonebook
D
You can store a list of names and phone numbers in
your phone’s electronic phonebook. Each memory location
from 01 through 99 can store three numbers and one
name associated with them. For a single contact, you can
store multiple numbers—for home, office, mobile.
Creating a Phonebook Entry
To create an entry:
1
Setting Up Your Phonebook
2
RA
Action
Enter the phone number you want to store, then
press
-
.You can store up to 32 digits per phone
number entry.
Press - to store the number in the displayed
location.
or
Enter a new 2-digit location and press -.
or
Press + to erase the displayed location, then
enter a new one and press
F
T
-
.
60
or
Scroll to an available location and press -.
3
Enter a name for the entry and press -.
Page 62

Action
4
Select the number type (home, mobile, office)
and press
If a number is already stored for the type you
select, you see
followed by
To leave the number unchanged, scroll to
press
or
To change the number:
a
b
5
Select the group (Family, Friends, Colleagues,
VIP, Other) and press
6
When you see
-
.
D
This number type is used
-
.
Overwrite?
.
RA
Scroll to
Edit the number, then press -.
Yes
and press -.
-
Another num?
.
:
,
No
and
Setting Up Your Phonebook
• Scroll to
or
• Scroll to
type and the next number, as instructed.
No
and press -.
F
Yes
and press -. Enter the number
T
61
Page 63

Action
7
If you see
the number or name is the same as one already
stored. When prompted to
D
•Scroll to
or
•Scroll to No and press - to exit without
Finding a Phonebook Entry
You can locate a phonebook entry by the name stored with
that entry or by the entry’s location number (01 through
99).
Setting Up Your Phonebook
Finding by Name
Duplicate Name
Yes
and press - to store the same
name and number.
RA
storing the entry.
or
Store?
Duplicate Number
:
62
Action
1
Press M 2 1.
Your phone displays the first entry in the phone
book (sorted alphabetically).
2
Scroll to the name of the entry you want.
or
Press the key with the first letter of the name you
want. (If no entry beginning with that letter is
found, you see
letter you entered.)
F
T
No x’s in memory
, where x is the
Page 64

Action
3
Press - to select the displayed name and
number.
or
D
Press * or # to scroll to another number (for
example, for office or mobile) for the same entry.
Finding by Location
RA
Action
1
Press M 2 2.
2
Enter the 2-digit memory location of the entry
you want, and press
Your phone displays the name, phone number,
and number type for the entry at that location.
3
Press * or # to scroll to another number (for
example, for office or mobile) stored in the same
location for the name selected.
-
.
F
T
Setting Up Your Phonebook
63
Page 65

Finding by Group
Action
1
Press M 2 3.
D
2
Scroll to the desired group and press -. Your
phone displays the first entry for that group
(sorted alphabetically).
or
Press the key with the first letter of the name you
want. Your phone displays that name in the
appropriate group, sorted alphabetically. (If no
entry beginning with that letter is found, you see
No x’s in memory
entered.)
3
Press - to select the displayed name and
number.
Setting Up Your Phonebook
or
Press * or # to scroll to another number (for
example, for office or mobile) stored in the same
location for the name selected.
RA
, where x is the letter you
F
Dialing a Phonebook Entry
To call a number stored in your phonebook:
Action
1
Retrieve the desired number.
(See “Finding a Phonebook Entry” on page 62.)
2
Press N to call the number.
64
T
Page 66

Editing a Phonebook Entry
Action
1
Retrieve the desired number.
D
(See “Finding a Phonebook Entry” on page 62.)
2
Press - to begin editing.
3
Erase, modify the number, or modify the name,
as desired:
• If you select
location are erased.
• If you select
the number displayed, enter the new number,
and press
RA
Erase
, all numbers for that
Modify Num
-
.
, press + to erase
Setting Up Your Phonebook
• If you select
the name displayed, enter the new name,
and press
• If you select
down) or
new group, then press
4
Press P to exit.
Checking Phonebook Capacity
You can see how much memory space remains for storing
Modify Name
-
.
ChangeGroup
*
(left) or # (right) to select the
, press + to erase
, press S (up or
F
-
.
T
65
Page 67

phonebook entries on your phone.
Action
1
Press M 2 4.
D
Your phone displays the number of memory
locations in use and the number remaining.
2
Press P to exit.
RA
Setting Up Your Phonebook
F
66
T
Page 68

Personalizing Your
Phone
D
Selecting a Ringer Style
You can select the style of ringer your phone uses to alert
you to incoming calls. Your phone includes 14
predefined ringer styles, and you can also download
ringer styles using the
Selecting a Predefined Style
Press To
1
M 4 31
2S (up or down)
3
-
4
O
RA
My Bell
function.
select
Predefined
scroll through the styles to
the one you want
As you scroll, your phone
F
plays a sample of the
currently displayed style.
select the style
exit to the previous menu
T
Personalizing Your Phone
67
Page 69

Downloading Ringer Tones
You can download up to 15 ringer tones over the network.
Press To
D
1
M 4 32
2S (up or down)
RA
3
-
4
O
select
My Bell
scroll through the styles to
the one you want
As you scroll, your phone
plays a sample of the
currently displayed style.
If you press
displays a help message.
Your phone also displays the
number of available locations
for new tones.
select the style
exit to the previous menu
0
, the phone
F
To erase a downloaded tone:
Personalizing Your Phone
68
Press To
1
M 4 32
2S (up or down)
3
+
4S (up or down)
5
-
select
My Bell
T
scroll through the styles to
the one you want
erase the tone
select
Yes
or
No
confirm your choice and exit
to the previous menu
Page 70

Note:
If you erase the currently assigned ringer tone and
do not select a new one, the phone uses the factory
default tone.
Setting Keypad Volume
You can adjust the volume of the tones you hear when you
press your phone’s keys.
1
2S (up or down) or
3
4
Setting Ringer Volume
You can adjust the volume of your phone’s ringer.
1
2S (up or down)
3
4
D
Press To
M 4 4
*
(left) or
#
-
O
Press To
M 4 7
-
O
RA
(right)
select
select the desired volume
(from silent to level 5)
confirm your selection
exit to the previous menu
select
select the desired volume
(from silent to level 5)
confirm your selection
exit to the previous menu
Key tone
F
Ringer Vol
T
Personalizing Your Phone
69
Page 71

Setting Message Tones
When you receive a new voicemail or alphanumeric
message, your phone beeps or vibrates. You can change
the number of beeps or turn them off completely.
Setting Reminders
D
Press To
1
M 4 8
2
1
RA
or
2
3
S
4
-
5
O
select message tones
select text message tones
select voicemail message
tones
scroll to the desired setting
select the displayed option
exit to the previous menu
A reminder is an alert that beeps or vibrates at regular
intervals to notify you about a received voicemail or text
message.
Personalizing Your Phone
70
Press To
1
M 4 9
2
S
3
-
4
O
F
T
select reminder alerts
scroll to
min
select the displayed option
exit to the previous menu
Remind once, Every 2
, or
Release
Page 72

Personalizing the Phone
Greeting
You can enter or change the greeting that the
phone displays when you turn it on.
1
2
D
Press To
M 5 2 4
keypad keys
go to the greeting entry area
enter the new greeting
RA
or
#
3
-
4
O
begin editing an existing
greeting
save the new/modified
greeting
exit to the previous menu
F
T
Personalizing Your Phone
71
Page 73

Personalizing Banner Text
You can enter or change the message banner that the
phone displays when it is idle. The banner can include up
to 12 characters.
D
Press To
1
M 5 2 3
2
keypad keys
go to the banner entry area
enter the new banner
RA
or
#
3
-
4
O
Setting the Menu Language
Set the language in which menu features and options are
displayed.
begin editing an existing
banner
save the new/modified
banner
exit to the previous menu
F
Personalizing Your Phone
72
Press To
1
M 5 2 1
2S (up or down) or
*
#
3
-
4
O
(left) or
(right)
view
Language
T
select one of the available
languages
confirm your selection
exit to the previous menu
Page 74

Resetting All Options
Use Master Reset to reset all options to their original
factory settings, except for the unlock code, security code,
and lifetime timer.
1
2
3
4
5
D
Action
Press M 5 3.
When prompted, enter the 6-digit security code.
Press 2 4 1.
Scroll to
Press O to exit.
RA
Yes
or No and press -.
Clearing All Stored Information
User Master Clear to clear all settings and entries that you
have made.
Caution:
information
phonebook and messaging entries. Once you erase the
information, it cannot be recovered.
1
2
3
4
5
Master Clear
stored in your phone’s memory, including
Action
Press M 5 3.
When prompted, enter the 6-digit security code.
Press 2 4 2.
Scroll to
Press O to exit.
Yes
erases all user-entered
F
T
or No and press -.
Personalizing Your Phone
73
Page 75

Clearing Selected Information
You can selectively erase the following:
•
all stored Call lists (except the lifetime timer)
D
•
all stored phonebook information
•
all stored to-do lists
•
all stored messages
Action
RA
1
Press M 5 3.
2
When prompted, enter the 6-digit security code.
3
Press 3.
4
Press the appropriate key for the list that you
want to delete.:
1
—call log
2
—phonebook
3
—to-do list
4
—stored messages
5
Scroll to
Personalizing Your Phone
6
Press O to exit.
Yes
F
or No and press -.
T
74
Page 76

Using Shortcuts
Your phone includes several standard key shortcuts. You
cannot edit or delete these shortcuts.
D
Key
Combination
1
- 3
2-
4
3-
5
4-
6
5-
8
Shortcut
Access the messaging menu.
Show the battery charge level.
Lock keypad immediately.
RA
Mute the phone.
Access the ring option menu. You
can then switch the ring mode
among
Ring Only, Vibrate Only
and
Vibrate then Ring
.
,
F
T
Personalizing Your Phone
75
Page 77

Getting More Out Of
Your Phone
D
Restricting Calls
You can restrict outgoing calls by setting different phone
service levels.
Level 1
RA
Calls can be placed only from memory
locations 1 through 9.
The following functions are restricted:
•
dialing with the keypad
•
calling from the phone book or
from call logs
•
saving a new number in the phone
book
F
•
viewing the last call list while the
phone is idle
Level 4
Getting More Out Of Your Phone
76
Release call restrictions imposed by
Level 1
T
Page 78

Press To
1
M 5 3
2
3
4S (up or down) or *
5
6
Using DTMF Tones
You can send numbers to the network as
dual tone multi-frequency (DTMF) tones
during a call. Use DTMF tones to communicate with
automated systems that require you to submit a PIN code
(such as voice mail or bank-by-phone).
You can set DTMF tones to
•
D
keypad keys enter the 6-digit security
1
RA
#
(left) or
-
P
Short
keypress. Short DTMF tones work with most
automated systems.
(right)
sends a short fixed-duration tone for each
access your phone’s
security settings
code
select the service level
option
select Level 1 or Level 4
confirm your selection
exit to the previous
menu
F
Long or Short
:
T
Getting More Out Of Your Phone
77
Page 79

•
Long
sends each tone for as long as you press the
key. Some systems (such as home answering
machines) require long tones for proper activation.
Press To
D
1
M 4 0
2S (up or down) or
*
(left) or
#
(right)
3
4
Using Service Tones
When Service Tones are set to On, you are instantly
alerted to any change in your wireless service. You
hear two short beeps whenever your phone:
•
begins to roam
•
returns to a home system after roaming
•
drops service
•
locates service
When Service Tones are set to
you when you connect to the network when placing a call.
RA
-
P
select
DTMF tone
Long
or
select
confirm your selection
exit to the previous menu
Short
F
On
, your phone will alert
T
Getting More Out Of Your Phone
78
Page 80

Note:
Your phone always beeps when a call is dropped.
Press To
1
M 4 5
2S (up or down) or
3
4
Monitoring Phone Use
You can view the duration of incoming and outgoing calls
by minute, and second.
D
*
(left) or
#
(right)
-
P
RA
select
Service tone
On
or
select
confirm your selection
exit to the previous menu
Off
Network connection time
moment you connect to your service provider's network
to the moment you end the call by pressing
time includes busy signals and ringing.
The amount of network connection time you track on
your resettable timer may not equal the amount of
time for which you are billed by your service provider.
For billing information, please contact your service
provider directly.
is the elapsed time from the
O
. This
F
T
Getting More Out Of Your Phone
79
Page 81

View and Reset Call Timers
To view a call timer:
D
Press To
1
M 3 4
2
1
RA
or
2
or
3
3
P
To reset the call timer:
Press To
1
M 3 4
2
2
3
+
select the list of call timers
select and view
approximate time spent on the
last dialed or received call. You
cannot reset this timer
select and view
total number of dialed calls and
the total time of those calls
select and view
total air-time since your phone
was activated
F
exit to the previous menu
Last
—
Resettable
Life timer
—
—
T
select the list of call timers
select
Resettable
select to reset
Getting More Out Of Your Phone
80
Page 82

Press To
Yes
or
4S (up or down)
or
*
(left) or
#
(right)
D
5
P
Adjusting System Options
scroll to
exit to the previous menu
No
Select a System
You can select your phone’s system according to the
system channel.
Press To
1
M 5 4 1
2 S (up or down)
or
*
#
3
-
4
P
RA
access the system selection
option
scroll to:
(left) or
(right)
• Automatic
• CDMA only
F
•
Analog only
(phone will not
operate
outside its
home system)
confirm your selection
exit to the previous menu
T
Getting More Out Of Your Phone
81
Page 83

Configure the System Mode
Your service provider configures the System Mode when
D
you receive your phone. You may decide to switch to
another mode to improve calling conditions, network
coverage, or roaming conditions.
Press To
1
2S (up or down)
3
Getting More Out Of Your Phone
4
RA
M 5 4 2
or
*
(left) or
#
(right)
-
P
access the system mode
option
scroll to:
•
Standard
1st seeks a home-type
system, then a nonhome-type system.
•
Home Only
not operate outside its
home system.
F
•
Scan A
Phone will
operate only
within non-
T
wireline (A) systems
•
Scan B
Phone will
operate only
within wireline
(B) systems.
confirm your selection
exit to the previous menu
—Your phone
—Phone will
—
—
82
Page 84

Select a Home System
Your phone can be activated with two unique phone
numbers. If you travel often, you can switch between
numbers to reduce roaming. This feature enables you to
change your active number to the one appropriate to the
area you are in.
When your phone has 2 numbers, only one can be active
at a time. Calls are placed and received by the currently
active number only. When you turn on your phone, a
message in the display indicates which phone number is
active.
1
2S (up or down)
3
4
D
RA
Press To
M 5 4 3
or
*
(left) or
#
(right)
-
P
display your phone’s currently
active NAM
select the NAM you want to
be active
confirm your selection
exit to the previous menu
F
T
Getting More Out Of Your Phone
83
Page 85

Viewing Phone Specifications
D
Display the System ID
You can view the number that identifies the wireless
system your phone is accessing.
Press To
1
2
Display Your Phone’s Software Version
You can view the version of software used by your phone.
Service personnel may ask you for this information if
you require technical assistance.
1
2
Display Your Phone’s PRL Version
You can view your phone’s PRL version. Service
personnel may ask you for this information if you require
technical assistance.
RA
M 5 4 4
P
Press To
M 5 4 5
P
view the system ID number
exit to the previous menu
view the software version
F
exit to the previous menu
T
Press To
1
M 5 4 6
2
P
Getting More Out Of Your Phone
84
view the PRL version
exit to the previous menu
Page 86

Display Your Phone’s ESN Number
Press To
1
M 5 4 7
2
D
P
view the ESN number
exit to the previous menu
RA
F
T
Getting More Out Of Your Phone
85
Page 87

PIMS
Alarm Clock
Your phone includes an alarm clock that you can set to
alert you at specific times.
Setting the Alarm
D
RA
Action
1
Press M 6 1 to select
2
Scroll to the desired setting (
Week day
3
If you select
press
erase one digit at a time.)
4
PIMS
Enter the hour and minute, and press-. (If you
make a mistake, press
time.)
5
Scroll to the desired repeat alarm setting, and
press
6
Press P to exit.
), and press -.
Once
, enter the month and day, and
-
. (If you make a mistake, press + to
F
-
.
Alarm
.
Once, Everyday
+
to erase one digit at a
T
, or
86
Page 88

Turning Off the Alarm
Action
1
Press M 6 1 to select
2
3
4
D
Press 2 to select
Scroll to
Press P to exit.
Yes
or No, and press -.
Release?
Alarm
.
.
Managing To-Do Lists
You can store up to 10 “to-do lists” to be displayed at
specified times. At a time you specify, a to-do list blinks on
and off on the phone’s display. Press any key to return to
the idle display.
You can store up to 10 lists.
Setting a To-Do List
Action
1
Press M 6 2.
If your phone cannot store any more lists, you
will see
2
Enter the text for your to-do list, and press -.
(See “How to Enter Text on Your Phone” on
page 24.)
RA
F
There is no storage for To-do list
T
.
PIMS
87
Page 89

Action
3
Enter the date and time for the to-do list, and
press
-
.
• To move the cursor 1 position to the right,
D
S
press
• To move the cursor 1 position to the left,
press
• Press
4
Scroll to the desired time for the To-do list alarm,
and press
• On time
• Bfor 10 min
• Bfor 1 hour
• Bfor 1 day
5
PIMS
Press P to exit.
(down).
S
(up).
#
to select AM or PM.
RA
-
:
F
T
88
Page 90
Viewing Your To-Do Lists
You can view your to-do lists in chronological order.
Action
1
2
D
Press M 6 2 2.
Your phone displays your stored lists, from
earliest to latest. If the time for a list has already
passed, your phone displays
of the entry.
Press S (up or down) or * (left) or # (right)
to scroll through the stored lists.
RA
past
at the bottom
To clear a selected list, press
No
, and press -.
3
Scroll to
4
Press P to exit.
Yes
or No, and press -.
+
, scroll to
F
T
Yes
or
PIMS
89
Page 91

Security
Activating Voice Privacy
Your phone can attempt to send your calls using
a high-security connection to prevent others
from intercepting them.
When voice privacy is turned On, your phone displays the
voice privacy icon
message.
Security
D
RA
Press To
1
M 5 5
2S (up or down) or
*
(left) or #(right)
3
-
4
P
k
and a voice privacy indicator
select
Voice Priv
On
scroll to
confirm your selection
exit to the previous menu
or
F
T
Off
90
Page 92

Specific Absorption Rate Data
The model wireless phone meets the government’s requirements for
exposure to radio waves.
Your wireless phone is a radio transmitter and receiver. It is designed and
manufactured not to exceed limits for exposure to radio frequency (RF)
energy set by the Federal Communications Commission (FCC) of the
U.S. Government and by the Canadian regulatory authorities. These
limits are part of comprehensive guidelines and establish permitted levels
of RF energy for the general population. The guidelines are based on
standards that were developed by independent scientific organizations
through periodic and thorough evaluation of scientific studies. The
standards include a substantial safety margin designed to assure the
safety of all persons, regardless of age or health.
The exposure standard for wireless mobile phones employs a unit of
measurement known as the Specific Absorption Rate, or SAR. The SAR
limit set by the FCC and by the Canadian regulatory authorities is
1.6 W/kg.
positions accepted by the FCC and by Industry Canada with the phone
transmitting at its highest certified power level in all tested frequency
bands. Although the SAR is determined at the highest certified power
level, the actual SAR level of the phone while operating can be well below
the maximum value. This is because the phone is designed to operate at
multiple power levels so as to use only the power required to reach the
network. In general, the closer you are to a wireless base station, the
lower the power output.
Before a phone model is available for sale to the public in the U.S. and
Canada, it must be tested and certified to the FCC and Industry Canada
that it does not exceed the limit established by each government for safe
exposure. The tests are performed in positions and locations (e.g., at the
ear and worn on the body) reported to the FCC and available for review
by Industry Canada. The highest SAR value for this model phone when
tested for use at the ear is 1.43 W/kg, and when worn on the body, as
D
RA
1
Tests for SAR are conducted using standard operating
F
T
91
Page 93

described in this user guide, is 0.40 W/kg. (Body-worn measurements
differ among phone models, depending upon available accessories and
regulatory requirements).
While there may be differences between the SAR levels of various
phones and at various positions, they all meet the governmental
requirements for safe exposure. Please note that improvements to this
product model could cause differences in the SAR value for later
products; in all cases, products are designed to be within the guidelines.
Additional information on Specific Absorption Rates (SAR) can be found
on the Cellular Telecommunications & Internet Association (CTIA) Web
site:
http://phonefacts.net
or the Canadian Wireless Telecommunications Association (CWTA) Web
site:
http://www.cwta.ca
1. In the United States and Canada, the SAR limit for mobile pho n es u s ed by
the public is 1.6 watts/kg (W/kg) averaged over one gram of tissue. The
standard incorporates a substantial margin of safety to give additional
protection for the public and to account for any variations in measurements.
2. The SAR information includes the Motorola testing protocol, assessment
procedure, and measurement uncertainty range for this product.
D
2
RA
F
92
T
Page 94

Product Registration
Online Product Registration:
http://www.motorola.com/warranty
Product registration is an important step toward enjoying your new
Motorola product. Registering helps us facilitate warranty service, and
permits us to contact you should your product require an update or
other service. Registration is for U.S. residents only and is not required
for warranty coverage.
Please retain your original dated sales receipt for your records. For
warranty service of your Motorola Personal Communications Product
you will need to provide a copy of your dated sales receipt to confirm
warranty status.
Thank you for choosing a Motorola product.
FT
A
R
Export Law Assurances
D
This product is controlled under the export regulations of the United
States of America and Canada. The Governments of the United States
of America and Canada may restrict the exportation or re-exportation
of this product to certain destinations. For further information contact
the U.S. Department of Commerce or the Canadian Department of
Foreign Affairs and International Trade.
93
Page 95

The U.S. Food and Drug
Administration's Center for
Devices and Radiological Health
Consumer Update on Mobile Phones
Additional Health and Safety Information
FDA has been receiving inquiries about the safety of mobile phones,
including cellular phones and PCS phones. The following summarizes
what is known—and what remains unknown—about whether these
products can pose a hazard to health, and what can be done to minimize
any potential risk. This information may be used to respond to questions.
Why the concern?
Mobile phones emit low levels of radio frequency energy (i.e., radio
frequency radiation) in the microwave range while being used. They also
emit very low levels of radio frequency energy (RF), considered nonsignificant, when in the stand-by mode. It is well known that high levels of
RF can produce biological damage through heating effects (this is how
your microwave oven is able to cook food). However, it is not known
whether, to what extent, or through what mechanism, lower levels of RF
might cause adverse health effects as well. Although some research has
been done to address these questions, no clear picture of the biological
effects of this type of radiation has emerged to date. Thus, the available
science does not allow us to conclude that mobile phones are absolutely
safe, or that they are unsafe. However, the available scientific evidence
does not demonstrate any adverse health effects associated with the use
of mobile phones.
D
A
R
T
F
What kinds of phones are in question?
Questions have been raised about hand-held mobile phones, the kind
that have a built-in antenna that is positioned close to the user's head
during normal telephone conversation. These types of mobile phones are
of concern because of the short distance between the phone's antenna—
94
Page 96

the primary source of the RF—and the person's head. The exposure to
RF from mobile phones in which the antenna is located at greater
distances from the user (on the outside of a car, for example) is drastically
lower than that from hand-held phones, because a person's RF exposure
decreases rapidly with distance from the source. The safety of so-called
“cordless phones,” which have a base unit connected to the telephone
wiring in a house and which operate at far lower power levels and
frequencies, has not been questioned.
How much evidence is there that hand-held
mobile phones might be harmful?
Briefly, there is not enough evidence to know for sure, either way;
however, research efforts are on-going. The existing scientific evidence is
conflicting and many of the studies that have been done to date have
suffered from flaws in their research methods. Animal experiments
investigating the effects of RF exposures characteristic of mobile phones
have yielded conflicting results. A few animal studies, however, have
suggested that low levels of RF could accelerate the development of
cancer in laboratory animals. In one study, mice genetically altered to be
predisposed to developing one type of cancer developed more than twice
as many such cancers when they were exposed to RF energy compared
to controls. There is much uncertainty among scientists about whether
results obtained from animal studies apply to the use of mobile phones.
First, it is uncertain how to apply the results obtained in rats and mice to
humans. Second, many of the studies that showed increased tumor
development used animals that had already been treated with cancercausing chemicals, and other studies exposed the animals to the RF
virtually continuously—up to 22 hours per day.
For the past five years in the United States, the mobile phone industry has
supported research into the safety of mobile phones. This research has
resulted in two findings in particular that merit additional study:
1
In a hospital-based, case-control study, researchers looked for an
association between mobile phone use and either glioma (a type of
brain cancer) or acoustic neuroma (a benign tumor of the nerve
R
D
FT
A
95
Page 97

sheath). No statistically significant association was found between
mobile phone use and acoustic neuroma. There was also no
association between mobile phone use and gliomas when all types of
types of gliomas were considered together. It should be noted that
the average length of mobile phone exposure in this study was less
than three years.
When 20 types of glioma were considered separately, however, an
association was found between mobile phone use and one rare type
of glioma, neuroepithelliomatous tumors. It is possible with multiple
comparisons of the same sample that this association occurred by
chance. Moreover, the risk did not increase with how often the mobile
phone was used, or the length of the calls. In fact, the risk actually
decreased with cumulative hours of mobile phone use. Most cancer
causing agents increase risk with increased exposure. An ongoing
study of brain cancers by the National Cancer Institute is expected to
bear on the accuracy and repeatability of these results.
2
Researchers conducted a large battery of laboratory tests to assess
the effects of exposure to mobile phone RF on genetic material.
These included tests for several kinds of abnormalities, including
mutations, chromosomal aberrations, DNA strand breaks, and
structural changes in the genetic material of blood cells called
lymphocytes. None of the tests showed any effect of the RF except
for the micronucleus assay, which detects structural effects on the
genetic material. The cells in this assay showed changes after
exposure to simulated cell phone radiation, but only after 24 hours of
exposure. It is possible that exposing the test cells to radiation for this
long resulted in heating. Since this assay is known to be sensitive to
heating, heat alone could have caused the abnormalities to occur.
The data already in the literature on the response of the micronucleus
assay to RF are conflicting. Thus, follow-up research is necessary.
FDA is currently working with government, industry, and academic groups
to ensure the proper follow-up to these industry-funded research findings.
Collaboration with the Cellular Telecommunications Industry Association
(CTIA) in particular is expected to lead to FDA providing research
D
A
R
T
F
1
2
96
Page 98

recommendations and scientific oversight of new CTIA-funded research
based on such recommendations.
Two other studies of interest have been reported recently in the literature:
1
Two groups of 18 people were exposed to simulated mobile phone
signals under laboratory conditions while they performed cognitive
function tests. There were no changes in the subjects' ability to recall
words, numbers, or pictures, or in their spatial memory, but they were
able to make choices more quickly in one visual test when they were
exposed to simulated mobile phone signals. This was the only
change noted among more than 20 variables compared.
2
In a study of 209 brain tumor cases and 425 matched controls, there
was no increased risk of brain tumors associated with mobile phone
use. When tumors did exist in certain locations, however, they were
more likely to be on the side of the head where the mobile phone was
used.
Because this occurred in only a small number of cases, the increased
likelihood was too small to be statistically significant.
In summary, we do not have enough information at this point to assure the
public that there are, or are not, any low incident health problems
associated with use of mobile phones. FDA continues to work with all
parties, including other federal agencies and industry, to assure that
research is undertaken to provide the necessary answers to the
outstanding questions about the safety of mobile phones.
What is known about cases of human cancer
that have been reported in users of hand-held
mobile phones?
Some people who have used mobile phones have been diagnosed with
brain cancer. But it is important to understand that this type of cancer also
occurs among people who have not used mobile phones. In fact, brain
cancer occurs in the U.S. population at a rate of about 6 new cases per
100,000 people each year. At that rate, assuming 80 million users of
R
D
FT
A
3
4
97
Page 99

mobile phones (a number increasing at a rate of about 1 million per
month), about 4800 cases of brain cancer would be expected each year
among those 80 million people, whether or not they used their phones.
Thus it is not possible to tell whether any individual's cancer arose
because of the phone, or whether it would have happened anyway. A key
question is whether the risk of getting a particular form of cancer is
greater among people who use mobile phones than among the rest of the
population. One way to answer that question is to compare the usage of
mobile phones among people with brain cancer with the use of mobile
phones among appropriately matched people without brain cancer. This is
called a case-control study. The current case-control study of brain
cancers by the National Cancer Institute, as well as the follow-up
research to be sponsored by industry, will begin to generate this type of
information.
What is FDA's role concerning the safety of
mobile phones?
Under the law, FDA does not review the safety of radiation-emitting
consumer products such as mobile phones before marketing, as it does
with new drugs or medical devices. However, the agency has authority to
take action if mobile phones are shown to emit radiation at a level that is
hazardous to the user. In such a case, FDA could require the
manufacturers of mobile phones to notify users of the health hazard and
to repair, replace or recall the phones so that the hazard no longer exists.
Although the existing scientific data do not justify FDA regulatory actions
at this time, FDA has urged the mobile phone industry to take a number of
steps to assure public safety. The agency has recommended that the
industry:
•
support needed research into possible biological effects of RF of the
type emitted by mobile phones
•
design mobile phones in a way that minimizes any RF exposure to
the user that is not necessary for device function
D
A
R
T
F
98
Page 100

•
cooperate in providing mobile phone users with the best possible
information on what is known about possible effects of mobile phone
use on human health
At the same time, FDA belongs to an interagency working group of the
federal agencies that have responsibility for different aspects of mobile
phone safety to ensure a coordinated effort at the federal level. These
agencies are:
•
National Institute for Occupational Safety and Health
•
Environmental Protection Agency
•
Federal Communications Commission
•
Occupational Health and Safety Administration
•
National Telecommunications and Information Administration
The National Institutes of Health also participates in this group.
In the absence of conclusive information about
any possible risk, what can concerned
individuals do?
If there is a risk from these products—and at this point we do not know
that there is—it is probably very small. But if people are concerned about
avoiding even potential risks, there are simple steps they can take to do
so. For example, time is a key factor in how much exposure a person
receives. Those persons who spend long periods of time on their handheld mobile phones could consider holding lengthy conversations on
conventional phones and reserving the hand-held models for shorter
conversations or for situations when other types of phones are not
available.
People who must conduct extended conversations in their cars every day
could switch to a type of mobile phone that places more distance between
their bodies and the source of the RF, since the exposure level drops off
dramatically with distance. For example, they could switch to:
•
a mobile phone in which the antenna is located outside the vehicle
R
D
FT
A
99
 Loading...