

Page 1

MODE
Page 2

2
Page 3
Contents
Safety Information. . . . . . . . . . . . .v
Getting Started. . . . . . . . . . . . . . . .1
Installing Batteries . . . . . . . . . . . . .2
Basic Operation of Your Radio . . . . . . . . .7
Turning On Your Radio. . . . . . . . . . . . . . . . .9
CommPort™ Charging Dock . . . . .5
Talking . . . . . . . . . . . . . . . . . . . .11
Before You Can Talk . . . . . . . . .11
To Talk . . . . . . . . . . . . . . . . . . . .12
Call Tone and Call Display . . . . .13
Alerts . . . . . . . . . . . . . . . . . . . . . .14
VibraCall
®
. . . . . . . . . . . . . . . . . .14
Keeping Time . . . . . . . . . . . . . . .15
Setting the Time . . . . . . . . . . . . . .15
Setting the Alarm . . . . . . . . . . . . .16
Stopwatch . . . . . . . . . . . . . . . . . . .17
Hands-Free Use (VOX) . . . . . . . .18
Privacy . . . . . . . . . . . . . . . . . . . . .19
Eavesdrop Reducer . . . . . . . . . . .19
QuieT6000™ . . . . . . . . . . . . . . . . .19
Weather . . . . . . . . . . . . . . . . . . . .20
Turning On the Weather . . . . . . . .20
Setting the Weather Channel . . . .21
Setting the Weather Alert . . . . . . .21
T6310 Features . . . . . . . . . . . . .22
Turning On the FM Radio . . . . . .22
Finding an FM Station . . . . . . . .22
Preset FM Stations . . . . . . . . . . .23
T6320 Features. . . . . . . . . . . . .24
Compass . . . . . . . . . . . . . . . . . .24
Thermometer . . . . . . . . . . . . . .26
Barometer . . . . . . . . . . . . . . . . .27
Altimeter . . . . . . . . . . . . . . . . . .28
Advanced Two-Way . . . . . . . .29
Lock . . . . . . . . . . . . . . . . . . . . . .29
LockPlus . . . . . . . . . . . . . . . . . .29
Channel Scanning . . . . . . . . . . .30
Talk Confirmation Tone . . . . . . .31
Button Beeps . . . . . . . . . . . . . . . . . . . . . . .31
Automatic Power Off . . . . . . . . . . . . . . . . .31
Monitor . . . . . . . . . . . . . . . . . . . . . . . . . . . .32
Reset . . . . . . . . . . . . . . . . . . . . . . . . . . . . .32
Setting the Battery Type . . . . . .32
Use and Care . . . . . . . . . . . . . .33
Contact Information . . . . . . . . .34
Frequency and Code Charts . .35
Interference Eliminator Codes .36
Troubleshooting . . . . . . . . . . . .37
Motorola Limited Warranty . . . .39
Page 4

4
Page 5

Safety and General Information
Important Information on Safe and Efficient Operation
Read This Information Before Using Your Radio
The information provided in this document supersedes the general safety information
contained in user guides publ ished prior to J uly 2000. F or inf ormation regarding ra dio use in a
hazardous atmosph ere ple ase re f er to t he Factory Mutual (FM) Appro v al Man ual Sup pleme nt
or Instruction Card, which is included with radio models that offer this capability.
RF Operational Characteristics
You r rad io c ontain s a t ra nsmitter and a re ceiver. W hen i t is ON, it re ceiv e s and tr ansmit s radi o
frequency (RF) energy. The radio operates in the frequency range of 450 MHz to 470 MHz.
Exposure to Radio Frequency Energy
Your Motorola radio is designed to comply with the following national and international
standards and guidelines regarding exposure of human beings to radio frequency
electromagnetic energy:
• United States Federal Communications Commission, Code of Federal Regulations; 47
CFR part 2 sub-part J
• American National Standards Institute (ANSI) / Institute of Electrical and Electronic
Engineers (IEEE) C95. 1-1992
• Institute of Electrical and Electronic Engineers (IEEE) C95.1-1999 Edition
• National Council on Radi ation Prote ction and Mea surem ents (NCRP) of the United States ,
Report 86, 1986
• International Commission on Non-Ionizing Radiation Protection (ICNIRP) 1998
• National Radiological Protection Board of the United Kingdom 1995
• Ministry of Health (Canada) Safety Code 6. Limi ts of Hum an Expo sure to Radi o Frequency
Electromagnetic Fields in the Frequency Range from 3 kHz to 300 GHz, 1999
Safety and General Information
v
Page 6

To assure optimal radio performance and make sure human exposure to radio frequency
electromagnetic energy is within the guidelines set forth in the above standards, always
adhere to the following procedures:
Portable Radio Operation and EME Exposure
Antenna Care
Use only the supplied or an approved replacement antenna. Unauthorized antennas,
modifications, or attachments could damage the radio and may violate FCC regulations.
DO NOT hold the antenna when the radio is “IN USE”. Holding the antenna affects the
effective range.
Two-Way Radio Operation
When using your radio as a traditional two-way radio, hold the radio in a
vertical position with the microphone two to three inches (5.0 to 7.5 cm)
away from the lips.
Body-Worn Operation
To maintain compliance with FCC RF exposure guidelines, if you wear a radio on your body
when transmitting, always place the radio in a Motorola supplied or approved clip, holder,
holster, case, or body harness. Use of non-Motorola-approved accessories may exceed
FCC RF exposure guidelines. If you do not use a body-worn accessory, ensure the
antenna is at least one inch (2.5 cm) from your body when transmitting.
Safety and General Information
Approved Accessories
For a list of approved Motorola accessories visit our website at www.motorola.com.
vi
Page 7

Electromagnetic Interference/Compatibility
Note: Nearly ev e ry electro nic d evice is susceptible to elec tromagnetic interf eren ce (EM I) i f
inadequately shielded, designed or otherwise configured for electromagnetic
compatibility.
Facilities
To avoid electromagnetic interference and/or compatibility conflicts, turn off your radio in any
facility where posted notices instruct you to do so. Hospitals or health care facilities may be
using equipment that is sensitive to external RF energy.
Aircraft
When instructed to do so, turn off your radio when on board an aircraft. Any use of a radio
must be in accordance with applicable regulations per airline crew instructions.
Safety and General Information
vii
Page 8

Medical Devices
Pacemakers
The Health Industry Manufacturers Association recommends that a minimum separation of 6
inches (15 centimeters) be maintained between a handheld wireless radio and a pacemaker.
These recommendations are consistent with the independent research by, and
recommendations of, Wireless Technology Research.
Persons with pacemakers should:
• AL WAYS keep the radio more th an six in che s (1 5 c ent im eters ) f r om their pacemaker when
the radio is turned ON.
• not carry the radio in the breast pocket.
• use the ear opposite the pacemaker to minimize the potential for interference.
• turn the radio OFF imm ediately i f yo u hav e an y reas on to sus pect that i nterf erence i s taking
place.
Hearing Aids
Some wireless radios ma y int erfere with some hearing aids. In th e event of such interference,
you may want to consult your hearing aid manufacturer to discuss alternatives.
Other Medical Devices
If you use any other personal medical device, consult the manufacturer of your device to
determine if it is adequately shielded from RF energy. Your physician may be able to assist
you in obtaining this information.
Safety and General Information
viii
Page 9

Safety and General Use While Driving
Check the laws and regulations on the use of radios in the area where you drive. Always
obey them.
When using your radio while driving, please:
• Give full attention to driving and to the road.
• Use hands-free operation, if available.
• Pull off the road and park before making or answering a call if driving conditions so require.
Operational Warnings
For Vehicles with an Air Bag
Do not place a portable r adio in th e area o v er an air b ag or in the a ir bag depl o yme nt area . Air
bags inflate with great force. If a portable radio is placed in the air bag deployment area and
the air bag inflates, the radio may be propelled with great force and cause serious injury to
occupants of the vehicle.
Potentially Explosive Atmospheres
Turn off your radio prior to entering any area with a pot entially exp losiv e atmosphe re, unle ss it
is a radio type especially qualified for use in such areas as “Intrinsically Safe” (for example,
Factory Mutual, CSA, or UL Approved). Do not remove, install, or charge batteries in such
areas. Sparks in a potentia lly e xplo siv e atmosphe re can ca use an e xp losion o r fire resu lting in
bodily injury or even death.
Note: The areas with potentially explosive atmospheres referred to above include fueling
areas such as below decks on boats, fuel or chemical transfer or storage facilities,
areas where the air contains chemicals or particles, such as grain, dust or metal
powders, and any other area where you would normally be advised to turn off your
vehicle engine. Areas with potentially explosive atmospheres are often but not always
posted.
Safety and General Information
ix
Page 10

Blasting Caps and Areas
To avoid possible interference with blasting operations, turn off your radio when you are
near electrical blasting caps, in a blasting area, or in areas posted: “Turn off two-way
radio”. Obey all signs and instructions.
Operational Cautions
Antennas
Do not use any portable radio that has a dam aged antenna. If a dama ged a nte nna com es
into contact with your skin, a minor burn can result.
Batteries
All batteries can cause property damage and/or bodily injury such as burns if a conductive
material such as jewelry, keys, or beaded chains touch exposed terminals. The conductive
material may com plete an electrical c ircui t (short circuit) and become qu ite hot. Exercise care
in handling any charged battery, particularly when placing it inside a pocket, purse, or other
container with metal objec ts.
Safety and General Information
x
Page 11

DCharging Safety Instructions
Before using the battery charger, read all instructions and cautionary markings on the:
1. battery
2. battery charger, and
3. radio using the battery.
Caution
To reduce the risk of injury, charge only the rechargeable batteries listed. Other types of
batteries may burst, causing personal injury and damage.‘
Single-Unit Charger
Kit Number Description
NTN9393 110V - NiMH Charging Adapter
Batteries
Capacit y i n
Kit Number
NTN9395 550 mAH T6000-Series NiMH
milliampere-hour mAH Description Composition
Safety and General Information
xi
Page 12

Save these Instructions
1. Do not expose the charger to rain or snow.
2. Do not operate the charger if it has received a sharp blow, or has been dropped or dam-
aged in any way.
3. Do not disassemble the charger if it has received a sharp blow, or has been dropped or
damaged in any way.
4. Never alter the AC cord or plug provided with the unit. If plug will not fit the outlet, have
proper outlet instal led b y a qua lified electrici an. An imp rop er condi tion ca n resul t in a risk
of electric shock.
5. To reduce risk of damage to cord or plug, pull the plug rather than the cord when discon-
necting charger from AC receptacle.
6. To reduce the risk of electric shoc k , unp lug the c harg er f r om the outlet before attem pt ing
any maintenance or cleaning.
7. Use of an attachment not recommended or sold by Motorola may result in a risk of fire,
electric shock, or personal injury.
8. Make sure that the cord is located so that it will not be stepped on, tripped over, or sub-
jected to damage or stress.
9. An extension cord should not be used unless absolutely necessary. Use of an improper
extension c ord coul d result i n a risk of fire and/or ele ctric shoc k. If an e xt ension c ord must
be used, make sur e:
-That the pins on the plug of the extension cord are the same number, size and shape
as those on the plug of the charger.
-That the extension cord is properly wired and in good electrical condition, and
Safety and General Information
-That the cord size is18 AWG for lengths up to 100 feet, and 16 AWG for lengths up to
150 feet.
10. The supply cord of this charger cannot be replaced. If the cord is damaged, the charger
should be discarded or returned to the point of purchase if within 90 days of purchase.
xii
Page 13
Getting Started
Hi, I’m QuickStart and I’m going to help you get started!
â
The Motorola
durable two-way radios that allow you to stay connected to
family, friends, and companions. They operate on Family Radio
Service (FRS) frequencies, require no service fee or license,
and can be used any where in the United Sta tes and othe r areas
as listed by the FCC.
But these radios offer more than just a way of keeping in touch.
They also he lp you and your g ro up s tay on schedule because a
clock, alarm, and sto pw atch are built into eac h model. And they
will even alert you with emergency weather broadcasts. The
weather won’t ever surprise you again!
The T6310 is a stylish two-way radio that receives FM stereo. It’s fun and cool, great for the
beach. And it includes all the features found on the Motorola Talkabout T6300.
The T6320 is rugged and sporty. It includes a digital compass, thermometer, barometer, and
altimeter , so you w on’t get lost i n the woo ds or on th e mounta in. These too ls, al ong wit h all the
other great stuff found on the T6300 radio, make the T6320 essential gear when going
outdoors.
The T6300, T6310, and T6320 radios are also easy to use. Just take a few minutes to read
this user’s guide and you’re ready to share your adventure.
A detachable Quick Reference Card is on the back cover.
Talkabout® T6300, T6310, and T632 0 radios are
Getting Started
1
Page 14
Installing Batteries
Your radio uses three AA b atte ries o r a rec harg eable Nickel-Metal Hydride (NiMH ) ba ttery.
Some radios inc lude a NiMH battery with char ger adap ter co v er, CommPort™ charging doc k,
and charger. If you don’t hav e th ese i tem s , th ey’re a ls o available in the NiMH ba ttery upg rade
kit (56319).
Latch
• Turn off the radio (see
Getting Started
page 9).
• Push latch up until it clicks.
• Lift back cover off.
Note: The radio keeps the cloc k se ttings if battery changes are made in le ss than 20
2
seconds. Try replacing one battery at a time.
• Remove and replace
batteries so the + and markings match the ones in
the compartment or the
NiMH charge contacts are
facing out.
• Hook back cover on the
hinges.
• Align tabs.
• Close battery door, press ing
lightly until latch clicks.
Page 15

5
Battery Life
The following chart lists the approximate battery life for each type of radio use.
Battery Typ e Two-W ay Use*
AA alkaline 35 hours 30 hours
NiMH 12 hours 9 hours
*Two-way use is defined as 90% standby time, 5% talk time, and 5% receive time.
Note: Use earbuds or a headset to minimize battery drain while using the FM stereo feature
(T6310 only).
The battery meter on the top-left corner of the display shows how much
battery power you ha v e. It sh ow s d(full), b(two-thirds full), c(one-
third full) and a(almost empty ). Wh en it’s c, the radio beeps every ten
minutes. So, change or charge those batteries!
FM Stereo with Earb uds
or Headset
Getting Started
3
Page 16
Charging the NiMH battery
Charge the NiMH overnight (12 to 16 hours) before using it for the first time, it will only
need up to four hours of charging thereafter.
Or
• Turn off the
Getting Started
• Plug in the
4
radio (see
page 9) or
place the NiMH
battery in the
charger
adapter cover.
charger.
At the contacts on the back of the radio, or if charging just the battery, at the battery contacts:
• Positio n the ch arger wit h the hook o n the LE D
end of the charger placed over the larger slot.
• Snap the hook on the cord end into the
smaller slot.
Note: If you notice the LED flashing red for
more than a minute while clamping the
charger onto the charger adapter cover,
the battery is faulty and should be
replaced.
• When the LED turns
solid green, the battery
is fully charged.
Note: When charging the
battery by itself,
remove the ch arger
from the charger
adapter cover
before installing or
removing the
battery.
Page 17
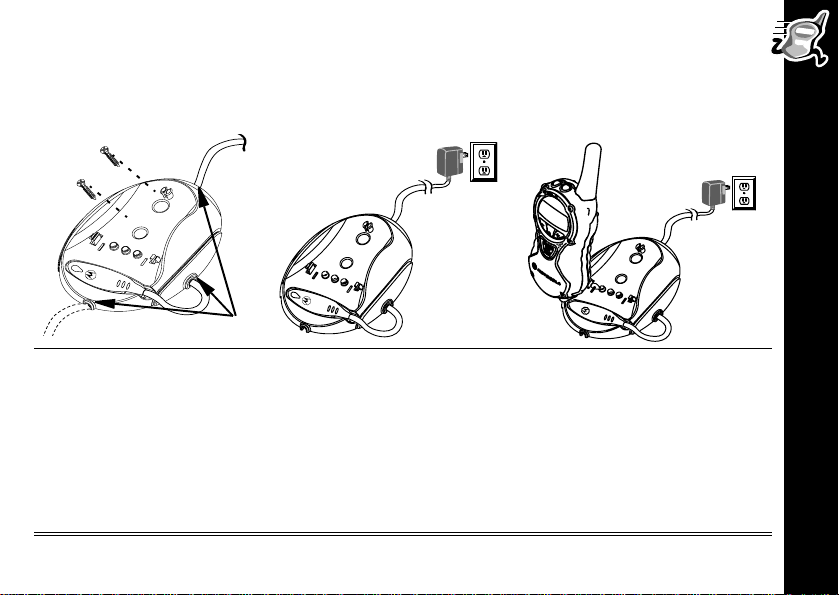
CommPort™ Charging Dock
The CommP ort™ chargin g doc k prov ides drop -in chargi ng con ve nience . The cha rging doc k
can be mounted or placed on any flat surface (such as a wall or workbench) and turns your
radio into a stationary intercom while keeping it charged and ready for any adventure.
Cutouts
To mount the charging dock:
• Wrap the power cord
under the charging dock .
Use the cut outs to hold
the cord in place.
• Attach using two #6 x ¾”
screws appropriate for the
mounting surface.
• Position the charger with the
hook on the LED end over
the left slot.
• Snap the hook on the cord
end into the right slot,
clamping the charger onto
the charging dock contacts
• Plug in the charger.
• Place the radio, or the NiMH
battery in the charger a da pter
cover, into the CommPort
charging dock.
• When the LED turns solid
green, the battery is fully
charged.
Getting Started
5
Page 18
Charging Status
The LED charger indicates charging status when the charger is connected to the radio,
the NiMH battery, or the CommPort™ charging dock.
Color Charging Status and Description
Solid Red Rapid charging Up to 90%
Flashing Green Top-off charging 90% to 100%
Solid Green Charging complete 100%
Charging Level
Complete
Flashing Red Battery faulty
Flashing Yellow Standby
Getting Started
6
-
If flashing red persists for more than one minute, the
battery is faulty and should be replaced.
Battery waiting to charge.
Temperature out of range for charging; must be
between 5o to 40o C or 41o to 104o F
Page 19
Basic Operation of Your Radio
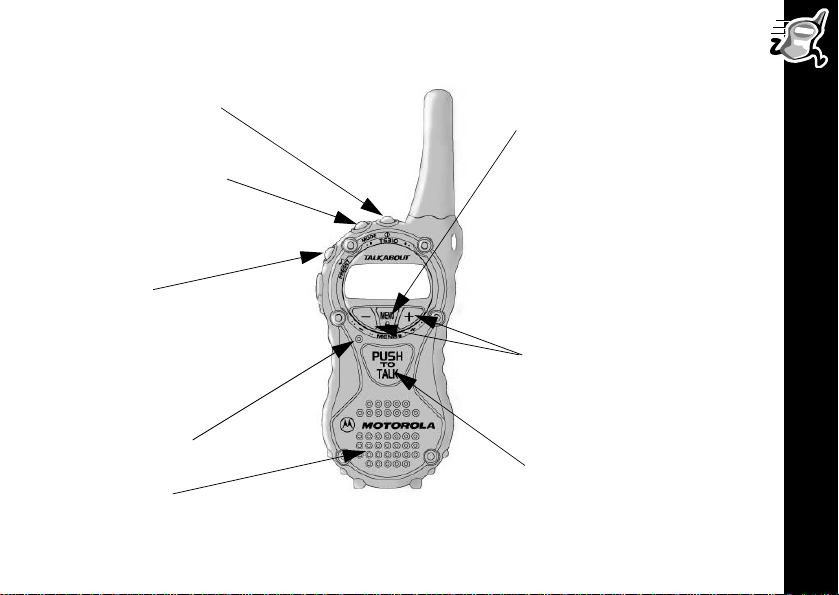
Use | to --
• Turn power on/off
Use ~ to --
• Scroll through mode
selections
• Return to two-way mode
(when held down)
‰ to --
Use
• Transmit call tone
• Start and stop stopwatch
• Select and scroll through
stereo presets (T6310 only)
Microphone
Speaker
Use y to --
• Scroll through menus
• Lock the keypad (when
held down and not in a
menu)
• Exit the menu (when held
down while in a menu)
Use x and z to --
• Change the volume
• Scroll through and selec t
settings
Use { to --
• Talk on the radio
• Save a setting
Getting Started
7
Page 20
Belt Clip
• Squeeze the top and
bottom of the clip to
attach or detach the
clip from the radio.
Note: The belt clip holds
the radio while
being worn on
your belt. It was
designed for your
convenience and
is not meant to
secure your radio
under all
circumstances.
Getting Started
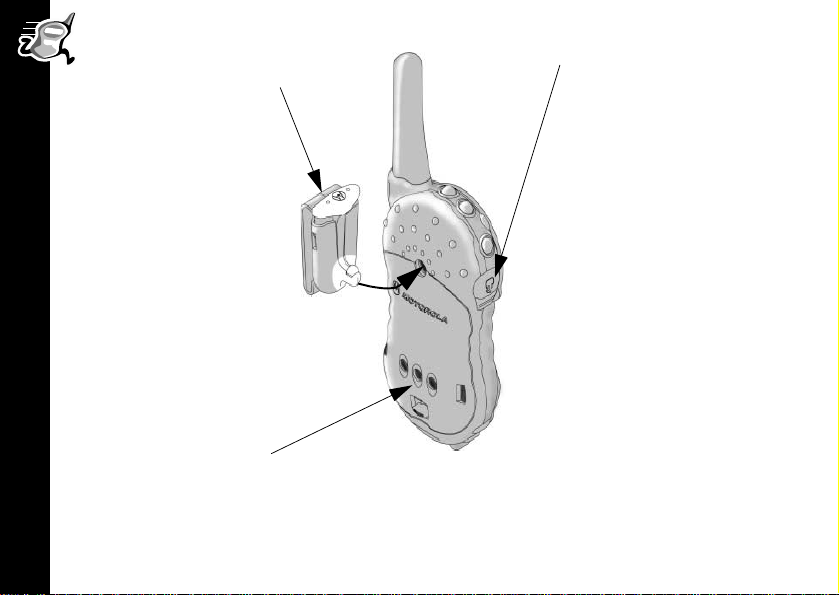
NiMH Battery
Charging Contacts
000516-O
When using aud io ac ce ss ories w ith your radio, Motorola recommends
that the volume level be kept at a comfortable listening level.
Accessory Connector (and
FM Connector on T6310)
• For audio accessories,
such as speaker/
microphone and fle xi ble
ear receiver.
• FM stereo earbuds (T63 10
only) or any standard
stereo headset.
Note: Connector(s) shown
with the cover plug in
place. Both
connectors cannot be
used at the same time.
Check out the Accessory Brochure for other cool stuff available from Motorola.
8
Page 21
Using your radio is easier than catching a wave!
Turning On Your Radio
Press To Display Then
|
be f g hi j
M O T O R O L A
klm
nop
b e f g h i
1 1
k lm
The radio beeps and
| flashes every
three seconds.
Your Radio’s Display
Lock Set
Eavesdrop Reducer
Battery Meter
Channel Indicator
Alarm On
Code Indicator
be f g hi j
M O T O R O L A
klm
nop
Channel Scan On
VibraCall
Automatic Power Off
VOX On
®
Alert On
Channel In Use
Weather On
Ring Alert
Turning Off Your Radio
To turn off your radio, press and hold | until the radio beeps and the display goes blank.
Getting Started
9
Page 22

Modes
Your radio can transmit and receive in all modes except the weather mode. The T6300,
T6310, and T6320 standard modes are:
TWO WAY, TIME, STPWATCH, WEATHER, and SETTINGS.
The T6310 also has an FMSTEREO mode. The T6320 has COMPASS, TEMPERAT, BAROMETER, and
ALTIMETR modes in addition to the standard modes.
Key Sequence
Almost everything you can do with your radio is done using the same basic key sequence!
Use your radio’s mode and menu screens to select options and set features the way y ou want
them. All the f eature s that wo rk using this ke y se quence a re described on the f ollo wing pa ges.
Press To Display Then Press
~
Getting Started
x
the mode you want
the menu you want
y
the setting you want
or
z
y
to display the associated menus
x
or z to select the menu
{
or wait ten seconds to save the setting or press and hold
Backlight
Being in the dark is n ev er a probl em. Your radio ha s a bac klig ht that turns on
automatically any time you press a button, except
{and ‰. The backlight
turns out when you’re talking on the radio and turns itself off automatically
after five seconds.
10
y
Page 23
Talking
Before You Can Talk
Have y o u ever tried to talk to someone who’s on a “diff ere nt w avelength?” It’s
not easy, is it? Well, you can’t talk with someone else on your two-way radio
unless you ARE BOTH on the same channel and using the sa me int erf e rence
eliminator code.
24
The channel is the radio frequency wave your radio uses to transmit. The
interference elimin ator cod e filters out stati c, no ise , an d unw anted me ssag es .
Refer to the Frequency and Code Charts beginning on page 35 for channel
and code choices.
Setting the Channel
Remember that basic key sequence? Use it now!
To set the channel, select the
Setting the Code
To set the code, select the
Your ra dio displays
p whenever the channel
frequency is in us e . Keep scrol lin g u ntil you get a
clear one.
Your radio can save a specific code for each channel. Set the channel and code and while
operating, press
yand then scroll between selected channel and code settings.
TWO WAY mode and the SET CHAN menu.
TWO WAY mode and the SET CODE menu.
Channel Frequency in U se
b e f g h i
14 1
k lmnop
Ta l ki n g
11
Page 24

Radio Volume
Can we talk yet?
Sure, but you should adjust the volume first. Press
If you want to, sound your call tone by pressing
To Talk
Press and hold {and talk two-to-three inches away from the microphone. When you’re
finished, just let {go. While transmitting, | glows red.
Ta lking Range
x or z until it’s just right.
‰
Talking
Optimal Range
• Flat, open areas from five
feet up to two miles
Using Accessories
Make sure the radio is turned off before plugging audio accessories into the accessory port.
Before you place an accessory on your head or in your ear, turn the volume down. After
placing the accessory on your head or in your ear, adjust the volume by pressing
Medium Range
• Buildings or trees
Minimal Range
• Dense foliage or mountains
12
x to z.
Page 25
Signal Strength Indicator
The signal strength indicator can help you determine when a
radio is moving out of range . It is a number displaye d wh en
you’re receiving on the same channel and code a s ano ther
transmitting radio and it indica tes the relative signal strength of
1
the transmitting radio:
6
is strongest (usually closest).
and
Note: Obstacles that bloc k the si gnal path ma y aff ect the
is weakest (usually f arthest aw ay)
Signal Strength
b e f g h i
14 1 5
k lmnop
Signal strength indicator
signal strength indicator function.
Call Tone and Call Display
Don’t you hate it when you miss a call?
I mean it could be someone rea lly important. A call y ou need to ta ke right a wa y. Or
worse, someone you’re trying to reach may not know that you’ve called because
their surroundings are too noisy.
Your radio can tr an sm it ten di fferent call tones. To set your call to ne , select the
WAY mode and the SET CALL menu.The radio pla ys a sa mple of each tone as y ou scroll thro ugh
them. To use your call tone, just press
You can always tell if someone using a T6000Series radio is trying to reach you when your
radio displays the call received screen...
‰ to transmit it to others.
b e f g h i
CALLRCVD
k lmnop
TWO
Ta l ki n g
13
Page 26
Alerts
You can determine how your radio will alert you when you’re receiving: vibrate, ring, or
both. Your radio will notify you with your selected alert if 30 seconds have passed since your
last transmission or incoming call.
VibraCall
®
Your radio features VibraCall®, a vibrating alert to notify you of two-way radio reception in
noisy environm ents.
OFF -- your radio doesn’t sound an alert except for the audio reception when receiving.
VIB ON -- your radio
vibrates to alert you.
RING-- your radio RINGS
your call tone when
receiving.
Alerts
VIB+RING--your radio vibrates and rings your call tone when receiving.
®
To set VibraCall
14
, select the SETTINGS mode and the SET VIB menu.
Page 27
Keeping Time
Your radio has several features to help you keep track of time: stopwatch, alarm, and the
clock display can be se t as your standby screen.
Setting the Time
Setting the time is easy! Use the basic k ey sequence to select the
TIME menu, then ...
.
.
Press To Display Then Press
TIME mode and the SET
x
and z to set hours and
minutes
b e f g h i
3:00 PM
k lmnop
y
to move between hours a nd
minutes
Setting the Clock Display
To display the clock, select the
TIME mode and the SET DISP menu.
If you choose to display the clock, the time screen becomes your two-way radio’s standby
screen. It appears whenever the radio is on and nothing else is happening.
Keeping Time
15
Page 28
Setting the Alarm
To set the time the alarm will sound, select
alarm time the same way y ou set the clock time.
5
The alarm volume is the same as the radio volume, so make sure it’s loud enough.
the TIME mode and the ALARMTME menu,
and set the
To set the alarm, select the
ALARM ON
(or
ALARM OFF
“I’m all shook up.”
).
Your alarm will now sound
your call tone at the set time
every day.
TIME mode and the SET ALARM menu. Press x
Alarm Turned On
b e f g h i
14 1 .
k lmnop
and z to select
Alarm On
Indicator
Turning Off the Alarm
When the alarm rings and lflashes, turn it off by pressing any button. If you don’t turn off the
Keeping Time
alarm, it rings and lflashes every ten seconds for up to one minute.
If your radio is turned off , it tu rns on automati cally at the same tim e e v ery da y when the alarm
sounds. And, the radio stays on if you don’t turn off the alarm. So turn it off and save your
batteries!
On T6310 radios, if the FM ster eo is on when the radio is turned off, the FM stereo pla ys when
the alarm sounds and the radio turns on.
16
Page 29

Stopwatch
If you’re running laps, or just feel like you are, you can use the stopwatch to time yourself.
Press To Display Then Press
~
until
appears
STPWATCH
b e f ggh i
STPWATCH
k lmnop
b e f ggh i
00:00:45
k lmnop
Your stopwatch has a lap timer function too. While the stopwatch is running, press
obtain the lap time. Press
Note: If you turn off the radio or take it out of stopwatch mode, the stopwatch time resets.
yagain to switch back to stopwatch.
b e f ggh i
00:00:00
k lmnop
b e f ggh i
05:30:00
k lmnop
‰
to start or stop timing
y
to reset stopwatch when
it is stopped
yto
Keeping Time
17
Page 30

Hands-Free Use (VOX)
LOOK, NO HANDS!!
Your radio has built-in Voice Operated Transmission (VOX), which allows
you to transmit “hands-free” just by talking or using VOX accessories.
4
2
After VOX has been set and turned on, you can use it anytime you want
your hands free for other things.
To set VOX, select the
ON. When VOX is set to ON, your display shows g.
SETTINGS mode and the SET VOX menu, select VOX
To turn on VOX, quickly press and release {and g will begin to flash. Your radio will now
transmit every time you talk. Press
transmitting. The
The VOX sensitivity level allows you to compensate for bac k g rou nd noise. This mi nim izes the
gwill stop flashing. To reset VOX use, select VOX OFF.
{to turn off VOX and return to the regular way of
chance of unintended noises triggering a transmission.
To set the VO X s ensitivi ty level, select the
high (
HI) for quiet environments, medium (MED), or low (LO) for noisy environments.
VOX MED is recommended for most situations, although you may need to experiment until you
SETTINGS mode and the SET SENS menu, then select
get the right setting.
Hands-Free Use (VOX)
When you connect a VOX accessory, the radio will automatically set to
VOX ON and g will
begin to flash, indicating that the radio is ready to transmit each time you talk.
When you transmit using a VOX headset, you’ll hear yourself talking through the accessory
speaker. This feature lets you know VOX is working.
18
Page 31
Privacy
Eavesdrop Reducer
Just between y ou and me , there are man y thi ngs we need to k e ep under wrap s ...
Your radio has the Eavesdrop Reducer feature, a scramble code that makes your
transmissions sound garb led to any one list ening. It doesn ’t guarantee secrecy, but
it adds an extra layer of privacy. Don’t forget -- all the radios have to be set to the
same scramble code for the transmissions to be clear.
To set the scramble code, select the
SCRM 1, SCRM 2
OFF.
or
SCRM 3. Your display will now show
QuieT6000™
The QuieT6000™ function helps ensure uninterrupted communication between Motorola
Talkabout T6300-series radios - it helps to prevent you from hearing transmissions from
anything othe r than th ese r adios . If y o u and y ou r co mpani ons use o nly the Motoro laTalkabout
T6300-series radios with QuieT6000 on, you’ll minimize the chance of being interrupted by
others (but they can hear you).
To turn the QuieT6000 function on or off, select the
All the radios have to be set to
tone befor e ta lking , other radi os on y our ch annel and code ca n t hen rec eiv e and tr ansm it unti l
30 seconds of inactivity occurs which resets the QuieT6000 function. * is displayed in the
signal strength area of the two-way mode display to indicate that the QuieT6000 function is
on, and it flashes while on a call with another MotorolaTalkabout T6300-series radio.
TWO WAY mode and the SETSCRAM menu, then
e
. To turn scramble code off, select SCRM
SETTINGS mode and the SETQUIET menu.
QUIET ON to avoid interruptions. You need to transmit a call
select code
Privacy
19
Page 32

Weather
You can’t ch ang e the weather, but you c an be prep ared for it
whenev er yo u take your Motor olaTalkabout T6300, T 6310, or
T6320 radio with you. That’s because it tunes in National
Oceanic and Atmospheric Administration (NOAA) Weather
Radio broadcasts. You can listen to a weather channel or
you can even set your radio to alert you to emergency
weather broadcasts.
And because NOAA W eather Radio no w broadcasts w arning
information for all types of hazards, routine broadcasts are
interrupted during eme rgenci es for natural and technologic al
warnings, watches, and other critical information.
NOAA has tra nsmitters lo cated throughout the United St ates that b roadcast Nationa l W eather
Service warnings, watches, forecasts and other hazard information 24 hours a day.
Weather
Whenever you are listening to the weather channel, you cannot use your radio for two-way
communications. However, a weather alert will notify you while the radio is in other modes
and it will overr i de FM Stereo broadcasts (T6310 only).
Turning On the Weather
To turn on weather channel reception, select the WEATHER mode and the SET WEA menu.
To turn off weather channel reception, select
WEA OFF
or take the radio out of weather mode.
20
Page 33

Setting the Weather Channel
Your radio receives six NOAA frequencies. (See the Frequency and Code Charts beginning
on page 35 for a complete list.)
After turning on the weather broadcast, select the
WEATHER mode and the SET CHAN menu to
select the strongest channel.
Note: As with two-wa y r adio rec eptio n, weat her cha nnel rec eption depen ds upon ho w clo se
you are to a transmitter. If you’re out of range you’ll hear static--try another weather
channel.
...We interrupt this broadcast to bring you a special bulletin...
Well, almost. You can program your two-way radio to cut in and switch to the
weather channel whenever it receives an emergency weather advisory.
Setting the Weather Alert
If you set the weather alert, whenever NOAA transmits an emergency
weather broadcast, your radio switches to the selected weather channel
when it detects the transmission.
To set weather alerts, select the
o
are set,
Note: The T alkAbout T6000-series two-way radios are designed to be two-way radios
is displayed.
primarily, with the added utility of features such as Weather Alert. The radio uses the
same circuitry for both two-way radio and weather alert receptions. Therefore, it is
possible to miss a weather alert while you are engage d in two-way communication
(either transmitting or receiving). To ensure that you do not miss a weather alert, leave
the radio in the Weather Mode.
WEATHER mode and the SET ALERT menu.
When weather alerts
Weather
21
Page 34

T6310 Features
Are you cool? Well you will be if you take your Motorola Talkabout T6310
radio with you. It has an FM radio mode, to let you tune in, tune out, and
stay cool.
Your radio allows you to search for (seek) FM stations in the local area. It
even has a tune feature so you can search for and receive weak or distant
stations.You can also program your radio to receive your favorite radio
stations by using the preset feature.
The FM stereo reception is only available on the T6310. It comes with stereo earbuds but
can use any standard connection stereo headset.
Note: FM reception and battery life are bes t when usin g ster eo earb uds instea d of the rad io
speaker.
Turning On the FM Radio
Turning on the FM radio is easy. And, don’t worry, you can still receive calls. The two-way
radio will cut right throu gh the FM rece ption whene v er it receiv es a call. To use the FM Stereo,
select the
T6310 Features
If you just want to listen to the radio and you don’t want to be interrupted by call s , the SET2WAY
setting allo ws y ou t o do j ust tha t. This sett ing is reset when th e mod e is c hange d or th e po w er
is turned off.
Finding an FM Station
Finding a cool station when you are in a new area is easy with your radio’s
It scans the airwaves for active radio stations, stopping at each one.
22
FM STEREO mode and the SET FM menu.
SEEK FM feature.
Page 35

To use the seek feature, select the
SEEK FM
Note: Your radio plays each station it finds as it scans.
menu, then x and z until you find a station yo u lik e
FM STEREO
mode and the
b e f ggh i
S R C H I N G
k20 lmnop
Tuning Your FM
and
SEEK
z until
This feature allows you to change the FM radio station by increments of 0.1 kHz. Unlike
FM which scans for strong signals, TUNE FM allows you to tune in weak stations.
To use the tune feature, select the FM STEREO mod e and the TUNE FM menu, then x
you have a clear signal.
Preset FM Stations
You have eight p reset stations.To preset a station, select the
PRESET menu, then scroll through the presets to the one you want to change. Press ‰ and
scroll through the FM stations. When you find the station you want to preset, press
5
FM STEREO mode and the
‰.
Later, when you want to play them, press ‰ to scroll through your set tings until y ou
reach one you like. Then let go and enjoy!
T6310 Features
23
Page 36

T6320 Features
CAUTION: The T6320 contains sophisticated electronic measuring components
(compass, baromete r , and altimeter). These com ponents require calibratio n
and care to function properly. Improper calibration or care will result in
inaccurate readings.
Compass
The compass feature is an accurate and instantaneous directional aid. When held
horizontally, the direction the radio antenna is pointing is displayed. The compass displays
eight cardinal points (N, NE, E, SE, S, SW, W, and NW) and the corresponding numeric
o
compass degre es from north; for exampl e 17
, 26o. Calibrate the compass for first use, after
changing batteries, during and after use in a motor vehicle, or after major changes in global
position.
Note: The effect of electric acc esso ries and hig h curren t de vic es pres ent in moto r v ehic les
can cause incorrect compass readings. The compass should be recalibrated during
and after use in a motor vehicle.
Calibrating the Compass
T6320 Features
To calibrate the compass, select the COMPASS mode and the CALIBRAT menu. Keep the radio
level during the calibration procedure. After turning calibration on, hold the radio horizontally
and rotate it at least a full circle (360
Note: Each time yo u select CALIB ON, you m ust pe rf orm the calib r ation pro cedure . Sele cting
CALIB ON clears previous calibration settings.
o
). Press yor turn calibration off to set the calibration.
24
Page 37
Compass Declination
Compass declination, also called ‘variation’ in mariners’ and aviators’ jargon, is the angle
between where a compass needle points, referred to as ‘magnetic north’, and the true north
pole. To set the compass declination, select the
can set the compass declinati on fro m magnetic no rth by pressing th e
setting appears, then pressing
Note: If you notic e an i ncorre ct co mpass readi ng an d y our compa ss h as been ca libra ted, y o u
{ to set.
COMPASS mode and the DECLINAT menu. You
x or z until the desired
may need to set the compass declination for your area. Visit www.motorola.com or
call Motorola for details on setting compass declination for your area.
Using the Compass
Press~until
compass screen displays
degrees.
COMPASS appears. Let go and the
-- showing the direction and
If --- is displayed instead of degrees from
b e f ggh i
NW 330
k lmnop
north, recalibrate the compass.
T6320 Features
25
Page 38
Thermometer
The thermometer feature measures the ambient temperature in the selected unit of
measurement (Fahrenheit or Celsius). When moving from environments with moderate
temperature differences, wait 20 minutes for the thermometer featu re to acclimate.
Otherwise, the temperature readings may not display accurately.
Using the Thermometer Feature
Press~until
The temperature screen displays -showing the
unit of measurement.
TEMPERAT appears.
temperature
in the selected
Fahrenheit Celsius
b e f i
TEMP 74F
b
TEMP 24C
lmnop
Setting the Units of Measurement
To set the units of measurement for the thermometer, select the
T6320 Features
SETUNITS menu. Press x
{
to set.
or z until your choice of
FAHRENHT
TEMPERAT mode and the
or
CELSIUS
appears, then press
26
Page 39
Barometer
The barometer feature measures changes in atmospheric air pressure. Increases in
pressure genera lly ind icate stab le or im pro ving w ea ther, while decreases in pressure indic ate
changing or stormy weather.
Note: The barometer feature displays the actual barometric pressure at the current
altitude. The display has not been corrected to the barometric pressure at sea level.
Using the Barometer
Press~until BAROMETR appears.
The barometer screen displays
-- showing the atmospheric
pressure in the selected unit of
measurement.
Inches of Mercury Millibars
b e f ggh i
BAR 29.97
k lmnop
b e f ggh i
BAR 1015
k lmnop
Setting the Units of Measurement
To set the units of measurement for the barometer, select the
SETUNITS menu. Press x
the
or z until your choice of
INHG
, or
set.
BAROMETR mode and
MBAR
appears, then press {to
T6320 Features
27
Page 40

Altimeter
The altimeter fea ture estimates your altitude based upon
atmospheric pressure. You can also use the altimeter to display
a relative change in height from one point to another.
Using the Altimeter
Press~
The altimeter screen displays -showing the altitude in the
selected unit of measurement.
until ALTIMETR appears.
b
460 FT
k lmnp
Altitudes measu red i n feet, display in 20-f oot inc rem en ts; while altitudes meas ure d i n m eters,
display in 5-meter increments
Setting the Units of Measurement
To set the units of measurement for the altimeter, select the
menu. Press
(kilometers) appears then press
Setting the Altimeter Level
T6320 Features
Because the altimeter display is based upon atmospheric pressure, it is only an
x
or z until your choice of
{
to set.
FEET
,
K FEET (thousands of feet), METERS,
ALTIMETR mode and the SETUNITS
approxim ati on o f al titude above se a level. Therefore, i t ’s im po rtant to set the altimeter level to
the correct alti tud e (i f you know it) each time you hea d o utd oors. Or, you can set your starting
level to 0 so that the next altimeter display is the change in altitude relative to your starting
point.
To set the altimeter level, select the
set the altimeter level to the correct height or press the
28
ALTIMETR mode and the SETLEVEL menu. Press x or z to
‰ button to set the level to 0.
or
K METERS
Page 41

Advanced Two-Way
Lock
You can make sure your menu settings won’t be changed accidentally.
Just turn on the menu lock by pressing
seconds. Now you’ll see a
for three
y
fon the display like this--
Locked Screen
b e f g h i
14 1
k lm
.
nop
Lock only locks
f disappears from your display when it’s turned off.
again.
LockPlus
The LockPlu s f ea ture loc ks al l th e b utton s e x cept |, ‰ and {. Meani ng tha t y ou can only
turn the two-way radio on and off and transmit.
Turn on the LockPlus feature by pressing
f. You can turn off the LockPlus feature by pressing
ysettings. You can turn off the menu lock by pressing
for six seconds, the display will show a flas hing
y
for six seconds again.
y
for three seconds
y
Advanced Two-Way
29
Page 42

Channel Scanning
5
By using
in on the one that interests you.You don’t have to set a new channel or code,
SCAN, you can monitor ch annels and cod es for transmissions and lock
the radio just resets itself temporarily to that channel and code and you can
start talking. Howe v er, if no transmissions tak e plac e f or fiv e s econds , scann ing
resumes.
After you turn on
SCAN, your radio scans channels and codes until it finds an active one and
locks on to it. If you do not begin talking or no one else transmits within a short time, it will
resume scanning.
If you want to scan channel frequencies without interference eliminator codes, change your
code to
0.
Turning on Channel Scanning
To set channel scanning, select the
TWO WAY mode and the SET SCAN menu.
Your channel/code
screen displays hand scrolls through channels when sca nning is turned on.
Scan List
You can select which c hannels are to be s canned b y pu tting them in a list . To set your sc an list
after you turn on SCAN, select the TWO WAY mode and the SCANLIST menu. Your radio displays IN
Advanced Two-Way
or OUT and a channel number. Use x to change the IN or OUT setting and z to scroll to the
next chan nel. Sele ct
channel select
IN to add the channel to y our sc an list , if y ou don ’t wish to scan a certain
OUT.
30
Page 43

Talk Confirmation Tone
5
Whenever you turn on the talk confirmation tone feature, your two-way radio
transmits a unique tone when you finish transmitting. It’s like saying “Roger” or
”Over” and lets others know when to begin talking.
To set this feature, select the
SETTINGS mode and the SETROGER menu.
Button Beeps
The button beeps feature allows you to control whether the radio beeps every time you press
a button. Turn it off if you want quiet radio operation. To set the button beeps feature, select
the SETTINGS mode and the SETBEEPS menu. To turn off the button beeps feature, select
BEEPSOFF; to turn on the button beeps feature, select BEEPS ON.. For a shortcut method of
turning off the button beeps feature, press and hold
x when turning on the radio.
Call Tones are not heard on the transmitting radio when button beeps are off.
Automatic Power Off
You can program yo ur radi o to turn itself off after a ce rtain period of inactiv ity. This helps sav e
battery life.
To set the automatic power off feature, select the
Choose the number of hours
turn off the automatic power off feature.
HOURS 1 -- 8, after which, power shuts off. Choose HOURS -- to
jdisplays on the screen when the automatic power
SETTINGS mode and the SETPWRDWN menu.
off feature is set.
Advanced Two-Way
31
Page 44

Monitor
Using the monitor feature helps to improve the reception of your radio if you’re frequently
almost out of range. It also allows you to listen to a channel frequency without codes (carrier
squelch) to tell whether or not it’s currently in use. To use the monitor, select the
mode and the
SET MON menu.
TWO WAY
Your channel and code screen will look like this.
You’ll hear static if the channel frequency is unused.
Changing from two-way mode will turn monitor off.
Monitor On
b e f g h i
14 MON 1
k lmno p
Reset
You can reset your menu settings to the default settings by turning your radio off and then
pressing |, {, and y at the same time.
Setting the Battery Type
Advanced Two-Way
SET BATT feature allows the battery meter to recognize and properly display the power
The
usage for either alkaline or aftermarket rechargeable single-cell nickel cadmium (NiCd)
batteries. To set the battery type feature, select the SETTINGS mode and then SET BATT. Press
x or z until your choice of ALKALINE or RECYCLE appears, then press { to set.
32
Page 45

Use and Care
glub
Use a soft cloth moistened with
soap and water to clean the
exterior.
If the radio gets wet...
Turn it off and re mo ve batteries. Dry with soft cloth. Do not use until completely dry.
Do not immerse in water. Do not use alcohol or cleaning
solutions.
Use and Care
33
Page 46
Contact Information
Repairs Warranty Questions
1-800-353-2729 (U .S.) 1-800-739-7834 (TTY) 1-800-461-4575 (Canada)
Warranty
34
Use and Care
On the web, please visit
www.motorola.com
Page 47

Frequency and Code Charts
The charts on these pages provide frequency and code compatibility information. These
charts are useful when using Motorola Talkabout two-way radios with other two-way radios.
Channel Frequency Chart
Channel MHz Channel MHz
1 462.5625 8 467.5625
2 462.5875 9 467.5875
3 462.612510467.6125
4 462.6375 11 467.6375
5 462.662512467.6625
6 462.687513467.6875
7 462.712514467.7125
Weather Frequency Chart
WX1 162.550 WX5 162.450
WX2 162.400 WX6 162.500
WX3 162.475
WX4 162.425
Frequency and Code Charts
35
Page 48

Carrier squelch (0) disables interference eliminator codes. This allows you to monitor all
activity on the channel you are using.
Interference Eliminator Codes
36
Talkabout
Code Hz Freq
1 67.0 14 107.2 D 27 167.9
2 71.9 15 110.9 28 173.8
3 74.4 16 114.8 29 179.9
4 77.0 A 17 118.8 E 30 186.2
5 79.7 18 123.0 31 192.8
6 82.5 19 127.3 F 32 203.5
7 85.4 20 131.8 33 210.7
8 88.5 B 21 136.5 G 34 218.1
9 91.5 22 141.3 35 225.7
10 94.8 23 146.2 36 233.6
11 97.4 C 24 151.4 37 241.8
12 100.0 25 156.7 38 250.3
Frequency and Code Charts
13 103.5 26 162.2
Motorola
7/7x Code
Talkabout
Code Hz Freq
Motorola
7/7x Code
Talkabout
Code Hz Freq
Motorola
7/7x Code
Page 49

Troubleshooting
No Po w er Reposition or replace alkaline batteries.
Recharge or replace NiMH battery.
Message not transmitted
Message not received Confirm radios have the sam e chan nel an d interference
Make sure
Reposition, replace, or recharge b atteries.
eliminator code settings.
{
is completely pressed as you tr ansm it.
Make sure
Reposition, replace, or recharge b atteries.
QuieT6000 feature is on , tra nsm it call tone before talking.
Obstructions and operating indoors , or in vehicles, may interfere
-- change location.
Hearing other noises or
conversation on a channel
Message scrambled Eavesdrop
Confirm interference eliminator code is set.
Shared channel or interf erenc e eliminator cod e may be in us e, try
another.
match other radios; all radios must use the same scramble cod e.
{
is not being pressed.
Reducer
scramble code is on or s etting d oesn’t
Troubleshooting
37
Page 50

Limited talk range Steel and/or concrete structures, heav y foliage, use in buildings
or vehicles decrease ra nge . C heck for clear line of sight to
improve transmission.
Wearing radio close to bod y such as in a p ocket or on a belt
decreases range. Chang e loca tion of radio.
Heavy static or interf ere nce Radios are too close, the y m us t be at lea st five feet apart.
Radios are too far apart or obstacles interfering with
transmission. Talk range is up to two miles in clear, unobstructed
conditions.
Channel and/or code locked Make sure radio is unlocked. See page 29.
Low batteries Replace alkaline batteries. Recharge or replace NiMH battery.
Extreme operating temperatures a ffect battery lif e .
Charger LED double flashin g Charger not properly positioned. Repos ition cha rger a nd ensure
it is firmly clamped to the radio, battery, or charging dock.
Troubleshooting
Battery power is very low; battery is charging up slowly before it
starts to quick charge.
Cannot activate VOX Feature not set and on. See page 18.
Poor FM reception FM stereo use is optimal with use of stereo earbuds.
38
Page 51

Motorola Limited Warranty
For Two-Way Family Radios
I. What this Warranty Covers and for How Long
The Motorola company listed below ("Motorola") warrants its Two-Way Family Radios (the
"Products") against defects in materials and workmanship under normal use for a period of
one year from the date of purchase. This warranty e xtends to the first end-user purchaser only,
and is not transferable.
Motorola, at its option, will at no charge either repair, replace or refund the purchase price of
any Products that do not conform with this warranty. Repair may include the replacement of
parts with functio nal ly equivalent reconditioned or new parts. Replacement may include
providing a functionally equivalent "Motorola Certified Reconditioned" or a new Product.
Products that have been repaired or replaced are warranted for the balance of the original
warranty period or for 90 days from the date that the repaired or replaced Product is received
by you, whichever is longer. All Products for which replacements have been provided will
become Motorola’s property.
II. Other Warranty Conditions
This warranty is valid only in the United States and Ca nada, and is Motorola’s complete
warranty for the Products. Motorola assumes no obligation or liability for changes to this
warranty unless made in writing and signed by an officer of Motorola.
Motorola does not warrant any installation, maintenance, or service that it did not perform.
SERVICE WORK PERFORMED BY SERVICE CENT ERS NOT AUTHORIZED BY
MOTOROLA TO PERFORM SUCH WORK WILL VOID THIS WARRANTY.
Motorola Limited Warranty
39
Page 52

III. What This Warranty Does Not Cover
a. Defects or damage resulting from: use of the Products in any manner not normal or
customary; misuse, accident or neglect such as dropping the Products onto hard surfaces,
contact with water, rain or extreme humidity, contact with sand, dirt or the like , contact with
extreme heat, spills of food or liquid; improper testing, operation, maintenance, installation,
adjustment; or any alteration or modification of any kind.
b. Scratches or other damage to plastic surfaces, cracked displays, or other externally
exposed parts caused by use of the Products.
c. Products disassembled or repaired in such a manner as to adversely affect performance or
prevent adequate inspection and testing to verify any warranty claim.
d. Products on which serial numbers or date tags have been removed, altered or obliterated.
IV. How to Get Warranty Service
To get warranty service, please call:
1-800-353-2729 USA 1-800-461-4575 Canada You will receive directions on how to mail the Produ cts to Mot or ola. All Products shipped to Motorola Service Centers must be shipped with freight and insurance prepaid. Along with the Products you must include a receipt, bill of sale, or some other comparable proof of purchase, a written description of the problem and, most importantly, y our address, and telephone number. Products that are repaired or replaced under this warranty will be shipped you at Motorola’s expense for the freight and insurance . If additional information is needed, please contact Motorola at the address at the bottom of th is document.
Motorola Limited Warranty
40
Page 53

V. General Provisio n s:
THIS IS THE COMPLETE WARRANTY FOR THIS PRODUCT BY MOTOROLA AND SETS
FORTH YOUR EXCLUSIVE REMEDIES. THIS WARRANTY IS GIVEN IN LIEU OF ALL
OTHER EXPRESS WARRANTIES. IMPLIED WARRANTIES, INCLUDING WITHOUT
LIMITATION THE IMPLIED WARRANTIES OF MERCHA NTABILITY AND FITNESS FOR A
PARTICULAR PURPOSE, ARE GIVEN ONLY IF SPECIFICALLY REQUIRED BY
APPLICABLE LAW. OT HERWISE, THEY ARE SPECIFICALLY EXCLUDED. IN NO EVENT
SHALL MOTOROLA BE LIABLE FOR DAMAGES IN EXCESS OF THE PURCHASE PRICE
OF THE ACCESSORY, OR FOR ANY INDIRECT, INCID ENTAL, SPECIAL OR
CONSEQUENTIAL DAMAGES ARISING OUT OF THE USE OR INABILITY TO USE THE
PRODUCT, TO THE FULL EXTENT THESE DAMAGES MAY BE DISCLAIMED BY LAW.
VI. Patent and Software Provisions
Motorola will defend at its own expense, any suit brought against you to the extent that it is
based on a claim that the Products infringe a United States patent. Motorola will pay those
costs and damages finally awarded against you in any such suit which is attributable to any
such claim. The defense and payments by Motorola are conditioned on the following: (a) that
you will notify Motoro la promptly in w ri ting any noti c e of the claim; a nd ( b ) t h at Motorola will
have sole control of the defense of the suit and all negotiations for its settlement or
compromise; and (c) should the Products become, or in Mot or ola's opinion be likely to
become, the subject of a claim of infringement of a Un it ed States patent, that you will permit
Motorola, at its option and expense, either: to procure for you the right to continue using the
Products or parts; to replace or modify them so that they become non-infringing; or to grant
you a credit for such Products or parts as depreciated and accept their return. The
depreciation will be an equal amount per year over the lifetime of the Products, accessories,
Motorola Limited Warranty
41
Page 54

battery or parts as established by Motorola.
Motorola will have no liability to you with respect to any claim of patent infringement which is
based upon the combination of the Products or parts furnished under this limited warranty with
software, apparatus or devices not furnished by Motorola. Motorola will have no liability for the
use of ancillary or peripheral equipment or software not furnished by Motorola which is
attached to or used in connection with the Product s. The foregoing states the entir e liability of
Motorola with respect to infringement of patents by the Products, accessories, batteries or any
parts of them.
Laws in the United States and other countries preserve for Motorola certain e xclusive rights for
copyrighted Motorola software such as the exclusive rights to reproduce in copies and
distribute copies of the Motorola software. Motorola software may be copied into, used in and
redistributed with only the Products associated with such Motorola software. No other use,
including without limitation disassembly, of such Motorola software or exercise of exclusive
rights in such Motorola software is permitted.
VII. State and Jurisdiction Law Rights
Some states and jurisdictions do not allow the limitation or exclusion of incidental or
consequential damages, so the above limitations or exclusions may not apply to you. This
warranty gives you specific legal rights, and you may also have other rights which vary from
state to state or from one jurisdiction to another.
Motorola:
In the USA: In Canada:
Motorola Limited Warranty
Motorola, Inc. Motorola Canada Limited
600 North U.S. Highway 45 5875 Whittle Road
Libertyville, IL 60048 Mississauga, ON L4Z 2H4
42
Page 55

Computer Software Copyrights
The Motorola equipment descri bed in this manual may include copyrighted Motorola computer
programs stored in semiconductor memories or other media. Laws in the United States and other
countries preser ve for Motorola certain exclusive rights for copyrighted computer programs,
including the exclusive right to copy or reproduce in any form the copyrighted computer program.
Accordingly , any cop yrighted Motorola computer programs contained in the Motorola equipment
described in this manual may not be copied or reproduced in any manner without the express permission of Motorola, Inc. Furthermore, the purchase of Motorola equipment shall not be deem ed
to grant either directly or by implication, estoppel, or otherwise any license under the copyrights,
patents or patent applications of Motorola, except for the normal nonexclusive, roy alty free license
to use arising by operation of law in the sale of this product.
FCC License Not Required
Changes or modifications not expressly approved by Motorola may void the user’s author i ty
granted by the FCC to operate this radio and should not be made. To comply with FCC requirements, transmitter adjustments should be made only by or under the supervision of a person certified as technically qualified to perform transmitter maintenance and repairs in the private land
mobile and fixed services as cer t ified by an organization represent ati ve of the user of those services. Replacement of any transmitter component (crystal, semiconductor, etc.) not authorized by
the FCC equipment authorization for this radio could violate FCC rules.
Patent Notice
This product is covered by one or more of the following United States patents.
5896277 5894292 5864752 5699006 5742484 D408396 D399821 D387758 D389158
5894592 5893027 5789098 5734975 5861850 D395882 D383745 D389827 D389139
5929825 5926514 5953640 6071640 D413022 D416252 D416893
Export Law Assurances
This product is controlled under the export regulations of the United States of America and Ca nada. The governments of the United States and Canada may restrict exportation and re-exportation of this product to certain destinations. For further information, contact the U.S. Department of
Commerce or the Canadian Department of Foreign Affairs and International Trade.
Page 56

Motorola, the Stylized M Logo, and all other trademarks indicated as such
© 2000 Motorola, Inc. All rights reserved. Printed in the U.S.A.
herein are trademarks of Motorola, Inc.
â Reg. U.S. Pat. & Tm. Off.
Consumer Products Division
1125 Satellite Road, Suite 101
Suwanee, GA 30024-2880
www.motorola.com
6880907Z94-A
6880907Z94
Page 57

Motorola Talkabout ™T6300-Series Radio
Quick Reference Card
Icons your radio displays:
b
Battery meter
e
Eavesdrop
Reducer on
f
Lock set
g
VOX on
h
Channel scan on
i
VibraCall® on
k
One of 14 channels
Buttons on your radio
• Turn power on/off
|
• Scroll through mode
~
selections
• Return to two-way mode
(when held down while in a
menu)
• Transmit call tone
‰
• Start and stop stopwatch
• Select and scroll through
stereo presets (T6310)
l
m
n
o
p
j
*
x
{
y
or
z
Alarm on
One of 38 codes
Ring alert
Weather on
Channel in use
Automatic power off
QuieT6000™
• Talk on the radio
• Save a setting
• Scroll through
menus
• Lock the keypad
(when held down
and not in a menu)
• Change the volume
• Scroll through and
select settings
Page 58

Standard Features
All T6300-Series Radios
Modes
TWO WAY TIME STPWATCH WEATHER SETTINGS
SET CHAN SET TIME SET WEA SETQUIET
Menus
SET CODE SETALARM SET CHAN SET VIB
SETSCRAM ALARMTME SETALERT SETROGER
SET CALL SET DISP SETWRDN
SET MON SETBEEPS SET SCAN SET VOX SCANLIST SET SENS
Optional Features
T6310 only T6320 only
Modes
Menus
FMSTEREO COMPASS TEMPERAT BAROMETR ALTIMETR
SET FM CALIBRAT SETUNITS SETUNITS SETUNITS
PRESET DECLINAT SETLEVEL
SEEK FM
TUNE FM
SET 2WAY
SET BATT
 Loading...