

Page 1
A
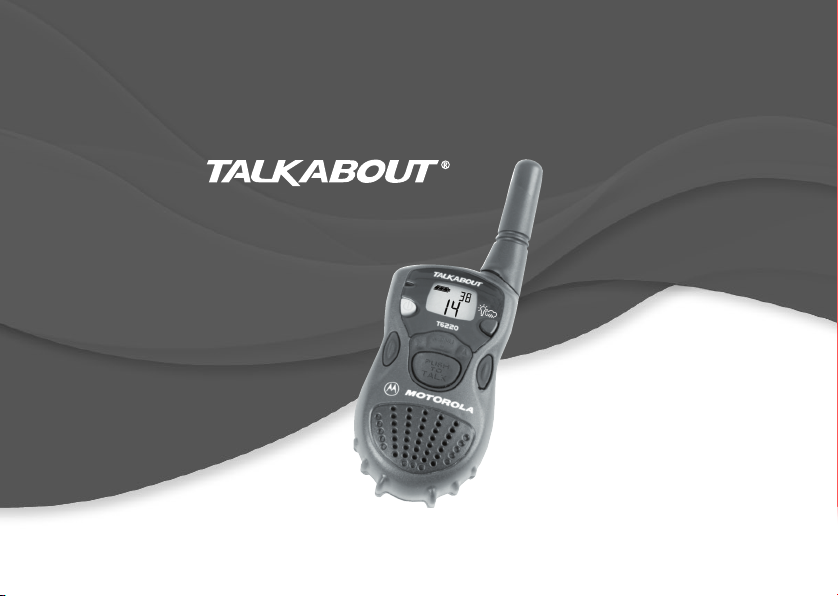
TWO-WAY RADIO
RADIO BIDIRECTIONNELLE
User's Guide
Manuel de l'utilisateur
@6864110R41@
6864110R41-O
Models T6200, T6210, and T6220
Modèles T6200, T6210 et T6220
Page 2

2
Page 3

Introduction
Hi, I’m QuickStart and I’m going to help you get started!
The Motorola
are durable two-way radios that operate on Family Radio
Service (FRS) frequencies, require no service fee or license,
and can be used anywhere in the United States and other
areas as listed by the FCC.
These radios offer more than just a way of keeping in touch.
The T6200 provides 14 channels and 38 interference eliminator
codes, five audible call tones, accessory connector, signal-
strength indicator, auto power off, and QuieT6000
The T6210 includes all the features found on the Motorola Talkabout T6200 plus
features such as Eavesdrop Reducer and VibraCall
The T6220 includes five additional call tones, eight NOAA weather channels, and
weather alert.
A detachable quick reference peel-off sticker that you can stick on the back of your
radio is included. This sticker will help you identify the settings and icons displayed
on your radio. This information is also included in the Getting Started section which
begins on page 14.
â
Talkabout® T6200, T6210, and T6220 radios
TM
.
®
alert.
Introduction
1
Page 4

Motorola, the Stylized M Logo, and all other trademarks indicated as such herein are
trademarks of Motorola, Inc.
â
Reg. U.S. Pat. & Tm. Off.
© 2001 Motorola, Inc. All rights reserved. Printed in the U.S.A.
Consumer Products Division
1125 Satellite Road, Suite 101
Suwanee, GA 30024-2880
For a copy of a large-print version of this guide, or for
product-related questions, please call the following
numbers:
1-800-353-2729 (U.S.A.) 1-800-461-4575 (Canada)
1-888-390-6456 TTY (Text Telephone)
On the web, please refer to the Two-Way Radio section of
www.motorola.com/store
1-888-390-6456 TTY (Text Telephone)
Page 5

Contents
Introduction . . . . . . . . . . . . . . . . . . .1
Contents . . . . . . . . . . . . . . . . . . . . .3
Safety and General
Information . . . . . . . . . . . . . . . . .5
Charging Safety Instructions . .11
Single-Unit Charger . . . . . . . .12
Batteries. . . . . . . . . . . . . . . . . .12
Getting Started . . . . . . . . . . . . . . .14
Basic Operation of Your Radio .14
Installing Batteries . . . . . . . . . . .16
Battery Meter . . . . . . . . . . . .18
Battery Life . . . . . . . . . . . . .18
Charging the NiMH battery .19
Charging Status . . . . . . . . . .20
Charging Dock . . . . . . . . . . .21
Turning On Your Radio . . . . . . .23
Your Radio’s Display . . . . . .24
Turning Off Your Radio . . . . . . .24
Changing Settings While
Turning On Your Radio . . . . .25
Accessing and Setting
Features . . . . . . . . . . . . . . . . .26
Setting the Battery Type . . . . . .26
Backlight . . . . . . . . . . . . . . . . . .27
Talking and Listening . . . . . . . . . 28
Before You Can Talk . . . . . . . . . 28
Setting the Channel . . . . . . 28
Setting the Interference
Eliminator Code . . . . . . . . . 29
Volume . . . . . . . . . . . . . . . . 29
To Talk . . . . . . . . . . . . . . . . . . . 30
Talking Range . . . . . . . . . . . 30
Using Accessories . . . . . . . 31
Monitor/Signal Strength
Indicator . . . . . . . . . . . . . . . . . 31
Alerts . . . . . . . . . . . . . . . . . . . . . . . 32
Call Tone and Call Display . . . . 32
Ring Only (T6200 Only) . . . . . . 33
Ring and/or VibraCall
®
(T6210 and T6220 Only) . . . . 34
Talk Confirmation Tone . . . . . . . 35
Button Beeps . . . . . . . . . . . . . . 35
Hands-Free Use (VOX) . . . . . . . . . 36
Hands-Free Use
With Accessories . . . . . . . . . . 36
Setting Sensitivity Level . . . 37
Contents
3
Page 6

Privacy . . . . . . . . . . . . . . . . . . . . . .38
Eavesdrop Reducer
(T6210 and T6220 Only) . . . . .38
QuieT6000™ . . . . . . . . . . . . . . .39
Unique Situations . . . . . . . . .40
Weather (T6220 Only) . . . . . . . . . .41
Turning On Weather
Channel Reception . . . . . . . . .41
Setting the Weather
Channel . . . . . . . . . . . . . . . . .42
Setting the Weather Alert . . . . .42
Contents
4
Other Important Features . . . . . . 44
Lock . . . . . . . . . . . . . . . . . . . . . 44
Scanning . . . . . . . . . . . . . . . . . 44
Auto Power Off . . . . . . . . . . . . 45
Reset . . . . . . . . . . . . . . . . . . . . 46
Simple Menu . . . . . . . . . . . . . . 46
Use and Care . . . . . . . . . . . . . . . . 47
Frequency and Code Charts . . . 48
Troubleshooting . . . . . . . . . . . . . 50
Motorola Limited Warranty . . . . 53
Page 7

Safety and General Information
Important Information on Safe and Efficient Operation
Read This Information Before Using Your Radio
The information provided in this document supersedes the general safety
information contained in user guides published prior to July 2000. For information
regarding radio use in a hazardous atmosphere please refer to the Factory Mutual
(FM) Approval Manual Supplement or Instruction Card, which is included with radio
models that offer this capability.
RF Operational Characteristics
Your radio contains a transmitter and a receiver. When it is ON, it receives and
transmits radio frequency (RF) energy. The radio operates in the frequency range of
450 MHz to 470 MHz.
Exposure to Radio Frequency Energy
Your Motorola radio is designed to comply with the following national and
international standards and guidelines regarding exposure of human beings to radio
frequency electromagnetic energy:
• United States Federal Communications Commission, Code of Federal
Regulations; 47 CFR part 2 sub-part J
• American National Standards Institute (ANSI) / Institute of Electrical and
Electronic Engineers (IEEE) C95. 1-1992
• Institute of Electrical and Electronic Engineers (IEEE) C95.1-1999 Edition
Safety and General Information
5
Page 8

• National Council on Radiation Protection and Measurements (NCRP) of the
United States, Report 86, 1986
• International Commission on Non-Ionizing Radiation Protection (ICNIRP) 1998
• National Radiological Protection Board of the United Kingdom 1995
• Ministry of Health (Canada) Safety Code 6. Limits of Human Exposure to Radio
Frequency Electromagnetic Fields in the Frequency Range from 3 kHz to
300 GHz, 1999
• Australian Communications Authority Radiocommunications (Electromagnetic
Radiation - Human Exposure) Standard 1999
To assure optimal radio performance and make sure human exposure to radio
frequency electromagnetic energy is within the guidelines set forth in the above
standards, always adhere to the following procedures:
Portable Radio Operation and EME Exposure
Antenna Care
Use only the supplied or an approved replacement antenna. Unauthorized
antennas, modifications, or attachments could damage the radio and may violate
FCC regulations.
Safety and General Information
DO NOT hold the antenna when the radio is “IN USE”. Holding the antenna
affects the effective range.
6
Page 9

Two-Way Radio Operation
When using your radio as a traditional two-way radio, hold the radio in
a vertical position with the microphone two to three inches (5.0 to
7.5 cm) away from the lips.
Body-Worn Operation
To maintain compliance with FCC RF exposure guidelines, if you wear a radio on
your body when transmitting, always place the radio in a Motorola supplied or
approved clip, holder, holster, case, or body harness. Use of non-Motorolaapproved accessories may exceed FCC RF exposure guidelines. If you do not use
a body-worn accessory, ensure the antenna is at least one inch (2.5 cm) from
your body when transmitting.
Approved Accessories
For a list of approved Motorola accessories refer to the Two-Way Radio section of
www.motorola.com/store.
Electromagnetic Interference/Compatibility
Note: Nearly every electronic device is susceptible to electromagnetic interference
(EMI) if inadequately shielded, designed or otherwise configured for
electromagnetic compatibility.
Safety and General Information
7
Page 10

Facilities
To avoid electromagnetic interference and/or compatibility conflicts, turn off your
radio in any facility where posted notices instruct you to do so. Hospitals or health
care facilities may be using equipment that is sensitive to external RF energy.
Aircraft
When instructed to do so, turn off your radio when on board an aircraft. Any use of a
radio must be in accordance with applicable regulations per airline crew instructions.
Medical Devices
Pacemakers
The Health Industry Manufacturers Association recommends that a minimum
separation of 6 inches (15 centimeters) be maintained between a handheld wireless
radio and a pacemaker. These recommendations are consistent with the
independent research by, and recommendations of, Wireless Technology Research.
Persons with pacemakers should:
• ALWAYS keep the radio more than six inches (15 centimeters) from their pace-
maker when the radio is turned ON.
Safety and General Information
• not carry the radio in the breast pocket.
• use the ear opposite the pacemaker to minimize the potential for interference.
• turn the radio OFF immediately if you have any reason to suspect that interference
is taking place.
8
Page 11

Hearing Aids
Some wireless radios may interfere with some hearing aids. In the event of such
interference, you may want to consult your hearing aid manufacturer to discuss
alternatives.
Other Medical Devices
If you use any other personal medical device, consult the manufacturer of your
device to determine if it is adequately shielded from RF energy. Your physician may
be able to assist you in obtaining this information.
Safety and General Use While Driving
Check the laws and regulations on the use of radios in the area where you drive.
Always obey them.
When using your radio while driving, please:
• Give full attention to driving and to the road.
• Use hands-free operation, if available.
• Pull off the road and park before making or answering a call if driving conditions
so require.
Safety and General Information
9
Page 12

Operational Warnings
For Vehicles with an Air Bag
Do not place a portable radio in the area over an air bag or in the air bag deployment
area. Air bags inflate with great force. If a portable radio is placed in the air bag
deployment area and the air bag inflates, the radio may be propelled with great force
and cause serious injury to occupants of the vehicle.
Potentially Explosive Atmospheres
Turn off your radio prior to entering any area with a potentially explosive
atmosphere, unless it is a radio type especially qualified for use in such areas as
“Intrinsically Safe” (for example, Factory Mutual, CSA, or UL Approved). Do not
remove, install, or charge batteries in such areas. Sparks in a potentially explosive
atmosphere can cause an explosion or fire resulting in bodily injury or even death.
Note: The areas with potentially explosive atmospheres referred to above include
fueling areas such as below decks on boats, fuel or chemical transfer or
storage facilities, areas where the air contains chemicals or particles, such
as grain, dust or metal powders, and any other area where you would
normally be advised to turn off your vehicle engine. Areas with potentially
Safety and General Information
Blasting Caps and Areas
To avoid possible interference with blasting operations, turn off your radio when you
are near electrical blasting caps, in a blasting area, or in areas posted: “Turn off twoway radio”. Obey all signs and instructions.
10
explosive atmospheres are often but not always posted.
Page 13

Operational Cautions
Antennas
Do not use any portable radio that has a damaged antenna. If a damaged antenna
comes into contact with your skin, a minor burn can result.
Batteries
All batteries can cause property damage and/or bodily injury such as burns if a
conductive material such as jewelry, keys, or beaded chains touch exposed
terminals. The conductive material may complete an electrical circuit (short circuit)
and become quite hot. Exercise care in handling any charged battery, particularly
when placing it inside a pocket, purse, or other container with metal objects.
Charging Safety Instructions
Before using the battery charger, read all instructions and cautionary markings on
the:
1. battery
2. battery charger, and
3. radio using the battery.
Caution: To reduce the risk of injury, charge only the rechargeable batteries listed.
Other types of batteries may burst, causing personal injury and damage.
Safety and General Information
11
Page 14

Single-Unit Charger
Kit Number Description
NTN9393 110V - NiMH Charging Adapter
Batteries
Capacity in
Kit Number
milliampere-hour mAH
Description Composition
NTN9395 550 mAH T6000-Series NiMH
Save these Instructions
1. Do not expose the charger to rain or snow.
2. Do not operate the charger if it has received a sharp blow, or has been dropped
or damaged in any way.
3. Do not disassemble the charger if it has received a sharp blow, or has been
dropped or damaged in any way.
4. Never alter the AC cord or plug provided with the unit. If plug will not fit the
outlet, have proper outlet installed by a qualified electrician. An improper
Safety and General Information
condition can result in a risk of electric shock.
5. To reduce risk of damage to cord or plug, pull the plug rather than the cord
when disconnecting charger from AC receptacle.
6. To reduce the risk of electric shock, unplug the charger from the outlet before
attempting any maintenance or cleaning.
12
Page 15

7. Use of an attachment not recommended or sold by Motorola may result in a risk
of fire, electric shock, or personal injury.
8. Make sure that the cord is located so that it will not be stepped on, tripped over,
or subjected to damage or stress.
9. An extension cord should not be used unless absolutely necessary. Use of an
improper extension cord could result in a risk of fire and/or electric shock. If an
extension cord must be used, make sure:
- That the pins on the plug of the extension cord are the same number, size and
shape as those on the plug of the charger.
- That the extension cord is properly wired and in good electrical condition, and
- That the cord size is18 AWG for lengths up to 100 feet, and 16 AWG for
lengths up to 150 feet.
10. The supply cord of this charger cannot be replaced. If the cord is damaged, call
Motorola Product Services at:
1-800-353-2729 (U.S.A.) 1-800-461-4575 (Canada)
1-888-390-6456 TTY (Text Telephone)
1-888-390-6456 TTY (Text Telephone)
Safety and General Information
13
Page 16
14
Getting Started
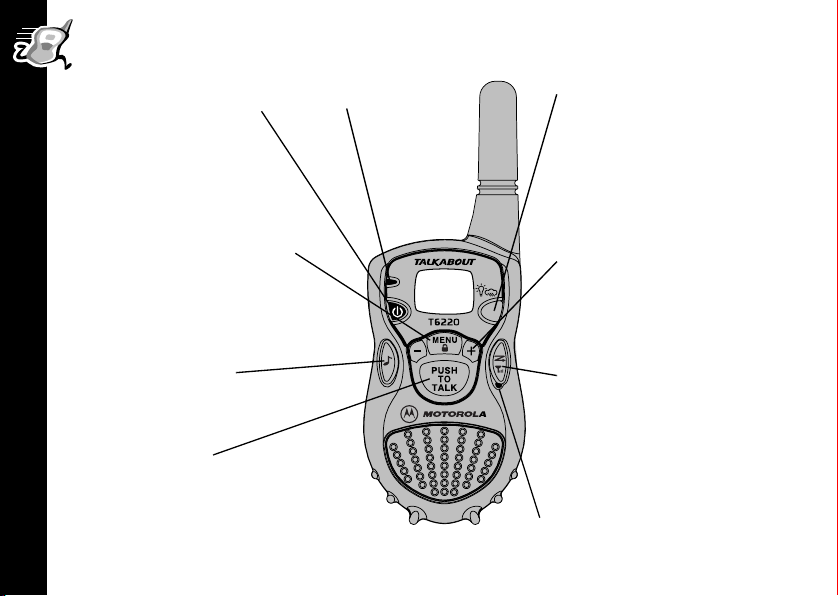
Basic Operation of Your Radio
Use P (Power) to:
• Turn power on/off
Use \ to:
• Scroll through menus
• Lock the keypad (when
held down and not in a
menu)
• Exit the menu (when held
down while in a menu)
Getting Started
Use ( (Call) to:
•Transmit call tone
Use M to:
• Talk on the radio
• Exit the menu (when briefly
pressed while in a menu)
Indicator Light
Use Q to:
• Turn on backlight
(short press).
• Press and hold to switch
between Weather Mode
and Two-Way Mode
(T6220 Only).
Use [ and ] to:
• Adjust volume
• Scroll through menu
settings
Use ) (Scan/Monitor) to:
• Turn Scan on/off
(short press)
• Monitor the channel &
check signal strength
(long press)
Microphone
Page 17
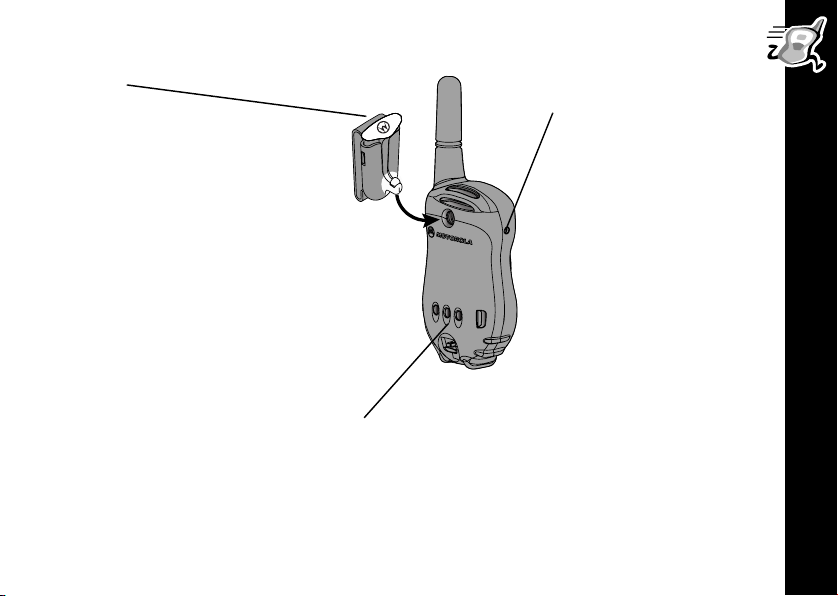
Belt Clip
- Squeeze the top and
bottom of the clip to attach
or detach the clip from the radio.
Note: The belt clip holds the
radio while being worn
on your belt. It was designed
for your convenience and is
not meant to secure your radio
under all circumstances. For
high activity environments, an
accessory carry case is more
appropriate to secure the radio.
When using audio
accessories, ensure that
they are plugged in before
you turn on the radio.
* Motorola recommends
that the volume level be
kept at a comfortable
listening level when using
audio accessories.
*
Getting Started
NiMH Battery Charging Contacts
Check out the accessory brochure for other cool stuff
available from Motorola.
000884-O
15
Page 18
Installing Batteries
Your radio uses three AA batteries or a rechargeable Nickel-Metal Hydride
(NiMH) battery.
Some radio packages include a NiMH battery with charger adapter cover, charging
dock, and charger. If you don’t have these items, they’re also available in the NiMH
battery upgrade kit (56319). Call 1-800-353-2729 (U.S.A.) or 1-800-461-4575
(Canada) for the dealer nearest you.
• Turn off the radio by pressing and holding
Getting Started
• Push latch up until it clicks.
• Lift back cover off.
16
P
.
Latch
Page 19

• Remove and replace batteries so the
+ marking matches the one in the
compartment or the NiMH charge
contacts are facing out toward the
battery door.
Getting Started
• Hook back cover on the hinges.
• Close the battery door, pressing
lightly until the latch clicks and returns
to its original position.
17
Page 20
Battery Meter
The battery meter on the top-left corner of the display shows how much
battery power you have. It shows d (full), b (two-thirds full), c
(one-third full), and a (empty). When it’s c, the radio beeps every
10 minutes. So, change or charge those batteries!
Battery Life
The following chart lists the approximate battery life during two-way use for alkaline
and NiMH batteries. See page 26.
Battery Type Two-Way Use*
AA alkaline 35 hours
NiMH 12 hours
Getting Started
*Two-way use is defined as 90% standby time, 5% talk time, and 5% receive time.
Note:
18
Battery life will be reduced if you regularly use Hands-Free (VOX) accessories,
Weather, or Scan.
Page 21
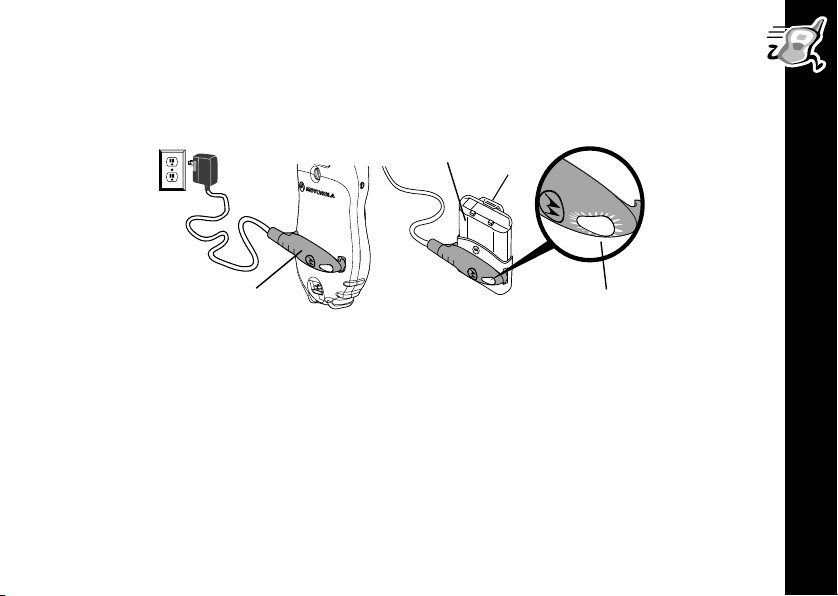
Charging the NiMH Battery
Charge the NiMH battery overnight (16 hours) before using it for the first time, it
will only need up to four hours of charging thereafter.
Charger
Battery
Adapter
Cover
Charger
Or
Light Indicator
• Turn off the radio by pressing and holding P, or place the NiMH battery in the
charger adapter cover.
At the contacts on the back of the radio (or if you are charging just the battery, at the
battery contacts):
• Position the charger so that the large hook on the end of the charger is over the
large slot on the battery door or if you are charging the battery by itself, on the
large slot on the charger adapter cover.
• Place the small hook on the other end of the charger over the small slot and snap
it into place.
• Plug in the charger.
Getting Started
19
Page 22
Charging Status
The Light Indicator shows the charging status when the charger is connected to
the radio, the NiMH battery, or the charging dock.
Light
Indicator Color
Solid Red Rapid charging Up to 90%
Flashing Green Top-off charging 90% to 100%
Solid Green
Flashing Red
Getting Started
Flashing Yellow
Note: When moving between hot and cold environments, do not charge the battery
until the battery temperature acclimates (usually about 20 minutes).
Charging Status and Description
Charging complete 100%
Battery faulty
If flashing red persists for more than one minute,
the battery is faulty and should be replaced.
Standby
Battery waiting to charge.
Temperature out of range for charging; must be
between 5
o
to 40o C or 41o to 104o F
Charging Level
Complete
-
-
20
Note:
When charging the battery by itself, remove the charger from the charger adapter
cover before inserting and/or removing the battery from the charger adapter cover.
Page 23

Charging Dock
The charging dock provides drop-in charging convenience. The charging dock can
be mounted or placed on any flat surface (such as a wall or workbench) and turns
your radio into a stationary intercom while keeping it charged and ready for any
adventure.
To mount the charging dock:
• Wrap the power cord under the charging dock.
Use the cutouts to hold the cord in place.
• Attach using two #6 x ¾” screws appropriate
for the mounting surface.
Cutouts
Getting Started
21
Page 24
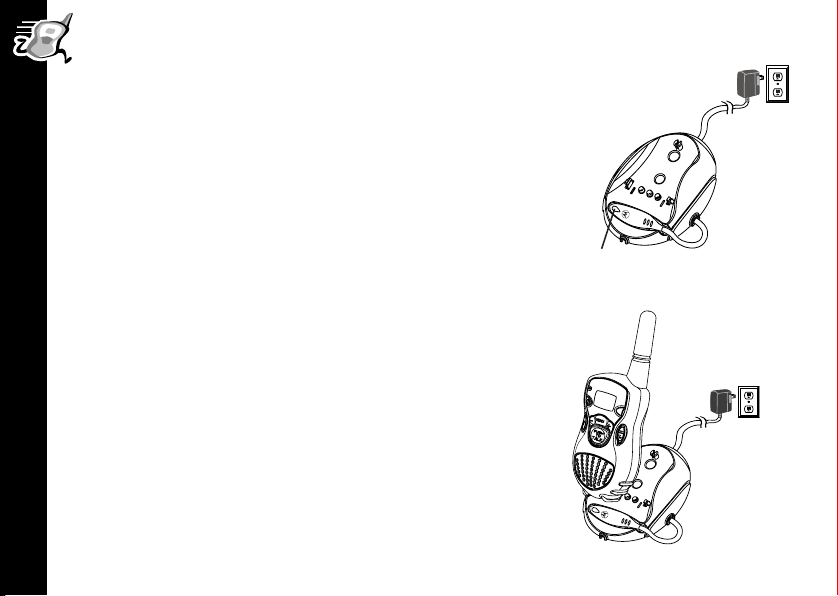
• Position the charger with the hook on the light
indicator end over the left slot.
• Snap the hook on the cord end into the right
slot, clamping the charger onto the charging
dock contacts.
• Plug in the charger.
Charging Dock
Charger
Light Indicator
22
Getting Started
• Place the radio, or the NiMH battery in the
charger adapter cover, into the charging dock
until you hear a click.
• When the light indicator turns solid green, the
battery is fully charged.
Page 25
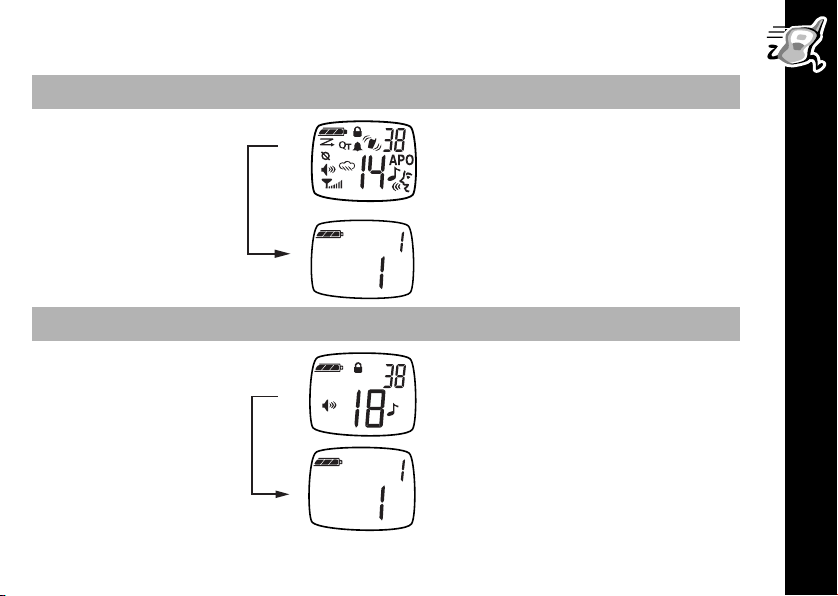
Turning On Your Radio
Press and Hold Normal Menu Mode
The radio beeps and the screen
temporarily displays every
image.
P
Press and Hold Simple Menu Mode (
P and \
The red light above the
button flashes every three
seconds.
Refer to
The radio beeps and the screen
temporarily displays only six
images.
The red light above the
button flashes every three
seconds. You have access to
only the Channel, Code, and
Call Tone menus.
page 46)
P
P
Getting Started
23
Page 26
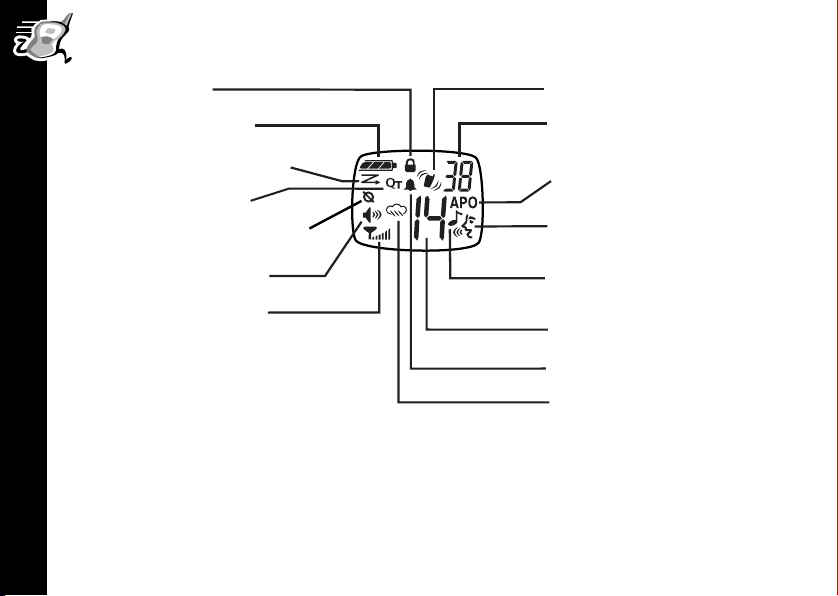
Your Radio’s Display
Lock Set
Battery Meter
Channel Scan On
QuieT6000™
Eavesdrop Reducer
Volume Control
Signal Strength
Indicator
Getting Started
VibraCall® Alert On
Interference Eliminator
Code
Automatic Power Off
Hands-free Use with
Accessories (VOX)
Transmit Call Tone\
Call Tone Received
Channel Indicator
Ring Alert On
Weather On
Turning Off Your Radio
To turn off your radio press and hold P for one second. The radio beeps and the
display goes blank.
24
Page 27
Changing Settings While Turning On Your Radio
The following table lists additional functions you can set by pressing and holding
specific key combinations while turning on your radio.
Key(s) Pressed and Held
While Turning On Your Radio
\
)
[
]
+
M
+
M
+
P
or
+
P
+
P
P +
Function
Reset factory settings.
Turns audible button beeps and local audible call
tones on or off.
Turns Talk Confirmation Tone on or off.
Getting Started
P + \
P +
P
(Call)
(
+ VOX accessory attached
Turns on Simple Menu mode. See page 46.
Enable/disable QuieT6000
page 39.
Enable External VOX (with accessory).
(Setting 1) See
25
Page 28
Accessing and Setting Features
Almost everything you can do with your radio is done using the same basic key
sequence! Use your radio’s
way you want them. All the features that work using this key sequence are described
on the following pages.
Press Display Then Press
\
the icon representing the
feature you want
and [ or ] to select options and set features the
\
[
or ] to select the option, then press
M
or wait ten seconds (60 seconds for Simple
Menu mode) to save the setting or press and
\
.
hold
Setting the Battery Type
This feature allows the battery meter to recognize and properly display the power
Getting Started
usage for either alkaline or rechargeable batteries.
To set the battery type, press
n (NiMH or NiCad rechargeable) is blinking. Press [
26
(Alkaline) or
] until your choice of A or n displays, then press
or
\ until d displays. Either A
to set.
M
Page 29

Backlight
Being in the dark is never a problem. Your radio has a backlight
that turns on automatically any time you press a button. The
backlight turns off automatically four seconds after you last pressed
a button.
You can also illuminate your display by pressing the
or
button (T6220).
button (T6200 and T6210)
Getting Started
27
Page 30

Talking and Listening
Before You Can Talk
To talk with someone on your two-way radio, both of you must be on the same
channel, interference eliminator code, and Eavesdrop Reducer code (T6210 and
T6220 only).
The channel is the radio frequency wave your radio uses to transmit. The
interference eliminator code filters out static, noise, and unwanted messages. Refer
to the Frequency and Code Charts beginning on page 48 for channel and code
choices. The Eavesdrop Reducer code makes your transmissions sound garbled to
anyone listening who is not set to that code. See page 38.
Setting the Channel
To set the channel, press
blink. Then press
Talking and Listening
next menu or wait 10 seconds to save the channel setting. To quickly
exit the menu and go back to the first display screen, press
[
\ once. The channel number begins to
or ] to set the channel. Then proceed to the
.
M
The red indicator light above the
in use. Keep scrolling until you find a clear channel.
28
P button flashes quickly whenever the channel is
Page 31

Setting the Interference Eliminator Code
To set the code, press \ twice until the code number display begins
to blink. Then press [ or ] to set the code. Press
code setting. To hear everyone on your channel, select code
to save the
M
.
0
You can specify a different code for each channel. To set a channel and code
combination, press \ and then press [ or ] to select the channel. Press \
again and then press [ or ] to select a code. Press M to exit the menu and to
save the channel and code combination. To set another channel and code
combination, repeat these steps.
Volu me
You can set the volume whenever you are not using a menu. Press
or ] until it’s just right. The display will show
[
)
1
with
setting (
to
20
1
being
the lowest volume and
and the volume
being the
5
highest volume.
Talking and Listening
Caution:
Do not hold the radio too close to your ear when the volume is at a high
setting. This could cause hearing damage.
29
Page 32

To Talk
Note:
Talking Range
Talking and Listening
Optimal Range
• Flat, open areas from five
30
The microphone is located under the ) button. So don’t cover it when you press
M
.
Press and hold M and talk two-to-three inches away from the
microphone. When you’re finished, just release
talk, release to listen). While transmitting, the red indicator light above the
button glows.
P
feet up to two miles (lineof-sight)
Medium Range
• Buildings or trees
(Press and hold to
M
Minimal Range
• Dense foliage or
mountains
• Buildings or vehicles
Page 33

Using Accessories
Make sure the radio is turned off before plugging audio accessories into the
accessory port. Before you place an accessory on your head or in your ear, turn the
volume down. After placing the accessory on your head or in your ear, adjust the
volume by pressing [ or
.
]
Monitor/Signal Strength Indicator
The ) button allows you to listen to all activity on a channel (open squelch) to tell
whether the channel is currently in use.
when a radio is moving out of range.
To check for channel activity, press and hold the ) button. You’ll hear static if the
channel is clear and
avoid interrupted conversation, wait until the channel is clear or switch to another
channel.
w will display. Don’t transmit if you hear conversation. To
This
button
can also help you determine
he w helps you determine when a radio is moving out of range by
T
displaying a receive signal-strength value next to the
press and hold
indicates the relative strength of the incoming signal.
Note:
Obstacles that block the signal path may affect the strength of the incoming signal.
. This value from
)
1
(weakest) through 6 (strongest)
w while you
Talking and Listening
6
Signal Strength
Indicator
31
Page 34

Alerts
Alerts allow members of your group to notify each other that they want to talk.
Alerts can be audible, visual, or vibrating.
You can also determine how your radio will alert you when you’re receiving: vibrate,
ring, both, or none. Your radio will vibrate and/or ring only the first time you receive a
transmission or call. It will not ring or vibrate again until 30 seconds of inactivity have
elapsed.
Call Tone and Call Display
Your radio can transmit different call tones to other radios in your group so you can
alert them that you want to talk to them. Each person in the group can have an
individual call tone.
Alerts
To set your call tone, press
press [ or ] to scroll through the available call tones. The radio
plays a sample of each tone as you scroll through them. To use your
call tone, just press
the channel number.
32
to transmit it to others. The ^displays next to
(
as needed to display ^. You can
\
Page 35

Ring Only (T6200 Only)
The ring feature rings the call tone you’ve selected to notify you of two-way radio
reception. When you set this feature, the radio produces the call tone you’ve
selected each time you receive a two-way radio transmission.
To set the Ring feature, press
press [ or ] to select
If you select Y, the
n or Y.
B will remain on the display after you exit the menu.
\ until B is displayed and then
Alerts
33
Page 36

Ring and/or VibraCall® (T6210 and T6220 Only)
Your radio features Ring and/or VibraCall®, a vibrating alert to notify you of
two-way radio reception in noisy environments.
To set Ring and/or VibraCall
press
Alerts
[ or
Setting
-
to select the desired setting.
]
Display
Within
Menu
®
, press \ until B and/or i is displayed and then
Function
Your radio doesn’t sound an alert, just the actual
transmission. You will still hear the talk confirmation tone (if
activated).
34
1i
2B
3Bi
Your radio vibrates to alert you.
Your radio rings your call tone when you receive a call.
Your radio vibrates and rings your call tone when receiving.
Page 37

Talk Confirmation Tone
Whenever you turn on the talk confirmation tone feature, your two-way radio
transmits a unique tone when you finish transmitting. It’s like saying “Roger” or
“Over” and lets others know you’re finished talking. If you don’t hear the talk
confirmation tone, you can enable it by pressing and holding
your radio. Now, whenever you release the
you’re finished talking by transmitting a tone. To disable the talk confirmation
tone feature, turn your radio off and then back on while pressing and holding
button, you let your friends know
M
] as you turn on
].
Button Beeps
Every time you press a button on your radio, it beeps unless you turn Button Beeps
off. To turn button beeps off, turn your radio on while you press and hold
button beeps back on, turn the radio off and then back on again while you press and
[.
hold
When Button Beeps are turned off, you won’t hear call tones that you send.
. To turn
[
Alerts
35
Page 38

Hands-Free Use (VOX)
Hands-Free Use With Accessories
VOX allows you to transmit “hands-free” by talking while using VOX accessories
connected to the radio.
To set VOX, plug in your accessory before you turn on your radio. When you turn on
your radio, flashing
every time you talk. When you transmit using a VOX headset, you will hear yourself
talking through the accessory speaker. This lets you know VOX is working.
g displays. Your radio will now detect your voice and transmit
Press
disappear. To reset VOX use, turn your radio off and then back on with your
accessory plugged in.
Note: When using accessories, ensure that they are plugged in before you turn on
Hands-Free Use (VOX)
Note: There is a short delay when you start talking before the transmitter turns on.
36
to turn off VOX and return to the regular way of transmitting. The g will
M
the radio.
Page 39

Setting Sensitivity Level
The sensitivity level allows you to compensate for background noise when using
an accessory. If you are not using an accessory, the sensitivity level will adjust your
microphone’s sensitivity. By adjusting the sensitivity level up or down, you can
minimize the chance of unintended noises triggering a transmission, or increase the
microphone’s ability to pick up quiet voices.
To set sensitivity level, press
1 through 3 are displayed. Then select:
3) for quiet environments
High (
Medium (
Low (
When you connect a VOX accessory, the radio will automatically be set to your last
sensitivity level.
2) for most environments
1) for noisy environments
\ as needed, until g and a value
1
g
Hands-Free Use (VOX)
37
Page 40

Privacy
Eavesdrop Reducer (T6210 and T6220 Only)
Your radio has the Eavesdrop Reducer feature, a scramble code that makes
your transmissions sound garbled to anyone listening without the same
code. It doesn’t guarantee secrecy, but it adds an extra layer of privacy.
Don’t forget -- all the radios have to be set to the same Eavesdrop Reducer
code for the transmissions to be clear.
To turn the Eavesdrop Reducer feature on, press
displayed, then
After you exit the menu, the display will show
Privacy
To turn the Eavesdrop Reducer feature off, press
displayed, then
the display.
38
select code 1, 2, or
select
-. After you exit the menu, the e icon will disappear from
3.
\ as needed until e
e.
\ as needed until e
is
is
Page 41

QuieT6000™
The QuieT6000TM function helps ensure uninterrupted communication among
Motorola Talkabout T6200 and T6300 series radios - it helps prevent you from
hearing transmissions from other radios. However, other radios can hear you.
To turn the QuieT6000 function on or off, press
displayed. Then select one of the following settings:
Setting Display Function
\ as needed until F is
-
38
QuieT6000 is turned off.
14
1
14
2
QuieT6000 is turned on, but is suspended while
scanning.
QuieT6000 is turned on, including while scanning.
14
You can also turn the QuieT6000
pressing and holding
while you turn on your radio.
(
function on (Setting 1) or off (Setting -) by
Privacy
39
Page 42

QuieT6000™ (continued)
If you have a T6200 radio with QuieT6000 on and want to talk to others in your
group who also have QuieT6000 on, you must first transmit a call tone before talking
to them. When the call tone is transmitted,
T6300 series radios with the same channel, interference eliminator code, and
QuieT6000 on, letting them know that you want to talk to them. Those radios can
then receive and transmit until 30 seconds of inactivity occurs, which resets the
QuieT6000 function. While QuieT6000 is on,
function is on. However, during the 30 seconds of inactivity,
Unique Situations
QuieT6000 can also keep your radio quiet when you are in a situation where noise
can be disruptive, such as when you are in a movie theater or out hunting. Set
Privacy
QuieT6000 to either 1 or 2 and set your radio’s alert to 1 (VibraCall only). Now
when you receive a call from another T6200 or T6300 series radio, your radio will
vibrate while the
you press any button. Only then can you receive and transmit to those radios until
30 seconds of inactivity occurs and the QuieT6000 function resets.
40
^ displays on the screen. The ^ will remain on the screen until
^ will display on the other T6200 or
F is displayed to indicate that the
will flash.
F
Page 43

Weather (T6220 Only)
You can’t change the weather, but you can be prepared for it
whenever you take your Motorola Talkabout T6220 radio with
you. That’s because it tunes into National Oceanic and
Atmospheric Administration (NOAA) Weather Radio broadcasts.
You can listen to a weather channel or you can even set your
radio to alert you to emergency weather broadcasts.
And because NOAA Weather Radio now broadcasts warning
information for all types of hazards, routine broadcasts are
interrupted during emergencies for natural and technological warnings, watches,
and other critical information.
NOAA has transmitters located throughout the United States and Canada that
broadcast National Weather Service warnings, watches, forecasts, and other hazard
information 24 hours a day.
Whenever you listen to a weather channel, you cannot use your radio for two-way
communications. However, a weather alert will notify you while the radio is in twoway mode (if you have enabled weather alert) and the radio is on but not
transmitting or receiving.
Turning On Weather Channel Reception
To turn on weather channel reception, press and hold the Ro button. To turn
off weather channel reception and return to two-way mode, press and hold the
Ro button again.
Weather (T6220 Only)
41
Page 44

Setting the Weather Channel
Your radio receives eight NOAA frequencies. See the Frequency and Code
Charts
beginning on page 48 for a complete list.
After turning on the weather broadcast, press
channel display blinking.
Press
[ or ] to select the strongest channel.
As with two-way radio reception, weather channel reception depends on how close
you are to a transmitter and whether you are indoors or outdoors. Also, because
weather channels are transmitted without codes, they may contain static or noise.
Note: In some isolated areas, it may not be possible to receive weather channel
transmissions.
Weather (T6220 Only)
42
\ to start the
Page 45

Setting the Weather Alert
If you set the weather alert and switch back to two-way mode, o
Whenever NOAA transmits an emergency weather broadcast on the selected
channel, your radio alerts you using the selected alert mode, ring B or vibrate i,
and switches to the selected weather channel. If your radio is in weather mode, you
will receive a weather alert only on the selected channel.
is displayed.
To set weather alerts, switch to weather mode, press
and press [ or ] to select
Note: The TalkAbout T6200-series two-way radios are designed to be two-way
radios primarily, with the added utility of features such as Weather Alert. The
radio uses the same circuitry for both two-way radio and weather alert
receptions. Therefore, you can miss a weather alert while you are engaged
in two-way communication (either transmitting or receiving). To ensure that
you do not miss a weather alert, leave the radio in the Weather Mode.
Y (on).
\ twice,
Weather (T6220 Only)
43
Page 46

Other Important Features
Lock
To avoid accidentally changing radio operation, the Lock feature locks the Menu,
Volume Control, Weather (T6220 only), and Scan functions. Meaning that you can
only turn the two-way radio on and off, transmit, and monitor
You can make sure your menu settings won’t be changed
accidentally. Just turn on lock by pressing
Now you’ll see the
To turn Lock off, press
Note: If your radio is in two-way mode and Weather Alert is enabled, an
emergency broadcast on the selected channel will still switch the radio to
that weather channel.
Scanning
Other Important Features
By using Scanning h, you can monitor channels and codes for transmissions
and lock in on the one that interests you. More importantly, you can find someone
in your group who has accidentally changed channels and is talking during your
scan. You don’t have to set a new channel or code, the radio just resets itself
temporarily to that channel and code and you can start talking.
44
f icon.
\ again for three seconds.
for three seconds.
\
Lock On
Page 47

Scanning (continued)
To start scanning, briefly press ) (Scan/Monitor).
h
and begins to scroll through channels. When the radio detects channel activity, it stops
on that channel and displays its channel and code. You can talk to the person(s)
transmitting without having to switch channels by pressing
press
channel you selected before you activated Scan. If no
seconds, scanning will resume.
If you want to scan channels without interference eliminator codes, change the code
for your set channel to
. If you press
)
while the radio is scanning, the radio will transmit on the
M
0 before you briefly press
Your channel/code screen displays
.
To stop scanning, briefly
M
transmission occurs within five
.
)
Auto Power Off
You can program your radio to turn itself off after a certain period of inactivity. This
helps save battery life.
To set the automatic power off feature, press \ as needed to display
O. Press [ or ] to set the number of hours
shuts off.
After you exit the menu, O displays on the screen when the automatic power off
feature has been activated. Five minutes before the radio shuts off, an alert beep
sounds. Another alert beep will sound once per minute and O will flash
continuously during those five minutes.
Select - to turn off the automatic power off feature.
1 - 8, after which power
O
8
Other Important Features
45
Page 48

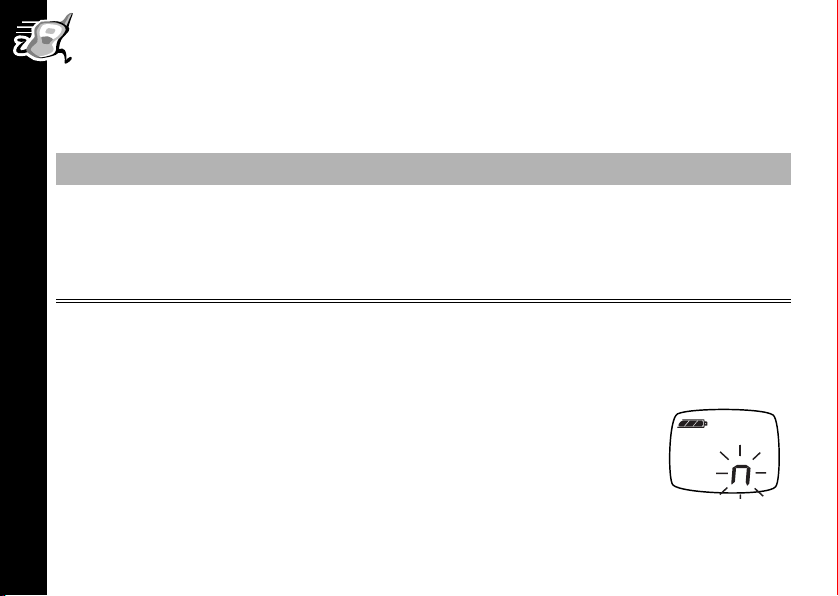
Reset
You can reset your radio’s menu settings to the factory settings by turning it on while
pressing and holding
and \ or
M
M
and ).
Simple Menu
Simple Menu allows you to limit the number of menus displayed (Channel, Code,
and Call Tones) to allow for simpler radio operation. The Scan and Weather
features, along with most of the radio turn-on sequences (See page 25), are also
disabled to prevent accidentally changing the radio’s mode of operation.
If you want the radios in your group to keep the same settings that you have on your
radio, press
out to 60 seconds. To turn off Simple Menu, press
If you want to set up Simple Menu for inexperienced users, without advanced
features activated such as Eavesdrop Reducer and QuieT6000, reset their radios to
Other Important Features
the original factory settings by either pressing
while turning on their radios. Then activate Simple Menu by turning their radios
\
off and then
46
as you turn each radio on. Simple Menu increases the menu time-
\
as you turn on the radio.
\
back on while pressing
\
and
)
.
or by pressing
M
M
and
Page 49

Use and Care
glub
Use a soft damp cloth to
clean the exterior.
If the radio gets wet...
Turn it off and remove
batteries.
Do not immerse in water. Do not use alcohol or
cleaning solutions.
Dry with soft cloth. Do not use until completely
dry.
Use and Care
47
Page 50

Frequency and Code Charts
The charts on these pages provide frequency and code compatibility information.
These charts are useful when using Motorola Talkabout two-way radios with other
FRS radios.
Channel Frequency Chart
48
Frequency and Code Charts
Channel
1 462.5625 8 467.5625
2 462.5875 9 467.5875
3 462.6125 10 467.6125
4 462.6375 11 467.6375
5 462.6625 12 467.6625
6 462.6875 13 467.6875
7 462.7125 14 467.7125
Weather Frequency Chart (T6220 Only)
WX1 162.550 WX5 162.450
WX2 162.400 WX6 162.500
WX3 162.475 WX7 162.525
WX4 162.425 WX8 162.275
MHz
Channel
MHz
Page 51
Carrier squelch (0) disables interference eliminator codes. This allows you to
monitor all activity on the channel you are using.
Interference Eliminator Codes
Talkabout
Code Hz Freq
Motorola
7/7x Code
Talkabout
Code Hz Freq
Motorola
7/7x Code
Talkabout
Code Hz Freq
Motorola
7/7x Code
1 67.0 14 107.2 D 27 167.9
2 71.9 15 110.9 28 173.8
3 74.4 16 114.8 29 179.9
4 77.0 A 17 118.8 E 30 186.2
5 79.7 18 123.0 31 192.8
6 82.5 19 127.3 F 32 203.5
7 85.4 20 131.8 33 210.7
8 88.5 B 21 136.5 G 34 218.1
9 91.5 22 141.3 35 225.7
10 94.8 23 146.2 36 233.6
11 97.4 C 24 151.4 37 241.8
12 100.0 25 156.7 38 250.3
13 103.5 26 162.2
Note: Motorola 7/7x is an older Motorola radio that has seven codes common
with newer FRS radios.
Frequency and Code Charts
49
Page 52

Troubleshooting
Symptom Try This:
No Power
Reposition or replace alkaline batteries.
Recharge or replace NiMH battery.
50
Troubleshooting
Message not
transmitted
Hearing other
noises or
conversation on
a channel
Message
scrambled
Limited talk
range
Make sure
Reposition, replace, or recharge batteries.
Confirm interference eliminator code is set.
Shared channel or interference eliminator code may be in use, try
another.
Eavesdrop
radios’ settings; all radios must use the same Eavesdrop
code.
Steel and/or concrete structures, heavy foliage, use in buildings or
vehicles decrease range. Check for clear line of sight to improve
transmission.
Wearing radio close to body such as in a pocket or on a belt
decreases range. Change location of radio.
M
is completely pressed as you transmit.
Reducer
code is on, or setting does not match other
Reducer
Page 53
Symptom Try This:
Confirm radios have the same channel and interference eliminator
code settings.
Make sure
Reposition, replace, or recharge batteries.
If QuieT6000
Message not
received
Heavy static or
interference
Channel and/or
code locked
If QuieT6000
received call must be acknowleged by pressing any button (or a
VOX activation) before the radio can receive any incoming
transmissions.
Obstructions and operating indoors, or in vehicles, may interfere -change location.
Verify that the radio is not in Scan mode.
Eavesdrop
radios; all radios must use the same Eavesdrop
Radios are too close, they must be at least five feet apart.
Radios are too far apart or obstacles interfering with transmission.
Talk range is up to two miles in clear, unobstructed conditions.
Make sure menu is unlocked. Unlock by pressing \ for three
seconds.
M
is
NOT
being pressed while trying to listen.
feature is on, transmit call tone before talking.
feature is on, with only VibraCall selected, a
Reducer
code is on, or setting does not match other
Reducer
Troubleshooting
code.
51
Page 54

52
Troubleshooting
Symptom Try This:
Cannot access
all menus
or
Cannot display
desired icon
Other radios not
receiving your
transmissions
Low batteries
Low battery
meter reading
although new
batteries are
installed
Charger LED
double flashing
Cannot activate
VOX
Verify whether Simple Menu is activated. Disable Simple Menu by
pressing
QuieT6000
QuieT6000
or turn
Replace alkaline batteries. Recharge or replace NiMH battery.
Extreme operating temperatures affect battery life.
Verify that the radio is set to the correct battery type. See page 26.
Charger not properly positioned. Reposition charger and ensure it
is firmly clamped to the radio, battery, or charging dock.
Battery power is very low; battery is charging up slowly before it
starts to quick charge.
Feature not set and on. See page 36.
while turning on the radio.
\
mode is set. Press ( to talk to members of your party
off.
Page 55

Motorola Limited Warranty
Motorola Personal Communications Products Purchased in the United States and
Canada
I. What This Warranty Covers
• Products. Defects in materials and workmanship in wireless cellular telephones,
pagers, and/or two-way radios, and certain accessories that are sold with them,
such as the battery, battery charger and holster manufactured and/or sold by
Motorola (Products).
• Batteries
manufactured by Motorola and/or sold with Products are covered by this
warranty only if the fully-charged capacity falls below 80% of rated capacity or
they leak.
• Software
any software supplied with the Products.
. Defects in materials and workmanship in batteries that are
. Physical defects in the media that tangibly embodies each copy of
Motorola Limited Warranty
53
Page 56

Motorola Limited Warranty
54
II. What the Period of Coverage Is
From the date the Products are purchased by the first end-user:
• Products.
GT series and Talkabout
• Software.
• Repairs / Replacements.
warranty or for 90 days from the date you receive it, whichever is longer.
The warranty is for one year. Exception: The warranty for Spirit
®
series two-way radio accessories is for 90 days.
The warranty is for 90 days.
The warranty is for the balance of the original
III. Who is Covered
This warranty extends to the first end-user purchaser, only.
IV. What We Will Do to Correct Warranty Problems
At no charge to you, we have the option to repair or replace the Products or
software that do not conform to the warranty, or to refund the Products’ purchase
price. We may use functionally equivalent reconditioned/refurbished/pre-owned
or new Products or parts. No software updates are provided.
Page 57

V. How to Get Warranty Service
Please call:
USA Canada
Cellular 1-800-331-6456 All Products 1-800-461-4575
Paging 1-800-548-9954 TTY 1-888-390-6456 (Text Telephone)
Two-Way 1-800-353-2729
TTY 1-888-390-6456 (Text Telephone)
You will receive instructions on how to ship the Products to Motorola. You must ship
the Products to us with freight, duties and insurance prepaid. Along with the Products
you must include: (a) a copy of your receipt, bill of sale or other comparable proof of
purchase; (b) a written description of the problem; (c) the name of your service
provider (if this Product requires subscription service); (d) the name and location of
the installation facility (if applicable) and, most importantly; (e) your address and
telephone number. If requested, you must also return all detachable parts such as
antennas, batteries and chargers. RETAIN YOUR ORIGINAL PROOF OF
PURCHASE.
We will ship repaired or replacement Products at our expense for the freight and
insurance, but at your expense for any duties. If additional information is needed,
please contact us at the telephone number listed above.
Motorola Limited Warranty
55
Page 58

Motorola Limited Warranty
56
VI. What This Warranty Does Not Cover
• Products that are operated in combination with ancillary or peripheral
equipment or software not furnished by Motorola for use with the
Products (“ancillary equipment”), or any damage to the Products or
ancillary equipment as a result of such use. Among other things,
“ancillary equipment” includes batteries, chargers, adaptors, and power
supplies not manufactured or supplied by Motorola. Any of these voids
the warranty.
• Someone other than Motorola (or its authorized service centers) tests,
adjusts, installs, maintains, alters, modifies or services the Products in
any way. Any of these voids the warranty.
• Rechargeable batteries that: (a) are charged by other than the Motorolaapproved battery charger specified for charging such batteries; (b) have
any broken seals or show evidence of tampering; (c) are used in
equipment other than the Product for which they are specified; or (d) are
charged and stored at temperatures greater than 60 degrees centigrade.
Any of these voids the warranty.
Page 59

• Products that have: (a) serial numbers or date tags that have been removed,
altered or obliterated; (b) board serial numbers that do not match each other, or
board serial numbers that do not match the housing; or (c) nonconforming or
non-Motorola housings or parts. Any of these voids the warranty.
• Defects or damage that result from: (a) use of the Products in a manner that is
not normal or customary; (b) improper operation or misuse; (c) accident or
neglect such as dropping the Products onto hard surfaces; (d) contact with
water, rain, extreme humidity or heavy perspiration; (e) contact with sand, dirt or
the like; or (f) contact with extreme heat, or spills of food or liquid.
• Physical damage to the surface of the Products, including scratches, cracks or
other damage to a display screen, lens or other externally exposed parts.
• Failure of Products that is due primarily to any communication service or signal
you may subscribe to or use with the Products.
• Coil cords that are stretched or that have any broken modular tabs.
• Products that are leased.
Flat-rate repair rates may apply to Products not covered by this warranty. To obtain
information about Products needing repairs that are not covered by this warranty,
please call the telephone number previously listed. We will provide information on
repair availability, rates, methods of payment, where to send the Products, etc.
Motorola Limited Warranty
57
Page 60

Motorola Limited Warranty
58
VII.Some Other Limitations
This is Motorola’s complete warranty for the Products, and states your
exclusive remedies. This warranty is given in lieu of all other express
warranties. Implied warranties, including without limitation, the implied
warranties of merchantability and fitness for a particular purpose, are
given only if specifically required by applicable law. Otherwise, they are
specifically excluded.
No warranty is made as to coverage, availability, or grade of service
provided by the Products, whether through a service provider or
otherwise.
No warranty is made that the software will meet your requirements or will
work in combination with any hardware or applications software
products provided by third parties, that the operation of the software
products will be uninterrupted or error free, or that all defects in the
software products will be corrected.
In no event shall Motorola be liable, whether in contract or tort (including
negligence) for damages in excess of the purchase price of the Product,
or for any indirect, incidental, special or consequential damages of any
kind, or loss of revenue or profits, loss of business, loss of information
or data, or other financial loss arising out of or in connection with the
ability or inability to use the Products, to the full extent these damages
may be disclaimed by law.
Page 61

VIII.Patent and Software Provisions
At Motorola’s expense, we will defend you, and pay costs and damages that may be
finally awarded against you, to the extent that a lawsuit is based on a claim that the
Products directly infringe a United States patent. Our obligation is conditioned on: (a)
you notifying us promptly in writing when you receive notice of the claim; (b) you
giving us sole control of the defense of the suit and all negotiations for its settlement
or compromise; and (c) should the Products become, or in Motorola's opinion be
likely to become, the subject of a claim of infringement of a United States patent, you
permit us, at our option and expense, either to: procure for you the right to continue
using the Products; replace or modify them so that they become non-infringing; or
grant you a credit for such Products, as depreciated, and accept their return. The
depreciation will be an equal amount per year over the lifetime of the Products, as
established by Motorola.
Motorola will have no liability to you with respect to any claim of patent infringement
that is based upon the combination of the Products or parts furnished under this
limited warranty with ancillary equipment, as defined in VI., above.
This is Motorola’s entire liability with respect to infringement of patents by the
Products.
Motorola Limited Warranty
59
Page 62

Laws in the United States and other countries preserve for Motorola and other third
party software providers certain exclusive rights for copyrighted software, such as
the exclusive rights to reproduce in copies and distribute copies of such software.
The software may be copied into, used in and redistributed with only those
Products that are associated with such software. No other use, including without
limitation, disassembly or reverse engineering of such software or exercise of
exclusive rights in such software is permitted.
Motorola Limited Warranty
60
Page 63

IX. State Law and Other Jurisdiction Rights
Some states and other jurisdictions do not allow the exclusion or limitation of
incidental or consequential damages, or limitation on the length of an implied
warranty, so the above limitations or exclusions may not apply to you.
This warranty gives you specific legal rights, and you may also have other rights,
which vary from jurisdiction to jurisdiction.
To obtain information on Motorola Personal Communications Products, including
warranty service, accessories and optional Extended Warranties on selected
Products, please call:
USA Canada
Cellular 1-800-331-6456 All Products 1-800-461-4575
Paging 1-800-548-9954 TTY 1-888-390-6456 (Text Telephone)
Two-Way 1-800-353-2729
TTY 1-888-390-6456 (Text Telephone)
To correspond with Motorola about the Products, please write us at
http://www.motorola.com or at:
USA Canada
Motorola, Inc. Motorola Canada Limited
600 North U.S. Highway 45 5875 Whittle Road
Libertyville, IL 60048 Mississauga, ON L4Z 2H4
Motorola Limited Warranty
61
Page 64

Computer Software Copyrights
The Motorola equipment described in this manual may include copyrighted
Motorola computer programs stored in semiconductor memories or other media.
Laws in the United States and other countries preserve for Motorola certain
exclusive rights for copyrighted computer programs, including the exclusive right
to copy or reproduce in any form the copyrighted computer program. Accordingly,
any copyrighted Motorola computer programs contained in the Motorola
equipment described in this manual may not be copied or reproduced in any
manner without the express permission of Motorola, Inc. Furthermore, the
purchase of Motorola equipment shall not be deemed to grant either directly or by
implication, estoppel, or otherwise any license under the copyrights, patents or
patent applications of Motorola, except for the normal nonexclusive, royalty free
license to use arising by operation of law in the sale of this product.
FCC License Not Required
Changes or modifications not expressly approved by Motorola may void the
user’s authority granted by the FCC to operate this radio and should not be made.
To comply with FCC requirements, transmitter adjustments should be made only
by or under the supervision of a person certified as technically qualified to
perform transmitter maintenance and repairs in the private land mobile and fixed
services as certified by an organization representative of the user of those
services. Replacement of any transmitter component (crystal, semiconductor,
etc.) not authorized by the FCC equipment authorization for this radio could
violate FCC rules.
Page 65

Patent Notice
This product is covered by one or more of the following United States patents.
5896277 5894292 5864752 5699006 5742484 D408396 D399821 D387758
D389158 5894592 5893027 5789098 5734975 5861850 D395882 D383745
D389827 D389139 5929825 5926514 5953640 6071640 D413022 D416252
D416893 D433001
Export Law Assurances
This product is controlled under the export regulations of the United States of
America and Canada. The governments of the United States and Canada may
restrict exportation and re-exportation of this product to certain destinations. For
further information, contact the U.S. Department of Commerce or the Canadian
Department of Foreign Affairs and International Trade.
Page 66

Page 67

]
or
[
Press
1 through 14
38
14
T6200-Series Two-Way Radio Menu Map
Channel
\
Press
0 through 38
38
Interference Eliminator Code
Eavesdrop Reducer
(T6210 & T6220)
- (off) 1, 2, 3
-
1 through 10 (T6220 Only)
1 through 5 (T6200 & T6210)
1
Call Tone/Call Display
n (off)
Ringer
(T6200 Only)
Y (on)
n
- (neither)
1 (vib)
Ringer VibraCall
(T6210 & T6220)
2 (ring)
3 (vib + ring)
1
1 low (in noisy places)
Sensitivity Levels
2 medium (most places)
3 high (in quiet places)
n
- (off)
1 to 8 hours
1
O
-
Automatic Power Off
TM
1 (on) except during scan
2 (on) including during scan
- (off)
QT
QuieT6000
-
A (alkaline)
n (NiMh)
Battery Type
A
To switch between Two-Way mode and Weather mode (T6220
only) press and hold Q.
Press [ or ]
T6220 Radio Weather Feature Map
\
Press
1 through 8
Weather Channel
n (off)
Y (on)
Y
Weather Alert
Page 68

]
14
ou
[
Appuyez
\
Appuyez
Guide des menus - Radios bidirectionnelles - Série T6200
1 à 14
Canal
Codes de réduction
de bruit
0 à 38
38
.
Q
1 à 5 (T6200 & T6210)
- (arrêt) 1, 2, 3
-
clandestine
(T6210 & T6220)
Réducteur d'écoute
1 à 10 (T6220 uniquement)
1
Tonalité d'appel /
Écran Appel entrant
n (arrêt)
Y (marche)
Sonnerie
(T6200 uniquement)
n
- (aucun)
1 (vib)
(T6210 & T6220)
Sonnerie VibraCall®
2 (sonnerie)
3 (vib + sonnerie)
1
1 faible (environnements bruyants)
2 moyen (majorité des environnements)
3 haut (environnements calmes)
1
Niveaux de sensibilité
- (arrêt)
1 à 8 heures
O
-
Arrêt automatique
MC
QuieT6000
1 (marche) sauf lors d'un balayage
2 (marche) même lors d'un balayage
- (arrêt)
-
QT
n (NiMh)
A (alcaline)
Type de pile
A
Pour basculer entre le mode bidirectionnel et le mode météo,
appuyez et maintenez la touche
Appuyez [ ou ]
\
Radio T6220 – Guide des fonctionnalités Météo
Appuyez
1 à 8
Canal météo
n (arrêt)
Y (marche)
Y
Alerte météo
Page 69

Introduction - Français
Bonjour, je m'appelle Guide-Éclair et je vais vous guider !
Les radios Talkabout
®
T6200, T6210 et T6220 de Motorola
sont des radios bidirectionnelles fiables qui exploitent les
fréquences FRS (Service radio familial), qui n'exigent aucuns
frais de service ou de licence. En outre, elles peuvent être
utilisées partout aux États-Unis ainsi que dans d'autres régions
tel que précisé par la FCC.
Ces radios sont plus qu'un simple moyen de communication.
La T6200 offre 14 canaux et 38 codes de réduction du bruit, 5
tonalités d'appel sonores, un adaptateur d'accessoires, un indicateur d'intensité du
MC
signal, l'arrêt automatique et la fonction QuieT6000
.
La T6210 contient toutes les fonctionnalités de la Motorola Talkabout T6200 ainsi
que des fonctionnalités supplémentaires telles que le réducteur d'écoute
®
clandestine et l'alerte VibraCall
.
La T6220 contient en plus 5 tonalités d'appel supplémentaires, 8 canaux météo
NOAA ainsi qu’une alerte météo.
Vous trouverez un autocollant aide-mémoire détachable que vous pourrez coller au
dos de la radio. Cet autocollant vous servira de référence pour comprendre les
paramètres et les icônes affichés sur la radio. Ces données figurent également dans
la section Mise en route à la page 80.
®
Introduction - Français
65
Page 70

MOTOROLA, le logo M stylisé et toute autre marque de commerce identifiée sont
des marques de commerce de Motorola, Inc.
®
Brevets et marques de commerce déposés aux É.-U.
© 2001 Motorola, Inc. Tous droits réservés. Imprimé aux É.-U.
Division des produits de consommation
1125 Satellite Road, Suite 101
Suwanee, GA 30024-2880
Pour obtenir un exemplaire du présent guide en gros caractères
ou des renseignements supplémentaires sur nos produits,
veuillez communiquer avec nous aux numéros suivants :
Introduction - Français
1 800 353-2729 (É.-U.) 1 800 461-4575 (Canada)
1 888 390-6456 Téléimprimeur
Ou rendez-vous sur Internet à la rubrique Radio bidirectionnelle du site
www.motorola.com/store
66
1 888 390-6456 Téléimprimeur
Page 71

Table des matières
Introduction - Français . . . . . . . . .65
Table des matières . . . . . . . . . . . .67
Renseignements généraux
et sécurité . . . . . . . . . . . . . . . . . . .69
Mise en route . . . . . . . . . . . . . . . .80
Fonctionnement de base
de la radio . . . . . . . . . . . . . . . . .80
Indicateur d'état de la batterie . .84
Durée des piles . . . . . . . . . . . .84
Recharge d’une batterie NiMH 85
État de la charge . . . . . . . . . . .86
Berceau de recharge . . . . . . . . .87
Comment mettre la radio
sous tension . . . . . . . . . . . . . . .89
L'affichage de la radio . . . . . . .90
Comment mettre la radio
hors tension . . . . . . . . . . . . . . . .90
Modification des paramètres
alors que la radio est mise
sous tension . . . . . . . . . . . . . . .91
Accès et configuration
des fonctions . . . . . . . . . . . . . . . 92
Réglage du type de pile . . . . . . 92
Rétroéclairage . . . . . . . . . . . . . . 93
Parler et écouter . . . . . . . . . . . . . . 94
Avant de parler . . . . . . . . . . . . . 94
Sélection du canal . . . . . . . . . 94
Sélection du code de
réduction du bruit . . . . . . . . . . 95
Volume . . . . . . . . . . . . . . . . . . 95
Pour parler . . . . . . . . . . . . . . . . 96
Portée de conversation . . . . . 96
Utilisation des accessoires . . . 97
Écoute et indicateur
d'intensité du signal . . . . . . . . . 97
Alertes . . . . . . . . . . . . . . . . . . . . . . 98
Tonalité d'appel et écran
Appel entrant . . . . . . . . . . . . . . . 98
Sonnerie seule
(T6200 uniquement) . . . . . . . . . 99
Sonnerie et/ou VibraCall®
(T6210 et T6220 uniquement) 100
Tonalité de confirmation . . . . . 101
Table des matières
67
Page 72

Bip des touches . . . . . . . . . . . .101
Fonction mains libres (VOX) . . .102
Fonction mains libres avec
accessoires . . . . . . . . . . . . . . .102
Réglage du niveau de sensibilité
103
Confidentialité . . . . . . . . . . . . . . .104
Réducteur d'écoute clandestine
(T6210 et T6220 uniquement) .104
QuieT6000
MC
. . . . . . . . . . . . .105
Circonstances particulières . .106
Météo (T6220 uniquement) . . . .107
Comment activer la réception
des canaux de météo . . . . . . .108
Table des matières
68
Sélection du canal météo . . . 108
Réglage des alertes météo . . 109
Autres fonctions importantes . 110
Verrouillage . . . . . . . . . . . . . . 110
Balayage . . . . . . . . . . . . . . . . 111
Arrêt automatique . . . . . . . . . 112
Réinitialisation . . . . . . . . . . . . 112
Menu simplifié . . . . . . . . . . . . 113
Entretien et utilisation . . . . . . . 114
Tableaux de fréquences
et de codes . . . . . . . . . . . . . . . . 115
Dépannage . . . . . . . . . . . . . . . . . 117
Garantie limitée . . . . . . . . . . . . . 121
Page 73

Renseignements généraux et sécurité
Données importantes pour une utilisation sûre et efficace
Lisez cet avis avant d'utiliser la radio
L’information fournie dans ce document annule et remplace les renseignements
généraux de sécurité contenus dans les guides d’utilisateur publiés avant juillet
2000. Pour les consignes concernant les risques d’utilisation de la radio en
atmosphère dangereuse, veuillez vous reporter au supplément du manuel Factory
Mutual (FM) Approval Manual Supplement ou à la Carte d’instruction qui
accompagne les modèles de radio qui offrent cette capacité.
Caractéristiques de fonctionnement RF
La radio contient un émetteur et un récepteur. Quand elle est sous tension, elle
reçoit et transmet l’énergie de radiofréquence (RF). La radio utilise la zone de
fréquences située entre 450 et 470 MHz.
Quand vous communiquez au moyen de votre radio, le système traitant votre appel
contrôle le niveau de puissance auquel votre radio transmet. Le niveau de
puissance en sortie peut habituellement varier dans une plage de 0.063 watts à
1.58 watts.
Renseignements généraux et sécurité
69
Page 74

Exposition à l’énergie radiofréquence
La radio Motorola est conçue pour respecter les standards nationaux et
internationaux ainsi que les directives suivantes quant à l’exposition des personnes
à l’énergie électromagnétique des fréquences radio :
• United States Federal Communications Commission, Code of Federal
Regulations; 47 CFR part 2 sub-part J
• American National Standards Institute (ANSI) / Institute of Electrical and
Electronic Engineers (IEEE) C95. 1-1992
• Institute of Electrical and Electronic Engineers (IEEE) C95.1-1999 Edition
• National Council on Radiation Protection and Measurements (NCRP) of the
United States, Report 86, 1986
• International Commission on Non-Ionizing Radiation Protection (ICNIRP) 1998
(Commission internationale de protection contre les rayonnements non
ionisants)
• National Radiological Protection Board of the United Kingdom 1995
• Santé Canada, Code de sécurité 6 : procédures de sécurité recommandées
pour l'installation de dispositifs à radiofréquences et micro-ondes de la gamme
3 kHz - 300 GHz, 1999
• Australian Communications Authority Radiocommunications (Electromagnetic
Renseignements généraux et sécurité
Radiation - Human Exposure) Standard 1999 (Applicable aux radiotéléphones
seulement)
70
Page 75

Il est essentiel de respecter les procédures suivantes en vue d'assurer le rendement
maximal de la radio et de respecter les limites d'exposition humaine à l'énergie
radiofréquence et électromagnétique mentionnées dans les normes énumérées
précédemment :
Utilisation de la radio portative et exposition à l'énergie
électromagnétique (EME)
Entretien de l’antenne
N’utilisez que l’antenne fournie ou une antenne de remplacement approuvée.
Les antennes non approuvées, les modifications, ou les accessoires risquent
d'endommager la radio et peuvent enfreindre les règlements FCC.
Ne tenez pas l’antenne alors que la radio est « UTILISÉE », cela pourrait réduire
la portée de la radio.
Exploitation de la radio bidirectionnelle
Lorsque vous l’utilisez comme radio bidirectionnelle, tenez la radio en position
verticale et maintenez une distance de 5 à 7,5 cm (de 2 à 3 po) entre le
microphone et les lèvres.
Renseignements généraux et sécurité
71
Page 76

Utilisation lorsque la radio est sur vous
En vue de respecter les directives FCC relatives à l'exposition RF, utilisez toujours
une pince, un support, un étui, une housse ou un harnais approuvé ou fourni
par Motorola lorsque vous transmettez un message avec la radio sur votre corps.
L'utilisation d'accessoires non approuvés par Motorola entraîne le risque de
dépasser les limites permises par les directives FCC en matière d'exposition RF. Si
vous n'utilisez pas un accessoire pour porter la radio sur votre corps,
assurez-vous de maintenir une distance minimale de 2,5 cm (1 po) entre
l'antenne et votre corps lors des transmissions.
Accessoires approuvés
Pour consulter la liste des accessoires approuvés par Motorola, allez à la rubrique
Radio bidirectionnelle du site Web www.motorola.com/store.
Interférence/compatibilité électromagnétique
Nota : Tout équipement électronique est susceptible à l'interférence électromag-
Installations
Afin d'éviter les conflits d'interférence ou de compatibilité électromagnétique,
Renseignements généraux et sécurité
respectez toujours les consignes de mise hors tension de la radio. Les hôpitaux et
les centres de soins de santé exploitent souvent des appareils sensibles à l'énergie
RF externe.
72
nétique (EMI), s'il n'est pas suffisamment protégé, conçu ou configuré en
fonction d’une compatibilité électromagnétique.
Page 77

Avion
Il se peut qu’à bord d'un avion on vous demande d'éteindre votre radio ; cette
consigne doit être respectée. L'utilisation d'une radio est régie par la réglementation
que mentionne l'équipage de bord.
Appareils médicaux
Stimulateurs cardiaques
La Health Industry Manufacturers Association recommande une distance minimale
de 15 cm (6 po) entre les radios sans fils portables et les stimulateurs cardiaques.
La recherche indépendante et les recommandations de Wireless Technology
Research appuient cette recommandation.
Consignes importantes pour les porteurs d’un stimulateur cardiaque :
• TOUJOURS maintenir une distance de plus de 15 cm (6 po) entre le stimulateur
cardiaque et la radio lorsque cette dernière est SOUS TENSION.
• Ne jamais transporter la radio dans une poche de poitrine.
• Afin de réduire la possibilité d'interférence, utiliser l'oreille du côté opposé au
stimulateur cardiaque.
• En cas de possibilité d'interférence, éteindre immédiatement la radio.
Prothèses auditives
Certaines radios sans fils nuisent à certaines prothèses auditives. Si jamais une
telle interférence se produit, veuillez consulter le fabricant de votre prothèse auditive
pour connaître les options possibles.
Renseignements généraux et sécurité
73
Page 78

Autres appareils médicaux
Pour tout autre appareil médical, il est recommandé de consulter le fabricant afin de
déterminer si l'appareil en question est suffisamment protégé contre l'énergie RF. Il
est possible que votre médecin soit en mesure de vous aider à obtenir ces
renseignements.
Sécurité et directives relatives à l'utilisation de la radio pendant la conduite
automobile
Utilisation en conduisant
Familiarisez-vous avec les lois et les règlements des régions où vous conduisez
quant à l'utilisation des radios. Ces lois et règlements doivent être respectés.
Lorsque vous utilisez la radio en conduisant, prière de :
• Concentrer votre attention sur la conduite et la route.
• Utiliser le mains libres, si disponible.
• Quitter la route et garer votre véhicule avant de répondre à un appel ou avant
d'en effectuer un si les conditions routières l'exigent.
Avertissements
Véhicules équipés de coussins gonflables
Renseignements généraux et sécurité
Ne placez jamais la radio portative devant le coussin gonflable ou dans son aire de
déploiement. Les coussins gonflables se déploient avec beaucoup de force.
Lorsqu'une radio portative est placée dans l’aire de déploiement, elle peut être
propulsée violemment, ce qui expose les passagers à un risque de blessure grave.
74
Page 79

Milieux potentiellement explosifs
À moins que votre radio soit qualifiée d'appareil à sécurité intrinsèque pour
utilisation dans un milieu potentiellement explosif (par ex. Factory Mutual, CSA ou
UL), éteignez la radio avant d'entrer dans une zone qui constitue un milieu
potentiellement explosif. Lorsque vous vous trouvez dans une telle zone, il ne faut
pas enlever, installer ou charger les piles. Les étincelles dans un milieu
potentiellement explosif risquent de causer une explosion ou un incendie et d’ainsi
poser un danger de blessure corporelle ou de mort.
Nota : Les milieux potentiellement explosifs comprennent les aires de
ravitaillement en carburant (par ex. cale de bateau), les installations de
transfert ou d'entreposage de carburant ou de produits chimiques, les
zones où l'air contient des produits chimiques ou des particules telles que
du grain, de la poussière et des poudres métalliques ainsi que tout autre
endroit où on vous demanderait normalement d'éteindre le moteur de votre
véhicule. Règle générale, les milieux potentiellement explosifs sont
identifiés bien que ce ne soit pas toujours le cas.
Détonateurs et aires de dynamitage
Afin d'éviter toute possibilité de nuire à une activité de dynamitage, éteignez la radio
lorsque vous êtes à proximité de détonateurs électriques, d'une aire de dynamitage
ou d’un endroit où sont affichés des avis du genre « Éteindre les radios
bidirectionnelles ». De tels avis doivent être respectés.
Renseignements généraux et sécurité
75
Page 80

Mises en garde
Antennes
N'utilisez jamais une radio avec une antenne endommagée. Il y a risque de brûlure
superficielle si l'antenne endommagée entre en contact avec la peau.
Batteries
Toute batterie peut causer des dommages matériels ainsi que des blessures
corporelles (par ex. brûlure) lorsqu'un conducteur touche aux bornes exposées
(exemples de conducteurs : bijoux, clés et mailles de chaîne). Le conducteur risque
de compléter un circuit électrique (court-circuit) et de surchauffer. Les batteries
chargées doivent toujours être manipulées avec soin, notamment si elles sont
placées dans une poche, un sac à main ou tout autre contenant qui renferme des
objets métalliques.
Consignes de sécurité concernant le chargement de la batterie
Avant d'utiliser le chargeur de batterie, veuillez lire soigneusement les consignes et
mises en garde sur:
1. la batterie
2. le chargeur de batterie
3. la radio dans laquelle sera installée la batterie.
Renseignements généraux et sécurité
76
Page 81

Mise en garde
Utilisez uniquement les batteries rechargeables énumérées ci-après pour réduire
tout risque de blessure. Les autres types de batterie risquent d'éclater et de causer
des blessures corporelles et des dommages.
Chargeur de pile uniquer
Numéro de
l'ensemble
NTN9393 Adapteur de recharge NiMH
Description
Batteries
Numéro de
l'ensemble
NTN9395 550 mAH Série T6000 NiMH
Capacité milliampère-
heure mAH Description Composition
Renseignements généraux et sécurité
77
Page 82

Gardez ces instructions à portée de la main:
1. Gardez le chargeur à l'abri de la pluie et de la neige.
2. N'utilisez pas le chargeur suite à un choc ou s'il a été échappé ou endommagé
de quelque façon que ce soit.
3. Ne démontez pas le chargeur suite à un choc ou s'il a été échappé ou
endommagé de quelque façon que ce soit.
4. Ne modifiez jamais le cordon d'alimentation ou la fiche c.a. livrés avec le
chargeur. Si la fiche ne s'adapte pas à la prise de courant, faites installer une
prise de courant convenable par un électricien certifié. Une installation
incorrecte entraîne un danger de choc électrique.
5. Pour éviter d'endommager le cordon d'alimentation et la fiche, tirez sur la fiche
et non sur le cordon lorsque vous débranchez le chargeur de la source
d'alimentation.
6. Débranchez le chargeur de la source d'alimentation électrique avant de faire
l'entretien ou le nettoyage de l'appareil afin d'éviter le risque de choc électrique.
7. L'utilisation d'un accessoire non recommandé ou non vendu par Motorola
entraîne un danger d'incendie, de choc électrique ou de blessure corporelle.
8. Rangez le cordon d'alimentation dans un endroit qui ne présente aucun risque
Renseignements généraux et sécurité
78
que quelqu'un ne marche ou ne trébuche dessus et choisissez un endroit où le
cordon ne sera pas endommagé.
Page 83

9. À moins que ce soit absolument nécessaire, évitez d'utiliser une rallonge
électrique. L'utilisation d'une rallonge non conforme entraîne le risque
d'incendie et de choc électrique. S'il est absolument nécessaire d'utiliser une
rallonge électrique, assurez-vous que :
-la rallonge dispose du même nombre de broches, et que celles-ci ont la même
forme et dimension que les broches du chargeur;
-la rallonge est correctement câblée et en bon état;
-les câbles d'une longueur maximale de 30,5 m (100 pi) sont de calibre
18 AWG, et ceux d'une longueur maximale de 45,75 m (150 pi) sont de calibre
16 AWG.
10. Le cordon d'alimentation du chargeur ne peut être remplacé. S'il est
endommagé, veuillez communiquer avec le service à la clientèle de Motorola
au :
1 800 353-2727 (É.-U.)
1 888 390-3456 Téléimprimeur
1 800 461-4575 (Canada)
1 888 390-6456 Téléimprimeur
Renseignements généraux et sécurité
79
Page 84

Mise en route
r
o
s
Fonctionnement de base de la radio
Appuyez sur P (Marche) pour :
• Mettre la radio sous/hors
tension
Appuyez sur \ pour :
• Faire défiler les menus
• Verrouiller le clavier
(maintenir la touche alors
qu'aucun menu n'est actif)
• Quitter le menu (maintenir la
touche alors qu'un menu est
actif)
Mise en route
Appuyez sur ( (Appel) pour :
• Transmettre votre tonalité
d'appel
Appuyez sur M pour :
-
• Parler à la radio
-
• Quitter le menu (touche brève
alors qu'un menu est actif)
80
Voy ant
lumineux
Appuyez sur Q pour :
• Allumer le rétroéclairage
(touche brève)
• Appuyez et maintenez pou
basculer entre Mode mété
et Mode bidirectionnel
(T6220 uniquement)
Appuyez sur [ et ] pour :
• Régler le volume
• Faire défiler les paramètre
du menu
Appuyez sur ) (Balayage/
Écoute) pour :
• Activer/désactiver le
balayage (touche brève)
•Écouter le canal et vérifier
l'intensité du signal
(touche prolongée)
Microphone
Page 85

Pince de ceinture
•
Serrez le dessus et le
dessous de la pince pour
l'installer sur la radio et pour la
retirer.
Nota: La pince à ceinture sert à
porter la radio à la ceinture.
Elle est conçue pour en
faciliter le transport, elle ne
peut pas garantir la sécurité
de la radio en toutes
circonstances. Pour des
situations actives, un étui
de transport est
recommandé pour la
sécurité de la radio.
Contacts de recharge de batterie NiMH
Consultez la brochure d'accessoires, vous y trouverez plein de
trucs intéressants offerts par Motorola.
Si vous utilisez des
accessoires, assurezvous qu’ils sont
raccordés avant de
mettre la radio sous
tension. *
* Motorola recommande
de maintenir un volume
d'écoute approprié
lorsque vous utilisez
des accessoires audio.
000884-O
Mise en route
81
Page 86

Installation des piles
La radio nécessite 3 piles AA ou 1 batterie au nickel-hydrures métalliques
(NiMH) rechargeable.
Certaines radios sont livrées avec une batterie au NiMH et un couvercle
d'adaptateur de recharge, un berceau de recharge et un chargeur. Si vous n'avez
pas ces articles, vous pouvez vous les procurer en obtenant la trousse de mise à
jour de batterie au NiMH (56319). Pour connaître l'adresse d'un détaillant dans votre
région, composez le 1 800 353-2729 (É.-U.) ou le 1 800 461-4575 (Canada).
• Fermez la radio en maintenant enfoncée la
touche P.
Mise en route
• Poussez le loquet vers le haut jusqu'à ce qu’un
déclic se fasse entendre.
• Retirez le couvercle arrière.
82
Loquet
Page 87
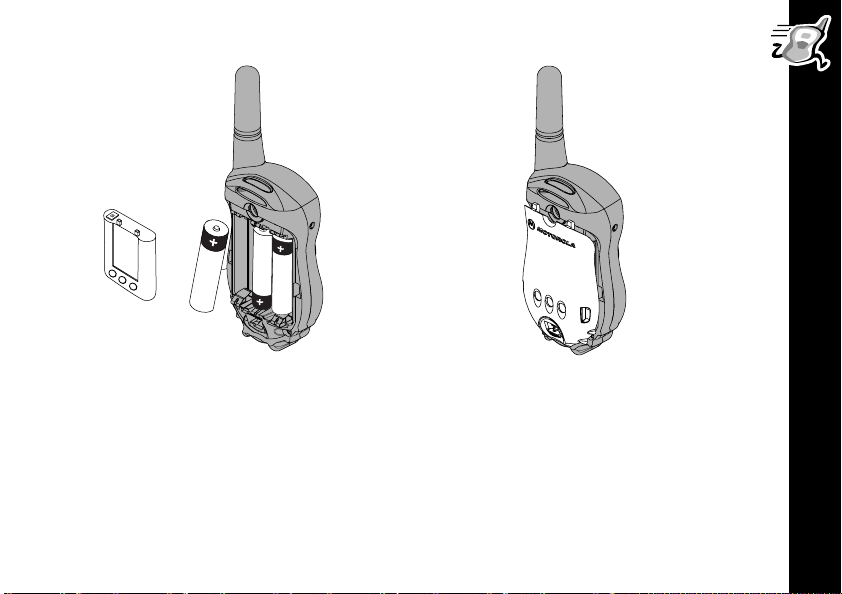
Mise en route
• Remplacez les vieilles piles par de
nouvelles en vous assurant que
l'indicateur + de la pile corresponde à
l'indicateur du compartiment. Pour la
batterie au NiMH, assurez-vous que
les contacts de recharge font face au
couvercle de la batterie.
• Accrochez le couvercle arrière aux
charnières.
• Remettez le couvercle de la batterie,
pressez légèrement dessus jusqu'à
ce que vous entendiez un déclic.
83
Page 88

Indicateur d'état de la batterie
L'indicateur d'état de la batterie, situé dans le coin supérieur gauche
de l'écran, signale la charge restante. Les états signalés sont : d
(pleine), b (deux tiers de charge), c (un tiers de charge) et
a (vide). Rendue à l'état c, la radio émet un bip toutes les
10 minutes. Remplacez ou rechargez alors
Durée des piles
Le tableau ci-dessous démontre la durée approximative des piles alcalines
batterie au
NiMH lorsque la radio est utilisée en mode bidirectionnel. Consultez la
page 92.
Type de pile Mode bidirectionnel*
Alcaline AA 35 h
NiMH 12 h
Mise en route
* Mode bidirectionnel signifie : temps de veille 90 %, temps d'appel 5 % et temps de
réception 5 %.
Nota :
L'utilisation fréquente des accessoires mains libres (VOX) et des fonctions Météo
et Balayage réduit la durée des piles et de la batterie.
84
la batterie au
les piles !
et de la
Page 89

Recharge d’une batterie NiMH
Chargez la batterie NiMH pendant la nuit (16 h) avant la première utilisation, les
charges subséquentes exigeront un maximum de 4 h.
Couvercle pour
Batterie
l'adaptateur de
recharge
Chargeur
Ou
DEL
• Fermez la radio en maintenant enfoncée la touche P ou placez la batterie au
NiMH dans le compartiment de l'adaptateur de recharge.
Positionnement du chargeur : Repérez les contacts au dos de la radio. Si vous
rechargez la batterie indépendamment, repérez les contacts de la batterie.
• Placez le chargeur de façon à ce que le gros crochet de l'extrémité du chargeur
soit situé au-dessus de la grande fente sur le couvercle de la batterie au, si vous
chargez la batterie indépendamment, au-dessus de celle du couvercle de
l'adaptateur de recharge.
• Situez le petit crochet sur l'autre extrémité du chargeur au-dessus de la petite
fente et enclenchez-le.
• Branchez le chargeur.
Mise en route
85
Page 90

État de la charge
Le voyant lumineux indique l'état de la charge lorsque le chargeur est raccordé à
la radio, à la batterie au NiMH ou au berceau de recharge.
Couleur du
voyant lumineux
État de la charge et description
Niveau de
charge achevé
Rouge fixe Recharge rapide Jusqu'à 90 %
Vert clignotant Recharge d'appoint de 90 à 100 %
Vert fixe Recharge terminée100 %
Batterie défectueuse
Rouge clignotant
Si le voyant rouge clignote plus d'une minute,
c'est que la batterie est défectueuse et doit être
-
remplacée.
Mise en route
Veille
Recharge en attente
Jaune clignotant
La température ne se situe pas dans les limites
-
nécessaires à la recharge, elle doit se situer
o
entre 5
et 40 oC ou 41o et 104 oF
Nota : Si vous vous déplacez entre des environnements chauds et froids, laissez
le temps à la batterie de s'acclimater avant de la charger (environ 20 min).
Nota :
86
Lorsque vous chargez la batterie indépendamment, retirez le chargeur du
couvercle de l'adaptateur de recharge avant d'installer ou de retirer la batterie.
Page 91

Berceau de recharge
Le berceau de recharge facilite la recharge brancher-charger. Il peut être placé ou
monté sur toute surface plane (mur ou établi) : la radio est alors convertie en
intercom fixe tout en demeurant chargée et prête pour l'aventure en tout temps.
Montage du berceau de recharge :
• Enroulez le cordon d'alimentation sous le berceau
de recharge et fixez-le à l'aide des fentes.
o
• Fixez le berceau avec 2 vis n
adaptées à la surface de fixation.
6 x 19 mm (3/4 po)
Fentes
Mise en route
87
Page 92

• Repérez le crochet du chargeur (situé sur la
même extrémité que le voyant lumineux) audessus de la fente gauche.
• Enclenchez le crochet (situé sur la même
extrémité que le cordon) dans la fente droite ;
le chargeur sera alors fixé sur les contacts du
berceau de recharge.
• Branchez le chargeur.
Berceau de
recharge
DEL
Chargeur
88
Mise en route
• Placez la radio ou la batterie au NiMH dans le
couvercle de l'adaptateur de recharge du
berceau de recharge et pressez jusqu'à ce
qu’un déclic se fasse entendre.
• Le voyant vert fixe indique que la batterie est
complètement chargée.
Page 93

Comment mettre la radio sous tension
Appuyez et
maintenez
Mode Menu normal
P
Appuyez et
maintenez
P
et
\
F
O
38
12
Mode Menu simplifié (
La radio émet un bip, et chaque
icône s’affiche temporairement à
l'écran.
Le voyant rouge au-dessus de la
touche
3 secondes.
Consultez la
La radio émet un bip, et 6 icônes
s’affichent temporairement à
l'écran.
Le voyant rouge au-dessus de la
touche P clignote toutes les
3 secondes. Vous avez
uniquement accès aux menus
Canal, Code et Tonalité d'appel.
clignote toutes les
P
page 113)
Mise en route
89
Page 94

L'affichage de la radio
Verrouillage activé
Indicateur d'état
de la batterie
Balayage des canaux
QuieT6000
Réducteur d'écoute
clandestine
Controle de volume
Indicateur d'intensité
du signal
Mise en route
MC
O
Alerte VibraCall® activée
Code d'élimination
de l'interférence
Arrêt automatique
Mode mains libres avec
accessoires (VOX)
Transmettre la tonalité
d'appel/Tonalité d'appel reçu
Indicateur des canaux
Alerte sonnerie activée
Alerte météo activée
(mode bidirectionnel)
Comment mettre la radio hors tension
Pour mettre la radio hors tension, maintenez enfoncée la touche P pendant une
seconde. La radio émet un bip et l'affichage s'éteint.
90
Page 95

Modification des paramètres alors que la radio est mise sous tension
Le tableau suivant présente des fonctions supplémentaires que l’on peut
paramétrer en maintenant enfoncées certaines combinaisons de touches alors que
la radio est mise sous tension.
Touches enfoncées en
mettant la radio sous tension
+ \ +
P
ou
+
P
+
P
+
P
+ \
P
+
P
+ Accessoire VOX raccordé
P
+
)
[
]
(Appel)
(
M
M
Fonction
Réinitialisation des paramètres initiaux
Active ou désactive les bips des touches et les
tonalités d'appel locales.
Active ou désactive la tonalité de confirmation.
Active le mode Menu simplifié. Consultez la
page 113.
Active/désactive QuieT6000
consultez la page 105.
Active la fonction VOX externe (avec accessoire).
(Paramètre1),
Mise en route
91
Page 96

Accès et configuration des fonctions
La même combinaison de touches de base sert à presque toutes les fonctions
de la radio ! Utilisez les touches \ et
fonctions à votre goût. Les fonctions qui répondent à cette combinaison de touches
sont décrites dans les pages qui suivent.
Appuyez Affichage Appuyez ensuite sur
\
Réglage du type de pile
Mise en route
Cette fonction permet à l'indicateur d'état de la batterie de reconnaître et d'afficher
correctement les paramètres des piles alcalines ou rechargeables.
Pour spécifier le type de pile, appuyez sur \ jusqu'à ce que d
s’affiche. Soit que
clignote. Appuyez sur [ ou ] jusqu'à ce que la sélection
s’affiche. Appuyez ensuite sur
92
l'icône qui représente la
fonction désirée
A (alcaline) ou n (NiMH ou NiCad rechargeable)
M
ou ] pour choisir et configurer les
[
ou sur ] pour choisir l'option. Appuyez
[
ensuite sur
(60 secondes en mode Menu simple) pour
sauvegarder le paramètre, ou bien maintenez
enfoncée la touche
pour établir le paramètre.
ou attendez 10 secondes
M
.
\
A ou n
Page 97

Rétroéclairage
La noirceur n'est plus un obstacle. Dès que vous appuyez sur une
touche, le rétroéclairage s'allume automatiquement. Il s'éteint
également automatiquement 4 secondes après que l’on ait appuyé
sur une touche.
Vous pouvez également éclairer l'affichage en appuyant sur
R
(T6220).
o
sur
R (T6200 et T6210) ou
Mise en route
93
Page 98

Parler et écouter
Avant de parler
Converser en utilisant une radio bidirectionnelle nécessite que les 2 locuteurs aient
recours aux mêmes canaux, code de réduction du bruit et code de réduction
d'écoute clandestine (T6210 et T6220 uniquement).
Le canal est l'onde de radiofréquence qu’utilise la radio lors de la transmission. Le
code de réduction du bruit sert à l'élimination de la statique, du bruit et des
messages importuns. Consultez les Tableaux de fréquences et de codes à la
page 115 pour connaître les canaux et les codes. Le code Réducteur d'écoute
clandestine brouille vos transmissions. Celles-ci seront également inintelligibles
pour toute personne à l’écoute de vos transmissions sans utiliser le même code.
Consultez la page 104.
Sélection du canal
Appuyez une fois sur \ pour choisir le canal. Le numéro du
Parler et écouter
canal clignotera. Appuyez ensuite sur [ ou ] pour établir la
sélection. Passez ensuite au menu suivant ou bien attendez
10 secondes pour sauvegarder la sélection du canal. Pour quitter
le menu rapidement et revenir à l'affichage initial, appuyez sur
Le voyant rouge au-dessus de la touche P clignote rapidement lorsque le canal est
en cours d'utilisation. Faites défiler la liste jusqu'à ce que vous trouviez un canal
disponible.
94
M
.
Page 99

Sélection du code de réduction du bruit
Pour choisir un code, appuyez 2 fois sur \ jusqu'à ce que le
numéro de code se mette à clignoter. Appuyez ensuite sur [ ou
pour établir la sélection. Appuyez sur
]
sélection du code. Si vous désirez entendre tous ceux qui sont
sur votre canal, choisissez le code
La radio permet d'enregistrer un code spécifique pour chaque canal. Pour
enregistrer une combinaison canal-code, appuyez sur \, puis sur [ ou ] pour
choisir le canal. Appuyez de nouveau sur \, puis sur [ ou ] pour choisir le code.
Appuyez sur
Répétez ces étapes pour établir une autre combinaison canal-code.
Volu me
Vous pouvez ajuster le volume alors qu'aucun menu n'est actif.
Appuyez sur [ ou ] jusqu'à ce que le volume vous convienne. Un
V accompagné du réglage actuel du volume s’affichera à l'écran
)
. Le
à
(
20
1
limite maximale.
pour quitter ce menu et sauvegarder la combinaison canal-code.
M
1
représente
la limite minimale du volume et le
0.
pour sauvegarder la
M
20, la
5
Parler et écouter
Attention :
Afin d'éviter des dommages auditifs lorsque le volume de la radio est réglé
à la valeur maximale, ne tenez pas la radio trop proche de l’oreille.
95
Page 100

Pour parler
Nota :
touche P luit.
Portée de conversation
Parler et écouter
Portée optimale
• Espaces ouverts et plats :
portée de 1,5 m (5 pi) et
3 km (2 milles), en
visibilité directe.
96
Le microphone est situé sous la touche ). Faites attention de ne pas le couvrir
lorsque vous appuyez sur la touche
Maintenez enfoncée la touche M et conservez une distance de 5 à 8cm
(de 2 à 3 po) entre la bouche et le microphone. Lorsque vous avez
terminé, relâchez la touche
pour écouter). Lors d'une transmission, le voyant rouge au-dessus de la
M
M (Maintenez enfoncée pour parler, relâchez
Portée moyenne
•Édifices ou arbres
.
Portée minimale
• Feuillage dense ou
montagnes
•Édifices ou véhicules
 Loading...