

Motorola SGSW-2620, T603 User Manual
motorola T603
User’s Guide

welcome
Welcome to Motorola’s “connected” world of
Bluetooth®
The Motorola T603 Automotive Bluetooth Handsfree
System makes wireless connection simple and quick.
The advanced, sophisticated Motorola T603
Automotive Bluetooth Handsfree System offers these
features:
personal area wireless networking.
•
Seamless, wireless handsfree audio through a
Bluetooth link
•
High quality, full-duplex digital audio interface
•
Voice dialing using your phone’s voice control
(if available)
•
Entertainment mute—automatically mutes
radio during calls
•
Noise reduction and acoustic echo
cancellation
•
Compatible with Bluetooth 1.2 devices, and
backwards-compatible with Bluetooth 1.1
devices—supports Headset and Handsfree
profiles.
Note:
Before using your handsfree system for the first
time, be sure to review the important safety and legal
pamphlet and follow instructions. Periodically review
this information so you remember how to safely use
your handsfree system.
1
Motorola, Inc.
Consumer Advocacy Office
1307 East Algonquin Road
Schaumburg, IL 60196
www.motorola.com
www.motorola.com/bluetoothsupport
1-877-MOTOBLU (Motorola Bluetooth support)
1-800-331-6456 (United States)
1-888-390-6456 (TTY/TDD United States for hearing impaired)
1-800-461-4575 (Canada)
The use of wireless devices and their accessories may be
prohibited or restricted in certain areas. Always obey the laws and
regulations on the use of these products.
All features, functionality, and other product specifications, as well
as the information contained in this user’s guide are based upon
the latest available information and are believed to be accurate at
the time of printing. Motorola reserves the right to change or
modify any information or specifications without notice or
obligation.
MOTOROLA and the Stylized M Logo are registered in the US
Patent & Trademark Office. The Bluetooth trademarks are owned
by their proprietor and used by Motorola, Inc. under license. All
other product or service names are the property of their respective
owners.
© 2008 Motorola, Inc. All rights reserved.
Software Copyright Notice
The Motorola products described in this manual may include
copyrighted Motorola and third-party software stored in
semiconductor memories or other media. Laws in the United
States and other countries preserve for Motorola and third-party
software providers certain exclusive rights for copyrighted
software, such as the exclusive rights to distribute or reproduce
the copyrighted software. Accordingly, any copyrighted software
contained in the Motorola products may not be modified,
reverse-engineered, distributed, or reproduced in any manner
to the extent allowed by law. Furthermore, the purchase of the
Motorola products shall not be deemed to grant either directly
or by implication, estoppel, or otherwise, any license under the
copyrights, patents, or patent applications of Motorola or any
third-party software provider, except for the normal, non-exclusive,
royalty-free license to use that arises by operation of law in the
sale of a product.
Manual Number: 68014100001-B
Bluetooth QD ID: B014834
2

contents
installing the handsfree
car kit . . . . . . . . . . . . . . . . . . . . 4
guidelines for installation
and connection . . . . . . . . . . . 4
installing the handsfree
car kit. . . . . . . . . . . . . . . . . . . 5
using your car kit. . . . . . . . . . 11
linking your car kit
and Bluetooth-enabled
device . . . . . . . . . . . . . . . . . 11
making and receiving
calls . . . . . . . . . . . . . . . . . . . 14
disconnecting the car
kit from your Bluetooth
device . . . . . . . . . . . . . . . . . 17
Appendix A —
Troubleshooting . . . . . . . . . . . 19
Appendix B — UIM Indicator
Light Status . . . . . . . . . . . . . . 23
Appendix C — UIM Button
Operation . . . . . . . . . . . . . . . . 24
Connected Mode
(Not in a Call) . . . . . . . . . . . . 25
Connected Mode
(In a Call) . . . . . . . . . . . . . . . 26
European Union Directives
Conformance Statement . . . . 27
index . . . . . . . . . . . . . . . . . . . . 28
contents
3
installing the handsfree car kit
•
guidelines for installation
and connection
Caution:
car kit. Because of the wide variety of vehicle types
and models it may be necessary to contact the vehicle
manufacturer for detailed installation information.
If needed, contact the vehicle manufacturer for air
bag information specific to the vehicle.
Caution:
place objects, including communication equipment, in
the area over the air bag or in the air bag deployment
area. If the communication equipment is improperly
installed and the air bag inflates, serious injury
could occur.
Only qualified personnel should install this
An air bag inflates with great force.
DO NOT
Mount components securely on strong
surfaces to prevent shifting that could cause
injury or interfere with safe vehicle operation.
Always use the supplied mounting hardware.
•
Mounted components and attached wires or
cables must not interfere with seating or
leg space.
•
Route cables so they are protected from
pinching, sharp edges and crushing. Keep all
in-line connectors easily accessible.
•
The car kit is intended for use in 12 Volt
negative ground systems only. The car kit
draws less than 3 Amps. Confirm that the
vehicle’s electrical system can supply
this current.
4
installing the handsfree car kit
•
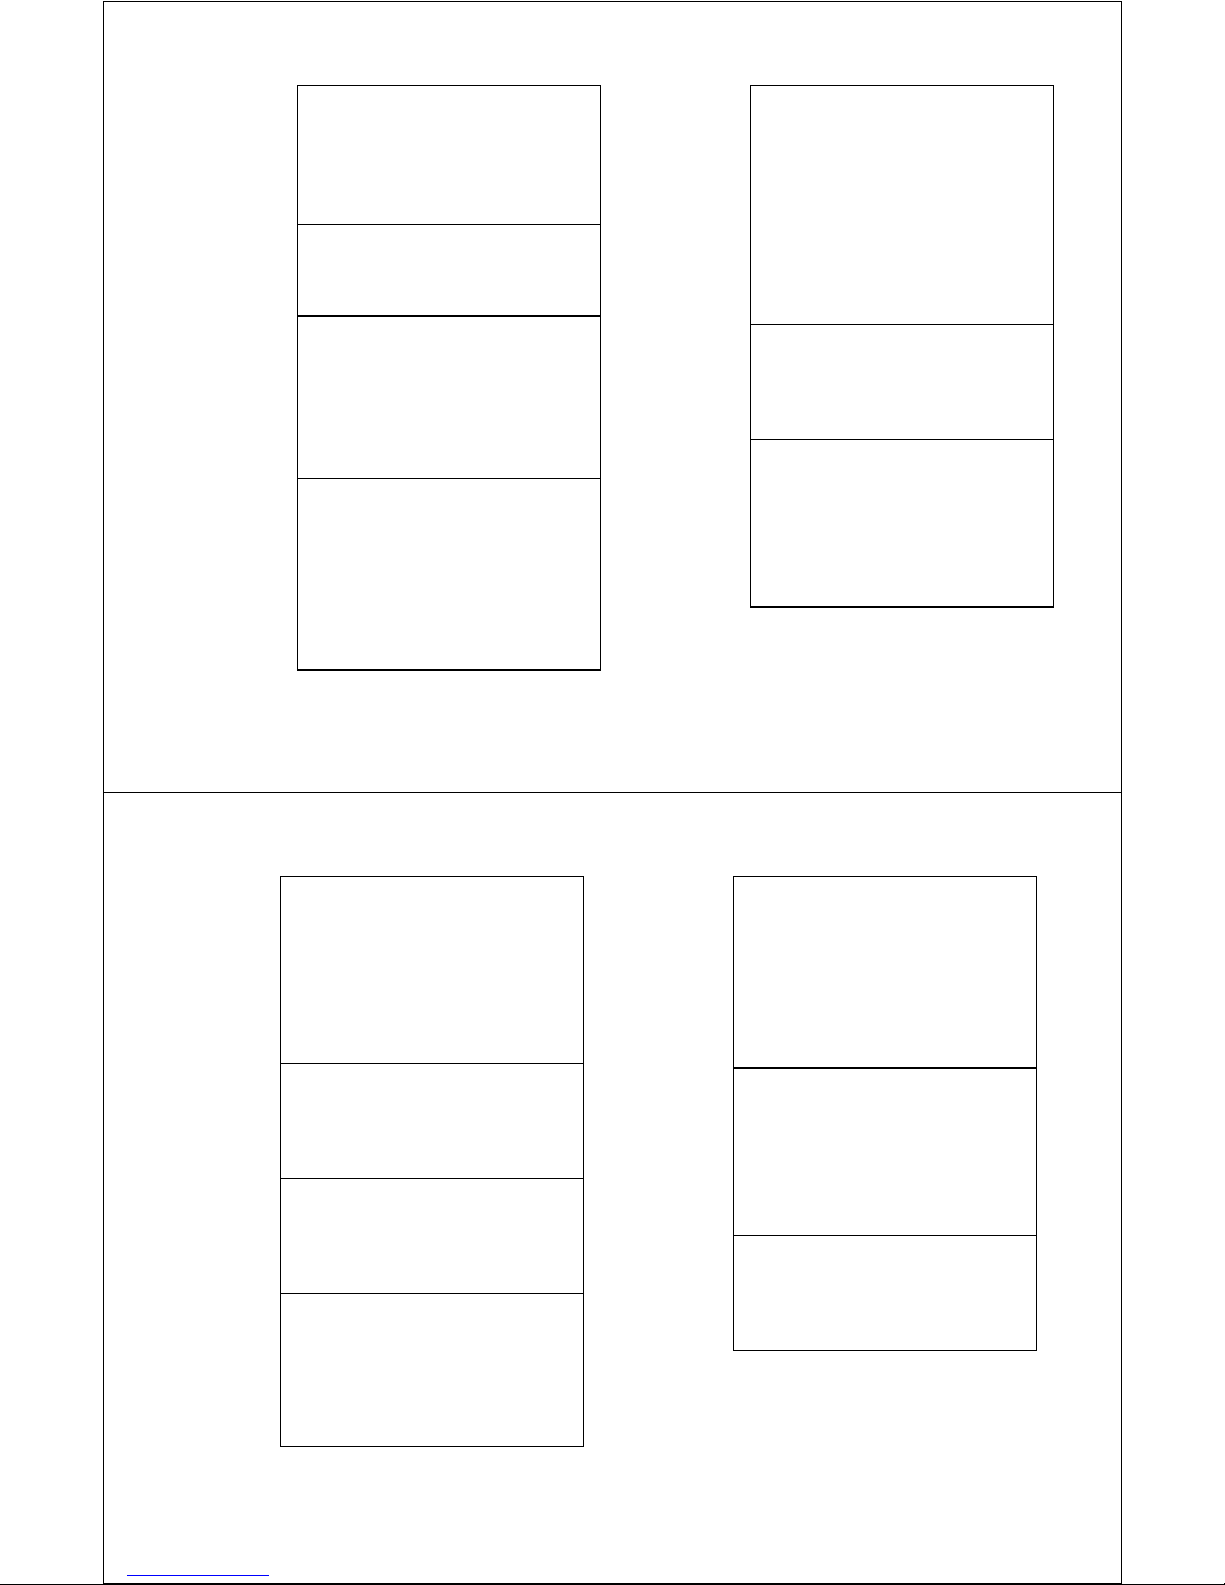
Mounting Surface
Barcode Mounting Surface
Barcode
The installation steps are in no particular order.
In general, you should first pick the locations
where you will be mounting the UIM,
microphone, speaker, and ECU. Mount the
UIM, speaker and microphone and route the
cables to the ECU mounting location. Install
the power adaptor cable. Plug everything into
the ECU, and then mount the ECU.
installing the handsfree
car kit
installing the Electronic Control
Module (ECU)
Mount the ECU securely.
The best location for the ECU is under the dash.
The box must be protected from dirt and moisture,
have adequate space for cooling, and allow for cable
connections.
Caution:
maximum
prevent fire or other damages should a short circuit
occur in the ECU.
Before installation, unpack, assemble, and test all
components on a service bench.
Caution:
vehicle’s air bag.
This car kit must be connected to a
5 Amp fuse in the car fuse panel to
The location
must not
interfere with the
installing the power adapter cable
Caution:
accessory not to work properly and could cause
damage to the car kit.
Note:
be available from a third-party vendor that allows
integration of the T603 handsfree audio into the
vehicle entertainment system. If you choose to use
a vehicle adapter harness, follow the vendor’s
guidelines for proper installation.
For installation into a vehicle
third-party adapter harness
Failure to follow these steps may cause the
A vehicle adapter harness (not supplied) may
without the use of a
:
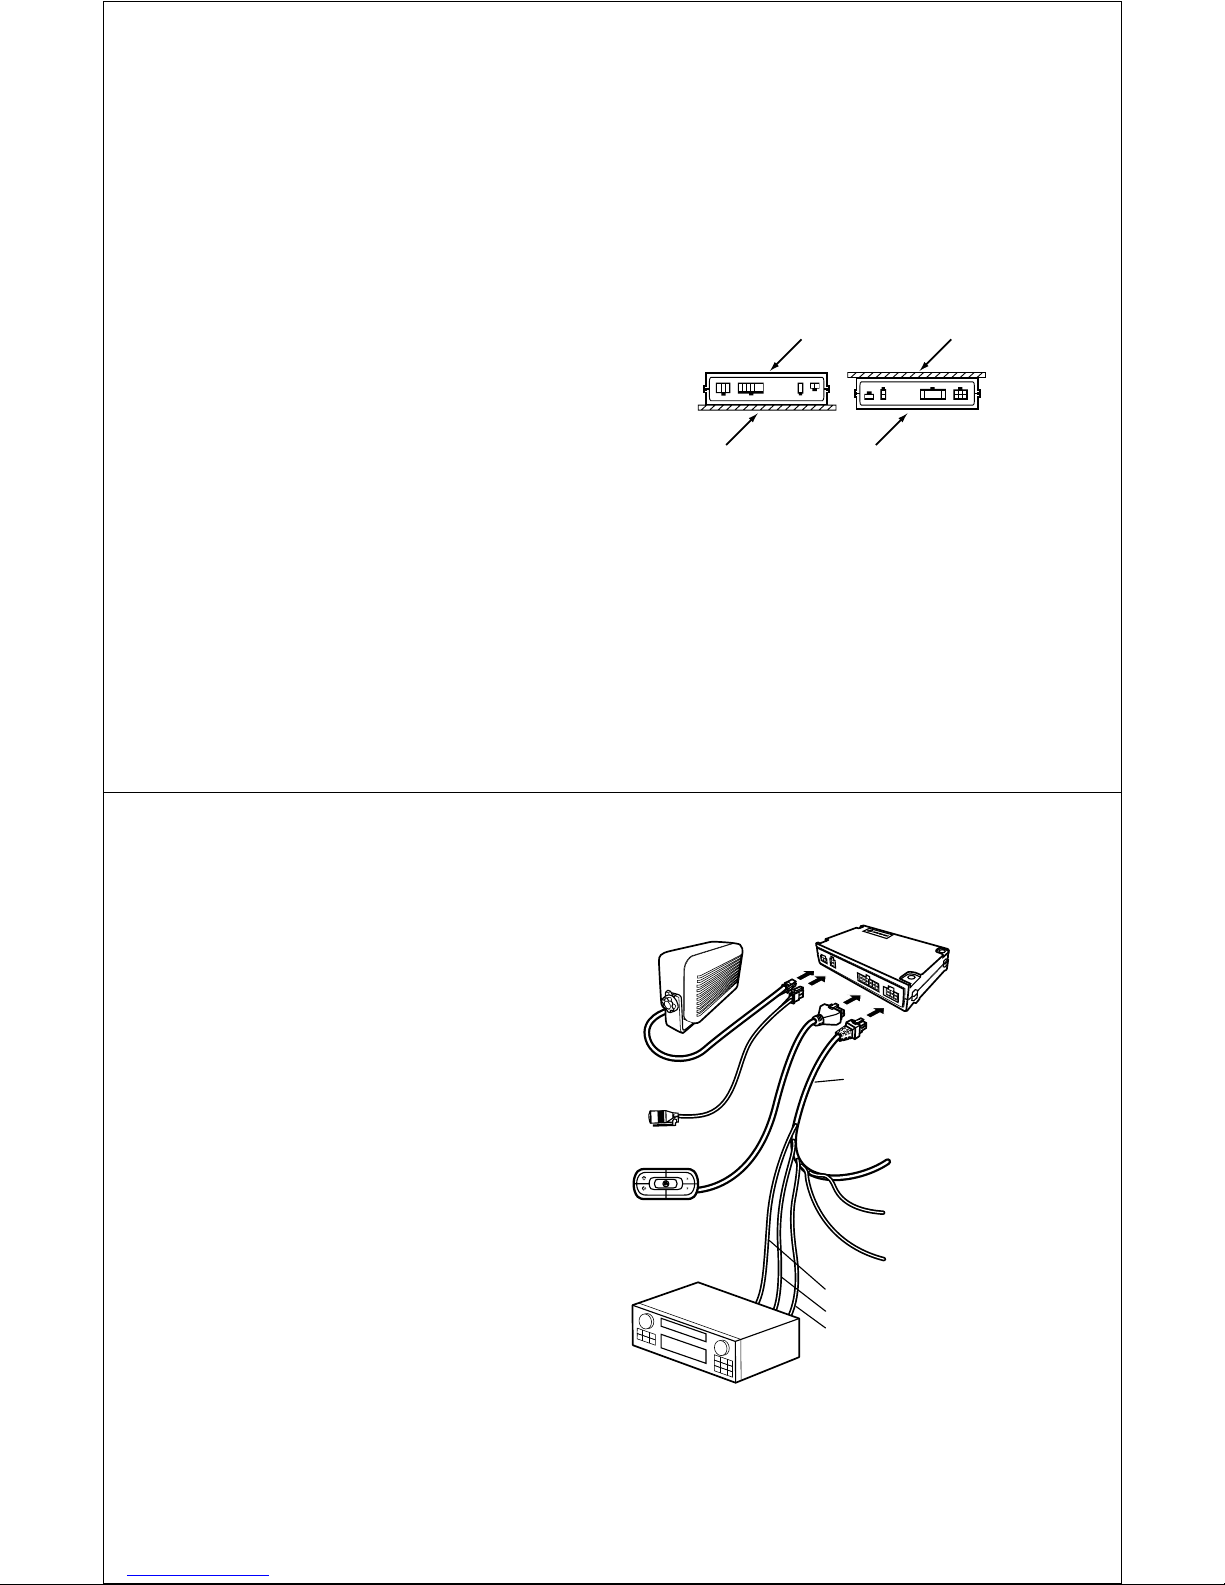
For optimal Bluetooth performance, mount the ECU
so that the side with the barcode faces away from the
mounting surface as shown above. The ECU can be
oriented in any direction. Do not place it behind or
within large areas of metal.
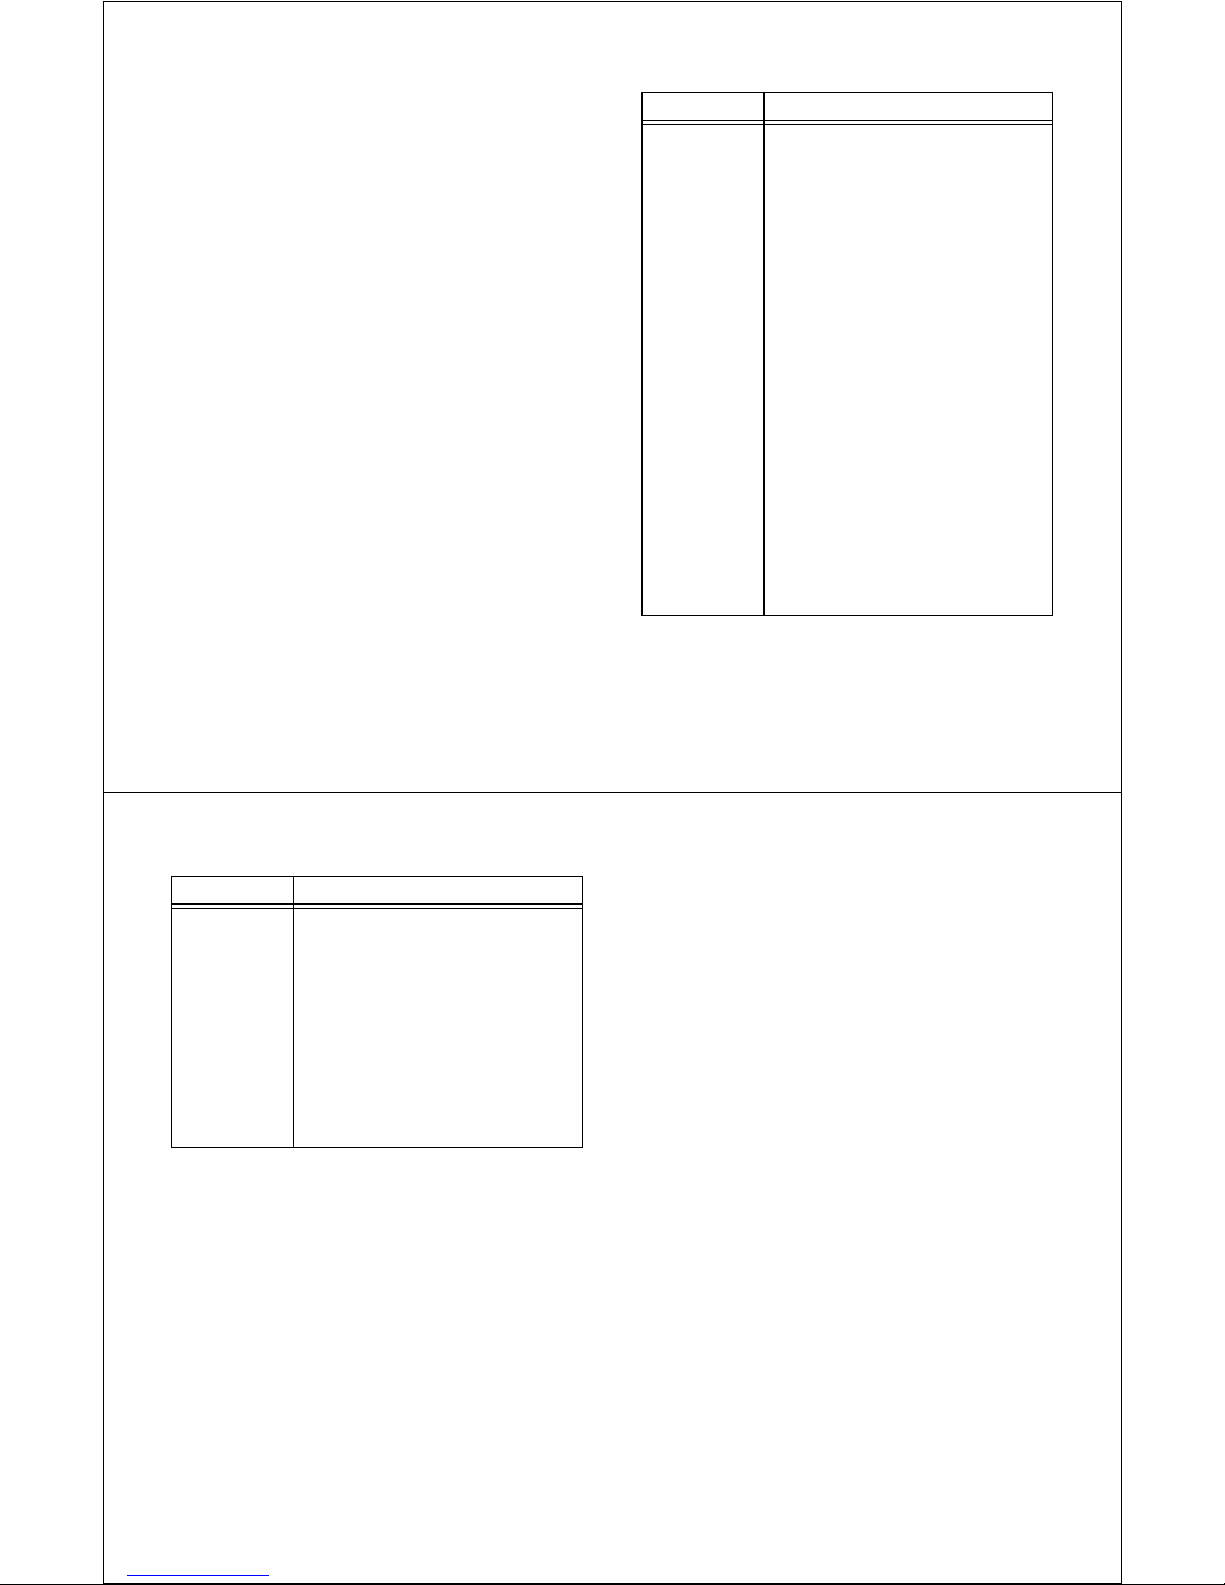
installing the handsfree car kit
Electronic Control Module
External Speaker
Microphone
User Interface
Module
(UIM)
Power Adapter Cable
Red: Fuse Box
(Power)
Green: Fuse Box
(Ignition)
Black: Vehicle
Chassis (Ground)
Orange: Line Level Handsfree Audio (+)
Blue: Line Level Handsfree Audio (-)
Yellow: Mute
5
6
installing the handsfree car kit
Vehicle Entertainment System

1
Disconnect the vehicle’s battery.
2
Remove all fuses from the power adapter cable
and tape them to their respective holders.
DO NOT
and inspect all connections.
3
If trimming the wire lengths on the power adapter
cable, be sure to leave the inline fuses on the
cable along with enough wire length to allow
connections to be made.
4
Connect the power adapter cable’s
Ignition Sense wire (3 Amp fuse) to an
ignition-switched location on the fuse block.
When the ignition is off, the ignition sense line
should be low.
re-insert fuses until you complete
GREEN
5
Connect the power adapter cable’s
Entertainment Mute Wire to the vehicle’s
entertainment system’s mute input.
Note:
This feature is only usable if the vehicle’s
entertainment system supports an active low,
single wire, radio mute signal. Otherwise, the
installation may require an optional relay adaptor
(not included) or other customization.
6
Connect the power adaptor cable’s
primary lead (4 amp fuse) to a point in the
vehicle’s fuse box that is fused at 4 to 5 amps.
The RED positive primary lead should be powered
continuously. On/Off switching is performed by
the GREEN Ignition Sense wire.
Important:
wires together. Doing so limits the functionality of
the car kit.
Do not connect the
YELLOW
RED
RED
positive
and
GREEN
7
Connect the power adapter cable’s
ground wire to the vehicle chassis.
Note:
Skip steps 8 and 9 if your vehicle
entertainment system does not support the
telephone audio input feature, or if you are using
the external speaker (supplied). This feature is
only operational if the vehicle’s entertainment
system supports this capability.
8
Connect the power adapter cable’s
wire to the (
of the vehicle’s entertainment system.
9
Connect the power adapter cable’s
the (
vehicle’s entertainment system.
10
Inspect all connections.
11
Connect the black 6-pin connector on the power
adapter cable to the ECU.
+
) line-level telephone audio input
-
) line-level telephone audio input of the
BLACK
ORANGE
BLUE
wire to
installing the handsfree car kit
12
Reinsert all fuses into the power adapter cable.
Do not replace any fuse with a higher amperage
fuse.
13
Reconnect the vehicle’s battery.
installing the microphone
Note:
Always use the supplied mounting hardware.
Note:
The microphone must be positioned properly or
the car kit
1
WILL NOT
Mount the microphone in a suitable location using
either screw, velcro, or clip.
•
The preferred spot to mount the microphone
is on the overhead console/dome light
assembly near the front center of the vehicle,
away from the window, pointed toward the
driver’s head.
•
Locate the microphone no more than
16 inches (40 cm) from the driver.
perform optimally.
7
8
installing the handsfree car kit
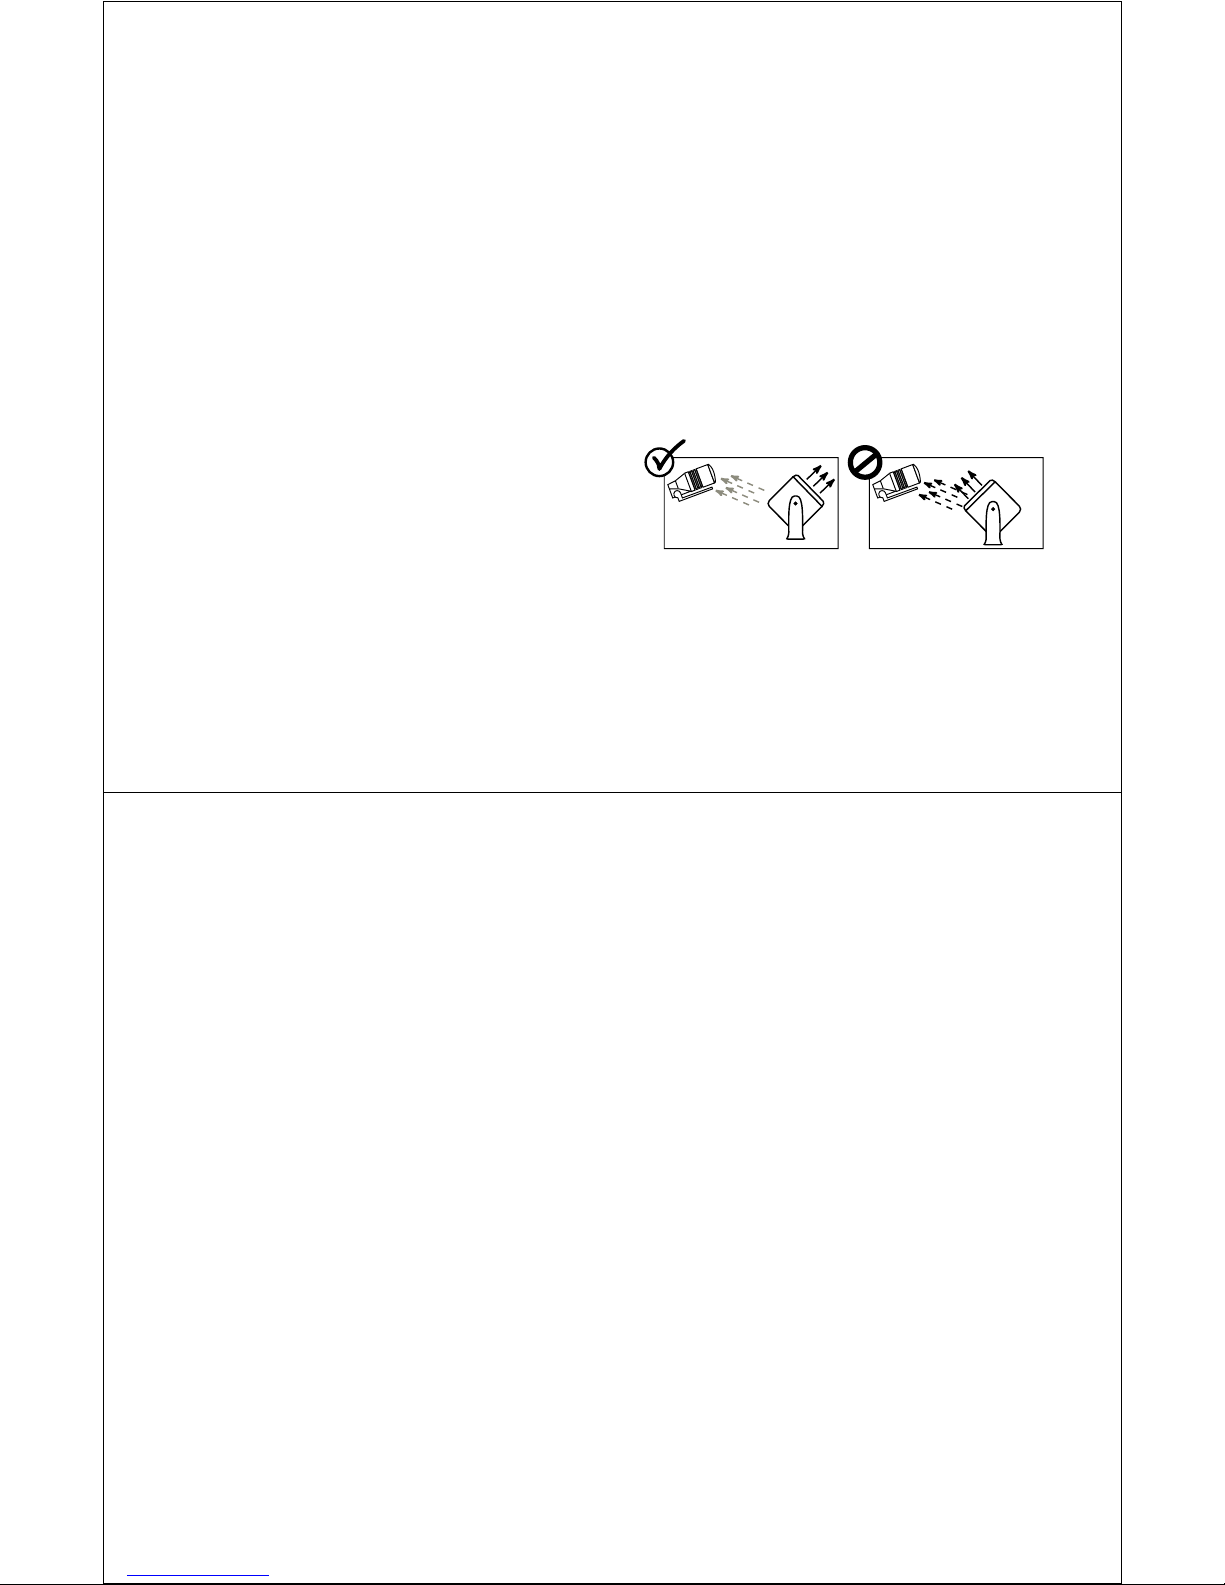
•
020707a
Aim the microphone toward the driver.
•
Do not allow anything (such as a rear-view
mirror or sun visor) to block the path between
the microphone and the driver.
•
Mount the microphone firmly so that
vibrations do not affect audio quality.
•
Refrain from locating the microphone directly
in the path of heat/AC vents.
•
Refrain from mounting the microphone on
door pillars or windows that can transmit
exterior wind noise to it.
•
Microphone should not be attached to the
car’s visor.
2
Route the microphone cable down the side of the
windshield, through the dash, and to the ECU.
3
Connect the microphone to the ECU.
installing the external speaker
Important:
the
ORANGE
cable to connect the audio to the vehicle’s
entertainment system.
Note:
1
Caution:
NOT
2
Do not perform this procedure if you used
and
BLUE
wires on the power adapter
Always use the supplied mounting hardware.
Mount the speaker so that the audio is clearly
heard by the driver. However, it must not interfere
with the safe operation of the vehicle. It is
recommended that the speaker and microphone
be separated by at least 3 feet (90cm).
The location of the external speaker
interfere with the vehicle’s air bag deployment.
Connect the speaker to the ECU.
MUST
installing the User Interface
Module (UIM)
The User Interface Module (UIM) can be mounted in
several orientations to provide a safe and comfortable
environment for use. You should mount the UIM on a
flat spot within easy reach of the driver (curved surfaces
can cause difficulties in pushing the buttons, and can
cause the UIM to come loose after repeated use).
Caution:
with the vehicle’s air bag deployment.
1
The location of the UIM must not interfere
Select a location on the dash and press the UIM
cable into the grooves on the back of the UIM
such that the UIM is oriented properly in the
desired location. The cable must be contained in
the slot to provide a flat surface for the UIM to be
mounted on.
installing the handsfree car kit
Caution:
to ensure good adhesion.
•
•DO NOT
•
3
Connect the UIM to the ECU.
Clean the mounting surface thoroughly
The mounted UIM
distraction.
mount the UIM on the steering
wheel.
The UIM must be in
MUST NOT
easy
reach of the driver.
9
create a visual
2
Remove the backing on the rear of the UIM and
press the UIM firmly into place.
10
installing the handsfree car kit
using your car kit
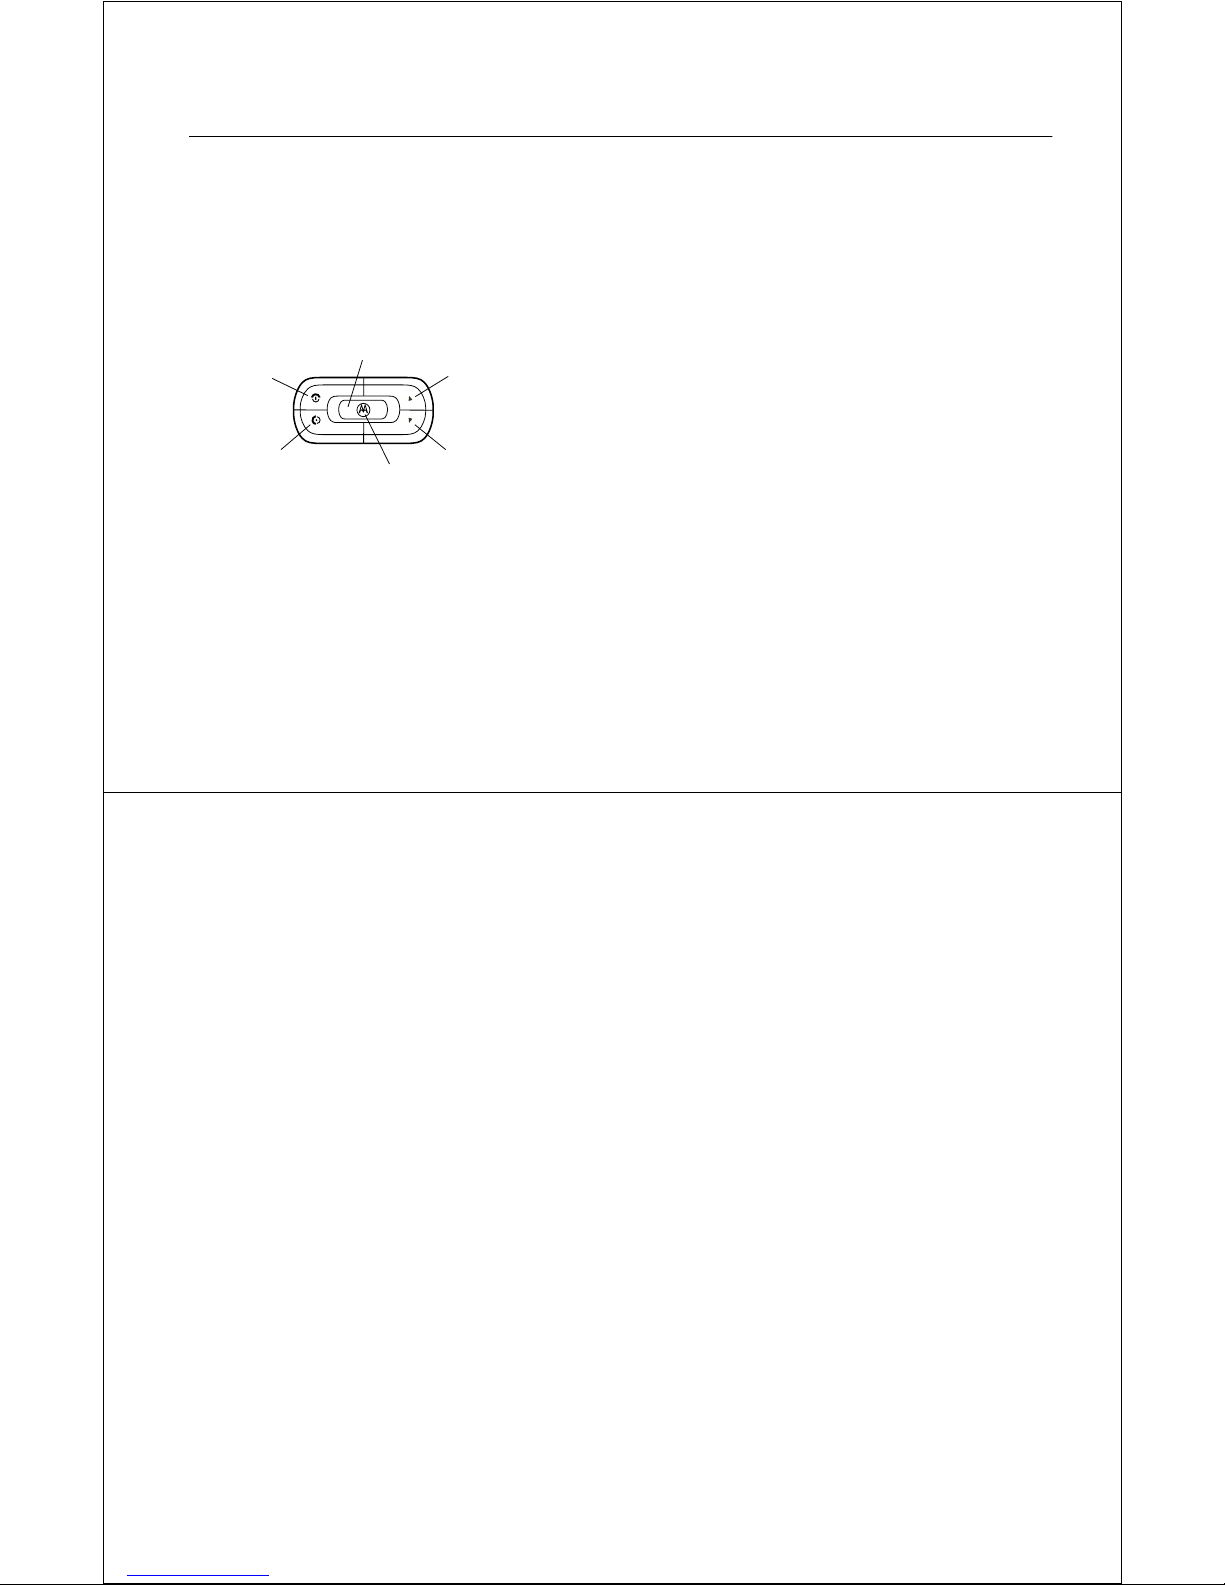
The User Interface Module (UIM) enables you to set
up and use your T603 Bluetooth Handsfree Car Kit.
The UIM provides both buttons to perform operations,
and an indicator light for status as shown below.
Multi-function (MFB)
red (END)
button
green (SEND)
button
button
indicator light
blue (UP ARROW)
button
blue (DOWN ARROW)
button
linking your car kit and
Bluetooth-enabled
device
Before you can use your Bluetooth car kit, you must
first link it with your Bluetooth-enabled device. You
establish a Bluetooth link between your car kit and
your device by creating a paired link.
When you set up a paired link, the car kit remembers
your device and automatically connects to your device
every time you start your vehicle or power up the car
kit. The car kit can remember up to 6 devices.
Note:
For safety reasons, it is recommended that the
pairing process be performed in a stationary vehicle.
using your car kit
11
initial pairing
Important:
connection with a device varies by device
manufacturer. Please have your device’s user manual
available for reference if needed.
STEP ONE—turn on your device’s Bluetooth
feature
Your device’s Bluetooth feature is off by default. To use
your car kit, you must first turn on the Bluetooth
feature in your device.
For most Motorola phones, do the following:
The process of initiating a Bluetooth
a
Press
Menu > Settings > Connection > Bluetooth Link
>
Setup
.
b
Scroll to
c
Select
d
Scroll to On.
Power
Change
.
.
e
Press
Select
to turn on the Bluetooth feature.
The Bluetooth feature remains on until you
turn the feature off.
Note:
These steps are for
For other devices, see your device’s user manual.
most
Motorola phones.
STEP TWO—connecting to your car kit
Before using your car kit, you must first pair (link) it to
your device. With the car kit and device turned on and
in proximity:
1 ENSURE THAT THE CAR KIT IS IN PAIRING
MODE.
button for 2-6 seconds until it beeps and the
indicator begins flashing in blue. The car kit is
now in the pairing mode.
2 SET YOUR DEVICE TO LOOK FOR YOUR CAR KIT.
Perform a Bluetooth device discovery/search from
your device. For most Motorola phones, do the
following:
Press and hold Multifunction (MFB)
12
using your car kit

a
Press
Menu > Settings > Connection > Bluetooth Link
>
Handsfree> Look for Devices
Bluetooth devices it finds.
b
Select
Motorola T603
devices.
c
Select OK or
your phone.
Ye s
. The phone lists the
from the list of
to pair your car kit with
flashing red and blue. When this occurs, return to
step 2 to repeat the initial pairing process.
additional pairings
Ensure that any previously paired devices are turned
off, and perform steps in “initial pairing” on page 12 to
pair with the new device.
d
Enter the passkey:
Select OK.
e
Note:
These steps are for
phones. For other devices, see your device’s user
manual.
When pairing is successful, the indicator light
flashes in purple followed by steady blue.
If initial pairing is not successful, the car kit
attempts to connect to devices that have already
been paired. This is indicated by the indicator light
When the Bluetooth connection is established, the
indicator light stays lit. If you are in a call when the car
kit powers up, the call is automatically transferred to
the car kit once the Bluetooth link is completed.
If your device is powered off when you start your
vehicle, the Bluetooth connection may not be
automatically established when you turn on your
device.
To manually connect to a previously paired device:
0000
most
Motorola
automatic connection
Once paired, each time you start your vehicle, your
Bluetooth-enabled device and car kit are automatically
connected (when your device is powered on and the
device’s relevant settings have not changed). The car
kit first tries to connect to the last phone device used.
If it is unable to connect, the car kit then tries
connecting to the next device in its history list. If there
are two phone devices available, the car kit connects
to the one last used (and ignores the other phone).
using your car kit
making and receiving
calls
Your T603 car kit allows you to make and receive
phone calls from your Bluetooth-enabled phone.
Note:
Before you can use your Bluetooth-enabled
phone, you must first create a paired link (see “linking
your car kit and Bluetooth-enabled device” on page 11
for details).
13
1
Turn on the device.
2
Set your device to look for the car kit.
For most Motorola phones, press
>
Connection > Bluetooth Link > Handsfree
T603
from the list, and press OK.
Your device attempts to connect to the car kit.
If a Bluetooth connection is established, the
indicator light changes from flashing red/blue
to steady blue.
14
using your car kit
Menu > Settings
, select
Motorola
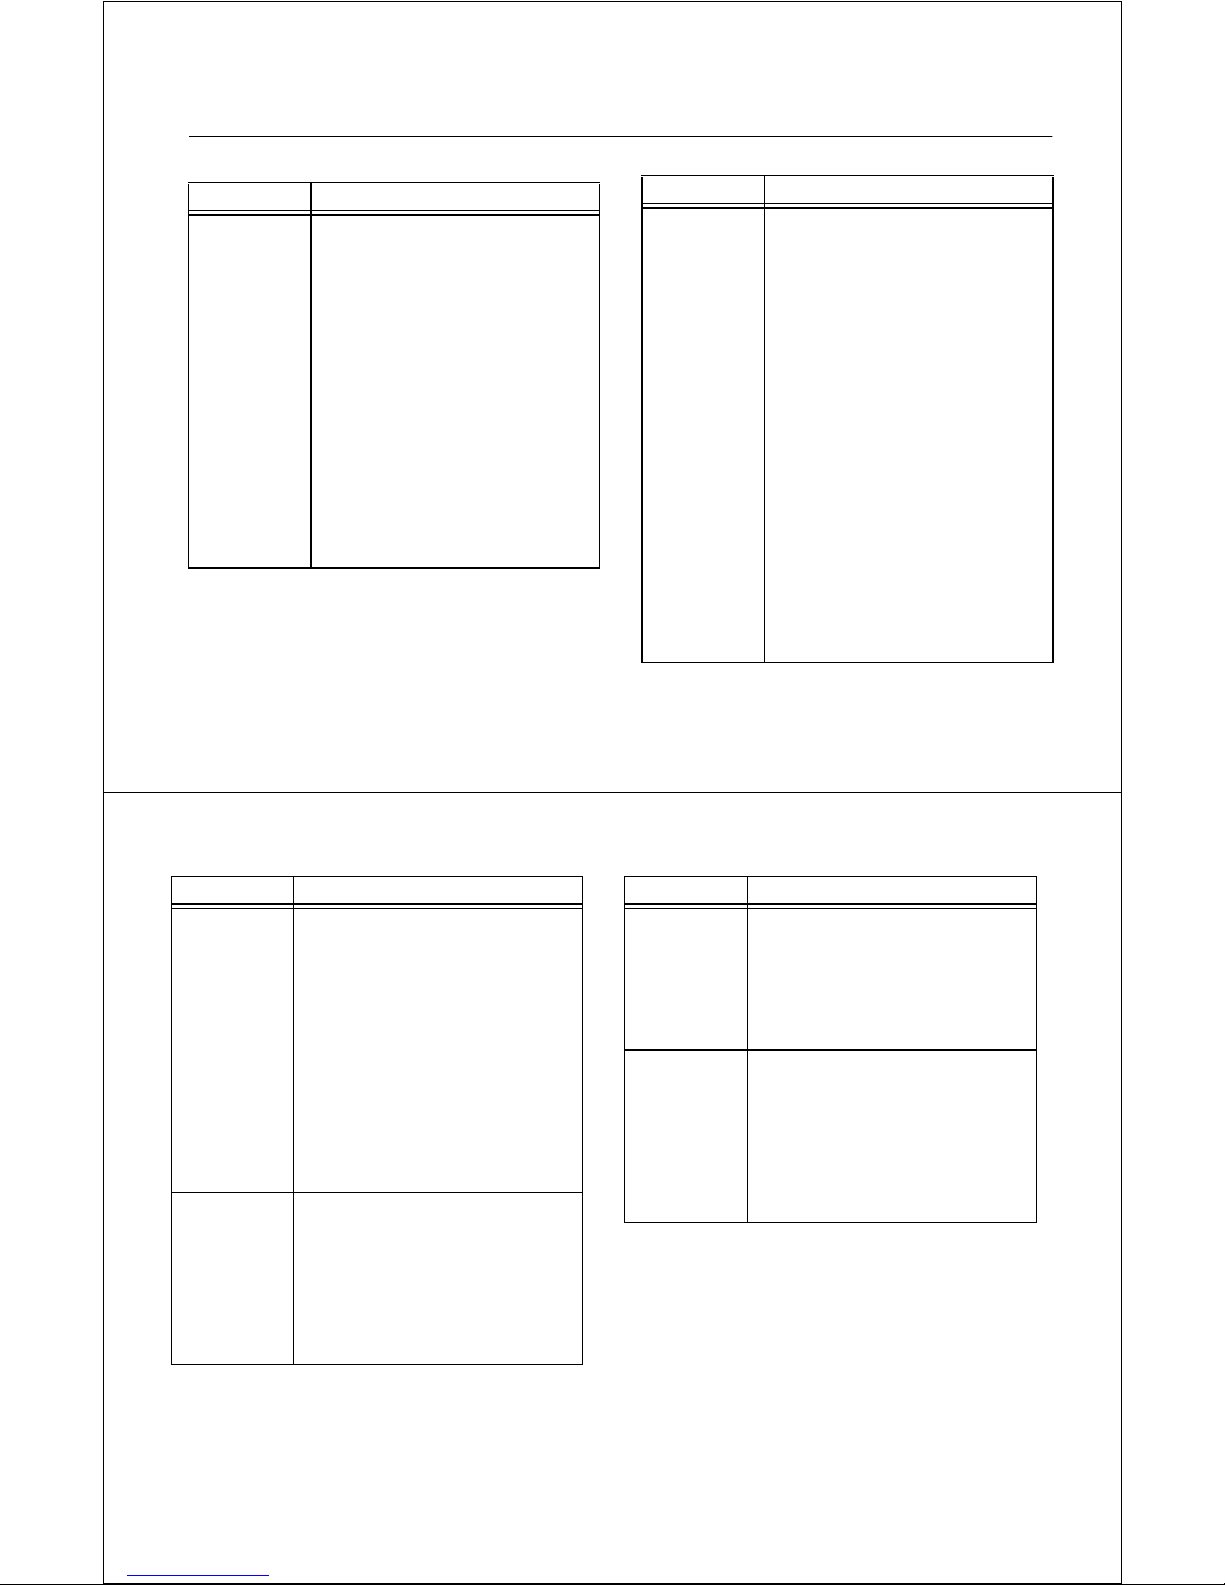
The following table provides details for making and
receiving calls from your connected phone using your
car kit:
Note:
Some features are phone/network dependent.
Make a Call
(Hand Dial)
Phone:
On-in idle
T603:
On
Enter phone number on phone, press
Send key on phone, phone dials call.
Make a Call
(Voice Dial)
Redial Last
Number
Receive
(Answer)
a Call
End a Call
Phone:
On-in idle
T603:
On
Press and hold green (SEND) button
for 2-6 seconds, wait for prompt from
phone, speak name, phone dials call.
Phone:
On-in idle
T603:
On
Press green (SEND) button.
Phone:
On–phone rings
T603:
On–indicator light flashes
quickly in blue
Press green (SEND) button. While call
is active, indicator light flashes slowly
in blue.
Phone:
On–in call
T603:
On–indicator light flashes slowly
in blue
Press red (END) button.
To end a call on hold, press green
(SEND) button to make call active, then
press red (END) button to end call.
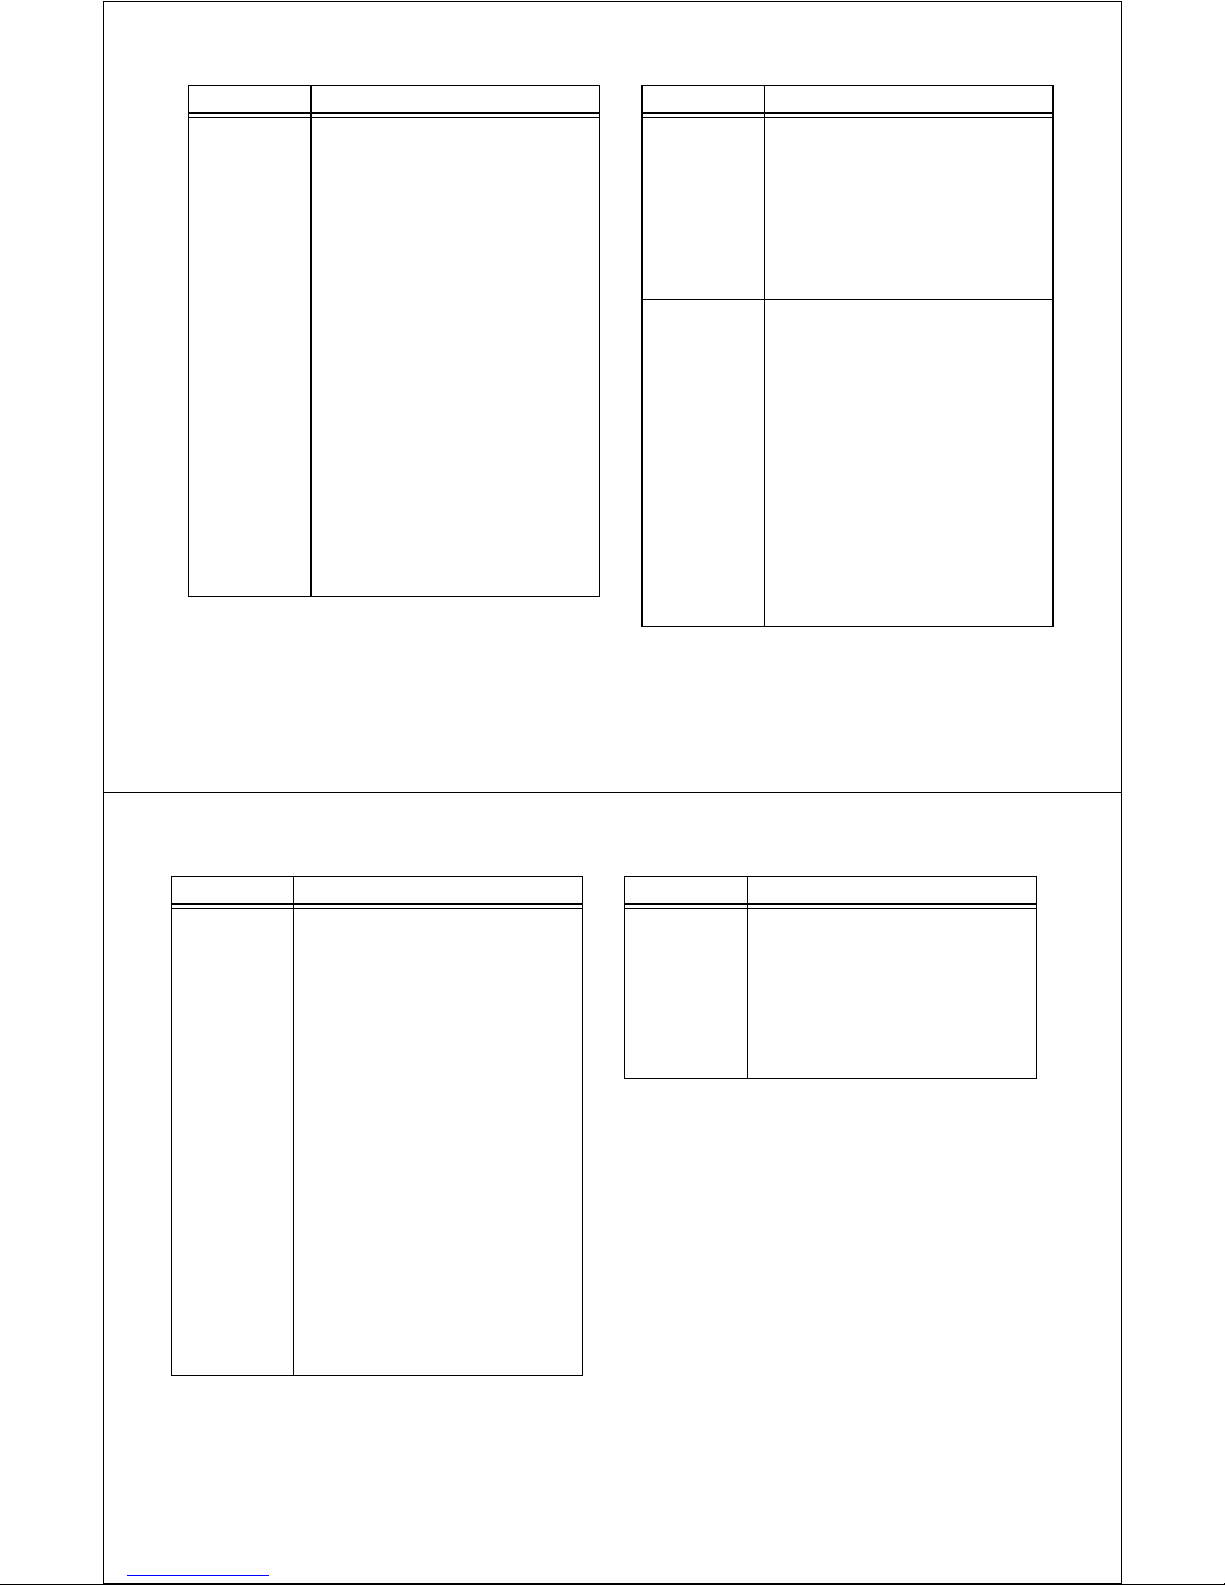
Change Call
Volume
Reject a Call
Mute/Unmute
aCall
Phone:
On–in call
T603:
On–indicator light flashes slowly
in blue
Press blue (UP ARROW) button to
increase or blue (DOWN ARROW)
button to decrease.
Note:
You can also adjust call volume
from your phone (if supported by
phone).
Phone:
On–phone rings
T603:
On–indicator light flashes
quickly in blue
Press red (END) button.
Phone:
On–in call
T603:
On–indicator light flashes slowly
in blue
Press MFB button.
While muted, indicator light flashes
slowly in purple.
Answer
Second
Incoming Call
Reject
Second
Incoming Call
Switch
Between Two
Calls (Active
and On Hold)
Link Two
(Active and
Incoming or
On Hold
Calls) - 3-way
Conference
Phone:
On–in call, 2nd call incoming
T603:
On–indicator light flashes
quickly in blue until call is answered
Press green (SEND) button, places
first call on hold, answers incoming
call. When call is on hold, indicator
light flashes quickly in blue.
Phone:
On–in call, 2nd call incoming
T603:
On–indicator light flashes
quickly in blue
Press red (END) button.
Phone:
On–in call, 2nd call on hold
T603:
On–indicator light flashes slowly
in blue
Press green (SEND) button.
Phone:
On–in call, 2nd call on hold
T603:
On–indicator light flashes slowly
in blue
Press and hold MFB button for
2-6 seconds.
Transfer Call
from Car Kit
to Phone
(Privacy
Mode)
Transfer Call
from Phone to
Car Kit
Change Ring
Tone/Alert
Tone Volume
using your car kit
Phone:
On–in call
T603:
On–indicator light flashes slowly
in blue
Press and hold green (SEND) button
for 2-6 seconds.
Note:
Some phones require you to
press and hold the MFB button twice.
Phone:
On–in call
T603:
On
Press and hold green (SEND) button
for 2-6 seconds.
Note:
Some phones require you to
press and hold the MFB button twice.
Phone:
On–in idle
T603:
On
Press blue (UP ARROW/DOWN
ARROW) buttons.
15
16
using your car kit
disconnecting the car kit
from your Bluetooth
device
The Bluetooth connection between the car kit and
Bluetooth device is automatically disconnected when
you turn off the vehicle. When the vehicle is powered
down, the call is seamlessly transferred to the phone.
To do this... Do this...
Manually
disconnect
the car kit
from your
device
Press and hold red (END) button for
2-6 seconds while not in a call.
This disconnects the last
connected device, and the car kit
begins searching for the next
available device in its history list.
If there are no other devices
available, the car kit continues to
look for any previously paired
device.
If you desire to reconnect the
device that was just disconnected,
you must initiate the Bluetooth
connection from the device.
See your device’s instruction
manual for details.
To do this... Do this...
Remove all
paired
devices from
the car kit’s
history list
Press and hold red (END) button for
6 seconds or longer while not in
a call.
Once a device has been removed
from the car kit’s history list, it
must be re-paired again before it
can be used. See “initial pairing” on
page 12 for instructions on pairing.
using your car kit
17
18
using your car kit
Appendix A — Troubleshooting
Problem Resolution...
I cannot pair
my device
with the
car kit.
•
Turn the device off and then
back on. Try pairing the
device and car kit again.
Sometimes removing the
device’s battery and
reinstalling it helps.
•
Remove all previous
pairings by pressing and
holding the red (END)
button for 6 seconds or
longer, then try pairing the
device and car kit again.
Problem Resolution...
I cannot pair
my device
with the
car kit
(con’t).
•
If you are using a Motorola
phone, do not use the “Find
me” menu item for pairing.
Instead, use the “Look For
Devices” menu item.
•
Ensure that the car kit is
not in Bluetooth search
mode (indicator light is
flashing red/blue). If so,
press the MFB button for
2-6 seconds to disable
search mode and place car
kit into Bluetooth
discoverable mode
(indicator light is flashing in
blue). Then try pairing the
device and car kit again.
Appendix A — Troubleshooting
19
Problem Resolution...
I make a call
and the other
party hears
too much
background
noise.
My device
doesn’t find
my car kit.
Check the location and placement
of your car kit’s microphone. It is
recommended to mount the
microphone in the front center of
the car, no more than 16 inches
(40 cm) from the drivers head.
Exterior wind noise can easily be
transmitted to the microphone if it
is near a window or if air is blowing
on it from a vent.
Make sure the indicator light is
flashing in blue while the device is
searching for the car kit. Do this by
pressing and holding the MFB
button for 2-6 seconds to enter
pairing mode.
Problem Resolution...
Invalid
Bluetooth
passkey
The car kit
connects to
another
device
instead of
mine.
If you enter an invalid Bluetooth
passkey, you will have to start the
pairing process again. You do not
get another chance to enter the
passkey.
The other device was the last
device used by the car kit. See the
section “disconnecting the car kit
from your Bluetooth device” on
page 17 to change devices.
20
Appendix A — Troubleshooting
Problem Resolution...
I paired my
device with
the car kit,
but now the
car kit won’t
connect
with it.
•
Your device has been
manually disconnected
from the car kit. Initiate a
Bluetooth connection from
the device as described in
“automatic connection” on
page 13.
•
Repeat the initial pairing
process (see “initial
pairing” on page 12).
•
The Bluetooth feature in
your device has been
turned off. Follow the
directions in your device’s
user manual to turn it
back on.
Problem Resolution...
Call waiting
does not
work.
Three-way
calling does
not work.
If I interrupt
the Bluetooth
link by
walking away
from the car,
it does not
automatically
reestablish
itself when I
come back
within range.
Some networks do not support
multi-party calling features.
Contact your service provider for
more information.
Some phones require you to
reconnect the phone to the car kit
from the phone’s menu after the
Bluetooth link has been interrupted.
Alternatively, you can press and
hold the green (SEND) button for
2-6 seconds to establish a voice dial
session in order to force a phone
connect. Once connected, press
the red (END) button to end the
voice dialing session.
Problem Resolution...
I cannot
voice dial a
call.
•
You may not have a “voice
tag” set up for the number
you want to dial in your
phone. Follow your device’s
user manual to set up voice
dialing.
•
Background noise may be
interfering with your voice.
Relocate the microphone to
a quieter place. Move the
microphone closer to the
driver. Passengers in the
car should be quiet while
voice dialing. Minimize
wind noise by rolling the
windows up.
Appendix A — Troubleshooting
Problem Resolution...
I cannot
voice dial a
call (con’t).
•
Most phones prompt with a
beep to indicate it is now
time to speak. Wait until
the beep has ended before
speaking. Do not over
speak the beep.
21
22
Appendix A — Troubleshooting

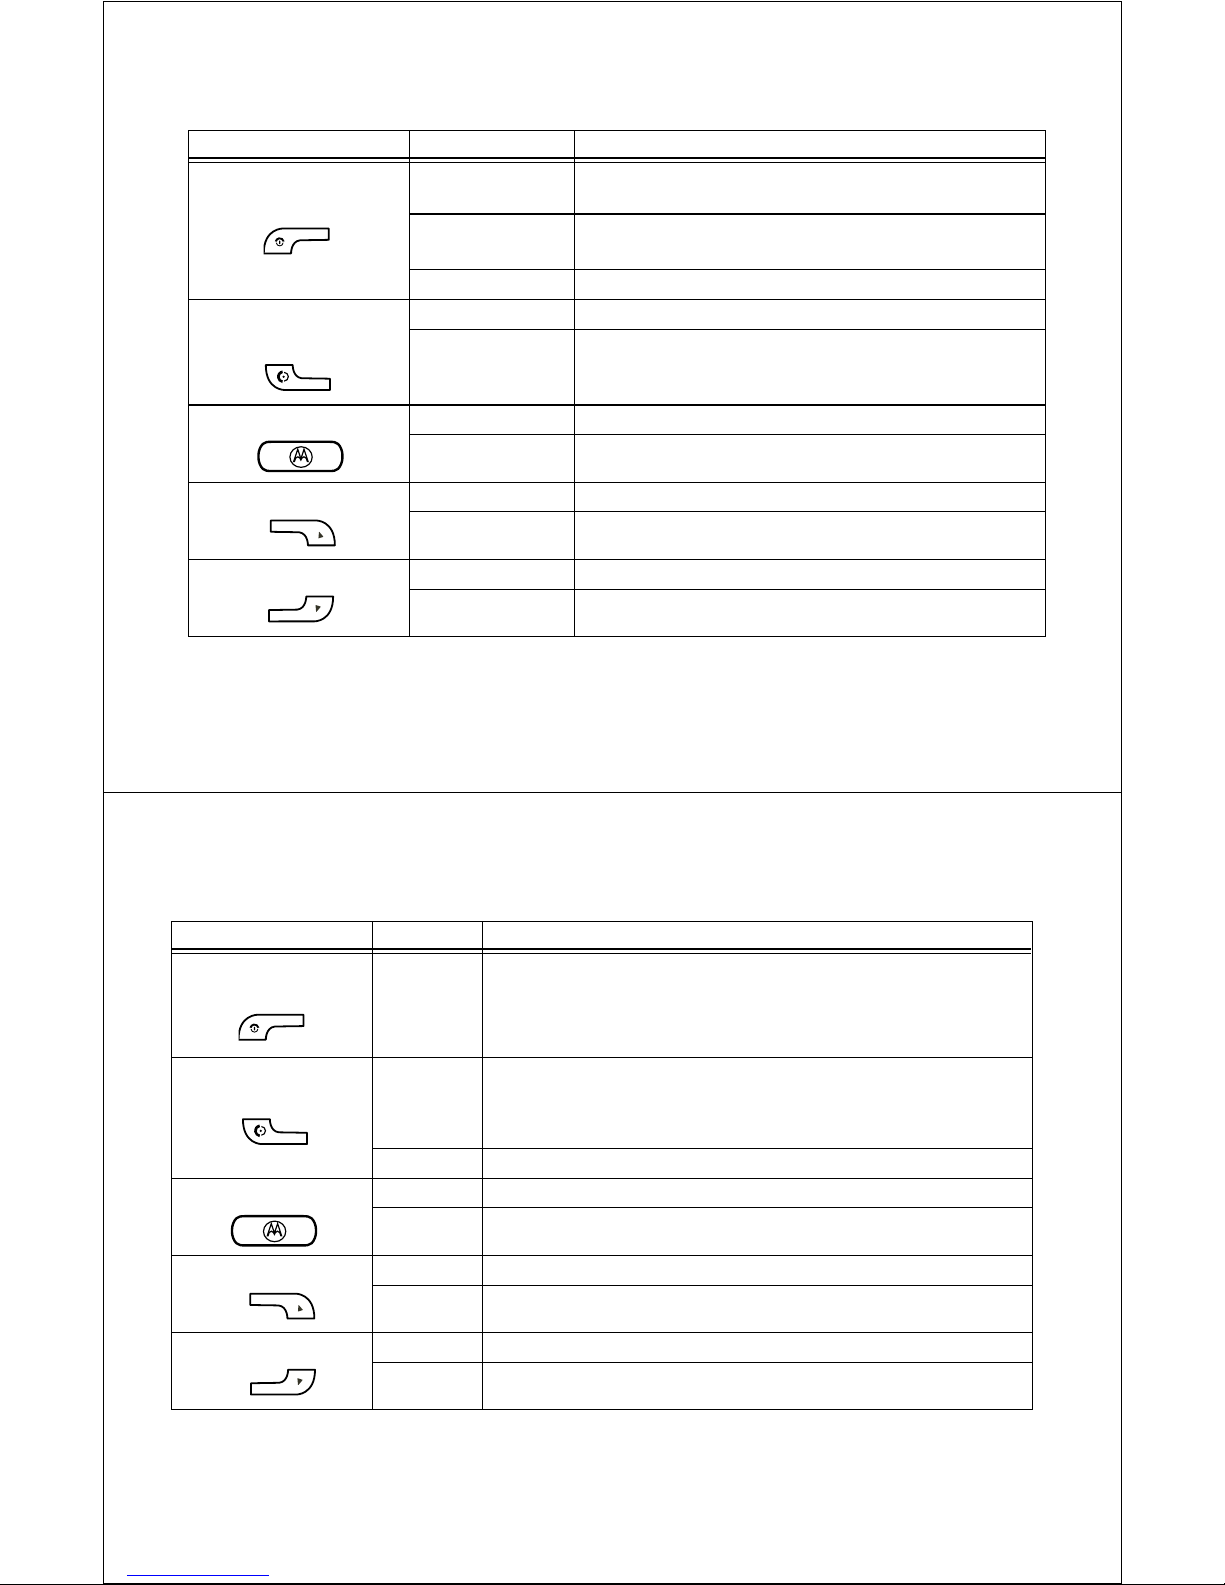
Appendix B — UIM Indicator Light
green (SEND)
button
red (END)
button
blue (UP ARROW)
button
blue (DOWN ARROW)
button
Multi-function (MFB)
button
Status
The indicator light on the UIM provides status
information.
Light Status
Off
Blue (three
flashes)
Blue
(continuous
flashing)
Short purple
flash, then
steady blue
Red and blue
(flashing)
power off
power on
pairing (discoverable) mode
pairing successful
searching mode
Light Status
Red (steady)
Blue (steady)
Blue
(quick flash)
Blue
(long flash)
Purple
(long flash)
Red
(flashing)
idle (not connected to device)
standby (connected to phone in
Connected mode)
incoming call
on a call
on a call (muted)
no service
Appendix B — UIM Indicator Light Status
23
Appendix C — UIM Button Operation
There are five buttons on the UIM whose functions
vary depending on how they are pressed.
24
Appendix C — UIM Button Operation
You can perform three types of actions with each UIM
button:
•
Short press (or “press and release”)
•
Long press (or “press and hold for 2 to
6 seconds”)
•
Extended press (or “press and hold for
6 seconds or longer”)
The function of each button changes depending on
what operating mode the car kit is in.
Connected Mode (Not in a Call)
Button Press Operations
red
(END)
green
(SEND)
Short Press
Long Press
Extended Press
Short Press
Long Press
•
Cancel current phone operation (such as making a voice
dial call)
•
Disconnect from current device
•
Try to connect with next device on history list
•
Remove all paired devices from history list
•
Last number redial
•
Make voice dial call
Multifunction (MFB) Short Press
Long Press
blue (UP ARROW) Short Press
Long Press
blue (DOWN ARROW) Short Press
Long Press
•
(No function)
•
Enter pairing (discoverable) mode
•
Increase ringer volume (one step)
•
Increase ringer volume (one step per second)
•
Decrease ringer volume (one step)
•
Decrease ringer volume (one step per second)
Connected Mode (In a Call)
Button Press Operations
red
(END)
Short Press
•
End active call
•
Reject incoming call
•
Reject second incoming call
25
green
(SEND)
Multifunction (MFB) Short Press
blue (UP ARROW) Short Press
blue (DOWN ARROW) Short Press
Short Press
Long Press
Long Press
Long Press
Long Press
26
•
Answer incoming call
•
Answer second incoming call
•
Switch between two calls
•
Transfer active call from car kit to phone
•
Mute/unmute call
•
Join two active calls (3-way conference)
•
Increase call volume (one step)
•
Increase call volume (one step per second)
•
Decrease call volume (one step)
•
Decrease call volume (one step per second)
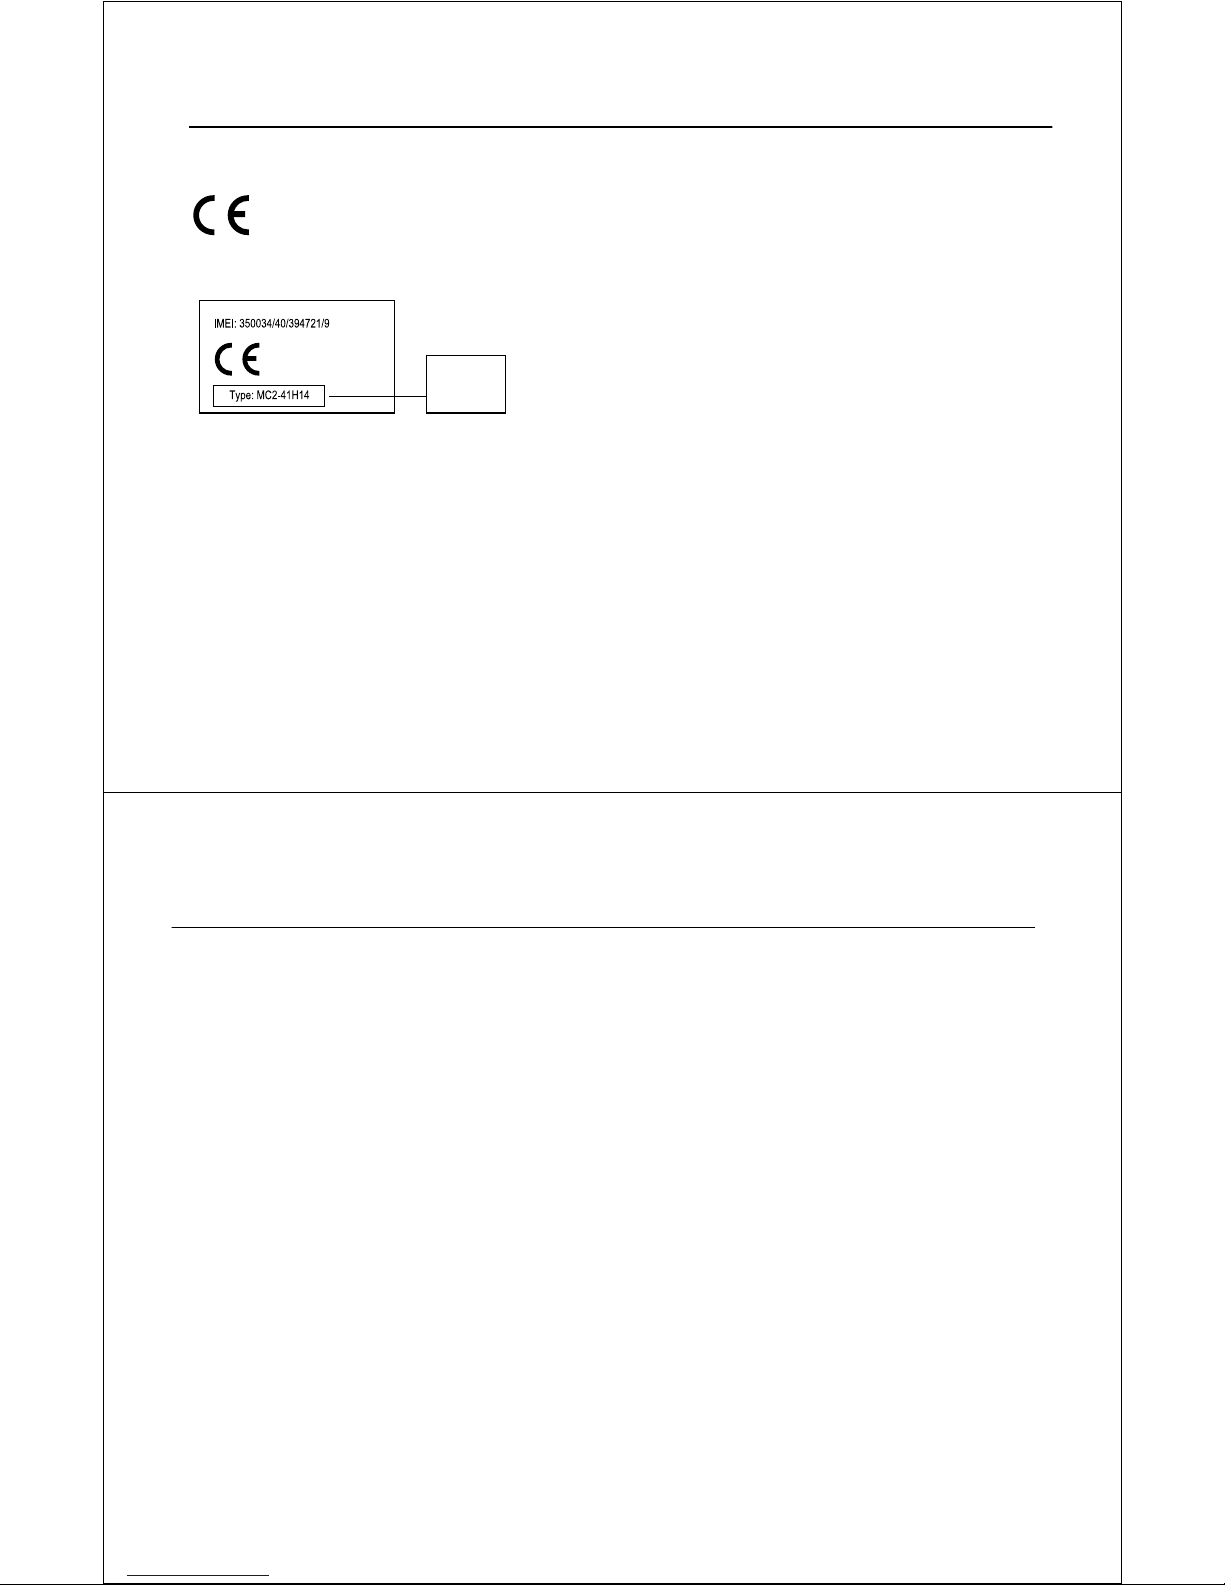
European Union Directives Conformance Statement
Hereby, Motorola declares that this product is in compliance with:
•
The essential requirements and other relevant
provisions of Directive 1999/5/EC
•
All other relevant EU Directives
Product
Approval
Number
The above gives an example of a typical Product Approval Number.
You can view your product’s Declaration of Conformity (DoC)
to Directive 1999/5/EC (to R&TTE Directive) at
www.motorola.com/rtte. To find your DoC, enter the product
Approval Number from your product’s label in the “Search” bar on
the Web site.
index
B
Bluetooth
disconnecting 17
establishing connection 12
pairing with devices 11
C
call
answering 15
answering second 16
changing ring tone/alert tone
volume 16
changing volume 15
ending 15
linking two 16
making (hand dial) 14
making (voice dial) 15
muting/unmuting 15
redialing last number 15
rejecting 15
rejecting second 16
switching between two 16
transferring from car kit to
phone (privacy mode)
16
transferring from phone to car
kit 16
27
E
Electronic Control Module (ECU)
installing 6
mounting 5
external speaker
installing 9
mounting 9
I
install
electronic control module
(ECU) 5
external speaker 9
guidelines 4
microphone 8
power adapter cable 6
user interface module (UIM) 10
28
index

M
microphone
installing 8
mounting 8
O
overview 1
P
pairing with Bluetooth devices 11
power adapter cable
installing 6
T
troubleshooting 19
U
User Interface Module (UIM)
button operation 24
in a call 26
not in a call 25, 26
indicator light status 23
installing 10
mounting 10
index
29

motorola T603
Guia do usuário

bem-vindo
Bem-vindo ao “conectado” mundo Motorola da rede
sem-fio pessoal do Bluetooth. O Sistema Viva-voz
Bluetooth Automotivo do Motorola T603 torna a
conexão sem fio simples e rápida.
O Sistema Viva-voz Bluetooth Automotivo moderno e
sofisticado do Motorola T603 oferece estas funções:
•
Áudio viva-voz sem fio uniforme via link
Bluetooth
•
Interface de áudio digital com alta qualidade,
full-duplex
•
Discagem por voz usando o controle de voz do
telefone (se disponível)
•
Recurso de mudo para entretenimento —
emudece o rádio automaticamente durante
ligações
•
Redução de ruídos e cancelamento do eco
acústico
•
Compatibilidade com dispositivos Bluetooth 1.2
e Bluetooth 1.1 — suporte a perfis de Fone de
ouvido e Viva-voz
Nota:
antes de usar o sistema viva-voz pela primeira
vez, consulte as importantes informações legais e de
segurança e siga as instruções. Consulte essas
informações periodicamente para lembrar de que
maneira usar o sistema viva-voz de forma segura.
1
Motorola Industrial Ltda.
Rodovia SP-340 - km 128,7 - Bairro Tanquinho
CEP 13820-000 - Jaguariúna - SP
Central de atendimento Motorola para capitais
e regiões metropolitanas ligue 4002-1244.
Demais localidades ligue 0800 773 1244.
www.hellomoto.com.br
O uso de dispositivos sem fio e de seus acessórios pode ser
proibido ou restrito em determinadas áreas. Sempre obedeça
às leis e aos regulamentos sobre o uso desses produtos.
Todas as funções, funcionalidades e outras especificações do
produto, bem como as informações contidas neste guia de
usuário baseiam-se nas informações mais recentes disponíveis
e consideradas como precisas quando o material foi impresso.
A Motorola se reserva o direito de alterar ou modificar quaisquer
informações ou especificações sem notificação prévia ou
obrigação.
O nome MOTOROLA e a logomarca Estilizada M estão registrados
no Escritório de Marcas e Patentes dos EUA. As marcas
registradas Bluetooth são de posse do seu proprietário e utilizadas
pela Motorola, Inc. sob licença.Todos os outros nomes de serviços
ou produtos são de posse de seus respectivos proprietários.
© 2008 Motorola, Inc. Todos os direitos reservados.
Aviso de copyright do software
Os produtos Motorola descritos neste manual podem incluir
software de terceiros ou com copyright da Motorola armazenado
em memórias semicondutoras ou outras mídias. As leis dos
Estados Unidos e de outros países asseguram para os
fornecedores de software da Motorola e de terceiros
determinados direitos exclusivos para software com registro de
copyright, como os direitos exclusivos de distribuição e reprodução
do software. Portanto, nenhum software protegido por leis de
copyright contido nos produtos Motorola pode ser modificado,
sofrer engenharia reversa, ser distribuído ou reproduzido de forma
alguma que não seja a maneira permitida por lei. Além disso,
a compra dos produtos da Motorola não deve ser considerada
como concessão, de forma direta ou por implicação, embargo ou
de outra forma, de qualquer licença relacionada a direitos
autorais, patentes ou aplicações de patentes de fornecedores da
Motorola ou de qualquer fornecedor de software de terceiros,
exceto a concessão de licença de uso normal, não exclusiva e
isenta de direitos de exploração de patentes que é apresentada
de acordo com a operação da lei na venda de um produto.
Número do manual: 68014100001-B
ID do QD Bluetooth: B014834
2

sumário
instalando o kit veicular
viva-voz. . . . . . . . . . . . . . . . . . . 4
instruções para instalação
e conexão . . . . . . . . . . . . . . . 4
instalando o kit veicular
viva-voz . . . . . . . . . . . . . . . . . 5
usando o kit veicular . . . . . . . 12
vinculando o kit veicular
e o dispositivo ativado
para Bluetooth . . . . . . . . . . . 12
fazendo e recebendo
ligações. . . . . . . . . . . . . . . . 15
desconectando o kit
veicular do dispositivo
Bluetooth. . . . . . . . . . . . . . . 19
apêndice A — solucionando
problemas. . . . . . . . . . . . . . . . 21
apêndice B — status da
luz indicadora do UIM . . . . . . 25
apêndice C — operação
do botão UIM . . . . . . . . . . . . . 26
modo conectado
(não em uma ligação). . . . . . 27
modo conectado
(em uma ligação) . . . . . . . . . 28
Declaração de Conformidade
com as Diretrizes da
União Européia. . . . . . . . . . . . 29
índice. . . . . . . . . . . . . . . . . . . . 30
sumário
3
instalando o kit veicular viva-voz
instruções para
instalação e conexão
Atenção:
instalar este kit veicular. Devido à grande variedade de
tipos e modelos de veículos, pode ser necessário
entrar em contato com o fabricante do veículo para
obter informações detalhadas sobre a instalação.
Se necessário, entre em contato com o fabricante
do veículo para obter informações específicas sobre
oair bag.
Atenção:
NÃO
comunicação, na área acima do air bag ou em sua área
de liberação. Caso o equipamento de comunicação
somente profissionais qualificados devem
um airbag infla com muita força.
coloque objetos, incluindo equipamento de
seja instalado de forma inadequada e o airbag infle,
pode haver sérios danos.
•
Instale os componentes com segurança sobre
superfícies resistentes para evitar que eles se
desloquem, o que poderia causar danos e
interferir na segurança do veículo. Utilize
sempre o hardware fornecido.
•
Os componentes instalados e fios ou cabos
conectados não devem interferir no banco ou
no espaço reservado para as pernas.
•
Posicione os cabos de forma a protegê-los de
bordas afiadas, pressionamentos e batidas.
Mantenha todos os conectores em local de
fácil acesso.
4
instalando o kit veicular viva-voz

•
Superfície de Montagem
Código de barras Superfície de Montagem
Código de barras
O kit veicular destina-se somente ao uso com
sistemas de energia de 12 V negativos. Esse
kit utiliza menos de 3 amperes. Verifique se o
sistema elétrico do veículo pode fornecer
essa corrente.
•
As etapas de instalação não estão em uma
ordem particular. Em geral, você deve primeiro
escolher os locais onde montará o UIM, o
microfone, o alto-falante e o ECU. Monte o
UIM, o alto-falante e o microfone e roteie os
cabos para o local de montagem do ECU.
Instale o cabo adaptador de energia.
Conecte tudo ao ECU e monte o ECU.
instalando o kit veicular
viva-voz
Atenção:
no máximo
carro para evitar incêndios e outros danos caso ocorra
algum curto circuito no ECU.
Antes da instalação, remova a embalagem, monte e
teste todos os componentes.
instalando o Módulo de Controle
Eletrônico (ECU)
Monte o ECU de forma segura.
O melhor local para o ECU é sob o painel. A caixa deve
ficar protegida contra poeira e umidade, e deve ter
espaço suficiente para refrigeração e para permitir as
conexões dos cabos.
esse kit veicular deve ser conectado,
, a um fusível 5A no painel de fusíveis do
Para obter o melhor desempenho do Bluetooth,
monte o ECU de modo que o lado com o código de
barras fique oposto à superfície de instalação,
conforme exibido acima. O ECU pode ser orientado
em qualquer direção. Não o coloque atrás ou dentro
de grandes áreas de metal.
Atenção:
do carro.
o local
não deve
interferir no air bag
instalando o kit veicular viva-voz
instalando o cabo adaptador de
energia
Atenção:
fazer com que o acessório não funcione corretamente
e causar danos ao kit veicular.
Nota:
fornecida) pode estar disponível a partir de terceiros
para permitir uma integração do áudio do viva-voz do
T603 ao sistema de entretenimento do veículo.
Se você optar por usar uma correia adaptadora para
veículo, siga as diretrizes do fornecedor para uma
instalação adequada.
Para a instalação em um veículo
correia adaptadora de terceiros
o não cumprimento destas etapas pode
uma correia adaptadora para veículo (não
sem o uso de uma
:
5
6
instalando o kit veicular viva-voz
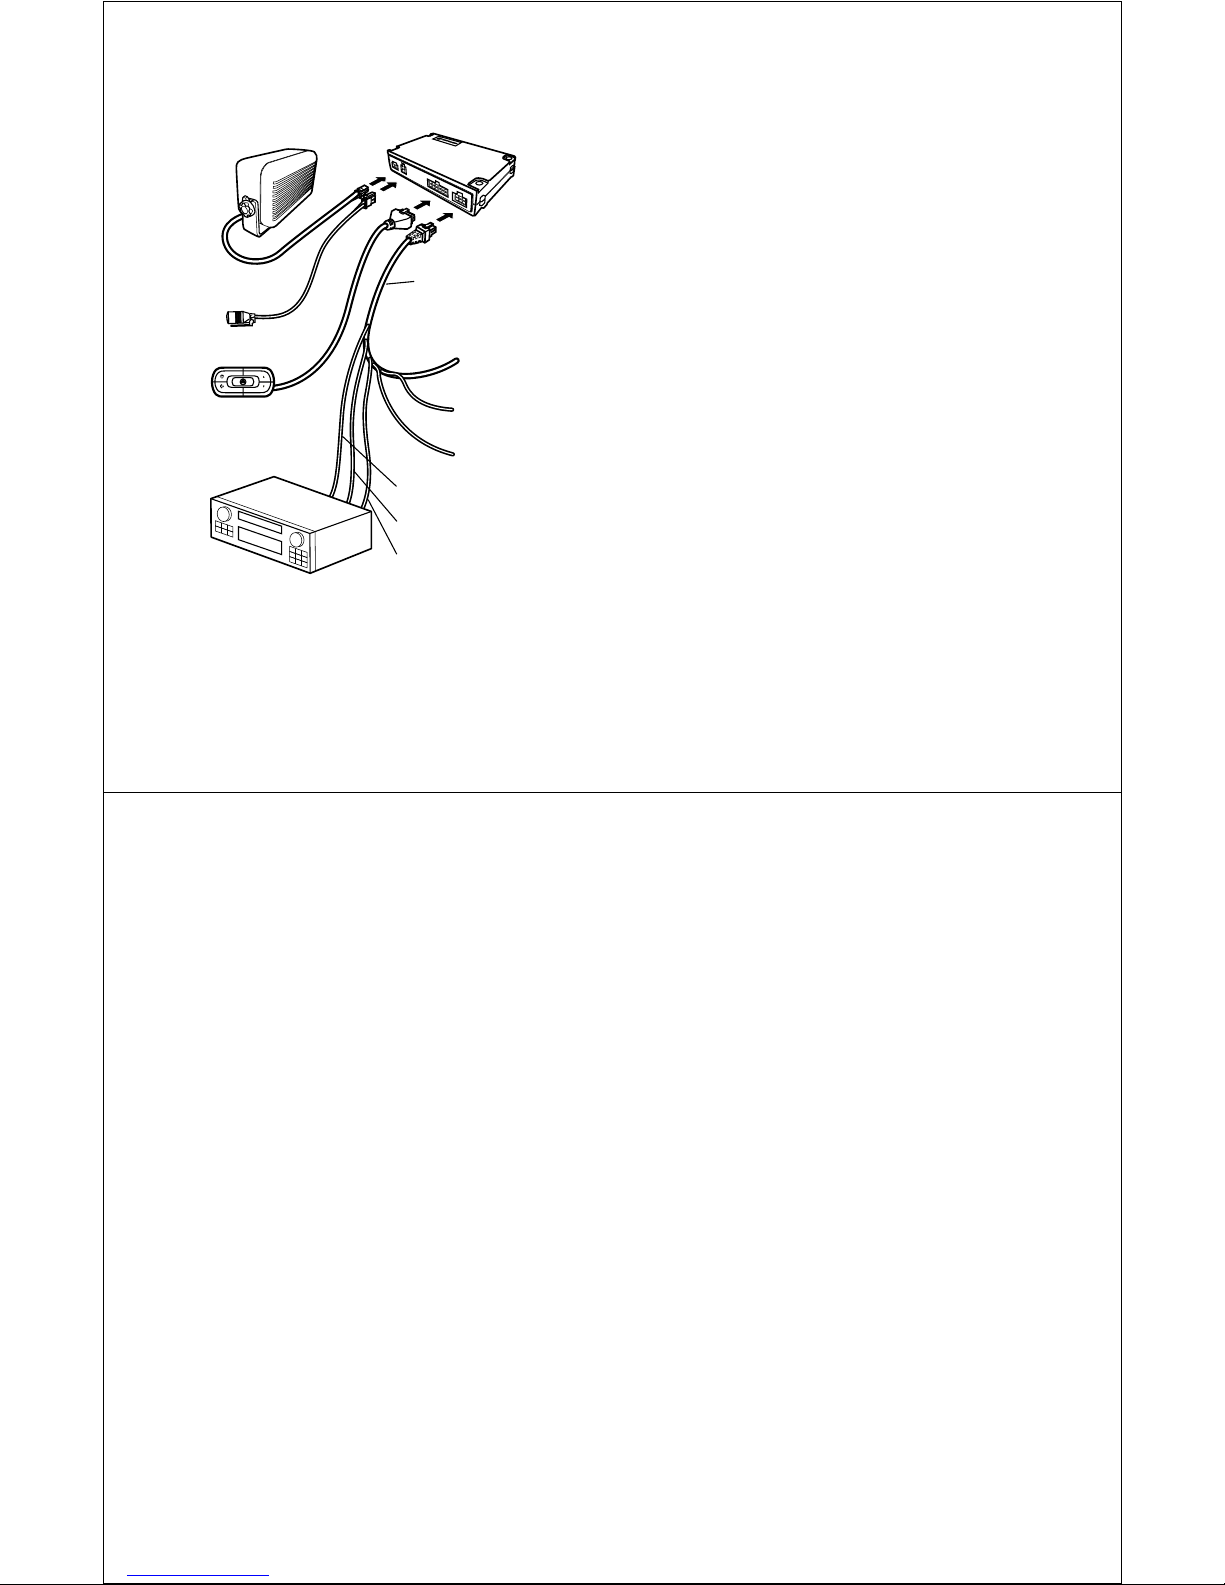
Alto-falante externo
Microfone
Módulo da Interface
do Usuário (UIM)
Som automotivo
Módulo de Controle Eletrônico (ECU)
Cabo Adaptador de Energia
Vermelho: caixa de
Fusível (Alimentação)
Verde: caixa de
Fusível (Ignição)
Preto: acessórios Veiculares
Chassis (Terra)
Laranja: nível de Linha Viva-voz
de Áudio (+)
Azul: nível de Linha Viva-voz
de Áudio (-)
Amarelo: emudecer
1
Desconecte a bateria do veículo.
2
Remova todos os fusíveis do cabo adaptador de
energia e prenda-os a seus respectivos suportes.
NÃO
reinsira os fusíveis até concluir e
inspecionar todas as conexões.
3
Se for aparar os comprimentos de fio no cabo
adaptador de energia, certifique-se de deixar os
fusíveis inline no cabo juntamente com um
comprimento de fio suficiente para permitir
que as conexões sejam feitas.
4
Conecte o fio do Sensor de Ignição
VERDE
cabo adaptador de energia (fusível de 3 amperes)
a um local no sistema de ignição no bloco de
fusível. Quando a ignição estiver desligada,
a linha do sensor de ignição deverá estar baixa.
5
Conecte o Fio silenciador do som automotivo
AMARELO
do cabo adaptador de energia à
entrada de emudecer do som automotivo.
do
Nota:
esse recurso só é útil se o som automotivo
suporta um sinal de mudo de rádio baixo ativo e
de um único fio. Caso contrário, a instalação pode
exigir um adaptador de transmissor opcional (não
incluído) ou outra personalização.
6
Conecte o cabo primário positivo
VERMELHO
do cabo adaptador de energia (fusível de
4 amperes) a um ponto na caixa de fusível do
carro adequado para fusíveis de 4 a 5 amperes.
O cabo primário positivo VERMELHO deve ser
alimentado continuamente. O fio do Sensor de
Ignição VERDE liga e desliga.
Importante:
VERDE
não conecte os fios
VERMELHO
juntos. Fazer isso limita a funcionalidade
do kit veicular.
e
instalando o kit veicular viva-voz
7
Conecte o fio terra
energia ao chassis do carro.
Nota:
ignore as etapas 8 e 9 se o som
automotivo não suportar o recurso de entrada de
áudio do telefone ou se você estiver usando o
alto-falante externo (fornecido). Esse recurso
funciona apenas se o som automotivo suporta
esse recurso.
8
Conecte o fio
energia à entrada de áudio do telefone de nível de
linha (
+
) do som automotivo.
9
Conecte o fio
energia à entrada de áudio do telefone de nível de
linha (
-
) do som automotivo.
10
Inspecione todas as conexões.
PRETO
do cabo adaptador de
LARANJA
AZUL
do cabo adaptador de
do cabo adaptador de
7
8
instalando o kit veicular viva-voz
11
Conecte o conector preto de 6 pinos do cabo
adaptador de energia ao ECU.
 Loading...