


APPLICANT: MOTOROLA, INC. FCC ID: IHDT5ZX1
A draft copy of the latest users manual follows.
Note: RF exposure information is provided on page 7.
EXHIBIT 8b
Getting Started.....................................................4
Welcome ................................................................4
Safety Information..................................................6
Introduction ..........................................................11
Phone Overview...................................................12
Basic Operation .................................................15
Turn Phone On and Off........................................15
Place a Call..........................................................17
Automatic Redial..................................................18
End a Call ............................................................19
Receive a Call......................................................19
Call in Absence Indicator.....................................19
Signal Strength Meter ..........................................20
Volume Meter.......................................................20
Speaker Volume...................................................21
Earpiece Volume..................................................21
Ringer Volume......................................................22
Display Own Phone Number ...............................22
Switch to Second Phone Number........................22
Place a Hands Free Call......................................24
Receive a Hands Free Call..................................24
Manual Handset to Hands Free Operation..........25
Automatic Hands Free .........................................25
Hands Free to Handset Operation.......................25
Memory ...............................................................26
Storing Information in Memory ............................26
Storing a Phone Number and a Name ................26
Storing Phone Number Only................................28
Storing Area Code and Prefix (Postscripting)......28
Store to a Location Number.................................29
Memory Autoload.................................................29
Memory Blocks ....................................................30
Table of Contents
1

Memory Protect ...................................................31
Recalling/Scrolling from Memory .........................31
Recalling/Scrolling by Name................................31
Recalling/Scrolling by Location Number..............32
Last Number Recall .............................................33
Recalling Last 10 Numbers Dialed ......................33
Recalling an Area Code and Prefix (Postscripting) ..34
Turbo Dial.............................................................34
One Touch Dialing Keys.......................................35
Super Speed Dialing............................................35
Scratch Pad Memory ...........................................36
Tone Dialing (Two-Part Calling) ...........................36
Pause Dialing (Memory Linking)..........................38
Calling Card Dialing .............................................40
One Touch Dialing Keys.......................................45
One Touch Emergency Dialing ............................45
Change Memory Entries - Alpha or Numeric ......46
Clear Memory Entries ..........................................47
Features ..............................................................48
Feature Menu ......................................................48
To Select/Cancel Menu Features.........................49
Signal Strength Meter ..........................................49
Feature Status Review.........................................50
Microphone Muting ..............................................50
Auxiliary Alert.......................................................50
Number Preference..............................................52
Automatic Answer................................................52
Multiple Key Answer.............................................53
Call Receive.........................................................53
Ringer ..................................................................54
Keypad Tones.......................................................54
Scratch Pad Tones ...............................................55
Remind Message.................................................55
Table of Contents
2

PIN Code Activation.............................................56
Timers ..................................................................57
Individual Call Timer ............................................57
Resettable Call Timer ..........................................58
Cumulative Call Timer..........................................58
Individual Timer....................................................59
One-Minute Timer ................................................59
Security Features.................................................59
Electronic Lock.....................................................60
Change Unlock Code...........................................60
Display Unlock Code............................................60
Automatic Lock ....................................................61
Theft Alarm ..........................................................61
Change Service Level..........................................62
Master Reset .......................................................64
Master Clear ........................................................64
Language Selection .............................................64
Extended Talk ......................................................65
Ringer Style .........................................................65
Reference............................................................66
The Cellular System ............................................66
Service Area ........................................................66
Weak Signal Alert ................................................66
Switchhook and Enhanced System Services ......67
Roaming...............................................................67
Selectable System Registration ..........................68
Troubleshooting....................................................71
Quick Reference Feature Guide ..........................72
Message Glossary ...............................................74
Rules, Regulations, & Precautions ......................76
Index ....................................................................79
Patent Information................................................82
Memory Location Directory..................................83
Table of Contents
3

Thank you for selecting Motorola – a world leader
in cellular technology.
All Motorola cellular phones are designed and
manufactured in the United States to meet
Motorola’s exacting specifications and world-class
quality standards. These phones withstand our
rigorous durability tests including temperature,
humidity, shock, dust, vibration, and a drop test.
Product superiority is yours with Motorola.
•
For information about your product or accessories
for your product, please call Motorola at:
1-800-331-6456
1-800-461-4575 (Canada)
•
For any information about your cellular service,
please call your service provider (Carrier).
Carrier’s Name ________________________
Carrier’s Phone Number _________________
Welcome
Getting Started
4

•
You will need to have the following information
when you inquire about your phone or service.
Your ESN (electronic serial number) and MSN
(mechanical serial number) are located on the
transceiver of your telephone.
ESN Number_____________________________
MSN Number ____________________________
Model Number ___________________________
Cellular Phone Number ____________________
•
Unlock Code — The sequential code of 123 is
the standard unlock code programmed into all
phones by the factory. It is often changed to the
last three digits of your cellular phone number by
the carrier. For easy access to this unlock code in
the future, please list it here now: __ __ __.
(Please contact your place of purchase if your
unlock code has been changed and you do not
have this information.)
Warranty Expiration Date ________________
Date of Purchase ______________________
Getting Started
5

IMPORTANT: Read this information before
using your wireless mobile phone.
Exposure to Radio Frequency Signals
Your wireless mobile telephone is a low power
radio transmitter and receiver. When it is ON, it
receives and also sends out radio frequency (RF)
signals.
International agencies have set standards and
recommendations for the protection of public
exposure to RF electromagnetic energy.
• International Commission on Non-Ionizing
Radiation Protection (ICNIRP)1996
• Verband Deutscher Elektrotechniker (VDE) DIN0848
• United States Federal Commission, Radio
Frequency Exposure Guidelines (1996)
• National Radiological Protection Board of the
United Kingdom, GS 11, 1988
• American National Standards Institute (ANSI)
IEEE. C95. 1-1992
• National Council on Radiation Protection and
Measurements (NCRP). Report 86
• Department of Health and Welfare Canada.
Safety Code 6
These standards are based on extensive scientific
review. For example, over 120 scientists,
engineers, and physicians from universities,
government health agencies, and industry
Safety Information
Getting Started
6

reviewed the available body of research to
develop the updated ANSI standard.
The design of your phone complies with these
standards when used as described under "Phone
Operation."
IIMMPPOORRTTAANNTT::
To maintain compliance with the
FCC's RF exposure guidelines, if you wear a
handset on your body use only the Motorola
supplied carrying case, holster or other
body-worn accessory for this product and ensure
that the antenna is at least 1 inch (2.5
centimeters) from your body when transmitting.
Antenna Care
Use only the supplied or an approved replacement
antenna. Unauthorized antennas, modifications, or
attachments could damage the phone and may
violate local agency regulations.
Carry Phone Operation
Do not operate your carry phone when a person is
within 4 inches (10 centimeters) of the antenna. A
person or object within 4 inches (10 centimeters)
of the antenna could impair call quality and may
cause the phone to operate at a higher power
level than necessary and expose that person to
RF energy in excess of that established by the
FCC RF Exposure Guidelines.
Mobile Phone Operation
Do not operate your mobile telephone when any
person is within 12 inches (30 centimeters) of its
vehicle-installed antenna.
Getting Started
7

Driving
Check the laws and regulations on the use of
wireless telephones in the areas where you drive.
Always obey them. Observe the following
guidelines when using your phone while driving.
• Give full attention to driving--driving safely is your
first responsibility.
• Use hands-free phone operation, if available.
• Pull off the road and park before making or
answering a call if driving conditions so require.
Electronic Devices
Most modern electronic equipment is shielded
from RF signals. However, certain equipment may
not be shielded against the RF signals from your
wireless phone.
Pacemakers
The Health Industry Manufacturers Association
recommends that a minimum separation of six
inches (6") be maintained between a wireless
phone's antenna and a pacemaker to avoid
potential interference with the pacemaker. These
recommendations are consistent with the
independent research by and recommendations of
Wireless Technology Research.
Persons with pacemakers:
• should ALWAYS keep the phone more than six
inches from their pacemaker when the phone is
turned ON
• should turn the phone OFF immediately if you
have any reason to suspect that interference is
taking place
Getting Started
8

Other Medical Devices
If you use any other personal medical device,
consult the manufacturer of your device to
determine if it is adequately shielded from external
RF energy. Your physician may be able to assist
you in obtaining this information.
Turn your phone OFF in health care facilities when
any regulations posted in these areas instruct you
to do so. Hospitals or health care facilities may be
using equipment that could be sensitive to
external RF energy.
Vehicles
RF signals may affect improperly installed or
inadequately shielded electronic systems in motor
vehicles. Check with the manufacturer or its
representative regarding your vehicle. You should
also consult the manufacturer of any equipment
that has been added to your vehicle.
Posted Facilities
Turn your phone OFF in any facility where posted
notices so require.
Blasting Areas
To avoid interfering with blasting operations, turn
your phone OFF when in a "blasting area" or in
areas posted: "Turn off two-way radio." Obey all
signs and instructions.
Getting Started
9

Potentially Explosive Atmospheres
Turn your phone OFF and do not remove your
battery when you are in any area with a potentially
explosive atmosphere. Obey all signs and
instructions. Sparks from your battery in such
areas could cause an explosion or fire resulting in
bodily injury or even death. Areas with a
potentially explosive atmosphere are often but not
always clearly marked. They include, but are not
limited to: fueling areas such as gasoline stations;
below deck on boats; fuel or chemical transfer or
storage facilities; areas where fuel odors are
present (for example, if a gas/propane leak occurs
in a car or home); areas where the air contains
chemicals or particles, such as grain, dust, or
metal powders; and any other area where you
normally would be advised to turn off your vehicle
engine.
For Vehicles Equipped with an Air Bag
An air bag inflates with great force. Do NOT place
objects, including both installed or portable
wireless equipment, in the area over the air bag or
in the air bag deployment area. If in-vehicle
wireless equipment is improperly installed and the
air bag inflates, serious injury could result.
MOB010699
Getting Started
10

The cellular telephone you have selected
represents the state-of-the-art in cellular telephones
today. The listing below shows just a few of the
exceptional features that your telephone provides.
• 14-character alphanumeric color LCD display
• 104 memories, including last number recall and
scratch pad
• Last 10 Number Redial
• Turbo Dialing
• Three One Touch Dial Keys
• Signal Strength Meter
• Auto Answer
• Five Call Timers
• Emergency Dialing
• Menu Mode/Alphanumeric Directory
• Two System Registration
• Multiple Key Answer
To help you become familiar with your telephone’s
features, we will take you through a logical stepby-step learning procedure. The tabs at the edge
of the manual mark the different categories that
the telephone’s operations have been broken into.
Please read the general safety information on
page 6, and the rules, regulations, & precautions
on page 76, before operating the phone.
Introduction
Getting Started
11

NOTE The telephone you receive may not look
exactly like the one shown on the facing page. All
features will operate as indicated.
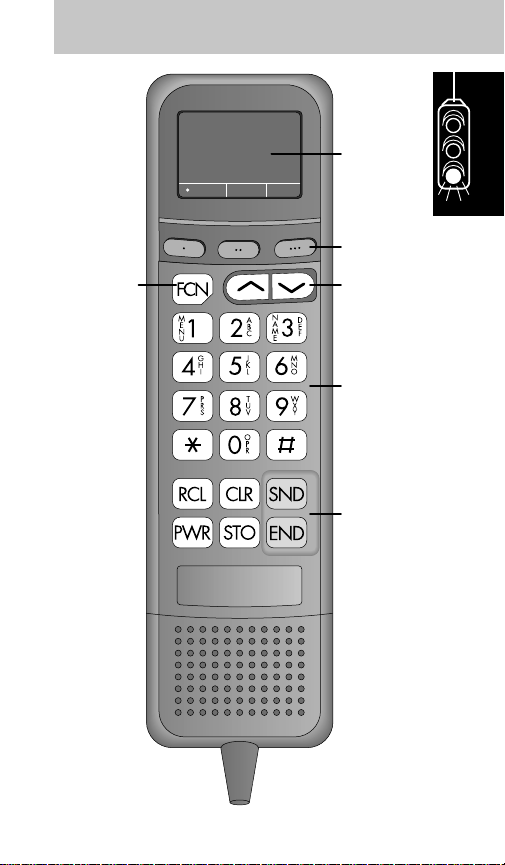
Operating Display and Status Indicators
Provide a visual indication of telephone
numbers and messages associated with
mobile telephone service.
Green Dot – Lights when unit is powered.
In Use – Lights when unit is in use.
No Svc – Lights when the unit is out of
service range of a cellular system. Calls
cannot be placed or received.
Roam – Lights when the unit is within
range of a cellular system other than your
home registered system.
Three One Touch Dial Keys
Allows for direct access to important phone
numbers and carrier network services.
Volume Keys
Adjust earpiece, ringer, and speaker volume.
Also:
≤ scrolls forward.
≥ scrolls backward.
Numeric Keypad
Used to enter call information. Also:
Ï, ⁄ enters feature menu.
≤ or £ scrolls forward.
≥ or • scrolls backward.
Phone Overview
Getting Started
12
Getting Started
13
In Use No Svc Roam

Control Keypad
‰ Recalls and displays telephone
numbers stored in memory.
Ç Clears the last digit entered when
pressed and released. Press and hold
to clear the entire display in the event
of an error (does not affect numbers
stored in memory).
Í Initiates a call to the entered
telephone number or answers a call.
∏ Controls power to the unit.
Ø Stores telephone numbers into any of
the memory locations.
´ Terminates a call in progress.
Ï Function Key
Used in combination with other buttons for
specific user-programmed functions (e.g.,
Ï, fi activates lock mode).
Getting Started
14
1. If your ignition is on and your telephone is
off, press ∏.
2. Press ∏ again to turn unit off.
Most users find it convenient to have their mobile
telephone turn on and off in conjunction with the
vehicle ignition switch. If you want your mobile
telephone to operate independently of the ignition
switch, discuss this with your installer.
We recommend that the engine be running when
using your mobile telephone.
Start-up Self Tests
Each time the telephone is turned on, it performs
a series of self tests, sounds a tone, and lights all
display positions and status indicators to check
their operation.
Display Messages
• If your phone is programmed for
two cellular systems, one of these
messages will appear in the
display upon power up.
• These are reminders as to which
system and phone number are
currently in use.
• Indicates that the phone has been
locked and cannot send or receive
calls until unlocked. Refer to page
60, Electronic Lock.
Message Explanation
LOCKED
A1 A2
B1 B2
Turn Phone On and Off
Basic Operation
15
Start-up Status Indicators
On/Lock Indicator
(green light)
• Lights steadily to indicate the
phone is on and fully
operative
• Lights steadily to indicate the
phone is locked and will not
place calls
In Use Indicator
• Lights steadily while a call is
in progress
No Svc (No Service)
Indicator
• Lights steadily if phone is
beyond range of a cellular
service area
• Calls cannot be placed or
received while lit
Roam Indicator
• If flashing, you are accessing
a service area outside of
your home system
• Steady Illumination -
Roaming on a home type
system
• Flashing - Roaming on a
non-home type system
In Use No Svc Roam
In Use No Svc Roam
In Use No Svc Roam
Indicators Explanation
In Use No Svc Roam
Basic Operation
16

1. With power on, enter the number you wish
to call.
2. Press Í. (You may leave the handset
mounted while dialing.)
The green
In Use
indicator will illuminate. You will
hear conventional ringing as the call is processed,
followed by the called party answering. Pick up the
handset and bring it up to your ear, or leave the
handset mounted and direct your conversation to
the Hands Free microphone for a hands free call.
If the green
In Use
indicator is extinguished, your
call has been terminated.
To Correct an Error
To clear the last digit entered, press and quickly
release Ç. To clear the entire entry, press and
hold Ç until the entire entry is erased.
Unsuccessful Call Attempts
If you hear one of the following signals, you have
not successfully completed your call.
Place a Call
Basic Operation
17

Your telephone includes a convenient feature
designed to make repetitive call attempts
unnecessary when a cellular system is busy.
If you receive an alternating high/low signal
(intercept), or the fast busy tone (reorder signal),
followed by System Busy in the display when
attempting to place a call and wish to retry the
call, press Í before ending the unsuccessful call
attempt. Redial is then displayed.
Your telephone will make the call attempt
continuously over the next four minutes. If four
minutes is insufficient time, press Í to begin
another cycle. You may terminate Automatic
Automatic Redial
Basic Operation
18
Tone Description
Tone
fast busy
(reorder
signal)
System
Busy
alternating
high/low
tone
(intercept)
No Service
busy signal
Cellular System Busy
Press Í again before ending the
unsuccessful call attempt to
automatically redial the call (see
Automatic Redial below), or press ´
and dial the call again.
Cellular System Could Not
Complete the Call
You may have tried to place a call
before the green
was lit to let you know your phone
was fully operative. Either press Í
again before ending the unsuccessful
call attempt to automatically redial the
call (see Automatic Redial below), or
press ´ and dial the call again.
The Called Party’s Line is Busy
ON/LOCK indicator

Redial by turning off the phone or ignition, or by
pressing ´.
NOTE
Automatic Redial applies when the system
is busy, and will not engage when the called
party’s line is busy.
Press ´ or return the handset to its mount.
The green
In Use
indicator will extinguish. If you
have activated the Automatic Hands Free feature,
you must press ´ to terminate the call. You may
terminate a call or procedure (except Master
Reset and Clear) at any time by pressing ´.
Press
Í
upon hearing the ring, or lift the
handset to your ear.
Power must be on to receive calls.
If your phone is on and an incoming call is
unanswered, Call is displayed. You must press
Ç or ´ to cancel the message and clear the
display.
If you wish to receive the Call message while you
are away from your vehicle, turn your phone on.
When you return to your vehicle, press any key
except Ç, ´, or ∏ to check for incoming calls.
Call in Absence Indicator
Receive a Call
End a Call
Basic Operation
19

The Signal Strength Meter (SSM) represents the
relative strength of the signal received by your
phone. The SSM is displayed as a bar graph
following the letter S at the left side of the display.
The S alone represents the lowest strength with
each additional bar representing a stronger signal.
W
EAKSIGNAL
S
TRONGSIGNAL
The SSM appears every time you turn your phone
on, unless this feature is turned off through the
feature menu (refer to pg. 48).
To best utilize the SSM, you should familiarize
yourself with the relative signal strength levels and
their associated call placement and call-inprogress qualities.
To deactivate the SSM, see pg. 49.
Any messages, such as LOCKED, which display as
a result of activation of a feature will take priority
over the SSM. You will not see the SSM displayed
in these cases.
The Volume Meter represents the current volume
setting and will display whenever you adjust the
volume control. The volume level is displayed as a
bar graph following the letter V at the left side of
the display, with each additional bar representing
a higher volume setting.
Volume Meter
S––==≠≠S
Signal Strength Meter
Basic Operation
20
L
OWEST
H
IGHEST
V
OLUMESETTINGVOLUMESETTING
The number of bars represents the number of
volume steps for speaker, earpiece, and ringer
volume. The volume levels can be adjusted by the
use of ≤ and ≥.
1. With the handset mounted, press and hold
≤. This will raise the volume.
2. To lower the volume, press and hold ≥.
The number of bars on the Volume Meter
will decrease.
The maximum number of bars that will appear on
the display is six bars.
Lift the handset and use ≤ and ≥ as
described above.
The maximum number of bars that will appear on
the display is five bars.
v––==≠
Earpiece Volume
v––==≠≠
Speaker Volume
v––==≠≠v
Basic Operation
21

Press Ï and use ≤ and ≥ as
described above.
The maximum number of bars that will appear on
the display is six bars.
1. Press ‰, £.
2. The phone number that is currently active
will be displayed.
3. When you have finished viewing, press Ç.
1. Press ‰, £, Ø.
2. The display will go blank to confirm the switch
and the newly activated number will appear.
3. When you have finished viewing, press Ç.
Your telephone can operate over two different
home systems, if you have made proper
arrangements with your Cellular System Operator.
Both are designated as your ‘home system’ but
are accessed with separate telephone numbers.
While you may switch from one system to the
other, only one of the two can be active at any
given time. Calls are placed and received through
the active system only.
If you have two phone numbers programmed into
your phone, each time the telephone is turned on,
Switch to Second Phone Number
Display Own Phone Number
v––==≠≠
Ringer Volume
Basic Operation
22

it displays a message indicating which home
system type and phone number is currently active.
The message shows the system type and phone
number applied, as follows:
If a call is placed to the inactive phone number,
the caller will receive the recorded ‘Not In Service’
message.
When you turn your phone on, the telephone will
remember which system was active when you
turned it off. That system will stay active until you
change to the other system with the sequence ‰,
£, Ø. You cannot switch systems during a call.
If you enter the sequence during a call, the phone
will wait until the call is terminated and the
In Use
indicator is extinguished before switching systems.
Each system (and phone number) has its own
Selectable System Registration state that you may
program (see page 68). That is, you can select
Home Only for system 1 (and phone number 1) and
System Type and
Phone Number
Display
Non-wireline or A type
with phone number 1
Non-wireline or A type
with phone number 2
Wireline or B type with
phone number 1
Wireline or B type with
phone number 2
B2
B1
A2
A1
Basic Operation
23

Standard Mode for system 2 (and phone number
2). Whenever you switch back to System 1, your
telephone will operate in Home Only mode again.
The
Roam
indicator will operate based on the
active system (see page 67 for detailed information
on Roaming). For example, if your active system
is A1 and you are roaming on a wireline (B)
system, the
Roam
indicator will flash rapidly.
Each system (and phone number) has its own
cumulative and resettable call timers. You can
only display the call timers of the active system
(and phone number).
1. Leaving the handset mounted, dial the
number you wish to call.
2. Press Í.
3. When the called party answers, direct your
conversation to the Hands Free microphone
typically mounted on your vehicle’s sun
visor.The In Use indicator will remain on and
HF will display for the duration of the call.
4. Press ´ to terminate the call.
1. Press Í.
2. Direct your conversation to the Hands Free
microphone. The In Use indicator will remain
on and HF will display for the duration of the
call.
3. Press ´ to terminate the call.
Receive a Hands Free Call
Place a Hands Free Call
Basic Operation
24

1. If you are using the handset and want to
switch to Hands Free operation, press Ï, fl.
2. Mute will display. Note that M for Mute
appears on fl.
3. Return the handset to its mount.
4. Press Ï, fl again and HF will display.
5. Direct your conversation to the Hands Free
microphone.
1. Press Ï, ⁄.
2. Scroll the menu by pressing ≥ or ≤
(• or £) until –HANG UP FOR HF displays.
3. Press Ç once to toggle this feature on (ø),
and again to toggle it off (–).
4. To exit the feature menu, press ´.
This feature allows you to automatically go to
Hands Free operation without pressing Ï, fl.
NOTE
You must first activate the Automatic Hands
Free feature through the feature menu on page
48.
To go from handset to Hands Free operation, hang
up the handset and begin speaking. To go from
Hands Free to handset operation, lift the handset.
Lift the handset while in a call.
Hands Free to Handset Operation
Automatic Hands Free
Manual Handset to
Hands Free Operation
Basic Operation
25

Your telephone provides memory capable of
storing up to 99 frequently called phone numbers
as well as a fourteen-character name tag. Upon
entering a phone number in memory, the phone
will prompt you to store an associated alphabetic
name. If you are not interested in creating a name
tag for the selected location, alpha entry may be
bypassed and just the phone number would be
stored. (Refer to page 28 for details.)
Before setting up your memory, we suggest you
read the rest of this section to become familiar
with the ways in which you will access and use it.
1. Enter phone number to be stored (up to 32
digits).
2. Press Ø.
3. Enter two-digit location number or press •
for Autoload.
4. The phone will then automatically prompt
for alphabetic name input. The Alpha Entry
Mode display will flash ALPHA or sto.
5. Utilize the alphanumeric keypad to enter
each letter as described below (up to 14
letters). £ advances to the next position.
• backspaces, if necessary. Repeat until
name tag is complete. If you do not want to
store a name tag, continue with Step 6.
6. Press Ø.
7. Phone will confirm storage by displaying
memory location number.
Storing a Phone Number and a Name
Storing Information in Memory
Memory
26

Details on Utilizing Alpha Entry Mode
Once in Alpha Entry Mode, you can enter letters
using your numeric keypad. For example, ‘A’ is at
the first press of ¤, ‘B’ is at the second press of
¤, and ‘C’ is at the third press of ¤.
EXAMPLE
To enter ‘Bob’ and his phone number
555-1234 into memory location 01:
1. Enter phone number by pressing fi, fi, fi,
⁄, ¤, ‹, ›
.
2. Press
Ø, ‚, ⁄
. The display will flash
ALPHA or sto.
3. Press ¤twice to select ‘B’. Press £ to
advance to the next position. Press
fl
three
times for ‘O’. Press
£
. Press ¤twice more to
select the second ‘B’.
4. Press
Ø
. The display will flash
01
to confirm
that the name and phone number were
successfully stored in memory location 01.
Memory
27
Key
¤
‹
›
fi
fl
‡
°
·
st
1
Press
A
D
G
J
M
P
T
W
nd
2
Press
B
E
H
K
N
Q
U
X
rd
3
Press
C
F
I
L
O
R
V
Y
th
4
Press
S
Z

NOTE
If Full displays, refer to Memory Protect
on page 31.
1. Enter the phone number you wish to store,
up to 32 digits.
2. Press Ø.
3. Enter two-digit location number or press •
for Autoload.
4. The phone is automatically in Alpha Entry
Mode. The display will flash ALPHA or sto.
Press Ø to bypass.
5. Phone will confirm storage by displaying
memory location number.
NOTE
If Full displays, refer to Memory Protect
on page 31.
1. Enter area code and prefix to be stored.
2. Press Ø.
3. Enter two-digit location number or press •
for Autoload.
4. The phone is automatically in Alpha Entry
Mode. The display will flash ALPHA or sto.
Enter a name or press Ø to bypass.
5. Phone will confirm storage by displaying
memory location number.
NOTE
If Full displays, refer to Memory Protect
on page 31.
Storing an area code and prefix for a frequently
called location such as an office, offers a
Storing Area Code and Prefix
(Postscripting)
Storing Phone Number Only
Memory
28

convenient means of postscripting the four-digit
extension of the party you wish to call. To place a
call from this type of memory location, simply
recall the location and enter the four-digit
extension before pressing Í.
There are three ways to select a memory location.
You can select a specific location number; you can
choose to autoload which will store the information
in the next sequentially available location; or you
can arrange the directory into blocks.
1. Enter phone number to be stored.
2. Press Ø.
3. Enter the two-digit location number in which
you wish to place the entry.
4. The phone is automatically in Alpha Entry
Mode. Enter a name or continue to step 5.
5. Press Ø.
6. Phone will confirm storage by displaying
memory location number.
NOTE
If Full displays, refer to Memory Protect
on page 31.
1. Enter phone number to be stored.
2. Press Ø, •.
3. The phone is automatically in Alpha Entry
Mode. Enter a name or continue to step 4.
4. Press Ø.
5. Phone will confirm storage by displaying
the autoload memory location number.
Memory Autoload
Store to a Location Number
Memory
29

NOTE
If Full displays, refer to Memory Protect
on page 31.
This procedure automatically stores memory
entries into the next available memory location.
This method serves particularly well if you do not
remember the next available memory location.
1. Enter phone number to be stored.
2. Press Ø.
3. Enter the first digit of the desired block –
‚, ⁄, ¤, etc.
4. Press •.
5. The phone is automatically in Alpha Entry
Mode. Enter a name or continue to step 6.
6. Press Ø.
7. Phone will confirm storage by displaying
memory location number.
NOTE
If Full displays, refer to Memory Protect
on page 31.
The directory can be arranged by location number
in blocks of ten (0-9, 10-19, 20-29, etc.).
Organizing your directory in this manner greatly
speeds review or recall of entries that share a
commonality: e.g., business associates, friends,
emergency numbers, etc. You will still be able to
recall your entries alphabetically.
To take advantage of memory blocks, store
entries into the next free location within a block of
ten numbers (0-9, 10-19, 20-29, etc.).
Memory Blocks
Memory
30

The directory has an automatic memory protect
feature which prevents the accidental overwriting and
loss of previously stored names and numbers in
memory. If you attempt to store a number or name
in a location that already contains an entry, the
phone will display FULL and the name/number in
that memory location. The display will then show
the previously stored number and alternate between
the name stored and CHANGE?.
If you wish to save to that location, thus overwriting
and erasing the old information, press Ø.
If you wish to store the entry in an alternate
location, press ´, Ø and the alternate location
number. Memory autoload or memory blocks may
also be used in this case (see pages 29 and 30).
Information stored in memory can be recalled or
reviewed by location number. You may also scroll
the memory during a call. Pressing ´ once in
this case will cancel scrolling, but not the call.
1. Press Ï, ‹.
2. Continually press £ or ≤ to scroll in
alphabetical order until the desired name
displays.
3. Press Í to place a call to the number
displayed.
Recalling/Scrolling by Name
Recalling/Scrolling from Memory
Memory Protect
Memory
31

Use ≤ and ≥ (• and £) to scroll forward
and backward.
To begin scrolling from a specific letter of the
alphabet, press Ï, ‹, then the letter from which
you wish to start. If no entries are stored under
this letter, the unit automatically searches forward,
alphabetically, until the next name is found.
To view the associated phone number
1. Press ‰. The display will flash the location
number, then the phone number.
2. Press ‰ again to view the name. If you
have the Name Preferred feature selected,
the phone will first show the alpha entry
when you recall by the memory location. To
view the location and phone number press
‰.
1. Press ‰.
2. Enter the desired two-digit location number.
or
Press ‚, ⁄ and press £ or ≤ to begin
scrolling from the beginning of the stored
locations.
3. The display will show the location number,
then the first 10 digits of the number, or if
no number was entered, up to 14 characters
of the name will display.
4. Press Í to place a call to the number
displayed.
Recalling/Scrolling by
Location Number
Memory
32

Use ≤ and ≥ (• and £) to scroll forward
and backward.
To scroll from a specific two-digit location, press
‰, then the location number where you wish to
begin scrolling.
The phone will display an apostrophe (’) after the
memory location number to indicate that memory
scrolling is active.
NOTE
If you have the Name Preference feature
selected, the above information is reversed. Refer
to the Number Preference section on page 52 for
more details.
1. Press ‰ (optional, allows you to see
number).
2. Press Í to place a call to the last number
displayed.
This feature automatically remembers the last
phone number entered from the keypad or
recalled from memory.
1. Press ‰, ‚, ‚. L0’ will display followed
by the name or number of the most recently
placed call.
2. Scroll the last ten numbers dialed with ≤
and ≥ (• and £).
3. To place a call to a displayed number, press
Í.
Recalling Last 10 Numbers Dialed
Last Number Recall
Memory
33

This feature allows you to refer to or redial any of the
last ten phone numbers to which calls were placed.
The numbers are stored in the order placed and
always represent the ten most recent calls.
Successive calls to the same number are stored only
once, and all are retained when the unit is shut off.
NOTE
When scrolling, you may observe that a
location number is skipped. This may be caused
by pressing Í when the display is empty and
does not mean that a number has been lost.
1. Recall two-digit location number where an
area code and prefix is stored.
2. Add additional digits as needed.
3. Press Í.
You can add additional digits to the end of recalled
numbers by entering them before pressing Í.
This is particularly useful if you often place calls to
the same area code and prefix, e.g., an office, but
need to reach different extensions with each call.
Press and hold for one second any one of
the digit buttons ¤ through ·.
The digit buttons ¤ through · (⁄ is reserved
for Emergency Dialing) provide an advanced form
of Super Speed Dialing. Once numbers have been
stored in memory location 2-9, calls can be placed
from these locations by pressing the associated
Turbo Dial
Recalling an Area Code and Prefix
(Postscripting)
Memory
34

key and holding for approximately one second.
There is no need to press Í.
NOTE
If you wish to use memory location 1 for a
non-emergency number, the Emergcy message
may be deactivated through the feature menu
(refer to page 48).
In order to prevent the accidental pressing of
these keys, Turbo Dial can be deactivated through
the feature menu.
NOTE
Turbo Dialing is affected by Call Restriction
Service Levels 1, 2, 3, and 8 (see page 62). Do
not select these service levels if you wish to use
Turbo Dialing.
Your phone has three special dialing keys, ≈,
¥, and Ω, which allow for easy one touch
access to numbers stored in these locations. See
page 45 for more details on how to use these keys.
1. Enter the location number.
2. Press Í.
Memory locations 1-99 are equipped with Super
Speed Dialing capability. Once information is
stored in these locations, Super Speed Dialing
allows you to place a call without pressing ‰.
The number dialed will not display for review.
NOTE
Do not attempt the sequence ‚, Í. This
will place a call to the local operator.
Super Speed Dialing
One Touch Dialing Keys
Memory
35

The scratch pad permits entry of numbers from
the keypad during conversation.
If your party gives you another number to call,
simply enter this from the keypad. If you make an
error, press Ç to erase the last digit entered or
hold Ç to erase the entire entry.
Advise your party that they will hear tones as you
store the number. To call the scratch pad number at
the end of an ongoing conversation, press ´, Í.
NOTE
Refer to the Scratch Pad Tones feature
(page 55) for details on silencing the tones.
Your telephone provides the standard Dual Tone
Multi-Frequency (DTMF) signals typically used to
access alternate long distance services, signal
pagers, answering machines, etc. Generally, these
services use a two-part procedure: First, a call is
placed from the memory or through the keypad to
a central telephone number, then a secondary dial
tone is heard and the additional tone digits are sent.
To tone dial from the keypad, make the initial call.
Append additional tone digits using the keypad.
The tones are automatically sent as you press the
keys. Do not press Í.
EXCEPTION
If you have selected silent scratch
pad, you must press ‰, Í after entering the
additional digits.
Tone Dialing (Two-Part Calling)
Scratch Pad Memory
Memory
36

To tone dial from a memory location, place the
initial call. Recall from memory (using ‰, location
number) the number you wish to send as DTMF
digits. Press ‰, Í. Repeat these steps as
required to send separate groups of numbers.
Two-part calling can be automated by a unique
feature which permits the programming and
memory storage of pauses between groups of
numbers. When recalled or sent, the telephone
stops transmitting at the pause and waits for your
response (i.e., secondary dial tone).
Two methods of Pause Dialing are explained below:
• Memory Linking is used when constant number
sequences are required, such as banking
inquiries, answering machines, and voice mail.
• Calling Card Dialing provides you with a method
for storing lengthy calling card information in the
phone’s memory and sending this information
quickly and easily.
Once this information is stored, a few key
presses will transmit the linked information. The
phone will even prompt you to insert the number
you wish to call.
Memory
37

1. Enter the first group of numbers from
the keypad or recall them from memory
using ‰.
2. Insert a pause by pressing Ï, Í. ø will
appear where the pause is inserted. To
store, press Ø.
3. Enter the next group of numbers, or recall
them from memory by pressing Ï, ‰,
two-digit location number.
4. Repeat this sequence for as many groups
as you wish up to a maximum of 32 digits.
(Each pause occupies a digit.)
EXAMPLE
To construct a number sequence
which you might use to inquire about your bank
balance, follow this example. The entry sequence
required by the bank is to call the access number,
wait for the tone, enter your ID number followed
by £, wait for the tone, then enter your account
number and £.
The bank’s telephone number is 123-4567. Your
ID number is 888. Your account number is 22.
NOTE
Pressing • or £ may be required by the
bank.
Pause Dialing (Memory Linking)
Memory
38

To place a linked call, press Í to transmit the
first group of numbers, prior to the first pause.
or sto
Memory
39
Instruction and Key
Sequence
Enter the phone number of the
1
bank — ⁄, ¤, ‹, ›, fi,
fl, ‡ or recall it from memory
location xx — ‰, x, x
Create a pause —
2
Ï, Í
Press Ø3
Enter the ID number and a
4
pound sign — °, °, °, £
or recall it from memory location
xx — Ï, ‰, x, x
Create another pause —
5
Ï, Í
Press Ø6
Enter the account number and a
7
pound sign — ¤, ¤, £
To store number, press Ø and
8
the two-digit location number.
Press Ø to bypass the Alpha
message in the display. The
memory location number will be
displayed to confirm storage.
Display
1234567
INSERT
PAUS ø
1
234567ø
12345
67ø888C
INSERT
PAUS ø
123456
7ø888Cø
34567ø8
88Cø22C
ALPHA
–

After waiting for the system response, press Í to
send the second group of numbers. Continue to
press Í until all digit groups are sent.
If the PIN code feature is activated (see page 56),
the PIN code will automatically be sent after the
first pause by pressing Í.
To store a linked sequence, press Ø, then enter the
location number where you wish to store the number.
Each memory location will only accept up to 32 digits.
NOTE
Long Tone DTMF signals cannot be sent
using this procedure. If Long Tone DTMF signals
are required, they must be sent manually. The tone
will be sent for as long as the key is depressed.
NOTE
Do not add the PIN code to the linked
sequence. Your phone will automatically insert the
PIN code when placing a linked call. Follow the
instructions on page 56.
The following is a typical example of information
required to make a credit card call. The order of
information may vary depending on your service
provider. The information provided below is
designed to accommodate credit card dialing for
the three major long distance carriers.
To enter your calling
card number into memory:
1. Enter your calling card access phone
number. (Typically this is a 1-800 phone
number or a 0. If a 0, skip to step 4.)
2. Insert a pause by pressing Ï, Í, Ø. ø
will appear where the pause is inserted.
Calling Card Dialing
Memory
40

3. Press ‚. (Long distance carriers typically
require that a 0 be placed before the number
you are calling.)
4. Press Ï, Í, £. NUM ‘N’ will display. This
serves as a marker for the spot where the
phone number you wish to call will be
automatically inserted into the sequence.
5. Press Ø. This stores the N character.
6. Insert another pause by pressing Ï, Í,
Ø. ø will appear where the pause is inserted.
7. Enter your credit card PIN number.
8. Press Ø and one of the three One Touch
Dial keys or Turbo Dial locations (1-9).
9. The phone will then automatically prompt
for alphabetic name input. Enter a name and
then press Ø or simply press Ø to
bypass the addition of an alphabetic name.
10.The phone will confirm storage by
displaying STORED for One Touch Dial keys
or the memory location number for Turbo
Dial locations.
This feature provides you with a convenient
method for saving your credit card calling
information in the phone’s memory. You can then
readily place calls without having to enter your
credit card information every time you place a
credit card call. Your credit card call can
conveniently be sent to a phone number stored in
any memory location or you can dial the phone
number through the keypad. The only requirement
is that the number you wish to call through memory
recall or dialing, must include the area code.
Memory
41

Memory
42
Instruction and Key
Sequence
1
Enter the access number.
2
Enter a pause — Ï, Í
3
Press — Ø
4
Press — ‚
5
Enter a pause — Ï, Í
6
Press — £
7
Press — Ø
8
Enter a pause — Ï, Í
9
Press — Ø
10
Enter your credit card PIN number
To store number, press Ø and the One Touch
11
Dial key or the Turbo Dial key. Press Ø again to
bypass Alpha display. The memory location
number will be displayed to confirm storage. If you
stored the number in a One Touch Dial location,
STORED will be displayed to confirm storage.
Display
1800
1234567
INSERT
PAUS ø
18001
234567ø
180012
34567ø0
INSERT
PAUS ø
NUM ’N
8001234
567ø0 ’N
INSERT
PAUS ø
0012345
67ø0 ’Nø
67ø0’Nø
8901234

To place a call using your credit card:
1. Recall and send the credit card memory
location. You can do this in the following
ways:
a. If the credit card number is stored in a
One Touch Dial location, simply press and
hold the appropriate One Touch Dial key for
one second.
b. If the credit card number is stored in a
Turbo Dial location (1-9), simply press and
hold the appropriate key for one second.
2. The display will flash Enter Number. This is
the prompt to enter the phone number you
wish to call.
3. Enter the phone number you wish to call or
recall it from memory. Note that the area code
must be included.You may enter and send
the phone number in the following ways:
a. Enter the number manually. The number
must be three or more digits. Press Í to
initiate the call.
b. Enter the Turbo Dial location where the
number is stored. You do not need to press
Í to initiate the call.
c. Enter ‰ and the two-digit memory
location. Press Í to initiate the call.
4. The call is now initiated. The first group of
numbers will be transmitted (i.e., the access
number or number you are calling). After
waiting for the system response, press the
One Touch Dial key to send the second
group of numbers (i.e., the number you are
calling or the credit card PIN number). If a
third group is required for your credit card,
Memory
43

wait for the next system response and press
the One Touch Dial key again.
IMPORTANT
If your credit card number is stored
in a Turbo Dial location, you must press Í rather
than the Turbo Dial key to send additional groups
of numbers.
EXAMPLE
Use the credit card information stored
in One Touch Dial location 1 to place a credit card
call to a ten-digit phone number stored in memory
location 3.
Memory
44
Instruction and Key
Sequence
Recall and send your credit card
1
number. In this example, use One
Touch Dialing. Press and hold
≈ for one second.
Enter and send the phone number
2
you wish to call. In this example,
memory location 3 is sent via Turbo
Dialing. Press and hold ‹ for one
second. (The Signal Strength Meter
will display and the In Use light will
begin to flash to let you know that
the call has been initiated.)
3
Send the final series of digits
(i.e., your credit card PIN
number) after you hear the
system response. (You will hear
the tones as the digits are sent.)
Display
ENTER
NUMBER
S––––––
S––––––

Press and hold the One Touch Dial Key
≈, ¥, or Ω.
To Store a Number
1. Enter phone number to be stored.
2. Press Ø.
3. Press specific One Touch Dial Key.
4. The phone is automatically in Alpha Entry
Mode. Enter a name or bypass by pressing
Ø.
5. Phone will confirm storage by displaying
Stored.
These keys function like Turbo Dial keys. When you
press and hold ≈, ¥, or Ω, a call is placed to
the number stored in that position. To recall the number,
press ‰, and the specific One Touch Dial Key. To
clear the number, press Ç, Ø, and the specific
One Touch Dial Key. ALPHA or sto will appear.
Press Ø. The unit will display the name and number
along with Change?. Press Ø to clear both name
and number.
1. Press and hold ⁄.
2. Emergcy will display.
Memory location 01, a Turbo Dial location, may be
used for 911 or any other emergency number you
may wish to dial even if your phone is locked.
NOTE
Do not select Call Restriction Service
Levels 1, 2, 3, or 8 if you wish to use One Touch
Emergency Dialing.
One Touch Emergency Dialing
One Touch Dialing Keys
Memory
45

Emergency dialing can be deactivated by using
the feature menu found on page 48. When this
feature is deactivated, the number stored in
memory location 01 will still be dialed if the phone
is
unlocked
and if you press and hold ⁄, but
Emergcy will not display.
NOTE
Automatic Redial does not work with
emergency dialing while the phone is locked.
1. Press ‰ and the two-digit location number.
2. Press ‰ again, if necessary, so that the
phone number to be changed is displayed.
3. Edit phone number by pressing Ç to back
out the digits to be changed. Enter new digits.
4. Press Ø and the same two-digit location
number.
5. ALPHA or sto will be displayed.
6. Change or add alpha name tag if desired. To
edit name, press Ç to back out the letters
to be changed. Enter new alpha characters.
(Enter alphabetic characters as described
on page 27.)
7. Press Ø.
8. You will see a Memory Protect message;
press Ø to overwrite.
9. Memory location number will display as
confirmation.
NOTE
See Number Preference feature on page
52 for more details on step 2 above.
Change Memory Entries Alpha or Numeric
Memory
46

Clearing via Memory Name
1. Press Ï, ‹ to enter alphabetic memory.
2. Review the memory locations using memory
review (see page 31), and recall the entry
you wish cleared.
3. Press Ç. The unit will display Clear?.
4. Press Ø to clear both name and number.
or
Press ´ to exit without deleting the entry.
Clearing via Memory Location Number
1. Press Ç, Ø, and the two-digit location
number to be cleared.
2. ALPHA or sto will display. Press Ø to
bypass.
3. The phone will display Full, flash number in
memory, followed by Change?.
4. Press Ø to clear.
or
Press ´ to exit without deleting the entry.
Clear Memory Entries
Memory
47

The feature menu permits review, selection, and
cancellation of most of your telephone’s features
through the keypad and display. The chart below
shows all features available through the menu and
the pages where detailed information is found.
Feature Page
52
61
19
45
65
25
59
54
53
52
59
56
55
54
65
55
64
Auto Answer
Auto Lock
Call Receive
Emergency Call
Extended Talk
HF Auto
Individual Timer
Keypad Tones
Multi Key Answer
Number Preferred
One-Minute Timer
PIN Active
Remind Message
Ringer On
Ringer Style
Scratch Pad Tones
Select Language
Signal Meter
Theft Alarm
Turbo Dial
49
61
34
Feature Menu
Features
48

Additional telephone features, that may be available
with your phone but are not accessed through the
feature menu, are also described in this section.
1. Press Ï, ⁄.
2. Scroll the menu by pressing ≥ or ≤
(• or £) until the desired feature displays.
3. Press Ç to toggle the feature off or Ø to
activate.
4. Press ´ to exit the feature menu.
EXAMPLE
To activate silent keypad, press Ï,
⁄, and scroll with £ or ≤ until the display
shows keypad tone on.
Press Ç to deactivate this feature. The display
will then show keypad Tone Off.
Press ´ to exit the menu.
To Disable the SSM from Displaying
1. Press Ï, ⁄.
2. Scroll the menu by pressing ≥ or ≤
(• or £) until signal meter on displays.
3. Press Ç once to disable the SSM. To
reactivate the SSM press Ø.
4. Press ´ to exit the feature menu.
See page 20 for more details on the operation of
the SSM.
Signal Strength Meter
To Select/Cancel Menu Features
Features
49

To Review Status
1. Press Ï, ‚, ·, ‰.
2. Press ≤ or ≥ (• or £) to scroll
messages.
3. To activate a feature that is displayed press
Ø..To deactivate a feature press Ç.
To End Review
Press ´.
To mute microphone
Press Ï, fl.
To disable mute
Press Ï, fl again.
This feature allows you to confer privately with
others in the car during a call. It will disable the
microphone and display Mute. Note that M for
Mute appears on fl. The mute feature is
canceled if you end your call.
1. Press Ï, › with the unit on, unlocked,
and Theft Alarm and Silent Ringer inactive.
ALERT will display.
2. Turn off the vehicle ignition.
The Auxiliary Alert feature allows an additional
alerting device (horn or lights) to be activated for
the first five rings (20 seconds) of an incoming
Auxiliary Alert
Microphone Muting
Feature Status Review
Features
50

call. This is useful if you intend to be outside of
the vehicle and expect a call.
NOTE
Determination of whether the Auxiliary Alert
feature is desired and, if so, which alerting device
is to be used is made at the time of installation.
Note that H for Horn appears on ›. The external
alerting device (horn or lights) will only respond if
the vehicle ignition switch has been turned off.
NOTE
A call cannot be in progress when you
enable Auxiliary Alert. Auto Answer is disabled
during Auxiliary Alert.
When the Auxiliary Alert mode is enabled, the
mobile telephone remains on despite the vehicle
ignition being turned off. Calls may be placed while
in the Auxiliary Alert mode unless the unit has also
been locked subsequent to pressing Ï, ›.
NOTE
If left active for more than eight hours, the
telephone will turn itself off to preserve your
vehicle’s battery.
The Auxiliary Alert mode is automatically disabled
the next time the ignition is turned from off to on.
The Auxiliary Alert mode can also be disabled by
pressing ∏ or by pressing Ï, › again. ALERT
will turn off when the feature is disabled.
Features
51

1. Press Ï, ⁄.
2. Scroll the menu by pressing ≥ or ≤
(• or £) until number pref on displays.
3. Press Ç once to toggle this feature off, and
Ø to toggle it on.
4. To exit the feature menu, press ´.
The Number Preference feature reverses the
display order of memory entries so that the
number will be displayed before the name.
1. Press Ï, ⁄.
2. Scroll the menu by pressing ≥ or ≤
(• or £) until auto ansr off displays.
3. Press Ç once to toggle this feature off, and
Ø to toggle it on.
4. To exit the feature menu, press ´.
This feature permits you to answer calls without
pressing Í. When your phone receives a call, it
will ring twice, then activate the Hands Free system.
NOTE
We suggest that you do not select the
Automatic Answer and Silent Ringer simultaneously
since incoming calls will then be announced only by
the flashing Call in the display. Also, this feature
may be incompatible with certain enhanced
system services, such as no-answer transfer.
Consult your Cellular Service Provider.
Automatic Answer
Number Preference
Features
52

1. Press Ï, ⁄.
2. Scroll the menu by pressing ≤ or ≥
(• or £) until multkey ansr off displays.
3. Press Ç once to toggle this feature off, and
Ø to toggle it on.
4. To exit the feature menu, press ´.
The Multiple Key Answer feature allows you to
answer an incoming call by pressing Í or any
digit key ⁄ through ·.
1. Press Ï, ⁄.
2. Scroll the menu by pressing ≥ or ≤
(• or £) until Call rcv on displays.
3. Press Ç once to toggle this feature off, and
Ø to toggle it on.
4. To exit the feature menu, press ´.
Use this feature if you prefer not to receive incoming
calls but wish to be informed of the attempt. If your
cellular service offers No-Answer Transfer, the
calls received while this feature is in effect can be
routed to a secretary or answering machine.
When the phone is on and this feature is selected,
incoming calls are signaled by several short bursts
of tone, Call in the display, and the green on
indicator. Without No-Answer Transfer, the caller
will receive the ‘Not in Service’ recording.
As a reminder that incoming call screening is
selected, the unit will sound the special tone burst
each time it is turned on.
Call Receive
Multiple Key Answer
Features
53

NOTE
We suggest you do not select Incoming
Call Screening and Silent Ringer simultaneously
since the incoming call will not be signalled by a
short burst of tone.
1. Press Ï, ⁄.
2. Scroll the menu by pressing ≥ or ≤
(• or £) until ringer on displays.
3. Press Ç once to toggle this feature off, and
Ø to toggle it on.
4. To exit the feature menu, press ´.
The telephone’s ring tones may be silenced where
they could prove a distraction, as during a business
conference, etc. In this case, incoming calls are
announced only by a flashing Call in the display.
NOTE
We suggest you do not select the Silent
Ringer and Automatic Answer simultaneously,
since the phone will then answer a call without
audible indication.
1. Press Ï, ⁄.
2. Scroll the menu by pressing ≥ or ≤
(• or £) until Keypad tone on displays.
3. Press Ç once to toggle this feature off, and
Ø to toggle it on.
4. To exit the feature menu, press ´.
When selected, this feature silences the tones
used to indicate keypad depressions.
Keypad Tones
Ringer
Features
54

1. Press Ï, ⁄.
2. Scroll the menu by pressing ≥ or ≤
(• or £) until scrpad tone on displays.
3. Press Ç once to toggle this feature off, and
Ø to toggle it on.
4. To exit the feature menu, press ´.
Use this feature to enter scratch pad numbers
during a call without transmitting DTMF tones. You
will hear the tones, but your called party will not.
NOTE
Should you wish to transmit DTMF tones
(to access answering machines, pagers, automatic
menus, etc.) while Silent Scratch Pad is activated,
enter the digits and press ‰, Í.
1. Press Ï, ⁄.
2. Scroll the menu by pressing ≥ or ≤
(• or £) until Remind Msg off displays.
3. Press Ç once to toggle this feature off, and
Ø to toggle it on.
4. To exit the feature menu, press ´.
Reminder tone is an audible message to alert the
user that they have received a short message. It
will beep every two minutes until the new
messages are read.
Your cellular carrier may offer enhanced features,
such as short messaging. Ask your cellular service
provider if this is supported in your system. If short
messaging is not supported in your system,
reminder beep selection will have no effect.
Remind Message
Scratch Pad Tones
Features
55

Activate PIN Code
1. Press Ï, ⁄.
2. Scroll the menu by pressing ≥ or ≤
(• or £) until pin inactive displays.
3. Press Ç once to toggle this feature off, and
Ø to toggle it on.
4. To exit the feature menu, press ´.
Store PIN Code in Memory Location 07
1. Enter PIN code.
2. Press Ø.
3. Press ‚, ‡.
Place a Call With PIN Code Active
1. Enter number to be called, or recall from
memory.
2. Press Í. Wait for double tone – “beep, beep.”
3. Press Í. The phone will automatically send
the PIN code stored in memory location 07.
Your cellular carrier may require a personal
identification number (PIN) when placing outbound
calls. This code assures the cellular system that
the person placing the call is an authorized user.
Ask your cellular service provider if this is required
in your system.
Only select this feature if your cellular service
provider requires it.
This feature will allow you to automatically send
your PIN code with all outbound calls. If Invalid
PIN displays, check to see if you have activated
the feature in the menu without storing a PIN
PIN Code Activation
Features
56

number in memory location 7. The PIN code must
be less than seven digits.
If you enter a service area which does not require a
PIN code, disable the feature in the feature menu.
Call timers provide a useful means of monitoring
the air-time spent in conversation. Several of
these operate in the background and can be
displayed at any time. Another offers tones heard
only on your side of the conversation.
Each timer begins counting as a cellular channel
is assigned, or when the phone rings to signal an
incoming call. If an incoming call is not answered,
the timers revert to their previous values.
To Display
Press ‰, £, £.
This timer accumulates the air-time of a call in
minutes and seconds.
It automatically resets before a new call is placed
and when the phone is turned off.
Individual Call Timer
Timers
Features
57

To Display
Press ‰, £, £, £.
To Reset
Press Ï, ‚, ‡, Ç.
This timer accumulates the air-time in minutes
from the point at which it is reset.
This resettable timer is generally utilized to track
monthly air-time usage and is set in conjunction
with the monthly billing cycle.
NOTE
If you have two phone numbers
programmed in your phone, each phone number
has its own resettable call timer. To view the
resettable call timer associated with the other
phone number, switch your phone to that number,
then use the sequence above.
To Display
Press ‰, £, £, £, £.
This is a non-resettable timer which accumulates
the phone’s total air-time in minutes, starting with
the initial factory setting.
NOTE
If you have two phone numbers
programmed in your phone, each phone number
has its own cumulative call timer. To view the
cumulative call timer associated with the other
phone number, switch your phone to that number,
then use the sequence above.
Cumulative Call Timer
Resettable Call Timer
Features
58

1. Press Ï, ⁄.
2. Scroll the menu by pressing ≥ or ≤
(• or £) until indiv timroff displays.
3. Press Ç once to toggle this feature off, and
Ø to toggle it on.
4. To exit the feature menu, press ´.
This feature automatically displays the
accumulated time in minutes and seconds during
and after each call.
1. Press Ï, ⁄.
2. Scroll the menu by pressing ≥ or ≤
(• or £) until one min timroff displays.
3. Press Ç once to toggle this feature off, and
Ø to toggle it on.
4. To exit the feature menu, press ´.
This timer provides a tone ten seconds before the
end of each minute during calls.
Your telephone offers several forms of security
against unauthorized use. These require either
your three-digit unlock code, or the six-digit
security code. The factory programmed unlock
code is 123 and the factory programmed security
code is 000000.
Security Features
One-Minute Timer
Individual Timer
Features
59

To Lock
1. Press Ï, fi.
2. Lock? will display.
3. Press Ø to lock.
4. Press ´ to exit.
To Unlock
Enter your three-digit unlock code. If you make
an error, press Ç and start again.
The electronic lock prevents use of the telephone
by disabling both incoming and outgoing calls. To
help remember which key to use, note that L for
Lock appears on fi.
If a call is received during this period, the phone
will ring and you must enter the unlock code
before the call can be answered.
1. Press Ï, ‚.
2. Enter your six-digit security code.
3. Enter the new desired three-digit unlock code.
4. Press Ø. The new unlock code will display
to confirm storage.
1. Press Ï, ‚.
2. Enter your six-digit security code.
3. Press ‰. The phone will display loccode
and the three-digit unlock code.
Display Unlock Code
Change Unlock Code
Electronic Lock
Features
60

NOTE
Use this procedure if you have forgotten
your current three-digit unlock code.
1. Press Ï, ⁄.
2. Scroll the menu by pressing ≤ or ≥
(• or £) until auto lock off displays.
3. Press Ç once to toggle this feature off, and
Ø to toggle it on.
4. To exit the feature menu, press ´.
This feature automatically locks your phone each
time it is turned off.
To Select (On)
1. Press Ï, ⁄.
2. Scroll the menu by pressing ≤ or ≥
(• or £) until theft alrmoff displays.
3. Press Ç once to toggle this feature off, and
Ø to toggle it on.
4. Press ´ to exit the feature menu. The
phone will display Armed.
5. Enter the phone number to be called or
recall a number from memory.
6. Turn off the ignition.Your telephone will turn
off as well.
To Cancel (Off)
1. Turn on the ignition.
2. Enter your three-digit unlock code within 30
seconds.
When the theft alarm is selected or an
unauthorized person turns on your phone and does
Theft Alarm
Automatic Lock
Features
61

not enter your unlock code within 30 seconds, an
alerting call will be placed to the phone number you
have stored in this feature. If the phone receives a
busy signal, it will repeat the call automatically.
Anyone answering the call will hear alternating
high and low pitched tones (siren). If you elected
to have the Auxiliary Alert feature installed, the
auxiliary alerting device will also be activated. The
phone will then repeat the call.
The removal of the control unit will not prevent
your mobile telephone from attempting to place
the call. However, if the antenna has been
removed, the phone will be prevented from
successfully completing the call. The Auxiliary
Alert device will still be activated.
NOTE
If you inadvertently trip the theft alarm and
the alarm call is placed, you can stop the alarm by
entering your three-digit unlock code. This feature
must be reset in the feature menu each time the
phone is disarmed.
If PIN code is activated, the theft alarm will not
work as the PIN code must be sent manually in
order to complete the call.
1. Press Ï, ‚.
2. Enter your six-digit security code.
3. Enter the number of the service level you
wish to use.
4. Press Ø. The phone will display service
level and the number selected.
Change Service Level
Features
62
Your telephone can be set to restrict call
placement (as when lending the phone to another
person). Using the six-digit security code, you may
select one of the following levels of restriction.
To change the phone to unrestricted operation, use
the procedure above and enter service level 4.
No restrictions. (Standard setting)
Full keypad and directory dialing.
No storage in directory locations
1-10 or One Touch Dial locations.
Keypad dialing only. No directory
or Turbo Dial access.
Phone will place calls from all directory
locations (‰, ‚ ⁄ - · ·, Í).
No keypad dialing. No directory change
or storage.
Seven-digit (local) dialing only, including
directory and message calls (if seven
digits or less).
Phone will place calls only from
directory locations 1-10 (‰, ‚ ⁄⁄ ‚, Í). If locations 1-10 are
cleared, no outgoing calls can be made.
No keypad dialing. No directory or One
Touch Dial storage.
Turbo Dial and One Touch Dial locations
are restricted from display access.
4
6
3
2
5
1
8
Service Level
Features
63

CAUTION
Once begun, this procedure cannot be
canceled or reversed.
1. Press Ï, ‚.
2. Enter your six-digit security code twice.
3. Press ⁄, Ø.
This feature allows you to reset the user selectable
options to their standard settings.
CAUTION
Master Clear performs all the functions
of Master Reset, in addition to erasing all names
and numbers stored in memory, and clearing the
Resettable Call Timer. Once begun, this
procedure cannot be canceled or reversed.
1. Press Ï, ‚.
2. Enter your six-digit security code twice.
3. Press ·, Ø. Busy may display. You must
wait for this to clear before operating the
phone further. It may take several minutes,
depending on how full your dialing memory
is. Do not turn the phone off during this
operation.
1. Press Ï, ⁄.
2. Scroll the menu by pressing ≤ or ≥
until Select Languag displays.
3. Press Ø to select this feature.
4. Scroll through menu by pressing ≤ or
≥.
Master Clear
Master Reset
Features
64
Language Selection

5. Press Ø to choose the desired language.
6. To exit the feature menu, press ´.
This feature allows you to change the language
that your menus and messages are displayed in.
You can choose from four different languages
(English, Spanish, French and Portuguese).
1. Press Ï, ⁄.
2. Scroll the menu by pressing ≤ or ≥
until Extend Talk On displays.
3. Press Ç once to toggle this feature off and
Ø to toggle it on.
4. To exit the feature menu, press ´.
The extended talk feature allows you to conserve
battery power when operating in a strong signal
area.
1. Press Ï, ⁄.
2. Scroll the menu by pressing ≤ or ≥
until Ringer Style _ displays.
3. Press Ø to select this feature.
4. Press ⁄ - · to sample the different ringer
styles.
5. Press Ø to select the desired ringer style.
6. To exit the feature menu, press ´.
This feature allows you to select one of nine
different ringer styles to differentiate when your
phone is ringing. When selected, the phone will
give you a brief sample of that ringer style.
Features
65
Extended Talk
Ringer Style

There are generally two types of cellular systems
serving any metropolitan area. One of these will
most likely be operated by the telephone company
that provides telephone service to your community,
generally referred to as a wireline carrier. The
other cellular service provider is a radio common
carrier, referred to as a non-wireline carrier.
Your Cellular Service Operator will provide
information concerning specific features,
procedures, and coverage in your particular area.
The area within which the telephone operates is
defined by your cellular service provider. Since this
is a radio system, no exact boundaries (as on a
map) can be drawn. The red
No Svc
(No Service)
indicator will be displayed if you are beyond range
of a service area. There may be locations within
your area, such as tunnels and underground parking
facilities, where the phone may act as if it were
beyond range.
If you are called while in a location the system
determines is inadequate for high quality service,
you may hear a series of beeps to inform you of
the call attempt. The caller will receive the
recorded ‘not in service’ message, Call will
display, and the green on indicator will flash
quickly. If this occurs, you must press Ç before
Weak Signal Alert
Service Area
The Cellular System
Reference
66

the phone will operate. Most systems do not
impose air-time charges for such call attempts.
NOTE
This indicator is controlled through the
initial programming of your phone and is usually
deactivated. Refer to the
Programming Guide
under Step 11 for more details.
Press Í.
During a call, pressing Í performs a switchhook
function used to access enhanced Cellular System
features such as call waiting and conference calls.
For the functioning of these features with Í,
consult your Cellular Service Provider.
The term ‘Roaming’ applies to the use of cellular
telephones within systems other than those
designated as their ‘Home’ system.
Roam
will be
displayed whenever the phone comes within range
of a visited system. As your phone begins to
roam, it seeks service according to the conditions
you have selected (see page 68).
Steady illumination of
Roam
signals that your
phone is accessing a home type system, while
flashing indicates the phone is attempting
connection through a non-home type system.
Contact your system operator, or that of the visited
system, for information on dialing and billing
procedures.
Roaming
Switchhook and Enhanced
System Services
Reference
67

To use alternate long distance services when
roaming, be certain to dial the appropriate area
code and local number to access the alternate
carrier in the visited area. Then use the tone
dialing sequence described on page 36. If you
selected two-system operation (see page 22),
enter ‰, £ to verify the currently active
number. This is especially important if your two
home systems have different area codes, or if
Roam
is flashing within your home service area.
To Review Current Setting
1. Press ‰, •. The display will show the
current active system choice.
2. Press ´ to exit without changing selection.
To Select (On)
1. Press ‰, •. The display will show the
current active system choice.
2. Repeatedly press • to review the system
type modes. (Press ´ to exit without
changing selections.)
3. If you chose Pref’d SIDs, press Ø and then
enter the five-digit number at this time. Use
• and £ to move to the next SID location.
4. Press Ø to activate the displayed selection.
5. Press ´ to exit.
Selectable System Registration
Reference
68

System Type Selection
Your telephone seeks cellular service according to
the mode you have selected. If you have selected
two-system operation, the phone seeks cellular
service according to the system type mode
selected for each phone number.
Constant flashing of
Roam,
or a steadily lit
No Svc
while within your home service area may indicate
an unintentional choice has been made. If this
occurs, re-enter system type selection to see if the
unit is operating in standard mode, or if an
alternate selection has been made.
Reference
69

Standard Mode
Your phone first seeks a home type system,
then a non-home type.
Invert Preference Mode
Your phone first seeks a non-home type
system, then home type. (Select this mode if
in a fringe area of your home system or in
certain roaming situations.)
If home system is type A
Fast flashing Roam = call on B system
Slow flashing Roam = call on home
type system
Slow flashing In Use = call on home system
If home system is type B
Fast flashing Roam = call on A system
Slow flashing Roam = call on home
type system
Slow flashing In Use = call on home system
Home Only Mode
Phone will not operate outside its home system.
Scan A Mode
Phone will operate only within A systems.
Scan B Mode
Phone will operate only within B systems.
Enter SID Mode
Unit will operate only within specifically identified
systems. This choice requires entry of up to 60
system ID numbers for those systems over which
you wish to operate. The SID digits are entered
as obtained from your Cellular Service Operator.
Scan A B
Std A B
Std B A
Scan B A
Home
p scan
Scan A
System Type Selection Display
Scan B
Reference
70

Is the unit locked?
See Electronic Lock, page 60.
Is the No Svc (No Service) indicator lit?
See Status Indicators, page 16.
Have you programmed a unique operating mode?
Constant flashing of the
Roam
indicator while in
your home service area may indicate that an
incompatible system type has been selected. See
Roaming, page 67.
Is the unit operating with non-standard settings?
You may have inadvertently selected improper
operating characteristics. See Feature Status
Review, page 50.
Are you having difficulty accessing devices
such as answering machines which require
longer access tones?
Your phone ships with Long Tone DTMF (Dual
Tone Multiple Frequency) Signal enabled. Check
your user NAM programming to be sure this
feature is enabled.
Troubleshooting
Reference
71

Basic Operation
Turn It On ∏.
Lock Ï, fi.
Unlock Three-digit unlock code.
Turn It Off ∏.
Place a Call Enter number, Í.
Receive a Call Í, or lift handset to ear.
End Call ´, or return handset to its
mount.
Volume Control
Earpiece Lift handset, ≤ or ≥.
Speaker With handset mounted,
press and hold ≤ or
≥.
Ringer Ï, then ≤ or ≥.
Store to Memory
Number Only Phone number, Ø, two-
digit location. To store in
next available location, Ø,
•.
Memory Recall
By Location ‰, two-digit location. Í
to place call.
Super Speed Memory location, Í.
Dialing
Turbo Dialing Press and hold memory
location (⁄-·) for one
second.
Quick Reference Feature Guide
Reference
72

Feature Menu
Enter Menu Ï, ⁄. ≥ or ≤ (•
or £) to scroll.
Select Feature Ø.
Cancel Feature Ç.
Exit ´.
Additional
Features
Status Review Ï, ‚, ·, ‰. ≥ or
≤ (• or £) to scroll.
Last Number ‰, Í.
Recall
Display Own ‰, £.
Number
Activate Other ‰, £, Ø.
Number
Mute Microphone Ï, fl.
Scratch Pad Enter numbers during call.
´ to terminate call and
Í to place call to scratch
pad number.
Reference
73

’ (Apostrophe) Scrolling activated
A • displayed as “A”
A1 Two System Operation (Active
system is non-wireline, using phone
number 1.)
A2 Two System Operation (Active
system is non-wireline, using phone
number 2.)
ARMED Theft Alarm selected
B––==≠≠ Battery Strength Meter (number of
bars indicates relative level of
strength)
B1 Two System Operation (Active
system is wireline, using phone
number 1.)
B2 Two System Operation (Active
system is wireline, using phone
number 2.)
BUSY Master Clear functioning
C Precedes Cumulative Timer display
(also used to display £)
CALL Shows incoming call (also used to
indicate call in absence)
delayed Delayed Call Placement activated
HOME System Type Selection – Home
Mode
LEVEL 1 Service level selected
LEVEL 2 Service level selected
LEVEL 3 Service level selected
LEVEL 4 Service level selected
LEVEL 5 Service level selected
LEVEL 6 Service level selected
LEVEL 8 Service level selected
MUTE Microphone muted
Message Glossary
Reference
74

ON Telephone is on
R Precedes display of Resettable Timer
S––==≠≠ Signal Strength Meter (SSM)
(number of bars indicates relative
signal strength)
SCAN A System Type Selection (scan “A”
only)
SCAN AB System Type Selection (scan “A”
type first, then “B”)
SCAN B System Type Selection (scan “B”
only)
SCAN BA System Type Selection (scan “B”
type first, then “A”)
STD All user features set to standard
System Busy Cellular system is busy
V––==≠≠ Volume Meter (number of bars
indicates relative volume level)
Reference
75

The U. S. Federal Communications Commission
and the Canadian Department of Communications
regulate cellular radiotelephone service in their
respective countries. It is important for you, the
cellular radiotelephone user, to observe the
applicable regulations when operating your cellular
phone in either country. In addition to these U. S.
and Canadian regulations, you may also be bound
by certain state, provincial, territorial, and local
rules and regulations, as well as by your cellular
carrier’s tariff (the rates, terms, and conditions of
its service). If you wish to use your cellular
radiotelephone in both the U.S. and Canada,
please consult with your system operator.
Furthermore, you should remember that your
cellular phone is a radiotelephone, – i.e., it
combines both wireline technology, as used in
your home or office telephone system, and radio
technology – and that the scope of regulations and
precautions is therefore broader than the scope of
regulations and precautions relating to wirelineonly telephone usage.
Some of the major points of consideration are set
out below. Please note, however, that this ‘Rules,
Regulations, & Precautions’ section does not
constitute legal advice; and is intended merely for
general information purposes. If you have any
specific questions, please contact your Cellular
Carrier (System Operator).
Rules, Regulations, & Precautions
Reference
76

License
If your home system is in the U. S., you do not
require a separate license to operate your cellular
telephone; obtaining a cellular telephone access
number is sufficient to register you as a user. If
your home system is in Canada, a separate
license is required; your carrier will assist you in
the licensing process. If you wish to use your
cellular phone on both sides of the border, please
contact your Cellular Carrier (System Operator).
Denial of Service
A cellular carrier may deny service temporarily, or
terminate service for violation of any government
regulations or of its tariff.
Consumer Responsibilities
Remember that the wireline and radio regulations
with respect to harassing calls, false distress calls,
obscene language, etc. apply to cellular phone
usage.
Privacy
As a telephone user, you have come to assume a
certain standard of privacy when you place or
receive a telephone call via the traditional wireline
systems. However, because cellular
radiotelephones utilize radio transmissions to
effect calls, the same standard cannot always be
assured. While it is unlawful for an unauthorized
person to divulge or use any information obtained
from intercepting or “listening in on” conversations
intended for others, you should not assume that
your conversation is completely secure.
Commercially available scanning equipment can
Reference
77

permit a third party to monitor the radio channels
used for cellular telephone calls.
Interference
No person shall interfere with or cause
interference to any radio communication or signal.
Equipment Modifications
The U.S. Federal Communications Commission
has type-approved and the Canadian Department
of Communications has granted technical
acceptance to the model of cellular telephone
which you have purchased, and both have
allocated a specific frequency range for cellular
service. No changes or adjustments are to be
made to your cellular phone.
Reference
78

Automatic Answer...........................................52-54
Automatic Hands Free ...................................19, 25
Automatic Lock ....................................................61
Automatic Redial ......................................18-19, 46
Auxiliary Alert.................................................50, 62
Call in Absence Indicator.....................................19
Calling Card Dialing .......................................37, 40
Cancel Menu Features ........................................49
Change Memory Entries ......................................46
Change Service Level..........................................62
Change Unlock Code...........................................60
Clear Memory Entries ..........................................47
Cumulative Call Timer .........................................58
Delayed Call Placement ......................................74
Display Own Phone Number ...............................22
Display Unlock Code ...........................................60
Earpiece Volume .................................................21
Electronic Lock ..............................................60, 71
End a Call ............................................................19
Extended Talk ......................................................65
Feature Menu .......12, 20, 25, 34-35, 46, 48-49, 73
Feature Status Review ..................................50, 71
General Safety Information..............................6, 11
Hands Free to Handset Operation.......................25
Incoming Call Screening.................................53-54
Individual Call Timer ............................................57
Individual Timer ...................................................59
Introduction ..........................................................11
Keypad Tones................................................49, 54
Language Selection .............................................64
Last Number Recall .................................11, 33, 73
Manual Handset to Hands Free Operation..........25
Index
Reference
79

Master Clear ..................................................64, 74
Master Reset .................................................19, 64
Memory Autoload...........................................29, 31
Memory Blocks ...............................................30-31
Memory Linking ..............................................37-38
Memory Location Directory ..................................83
Memory Protect ........................................28-31, 46
Message Glossary ...............................................74
Microphone Muting ..............................................50
Multiple Key Answer ......................................11, 53
Number Preference ............................32-33, 46, 52
One Touch Dialing Keys................................35, 45
One Touch Emergency Dialing............................45
One-Minute Timer ................................................59
Pause Dialing .................................................37-38
Phone Overview ..................................................12
PIN Code Activation.............................................56
Place a Call...........17-18, 29, 31-33, 35, 43, 56, 72
Place a Hands Free Call......................................24
Postscripting .............................................28-29, 34
Quick Reference Feature Guide..........................72
Recalling an Area Code and Prefix .....................34
Recalling by Location Number.............................32
Recalling by Name...............................................31
Recalling from Memory ........................................31
Recalling Last 10 Numbers Dialed ......................33
Receive a Call ...............................................19, 72
Receive a Hands Free Call..................................24
Remind Message .................................................55
Resettable Call Timer ....................................58, 64
Ringer ..................................................................54
Ringer Style .........................................................65
Ringer Volume ................................................21-22
Roaming .............................................24, 67-68, 71
Reference
80

Rules, Regulations, & Precautions................11, 81
Scratch Pad Memory ...........................................36
Scratch Pad Tones ........................................36, 55
Scrolling by Location Number..............................32
Scrolling by Name................................................31
Scrolling from Memory .........................................31
Security Features.................................................59
Selectable System Registration.....................23, 68
Service Area.................................57, 66, 68-69, 71
Signal Strength Meter........................11, 20, 49, 75
Silent Ringer .............................................50, 52-54
Speaker Volume ............................................12, 21
Store to a Location Number.................................29
Storing a Phone Number and a Name ................26
Storing Area Code and Prefix..............................28
Storing Information in Memory ............................26
Storing Phone Number Only................................28
Super Speed Dialing.......................................34-35
Switch to Second Phone Number........................22
Switchhook and Enhanced System Services ......67
The Cellular System ..................................6, 55, 66
Theft Alarm .........................................50, 61-62, 74
Timers......................................................11, 24, 57
To Select Menu Features ....................................49
Tone Dialing...................................................36, 68
Troubleshooting ...................................................71
Turbo Dial......................................34-35, 41, 43-45
Turn Phone On and Off .......................................15
Two-Part Calling .............................................36-37
Volume Meter ...........................................20-21, 75
Weak Signal Alert ................................................66
Welcome ................................................................4
Reference
81

4121218 4648125 4829274 5036532 5233633 5432017 D375734
4138681 4649543 4837534 5053924 5235492 D360632 D375932
4193036 D288683 D301476 5057762 5237257 5438684 D375952
4254382 4654655 4843621 D320780 5239127 D361070 D376127
4302845 D289156 4845772 5059885 5241545 5442680 5588041
4312074 4662691 D302015 5060294 5241548 5446763 5589796
4327319 4667333 4851966 D322783 5241650 5448763 5590177
4329666 4668917 4868576 D322955 5241693 5448771 5594778
4369516 4670747 4870686 5081674 5242767 5453997 5594951
4369522 4672502 D303656 5083304 D339582 D362840 D377792
4378603 4680787 4876552 D324024 5249302 5457744 D377934
4390963 4681476 4879533 D324388 5251331 5459640 5604050
D269873 4683585 D305427 5095503 D340710 5463646 5606730
4398265 4692726 4896124 D325028 5260988 5465412 D378366
4400584 4704588 4897873 D325583 5261119 5469177 5613229
4400585 D292578 D305717 5109536 5262710 5475752 5613863
D270835 4706036 4904549 D325915 5263052 D365094 5615233
D271491 D292920 4905288 5113436 5276707 D365817 5621763
Re.31470 4710724 4905301 5117450 5278994 5486843
4431977 4711361 D306293 5121047 D343173 5487184 PAT111398
4434461 4715063 D306441 5122480 5280637 5488335
4455534 4716319 D306594 5122722 D344087 5488649
4462098 4716391 4912602 D327061 5287553 D366872
D275951 4723305 4918732 5128834 5287555 5493198
4484153 D294257 4922178 D328302 5287556 5493714
4485486 4727306 4945570 5142551 D344511 5497126
4486624 4727583 4954796 5142696 5301365 5497382
D276809 4730195 4959851 5146620 5321847 D367640
4491972 4734635 4963812 5148471 D348880 5499394
D277667 4736277 4963843 5148473 5349588 5506490
4504834 4737976 4965537 5148961 5359696 D368696
D278708 4740794 4972355 5150359 5361400 5510693
4523155 4741018 4972432 5150384 5363071 5511235
4546329 4741034 4972455 5152006 5365549 D369162
4550426 4742562 4975808 5157693 D352497 5513078
4551696 D295627 4984290 5163159 5366826 D369359
4564821 4746242 D314173 5164652 D353131 5519303
D282169 D295973 D315330 5166596 D353361 5519346
4571595 D295975 D315346 5175759 5375143 5524276
4573017 4751737 D315543 5175874 5375258 5524278
4574243 D296187 D315559 D332261 5379324 D370463
4585957 4761621 D315565 5182749 D354055 5530922
4602218 4764737 5004992 D332785 D354062 5542116
D284759 D297734 D315907 5185566 5384825 5544250
D285439 D297735 5008925 5187809 D356084 D372481
4616314 4777564 D316417 5193223 5402447 5546275
4617520 Re.32768 D316859 5195106 5406146 5546380
D286778 D299136 5017856 5195108 5406562 D372896
4626309 4797929 5018188 5201069 D357224 5551078
4628529 4798975 5020091 5204977 D357457 5559471
4629829 4800348 5020092 5210793 5410741 D374424
4630304 4802236 5020093 5214675 D357680 D374872
4630305 4809356 5028083 5222104 D357681 5572193
4633141 4811377 5028859 5222251 5428836 5574976
4636593 4811404 5029044 D337332 D359734 5577268
4636741 4827226 5029233 5230007 D359735 D375732
D288432 4827507 5031028 5230093 D359959 D375733
Other patents pending
Reference
82
Patent Information
Manufactured under one or more of the following
US patents.

Location Name Phone Number
Memory Location Directory
Reference
83
 Loading...