

Page 1

APPLICANT: MOTOROLA, INC. TRANSCEIVER TYPE: IHDT5YV1
A preliminary user manual follows.
EXHIBIT 7
Page 2

Welcome
Thank you for choosing Motorola—a global leader in
communications technology.
All Motorola phones are designed and manufactured
in the United States to meet Motorola’s exacting specifications
and world-class quality standards. During development,
our laboratory testing team took the durable SC-3160
phone through its paces. They cooked it, steamed it, shook it,
shocked it, dusted it, and dropped it—and the phone still
worked! We are confident that the one you purchased will meet
your own exacting standards.
Thank you for choosing Motorola, and by all means, enjoy your
SC-3160 dual mode digital cellular phone!
1
Page 3

Guide Overview
Okay, you’ve got a brand new phone
with a bunch of nifty features.
Now what?
Afraid you’ll press the wrong key?
Or forget a feature or two?
Don’t sweat it!
We’ve designed this guide to take you
step-by-step through each feature of
your new SC-3160 phone. We’ll show
you what key to press and what happens when you press it. Follow
along, chapter-by-chapter, and you’ll find it’s as easy as 1-2-3.
Here’s an idea of what you’ll learn in each chapter:
Getting Started
First things first. Turn to page 10, and we’ll explain what came
with your phone. Then, we’ll show you how to install and
charge your battery so that you can get started with “The Basics”
in the next section.
The Basics
What do all those buttons and lights mean? How do I make my
first phone call? In this section, we’ll answer those questions and
get you going with your SC-3160 phone. Start learning “The
Basics” on page 18.
2
Page 4

Guide Overview
Using Memory
Read “Using Memory,” beginning on page 32, and you’ll learn
how to make the most of your new phone’s built-in Phone Book.
You’ll save time with dialing shortcuts and memory tricks that
make it easy to place quick calls.
Using Messaging
Did you know that your SC-3160 phone supports optional messag-
*
ing services, like Caller ID
before you answer? Your new phone can even receive alphanumeric messages just like a pager and tell you when you have Voice
Mail*. Simply turn to page 42 to begin “Using Messaging.”
The Works
When you’re ready to get into the more advanced features your
new phone has to offer, just turn to page 50 for “The Works.”
Learn about everything from navigating the menu system to electronically locking your phone.
So relax! Let us show you what your
SC-3160 phone can do!
, which allows you to see who’s calling
Contact your Service Provider for availability.
*
3
Page 5

Contents
Introduction
Safety Information . . . . . . . . . . . . . . . . . . . . . . . . . . . . 6
Getting Started
Package Content Options . . . . . . . . . . . . . . . . . . . . . . 10
Introduction to Batteries. . . . . . . . . . . . . . . . . . . . . . . 11
Installing Batteries . . . . . . . . . . . . . . . . . . . . . . . . . . . 12
Charging Batteries . . . . . . . . . . . . . . . . . . . . . . . . . . . 13
Phone Overview. . . . . . . . . . . . . . . . . . . . . . . . . . . . . . 17
The Basics
Turning Your Phone On . . . . . . . . . . . . . . . . . . . . . . . 18
Reading the Indicators . . . . . . . . . . . . . . . . . . . . . . . . 20
Placing and Ending Calls. . . . . . . . . . . . . . . . . . . . . . 24
Receiving Calls . . . . . . . . . . . . . . . . . . . . . . . . . . . . . . 25
Redialing Numbers. . . . . . . . . . . . . . . . . . . . . . . . . . . 27
Basic Tone Controls . . . . . . . . . . . . . . . . . . . . . . . . . . 28
Your Phone & Its Shortcuts . . . . . . . . . . . . . . . . . . . . 30
Using Memory
Introduction . . . . . . . . . . . . . . . . . . . . . . . . . . . . . . . . 32
Making the Most of Memory . . . . . . . . . . . . . . . . . . . 33
Storing. . . . . . . . . . . . . . . . . . . . . . . . . . . . . . . . . . . . . 34
Recalling. . . . . . . . . . . . . . . . . . . . . . . . . . . . . . . . . . . 36
Pause Dialing . . . . . . . . . . . . . . . . . . . . . . . . . . . . . . . 40
4
Page 6

Using Messaging
Introduction. . . . . . . . . . . . . . . . . . . . . . . . . . . . . . . . .42
Receiving Messages . . . . . . . . . . . . . . . . . . . . . . . . . . .43
Viewing Your Caller IDs. . . . . . . . . . . . . . . . . . . . . . . .44
Checking Your Voice Mail . . . . . . . . . . . . . . . . . . . . . .46
Reading Your Messages . . . . . . . . . . . . . . . . . . . . . . . .48
The Works
Introducing the Menu Features. . . . . . . . . . . . . . . . . .50
The Internal Phone Book . . . . . . . . . . . . . . . . . . . . . .52
Learn how to store and recall numbers
Using Call Timers . . . . . . . . . . . . . . . . . . . . . . . . . . . .60
Learn how to monitor the length of your calls
Setting Tone Controls. . . . . . . . . . . . . . . . . . . . . . . . . .66
Learn how to adjust your phone’s tone controls
Lock/Security Features. . . . . . . . . . . . . . . . . . . . . . . . .72
Learn how to control access to your phone
Phone Options . . . . . . . . . . . . . . . . . . . . . . . . . . . . . . .80
Learn how to personalize your phone’s operation
Reference Information
Accessory Options. . . . . . . . . . . . . . . . . . . . . . . . . . . . .92
Troubleshooting. . . . . . . . . . . . . . . . . . . . . . . . . . . . . .95
Glossary . . . . . . . . . . . . . . . . . . . . . . . . . . . . . . . . . . . .97
Index . . . . . . . . . . . . . . . . . . . . . . . . . . . . . . . . . . . . .104
Contents
5
Page 7

Exposure
to Radio
Frequency
Signals
Antenna
Care
Phone
Operation
Safety Information
Your wireless handheld portable telephone is a low power radio
transmitter and receiver. When it is ON, it receives and also sends out
radio frequency (RF) signals.
In August 1996, the Federal Communications Commissions (FCC)
adopted RF exposure guidelines with safety levels for hand-held
wireless phones. Those guidelines are consistent with the safety
standards previously set by both U.S. and international standards
bodies:
ANSI C95.1 (1992)
•
NCRP Report 86 (1986)*
•
ICNIRP (1996)*
•
Those standards were based on comprehensive and periodic evaluations of the relevant scientific literature. For example, over 120 scientists, engineers, and physicians from universities, government
health agencies, and industry reviewed the available body of
research to develop the ANSI Standard (C95.1).
The design of your phone complies with the FCC guidelines (and
those standards).
Use only the supplied or an approved replacement antenna. Unauthorized antennas, modifications, or attachments could damage the
phone and may violate FCC regulations.
Normal Position:
Hold the phone as you would any other telephone, with the antenna
pointed up and over your shoulder.
Tips on Efficient Operation:
For your phone to operate most efficiently:
•
Extend your antenna fully.
•
Do not touch the antenna unnecessarily when the phone is in use.
Contact with the antenna affects call quality and may cause the
phone to operate at a higher power level than otherwise needed.
*
American National Standards Institute; National Council on Radiation Protection and
*
Measurements; International Commission on Non-Ionizing Radiation Protection
6
Page 8
Safety Information
Caution:
All batteries can cause property damage, injury or burns if
a conductive material, such as jewelry, keys or beaded chains,
touches exposed terminals. The material may complete an electrical
circuit and become quite hot. To protect against such unwanted current drain, exercise care in handling any charged battery, particularly when placing it inside your pocket, purse or other container
with metal objects. When the battery is detached from the phone:
your battery is packed with a protective cover.; please use this cover
for storing your battery when not in use.
Check the laws and regulations on the use of wireless telephones in
the areas where you drive. Always obey them. Also, if using your
phone while driving, please:
•
Give full attention to driving–driving safely is your first responsibility;
•
Use hands-free operation, if available;
•
Pull off the road and park before making or answering a call if
driving conditions so require.
Most modern electronic equipment is shielded from RF signals.
However, certain electronic equipment may not be shielded against
the RF signals from your wireless phone.
Pacemakers
The Health Industry Manufacturers Association recommends that a
minimum separation of six (6”) inches be maintained between a
handheld wireless phone and a pacemaker to avoid potential interference with the pacemaker. These recommendations are consistent
with the independent research by and recommendations of Wireless
Technology Research.
Persons with pacemakers:
•
Should ALWAYS keep the phone more than six inches from their
pacemaker when the phone is turned ON;
•
Should not carry the phone in a breast pocket;
•
Should use the ear opposite the pacemaker to minimize the potential for interference.
•
If you have any reason to suspect that interference is taking place,
turn your phone OFF immediately.
Batteries
Driving
Electronic
Devices
7
Page 9
Safety Information
Hearing Aids
Some digital wireless phones may interfere with some hearing aids.
In the event of such interference, you may want to consult your
hearing aid manufacturer to discuss alternatives.
Other Medical Devices
If you use any other personal medical device, consult the manufacturer of your device to determine if they are adequately shielded
from external RF energy. Your physician may be able to assist you in
obtaining this information.
Turn your phone OFF in health care facilities when any regulations
posted in these areas instruct you to do so. Hospitals or health care
facilities may be using equipment that could be sensitive to external
RF energy.
Vehicles
RF signals may affect improperly installed or inadequately shielded
electronic systems in motor vehicles. Check with the manufacturer
or its representative regarding your vehicle. You should also consult
the manufacturer of any equipment that has been added to your
vehicle.
Posted Facilities
Turn your phone OFF in any facility where posted notices so require.
Aircraft
8
FCC regulations prohibit using your phone while in the air. Switch
OFF your phone before boarding an aircraft.
Page 10

Safety Information
To avoid interfering with blasting operations, turn your phone OFF
when in a “blasting area” or in areas posted: “Turn off two-way
radio.” Obey all signs and instructions.
Turn your phone OFF when in any area with a potentially explosive
atmosphere, and obey all signs and instructions. Sparks in such
areas could cause an explosion or fire resulting in bodily injury or
even death.
Areas with a potentially explosive atmosphere are often, but not
always, clearly marked. They include fueling areas such as gasoline
stations; below deck on boats; fuel or chemical transfer or storage
facilities; areas where fuel odors are present, i.e. if a gas/propane
leak occurs in a car or home; areas where the air contains chemicals or particles, such as grain, dust, or metal powders; and any
other area where you would normally be advised to turn off your
vehicle engine.
Blasting
Areas
Potentially
Explosive
Atmospheres
An air bag inflates with great force. DO NOT place objects, including
both installed or portable wireless equipment, in the area over the
air bag or in the air bag deployment area. If in-vehicle wireless
equipment is improperly installed and the air bag inflates, serious
injury could result.
Your Motorola cellular radiotelephone is designed for excellent
durability under normal use conditions. Protect your cellular telephone from water damage that could result from spills or excessive
exposure to rain. Never submerge your cellular phone.
Vehicles
Equipped
with Air
Bags
Equipment
Care
9
Page 11

Getting Started
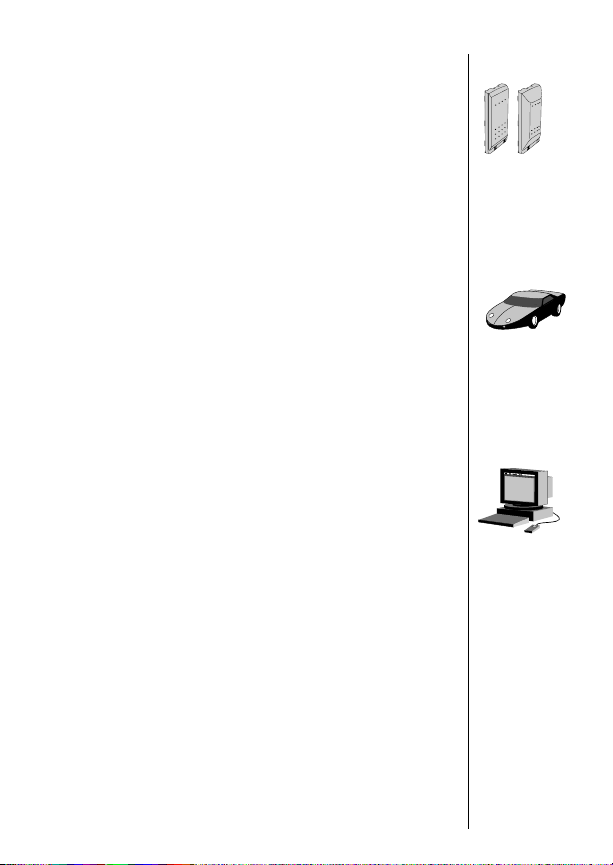
Package Content Options
The SC-3160 phone comes equipped with a standard battery and
an AC adapter to get you up and running. An exciting
line of accessory options, now smaller and lighter than ever, can
customize your cellular package for maximum performance and
portability.
Slim Battery
FPO
SC-3160 Dual Mode Phone
Cigarette Lighter Adapter
Standard Battery
FPO
FPO
FPO
Desktop Charger
(AC Adapter required)
Your phone and accessories may not look exactly as pictured above.
10
AC Adapter
Page 12

Introduction to Batteries
Battery Covers
Your phone’s batteries are shipped uncharged, protected by a plastic storage case. You should use this case to store and carry batteries. The storage case prevents objects from touching the battery
terminals, thereby reducing the risk of injury or damage from a
short circuit.
To begin using your battery:
Getting Started
1.
2.
Unsnap
Battery
Remove
Battery
Unsnap the top of the plastic storage case.
Remove the battery from the case and snap the
case closed.
FPO
11
Page 13

Installing Batteries
Battery Installation
Find the imprinted arrows and the release latch on the top back
of your phone.
Place
1.
Battery
Slide
2.
Battery
Battery Removal
To remove a battery:
Turn OFF
1.
Phone
Press
2.
Latch
Slide
3.
Battery
Place the top of the battery just below the bottom of the imprinted arrows.
Slide the battery up along the guides until it
clicks into place.
Press ¡ to turn your phone OFF.
Press the release latch on the top back of the
phone.
Slide the battery down the phone until it
comes free.
12
Page 14

Charging Batteries
Using the Internal Rapid Charger
Believe it or not, there’s a battery charger built right into your
phone! It’s called the internal charger and it’s a quick and easy
way to charge your phone’s battery. To make use of the internal
charger, all you need is one of the three available adapters, either
a standard AC adapter, a rapid rate AC adapter, or a cigarette
lighter adapter.
Keep in mind:
phone is ON, you can still place and receive calls. Just remember,
talking on the phone requires energy, so your phone may not
charge while the call is in progress.
When the internal charger is in use and the
Getting Started
Attach
1.
Adapter
to Phone
Plug In
2.
Adapter
Keep in mind:
cigarette lighter.
Plug the AC or cigarette lighter adapter into the
accessory connector on the bottom of your
phone as shown.
Plug the adapter into the appropriate
power source.
FPO
PUSH IN
TO
RELEASE
In some cars, the ignition must be ON to use the
13
Page 15

Charging Batteries
The Battery Indicator
In the upper right corner of your phone’s display, there is a battery indicator filled with three segments. The more segments you
see, the greater the charge.
•
The border of the battery icon will flash during charging.
•
When both batteries are fully charged, the battery icon will
stop flashing and become solid.
14
High
Battery Storage and Disposal
Low
To prolong the life of your batteries, avoid exposing them to
°
temperatures below -10
C (14°F) or above 45°C (113°F). As a
good rule of thumb, always take your phone with you when you
leave your car.
To dispose of batteries, check with your local recycling center for
a battery recycler near you. Never dispose of batteries in fire.
Caution:
To prevent injuries or burns, do not allow metal
objects to contact or short circuit the battery terminals.
Page 16

Charging Batteries
Using the Desktop Charger
The desktop charger’s front pocket can charge batteries while
they are attached to your phone, and the rear pocket can charge
batteries separately.
If you have a desktop charger:
Getting Started
Attach
1.
Adapter
Plug In
2.
Adapter
Insert
3.
Phone
Insert
&
Battery
Note:
If a phone and a battery are loaded in the charger, the bat-
Plug the AC adapter into the back of the charger.
Plug the other end of the AC adapter into a wall
socket.
Insert the phone with a battery attached into the
front pocket.
If you like, insert a battery by itself into the rear
pocket.
PHONE
BATT.
teries will charge one at a time. The battery attached to the
phone will charge first, followed by the battery in the rear pocket.
15
Page 17

Charging Batteries
Desktop Charger Indicators
Each pocket of the desktop charger has its own LED indicator to
let you know the current state of any charging batteries.
•
Red means the battery is charging.
•
Flashing yellow means the battery is waiting to be charged.
•
Green means the battery is charged within 90% of its capacity
and can be used. An additional hour of charging will bring
your battery up to 100% capacity.
•
Flashing red means the battery is damaged and can’t be
charged.
Desktop Charger Charging Times
The time it takes for your battery to obtain a full charge is
affected by a variety of factors, including:
•
Temperature Batteries should be at or near room
temperature when charging. To prolong battery life
and charge capacity, avoid exposing your batteries to
°
temperatures below -10
As a good rule of thumb, always take your phone with
you when you leave your car.
•
Inactivity
for long periods of time, may not rapid charge properly. In
these instances, the battery requires an overnight charge.
•
Extended Usage Over extended periods of time, batteries
gradually wear down and require longer charging times.
This is normal. If you’ve been charging your battery regularly
and notice a decrease in talk-time or an increase in charging
time, then it’s probably time to purchase a new battery.
New batteries, or batteries that have been stored
C (14°F) or above 45°C (113°F).
16
Page 18

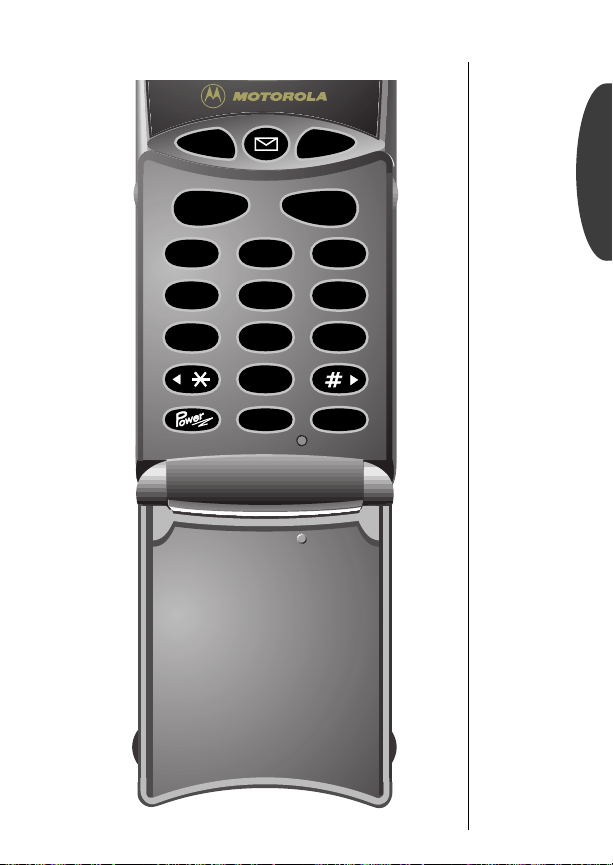
Phone Overview
Function Keys
¡
Turns the phone ON and OFF.
ø
Opens messaging menus.
ƒ
Acts as a “shift” key to access the secondary functions of other keys.
‰
Recalls phone numbers from memory.
¬
Stores phone numbers into memory.
Ç
Clears characters from the screen.
º
Ends phone calls and exits the menu.
æ
Places or answers calls.
«
Can be used to scroll through memory entries
»
and menu features.
Alphanumeric Display Displays your input from the keypad,
information recalled from memory, and other messages.
Microphone Positioned for convenient conversation.
Retractable Antenna Extend for best performance.
Earpiece Ultra-compact phone speaker.
Headset Jack Provides the connection for an optional headset.
Accessory Connector Provides the connection for an external
power supply.
Volume Keys Represented in this manual by ” and ’, these
keys adjust keypad, earpiece, and ringer volume. They also scroll
up and down through memory locations and menu features.
Getting Started
17
Page 19

The Basics
The next few pages will introduce you to the basic features of
your phone. In the chapters that follow, we’ll take you step-bystep through every one of your phone’s features, including storing names and numbers, using the call timers, locking the
phone, and more.
Turning Your Phone On
Follow these steps to turn your phone ON and OFF:
18
Extend
1.
Antenna
Open
2.
Flip
Turn ON
3.
Phone
Turn OFF
4.
Phone
What you will see:
Extend the antenna completely for best
performance.
Open the flip to expose the keypad.
Press ¡ once to turn the phone ON.
Press ¡ again to turn the phone OFF.
Each time you turn your phone ON, it performs a short self-test
to make sure it’s operational and then scans for service. While
the phone scans, the display reads:
CDMA Digital
Searching
.
If your phone finds a
CDMA digital system,
you will see the time
and date, the icon,
or the
and either
Ready
Mon
12:00
10/12/98
Ready
personalizable banner
(if programmed).
Page 20

Turning Your Phone On
Analog
If your phone finds an analog system, you will see the icon
and either
Ready or your personalized banner.
Ready
Quad Number
Your phone can be activated with up to four unique phone numbers. If there’s more than one phone number programmed on
your phone, you’ll see the currently active number whenever you
turn on the phone.
Basics
Number
847-555-1212
Turn to Changing Your Number on page 82 if you want to
change your currently active number.
Standby Mode
To conserve energy, your phone enters standby mode and turns
off the back light when you close the flip or haven’t touched a
key for a few seconds. The back light will come back on as soon
you press a key or open the flip.
4
19
Page 21

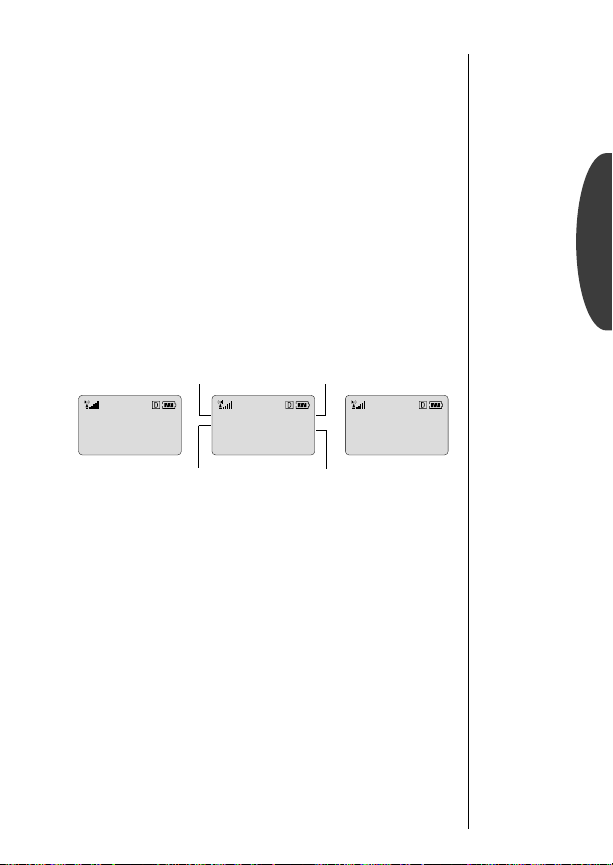
Reading the Indicators
4 5 6 71 2 3
Strong
Weak
12:00
8
Mon 10/12/98
Signal Strength (1)
Displays the strength of the connection between your phone and
the local cellular system.
VibraCall™ On (2)
Indicates that your phone’s ringer is turned OFF and the
VibraCall alert is ON.
In Use (3)
Appears when a call is in progress.
Caller ID/Message (4)
Appears when you receive a Caller ID* or alphanumeric message.
It will disappear after you’ve viewed the Caller ID or read the
message.
Voice Mail (4)
Indicates that you’ve received a Voice Mail* message in your Voice
Mailbox. It will disappear after you’ve listened to the message.
Roam (5)
Lights up when your phone accesses a cellular service outside of
your home system. When you leave your cellular service area,
your phone roams (seeks another cellular system).
20
Contact your Service Provider for availability.
*
Page 22

Reading the Indicators
Digital (6)
Indicates you’re on a digital channel, allowing for better voice
quality. Check with your Service Provider for more information.
Analog (6)
Appears when you’re on an analog channel.
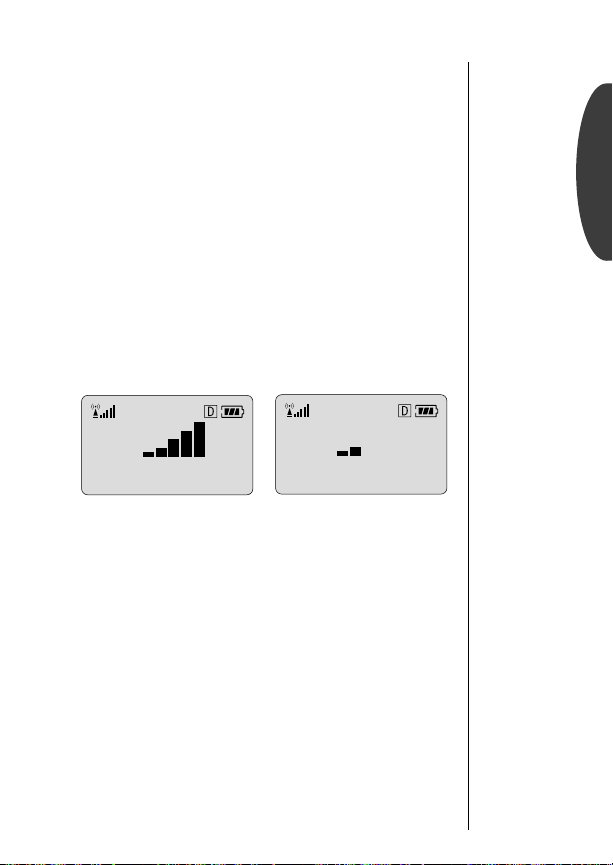
Battery Level (7)
The three bar segments on the phone’s Battery Level Indicator
show the amount of charge remaining in your battery. The more
bar segments you see, the higher the charge. If your battery is
low, the phone alerts you in three ways:
• No bar segments on the indicator will be highlighted.
• Low Battery will appear on your display.
• A hi-lo tone will sound periodically.
If you ignore these warnings, the phone will automatically turn
itself OFF when the battery is exhausted. At this point, you should
charge the battery or insert a new battery.
Time and Date(8)
When your phone is on a CDMA digital network, the display
shows the current time and date transmitted by your digital Service Provider. Wherever you are, you’ll have the correct local
time. You can set your clock for 12- or 24-hour format. See page
89 for more information.
Basics
High
Low
21
Page 23

Reading the Indicators
Detailed Battery Level Reading
Press ƒ then press ›.
The bar graph in the display represents the battery level. The
higher the graph, the closer the battery is to full charge.
Battery Battery
Full Charge Low Charge
Important: If the phone is being powered externally–from the
cigarette lighter adapter for example–you will see:
Charging
22
Page 24

Reading the Indicators
Power/Status Indicator
The Power/Status Indicator is on top of your phone and lights up
when your phone is ON. The color it flashes depends on your
phone’s current state of service. Read the chart below to learn
how to recognize your phone’s state of service at a glance, without even opening the phone.
Power/Status Indicator
FPO
Basics
Red & Green,
alternating
Green, flashing
Red, flashing
Yellow, flashing slow
Yellow, flashing fast
Incoming call or message
In Service: home type system
No Service
Roaming: home type system
Roaming: non-home type system
23
Page 25

Tip:
If you press
æ without
entering a
number, your
phone will dial
the last number
entered.
Placing and Ending Calls
Placing a Call
1.
2.
3.
Extend
Antenna
Open
Flip
Enter
Number
Correct
Errors
Extend the antenna completely for best
performance.
Open the flip to expose the keypad. If necessary,
¡ to turn the phone ON.
press
Enter the number you want to call,
for example: 555-1212.
Ç to erase one digit at a time if you
Press
make a mistake. Press & hold
entire entry and start again.
Ç to erase the
24
4.
Place
Call
Press æ to place the call.
You will see:
Dialing 555-1212.
You can dial phone numbers with up to 32 digits, but only the
last twenty-four digits will appear in the display.
Press
‰ to see the rest of the number.
Your phone will display the first 24 digits, then a second screen
will show the digits remaining in the phone number.
Ending a Call
There are two ways to end a call:
or
Close
Phone
Press Key
Close the flip to end a call.
Press º.
Page 26

Receiving Calls
Your phone must be ON to receive calls.
When a call is incoming:
• an alert will sound and/or vibrate.
• the Service Light (pg. 23) will flash red and green.
You can choose your phone’s alert, selecting from nine ringer
styles or silent vibration mode. See page 69.
Answering a Call
To answer a call:
Extend
1.
Antenna
Open
2.
Flip
Caller ID
If Caller ID* service is active on your phone, you can see who’s
calling before you answer! The display will show either your
caller’s name (if it’s in your Phone Book) or your caller’s number. If you prefer to always see your caller’s number, see page 57
to turn Number Preference ON.
Extend the antenna completely for best
performance.
Open the flip to expose the keypad.
Basics
Mon
12:00
10/12/98
312-555-1212
The Caller IDs for your last 16 callers will be saved. See page 44 to
learn how to view your stored Caller IDs.
Contact your Service Provider for availability.
*
Mon
Jane
12:00
10/12/98
Smith
25
Page 27

Receiving Calls
Call Waiting
If you subscribe to Call Waiting through your Service Provider,
you may hear a tone while on a call, indicating that you are
receiving a second call.
Answer
Call
or
End
Current
Call
Unanswered Call Indicator
Even with the latest wireless technology, sometimes you are
unavailable to answer calls. If your phone is ON, it keeps a count
of unanswered calls. For example, if you miss two calls, your display will show:
Press æ to answer the call and automatically
place the current call on hold.
º to end the current call. Your phone
Press
will then ring and/or vibrate as usual. Press
æ to answer the call.
2 Calls Unanswered.
26
Clear
Display
Press Ç or press º to clear the display,
and you can begin placing calls again.
If you subscribe to Caller ID service, you can easily return the
calls that you missed. See page 44 to learn how.
Page 28

Redialing Numbers
Automatic Redial
The cellular system may at times be too busy to handle your call.
If this is the case, you will hear a fast busy signal and see
on the display. You can let your phone take care of the
Redial
redialing for you – Automatic Redial will repeat the attempt over
the next four minutes. When the call succeeds, your phone will
ring or vibrate until the person you are calling answers.
SND to
Basics
Auto
Redial
Press æ. You will see: Redialing.
To make this feature even easier, turn Instant Redial ON. Your
phone will instantly redial after a fast busy signal, and you won’t
even have to push a button. To find out more, see page 87.
Redial
If you hear an ordinary busy signal:
Hang Up Press º to hang up.
1.
Redial Press æ to redial.
2.
You will see:
Dialing.
Display Last Ten Numbers Dialed
Your phone keeps track of the last ten numbers you’ve dialed.
1.
2.
3.
Enter
List
Review
List
Call
Number
Press ‰ then press ‚, ‚. The display
will show the last number you dialed.
Press ” or ’ to scroll through the last ten numbers dialed, starting with the most recent.
Press æ to call the number in your display.
You will see:
Dialing.
Tip:
Your phone
automatically
remembers
the last number
entered.
See page 39
to learn more
ways this might
be helpful.
27
Page 29

Basic Tone Controls
Vibration Mode
In situations where ringing may not be appropriate, or in noisy
places where you may not hear your phone, select the Vibra-
™
Alert. Ringing will be replaced by gentle vibrations.
Call
Toggle
VibraCall
Alert
ƒ then press ° to switch between
Press
ringer and vibrator alerts.
Silent Mode
For complete discretion, just turn Silent Mode ON. All tones will
be silenced. You can dial silently, and the ringer will be replaced
by gentle vibrations.
Activate
Silent
Mode
ƒ then press & hold ° until you
Press
Silent Mode On.
see:
Note: This shortcut allows you to activate Silent Mode quickly.
To learn how to turn Silent Mode OFF, see page 68.
Muting the Microphone
If you need some privacy while a call is in progress, try muting
the microphone—you’ll be able to hear the party on the other
end, but they will not hear you.
Mute
Phone
Unmute
Phone
ƒ then press fl to mute
Press
the microphone. You will see:
ƒ then press fl again to
Press
resume your conversation.
Muted.
28
Page 30
Basic Tone Controls
The upper and lower volume keys are left of the display and can
be used to adjust both the earpiece and ringer volume. As you
press these keys, the phone’s speaker will demonstrate the new
volume level.
Adjusting Earpiece Volume
To adjust earpiece and keypad volume:
Basics
Raise
Volume
Lower
Volume
The bar graph in the display represents the volume level. The
higher the graph, the louder the volume is.
Key
High Volume Low Volume
Adjusting Ringer Volume
To adjust ringer volume:
Raise
Volume
Lower
Volume
Press ” to raise the earpiece volume.
Press
’ to lower the earpiece volume.
Volume
Press
ringer volume.
Press
ringer volume.
ƒ then press ” to raise the
ƒ then press ’ to lower the
Key
Volume
29
Page 31

Your Phone & Its Shortcuts
Throughout this guide you will see shortcuts that point out simple ways to reach some of your phone’s features. If you’ve owned
a Motorola phone before, many of these shortcuts will already be
familiar to you.
The Usual Shortcuts
You’ll notice the words “menu,” “batt,” “lock,” “mute,” and
“vib” written on the
ƒ key first, then any one of these buttons, and your
Press the
phone will perform that function. It’s easy, so give it a try!
⁄, ›, fi, fl, and ° buttons.
Tip:
Your factory
lock code is
set to 123.
See Locking
the Phone on
page 74
for more
information.
30
Enter
Menu
Toggle
Analog
Display
Meter
Lock
Phone
Mute
Phone
Silence
Ringer
Silence
All Tones
Press ƒ then press ⁄ to enter the menu
system.
ƒ then press ¤ to toggle Analog
Press
Only On
or Analog Only Off.
ƒ then press › to display the
Press
battery meter.
ƒ then press fi.
Press
You will see:
Press
and OFF during a conversation.
Press
phone’s VibraCall
Press
ON Silent Mode.
Lock? Press ¬ to lock.
ƒ then press fl to toggle mute ON
ƒ then press ° to toggle your
™
Alert ON and OFF.
ƒ then press and hold ° to turn
Page 32
Your Phone & Its Shortcuts
FCN
SEND
menu
1 2 3
batt lock mute
4 5 6
ghi
7 8
pqrs
0
STO
END
abc def
jkl mno
vib
tuv
opr
CLR RCL
Basics
9
wxyz
31
Page 33

Using Memory
/
Do you have places to go and people to see? Too many phone
numbers to remember? Let your phone remember them for you.
Your phone’s internal Phone Book can store up to 99 names and
numbers for easy access on the go.
In this chapter you will learn how to:
store names and numbers into the Phone Book.
•
• recall phone numbers from memory.
• dial in a flash with the Super Speed Dial and Turbo Dial
functions.
• simplify automated calling systems.
Follow these symbols as a guide for using the keys on the side of
your phone.
Press ” to scroll up
™
07/07
32
Press ¬ to select
Press ’ to scroll down
FPO
menu
11
batt
abc
22
lock
jkl
55
Page 34
Making the Most of Memory
Each phone number is stored in a “memory location” numbered
01-99. You can arrange your Phone Book for convenient recall
by storing related numbers in groups of ten. For example, store
your ten most frequently called numbers in locations 01-09, then
you can use the Turbo Dial
a key. You could store business phone numbers in locations 1019, family numbers in 20-29, friends in 30-39, and so on.
You can also store names to help identify phone numbers. Later
you can easily recall numbers either by memory location or by
name. If someone you know has more than one phone number,
you could quickly recall the number you need by storing it with
a descriptive name, for example:
™
keys to call them with the push of
Using Memory
Smith J
Home
773-555-1515
Name
06
Information
about phone
number
Memory location
Smith J
Work
312-555-1414
36
Phone
number
Smith J
Mobile
847-555-1313
56
When you feel ready for more, try the advanced storing features
at the end of the chapter. For instance, pages 40-41 describe how
the Phone Book can help you access Voice Mail and other automated calling systems with just a few keystrokes.
33
Page 35

Storing Names and Numbers
To take advantage of the internal Phone Book, you’ll first want to
store some names and numbers into memory. Your phone’s dedicated ¬ key makes storing quick and easy.
1.
2.
3.
or
or
4.
Enter
Number
Begin
Storing
Enter
Location
Select
First
Empty
Select
Range of
Ten
Enter
Name
Enter the phone number you want to store.
Press ¬ to begin storing.
You will see:
Enter the two-digit memory location where you
want the entry stored.
Press
available location.
Enter the first digit of the memory location and
press
available location beginning with that digit.
Enter a name to identify the phone number. (See
the next page for help entering names.) Press
¬ when you are finished. Your phone will
confirm the entry by displaying the information
stored.
Location__.
« to store the sequence in the first
« to store the sequence in the first
Keep in mind: Your Phone Book sorts alphabetically by the
first letter in the entry. If you store an entry without a name it will
be placed at the back of the Phone Book.
34
Page 36

Entering Names
When the display shows Alpha or Press STO, you can use the keypad
to produce any letter in the alphabet. Press any key to scroll
through the letters printed on the key and use the volume keys to
switch between upper and lowercase. For example, press
enter the letters “A,” “B,” or “C” as shown:
press 1 time to insert an "A"
press 2 times to insert a "B"
press 3 times to insert a "C"
press 4 times to insert a "2"
To enter a name into the Phone Book:
Enter
1.
Letter
Toggle
Case
Advance
2.
Cursor
Clear
Letter
Finish
3.
Storing
Press a key as many times as necessary to enter
a letter. The next letter on the key will appear
with each press.
” or ’ to toggle between upper and
Press
lowercase.
After each letter, press » to advance the cursor to the next space.
Ç or « to erase a letter if you
Press
make a mistake.
Enter up to 18 letters. Press ¬ when you are
finished. Your phone will confirm the entry by
displaying the information stored.
To enter punctuation:
Using this chart as a guide, press ⁄ to scroll through the
available punctuation marks:
¤ to
Using Memory
FPO
35
Page 37

Recalling from Memory
Recall by Name
Once you have stored names and numbers, you can recall them
alphabetically and immediately place calls.
Enter
1.
Menu
Enter
2.
Phone
Book
Select
3.
Feature
Search
4.
for Name
Place
5.
Call
End
6.
Call
Press ƒ and ⁄ to enter the menu.
You will see:
Press
You will see:
Press ¬ to select Recall By Name.
You will see:
Enter the first letter of the name. (See page
35 for details on entering letters.) The display
will show the name, phone number, and
memory location of the first entry beginning
with that letter.
Phone Book.
¬ to enter Phone Book.
Recall By Name.
Enter 1st Letter.
Smith J
06
Home
773-555-1515
Press æ to call the number you selected. You
Dialing.
will see:
Press º or close the flip.
36
Page 38

Recalling from Memory
Recall by Memory Location
Each name and number you store is placed in a memory location numbered 01-99. Once you have stored names and numbers, you can recall them by memory location.
Begin
1.
Recalling
Enter
2.
Location
Place
3.
Call
End
4.
Call
Press ‰ to begin recalling.
Enter the two-digit memory location of the
phone number you are looking for.
Press æ to call the number you selected. You
Dialing.
will see:
Press º or close the flip.
Clear an Entry
Here’s an easy way to erase a memory entry:
1.
2.
3.
Recall
Entry
Clear
Entry
Confirm
Erase
Press ‰ and the two-digit location number
of the entry.
Press & hold Ç to clear the entry.
You will see:
Press ¬ to confirm that you want to
erase the entry.
Clear?
Using Memory
37
Page 39

Recall Shortcuts
Super Speed Dial
If you know the memory location of the number you want to
call, try the Super Speed Dial function.
1.
2.
Enter
Location
Place
Call
Enter the two-digit memory location, 01-99.
Press æ to call the number you selected. The
number stored in the memory location you
entered will be dialed. You will see:
Dialing.
Note: If you enter the number of an empty location, you will see:
Location XX Is Empty.
Turbo Dial
The Turbo Dial™ keys let you dial numbers stored in locations
01-09 with the push of a button.
Turbo
Dial
Press & hold the memory location number of the
entry you want to call,
your call is placed.
You will see:
⁄ through ·, and
Dialing.
Your phone’s Emergency Call feature gives you unrestricted
access to any number stored in location 01, even if your phone is
locked. To learn how to activate this feature, see page 75.
38
Page 40

Scratchpad
If you need to take a quick note, but you don’t necessarily want to
save the number, use the Scratchpad, which always remembers
the last phone number that was on your phone’s display. The
Scratchpad is especially helpful if you are on the phone and your
party gives you another number to call.
1.
Enter
Number
Enter the number with the keypad. (The person
on the line will hear tones as you dial.)
Using Memory
2.
or
&
Store
Number
End
Call
Place
Call
Press ¬ and continue storing with step 3
on page 34.
º to end your current call
Press
if necessary.
Press æ to call the number in the
Scratchpad.
39
Page 41

Pause Dialing
When you call automated systems like Voice Mail or bank by
phone, a recorded message prompts you for PIN numbers,
account numbers, etc. Pause Dialing can make using automated
systems easy by allowing you to store these numbers in the same
memory location as the automated system’s access number. Just
separate each set of numbers with a “pause”– a special character
that tells your phone to wait before sending additional numbers.
Storing a Number with Pause Dialing
The pause occupies a one-digit space in your phone’s memory.
Once you have entered a string of numbers and pauses (up to 32
digits, including pauses), store the string in the same way you
store other entries.
Tip:
Always store
your Voice
Mail number
in location 98.
40
Enter
1.
Number
Insert
2.
Pause
Enter
3.
PIN
Insert
4.
Pause
Store
5.
Sequence
Enter the phone number you use to access the
automated system.
Press ƒ and press æ. You will see:
Insert Pause o. Press ¬. You will see a pause
circle inserted into the number entry:
pause counts as one digit, and you can store up
to 32 digits in each memory location.
Enter the next group of numbers, for example,
your PIN number. If the automated system
requires a * or #, enter those symbols, too.
Press ƒ and press æ then ¬. Repeat
steps 3 and 4 as many times as necessary.
Press ¬. You will see: Location__. Enter a
two-digit location, enter a name if you like, and
¬ when finished. Your phone will con-
press
firm the entry by displaying the information you
stored.
o. Each
Page 42

Pause Dialing
Using Pause Dialing
Once stored, simply recall the entry and place the call. All of the
digits you’ve stored will be recalled, but your phone will only send
the tones for the set of numbers before the first pause.
1.
2.
3.
Place
Call
Send
More
Numbers
End
Call
Enter the two-digit memory location where you
stored your Pause Dialing number and press
æ
. Your phone will dial the access number
and wait for your input when it reaches the
first pause.
When the automated system prompts you for
information, press
of numbers. Repeat this step to send each
group of numbers that you have stored.
Press º or close the flip.
æ to send the next group
Using Memory Linking
Each memory location holds up to 32 digits, including pauses.
Some automated systems, however, may require you to enter
more than 32 digits. In these cases, using Pause Dialing is still
easy enough. Just split the numbers into two memory locations
and recall the second set of digits as you need them.
Recall 2nd
1.
Location
Send
2.
Tones
Once you have sent the tones from the
1st location, press
memory location where you stored the second
set of digits.
Press ‰ and æ to send the tones in the
2nd location. If you have stored a pause in the
2nd location, your phone will pause as usual
when it reaches the pause character.
‰ and the two-digit
Using Memory
41
Page 43

99
d
a
Using Messaging
Just press the dedicated Message Key to open your phone’s new
and easy Messaging Menu. Through this menu, you can view
Caller IDs, check your Voice Mail, and read your pager-like
alphanumeric Messages.
In this chapter you will learn how to:
view your Caller IDs.
•
• check your Voice Mail.
• read your Messages.
• explore your options with the Function Menus.
Follow these symbols as a guide for using the keys on your phone.
Press ” to scroll up
*
07/07/98
42
Press ¬ to select
Press
’ to scroll down
Press
ø to open messaging menus
*Contact your Service Provider for availability.
11
menu
batt
ghi
FPO
44
77
Digit
33
abc
22
lock
66
jkl
55
vib
tuv
88
pqrs
opr
00
STO CLR
RCL
FCN
Page 44

Receiving Messages
If your phone is ON and you receive a Caller ID, Voice Mail, or
alphanumeric message:
• An alert sounds or vibrates:
Your phone will beep or vibrate three times. See Ringer or Vibrator Selection on page 69 to set your phone’s alert. See page 71 to
learn about Message Reminder Tones.
• An indicator appears on the display:
Appears on the lower line of the display when you receive a
Caller ID or alphanumeric message. It will stay on the display
until you’ve viewed the Caller ID or read the message.
Urgent Appears in the main display when you receive an
urgent message and your phone is in idle mode. After a few seconds, the screen will change to
Msg Mem Low Appears when your phone’s alphanumeric message
memory is almost full (at approximately 85% capacity).
Msg Mem Full Appears in the main display when the alphanu-
meric message memory is completely full and your phone is in
idle mode.
Appears when you receive a Voice Mail message. It will stay
on the display until you’ve listened to the message. Your Service Provider will then signal your phone to turn the indicator OFF.
• Press ø to open the Messaging Menu:
The specific icon will be flashing.
FPO
Press and begin flashing.
Voice Mail
Caller ID/
Message Indicator
Indicator
Messaging
Tip:
Your Service
Provider holds
your messages
and will forward them
after you’ve
made room.
See page 49
to learn how
to delete
messages.
43
Page 45
Viewing Your Caller IDs*
Your phone supports Caller ID service which lets you see who’s
calling before you answer. The Caller IDs for the last 16 different
callers are stored so they can be viewed at any time.
44
Enter
1.
Press ø to open the Messaging Menu.
Messaging
2.
Select
Caller ID
Press ” or ’ to scroll to Caller ID and press
¬ to select.
You will see a Caller ID icon for each stored Caller ID.
Flashing icons represent Caller IDs that have not been viewed.
Below the icons you’ll see information for the latest Caller ID:
selected Caller ID
time & date of call
your caller‘s
phone number
3.
Select
Caller
FPO
Press ” or ’ to highlight a Caller ID to view
¬ to view complete information
and press
for that call:
number
of times
they
called
FPO
your
caller’s
name
your caller’s
phone number
Keep in mind: You will see the caller’s name only if it is stored
in your Phone Book.
A check mark will appear in the corner if you’ve answered or
returned the call. Press æ
caller. Press
*Contact your Service Provider for availability.
¬ to store the information in your Phone Book.
to return the call of the displayed
Page 46

Caller ID Options
While viewing Caller IDs, just press the Message Key to see the
options available for the highlighted Caller ID.
Access
4.
Options
Go To
Messaging
Menu
Choose
5.
Function
Go To Msg
Menu
Exit
Delete
Message
Delete
AllMsgs
CallBack
Store To
Mem
Press ø to open the Caller ID
Function Menu.
FPO
Exit
Delete
Delete All
Message
Messages
Press ” or ’ to scroll to one of the
following:
Press ¬ to return your phone to the
Messaging Menu.
Press ¬ to exit Messaging to idle mode.
Press ¬ to delete the currently selected
Caller ID. Press
Press ¬ to delete all your Caller IDs.
¬ again to confirm.
Press
Press ¬ to dial the caller’s number..
Press ¬ to begin storing the number into
your Phone Book. Once selected follow the
steps on page 34.
Call Back
¬ again to confirm.
Store To
Memory
Messaging
45
Page 47

Checking Your Voice Mail*
When you receive Voice Mail, your Service Provider sends a notification to your phone and your phone displays an indicator.
You’ll know when you have new Voice Mail without even calling
your access number.
Enter
1.
Messaging
Select
2.
Voice Mail
If you have one or more Voice Mail messages, you will see:
To listen to your messages, all you need to do is dial your access number. Your phone will do this automatically with one keypress.
Press ø to open the Messaging Menu.
Press ” or ’ to scroll to Voice Mail and press
¬ to select.
FPO
46
Dial
Number
While viewing notifications, press æ to dial
your Voice Mailbox number.
Keep in mind: Some Service Providers send the Voice Mailbox
number to your phone automatically. If the number has not
been sent, just store it in location 98 of your Phone Book. To
learn how, see Pause Dialing on page 40.
If you have no new messages, you will see:
FPO
*Contact your Service Provider for availability.
Page 48

Voice Mail Options
While checking Voice Mail, just press the Message Key to see
options for the highlighted Voice Mail notification.
FPO
Go To
Messaging
Menu
Exit
Delete
Message
Call Back
3.
4.
Access
Options
Choose
Function
Go To Msg
Menu
Exit
Delete
Message
CallBack
Press ø to open the Voice Mail
Function Menu.
Press ” or ’ to scroll to one of the
following:
Press ¬ to return your phone to the
Messaging Menu.
Press ¬ to exit Messaging to idle mode.
Press ¬ to delete the currently selected
Voice Mail notification.
¬ again to confirm.
Press
Press ¬ to dial your Voice Mailbox number.
Messaging
47
Page 49

Reading Your Messages*
Your phone can receive alphanumeric messages just like a pager.
The message memory stores up to 60 messages, depending on
the size of each.
Enter
1.
Messaging
Select
2.
Messages
You will see a row of message icons , one for each message.
You may also see for urgent messages and for locked messages. Flashing icons represent messages that have not been
viewed. If there are more messages than can be shown on one
line, arrows will point to the rest of the messages. Below the icons
you’ll see the latest message:
urgent
message
more msgs
to left
locked msg
msg
number
sender’s
number
Press ø to open the Messaging Menu.
Press ” or ’ to scroll to Messages and press
¬ to select.
selected
message
more msgs
to right
time & date
FPO
of msg
text of
selected
msg
48
Select a
3.
Message
Scroll Press
Review
Press ” or ’ to highlight a message to read
¬ to read message.
and press
¬ to scroll through the message.
Press
” or ’ to scroll to other messages.
Messages
Call Back Press
æ to dial the Call Back number (in
parentheses if included).
Store to
Memory
*Contact your Service Provider for availability.
¬ to store the Call Back number (in
Press
parentheses if included) in your Phone Book.
Page 50

Message Options
While reading your messages, just press the Message Key to see
the options available for the highlighted message.
4.
Access
Options
Press ø to open the Message
Function Menu.
Go To
Messaging
5.
Choose
Function
Go To Msg
Menu
Exit
Delete
Message
Delete
AllMsgs
Lock
Exit Delete All Delete
Message Messages
Press ” or ’ to scroll to one of the
following:
Press ¬ to return your phone to the
Messaging Menu.
Press ¬ to exit Messaging to idle mode.
Press ¬ to delete the currently selected
message. Press
Press ¬ to delete all messages.
¬ again to confirm.
Press
Press ¬ to lock or unlock the message.
Lock
Call Back
(Unlock)
¬ again to confirm.
Message
FPO
Unlock
Message
If the message contains a Call Back number (in parentheses), you will also see these options:
CallBack
Store To
Mem
Messages must be unlocked before they can be
deleted.
Press ¬ to dial the sender’s number.
Press ¬ to begin storing the number into
your Phone Book. Once selected follow the
steps on page 34.
Store To
Memory
Messaging
49
Page 51
D
9
The Works
Introducing the Menu Features
The SC-3160 dual mode digital cellular phone is loaded with
handy features that can help make life easier, more productive,
and just a bit more exciting. The phone’s user-friendly menu system will help you find what you need quickly and easily.
Navigating the Menu
You can navigate through the menu system using the volume
keys and the ¬ key. Use the upper and lower volume keys to
scroll through the options available on one level. Use the ¬
key to choose an option, both menus and features.
This manual uses these symbols to instruct you to use the
navigation keys
Press ” to scroll up
Press
¬ to select
Press
’ to scroll down
07/07/
FPO
abc
22
menu
11
lock
jkl
55
batt
50
Page 52

Road Maps
To help you navigate through the phone’s menu system, chapters
begin with an easy-to-follow visual “road map”—a quick overview of what you’ll find in the chapter that follows.
To use the menu system:
1.
2.
3.
Enter
Menu
Scroll
through
Menu
Exit
Menu
Press ƒ then
⁄.
press
’ or ” to scroll
Press
through the menu’s
top level, shown on
the right.
Press º to exit
the menu.
pg. 52
pg. 60
pg. 66
pg. 72
pg. 80
Previous User Compatibility
If you are already familiar with previous Motorola cellular
phones, you may prefer to use your phone’s « & » keys to
scroll through the menu system.
In ”The Works”
Within the chapters that follow, detailed instructions describe
the operation of each feature. We’ll teach you everything you
need to know about your new phone, including how to use and
access a feature and what happens when you do, without missing
a keypress.
The Works
51
Page 53
b
07
Phone Book
In “Using Memory” you learned how to store and recall phone
numbers with the internal Phone Book. You can access the same
features, along with a few others, using your phone’s convenient
menu system.
In this chapter you will learn how to:
recall and store phone numbers using the menu system.
•
• edit your memory information.
• view your own phone number.
Follow these symbols as a guide for using the navigation keys.
Press ” to scroll up
Press ¬ to select
Press ’ to scroll down
FPO
menu
a
2211
52
Page 54

Road Map
Press ƒ and press ⁄ to enter the menu system.
Start:
pg. 52
pg. 54
pg. 55
pg. 55
pg. 56
pg. 58
pg. 57
pg. 57
Phone Book
53
Page 55

Getting to Phone Book...
Enter Menu Press ƒ and press ⁄.
1.
2.
Recall By
Name
Enter
Phone Book
Press ¬ to enter Phone Book.
Recalling By Name
Once you have stored names and numbers, you can recall them
alphabetically with the Phone Book menu.
Begin
3.
Recalling
Enter
4.
Name
Find
5.
Name
Place
6.
Call
End
7.
Call
Press ¬ to select Recall By Name.
You will see:
Press the appropriate digit key as many times as
necessary to enter the first letter of the name.
(See page 35 for help entering letters.) You will
see the first entry with that letter.
Press ” or ’ to scroll to the name you are looking for.
Press æ. You will see: Dialing.
Press º or close the flip.
Enter 1st Letter.
54
Page 56

Recalling By Location
Each name and number you store is placed in a memory location numbered 01-99. Once you have stored names and numbers, you can use this feature to recall them by memory location.
Begin
3.
Recalling
Enter
4.
Location
Place
5.
Call
Press ” or ’ to scroll to Recall By
Location
and press ¬ to select.
Enter the two-digit memory location of the number you’re looking for. You will see the Phone
Book screen for that memory location.
Press æ. You will see: Dialing.
Recall By
Location
Tip:
To place a
quick call just
enter the twodigit location
and press
æ. See
page 38 for
more information.
Phone Book
End
6.
Call
Press º or close the flip.
Phone Book Status
You can use this feature to see how many of your Phone Book’s
99 locations have been used.
3.
4.
Select
Feature
Exit
Menu
Press ” or ’ to scroll to Phone Book
Status
and press ¬ to select. You will see: XX
Full XX Empty
Press º to exit menu, or you may scroll to
other features.
.
Phone Book
Status
55
Page 57

Getting to Phone Book...
Enter Menu Press ƒ and press ⁄.
1.
Enter
2.
Phone Book
Store New
Number
Tip:
Press « to
store the entry
in the first available location or
press one digit
« to
and
store it in the
first location
beginning with
that digit.
Press ¬ to enter Phone Book.
Storing a New Number
Whether you store numbers as described in “Using Memory” or
store numbers with this menu feature, you will get the same
results – so give it a try!
Begin
3.
Storing
4. Enter
Number
Enter
5.
Location
Enter
6.
Name
Store
7.
Number
Exit
8.
Menu
Press ” or ’ to scroll to Store New Number and
¬ to select.
press
You will see:
Enter the number you want to store and press
Enter Number.
¬. You will see: Location__.
Enter the two-digit number of the memory location where you want the number stored.
Alpha or Press STO.
will see:
Enter a name to identify the phone number or
continue with step 7. See page 35 for details on
entering names.
¬ when finished entering the name.
Press
Your phone will confirm the entry by displaying:
Stored At XX.
Press º to exit menu, or return to Step 3 to
store more numbers.
You
56
Page 58

Viewing Your Number
Use this feature to view your phone’s currently active phone number. If you have more than one phone number, you can change
the active number with Changing Your Number on page 82.
View My
Number
3.
4.
View
Number
Exit
Menu
Press ” or ’ to scroll to View My
Number
and press ¬ to select. The
display will show the currently active
number on your phone.
Press º to exit the menu, or you may scroll
to other features.
Number Preference
When Placing Calls:
If you prefer to see the phone number (Dialing 555-1212) instead of
the name (
internal Phone Book, turn Number Preference ON.
When Receiving Calls:
If you subscribe to Caller ID, your phone automatically looks up
callers in your Phone Book and displays the name stored in the
entry. If you prefer to see the caller’s number (
Number Preference ON.
Calling Jane Smith) when you place a call from the
3.
4.
5.
Find
Feature
Toggle
Feature
Exit
Menu
Press ” or ’ to scroll to Number Prefer.
Press ¬ to toggle the feature ON or OFF.
Press º to exit the menu, or you may scroll
to other features.
555-1212), turn
Shortcut:
Press ‰
».
Phone Book
Number
Prefer Off
57
Page 59

Getting to Phone Book...
Enter Menu Press ƒ and press ⁄.
1.
Edit
Memory
Enter
2.
Phone Book
Press ¬ to enter Phone Book.
Editing a Memory Location
You can edit an entry or move it to another location. When you
move an entry, the original location remains untouched, allowing you to easily create a Phone Book entry similar to one you’ve
already stored.
3.
4.
or
5.
Begin
Editing
Find by
Location
Find by
Name
Edit
Phone
Number
Press ” or ’ to scroll to Edit Memory and press
¬ to select.
Press ” or ’ to scroll to Edit By Location and
¬ to select. You will see: Location__.
press
Enter the two-digit memory location of the
phone number you want to edit. Press
begin editing the displayed entry and continue
with Step 5.
Press ” or ’ to scroll to Edit By Name and press
¬ to
¬ to select. You will see: Enter 1st Letter.
Enter the first letter of the name you want to
edit. (See page 35 for information on entering
letters.) You will see the first entry beginning
with that letter. Press
name you are looking for and press
begin editing.
Enter your changes to the phone number. Pr
” or ’ to scroll to the
¬ to
ess
Ç to erase one digit at a time, or press &
hold Ç to erase the entire number. Press
« to move the cursor backward.
58
Page 60

Editing a Memory Location
(continued)
Finish
6.
Number
Move to
7.
a New
Location
Overwrite
or
Original
Edit
8.
Name
Confirm
9.
Changes
Choose
or
Different
Location
Press ¬ when you finish editing the
phone number. The display will show the
current location.
If you’d like to move the entry to a new location
and preserve the original entry, press & hold
Ç to erase the location and enter a new
two-digit location. You will see the name associated with the entry.
If you’d like to overwrite the original entry, press
¬. You will see the name associated with
the entry.
Enter your changes to the name. (See page 35
for details on entering names.) Pr
ess Ç or
« to erase one letter at a time, or press &
hold Ç to erase the entire name. Skip this
step to leave the name unchanged.
Press ¬ when you finish editing the name. If
you are overwriting an entry, you will see:
tion XX is Full
new information and you will see:
. The display will then show the
Loca-
Change? Press
¬ again to save your changes. You will see:
Stored At XX.
Ç to choose a new memory location
Press
and return to step 6.
Phone Book
or
10.
Discard
Changes
Exit
Menu
Press º to exit without saving your changes.
Press º to exit the menu, or you may scroll
to other features.
59
Page 61

o
b
/
Call Timers
Your phone is equipped with three visual and three audible call
timers. You can monitor or record the length of individual calls,
set a timer to track monthly usage, or have the phone alert you at
intervals that you specify.
In this chapter you will learn how to:
monitor the length of your calls.
•
• set and view the resettable timer for long-term monitoring.
• program audible timers for your individual needs.
Follow these symbols as a guide for using the navigation keys.
60
Press ” to scroll up
Press ¬ to select
Press ’ to scroll down
FPO
menu
07
a
2211
l
Page 62

Road Map
Press ƒ and press ⁄ to enter the menu system.
Start:
pg. 52
pg. 60
pg. 62
pg. 62
pg. 63
CallTimers
pg. 63
pg. 64
pg. 64
pg. 65
pg. 65
61
Page 63

Getting to Call Timers...
Enter Menu Press ƒ and press ⁄.
1.
Enter
2.
Call Timers
Individual
00:00:00
Shortcut:
‰
Press
then » twice
for a quick look
at this timer.
Resettable
Time 00000
Shortcut:
‰
Press
then » three
times for a quick
look at this timer
Press ” or ’ to scroll to Timers
and press ¬ to select.
Viewing the Individual Timer
The individual timer records the air-time of your most recent call
in hours, minutes, and seconds. It resets before you place the
next call and when you turn the phone OFF. You can have the
timer display automatically while calls are in progress. See Auto
Display Individual Timer on page 64.
3.
4.
View
Timer
Exit
Menu
When you enter the Call Timers menu,
you will see:
Press º to exit the menu, or you may scroll
to other features.
Individual XX:XX:XX.
Viewing the Resettable Timer
You can track how much air-time you have accumulated during
any time period you choose. For example, reset this timer at the
beginning of each billing period to know where you stand at any
given moment. Use this feature to view the time elapsed, and follow the instructions on page 63 to reset the timer.
.
View
3.
Timer
Press ” or ’ to scroll to Resettable Time. You will
see the air-time in minutes since you last reset
the timer.
62
4.
Exit
Menu
Press º to exit the menu, or you may scroll
to other features.
Page 64

Viewing the Cumulative Timer
This is a non-resettable timer that keeps track of your phone’s
total air-time (in minutes) since your phone was activated.
View
3.
Timer
Exit
4.
Menu
Press ” or ’ to scroll to Cumulative Time.
You will see the total air-time in minutes.
Press º to exit the menu, or you may scroll
to other features.
Cumulative
Time 000000
Shortcut:
‰
Press
then » four
times.
Resetting the Timer
Scroll over to this feature at the beginning of each billing cycle
and you will always be in the know. After you reset the timer, it
will continue to keep track of your air-time (in minutes) until
you reset it again.
Find
3.
Feature
Reset
4.
Timer
Exit
5.
Menu
Keep in mind: The shortcuts will not work if the Resettable
Timer is already set at zero.
Press ” or ’ to scroll to Reset Timer.
Press ¬ to reset. You will see: Resettable Time
00000
.
Press º to exit the menu, or you may scroll
to other features.
Reset
Timer
Shortcut:
ƒ then
Press
‚
, ‡,
‰ to reset
the timer.
CallTimers
63
Page 65

Getting to Call Timers...
Enter Menu Press ƒ and press ⁄.
1.
Enter
2.
Call Timers
Individual
Timer Off
One Minute
Timer Off
Press ” or ’ to scroll to Timers
and press ¬ to select.
Auto Display Individual Timer
When you turn this feature ON, your phone will automatically
display your air-time in minutes and seconds during and after
each call.
Note: Activating the Auto Display Timer may reduce standbytime and talk-time
Find
3.
Feature
Toggle
4.
Display
Exit
5.
Menu
.
Press ” or ’ to scroll to Individual Timer.
Press ¬ to toggle ON or OFF the automatic
display of the individual timer.
Press º to exit the menu, or you may scroll
to other features.
One Minute Audible Timer
Turn this feature ON to hear an audible beep 10 seconds before
the end of every minute during a call. Don’t worry, the party on
the other end will not hear the beeps.
3.
Find
Feature
Press ” or ’ to scroll to One Minute Timer.
64
4.
5.
Toggle
Timer
Exit
Menu
Press ¬ to toggle the timer ON or OFF.
Press º to exit the menu, or you may scroll
to other features.
Page 66

Repeating Audible Timer
You can set this timer to beep during your calls at an interval that
you select—from 11-999 seconds. Like the One Minute Audible
Timer, you will hear the beep 10 seconds before the end of each
interval, and the party on the other end will not hear the beeps.
Repeating
Timer Off
3.
4.
5.
6.
Find
Feature
Toggle
Timer
Enter
Seconds
Exit
Menu
Press ” or ’ to scroll to Repeating Timer.
Press ¬ to toggle the timer ON or OFF.
If you toggle the timer ON, you will see: Enter
Seconds
. Enter the number of seconds you would
like between beeps and press
timer. You will see:
Press º to exit the menu, or you may scroll
to other features.
Set At XXX Secs.
¬ to set the
Single Audible Timer
You can set the Single Timer to beep at a time that you select–
from 11-999 seconds. It will beep once during each call, 10 seconds before the end of the interval. The party on the other end
will not hear the beeps.
3.
4.
5.
Find
Feature
Toggle
Timer
Enter
Seconds
Press ” or ’ to scroll to Single Timer.
Press ¬ to toggle the timer ON or OFF.
If you toggle the timer ON, you will see: Enter
Seconds
. Enter the number of seconds you would
like before the beep and press
timer. You will see:
Set At XXX Secs.
¬ to set the
CallTimers
Single
Timer Off
Exit
6.
Menu
Press º to exit the menu, or you may scroll
to other features.
65
Page 67

oc
c
/
Tone Controls
If you’ve been reading along diligently, this may be a good time
for a break—put your feet up and have some fun with the Tone
Controls. Use these features to select Silent Mode, personalize
your phone’s ringer styles—or turn them OFF for some peace
and quiet.
In this chapter you will learn how to:
choose from nine different ringer styles.
•
• activate and deactivate the VibraCall
• silence the keypad.
• silence all your phone’s tones with one convenient feature.
• set the Message Reminder.
Follow these symbols as a guide for using the keys on the side of
your phone.
™
Alert.
66
Press ” to scroll up
Press ¬ to select
Press ’ to scroll down
FPO
menu
07
ab
2211
l
Page 68
Road Map
Press ƒ and press ⁄ to enter the menu system.
Start:
pg. 52
pg. 60
pg. 66
pg. 68
pg. 69
pg. 68
Tone Controls
pg. 69
pg. 70
pg. 71
pg. 71
67
Page 69

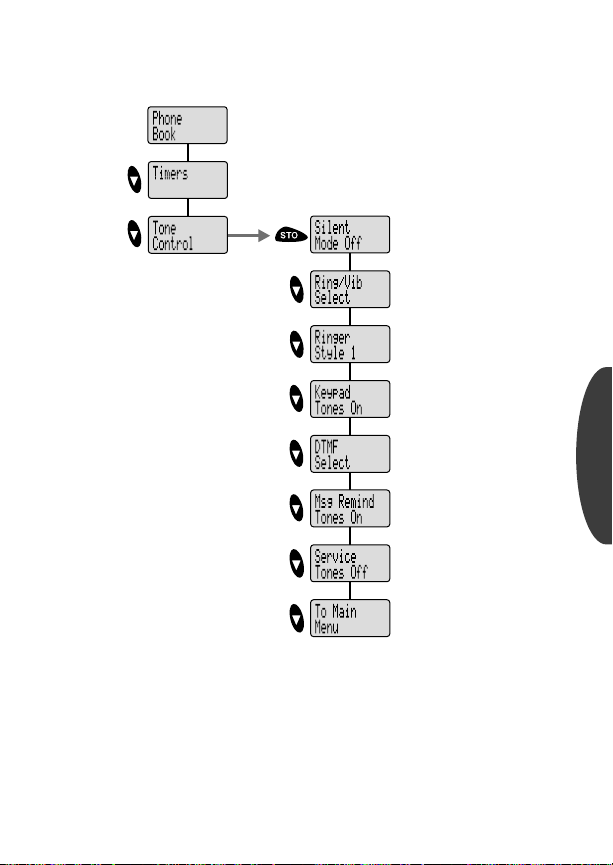
Getting to Tone Control...
Enter Menu Press ƒ and press ⁄.
1.
Enter
2.
Tone Control
Silent
Mode Off
Shortcut:
Press ƒ
then press &
°.
hold
Ringer
Style 1
Press ” or ’ to scroll to Tone Control
and press ¬ to select.
Silent Mode
When you need to be discreet, just turn Silent Mode ON. All tones
will be silenced. The ringer and incoming message tones will be
replaced by vibrations.
3.
4.
5.
Find
Feature
Toggle
Feature
Exit
Menu
Press ” or ’ to scroll to Silent Mode.
Press ¬ to toggle the feature ON or OFF.
Press º to exit the menu, or you may scroll
to other features.
Selecting a Ringer Style
Your new phone offers nine different ringer styles. After you
choose a style, the phone will give you a brief sample of your new
alert sound, or vibrate if you have the VibraCall
3.
4.
Enter
Feature
Select
Ringer
Press ” or ’ to scroll to Ringer Style
¬.
and press
Press ” or ’ to scroll through the ringer styles.
As you scroll, your phone will give an audible
sample of the currently displayed style. Press
¬ to select the displayed option.
™
Alert selected.
68
5.
Exit
Menu
Press º to exit the menu, or you may scroll
to other features.
Page 70

Ringer or Vibrator Selection
Motorola’s VibraCall™ Alert is ideal for situations where ringing
may not be appropriate, or in noisy places where you might not
hear the ringer. You can choose to be alerted to incoming calls
using the vibrator, ringer, both or neither.
3.
4.
Enter
Feature
Select
Ringer/
Vibe
Press ” or ’ to scroll to Ring/Vib Select and
¬.
press
” or ’ to scroll to Vibrate Only, Ring Only,
Press
Vibrate Then Ring and press ¬ to select the
or
displayed option.
Ring/Vib
Select
Shortcut:
Press ƒ then
° to
press
toggle the Vibra-
™
Alert ON
Call
and OFF.
Exit
5.
Menu
Press º to exit the menu, or you may scroll
to other features.
Keep in mind: When both the ringer and vibrator are ON, the phone
alerts you by vibrating for three ring cycles and then ringing.
Keypad Tones
Keypad Tones are the sounds you hear when you press any key on
the phone. If you want to be discreet, use this feature to silence
the audio feedback from the keypad.
Keep in mind: Turning Keypad Tones OFF does not silence the
tones your phone sends across the line. See Transmit Tones on
the following page for more information.
3.
4.
5.
Find
Feature
Toggle
Feature
Exit
Menu
Press ” or ’ to scroll to Keypad Tones.
Press ¬ to toggle the feature ON or OFF.
Press º to exit the menu, or you may scroll
to other features.
Tone Controls
Keypad
Tones On
69
Page 71

Getting to Tone Control...
Enter Menu Press ƒ and press ⁄.
1.
DTMF
Select
Enter
2.
Tone Control
Press ” or ’ to scroll to Tone Control
and press ¬ to select.
Transmit Tones
Your phone transmits tones to communicate with automated
calling systems like Voice Mail or bank by phone. These tones are
called DTMF tones (Dual Tone Multi-Frequency tones), and this
feature allows you to control the length of the tone your phone
sends. For most systems, you should use the default setting of
short tones, which sends the tones for a preset length of time. If
you choose long tones, your phone will transmit the tones for as
long as you press & hold the key. To silence the tones during conversations, turn the tones OFF.
Enter
3.
Feature
Select
4.
Setting
Exit
5.
Menu
Note: If you turned the DTMF tones OFF, but you want to access
a tone-activated system like Voice Mail, place your call, enter the
numbers you need to transmit and:
Press ” or ’ to scroll to DTMF Select and press
¬ to select.
Press ” or ’ to scroll to Transmit DTMF Long,
Transmit DTMF Short
¬ to select.
press
Press º to exit the menu, or you may scroll
to other features.
, or Transmit DTMF Off and
70
Send
Tones
Press ‰ then press æ to send the tones
if DTMF tones are OFF.
Page 72

Message Reminder
If you subscribe to messaging services, there’s no need to worry
about missing the new message alert. Just turn Message Reminder
Tones ON and your phone will remind you of unread messages by
beeping and /or vibrating every two minutes. This feature is especially helpful if you are busy or away from your phone.
Msg Remind
Tones On
3.
4.
5.
Find
Feature
Toggle
Feature
Exit
Menu
Press ” or ’ to scroll to Msg Remind Tones.
Press ¬ to toggle the feature ON or OFF.
Press º to exit the menu, or you may scroll
to other features.
Service Tones
When Service Tones are ON, you’ll be instantly alerted to any
change in your cellular service. You’ll hear two short beeps when
your phone (1) starts to roam, (2) returns to a home system after
roaming, (3) loses service, (4) finds service, or (5) moves from
digital
Keep in mind: Your phone will always beep if a call
is dropped.
to analog service (or vice versa).
3.
4.
5.
Find
Feature
Toggle
Feature
Exit
Menu
Press ” or ’ to scroll to Service Tones.
Press ¬ to toggle the feature ON or OFF.
Press º to exit the menu, or you may scroll
to other features.
Service
Tones Off
Tone Controls
71
Page 73

o
c
/
Lock/Security
While you probably would not want to leave your phone
unattended, your phone has a number of built-in
security features to prevent unauthorized use.
In this chapter you will learn how to:
lock and unlock your phone.
•
• place emergency calls.
• view and change your lock code.
• restrict call placement and memory access.
• reset or clear your phone’s settings.
Follow these symbols as a guide for using the keys on the side of
your phone.
72
Press ” to scroll up
Press ¬ to select
Press ’ to scroll down
FPO
menu
07
ab
2211
l
Page 74

Road Map
Press ƒ and press ⁄ to enter the menu system.
Start:
pg. 52
pg. 60
pg. 66
pg. 72
pg. 74
pg. 75
pg. 76
pg. 76
Lock/Security
pg. 76
pg. 76
pg. 78
pg. 77
pg. 77
73
Page 75

Getting to Lock/Security...
Enter Menu Press ƒ and press ⁄.
1.
2.
Auto
Lock Off
Enter
Lock/Secure
Press ” or ’ to scroll to Lock Secure
¬ to select.
and press
Auto Lock
Turn this feature ON and your phone will automatically lock
itself each time the phone is turned OFF.
Find Feature Press ” or ’ to scroll to Auto Lock.
3.
Toggle Lock Press ¬ to toggle the feature ON or OFF.
4.
Exit
5.
Menu
Locking the Phone
You can lock your phone manually at any time to help prevent
unwanted use. Once locked, you can leave the phone ON or turn
it OFF and the phone will remain locked.
Lock Phone Press ƒ then press fi.
1.
Confirm Press ¬. You will see: Locked.
2.
Unlocking the Phone
Unlocking your phone is quick and easy. Your factory programmed lock code is 123. If you’ve changed this code and can’t
remember what it is, see Viewing the Lock Code on page 76.
Keep in mind: You can still receive calls when the phone is
locked. Follow these steps to answer an incoming call:
Press º to exit the menu, or you may scroll
to other features.
You will see:
Lock?
74
Unlock Enter your three-digit code.
1.
2.
Answer
Call
Press æ to answer the call.
Page 76

Emergency Call
Your phone’s emergency call feature allows you to instantly place
a call from location 01 – even when your phone is locked.
Emergency
Call On
Find
3.
Feature
Toggle Press ¬ to toggle the feature ON or OFF.
4.
Exit
5.
Menu
Press ” or ’ to scroll to Emergency Call.
Press º to exit the menu, or you may scroll
to other features.
Keep in mind: Some cellular systems only allow access to
their own emergency numbers. Check with your Service Provider
for more information.
Storing an Emergency Call Number
You should reserve memory location 01 for an emergency number or the number of a family member or close friend. To store
your emergency number, follow these steps:
1.
2.
3.
Enter
Number
Save
Number
Enter
Name
Enter your emergency number.
Press ¬ and press ‚, ⁄ to choose
location 01. You will see:
Enter a name if you like and press ¬ when
finished. Your phone will confirm the entry by
displaying the stored information.
Alpha or Press STO.
Placing an Emergency Call
Place
Call
Press & hold
⁄ at any time.
Lock/Security
Keep in mind: If call restriction Service Level 1 is enabled, the
™
Turbo Dial
Keys will not be active. To override the restriction
and place an emergency call, press ‰, ⁄, æ. See page
78 for information on your phone’s service levels.
75
Page 77

Getting to Secure Options...
Enter Menu Press ƒ and press ⁄.
1.
Enter
2.
Lock/Secure
Access
3.
Secure
Options
Press ” or ’ to scroll to Lock Secure
¬ to select.
and press
” or ’ to scroll to Secure Options
Press
and press ¬. You will see: Secure Code______.
Enter your six-digit secure code.
Secure
Options
View Lock
Code
Shortcut:
Press ƒ,
‚, enter six-
digit security
code, then
‰.
Change
Lock Code
Shortcut:
Press ƒ
‚
, enter your
six-digit secure
code, enter a
new lock code,
¬.
then
76
Secure Options Submenu
For your protection, you must enter a six-digit secure code in
order to access the features in the Secure Options submenu. The
factory programmed secure code is 000000.
Viewing the Lock Code
Forget your lock code or need to double-check it?
Help is only a few keystrokes away.
View
4.
Code
Exit
5.
Menu
Changing the Lock Code
Changing your lock code is easy– follow these simple steps.
Begin
4.
Change
Enter New
5.
Code
Exit
6.
Menu
Press ¬ to select View Lock Code.
You will see:
Press º to exit the menu, or you may scroll
to other features.
Press ” or ’ to scroll to Change Lock Code and
press
You will see:
Enter a new three-digit lock code. Your phone
will confirm by displaying:
Press º to exit the menu, or you may scroll
to other features.
Lock Code XXX.
¬ to select.
Enter New Code___.
New Lock Code XXX.
Page 78

Master Reset
Use this feature to reset all user-selectable options back to their
original factory settings.
Keep in mind: Once you select this feature, the reset process
cannot be canceled or reversed.
Master
Reset
Reset
4.
Features
Confirm
5.
Reset
Exit Press º to exit without resetting.
or
Exit
6.
Menu
Press ” or ’ to scroll to Master Reset and press
¬ to select. You will see: Reset?
Press ¬ to confirm.
You will see:
Press º to exit the menu, or you may scroll
to other features.
Standard Setting.
Master Clear
If you want to start with a clean slate, use Master Clear to clear all
user-selectable options, the resettable timer, the Phone Book, and
the Messaging memory.
Keep in mind: Once you select this feature, the process cannot
be canceled or reversed.
Clear
4.
Settings
Confirm
5.
Clear
Exit Press º to exit without resetting.
or
Exit
6.
Menu
Press ” or ’ to scroll to Master Clear and press
¬ to select. You will see: Clear?
Press ¬ to confirm. You will see: Busy. It
will take a few seconds to reset all of your
phone’s options back to their factory settings.
Press º to exit the menu, or you may scroll
to other features.
Master
Clear
Lock/Security
77
Page 79

Getting to Secure Options...
4 Std
Setting
Enter Menu Press ƒ and press ⁄.
1.
Enter
2.
Lock/Secure
Access
3.
Secure
Options
Press ” or ’ to scroll to Lock Secure
and press
” or ’ to scroll to Secure Options
Press
and press ¬. You will see: Secure Code______.
Enter your six-digit secure code.
Secure Options Submenu
Service
Level 4
Service Level
When loaning your phone to others, you may want to restrict call
placement or protect memory information. Your phone has two
service levels that allow you to control the types of outgoing calls
that can be made from your phone.
Select
4.
Feature
Choose
5.
Level
Exit
6.
Menu
Your phone has two service levels:
Level 1: Calls can be placed from
memory locations 1-10 only.
• No dialing from keypad.
• No memory edit or storage.
• No access to name directory.
Level 4: This is the default setting.
• No restrictions.
¬ to select.
Press ” or ’ to scroll to Service Level and press
¬ to select.
Press ” or ’ to scroll through service level settings and press
(See the chart below for descriptions.)
Press º to exit the menu, or you may scroll
to other features.
¬ to select the setting.
1 Memory
1-10 Only
78
Page 80

Authentication (A-Key) Entry
Your A-Key feature acts like a PIN code and helps to protect your
phone from unauthorized users. Contact your Service Provider
for your personalized A-Key number.
Keep in mind: This feature should only be programmed once.
To activate the A-Key feature:
1.
2.
3.
4.
Activate
Feature
Select
Number
Enter
A-Key
Validate
A-Key
Press ¤, fi, ‹, · then ƒ,
ƒ
. You will see your phone’s active phone
.
number
If the phone number displayed is not the number you want the A-Key programmed to, press
» to select another number. This will be the
phone number your phone will operate with
once you exit the A-Key feature.
Enter your new A-Key (6- to 26-digit number) as
provided by your Service Provider and
¬
. Press Ç to correct any errors.
Press ¬ to validate the A-Key entry. You
Valid if the A-Key was entered cor-
will see
rectly, or you’ll see
re-enter your A-Key number.
A-Key Invalid if you need to
¬,
Lock/Security
79
Page 81

o
c
/
Phone Options
The Phone Options menu is your “command center” for adjusting the way your phone sends and receives calls. You can fine
tune your phone for optimal performance, view information
about your phone’s settings, and much more.
In this chapter you will learn how to:
switch phone numbers.
•
• review your phone’s settings.
• select a variety of system specific settings.
Follow these symbols as a guide for using the keys on the side of
your phone.
80
Press ” to scroll up
Press ¬ to select
Press ’ to scroll down
FPO
menu
07
ab
2211
l
Page 82

Road Map
Press ƒ and press ⁄ to enter the menu system.
Start:
pg. 52
pg. 60
pg. 66
pg. 66
pg. 80
pg. 82
pg. 84
pg. 83
pg. 86
pg. 88
pg. 90
pg. 86
pg. 86
pg. 87
pg. 88
pg. 88
pg. 89
Phone Options
pg. 90
pg. 91
81
Page 83

Getting to Phone Options...
Enter Menu Press ƒ and press ⁄.
1.
Enter
2.
Phone Options
Change
Number
Press qqqq or ’ to scroll to Phone Options
and press ¬ to enter.
Changing Your Number
Your phone can be activated with up to four unique phone numbers. You could use one number for personal use, one for business, and the other two for cities that you travel to frequently.
This feature allows you to select an appropriate number.
Keep in mind: Only one number can be active on your
phone at a time.
3.
4.
5.
Begin
Change
Choose
Number
Exit
Menu
Press ¬ to enter Change Number. The
display will show your phone’s currently active
number.
Press ” or ’ to scroll through the phone numbers programmed into your phone.
¬ to select the desired number.
Press
You will see:
Press º to exit the menu, or you may scroll
to other features.
Set.
82
Page 84

Feature Review
After you’ve spent some time adjusting your phone’s settings, use
this feature to review the changes you’ve made. When you enter
Feature Review, your phone will display any features that you
have changed from their default factory settings.
Keep in mind: Feature Review is simply an opportunity to
review – but not change – your current settings.
3.
4.
Begin
Review
Browse
Features
Press ” or ’ to scroll to Feature Review and
¬ to enter.
press
Press ” or ’ to scroll through any features you
have changed from their default settings. If all
features are set to their default factory settings, the display will show:
Standard Settings.
Feature
Review
Shortcut:
Press ƒ then
‚, ·,
‰.
5.
Exit
Menu
Press º to exit the menu, or you may scroll
to other features.
Phone Options
83
Page 85

Getting to Phone Options...
Enter Menu Press ƒ and press ⁄.
1.
Enter
2.
Phone Options
Select
SystemMode
Press qqqq or ’ to scroll to Phone Options
and press ¬ to enter.
Selecting a System Mode
Your Service Provider configures this feature when you receive a
cellular phone number. Select System Mode allows you to select the
type of cellular system your phone will attempt to access. See the
next page for a chart of available settings.
Begin
3.
Selection
Choose
4.
Mode
Exit
5.
Menu
Press ” or ’ to scroll to Select
SystemMode
and press ¬ to enter. The display
will show your phone’s current System Mode
setting.
Press ” or ’ to scroll through the System
Mode settings (see chart on next page). Press
¬ to select the displayed setting.
Press º to exit the menu, or you may scroll
to other features.
84
Page 86

Selecting a System Mode
Home Only
Scan A
Scan B
Preferred
SID Scan
Standard Mode:
Your phone first seeks a home type
system, then a non-home type system.
If home system is non-wireline
(type A)
If home system is wireline (type B)
Reversed Preference Mode:
Your phone first seeks a non-home
type system, then a home type system. (This mode may be useful in
fringe areas or certain roaming situations.)
If home system is non-wireline
(type A)
If home system is wireline (type B)
Home Only Mode:
Phone will not operate outside its
home system.
Std AB
Std BA
Scan BA
Scan AB
Scan A Mode:
Phone will operate only within
non-wireline (A) systems.
Scan B Mode:
Phone will operate only within
wireline (B) systems.
Preferred System ID Mode:
Phone will scan for home or programmed preferred SIDs first.
This choice requires entry of up to
60 System ID numbers for those
systems in which you wish to
operate. Contact your Cellular
Service Provider for SID information.
Phone Options
85
Page 87

Getting to Call Options...
Enter Menu Press ƒ and press ⁄.
1.
Enter
2.
Phone Options
Enter
3.
Call Options
Call
Options
Multi Key
Answer Off
Auto
Answer Off
Press qqqq or ’ to scroll to Phone Options
and press ¬ to select.
Press qqqq or ’ to scroll to Call Options
and press ¬ to enter.
Call Options Submenu
This submenu gives you control over the way your phone places
and receives calls.
Multiple Key Answer
Why fumble for the æ key to answer calls? With Multiple Key
”
Answer ON, you can answer calls by pressing
in the center of the keypad,
Find
4.
Feature
Toggle
5.
Feature
Exit
6.
Menu
⁄ through ».
Press ” or ’ to scroll to Multi Key Answer.
Press ¬ to toggle the feature ON or OFF.
Press º to exit the menu, or you may scroll
to other features.
Keep in mind: If there are any digits in your Scratchpad or if
your phone is locked, this feature will not work.
Automatic Answer
Turn Auto Answer ON to have your phone automatically answer
incoming calls after two ring cycles.
or ’, or any key
86
4.
Find
Feature
Press ” or ’ to scroll to Auto Answer.
Page 88

Automatic Answer (continued)
5.
6.
Toggle
Feature
Exit
Menu
Press ¬ to toggle the feature ON or OFF.
Press º to exit the menu, or you may scroll
to other features.
Note: We recommend you use this feature only with vehicle
accessories and with your phone’s ringer active (pg. 69). For
instance, if you leave your phone unattended with this feature
ON or do not hear the incoming call alert, your phone may
answer a call in your absence.
Instant Redial
When placing calls, you may at times hear a fast busy signal and see
Press SND to Redial. This probably means the network is tem-
porarily unable to handle your call, and pressing
æ will tell your
phone to keep trying the number for the next four minutes or until
the call goes through. If you turn Instant Redial ON, your phone will
take care of the redialing for you! There’s no need even to press
æ. You will see: Redialing.
4.
5.
6.
Find
Feature
Toggle
Feature
Exit
Menu
Press ” or ’ to scroll to Instant Redial.
Press ¬ to toggle the feature ON or OFF.
Press º to exit the menu, or you may scroll
to other features.
Instant
Redial Off
Phone Options
Keep in mind: This feature redials only when the network is
busy. If you hear a normal busy signal, this feature will not work.
87
Page 89

Getting to Display Options...
Enter Menu Press ƒ and press ⁄.
1.
Enter
2.
Phone Options
Enter
3.
Display Options
Display
Options
Change
Banner
Auto
Hyphen Off
Press qqqq or ’ to scroll to Phone Options
and press ¬ to select.
Press qqqq or ’ to scroll to Display Options
and press ¬ to enter.
Display Options Submenu
This submenu has a few features that determine how information appears on your phone’s display.
Changing the Banner
Want to give your phone even more personality? Then create
your own message banner for the phone to display when it’s idle.
Your banner can be up to 12 characters long.
Enter
4.
Feature
Enter
5.
Message
Exit
6.
Menu
Auto Hyphen
Just turn Auto Hyphen ON to have all phone numbers automatically hyphenated on the display. This allows you to easily distinguish between area codes, call prefixes, and other numbers.
Find
4.
Feature
Press ¬ to enter Change Banner. You will see
either the current banner or if no banner is programmed:
Enter your message using the alphanumeric
keypad. (See page 35 for information on entering alphanumeric messages.) Press
when your message is complete.
Press º to exit the menu, or you may scroll
to other features.
Press ” or ’ to scroll to Auto Hyphen.
Alpha or Press STO.
¬
88
Page 90

Auto Hyphen (continued)
5.
6.
Toggle
Feature
Exit
Menu
Press ¬ to toggle the feature ON or OFF.
Press º to exit the menu, or you may scroll
to other features.
Displaying the 24-Hour Clock
Your phone can display the current time in 12-hour or 24-hour
format. Use this feature to turn the 24-hour clock ON or OFF.
4.
5.
6.
Find
Feature
Toggle
Feature
Exit
Menu
Press ” or ’ to scroll to 24 Hour Clock.
Press ¬ to toggle the feature ON or OFF.
Press º to exit the menu, or you may scroll
to other features.
24 Hour
Clock Off
Phone Options
89
Page 91
Getting to System Options...
Enter Menu Press ƒ and press ⁄.
1.
Enter
2.
Phone Options
Enter
3.
System Options
System
Options
Display
System ID
Press qqqq or ’ to scroll to Phone Options
and press ¬ to select.
Press qqqq or ’ to scroll to System Options
and press ¬ to enter.
System Options Submenu
The System Options submenu offers a couple features that will
help you use your cellular network.
Displaying the System ID
Use this feature to determine the unique System ID for your
cellular phone.
View SID Press ¬ to select Display System ID. You will
4.
see the System ID for your phone.
Exit
5.
Menu
Press º to exit the menu, or you may scroll
to other features.
90
Page 92

Analog Only
Turning Analog Only ON tells your phone to select an analog
channel for the next call. If you don’t place a call, your
phone will revert to dual mode service after a few minutes.
Note: Some peripheral devices, like fax machines and modems,
require analog operation.
4.
5.
6.
Find
Feature
Toggle
Feature
Exit
Menu
Press ” or ’ to scroll to Analog Only.
Press ¬ to toggle the feature ON or OFF.
Press º to exit the menu, or you may scroll
to other features.
Analog
Only Off
Shortcut:
Press ƒ
¤ to
then
toggle Analog
Only ON or
OFF.
Phone Options
91
Page 93

Accessory Options
An exciting line of accessories can enhance and personalize
your dual mode digital cellular experience.
Lithium Ion Batteries
Motorola’s Lithium Ion (LiIon) batteries are high energy-density batteries that offer increased capacity and are lighter in
weight than similar sized Nickel Cadmium and Nickel Metal
Hydride batteries.
Nickel Metal Hydride Batteries
Nickel Metal Hydride batteries (NiMH) are high-capacity batteries that offer up to 30% more talk-time than comparable Nickel
Cadmium batteries. To help achieve maximum life and capacity
for your NiMH battery, do not leave the battery in the charger for
more than 24 hours, and use only Motorola-approved chargers.
Cigarette Lighter Adapter
Lets you plug into a reliable power source on the road. Uses your
car’s battery to power your phone and rapid charge its battery at
the same time. The Cigarette Lighter Adapter will not overcharge
your battery and contains circuitry to protect against overvoltage
and power surges in the vehicle. In some cars, the engine must
be running in order for the cigarette lighter to operate.
92
FPO
Page 94

Accessory Options
Desktop Charger (AC Adapter Required)
This charger can be loaded
with up to two batteries. It’s
easy to rotate batteries and
always have a charged spare
or two! Equipped with one
LED charging status indica-
PHONE
BATT.
attached to a phone, and the rear pocket can charge one battery
by itself. For use with Lithium Ion, Nickel Cadmium and Nickel
Metal Hydride batteries.
Headset
The convenient headset provides both
an earphone and microphone in one
small piece for simple hands-free and
FPO
private telephone conversations. The
headset plugs directly into the jack on
the top of your phone, so that you can
wear your phone and move freely. Place
the foam cover on the earpiece for a
more comfortable fit. See pages 86-87 for Call Options that
make using a headset with your phone even more convenient.
tor for each battery, the desktop charger’s front pocket
can charge both a main and
an auxiliary battery
PCMCIA Modems
These compact modems are made for mobility, with cable
attachments that plug directly into the bottom of your Motorola
cellular phone. They support fax, e-mail, and data transmission. The PCMCIA modems work with data devices using a standard PCMCIA Type II slot.
Reference
93
Page 95

Accessory Options
Hands-Free Vehicle Kit
Optional Hands-Free Kits give you the convenience of handsfree, speaker phone operation while in your car. Full duplex
operation lets you simultaneously talk and listen, so both parties
can interrupt each other for a normal sounding conversation.
The Hands-Free Kit powers the phone and rapid charges its battery whenever your car’s engine is running.
Keep in mind:
includes a 3-watt booster for analog signals. Since it is a digital
cellular phone, your phone is NOT compatible with the 3-Watt
Kit.
Important: We recommend you use genuine Motorola batteries and accessories. Under its cellular telephone warranty,
Motorola specifically disclaims any responsibility for damage
caused by the use of portable cellular telephone accessories not
manufactured by Motorola.
Zero Install Car Kit
For the quickest and easiest mobile solution, use the Zero Install
Car Kit. Just plug it in, attach the microphone, and you’re ready
to go!
Motorola offers a 3-Watt Vehicular Kit, which
94
FPO
Page 96

Troubleshooting
Q. I pressed the power button, but nothing hap-
pened. What’s wrong with my phone?
A. Check that you have installed a battery and that the bat-
tery is charged. See page 12 for information about installing your battery.
Q. The display says Locked.
How do I unlock my phone?
A. Try entering the last three digits of your cellular number.
If that doesn’t work, try using the factory preset lock code:
123. If all else fails, call your Service Provider (the company that sends you your monthly cellular bill) for assistance. For more information on your phone’s security
features, see the Lock/Security chapter, page 72.
Q. My battery didn’t last as long as I expected.
What can I do to extend battery life?
A. To get the most from your battery, make sure it is fully
charged. To charge the battery to 100% of its capacity,
leave it in the charger for an extra hour after the
charger’s light turns green.
Exposing your battery to extreme temperatures—below 10°C (14°F) or above 45°C (113°F)—can shorten battery
life. Batteries are especially sensitive to high temperature
extremes. As a good rule of thumb, always take your phone
with you when you leave your car.
Q. I tried to place a call and received a fast busy
signal. What does this mean?
A. This sound means that the cellular system did not process
your call. For example, the cellular system may be overloaded with call attempts. To redial the number, press the
Smart Button or press
æ before ending your call
attempt, or press º and try the call again later. See
page 87 for more information on redialing.
Reference
95
Page 97

Troubleshooting
Q. I tried to place a call but received an alternat-
ing high/low tone.
A. This sound means your call did not reach the cellular sys-
tem. Most likely, you dialed the number too soon after
turning the phone ON. Wait until the NS indicator disappears before placing a call.
An alternating tone may also indicate that your phone’s
signal is blocked. Make sure the antenna is fully extended
and move clear of any obstructions, like bridges, parking
garages, tall buildings, etc.
96
Q. My phone started beeping, and the display
1 Call Unanswered. What happened?
says:
A. Someone tried to call you while you were in an area
where the cellular signal was weak. Press Ç to clear
your display, extend your phone’s antenna, and avoid
obstructions like tunnels, parking garages and tall buildings whenever possible.
Q. My phone was stolen. What should I report
and to whom?
A. Report a stolen phone to the police and to your Service
Provider (the company that sends you your monthly cellular service bills).
Page 98

Glossary
A
AC adapter An accessory device that allows you to power and/or charge your
phone from a wall outlet. See page 13.
accessory connector A socket on the bottom of the phone where you can
attach accessories such as an AC adapter or cigarette lighter adapter. To learn
more, see page 13.
air-time The amount of time you spend using a cellular system, between the
time you successfully place a call and the termination of that call.
alkaline A battery technology used in personal cellular telephones.
analog The traditional method of cellular transmission. In addition to analog
capability, your phone is equipped to handle digital transmission. See also
CDMA.
antenna The device on your phone that sends and receives cellular signals. For
tips on antenna use and efficiency, see page 6.
Auto Answer When you activate this feature, your phone automatically
answers after two rings. See page 86.
Auto Hyphen A feature that automatically inserts hyphens into displayed phone
numbers for easier visibility. See page 88.
Automatic Redial When your cellular network cannot handle your call, this
feature enables your phone to automatically redial with one button push.
See page 27.
C
Call Back number A phone number in an alphanumeric message, provided by
the sender. See page 48.
Caller ID A network/subscription dependent service that allows you to view
information on incoming calls before answering. See page 44.
CDMA (Code Division Multiple Access) CDMA takes digitized voice and
encodes it in a unique scheme that is sent out over the air. CDMA digital
reduces the probability of dropped calls. Your phone is equipped to handle
CDMA digital voice transmission.
cellular carrier One of multiple competing companies in a given geographic
area that owns and operates a cellular system.
Cellular Service Provider A company affiliated with a cellular carrier that
provides cellular service to its customers.
Reference
97
Page 99

Glossary
cellular signal The radio waves that carry information between your cellular
phone and the cellular system.
cellular system The cellular equipment in a given geographic area that relays
signals to and from individual cellular telephones and the landline telephone system.
cigarette lighter adapter An accessory device that allows you to power and/
or charge your phone from a car’s cigarette lighter.
dedicated Message Key See Message Key.
default A feature’s original setting as programmed in the factory.
digital See CDMA.
DTMF Dual Tone Multi-Frequency are the tones that your phone transmits to
communicate with tone activated phone systems like Voice Mail or bank-byphone. See page 70. Keep in mind: “DTMF Tones” does not refer to the
sounds produced by your phone’s speaker. See Keypad Tones for information
on the sounds produced by your phone’s speaker.
Emergency Call This feature allows you to place a call from memory location
01 even if the phone is locked. See page 75.
fringe area The outermost range of a cellular system where cellular signals are
weak.
function keys The non-numeric keys on your phone used to access and navi-
gate menu features, as well as perform memory functions. See page 17.
Home Only Mode When your phone is active in this System Mode setting and
you are beyond the range of your home Service Provider, your phone will not
operate. See pages 84-85. See also system type.
home system The local cellular system where you obtain your cellular service.
home type system A cellular system of the same type as the local cellular sys-
tem where you obtain your service. See also non-home type system and system type.
icon One of the variety of symbols used to designate menu features and messages.
indicator A symbol on your phone that gives you information about your
phone’s status. See pages 20-23.
D
E
F
H
I
98
Page 100

Glossary
K
Instant Redial When your cellular network cannot handle your call, this fea-
ture enables your phone to continuously redial for four minutes or until your
call is picked up by the network. See page 87.
Internal Rapid Charger A charger built into your phone for use with an AC
adapter or cigarette lighter adapter. See page 13.
Keypad Tones The sounds produced through your phone’s speaker when you
press the keys. See page 69. Keep in mind: “Keypad Tones” does not refer to
the tones sent by your phone to communicate with automated phone systems. See Transmit Tones for information on the tones used to access automated phone systems.
L
landline The telephone system used for conventional office and home phones.
Lithium Ion (LiIon) A battery technology used in personal cellular telephones.
Lithium Ion batteries generally provide more energy capacity than Nickel
Metal Hydride batteries of the same weight.
lock To prevent unauthorized access to the cellular telephone. See page 74.
lock code A three-digit code used to access your phone once it has been locked.
The factory programmed lock code is 123. To view or change your lock code,
see page 76.
M
memory location A space in the internal Phone Book where you can store a
telephone number and a name. Each of the Phone Book’s 99 memory locations (numbered 01-99) can hold up to 32 digits and 24 letters.
menu This system contains five features: Phone Book, Timers, Tone Control,
Lock/Secure, and Phone Options.
menu feature Any feature that can be accessed through the menu system.
Message Key Located in the center just below the display, the dedicated Mes-
sage Key offers one-touch access to messages and messaging functions. See
page 43. See also Caller ID, Messages, and Voice Mail.
Messages A network/subscription dependent service that enables your phone to
receive alphanumeric messages just like a pager. See page 42.
Reference
99
 Loading...