


APPLICANT: MOTOROLA, INC. FCC ID: IHDT5GB1
INSTRUCTION MANUAL
• A preliminary draft copy of the User’s Manual follows this cover page.
• The User’s Manual will have the following text added to it:
"NOTE: This equipment has been tested and found to comply with the limits for a Class B
digital device, pursuant to Part 15 of the FCC Rules. These limits are designed to provide
reasonable protection against harmful interference in a residential installation. This equipment
generates, uses and can radiate radio frequency energy and, if not installed and used in
accordance with the instructions, may cause harmful interference to radio communications.
However, there is no guarantee that interference will not occur in a particular installation. If
this equipment does cause harmful interference to radio or television reception, which can be
determined by turning the equipment off and on, the user is encouraged to try to correct the
interference by one or more of the following measures:
. Reorient or relocate the receiving antenna.
. Increase the separation between the equipment and receiver.
. Connect the equipment into an outlet on a circuit different from that to which the receiver is
connected.
. Consult the dealer or an experienced radio/TV technician for help."
A statement according to FCC Part 15.19(a) will be included in the production version of the user's manual.
EXHIBIT 8

W210
CDMA
motorola.com

HELLOMOTO
Welcome to the world of Motorola digital wireless communications! We are pleased that
you have chosen the Motorola W210 wireless phone.
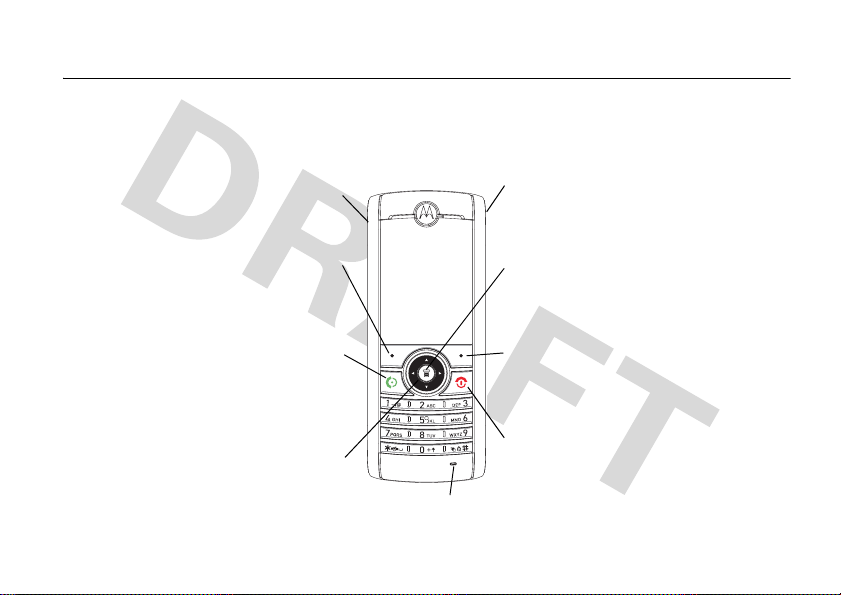
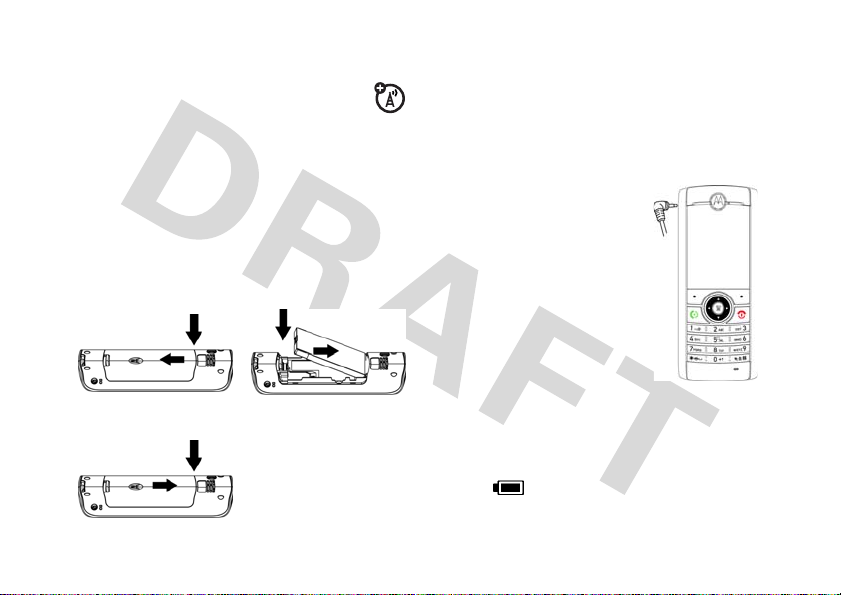
Power Connector
Port Insert the charger.
Left Soft Key
Perform functions identified by
left display promp t.
Send/Answer Key
Make & answer calls. Press in
idle screen to see the recent
dialed calls.
Navigation Key
Scroll through lists,
set volume.
Microphone
Earpiece
Listen to your voice
calls & messages.
Menu Key
Open a menu when you see
in the display.
Right Soft Key
Perform functions identified by
right display prompt.
Power/End Key
Press & hold to turn on/off the
phone. Press & release to end
phone calls, exit menu system.
1

Motorola, Inc.
Consumer Advocacy Office
1307 East Algonquin Road
Schaumburg, IL 60196
www.hellomoto.com
Certain mobile phone features are dependent on the
capabilities and settings of your service provider’s
network. Additionally, certain features may not be
activated by your service provider, and/or the
provider's network settings may limit the feature’s
functionality. Always contact your service provider
about feature availability and functionality. All
features, functionality, and other product
specifications, as well as the information contained
in this user's guide are based upon the latest
available information and are believed to be accurate
at the time of printing. Motorola reserves the right to
change or modify any information or specifications
without notice or obligation.
2
MOTOROLA and the Stylized M Logo are registered
in the US Patent & Trademark Office. 2005 All other
product or service names are the property of their
respective owners. © Motorola, Inc. 2005.
Manual Number:
check it out!
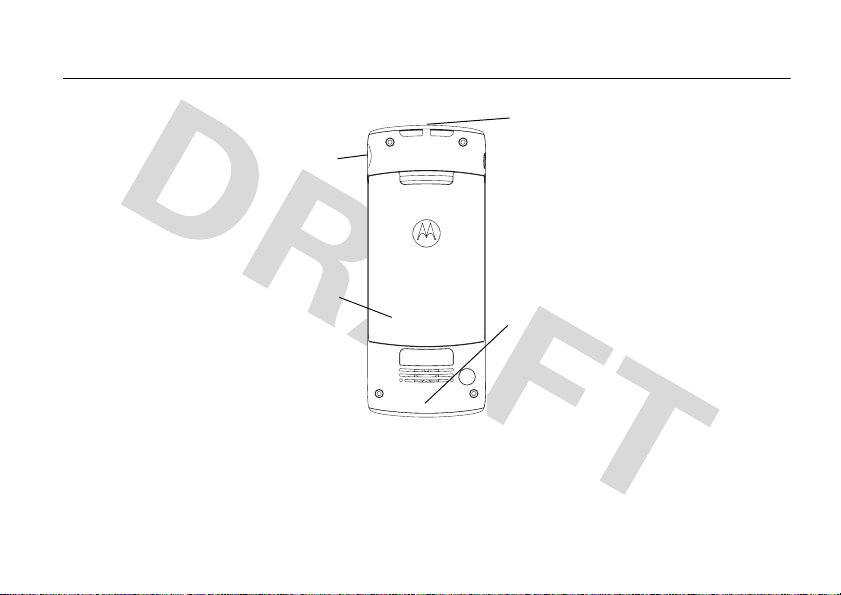
Lanyard Attachment
Headset jack
Battery Room
Integrated Antenna
Embedded in the top-back
of the phone.
Note:
Your phone may not appear exactly as the phone image above, however, all key
locations, sequences, and functions remain the same.
check it out!
3
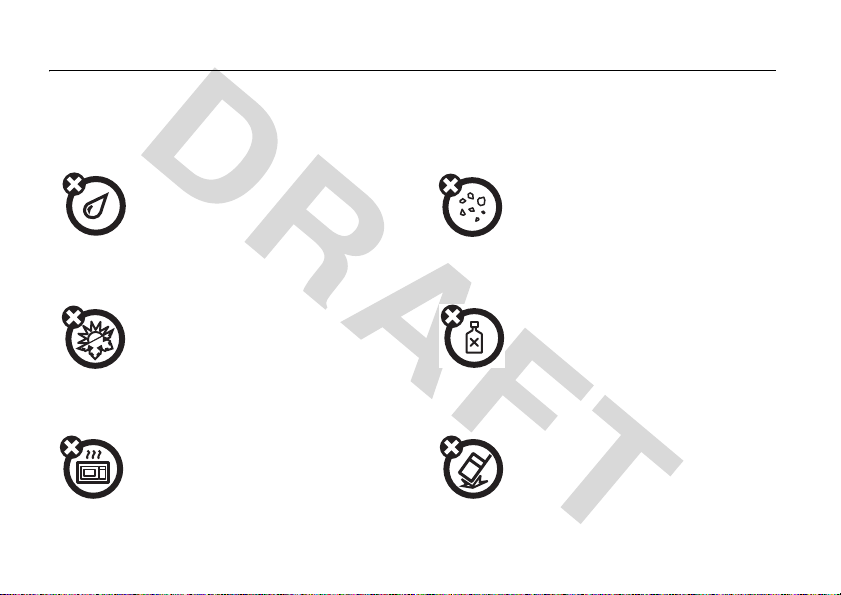
Use and Care
To care for your Motorola phone, please keep it away from:
liquids of any kind
Don’t expose your phone to
water, rain, extreme humidity,
sweat, or other moisture.
extreme heat or cold
Avoid temperatures below
-10°C/14°F or
above 45°C/113°F.
microwaves
Don’t try to dry your phone in
a microwave oven.
4
dust and dirt
Don’t expose your phone to
dust, dirt, sand, food, or other
inappropriate materials.
cleaning solutions
To clean your phone, use only
a dry soft cloth. Don’t use
alcohol or other cleaning
solutions.
the ground
Don’t drop your phone.

main menu
feature locator
Messages
• Create Message
•Voicemail
•Text Msgs
•Quick Notes
• Outbox
•Drafts
Phonebook
•[New Entry]
Recent Calls
• Missed Calls
• Received Calls
• Dialed Calls
•Call Times
Games
• Football
•Crazy
•Rabel
MyMenu
• [New MyMenu]
Alarm Clock
•[New Entry]
Brew
• Mobile Shop
• Settings
•Help
Settings
•Ring Styles
• Phone Status
• In-Call Setup
• Security
• Personalize
•Initial Setup
•Network
• Headset
More
•Calculator
• Stop Watch
• Datebook
•Alarn Clock
• Service Dial
5

contents
check it out! . . . . . . . . . . . 3
Use and Care . . . . . . . . . . 4
essentials . . . . . . . . . . . . . 8
about this guide . . . . . . . 8
RUIM card . . . . . . . . . . . 9
battery . . . . . . . . . . . . . . 9
battery tips. . . . . . . . . . 10
turn it on & off . . . . . . . 11
make a call . . . . . . . . . . 11
answer a call . . . . . . . . 11
correcting entry errors . 12
main attractions. . . . . . . 13
zoom number display. . 13
datebook . . . . . . . . . . . 13
read messages with
iMelody . . . . . . . . . . . . 18
fm radio . . . . . . . . . . . . 19
contents
6
basics . . . . . . . . . . . . . . . 20
display . . . . . . . . . . . . . 20
menus . . . . . . . . . . . . . 22
text entry . . . . . . . . . . . 24
navigation key . . . . . . . 26
codes & passwords . . 26
lock & unlock phone. . . 27
phonebook search . . . . 27
storing phone numbers 28
adjusting in-call
microphone volume . . . 28
volume . . . . . . . . . . . . . 28
speakerphone . . . . . . . 29
using caller ID . . . . . . . 29
redialing last dialed,
received, or missed
number . . . . . . . . . . . . 29
speed dmialing. . . . . . . 30
keypad lock/unlock . . . 30
etiquette mode. . . . . . 30
shortcut . . . . . . . . . . . 31
personalizing . . . . . . . 31
customize . . . . . . . . . . . 32
ring style . . . . . . . . . . 32
time & date . . . . . . . . 33
animation . . . . . . . . . . 33
display appearance. . . 33
screen saver. . . . . . . . 33
home screen . . . . . . . 34
main menu . . . . . . . . . 34
battery save . . . . . . . . 34
answer options . . . . . 34
calls . . . . . . . . . . . . . . . . 35
recent calls. . . . . . . . . 35
redial . . . . . . . . . . . . . 35

return a call . . . . . . . . . 36
mute a call . . . . . . . . . . 36
caller ID . . . . . . . . . . . . 36
emergency calls . . . . . 37
international calls. . . . . 37
voice mail . . . . . . . . . . 38
special characters . . . . 38
other features . . . . . . . . 39
phonebook. . . . . . . . . . 39
recent calls . . . . . . . . . 40
messages . . . . . . . . . . 41
settings . . . . . . . . . . . . 44
more features . . . . . . . 48
game . . . . . . . . . . . . . . 48
alarm clock. . . . . . . . . . 48
service and repairs . . . . 49
Specific Absorption Rate
Data . . . . . . . . . . . . . . . . 50
index. . . . . . . . . . . . . . . . 52
contents
7
essentials
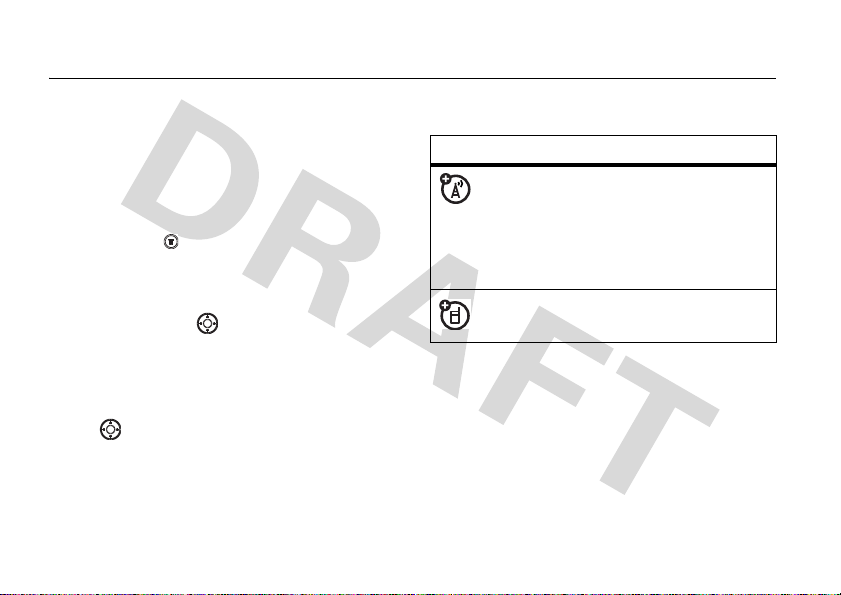
about this guide
This guide shows how to locate a menu
feature as follows:
Find it:
Find/Jump
This example shows that, from the home
screen, you press to open the menu,
highlight and select
select
Find/Jump
Press up or down to highlight a menu
feature. Press
select the highlighted menu feature.
8
Press >
Search
, then highlight and select
.
essentials
Phonebook
X
on the navigation key to
>
Phonbook
, highlight and
Serach By
>
symbols
This means a feature is
network/subscription dependent
and may not be available in all
areas. Contact your service
provider for more information.
This means a feature requires an
optional accessory.
RUIM card
battery
Your Removable-User Identity
Module (RUIM) card contains
personal information like your phone
number and phonebook entries.
Caution:
card. Keep it away from static electricity,
water, and dirt.
12
3
Don't bend or scratch your RUIM
battery installation
battery charging
New batteries are
shipped partially
charged. Before you
can use your phone,
install and charge
the battery as
described below.
Some batteries
perform best after
several full charge/discharge cycles.
When the battery charging is complete, the
battery icon will change to a battery full
icon ( ) and the screen displays
.
Complete
essentials
Charging
9

Tip:
Relax, you can't overcharge your
battery. It will perform best after you fully
charge and discharge it a few times.
battery tips
Battery life depends on the network, signal
strength, temperature, features, and
accessories you use.
•
Always use Motorola
Original batteries and
chargers. The warranty does
not cover damage caused by
non-Motorola batteries and/or chargers.
•
New batteries or batteries stored for
a long time may take more time to
charge.
•
When charging your battery, keep it
near room temperature.
essentials
10
•
When storing your battery, keep it
uncharged in a cool, dark and dry
place.
•
Never expose batteries to
temperatures below -10°C (14°F) or
above 45°C (113°F). Always take your
phone with you when you leave your
vehicle.
•
It is normal for batteries to gradually
wear down and require longer
charging times. If you notice a
change in your battery life, it is
probably time to purchase a new
battery.
Contact your local recycling center
for proper battery disposal.
Warni n g:
fire because they may explode.
Never dispose of batteries in a
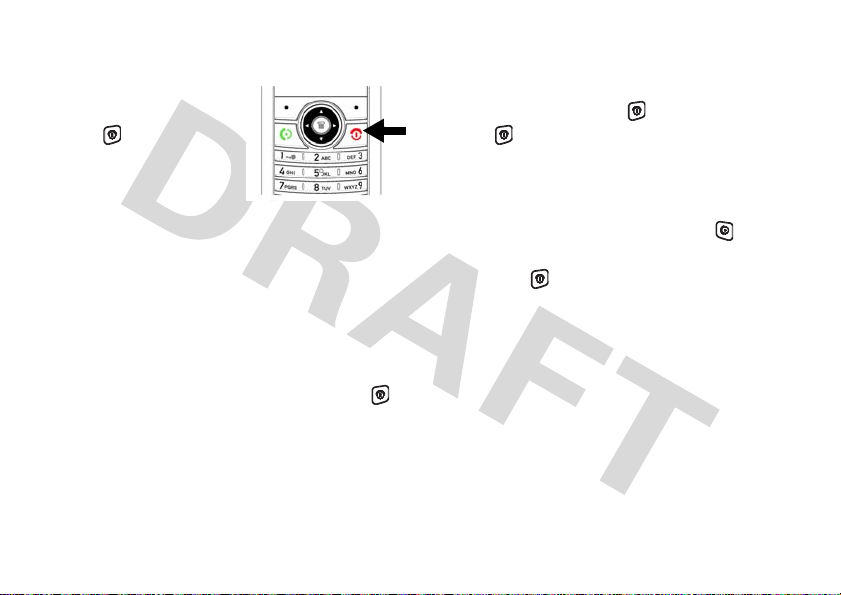
turn it on & off
make a call
To turn on your
phone, press and
hold for 2
seconds. If
prompted, enter
your 8-digit RUIM
card PIN code and/or 4-digit unlock code.
Caution:
3 times in a row, your RUIM card becomes
disabled and your phone displays
Blocked
RUIM is blocked.
To turn off your phone, press and hold
for 2 seconds. If prompted, enter your
4-digit unlock code.
If you enter an incorrect PIN code
RUIM
. Contact your service provider if your
In home screen, enter a phone number (up
to 32 digits) and press . To end a call,
press .
answer a call
To answer an incoming call, press or any
Answer Option
key if
call, press .
If your phone subscribes to Caller ID, a
caller's phone number will be displayed on
screen. If caller's number is stored in the
Phonebook
displayed.
, the caller's name will be
is set to
Any Key
. To end a
essentials
11

correcting entry errors
To correct a misdialed digit, press to
erase one digit at a time. You can erase all
the digits at once by pressing and
holding it down over one second.
essentials
12

main attractions
zoom number display
Zoom number display is a smart function
that lets you see the screen numbers more
easily by altering the screen font size
depending on how many digits are in the
number. Because most people enter seven
digits most frequently, your font size is
large most of the time and becomes
smaller only when necessary.
datebook
The datebook is a calendar that lets you
schedule and organize events such as
appointments and meetings. You can
review your schedule of events for the
week or by the day, and have the datebook
play a reminder alarm for specific events.
Note:
You must set the phone’s correct
time and date in order to use the datebook.
To schedule or review events in the
datebook:
Find it:
Press >
More
>
Datebook
viewing by the week
When you open the datebook, your phone
displays a calendar for the week. Lines or
filled boxes under each day indicate
scheduled events.
main attractions
13

view by day
Select a day in the week view and press
VIEW
to see the day’s events. You can store,
edit, view, copy, and delete any event from
the day view.
view by event
Select an event in the day view and press
VIEW
to open the detailed event view. You
can edit, copy, and delete events from the
event view.
add a new event
You can add a new event two different
ways.
To s et up t he
below. A title is required for a datebook
event. All other information is optional.
1
Press
2
Use the keypad keys to enter a title for
the event.
3
Press OK to store the event title.
4
Press up and down to scroll to other
fields and enter information as
necessary.
Other fields let you enter
Date, Repeat
5
Press
return to the day view.
Event
detail, follow the steps
CHANGE
to select
, and
DONE
to store the new event and
Alarm
.
Title
.
Start, Duration
,
Find it:
New Entry
New
14
Press >
or >
>
Event
main attractions
More
More
>
>
Datebook
Datebook
> day >
> day > >

add a new task
You can add a new task by doing the
following:
Find it:
To s et up t he
below. A summary is required for a
datebook task. All other information is
optional.
1
2
3
4
Press >
New
>
>
Task
Press
CHANGE
Use the keypad keys to enter a
summary for the task.
Press OK to store the task summary.
Press up or down to scroll to other
fields and enter information as
necessary.
More
>
Datebook
> day >
Task
detail, follow the steps
to select
Summary
.
Start Date
, and
,
Status
Other fields let you enter
Deadline, Priority, Completed, Category
5
Press
DONE
to store the new task and
return to the day view.
change event/task information
To change information about an existing
event/task:
Find it:
1
2
3
4
5
Press >
Press left or right to scroll to the
scheduled event/taks day.
Press
VIEW
Press up or down to scroll to the
event/task you want to change.
Press
VIEW
Press
EDIT
More
>
Datebook
to display the day view.
to display the event/task.
to edit the event/task.
.
main attractions
15

6
Press up or down to scroll to the
detail you want to change.
7
Press
CHANGE
to edit the information.
8
Use the keypad keys to enter the new
information.
9
Press
DONE
to store the information.
copy an event/task
To copy information from a current
event/task to a new event/task:
Find it:
1
2
3
4
16
Press >
Press left or right to scroll to the
scheduled event/task day.
Press
VIEW
Press up or down to scroll to the
event/task to copy.
Presss to open the
main attractions
More
>
Datebook
to display the day view.
Datebook Menu
5
Press up or down to scroll to
6
Press
SELECT
to copy the event/task.
7
Press
YES
to confirm the copy.
Your phone assumes that you want to
change the date, and displays the
field.
8
Use the keypad keys to enter the date
information.
9
Press left or right to scroll to the day,
month, and year.
10
Press OK to save the copy of the
event/task.
11
Press up or down to scroll to
event/task details and edit the
information as necessary.
12
Press
DONE
to store the new event/task
.
and return to the day view.
Copy
Date
.

delete an event
Find it:
1
2
3
4
5
6
Press >
Press left or right to scroll to the
scheduled event day.
Press
VIEW
Press up or down to scroll to the
event to delete.
Press to open the
Press up or down to scroll to
Press
SELECT
For non-repeating events, a
confirmation message will pop up.
Choose
the delete. For repeating events, the
phone displays a delete event menu:
More
>
Datebook
to display the day view.
Datebook Menu
to select
Yes
or No to confirm or cancel
Delete
.
.
Delete
delete a task
Find it:
1
2
.
3
4
5
6
7
Press up or down to scroll to
or
Repeat Events
Only
the event(s) to delete.
Press >
Press left or right to scroll to the
scheduled task day.
Press
VIEW
Press up or down to scroll to the
event to delete.
Press to open the
Press up or down to scroll to
Press
SELECT
A confirmation message will pop up.
Choose
the delete.
Yes
. Press
More
to display the day view.
to select
or No to confirm or cancel
SELECT
>
Datebook
Datebook Menu
Delete
This Event
to select
.
Delete
.
.
main attractions
17

read messages with iMelody
Find it:
To open the message:
1
2
3
18
Press >
Press to scroll to the message.
Press
READ
The phone asks
Press
YES
will play only if the format is correct. A
pop-up screen will notify you
otherwise.) Press
playing.
main attractions
Messages
>
Text Msgs
to open the message.
Play Ring Tone?
to play the iMelody. (iMelody
NO
.
to cancel the
store iMelody
You can store the iMelody.
1
Press
STORE
and the file name appears
on the display.
2
Press OK to save the iMelody into
.
Tones
Storing your iMelody may fail for two
reasons: if the file name is duplicated or if
the memory is full. If the file name is
duplicated, rename the file under
If the memory is full, replace old ring tones
with the new one.
My
Tone details
.

fm radio
Plugging in the headset changes the
MYMENU
the
the FM Radio on; pressing RADIO again
turns it off. When activated, pressing
(menu wheel) left/right adjusts the
frequency while pressing (menu wheel)
up/down adjusts the volume. The
option turns on the speaker while
turns it off.
option, on the home screen, to
RADIO
option. Pressing RADIO turns
SPK ON
SPK OFF
main attractions
19

basics
See page 1 for a basic phone diagram.
display
Status
The home screen displays when you turn
on the phone. To dial a number from the
home screen, press number keys and .
Note:
Your home screen may look different
from the one below, depending on your
service provider.
basics
20
Clock
Left Soft Key Label
Main Menu
Soft key labels show the current soft key
functions. For soft key locations, see
page 1.
Right Soft Key Label

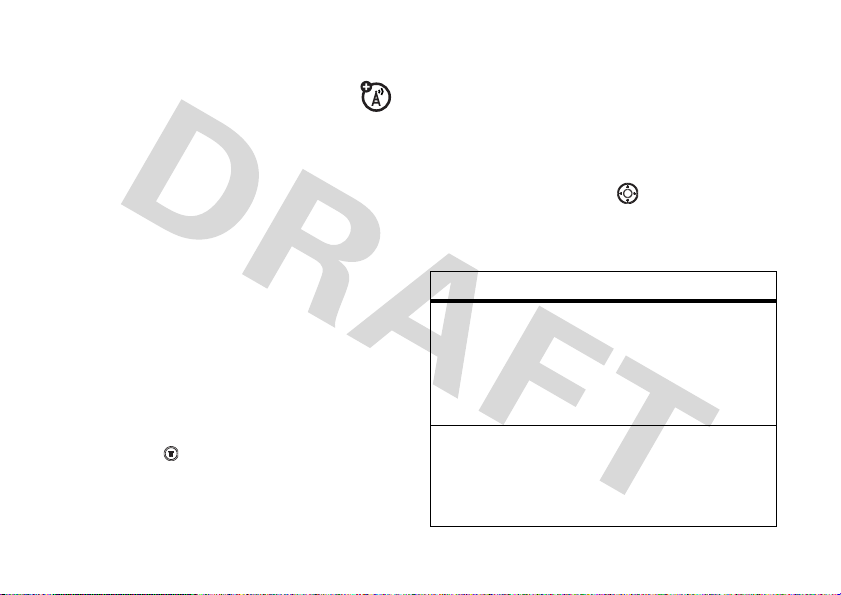
Status indicators display at the top of the
home screen:
4
6
2
1
5
3
7
8
1 Signal Strength Indicator –
Shows the strength of your
phone's connection with the network.
21X Indicator –
Shows that the phone is
operating in 1X mode.
3 Roam Indicator –
Appears when
your phone uses a network
system outside your home network.
This icon can also indicate your text
entry mode, alpha, numeric, symbol
and etc.
4 In Use Indicator –
Indicates
when a call is in progress, and
when you have a secure or insecure
connection.
5 Enter Method Indicator –
Displays the
type of entry method you selected.
6 Message Indicator –
Appears
when you have a new voice or
text message waiting:
= text/voice
message
Note:
When the message full indicator
= message
full
appears, it means the message inbox has
reached the storage limit. Delete the old
messages so that your phone can receive
new ones.
basics
21

7 Alert Type Indicator –
assigned ring type.
= Loud Ring = Vibe then
Ring
= Soft Ring = Silent
= Vibrate
Displays your
menus
From the home screen, press to enter
the main menu and scroll up and down
through the main menu list.
8 Battery Level Indicator –
amount of charge left in your battery.
The more bars present, the greater the
charge.
basics
22
Shows the
Select the
highlighted
menu
feature.
Scroll up
or down.
Exit the
main menu.
Exit menu
without
making
changes.
Increase or
decrease
values.

The following menu icons may be available,
depending on your service provider and
service subscription options.
menu features
Messages Ring Styles
Phonebook Alarm Clock
Recent Calls Settings
Games More
MyMenu
Some features require you to select an
option from a list:
Highlighted
Option
Press
SELECT
to confirm
your selection.
•
Scroll up or down to highlight the
Press
EXIT
to returnto
the previous screen.
option you want.
•
When an option has a list of possible
values, scroll left or right to select
the values.
basics
23
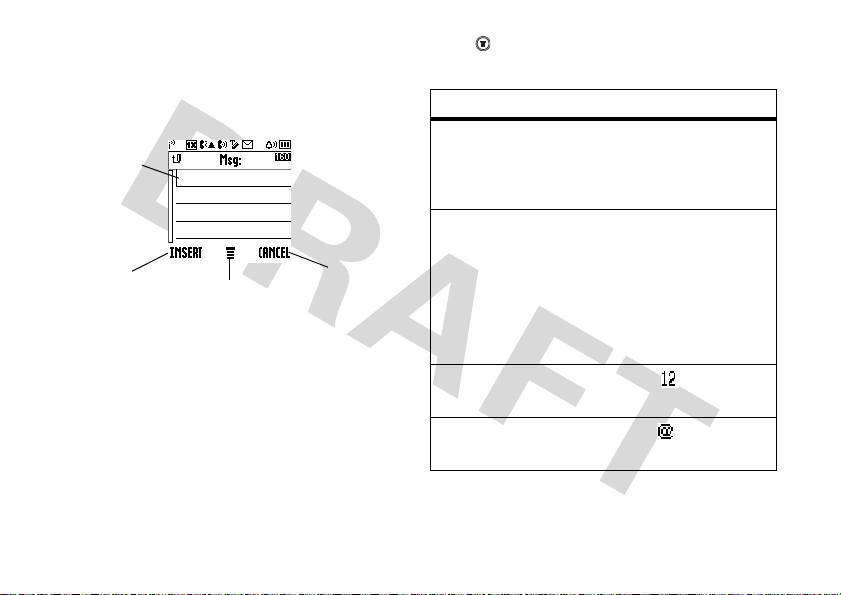
text entry
Some features let you enter text.
Cursor
indicates
insertion
point.
Press
quick note.
24
INSERT
to add a
basics
Press to
change entry
method.
Press
to abort the
message.
CANCEL
Press in a text entry screen to select an entry
mode:
entry mode
TAP
iTap
Numeric
Symbol
Your Tap entry modes
include:
•
TAP English
Your Tap entry modes
include:
•
iTAP English
•
Tap English
•
Numeric,Symbol
Numeric
mode ( ) enters
numbers only
Symbol
mode ( ) enters
symbols only

iTAP® mode
Press in a text entry screen to select and
switch to iTAP mode. iTAP mode lets you
enter words using one key press per letter.
When iTAP is selected, its icon with an
arrow will display on the top screen. The
iTAP software combines your key presses
into common words, and predicts each
word as you enter it.
For example, if you press ,
your phone displays a list of word
appl, aspj
, and
aspk
combination such as
.
When you enter three or more characters
in a row, your phone will guess the rest of
appl
Press
to delete
the letter.
your
DELETE
the word. For example, if you enter
phone might display:
Character
displays at
insertion
point.
OK
Press
accept and
store text.
to
Press to
change entry
method.
basics
25

tap mode
navigation key
Press in a text entry screen and select
Tap mode. To enter text in tap mode, press
a keypad key repeatedly to cycle through
the letters and number on the key. Repeat
this step to enter each letter.
numeric mode
Press the number keys to enter the
numbers you want.
symbol mode
Press a keypad key to show its symbols at
the bottom of the display.
Highlight the symbol you want and press
SELECT
the
26
key.
basics
Press the navigation
key up or down to
scroll and highlight
things. When you
highlight something,
press the right soft key
to select it.
codes & passwords
To change your 4-digit codes or passwords:
Find it:
Passwords
Tip:
confirm your password by entering it twice.
Press >
To change passwords, you must
Settings
>
Security
>
New

lock & unlock phone
phonebook search
Phone Lock
emergency numbers.
To lock the phone manually:
Find it:
Phone Lock
To lock the phone automatically:
Find it:
Phone Lock
Tip:
locked, you must unlock the phone first.
The lock/unlock code is set to 1234
(4zeros).
restricts all outgoing calls except
Press >
>
Lock Now
Press >
>
Automatic Lock
To place a call when the phone is
Settings
Settings
>
>
Security
Security
>
>
Press up/down to directly access the
phonebook.
Press the key of the first letter of the
contact's name. For example, if you want
to check John's phone number, press to
access the phonebook list that starts from
J. Press down to scroll through the
contact list until you locate John's phone
number. To narrow down your search, you
can enter up to the first three letters of the
entry, such as JOH.
basics
27

storing phone numbers
adjusting in-call
Phone numbers for frequently used
services are pre-programmed into your
phone. To store a number,
•
Enter a phone number and press
STORE
. Or in home screen, press >
Phonebook
•
Press down and enter the name.
•
Press down and enter the phone
number.
•
If necessary, press to change
Speed No.
•
Press
28
basics
>
.
DONE
to store.
[New Entry]
.
microphone volume
To adjust the in-call microphone volume:
•
Press right to increase and
left to decrease the mic volume.
•
Press then select mute to mute
the call.
Once a call has ended, the mic volume
reverts back to the default volume.
volume
During a call, you can adjust the volume of
the earpiece by using right to increase
and left to decrease. Briefly press the
key once to display your current earpiece
volume setting.
Repeatedly press the key to adjust.

speakerphone
redialing last dialed,
You can activate the speakerphone during a
SPKR ON
call by pressing
pressing
SPKR OFF
and turn it off by
.
using caller ID
This feature informs you of the caller's
identification by displaying their number
when the phone rings.
If the corresponding caller's information is
already available in your
caller's name will appear on screen. Calling
someone who has this feature will display
your number on their phone. To access the
call log, press .
Phonebook
, that
received, or missed
number
Up to 30 dialed, received, or missed calls
can be redialed directly. Simply press to:
•
Access the call log of 30 call entries
in chronological order.
•
Then, press the
and number of the selected call.
•
Simply press to redial that
number.
VIEW
to see the time
basics
29

speed dmialing
etiquette mode
Once a phone number is stored in your
Phonebook
number using assigned speed dial keys.
Enter the location number of a stored
number and press . The phone will then
automatically connect to that number.
Press to dial the number.
, you can access and dial that
keypad lock/unlock
You can lock the keypad to prevent the keys
from being accidentally pressed, for
example, when your phone is in your
pocket. You can do it by pressing for a
second in home screen. Alternatively, press
and to lock. To unlock, press and
.
basics
30
In social situations where audible rings,
bells, or tones are inappropriate, such as in
a movie theater, at a museum, play, etc,
your phone can be set on etiquette mode.
All incoming calls under this mode will be
notified by inaudible vibration. Press the
navigation key left or right to display the
volume meter in home screen. Keep
W
pressing
unmute the phone, press
for more times. Press one time to cancel
the mode.
left to activate
Silent
mode. To
X
right once or

shortcut
personalizing
•Keypad Lock:
home screen, press and hold for
one second to lock. Alternatively,
press and to lock. To unlock
the keypad, press and .
•Etiquette Mode:
to activate
X
right to unmute the phone.
• Phone Book Entry:
up/down. All stored phone numbers
will be listed in alphabetical order.
When the phone is in
Keep pressing W left
Silent
mode. Keep pressing
Press
You can use this menu to adjust the main
menu layout, home screen layout, initial
greeting, banner and screen saver.
Find it:
Press >
Settings
>
Personalize
basics
31

customize
ring style
Your phone rings and/or vibrates to notify
you of an incoming call, message or other
event. There are five ring types in your
phone:
and
To select a ring type:
Find it:
To select
Find it:
To t u rn
Find it:
Alert
32
Loud Ring, Soft Ring, Vibrate, Vibe then Ring
Silent
.
Press >
My Tones
Press >
Minute Alert
Press > Settings
> Minute Alert
customize
Settings
:
Settings
on/off:
>
Ring Styles
>
My Tones
>
Ring Styles >
>
,
Alert
Other
To adjust the volume for different alert:
Find it:
Detail
Voicemail, Key Volume, Earpiece Vol
Select an alert type for
Alarms
Find it:
desired event
This phone contains 32 preloaded
polyphonic ringtones. More can be
downloaded via
Press >
>
Ring Volume, In Call, Message Tone, Alarms
, and
Voicemail
Press >
Settings
>
Ring Styles
.
In call, Message Tone
:
Ring Styles > Alert Detail
BREW
.
>
Alert
,
,
>

time & date
To set the time and date for your phone:
Find it:
and Date
Press >
Settings
>
Initial Setup
>
Time
animation
Your phone plays an animation when it is
powered on.
key. To set how long your phone waits
before the backlight turns off:
Find it:
Backlight
Press >
Settings
>
Initial Setup
>
screen saver
To set a screen saver for your phone:
Find it:
Saver
Press >
>
Picture
Settings
>
Personalize
>
Screen
display appearance
To set the contrast of your phone:
Find it:
Contrast
To save battery life, your backlight turns off
when you're not using your phone. The
backlight turns back on when you press any
Press >
Settings
>
Initial Setup
>
This phone comes with several preloaded
screen savers (
Motorola Batwing & Analog Clock
More screen savers may be downloaded
BREW
via
time:
Find it:
>
Delay
Saver
Train, Summer, Frog,
. To set the screen saver delay
Press >
Settings
>
Personalize
customize
>
).
Screen
33

home screen
battery save
To modify what is displayed on the home
screen:
Find it:
Screen
From here, you can choose to modify the
Home Keys, Layout and Clock Set
Press >
Settings
.
>
Customize
>
Home
main menu
To modify whether the main menu uses
icons or words, and their order:
Find it:
Menu
34
Press >
customize
Settings
>
Customize
>
Main
To save battery power, you may turn on the
Battery Save
Find it:
Save
feature:
Press >
Settings
>
Initial Setup
>
Battery
answer options
You can use additional, alternative methods
to answer an incoming call. To activate or
deactivate an answer option:
Find it:
Info
>
Answer Call
option
Anykey
Send key
Press >
Settings
Answer by pressing any
key.
Answer by pressing .
>
In-call Setup
>
Call

calls
This chapter describes features related to
making and answering calls.
recent calls
Your phone keeps lists of incoming and
outgoing calls, even for calls that didn't
connect. The most recent calls are listed
first. The oldest calls are deleted as new
calls are added.
Find it:
list
1
Press >
Highlight
, and press
Calls
Recent Calls
Missed Calls, Received Calls
SELECT
> desired call
.
, or
Dialed
2
Highlight a call. A marker next to a call
means the call connected.
•
To call the number, press .
•
To see call details (like time and
VIEW
date), press the
.
redial
1
Press from the home screen
to see the
>
Received Calls
2
Highlight the entry you want to call,
then press .
Dialed Calls
Recent Calls
.
list. Or press
>
Dialed Calls, Missed Calls
calls
and
35

return a call
caller ID
Your phone keeps a record of your
unanswered calls, and displays
the screen.
1
Press
VIEW
to see the
2
Highlight the call you want to return,
and press .
Missed Calls
Missed Calls
on
list.
mute a call
When you are on a call:
1
Press > >
When a call comes in and the phone rings,
you can press
mute the call/ring.
calls
36
Mute
.
W
on the navigation key to
Calling Line Identification (caller ID)
shows the phone number for an
incoming call in your external and internal
displays.
Your phone shows the caller's name when
they're stored in your phonebook, or
when caller ID information isn't
Calls
available.
You can set your phone to play a distinctive
ringer ID for specific entries stored in your
phonebook.
Received

emergency calls
Your service provider programs one or
more emergency phone numbers (such as
112 or 911) that you can call under any
circumstances, even if the RUIM card is
not inserted. You can dial and call the
emergency number even when your phone
is locked, when you are prompted to enter
a code or password.
Note:
Emergency numbers vary with
different countries. Your phone's
preprogrammed emergency number(s)
may not work in all locations, and
sometimes an emergency call cannot be
placed due to network, environmental, or
interference issues.
To call the emergency number at any time:
1
Press the keypad keys to dial the
emergency number.
2
Press to call the emergency number.
international calls
If your phone service includes
international dialing, press and hold
to insert your local international access
+
code (indicated by
keypad keys to dial the country code and
phone number.
). Then, press the
calls
37
voice mail
special characters
You can listen to your voice mail
messages by calling your network
voice mail phone number. Voice mail
messages are stored on the network—not
on your phone. Contact your service
provider for more details.
When you receive a voice mail message,
your phone displays a new voice mail
indicator on the status pane. (Some
networks only indicate when you have
messages, whether they are new or not.) If
users delete all voice mail messages, the
voice mail indicator will disappear.
To listen to your voice mail message:
Find it:
Your phone calls the voice mail phone
number you stored.
38
Press >
calls
Messages
>
Voicemail
In addition to pressing numbers on your
keypad, you can insert special characters in
a phone number.
While dialing (with digits visible in the
display), you can press up to select
p
from hard pause, time pause,
t
will show later in the display:
then
option
Hard pause
p
)
(
Time pause
t
)
(
Your phone waits until the
call connects, then
prompts you for
confirmation before it dials
the next digit(s).
Your phone waits until the
call connects before it dials
the next digit(s) in the
series.
shows and

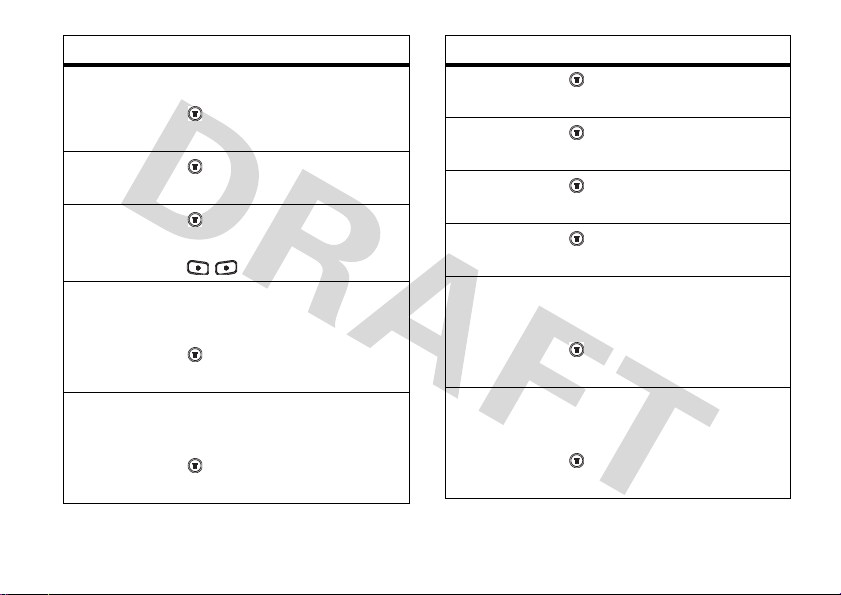
other features
phonebook
feature
add new
entry
view
contact list
To add a new contact to
your phonebook:
>
Select a location, enter
entry details, and press
DONE
To view phonebook list:
From home screen, press
T
or S.
Phonebook
.
>
[New Entry]
feature
search
entry by
name
delete an
entry
delete all
entries
To search entry by name:
Phonebook
>
Tip:
Enter the first letter of
a name to show similar
names.
To delete a phonebook
entry:
Phonebook
>
To delete all phonebook
entries:
Phonebook
>
> >
> >
other features
Delete
Delete All
39

feature
attach a
phone
number
view
phone
capacity
40
To attach a phone number
to an entry:
>
Number
To view the remaining
phone memory:
>
Capacity
other features
Phonebook
Phonebook
> >
> >
Attach
Phone
recent calls
feature
view call
list
clear call
list
To view outgoing,
incoming and missed call
lists:
>
Tip:
call history for more
information such as
number, time, date, and
duration.
To delete missed, called,
received and stored call
lists:
>
>
Recent Calls
You may refer to your
Recent Calls
Delete All
> call list >
>
YES

feature
view call
times
To view the call duration of
last call, dialed calls,
received calls and all calls:
Recent Calls
>
>
Call Times
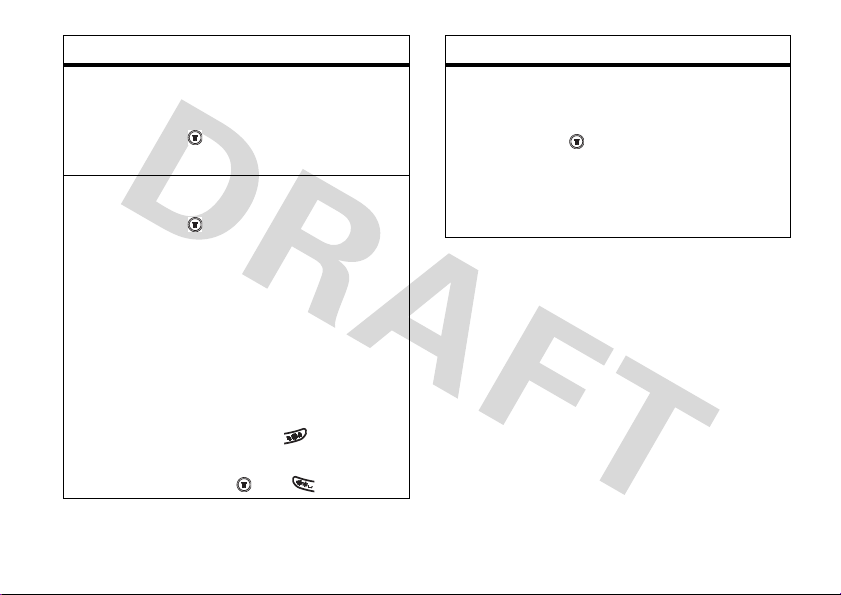
messages
feature
read old
text
messages
delete text
messages
call the
message
sender
create a
new
message
edit an old
message
message
message
message
>
Messages > Text Msgs
>
Messages >
>
Delete
>
Messages >
> Call Back
>
Messages > Create Messages
>
Messages >
> Forward
location >
>
location >
>
location >
>
other features
41

feature
listen to a
voice
message
set
message
alert
other features
42
>
Messages > Voicemail
Note:
When you receive a
voice mail, your phone
e
displays
. Sometimes e
won't disappear even if
you checked the message.
It depends on the
condition of the service
provider's system.
To set a message alert
type:
> Messages >
>
Setup
SMS Alert
>
Text Msg
feature
set up
voicemail
box
view the
message
memory
meter
To set up your voicemail
box before you can receive
a voicemail:
> Messages >
>
Voicemail
Setup
To view the remaining
memory space for
messages:
> Messages >
>
Memory
Meter

feature
delete
messages
Auto Retry
To clean up your messages
folders manually:
> Messages >
>
Cleanup
Now
Tip:
Select the desired
folder that you would like
to delete.
To clean up your message
folders automatically:
> Messages >
Delete Inbox
>
or
Auto Delete Outbox
Auto
To set Auto Retry:
> Messages >
>
Enable
Retry
or
>
Disable
Auto
feature
set call
back
display
delivery
ack
To set call back display:
> Messages >
>
Call Back
Display
To s et
Delivery Ack
> Messages >
Read Ack > Enable
or
:
>
or
User Ack
Disable
other features
43

settings
feature
set my Tel.
numbers
view ESN
view
battery
meter
other features
44
To s et
My Tel. Numbers
> Settings > Phone Status >
My Tel. Numbers
Tip:
You are allowed to set
up to two numbers.
Note:
To view
during a call, press and
scroll down to see the
feature.
>
Settings > Phone Status >
ESN
>
Settings > Phone Status >
Battery Meter
:
My Tel. Numbers
feature
view
software
version
view PRL
version
set auto
redial
set voice
privacy
define
answer
option
set Easy
Prefix
>
Settings > Phone Status >
SW Version
>
Settings > Phone Status >
PRL Version
>
Settings > In-Call Setup >
Auto Redial > Enable
>
Settings > In-Call Setup >
Voice Privacy > Enable
To s et
Answer Option
> Settings > In-Call Setup >
Answer Option > Send Key Only
Any Key
To s et
Easy Prefix
> Settings > In-Call Setup >
Easy Prefix > Auto Change > Off
Add
, or
Replace or Add
:
or
or
:
Disable
Disable
or
,
feature
set IAC
String
reorder
menu
redefine
left/right
soft keys
create a
greeting
create a
banner
To s et
IAC String
:
> Settings > In-Call Setup >
IAC String
>
Settings > Personalize >
Main Menu
>
Settings > Personalize >
Home Screen > Home Keys >
/
To enter a greeting
message:
> Settings > Personalize >
Greeting
To create a banner on the
standby screen:
> Settings > Personalize >
Banner
feature
set time
and date
Backlight
>
Settings > Initial Setup >
Time and Setting
>
Settings > Initial Setup >
Backlight
Scroll
>
Settings > Initial Setup >
Scroll
Animation > Settings > Initial Setup >
Animation
select a
language
To create a banner on the
standby screen:
> Settings > Initial Setup >
Language
Battery
Save
To enable/disable
:
Save
> Settings > Initial Setup >
Battery
Battery Save
other features
45

feature
Contrast
set DTMF
clear
phone data
phone
reset
other features
46
To adjust
Contrast
level:
> Settings > Initial Setup >
Contrast
To select DTMF length:
> Settings > Initial Setup >
DTMF
To clear the entered
information in the phone:
> Settings > Initial Setup >
Master Clear
To restore the phone's
default values:
> Settings > Initial Setup >
Master Reset
feature
define
NAM
setting
set Service
tone
set call
drop tone
select a
band
To set NAM and enable it:
> Settings > Network > NAM
Setting
Tip:
You are allowed to set
two NAM settings.
To s et
Service Tone
> Settings > Network >
Service Tone > On
To S et
Call Drop Tone
> Settings > Network > Call
Drop Tone >
>
Settings > Network > Band
On or
or
Off
:
Off
:
Selection
feature
set Auto
Answer
phone lock
To s et
Auto Answer
when the
headset is connected:
> Settings > Headset > Auto
Answer
To set phone lock
Settings
>
Security
>
>
> lock mode >
Lock
Phone
password.
Two phone lock modes are
available:
Automatic Lock
Lock Now and
.
You can manually lock your
keypad by simply pressing
and holding from the
home screen. Or you may
press and .
feature
changing
password
To change the 4-digit
password:
Settings
>
Security
>
>
New
Passwords
The default password is
set to 0000 (four zeros).
other features
47

more features game
feature
Calculator
set
Exchange
rate
stop watch
set Service
dial
set Screen
Saver
other features
48
>
More
>
Calculator
To set exchange currency
rate:
More
>
Calculator
>
:
:
:
Personalize
or
Exchange
>
Delay
>
rate
To use
More
>
To s et
Service Dial
More
>
To s et
Screen Saver
Settings
>
Screen Saver
Stop Watch
>
Stop Watch
>
Service Dial
>
>
Picture
feature
play a
game
To start a game
alarm clock
feature
set alarm
clock
To set Alarm Clock:
[NewEntry] > set the name
and time
Tip:
setting, the alarm will be
enabled automatically. To
disable it, press
:
> Games >
> More > Alarm Clock >
When you finish
game
DISABLE
.

service and repairs
If you have questions or need assistance,
we’re here to help. Go to
www.hellomoto.com, where you can
select from a number of customer care
options. You can also contact the Motorola
Customer Support Center at 0 800 666
8676 (Argentina), 800-201-442 (Chile),
01-800-700-1504 (Columbia), 01 800 021
0000 (México), 0800-100-4289 (Venezuela),
or Perú (0-800-52-470).
service and repairs
49

Specific Absorption Rate Data
The model wireless phone meets the
government’s requirements for
exposure to radio waves.
Your wireless phone is a radio transmitter and
receiver. It is designed and manufactured not to
exceed limits for exposure to radio frequency (RF)
energy set by the Federal Communications
Commission (FCC) of the U.S. Government and by the
Canadian regulatory authorities. These limits are part
of comprehensive guidelines and establish permitted
levels of RF energy for the general population. The
guidelines are based on standards that were
developed by independent scientific organizations
through periodic and thorough evaluation of scientific
studies. The standards include a substantial safety
margin designed to assure the safety of all persons,
regardless of age or health.
Specific Absorption Rate Data
50
The exposure standard for wireless mobile phones
employs a unit of measurement known as the
Specific Absorption Rate, or SAR. The SAR limit set
by the FCC and by the Canadian regulatory
authorities is 1.6 W/kg.
using standard operating positions accepted by the
FCC and by Industry Canada with the phone
transmitting at its highest certified power level in all
tested frequency bands. Although the SAR is
determined at the highest certified power level, the
actual SAR level of the phone while operating can be
well below the maximum value. This is because the
phone is designed to operate at multiple power
levels so as to use only the power required to reach
the network. In general, the closer you are to a
wireless base station, the lower the power output.
Before a phone model is available for sale to the
public in the U.S. and Canada, it must be tested and
certified to the FCC and Industry Canada that it does
1
Tests for SAR are conducted

not exceed the limit established by each government
for safe exposure. The tests are performed in
positions and locations (e.g., at the ear and worn on
the body) reported to the FCC and available for
review by Industry Canada. The highest SAR value for
this model phone when tested for use at the ear is
1.34 W/kg , and when worn on the body, as described
in this user guide, is 0.55 W/kg. (Body-worn
measurements differ among phone models,
depending upon available accessories and regulatory
requirements).
2
While there may be differences between the SAR
levels of various phones and at various positions,
they all meet the governmental requirements for safe
exposure. Please note that improvements to this
product model could cause differences in the SAR
value for later products; in all cases, products are
designed to be within the guidelines.
Additional information on Specific Absorption Rates
(SAR) can be found on the Cellular
Telecommunications & Internet Association (CTIA)
Web site:
http://www.phonefacts.net
or the Canadian Wireless Telecommunications
Association (CWTA) Web site:
http://www.cwta.ca
1. In the United States and Canada, the SAR limit for
mobile phones used by the public is 1.6 watts/kg
(W/kg) averaged over one gram of tissue. The standard
incorporates a substantial margin of safety to give
additional protection for the public and to account for
any variations in measurements.
2. The SAR information includes the Motorola testing
protocol, assessment procedure, and measurement
uncertainty range for this product.
Specific
Absorption Rate Data
51

index
A
accessories 8
alert
defined 32
indicators 22
interval 42
message type 42
setting 30, 32
answer key 1
answering a call 11, 34
B
backlight 33
battery
charging 9
index
52
extending battery life
10, 33
installing 9
Bluetooth indicator 3
C
call
answer options 11, 34
call waiting 36
dialed calls list 35
emergency number 37
international access
code 37
missed call 36
mute 36
received calls list 35
redial 35
ring style 30, 32
unanswered call 36
Call Failed, Number Busy
message 35
call waiting 36
caller ID 36
calling line identification.
See caller ID
camera 3
clock
setting 33
clock, set as screen saver
See screen saver
codes
changing 26
default 26

forgetting 26
contrast, setting 33
correcting entry errors 12
D
date, setting 33
dialed calls list 35
dialing a number 28
display
backlight 33
contrast 33
description 20
home screen 20
personalizing 44
E
earpiece 1
emergency number 37
end key 1
external display 3
F
flip 34
H
home screen
defined 20
I
Incoming Call message 36
indicators
alert type 22
message waiting 21
status, in home screen
21
international access code
37
iTAP software 25
K
key
answer 1
end 1
left soft key 1, 20
menu 1
navigation key 26
power 1
right soft key 1, 20
send 1
volume 32
volume control 1, 28
keypad 34
locking, unlocking 30
L
left soft key
functions 1, 20
lock
phone 27
index
53

RUIM card 11
M
menu
entering text 24
icons, in home screen
23
using 22
menu key 1
message waiting indicator
21
missed call 36
mute a call 36
N
navigation key 26
numbers, entering 26
O
open to answer 34
index
54
optional accessory 8
optional feature 8
P
passwords. See codes
phone
answer options 11, 34
clear stored call lists 40
codes 26
date, setting 33
locking 27
ring style 30, 32
security code 26
time, setting 33
turning on/off 11
unlock code 26
unlocking 27
phone number
international access
code 37
redialing 35
storing in phonebook 39
phonebook
picture ID 36
speed dial number 30
storing an entry 39
photo
picture ID 36
picture
screen saver 33
viewing 36
picture ID 36
PIN code
entering 11
power key 1
predictive text entry 25
R
received calls list 35
recent calls 35

redial
busy number 35
right soft key
functions 1, 20
ring style, setting 30, 32
ring tone
changing 32
ringer volume, setting 30,
32
RUIM card
locking 11
RUIM PIN code
entering 11
S
screen saver 33
security code
changing 26
default 26
send key 1
service dial 28
shortcuts 31
silent alert, setting 30, 32
SIM Blocked message 11
SIM card
defined 9
installing 9
PIN code entry 11
precautions 9
SIM Blocked message
11
smart key 3
soft keys
functions 20
illustration 1
speed dial 30
standby time, increasing
33
symbols, entering 26
T
tap method text entry 26
text
entering 24
iTAP software predictive
text entry 25
numeric method 26
symbol method 26
tap method 26
time, setting 33
U
unanswered call 36
unlock
phone 27
unlock code
bypassing 26
changing 26
default 26
entering 27
index
55

V
vibrate alert
setting 30, 32
voicemail 38
volume
keypad 32
ringer 30, 32
volume keys 1, 28
index
56

index
57


 Loading...