


APPLICANT: MOTOROLA, INC. FCC ID: IHDT5FA1
INSTRUCTION MANUAL
A preliminary draft copy of the Users Manual follows:
EXHIBIT 8

User Manual
C-222
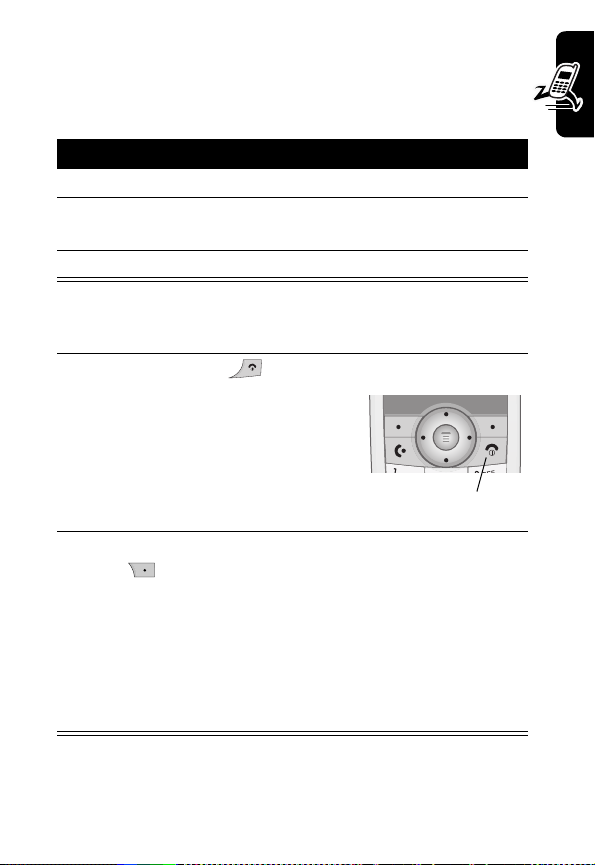
START HERE >

2
Welcome
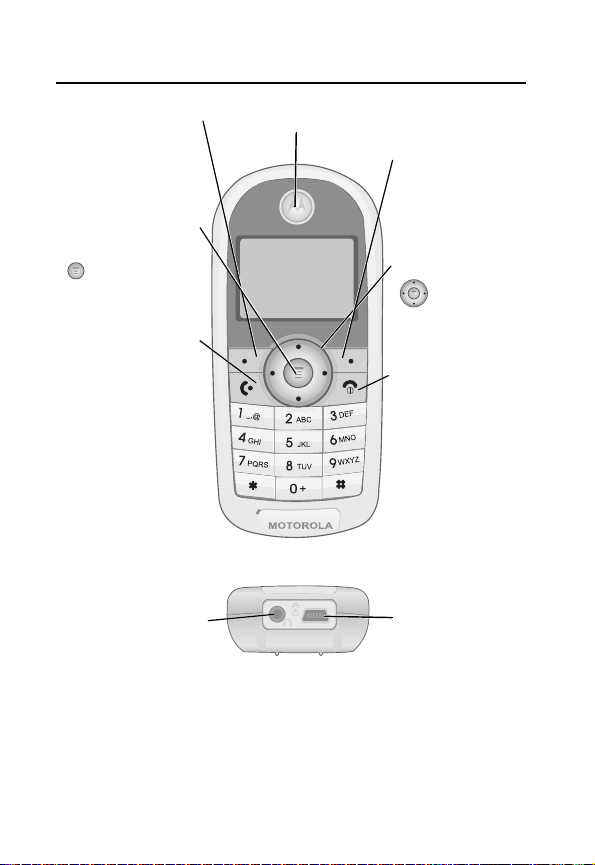
Left Soft Key
Performs functions
identified by left
display prompt.
Menu Key
Open a menu when
is in the display.
Send/Answer Key
Make and answer
calls; press in idle to
list recently dialed
calls.
Microphone
Earpiece
Right Soft Key
Performs functions
identified by right
display prompt.
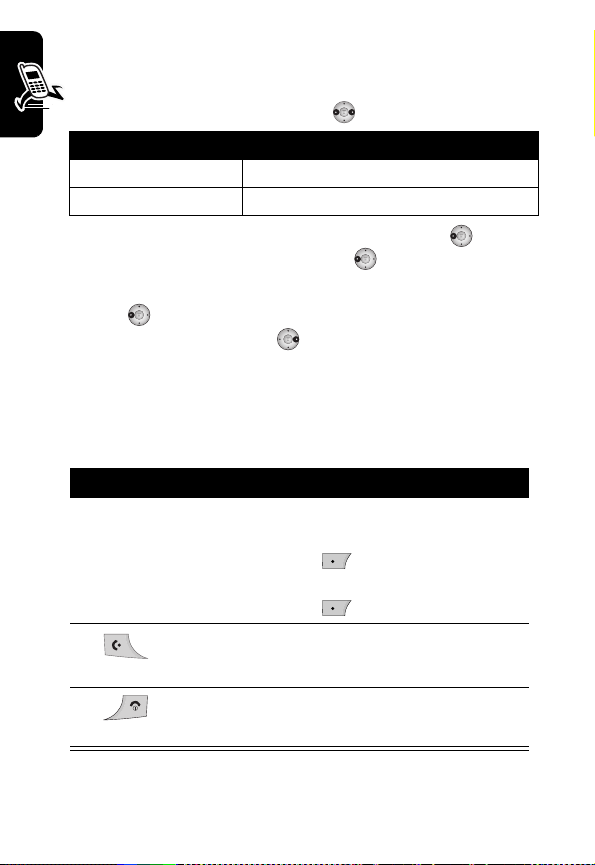
Navigation Keys
Scroll through
lists, set volume.
Power/End Key
Press & hold to turn
phone on or off.
Press & release to
end phone calls,
exit menu system.
Power Connector
Insert Charger.
Your phone may not appear exactly as the phone image
above.
Note that all key locations, sequences, and functions remain
the same with any of the covers.
3

Motorola, Inc., Consumer Advocacy Office 1307 East
Algonquin Road Schaumburg, IL 60196
1-800-331-6456 (United States)
1-888-390-6456 (TTY/TDD United States)
1-800-461-4575 (Canada)
www.motorola.com(United States)
www.motorola.ca(Canada)
MOTOROLA and the Stylized M Logo are registered in the US
Patent & Trademark Office. All other product or service names
are the property of their respective owners. Acrobat and
Acrobat Reader are registered trademarks of Adobe Systems
Incorporated.
© Motorola, Inc. 2005
Software Copyright Notice
The Motorola products described in this manual may include
copyrighted Motorola and third party software stored in
semiconductor memories or other media. Laws in the United
States and other countries preserve for Motorola and third
party software providers certain exclusive rights for
copyrighted software, such as the exclusive rights to distribute
or reproduce the copyrighted software. Accordingly, any
copyrighted software contained in the Motorola products may
not be modified, reverse-engineered, distributed, or
reproduced in any manner to the extent allowed by law.
Furthermore, the purchase of the Motorola products shall not
be deemed to grant either directly or by implication, estoppel,
or otherwise, any license under the copyrights, patents, or
patent applications of Motorola or any third party software
provider, except for the normal, non-exclusive, royalty-free
license to use that arises by operation of law in the sale of a
product. Actual part numbers to be provided.
Manual number: 6809457A28-O
Cover number: 8988485L61-O
4

Contents
Welcome ...........................................................................3
Getting Started ...............................................................17
What's in the Box?........................................................17
About This Guide..........................................................17
Installing the Battery.....................................................18
Charging the Battery.....................................................19
Charging time ...............................................................20
Battery Use...................................................................21
Resetting Your Phone ..................................................23
Turning Your Phone On................................................23
Adjusting the Volume....................................................24
Making a Call................................................................24
Answering a Call...........................................................25
Dialing Menu.................................................................25
Active Call Menu...........................................................25
Mute.....................................................................................26
Unmute ................................................................................ 26
My Phone #.......................................................................... 26
Outgoing calls...................................................................... 27
Incoming calls...................................................................... 27
New Message...................................................................... 27
Voice Privacy.......................................................................28
Tone Length......................................................................... 28
Learning to Use Your Phone.........................................29
Using the Display..........................................................29
Using the 4-Way Navigation Keys................................32
5

Using Menus................................................................ 33
Selecting a Feature Option .......................................... 34
Entering Text................................................................ 35
Choosing a Text Entry Method .................................... 36
Using Tap Method........................................................ 37
Using the iTAPTM Method........................................... 39
Entering Words ....................................................................40
Using Symbol Method.................................................. 43
Symbol Chart ............................................................... 43
Canned Message......................................................... 44
QUICK TITLE............................................................... 45
Recent Calls ................................................................... 46
Outgoing Calls ............................................................. 46
Incoming Calls ............................................................. 46
Missed Calls................................................................. 46
Erase History ............................................................... 47
Outgoing Calls .....................................................................47
Incoming Calls .....................................................................47
Missed Calls.........................................................................47
All Calls................................................................................47
Call Time...................................................................... 48
Last Call............................................................................... 48
Outgoing Calls .....................................................................48
Incoming Calls .....................................................................48
Total Calls............................................................................48
Life time ...............................................................................49
Reset....................................................................................49
Tones / IMGS .................................................................. 50
Theme.......................................................................... 50
6

Images..........................................................................51
Ringer Type ......................................................................... 53
My Tones......................................................................54
New Tone ............................................................................55
Edit....................................................................................... 56
Delete ..................................................................................56
Play......................................................................................56
Help .....................................................................................57
Phonebook......................................................................58
Creating a Phonebook Entry ........................................58
Finding a Phonebook Entry ..........................................61
Finding by Name.................................................................. 61
Finding by Location.............................................................. 62
Phonebook Option........................................................64
New...................................................................................... 64
Edit....................................................................................... 64
Delete ..................................................................................64
Send Message.....................................................................64
Set Primary Number ............................................................ 64
Add Digits ............................................................................65
Attach Number..................................................................... 65
Sort ...................................................................................... 65
Speed Dial....................................................................66
Dialing a Phonebook Entry ...........................................66
Speed Dialing ...............................................................66
Turbo Dialing ................................................................67
Editing a Phonebook Entry...........................................68
Viewing My Number .....................................................68
Checking Phonebook Capacity ....................................69
Erasing All Entries ........................................................69
7

Messaging ...................................................................... 70
SMS ............................................................................. 70
Sending a Text Message .....................................................70
Receiving a New Message ..................................................71
Viewing Messages...............................................................72
Setting Up SMS ...................................................................73
WAP Alerts................................................................... 74
Viewing WAP messages...................................................... 74
Voicemail ..................................................................... 74
Receiving a New Voicemail Message.................................. 74
Listening to a Voicemail Message .......................................74
Clearing Voicemail Icon .......................................................75
Storing Your Server Number................................................75
Quick dial ..................................................................... 75
Calling Quick Dial.................................................................75
Change Quick Dial............................................................... 75
Delete Quick Dial .................................................................75
Office Tools.................................................................... 76
Datebook...................................................................... 76
General Description .............................................................76
Alarm Clock.................................................................. 78
Calculator..................................................................... 79
Access Calculator
Calculator Rules...................................................................80
Using the Calculator
(Addition, Subtraction, Multiplication, Division)............ 82
World Time................................................................... 84
General Description .............................................................84
Stopwatch .................................................................... 84
...............................................................80
8

Setting Up Your Phone ..................................................85
SOUNDS ......................................................................85
VOLUME.............................................................................. 85
RINGER TYPE ....................................................................87
ALERTS...............................................................................88
TONE LENGTH ................................................................... 90
Display..........................................................................91
Adjusting the Backlight ........................................................91
Adjusting Display Contrast................................................... 91
Selecting a Screensaver Timer............................................ 92
Time and Date .....................................................................92
Color Style ........................................................................... 93
Security.........................................................................94
Unlocking Your Phone.........................................................94
Locking and Unlocking Your Phone..................................... 94
Setting Your Phone to Lock Automatically........................... 95
Changing Your Phone’s Code ............................................. 96
Restricting Calls................................................................... 97
Limit Use..............................................................................98
Master Reset .....................................................................100
Master Clear ...................................................................... 101
System........................................................................102
System Select....................................................................102
Selecting Active Line .........................................................102
Voice Privacy.....................................................................103
Network ......................................................................104
Selecting Set mode............................................................ 104
Display Current Network.................................................... 104
Others.........................................................................105
Setting the Language......................................................... 105
Setting Answer Options ..................................................... 105
9

Using Automatic Redial......................................................106
Using Call Waiting..............................................................107
Forwarding a Call............................................................... 107
Call Forward to Voicemail..................................................109
Setting Auto Hyphen.......................................................... 110
Phone Info.................................................................. 111
Viewing Your Phone Number.............................................111
Viewing Version .................................................................111
More........................................................................... 113
Specific Absorption Rate Data................................... 114
Additional Health and Safety Information Consumer
Information on Wireless Phones from the FDA.......... 117
Motorola Limited Warranty for the United States and
Canada What Does this Warranty Cover?................. 123
10

Safety and General Information
IMPORTANT INFORMATION ON SAFE AND EFFICIENT
OPERATION.
READ THIS INFORMATION BEFORE USING YOUR PHONE.
The information provided in this document supersedes the
general safety information in user guides published prior to
December 1, 2002.
Exposure To Radio Frequency (RF) Energy
Your phone contains a transmitter and a receiver. When it is ON,
it receives and transmits RF energy. When you communicate
with your phone, the system handling your call controls the
power level at which your phone transmits.
Your Motorola phone is designed to comply with local regulatory
requirements in your country concerning exposure of human
beings to RF energy.
Operational Precautions
To assure optimal phone performance and make sure human
exposure to RF energy is within the guidelines set forth in the
relevant standards, always adhere to the following procedures.
External Antenna Care
Use only the supplied or Motorola-approved replacement
antenna. Unauthorized antennas, modifications, or attachments
could damage the phone.
Do NOT hold the external antenna when the phone is IN USE.
Holding the external antenna affects call quality and may cause
the phone to operate at a higher power level than needed. In
addition, use of unauthorized antennas may result in
noncompliance with the local regulatory requirements in your
country.
Phone Operation
When placing or receiving a phone call, hold your phone as you
would a wireline telephone.
11

Body-Worn Operation
To maintain compliance with RF energy exposure guidelines, if
you wear a phone on your body when transmitting, always place
the phone in a Motorola-supplied or approved clip, holder,
holster, case, or body harness for this phone, if available. Use of
accessories not approved by Motorola may exceed RF energy
exposure guidelines. If you do not use one of the body-worn
accessories approved or supplied by Motorola, and are not using
the phone held in the normal use position, ensure the phone and
its antenna are at least 1 inch (2.5 centimeters) from your body
when transmitting.
Data Operation
When using any data feature of the phone, with or without an
accessory cable, position the phone and its antenna at least 1
inch (2.5 centimeters) from your body.
Approved Accessories
Use of accessories not approved by Motorola, including but not
limited to batteries and antenna, may cause your phone to
exceed RF energy exposure guidelines. For a list of approved
Motorola accessories, visit our website at www.Motorola.com.
RF Energy Interference/Compatibility
Note:
Nearly every electronic device is susceptible to RF
energy interference from external sources if inadequately
shielded, designed, or otherwise configured for RF energy
compatibility. In some circumstances your phone may cause
interference.
Facilities
Turn off your phone in any facility where posted notices instruct
you to do so. These facilities may include hospitals or health care
facilities that may be using equipment that is sensitive to external
RF energy.
12

Aircraft
When instructed to do so, turn off your phone when on board an
aircraft. Any use of a phone must be in accordance with
applicable regulations per airline crew instructions.
Medical Devices
Pacemakers
Pacemaker manufacturers recommend that a minimum
separation of 6 inches (15 centimeters) be maintained between
a handheld wireless phone and a pacemaker. Persons with
pacemakers should:
•
ALWAYS keep the phone more than 6 inches (15 centimeters)
from your pacemaker when the phone is turned ON.
•
NOT carry the phone in the breast pocket.
•
Use the ear opposite the pa cemaker to minimize the potential
for interference.
•
Turn OFF the phone immediately if you have any reason to
suspect that interference is taking place.
Hearing Aids
Some digital wireless phones may interfere with some hearing
aids. In the event of such interference, you may want to consult
your hearing aid manufacturer to discuss alternatives.
Other Medical Devices
If you use any other personal medical device, consult the
manufacturer of your device to determine if it is adequately
shielded from RF energy. Your physician may be able to assist
you in obtaining this information.
Use While Driving
Check the laws and regulations on the use of phones in the area
where you drive. Always obey them.
When using your phone while driving, please:
•
Give full attention to driving and to the road.
13

•
Use hands-free operation, if available.
•
Pull off the road and park before making or answering a call if
driving conditions so require.
Responsible driving best practices may be found in the “Wireless
Phone Safety Tips” at the end of this manual and at the Motorola
website:
www.Motorola.com/callsmart.
Operational Warnings
For Vehicles With an Air Bag
Do not place a phone in the area over an air bag or in the air bag
deployment area. Air bags inflate with great force. If a phone is
placed in the air bag deployment area and the air bag inflates,
the phone may be propelled with great force and cause serious
injury to occupants of the vehicle.
Potentially Explosive Atmospheres
Turn off your phone prior to entering any area with a potentially
explosive atmosphere, unless it is a phone type especially
qualified for use in such areas and certified as “Intrinsically
Safe”. Do not remove, install, or charge batteries in such areas.
Sparks in a potentially explosive atmosphere can cause an
explosion or fire resulting in bodily injury or even death.
Note:
The areas with potentially explosive atmospheres
referred to above include fueling areas such as below decks
on boats, fuel or chemical transfer or storage facilities, areas
where the air contains chemicals or particles, such as grain,
dust, or metal powders. Areas with potentially explosive
atmospheres are often but not always posted.
Blasting Caps and Areas
To avoid possible interference with blasting operations, turn OFF
your phone when you are near electrical blasting caps, in a
blasting area, or in areas posted “Turn off electronic devices.”
Obey all signs and instructions.
14
Batteries
Batteries can cause property damage and/or bodily injury such
as burns if a conductive material such as jewelry, keys, or
beaded chains touch exposed terminals. The conductive
material may complete an electrical circuit (short circuit) and
become quite hot. Exercise care in handling any charged
battery, particularly when placing it inside a pocket, purse, or
other container with metal objects.
Use only Motorola original batteries and chargers.
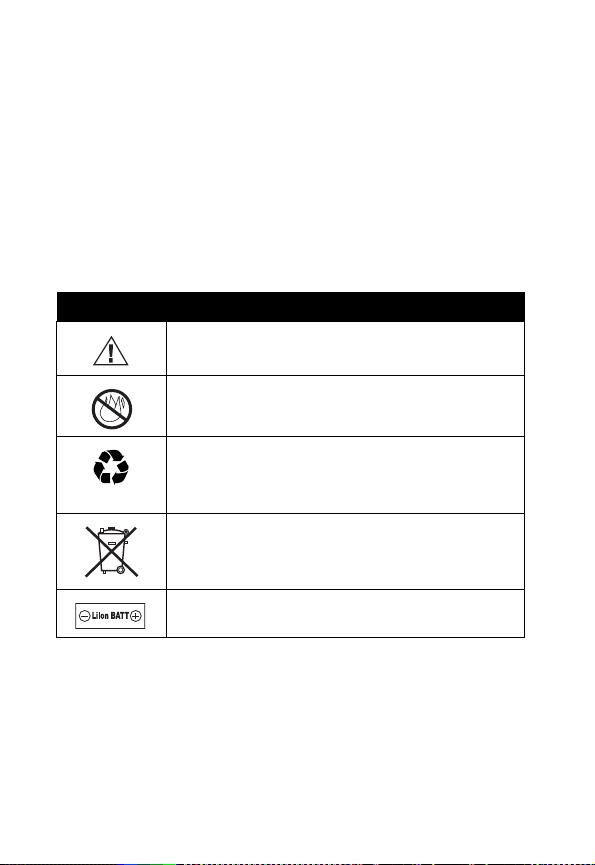
Your battery or phone may contain symbols, defined as follows:
Symbol Definition
Important safety information will follow..
Your battery or phone should not be disposed of in
a fire.
Your battery or phone may require recycling in
accordance with local laws. Contact your local
regulatory authorities for more information.
Your battery or phone should not be thrown in the
trash.
Your phone contains an internal lithium ion battery.
Seizures/Blackouts
Some people may be susceptible to epileptic seizures or
blackouts when exposed to blinking lights, such as when
watching television or playing video games. These seizures or
blackouts may occur even if a person never had a previous
seizure or blackout.
15

If you have experienced seizures or blackouts, or if you have a
family history of such occurrences, please consult with your
doctor before playing video games on your phone or enabling a
blinking-lights feature on your phone. (The blinking-light feature
is not available on all products.)
Parents should monitor their children's use of video game or
other features that incorporate blinking lights on the phones. All
persons should discontinue use and consult a doctor if any of the
following symptoms occur: convulsion, eye or muscle twitching,
loss of awareness, involuntary movements, or disorientation.
To limit the likelihood of such symptoms, please take the
following safety precautions:
•
Do not play or use a blinking-lights feature if you are tired or
need sleep.
•
Take a minimum of a 15-minute break hourly.
•
Play in a room in which all lights are on.
•
Play at the farthest distance possible from the screen.
Repetitive Motion Injuries
When you play games on your phone, you may experience
occasional discomfort in your hands, arms, shoulders, neck, or
other parts of your body. Follow these instructions to avoid
problems such as tendonitis, carpal tunnel syndrome, or other
musculoskeletal disorders:
•
Take a minimum 15-minute break every hour of game playing.
•
If your hands, wrists, or arms become tired or sore while
playing, stop and rest for several hours before playing again.
•
If you continue to have sore hands, wrists, or arms during or
after play, stop playing and see a doctor.
16

Getting Started
What's in the Box?
Your digital wireless phone typically comes with a battery
and a charger. Other accessory options can customize
your phone for maximum performance and portability.
To purchase Motorola Original™ accessories, contact the
Motorola Customer Call Center at 1-800-331-6456 in the
United States or 1-800-461-4575 in Canada.
About This Guide
This guide describes the basic features of your Motorola
C222 wireless phone.
Getting Started
17
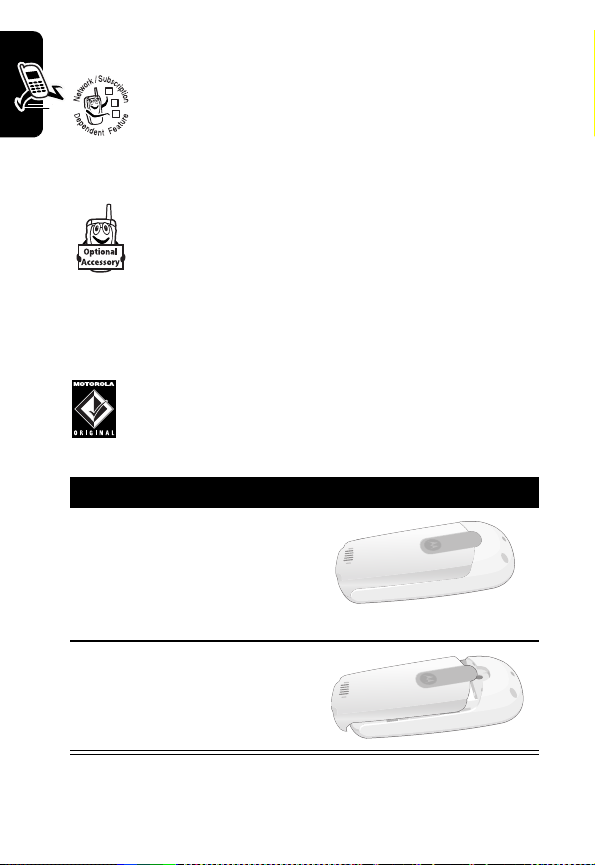
Optional Features
This label identifies an optional network or
subscription-dependent feature that may not be
032380o
offered by all service providers in all geographical
areas. Contact your service provider for more
information.
Optional Accessories
This label identifies a feature that requires an
optional Motorola Original™ accessory.
Getting Started
Installing the Battery
You must install and charge the battery to use your phone.
Your phone is designed to be used only with
Motorola Original batteries and accessories. We
recommend that you store batteries in their
protective cases when not in use.
Action
Insert the part where the
1
metal groove of the
battery is located into the
groove at the bottom of
the handset.
18
2
Then press the top of the
battery until it snaps.
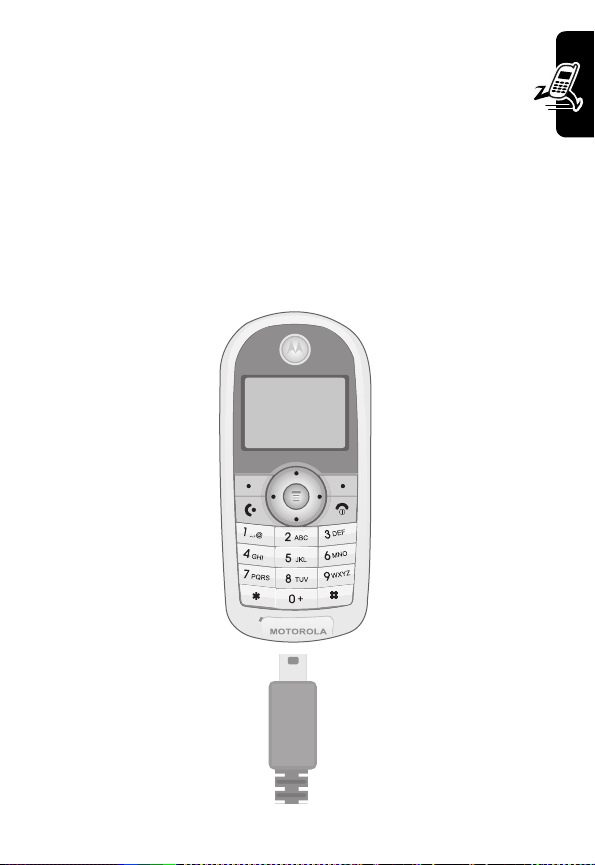
Charging the Battery
New batteries are partially charged. Before you can use
your phone, you need to install and charge the battery.
Some batteries perform best after several full charge/
discharge cycles.
Caution:
display Charging for up to 1 minute after inserting the charger.
Do not attempt to force the charger further in if you do not see
an immediate response.
If the battery is fully discharged, your phone may not
Getting Started
19

Action
Plug the travel charger into the middle jack on the
1
bottom of your phone.
2
Plug the other end of the travel charger into the
appropriate electrical outlet.
3
When your phone indicates Charge Complete,
remove the travel charger.
Getting Started
When you charge the battery, the battery level indicator
in the upper right corner of the display shows how much
of the charging process is complete.
Charging time
The Table below displays an approximate battery charging
time.
•
The charging time depends upon the reminded capacities of a
battery.
•
Charge the battery in the room temperature.
Battery Charging Times
Li-Ion 700mAh Within 5 hours
20

Battery Use
Caution: To prevent injuries or burns, do not allow metal
objects to contact or short-circuit the battery terminals.
To maximize your battery’s performance:
•
Always use Motorola Original™, batteries and battery
chargers. The phone warranty does not cover damage
caused from using non-Motorola batteries and/or battery
chargers.
•
New batteries or batteries that have been stored for a long
time may require a longer initial charge time.
•
Maintain the battery at or near room temperature when
charging.
•
Do not expose batteries to temperatures below -10°C
(14°F) or above 45°C (113°F). Always take your phone
with you when you leave your vehicle.
•
When you do not intend to use a battery for a while, Store
it uncharged in a cool, dark, dry place, such as a
refrigerator.
•
Over time, batteries gradually wear down and require
longer charging times. This is normal. If you charge your
battery regularly and notice a decrease in talk time or an
increase in charging time, then it is probably time to
purchase a new battery.
•
Activities that require intensive keystroke use (such as
playing a game or using messaging) reduce your phone’s
talk and standby time. To help maximize battery life,
activate Battery Save.
Getting Started
21

Never dispose of batteries in a fire because they
may explode. The rechargeable batteries that
power this product must be disposed of properly
and may need to be recycled. Contact your local recycling
center for proper disposal methods. Refer to your battery’s
label for battery type.
Getting Started
22
Resetting Your Phone
If your phone freezes on a display, error message, or
power up, reset it by removing and reinstalling the battery:
Action
Turn off your phone
1
2
Remove and reinstall your battery as described on
page 19.
3
Turn on your phone.
Turning Your Phone On
1
Press and hold ( ) (
Note:
If your cellular phone
company uses the SIM card,
please proceed as indicated in the
step 2 below to turn on the phone,
otherwise skip step2 and go
directly to step3.
2
If necessary, enter your 4-digit unlock code and press
OK
( ) to unlock your phone.
Note:
The unlock code is originally set to 1234 by Motorola
(for more information, see page 111). Your cellular phone
provider may have changed the lock code to the last four
digits of your phone number or for specific 4-digit code. In
this case please contact your cellular phone operator to geet
the correct unlock code.
End/Power
key).
End/Power
Getting Started
23
Adjusting the Volume
You can adjust your phone's earpiece and ring tone volume
by pressing right and left on the ( ).
When You Can Adjust
You are in a call Earpiece voice volume
The display is idle ring tone volume
Tip:
At the lowest ring tone volume setting, press ( ) left
once to switch to vibrate alert. Press ( ) left again to switch
to “Ringer off” alert in the “Vibrate” mode.
Getting Started
Press
()
left again to switch to “Silence all” in the
“Ringer off” mode. Press ( ) right to cycle back to vibrate
alert, then ring alert.
Making a Call
Press To
1
Keypad
keys Dial the phone number
Tip:
If you make a mistake, press
DELETE ( ) to delete the last
digit, or press and hold
DELETE ( ) to delete all digits.
2
(
Send/Answer
3
(
Power/End
key)
key)
Make the call
End the call and “
phone
hang up
” the
24
Answering a Call
When you receive a call, your phone rings and/or vibrates
and displays an incoming call message.
Action
1
Press ( ) or
2
Press ( )(
Note:
If the phone is locked, you must unlock it to answer the
call.
ANSWER ().
end
key) when the call is done.
Dialing Menu
Press To
>
Attach Number
>
Entering Number(s)
Hide ID
>
Insert Pause
>
Insert Wait
>
Send Message
Active Call Menu
Press ( ) key during the call to access call menu.
Getting Started
Press To
>
>
In Call status
>
>
>
>
Mute
Hold
New Call
My Phone #
Outgoing Calls
Incoming Calls
25
Mute
Press To
Unmute
Getting Started
Press To
My Phone #
Press To
UP/DOWN ( ) key select.
“
Mute
”, and then
The microphone will be turned
off.
on the conversation screen.
The microphone will be turned
on.
UP/DOWN ( ) key select.
“
My Phone #
You will see your mobile phone
number.
()
”,
()
.
.
26
Outgoing calls
Press To
Incoming calls
Press To
New Message
Press To
UP/DOWN ( ) key to select
“
Outgoing calls
()
You will see outgoing calls list.
UP/DOWN ( ) key to select
“
Incoming calls
()
You will see incoming calls list.
UP/DOWN ( ) key to select
“
New Message
()
You will send text Message.
”, and then press
.
”, and then press
.
”, and then press
.
Getting Started
27
Voice Privacy
Press To
Tone Length
Getting Started
Press To
UP/DOWN ( ) key to select
“
Voice Privacy
()
You will see Voice Privacy list.
UP/DOWN ( ) key to select
“
Tone Length
()
You will see Tone Length list.
”, and then press
.
”, and then press
.
28
Learning to Use Your Phone
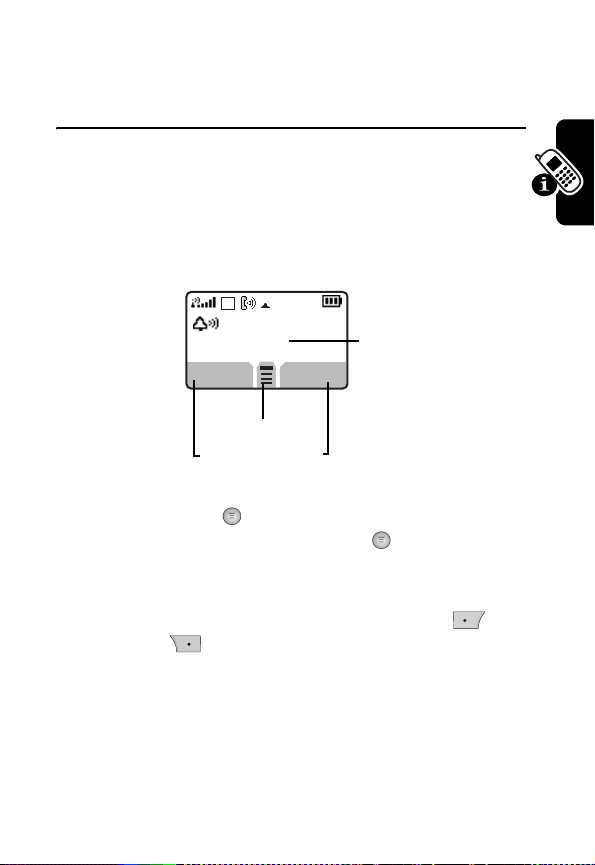
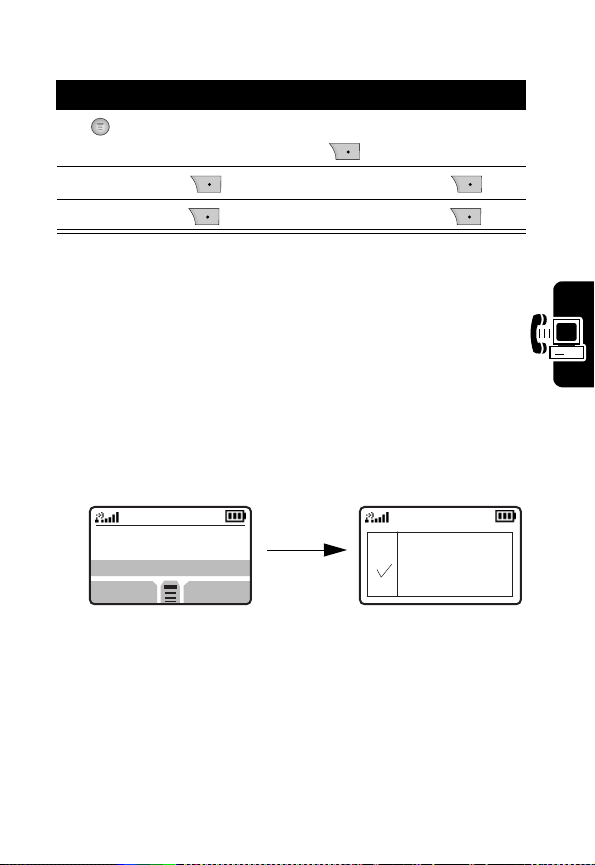
Using the Display
The idle display (see below) is the standard display when
you are not on a call or using the menu.
D
11:27 am
PH.BOOK
Menu Indicator
Soft Key Labels
The Menu indicator ( ) at the bottom center of the display
indicates you can press the menu key ( ) to display the
main menu.
Labels at the bottom corners of the display show the
current soft key functions. Press the left soft key ( ) or
()
right soft key
left or right soft key label.
to perform the function indicated by the
CALLS
Clock
Learning to Use Your Phone
29

The following status indicators can display:
In Use Roam
Digital / Analog / 1X
SERVICE STATUS
Signal
D
Strength
Alert Type
11:27 am
PH.BOOK
Alert Type Indicator. Shows the currently selected alert
profile. The default alert profile is loud ring.
Ringer Volume:
High
->
->
High & Vib.
Silence All
->
Escalating
->
Ringer Off -> Vibrate
Name Icon
Escalating
High & Vib.
3~5
Learning to Use Your Phone
2
1
Vibrate
Ringer Off
Silence All
MESSAGE
Text Case
(if applies)
Message or
Entry Method
Battery Level
->
Low
->
Medium
Signal Strength Indicator Indicates the strength of your
phone’s connection with the network
You cannot make or answer calls when the “
indicator displays.
30
no signal
”

Digital/Analog /UIS-1X-SERVICE STATUS
If you are in a digital
coverage area, lights up the digital indicator. Lights off when you
are in an analog coverage area.
In Use Indicator
( ) Appears when a call is in progress.
( ) If you trouble beyond the range of a cellular system, the
Service indicator
appears to let you know that calls cannot be placed
or received from your location.
Roam/Home
Lights up when your phone accesses a wireless
service outside `of your home system. When you leave your
wireless Service Area, your phone roams (seeks another wireless
system).
Text Case Indicator
Indicates the text case when you are in a text
editor.
Message or Entry Method Indicator
Indicates when you have an
active Chat session ( ), or when you have a new voice ( )
or text ( ) message waiting. When you enter a text message,
a number here indicates how many more characters can fit in the
message.
Battery Level Indicator
Shows the amount of charge left in your
battery. The more bars visible, the greater the charge. Recharge
your battery as soon as possible when you see the
Low Battery
warning message and hear the low battery alert.
No
Learning to Use Your Phone
31

Using the 4-Way Na vig ation Keys
Use the 4-way navigation
keys like a joystick to
navigate the menu system,
change feature settings,
and play games.
Tip:
Down and up are the
primary movements within
menus. Move left and right to
change feature settings, and
edit text.
Learning to Use Your Phone
Navigation
Keys
32

Using Menus
-
y
.
r
.
n
.
d
t
.
&
.
From the idle display, press ( )to display the main menu.
Left Soft Key
Perform func-
tions identified
by left display
prompt.
Send/Answer
Key
Places or
answers a call.
Right Soft Key
Perform functions iden
tified by right displa
prompt
Menu Key
Enter menu system o
open a sub-menu
Power/End Key
Press & hold to tur
phone on or off
Press & release to en
phone calls, exi
menus
Navigation Keys
Learning to Use Your Phone
Scroll through menus
lists, set feature values
Selecting a Menu Feature
From the idle display, select a menu feature as follows:
Find the Feature >
This example shows that from the idle display, you must
press ( ), scroll to and select
Outgoing Calls
select
scroll, and the left/right soft keys to perform the functions in
the bottom left and right corners of the display.
to display the dialed calls list. Use ( ) to
Recent Calls
>
Outgoing Calls
Recent Calls
,
then scroll to and
33

Selecting a Feature Option
Some features require you to select an item from a list:
Press
()
to
display the
previous screen.
Press
•
Press ( ) to scroll up or down to highlight an item.
•
In a numbered list, press a number key to highlight the
Outgoing Calls
6)Johone Smith
5)123456.....
BACK
()
to open the sub-menu.
VIEW
Highlighted Item
Press
display details for the
highlighted item.
item.
•
In an alphabetized list, press a key repeatedly to cycle
through the letters on the key and highlight the closest
matching list item.
•
When an item has a list of possible values, press ( ) to
the left or right to scroll and select a value.
Learning to Use Your Phone
•
When an item has a list of possible numeric values, press
a number key to set the value.
VIEW
()
to
34

Entering Text
Some features require you to enter information: For
example, enter “phonebook” menu and select “Add New
Entry” menu.
Press ( ) to
scroll down to
additional items.
Press
CANCEL
( ) to exit
without making changes.
DONE
( ) displays when you
enter or edit information.
Add New
Name:
No.: 12345....
CANCEL
CHANGE
Press
number keys to edit the
information.
CHANGE
()
Highlighted Item
or
The message center lets you compose and send text
messages. A flashing cursor shows where text will appear:
Countdown Icon (only
Flashing cursor
indicates
Message:
160
input SMS Text
Message)
insertion point.
Press
CANCEL
CANCEL
( ) to exit
BROWSE
Press
BROWSE
()
view and insert stored
to
without making changes.
Press
()
to open the sub-
Learning to Use Your Phone
35

When you enter text using the standard tap method, the
flashing cursor changes to a block cursor, and the soft key
functions change:
Block cursor indi-
cates currently
highlighted char-
acter.
After 2 seconds,
the block cursor
changes to a
flashing cursor
and moves to the
next position.
Message:
T
DELETE
Press
DELETE
to the left of the insertion point.
159
Press OK
accept and store the
text.
OK
( ) to delete the character
Choosing a Text Entry Method
Your Phone includes three methods of editing text in the
text editor. The following describes how to change in these
methods.
Learning to Use Your Phone
Press To
1
2
or
3
enter
ENTRY METHOD
Note:
In case of a text-entry
screen
screen to input text message or
input datebook title . :
[Menu]->Select “
Entry Method
the editor menu
highlight the desired Text
Entry Method.
select the highlighted method.
()
to
” in
36

Let the phone predict each word as you enter it,
iTAP English
iTAP Spanish
iTAP Portuguese
Tap Method
Numeric
Symbol
Note:
The text entry method you select remains active until
you change it by selecting another method. The text entry
methods supported are Tap method and Numeric method at
when input Email and canned message edit and password.
then choose the word from a list. When
Established language is English.
When Established language is Spanish.
When Established language is Portuguese.
Enter characters one at a time by pressing the
key for the letter, number, or symbol (see page
4). This is the standard method for entering text.
Enter numbers only.
Enter symbols only (see page 7).
Using Tap Method
The Tap method of text entry method is the standard
method. Each number key on the keypad is used to input a
series of characters (See Page 41, Character Chart) which
can be accessed through pressing a single key multiple
times.
Select Tap method in an
Tap M e t h od Ru l es
The first character of every sentence is automatically
capitalized.
If the cursor is the Block cursor:
•
Press the previously pressed digit key repeatedly to
circulate that of a series of characters.
ENTRY METHOD
screen.
Learning to Use Your Phone
37

•
Press a different key: Your phone will accept the
character, advance the cursor and insert the first
character associated with the last key pressed.
Press To
Your phone will accept the character and
advance the cursor to the next position
as an I-Beam.
If no keys are pressed (within two seconds), the character
in the Block is accepted and the cursor advances to the
next position as an I-Beam.
Press To
or
If the cursor is the I-Beam cursor:
Press To
Your phone will be changed between
uppercase and lowercase.
Learning to Use Your Phone
38
The cursor will be moved to the left.
(If the cursor is placed in the last position
and the last character is a space, remove
the space character.)
If the cursor is placed in the last position
of edited text, your phone will insert a
space character. If the cursor is placed in
edited text, the cursor will be moved to
the right.
The cursor will be moved to the same
position in the line above the current line
(unless it is on the top line, in which case
nothing happens).

Character Chart
Use this chart as a guide for entering characters with the
tap method.
Space . 1 @ ? ! , & : ; “ ( ) ‘ ¿ ¡ % $ _ ~ \
A B C 2 À Ã Á Â Ç
D E F 3 É È Ê
G H I 4 Í
J K L 5
M N O 6 Ñ Ò Õ Ó Ô
P Q R S 7
T U V 8 Ù Ú Ü
W X Y Z 9
+ - 0 * / = > < # § [ ]
Note:
This chart may not reflect the exact character set
available on your phone.
Press and Hold 2 seconds to toggle from
method.
Tap method
to
Numeric
Using the iTAPTM Method
Learning to Use Your Phone
iTAP TM software provides a predictive text entry method
that lets you enter a word using one keypress per letter.
Press ( ) Entry Method from a text entry screen and
select iTAP
39

Entering Words
Press To
1
A number key one
time
2
Number Keys (one
per letter)
3
left
4
SELECT ()
Learning to Use Your Phone
or
right
enter the first letter of the word
associated with the key are
shown at the bottom of the
display. (The edit screen is
entered to iTAP word screen.)
enter the rest of the word
Alternative words and letter
combinations are shown at the
bottom of the display.
The word choices are updated
with each keypress.
highlight the word you want
enter the word at the flashing
cursor. A space is automatically
inserted after the word. (The
iTAP word screen is escaped to
the edit screen.)
40

For Example, to spell “art,” press .
The display shows:
Flashing cursor
indicates insertion
point.
D
Art Apt Cpu Cru
DELETE
159
SELECT
Countdown
icon(only input
Text Message)
Press ( ) to scroll
and see additional
choices.
Press
Press
DELETE
()
to clear the last letter
entered.
SELECT ()
insert the highlighted
letters.
Entering Punctuation
- To add a symbol to the end of the word.
Press To
1
2
+ - 0 * / > < # § [ ]
' Space . 1 @ ? ! , & : ; “ () ¿ ¡ %
$ _ ~ \
SMS
to
Learning to Use Your Phone
41

Change of capitalization rule
•
Press ( ) : If the words aren't capitalized, press ( )
once to capitalize the first letters of those words. Press
( ) again to capitalize all of the letters in each word (for
example, car->Car->CAR).
•
Press ( ): If the words are capitalized. press ( ) once
to capitalizes the first letters of those words. Press ( )
agian to changes the words to all lower case (for example,
CAR->Car->car)
Entering Numbers in iTAP Method
•
Press number key: All letters associated with the key are
shown at the bottom of the display.
•
Press ( ) or ( ): Move the highlighted cursor to the
numeric letter.
•
Press number key : The corresponding digit will be added
to the end of numeric letter.
•
Press ( ): Exit iTAP word screen and the numbers are
entered at the flashing cursor position in edit screen.
Learning to Use Your Phone
Deleting Letters and Words
Press To
1
DELETE
2
DELETE
Hold
()
( ) and
The last letter of the entered
words/numbers will be removed
in
iTAP
word screen.
All the entered words/numbers
will be removed in
screen and exit
screen, return to the edit
screen.
iTAP
iTAP
word
word
42

Using Symbol Method
To enter symbol characters in a message, press ( ) >
Entry Method
1
2
3
from any text entry screen and select
Press To
A number key one
time
left
or
right
or the
number key repeatedly
SELECT ()
display a symbol at the bottom
of the display.
highlight the symbol you want
enter the symbol
Symbol
.
Symbol Chart
Use this chart as a guide for entering symbols in symbol
method.
Space . 1 @ ? ! , & : ; “ ( ) ‘ ¿ ¡ % $ _ ~ \
@ _ \
/ : ;
“ & ‘
( ) ( ) { }
¿ ¡ ~
< > =
$ £ ¥
# % *
+ - 0 * / = > < # § [ ]
Learning to Use Your Phone
43

Canned Message
Canned Message is a predetermined sentence that is often
used text message entry.
1
In text message entry screen:
Press To
Select
1
(
BROWSE
2
() / ()
3
()
4
()
5
()
Learning to Use Your Phone
) or ( )
“Browse”
CANNED MSG
message will be displayed.
(total:20items > 10 default items and
10 user-editable items)
highlight the desired canned message
insert highlighted canned message in
text message entry screen
return to the text message entry
screen
enter
BROWSE OPTION
BROWSE OPTION>
Add New
- “
Edit
” : To modify the predetermined
- “
Erase
- “
in editor menu > enter
screen. The list of canned
screen
” : To input new canned
message
canned message.
” : T o d e le t e p r e d et e r m i n ed
canned message.
44

QUICK TITLE
“QUICK TITLE” is predetermined title that are often used,
and used only in “datebook title” entry.
1
In the “Datebook title” entry screen:
Press To
Select “
Browse
1
(
BROWSE
) or ( )
2
() / ()
3
()
4
()
QUICK TITLE
The list of quick title will be
displayed.(11 items)
ighlight the desired quick title.
insert highlighted quick title in
datebook title entry screen
return to the datebook title entry
screen.
” in editor menu -> enter
screen.
Learning to Use Your Phone
45

Recent Calls
Outgoing Calls
Press To
>
Recent Calls
>
Outgoing Calls
Incoming Calls
Press To
>
Recent Calls
Recent Calls
>
Incoming Calls
Missed Calls
Press To
>
Recent Calls
>
Missed Calls
You can see the list of outgoing
DETAIL
DETAIL
DETAIL
, you can
, you can
, you can
calls. If you press
see more information.
You can see the list of incoming
calls. If you press
see more information.
You can see the list of missed
calls. If you press
see more information.
46
Note:
When your phone displays
()
to see the list of calls, and press ( ) to dial the
selected call.
Missed Calls
, press
VIEW

Erase History
Outgoing Calls
Press To
>
Recent Calls
>
Erase History
>
Outgoing Calls
Incoming Calls
You can delete the list of
outgoing calls.
Press To
>
Recent Calls
>
Erase History
>
Incoming Calls
Missed Calls
Press To
>
Recent Calls
>
Erase History
>
Missed Calls
All Calls
Press To
>
Recent Calls
>
Erase History
>
All Calls
Recent Calls
You can delete the list of
incoming calls.
You can delete the list of
missed calls.
You can delete the list of
all calls.
47

Call Time
Last Call
Press To
>
Recent Calls
>
Call Time
>
Last Call
Outgoing Calls
Press To
>
Recent Calls
>
Call Time
>
Outgoing Calls
Recent Calls
Incoming Calls
Press To
>
Recent Calls
>
Call Time
Incoming Calls
>
You can see the last call
time.
You cannot reset this value.
You can see the all of
outgoing calls time after
recent reset.
You can see the all of
incoming calls time after
recent reset.
48
Total Calls
Press To
>
Recent Calls
>
Call Time
Total Calls
>
You can see the all of
outgoing and incoming calls
time after recent reset.

Life time
Press To
>
Recent Calls
>
Call Time
Lifetime
>
Reset
Press To
>
Recent Calls
>
Call Time
Reset
>
You can see the all call times.
You cannot reset this value.
You can reset call times of
outgoing call, incoming calls
and total calls.
You cannot reset this value.
Recent Calls
49

Tones / IMGS
Theme
A theme is a group of settings for your phone's
screensaver, wallpaper, ring tone, and other
032380o
personal preferences. When you select a theme
for your phone, the theme instantly applies all of
its settings to your phone.
To download a theme, see page ???.
When you receive the theme, you can instantly apply its
settings when your phone prompts you to Apply Now?
Your phone saves the downloaded files so that you can
always apply them as individual items.
When you select a theme for your phone, the theme
instantly applies all of its settings to your phone:
50
Tones / IMGS
Press To
1
> Tones/Imgs > Theme
2
3
Select ( )
or
Notes :
•
Phone settings that are set by the theme appear with the value
(Set by theme). Changing any 1 of the values set by the theme
resets the Theme selection to Custom, though the theme's
settings all remain except for the 1 you changed.
Scroll to the theme you want
Apply the theme Open the theme
Delete
menu to
themes
Notes :
•
You can download, use, and delete themes, but you cannot
edit them. Downloaded themes may arrive in MTF files,
compressed with files that they reference.
Images
Your phone contains pictures and animations that you can
insert into text messages, and use as wallpaper and screen
saver images. To download pictures or animations, see
page ??? (Browser section). Your phone may also include
predefined images. You cannot rename or delete about
predefined images.
Press To
1
> Tones/Imgs
> Images
2
3
Select ( )
4
up or down
or
Details ( )
or
Scroll to the picture
View the picture
View the previous/next picture
View picture information
Open the
perform other procedures as
described in the follwing list.
Picture Viewer
menu to
Tones / IMGS
51

Picture Viewer Menu Options
The Picture Viewer menu can include the following options:
Details
Set as Wallpaper
Set as Screen Saver
Rename
Delete
Note:
When you set an animation as a wallpaper image, only
View picture information.
Set the picture as your phone's
wallpaper image.
Set the picture as your phone's Screen
Saverimage.
Rename the picture.
Delete the picture.
the first frame of the animation appears.
Note:
The screen saver image is shrunk to fill the display, if
necessary. An animation repeats for 5 times, then the first
frame of the animation displays.
Tones / IMGS
52

Ringer Type
Predefined
After you choose a style, your phone will give you a brief
sample of your new alert sound.
Press To
1
> Tones/Imgs
> Ringer Type > Predefined
2
3
4
My Bell
You can download up to 14 ringer tones over the network.
Press To
1
> Tones/Imgs
> Ringer Type > My Bell
2
3
4
select the feature.
scroll the ringer styles As you scroll
your phone will give an audible
sample of the currently displayed
style.
select the displayed option
-> Ring 20(Default: Acoustica)
exit
select the feature.
scroll the ringer styles
As you scroll your phone will give an
audible sample of the currently
displayed style.
select the displayed option
-> My Bell 14
exit
Tones / IMGS
53

My Tones
This feature allows the user to
manage tones, include creating new
tones and deleting tones.
Find the Feature
Tone Menu (Submenu of My tones -
New Tone, Edit, Delete, Play, Help
accessed from My Tones List View by
pressing the ( ) key.
Tones/Imgs
>
>
Ringer Type
>
My Tone
) can only be
My Tones
Tone 1
[ New Tone ]
EXIT
EDIT
Tone Menu is not available when (
) is highlighted in the My Tones
Tone
List View.
Tones / IMGS
54
New
Tone Menu
New Tone
Edit
Delete
Play
Help
New Tone
Press To
1
> Tones/Imgs
> Ringer Type > My Bell
2
Select
Notes
() Enter
3
Select
Name
()
Notes
•
The maximum length of a tone will be 120 characters and
tone names are limited to 32 characters.
•
If the user tried to store a tone without name a transient
error message “Tone Name Required” is displayed.
•
If the user tried to store a tone without notes a transient
error message “Tone Notes Required” is displayed.
•
If all user locations are full a transient error message
“Memory Full” is displayed.
select the “New Tone” and
press ( )
Notes
and press ( )
Enter the
Name
and press ( )
Tones / IMGS
Tone 9
Tone 10
[New Tone]
EXIT
SELECT
Memory
Full
SELECT
55

Edit
User can access tone detail form by either:
Select
Edit
Select
key from
Edit
from
My Tones List View
Tone Menu
.
Press To
1
> Tones/Imgs
> Ringer Type > My Bell
2
Select
Edit
()
Select ( ) key from
view.
You can edit
Notes
and name and
My Tones
press ( )
3
You can save it.
Delete
The user can delete a selected My Tones. Before an entry
is deleted a confirmation dialog is displayed to the user.
Press To
Tones / IMGS
1
> Tones/Imgs
> Ringer Type > My Bell
2
Select
Delete
()
Select ( ) key from
My Tones
view.
Press ( ) you can delete it.
list
list
Play
To play
to the desired entry and select Play from the
the user is taken to an animated playback meter.
56
My Tones
, the user can do one of the following: Scroll
My Tones
menu,

Help
The user can Help menu a selected My Tone.
---- Help ----To enter a note, use the up/down scroll. A note can also be
entered using the key associated with the note letter.
Change octaves using the 0 key to insert a ‘ * ’ followed by
the octave number. Insert a flat ‘ & ’ or a sharp ‘ # ’ using 0
key before the note. Change duration by inserting 0-5 after
the note. Modify duration by 1+1/2=‘.’ or by 1+3/4 =‘:’ or by
2/ 3=‘;’ using 1 key after note. Insert a rest ‘r’ using 7 key.
Scroll left/right using the * and # key.
Tones / IMGS
57

Phonebook
>
Creating a Phonebook Entry
You can store a list of names and phone numbers in your
phone’s electronic phonebook. Each memory location from
01 through 100 can store three numbers, a ringer ID and
one name associated with them. For a single contact, you
can store multiple numbers – for home, office, mobile.
Entry’s Name
Entry’s Phone Number
Type
Home
Office
Mobile
To create an entry:
Action
Phonebook
Enter the phone number you want to store, then press
( ). You can store up to 32 digits per phone number
entry.
Or, Press ( ) scroll to Phonebook and press ( ) .
Scroll to
Scroll up to the name item and press ( ) or number
keys to enter a name. In the same way, enter a number
item.
Entering text methods (iTAP) are explained on page ??.
58
Add New Entry
Name :
No.: 123456....
Type:Home
DONE
Speed Number
Ringer ID
in the menu list and press ( ).
<
CHANGE
Entries with a speed dial
number from 1 to 100
are stored on your

Action
Now scroll down to the type item and choose the
number type (home, mobile, office). Press ( )
left or
right to change the type or press ( ) and select one
from the list.
None
Default speed no. is
, you can press ( ) and
select the displayed number or you can press ( ) to
erase the displayed number and enter a new number
and press ( ).
Scroll down to Ringer ID item. Default Ringer ID is
None
.
Press ( ) left or right to change the Ringer ID or
Press ( ) and select a Ringer ID from the list.
Scroll down to Email item. Press ( ) or number keys
to enter an email address.Entering text methods(iTAP)
are explained in page ??.
---More---
Scroll down to
.
If you want to save another number for this entry press
( ) and you see new input fields for one more
number. If name and number are not entered, ‘
number required
’ warning message is displayed.
Name and
Edit the fields as above. You can add total three
numbers for one entry. If you try to add more than three
numbers, a warning message ‘
Can’t add field any more
’ is
displayed.
If you do not want to save another number and you are
done, press ( ).
Phonebook
59

Action
You see
Duplicated Name
or
Duplicated Number
name is the same as one already stored. When
Prompted
Store anyway?
( ) to store or select
Select
Yes
by pressing
No
by pressing ( ) to go
back and re-edit the entry.
Phonebook
if the number or
60

Finding a Phonebook Entry
You can locate a phonebook entry by the name stored with
that entry or by the entry’s location number (01 through
100), or by the entry’s speed dial number (01 through 300).
Find Name :
EXIT
FIND
Finding by Name
Action
Press ( ), scroll to
Name
from the menu list.
Enter the letters of the name you are finding, and press
( ). You can also press ( ) without entering any
letters.
Your phone displays the list of all the entries matching
the letters you entered. (sorted alphabetically). If you
haven’t entered any letters in the previous screen your
phone shows all the entries in the phonebook sorted in
alphabetical order. If no name is found matching the
letters you entered, you see
can enter the letters again.
Scroll to the name of the entry you want. Or Press the
key with the first letter of the name you want. (If no entry
beginning with that letter is found, you see “
xx being the letter you entered.)
Press ( ) to view the details of the entry.
Press ( ) to edit it.
Phonebook
and press ( ). Select
No Matched Name Found
and you
No xx’s Found
Find
”,
Phonebook
61

Action
New
: Insert the new phone number.
Edit
: Edit the selected number.
Delete
: Delete the selected number.
Send Message
: Send a message to the
selected number
Set Primary No
: Changes the primary
no.
Add Digits
: Add digits to the number.
Attach Number
Sort
: Attach to other stored number.
: Sort the phonebook list by name or by location.
Phone Book Menu
New
Edit
Delete
Send Message
Set Primary No.
Add Digits
Attach Number
Sort
Press ( ) to dial the entry.
Or Press ( ) left/right to select another number (for
example office or mobile) in the same entry.
Finding by Location
Action
Press ( ), scroll to
Phonebook
Select
Find Location
Enter the number of the position you are finding, and press ( ).
You can also press ( ) without entering any location numbers.
Your phone displays the entry stored at that location with a list of all
the entries in your phonebook. If you haven’t entered any number
location 01 is displayed. If there is no number stored at the location
you entered, you see (
entered), and you can enter the location number again.
Phonebook
from the menu list.
and press ( ).
xx Not Found, xx
being the location you
62

Action
Press the number key one time and the entry at that 1-digit location
is displayed. Press the second number key within 1.5 seconds and
the entry at that 2-digits number’s location is displayed. If there is no
entry at that location you see (
xx Not Found, xx
being the location you
entered.)
Press ( ) to view the details of the entry.
Press ( ) to dial the entry.
Or Press ( ) left right to select another number (for example
office or mobile) in the same entry.
Finding by Speed Dial
Action
Press ( ), scroll to
Phonebook
and press ( ).
Select Speed Dial from the menu list.
All the numbers with valid
speed dial
numbers are displayed,
sorted in speed number order.
Press a number key and the number with that
speed dial
number is highlighted. Press the second number key
within 1.5 seconds and the number with that 2-digit
speed dial number is highlighted. Same with the 3-digit
speed number.
Phonebook
63

Phonebook Option
You can access
when you are in phonebook list or detailed view.
phonebook option menu by pressing ( )
New
Refer to “Creating a phonebook entry”.
Edit
Editing the selected entry. The procedure is the same as
“Creating a phonebook entry”.
Delete
Deleting the selected entry. If you delete from the list,
whole entry is deleted.
If you delete from the detailed view, only the number
showing on screen is deleted.
Send Message
Sends message to the selected number or email. Refer to
SMS manual.
Set Primary Number
Phonebook
Changes the
Number
Action
Shows a list of all numbers stored in the selected entry.
Scroll to the number you want to set
().
Now the
first when the list is displayed.
primary number
is the number that is displayed initially on the list.
primary number
for the selected entry.
primary
, and press
is changed. This number will show
Primary
64

Add Digits
Shows the number you selected on the screen, you can
to the number and store it or call it as you wish.
digits
Attach Number
Attach another number to the selected number
Action
Attach Number shows a list (Phonebook/Outgoing calls/
Incoming calls) you can choose the number to attach
from. Scroll to the list you want, press ( ).
You see all the numbers from the list you just selected.
Scroll to the number you want to attach and press
( ) again.
Now two numbers (the number you originally selected
before pressing ( ) and the number you just selected
from the list) are attached and displayed on the screen.
.
Sort
Sort the phonebook list by name or by location.
Action
Scroll and press ( ). Once you change the order, the
list will be sorted in this order whenever you access the
phonebook.
add
Phonebook
65

Speed Dial
You can assign or remove
number.
Action
Press ( ), scroll to Phonebook and press ( ).
Select
Speed Dial
All the numbers with valid
sorted in speed number order. And empty
slots are displayed with space in the list.
When empty slots are highlighted, ( ) will be
key and when slots with entries are highlighted ( )
REMOVE
will be
from the menu list
key.
Speed Dial No.
speed dial numbers
for each phone
.
are displayed,
Dialing a Phonebook Entry
To call a number stored in your phonebook:
Action
Retrieve the desired number.
Finding a Phonebook Entry
(See “
Phonebook
Press ( ) to call the number.
” on page ??.)
Speed Dialing
Speed Number
BROWSE
To call a phonebook entry by pressing its speed dial no.
Action
Entering a 1,2, or 3 digit speed dial position number, then
( ) followed by ( ).
66

Action
Pressing the ( ) key before pressing ( ) will show
the view detail of the phonebook entry.
Example: Press ( ) ( ) ( ) ( ) to dial
phonebook entry 22.
Turbo Dialing
To call phonebook entries with by one touch.
Action
To call phonebook entries with speed dial position
number1 through 9, press and hold numeric keys 1 to 9
for 1.0 seconds and number is dialed without pressing
( ) key or ( ) + ( ) key.
Example: Press
phonebook entry with speed number, 2.
In addition, you can also call phonebook entries
with speed dial position number,10 through 100,
by pressing the 1st digit and pressing hold the 2nd
digit or 3rd digit.
Example: Press
seconds to dial phonebook entry with speed
number, 21.
()
for 1.0 seconds to dial
()
and hold ( ) for 1.0
Phonebook
67

Editing a Phonebook Entry
Action
Retrieve the desired number. (See “
on page ??.)
Press ( ) and when the details are displayed, press
( ) again to begin editing.
Or, Press ( ) and scroll to
and press ( ).
Modify the number, modify the name, type, speed no.,
ringer id as desired. Editing each field is similar to
adding new entry.
Press ( ) to save and exit.
Finding a Phonebook Entry
Edit
in the option menu list
Viewing My Number
You can see your phone number.
Action
Press ( ), scroll to Phonebook and press( ). Scroll
Phonebook
My phone #
to
Press ( ) to exit. Or wait for time-out and exit
automatically.
in the menu list and press( ).
”
68

Checking Phonebook Capacity
You can see how much memory space remains for storing
phonebook entries on your phone.
Action
Press ( ), scroll to Phonebook and press( ). Scroll
Phonebook Status
to
Press ( ) to exit. Or wait for time-out and exit
automatically.
in the menu list and press( ).
Erasing All Entries
To erase all entries in your phonebook:
Action
Press ( ), scroll to Phonebook and press ( ). Scroll
Erase Phonebook
to
You see a prompt for the lock code. Enter the 4-digit lock
code you set up (Changing your lock code in page 100).
Press ( )
If the lock code is correct, you select to
() or
If the lock code is not correct, you see
you can enter again.
in the menu list and press ( ).
No
by pressing ( ).
Yes
by pressing
Invalid Lock code
, and
Phonebook
69

Messaging
SMS
You can send text messages and receive alphanumeric
messages with your wireless phone.
Sending a Text Message
Find the Feature
Action
Enter the destination phone number and press ( ).
You can enter up to 10 destination numbers. After each phone
number enter, press
number
Enter the message contents, and press ( ).
Enter a call back number and press ( ).
(Your number is automatically entered as the call back number.)
Scroll to the desired priority level and press ( ).
Select ( ) (
then proceed to step 6 to send the message immediately.
Messaging
Or
Select ( ) (No), then proceed to step 7 to select save or
not.
Or
Select ( ) (
time or deliver time.
() (up or down
Yes
) about question, Send Message Now?,
Menu
), then proceed to step 8 to set validity
>
Messaging
New message
>
>
SMS
), then enter another
70

Action
The message is sending
- If the message is sent successfully, “
Message sent
” is displayed
and the phone returns to the previous menu. The sent message
is automatically stored in
Sent Folder
- If the message is not sent successfully, “
Press ( ) or ( ) to select
successful, the message is automatically stored in the
.
Retry?
” is displayed.
Yes
or No. If the resend is not
Outbox
.
Scroll to the save option and press ( ). If you save the
message, the message is stored in the Draft folder.
Scroll to time setting and press ( ). Then you can set validity
time or deliver and press ( ). You return to step 5.
Receiving a New Message
When you receive a
message, your
phone:
- Beep or vibrates
- Displays the ( ) indicator
- Displays
Message!
- Displays a call back number, if
induded
if the received number matches the
number of a phonebook entry, the
name for that entry is displayed
instead of the call back number.
Back
If you press ( ) (
) in the message dialog state,
you return previous state.
Incoming messages are stored in the
store up to 20 messages.
Inbox
. The Inbox can
Messaging
71

Viewing Messages
Find the Feature
Action
Press ( ) (up
or
down
message headers.
To select a message and view its contents,
press ( ).
up or
Press ( ) (
text. Press ( ) (
down
left or
message text.
Your phone displays the message text, where you can see
( ). If you press ( ), you see option list that depend on Box
or Folder. In the message text display, you can:
Press To
>
Call
>
Reply
>
Edit
Messaging
>
Forward
>
Resend
>
Store number
>
Goto
>
Messaging > SMS
Inbox (or Outbox or Sent Folder
>
or
Draft Folder)
) to scroll through the list of
) to scroll through the message
right
) to scroll through the list of
call [I, O, S, D]
send message using callback number [I]
edit message which is saved [O, D]
send message with same text to someone [I,
O, S, D]
send failed message again [O, S]
store callback number to phonebook [I]
Access URL if the message text include URL
[I]
72

Press To
lock Message or Unlock Message [I,D]
erase the message [I, O, S, D]
erase the box or folder [I, O, S, D]
, [S]
Sent Folder
, [D]
Draft Folder
)
([I]
>
Lock, Unlock
>
Erase
>
Erase Box
Inbox
, [O]
Outbox
Setting Up SMS
Find the Feature
Overwrite:
User can select overwrite option when inbox (or sent folder)
memory buffer is full, phone can overwrite or cannot
receive(or cannot send).
Reminder:
Messaging alerting is selectable to:
- once
- repeat alert (every 2 minutes)
- release.
Erase All Folders:
If user selects Erase All Folder, All messages in the inbox,
outbox, sent folder, and draft folder are deleted.
Delivery Acknowledgment:
If you want to receive delivery acknowledge when you send
SMS message, select “Yes”.
If you want to receive user acknowledge when you send
SMS message, select “Yes”. (Flex Option)
Messaging
>
>
SMS
>
Setting
Messaging
73

WAP Alerts
You can receive a WAP message and see it.
Viewing WAP messages
Find the Feature
Action
Press ( ) (up
message headers.
Erase
Press
Press Check(V) to connect a site.
or
down
to erase the WAP message.
>
Messaging
>
WAP Alerts
) to scroll through the list of
Voicemail
You can listen to your voicemail messages by calling
your network voicemail phone number. Voicemail
032380o
messages are stored on the network-not on your phone.
Receiving a New Voicemail Message
When you receive a voicemail message, your phone displays
( ) (voice message waiting) and
If you press
voice message.
Messaging
()
in the voice mail dialog state, you can listen to
Listening to a Voicemail Message
Find the Feature
You can view voice mail. If you press
voice mail sever number. If you press
the call back number of the voice mail.
74
New Voicemail.
Messaging
>
Call Voicemail
>
()
(),
>
Voice Mail
, your phone dials the
your phone dials

Clearing Voicemail Icon
Find the Feature
You r phone clear ( ) (voice message waiting).
Messaging
>
Clear Icon
>
>
Voice Mail
Storing Your Server Number
Find the Feature
You can change or view server number.
Press To
Edit
()
Keypad keys
OK
()
Messaging
>
Server Num
>
Start editing
Enter your server number
Store the number
>
Voice Mail
Quick dial
Calling Quick Dial
Find the Feature
You can press ( ) >
your phone. If there is no number, you can set your quick
dial numbers.
Quick Dial
Quick Dial
>
to dial preset numbers on
Messaging
Change Quick Dial
You can press ( ) >
numbers.
Quick Dial
Delete Quick Dial
You can press ( ) >
numbers.
Quick Dial
> ( ) to change quick dial
> ( ) to delete quick dial
75

Office Tools
Datebook
General Description
The Datebook application is a calendar that allows the user
to schedule and organize events such as appointments
and meetings. The Datebook also is able to show when
events exist in a view that shows an entire week. Due to
limited space on the display, the view showing events
during a week is targeted at showing how full each day's
schedule is during that week and making it easier to
navigate from dayto-day in the calendar.
Find the Feature
Press To
Scroll to the day.( ) ( )
View the day in Week View or the event in
VIEW
()
up
or
down
* Respond to event reminder : When an event reminder
displays you can press
EXIT
( ) to dismiss the reminder
Day View
including the day of week, time, title, duration,
alarm time, and repeat cycle)
View the previous/next event detail
Open the datebook menu to perform other
procedures as described in the following list.
Office Tools > Datebook
>
view the event detail(an event
VIEW
( ) to view the event, or
Office Tools
76

The Datebook menu can include the following options:
Option Description
Brings up the Week View including today's date if
Go to Today
in Week View. If in Day View or the Event
Information View, brings up the Day View for today
New
Edit
Delete
Brings up a selection list
Brings up the Event Form with data associated with
the selected event
Deletes selected event
Option Description
Setup
Option Description
Determines the beginning time for
Daily Begin
the 12-hour time window shown in
the Week View
The user can determine how long
Datebook data is kept in the
Delete After
phone's memory. The default will
be for events to be deleted that
were listed on a date more than 4
weeks prior to today.
77
Office Tools

Alarm Clock
You can set your phone to alert you at a specific time like
an alarm clock.
Find the Feature
Press To
Scroll to the alarm list
Office Tools
>
>
Alarm Clock
ENABLE ( )
DISABLE ( )
Snooze ( )
(It is available
function when
alarm ringing
message show
up.
alarm ringing time : 3 minutes
Respond to alarm : To stop ringing alarm, Press any key.
The Alarm Clock menu can include the following options
Option Description
New
Edit
Delete
Delete All
Enable or disable alarm
Specified the 90 minute rule for “Alarm-Snooze”
cycle applies when there’s no user Interaction.
Open the alarm clock menu to perform other
procedures as described in the following list
Brings up Alarm Clock form.
Brings up the Alarm Form with data from selected
alarm
Deletes entry
Deletes all alarms in the Alarm Clock list
.:
Office Tools
78

Calculator
Find the Feature
The Calculator allows you to calculate simple mathematical
equations. You can add, subtract, multiply, divide, convert
and currency .
The following “buttons” will be available:
Press To
# Insert a Decimal Point
C Clear All Digit
E Clear One Digit
= Calculate the Answer
+Add
- Subtract
X Multiplie
/Divide
$ Convert Currency
Convert Currency Menu
Left/Right Scroll
Office Tools
>
>
Calculator
79
Office Tools

Access Calculator
Find the Feature
Calculator
0
S C E = + - x /
EXIT
SELECT
Office Tools
>
>
Calculator
>
down key
Calculator Rules
1
Upon entering the Calculator, the “+” symbol will be
highlighted.
2
The line under the title “
numbers entered and the calculation.
3
The Calculator display always starts with a default value of
zero.
4
A right arrow next to the calculation symbols indicates that
additional items can accessed by scrolling right.
5
A left arrow next to the calculation symbols indicates that
additional items can accessed by scrolling left.
6
SELECT is used to choose the current calculation symbol that
is highlighted
7
The value entered may not exceed 8 digits and 2 decimal
point.
- Any digit entered after the eight digit shall be ignored.
- Any decimal points entered when one decimal point is
already being displayed shall be ignored.
8
The largest valid number that can be expressed shall be
“99999999”. Any number larger than “99999999” shall be
ignored.
Calculator
” will be the area to display
Office Tools
80

9
The smallest valid number that can be expressed shall be
“-99999999”. Any number smaller than “-99999999” shall be
ignored.
Each digit entered using the keypad will be inserted at the
left end of the line, causing preceding digits to shift one
position to the right, unless only “0” is displayed.
If “0” is displayed, then the first digit entered will replace “0”.
“0” is only shifted to the right by one if “.” is selected.
“.” must always be preceded by a digit.
1. The result of digits entered and a command selected will
be displayed in the
Display Window
(left justified).
2. The result of one calculation can be used with another
command for a different calculation.
3. If another operation is pressed before any digits are entered,
the most recent operation shall be ignored.
4. Example: The following was entered: 5, +, -, -, *. The error
tone sounded.
LEFT/RIGHT MOVE
5.
allows you to move around the calculator to
highlight a desired calculation symbol.
6. SELECT chooses the highlighted calculation symbol.
81
Office Tools

Using the Calculator
(Addition, Subtraction, Multiplication, Division)
Entering Value
The following example shows how to calculate the sum of
“1234+56789”.
Number appears left justified in the
Display Window. Highlight defaults
“
Plus
to the
” sign.
After you enter digits press left
equals
arrow, to highlight to “
” sign to
calculate the digits.
Calculator
1234
S C E = + - x /
EXIT
Calculator
1234+5678
S C E = + - x /
EXIT
SELECT
SELECT
User continues with a new
calculation
.
The example of maxium input
cipher(The priority of the
calculation is calculated in
accordance with the sequence of
data input. It's because it doesn't
offer parenthesis). Other
operations will be done in the same
way.
Calculator
58023
S C E = + - x /
EXIT
123+456+79-234+23+1
234x567.8/25
S C E = + - x /
EXIT
SELECT
SELECT
Office Tools
82

Currency Conversion
Exchange Rate:
1.5000
Find the Feature
DELETE
Calculator
>
>
Menu key
Exchange Rate Select
OK
The Calculator Menu is accessible by pressing MENU from the
calculator.
The exchange rate editor is identical to the currency number editor.
- the value entered can have up to five digits before the
decimal.
- the value entered can have up to four digits after the
decimal.
- the value shall be followed by nothing.
Converting the Displayed Number
Set the exchange rate to 1.5, enter
a number in the calculator display,
and then scroll to $ to convert the
number.
Calculator
6
S C E = + - x /
EXIT
SELECT
When you select the currency converter symbol the
displayed number is multiplied by the exchange rate.
83
Office Tools

World Time
General Description
User can view a world-time of the city to want.
Find the Feature
Press To
Up
(left) or
EXIT ()
The city which the summertime is applied is marked by the
daylight icon ( ).
Down (right) Scroll to the world-time list
Office Tools
>
End the world-time session and
return to the office tools menu.
>
World Time
Stopwatch
The stopwatch allows you to measure time.
Find the Feature
Press To
START ( )
STOP ( )
RST ( )
SPL ( )
REL ( )
EXIT ( )
Start the stopwatch
Stop the stopwatch
Reset the stopwatch timer to 00:00:00
Split the stopwatch timer
Release the stopwatch timer
End the stopwatch session and return
to the office tools menu
Office Tools
>
>
Stopwatch
Office Tools
84

Setting Up Your Phone
SOUNDS
VOLUME
RINGER VOLUME
You can adjust the volume of your phone’s ringer.
Find the Feature
Press To
Select the feature
Select ()
Silence All
3~5 High & Vib Escalating
• Silence All
• Ringer Off
• Vibrate
• Ring 1~5
volume level.
• High & Vib
after High volume level
• Escalating
changes from 1 to 5.
Ringer Off
:
When you receive a call, your phone ringing silence.
:
When you receive a call, your phone silence.
:
When you receive a call, your phone vibrate.
: When you receive a call, your phone adjust ringe
: When you receive a call, your phone is 3 vibrate
: When you receive a call, your phone ringer level
Save it
Vibrate
Settings
>
Ringer Volume
>
>
Sounds
RINGER VOLUME
1
>
Volume
2
r
Setting Up Your Phone
85

VOICE VOLUME
You can adjust your voice volume.
Find the Feature
Settings
>
Voice Volume
>
Press To
Adjust your voice volume.
Select ()
Save it
KEY BEEP VOLUME
You can adjust your key beep volume.
Find the Feature
Settings
>
Key beep Volume
>
Press To
Adjust your key beep volume.
Select ()
Save it
Setting Up Your Phone
>
>
Sounds
Sounds
>
>
Volume
Volume
86

RINGER TYPE
PREDEFINED
After you choose a style, your phone will give you a brief
sample of your new alert sound.
Find the Feature
Settings
>
Predefined
>
>
Sounds
>
Ringer Type
Press To
To scroll the ringer styles.
As you scroll, your phone will give an
audible sample of the currently
displayed style.
Save it
Select ()
To Select the displayed option ->
Ring 10 (Default : air)
MY TONES
You can download up to 14 ringer tones over the network.
Find the Feature
Settings
>
My tones
>
>
Sounds
>
Ringer Type
Press To
To scroll the ringer styles.
As you scroll, your phone will give an
audible sample of the currently
displayed style.
Save it
Select ()
To Select the displayed option ->
My Tones 10
Setting Up Your Phone
87

ALERTS
SERVICE
When Service Tones are On, you will be instantly alerted to
any change in your wireless service.
Find the Feature
>
Settings
>
Sounds
>
Alerts
>
Press To
Up or
down
Select ()
Select “ON” or “
Save it
OFF
”
MINUTE BEEP
If the Minute Beep is set to on, an audible alerts when a
minute was passed in call.
Find the Feature
Settings
>
Minute Beep
>
>
Sounds
>
Alerts
Press To
Up or
Setting Up Your Phone
Select ()
down
Select “ON” or “
Save it
OFF
”
VOICEMAIL
When you receive a new voice mail, your phone alert is
repeat until user check this.
Find the Feature
Settings
>
Voice Mail
>
>
Sounds
>
Alerts
Service
88

Press To
Up or
down
Select ()
Select 1beep~3beep
Save it
MESSAGE
When you receive a new message, your phone alert is
repeat until user check this.
Find the Feature
Settings
>
Message
>
>
Sounds
>
Alerts
Press To
Up or
down
Select ()
Select 1beep~3beep
Save it
CALL LOST
If the Call Lost is set to on, an audible alerts when the
current call is dropped because of signal fade.
Setting Up Your Phone
Find the Feature
Press To
Up or
down
Select ()
Select “ON” or “
Save it
Settings
>
Call Lost
>
OFF
>
”
Sounds
>
Alerts
89

DATEBOOK
Find the Feature
Settings
>
Datebook
>
>
Sounds
>
Alerts
Press To
Up or
down
Select ()
To scroll the feature “Ring1~9” and
“Vibration”
Save it
TONE LENGTH
Your phone transmits tones to communicate with
automated systems like Voice Mail or bank by phone.
These tones are called Dual Tone Multi-Frequency (DTMF)
tones. This feature allows you to control the duration of the
tone when a key is pressed. For most systems, you should
use the default setting of short tones, which sends the
tones for a preset length of time. If you choose long tones,
your phone will transmit the tones for as long as you press
and hold the key.
Find the Feature
Setting Up Your Phone
Press To
Up or
Select ()
down
Settings
>
Sounds
>
>
Tone Length
Select one of the options
Save it
Long, Short, None
90

Display
Adjusting the Backlight
You can set the amount of time that the display backlight remains
on, or turn off the backlight to conserve battery power:
Find the Feature
Press To
Up or down
SELECT ( )
BACK ( )
Select one of the options (
Always off, 8Seconds, 15Seconds
Confirm your selection
Return to the previous menu
Settings
>
>
Display
>
Backlight Control
Continuous,
)
Adjusting Display Contrast
Contrast control will give the ability to fine tune the contrast
of the display. Adjusting the “Contrast” setting follows the
standard meter settings. Three bars on the contrast meter
is the default factory contrast setting.
Find the Feature
Press To
Up(right) or
down(left)
SELECT ( )
EXIT ( )
Adjust contrast Level 1~6
Confirm your selection
Return to the previous menu
>
Settings
>
Display
>
Contrast
Setting Up Your Phone
91

Selecting a Screensaver Timer
You can set a picture or an animation as a screen saver
image. The image displays when the phone detects no
activity for a specified time. The screen saver image is
shrunk to fill the display, if necessary. An animation repeats
for 5 times, then the first frame of the animation displays.
Find the Feature
>
Settings
>
Display
>
Screensaver Timer
Press To
Up or down
SELECT ( )
BACK ( )
Select one of the options (
2minutes, 5minutes, 10minutes
Confirm your selection
Return to the previous menu
Off, 1minute,
)
Time and Date
Adjusting Time Format
You can change the value of the Format field. Available
values are shown using a fixed format time.
Find the Feature
Setting Up Your Phone
Settings
>
Time and Date
>
>
Display
>
Time Format
92
Press To
Up or down
SELECT ( )
BACK ( )
Select to :
Confirm your selection
Return to the previous menu
12hrs AM/PM, 24hrs

Adjusting Date Format
You can change the value of the Format field. Available
values are shown using a fixed format date.
Find the Feature
Settings
>
Time and Date
>
>
Display
>
Date Format
Press To
Up or down
SELECT ( )
BACK ( )
Select to :
Confirm your selection
Return to the previous menu
DD/MM/YY, MM/DD/YY
Color Style
You can select the color palette that your phone uses to
display indicates, highlights, and softkey labels.
Find the Feature
Press To
Up or down
SELECT ( )
BACK ( )
Select to :
Dusk, Gray
Confirm your selection
Return to the previous menu
Settings
>
Display
>
>
Pacific, Mandarin, Evergreen, Autumn,
Color Style
Setting Up Your Phone
93

Security
Unlocking Your Phone
At the Enter Lock Code prompt:
Find the Feature
Press To
Keypad keys
OK ( )
CANCEL ( )
Note:
The unlock code is originally set to 1234 by Motorola.
Your service provider may have changed the lock code to the
last four digits of your phone number or for a specified 4-digit
code. In this case please contact your cellular phone operator
to get the correct unlock code.
Enter your 4-digit unlock code. The
unlock code is originally set to 1234.
Unlock your phone
Return to the previous menu
Locking and Unlocking Your Phone
You can lock or unlock your phone manually, or set your phone
to lock whenever you turn it off. A locked phone still rings or
vibrates for incoming calls or messages, but you must unlock it
to answer. To use a locked phone, enter the unlock code. You
Setting Up Your Phone
can make emergency calls on your phone even when it is locked.
>
Settings
>
Security
94

Locking Your Phone Manually
Find the Feature
>
Settings
>
Security
Lock Phone> Lock Now
>
>
Enter Unlock Code
Press To
SELECT ( )
BACK ( )
Confirm your selection and then lock the
phone
Return to the previous menu
Unlocking Your Phone
Press To
Keypad Keys
OK ( )
Enter your 4-digit unlock code.
The unlock code is originally set to 1234.
Unlock your phone
Setting Your Phone to Lock Automatically
You can set your phone to lock every time you turn it off.
Setting Up Your Phone
Find the Feature
Press To
up or down
SELECT ( )
BACK ( )
Select to :
Power-up)
Confirm your selection
Return to the previous menu
Settings
>
>
Enter Unlock Code
>
Lock on Power-up
Security
or
>
Lock Phone
Unlock (Unlock on
95

Changing Your Phone’s Code
Your phone’s 4-digit unlock code is originally set to 1234.
Your service provider may reset these numbers before you
receive your phone. If your service provider has not reset
these numbers, we recommend that you change them to
prevent others from accessing your personal information or
modifying your phone settings. The unlock code must
contain 4 digits. To change a code or password:
Find the Feature
Press To
Keypad keys
OK ( )
Keypad keys
OK ( )
CENCEL ( )
Setting Up Your Phone
Enter your 4-digit new lock code.
To confirm new lock code, Try again!
Re-enter 4-digit new lock code
Change the lock code
Return to the previous menu (change
DELETE if you input digit)
Settings
>
>
>
Change Lock Code
Security
>
Enter Unlock Code
96
Restricting Calls
You can restrict outgoing calls by setting different phone
service levels.
Setting Description
The following functions are restricted:
- Dialing with the keypad
- Calling from the phonebook or from
Level 1
Level 4
call logs
- Saving a new number in the
phonebook
- Viewing the last call list while the
phone idle.
Release call restrictions imposed
BY LEVEL 1
Setting Up Your Phone
Find the Feature
Press To
up or down
SELECT ( )
BACK ( )
Scroll to :
Confirm your selection
Return to the previous menu
Settings
>
>
Level 1
>
Enter Unlock Code
or
Level 4
Security
>
Call Restriction
97

Limit Use
Lock Application
Locking Call History
You can lock or unlock call history.
Find the Feature
Press To
up or down
SELECT ( )
BACK ( )
Scroll to Lock or Unlock
Confirm your selection
Return to the previous menu
Locking Phonebook
You can lock, unlock and view only phonebook.
Find the Feature
Setting Up Your Phone
Press To
up or down
SELECT ( )
BACK ( )
Scroll to:
Confirm your selection
Return to the previous menu
>
>
>
>
>
>
Lock
Unlock
View Only
Settings
Limit Use
Call History
Settings
Limit Use
Phone Book
>
Security
>
Lock Application
>
Security
>
Lock Application
>
Enter Unlock Code
>
Enter Unlock Code
98

Locking Messaging
You can lock or unlock messaging.
Find the Feature
Settings
>
Limit Use
>
>
Messaging
Press To
up or down
SELECT ( )
BACK ( )
Scroll to
Confirm your selection
Return to the previous menu
Lock
or
Unlock
>
Security
>
Lock Application
>
Enter Unlock Code
Locking Datebook
You can lock or unlock datebook.
Find the Feature
Settings
>
Limit Use
>
Press To
up or down
SELECT ( )
BACK ( )
Scroll to
Confirm your selection
Return to the previous menu
Lock
or
>
Security
>
Lock Application
Unlock
>
Enter Unlock Code
>
Datebook
Setting Up Your Phone
99
 Loading...