


APPLICANT: MOTOROLA, INC. FCC ID: IHDT5CK1
INSTRUCTION MANUAL
A preliminary draft copy of the Users Manual follows:
EXHIBIT 8

Thanks in deed for purchasing this cellular phone of Motorola which takes pride in its world-best radio communication
technology.
All of the Motorola cellular communication equipment are designed and manufactured in compliance with the in-house
strict standards and international standards, and especially, they are subjected to stringent quality tests in connection
with temperature, humidity, impact, dust, vibration, and drop before being released.
We assure you that this Motorola phone manufactured through these processes gives you high quality satisfaction.
Thank you again for selecting our products, and hopefully you would succeed in your business with your Motorola V720.
◈ Any content of this manual and any function of this product are subject to change accordingly.
◈ We suggest that you set your phone to vibration mode at a public place in order to observe right manners in
using the phone.

Each digital wireless phone manufactured and supplied by Motorola has its own ESN (Electronics Serial Number).
Removal or change of this ESN, or an attempt to reproduce and enter another ESN shall be deemed an illegal act.
Any person who commits such an illegal act shall be sentenced to three years’or shorter penal servitude or fined
10 million won or less pursuant to the related civil laws (Article 4 of Radio Wave Act, Article 4 of Telecommunications
Enterprise Act, and Article 347 of the Criminal Law Act).
In addition, such an illegal act may damage the software built in the phone, with the result that the phone cannot be
used any longer. Thus, customers are required to be careful not to incur any damage due to such an illegal act.
Especially, once such an illegal act is identified, both the free and paid services warranted by Motorola are rejected.
Precautions
■ Do not lend your own phone to other person inadvertently.
■ For repairs or other services, contact our designated service center.
■ If your phone has gotten lost or stolen, immediately report to the relevant telecommunications service provider.
※ This product should not be added with any separate equipment that may cause an alteration to its original
performance as described on type registration.
Read this information carefully before you use the phone, for safe and efficient use.
Exposure to Radio Frequency Signal
Your digital wireless phone is a power radio transmitter and receiver. When it is ON, it receives and also sends out high
radio frequency(RF) energy. International agencies have set standards and recommendations for the protection of
public exposure to RF energy.
●
US FCC Code of Regulations : 47 CFR part2 sub-part J*
●
ANSI IEEE C95.1 (1992)*
●
IEEE C95.1 (1999)*
●
NCRP Report 86 (1986)*
●
ICNIRP (1998)*
Department of Health and Welfare Canada, Safety Code 6 (1999)
Australia Communication Committee, Standard of Wireless Communication for Exposure to Electromagnetic Wave (1999)
* Federal Communication Commission ; American National Standards Institute :National Council on Radiation Protection
and Measurements ; International Commission on Non-Ionizing Radiation Protection
Antenna
Use only the antenna authorized by Motorola. Using an unauthorized antenna may damage your phone, which rejects
the free services offered by Motorola. Do not use the damaged antenna. You may get slightly burned if you touch the
damaged antenna.
Effective Operation
Hold your phone as when doing to the general telephone, with the antenna placed straight over your shoulder.
Speak distinctly to your phone with your mouth placed near the transmitter.
Never touch the antenna during a call. If so, it may degrade call quality and cause the phone to transmit excessive power.
Phone Case
In order to minimize exposure to electromagnetic wave, hold the phone in the case provided or authorized by Motorola.
You may be exposed to excessive electromagnetic wave if you use the case not provided or authorized by Motorola.
If you don’t use the case or when you use the data call, keep the distance of at least 2.5cm between the phone and
your body.
✽ See www.mymotorola.co’for authorized Motorola accessory.
Digital Wireless Phone and Electronic Devices
Most electronic equipment is shielded from high RF signals. However, certain equipment may not be shielded against
RF signals from your wireless phone and cause malfunctions to it.
Aircraft
Switch OFF your phone before boarding an aircraft. The wireless phone could interfere with the electronic navigation
devices of an aircraft.

Pacemaker
The Health Industry Manufacturers Association recommends that a minimum separation of fifteen centimeters (15cm) be
maintained between a wireless phone’s antenna and a pacemaker to avoid potential interference with the pacemaker.
Persons with pacemakers should always use the phone in the opposite side of the pacemaker to minimize interference.
Turn your phone OFF as far as possible.
Hearing Aid
Some types of wireless phone may interfere with a hearing aid.
Other Medical Devices
If you use any other personal medical device, consult the manufacturers of your device to determine if they are adequately
shielded from external RF energy. Turn your phone OFF in health care facilities when any regulations posted in these
areas instruct you to do so. Hospitals or health care facilities may be using equipment that could be sensible to external
RF energy.
Using a Phone While Driving
Abide by the regulations relating to the use of cellular phone while driving. And be
sure to keep the following precautions.
●
Give full attention to driving.
●
Do not use your phone while driving, or use the hands-free kit if required.
●
Pull off the road and park before making or answering a call if required.
Vehicles Equipped with Air Bags
An air bag inflates with great force in a moment. If in-vehicle handsfree car kit is improperly installed and the air bag inflates,
serious injury could result.DO NOT place objects, including both installed or portable wireless equipment or other objects,
in the area over the air bag or in the air bag deployment area.
Explosion site
Turn your phone OFF in a place possibly causing a danger to it or posted ‘Turn Your Cellular Phone OFF’. This is to avoid
interference with the explosive detonating operation. And observe all the instructions and signals posted in these areas.
Danger Zone
Do not remove the battery in the danger zone. Turn your phone OFF. Follow all the instructions and signals in the danger
zone. RF energy equipment could be used on construction sites for detonation of remote explosives.
DO NOT install accessories onto your phone in such areas that a gas/propane leak may occur, fuel or chemical transfer
or storage facilities, and below deck on boats.
Also, DO NOT place any inflammables near in-vehicle accessories for car phone.
Very rarely, however, sparks from your phone or accessories could occur.
When Using the Battery
Caution! If the battery terminal contacts a conductor (key, necklace, etc.), it may cause damage to other objects and injury
such as a burn to a person. When the battery terminal contacts a conductor, the battery becomes a part of the closed
circuit and produces heat, becoming so hot. Handle the charged battery very cautiously. If you want to put the battery
pack in your pocket or bag together with other metal goods, first be sure to store it in the battery case.

V720
I. Before Use
1. Inside the package 9
2. Name and Functions of the Parts 10
3. Icons 12
4. How to Use the Battery Pack 13
5. Precaution 17

1. Inside the Package
Handset
Battery packs
I. Before Use
9 3 0 m A h ( V 7 2 0 )5 5 0 m A h ( V 7 2 0 )
Battery Case
Desktop Charger
User’s Manual
V720·9
I. Before Use
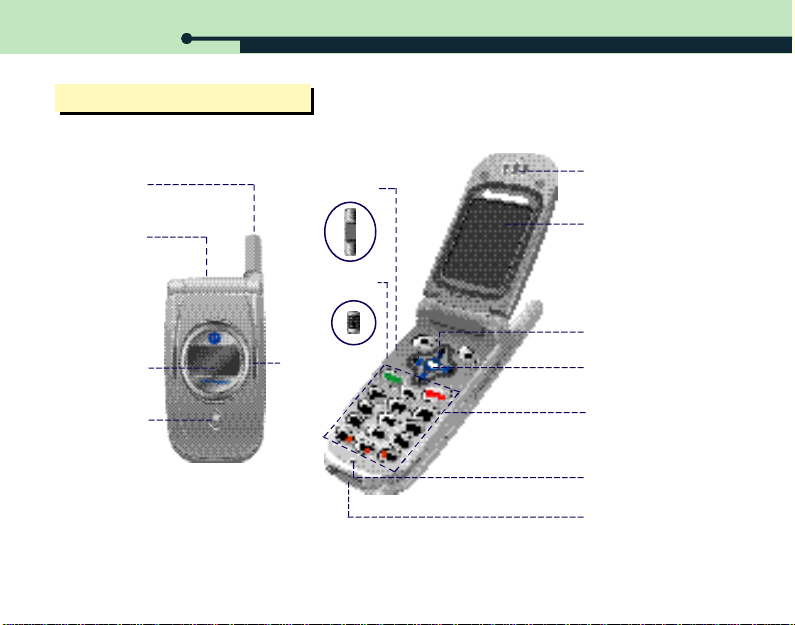
2. Names and Functions of Parts
Antenna
Earmic Jack
External LCD
External Key
10·V720
Volume Button
Record Button
Service Lamp
Earpiece
LCD Screen
Navigation Button
Wap Button
Dial Button
Transmitter
Wireless Data
Communication
Cable Port
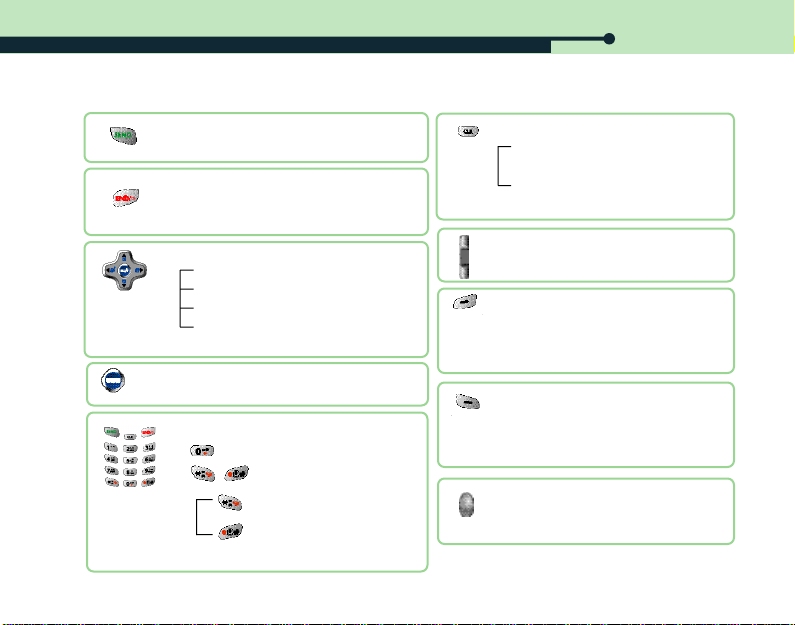
● Makes a call
● Displays the list of calling numbers
● Switches on/off power, and ends the call
● Ends the function and returns to the main
menu
● At standby mode :
Left : UnansCall List
Right : Phonebook Quick Search
Up : Download Manager
Down : Alarm Setting
● At menu mode - Used to search for menua
● Accesses WAP(See P.93)
● Function as [OK] at menu mode
● Dial Button ? Enters figures and characters
● International call speed dialing
● Menu Serch
Etiquette mode setup/release
One-touch lock setup/release
I. Before Use
●
Deletes characters and figures
Press : Deletes a character or a figure
at a time
Press and hold : Deletes all
●
Moves to upper menu or previous screen
●
Searches for list, or adjusts volume
during the call
● Moves to the top menu from the standby
mode
● Functions as the [Option] key at menu and
Msg mode
● Moves to Msg mode from the standby
mode
● Functions as the [Back] key at menu and
Msg mode
● Retrieves voice and short Msg
● Connects a call when using the earmic.
V720·11
I. Before Use
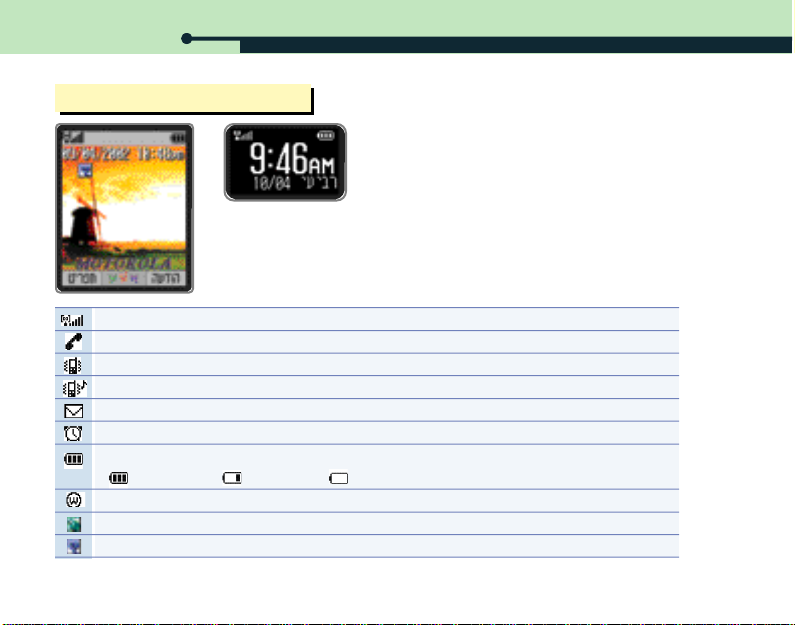
Indicates the signal strength level in the current service area
This symbol is displayed when attempting a call or during a call.
Indicates that the phone is set to the Vib. Only mode.
Indicates that the phone is set to the VibThenBell mode
Indicates that a voice or text Msg has been received
Indicates that alarm has been set to ON. This icon is disappeared if the alarm is released.
Indicates the remaining battery capacity.
Indicates that GoNext is connected.
Indicates that the phone has been locked.
Indicates that the data communication cable is connected.
12·V720
3. Icons
Fully charged Battery low Needs to be charged at once
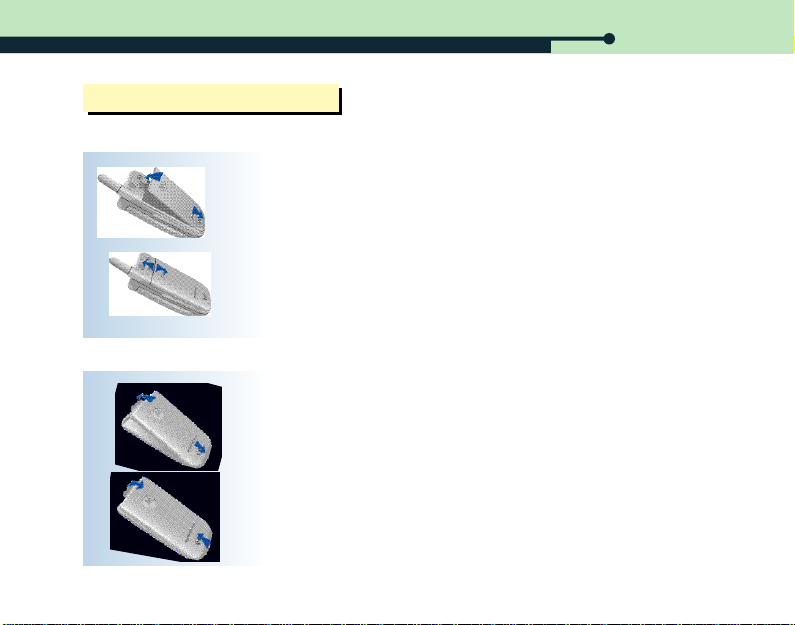
4. How to Use Battery Pack
1. Handset and Battery Pack
②
①
I. Before Use
1. Installing
① Fit the battery pack into the groove on the lower side of the handset.
② Push it all the way in the arrow direction until a ‘click’is heard.
①
②
2. Battery Case and Battery Pack
②
2. Removing
1. Installing
①
①
2. Removing
②
① Push the removal button upward.
② Remove the battery pack in the arrow direction from the handset.
① Fit the battery pack into the groove on the lower side of the battery case.
② Push it all the way in the arrow direction until a ‘click’is heard.
① Lift up the upper part, and then push the battery pack forward.
② Remove the battery pack in the arrow direction from the battery case.
V720·13
I. Before Use
3. Charging the Battery Pack
1. Charging with desktop charging cradle
Be sure to charge the battery pack fully as it is not fully charged when you purchase it.
● Connect the power plug of the desktop charging cradle to the wall socket outlet (220V only)
● To charge both the handset and battery pack, fit the battery pack installed on the handset or the battery case
into the front charging port of the desktop charging cradle and insert the battery pack into the rear charging port.
The cradle charges first the handset fit in the front charging ports. You can charge the battery installed on the
battery case in the front charging port.
● Charging state is indicated by the indicator lamp on the desktop charging cradle.
2. Charging with power cable
● Connect the power cable to the charger (DC power equipment) and connect the power plug to the wall socket outlet.
● Plug the power cable jack into the port on the lower part of the handset.
● The message “Being charged”is displayed on the external screen.
4. Batteru Pack Charging Progress State
Port Stnadby Being charged Charging complete
Front Prot
Rear Port Amber Red Green
<If the lamp blinks in red>
● The charging terminals are not contacted properly. Check to see if the battery pack is clean, and then, make
another attempt.
14·V720
-
Red Green
I. Before Use
● The battery pack has been discharged excessively. The indicator lamp will light up in normal color after a while and
charging operation will be started.
● The battery pack or any other component might be defective. Contact the service center.
<If the lamp is in amble>
● The battery pack is on standby for charging or is being charged in a too hot or cold place
● If you place it in room temperature, the indicator lamp color will change into red and charging operation will be started
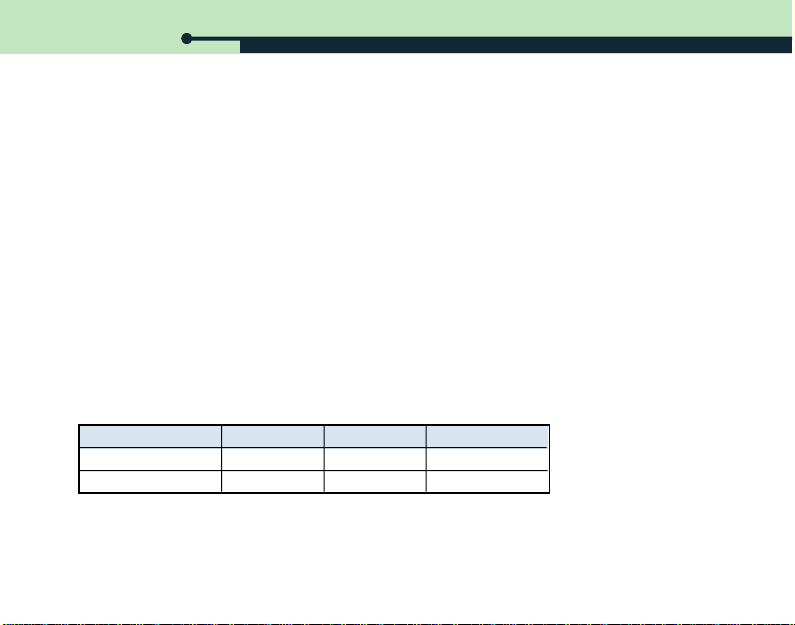
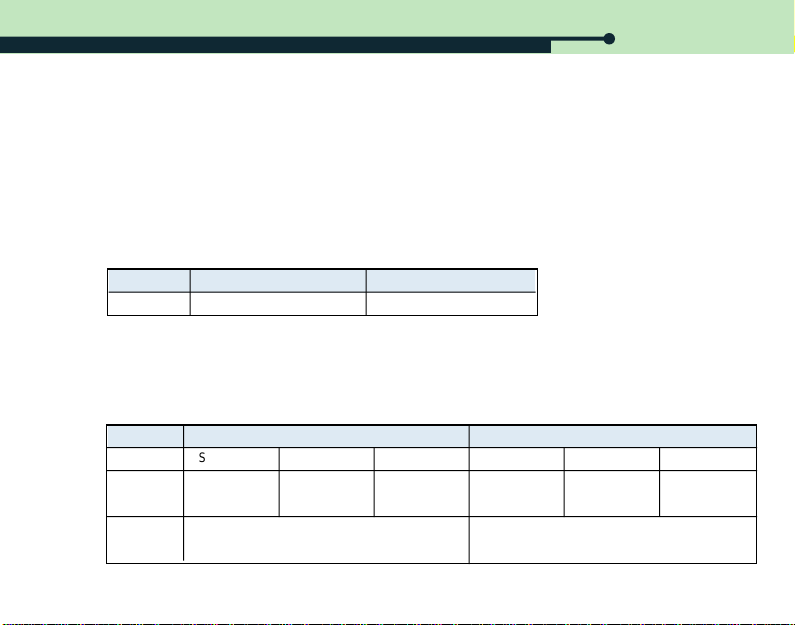
5. Battery Pack Charging Time
Battery type 550mAh(V720) 930mAh(V720)
Approximately 90 min Approximately 150 min Time
● Charging times are subject to change by the battery pack condition.
● The lower the AC power to the adapter, the charging times may become longer.
● Charging is not performed if the ambient temperature is too high or too low. Be sure to charge the battery in room
temperature.
6. Battery Pack Operationg Time
Type 550mAh(V720) 930mAh(V720)
Standard
standby time
Standard
talk time
Slot Mode 0Time
Appex
30~50 hour
Slot Mode 1
Appex
60 ~ 80 hour
Apprx 100 minutes
Slot Mode 2
Appex
90 ~ 100 hour
Slot Mode 0
Appex
50~80 hour
Slot Mode 1
Appex
100 ~ 130 hour
Apprx 170 minutes
Slot Mode 2
Appex
150~170 hour
V720·15

I. Before Use
● Slot mode is varied by service area.
● It takes the same amount of power between receiving and making a call.
● Standby time is reduced by poor coverage.
● Operating time is varied in accordance with charging status, temperature(low/high), coverage, LCD backlit and
keypad backlit.
Slot Mode?
Your mobile phone communicates with the base station at regular intervals and notifies its location to the
base station. This is called ‘Slot Mode’. Standby time is reduced, as the interval gets shorter.
7. Low Battery Charge Indicatior
● When the battery pack is almost consumed, a ‘beep’is sounded and ‘ ’flashes.
● If you continue to use your phone in this state, the power of the phone is turned off. Recharge your phone
immediately.
● If ‘ ’flashes, LCD backlit and keypad backlit may not be on, and the phone may not function normally.
8. How to Manage Battery Pack
● Always use the authorized battery pack and charger. If you install an unauthorized battery pack, the message
‘Warning | Unauthorized Battery’is displayed on the standby screen.
● Using an unauthorized charger may cause damage to the battery pack or may be exploded.
● The battery pack can be exploded if the terminals get short. Always keep the battery with the battery case on.
16·V720

I. Before Use
● Recharge and keep the battery in room temperature. If you recharge the battery in too hot a place (inside the car in
summer or near fire), or in too cold a place, recharging is not done well, and the lamp turns into amber. If you leave
the battery unused for a long time, the operating time is reduced.
● Never put apart the charger and the battery pack, or leave them near fire.
● Keep the charger and the battery pack away from the reach of a child.
● Strong impact or drop of battery may cause reduced battery life.
● Always keep the terminal of the charger and the battery pack clean.
● The battery pack is a consumable good, and its operating time reduces slowly by repeated recharging/discharging.
If the operating time reduces to half, purchase a new battery pack.
5. Precaution
● Always use the authorized, dedicated battery pack and charger. Using an unauthorized battery pack or charger rejects
the services offered by Motorola.
● Never use them in a humid, hot atmosphere. If your phone becomes damp, malfunction may result.
If submerged, it may be beyond repair. NEVER turn the power ON with your phone dampen. Remove the battery pack
and contact the nearest service center for repair.
● Never disassemble or alter your phone. Unauthorized disassembly may reject free service offered by Motorola.
● Use care not to give an impact or vibration to your phone. When not in use, it should be stored in a safe place.
● Avoid touching the antenna or letting it contact any part of your body during a call.
● Avoid cleaning your phone with chemical solutions such as solvent or thinner.
● Always use the authorized handsfree kit. Using an unauthorized kit may result in malfunction. Especially, any product
having strong magnetism can cause direct malfunction to your phone and thus reject the free services offered by
Motorola.
V720·17
V720
II. Basic Operation
1. Power On/Off 19
2. Placing a call 19
3. Receiving a call 24
4. Unanswered call 28
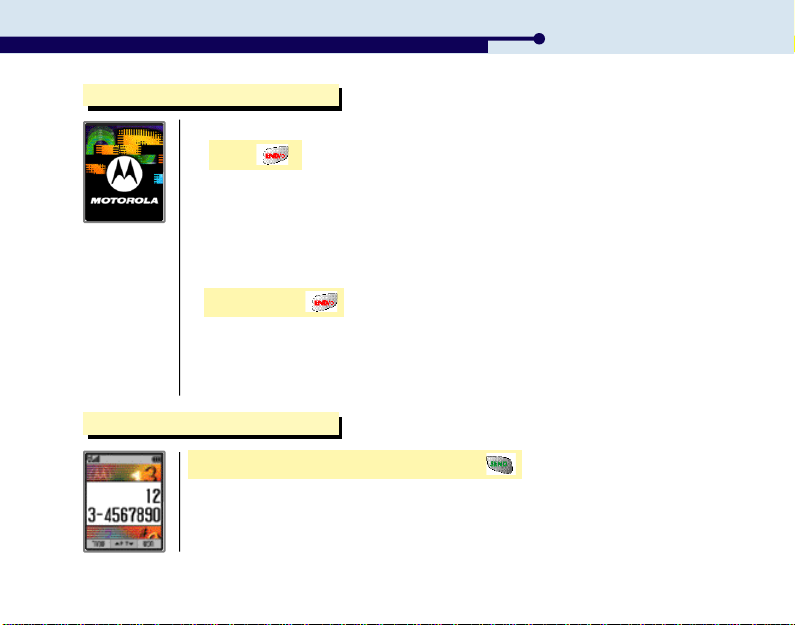
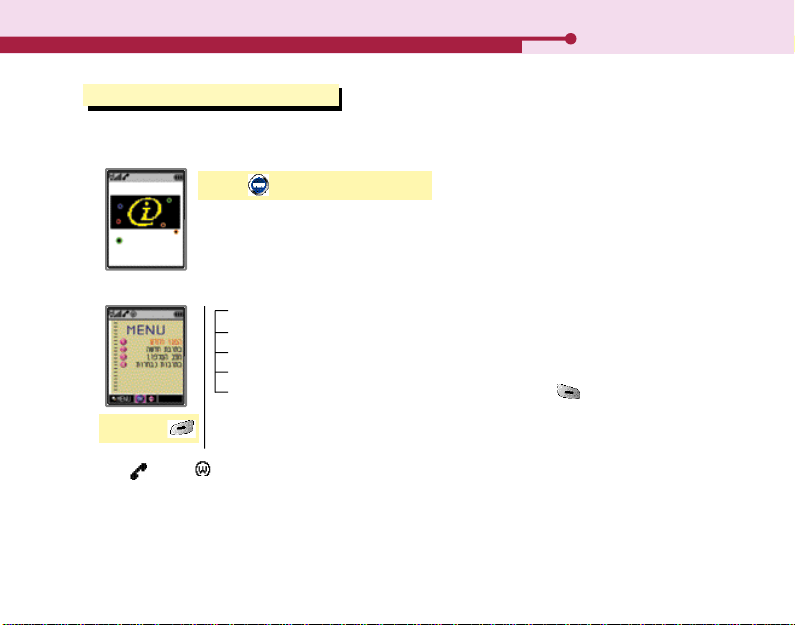
1. Power On/Off
1. Power On
Press
●
The service lamp is on, displaying Motorola logo and user-set graphic. And then, the initial
screen is displayed.
2. Power Off
Press and hold
●
The graphic disappears before the power gets off.
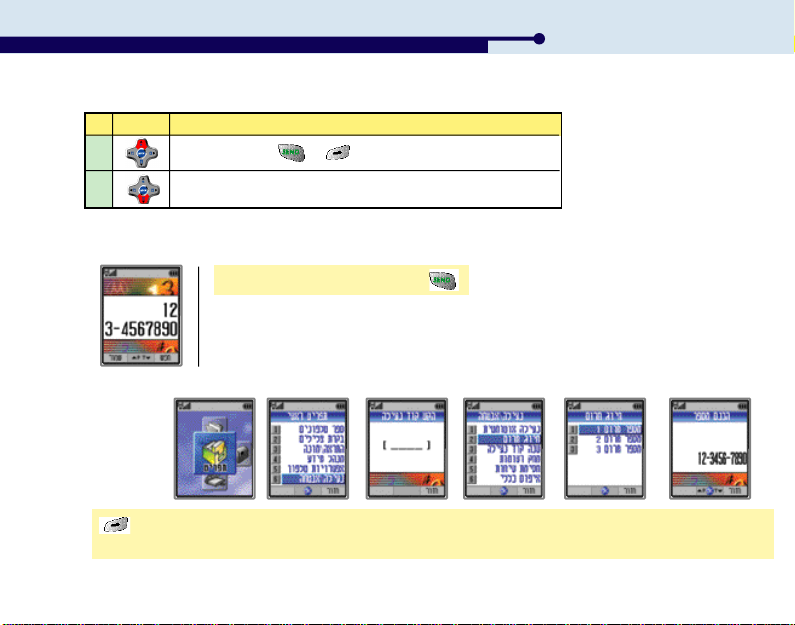
2. Placing a Call
Enter the area code and the phone number ▶
II. Basic Operation
V720·19
II. Basic Operation
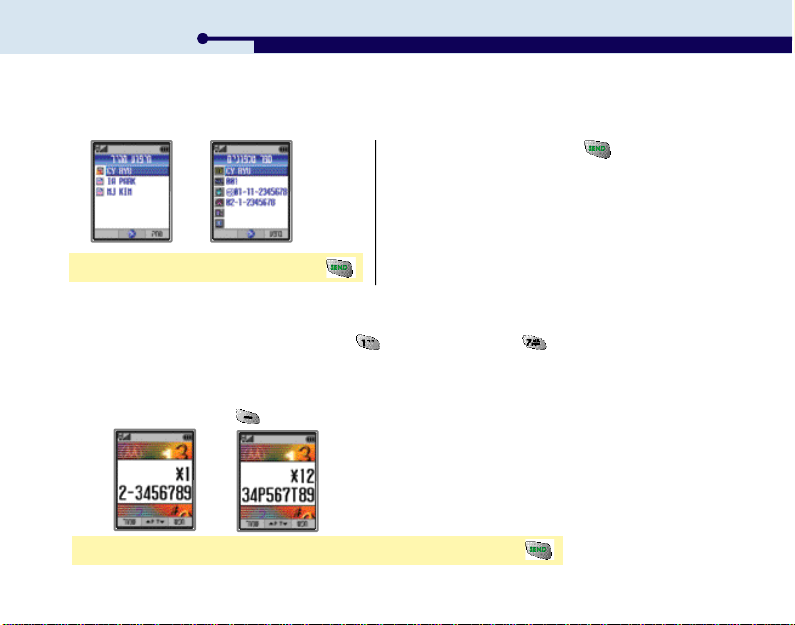
1. Using the Phonebook
Select a person using Quick Search. (See P.40~42 on how to search for a number.)
● If you select a person and press , a call is
placed to the ‘Representative Number’
Select a person ▶ Select a number ▶
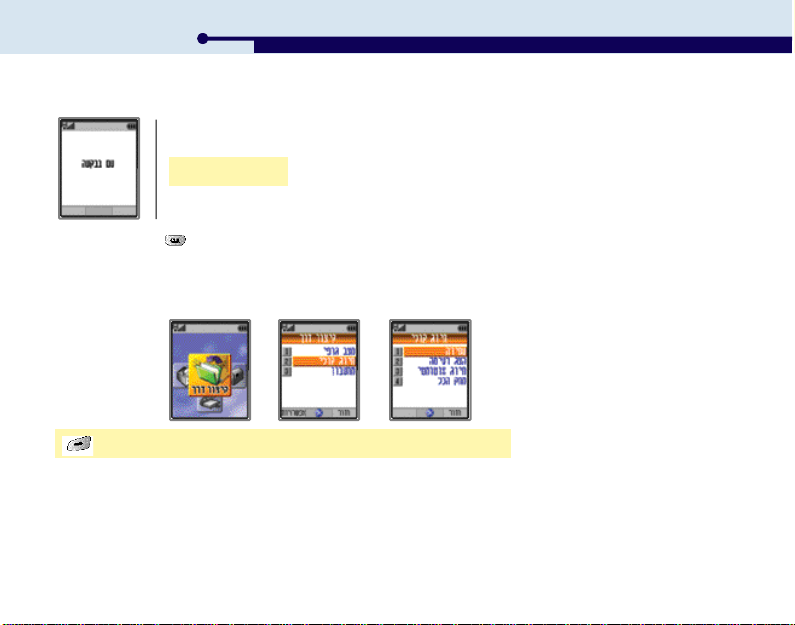
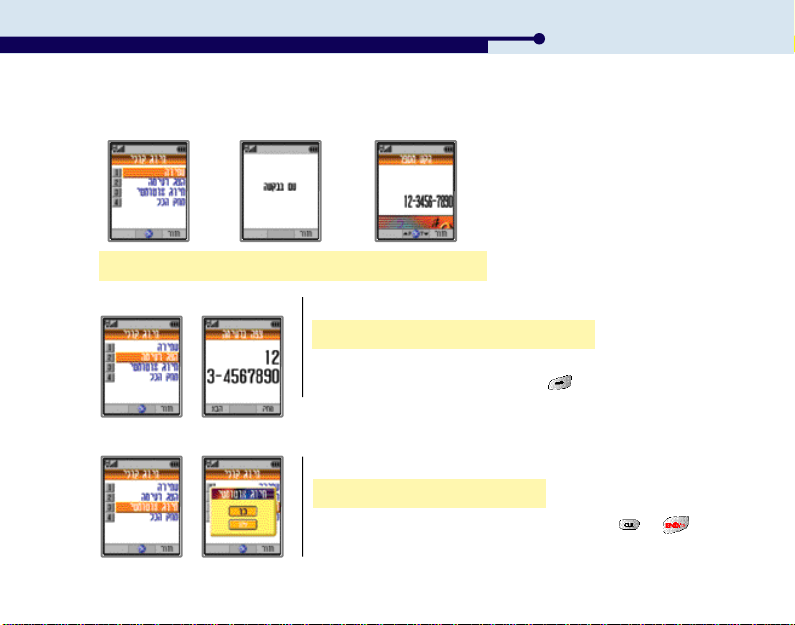
2. Turbo dialing
If you press and hold an address, a call is placed to the representative number of the
address. If the address is 17, press the dial button and then press and hold .
(See P.34 setting a representative number.)
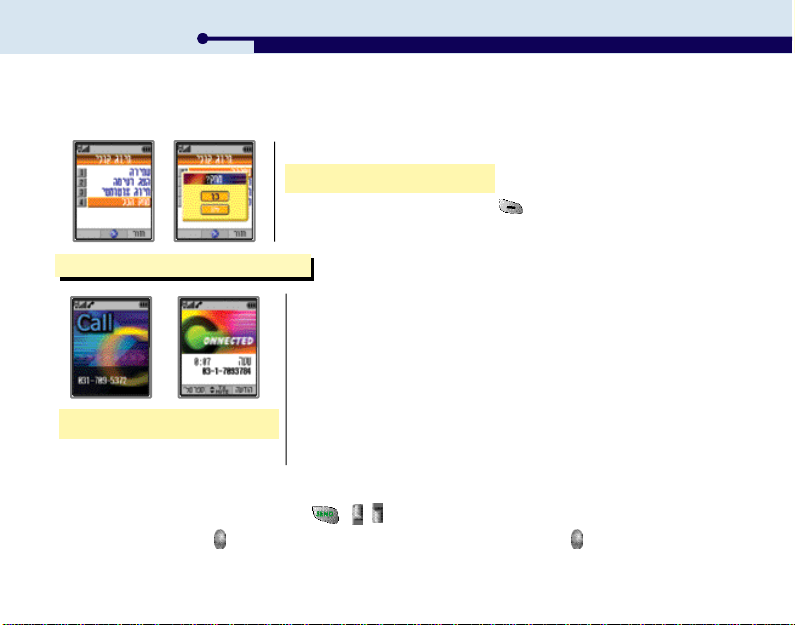
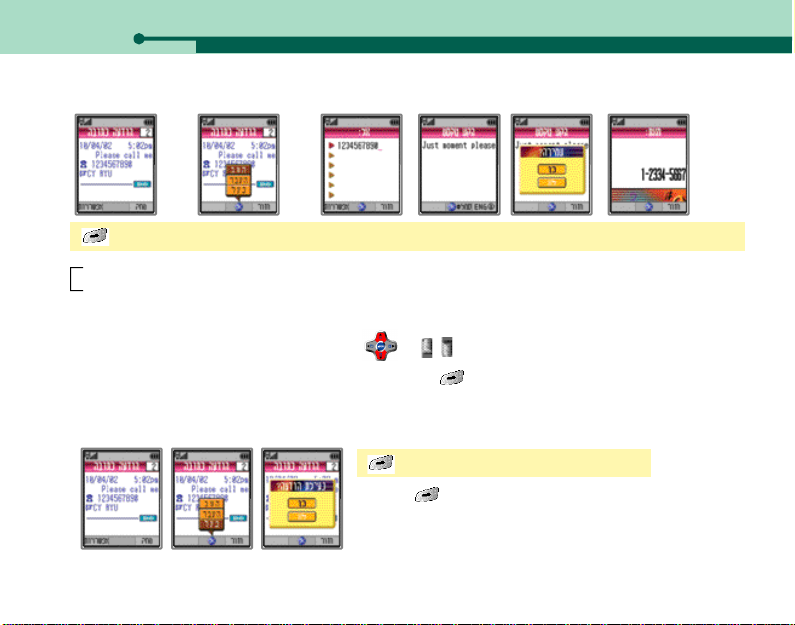
3. Electronic dialing
You can use this function to make a call to ARS or telebanking, or to retrieve a voice message. If you want to cancel
the electronic dialing, press (BACK).
Enter the phone number ▶ Press ‘P’or ‘T’, and then the electronic number ▶
20·V720
II. Basic Operation
Key
P
T
You should press or [Next] to send the number after ‘P’.
The number after ‘T’ is send after a while.
Operation
4. Emergency dialing
You can make a call to the emergency number even when the phone is locked.
Enter the emergency number ▶
1. Saving Emergency Number
[TopM.] ▶ Select MENU ▶ Select Lock/Secure, and then enter the Lock Code ▶ Select Emergency ▶
Select EmergencyNum1, 2 or 3 ▶ Enter the number.
V720·21
II. Basic Operation
5. Voice dialing
You can make a call by saying the stored name. If you have set the voice dialing function, it starts automaticall
when you open the lid.
Say the name.
● Press and hold in idle mode to use voice dialing. The name must have been stored on the voice dialing list.
● There can be a mistake in recognizing the voice.
● You can’t use voice dialing if the phone is locked. Unlock the phone before using the voice dialing.
(See P.69~70 on how to clear Lock.)
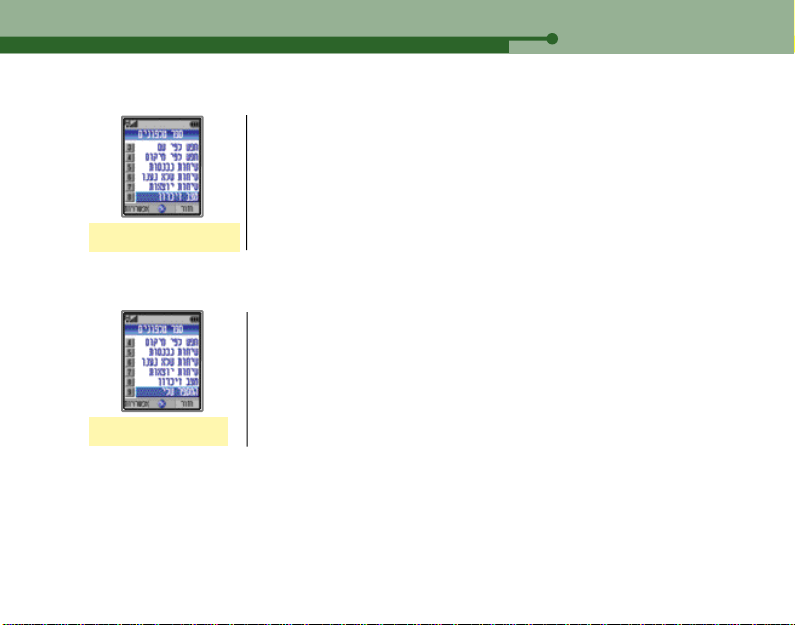
[TopM.] ▶ Select Shortcut ▶ Voice Dialing ▶ Select an option
22·V720
1. Storing
Select Storing ▶ Say the name (Twice) ▶ Enter the number
2. View List
Select View List ▶ The number is displayed.
● You can hear the stored voice and view the number on the screen.
● To view the next stored number, press [Next].
3. Auto Dialing
If you activate this option, ‘Voice Dialing’is running automatically.
Select Auto Dialing ▶ Select value
● You can switch the phone to idle mode by pressing or .
II. Basic Operation
V720·23
II. Basic Operation
4. Delete All
If you select this option, all the contents stored in voice dialing list are deleted.
Select Delete All ▶ Select value
● To delete an individual item, press [DEL] when the item to delete is
displayed in ‘View List’.
3. Receiving a Call
● You can select the ringer style and answer mode (Ring/Vib, Graphic).
(See P.47 for selecting ringer style / P.48 for selecting Ring/Vib/
P.67 for setting graphic)
● If you have registered to the ‘Calling Line Identification Presentation’
service,the caller number is displayed on the Main LCD and the Sub LCD.
● You can download a graphic from GoNext, and change the display in ‘Set
Open the lid to receive a call.
1. Using Earmic
If the earmic is connected, press and hold , , or the earmic button.
If the lid is closed, press or the earmic button to receive a call. To finish the call, press or the earmic button.
24·V720
Graphic’in ‘Shortcut’. It may take time to display the graphic on the phone
depending on the downloaded graphic size.
(See P.67 for setting the graphic.)
II. Basic Operation
1. Open to Answer
Yes : Opne the lid to answer the call.
No : Open the lid, and press any key except the button to answer the call.
2. Auto Answer
If the lid is open or the earmic is connected, the call is automatically connected after the ringer tone for the
designated time. If the lid is closed, you cannot use this Auto Answer function unless the earmic is connected.
2. Setting answer mode
[TopM.] ▶ Menu ▶ Phone Option ▶ Call Answer ▶ Select an answer mode
3. Using Auto Answering
In case you cannot answer a call, you can connect the call to auto answering function.
You can also use this function temporarily by pressing and holding .
V720·25
II. Basic Operation
1. Activating/Inactivating Auto answering
Press ▶ Auto Answer ▶ Select value
2. Play
Press ▶ Play ▶ Select an item to play
26·V720
● If the phone is short of free memory, a message is
displayed, indicating the phone is short or free memory.
Delete the previous record and set the function again.
(See P.75 for Deleting Recording.)
● If the phone is locked, you cannot use Auto Answer
function. Release Lock before you set the function.
(See P.70 on how to clear lock.) However, you can
still activate the function temporarily even when the
phone is locked.
● When ‘Auto Answer’is being played, the caller number
is not displayed for another call, and such call is not
displayed in CLI list and UnansCall list.
● You can listen to the recording in Answering Play.
3. Answer Ment Select
Press ▶ Answer Ment Sel ▶ Select a ment
4. Answer Ment Select
Press ▶ Answering Rec. ▶ Record a ment
II. Basic Operation
Default Ment : This ment is stored in the phone in default.
User Rec. Ment : You can record your own ment.
● Stop recording : [END]
● You can listen to the recorded ment in Answering Play.
● To delete the recorded ment, press [DEL] in
Answering Play. You cannot delete the default ment
though.
V720·27
II. Basic Operation
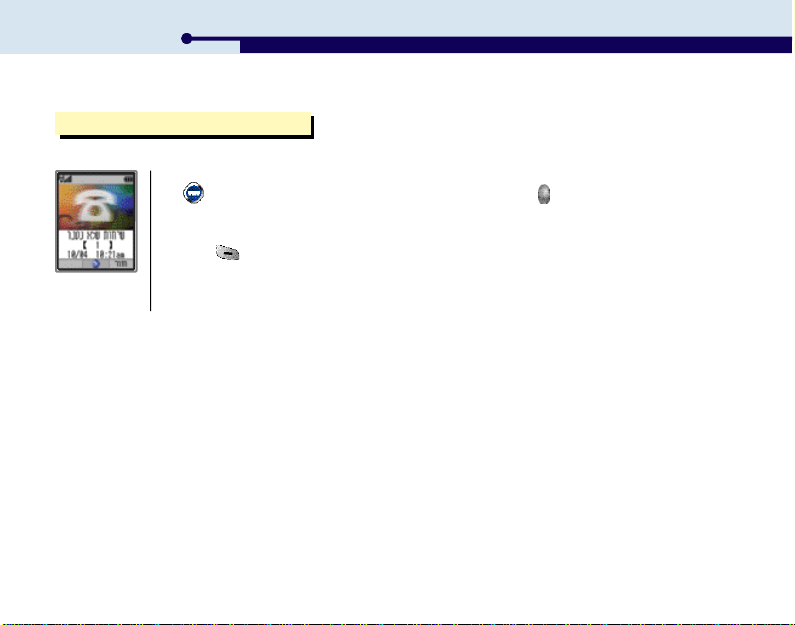
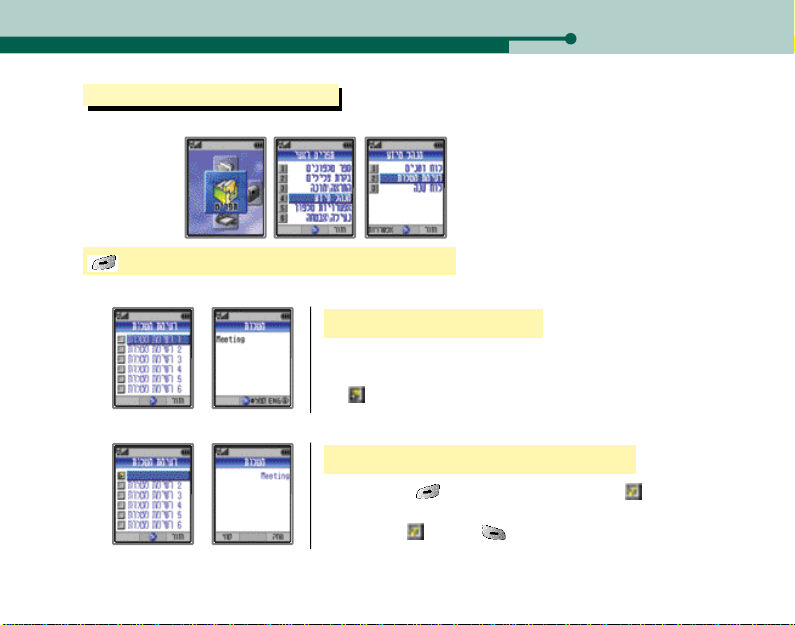
4. Unanswered Call
If you missed a call, it is displayed on the screen as below.
28·V720
● If you have registered to the ‘Calling Number Identification Presentation’service, press
[OK] to display the UnansCall List. If the lid is closed, press to view the UnansCall
List on the Sub LCD. (See P.43 for viewing UnansCall List.) If the number is in Call
Restrict, the message ‘No Caller Information’is displayed.
●Press [BACK], to return to idle mode.

V720
III. Entering Charactera
1. Changing Character Mode 30
2. Hebrew Letters 30
3. English Letters and Numbers 30
4. Special Characters and Graphic Characters 30
5. Editing and Modifying Characters 31
6. Deleting Characters 31

III. Entering Characters
1. Changing Character Mode
● Each time you press , the input mode switches to ‘Hebrew ▶ English Capital ▶
English Small ▶ Number’.
● Use to move the cursor.
2. Hebrew Letters
3. English Letters and Numbers
1. English Letters
To enter the first, second and third English letter on a key, press the key once, twice and three times respectively.
2. Numbers
Press the number key in number mode.
4. Special Characters and Graphic Characters
● Press in the character mode to display ‘Special Characters’. Press to display Special Characters or
Graphic Characters.
● Press the number key for the special character or the graphic character.
30·V720

III. Entering Characters
1. Special Character
▶
5. Editing and Modifying Characters
● Place the cursor to the position to insert a character. The typed character is
entered in front of the cursor.
● Press to delete the characters from the next of the cursor.
6. Deleting Characters
● Press to delete a character at a time, or press and hold to delete all.
V720·31

V720
IV. Phone Book
1. Saving Phone Number 33
2. Modifying Phone Number 36
3. Deleting Phone Number 38
4. Seaching Phone Number 40
5. Viewing Phone Number 42

IV. Phone Book
1. Saving Phone Number
1. Saving phone number in the number
[TopM.] ▶ Select Save Phone Number ▶ Select the item ▶ Type the content ▶ [DONE]
2. Saving phone number in the idle Mode
Enter phone number ▶
[STO] ▶
Select an icon ▶
Select the additional item ▶
[DONE] after entering the content
● You can save up to 9 items. You can save other items once the content is saved for an item. Press [DONE]
to finish saving.
Name Location Cell Phone house
Office E-mail Other Group
V720·33

IV. Phone Book
● If you have entered all contents, the phone is switched into input mode.
● You can save phone numbers of up to 200 persons.
● To cancel saving, press or during saving.
1. Entering name
You can enter the name of up to 16 Hebrew letters or up to 16 English letters. (See P.30~31 for entering characters.)
2. Entering phone number
You can enter the phone number of up to 34 figures. It is displayed up to 15 figures. (including hyphen.)
3. Selecting representative number
● You can select a phone number (home, mobile, office) as the representative number. Enter the phone numbers first
before selecting a representative number. If you don’t select a specific number as the representative number, the phone
it self designate a representative number from the entered numbers. ( in the order of Mobile ▶ Home ▶ Office )
‘ ’is marked on the item selected as the representative number. If you press and hold the address in the idle mode,
a call is made to the representative number. (See P.20 on Speed Dialing.)
● You can make a call to the number you have entered by pressing .
4. Entering E-mail address
● You can enter up to 50 characters including the E-mail symbols like ‘@’and ‘,’for E-mail address.
● Press during entering the address to enter the symbols required for E-mail address.
(@, ., -, _, /, ;, .com, .net, .co.il)
34·V720

IV. Phone Book
5. Using [Option] while saving phone number
If you enter a mobile number of an E-mail address, [Option] is displayed on the screen. If you press [Option],
you can send a message or a mail to the mobile number or the E-mail address.
[When selecting the mobile number]
Select the mobile number ▶ [Option] ▶ Select Pop-up menu value ▶ Enter the receiver number
[When selecting the E-mail address]
Select the E-mail address ▶ [Option] ▶ Select Pop-up menu value ▶ Enter the receiver address
● After sending a message or a mail, the phone returns to the phone number saving mode.
● Press [DONE] to finish saving.
● See P.86~87 on Sending
a message.
V720·35

IV. Phone Book
6. Selecting bell
You can select different bells according to the individual and the group.
Select ‘ ’in the phone number saving mode, and select a bell.
● If no bell is selected for an individual, the group bell is applied for the individual. If neither the individual nor the
group character is selected, the bell selected in ‘Ringer Style’In ‘Tone Control’is applied.
(See P.47 on Ringer Style.)
7. Selecting group
Select ‘ ’in the phone number saving mode to select a group. The default groups are Family, General, Office,
Friend, and New. You can make a new group if you select ‘New Group’.
● Groups are saved in alphabetic order regardless of saving sequence.
● You can use up to 6 Hebrew letters and 12 English letters for a group name.
● You can make up to 30 new groups.
2. Modifying Phone Number
Display the items to modify using the search function. (See P.40~42 for Searching a phone number.)
Select the list to modify ▶ Select the item to modify
36·V720

IV. Phone Book
1. Modifying phone number
Select a phone number list to modify ▶ Modify the number ▶ [DONE]
● See ‘Editing Character’(See P.31)
2. Modifying name and E-mail address
Select the item (Name/E-mail) to modify ▶ Modify contents ▶ [DONE]
3. Modifying group
1. Changing the group in an entry
Select an entry, using the phone number search function, of which group name is to be changed.
(See P.40~42 for searching for phone number.)
‘ ’Select a group ▶ Select a group to save ▶ [DONE]
2. Changing group name
Select a group to change using Recall by Group’. (See P.41 for Recall by Group.)
Select the group to change ▶ [Option] ▶ Select the value to change name ▶ Change the name
● Press to delete the existing name before entering a new group name.
●You can use up to 6 Hebrew letters and 12 English letters.
V720·37

IV. Phone Book
●You cannot enter the same group name with the existing group.
●All the group names in the entries in the changed group list are automatically changed.
●You cannot change the group name ‘General’.
3. Deleting Phone Number
1. Deleting Entire PhoneBook
[TopM.] ▶ Select Menu ▶ Select Lock/Secure and enter the password ▶Select Clear List ▶
Select PhoneBook ▶ Select the value
2. Deleting an entry
Use the phone number search function to select the entry to delete. (See P.40~42 for searching for phone number.)
Select the list to delete, and then select [DEL] ▶ Select the value
38·V720

3. Deleting individual item
Select the entry to delete with the search function. (See P.40~42 for Searching Phone Number.)
Select the entry ▶ Select the item to delete ▶ Press to delete ▶ [DONE]
4. Deleting group
Delete the group to delete. (See P.41 for Recall by Group)
● If you select a group, all information in the group is moved to the
General group. The ‘General’group is not deleted.
[DEL] ▶ Select the value
IV. Phone Book
V720·39

IV. Phone Book
4. Searching for phone number
[TopM.] ▶ Select Menu ▶ PhoneBook ▶ Select a search method
● If you type the first character of the name in ‘Quick Search’and ‘Recall by Group’, the names and group names
starting with the character are displayed.
1. Quick Search
The names are listed in alphabetic order on the PhoneBook.
Select Quick Search ▶ Select the entry ▶ Display information
● Any entry without name is placed in the bottom of the list.
● Press in the idle mode to move directly to ‘Quick Search’.
40·V720

2. Recall by Group
You can view the list of group, and search for a number in a group.
Select Recall by Group ▶ Select the group to search ▶ Select the entry ▶ View information
3. Recall by Name
Enter the name to search.
Select Recall by Name ▶ Enter the name ▶ Select the entry ▶ View information
IV. Phone Book
V720·41

IV. Phone Book
4. Recall by address
You can select address which you ward to find with input address.
Select Recall by Address ▶ Enter the address ▶ View information
5. Viewing Phone Book information
[TopM.] ▶ Select Menu ▶ Phone Book ▶ Select a menu
● To return to the previous screen, press [Back] and .
42·V720

1. Viewing CLI List
Select CLI List ▶ View information
2. Viewing UnansCall
Select UnansCall ▶ View information
3. Viewing Send Call List
IV. Phone Book
Up to 30 calling numbers are stored.
Up to 30 unanswered call numbers are stored. If the number is on the
Phone Book, the name is displayed.
● If you select in the idle mode, the UnansCall list is displayed.
Up to 30 call numbers are stored.
Select Send Call List ▶ View information
V720·43

IV. Phone Book
4. Deleting CLI List/ UnansCall / Send Call list
1. Deleting entire list
[TopM.] ▶ Select Menu ▶ Select Lock/Secure, and then, enter the password. ▶ Select Clear List ▶
Select the list to clear ▶ Select the value
2. Deleting individual item
Select the item to delete, and then press [DEL].
5. Viewing CLI List / UnansCall / Send Call List on the Sub LCD
Press twice ▶ Search with , and the press ▶ ▶ View call details
● To make a call to the searched phone number, select ‘Send’and press .It is available only
when you use the earmic.
44·V720
6. Memory Status
Select Memory Status
7. View My Num
Select View My Num
IV. Phone Book
You can view the status of the Phone Book.
You can view your own phone number.
V720·45

V720
V. Tone control
1. Selecting Ringer 47
2. Ring/Vibration 48
3. Ring Volume 49
4. Ringer Option 50
5. Connect Tone 50
6. Sound Effect 51
V. Tone Control
1. Selecting Ringer
You can select the ringer by downloading various melodies from the service provider in addition to the default
melodies.
[TopM.] ▶ Select Menu ▶ Tone Control ▶ Ringer Style ▶ Select the ringer type ▶ Select a ringer
● Ringer Tone : 1 ~ 10
● Melody : 1 ~ 20
● Natural Sound : 1 ~ 4
● Voice Bell : 1 ~ 4
V720·47

V. Tone Control
2. Ring / Vibration
You can select ring or vibration for incoming call or message.
[TopM.] ▶ Select Menu ▶ Tone Control ▶ Ring/Vb ▶ Select a mode
● Ring, Vib (‘ ’is displayed on the LCD), VbThenBell (‘ ’is displayed on the LCD), Lamp
1. Setting etiquette mode
You can change the tone from ring mode to vibration or lamp.
1. Setting
Press and hold
● A message ‘Etiquette mode is on’is displayed, and then, with vibration, the LCD is switched
into idle mode.
2. Releasing
Press and hold
● A message ‘Etiquette mode is off’is displayed, and then, the LCD is switched into idle mode.
48·V720

If the etiquette mode is on
● Ringer : Vibration with lamp
● Key tone : Mute
● Alarm : Vibration with lamp
● Connect tone : Mute
● 1 Min Timer : Mute
● Reminder tone : Vibration with lamp
(For ‘Reminder tone’, if ‘Alarm Off’is set, the lamp blinks. See P.88 for details.)
3. Ring Volume
You can control ring volume. (5 Steps)
[TopM.] ▶ Select Menu ▶ Tone Control ▶ Ring Volume ▶ Set the volume
● Control the volume with
V. Tone Control
V720·49

V. Tone Control
4. Ringer Option
You can select the ringer option.
[TopM.] ▶ Select Menu ▶ Tone Control ▶ Ringer Option ▶ Select an option
To Set Volume : As set in Ring Volume.
Low to High : Ring volume increases from Stage 1 to Stage 5, and keeps Stage 5.
High to Low : Ring volume decreases from Stage 5 to Stage 1, and keeps Stage 1.
5. Connect Tone
The connect tone informs you that the call you have placed is being connected.
[TopM.] ▶ Select Menu ▶ Tone Control ▶ Connect Tone ▶ Select a value
50·V720

6. Sound Effect
You can select the sound effect for Power On/Off.
[TopM.] ▶ Select Menu ▶ Tone Control ▶ Sound Effect ▶ Select a value
V. Tone Control
V720·51

V720
VI. Alarm and Timer
1. Alarm 53
2. World Time 55
3. Timer 56
4. 1 Min Timer 57
VI. Alarm and Timer
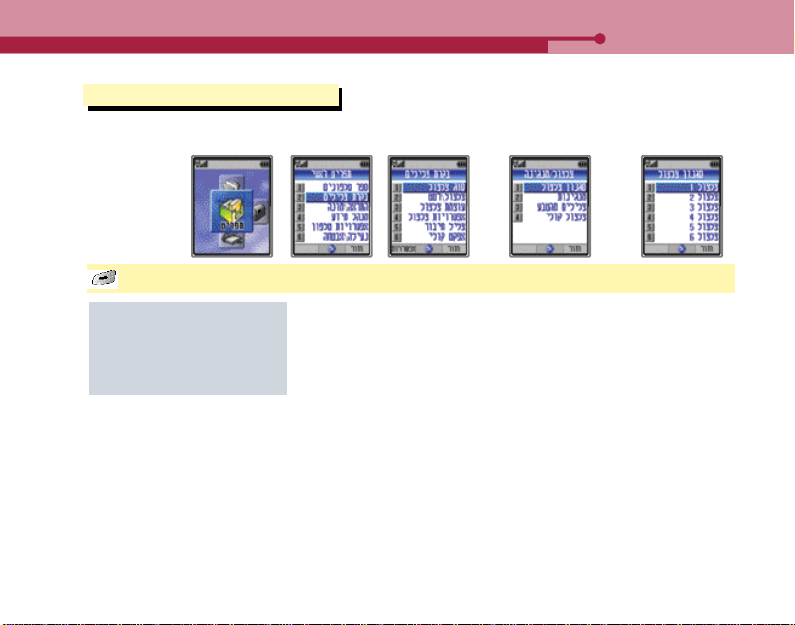
1. Alarm
[TopM.] ▶ Select Menu ▶ Alarm/Timer ▶ Alarm
1. Alarm setting
● You can display the ‘Alarm Setting’menu by pressing
in the idle mode.
● To turn off alarm, open/close the lid, or press a keypad.
●‘ ’is displayed on the LCD if alarm is set.
Select Alarm Setting ▶ Select an alarm setting option
1. Choose Time
You can set the alarm to go off at some time later (as you require), instead of a certain time.
Select Choose Time ▶ select time
●10 Min later / 30 Min later / 1 Hour later / 3 Hour later
V720·53

VI. Alarm and Timer
2. Set Time
You can set the time and alarm cycle.
Select Set Time ▶ Enter time ▶ Select cycle
- Entering time ?
● Enter Hour ▶ [OK] ▶ Enter Min ▶ [OK] ▶ am/pm
● To move to the next field, press .
● If you enter Hour and Min with the keypad, the cursor automatically moves to the next field.
● Alarm Cycle Once : Alarm is on once at the designated time
Everyday : Alarm is on at the designated time every day
3. Setting Bell
You can select a ring for alarm.
Select Setting Bell ▶ Select Ringer Style ▶ Select a ringer
● If you don’t select a ringer, the alarm is on with the default alarm tone. (Default tone : Bell 1)
● If the phone is set to ‘Vibration’or ‘Etiquette mode’, the alarm is on with vibration.
● Alarm volume increases regardless of the ringer option. (Increases from Stage 1 to Stage 5. See P.50 for
Ringer Option.)
54·V720

VI. Alarm and Timer
2. Alarm Off
You can clear alarm as below.
Clearing Choose Time : Clears ‘Choose Time’
Clearing Set Time : Clears ‘Set Time’
●‘ ’disappears from LCD if the alarm is off.
Select Alarm Off ▶ Select the alarm to clear ▶ Select value
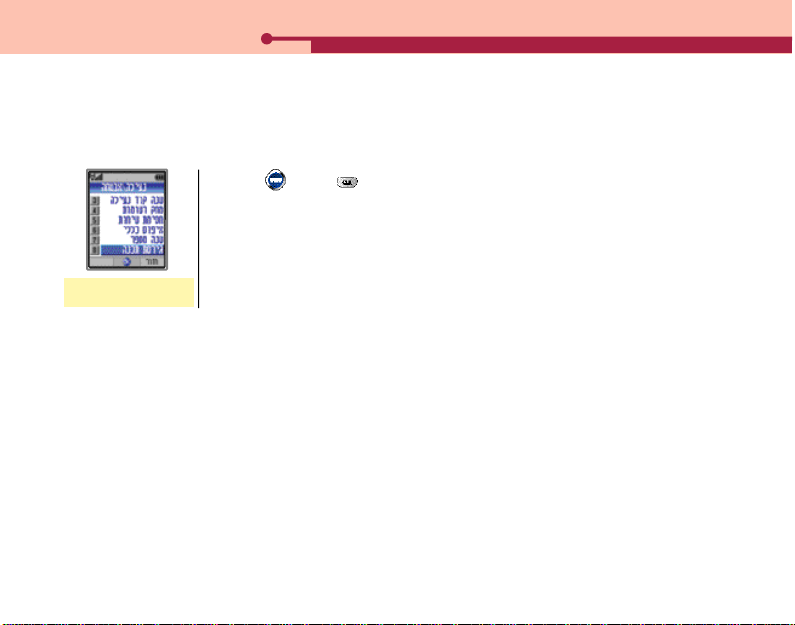
2. World Time
● To return to the previous
LCD display, press
[Back] or .
[TopM.] ▶ Select Menu ▶ Alarm/Timer ▶ World Time ▶ Search with
● Seoul, Tokyo ● Guam, Sydney ● Samoa ●Honolulu
● Anchorage ● San Francisco ●Seattle ●LA
● Denver, Phoenix ● Mexico City ● Chicago, Dallas ● Detroit, Miami
● Washington ● Montreal, NewYork ● Boston ●Rio de Janeiro
● Lisbon, Madrid ● London ● Paris, Amsterdam ●Rome, Berlin, Vin
● Athens, Helsinki ● Jerusalem ●Moscow, Baghdad ● Tehran, Abu Dhabi
V720·55

VI. Alarm and Timer
● Athens, Helsinki ● Jerusalem ●Moscow, Baghdad ● Tehran, Abu Dhabi
● Calcutta ● Bangkok, Jakarta ● Singapore ● Beijing, Hong Kong
● Taipei
3. Timer
[TopM.] ▶ Select Menu ▶ Alarm/Timer ▶ Select Timer ▶ Select an option
1. Individual
Shows the time taken for the latest call.
2. Cumulative
Shows the total time of the calls you have made from service start to now. You cannot reset the Cumulative time.
(See P71).
3. Roam Timer
Shows the time you have made a call using other service Provider.
56·V720

VI. Alarm and Timer
4. Reset Timer
Shows the accumulative time after the reset.
[Top Menu] ▶ Select Menu ▶ Alarm/Timer ▶ Select Reset Timer ▶ Reset
‘ Resetting Reset Timer’
When the Reset Timer is displayed ▶ [Reset] ▶ Select value
● The call time displayed on LCD does not match to the charged call time.
4. 1 Min Timer
You can check the call timer during a call. The phone gives you alarm at 10 seconds prior to every minute.
[TopM.] ▶ Select Menu ▶ Alarm/Timer ▶ 1 Min Timer ▶ Select value
V720·57

V720
VII. PIMS
1. Schedule 59
2. To do list 61
3. Calendar 62

VII. PIMS
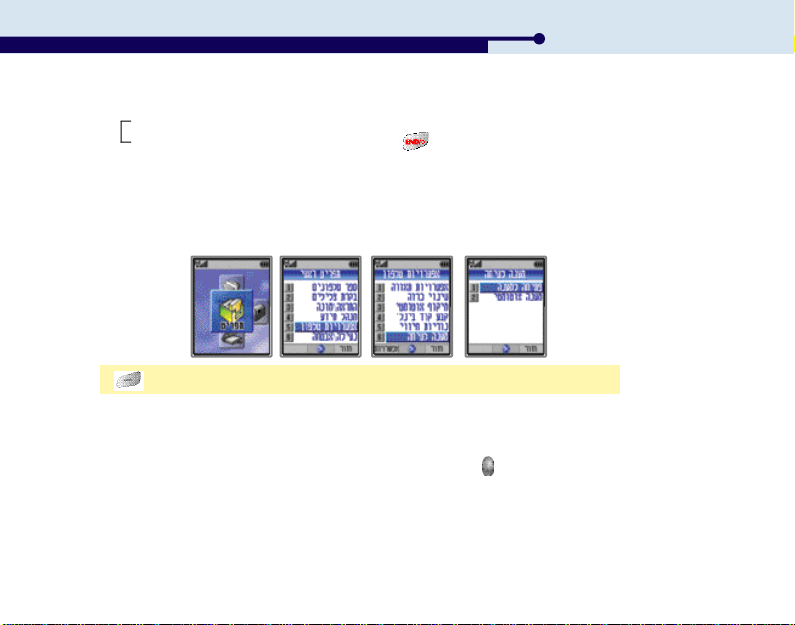
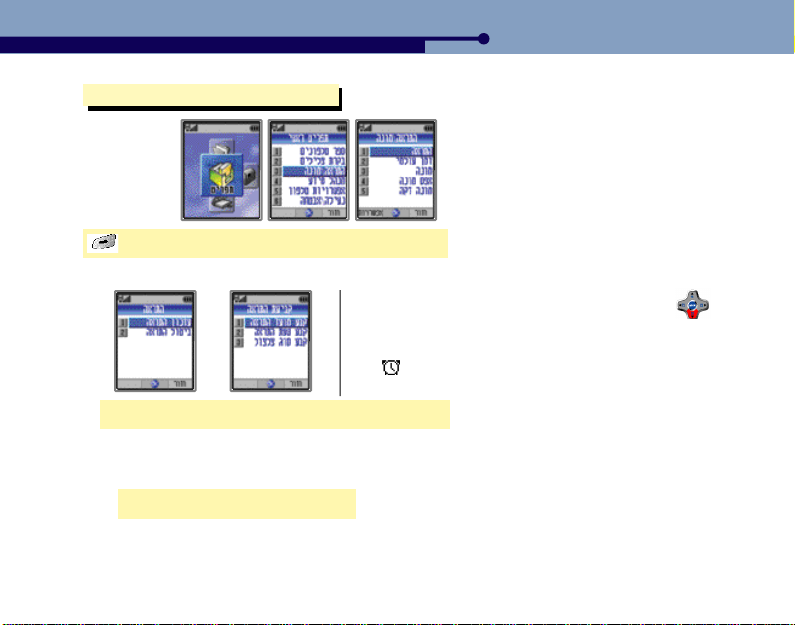
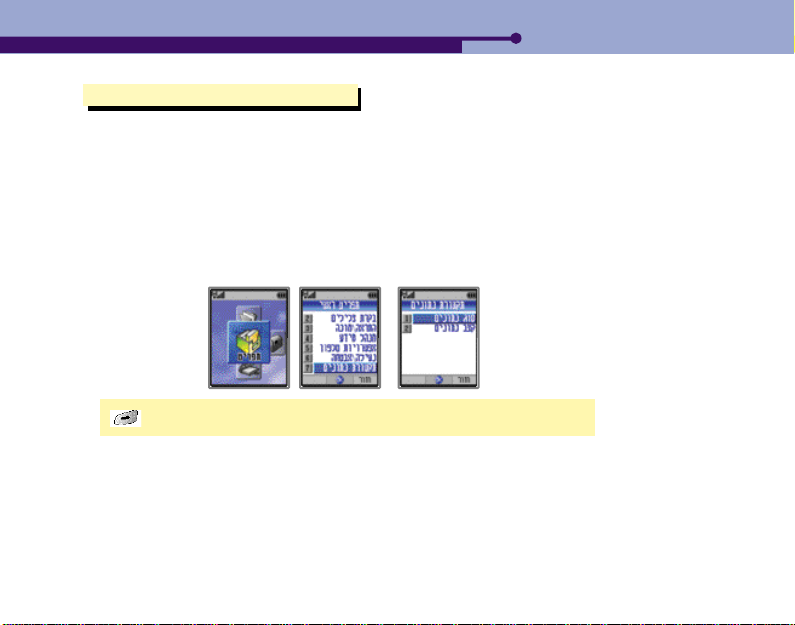
1. Schedule
If you select schedules, the alarm is on the designated day and displays the content.
[TopM.] ▶ Select Menu ▶ PIMS ▶ Schedule
1. Entering Schedule
Select Enter Schedule ▶ Enter date ▶ Enter time ▶ Select alarm time ▶ Enter content
● When entering date, switch input mode with . The input mode changes ‘Day ▶ Month ▶ Year’.
Press at each mode to enter date, month and year.
● You can enter numbers of schedules in a day.
● You can save up to 20 schedules.
● You can enter up to 96 Hebrew letters and up to 96 English letters for content.
V720·59
VII. PIMS
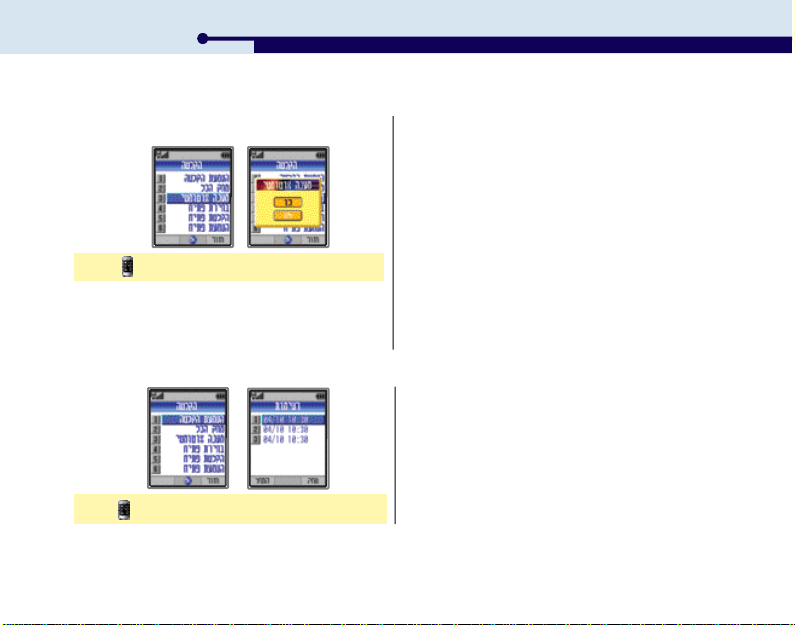
2. Checking Schedule
Select Check Schedule ▶ Select the date ▶ View content
● The next scheduled date is highlighted, and other scheduled dates are outlined.
● If numbers of schedules are stored on a day, select the day and display the schedule list.
● When alarm is on, press or [OK] to return to the initial screen.
3. Deleting Schedule
1. Deleting checked schedule
When a schedule is displayed, press [DEL].
2. Deleting entire schedule
[TopM.] ▶ Select Menu ▶ Select Lock / Secure and enter the password ▶ Clear List ▶
Schedule ▶ Select a value
60·V720
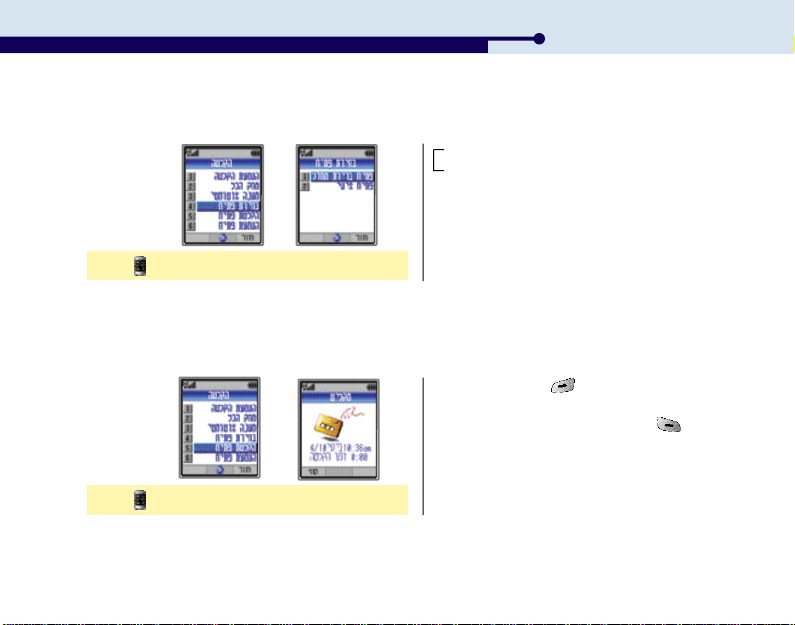
2. To do list
You can store the to do list on the phone.
[TopM.] ▶ Select Menu ▶ PIMS ▶ To do list
1. Entering To do list
Select an event ▶ Enter content
●You can save up to 20 events.
●You can use up to 96 Hebrew letters or 96 English letters for an event.
●‘ ’is displayed on the event.
2. Checking To do list
Select the event to display ▶ Display the event
● If you press [End] after checking the event, ‘ ’is displayed,
indicating that the event is completed.
● To delete ‘ ’, press [UNLOC] when the event is displayed.
VII. PIMS
V720·61

VII. PIMS
3. Deleting To do list
1. Deleting the checked event
Press [DEL] when an event is displayed.
2. Deleting all
[TopM.] ▶ Select Menu ▶ Select Lock/Secure and enter password ▶ Clear List ▶ To Do List
▶ Select a value.
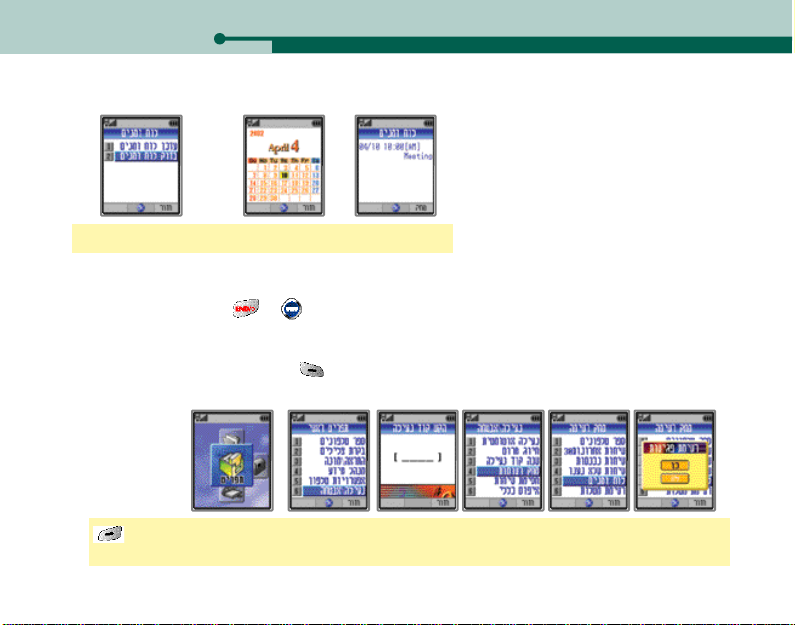
3. Calendar
You can view the calendar.
[TopM.] ▶ Select Menu ▶ PIMS ▶ Calendar ▶ Search Date
62·V720

● Press to change the mode, and then change date with .
● The calendars stored are from 1980 to 2044.
VII. PIMS
V720·63

V720
VIII. Phone Option
1. LCD Environment 65
2. Phone Environment 69

1. LCD Environment
1. Selecting backlit
[TopM.] ▶ Select Menu ▶ Phone Option ▶ Light Select ▶ Select a backlit
VIII. Phone Option
1. Selecting LCD backlit
You can set the time for LCD backlit on
after the lid is open.
Select LCD backlit ▶ Select a value
2. Selecting Key backlit
You can set the time for keypad backlit on.
Select Keypad backlit ▶ Select a value
V720·65

VIII. Phone Option
2. Changing banner
[TopM.] ▶ Select Menu ▶ Phone Option ▶ Change Banner ▶ Enter a new banner ▶
Display on the LCD in idle mode
● You can enter up to 18 Hebrew Korean letters or 18 English letters.
● If you don’t change the banner, the ‘MOTOROLA’logo is displayed.
3. Controlling Contrast
You can adjust the luminosity of screen.
[TopM.] ▶ Select Menu ▶ Phone Option ▶ Contrast Ctrl ▶ Select an LCD ▶ Adjust the contrast
66·V720

VIII. Phone Option
4. Setting Graphic
This is the function to let the user change graphic which appears according to the condition of phone.
[TopM.] ▶ Select Shortcut ▶ Graphic Mode ▶ Select a screen ▶ Select a graphic
1. Changing menu background color
You can select the color for LCD screen.
● Light / Dark
Select Menu BG Color ▶ Select a color
2. Deleting Graphic
Select a downloaded graphic and press [DEL].
V720·67

VIII. Phone Option
5. Service light
You can view the service status in color in idle mode.
[TopM.] ▶ Select Menu ▶ Phone Option ▶ Service Light ▶ Select value
Idle mode (Service light is set)
Light
Phone status
6. Language
You can select the language to be displayed on the phone.
[TopM.] ▶ Select Menu ▶ Phone Option ▶ ChangeLanguage ▶ Select a language
68·V720
Blue
available
Red
unavailable
Call status (always displayed)
Spectrum
Incoming call
Purple
Call is connected
● Hebrew /
English

2. Phone Environment (Security)
[TopM.] ▶ Select Menu ▶ Select Lock/Secure and enter the password ▶Select a sub menu
1. Auto Lock
You can lock the phone so that it is not used by others.
1. Setting Auto Lock
2. Clearing Auto Lock
VIII. Phone Option
Auto Lock ▶ Select a value
Auto Lock ▶ Select a value
V720·69

VIII. Phone Option
2. One-touch Lock
1. Setting One-touch Lock
Press and hold .
2. Clearing One-touch Lock
● You can still answer a call even when the phone is locked.
● Even if the phone is off and on again, the phone keeps the lock.
● You can still make a call to *166, 100, 101, 102 or other emergency number, or to turbo dial 1 even when the phone is
locked.
● Clearing lock to use the phone is a temporary clearance. In order to clear lock completely, press and enter the
password, or set the value to ‘No’in Auto Lock menu.
Press and hold , and enter the password.
3. Changing Lock Code
You can change the password to clear Auto Lock or to use other security options.
● The default Lock Code is ‘0000’.
Select ChangeLockCode ▶ Type a new code ▶ Re-enter the new code
70·V720

VIII. Phone Option
4. Master Reset
You can reset the phone functions to the default status.
● After you reset the phone, the phone gets off/on.
● You cannot reset the information in Phone Book, received voice
message and SMS message, downloaded graphic and melody,
received message, and total call timer.
Select Master Reset ▶ Select value
5. Changing NAM
If you use 2 or more numbers, or have subscribed to 2 or more carriers, you can select one of the phone numbers.
When you change the NAM, the phone gets off/on.
Select Change NAM ▶ Select a NAM
V720·71
VIII. Phone Option
6. S/W Version
You can view the S/W version of the phone.
● Press [OK] or to return to the previous screen.
Select S/W Version
72·V720

V720
IX. Supplementary Functions
1. Calculator 74
2. Recording 74
3. Editing the phone 76
4. Wireless Data Communication Service 77
IX. Supplementary Functions
1. Calculator
[TopM.] ▶ Shortcut ▶ Calculator ▶ Enter figures ▶ Enter operator with ▶ Enter figures ▶
Press or to view the result
● Press to reset the calculator.
● Press to enter a decimal point
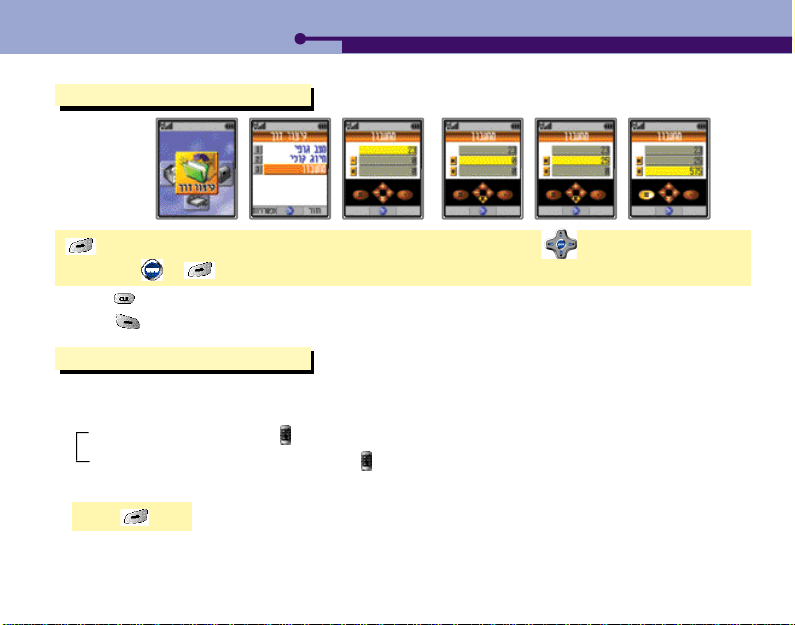
2. Recording
You can record conversation during the call or in idle mode.
1. Recording
During the call : Press and hold ‘ ’during the call. You can record the voice of the other party only.
In idle mode : Open the lid and press and hold ‘ ’. The phone starts recording with ‘beep’.
2. Finishing recording
Press [End].
74·V720

● If the call is disconnected, the recording is stopped automatically.
● If a call is incoming, recording stops at that point.
● You can cancel recording if you press [Back].
● You can record up to 10 times with 10 min per a record.
3. Playing
Press ▶ Select Play ▶ Select the item to play
4. Deleting
1. Deleting individual record
IX. Supplementary Functions
● You can use to display the recording list.
2. Deleting all
Press [DEL] when the record is displayed ▶
Select value
Press ▶ Delete All ▶ Select value
V720·75
IX. Supplementary Functions
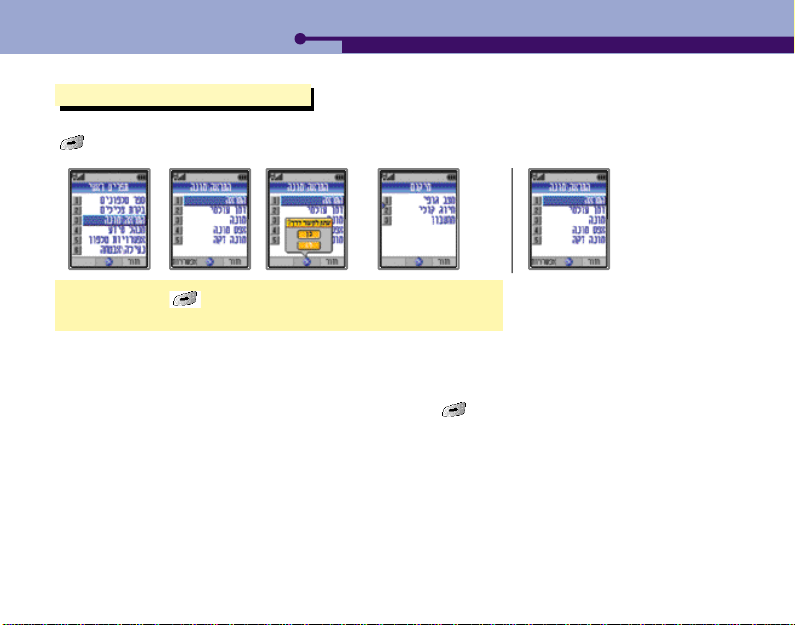
3. Editing the phone
You can move the most frequently used menus to Shortcut. If ‘Option’key is activated for some menus, you can press
[Option] to move the function to Shortcut.
Select a menu ▶ [Option] ▶Select value ▶ Select the location in
Shortcut Copy to Character
● You cannot use edit function for the menus in Lock /Secure.
● The menus in Shortcut are available to move within the folder.
● The menus are remained in the existing folder, even though they are moved to Shortcut.
● To delete a menu from Shortcut, select the menu to delete, press [Option], and then select Delete option.
76·V720
IX. Supplementary Functions
4. Wireless Data Communication Service
You can use internet and E-mail on the phone without additional modem, if you can connect your phone to a notebook or
a PC over the wireless data cable.
● You should purchase a data communication cable from the nearest Motorola service center or the accessory
dealer.
● See User’s Guide of the data communication cable for PC environment and other details.
● Please contact the carrier for details.
1. Data setting
[TopM.] ▶ Select Menu ▶ Data ▶ Select Data Mode / Data Rate
V720·77

IX. Supplementary Functions
1. Data mode
You can set the data receiving mode.
Data : You can receive data call.
Fax : You can receive Fax data.
Call : You can receive voice call.
● Please contact the carrier for details.
2. Data rate
You can set the data rate between the phone and PC (notebook).
● The maximum data rate between the phone and PC (notebook) must be :
9600 / 19200 / 15200 / 230400
78·V720

V720
X. On-call Functions
1. Controlling volume during the call 80
2. Memo during the call 80
3. Viewing menu during the call 80
4. Sending my number 81
5. Silence 81

X. On-call Functions
1. Controlling volume during the call
You can control volume during the call
Press during the call.
2. Memo during the call
You can save a new number during the call.
Enter a phone number during the call
● The number you entered during the call is stored in ‘Send Call List’.
● If you press after the call, you can make a call to the number stored in Send Call
List without saving it.
3. Viewing menu during the call
You can search Phone Book during the call.
Press during the call ▶ Select the menu
80·V720

4. Sending my number
You can send you number on the phone or beeper of the other party.
Press during the call
● Your number is displayed on the screen. The screen returns to call mode after
transmitting your number.
● You should press to release memo before you send your number.
5. Silence
You can activate silence mode during the call so that the other party cannot hear you talk.
1. Activating silence mode
Press during the call
● To clear silence mode, press .
X. On-call Functions
V720·81

V720
XI. SMS
1. Reading Message 83
2. Sending Message 86
3. Alert Method 88
4. Deleting Message 89

1. Reading Message
1. Text Message
1. Reading a messag
Confirm message ▶ [Msg] ▶ Text Msgs ▶ Select a message ▶ [OK]
● The phone makes alert when a new text message is received. (See P.88 for Alert Method)
● The latest received message is on the top of the list.
● In case of repeated message, the latest message is displayed.
● Press to read the next message.
● To make a call to the caller’s number, press .
XI. SMS
V720·83
XI. SMS
2. Replying/Relaying a message
[Option] ▶ Select Reply/Fwd ▶ Enter the sender ▶ Enter text ▶ Select value ▶ Enter the receiver
Reply : You can send reply to the sender.
Fwd : You can forward the message to other person.
● When you enter the receiver, the sender’s phone number is automatically displayed.
● If you send the message to another person, press or to move to the next line, and then enter the number.
You can search for the number on the Phone Book by pressing .
3. Message Lock
You can set Lock to a message to protect it from being deleted. Clear Message Lock first to delete the message.
[Option] ▶ Select Lock ▶ Select value
● Press [Option] and select ‘Clear’to clear Message Lock.
84·V720

2. Voice Message
Confirm message ▶ [Msg] ▶ Voice Msg ▶ [OK]
● To access the voice mailbox, press ‘*151’ and , or press and hold .
● If numbers of voice messages are received, the latest voice message is displayed.
3. Reading Message on the Sub LCD
If the lid is closed, a message receiving is displayed on the Sub LCD
Confirm message ▶ Press ▶ Read message with
1. Reading a text message
● If you have select View Msg in Alert Method, you can read the message on the Sub LCD.
(See P.88~89 for Alert Method.)
XI. SMS
V720·85
XI. SMS
● If a message is received, press , and then press to read the message.If there is a message you
have not read,you can continue reading the message with .
● You can make a call to the sender if you select ‘Call’and press . It is available only when you use the earmic.
2. Retrieving voice message
To access the voice mailbox, select ‘Voice mailbox’, and press . If the call back number is displayed, select
‘Call’and press . It is available only when you use the earmic.
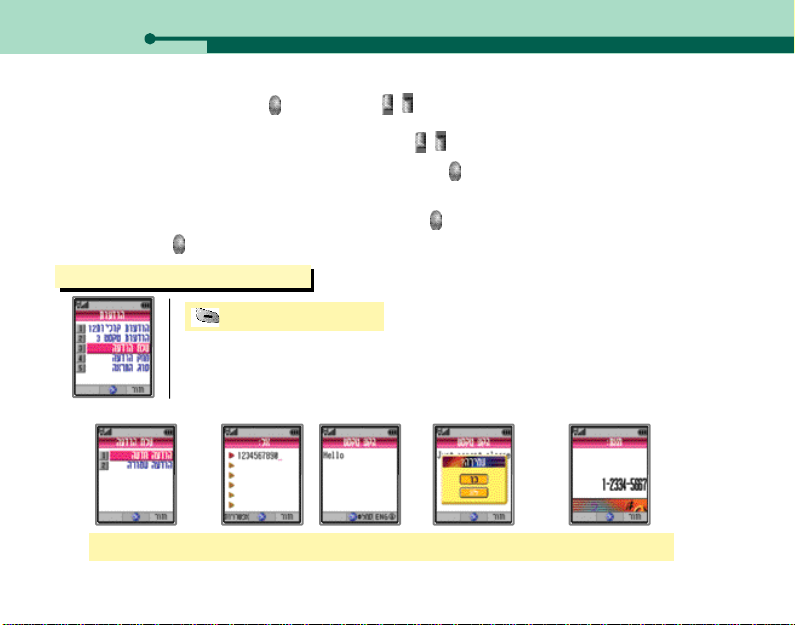
2. Sending Message
[Msg] ▶ Send a Msg
1. Sending a new message
Select New Msg ▶ Enter receiver ▶ Enter text ▶ Set Msg storing option ▶ Enter sender
86·V720
XI. SMS
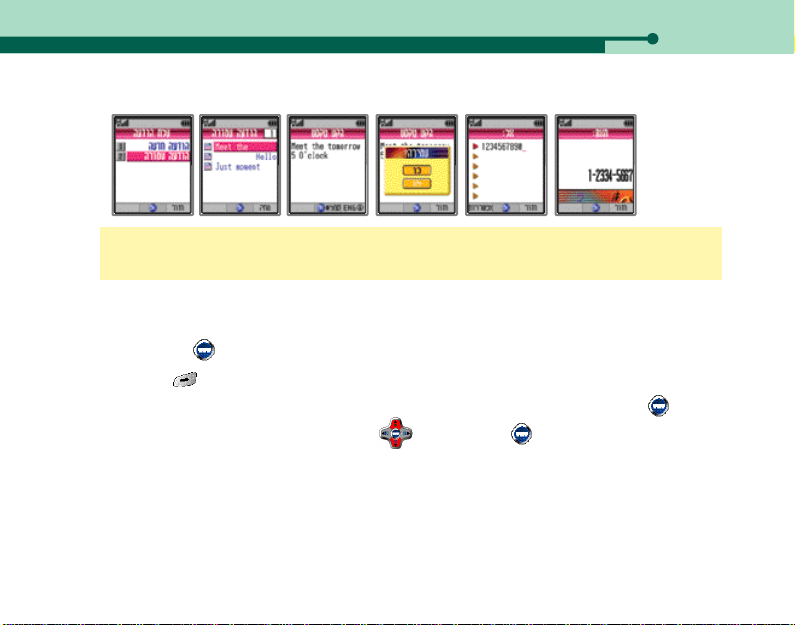
2. Sending a stored message
Select Stored Msg ▶ Select the message to send ▶ Check and enter content ▶ SetMsg storing
option ▶ Enter receiver ▶ Enter sender
1. Selecting receiver
● You can send a message to numbers of receivers. After you enter the receiver, move the cursor to the next line
with press [OK]. You can send a message to up to 6 receivers.
● Press [Option] to recall a mobile number from the Phone Book.
● If you type the first character, the phone displays the names starting with the character. Press [OK] to move
to quick search. Search for the number with , and then press [OK].
● If you save the message, you can select the saved message and send it.
● You can save up to 30 messages.
● For the receiver who failed to receive the message, a fail list is made, displaying the resend message.
● If you receive a call while you entering message, the message is saved automatically.
V720·87

XI. SMS
3. Alert Method
[Msg] ▶ Alert Method ▶ Select a sub menu
1. Reminder Tone
2. View Msg
View Msg
88·V720
You can select the reminder tone.
Reminder Tone ▶ Select an option
Once : One reminder tone for a message
Every 2 Min : Every 2 minutes before you read the message
Off : No reminder tone but flickering lamp.
You can select the way how the message is noticed on the LCD.
Full : The initial text line is displayed on the LCD. You can read the full text with .
Title : The type and caller number is displayed.
Off : Only the message icon ‘ ’is displayed.

3. Msg Sound
You can select the alert tone.
● SMS sound 1~5
Msg Sound
4. Deleting Message
You can delete the received message or the stored message.
1. Deleting individual message
Msg] ▶ Select the message type (Voice/Text) ▶ Select the message to delete ▶ [DEL] ▶
[
Select value
XI. SMS
V720·89

XI. SMS
2. Delete All
[Msg] ▶ Delete Msgs ▶ Select the message type ▶ Select value
● The ‘Locked’message is not deleted. You need to clear Message Lock first.
(See P.84 for Message Lock.)
● Voice messages must be deleted from the voice mailbox.
90·V720

XI. SMS
V720·91

V720
XII. WAP
1. Accessing GoNext 93
XII. WAP
1. Accessing GoNext
GoNext is an interactive information service that enables you to search internet on your mobile phone.
1. Accessing GoNext
Press [WWW] in the idle mode.
2. GoNext Menu
Refresh : You can update the current site.
New URL : You can enter the site address to visit.
Phone mode : You can go into the phone mode temporarily to us Phone Book, Tone Control,
Alarm/Timer, and PIMS.
TOP URL : You can move to the top site. Press and hold .
conneting
●‘ ’and ‘ ’are displayed on the LCD while you are connected to GoNext.
V720·93

XII. WAP
94·V720
V720
XIII. Appendix
1. Accessories 96
2. Troubleshooting 97
XIII. Appendix
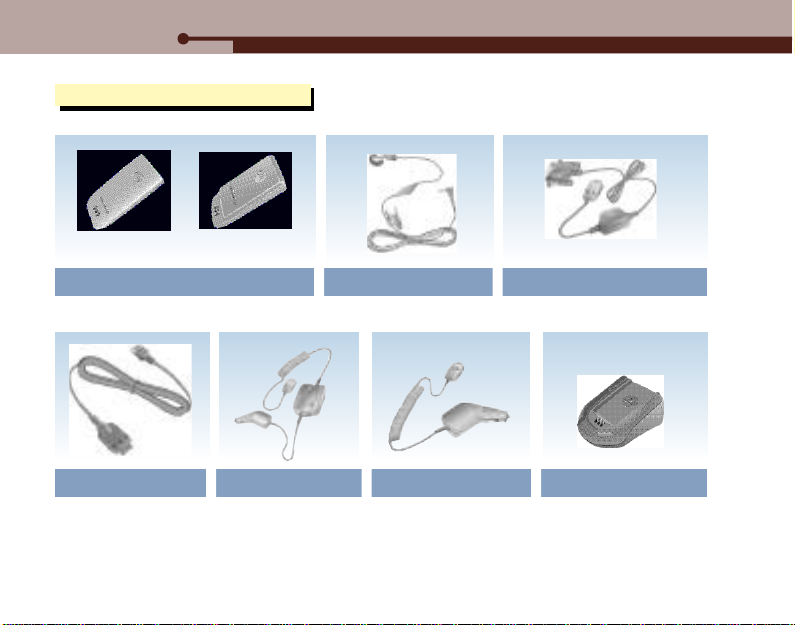
1. Accessories
Battery Pack
9 3 0 m A h ( V 7 2 0 )5 5 0 m A h ( V 7 2 0 )
Earmic Data Communication Cable
Cable Charger
96·V720
Handsfree kit Cigar Lighter Charger
Desktop Charger

XIII. Appendix
2. Troubleshooting
● Nothing displayed on the screen
- Check the battery pack state. (Discharged or connected wrong)
● No antenna graphic displayed on the screen
- Move to other place and attempt a call again.
● Alarms heard when a call is placed
- There is no communication channel available or difficulty in communicating with the base station. Press to end
the call and press to redial.
● Charging lamp on the charger flashes in red
- Check the location of the battery pack and then attempt a call again. Clean the terminals and attempt a call again. If
the lamp keeps flashing in spite of several attempts, contact the nearest Motorola service center.
● Battery pack operating time is different from the explanation in the User’s Manual.
- If you charge and discharge the battery pack continuously, its operating time becomes shorter gradually than when
purchased. If the charged battery pack is exposed to low or high temperature, its operating time may varies.
● Malfunctions arisen during using the phone or no power ON
- Remove the battery pack and reinstall it, and then turn the power ON.
V720·97
 Loading...