


APPLICANT: MOTOROLA, INC. FCC ID: IHDT5AG1
INSTRUCTION MANUAL
A preliminary draft copy of the Users Manual follows:
EXHIBIT 8
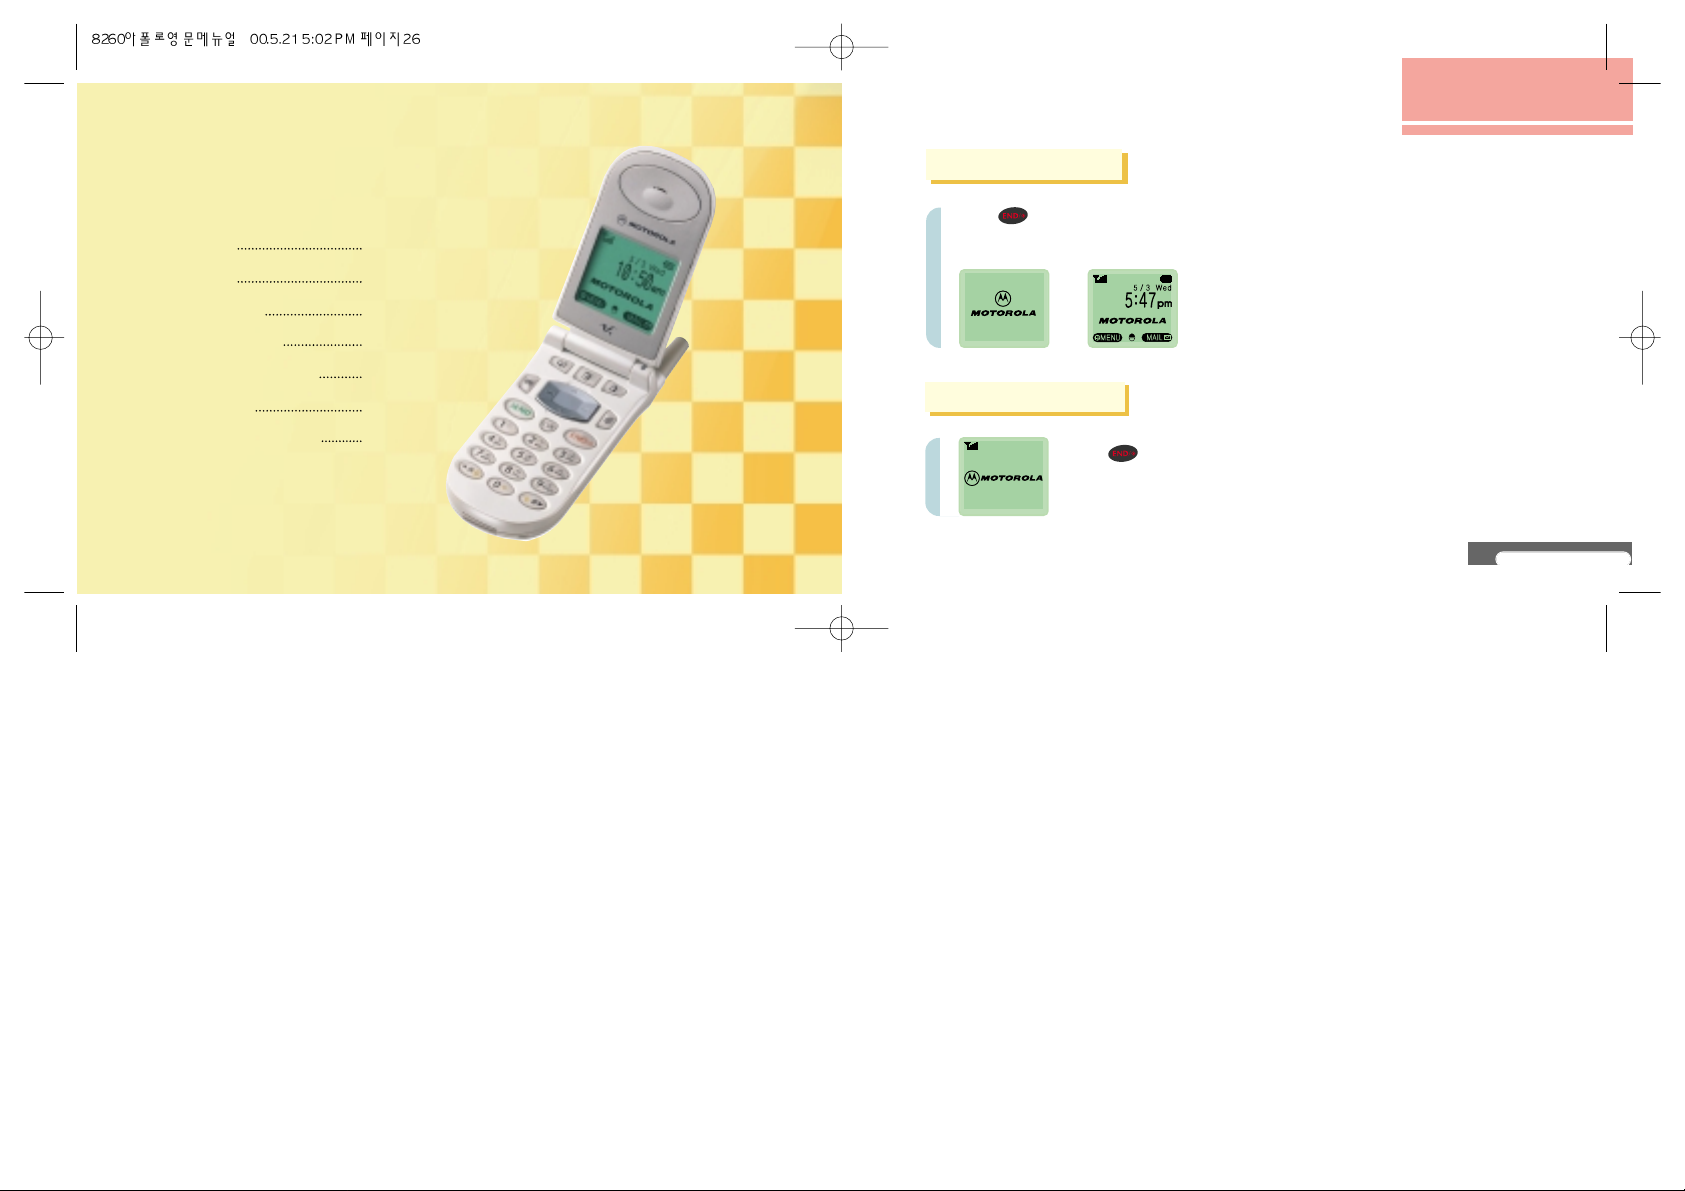
Welcome
Thank you for Motorola-a global leader in communications technology.
All Motorola celluler phones are designed and manufactured to meet Motorola’s exacting
specifications and world-class quality standards.
During development, our laboratory testing team took the durable “Motorola V” phone through its
paces. They cooked it, dusted it, and dropped it - the phone still worked !
We are confident that the one you purchase will meet your own exacting standards.
Thank you for choosing Motorola, and by all means, enjoy your “Motorola V” phone !
V8260
4
Exposure to Radio Frequency Signals
You wireless handheld portable telephone is a low power radio transmitter and receiver.
When it is ON, it receives and also sends out radio frequency (RF) signals.
International Commission on Non-Ionizing Radiation Protection (ICNIRP) 1996
Verband Deutscher Elektrotechniker(VDE) DIN-0848
United States Federal Communications Commission, Radio Frequency Exposure
Guidelines(1996)
National Radiological Protection Board of the United Kingdom, GS 11, 1988
American National Standards Institute(ANSI) IEEE. C95. 1-1992
National Council on Radiation Protection and Measurements(NCRP). Report 86
Department of Health and Welfare Canada. Safety Code 6.
V8260
5
These standards were based on extensive scientific review. For example, over 120
scientists, engineers, and physicians from universities, government health agencies, and
industry reviewed the available body of research to develop the updated ANSI Standard.
The design of your phone complies with these standards when used normally.
Antenna Care
Use only the supplied or an approved replacement antenna. Unauthorized antennas,
modifications, or attachment could damage the phone and may violate local agency
regulations.
Phone Operation
Normal Operation
Hold the phone as you world any other telephone, with the antenna pointed up and over
your shoulder.
Tips on Efficient Operation:
Observe the following guidelines to operate your phone most efficienty.
- Extend your antenna fully.
- Do not touch the antenna unnecessarily when the phone is in use.
Contact with the antenna affects call quality and may cause the phone to operate at a
higher power level otherwise needed.
SAFETY INFORMA TION
V8260
6
Batteries
CAUTION ! All batteries can cause property damage, injury or burns if a conductive
material, such as jewelry, keys or beaded chains, touches exposed terminals. The material
may complete an electrical circuit and become quite hot. To protect against such
unwanted current drain, exercise car in handing and charged battery, particularly when
placing it inside your pocket, purse or other container with metal objects.
Driving
Check the laws and regulations on the use of wireless telephones in the areas where you
drive. Always obey them. Observe the following guidelines when using your phone while
driving.
Give full attention to driving-driving safely is your first responsibility;
Use hands-free phone operation, if available.
Pull off the road and park before making or answering a call if driving conditions to
require.
V8260
7
Vehicles
RF signals may affect improperly installed or inadequately shielded electronic systems in
motor vehicles. Check with the manufacturer of any equipment that has been added to
your vehicle.
For Vehicles Equipped with an Air Bag
An air bag inflates with great force. DO NOT place objects, including both installed or
portable wireless equipment, in the area over the bag or in the air bag deployment area. If
in-vehicle wireless equipment is improperly installed and the air bag inflates, serious injury
could result.
Electronic Devices
Most modern electronic equipment is shielded from RF signals. However, certain
electronic equipment may not be shielded against the RF signals from your wireless
phone.
Pacemakers
The Health Industry Manufactures Association recommends that a minimum separation on
V8260
8
six (6 ) inches be maintained between a handheld wireless phone and a pacemaker to avoid
potential interference with the pacemaker. These recommendations are consistent with the
independent research by and recommendations of Wireless Technology Research.
Person with pacemakers:
- Should ALWAYS keep the phone more than six inches from their pacemaker when the phone
is turned ON;
- Should not carry the phone in a breast pocket;
- Should use the ear opposite the pacemaker to minimize the potential for interference.
- Should turn the phone OFF immediately if you have any reason to suspect that interference is
taking place.
Other medical devices
If you use any other personal medical device, consult the manufacture of your device to
determine if it is adequately shielded from external RF energy. Your physician may be able to
assist you in obtaining this information.
V8260
9
Hearing Aids
Some digital wireless phones may interfere with some hearing aids. In the event of such
interference, you ,may want to consult your hearing aid manufacture to discuss alternatives.
Aircraft
Airline regulations prohibit using your phone while in the air.
Switch OFF your phone before boarding an aircraft.
Potentially Explosive Atmospheres
Turn your phone Off when in any area with a potentially explosive atmosphere, and obey all
signs and instruction. Sparks in such areas could cause an explosion or fire resulting in
bodily injury or even death.
Areas with a potentially explosive atmosphere are often, but not always, clearly marked. The
include fueling areas such as gasoline station; below deck on boats, fuel or chemical
transfer or storage facilities; vehicles using liquefied petroleum has (such as propane or
butane); area where the air contains chemicals or particles, such as grain, dust, or metal
powders; and any other area where you would normally be advised to turn off your vehicle
engine.
V8260
10
BEFORE USE
Confirm Components
Name and Function of Each Part
Function of Each Button
Description of Display Symbols
How to Use Battery
Assemble Battery Pack
Dissemble Battery Pack
Battery Pack Management Information
How to charge Battery Pack
Charge State of Battery Pack
Charge Time of Battery Pack
Use Time of Battery Pack
Low Voltage Warning
Precautions in Use
HOW TO USE BASIC FUNCTIONS
Turn on power
Turn off power
Make a phone call
Receive a phone call
Indicate CALL in absence
Electronic dialing
List of originating numbers
HOW TO USE MENU FUNCTIONS
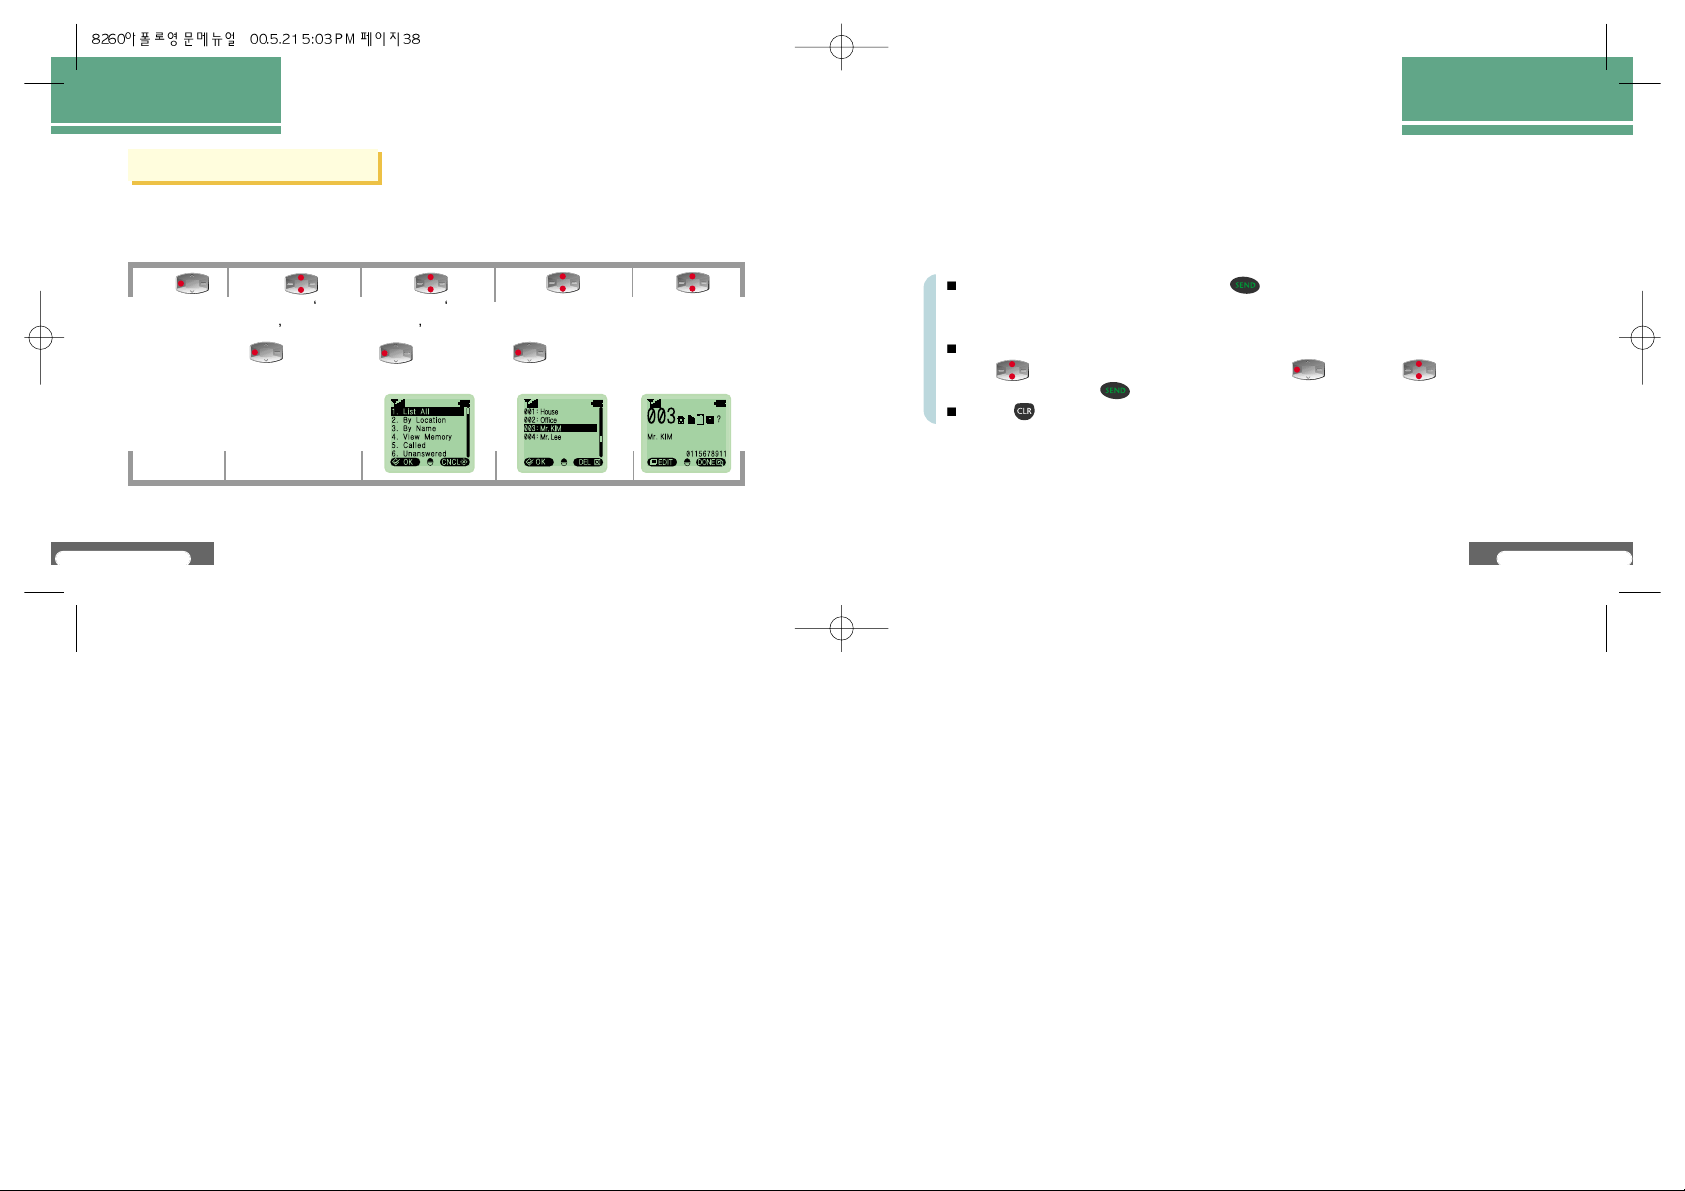
Phone Book
Save Phone Book
Set Turbo Dial
Correct and Edit
Delete
Search Phone Book
Fast Search
By location
By Name
View Memory
Called
Unanswered
View My No.
Tone Control
Bell/Melody
Ring/Vib
Ringer Vol.
Earpiece Vol.
Keypad Tone
Link Tone
Sending Tone
14
15
16
17
18
18
18
19
20
22
23
24
25
25
27
27
28
29
29
30
31
14
15
16
17
18
18
18
19
20
22
23
24
25
25
27
27
28
29
29
30
31
V8260
11
Alarm/Timer
Alarm
Set Alarm
Clear Alarm
World Times
User Times
Individual
All Calls
Roam Calls
Reset Timer
One Minute
PIMS
Schedule
Save Schedule
Confirm Schedule
Delete Schedule
Work Plan
Save Work Plan
Confirm Work Plan
Delete Work Plan
Calculator
Calendar
Features
Bklt Color
Bklt Time
Banner
City Code
Intl. Code
Service Lamp
Auto Hyphen
Redial
Call Answer
LCD Contrast
Lock/Security
Lock Mode
Set Lock
Clear Lock
Emergency #
Change PWD
Clear Calls
Restrict
Default Mode
Second Number
Register Second No.
Delete Second No.
Select Second No. Bell
Change NAM
S/W Version
54
54
55
58
60
62
64
65
66
67
68
69
69
70
72
73
74
75
76
77
78
79
80
80
81
82
83
84
85
86
87
88
89
90
90
90
91
92
93
94
95
96
97
97
98
99
100
101
CONTENTS
CONTENTS
V8260
12
Game
Car Race
Poker
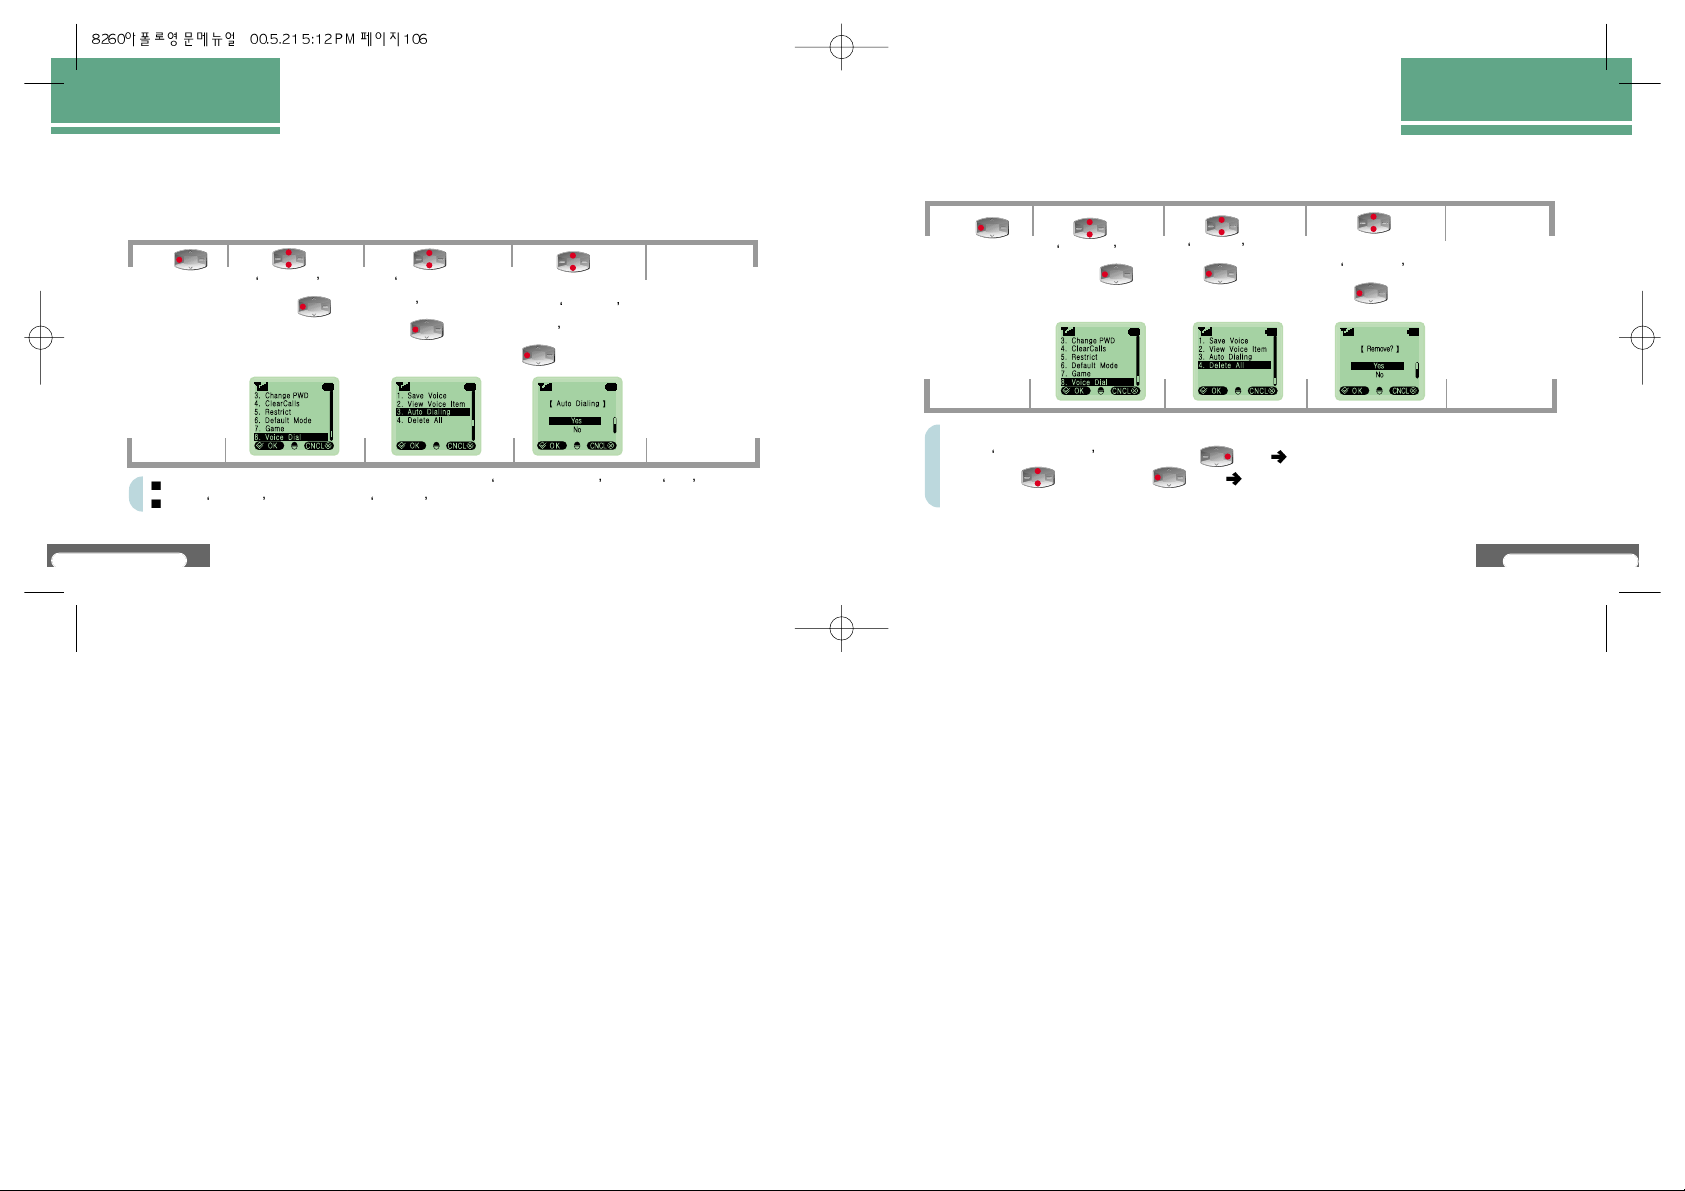
Voice Dial
Save Voice
View Voice Item
Auto Dialing
Delete All
Config Data
Data Speed
Receive Mode
FUNCTIONS USED DURING CALL
Control Earpiece
Memo During Call
Send My No.
Cut Sending Tone
MAIL
Enter Characters
Enter Korean Characters
Enter English Characters and Numbers
Enter Special Characters
Voice Mail
Text Mail
Sending Mail
To send
Recall Msgs
Delete Mail
Alert Method
Set Alert
Set Preview
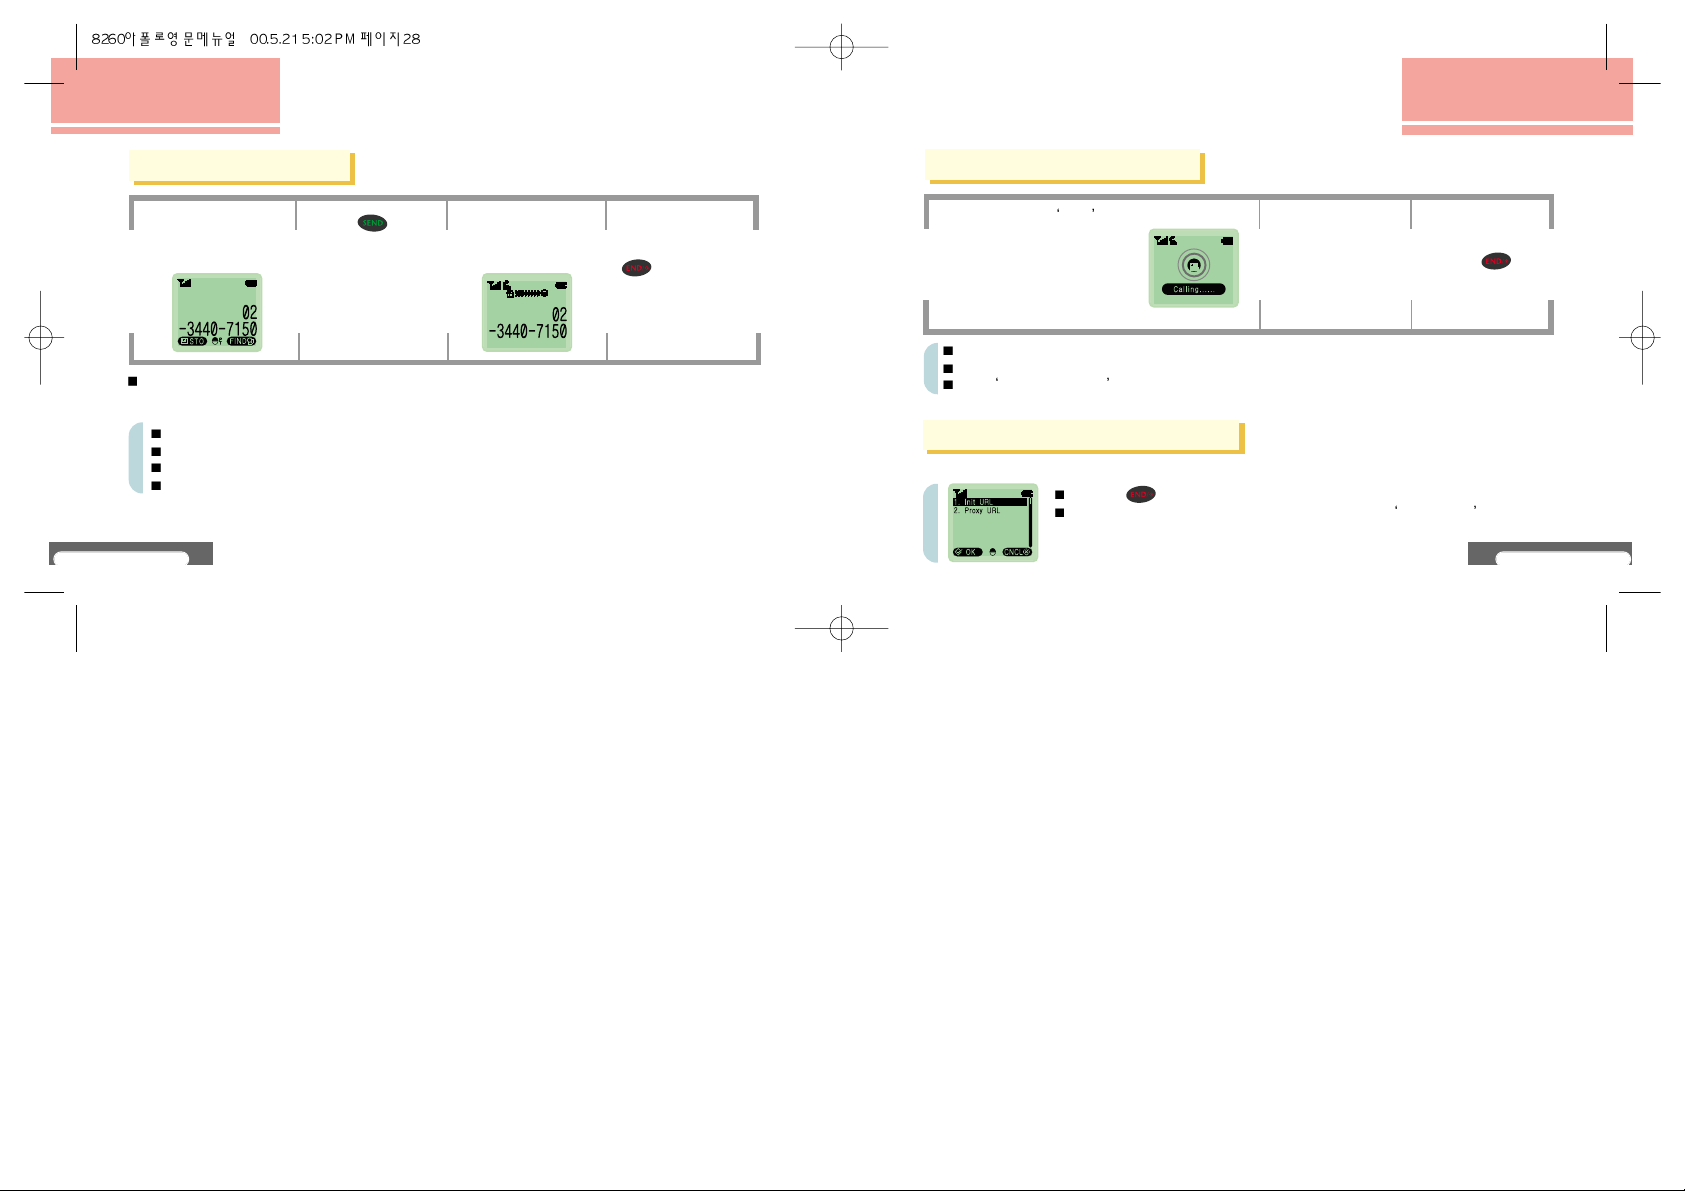
n.TOP Config
Init URL
Proxy URL
APPENDIX
Recording
n.TOP Function
Connect to n.TOP
Use n.TOP
Mybell Service
Wireless Data Communication Service
How to use ear microphone
Before thinking it is out of order
Motorola Service Center
Quality Assurance
102
103
103
104
104
105
106
107
108
108
109
111
111
112
112
114
114
116
117
118
120
122
122
124
126
127
127
128
129
129
130
132
134
134
134
135
136
137
138
140
145
Confirm Components 14
Name and Function of Each Part 15
Function of Each Button 16
Description of Display State Symbols 17
How to Use Battery 18
Precautions In Use 25
BEFORE USE
CONTENTS

V8260
14
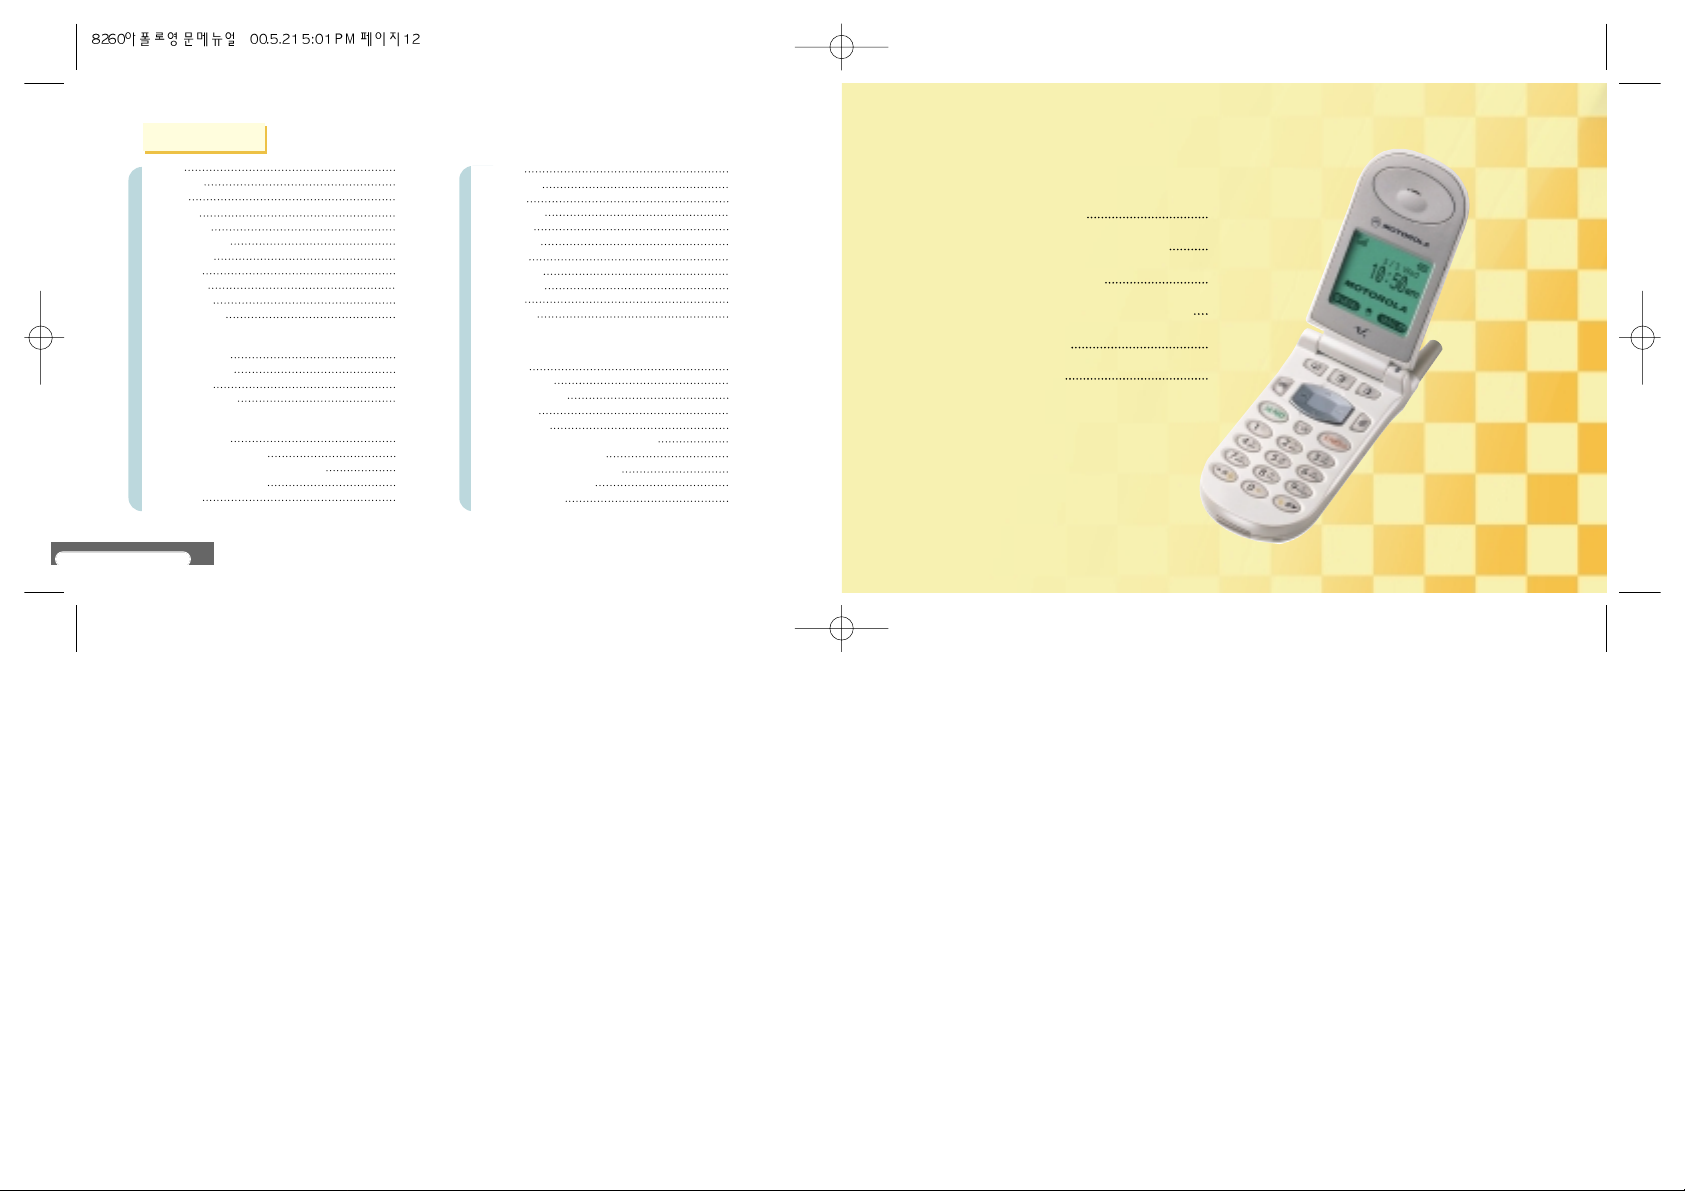
BEFORE USE
Portable Phone Battery Pack Desktop Charger
User Manual Leather Holster
Components may vary with specifications of service providers.
Charger
(DC power unit)
(V8260/500 mAh)
(V8260/900 mAh)
Confirm Components
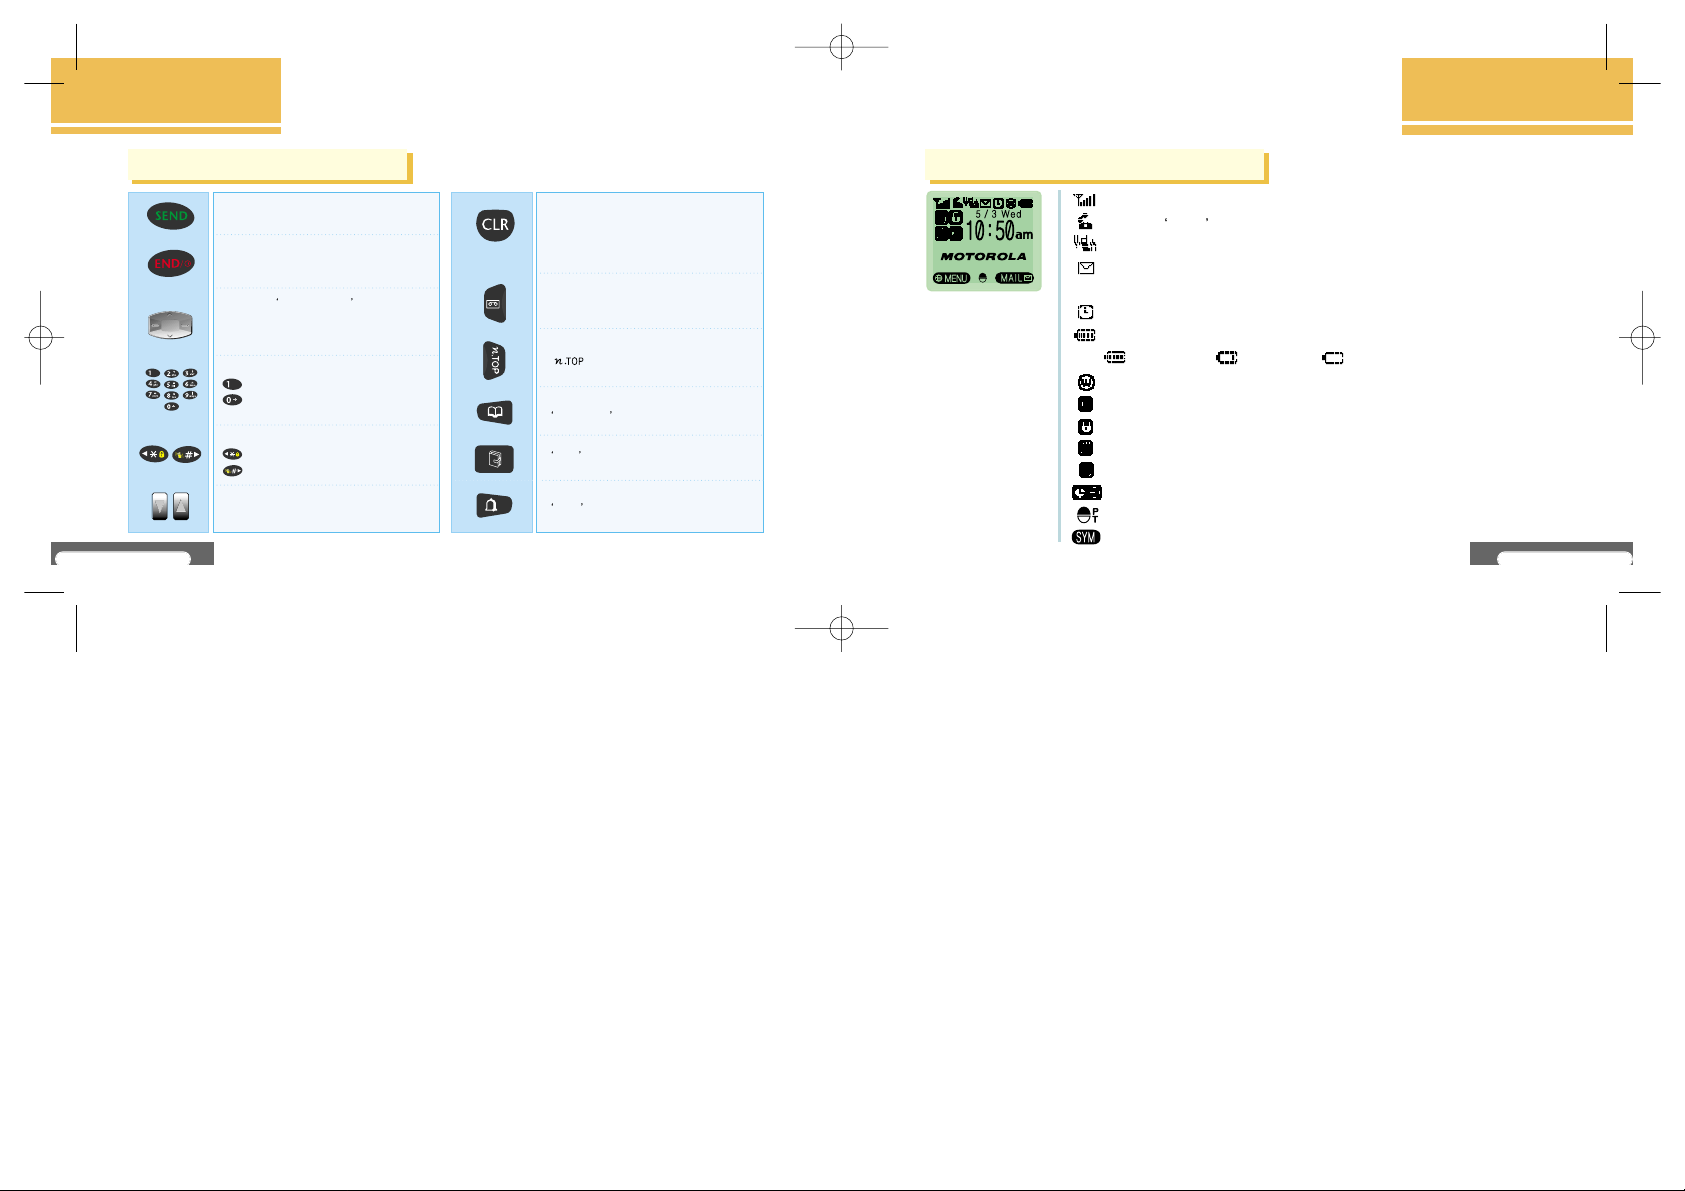
BEFORE USE
Receiver
Antenna
LCD display
Volume button
Ear-microphone terminal
Sender
Service Lamp
Dial button
Power cable connection jack
Name and Functions of Each Part
V8260
15
BEFORE USE
V8260
16
BEFORE USE
Makes or receives a call
Turns the phone on and off,
Ends a call and ends the selected
Function to convert to initial menu
Left/Right - Selects/Cancels a menu
Up/Down - Searches entries
(If held down while searching,searches
automatically)
Dial Buttons - Enters numbers and characters
Emergency dialing (See P.92)
International call abbreviated dialing (See P.84)
Scroll button - searches menu sequentially
Lock/Unlock (See P.90)
Etiquette set/clear (See P.47)
Volume button - Searches menu item and
control volume during call (See P.111)
When entering a character or number,
corrects or erases it
- Pressing briefly: erase one character by one
- Pressing long: erase all
Records call and voice (See P.132~133)
one-touch dialing (See P.134)
Phone Book one-touch dialing (See P.41)
PIMS one-touch dialing (See P.70)
Alarm one-touch dialing (See P.55)
Functions of Each Button
BEFORE USE
When attempting a call or in use, indicates signal strength of the area
Indicates
In Use state. Indicated when attempting a call or in use.
Indicates the received tone is a vibration mode.
Indicates that a message is received. Indicated when voice mail or text mail is
received. Disappears when message is opened.
Indicates that alarm is set. Disappears when alarm is cleared.
Indicates the current remaining battery charge
Full charged low charged needs immediate charging
Indicates that n.TOP is connected to Internet.
Indicates that Etiquette is set. Disappears when the function is cleared.
Indicates that the phone is locked. Disappears when it is unlocked.
Displayed when using ear-microphone.
Displayed when using Handsfree.
Displayed when User Times is set.
Indicates electronic dial can be entered. (See P.30)
Indicates that special characters can be entered. (See P.117)
Description of Display Symbols
V8260
17
BEFORE USE
V8260
18
BEFORE USE
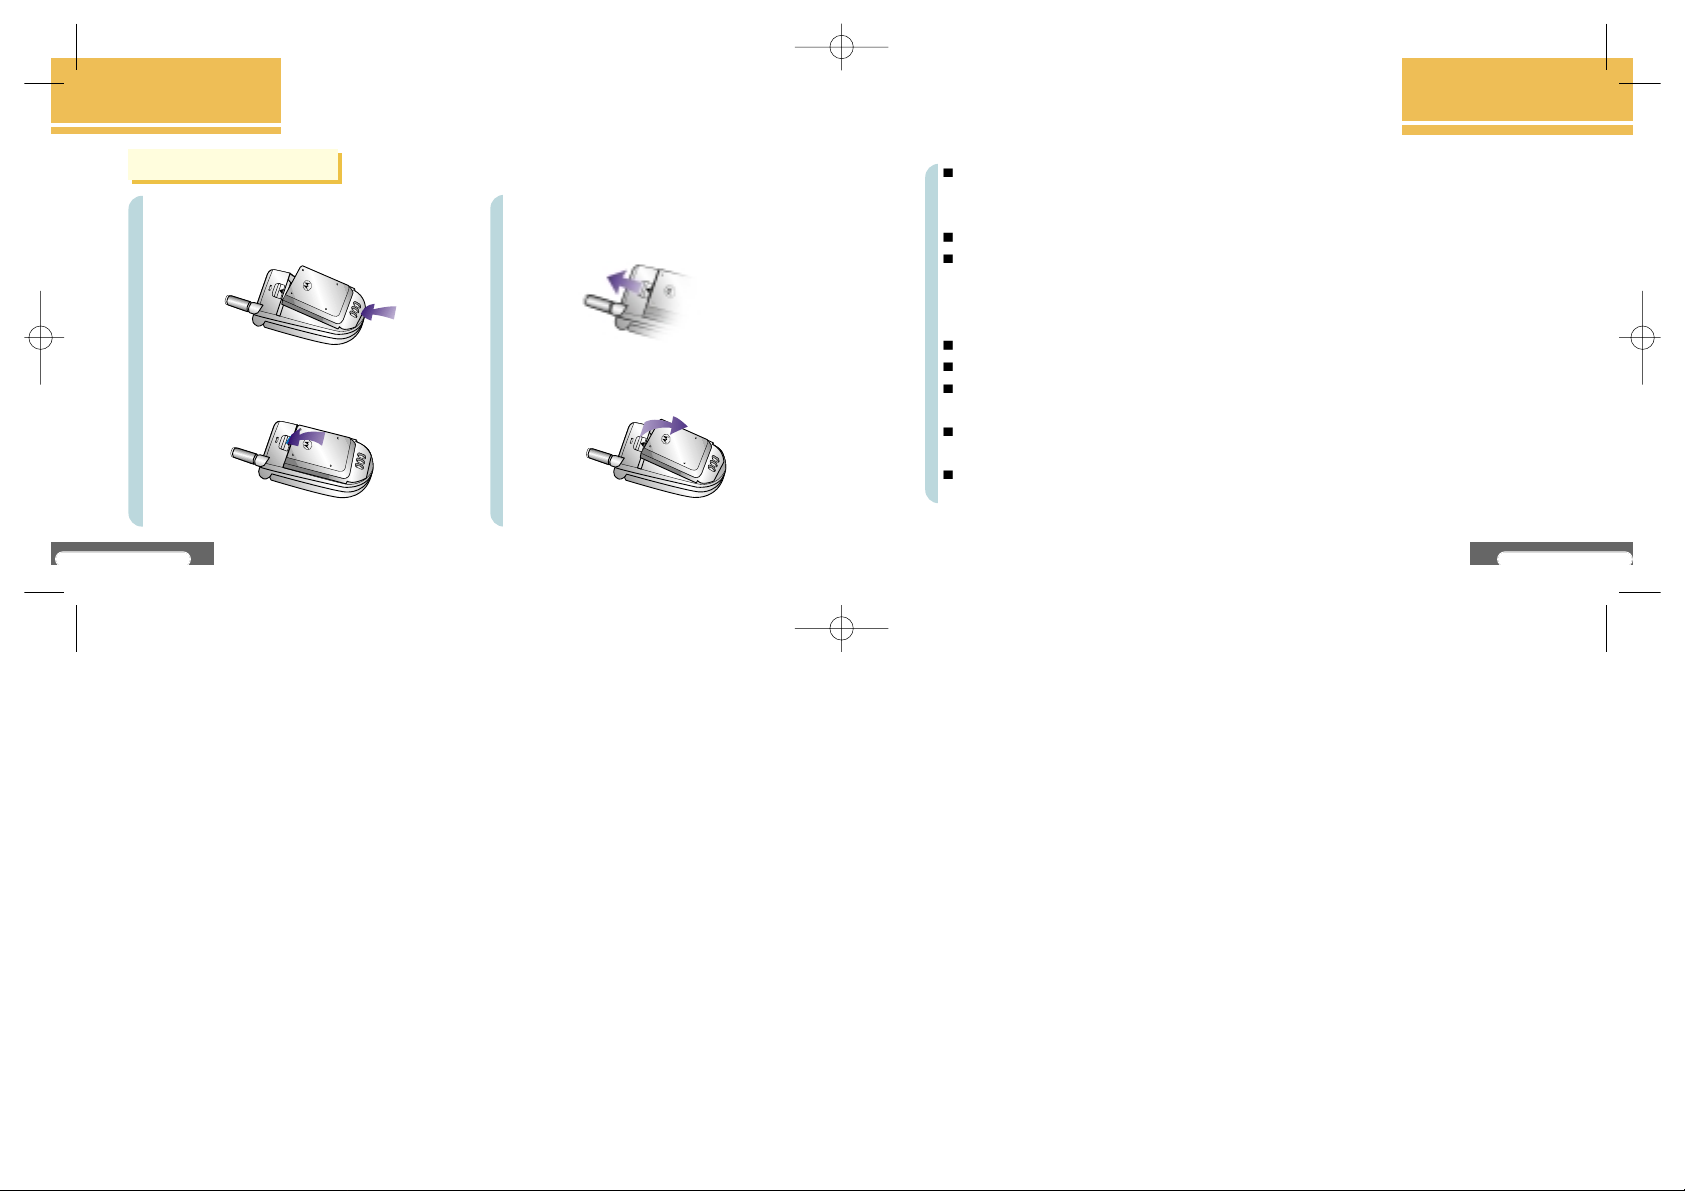
Assemble battery pack
Fit a battery pack correctly onto the indent of the
phone.
Push it downwards in the arrow direction until it
clicks into place.
Dissemble battery pack
Push dissembling button upwards.
Dissemble battery pack from phone.
How to Use Battery
BEFORE USE
Battery pack management information
Make sure to use the designated dedicated charger and battery pack.
Make sure to use the dedicated charger, or otherwise it may give damage to battery pack
or in danger of explosion.
Never make short circuit of connection terminal of battery pack, it may be in danger of explosion.
Always charge and store battery pack in room temperature.
If charging in too hot places (inside car in summer, near firearms) or too cold places, it is not well
charged and lamp turns into orange color. And, in case of storing it for a long period, battery
charge will be decreased, reducing use time.
Never dissemble or put charger and battery pack near firearms.
Store charger and battery pack out of reach of children.
Take precautions not to apply strong shock to battery pack or not to drop it, it may be
out of order or life may decrease.
Manage charger and battery pack in clean conditions. If foreign matter is attached to the metal part
of the connection terminal of charger and battery pack, it may not be charged.
Since battery pack for charging is a consumption goods, repeating charging and discharging will
reduce life. If use time is reduced to about half, purchase and use a new a battery pack.
V8260
19
BEFORE USE
V8260
20
BEFORE USE
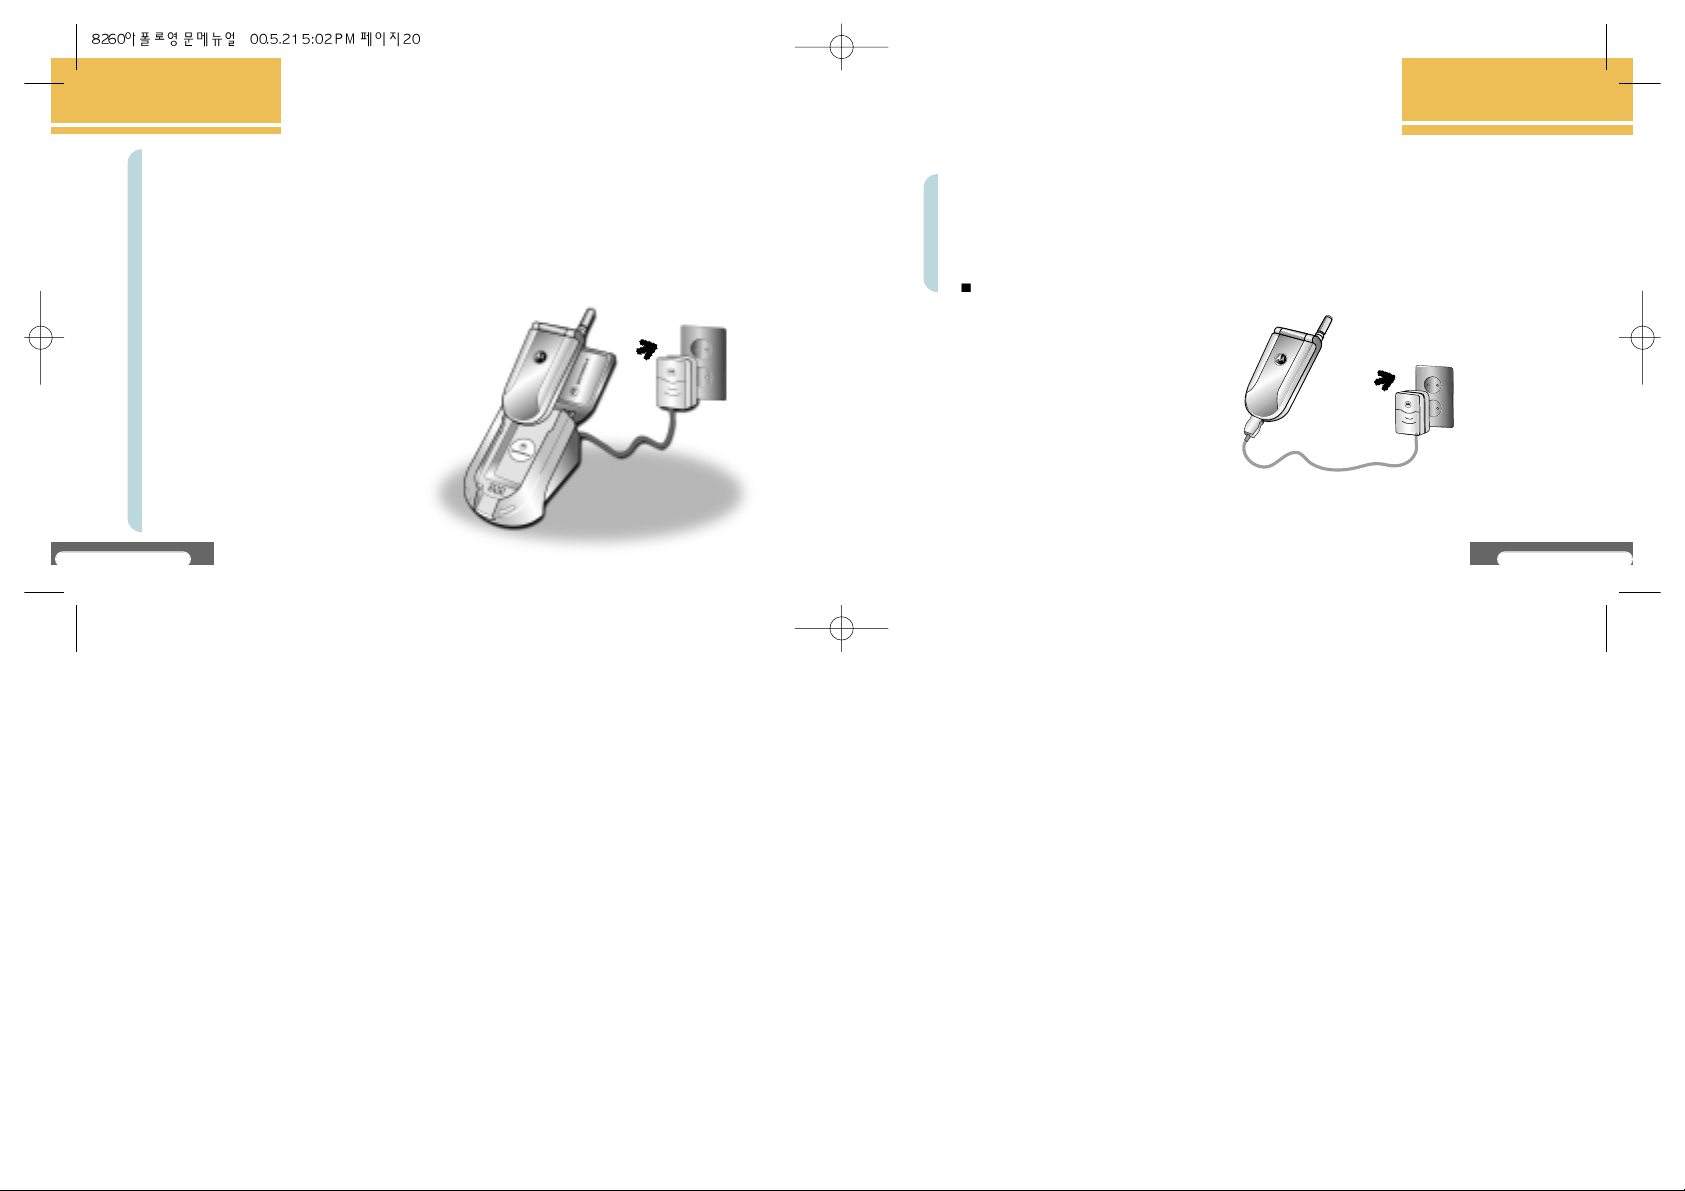
Charging with power cable
1. Connect power cable to charger (DC power unit) and plug power adapter in outlet.
2. Insert power cable jack to connection part of bottom of the phone.
3. Charge state is indicated on lamp of charger (DC power unit).
Purchase power cable additionally in near agent.
BEFORE USE
V8260
21
BEFORE USE
How to charge battery pack
When purchasing the product, it is not fully charged so use it after charging fully.
Charging with desktop charger
1. Connect desktop charger to charger (DC power unit) and plug power adapter in outlet.
2. Charge by inserting the phone in the front charging socket of the desktop charger
and battery pack in the rear socket. First charge the phone inserted in the front
charging socket.
3. Charge state is indicated on lamp of desktop charger.
220V
220V
Front charging socket
(left lamp)
Rear charging socket
(left lamp)
V8260
22
BEFORE USE
Charge state of battery pack
Charging method
Charging with power cable
Charging with desktop
charger
Classification
-
Waiting to
charging
-
-
Orange
Charging in
progress
Red
Red
Red
Charging
completed
Green
Green
Green
Charger lamp
(DC power unit) is turned off
When charging with desktop charger
Charge state is indicated on lamp of desktop charger.
< When lamp blinks in red >
This indicates that connection state of charging terminal is not good. Confirm the cleanness state
of battery pack and retry.
This indicates that battery pack is over-discharged, and after a short time, lamp returns into normal
color and charging begins.
This indicates that battery pack or other components are faulty, contact service center.
< When lamp is orange >
This indicates that charging is in waiting state or, the phone is being charged in too hot or to cold
places.
When the temperature returns to room temperature, lamp changes into red and charging begins.
When charging with power cable
Charge state is indicated on lamp of charger (DC power unit).
< When lamp blinks in red >
This indicates that connection state of charging terminal is not good. Again connect charger (DC
power unit) jack to the phone.
This indicates that battery pack or other components are faulty, contact service center.
Charge time of battery pack (when phone is turned off)
Charge time may vary with battery pack state.
In case AC power applied to power adapter is low, charge time may be longer.
If surrounding temperature is too high or too low, the phone is not well charged. Always charge in
room temperature.
BEFORE USE
V8260/500 mAh
About 90 minutes
Classification
Time
V8260/900 mAh
About 130 minutes
V8260
23
BEFORE USE
V8260
24
BEFORE USE
Low voltage warning
If battery pack is almost used out, beep-beep sound is heard and blinks.
If continuing to use it, power of the phone is turned off after a short time. Charge immediately.
If blinks, even though pressing button, display and button LCD is not turned on and
message receiving, saving and setup function is not normally supported. Immediately charge and use it.
Make sure to use the designated dedicated battery pack and charger.
When using the unauthorized battery pack and charger, service is not provided.
Do not use in areas with high temperature and humidity. If the phone is immersed in water, it may
cause faults and repair may be impossible. When the phone is in wet state, never turn on the power.
Dissemble the battery pack and ask for repair in the near service center.
Do not dissemble or modify the phone. If dissembling it at your own way, you cannot be provided with
free service.
Avoid vibration or shock to the phone and when not in use, store it in places where shock may be
avoided.
When using the phone, do not hold or contact antenna.
Do not wash the phone with chemical solution such as solvent or thinner.
BEFORE USE
Precautions in use
V8260
25
BEFORE USE
V8260/500 mAh
About 100 minutes
About 40~110 hours
Classification
Continuous call
Continuous waiting
V8260/900 mAh
About 180 minutes
About 90~200 hours
Use time of battery pack
Continuous waiting time is based on slot mode 2 and varies with service type of service provider.
In call state, more power is consumed than in waiting state, and the longer call duration is, the
shorter waiting time is.
When receiving a call, the same amount of time is consumed as when making a call.
In areas where service is provided, waiting time becomes shorter.
Use time varies with charge state, temperature (low temperature/high temperature) and wave state of
location in use and surrounding illumination state.
What is slot mode?
The cellular phone makes a call possible by informing the location of the phone user to BTS while
communicating with
BTS every specified interval. This is called slot mode, and the more number of times of communication with
BTS is, the shorter waiting time is.
V8260
27
Press button long
Service lamp is turned on, Motorola logo is displayed and after a short time, display
turns into initial display.
HOW TO USE BASIC FUNCTIONS
Press button long
Motorola logo disappears and power is turned off.
Turn on power
Turn off power
Turn on power
Turn off power
Make a phone call
Receive a phone call
Indicate CALL in absence
Electronic dialing
List of originating numbers
HOW TO USE BASIC
FUNCTIONS
27
27
28
29
29
30
31
HOW TO USE BASIC FUNCTIONS
V8260
29
Phone rings and the CALL
message is displayed as in the right
screen.
Opens Folder and
receives the call.
When call ends,
closes Folder or
presses
button.
In case the user has not received a call, the following is displayed on screen.
Pressing button returns the display to the initial screen
Telephone numbers received in absence are stored in Unanswered list.(See P.44)
HOW TO USE BASIC FUNCTIONS
V8260
28
Press area code and phone
number.
Press button.
Calling
When call is ended,
close folder or press
button.
Making a phone call in other ways
Make a phone call
In case a call is not connected, redialing is made. (See P.87)
Receiving a phone call
Indicating Call in absence
If it is set to Vibrate or Lamp, the phone vibrates or lamp blinks.
When the Folder is open, press any button.
When Automatic Answer is set, ringer tone rings three time and call is automatically connected.
Making a call with turbo dial : Press long the last number of the address set. (See P.35)
Making a call with electronic dialing : Convenient when using ARS. (See P.30)
Making a call with emergency call : Can make a call even when the phone is in LOCK state. (See P.92)
Making a call with voice dial : Can make a call with voice without pressing DIAL button (See P.104~107)
P stops continuously : To enter P after telephone number, press . Number after
P is sent out only by pressing button.
T stop briefly : To enter T after telephone number, press . Number after T is
sent out after a while.
To store telephone number entered electronically in phone book, press [STO]
button. (See P.33~36)
HOW TO USE BASIC FUNCTIONS
V8260
31
Press
in initial screen.
HOW TO USE BASIC FUNCTIONS
V8260
30
When using ARS, enters multiple numbers in advance for convenient use. (telebanking, paging,
confirming voice mail)
Electronic dialing
Enter
telephone
number.
Press , enter
P or T and
dial number
electronically.
Pressing
button
connects to
the phone.
List of outgoing numbers
The list of telephone numbers the user called is displayed.
Confirming list of outgoing numbers
Press to move
to the desired list and
press [OK].
Contents of the selected
list of outgoing numbers
is displayed (outgoing
number, sequence, name,
date and time of call)
Storing list of outgoing numbers
When contents of the selected list of outgoing numbers is displayed, press [STO]
to store the list. (See P.33~36)
Erasing list of outgoing numbers
When the selected list of outgoing numbers is displayed, press [DEL] to erase the list. (See P.37)
(To erase all lists of outgoing numbers, erase in
Delete List . (See P.94)
In case of telephone number stored in storage address, the name is displayed.

Phone Book 33
T one Control 46
Alarm / Timer 54
PIMS 69
Features 80
Lock / Security 90
Game 102
Voice Mail 104
Config Data 108
HOW TO USE
MENU FUNCTIONS
HOW TO USE MENU FUNCTIONS
V8260
33
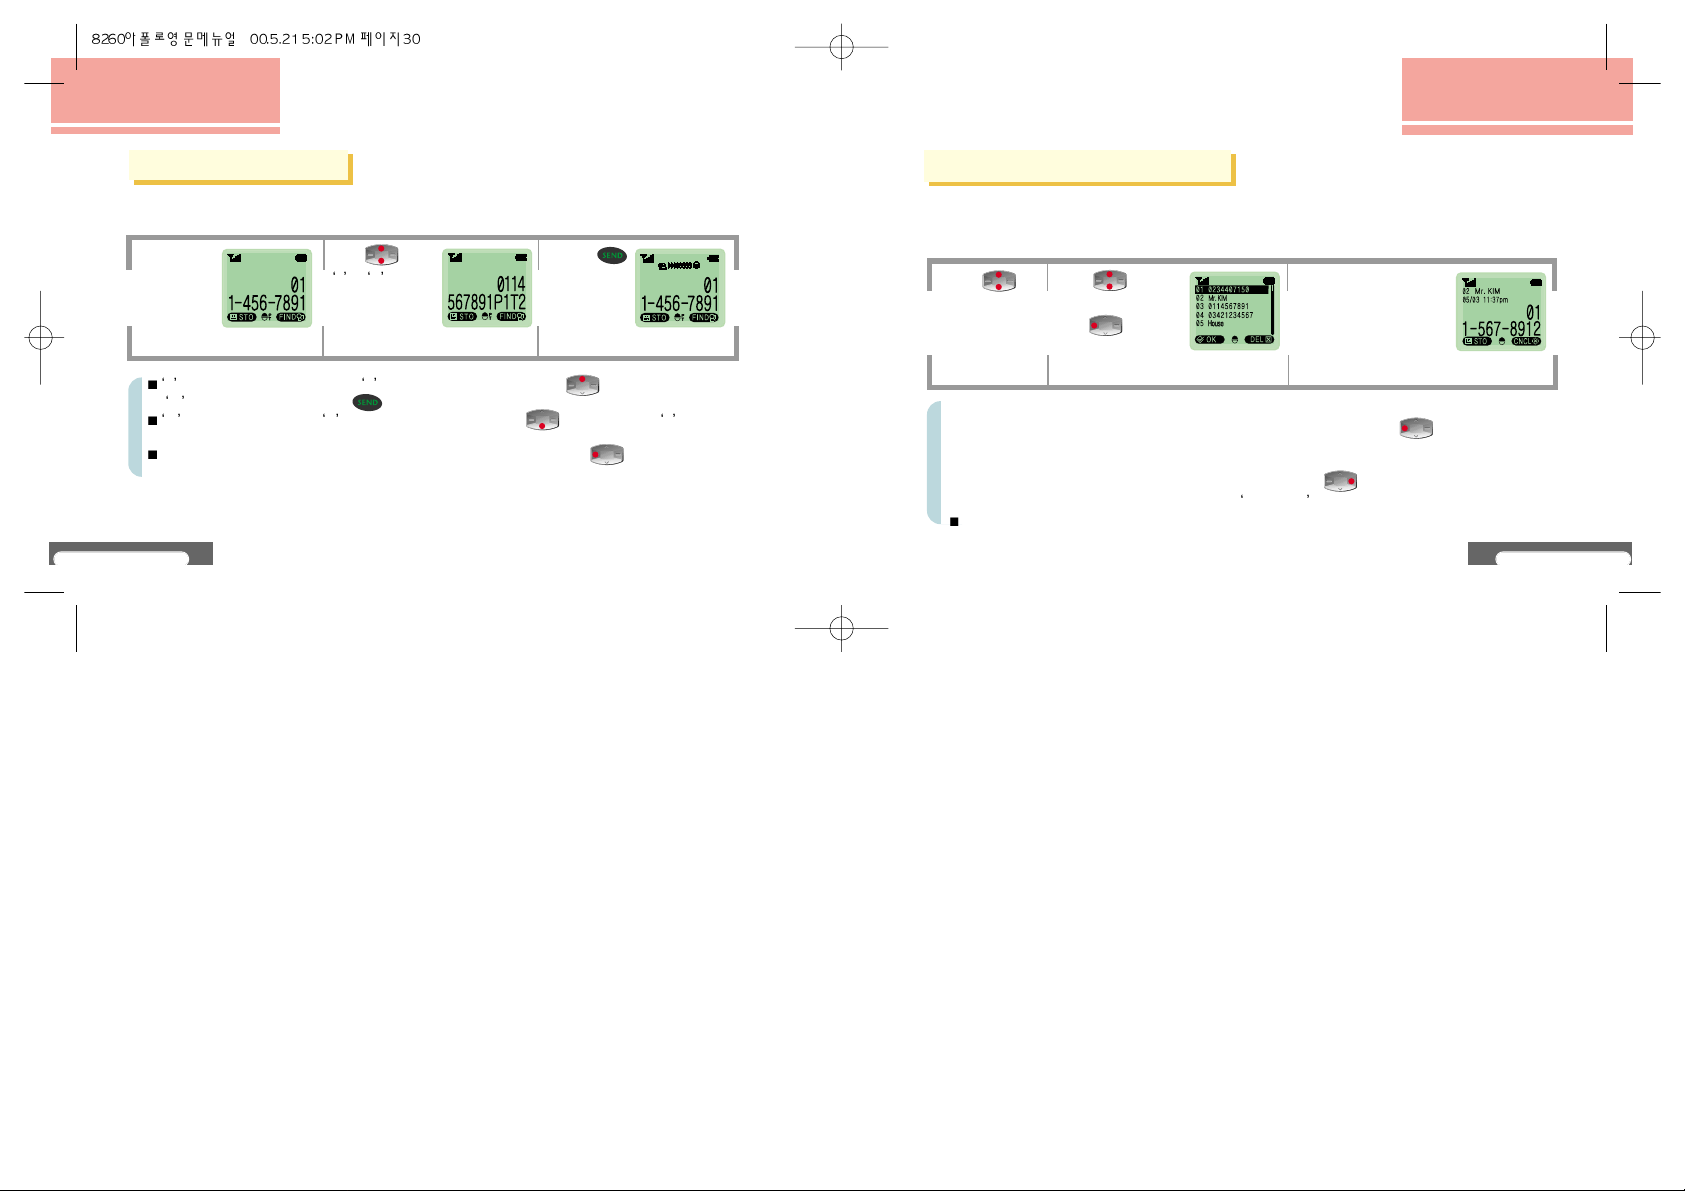
Enter a telephone
number and press
[STO].
Enter memory
address and press
[OK].
Enter the name to
store and press
[OK].
(See P.114~117)
After message is
displayed, Enter
next number is
displayed.
Press to move
to the icon to store
and press
[OK].
Phone Book
Storing in phone book
The phone can store up to 5 telephone number for a person and when you want to
retrieve them, you cam make a call with various search methods.

HOW TO USE MENU FUNCTIONS
V8260
34
After pressing telephone number, pressing [OK] can continue to store the next number.
Memory address shows the latest address available.
When designating memory address, the address in which telephone number is already
stored is indicated as [ADD/BACK].
Pressing [ADD] can additionally store telephone number in the icon not designated
of five icons. (See P.36)
Pressing [Dial] button or can enter the desired address.
The name to store can be stored up to 10 characters and 20 alphabets.
When entering name, if a name already stored exists, it is
Up to 200 addresses can be stored.
Home Company Portable phone Pager User customized
HOW TO USE MENU FUNCTIONS
V8260
35
Setting turbo dial
When making a phone call, pressing long the last number of the stored address make a
call to the telephone number of the icon in which turbo dial is set.
Turbo dial is set only in one icon of one storage address.
Only icons containing stored telephone number is displayed when setting turbo dial.
Setting or clearing turbo dial completes storing telephone number.
Enter the telephone number to store
and if
Enter next number is
displayed, press [DONE]
Press to move to the
icon in which to set turbo dial
and press [OK].
After message is
displayed, move to the
initial screen
HOW TO USE MENU FUNCTIONS
V8260
36
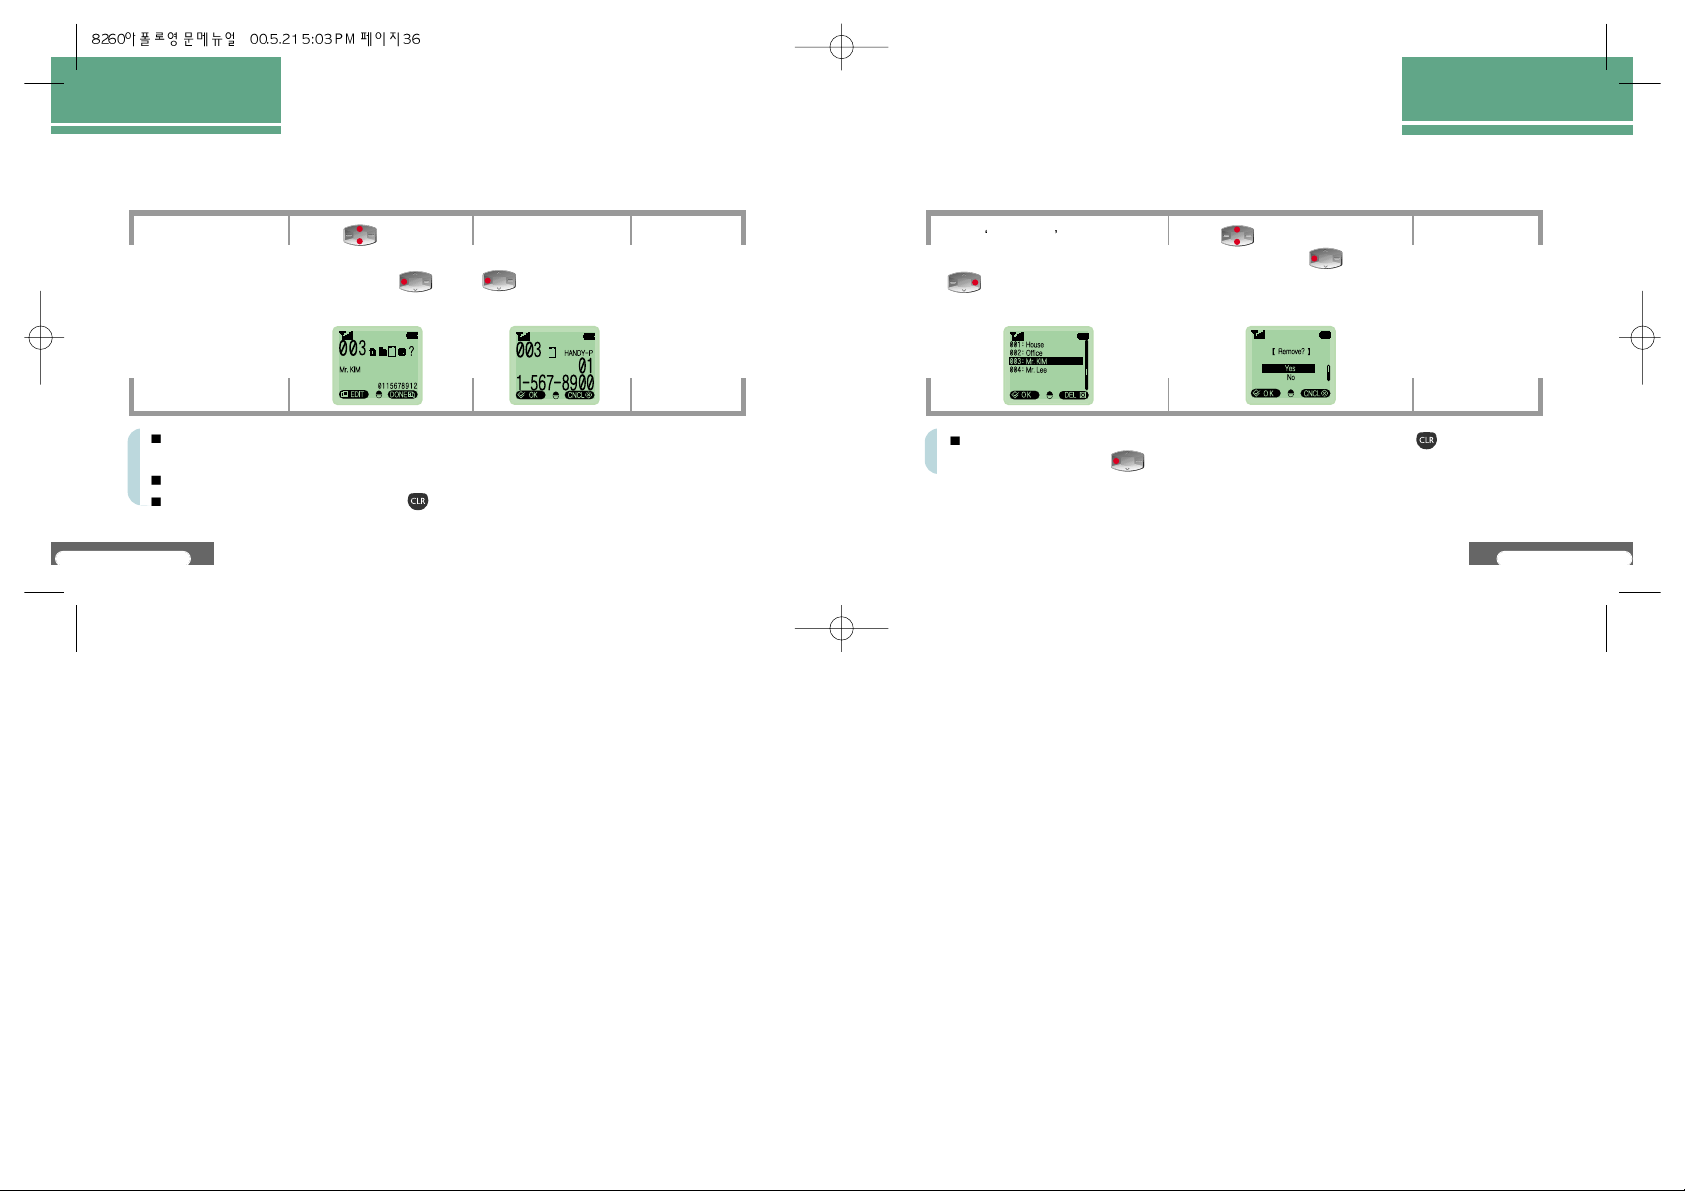
Correcting and editing
Corrects, adds or erases telephone number and name already stored.
Using phone book
search function, find and
select the address to
correct. (See P.38~41)
Press to move to the
icon to correct and name to
store and press [Edit].
After message is
displayed, move
to the previous
menu.
After correcting
telephone number, press
[OK].
In case there are telephone numbers stored when selecting the icon to store, telephone
number is displayed.
Selecting the name to store can correct the name.
To erase number when correcting, press button.
HOW TO USE MENU FUNCTIONS
V8260
37
Erasing
Erases stored contents.
Using Fast Search , find and move
to the address to erase, and press
[DEL]. (See P.38)
After message is
displayed, move to
the previous menu.
Press to move to the desired
setup value and press [OK].
To erase stored contents of icon in address, select the icon and press long button
to erase, and then press [OK].
HOW TO USE MENU FUNCTIONS
V8260
39
HOW TO USE MENU FUNCTIONS
V8260
38
Easily searches as it is indicated in the order of address.
Press
[MENU].
Press
to move to
Phone
Book and press
[OK].
Press
to move to Fast
Search and press
[OK].
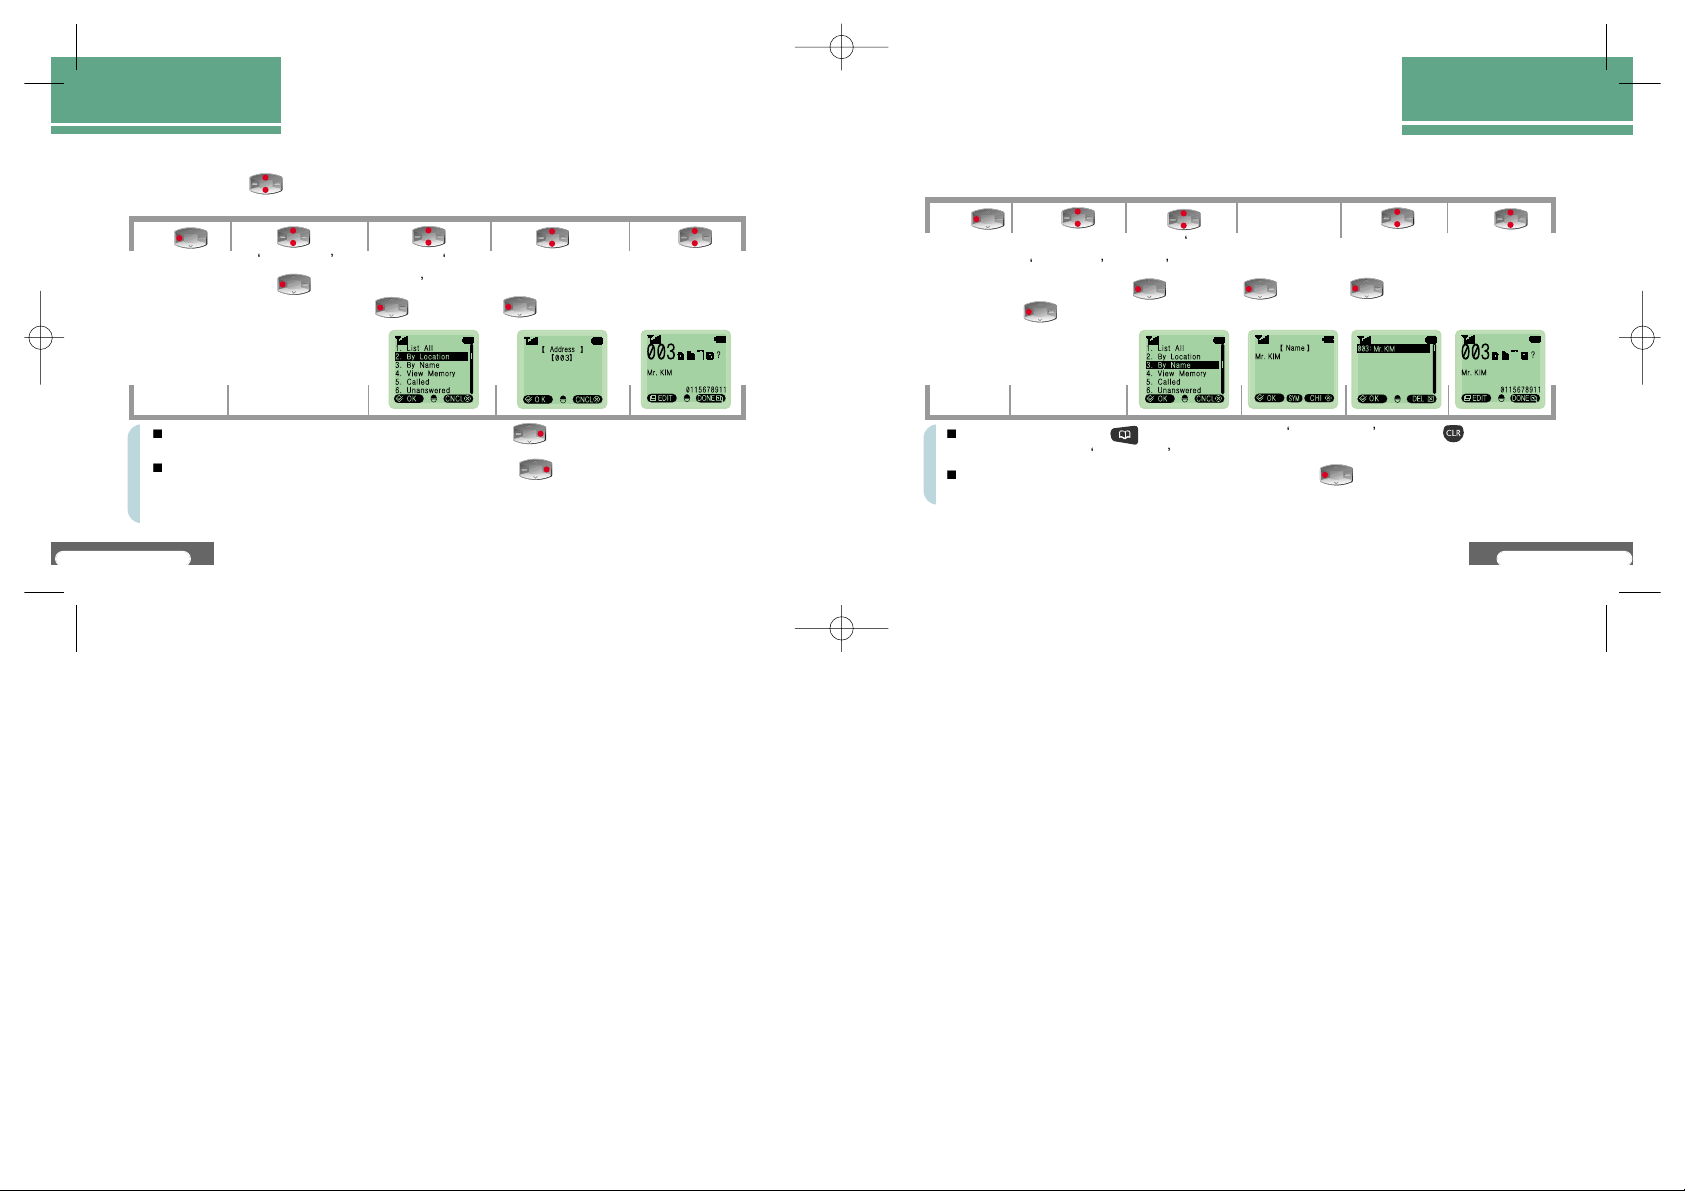
Searching phone book
Fast search
Press
to move to list to
search and press
[OK].
Press
to select icon to
search.
If you want a call to the address found, press button in the state that the desired address
is selected. Call is connected to the telephone number of the icon in which
turbo dial is set. (See P.35)
In case you want to make a call to telephone number f icon in which turbo dial is not set.
Press to move to the address to call to and press [OK]. Press to move to the
desired icon and press button.
Pressing button moves to the previous menu.
HOW TO USE MENU FUNCTIONS
HOW TO USE MENU FUNCTIONS
V8260
40
Finding by address
If the user presses or enters the address to find with [Dial] button, information of the designated
address is displayed.
Press
[MENU].
Press
to enter the address to
search and press
[OK].
Press
to select icon to
search.
Press to move
to Phone Book and
press [OK].
Press
to move to Find by
address and press
[OK].
In initial screen, entering the stored address and pressing [LOC] displays the
contents of the address.
In initial screen, entering telephone number and pressing [FIND] displays the
address in which the entered telephone number is stored.
In case there are a number of addresses relevant to the entered telephone number, all
of the relevant addresses are displayed.
Finding by name
Pressing the name to find displays information of the selected name.
Press
[MENU].
Address of the
entered name is
displayed. Press
[OK].
(See P.114~117)
Press to
enter the name to
search and press
[OK].
Press to
select icon to
search.
Press
to move to
Phone Book
and press
[OK].
Press to
move to Find by
name and press
[OK].
In initial screen, pressing button moves to the list Find by name . Pressing button
displays menu of the Phone Book .
Entering the first consonant of the name to find and pressing [OK] displays all the addresses
in which the name containing the entered consonant is stored.
V8260
41

HOW TO USE MENU FUNCTIONS
V8260
43
HOW TO USE MENU FUNCTIONS
V8260
42
Viewing memory
Press
[MENU].
Memory is displayed. Press
[OK] / [CNCL] or
button to move to the
previous menu.
Press to move
to
Phone Book and
press [OK].
Press
to move to View
memory and press
[OK].
Indicates state of phone book the user has set as number of memory addresses in use and the
number of addresses available.
Called
Press
[MENU].
Called is displayed.
Press to move to
Phone Book and
press [OK].
Press to move to
Called and press
[OK].
Indicates information of callers and stores up to 10 callers.
(This function operates only when service provider provides service. For details, contact
the service provider)
To store, press [STO] to store. (See P.33~36)
To erase, press [DEL]. (See P.37)

HOW TO USE MENU FUNCTIONS
V8260
45
HOW TO USE MENU FUNCTIONS
V8260
44
Unanswered
Press
[MENU].
Press to move
to Unanswered and
press [OK].
Unanswered is displayed.
Press to move to
Phone Book and
press [OK].
When a call is received to the telephone number stored in memory address, the name
is displayed together with the number.
To store, press [STO] to store. (See P.33~36)
To erase, press [DEL]. (See P.37)
In case the user has not received call, displays information of up to 10 received numbers.
(This function operates only when service provider provides service. For details, contact
the service provider)
Viewing my No.
Press
[MENU].
Press to move to
View my No. and press
[OK].
Press display user
number [OK] / [CNCL] or
button to move to the
previous menu.
Press to move to
Phone Book and press
[OK].
Confirms the user s telephone number.

HOW TO USE MENU FUNCTIONS
V8260
47
HOW TO USE MENU FUNCTIONS
V8260
46
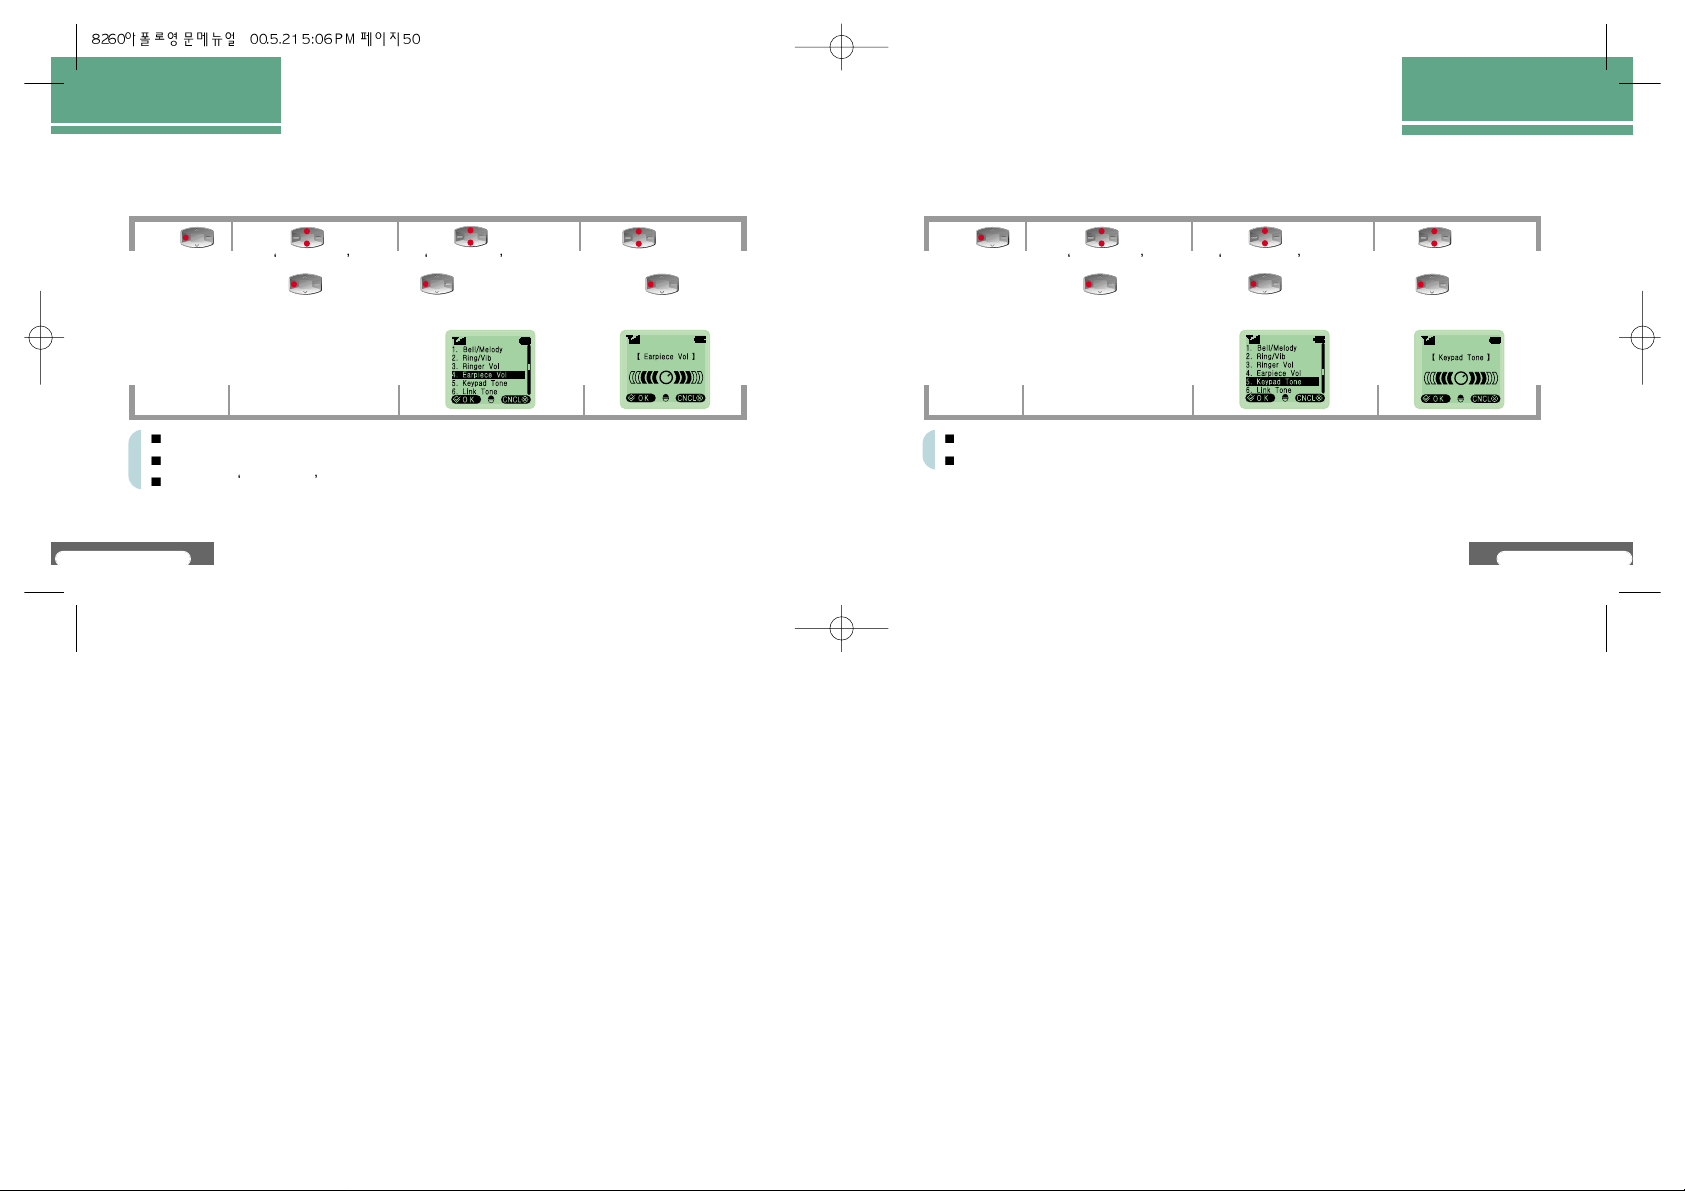
Tone control
Bell / Melody
Press
[MENU].
Press to move to
Bell / Melody and
press [OK].
After message
is displayed,
move to the
previous menu.
Press to
move to Tone
control and
press
[OK].
Press to move to
the desired bell or
melody and press
[OK].
The user can change the type of ringer tone when a call is received. Four types of bells and ten types
of melodies can be selected, and by downloading melodies provided by the service provider, up to
3 melodies can be used additionally. (See P.135)
Bell : bell 1 ~ bell 4
Melody : melody 1 ~ melody 10
User : user1 ~ user 3
Etiquette
In meeting, lecture or in public places, changes the bell sound to vibration mode in
order not to give inconveniences to others.
How to set : Press long button.
After
Setting Etiquette function message is displayed,
move to the initial screen.
If Etiquette function is set, it is displayed as in the right figure.
How to clear : Press long button.
After
Clearing Etiquette function message is displayed, move to the initial screen.
When Etiquette function is set
Ringer tone vibrating and lamp blinks
Alarm tone vibrating and lamp blinks
One minute no sound
Call alarm vibrating and lamp blinks (when setting No Sound, no sound)
Button tone no sound
Link tone no sound
One minute no sound

HOW TO USE MENU FUNCTIONS
V8260
49
HOW TO USE MENU FUNCTIONS
V8260
48
Ring / Vib
Selects ringer tone notifying that a call and mail is received.
Press
[MENU].
Press to move
to the desired ringer
tone and press
[OK].
After message is
displayed, move
to the previous
menu.
Press to move
to Tone control and
press [OK].
Press to
move to ‘ Ring / Vib ’
and press
[OK].
Bell : Bell rings
Vibration : Vibration occurs ( is displayed on screen)
Bell after vibration : Bell rings after vibration ( blinks on screen)
Lamp : Only lamp blinks
Ringer Vol
Adjusts the volume of ringer tone when call is received.
Press
[MENU].
Press to adjust to the
desired bell volume and
press [OK].
Press to move
to Tone control and
press [OK].
Press to move to
Ring / Vol and press
[OK].
After selecting ringer volume, move to the previous menu.
Ringer volume : 5 levels
HOW TO USE MENU FUNCTIONS
V8260
51
HOW TO USE MENU FUNCTIONS
V8260
50
Earpiece Vol
Adjusts earpiece volume heard during call.
Press
[MENU].
Press to adjust to the
desired earpiece volume
and press [OK].
Press to move
to Tone control and
press [OK].
Press to move to
Earpiece Vol and press
[OK].
After selecting earpiece volume, move to the previous menu.
Earpiece volume: 5 levels
During call, Earpiece vol can be adjusted. (See P.111)
Keypad Tone
Adjusts button tone heard when pressing button.
Press
[MENU].
Press to adjust to the
desired keypad tone and
press [OK].
Press to move
to Tone control and
press [OK].
Press to move to
Keypad Tone and
press [OK].
After selecting keypad tone, move to the previous menu.
Keypad tone: 6 levels

HOW TO USE MENU FUNCTIONS
V8260
53
HOW TO USE MENU FUNCTIONS
V8260
52
Link Tone
Notifies that call is connected
Press
[MENU].
Press to adjust
to the desired setup
value of link tone and
press [OK].
After message is
displayed, move
to the previous
menu.
Press to move
to Tone control and
press [OK].
Press to move
to Link Tone and
press [OK].
Sending Tone
Adjusts length of sound heard when pressing keypad button.
Press
[MENU].
Press to adjust
to the desired setup
value of sending tone
and press [OK].
After message is
displayed, move
to the previous
menu.
Press to move
to Tone control and
press [OK].
Press to
move to Sending
Tone and press
[OK].
Briefly : Pressing keypad button produces brief beep sound.
Long : While pressing [Dial] button, long beep sound is heard.
While keypad buttons except for [Dial] button, beep sound is heard continuously.

HOW TO USE
MENU FUNCTIONS
Quick set
Set Alarm
Sets alarm to ring in the time neares to the time set by user without designating specifc time.
Ring after 10 minutes : Alarm rings after 10 minutes of alarm setting.
Ring after 30 minutes : Alarm rings after 30 minutes of alarm setting.
Ring after 1 hour : Alarm rings after 1 hour of alarm setting.
If alarm is set, is displayed on screen.
V8260
54
V8260
55
HOW TO USE MENU FUNCTIONS
HOW TO USE MENU FUNCTIONS
By setting specific time and alarm interval, operates alarm in the desired time,
Alarm / Time
Alarm
Pressing button moves to Quick Set menu.
Pressing [CNCL] or button displays Alarm menu.
To stop when alarm rings, press any keypad buttons or open and close folder.
Press to move to Alarm
and press [OK].
Press to move to Alarm /
Timer and press [OK].
Press [MENU]
Press to move to
Alarm / Timer and press
[OK].
Press to move to
Quick Set and press
[OK].
Press to select the
desired alarm time and
press [OK].
After message is
displayed, move
to the previous
menu.

V8260
56
V8260
57
HOW TO USE MENU FUNCTIONS
HOW TO USE MENU FUNCTIONS
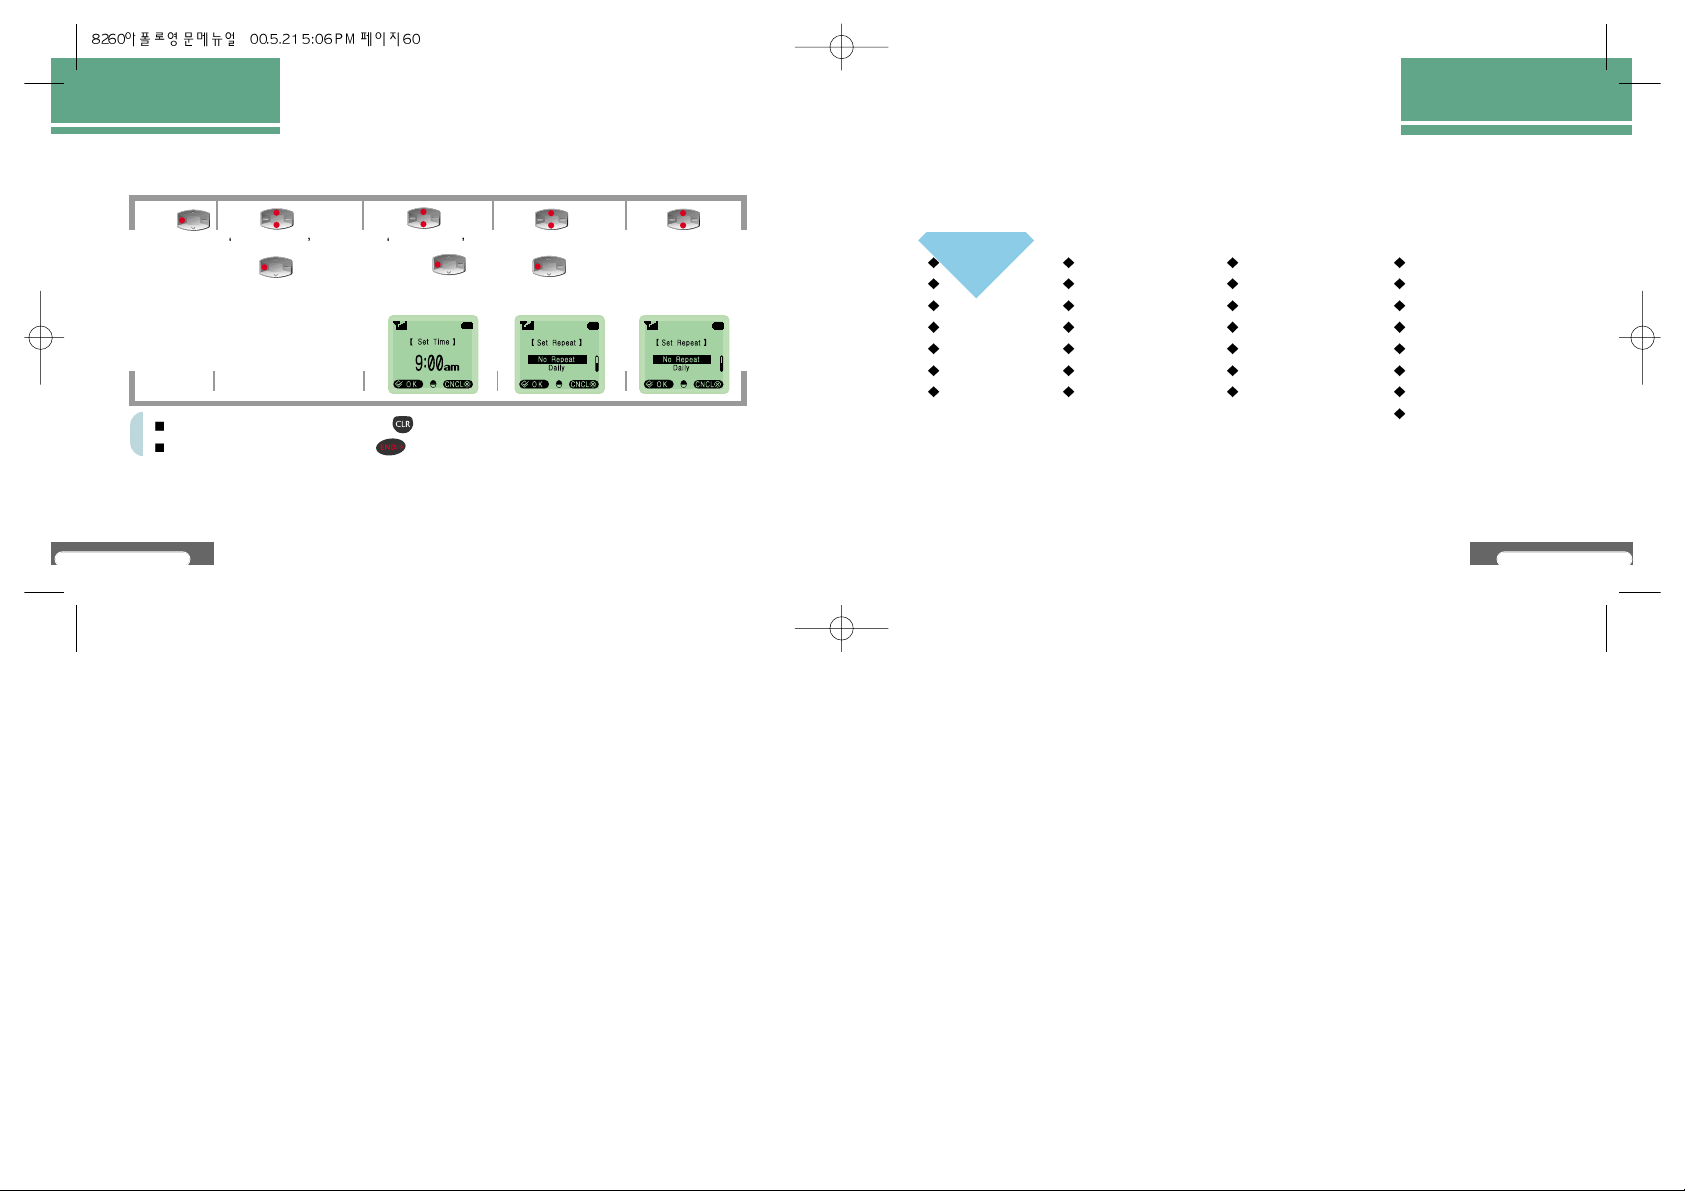
Set time
Sets alarm to ring in the desired time by the user setting time and alarm interval.
Entering alarm time
Press and enter Time Press [OK] Press and enter Minute Press [OK]
Press and enter am / pm Press [OK]
Ring one time : Rings one time in the set time.
Ring daily : Rings daily in the set time.
If alarm is set, is displayed on screen.
To move to the previous column, press button
Pressing time and minute using [Dial] button automatically moves to the next column.
Press to move
to Set Alarm and
press [OK].
Press to move
to Set Timer and
press [OK].
After entering alarm
time, press
[OK]. (See P.57)
Press to set
Alarm Interval and
press [OK].
After message is
displayed, move
to the previous
menu.

Quick claer
Claer time
In case alarm is set with Set Time , clears alarm.
V8260
58
V8260
59
HOW TO USE MENU FUNCTIONS
Claer Alarm
In case alarm is set with Quick Set , clears alarm.
If alarm is cleared, disappears from screen.
HOW TO USE MENU FUNCTIONS
If alarm is cleared, disappears from screen.
Press to move
to Claer Alarm and
press [OK].
Press to move to
Claer Quick Timer and
press [OK].
Press to select
setup value of clear
quick set and press
[OK].
After message is
displayed, move to
the previous menu.
Press to move to
Claer Alarm and
press [OK].
Press to move to
Claer Set Timer and
press [OK].
Press to select
setup value of clear set
time and press
[OK].
After message is
displayed, move to
the previous menu.
V8260
60
V8260
61
HOW TO USE MENU FUNCTIONS
World time
Shows times of major cities in the world.
HOW TO USE MENU FUNCTIONS
To move to the previous menu, press button
To move to the initial screen, press button
Los Angeles
Denver, Phoenix
Mexico City
Dallas, Chicago
Detroit, Miami
Washington
Montreal, New York
Boston
Rio de Janeiro
Lisbon, Madrid
London
Paris, Amsterdam
Rome, Berlin, Vienna
Athens, Helsinki
Cairo
Moscow, Baghdad
Teheran, Abu Dabi
Calcutta
Bangkok, Jakharta
Singapore
Beijing, Hongkong
Taipei
Press
[MENU].
Press to move to
Alarm / Timer and
press [OK].
Press to move
to World Times
and press
[OK].
Press to move
to the desired city and
press [OK].
Press to
search the desired
city and time.
Cities for which World Times is stored
Seoul, Tokyo
Guam, Sydney
Samoa
Honolulu
Anchorage
Seattle
San Francisco

V8260
63
HOW TO USE MENU FUNCTIONS
V8260
62
HOW TO USE MENU FUNCTIONS
User Time
Sets the time displayed in initial screen to the time of the desired city.
Cities for which World Times is stored
Press and select Fast/Slow Press [OK] Press and enter Time Press
[OK] Press and enter Minute Press [OK]
Entering time and minute using [Dial] button automatically moves
to the next column.
If user time is set, it is displayed as in the right figure.
Press
[MENU].
Press to
move to
Alarm / Timer
and press
[OK].
Press to
move to User
Times and press
[OK].
Press to
select the setup
value of user
times and press
[OK].
Enter user times.
(See P.63)
After
message is
displayed,
move to the
previous
menu.
V8260
65
HOW TO USE MENU FUNCTIONS
All Calls
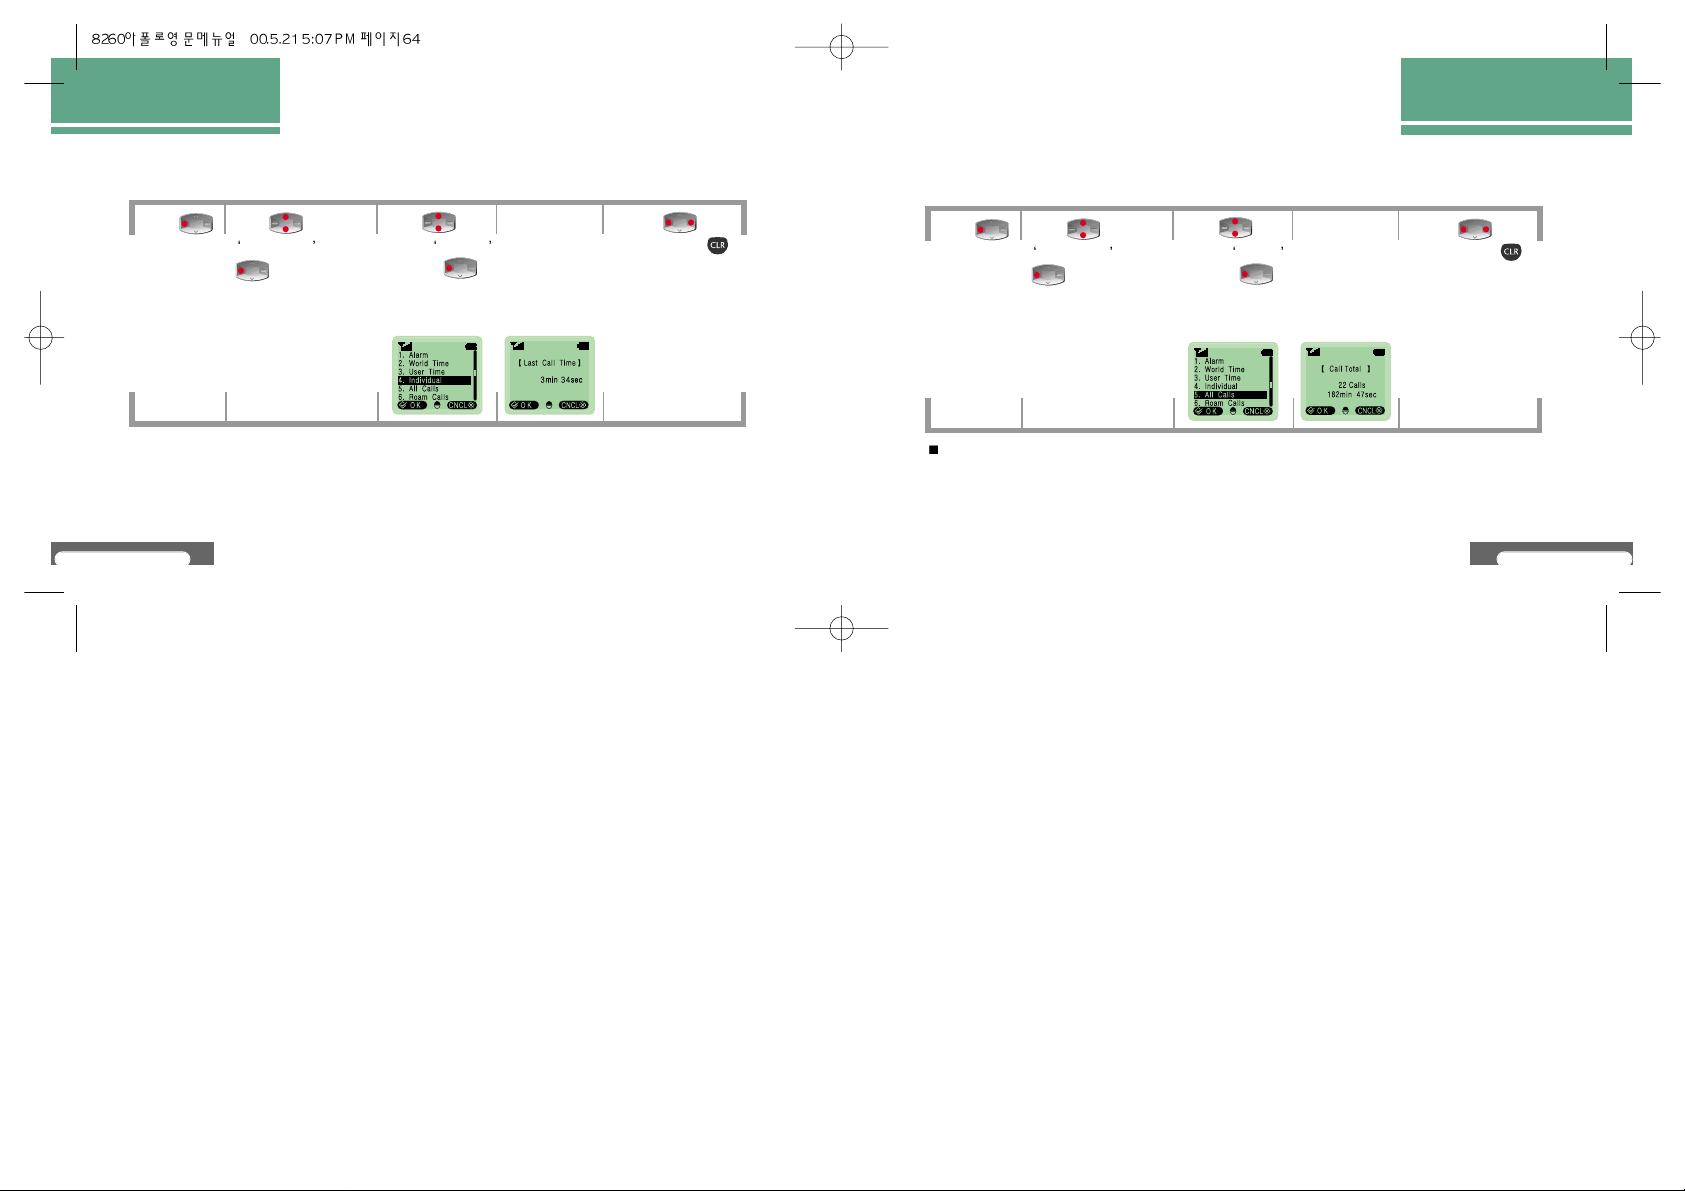
Displays the duration of all calls in number of calls, minute and second.
All Calls is not initialized.
V8260
64
HOW TO USE MENU FUNCTIONS
Individual
Displays the duration of last call.
63
Press
[MENU].
Press to move to
Alarm / Timer and press
[OK].
Press to
move to Individual
and press
[OK].
Individual is
displayed.
Pressing
[OK] / [CNCL] or
button moves to the
previous menu.
Press
[MENU].
Press to move to
Alarm / Timer and press
[OK].
Press to
move to All Calls
and press
[OK].
All Calls is
displayed.
Pressing
[OK] / [CNCL] or
button moves to the
previous menu.

V8260
67
HOW TO USE MENU FUNCTIONS
Reset Timer
When Reset Timer is displayed, press [RESET] Press to select setup value
of initialization and press [OK] After message is displayed, move to the
previous menu.
V8260
66
HOW TO USE MENU FUNCTIONS
Roam Calls
Displays duration of calls using BTS of other service provider in accumulation in
number of calls, minute and second.
Displays accumulated duration of calls after user resetting in number of calls, minute and second.
Press
[MENU].
Press to move to
Alarm / Timer and
press [OK].
Press to
move to Roam
Calls and press
[OK].
Roam Calls is
displayed.
Pressing
[OK] / [CNCL] or
button moves to the
previous menu.
Pressing [CNCL] moves to the previous menu.
Pressing [RESET] can initialize reset timer.
Press
[MENU].
Press to
move to Alarm /
Timer and press
[OK].
Press to
move to Reset
Time and press
[OK].
Reset Timer is
displayed.
Initializing

V8260
69
HOW TO USE MENU FUNCTIONS
V8260
68
HOW TO USE MENU FUNCTIONS
If the user stores schedule, alarm tone rings in the designated day and stored contents is displayed.
PIMS
Stores and manages user s individual information and schdule.
Schedule
One Minute
Checks duration during call. Notifies by ringing alarm before 10 second to minute every
minute from call connection.
Press
[MENU].
Press to move to
Alarm / Timer and
press [OK].
Press to
move to One Calls
and press
[OK].
Press to
select the setup
value of one minute
and press
[OK].
After message is
displayed, move to
the previous menu.
Press
[MENU].
Press to move to
PIMS and press
[OK].
Press to move
to Schedule and
press [OK].

V8260
71
HOW TO USE MENU FUNCTIONS
V8260
70
Storing Schedule
HOW TO USE MENU FUNCTIONS
Press to
move to the address
to store and press
[OK].
Enter contents for
schedule and press
[OK].
(See P.114~117)
Set schedule time.
(See P. 71)
Press to
enter alarm time
and press
[OK].
After message is
displayed, move to
the previous menu.
Pressing button moves to Schedule .
Pressing button displays PIMS menu.
Entering time and date
Press and enter Month Press [OK] Press and enter Date Press
[OK] Press and enter Time Press [OK] Press and enter Minute
Press [OK] Press and enter am / pm Press [OK]
Entering date and time using [Dial] button moves automatically to the next column.
To move to the previous column, press button
For Enter Contents for schedule, up to 16 characters of Korean alphabets and up to
32 English alphabets can be entered.

V8260
73
HOW TO USE MENU FUNCTIONS
V8260
72
HOW TO USE MENU FUNCTIONS
Confirming schedule
Press to move to the list
to search and press [OK].
If the entered date is displayed in
calendar, press [OK].
Stored date, time and schedule
is displayed.
Pressing [CNCL] moves to the previous menu.
Erasing schedule
Press to move
to the list to erase and
press [OK].
If the entered date
is displayed in
calendar,press
[OK].
If stored date, time
and schedule is
displayed, press
[DEL].
Press to select
the desired setup value
and press [OK].
After message
is displayed,
move to the
previous menu.
V8260
75
HOW TO USE MENU FUNCTIONS
V8260
74
HOW TO USE MENU FUNCTIONS
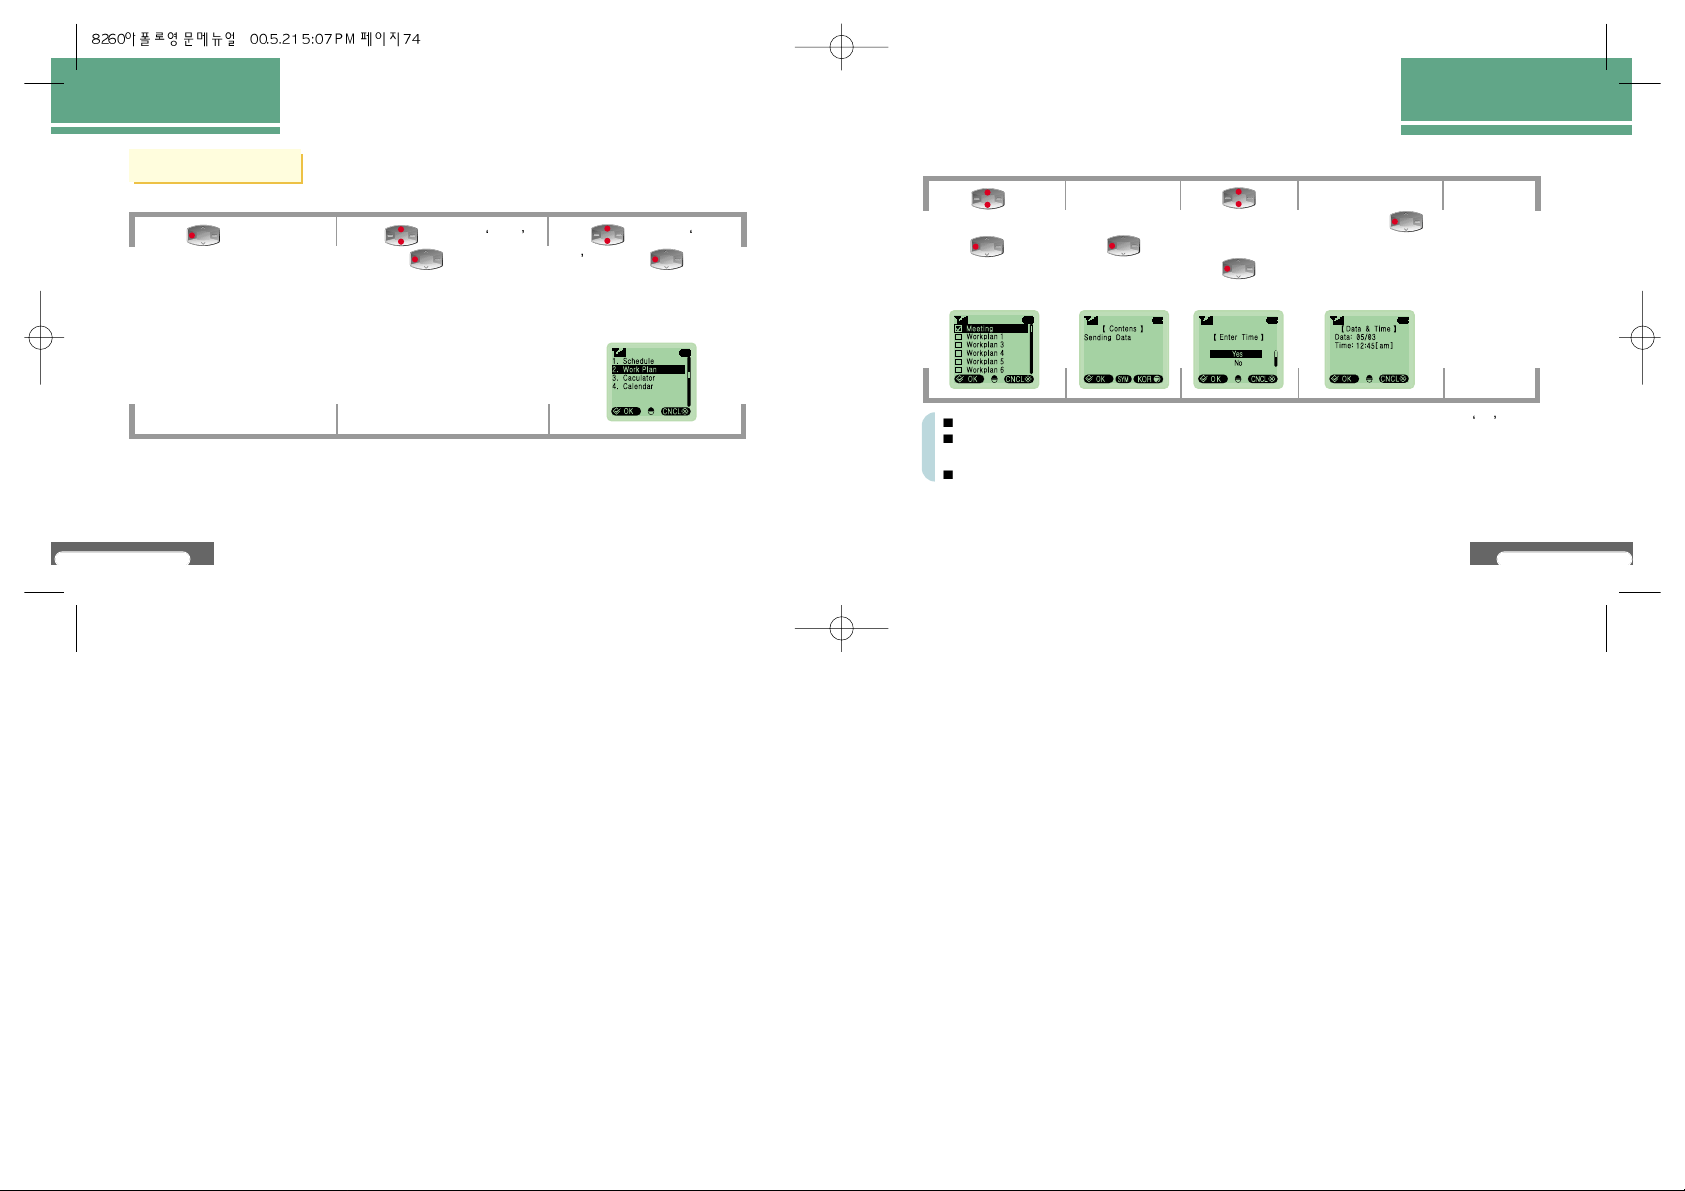
Creates and stores list of work the user plans for schedule management.
Work plan
Storing work plan
Press [MENU].
Press to move to PIMS
and press [OK].
Press to move to Work
Plan and press [OK].
Press to move
to the list to store and
press [OK].
Enter contents for
work plan and
press [OK].
(See P.114~117)
Press to
select the setup
value for time and
press [OK].
Enter time for work
plan and press
[OK]. (See P.71)
After message
is displayed,
move to the
previous menu.
In case the user does not want to enter time for work plan, set setup value for time as No
F or contents for work plan, up to 16 characters of Korean alphabets and 32 characters
of English alphabets can be entered.
F or work plans, up to 10 plans can be entered.
The list of work plan to be confirmed by the user is indicated as
To delete , press [UNLOC] when contents for work plan, date and time is displayed.
In case alarm time is not entered, calendar is not displayed.
V8260
76
HOW TO USE MENU FUNCTIONS
V8260
77
HOW TO USE MENU FUNCTIONS
Confirming work plan
Press to move to
the list to search and press
[OK].
If date for work plan is
displayed in calendar,
press [OK].
If the stored work plan, date ad
time is displayed, press
[OK DONE].
After message is
displayed, move
to the previous
menu.
Erasing work plan
Press to move
to the list to erase and
press [OK].
If entered date is
displayed in
calendar, press
[OK].
If the stored work
plan, date ad time is
displayed, press
[DEL].
Press to select
the desired setup value
and and press
[OK].
After message
is displayed,
move to the
previous menu.

V8260
79
HOW TO USE MENU FUNCTIONS
V8260
78
HOW TO USE MENU FUNCTIONS
View calendar of the past, present and future.
Calendar
Performs simple calculations
To correct numbers, press button
For division, down to 3 digits below decimal point is displayed.
To initialize after calculation is competed, press [=].
Calculator
Press [MENU].
Press to move to PIMS
and press [OK].
Press to move to
Calculator and
press [OK].
Calculator method
Enter numbers Press to set symbols +, -, , Press +, -, ,
Press numbers Press [=] Calculation result is displayed
Press [MENU]. Press to
move to PIMS
and press
[OK].
Press to
move to Calculator
and press
[OK].
After searching month
and day, press
LUNAR .
Information for
lunar calendar of
the selected date
is displayed.
Press , button to search month.
Press to search Date
Pressing [CNCL] moves to the previous menu.
Calendar is displayed from 1980 till 2019.

V8260
80
V8260
81
HOW TO USE MENU FUNCTIONS
HOW TO USE MENU FUNCTIONS
Bklt color
Changes the display color.
Features
Press
[MENU].
Press to move to
Features and press
[OK].
Press to
move to Bklt Color
and press
[OK].
Press to
move to the
desired color and
press [OK].
Color is changed to the
selected color and
moves to the previous
menu.
Bklt Time
Sets duration of LCD.
Press
[MENU].
Press to move
to Features and
press [OK].
Press to
move to Bklt Time
and press
[OK].
Press to move
to the desired Bklt
Time and press
[OK].
After message is
displayed, move to the
previous menu.
5 seconds : LCD is turned off 5 minutes after opening folder
When opening flip : While flip is open, LCD remains ON.
Always off : Even when flip is open, LCD remains ON.

V8260
82
V8260
83
HOW TO USE MENU FUNCTIONS
HOW TO USE MENU FUNCTIONS
City Code
If setting the often used area codes, the area code is automatically inserted every time making a call.
Banner
Changes contents of initial screen.
Press
[MENU].
Press to
move to Features
and press
[OK].
Press to
move to Banner
and press
[OK].
Entering the contents to
correct and pressing
[OK] moves to
the previous menu.
(See P.114~117)
In initial screen,
changed contents are
displayed.
For contents for initial screen, up to 10 characters of Korean alphabets and 20 characters of
English alphabets can be entered.
If not entering nothing Banner , Motorola logo is displayed on initial screen.
Press
[MENU].
Press to
move to
Features
and press
[OK].
Press to
move to City
Code and press
[OK].
Press to
select setup value
of city code and
press [OK].
Enter the
number to store
as city code
and press
[OK].
After message
is displayed,
move to the
previous menu.
When City Code is set, opening flip displays the city code set.
If pressing button, city code disappears.
Pressing number displays city code set.

V8260
84
V8260
85
HOW TO USE MENU FUNCTIONS
HOW TO USE MENU FUNCTIONS
Serice Lamp
In case the phone is in waiting state, displays service state in color and state of service lamp.
Waiting state
(Displayed when setup value of
service lamp is set)
Yellow color blinks Red color blinks
Red-yellow-red
blinks alternatively
When receiving a
phone call
When call is
connected
Lamp state
Cellular
phone state
Service available
state
Service unavailable
state
Call state
(Always displayed )
Serice Lamp
Red color stops
briefly
Intl.Code
When making an international call, shows international call using abbreviation keys.
Press
[MENU].
Press
to move to
Features
and press
[OK].
Press
to move to Intl.
Code and press
[OK].
Press
to select setup
value of intl. code
and press
[OK].
Enter the desired
international
number and
press
[OK].
After message
is displayed,
move to the
previous menu.
When setting international code, pressing long button displays the Intl. Code set.
Press
[MENU].
Press
to move to
Features and
press
[OK].
Press
to move to Service
Lamp and press
[OK].
Press
to select setup value of
service lamp and press
[OK].
After message is
displayed, move to the
previous menu.

V8260
86
V8260
87
HOW TO USE MENU FUNCTIONS
HOW TO USE MENU FUNCTIONS
Redial
When call is not connected due to heavy traffic or weak receiving strength, automatically redials.
Auto hyphen
When entering a telephone number, hyphen is automatically inserted.
Press
[MENU].
Press
to move to
Features and
press
[OK].
Press
to move to Auto
Hyphen and press
[OK].
Press to select
setup value of auto
hyphen and press
[OK].
After message is
displayed, move to the
previous menu.
Press
[MENU].
Press
to move to
Features and
press
[OK].
Press
to move to Redial
and press
[OK].
Press
to select setup value of
redial and press
[OK].
After message is
displayed, move to the
previous menu.

V8260
88
V8260
89
HOW TO USE MENU FUNCTIONS
HOW TO USE MENU FUNCTIONS
LCD Contrast
The function enables the user to control the screen contrast.
Call Answer
This function enables the user to select how to make a call.
Press
[MENU].
Press to
move to
Features and
press
[OK].
Press to
move to Call
Answer and press
[OK].
Press to
move to the
desired way to
answer the call
and press
[OK].
Press to
set the desired
set value and
then press
[OK].
Move to the
previous menu
after the
message
appears.
Automatic Answer : When the folder is open, the answering tone rings three times and
a call is automatically answered if Call Answer is set to Automatic Answer.
Folder Answer : When Folder Answer is set to YES , open the folder to answer the
call if a call is received. When Folder Answer is set to
NO , open the folder and then
press the keypad button to answer the call.
Press
[MENU].
Press to
move to Features
and press
[OK].
Press to move
to LCD Contrast
and press
[OK].
Press to control
the screen contrast as
desired and press
[OK].
Move to the previous
menu after the
message appears.

One-touch Lock
V8260
91
HOW TO USE
MENU FUNCTIONS
HOW TO USE MENU FUNCTIONS
V8260
90
HOW TO USE MENU FUNCTIONS
Press
[MENU].
Press to
set the value for
Lock Mode and
press [OK].
appears
on the
initial screen.
Press to move to
Lock/Security and
press [OK].
Here, enter the
password.
Press to
move to
Lock
Mode and press
[OK].
To enter the password after pressing [MENU] or pressing button for a while will release
the lock.
This is the function to lock the mobile phone to prevent non-owner from using it.
Lock Release
Setting Lock
Lock / Security
This function prevents any other than the mobile phone owner from using the designated
information without the owner
s permission. First, the user must enter the password to use
the Lock/Security function. The password is
0000 when the mobile phone is purchased.
After the registration for the service is completed, the last four digits of the phone number
is set to the password.
Lock Mode
It is possible to answer a call even in the locked state.
Even when the mobile is turned off and on again, its locked state is maintained.
It is possible to make a call at 112, 119, the numbers saved as an emergency number, or the
memory LOC, No. 1, regardless of the lock state (See P. 92)
Move to
the
previous
menu after
the
message
appears.
How to set : To push button for a while will set Lock Mode.
How to release : To enter the password after pressing button for a while
will release Lock Mode.
HOW TO USE
MENU FUNCTIONS
HOW TO USE
MENU FUNCTIONS
V8260
92
V8260
93
HOW TO USE
MENU FUNCTIONS
HOW TO USE MENU FUNCTIONS
HOW TO USE MENU FUNCTIONS
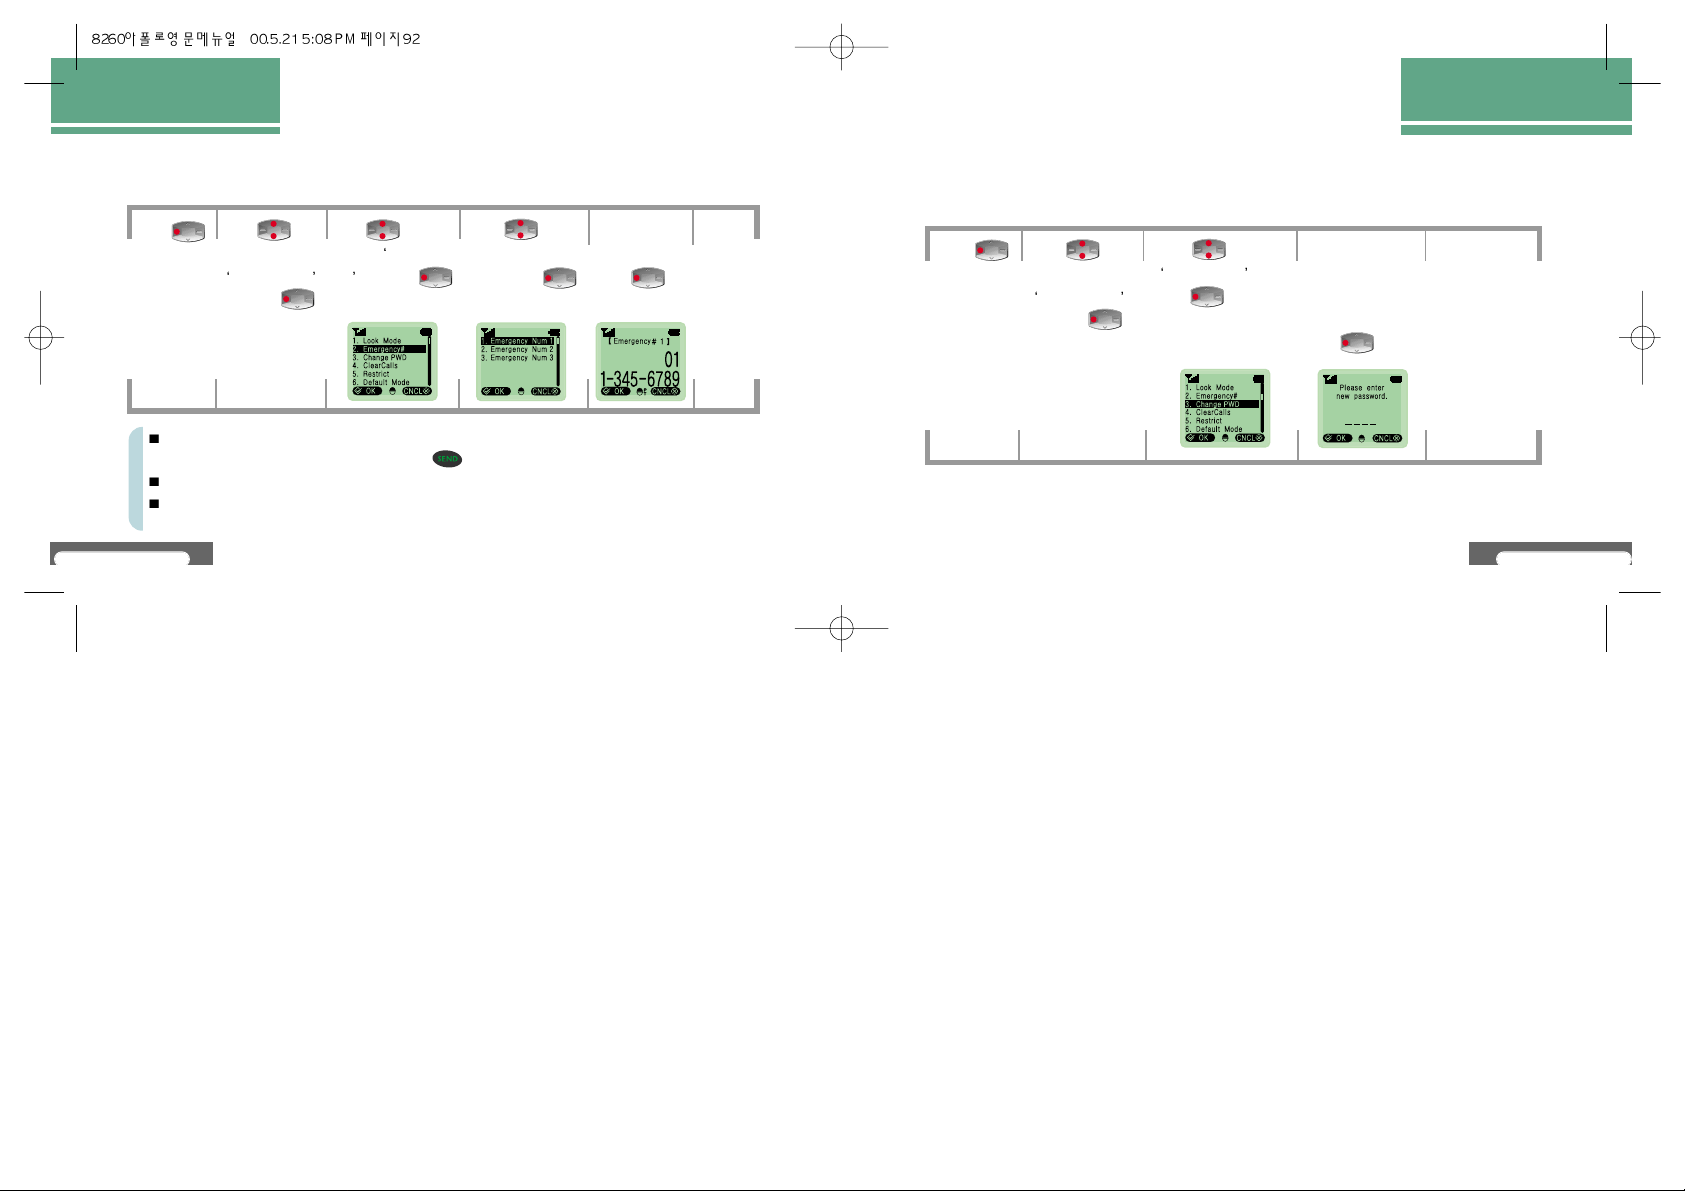
Change PWD
This function enables the user to change the password which is used to release the
locked mobile phone or use the security function.
Press
[MENU].
Press to move to
Change PWD and
press [OK].
Enter the new
password twice
according to the
message and then
press [OK].
Move to the
previous menu
after the
message
appears.
Press to
move to
Lock / Security
and press
[OK]. Enter the
password.
Emergency Call
It is possible to call the number saved as an emergency number even when the mobile phone
is in the locked state.
Press
[MENU].
Press to
move to
Emergency
Call and press
[OK].
Press to
move to the desired
list and press
[OK].
Move to
the
previous
menu
after the
message
appears.
Press to
move to
Lock / Security
and press
[OK]. Enter
the password.
Enter the phone
number and
press
[OK].
When it is desired to make an emergency call: enter the phone number saved as an emergency
number by using [Dial] button and then press button.
It is possible to save up to three emergency numbers.
If the user saves the emergency number at the storage location and sets it as a turbo dial, he or
she can use it as a speed emergency dial (See P. 35)

HOW TO USE
MENU FUNCTIONS
HOW TO USE
MENU FUNCTIONS
V8260
94
V8260
95
HOW TO USE
MENU FUNCTIONS
HOW TO USE MENU FUNCTIONS
HOW TO USE MENU FUNCTIONS
Restrict
This function enables the user to restrict the specific calls incoming.
Clear Calls
This function is used to erase the saved phone numbers or contents.
Press
[MENU].
Press to
move to
Clear Calls
and press
[OK].
Move to the
previous
menu after
the message
appears.
Press to
move to the calls
to clear and
press [OK].
Press to
move to the
Lock / Security
and press
[OK].
Enter the
password.
Press to
select the value
set for clear
calls and press
[OK].
If there is no information to erase, the message, There is no message to delete. will appear.
Press
[MENU].
Press to
move to
Restrict and
press [OK].
Move to the
previous
menu after
the message
appears.
Press to
move to the call to
restrict and press
[OK].
Press to
move to the
Lock / Security
and press
[OK]. Enter the
password.
Press to
select the
desired set
value and the
press [OK].
Restrict international calls : It restricts the use of international calls.
Restrict 700 : It restricts the phone numbers starting with 700.
Restrict memory LOC : It restricts the use of making a call and designating/erasing a
phone number.

HOW TO USE
MENU FUNCTIONS
This function enables the service company to use a new number as the number dedicated to
answering by giving the company another number in addition to the existing number used by
the user
Press
[MENU].
Move to the
previous menu
after the
message
appears.
Press to
move to
Lock / Security
and press
[OK].
Enter the
password.
HOW TO USE
MENU FUNCTIONS
V8260
96
V8260
97
HOW TO USE
MENU FUNCTIONS
HOW TO USE MENU FUNCTIONS
HOW TO USE MENU FUNCTIONS
Default Mode
This function initializes the functions of a mobile phone to the initial state. However,
the information saved at the memory LOCs is not initialized.
Press
[MENU].
Press to move
to
Default Mode and
press [OK].
The power will be
turned off after the
message appears.
Press to
select the value set
for
Default Mode
and press
[OK].
Press to
move to
Lock / Security
and press
[OK].
Enter the password.
Press to turn on the power to use the mobile phone again (See P. 27)
Second Number (Number Plus Service)
Second Number Registration
Press to
move to Second
Number and
press [OK].
Press to
move to
Second Number
Registration and
press [OK].
Enter the
number to use
additionally.

HOW TO USE
MENU FUNCTIONS
HOW TO USE
MENU FUNCTIONS
HOW TO USE
MENU FUNCTIONS
V8260
98
HOW TO USE MENU FUNCTIONS
Clear Number
Press
[Menu].
Move to the
previous menu
after the
message
appears.
Press to
move to
Lock/Security
and press
[OK]. Enter the
password.
Press to
move to Second
Number and
press [OK].
Press to
move to Second
Number Deletion
and press
[OK].
Select the
value Second
Number
Deletion value
set for
and press
[OK].
HOW TO USE MENU FUNCTIONS
V8260
99
Second Number Bell
This function assigns different bell sounds to the existing number and the added one so
that the user can distinguish one from the other when a call is received.
Press
[MENU.
Press to
move to Second
Number and
press [OK].
Move to the
previous
menu after
the message
appears.
Press to
move to the
desired bell or
melody and
press [OK].
Press to
move to the
Lock / Security
and press
[OK].
Enter the
password.
Press to
move to Second
Number Bell and
press [OK].
Bell : Bell 1 ~ Bell 4
Melody : Melody 1 ~ Melody 10
User : User 1 ~ User 3 (See P. 135)

HOW TO USE
MENU FUNCTIONS
HOW TO USE MENU FUNCTIONS
HOW TO USE MENU FUNCTIONS
V8260
100
V8260
101
NAM Change
Press
[MENU].
Move to the
previous menu
after the
message
appears.
Press to
move to
Lock / Security
and press
[OK]. Enter the
password.
Press to
move to NAM
Change and
press [OK].
Press to
move to the
desired NAM
and press
[OK].
Press [OK]
when the selected
NAM appears
on the screen.
When the user subscribers to more than one provider, this function enables the user to select on of the
subscribed phone numbers.
S/W version
The function indicates the software version of the mobile phone currently used by the user.
Press
[MENU].
Press to move to
S/W Version and press
[OK].
The software
version appears.
Press to move to
the Lock / Security
and press [OK].
Enter the password.

HOW TO USE
MENU FUNCTIONS
V8260
102
V8260
103
HOW TO USE
MENU FUNCTIONS
HOW TO USE MENU FUNCTIONS
HOW TO USE MENU FUNCTIONS
Press to move to Game
and press [OK].
Game
The user can enjoy games by using a mobile phone.
: move left and right
: increase the speed
: decrease the speed
~ : Hold
: Redeal
Classification
Car race
Poker
The indication of the used buttons
The indication of the
initial screen of the
game
The start of the game
Press [MENU].
Press to move to the
desired game and press [OK].
The user can choose any of the following three levels for the car race: beginner, intermediate,
and advanced.
Press any button on the keypad to start a game or move to next screen.

HOW TO USE
MENU FUNCTIONS
HOW TO USE MENU FUNCTIONS
HOW TO USE MENU FUNCTIONS
Save voice
Register the name of the person to call by using the voice dial.
V oice Dial
This function, which automatically makes a call by recognizing the user s voice, enables
the user to make a call without pressing [dial] buttons.
Press
[MENU].
Enter the name and the
phone number and
press [OK].
Press to
move to Voice
Dial and press
[OK].
Press to
move to Save
Voice and press
[OK].
Move to the
previous menu
after the message
appears.
View Voice Item
This function enables the user to verify and delete the saved voice items.
The phone number appears
and the saved voice is
heard.
Press to move to
View Voice Item and
press [OK].
If [NEXT] is pressed, the next name saved is heard and the corresponding phone number
appears.
Repeat entering the name to save twice according to the announcement and then save
the phone number by entering it.
It is possible to save up to 10 voices.
V8260
104
V8260
105
Press
[MENU].
Press to move to
Voice Dial and press
[OK].
HOW TO USE
MENU FUNCTIONS
HOW TO USE MENU FUNCTIONS
HOW TO USE MENU FUNCTIONS
Delete All
Press to
select the value set
for Delete All and
press [OK].
Move to the
previous menu
after the
message
appears.
Press to move
to Delete All and
press [OK].
This function enables the user to delete all the contents saved in Voice Dial.
Auto Dialing
To open the folder prompts the question asking the name of the person to call. This function enables
the user to make a call at the saved phone number by telling the number without pressing [Dial]
buttons.
Press to
select the value to
set for Automatic
Dialing and press
[OK].
Move to the
previous menu
after the
message
appears.
Press to move
to Automatic
Dialing and
press [OK].
Press
[MENU].
Press to move
to Voice Dial
and press
[OK].
It is possible to make a call by voice dialing only when Automatic Dialing is in the Set state.
All the Restricts should be set to Release to use the automatic dialing function.
V8260
106
V8260
107
Press
[MENU].
Press to move
to Voice Dial
and press [OK].
Delete individual items
Select View Voice Item and then press [DEL] Select the desired set value
by pressing and then press [OK]. If the saved voice is heard after the
message appears, the phone number will appear.

HOW TO USE MENU FUNCTIONS
V8260
109
HOW TO USE
MENU FUNCTIONS
HOW TO USE MENU FUNCTIONS
Data Speed
This function enables the user to set the speed of the data transmitted when the power
is turned on after the connection of the wireless data communication cable.
Config. Data
This function enables the user to select the data speed and the receive mode.
Press
[MENU].
Press to
select the desired data
speed and press
[OK].
Press to
move to Config.
Data and press
[OK].
Press to
move to Data
Speed and
press [OK].
Move to the
previous menu
after the message
appears.
After the connection between a mobile phone and PC or a notebook is established, the
data transmission is performed at the data speed set on PC or a notebook.
Please, contact the service provider for the details.
V8260
108
Receive Mode
This function enables the user to set the receive mode of a mobile phone during data reception.
Press
[MENU].
Press to
select the desired
receive mode and
press [OK].
Press to
move to Config.
Data and press
[OK].
Press to
move to Receive
Mode and press
[OK].
Move to the
previous menu
after the message
appears.
Receive calls: receive the call made to a mobile phone.
Receive data: receive the call made to data communication through a general modem.
Receive FAX: receive data through fax.
Please, contact the service provider for details.

HOW TO USE
MENU FUNCTIONS
FUNCTIONS USED DURING A CALL
V8260
111
It is possible to adjust the volume of the opposite s voice.
Adjust the call volume by pressing during a call.
Call volume adjustment 1 11
Memo during a call 111
Send Out my number 112
Block Sending T one 1 12
Functions used
during a call
Enter the phone number to save and then press [STO].
To press button after a call will connect a call at the designated phone number.
Even though the user does not save the number additionally after entering it, he
or she can make a call by pressing button after a call is completed.
The phone number entered as a memo during a call is saved in Calling .(See.P.31)
Call volume adjustment
Memo during a call
It is possible to enter and save a new phone number during a call.
V8260
112
FUNCTIONS USED DURING A CALL
This function enables the user to send out his or her phone number to leave it for a
callback in a mobile phone or a pager.
Press [MENU] during a call.
Move to Send Out My Number by pressing and then press [OK].
Return to Call Mode after sending out the user s number.
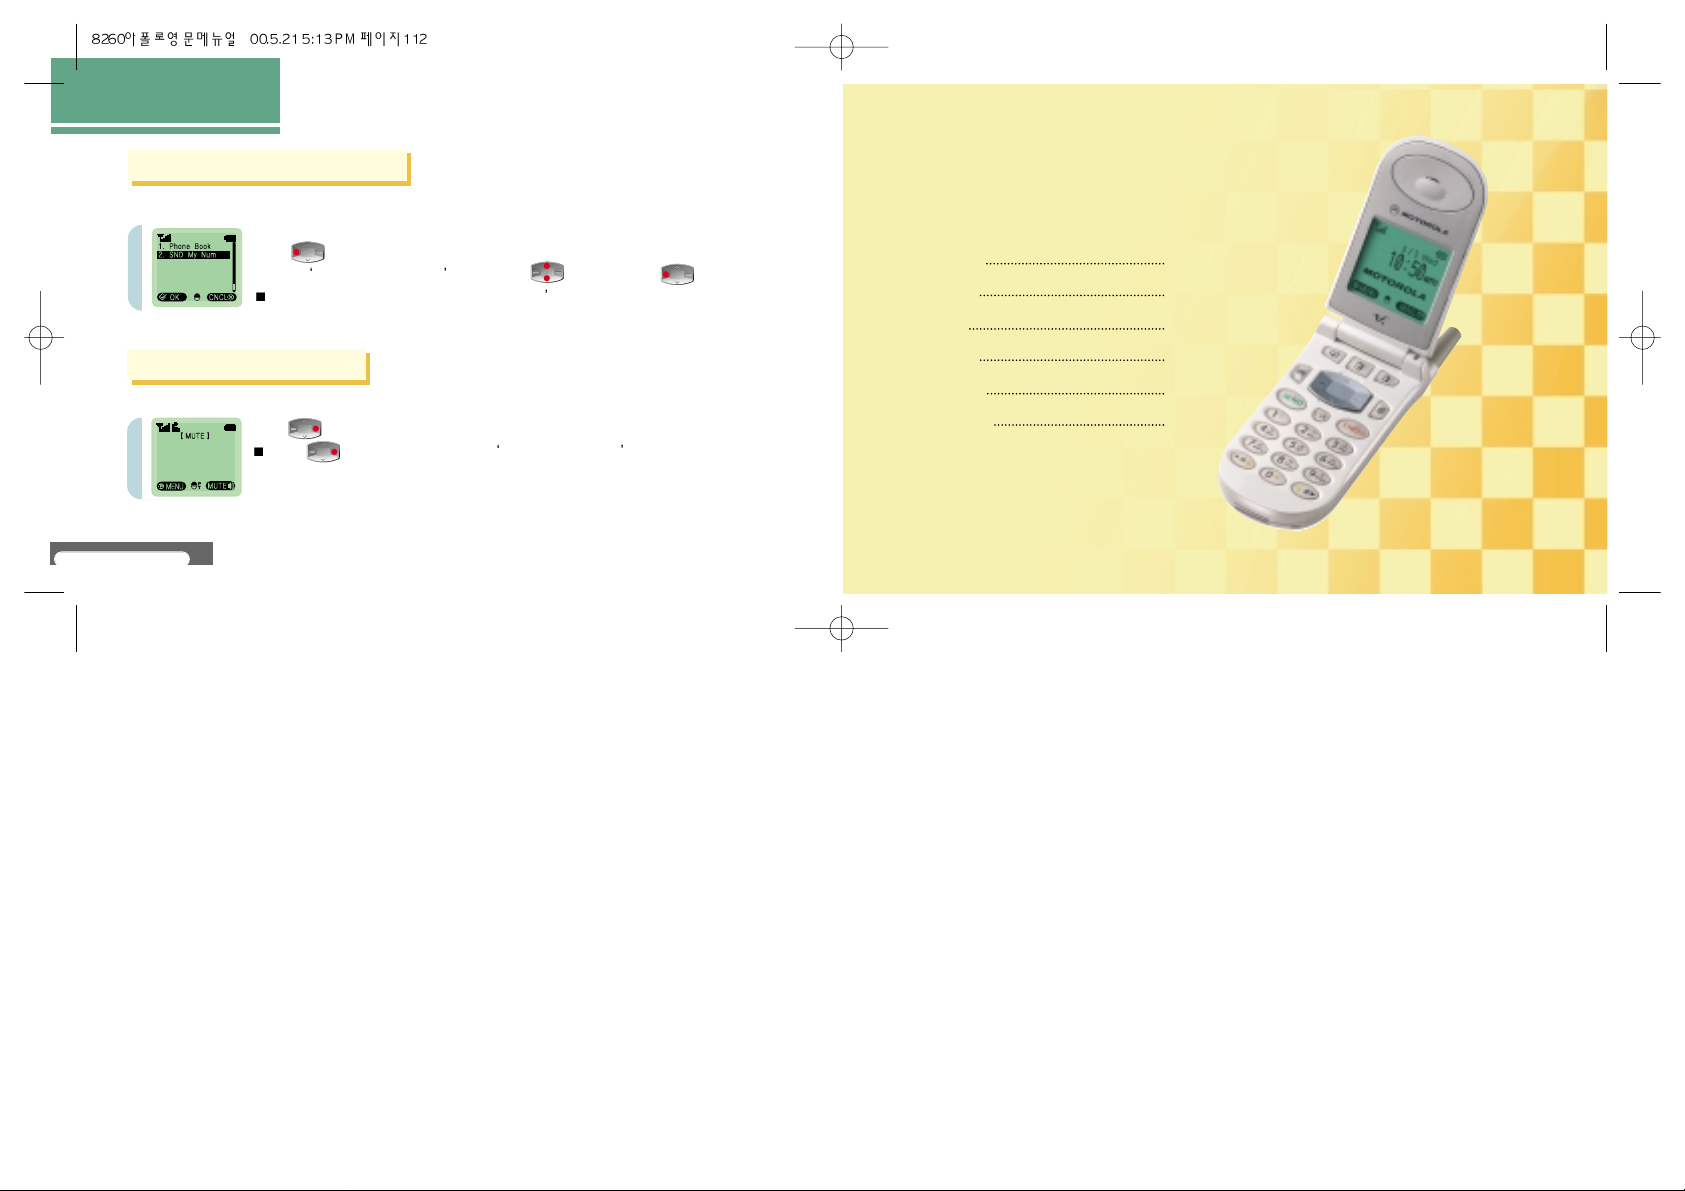
Press [MUTE] during a call.
Press [MUTE] again to release Block Sending Tone
Send Out My Number
Block Sending Tone
It is possible to enter and save a new phone number during a call.
HOW TO USE
MENU FUNCTIONS
MAIL SERVICE
FUNCTIONS
Enter T exts 1 14
Voice Mail 1 18
T ext Mail 120
Send Mail 122
Delete Mail 126
Alert Method 127
MAIL SERVICE FUNCTIONS
Text Entering Mode supports Korean text (icon), English text (large and small), numbers, and
special characters.
V8260
114
V8260
115
Enter Texts
MAIL SERVICE FUNCTIONS
The initial mode is set to enter Korean.
Every time that is pressed once, the change will occur in the following order:
[KOR ] : Entering Korean [ENG ] : Entering English text (Large)
[eng ] : Entering English text (Small) [DGIT 8] : Entering numbers.
The Korean consonant and vowel indicated on each button indicate the consonant and
vowel shown in the beginning on the button.
Enter texts and then move to next blank by pressing button.
To correct the entered texts,
Correction letter by letter : Press button for a short time.
Correction of the whole : Press button for a long time.
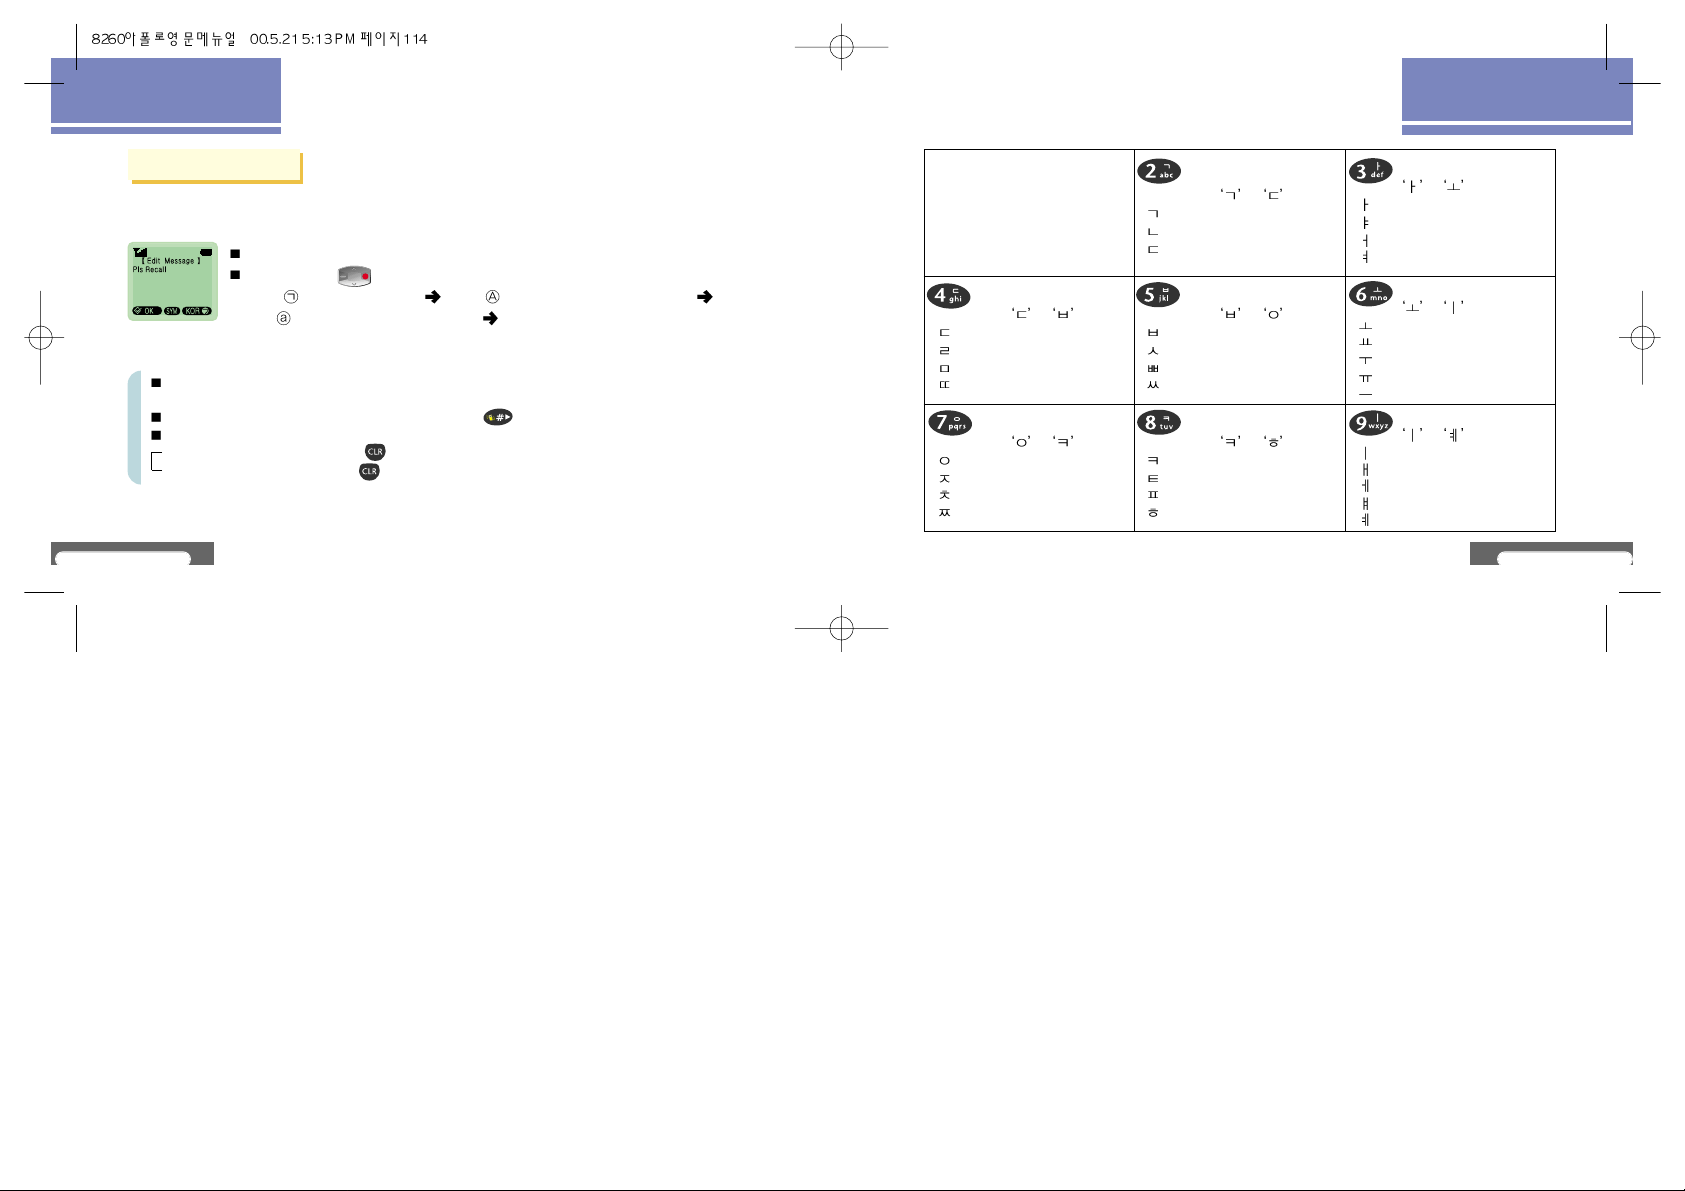
Enter Korea Text
Korean Entering T able
Enter the consonants
from
to .
: Press once.
: Press twice.
: Press three times.
: Press four times.
Enter the consonants
from to .
: Press once.
: Press twice.
: Press three times.
: Press four times.
Enter the consonants
from
to .
: Press once.
: Press twice.
: Press three times.
Enter the consonants
from
to .
: Press once.
: Press twice.
: Press three times.
: Press four times.
Enter the consonants
from to .
: Press once.
: Press twice.
: Press three times.
: Press four times.
Enter the vowels from
to .
: Press once.
: Press twice.
: Press three times.
: Press four times.
Enter the vowels from
to .
: Press once.
: Press twice.
: Press three times.
: Press four times.
: Press five time.
Enter the vowels from
to .
: Press once.
: Press twice.
: Press three times.
: Press four times.
: Press five times.

Press [Dial] button once, twice, and three times for the first text, the second text,
and the third text, respectively.
Press the relevant [Dial] button in Number Mode to enter numbers.
If a certain period lapses after a text is entered, the cursor automatically moves to next blank.
To correct the entered texts,
V8260
117
MAIL SERVICE FUNCTIONS
V8260
116
MAIL SERVICE FUNCTIONS
Correction letter by letter: Press button for a short time.
Correction of the whole: Press button for a long time.
Enter English Texts and Numbers
To press in Enter Text Mode while entering Korean or English texts will show Special
Character Group.
The user can see the special characters on next or the previous screen by pressing .
Enter special characters by pressing the [Dial] button with the corresponding number.
Enter Special Characters
English Entering T able
: Press once.
: Press twice.
: Press three times.
G
H
I
: Press once.
: Press twice.
: Press three times.
: Press four times.
P
Q
R
S
: Press once.
: Press twice.
: Press three times.
A
B
C
: Press once.
: Press twice.
: Press three times.
J
K
L
: Press once.
: Press twice.
: Press three times.
T
U
V
: Press once.
: Press twice.
: Press three times.
D
E
F
: Press once.
: Press twice.
: Press three times.
M
N
O
: Press once.
: Press twice.
: Press three times.
: Press four times.
W
X
Y
Z

V8260
119
MAIL SERVICE FUNCTIONS
V8260
118
MAIL SERVICE FUNCTIONS
This function enables the user to check the voice mails received through the voice mailbox.
This function shows the number of received voice mails, the reception time, and the received phone
number (when the caller left the number for a callback).
Voice Mail
The information on the
received voice mail
appears.
Press [MAIL].It is indicated that
a voice mail has
been received.
Check Voice Mail
Move to Voice Mail by
pressing and then
press [OK].
When several voice mails are received, the information on the most recent voice mail appears.
When the information on the received mail is indicated, Press [CALL].
When the information on the received voice mail is indicated,
Press [DEL].
Press to select the desired set value and press [OK].
Make a Call to the Recived Mail
Delete
When the caller s number is left: A call is made to the received number.
When the caller s number is not left: A connection is made to the voice mailbox.
(Press [MAIL] for a long time or press *89 by using [Dial] button on the initial
screen and then press button. Then, the connection will be made to the voice mailbox.)
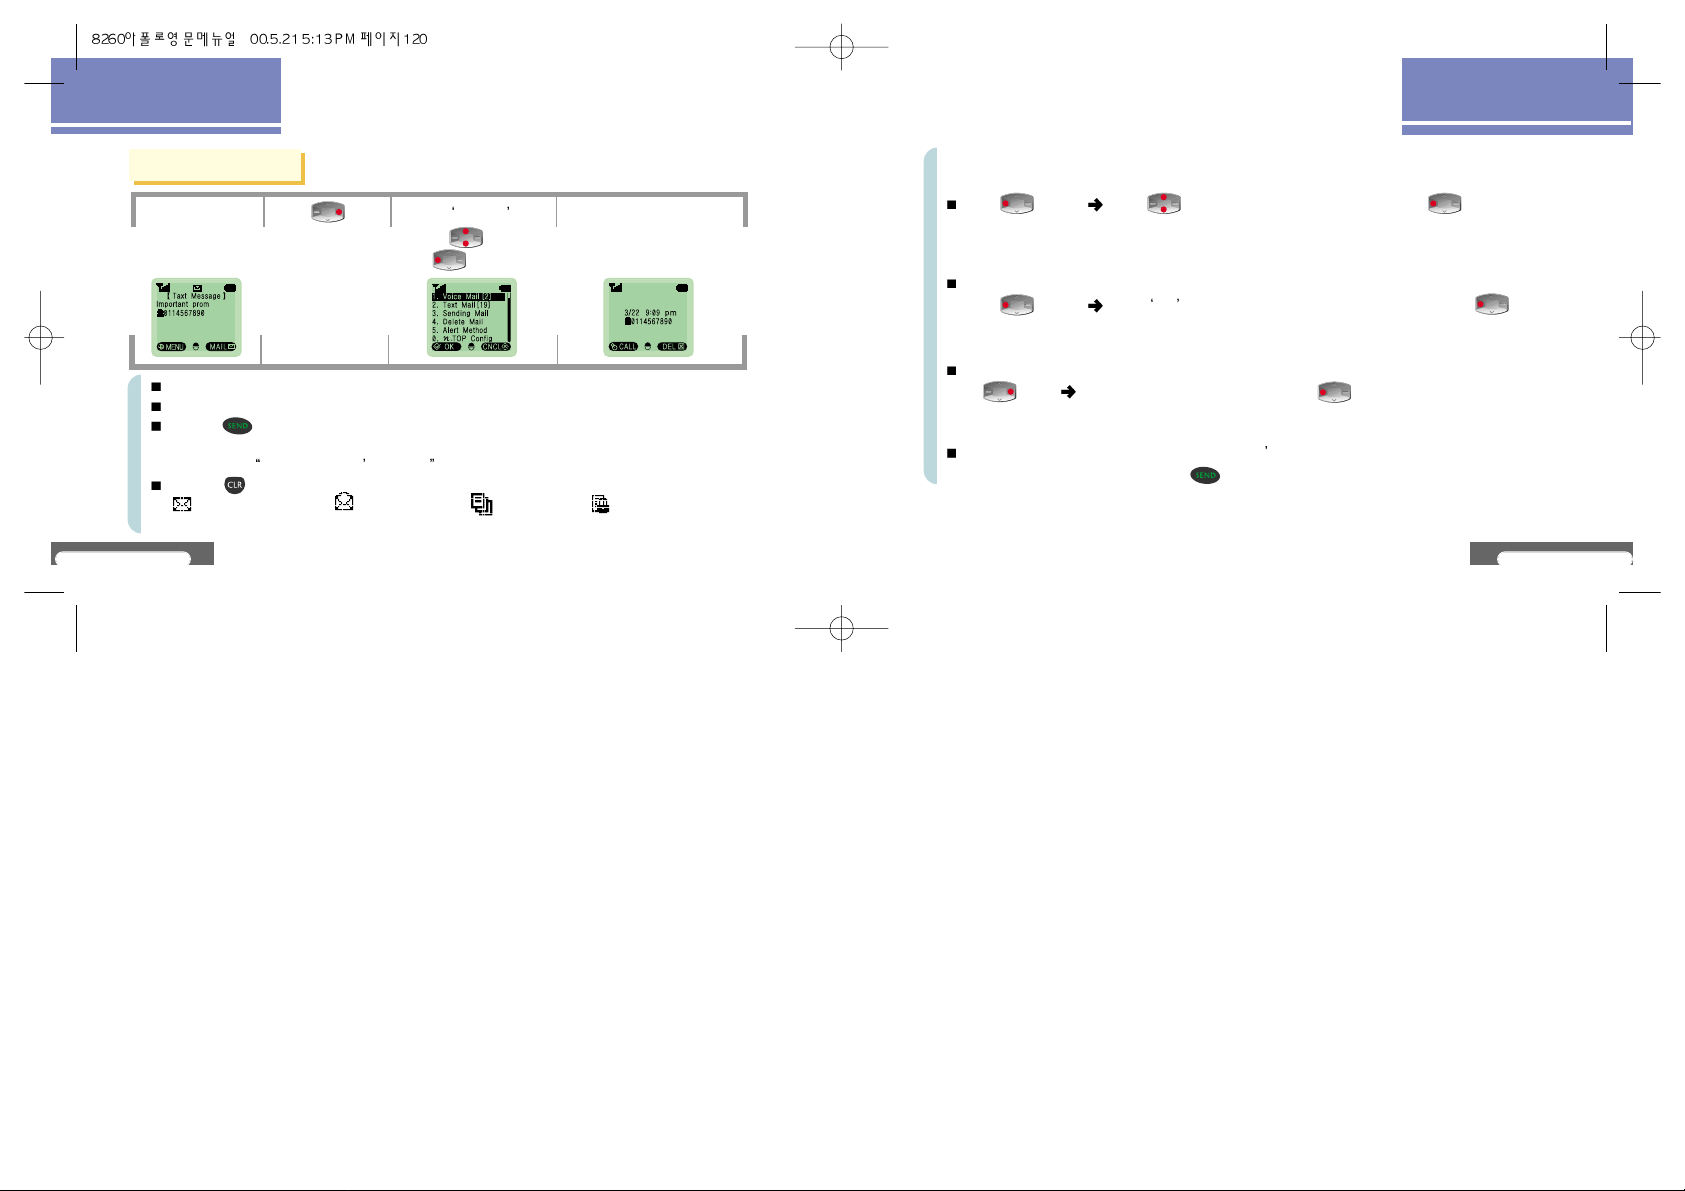
V8260
121
MAIL SERVICE FUNCTIONS
V8260
120
MAIL SERVICE FUNCTIONS
Text Mail
The information on the
received voice mail appears.
Press [MAIL].It is indicated that
a voice mail has
been received.
Move to Text Mail by
pressing and then
press [OK].
The most recently received text mail appears on the top.
When several text mails are received, the information on the one received last appears.
To press button when the number of the caller who left the mail is entered will make a
call at the entered number (when the number of the caller who left the mail is not entered,
the message, There is no caller s number. appears.)
To press button while checking mails will make a movement to the previous menu.
Text mail not checked Text mail checked Repeated mail Mail
whose protection is set.
When the information on the received text mail appears,
Press [LOCK]. Press to select the desired set value and press [OK].
The mail selected for protection is indicated by .
If the information on the received text mail appears when the mail is in the protection state,
press [LOCK]. Select NO for the value to set for mail protection and press [OK].
Protect(Save)Mail
Release Mail Potection
If the information on the received text mail appears,
Press [DEL]. Select the desired set value and press [OK].
Delete Mail
It is possible to make a call only when the caller s number is indicated. If the information on
the received text mail appears, press button.
Call to the Received Mail
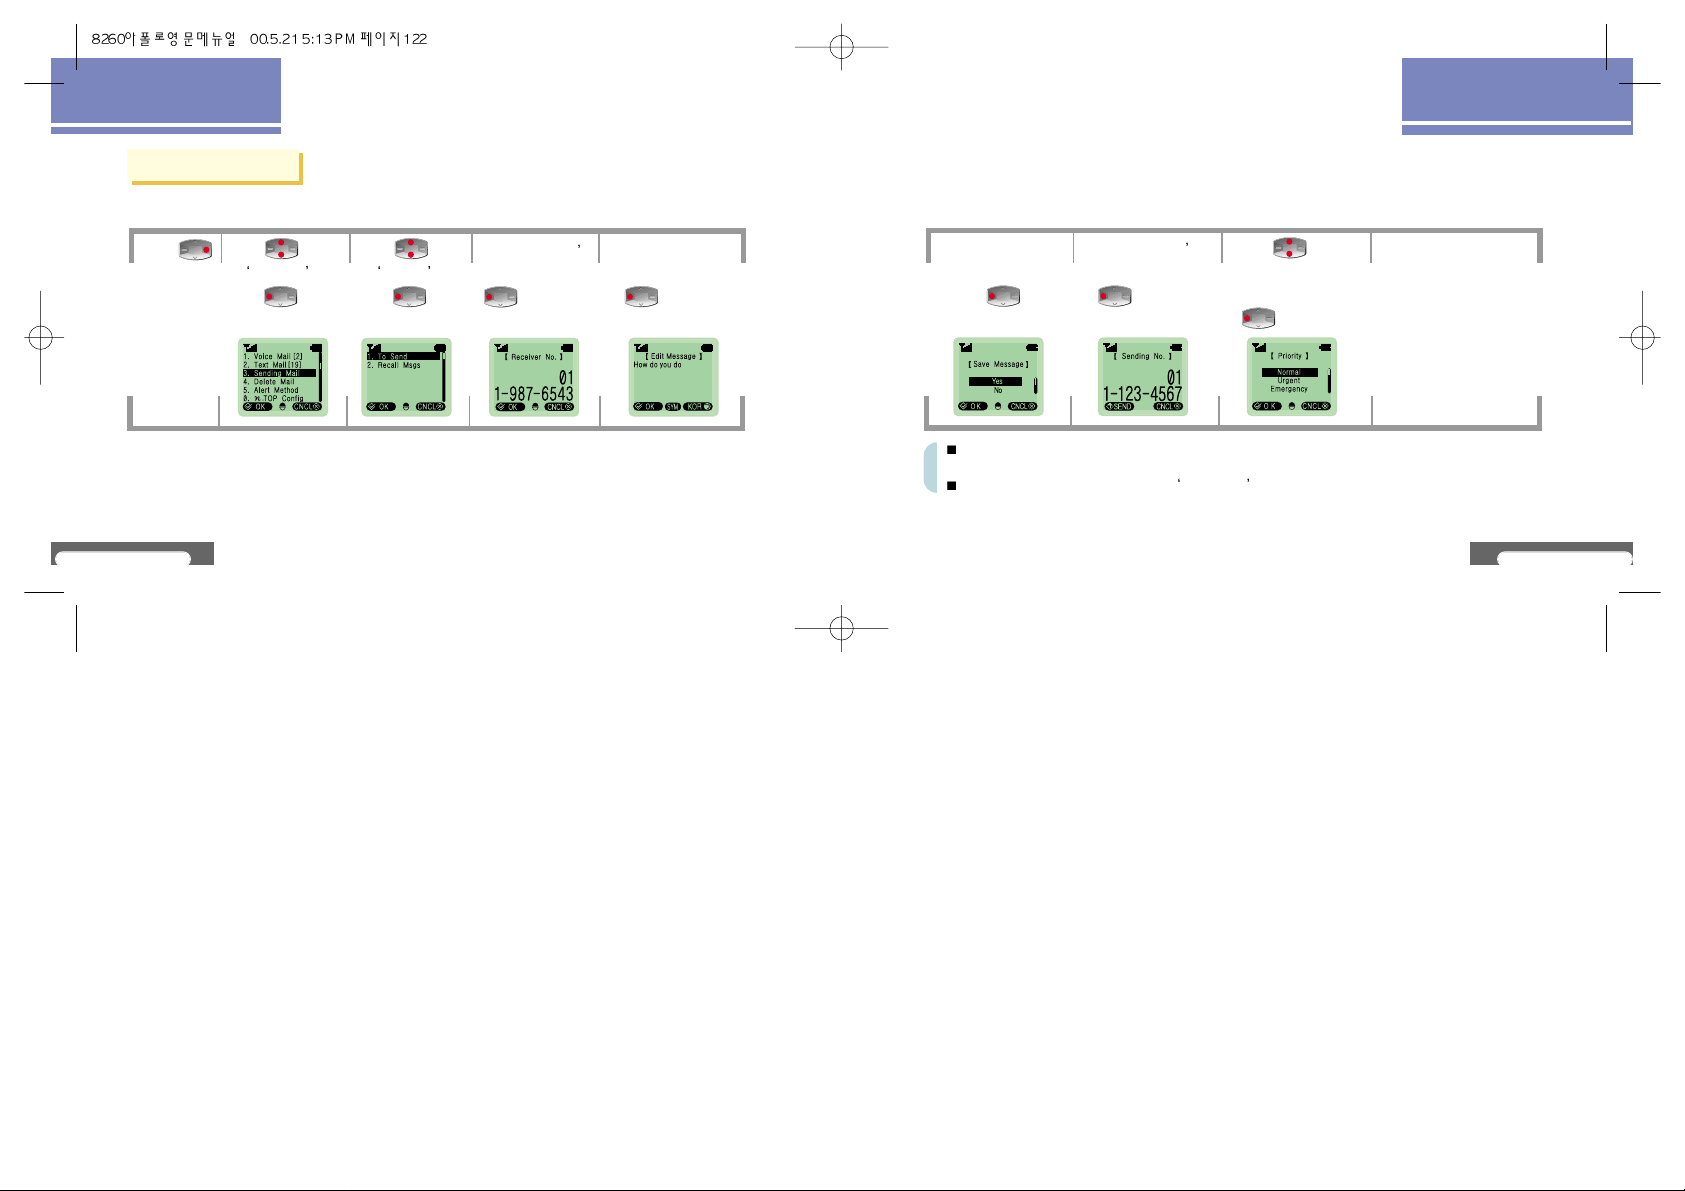
V8260
123
MAIL SERVICE FUNCTIONS
V8260
122
MAIL SERVICE FUNCTIONS
Send Mail
Press
[MAIL].
To Send
Press to move
to Send Mail and
press [OK].
Press move
to To Send and
press [OK].
Enter the receiver s
number and press
[OK].
Enter the mail
contents and press
[OK]
(See P. 114 ~ 117)
Select the set value
for mail saving and
press [OK].
Enter the sender s
number and press
[SEND].
Press to move to
the desired sending
method and press
[OK].
Press to move to the
previous menu after
the message
appears.
If a mail is saved, it is possible to send the same mail by selecting the saved mail without
entering the contents again.
The saved mail can be searched in Saved Mail .
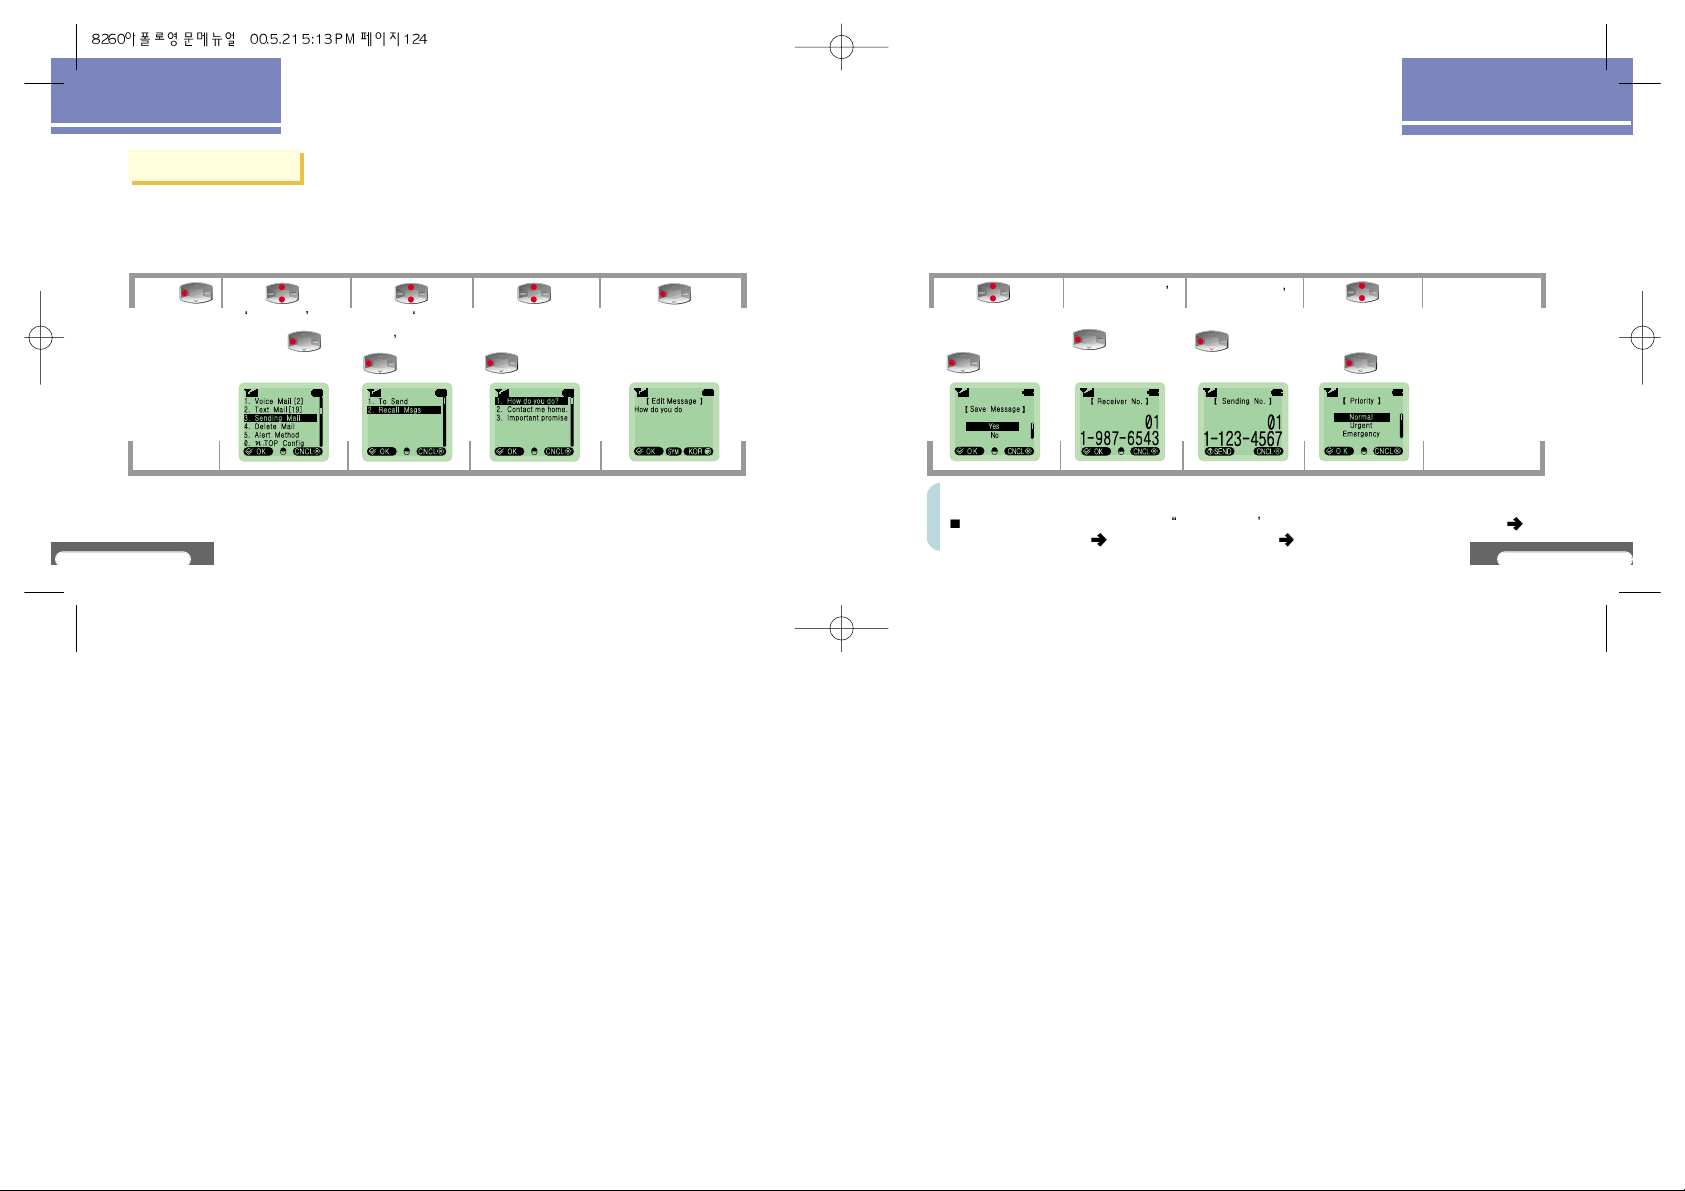
V8260
125
MAIL SERVICE FUNCTIONS
V8260
124
MAIL SERVICE FUNCTIONS
Send Mail
Press
[MAIL].
Recall Msgs
Press to move
to Send Mail
and press
[OK].
Press to
move to Recall
Msgs and press
[OK].
Press to
move to the saved
mail item and press
[OK].
Press [OK]
when the mail
appears.
Press to select
the set value for mail
saving and press
[OK].
Enter the receiver s
number and press
[OK].
Enter the sender s
number and press
[SEND].
Press to
move to the desired
sending method and
press [OK].
Move to the
previous menu
after the message
appears.
The system prompts a message, Sending fails, and asks if the user wants to try again.
Select the set value. Select the sending method. Resend.
This function enables the user to edit the saved text mails or the assigned text mails
and send the edited mails. It is possible to save up to 10 mails.
When sending fails,

Once : The alarming sound is generated to notify a mail reception.
2m Interval : The alarming sounds are generated every two minutes to
notify a mail reception until the user checks it.
Cancel Alert : The alarming sound is not heard.
V8260
127
MAIL SERVICE FUNCTIONS
V8260
126
MAIL SERVICE FUNCTIONS
Send Mail
Press
[MAIL].
Delete Mail
Press to
move to Delete
Mail and press
[OK].
Press to move to
items to delete
and press
[OK].
Press to
select the set value
for deleting mail and
press [OK].
Move to the previous
menu after the
message appears.
This function enables the user to delete the received or saved mails.
It is impossible to delete the mail, for which Mail Protection is set, even by selecting
Delete Mail .
It is necessary to first release the mail protection to delete the mail for which Mail
Protection
is set (See P. 121)
Alert Method
Press
[MAIL].
Set Alert
Press to move
to Alert Method
and press
[OK].
Press to move
to Set Alert and
press [OK].
Press to move
to the desired set
value for Set Alert and
press [OK].
Move to the previous
menu after the
message appears.
When a mail is received, this function notifies the user by means of alarm sounds that a mail
has been received.
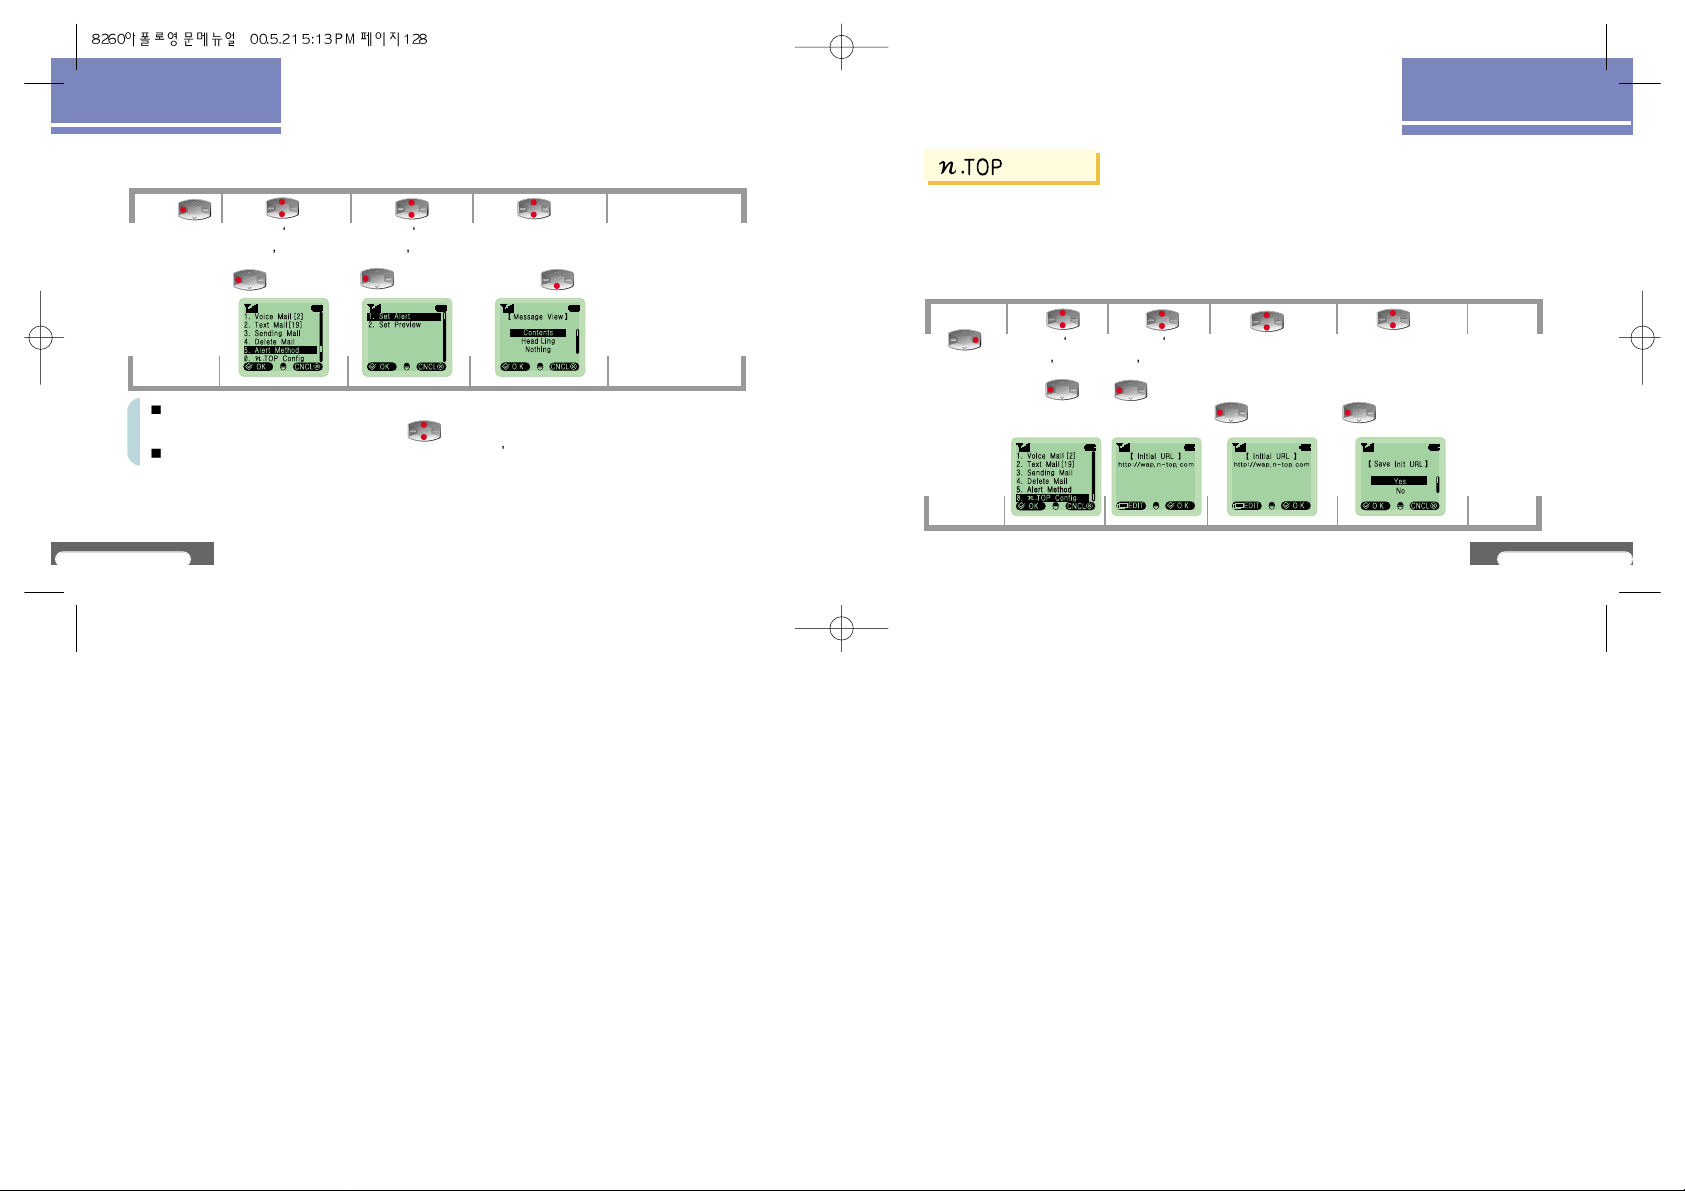
V8260
129
MAIL SERVICE FUNCTIONS
V8260
128
MAIL SERVICE FUNCTIONS
Press
[MAIL].
Set Preview
Press to
move to Alert
Method and press
[OK].
Press to
move to Set
Preview and press
[OK].
Press to move
to the desired set
value for Set Preview
and press [OK].
Move to the previous
menu after the
message appears.
This function enables the user to decide on what the screen shows when a mail is received.
Contents : The received text mail appears on the screen immediately and it is possible
to search the received contents by using .
Head Line : The kind of the received mail and the sender s number appear.
Config
Press
[MAIL].
Init.URL
Press to
move to n.TOP
Config. and
press
[OK].
Press to
move to Init.
URL and press
[OK].
Press [EDIT]
and enter the URL to
be used as the initial
screen. Then, press
[OK].
Press to select
the set value to save
the initial URL by
pressing and press
[OK].
Move to the
previous
menu after
the
message
appears.
This function enables the user to set and use the desired initial screen and server when using
WAP function.
This function enables the user to set the desired initial screen when using WAP function.
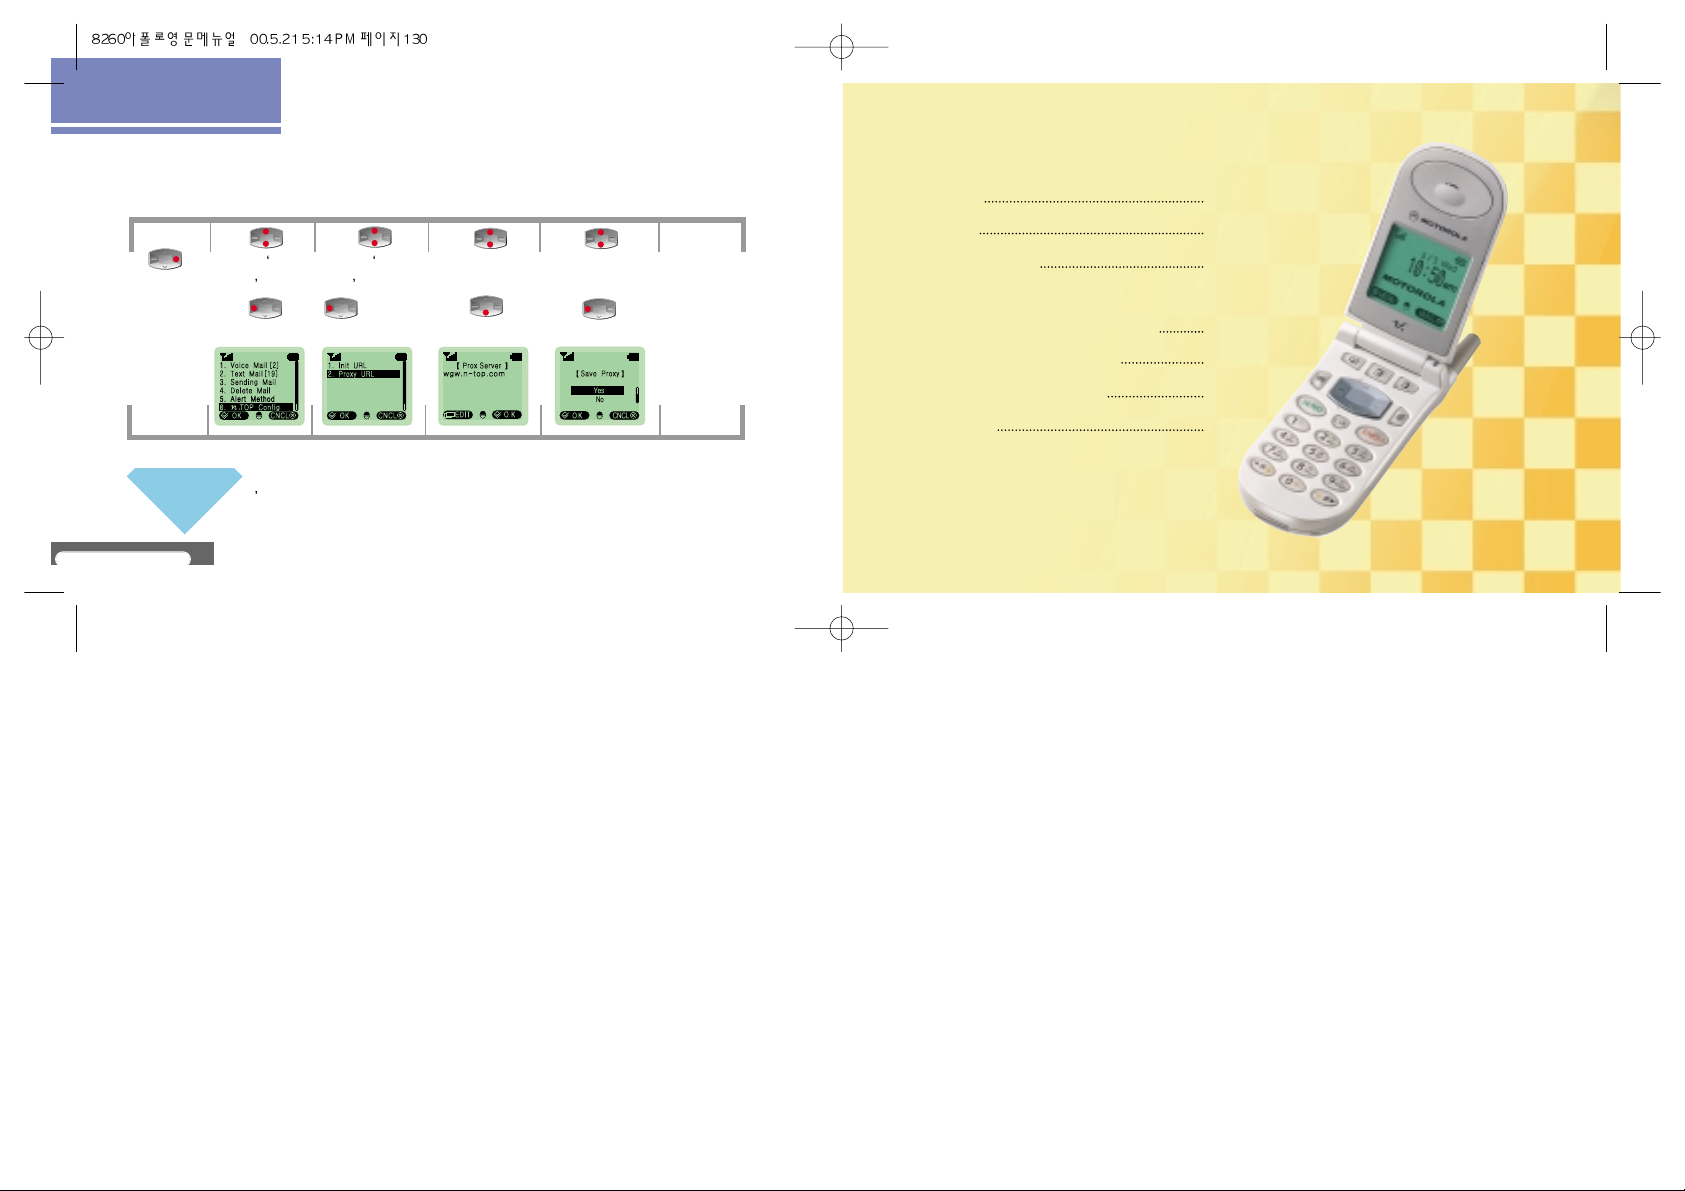
What is Proxy URL?
Being located between the user and the service server, it takes the roles of brining the desired requests
according to the user
s request and transferring it to him or her.
V8260
130
MAIL SERVICE FUNCTIONS
Porxy URL
This function enables the service provider to set proxy URL arbitrarily when adding or deleting
addresses by extending proxy URL.
Press
[MAIL].
Press to
move to n.TOP
Config. and
press
[OK].
Press to
move to Proxy
URL and press
[OK].
Press
[EDIT] and then
enter Proxy URL.
Press [OK].
Press to
select the set value
for Proxy URL and
press [OK].
Move to the
previous
menu after
the message
appears.
APPENDIX
Record 132
n.TOP 134
Mybell Service 135
Wireless Data Communication Service 136
How to Use an Ear Microphone 137
Before thinking it is broken 138
Motorola Service Center 140
Warranty 145
APPENDIX

APPENDIX
V8260
132
V8260
133
APPENDIX
Record
This function enables the user to record the call contents or the user s voice in the
standby state on the mobile phone.
Recording
Start
It is possible to record the call contents by pressing button for a long time
during a call. Save the contents by pressing [STO] when the recording is
done.
It is possible to record the user s voice by pressing button for a long time on
the initial screen. The recording starts with the beep sound. Save the user s
voice by pressing [STO] by pressing when the recording is done.
To press [CNCL] will cancel the recording.
End
Press or button
Play Recording
Press
button.
It is possible to hear the recorded
contents by moving to the
desired recorded items by
pressing . Press
[PLAY] to hear them again.
Press to
move to Play
Recording and
press
[OK].
Erasing
Press
button.
Select the set value for Delete
Recording and press
[OK].
Press to
move to Delete
All and press
[OK].
When the user wants to delete the item which is being played currently, Press [DEL] when the
recording is played. Press to select the desired set value and press [OK].

V8260
135
APPENDIX
APPENDIX
V8260
134
n.TOP
This is bi-directional information service which enables the user to easily search for the desired Internet
information with a mobile phone anytime anywhere. Because it is classified into information, economics,
entertainment, my network, and TTL
n.TOP, the user can search for information more easily.
Connect to n.TOP
Press to make a connection to n.TOP.
Press to search for items.
Press [OK] to select the desired item.
Press button to end n.TOP.
When the connection to n.TOP is made, appears.
Use n.TOP
Mybell Service
This function enables the user to download desired melodies in addition to those already
saved in the mobile phone and use them as the receive bell.
How to Use
02-700-5782 Press button.
To select the desired melody according to the announcements will automatically
download the melody and be registered on
User 1 ~ User 3 of Bell/Melody.
The melody is downloaded through Bell / Melody and select the registered User
(See P. 46 ~ 47) User 1 ~ User 3.
Change to the Receive Bell
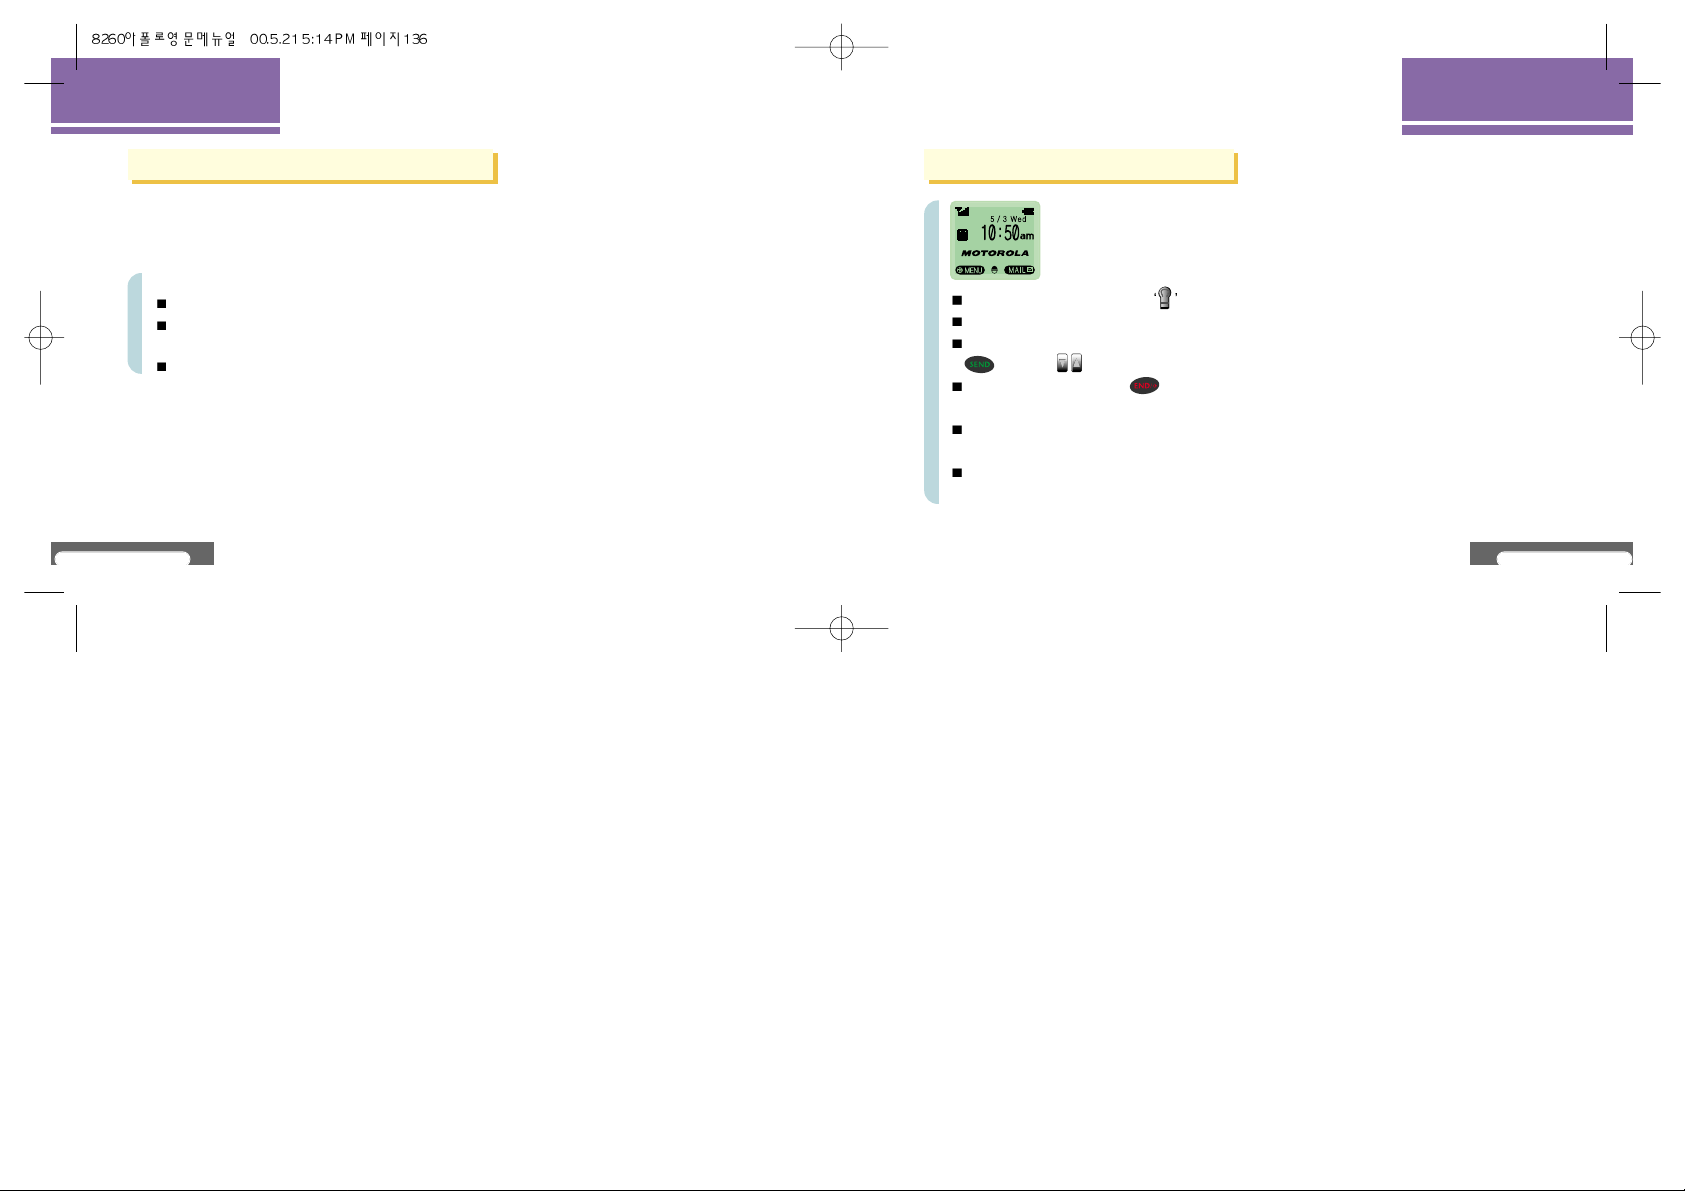
V8260
137
APPENDIX
APPENDIX
V8260
136
Wireless Data Communication Service
This service enables the user to use the functions such as Internet, various information search, and
receiving/sending e-mails simply by connecting the mobile phone to a notebook or PC through wireless
data connection cable without an additional modem even when the user is moving.
To use the wireless data communication service
It is necessary to separately purchase the data communication cable at a near agency.
Refer to the manual given during the purchase of the data communication cable for
how to set the computer environment and other details.
Contact the service provider for other details.
How to use an ear microphone
Connect an ear microphone to located on the top of the mobile phone.
Insert the ear microphone to the ear.
If a call is received when the ear microphone is connected to the mobile phone, press
button or button to answer the call.
To terminate the call, press button.
- If the caller terminates the call first, the call automatically ends.
If taking the ear microphone out of the ear during the call, the user can talk through the
mobile phone.
If the ear microphone is connected to the mobile phone, to close the folder during a
call would not terminate the call.

V8260
139
APPENDIX
APPENDIX
V8260
138
Before thinking it is broken
The screen shows nothing.
Check the battery state (in case of discharge or an incorrect connection).
The screen does not show the antenna.
Try a call again after moving to another location.
Tututu alarm sounds are heard when a call is attempted.
There is no channel or the communication with the BTS is not done. Terminate the call temporarily by
pressing button and then redial the number by pressing button.
The screen shows .
The mobile phone locked and a call cannot be made. Attempt a call after releasing the mobile phone
by pressing the password.
The red light blinks on the charge lamp of the charger.
Attempt a call again after checking the location of the battery pack.
Attempt a call again after cleaning the charging terminal.
If the blink continues even after trying these several times, contact the near service center.
The time to use the battery pack is different from what is mentioned in the manual.
The use time of a battery pack gradually becomes shorter than that at the time of the purchase as
charging and discharging continue repetitively. The use time can change if the charged batter
pack has been left in the low temperature or high temperature.
Abnormal actions occur during the use of the mobile phone or the power is not turned on.
Separate the battery pack and mount it again. Then, turn on the power.
The screen shows Warning for low voltage! .
Pipipig is heard and the sign blinks. If the mobile phone is continuously used, it will be turned off.
Consequently, charge it before using it. When the mobile phone is in the low voltage state, the
function related to memory does not operate.
 Loading...