


APPLICANT: MOTOROLA, INC. FCC ID: IHDT5AE1
INSTRUCTION MANUAL
A preliminary draft copy of the Users Manual follows:
EXHIBIT 8

Each digital wireless phone manufactured and supplied by Motorola has its own ESN(Electronics Serial Number). Removal or change of this ESN,
to three or less years' penal servitude or fined 10 million or less won pursuant to the related civil laws(Article 4 of Radio Wave Act, Article 57 of
Prohibition of illegal modification of ESN
or an attempt to reproduce and enter another ESN shall be deemed an illegal act. Any person who commits such an illegal act shall be sentenced
Telecommunications Enterprise Act, and Article 347 of the Criminal Law Act).
In addition, such an illegal act may damage the software built in the phone, with the result that the phone cannot be used any longer.
Thus, customers are required to use care not to incur any damage due to such an illegal act. Especially, once such an illegal act is identified, both
the free and paid services warranted by Motorola are rejected.
Precautions
Do not lend your own phone to other person inadvertently.
For repairs or other services, contact our designated service center.
If your phone has got lost or stolen, immediately report to the relevant telecommunications service provider.
This product should not be added with any separate equipment that may cause an alteration to its original performance as described
on type registration.
1

Safety Information
Exposure to Radio Frequency Signal
IMPORTANT: Read this information before using your wireless handheld phone.
Exposure to Radio Frequency Signals
Your wireless handheld portable telephone is a low power radio transmitter and receiver. When it is ON, it receives and also
sends out radio frequency (RF) signals.
In August 1996, The Federal Communications Commission (FCC) adopted RF exposure guidelines with safety levels for
handheld wireless phones. Those guidelines are consistent with safety standards previously set by both U.S. and
international standards bodies:
American National Standards Institute (ANSI) IEEE. C95. 1-1992
National Council on Radiation Protection and Measurement (NCRP). Report 86
International Commission on Non-Ionizing Radiation Protection (ICNIRP) 1996
Ministry of Health (Canada), Safety Code 6
Those standards were based on comprehensive and periodic evaluations of the relevant scientific literature. For example,
over 120 scientists, engineers, and physicians from universities, government health agencies, and industry reviewed the
available body of research to develop the ANSI Standard (C95.1).
2

The design of your phone complies with the FCC guidelines (and those standards). For additional information concerning
exposure to radio frequency signals, see the statement by the FDA at the end of this user guide.
To maintain compliance with FCC RF exposure guidelines, if you wear a handset on your body, use the Motorola-supplied or
approved carrying case, holster, or other body-worn accessory. If you do not use a body-worn accessory, ensure the antenna
is at least one inch (2.5 centimeters) from your body when transmitting. Use of non-Motorola accessories may violate FCC RF
exposure guidelines.
Care
Use only the supplied or an approved replacement antenna. Unauthorized antennas, modifications, or attachments could
damage the phone and may violate FCC regulations.
3
All batteries can cause property damage, injury, or burns if a conductive material, such as jewelry, keys or
inside your pocket, purse, or other container with metal objects. When the battery is detached from the phone, your
Phone Operation / Normal Operation
ies
Hold the phone as you would any other telephone, with the antenna pointed up and over your shoulder.
Phone Operation / Tips on Efficient Operation
Observe the following guidelines to operate your phone most efficiently.
iExtend your antenna fully, if applicable.
iDo not touch the antenna unnecessarily when the phone is in use. Contact with the antenna affects call quality
and may cause the phone to operate at a higher power level than otherwise needed.
Caution!
beaded chains, touches exposed terminals. The material may complete an electrical circuit and become quite hot. To
protect against such unwanted current drain, exercise care in handling any charged battery, particularly when placing it
batteries are packed with a protective battery cover; please use this cover for storing your batteries when not in use.
Check the laws and regulations on the use of wireless telephones in the areas where you drive. Always obey them.
Observe the following guidelines when using your phone while driving.
4

i Give full attention to driving--driving safely is your first responsibility.
Electronic Devices
i Use hands-free phone operation, if available.
i Pull off the road and park before making or answering a call if driving conditions so require.
Most modern electronic equipment is shielded from RF signals. However, certain equipment may not be shielded against
the RF signals from your wireless phone.
The Health Industry Manufacturers Association recommends that a minimum separation of six inches (6") be maintained
between a handheld wireless phone and a pacemaker to avoid potential interference with the pacemaker. These
recommendations are consistent with the independent research by and recommendations of Wireless Technology Research.
Persons with pacemakers:
i should ALWAYS keep the phone more than six inches from their pacemaker when the phone is turned ON
i should not carry the phone in a breast pocket
i should use the ear opposite the pacemaker to minimize the potential for interference
i should turn the phone OFF immediately if you have any reason to suspect that interference is taking place
aids
Some digital wireless phones may interfere with some hearing aids. In the event of such interference, you may want to
consult your hearing aid manufacturer to discuss alternatives.
5

If you use any other personal medical device, consult the manufacturer of your device to determine if it is adequately shielded
from external RF energy. Your physician may be able to assist you in obtaining this information.
Turn your phone OFF in health care facilities when any regulations posted in these areas instruct you to do so.
Hospitals or health care facilities may be using equipment that could be sensitive to external RF energy.
RF signals may affect improperly installed or inadequately shielded electronic systems in motor vehicles.
Check with the manufacturer or its representative regarding your vehicle. You should also consult the manufacturer of any
Equipment that has been added to your vehicle.
Turn your phone OFF in any facility where posted notices so require.
Aircraft
Switch OFF your phone before boarding an aircraft.
Airline regulations prohibit using your phone while in the air. Check and comply with the policy of your airline regarding
the use of your phone while the aircraft is on the ground.
6
Blasting Areas
To avoid interfering with blasting operations, turn your phone OFF when in a "blasting area" or in areas posted: "Turn off
Two-way radio." Obey all signs and instructions.
Potentially Explosive Atmospheres
Turn your phone OFF, do not remove your battery when you are in any area with a potentially explosive atmosphere,
and obey all signs and instructions. Sparks from your battery in such areas could cause an explosion or fire resulting in
bodily injury or even death.
Areas with a potentially explosive atmosphere are often but not always clearly marked. They include: fueling areas
such as gasoline stations; below deck on boats; fuel or chemical transfer or storage facilities; areas where fuel odors
are present (for example, if a gas/propane leak occurs in a car or home); areas where the air contains chemicals or particles,
such as grain, dust, or metal powders; and any other area where you normally would be advised to turn off your vehicle
engine.
For Vehicles Equipped with an Air Bag
An air bag inflates with great force. Do NOT place objects, including both installed or portable wireless equipment,
in the area over the air bag or in the air bag deployment area. If in-vehicle wireless equipment is improperly installed
and the air bag inflates, serious injury could result.
7
Confirming Components
Using Menu
Features
Features Usable During A Call
9
24
19
67
Content
Confirming ComponentsLLLLLLLLLLLL
Name and Function of Each PartLLLLLLLL
Function of Each ButtonLLLLLLLLLLLL
Explanations of Screen Status and SymbolsLLL
Battery Installation and RemovalLLLLLLLL
Battery Pack Care InformationLLLLLLLLL
Charging Battery PackLLLLLLLLLLLLL
10
11
12
13
14
Basic Operation
Power ONLLLLLLLLLLLLLLLLLL
Power OFFLLLLLLLLLLLLLLLLLL
Placing a CallLLLLLLLLLLLLLLLLLL
Receiving a CallLLLLLLLLLLLLLLL
Unanswered Call DisplayLLLLLLLLLLLL
Electronic Dialing FeatureLLLLLLLLLLLL
Called ListLLLLLLLLLLLLLLLLLL
19
20
20
21
21
22
Phone BookLLLLLLLLLLLLLLLLLL
Tone Type SelectionLLLLLLLLLLLLLL
Alarm/TimerLLLLLLLLLLLLLLLLLL
Personal Information ManagementLLLLLLLL
Phone OptionLLLLLLLLLLLLLLLLLL
Lock/SecurityLLLLLLLLLLLLLLLLLL
FeaturesLLLLLLLLLLLLLLLLLLLL
GameLLLLLLLLLLLLLLLLLLLLL
Voice Dialing/Storing VoiceLLLLLLLLLLL
Changing VocoderLLLLLLLLLLLLLLL
Earpiece Volume ControlLLLLLLLLLLLL
Scratch Pad FeatureLLLLLLLLLLLLLLL
Phone BookLLLLLLLLLLLLLLLLLLL
Sending My Phone NumberLLLLLLLLLLL
Muting the PhoneLLLLLLLLLLLLLLLL
30
35
44
50
55
60
62
65
67
68
68
69
8
Message Service Features
71
83
87
Appendix
i-touch ServiceLLLLLLLLLLLLLLLL
i-station ServiceLLLLLLLLLLLLLLL
n.TOP ServiceLLLLLLLLLLLLLLLL
Voice MessageLLLLLLLLLLLLLLLL
Text MessageLLLLLLLLLLLLLLLLL
Sending a MessageLLLLLLLLLLLLLL
Deleting a MessageLLLLLLLLLLLLLL
Answering Mode SetupLLLLLLLLLLLL
Entering TextLLLLLLLLLLLLLLLLL
Supplemental Features
700 Service for Melody DownloadLLLLLLL
Power Angel ServiceLLLLLLLLLLLLL
Radio Data Communication ServiceLLLLLL
71
72
73
74
76
78
79
80
83
84
PC sync using PIMsLLLLLLLLLLLLLLL
How to Use Speaker phoneLLLLLLLLLLLL
Separately Sold ItemsLLLLLLLLLLLLLL
TroubleshootingLLLLLLLLLLLLLLLLL
Menu Status TableLLLLLLLLLLLLLLLL
87
88
89
90
9

Before Using
Confirming Components
Name and Function of Each Part
Function of Each Button
Explanations of Screen Status and Symbols
Battery Installation and Removal
Battery Pack Care Information
Charging Battery Pack
10
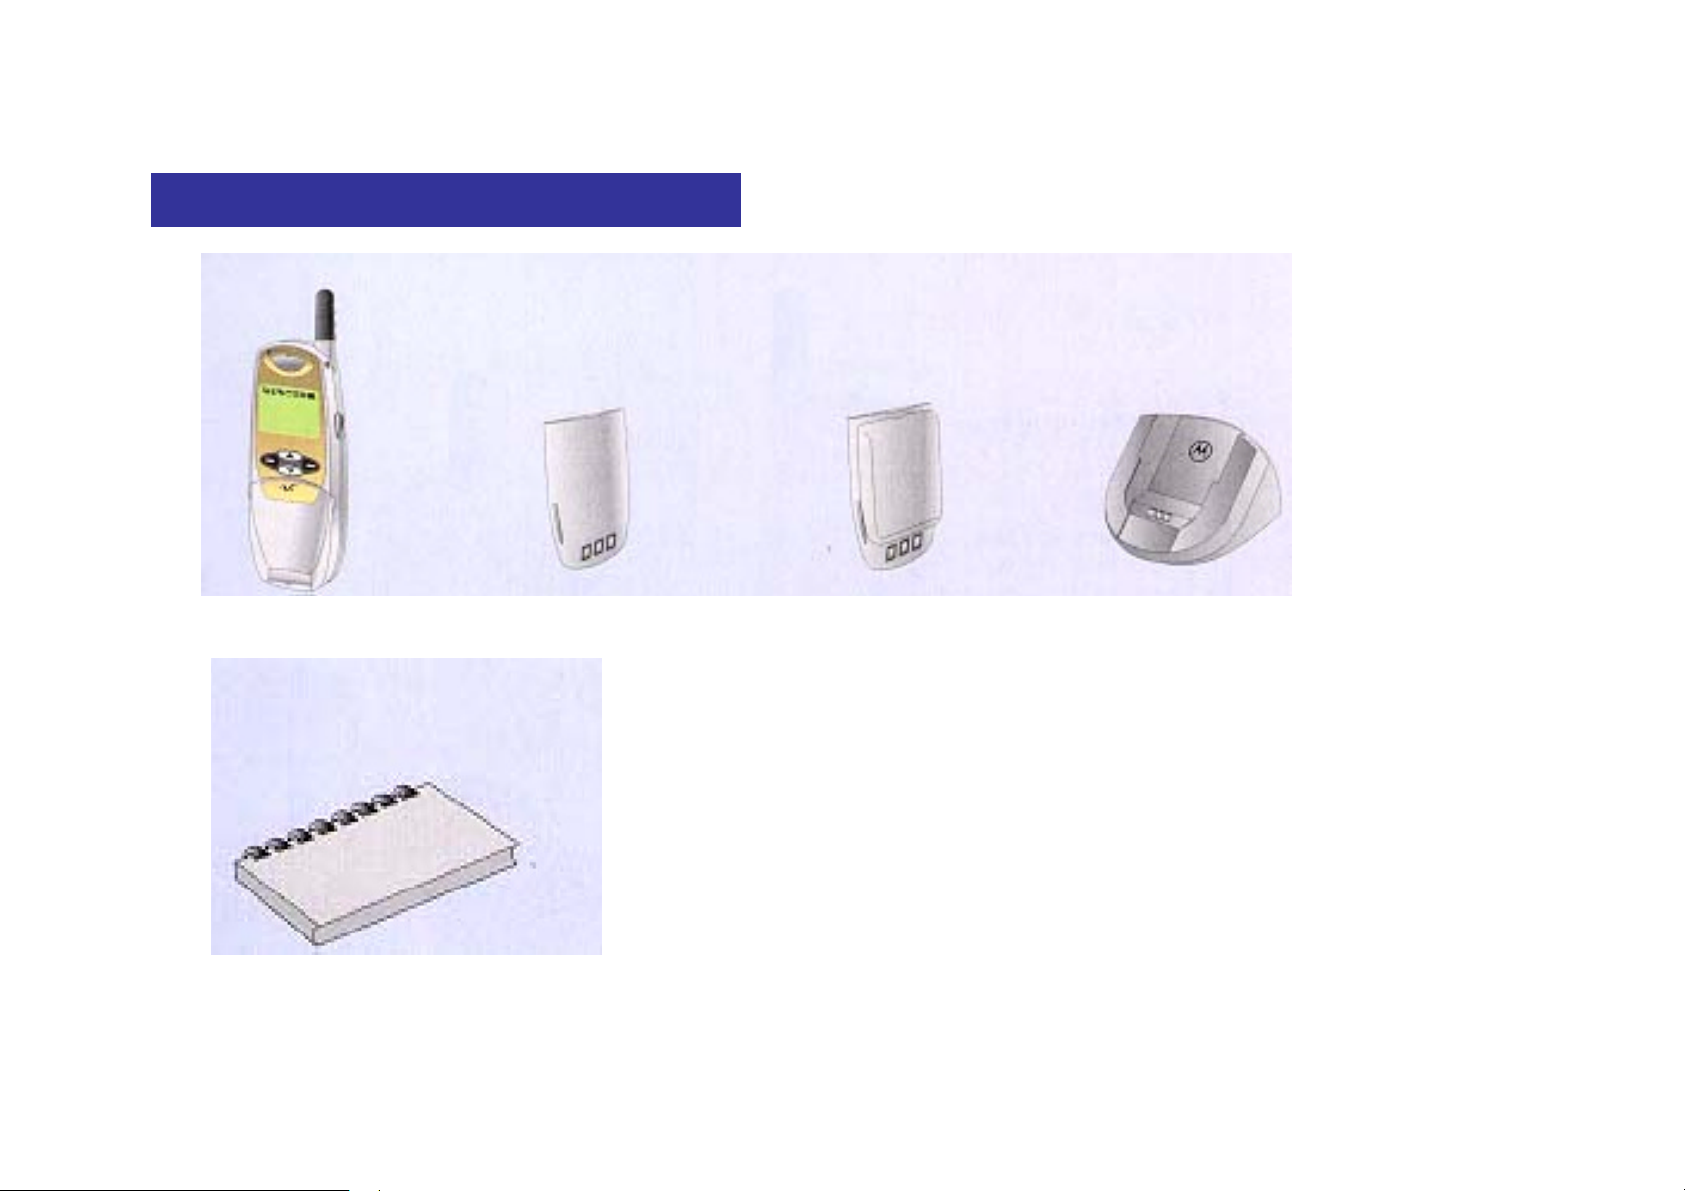
Confirming Components
Handset Battery Pack, Battery Pack Desktop Charging Cradle,
(small capacity) (standard type),
User's Manual
These separate items may vary according to the specifications provided by service providers.
11
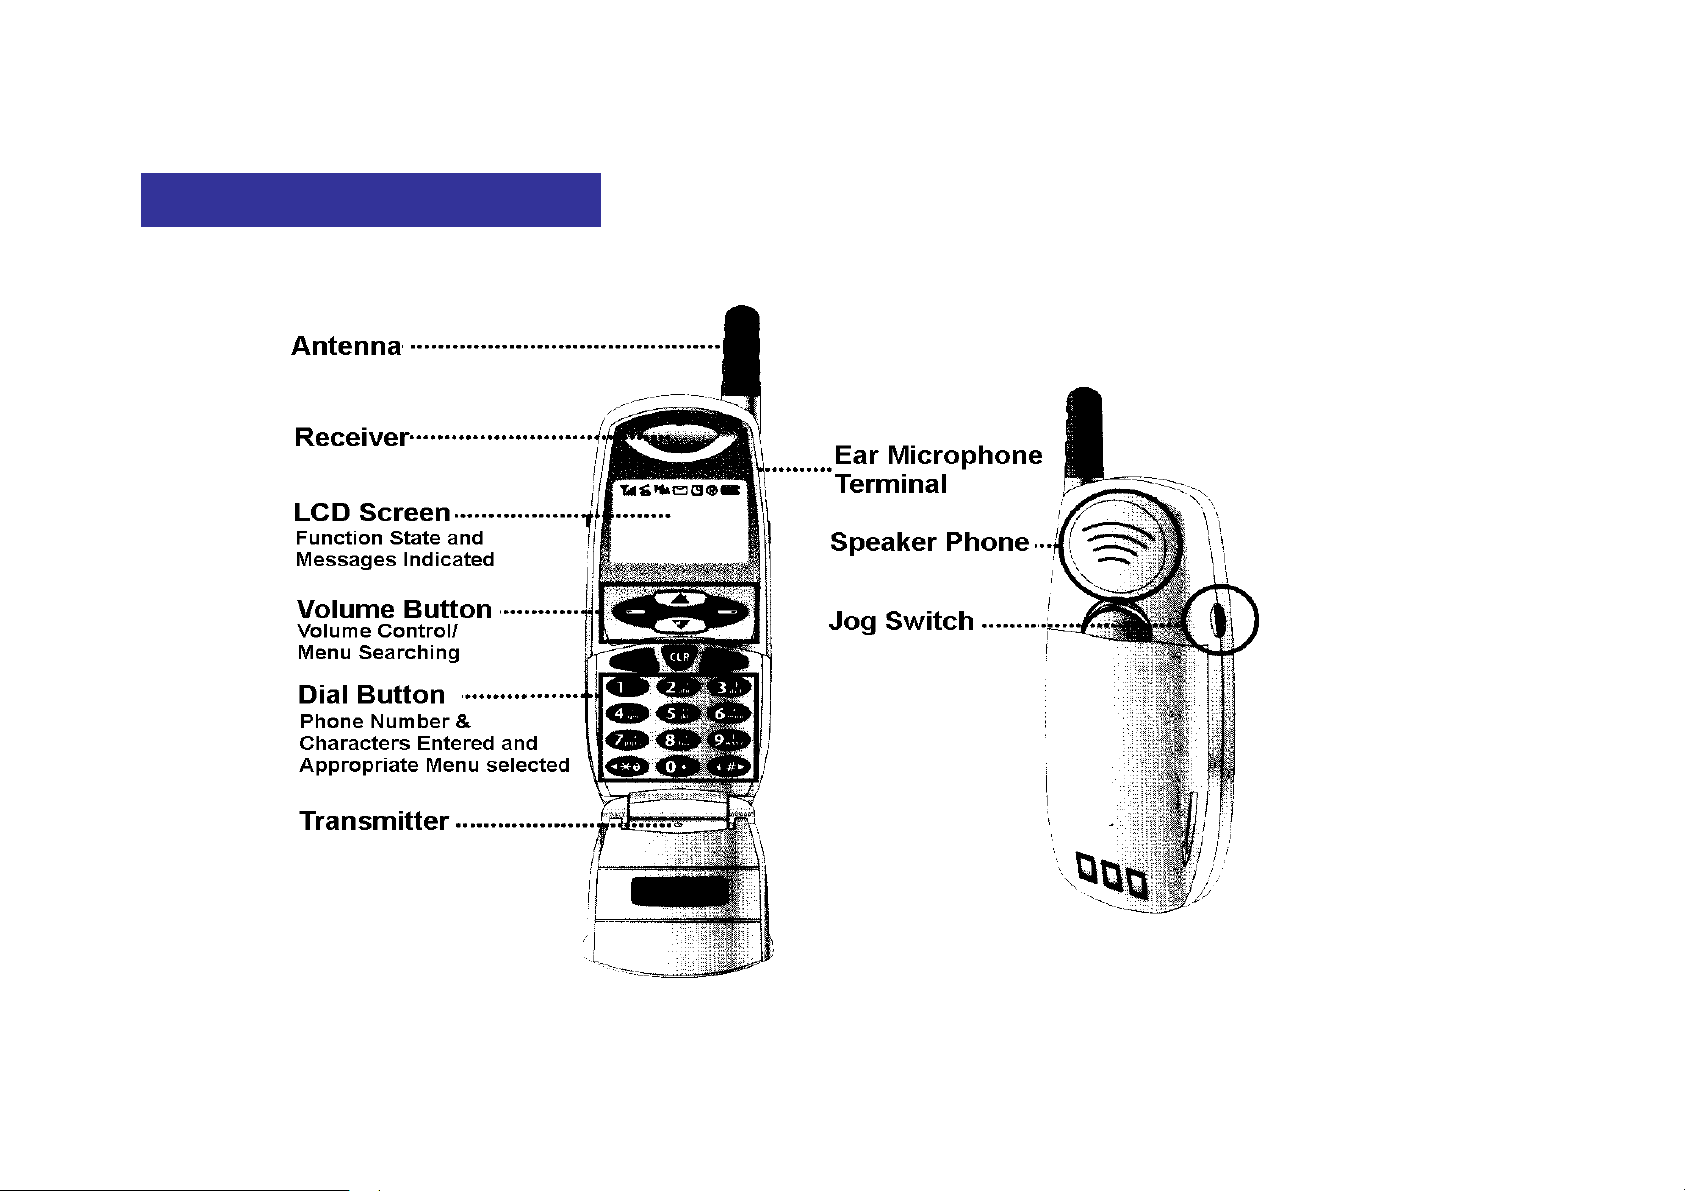
Name and Function of Each Part
12
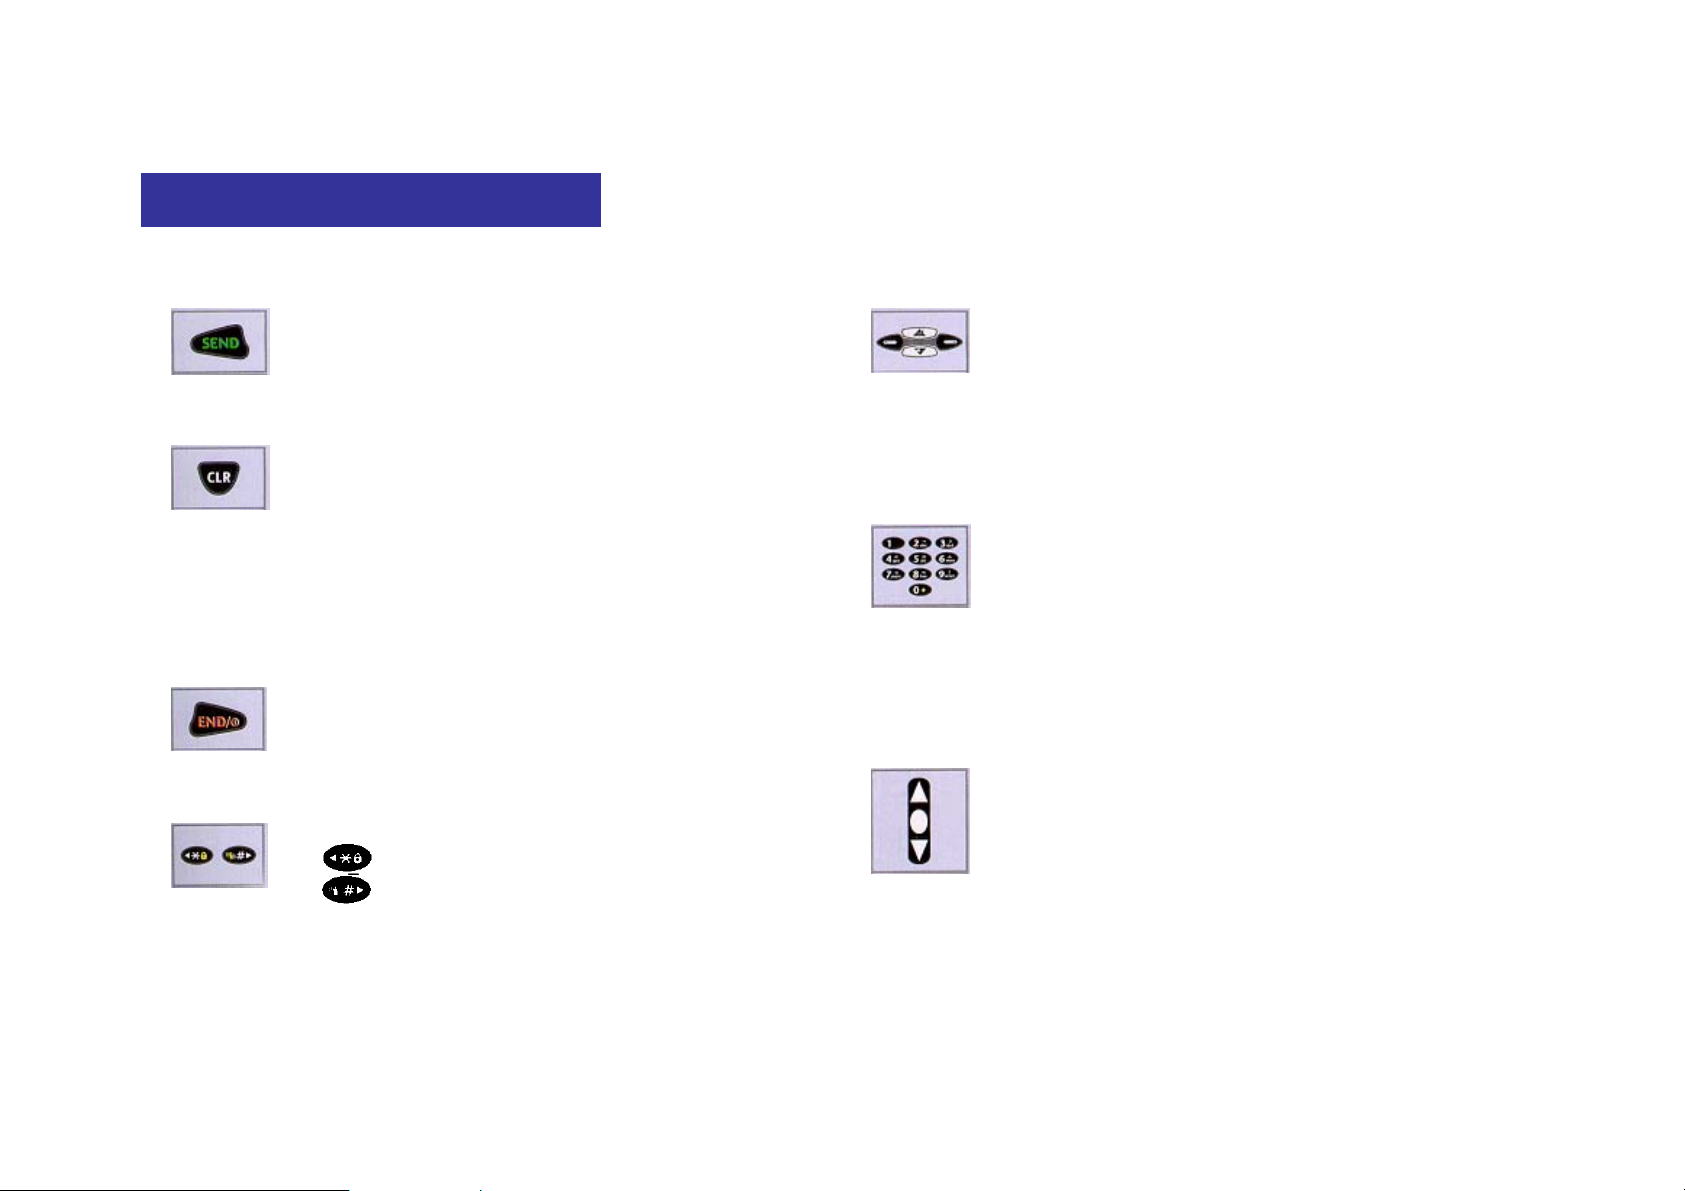
Function of Each Button
To place or receive a call
To correct or delete a character or number
When pressed: Deleting one by one
When pressed and held: Deleting the whole
Used to set Auto Voice Dial feature
(This can be used only when Auto Voice Dial feature
is cleared.)
To turn the power ON/OFF, end a call, and end
a selected feature to return to the initial menu
*# To search menu in sequence
To set Lock feature
To set/clear Etiquette mode
Left/Right - To select/cancel a menu
Up: To connect i-touch or n-TOP
Down: To turn Speaker Phone feature ON/OFF
(Pressing and holding the button when searching a list
enables automatic scroll..)
Dial buttons - To enter numbers and characters
Emergency Dial-up
Quick dial feature for Recall by Stored on phone book
Quick dial feature for Personal Information
Management item
€ Quick dialing for an international call
Jog Switch
To scroll through the menus
To control volume
To turn voice recording feature ON/OFF
13
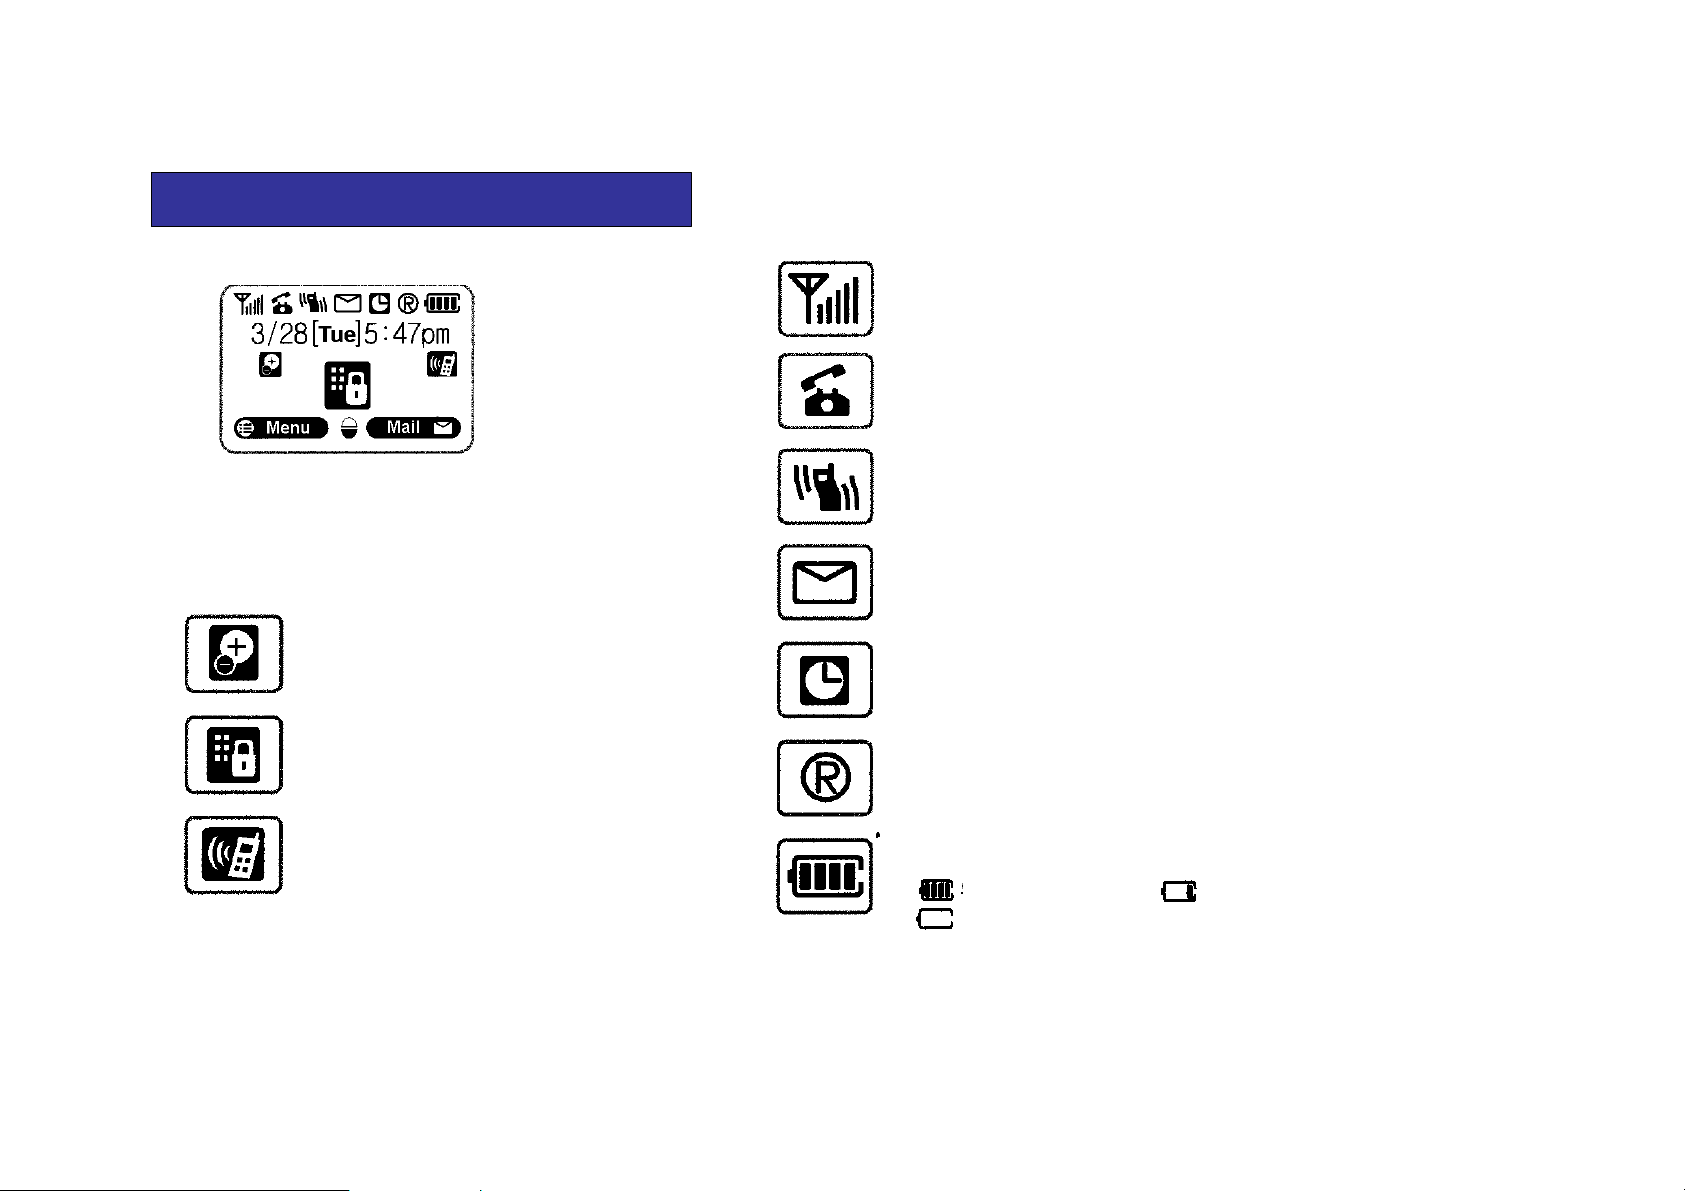
Explanations of Screen Status and Symbols
when the received tone has been set to vibration mode.
when you clear alarm setting.
To indicate the signal strength level in the current service area
To indicate call status. This symbol is displayed during a call.
To indicate tone status when a call is received. This is displayed
To prompt you whether or not to receive a message. This symbol
is displayed when a voice or text message is received.
To indicate that user time has been set up.
To indicate that LOCK feature has been set up.
To indicate that Speaker Phone mode has been
set up.
14
To indicate that alarm has been set to ON. This symbol disappears
To indicate roaming service
To indicate the remaining battery capacity
Full charging state Low charging level,
Required to charge immediately
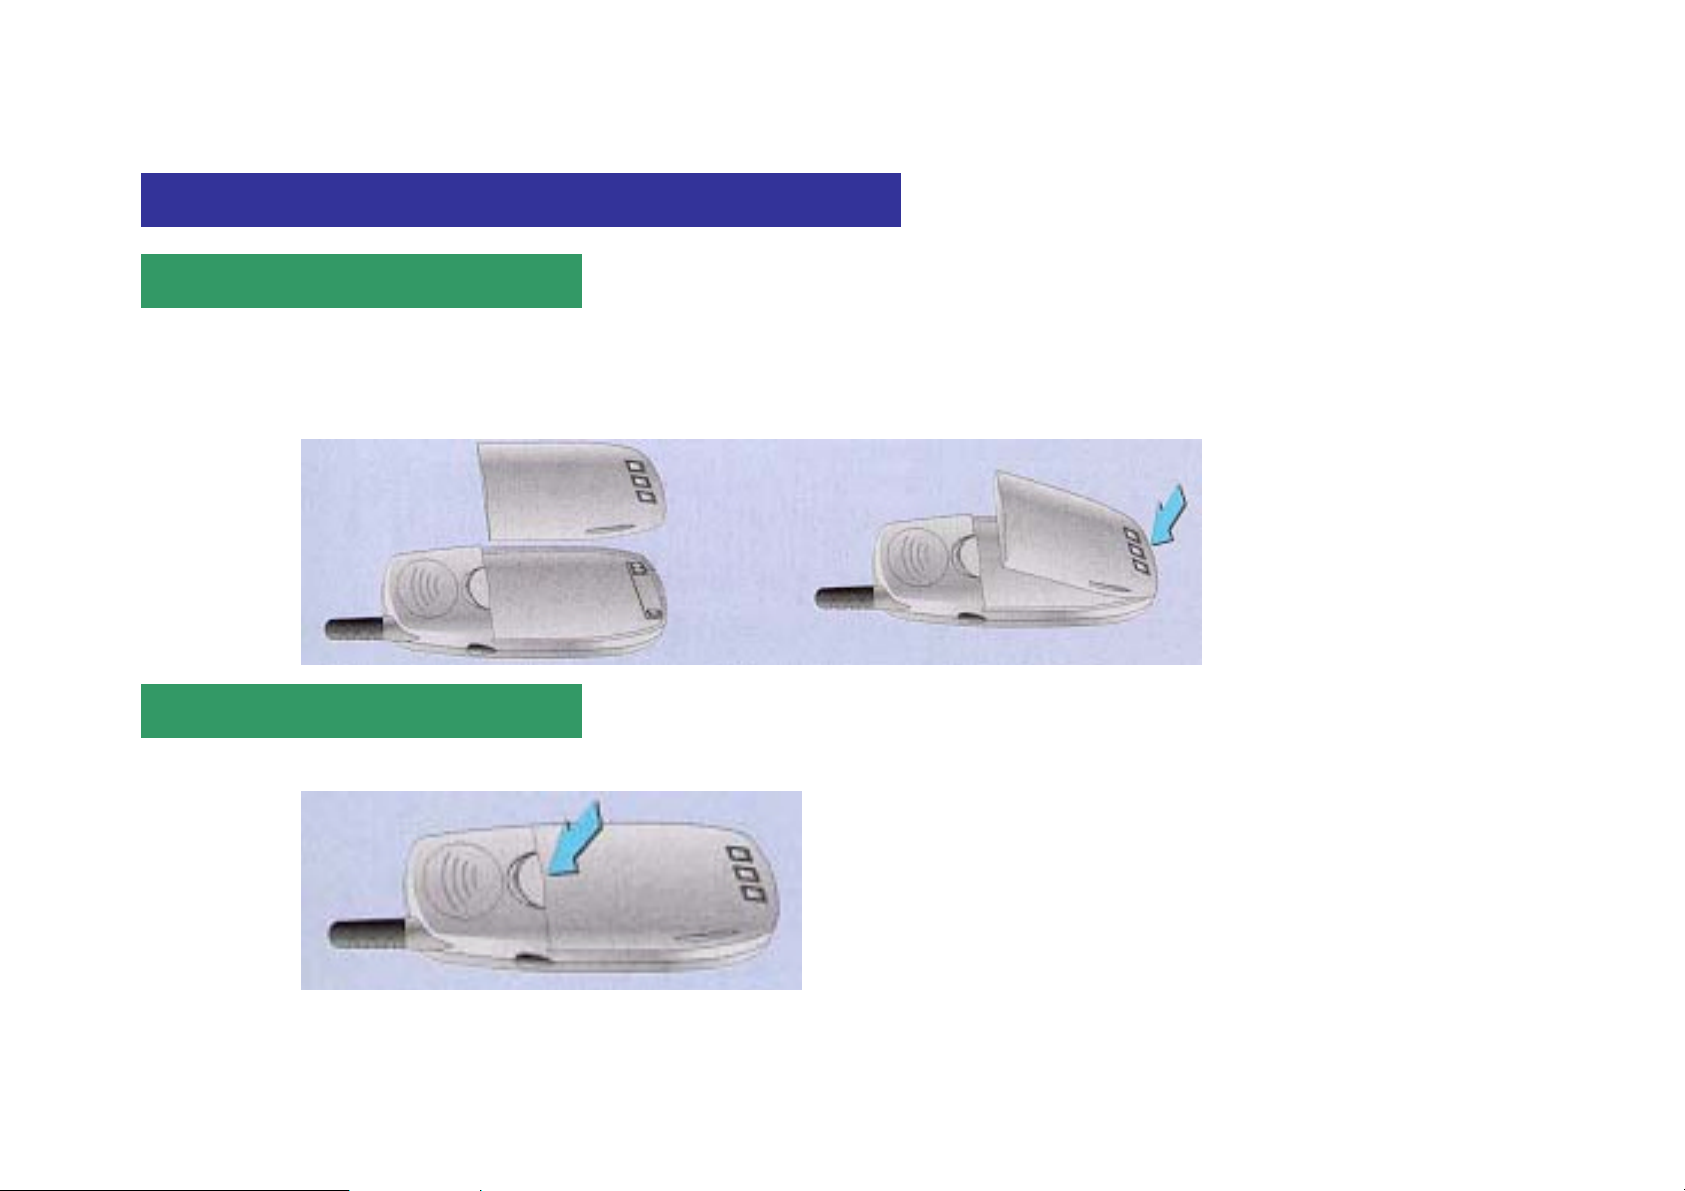
Battery Installation and Removal
Installing Battery Pack
Fit the battery pack correctly into the groove provided on the lower side of the handset.
Slide it all the way in the arrow direction until a 'click' is heard.
If the battery pack is not installed correctly, the power may not be turned on or the pack may fall out of the handset. Be sure to check to see if it has been firmly installed.
Removing Battery Pack
Turn off the power first. Press the removal button downward and push it in the arrow direction.
15

Battery Pack Care Information
ALWAYS use the authorized, dedicated charger and battery pack.
iUsing an unauthorized charger could cause damage to the battery pack and explosion may result.
NEVER short-circuit the contact terminals of the battery pack. Explosion may result.
ALWAYS charge or store the battery pack in room temperature.
iCharge would not be achieved sufficiently and the indicator lamp changes into orange if you charge the battery pack in a too hot place(in a car in the
summer or near open flames) or a too cold place. If stored over an extended period of time, its capacity level becomes lower, shortening its operating time.
NEVER disassemble the charger and battery pack or place them near open flames.
Store the charger and battery pack in the area out of children's reach.
NEVER give a strong impact to your phone or let it drop. Malfunctions or short life may result.
Any foreign matters in contact with the metallic part of contact terminals of the charger or battery pack may interfere with charging process.
ALWAYS keep them clean.
The chargeable battery pack is a consumable item. Repeated switching between charging and discharging process reduces its service life
gradually. If the battery operating time is reduced to a half level, compared to that when purchased, replace it with a new one. The warrant period
for it is six (6) months from purchase.
16
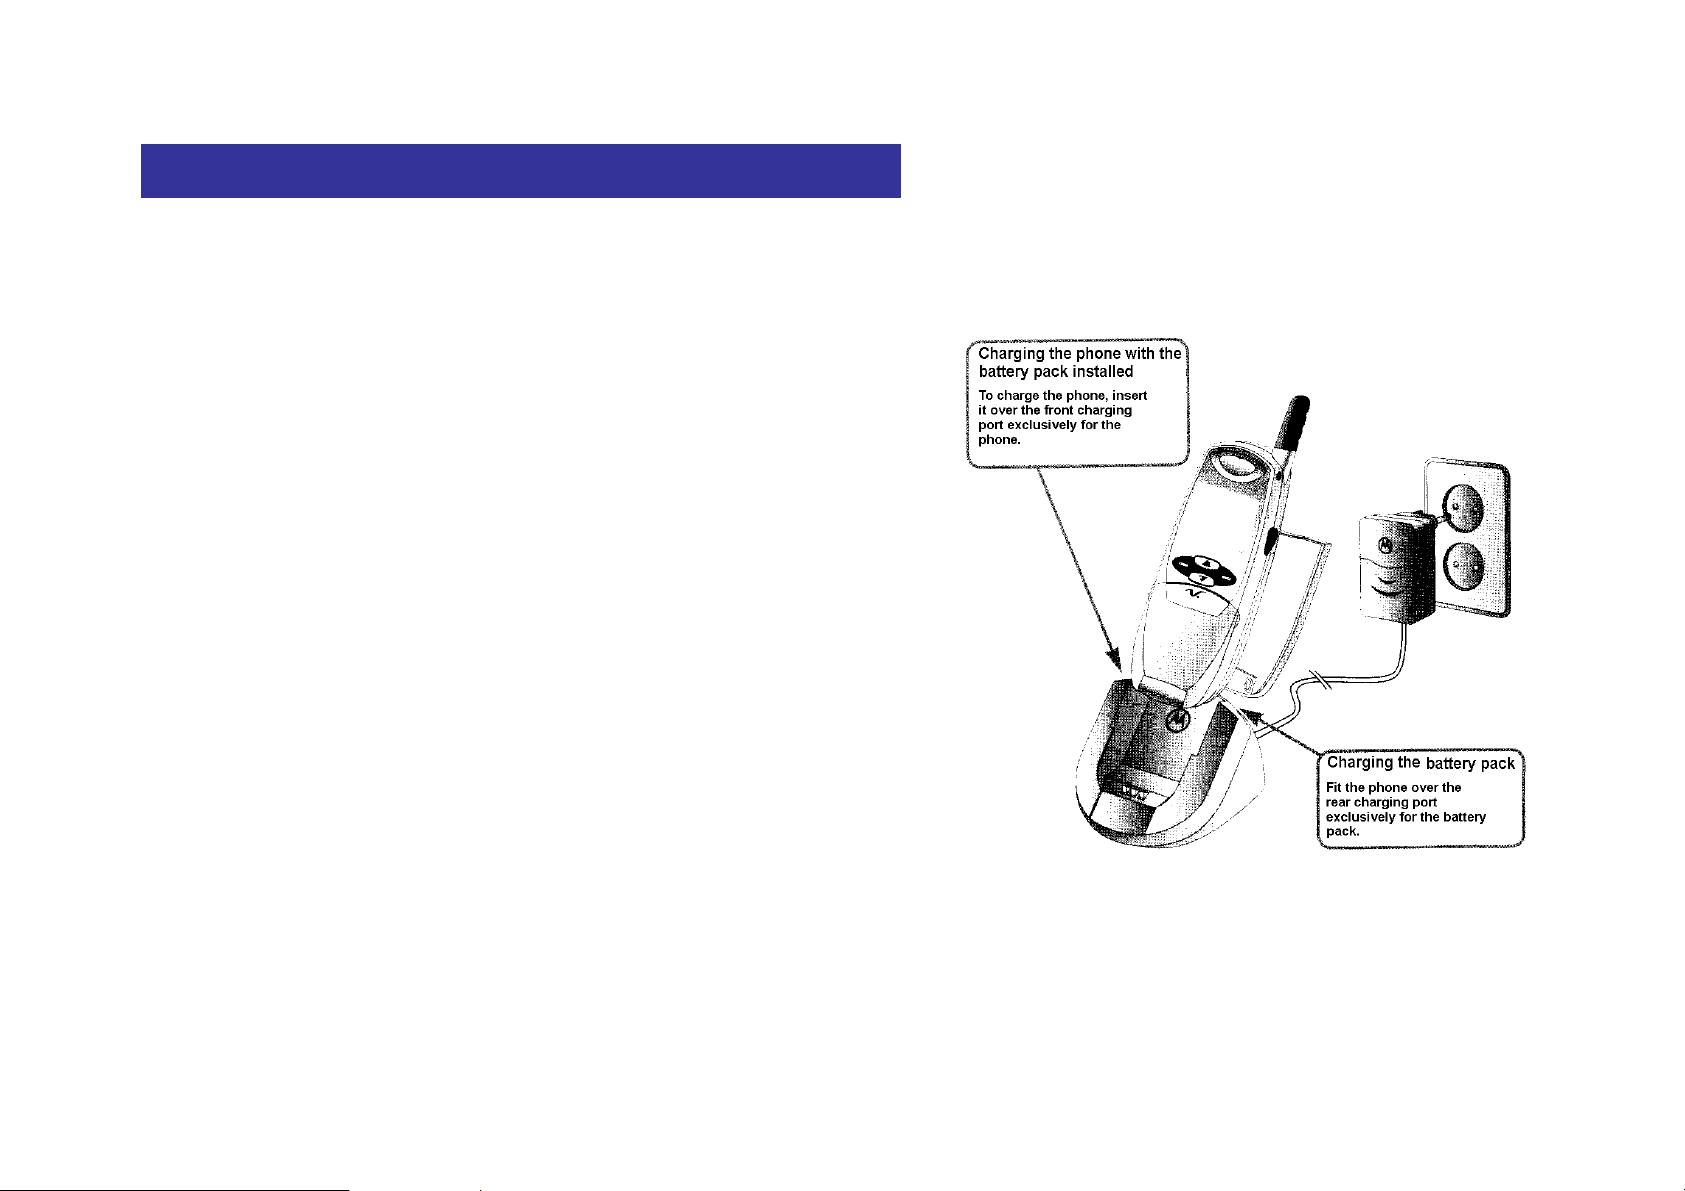
Charging Battery Pack
The battery pack is not fully charged when purchased. Fully charge it before using.
Connect the power plug of the charger to a wall socket outlet.
The charger can be used with either 110V or 220V.
To charge your phone with the battery pack installed,
if charging only the battery pack using the front charging port,
fit the phone into the rear charging port exclusively for the battery pack.
iEven though you are using the charging port dedicated to the battery pack,
the front charging port starts charging process first, and the charging port
dedicated to the phone is switched to standby state.
iWith the phone turned ON, if you charge it, charging efficiency becomes lower
than when you turn OFF the phone to charge it.
Upon the completion of charging process, the lamp turns green.
into the front hollow of the desktop charging cradle, insert the battery pack into the
rear side
iIf you leave the phone in the charger after the lamp turns green, nothing gives
impact to the phone.
Caution) If you charge the phone with a small-capacity battery installed using the front
charging port, fit the protruding part inside the charger into the groove on the
side of the battery pack.
17
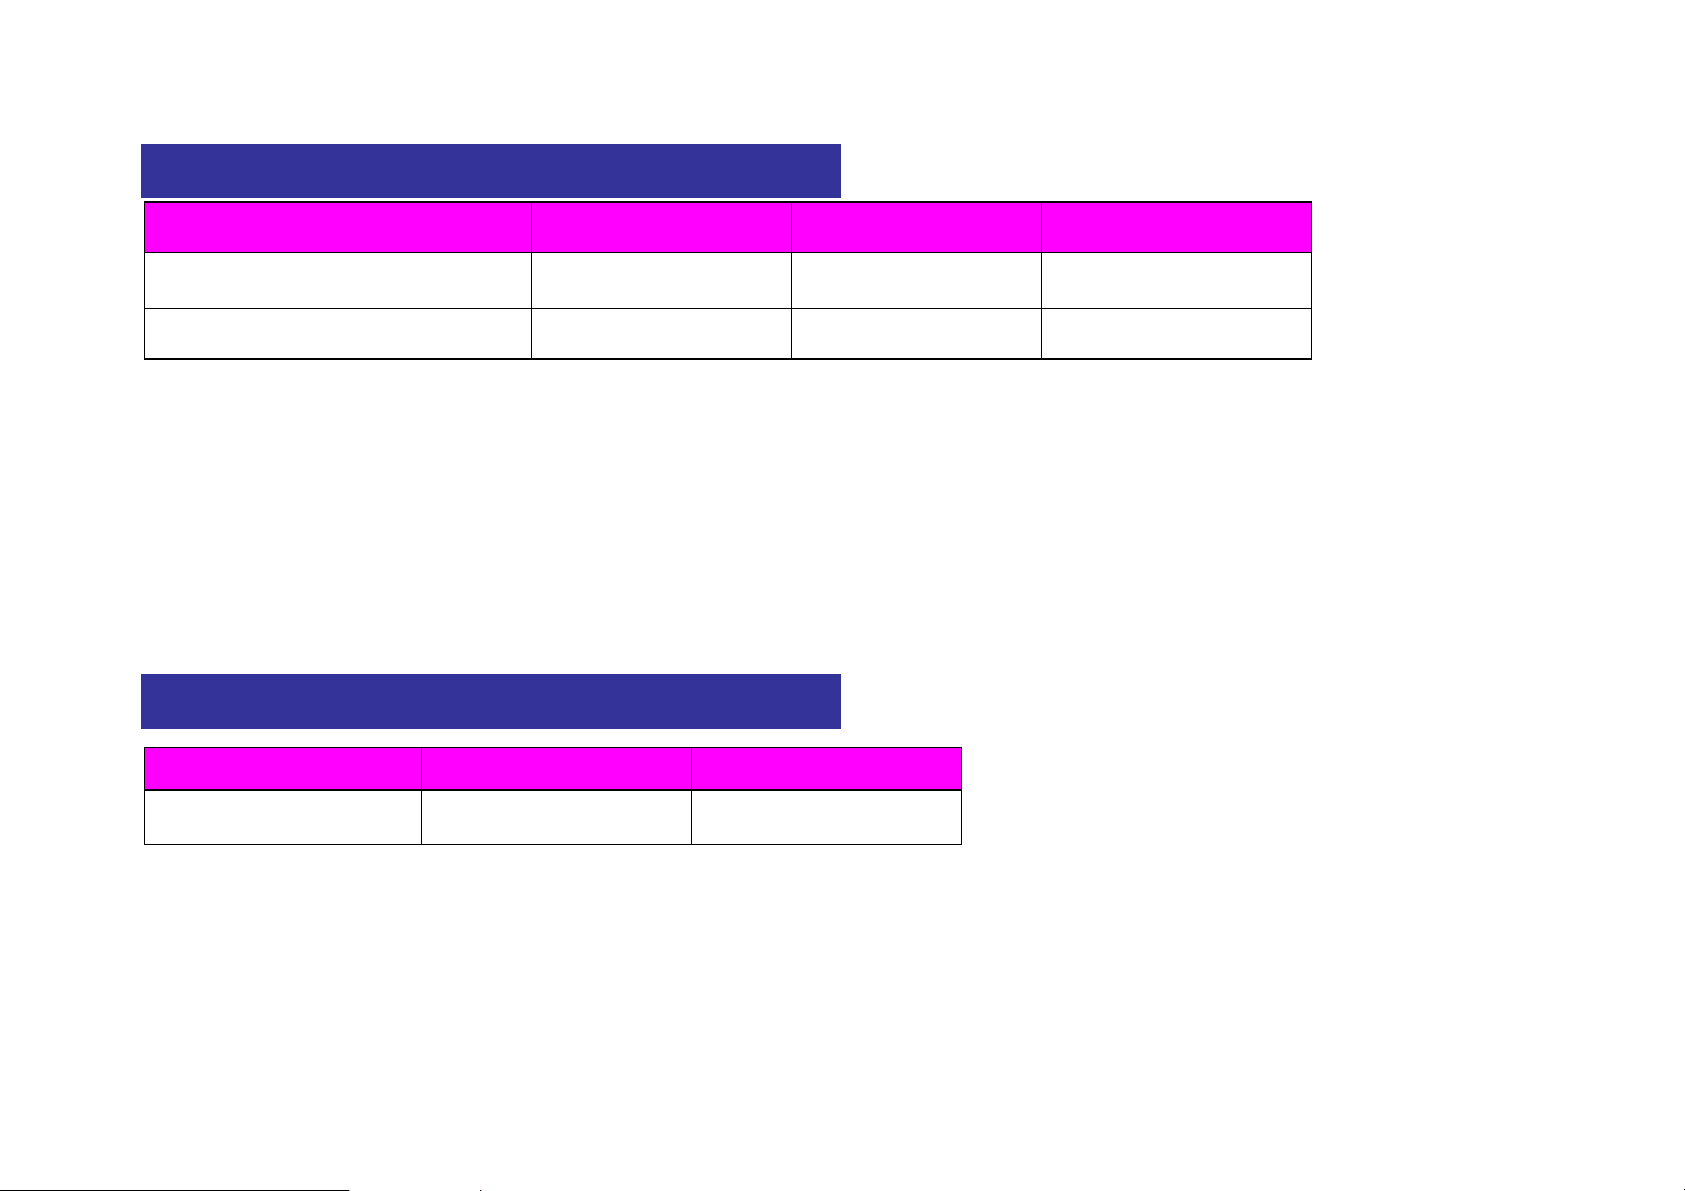
Battery Pack Charging Process State
Charging Method On standby for charging Charging in progress At completion of charging
Using front port(exclusively for phone) - Red Green
Using rear port(exclusively for battery pack) Orange Red Green
If the indicator lamp flickers in red
i The charging terminals are not contacted properly or the battery pack is defective. Check to see if the battery pack is clean, and then make another
attempt.
i If it does not operate normally in spite of repeated attempts, contact the service center.
If the indicator lamp is in orange
i If you use the charger in a too hot or cold place, the indicator lamp lights up in orange.
i If you relocate it in room temperature, the indicator lamp turns red and charging operation is started.
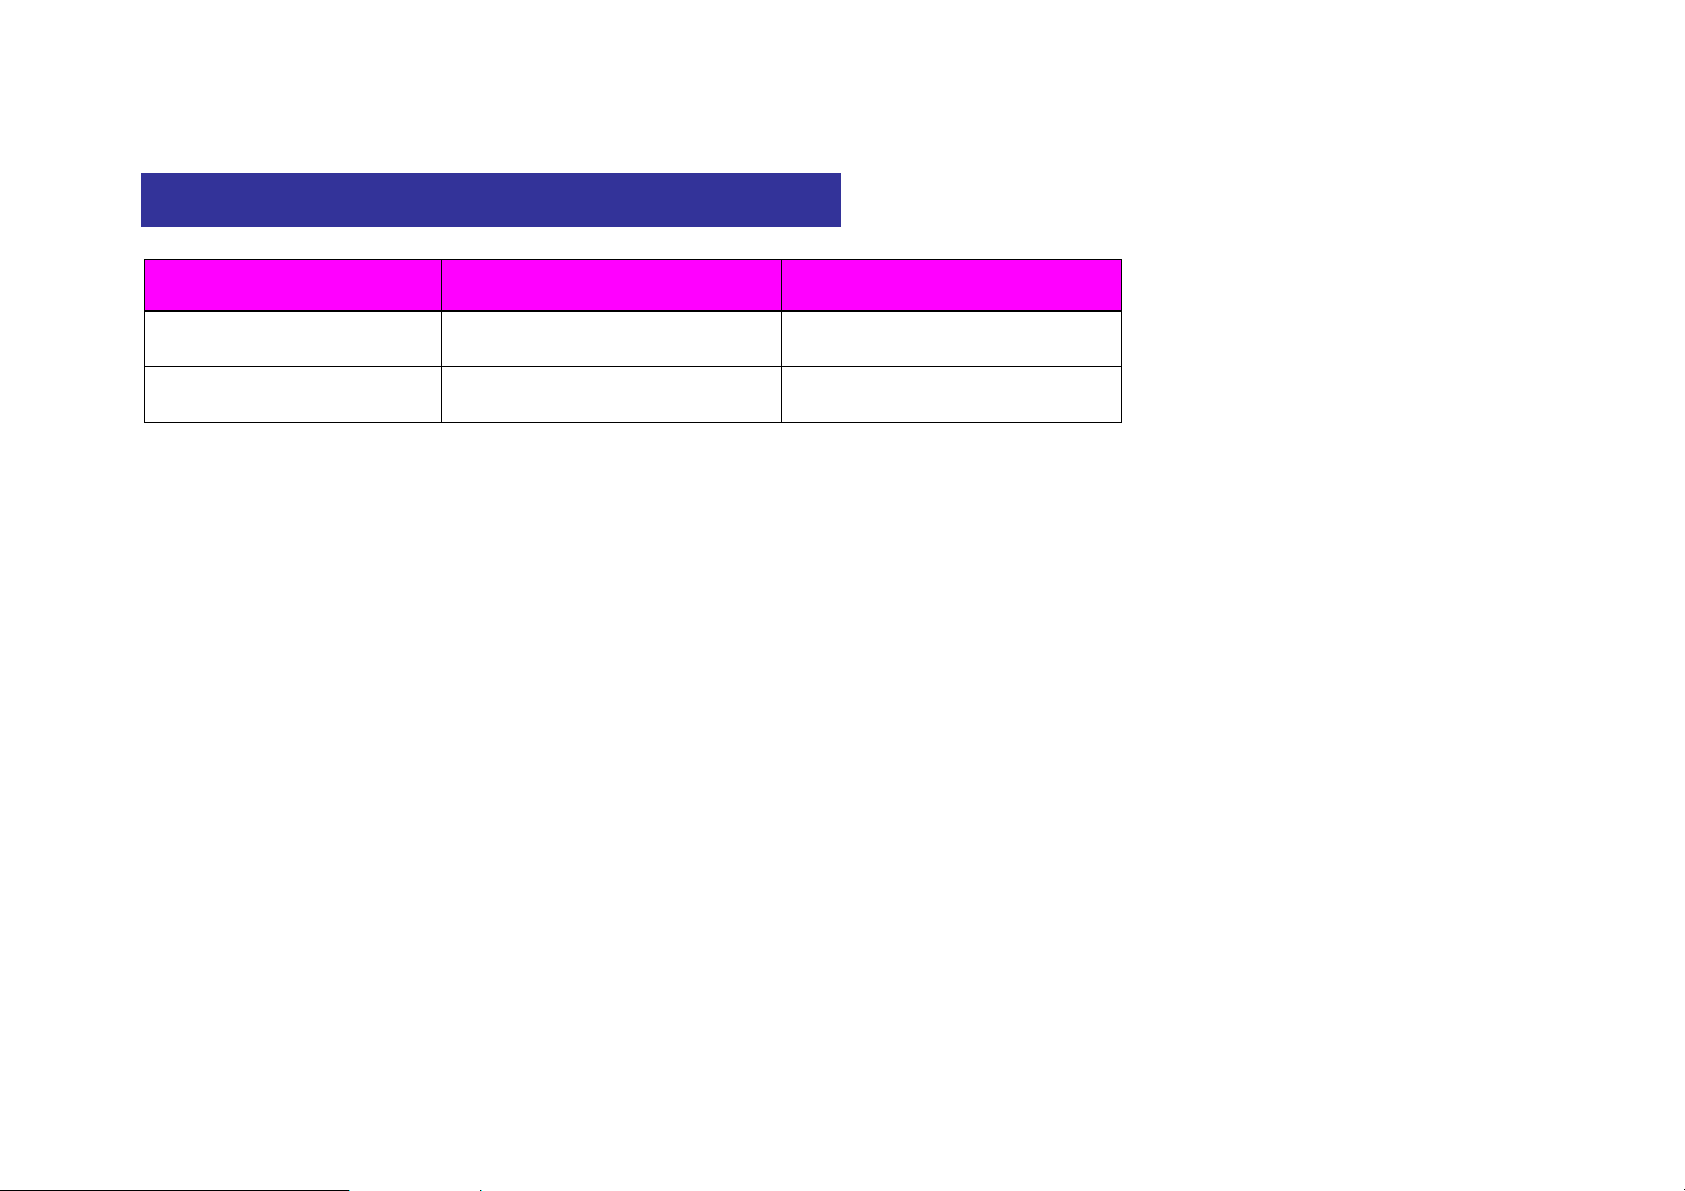
Length of Time for Battery Pack Charging Operation
Description Small-capacity Standard type
Length of Time Approximately 2 hours Approximately 3 hours
i The charging time may vary according to the battery pack condition.
i If AC power voltage applied to the power supply adapter is low, the charging time may lengthen.
i If ambient temperature is too high or low, charge would not be achieved sufficiently. ALWAYS perform charging operation in room temperature.
18
Battery Pack Operating Time
Description Small-capacity Standard type
Continuous call
Continuous standby
i Continuous standby time is based on slot mode 2, varying according to the types of services provided by service providers.
i Electric currents are used more in call state than in standby state, so the longer call time is, the shorter the standby time becomes.
i Receiving a call requires as much currents as when placing a call.
i Standby time in 'NO SERVICE' area becomes shorter.
i The operating time varies according to charging state, temperature(low/high), radio wave condition in the area of use, and backlight status.
Approximately 60 100 minutes Approximately 120 180 minutes
Approximately 80 140 hours Approximately 180 240 hours
19

Basic Operation
Power ON
Power OFF
Placing a Call
Receiving a Call
Unanswered Call Display
Electronic Dialing Feature
Called List
20
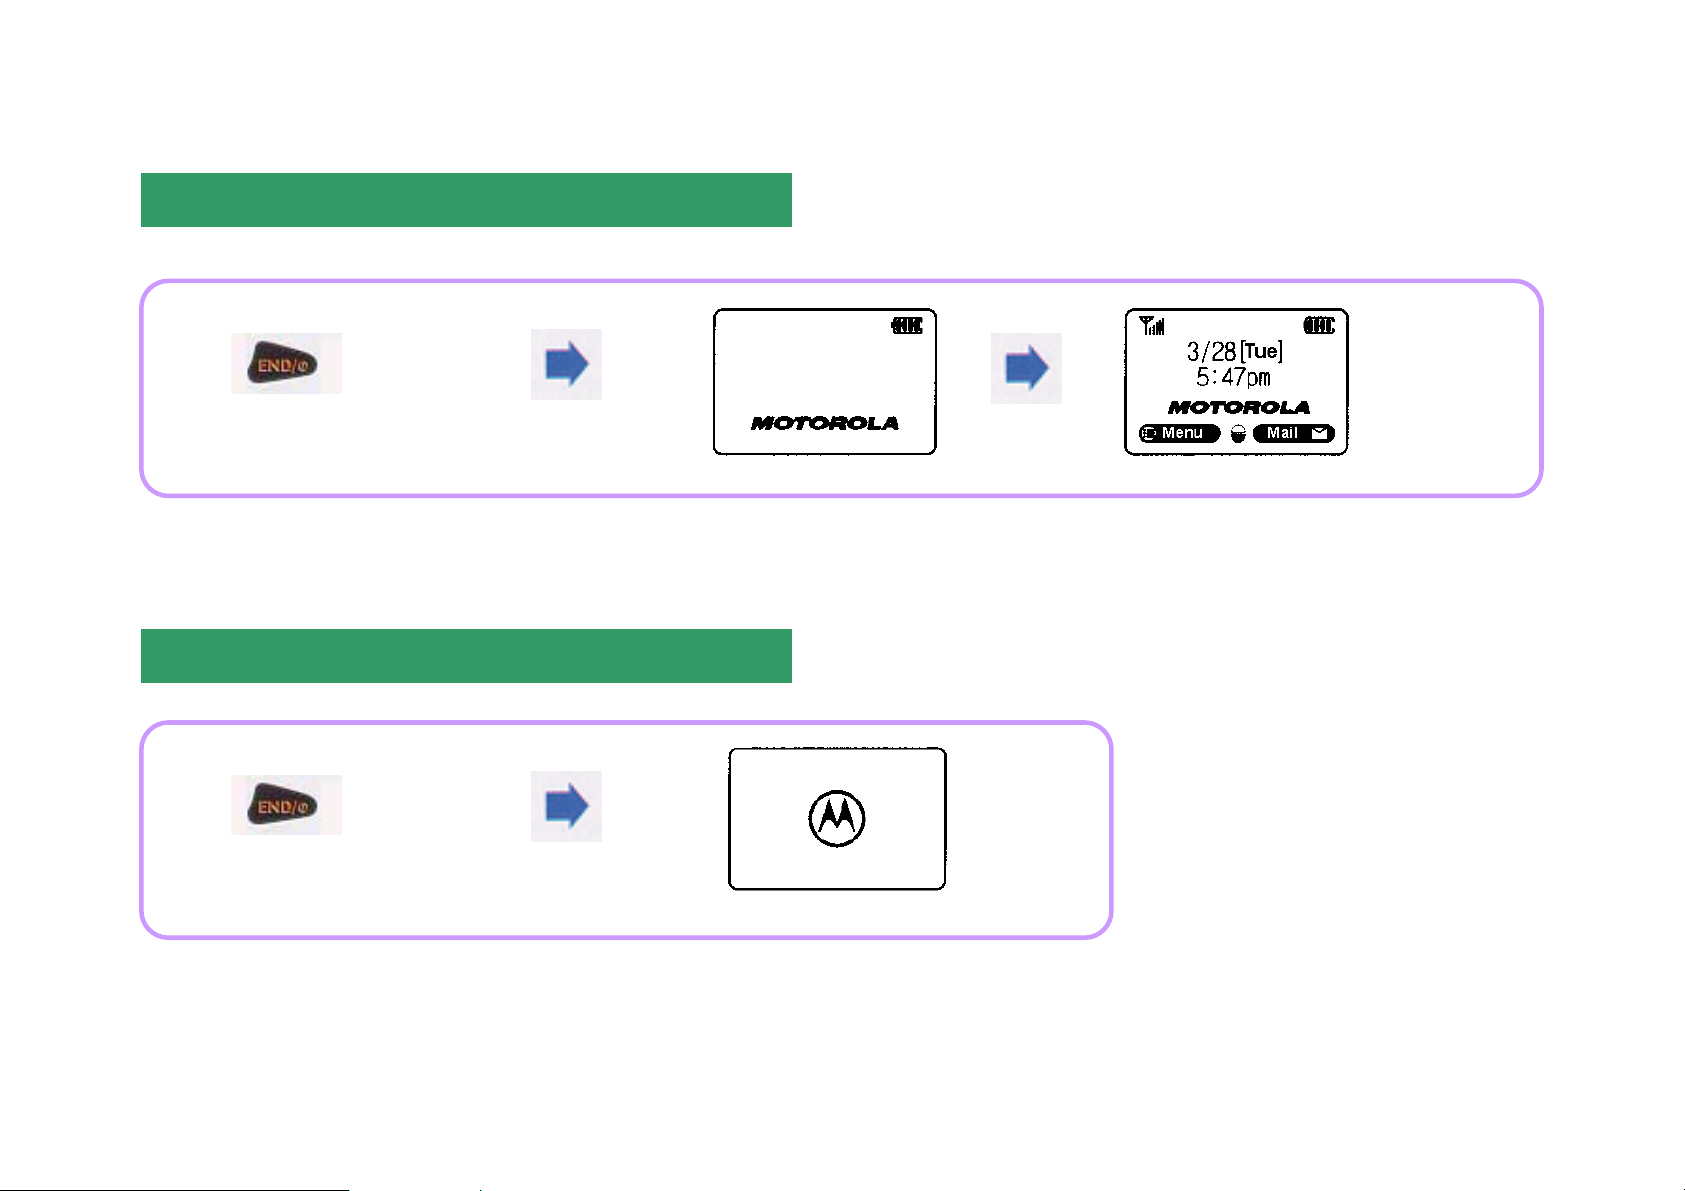
Power ON
Press
Press
and hold
The service lamp lights up, Motorola logo is displayed, and the phone is reset to the initial screen.
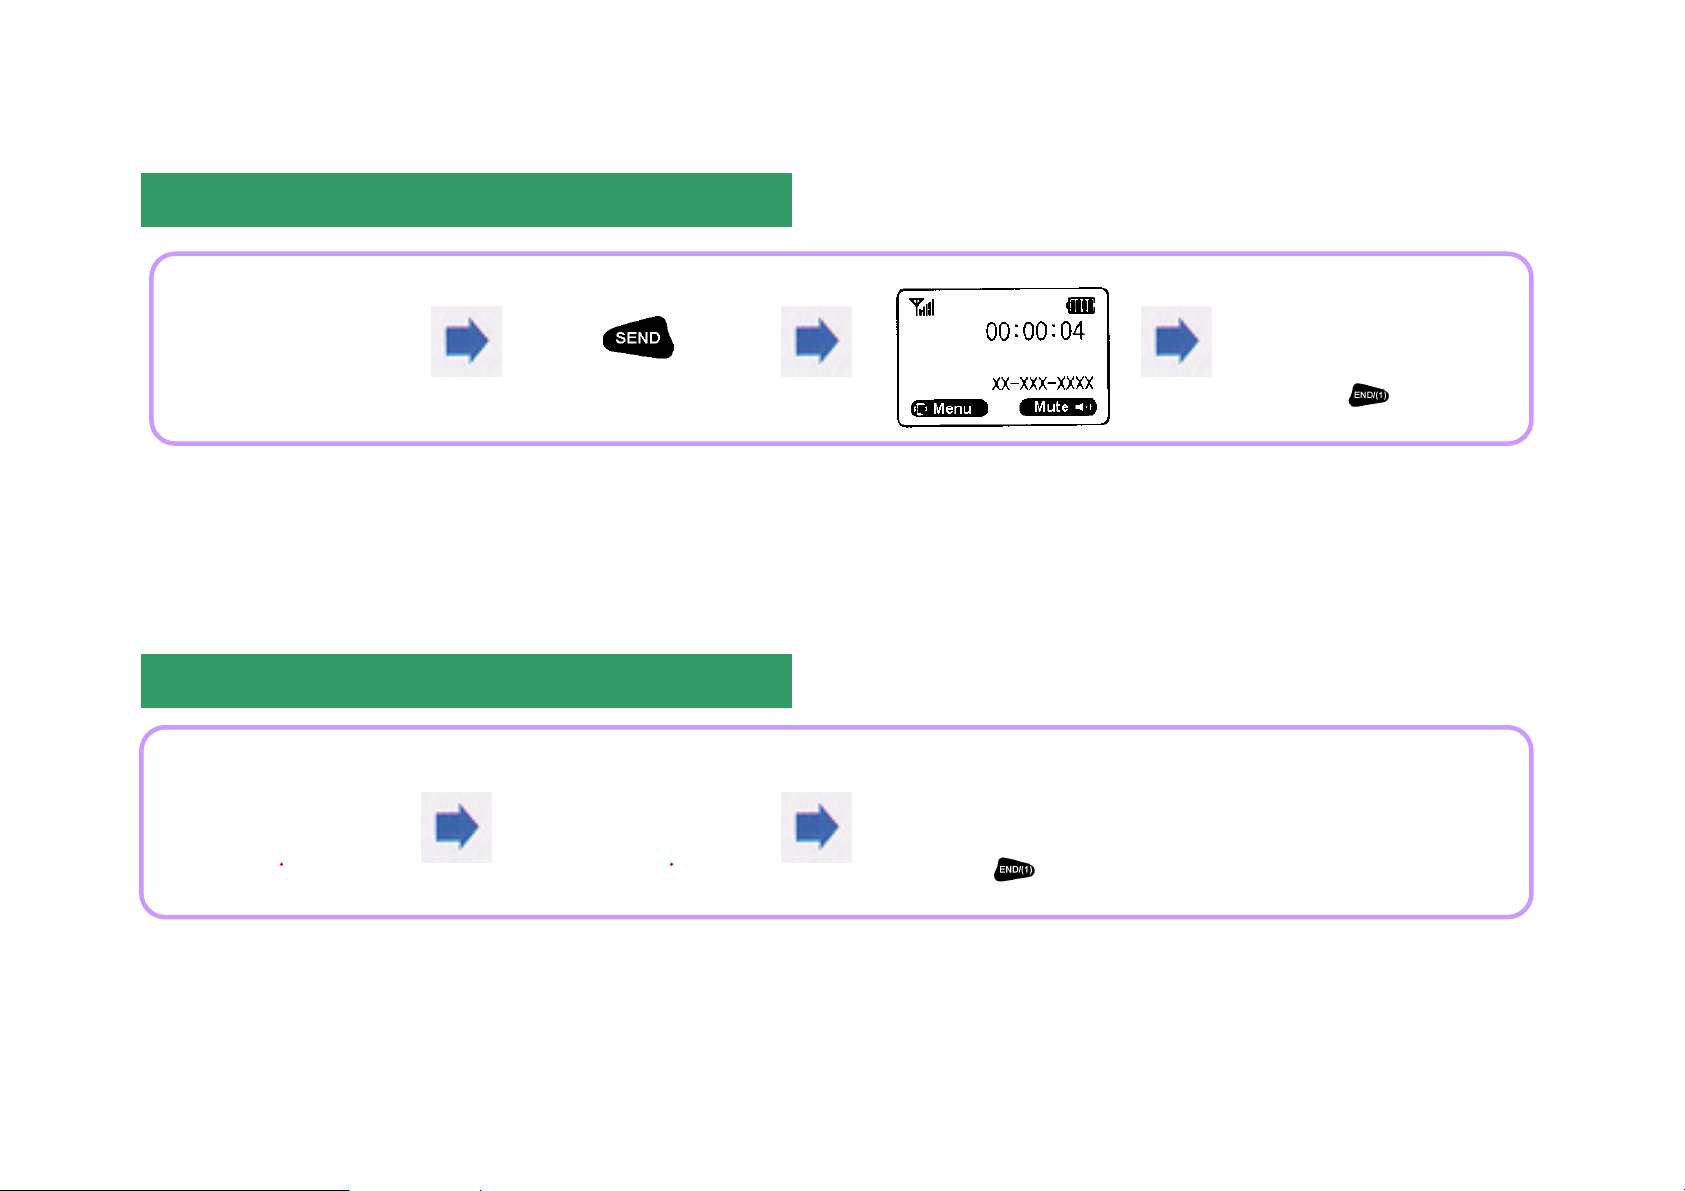
Power OFF
and hold
The Motorola logo disappears and the power is turned off.
21
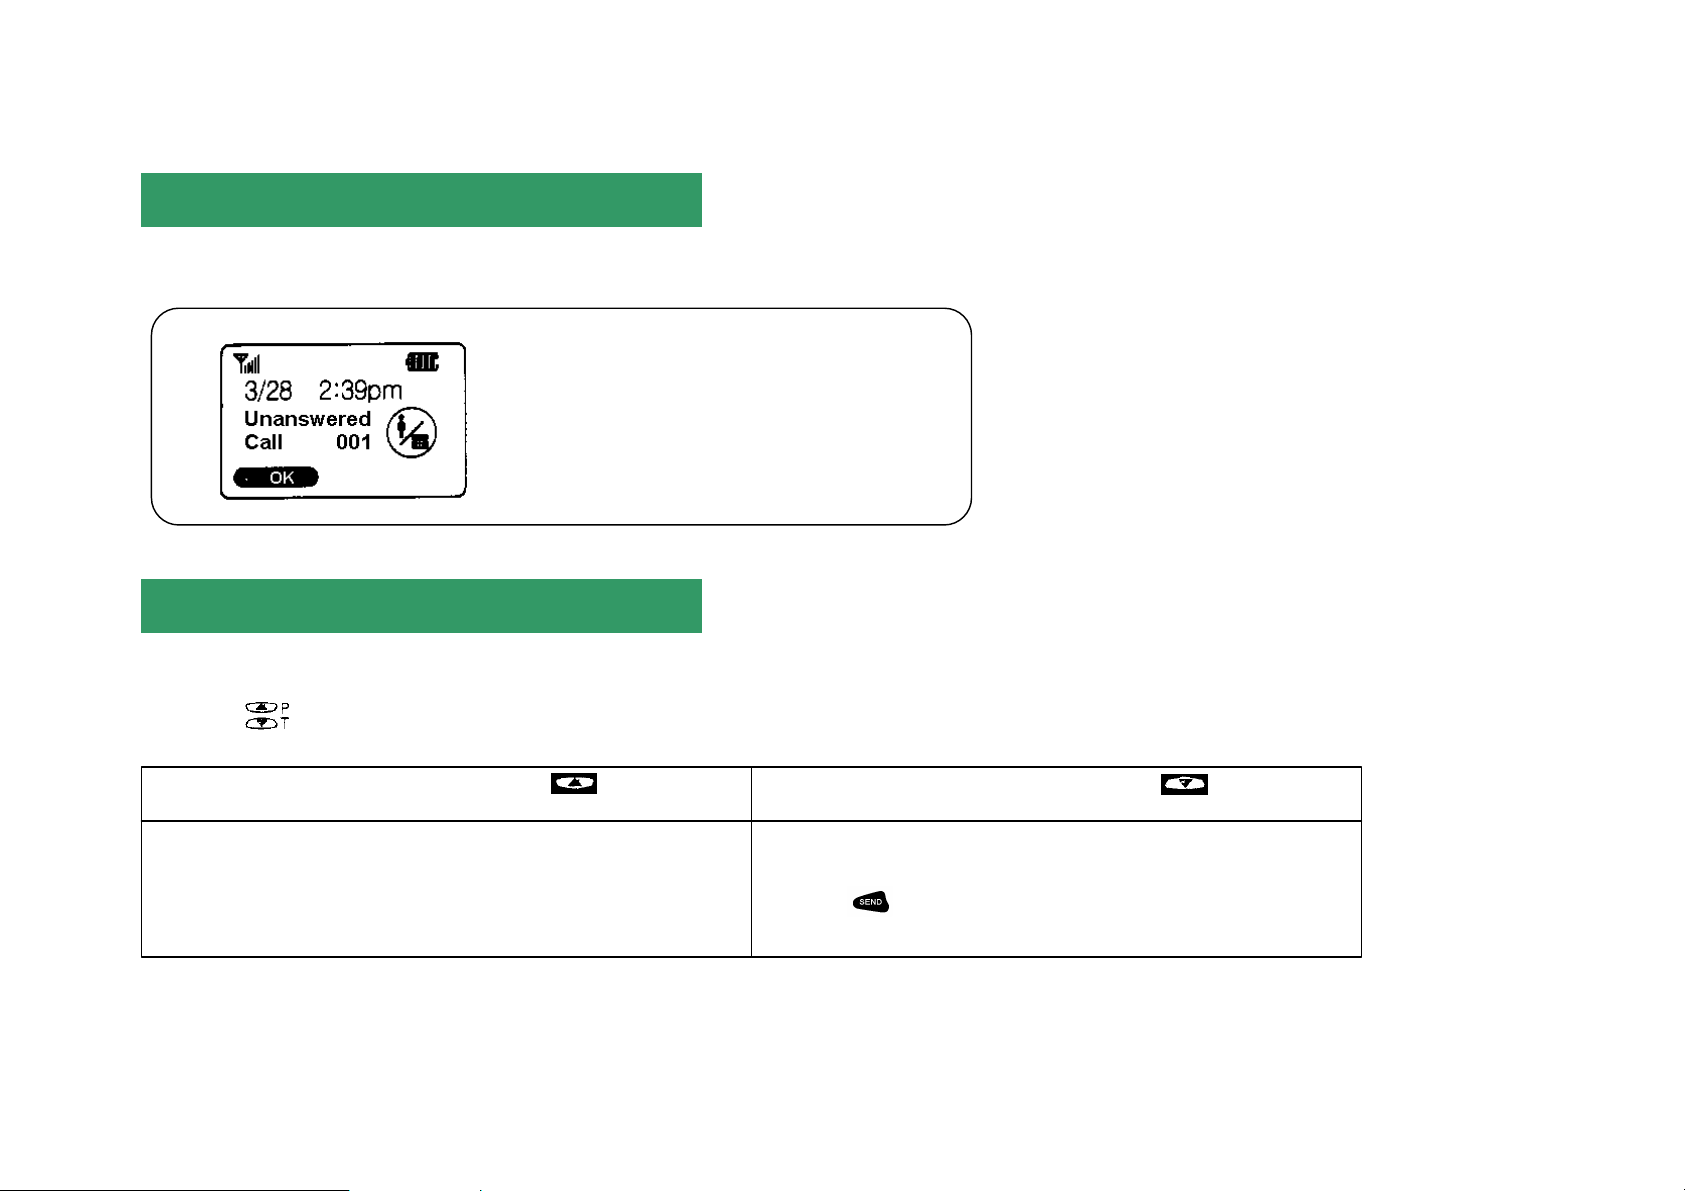
Placing a Call
The phone
Open the flip
Press the desired
area code and
phone number.
Other call placing modes
Turbo dialing: Press and hold the last number of the desired phone number set up in a memory location. (See p.25.)
Electronic dialing: Used conveniently for ARS.
Emergency dialing: Call can be placed even with the phone set to 'Lock' mode. (See p.56.)
Voice dialing: You can use your own voice to place a call without pressing [Dial] buttons. (See pp.63.)
After the call, close the flip or press (END).
Receiving a Call
]
After the call,
audibly rings.
to receive a call.
close the flip or
press .
After the call,
close the flip or
press .
If vibrator or lamp is set, the phone
produces vibration or the lamp flashes.
22
If the flip remains open, press any button.
(except for END button)
Unanswered Call Display
T(Temporary Pause)
P(Continued Pause)
If the user fails to receive a call, the following is displayed on the display screen:
Any phone numbers received during absence
of the user are stored in 'Unanswered Call
List'.
Electronic Dialing Feature
This is a convenient feature that enables the user to enter in advance a few phone numbers as dictated by voice instructions when using ARS.
Pressing while entering a phone number can enable you to select PAUSE.
If you add 'T' behind a phone number,
the number behind 'T' will be sent shortly after.
If you add 'P' behind the appropriate number,
button should be pressed to send the
number behind 'P'.
23
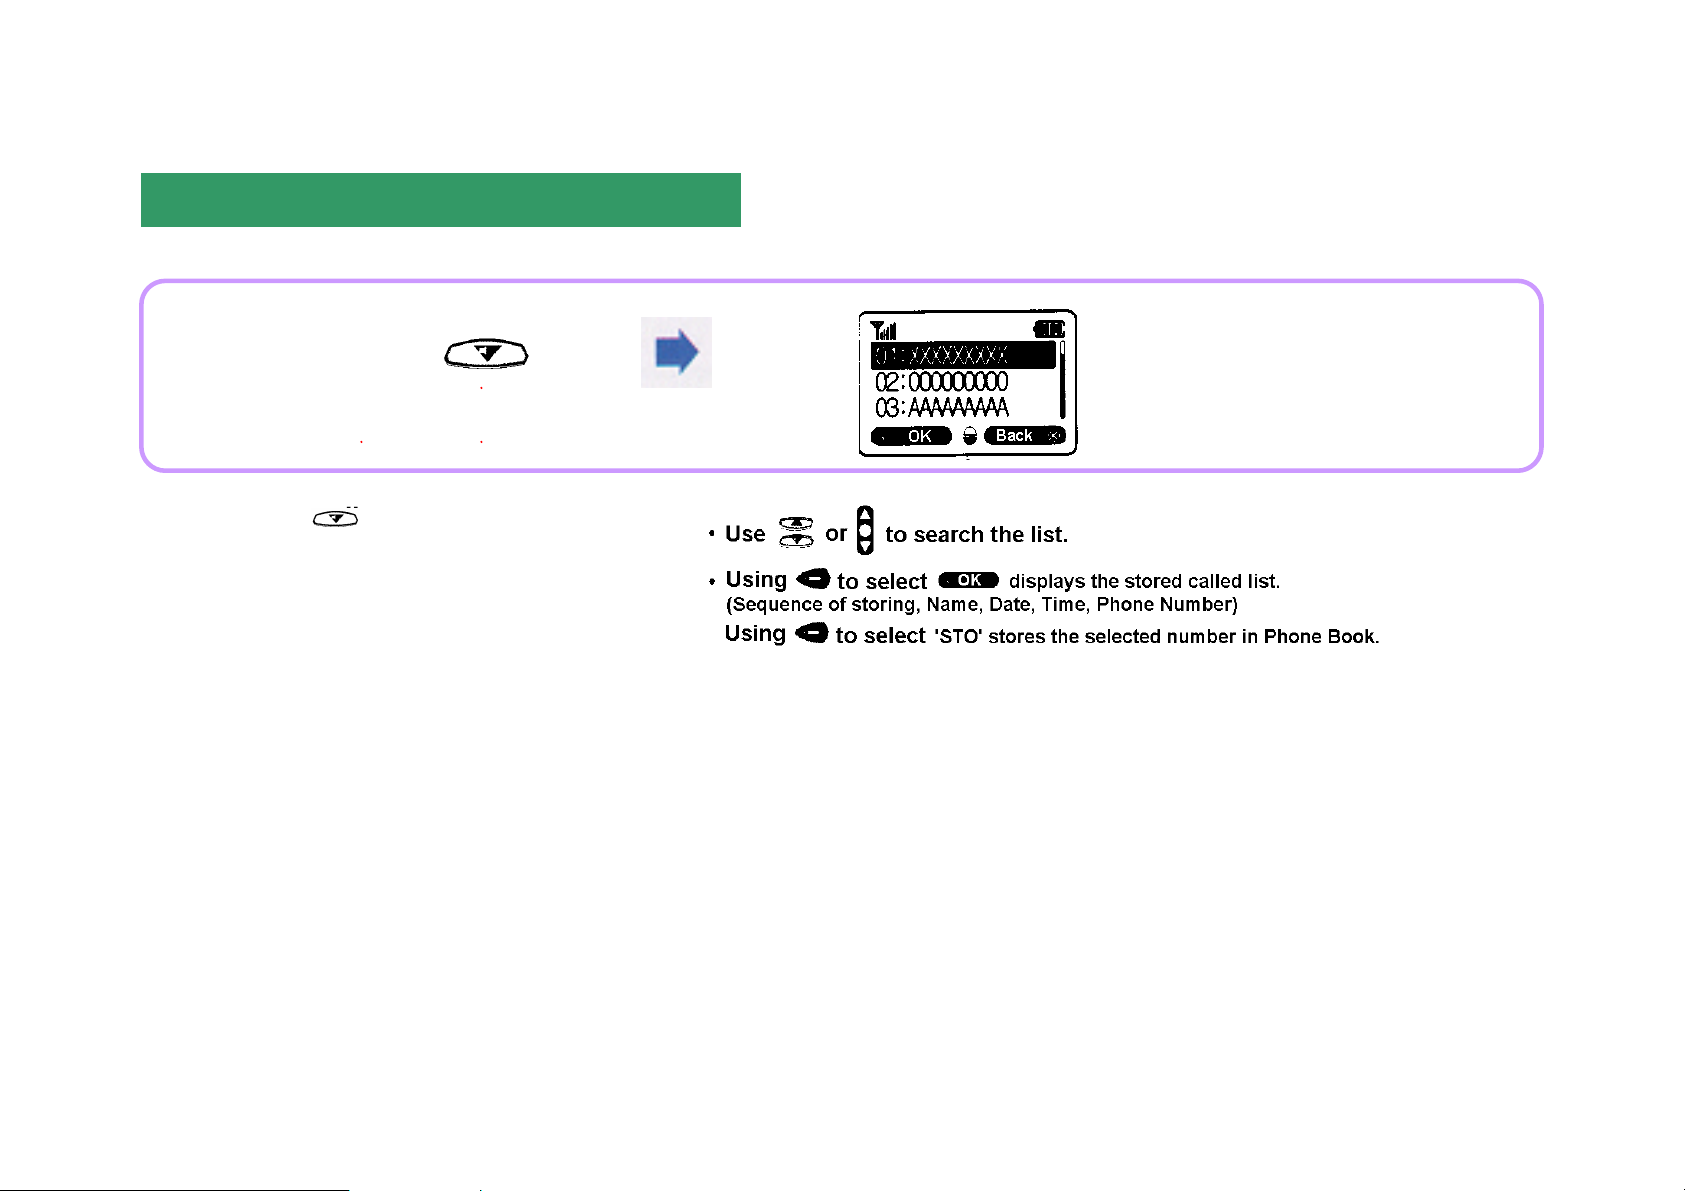
Called List
Pressing displays Called List.
24

Phone Book
Tone Type Selection
Alarm/Timer
Using Menu Features
Personal Information Management
Phone Option
Lock/Security Features
Game
Voice Dialing
Changing Vocoder
25
Phone Book
Enter
Specify
This feature is used to display a stored called list in the sequence of name. You can store frequently used phone numbers and use easily search mode to
place a call. Up to five phone numbers for each name can be stored or searched.
To Store Phone Numbers in Phone Book
To store phone numbers in Phone Book
26
a phone
number.
'Memory
Location'
Enter
a 'Name'.
Press [OK] to select
a desired category.
Message is displayed and
then [Enter Number] is displayed.
i Memory location displays the recent locations that are handy.
i Pressing dial buttons enables you to enter a desired location directly.
i Up to 8 names can be entered.
i When a name is entered, if there is the same name already stored in the location, a message is displayed to confirm whether you want to enter it.
i Up to 300 locations can be stored, and up to 1,500 numbers can be entered.
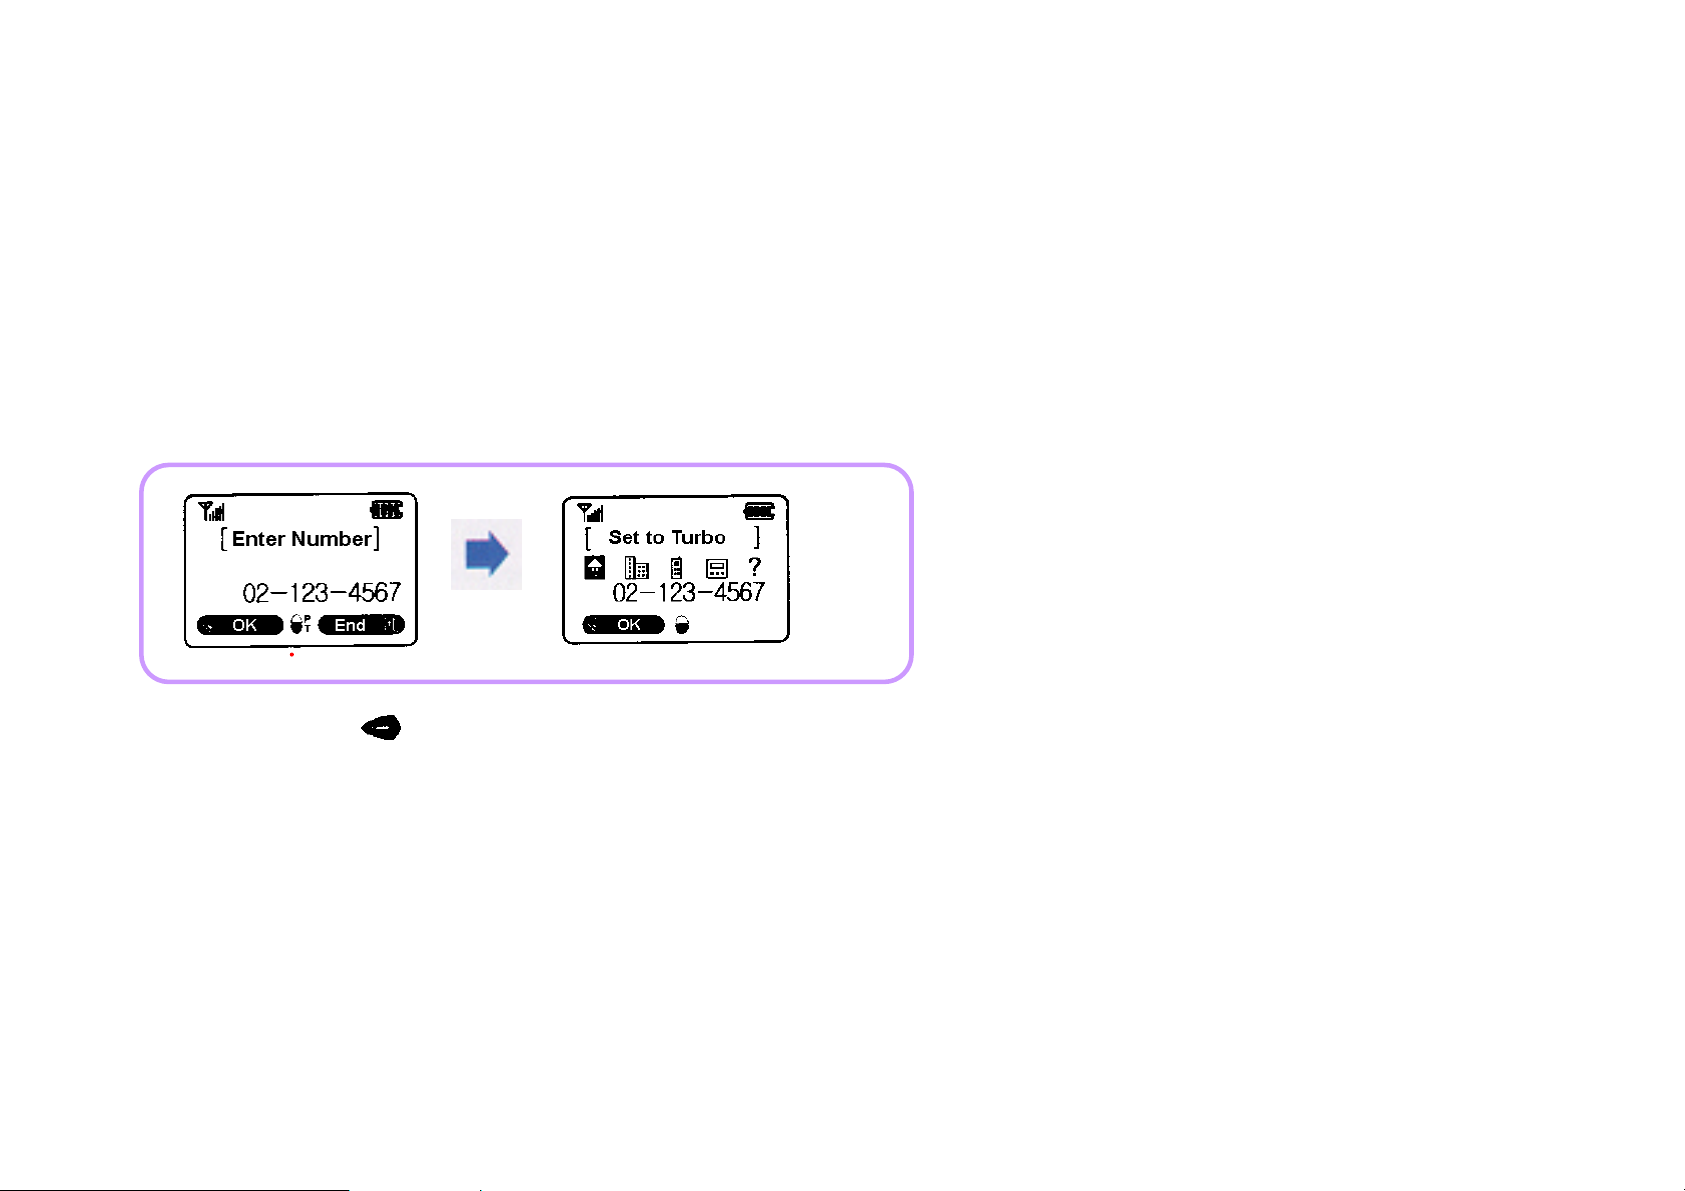
Turbo Dial Setting
When placing a call, pressing and holding the last number of the memory location places a call to the phone number in the icon, among the five icons, where
turbo dial has been set.
To end, press .
Turbo dial is set to only one number selected among those items with numbers entered.
27
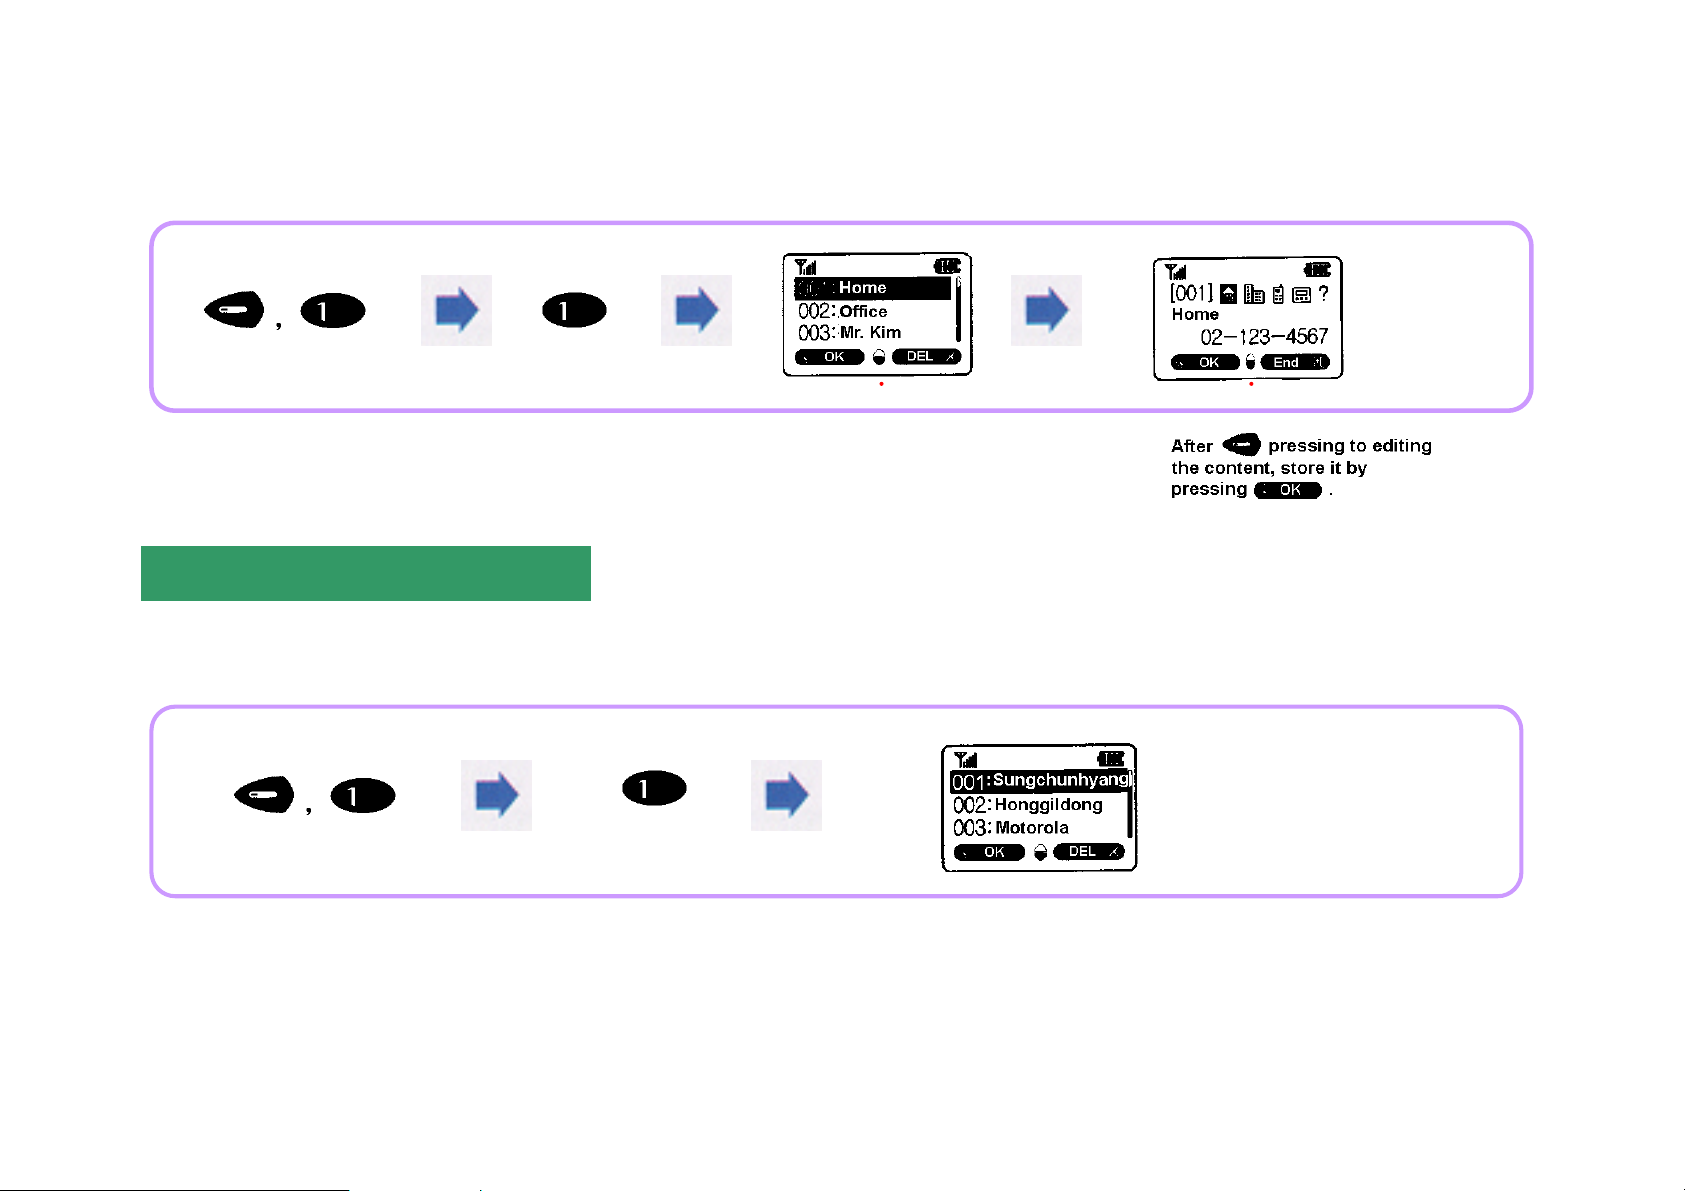
Correction and Editing
After searching a number
This feature enables you to correct, add, or delete the previously stored numbers.
to be corrected, press OK.
Searching
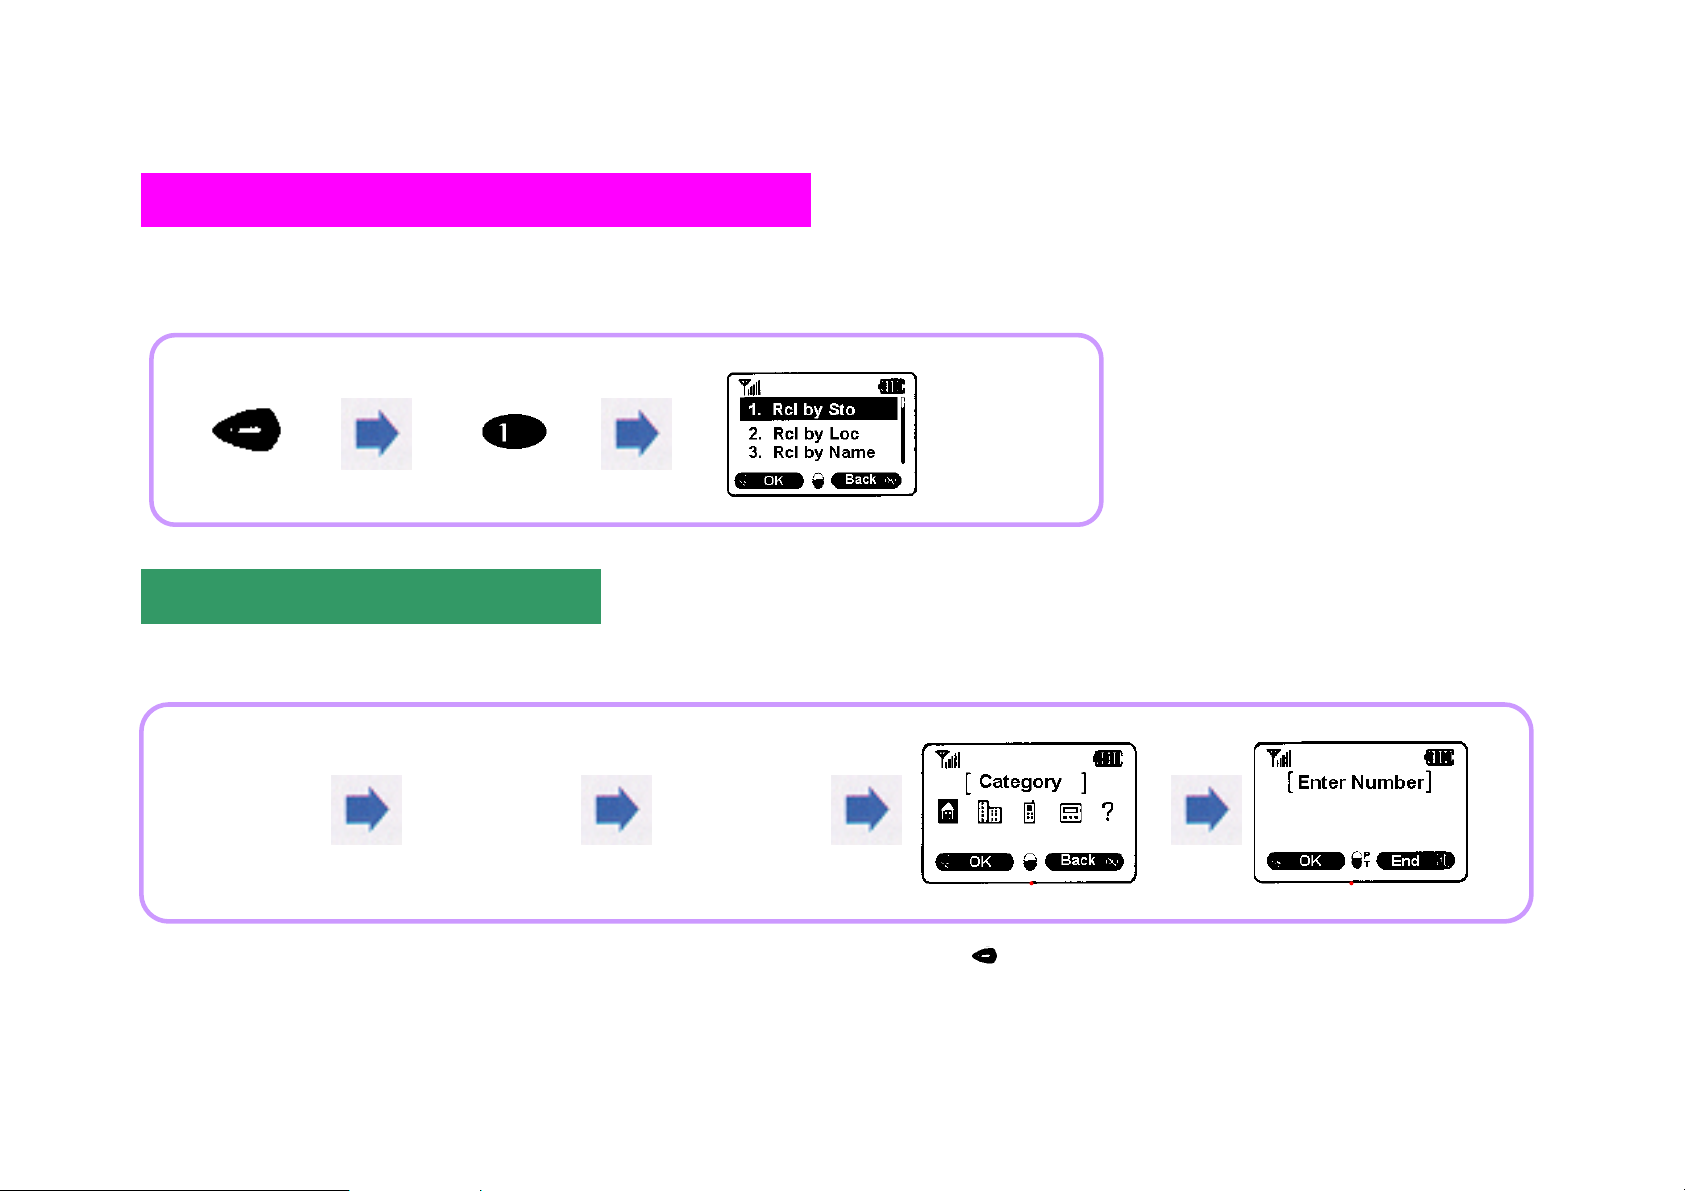
Recall by Stored
This feature enables you to easily search locations stored in sequence.
If there is no number stored, 'No Number in Memory' is displayed.
28

Recall by Location
After entering a location
Pressing
during the search
This feature enables you to enter a desired location and then to confirm the information about the appropriate location.
to search, press .
Recall by Name
Entering a desired name displays the information about the selected name.
Entering only one character from a desired name displays all the registered names with
the appropriate character in sequence.
moves to the previous menu.
29

Phone Book Status
This feature displays the number of memory locations both being used and available on phone book set by the user.
Caller Line Indicator List (CLI Feature)
Information about originators is displayed. Up to 10 numbers are stored.
This feature is available only if the service provider provides this service. For details, consult your service provider.
30

Unanswered Call List
If the user fails to receive calls, the incoming call numbers are displayed up to 10.
i If a call is received to a number stored in memory location, the number is displayed together with the appropriate name.
This feature is available only if the service provider provides this service. For details, consult your service provider.
View Phone Number
This feature enables you to view your own phone number.
31

Tone Type Selection
Select a desired type of bell.
Bell/Melody
The user can select a desired ringer tone type from 4 types of bells or 10 types of melodies. Also the user can use the melody download service provided by
your service provider to use 3 more types.
32
(Bell: Bell 1 Bell 4
Melody: Melody 1 Melody 10
User: User 1 User 3)

Etiquette Mode
Press and
Press and
This feature allows you to change Bell mode to Vibrator mode in order not to make yourself a nuisance at a meeting, in class, or in a public place.
1. Setting 2. Clearing
hold
button.
Ring/Vibration Selection
This feature allows you to select a ringer tone for an incoming call or message.
i Bell: Bell tone sounds. 'Bell is Selected.' is displayed.
i Vib: Vibration is produced. 'Vibrator' is Selected.' is displayed.
i VibThenBell: Bell tone sounds after vibration. 'VibThenBell is Selected.' is displayed.
i Lamp: The lamp only flashes. 'Lamp is Selected.' is displayed.
hold
button.
Set a desired ringer tone.
(Bell/Vib/VibThenBell/Lamp)
Bell Volume
33

This feature is used to adjust the volume of ringer tone sounded when a call is received.
Earpiece Volume
This feature is used to adjust the volume of voice tone heard through your ear during a call.
Use to adjust earpiece volume.
Keypad Tone Volume
34

This feature is used to adjust the volume of keypad tone heard when a button is pressed.
Pressing in the initial screen adjusts keypad tone.
Call Connection Tone
35

This feature is used to inform the user that a call is connected.
i
to ‘Long
’
DTMF Tone
This feature is used to select a desired DTMF tone.
When electronic dial is used, if the called party fails to recognize it, adjust DTMF
tone
Alarm/Timer
36

Alarm
Choose Time
Choose Time and Choose Time Off are used to actuate alarm to ring near the time set by the user without designating time specially.
Select a desired alarm time.
(10 Min Later/30 Min Later
/1 Hour Later/3 Hour Later)
Choose Time Off
37

This feature is used to reset alarm time if it has been set in Choose Time mode.
Select 'Yes' or 'No'.
Programmable Alarm Time
38
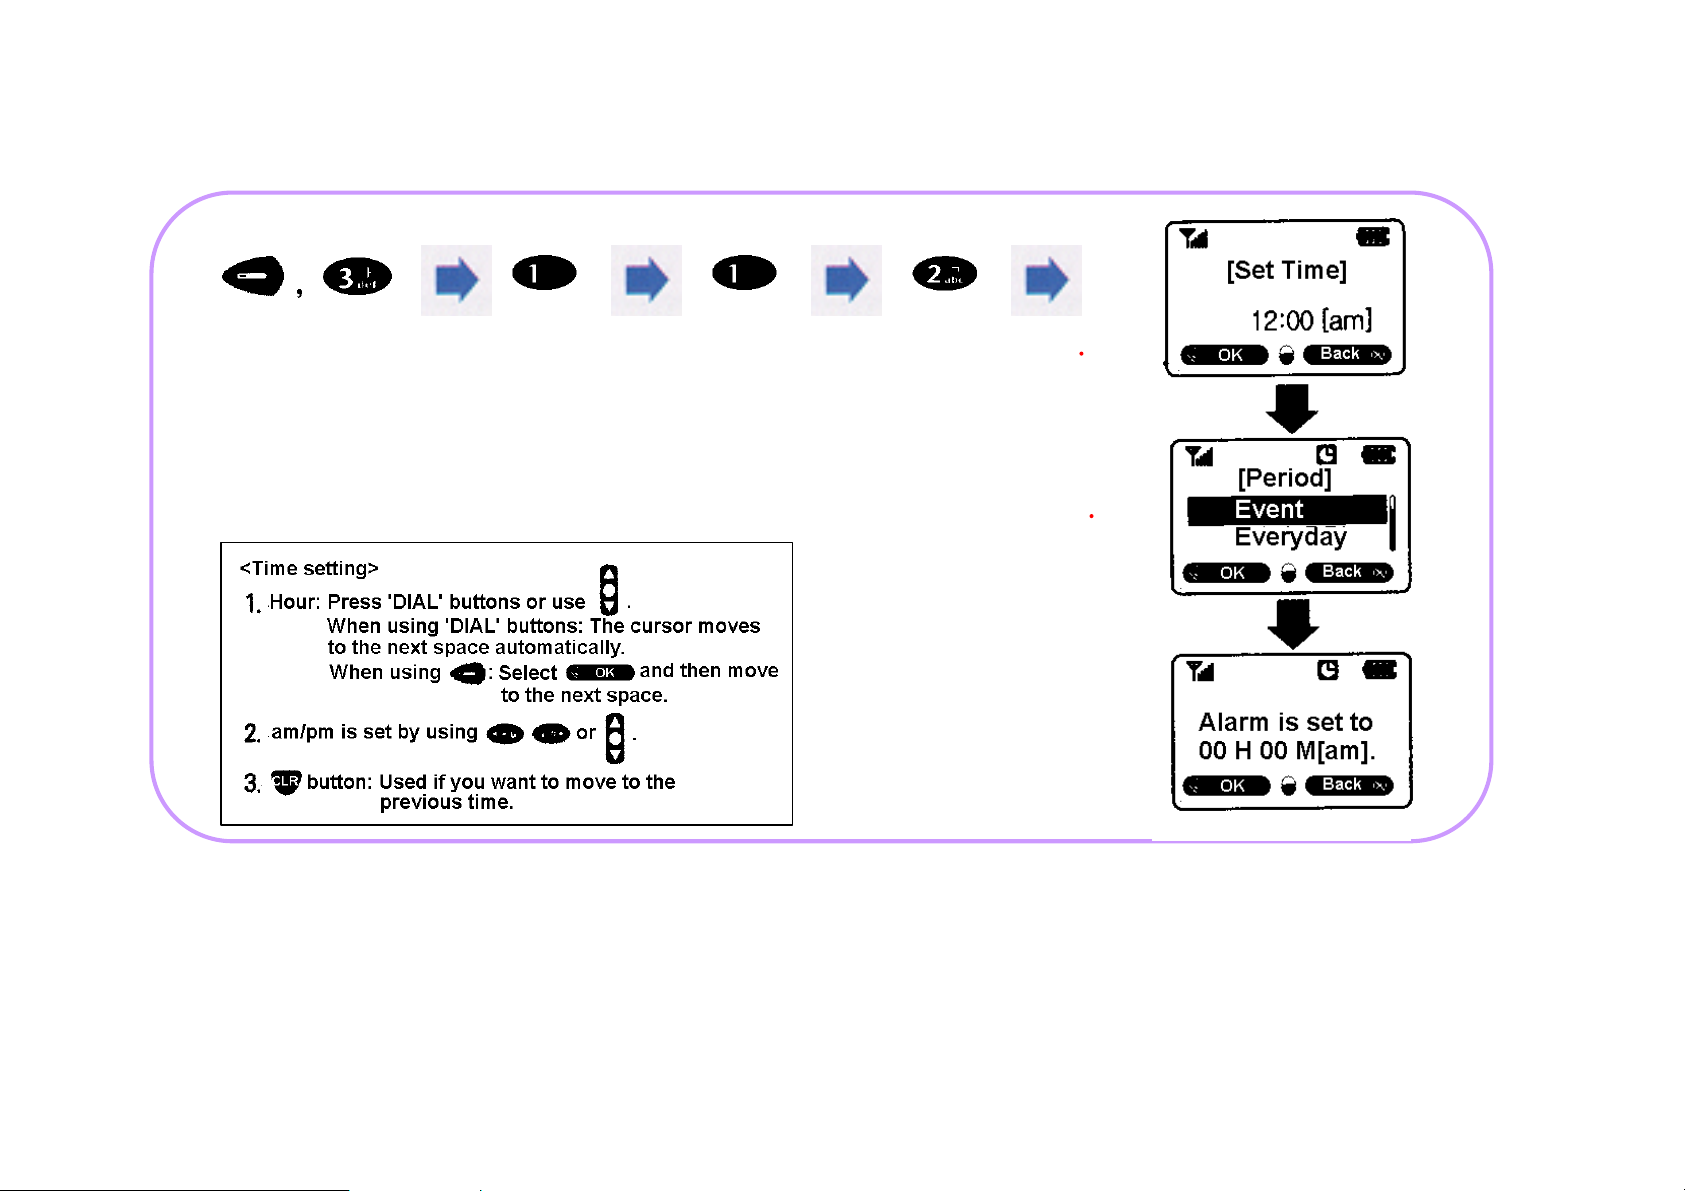
You can set time and alarm ring period to actuate alarm to beep at the desired time.
Enter time.
Select a desired alarm period.
i Event Alarm rings once at the designated time.
i Everyday Alarm rings at the designated time everyday.
To stop alarm tone, press any key, or open and then close the flip.
Alarm off of designated time
If alarm has been set using 'Set Time', you can set this alarm feature to Off.
39

Select 'Yes' or 'No'.
World Time
40

This feature displays the time of major world cities.
Cities for which world time is displayed
Seoul Tokyo
Athens Cairo
Los Angeles
User Time
Hong Kong Singapore
Rome Berlin Paris
Hawaii
Bangkok
London Madrid
Guam Sydney Melbourne
Baghdad
Toronto Washington
Beijing Taipei
Moscow
Chicago
New York Miami
41

This feature is used to set the time displayed on the initial screen to a desired local time.
Select 'ON/OFF Enter a desired time.
Individual Timer
42

This feature is used to display the last call time.
Cumulative Timer
Using this feature displays the total call time up to present time from the beginning in XX calls/X minutes and XX seconds.
The Cumulative Time cannot be reset.
Roaming Timer
43

This feature is used to display the call time for roaming service in X calls/X minutes and XX seconds.
Reset Timer
This feature is used to display the cumulative call time up to the present time from the call time resetting in X calls/X minutes and XX seconds.
How to reset
44

Select 'Yes/No'.
One(1) Minute Timer
This feature checks up call time during calls and actuates alarm to ring at every end of elapse of every minute from call connection.
Select 'Yes/No'.
Select 'Yes/No'.
Personal Information Management
45

Schedule Management
Once the user's schedule has been stored, the alarm beeps when the actual date and time falls on the set date and time
and displays the content stored. Up to 10 schedules can be registered.
46

Confirming Schedule
Deleting Schedule
To Do List
47

This feature is used to make the list of schedules for the user and actuate an alarm to ring at a desired time.
48

49

Calculator
This feature is used for simple calculation( , , , ).
50

Calendar
This feature is used to view various calendars for the present, past, and future as well lunar calendar.
51

Phone Option
i
Select a desired light color.
Light Color Selection
You can change the light color using this feature.
Select 'Yes/No'.
If a call is received, the backlights in 7 colors light up
one after another to indicate that a call is received.
52
(Green/Orange/Red/Blue/Azure/Yellow/White)

Backlight Selection
Select a desired
backlighting time.
You can use this feature to set the length of time for backlight to light up.
Change Banner
Using this feature, you can change the content of the initial screen.
Select 'Yes/No'.
(5Sec/FlipOpen/Off)
How to enter Korean and English characters: See p.80.
53
Auto Area Code
You can use this feature to set frequently used area codes so that they can be recalled automatically whenever you place a call.
Select 'Yes' Enter 'Area Code'.
When setting an auto area code, if opening the flip, the set area code is displayed.
If you do not want to use the displayed area code, only press to delete it.
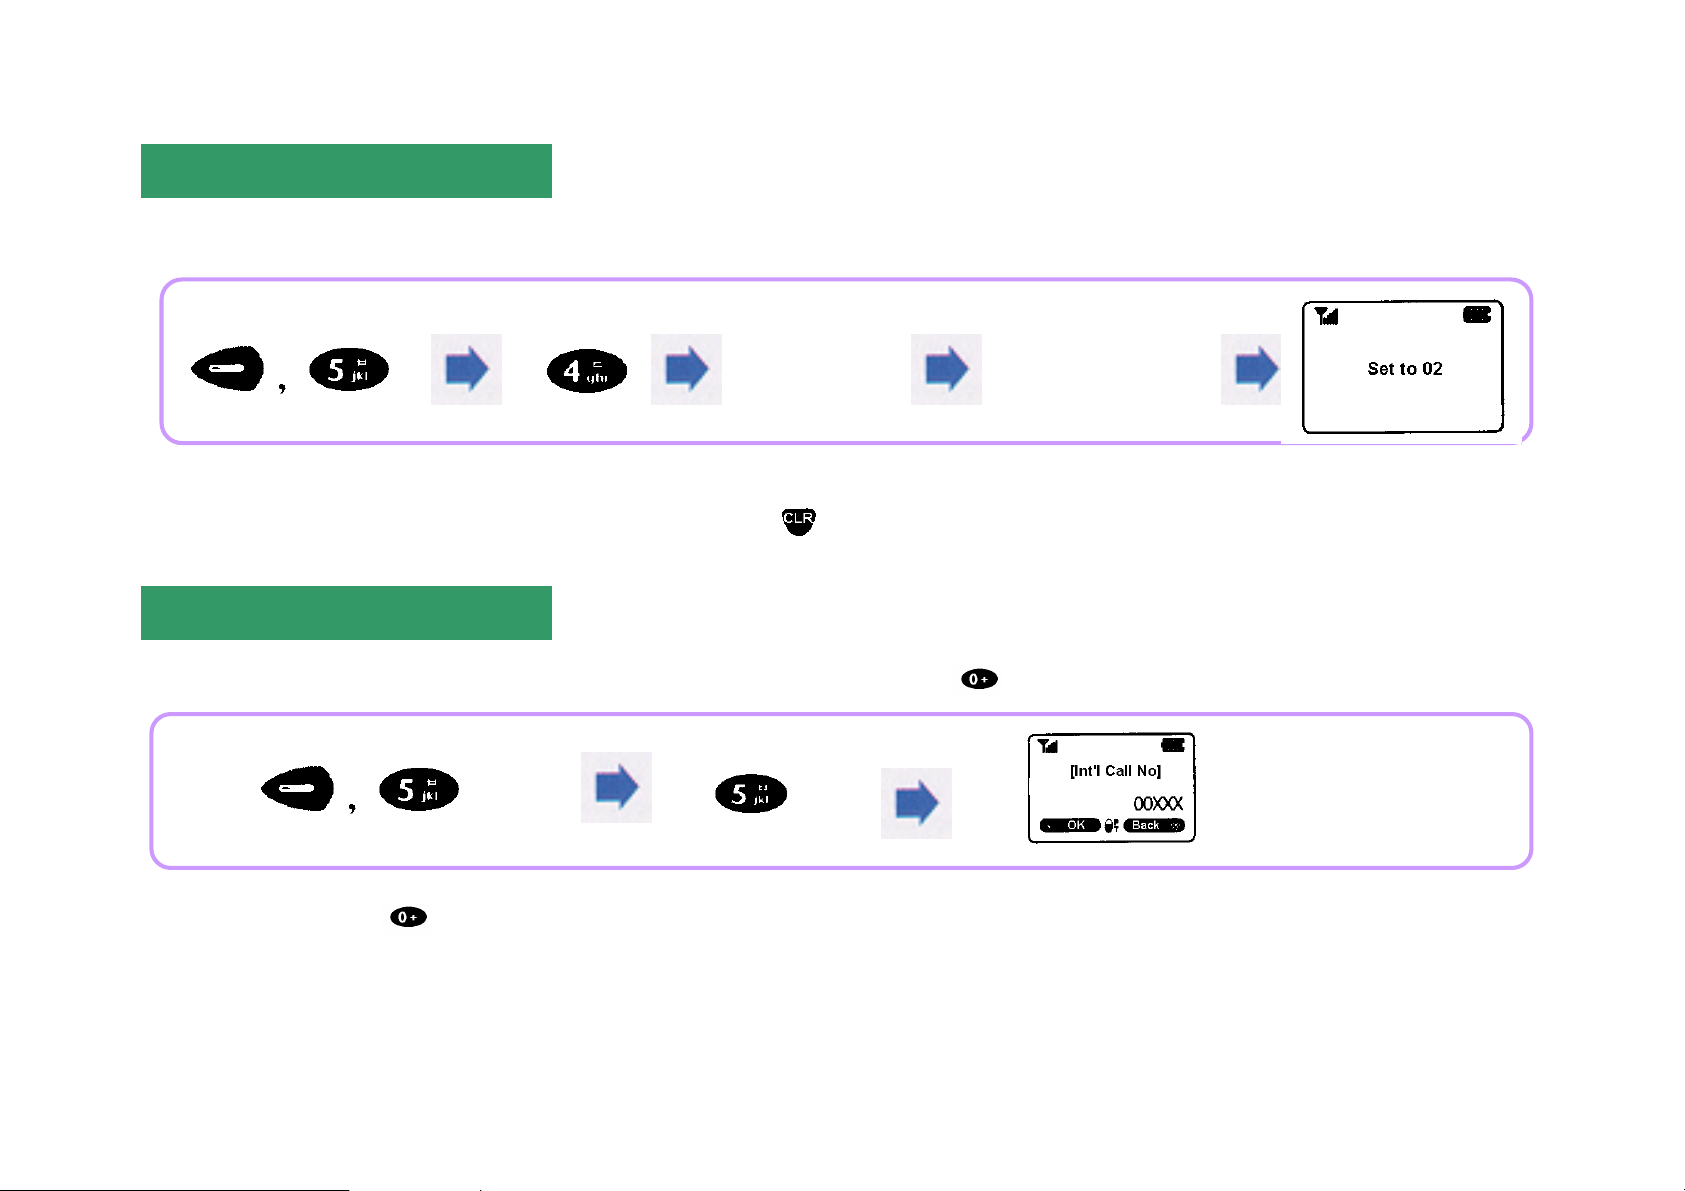
International Call Number Setting
This feature is used to display a frequently used international call number using quick dial when you place an international call.
Pressing and holding after setting an international call number displays the set number.
54

Auto Hyphen
This feature is used to insert a hyphen(-) automatically when inputting a phone number.
'Auto Hyphen is set' is displayed after setting process. Select 'Yes' or 'No'.
Auto Redial
This feature is used to redial phone number automatically when it is difficult to connect a call due to heavy traffic or weak signal strength.
When this feature is selected, the phone attempts redial at intervals of 5 seconds automatically Select 'Yes' or 'No'.
When this feature has been cleared, if you want redial, press again button.
55

Auto Answer
(Select a desired logo.
number is set as your Lock Code.
If this feature is enabled, when a call is received, the ringer beeps or vibration is produced, and then the call is connected automatically.
If 'Yes' is selected in Auto Answer, the ringer beeps or vibration is produced 3 times
and then the call is automatically connected.
Select 'Yes' or 'No'.
Power Up Banner
You can change the logo appearing on the initial screen using this feature.
56
Lock/Security Features
(Motorola/Brand/Operator)
This feature has the purpose of preventing an unauthorized person
from using the information stored in your phone without permission.
To enable Lock/Security feature, enter your Lock Code first. The
default Lock Code of this product is factory-set to 0000. If you
register your phone for service, the last 4-digit number of your phone

Enter
'Lock Code'.
Enter
Setting Lock Mode
This feature is used to set LOCK feature in order to prevent an unauthorized person from using your phone.
'Lock Code'.
You can receive a call even with your phone locked.
Even if you turn the power Off and then On, your phone maintains LOCK status.
Even if your phone remains locked, you can place an emergency call.
(Emergency call number usable: 112, 113, and 119. Emergency call numbers stored: 1 3.)
Auto Lock Mode
If 'Yes' is selected 'Lock Mode is On' is displayed.
If 'No' is selected 'Lock Mode is Off' is displayed.
57

<Setting Lock On> <Setting Lock Off>
Enter 'Lock Code'
of 4 digits in Lock
Enter
Pressing and
holding
button sets
Lock Mode.
Mode and select
[UNLOC].,
Emergency Call
You can place a call to the numbers stored as emergency calls even if the phone has been set to Lock Mode.
'Lock Code'.
Deleting Emergency Call Number
iA number stored in Emergency Call is not displayed on the screen.
iUp to 3 emergency call number can be stored.
iTo delete an emergency call number, move the cursor onto the appropriate
number and then press .
Changing Lock Code
58

The Lock Code is used to set Lock Mode to Off or gain access to other security feature. You can change this Lock Code to a new one.
Enter
Enter
(Clear Phone Book/Clear Last 10 Called/Clear CLI List/
'Lock Code'.
Enter ‘Lock Code’ and ‘New Lock Code’
and then check them.
Clearing List
This feature is used to delete a phone number or content stored in the phone.
'Lock Code'.
Restricting Calls
Clear Unanswered Call List/Clear Schedule/Clear To Do List)
59

This feature is used to restrict the originating of a specific phone number.
Enter
Enter
'Lock Code'.
Memory Restrict: To restrict the origination, storing,
and editing of a call number stored in Phone Book
(Int'l Call Restrict/700 Restrict/Memory Restrict)
Master Reset
This feature is used to reset the phone feature to the initially set status. However, the information stored in the memory location cannot be reset.
'Lock Code'.
Changing NAM
60

This feature is used to select one phone number among those that have been registered with 2 or more service providers.
Enter
Enter
Screen for 017 subscribers Screen for 011 subscribers
'Lock Code'.
Unregistered NAM is indicated as '000-000-0000'.
Setting Navigation Key
Setting Navigation Key restricts the operation of the External Function Key .
'Lock Code'.
Software Version
61

This feature is used to display the Software Version of your phone.
Enter
i
Select a desired game,
'Lock Code'.
Game
If a call is received while you are enjoying a game, it is stopped automatically.
To start a game: Press any key(except button).
i To quit a game: Press button.
62
and then select a desired level.

Game Function of Button Initial Screen Starting Screen
Speed up(+)
Battle Race
Slow down(-)
Move left or right
Fire
Poker Hold cards
Spin
Voice Dialing
63

62p
Say the name twice as dictated by voice
With this feature set up, your phone recognizes your voice and places a call without your pressing [Dial] buttons.
Storing Voice
Register the name of a called party to whom you want to make a call using voice dial.
Stored List/Deletion
64
instructions.
After entering a phone number, store it.

This feature is used to confirm or delete the stored list.
You can hear the stored name in the selected list.
Auto Dialing
When opened, the flip actuates voice dial automatically to place a call.
Clearing All
65

This feature is used to delete all the contents stored in Voice List.
Press and
Press and
Recording Feature
This feature is used to record the content of a phone conversation using your own voice.
hold
button.
When recording is ended, select STO.
Playing back/Deletion
66
hold

The content of recording is displayed in the sequence of date/time/recording time.
Enter '6-digit
Changing Vocoder
This feature enables the user to select 'EVRC' mode which is a voice quality enhancing technology built in the product.
Lock code
[000000]'.
67

Features Usable During A
Earpiece Volume Control
Scratch Pad Feature
Call
Phone Book
Sending My Phone Number
Muting the Phone
Earpiece Volume Control
68

You can control the called party's voice heard through the receiver.
Enter a
Press during a call to
adjust earpiece volume.
(Earpiece volume: 5 steps)
Scratch Pad Feature
You can enter and store a new phone number during a call.
Press [STO] .
phone number.
i A phone number stored in Called List can be stored in Phone Book after ending the call.
Phone Book
69

During a call, you can search and use Phone Book.
Sending My Phone Number
When a callback number is memorized on the phone or pager, you can use this feature to send your phone number easily.
70
Muting the Phone

This feature is used to mute the phone so that the called party cannot hear your private conversation during a call.
During a call,
i-touch Service
press to
mute [sending tone].
To clear 'Mute': Press again .
71

Message Service Features
72
i-touch Service
(Service exclusively for 017 subscribers)

This is a comprehensive wired and radio portal service provided by Power Digital 017. Using this service, the user can gain access to Internet to easily
search various information. It consists of 7 Networks including i-touch News, E-mail, Web site connection, My Book, My Home, Book Mark, and Service
setting, so that the user can search various information efficiently. For details, contact your service provider.
For support of i-touch service, S/W upgrade is a must.
For details of upgrade, contact Motorola's Customer Support Center.
i-station Service
Pressing or [DIAL] buttons connects you to a desired service directly.
(Service exclusively for 017 subscribers)
This provides SMS(Short Message Service) and state-of-the-art SMS feature(broadcasting/interactive) for the user to easily make inquiries/retrieval about
desired information. In addition, the user can set services such as the connection of voice information and tracking more easily. For details, contact your
service provider.
If Key Lock is On, will not operate.
Pressing or [DIAL] buttons connects you to a desired service directly.
73

n.TOP Service
This is two-way information service for you to search desired internet information using your phone at any time and at any place. It is divided into 4 sections:
Information, Economy, Entertainment, and My Network. For more efficient retrieval of information, it ensures quick and easy retrieval of any information and
tailored information that you can compile and set only what you are interested in. For details, contact your service provider.
To go direct to n.TOP: Press and hold , and you are connected to n.TOP service directly.
(Service exclusively for 011 subscribers)
74

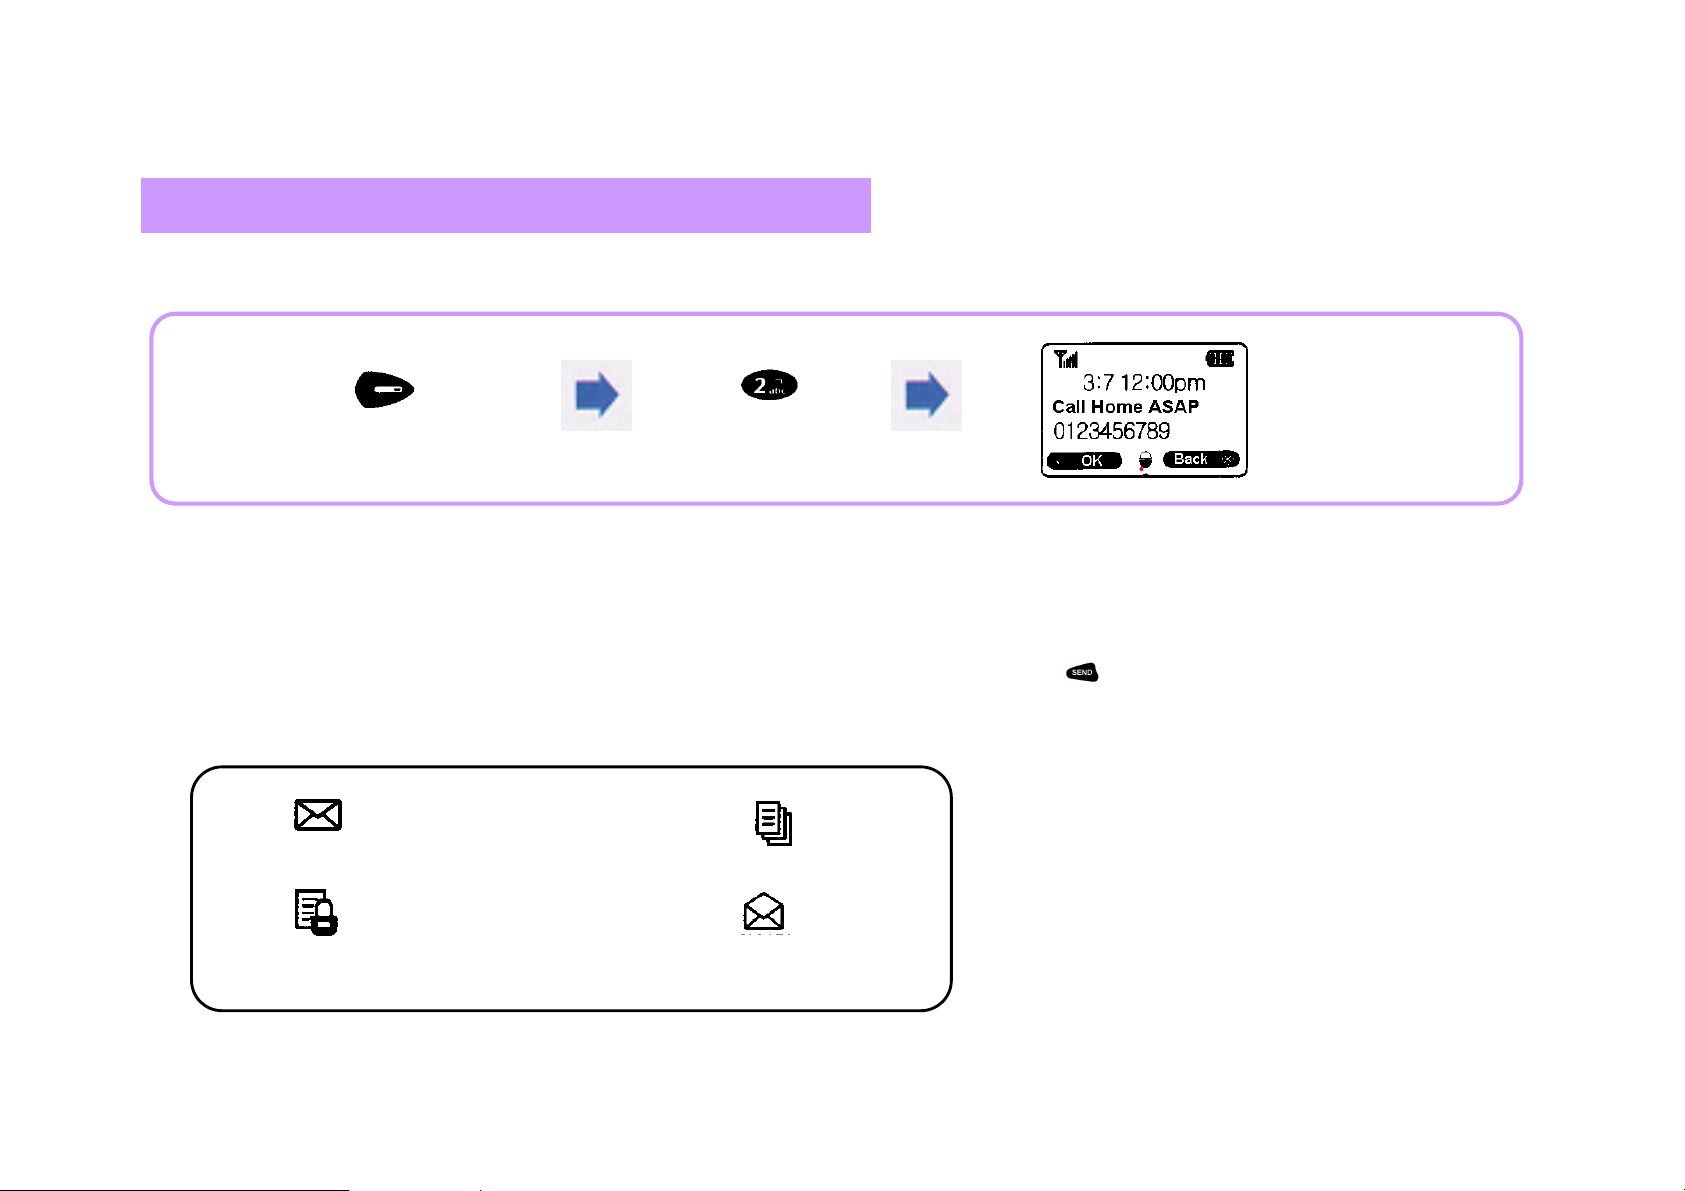
Voice Message
This feature is used to confirm voice message received through Voice Mail.
This feature displays the number/time of the received voice message and a callback number(if the calling party has left it).
Confirming Voice Message
[MAIL ]
If there is no voice message received, 'No Message' is displayed.
Connecting a Call
i Press to select [CONNECT].
If there is a callback number: Call is connected to the received callback number.
If there is no callback number: Call is connected to Voice Mail.
i If a few messages have been received, the information about the most recently received one is displayed.
To Delete
i Press to select [DEL].
75
Text Message
i
If a text message is received, the phone beeps an alarm and displays 'New Msg Rcvd' on the screen.
The content is displayed.
Text messages are displayed on the screen in the sequence of the most recently received one on top.
i If a few messages with same content have been received, the information about the last message is displayed on the screen.
i If the calling party's callback number has been inputted in the received text message, pressing button connects you to that number.
(If the calling party's number has not been inputted, 'No CallBack Number' is displayed.
i Pressing (CLR) button while viewing a message recalls the previous menu.
Text message not confirmed Duplicate message
Message with Message Lock set up Text message confirmed
76

Locking(Storing) Message
This feature is used to store a received message.
With Message Lock selected, even if you set 'Clear All', the locked message cannot be deleted.
77

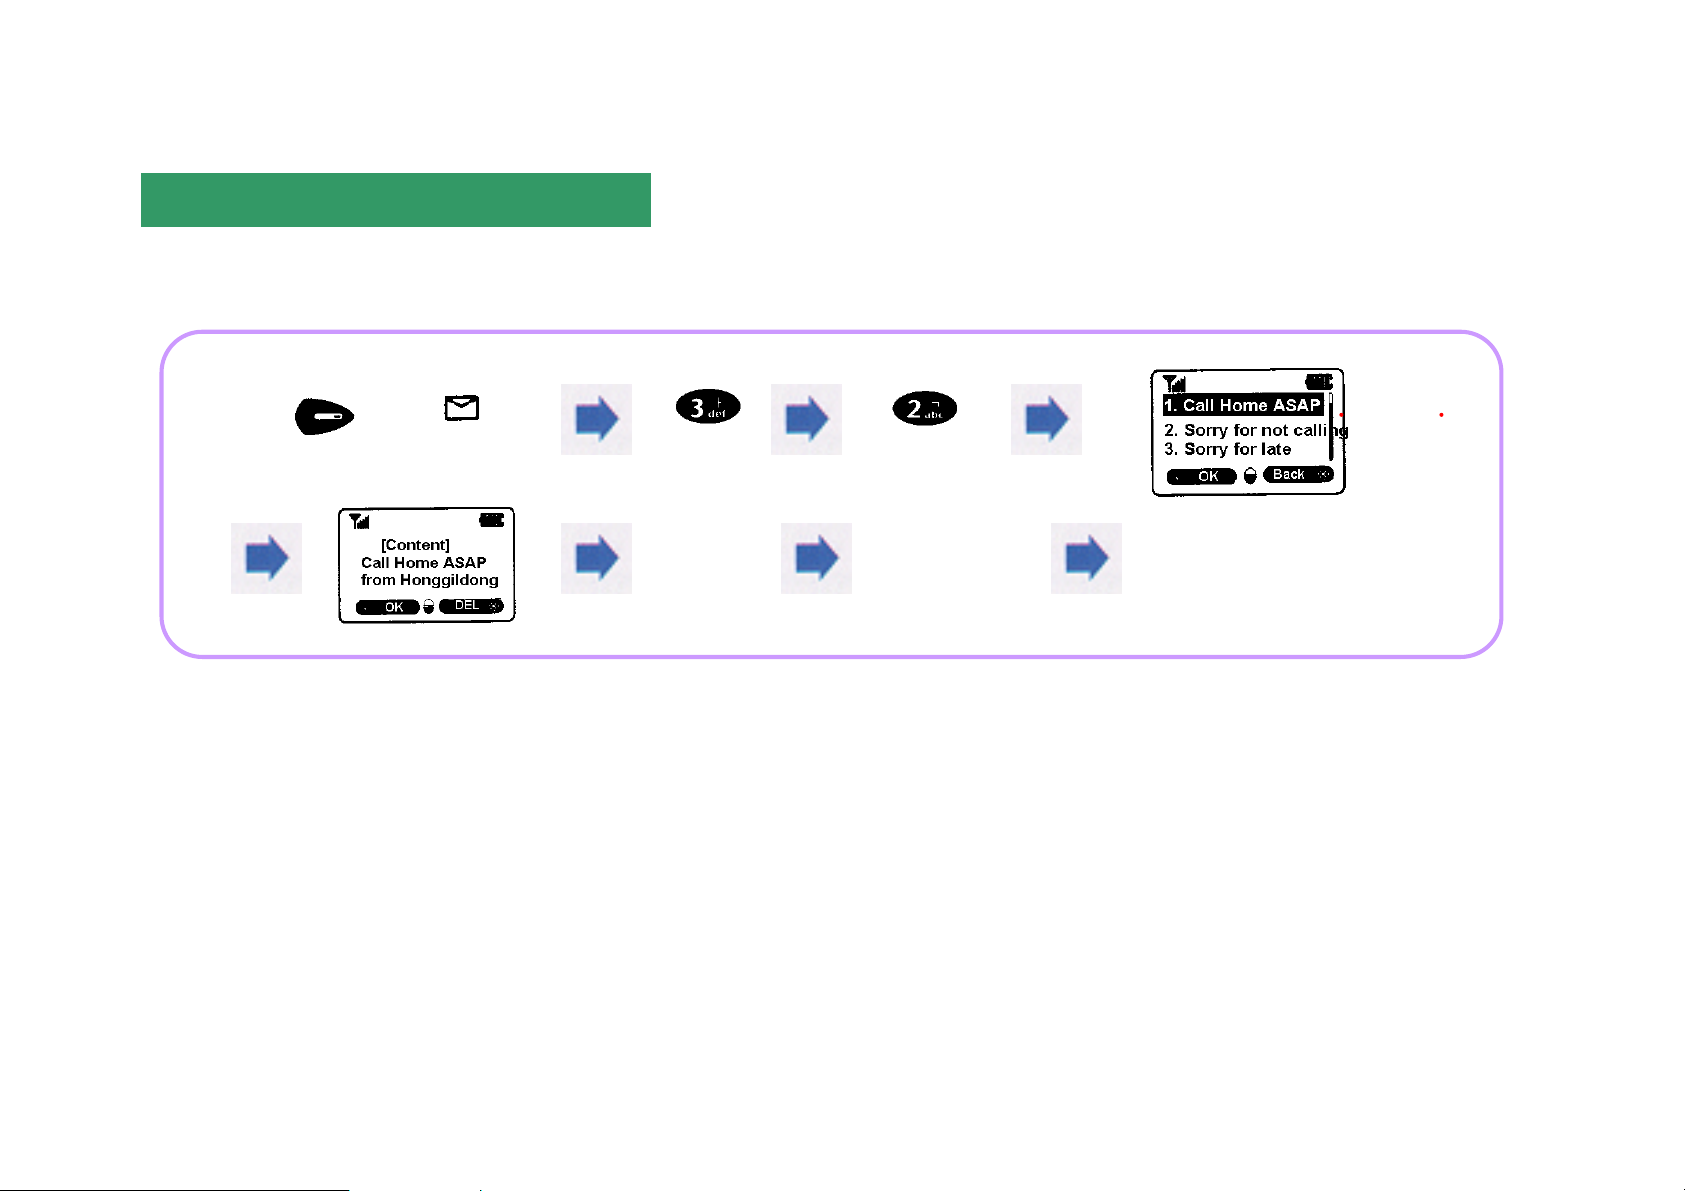
Sending a New Message
Select
‘
Send Mode
’
.
[MAIL ] Enter ‘To’
Sending a Message
Input ‘Content’.
(Normal/Fast/Urgent)
Once a message is stored, when you want to send the same message,
you can select the stored message to send it without entering its content again.
Character input method: See p.82.
78
Sending a Stored Message
After selecting a stored message,
This feature is used to edit and send the existing text messages stored, or stored messages. Up to 10 messages can be stored.
[MAIL ]
Input ‘To’ Input ‘From’. Select ‘Send Mode’.
If the message fails to be sent, 'Not Sent' is displayed and you are prompted whether
or not to send it again. If you want to re-send it, select a desired send mode and start re-sending.
if its content is displayed, select it.
79

Deleting a Message
[MAIL ]
A message with 'Msg Lock' set up cannot be deleted even if 'Delete Msg' is selected.
To delete a message with 'Msg Lock' set up, you should clear 'Msg Lock' first.
Clearing Message Lock
To clear Message Lock, press on the screen after the message is displayed and then select 'No' from the Message Lock settings.
80

Answering Mode Setup
Remind Tone Setup
This feature is used to sound an alert to inform the user that a message has been received.
[MAIL ]
Viewing a Message
This feature is used to specify the content to be displayed on the screen when a message is received.
[MAIL ]
View Content: The content of a received message is displayed on the screen.
Basic Info: The kind of a received message and callback number are displayed.
81

Entering Text
Input 'To'.
Korean, English(upper/lower cases), numbers, and symbolic characters are supported in Text Enter Mode.
Press or to select a kind of text to be inputted.
Entering Korean Letter
The first Korean consonant or vowel marked on each button
represents the consonant or vowel starting with that sound.
82

Entering English Letter
In English Entering mode, press an appropriate 'DIAL' button as times as the sequence marked on it.
A : Press once.
B : Press twice.
C : Press three times.
Entering Number
In Number Entering mode, press an appropriate 'DIAL' button.
Entering Symbolic Character
In Symbolic Character Entering mode, press an appropriate 'DIAL' button.
83

84
700 Service for Melody Download
Supplemental Services
Power Angel Service
Radio Data Communication Service

700 Service for Melody Download
i
i
Power Melody Service
\
Press to get access.
i Select a desired melody as dictated by voice instructions, and it will be downloaded onto your phone automatically.
i Press to select the downloaded melody. (Up to 3 melodies can be stored.)
My Bell Service
Press 700-5782
i Select a desired melody as dictated by voice instructions, and it will be downloaded onto your phone
automatically.
Power Angel Service
(Exclusively for 017 service subscribers)
(Exclusively for 011 service subscribers)
(Exclusively for 017 service subscribers)
If you have lost your phone or the base station intends to transmit an important message urgently to a subscriber, this service is actuated to display banner
message on the user's phone. For details, contact your service provider.
85

Radio Data Communication Service
i
You can use such features as internet and various information search, E-mail transmission/reception, etc. even while moving around by connecting radio data
connection cable between your phone and a notebook or PC without a modem separately.
To use radio data communication service:
i You should purchase data communication cable separately from the nearest Motorola dealer.
i For details of computer environment setup and other, refer to the User's Manual attached to the data communication cable.
i For other detail, contact your service provider.
Setting Serial Mode
PIMs Mode: To use personal information management program, you should set up '2. PIMs Mode'.
i PIMs program is provided together with data cable when you buy it,
or it can be downloaded from the Motorola Home Page.
86
To use data service, select
'1. Data Mode'.

Setting Data Mode
(Exclusively for 011 service subscribers)
Setting Data Rate
i To use high-speed data service, you should set up '2. 115200'.
(Exclusively for 011 service subscribers)
87

PC sync using PIMs
How to Use Speaker phone
Appendix
Separately Sold Items
Troubleshooting
Menu Status Table
88

PC sync using PIMs
i
PC sync is a feature to synchronize data such as telephone number, schedule, to-do list, and phone setting prepared on PC which is connected to the phone
using a cable with the phone or to read the date from the phone to edit and store it. For details, refer to the Motorola PIMS program and User's Guide provided
at purchase of data cable.
To use this feature, press ( ) ( ) ( )
( ) to set 'PIMs Mode' in advance.
This screen informs you that PC sync is under way.
How to Use Speaker phone
This product has a build-in 'Speaker Phone' feature, which enables you to talk over the phone freely without nearing your ear to the phone. Pressing ( ) during
standby or a call switches the phone to speaker mode or resets this mode.
Once speaker mode is set, is displayed on the initial screen.
iOnce speaker mode is set, you can converse handsfree in a car or quiet
89

Separately Sold Items
Battery pack Compact type vehicle handsfree Vehicle power adapter
Data communication cable Earpiece Portable battery changer
90

Troubleshooting
Nothing is displayed on the screen.
Disassemble the battery pack and reassemble it, and then turn the power ON.
i Check the battery pack. (Discharged or connected wrong)
No antenna graphic is displayed on the screen.
i Move to other place and attempt a call again.
Alarms 'Toot-toot' are heard when call placed.
i There is no communication channel or difficulty in communicating with the base station.
If you press button to end the call and then press button again, the phone will redials up.
is displayed on the screen.
i The phone has been locked.
Press your Lock Code to clear lock mode, and then use the phone again.
Charging lamp on the charger flashes in red.
i Check the position of the battery pack and then attempt a call again.
i Clean the terminals and attempt a call again.
i If the lamp keeps flashing in spite of several attempts, contact the nearest Motorola service center.
Battery pack operating time is different from the explanation in the User's Manual.
i If you repeat charging and discharging the battery pack continuously, its operating time becomes shorter gradually than when purchased.
i If the charged battery pack is exposed to low or high temperature, its operating time may vary.
Malfunctions arisen during using the phone or no power ON
i
91

Menu Status Table
92

93

94
 Loading...