

Page 1
User Guide
06/06/2012
FCC
©2012 Sprint. Sprint and the logo are trademarks of Sprint. Other marks are trademarks of their
respective owners.
Page 2
Table of Contents
06/06/2012
FCC
Get Started ................................................................................................................................ 1
Your Phone at a Glance ......................................................................................................... 1
Set Up Your Phone................................................................................................................. 1
Activate Your Phone ............................................................................................................... 2
Complete the Setup Application.............................................................................................. 3
Set Up Voicemail .................................................................................................................... 3
Setting Up Visual Voicemail ................................................................................................ 3
Setting Up Traditional Voicemail ......................................................................................... 4
Sprint Account Information and Help ...................................................................................... 4
Sprint Account Passwords .................................................................................................. 4
Manage Your Account......................................................................................................... 5
Sprint Support Services ...................................................................................................... 6
Phone Basics ............................................................................................................................. 7
Your Phone’s Layout .............................................................................................................. 7
Key Functions ..................................................................................................................... 8
Turn Your Phone On and Off .................................................................................................. 9
Turn Your Screen On and Off ................................................................................................. 9
Touchscreen Navigation ........................................................................................................10
Touch Gestures .................................................................................................................10
Your Home Screen ................................................................................................................10
Customize the Home Screen .............................................................................................11
App Menu ..............................................................................................................................11
Recent Apps ......................................................................................................................12
Search ...................................................................................................................................12
Status Bar .............................................................................................................................12
Enter Text ..............................................................................................................................13
QWERTY Keyboard ...........................................................................................................14
Touchscreen Keyboard ......................................................................................................14
Tips f
or Editing Text ...........................................................................................................15
Auto-Correction ..................................................................................................................15
TOC i
Page 3
Text Input Settings .............................................................................................................15
06/06/2012
FCC
Phone .......................................................................................................................................16
Make Phone Calls .................................................................................................................16
Call Using the Phone Dialer ...............................................................................................16
Call from Recent ................................................................................................................16
Call from Contacts .............................................................................................................17
Call from Favorites .............................................................................................................17
Call a Number in a Text Message ......................................................................................17
Call Emergency Numbers ..................................................................................................17
Receive Phone Calls .............................................................................................................18
Answer an Incoming Call ...................................................................................................18
Mute the Ringing Sound .....................................................................................................18
Reject an Incoming Call .....................................................................................................18
Phone Call Options................................................................................................................18
Making a Conference Call .....................................................................................................19
Phone Settings..........................................................................................................................20
Wireless & Network Settings .................................................................................................20
Airplane Mode ....................................................................................................................20
Wi-Fi Settings ....................................................................................................................21
®
Bluetooth
Tethering & Mobile Hotspot Settings ..................................................................................21
VPN Settings .....................................................................................................................21
Mobile Network Settings ....................................................................................................21
Call Settings ..........................................................................................................................21
Voicemail Settings .............................................................................................................22
Other Call Settings .............................................................................................................22
Sound Settings ......................................................................................................................23
General Sound Settings .....................................................................................................23
Incoming Call Sound Settings ............................................................................................
ications .......................................................................................................................24
Notif
Settings ............................................................................................................21
24
Sound Feedback Settings ..................................................................................................24
Display Settings .....................................................................................................................25
Brightness ..........................................................................................................................25
TOC ii
Page 4

Auto-Rotate Screen ...........................................................................................................25
06/06/2012
FCC
Screen Timeout..................................................................................................................25
Wallpaper Settings .............................................................................................................25
Battery Settings .....................................................................................................................25
Battery Remaining .............................................................................................................25
Battery Capacity.................................................................................................................26
Charging the Battery ..........................................................................................................26
Battery Cool Down .............................................................................................................26
Battery mode .....................................................................................................................26
Location Settings ...................................................................................................................27
My Location .......................................................................................................................27
Security Settings ...................................................................................................................27
Set Up Screen Lock ...........................................................................................................27
Data Encryption .................................................................................................................29
Passwords .........................................................................................................................29
Device Administration ........................................................................................................29
Credential Storage .............................................................................................................29
Certificates .........................................................................................................................29
Account Settings ...................................................................................................................30
Set Up a New Account .......................................................................................................30
Manage Existing Accounts .................................................................................................30
Applications Settings .............................................................................................................30
Unknown Sources ..............................................................................................................30
Manage Applications ..........................................................................................................30
Running Services ...............................................................................................................31
Privacy Settings .....................................................................................................................31
Backup and Restore ..........................................................................................................31
Resetting Your Phone ........................................................................................................31
Storage Settings ..........................................................................................
Inter nal Storage .................................................................................................................31
..........................31
SD Card .............................................................................................................................32
Language & Keyboard Settings .............................................................................................32
Language Settings .............................................................................................................32
TOC iii
Page 5
Keyboard Settings ..............................................................................................................32
06/06/2012
FCC
Voice Input & Output Settings ................................................................................................34
Voice Input .........................................................................................................................34
Voice Output ......................................................................................................................34
Accessibility Settings .............................................................................................................34
Date & Time Settings .............................................................................................................34
Changing the Date & Time .................................................................................................34
About Phone..........................................................................................................................35
System Updates.................................................................................................................35
Status ................................................................................................................................35
Legal Information ...............................................................................................................35
Contacts....................................................................................................................................36
Get Started with Contacts ......................................................................................................36
Access Contacts ................................................................................................................36
Add a Contact ........................................................................................................................37
Save a Phone Number ..........................................................................................................37
Edit a Contact ........................................................................................................................38
Sync or Transfer Contacts .....................................................................................................38
Transfer Contacts Using a microSD Card ..........................................................................39
Share Contacts ......................................................................................................................39
Call or Text Contacts .............................................................................................................39
Make Groups .........................................................................................................................40
Calendar & Tools ......................................................................................................................41
Calendar ................................................................................................................................41
Add Calendar Events .........................................................................................................41
Manage Calendar Events ...................................................................................................41
File Manager .........................................................................................................................42
Alarm Clock and Timer ..........................................................................................................42
Alarm Clock .......................................................................................................................
Timer .......................................
..........................................................................................42
42
Help Center ...........................................................................................................................43
Calculator ..............................................................................................................................43
Tasks.....................................................................................................................................43
TOC iv
Page 6

Quickoffice ............................................................................................................................43
06/06/2012
FCC
Quick Office Programs .......................................................................................................43
Create a New File ..............................................................................................................44
Open a Document ..............................................................................................................44
Browse Files ......................................................................................................................44
Tips ....................................................................................................................................44
Update Your Phone Software ................................................................................................44
Voice Commands ..................................................................................................................45
Voice Actions .....................................................................................................................45
Voice Commands ...............................................................................................................45
®
Bluetooth
Turn Bluetooth On or Off ....................................................................................................46
Connect New Devices ........................................................................................................46
Reconnect Devices ............................................................................................................47
Disconnect Devices ...........................................................................................................47
Connections .........................................................................................................45
Edit the Device Name ........................................................................................................47
MOTOPRINT .........................................................................................................................47
Print a Document or File ....................................................................................................47
Add a Printer ......................................................................................................................47
Smart Actions ........................................................................................................................47
microSD Card ...........................................................................................................................48
Optional microSD Card ..........................................................................................................48
Insert the microSD Card .....................................................................................................48
microSD Card Settings ..........................................................................................................49
View Memory in the microSD Card ....................................................................................49
Format the microSD Card ..................................................................................................49
microSD Card ........................................................................................................................49
Connect Your Phone to Your Computer ................................................................................49
Camera ..........................................................................................
Take Photos ..........................................................................................................................51
...........................................51
Photo Options ....................................................................................................................51
Record Videos .......................................................................................................................52
Video Options ....................................................................................................................52
TOC v
Page 7
View Photos & Videos ...........................................................................................................53
06/06/2012
FCC
Change Gallery Settings ....................................................................................................53
Share Photos and Videos ..................................................................................................54
Manage Photos and Videos ...............................................................................................54
Edit Photos and Videos .........................................................................................................54
Sprint Basics .............................................................................................................................55
Voicemail ...............................................................................................................................55
Visual Voicemail.................................................................................................................55
Traditional Voicemail ..........................................................................................................58
Accounts ...............................................................................................................................58
Setting Up Accounts ..........................................................................................................58
Gmail™ and Google™ .......................................................................................................59
Text Messages and MMS ..................................................................................................62
Roaming ................................................................................................................................65
Roaming Icon .....................................................................................................................65
Setting Roam Mode ...........................................................................................................65
Call Guard ..........................................................................................................................65
Data Roam Guard ..............................................................................................................65
Apps and Entertainment ............................................................................................................67
Google Play Store™ ..............................................................................................................67
Find and Install Apps .........................................................................................................67
Create a Google Checkout™ Account ...............................................................................68
Request a Refund for a Paid App .......................................................................................68
Manage or Remove Apps ..................................................................................................68
Download Apps from the Web ...............................................................................................68
Manage Your Downloads ...................................................................................................69
Navigation .............................................................................................................................69
Google Maps™ ..................................................................................................................69
Google Latitude™ ..............................................................................................................
e Play Music.................................................................................................................71
Googl
70
Get Music...........................................................................................................................72
Tips and Tricks...................................................................................................................73
Web and Data ...........................................................................................................................74
TOC vi
Page 8
Wi-Fi ......................................................................................................................................74
06/06/2012
FCC
Turn Wi-Fi On or Off ..............................................................................................................74
Wi-Fi Search and Connect .................................................................................................74
Wi-Fi Modes ..........................................................................................................................75
Wi-Fi Hotspot .........................................................................................................................75
Setting up the Hotspot........................................................................................................75
Activating the Hotspot ........................................................................................................76
Browser .................................................................................................................................76
Your Browser .....................................................................................................................76
Connect .............................................................................................................................76
Select Links .......................................................................................................................76
See Options .......................................................................................................................76
Go to a Specific Website ....................................................................................................77
Adjust Browser Settings .....................................................................................................77
YouTube™ ............................................................................................................................78
Sprint Worldwide Wireless Service ............................................................................................79
Getting started with Sprint Worldwide Service .......................................................................79
Activating Global Roaming Mode ...........................................................................................79
Making and Receiving Worldwide Calls .................................................................................80
Making Calls Using Plus (+) Cod e Dia ling ..........................................................................80
Sprint Voicemail Service ........................................................................................................80
Setting Up Your Voicemail Access Number .......................................................................80
Accessing Your Voicemail ..................................................................................................81
International Data Roaming ...................................................................................................81
Getting Started with Data Services.....................................................................................82
Accessing Your Email and Data Services on GSM/UMTS Networks ..................................82
Accessing Your Email and Data Services on CDMA Networks ..........................................82
Understanding Status Messages ...........................................................................................82
Contacting Sprint ...................................................................................................................
Please c
all the numbers below if you need assistance: .........................................................84
84
Important Safety Information .....................................................................................................86
General Precautions ..............................................................................................................87
Maintaining Safe Use of and Access to Your Phone ..........................................................87
TOC vii
Page 9
Battery Use & Safety .............................................................................................................88
06/06/2012
FCC
DON’Ts ..............................................................................................................................88
DOs ...................................................................................................................................88
Battery Charging ...................................................................................................................89
Third Party Accessories .........................................................................................................90
Driving Precautions ...............................................................................................................90
Seizures/Blackouts ................................................................................................................91
Caution About High Volume Usage .......................................................................................91
Repetitive Motion ...................................................................................................................91
Children .................................................................................................................................91
Glass Parts ............................................................................................................................92
Operational Warnings ............................................................................................................92
Potentially Explosive Areas ................................................................................................92
Symbol Key ........................................................................................................................92
Radio Frequency (RF) Energy ...............................................................................................93
Exposure to RF Energy ......................................................................................................93
RF Energy Operational Precautions ...................................................................................93
RF Energy Interference/Compatibility .................................................................................94
Regulatory Information ..........................................................................................................94
Specific Absorption Rate (FCC & IC) .....................................................................................94
European Union Directives Conformance Statement .............................................................95
FCC Notice to Users ..............................................................................................................96
Industry Canada Notice to Users ...........................................................................................96
Software Notices ...................................................................................................................97
Location Services ..................................................................................................................97
Your Location .....................................................................................................................97
Emergency Calls ................................................................................................................98
Navigation .............................................................................................................................98
Privacy & Data Security .........................................................................................................
Use & Ca
re ............................................................................................................................99
98
Recycling ............................................................................................................................. 100
Mobile Devices & Accessories ......................................................................................... 100
Packaging & Product Guides ........................................................................................... 100
TOC viii
Page 10
California Perchlorate Label ................................................................................................ 100
06/06/2012
FCC
Hearing Aid Compatibility with Mobile Phones ..................................................................... 101
Software Copyright Notice ................................................................................................... 101
Content Copyright ............................................................................................................... 102
Open Source Software Information ...................................................................................... 102
Export Law Assurances ....................................................................................................... 102
Product Registration ............................................................................................................ 103
Service & Repairs ................................................................................................................ 103
How to Obtain Service or Other Information ........................................................................ 103
Owner’s Record ................................................................................................................... 104
Copyright & Trademarks ...................................................................................................... 104
Manufacturer’s Warranty ......................................................................................................... 106
Manufacturer’s Warranty ..................................................................................................... 106
Motorola Mobility Inc. Limited Global Warranty Mobile Phones ........................................ 106
Index ....................................................................................................................................... 112
TOC ix
Page 11
Get Started
06/06/2012
FCC
This section gives you all the information you need to set up your phone and Sprint service the
first time.
Your Phone at a Glance
Set Up Your Phone
Activate Your Phone
Complete the Setup Application
Set Up Voicemail
Sprint Account Information and Help
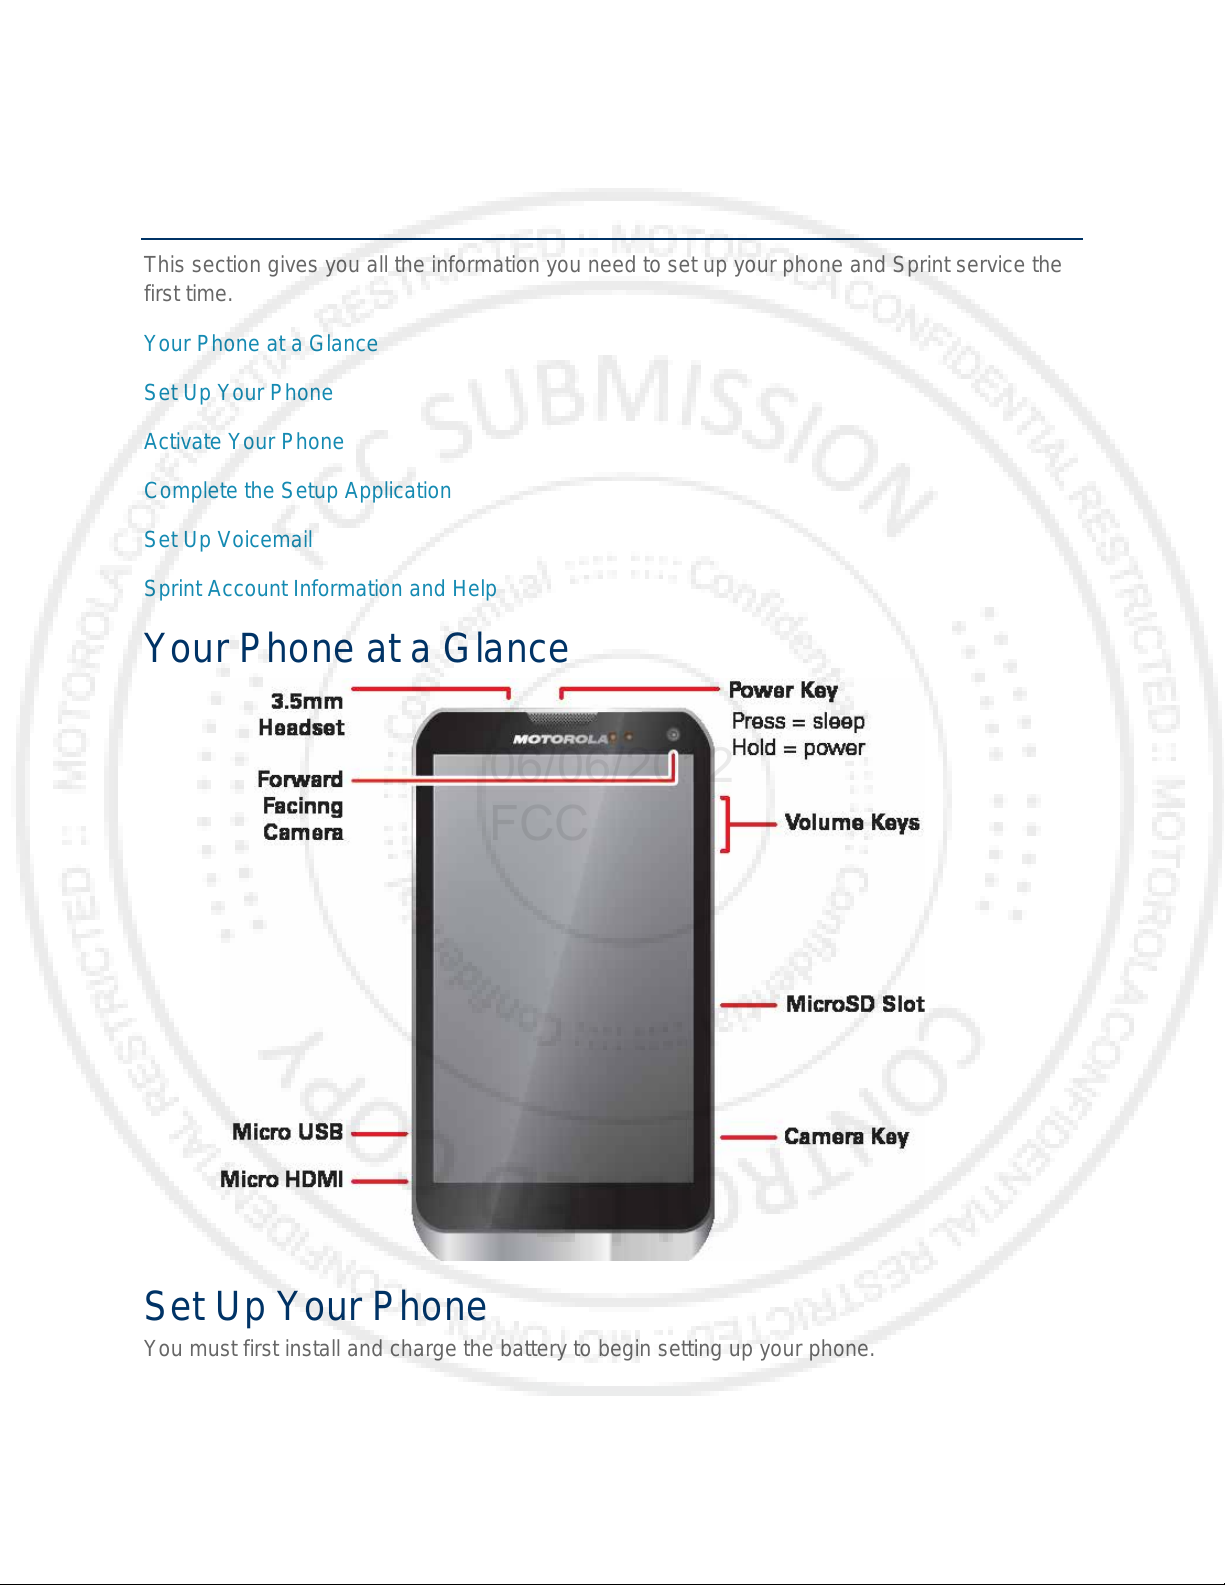
Your Phone at a Glance
Set Up Your Phone
You must first install and charge the battery to begin setting up your phone.
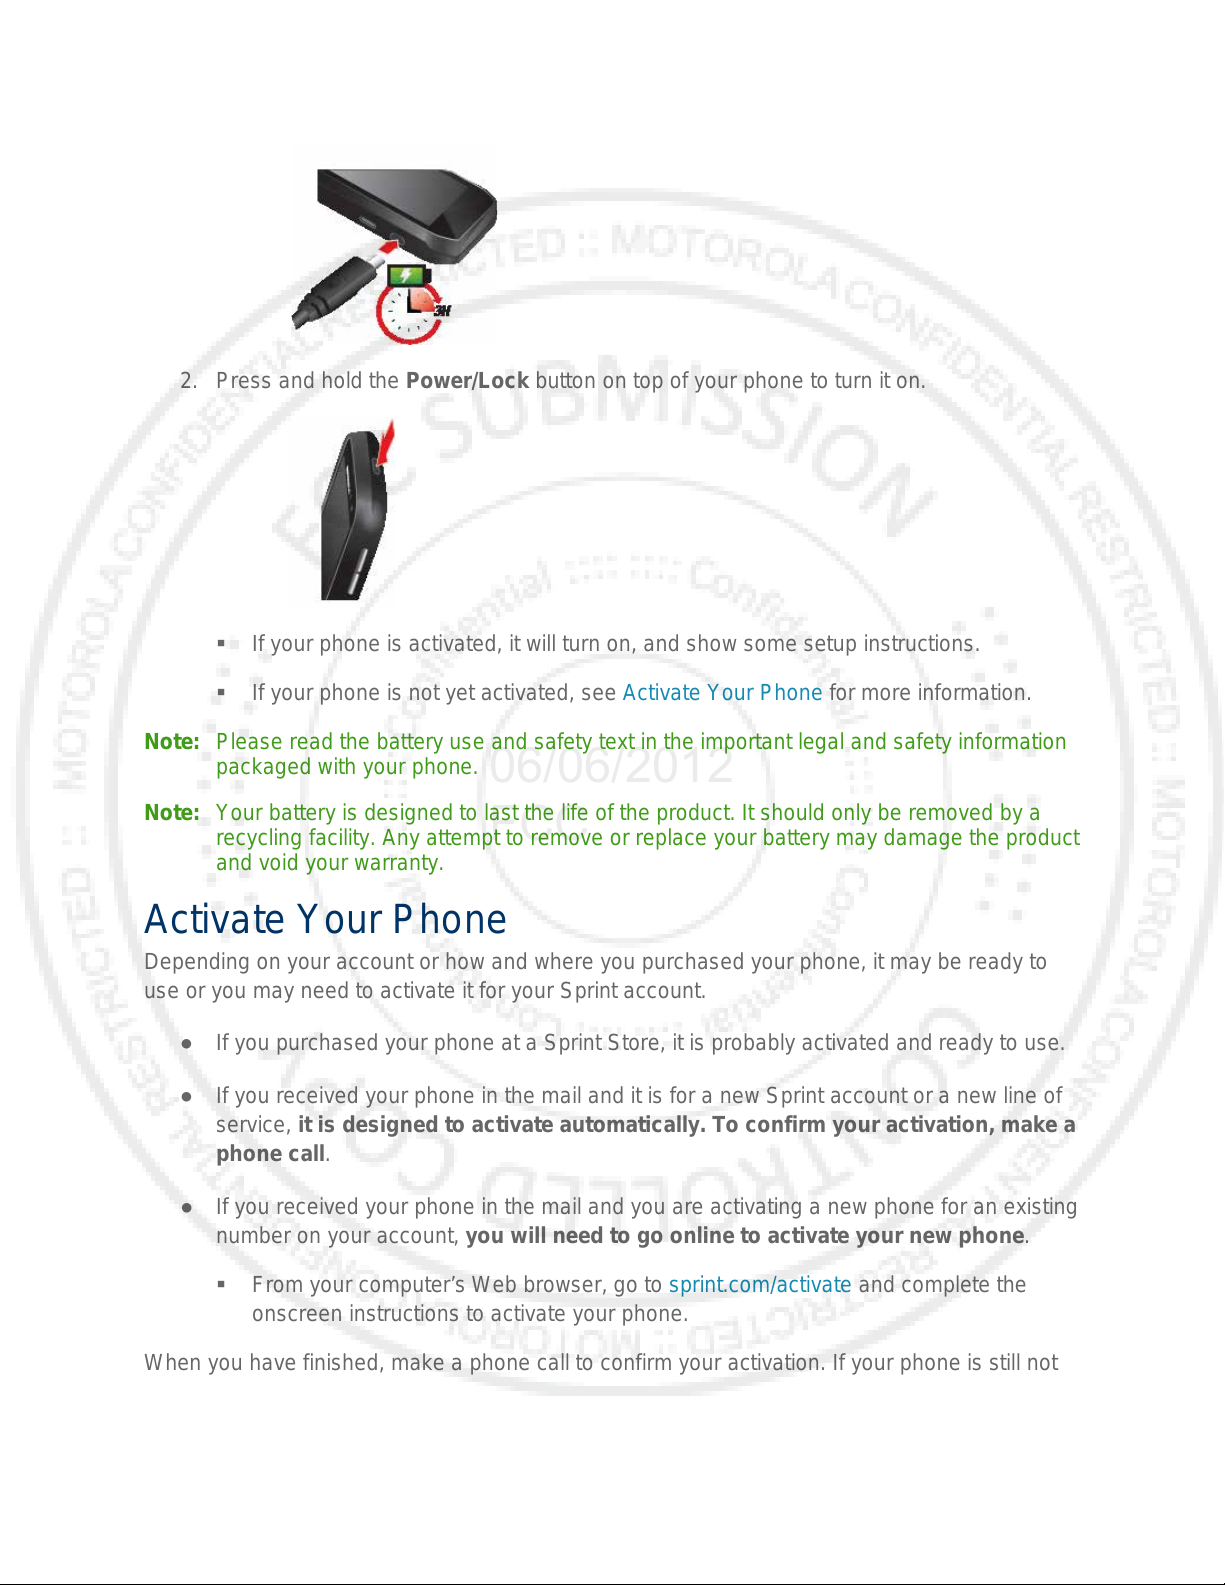
1. Charge your battery for at least three hours.
Get Started 1
Page 12
06/06/2012
FCC
2. Press and hold the Power/Lock button on top of your phone to turn it on.
If your phone is activated, it will turn on, and show some setup instructions.
If your phone is not yet activated, see Activate Your Phone for more information.
Note: Please read the battery use and safety text in the important legal and safety information
packaged with your phone.
Note: Your battery is designed to last the life of the product. It should only be removed by a
recycling facility. Any attempt to remove or replace your battery may damage the product
and void your warranty.
Activate Your Phone
Depending on your account or how and where you purchased your phone, it may be ready to
use or you may need to activate it for your Sprint account.
● If you purchased your phone at a Sprint Store, it is probably activated and ready to use.
● If you received your phone in the mail and it is for a new Sprint account or a new line of
service, it is designed to activate automatically. To confirm your activation, make a
phone call.
● If you received your phone in the mail and you are activating a new phone for an existing
number on your account, you will need to go online to activate your new phone.
From your computer’s Web browser, go to sprint.com/activate and complete the
When you have finished, make a phone call to confirm your activation. If your phone is still not
activated or you do not have access to the Internet, contact Sprint Customer Service at 1-888-
211-4727 for assistance.
Get Started 2
onscreen instructions to activate your phone.
Page 13
Tip: Do not press the Power/Lock button while the phone is being activated. Pressing it
06/06/2012
FCC
cancels the activation process.
Note: If you are having any difficulty with activation, contact Sprint Customer Service by calling
1-888-211-4727 from any other phone.
Complete the Setup A ppl i cation
After activation and any required updates, your phone should power off and then back on again.
After the restart, you’ll see a Welcome screen. You can then complete the Setup steps.
1. Touch the Android™ icon to begin the setup application. Follow the prompts to set up
your phone and accounts.
View a tutorial: Touch Begin to see a brief tutorial about getting started.
Set up your Google™ Account: Create or sign in to your Google account.
Use Google Location Service™: Touch the check marks to select options.
Backup and restore: Choose whether or not to back up data with your Google™
account.
Note: You do not need to sign up for a Google™ account to make a phone call. However, to
download applications from the Google Play Store™, you must link your phone to a
Google account.
2. Touch Finish setup.
Note: To skip account setup and go directly to the home screen, touch Skip from the Welcome
page. You can set up accounts in the Accounts settings menu.
Set Up Voicemail
Setting Up Visual Voicemail
Your phone automatically transfers all unanswered calls to your voicemail, even if your phone is
in use or turned off. You should set up your Sprint Voicemail and personal greeting as soon as
your phone is activated.
To setup your Visual Voicemail:
1. Touch Apps
2. Touch Personalize now and follow the system prompts to:
Create a password (part of standard voicemail).
Record your name announcement.
>
Voicemail.
Record your greeting.
Get Started 3
Page 14
3. When prompted to enter information, touch Dialpad t o bring up the onscreen dialpad to
06/06/2012
FCC
enter your numeric responses.
4. Once you have completed the setup process return to the voicemail page (see step 1).
5. Touch the Welcome to Voicemail message on the screen to play a brief explanation of
the voicemail services.
Setting Up Traditional Voicemail
To set up your voicemail:
1. Touch Phone to open the dial screen, and then touch and hold (the number 1
on the dial pad - voicemail) or touch Apps
2. Follow the system prompts to:
Create your password.
Record your name announcement.
Record your greeting.
Note: Voicemail Password – Sprint strongly recommends that you create a password when
setting up your voicemail to protect against unauthorized access. Without a password,
anyone who has access to your phone is able to access your voicemail messages.
For more information about using your voicemail, see Voicemail.
>
Voicemail.
Sprint Account Information and Help
Sprint Account Passwords
Manage Your Account
Sprint Support Services
Sprint Account Passwords
As a Sprint customer, you enjoy unlimited access to your personal account information, your
voicemail account, and your data services account. To ensure that no one else has access to
your information, you will need to create passwords to protect your privacy.
Account User Name and Password
If you are the account owner, you will create an account user name and password when you
sign o n to sprint.com. (Click Sign in and then click Sign up now! to get started.) If you are not
the account owner (if someone else receives the bill for your Sprint service) you can get a sub-
account password at sprint.com.
Get Started 4
Page 15
Voicemail Password
06/06/2012
FCC
You’ll create your voicemail password when you set up your voicemail. See Set Up Voicemail
for more information on your voicemail password.
Data Services Password
With your Sprint phone, you may elect to set up an optional data services password to control
access and authorize Premium Service purchases.
For more information, or to change your passwords, sign on to sprint.com or call Sprint
Customer Service at 1-888-211-4727.
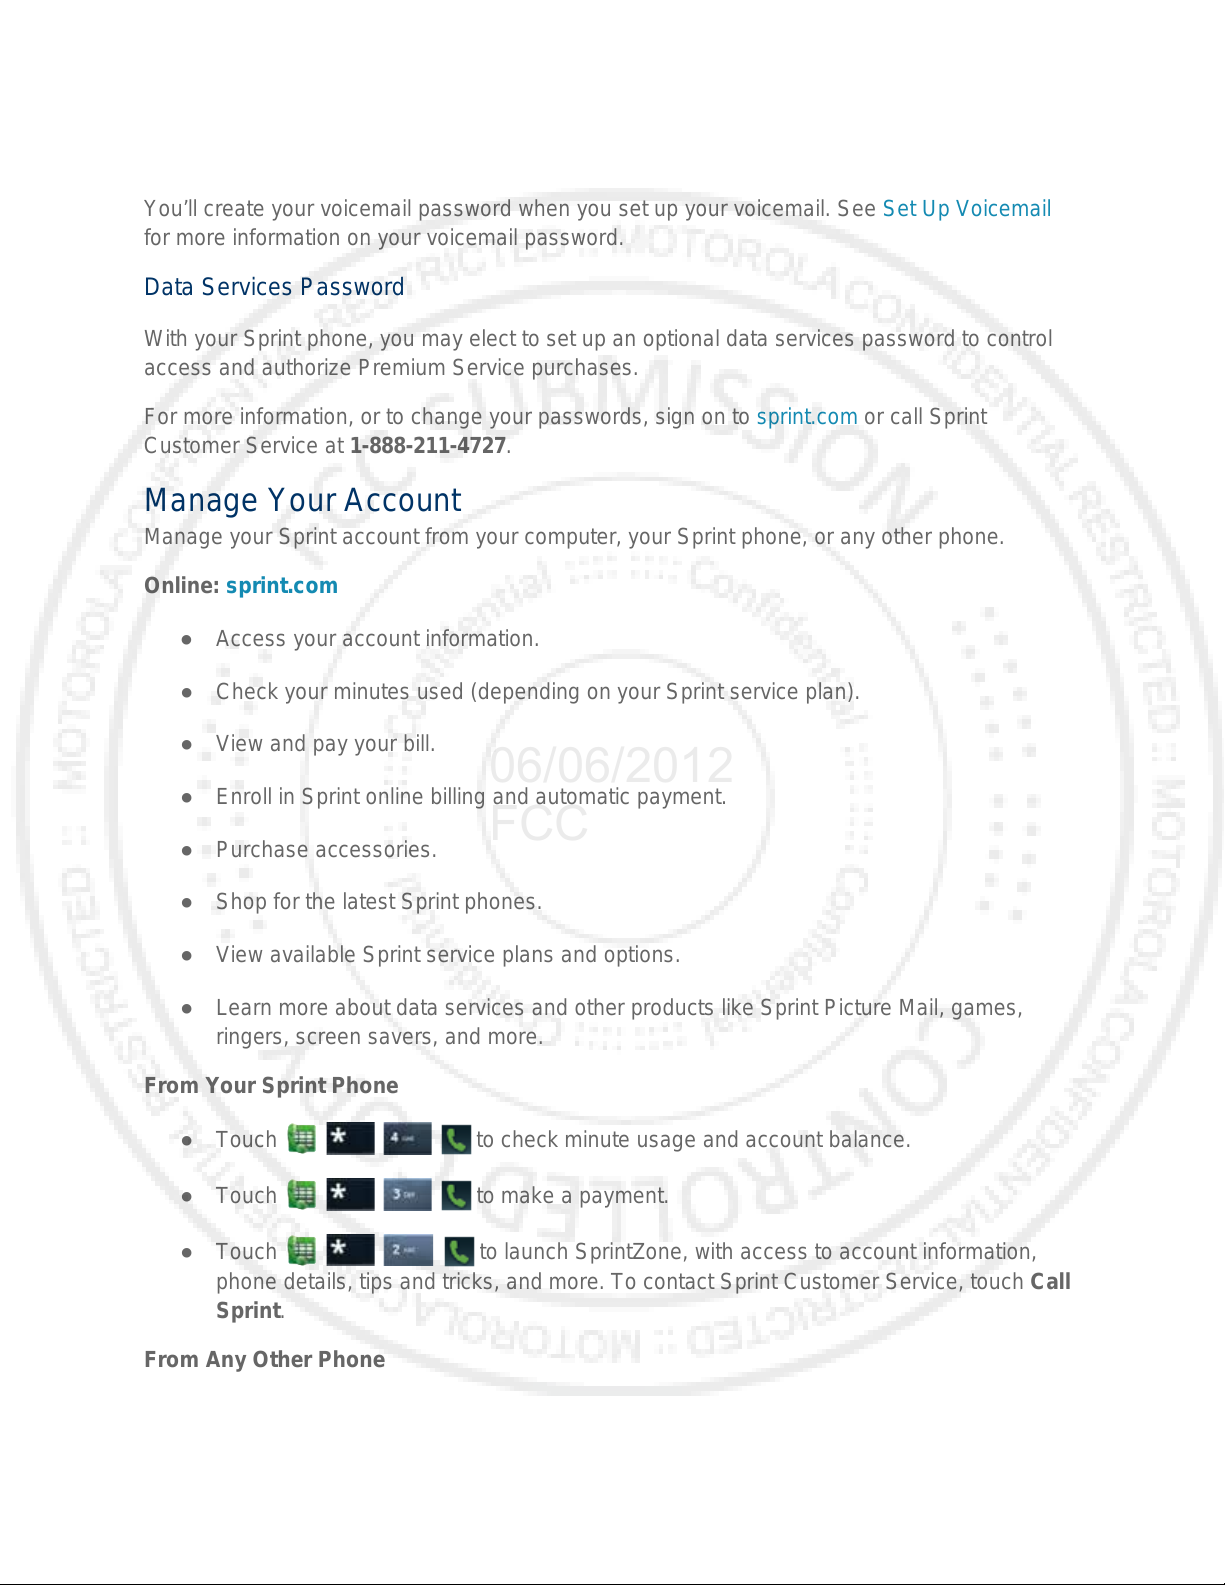
Manage Your Account
Manage your Sprint account from your computer, your Sprint phone, or any other phone.
Online: sprint.com
● Access your account information.
● Check your minutes used (depending on your Sprint service plan).
● View and pay your bill.
● Enroll in Sprint online billing and automatic payment.
● Purchase accessories.
● Shop for the latest Sprint phones.
● View available Sprint service plans and options.
● Learn more about data services and other products like Sprint Picture Mail, games,
ringers, screen savers, and more.
From Your Sprint Phone
● Touch
● Touch
● Touch
phone details, tips and tricks, and more. To contact Sprint Customer Service, touch Call
Sprint.
to check minute usage and account balance.
to make a payment.
to launch SprintZone, with access to account information,
From Any Other Phone
● Sprint Customer Service: 1-888-211-4727.
Get Started 5
Page 16
● Business Customer Service: 1-888-788-4727.
06/06/2012
FCC
Sprint Support Services
Sprint 411
Sprint 411 gives you access to a variety of services and information, including residential,
business, and government listings; movie listings or showtimes; driving directions, restaurant
reservations, and major local event information. You can get up to three pieces of information
per call, and the operator can automatically connect your call at no additional charge.
There is a per-call charge to use Sprint 411, and you will be billed for airtime.
► Touch
Sprint Operator Services
Sprint Operator Services provides assistance when you place collect calls or when you place
calls billed to a local telephone calling card or third party.
► Touch
For more information or to see the latest in products and services, visit us online at sprint.com.
.
.
Get Started 6
Page 17
Phone Basics
06/06/2012
FCC
Your Phone’s Layout
Turn Your Phone On and Off
Turn Your Screen On and Off
Touchscreen Navigation
Your Home Screen
Status Bar
Enter Text
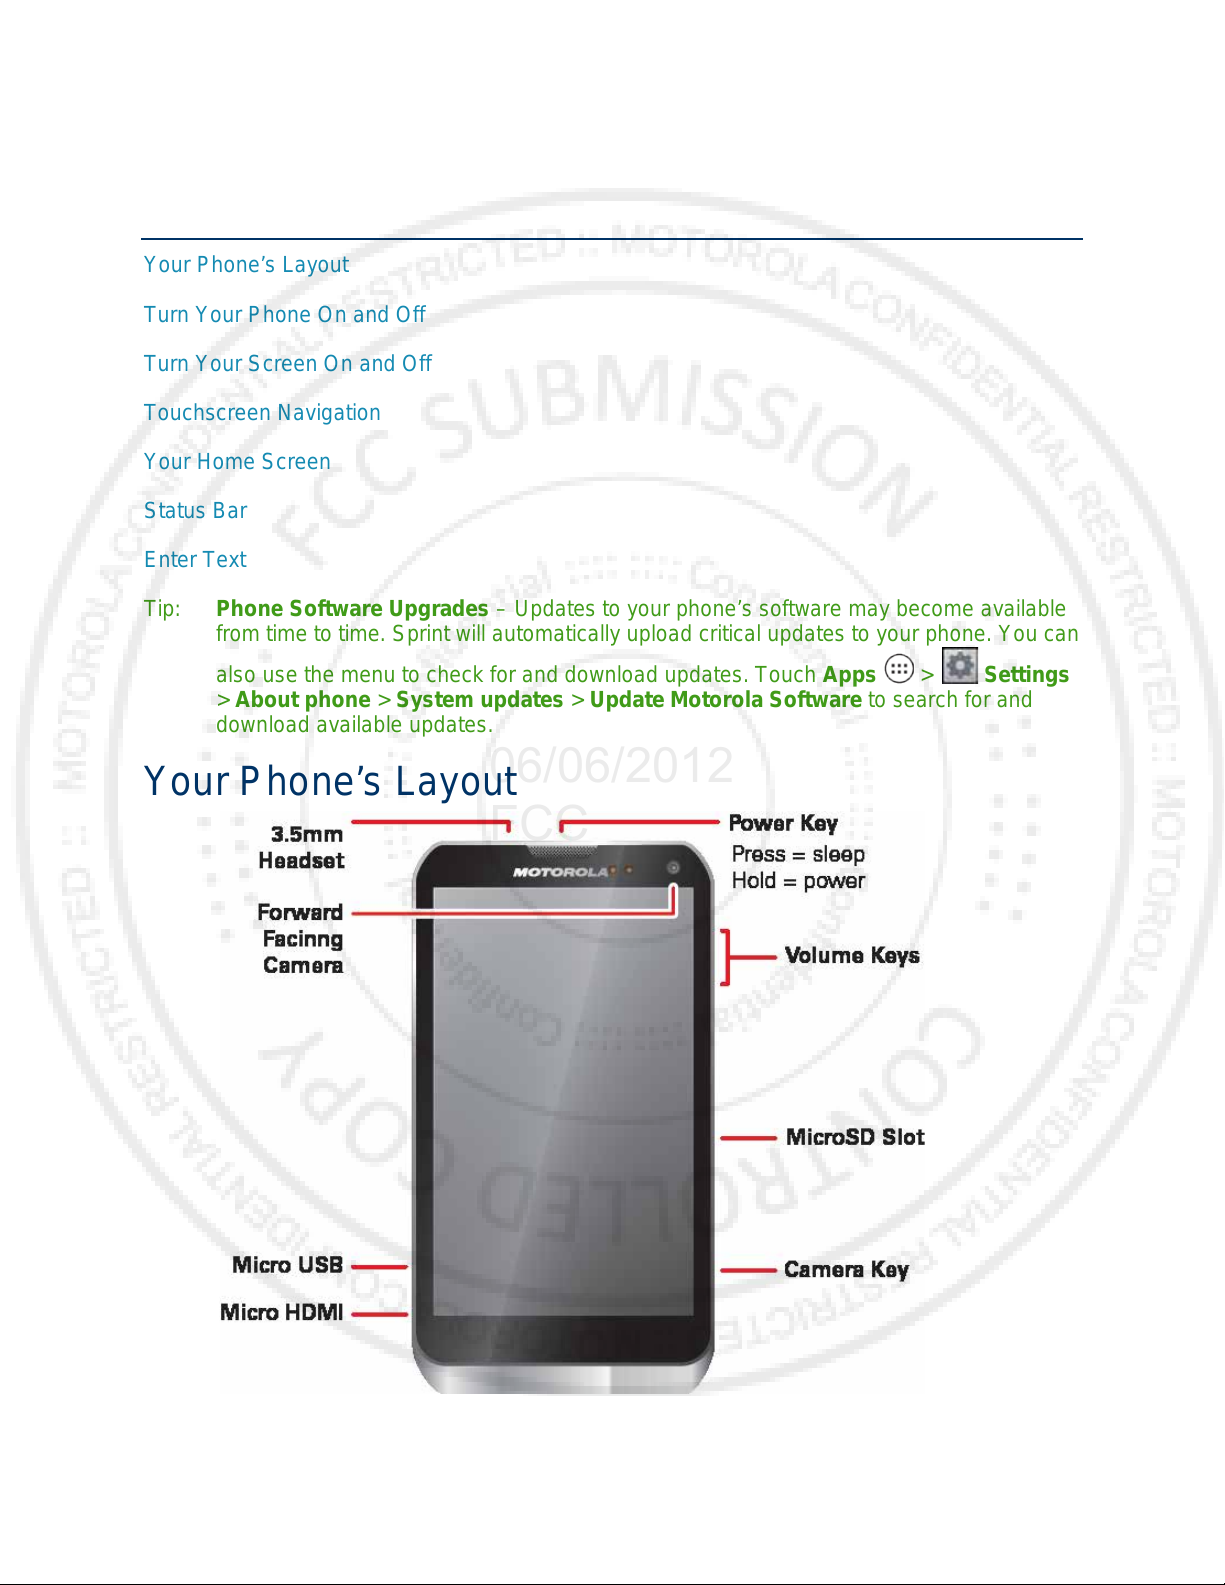
Tip: Phone Software Upgrades – Updates to your phone’s software may become available
from time to time. Sprint will automatically upload critical updates to your phone. You can
also use the menu to check for and download updates. Touch Apps > Settings
> About phone > System updates > Update Motorola Software to search for and
download available updates.
Your Phone’s Layout
Phone Basics 7
Page 18
06/06/2012
FCC
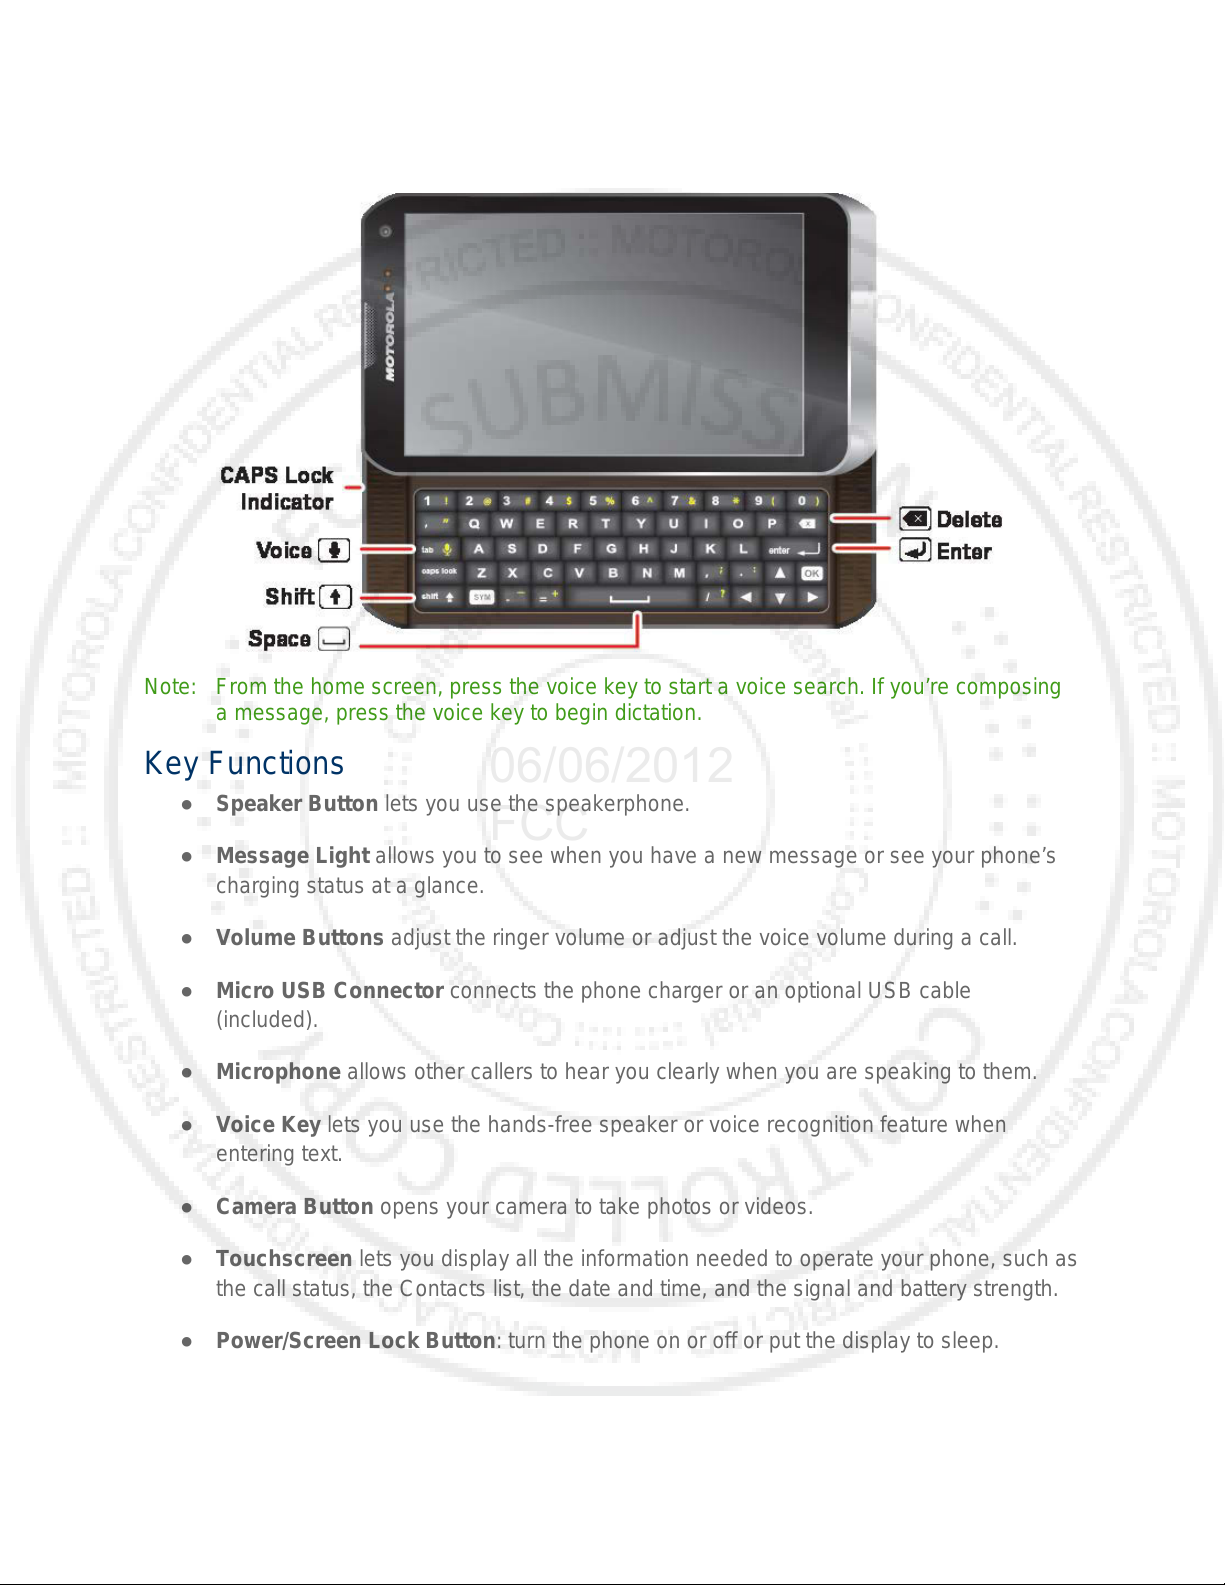
Note: From the home screen, press the voice key to start a voice search. If you’re composing
a message, press the voice key to begin dictation.
Key Functions
● Speaker Button lets you use the speakerphone.
● Message Light allows you to see when you have a new message or see your phone’s
charging status at a glance.
● Volume Buttons adjust the ringer volume or adjust the voice volume during a call.
● Micro USB Connector connects the phone charger or an optional USB cable
(included).
● Microphone allows other callers to hear you clearly when you are speaking to them.
● Voice Key lets you use the hands-free speaker or voice recognition feature when
entering text.
● Camera Button opens your camera to take photos or videos.
● Touchscreen lets you display all the information needed to operate your phone, such as
the call status, the Contacts list, the date and time, and the signal and battery strength.
● Power/Screen Lock Button: turn the phone on or off or put the display to sleep.
● 3.5 mm Headset Jack allows you plug in either a stereo headset (included) or an
optional headset for convenient, hands-free conversations.
Phone Basics 8
Page 19
CAUTION! Inserting an accessory into the incorrect jack may damage the phone.
06/06/2012
FCC
Turn Your Phone On and O ff
Turn Your Phone On
► Press and hold the Power/Lock button.
Once your phone is on, it may display “Searching for Service.” When your phone finds a
signal, it enters standby mode—the phone’s idle state. At this point, you are ready to begin
making and receiving calls.
If your phone is unable to find a signal after 15 minutes of searching, a Power Save feat ure is
automatically activated. When a signal is found, your phone automatically returns to standby
mode.
Tip: The Power Save feature conserves your battery power when you are in an area where
there is no signal.
Turn Your Phone Off
► Press and hold the Power/Lock button to open the phone options menu. Touch Power
off to turn the phone off.
Your screen remains blank while your phone is off (unless the battery is charging).
Turn Your Screen On and Off
Turn the Screen Off When Not in Use
► To quickly turn the screen off, press the Power/Lock button. Pressing it again or
receiving an incoming call will turn on your phone screen and show the lock screen.
To save battery power, the phone automatically turns off the screen after a certain period of
time when you leave it idle. You will still be able to receive messages and calls while the
phone’s screen is off.
Turn the Screen On and Unlock It
1. To turn the screen on, press the Power/Lock button.
2. Drag the lock to the right to unlock the screen.
If you have set up a screen lock, you will be prompted to draw the pattern or enter
the password or PIN. See Set Up Screen Lock.
Phone Basics 9
Page 20
Touchscreen Navigation
06/06/2012
FCC
Touch Gestures
● Touch: Choose an icon or option.
● Touch and Hold: Select an item and open an action bar.
● Drag: Move items in the home screen, or scroll slowly through lists.
● Flick: Scroll quickly between views or through lists.
Tip: When you flick a long list, touch the screen to stop it from scrolling.
●
● Pinch or double-touch: Zoom in and out on websites, photos, and maps.
Phone Covers
Your touchscreen might stay dark during calls if the sensor just above it is covered. Don’t use
covers or screen protectors (even clear ones) that cover this sensor.
Screen protectors can also interfere with touchscreen performance.
Your Home Screen
The home screen is the starting point for your phone’s applications, functions, and menus. You
can customize your home screen by adding application icons, shortcuts, folders, widgets, and
more. Your home screen can extend beyond the initial screen. Swipe the screen left or right to
display additional screens.
Note: Your home screen might look a little different.
Phone Basics 10
Page 21
Customize the Home Screen
06/06/2012
FCC
Add Pages to the Home Screen
To create more home screen pages for additional shortcuts and widgets, flick right in the home
screen until you see the Add a page screen, and then select Blank page or Start with a
template.
To rearrange or remove home screen pages, touch Manage pages at the bottom of the Add a
page screen.
Add Items to the Home Screen
● Widget: Touch Apps , touch Widgets at the top, and then touch an hold a widget (or
flick left to see more widgets).
To resize a widget, touch and hold a side until feel a vibration, and then drag.
● Shortcut: Touch Apps , touch and hold an app and then drag it to a spot on the
home screen page.
To create a shortcut folder, drag one shortcut onto another to put them both in a folder.
To add other shortcuts, drag them onto the folder icon. To name the folder, touch it and
enter a name at the bottom.
● Wallpaper: Touch and hold a blank spot on the home screen. Select a wallpaper source
from your picture gallery, Sprint ID wallpapers, live wallpapers, or other preloaded
options.
Move or Remove Items on the Home Screen
● To move the item, touch and hold it, and then drag it to a new location.
● To remove the item, touch and hold it, and then drag it to Remove at the top of the
screen.
App Menu
The app menu shows you all of your applications. To open it from the home screen, touch
Apps .
Phone Basics 11
Page 22
Icon
Description
GPS acti ve
06/06/2012
FCC
Flick left and right to see all of your apps. Any new apps that you download (see Google Pl ay
Store™) are added to the app menu.
To close the app menu, touch Home or Back .
Recent Apps
Touch Recent Apps to see the last few apps you used, and then touch the app you want.
Touch Back to return to the home screen.
Search
Note: You can also use the Voice search key on the keyboard.
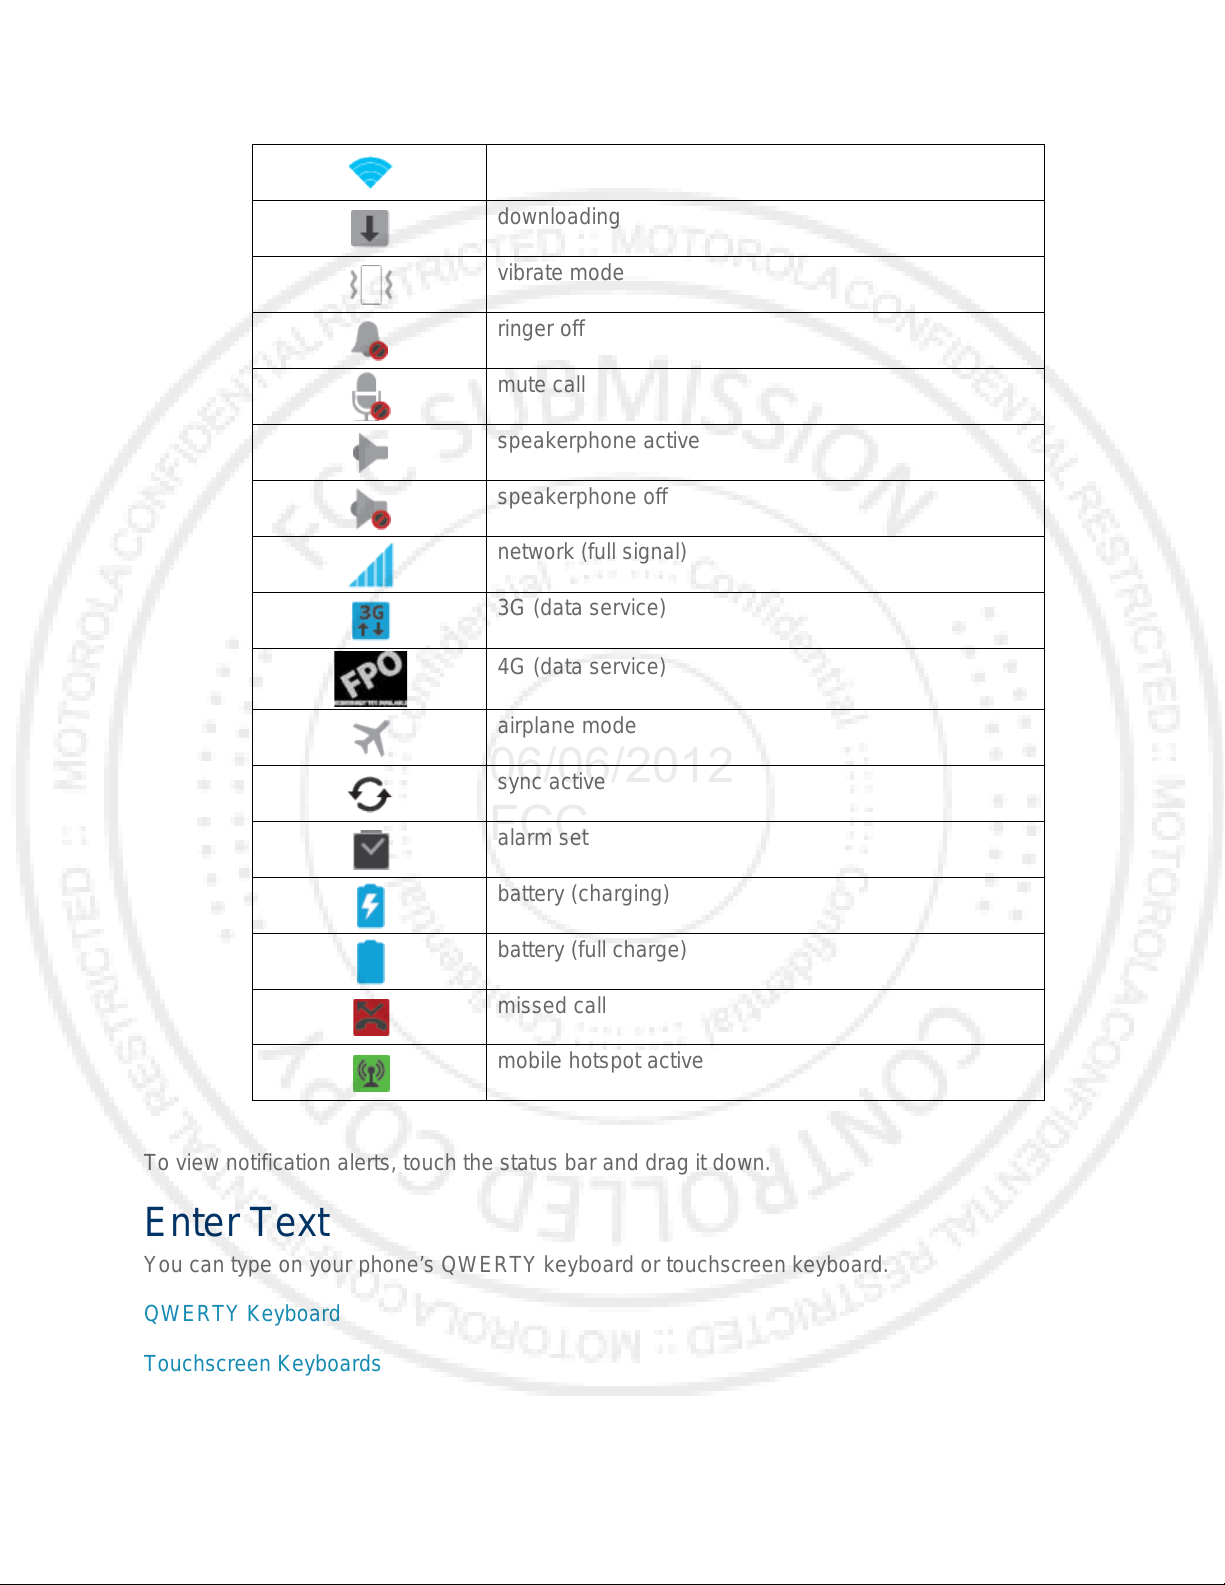
Status Bar
Your phone’s display provides information about your phone’s status and options. This list
identifies some of the symbols you’ll see: To view notification alerts, touch the status bar and
drag it down.
Status Icons
Phone Basics 12
Bluetooth® active
Page 23
Wi-Fi active
downloading
vibrate mode
ringer off
mute call
speakerphone active
speakerphone off
network (full signal)
3G (data service)
4G (data service)
airplane mode
sync active
alarm set
battery (charging)
battery (full charge)
missed call
mobile hotspot active
06/06/2012
FCC
To view notification alerts, touch the status bar and drag it down.
Enter Text
You can type on your phone’s QWERTY keyboard or touchscreen keyboard.
QWERTY Keyboard
Touchscreen Keyboards
Tips for Editing Text
Phone Basics 13
Page 24
QWERTY Keyboard
06/06/2012
FCC
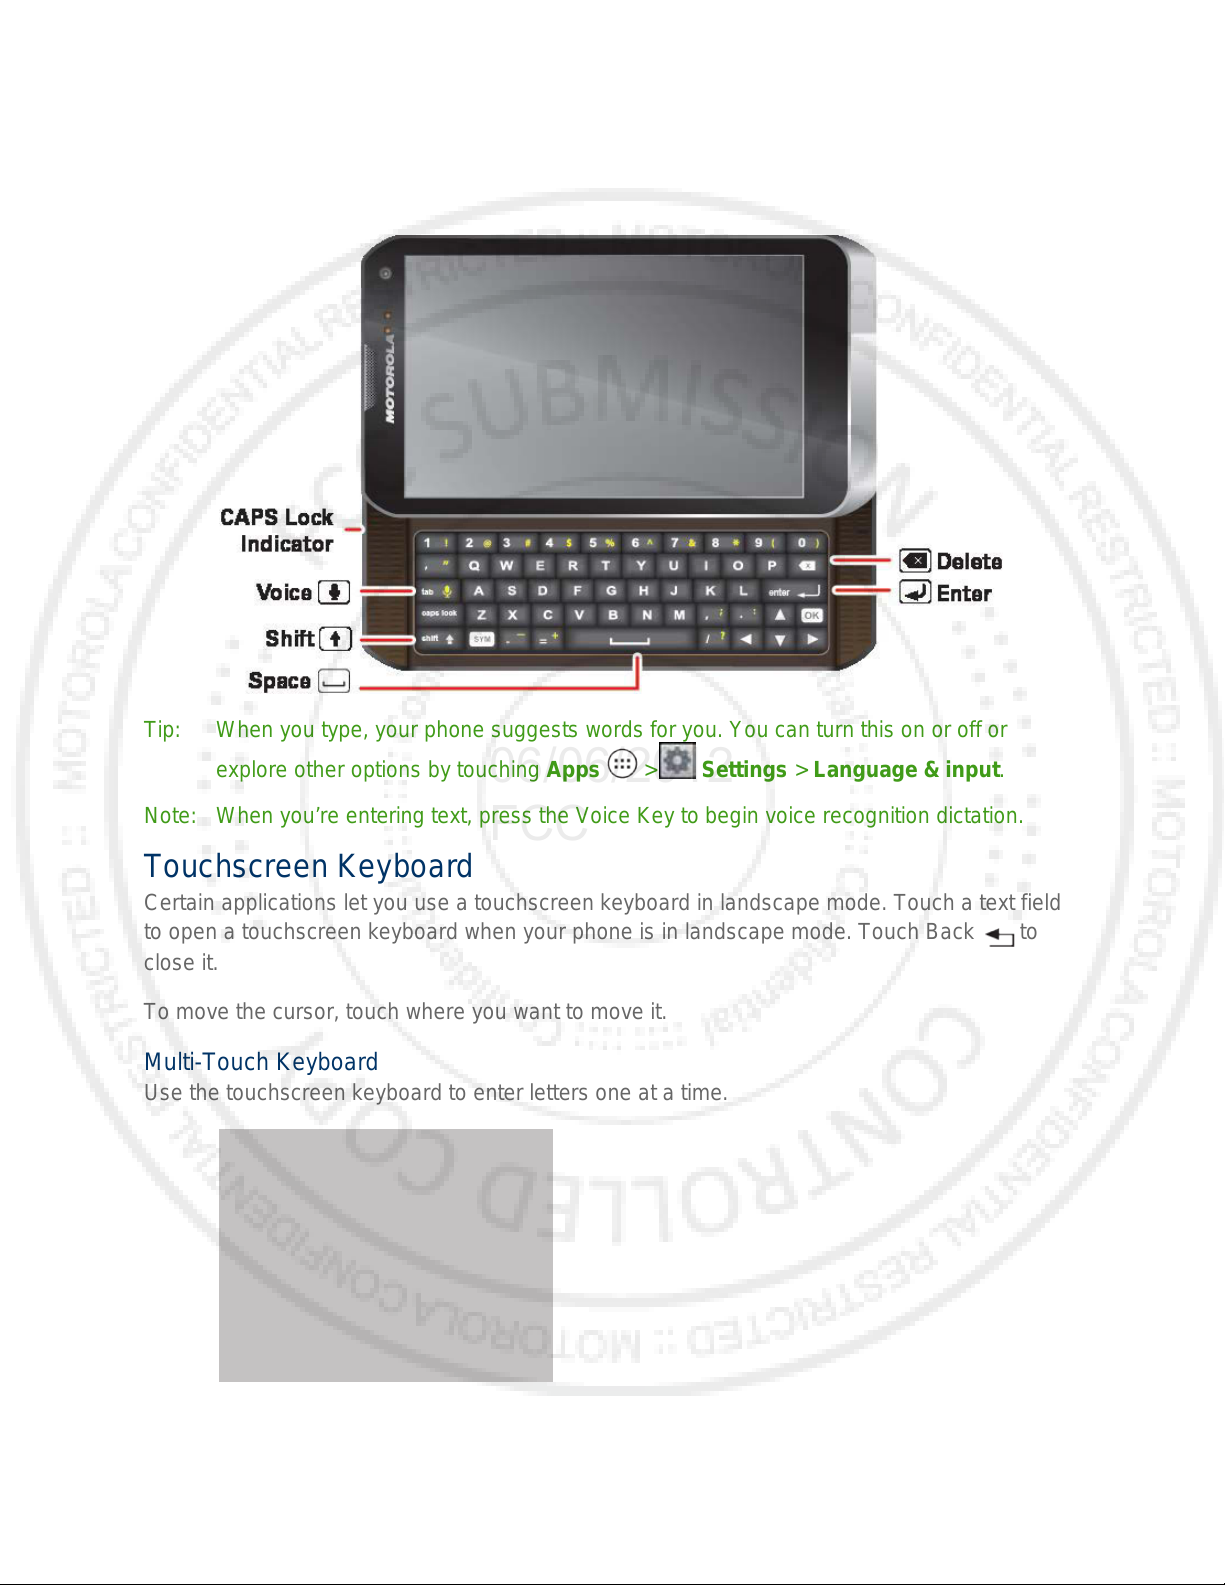
Tip: When you type, your phone suggests words for you. You can turn this on or off or
explore other options by touching Apps > Settings > Language & input.
Note: When you’re entering text, press the Voice Key to begin voice recognition dictation.
Touchscreen Keyboard
Certain applications let you use a touchscreen keyboard in landscape mode. Touch a text field
to open a touchscreen keyboard when your phone is in landscape mode. Touch Back to
close it.
To move the cursor, touch where you want to move it.
Multi-Touch Keyboard
Use the touchscreen keyboard to enter letters one at a time.
Phone Basics 14
Page 25
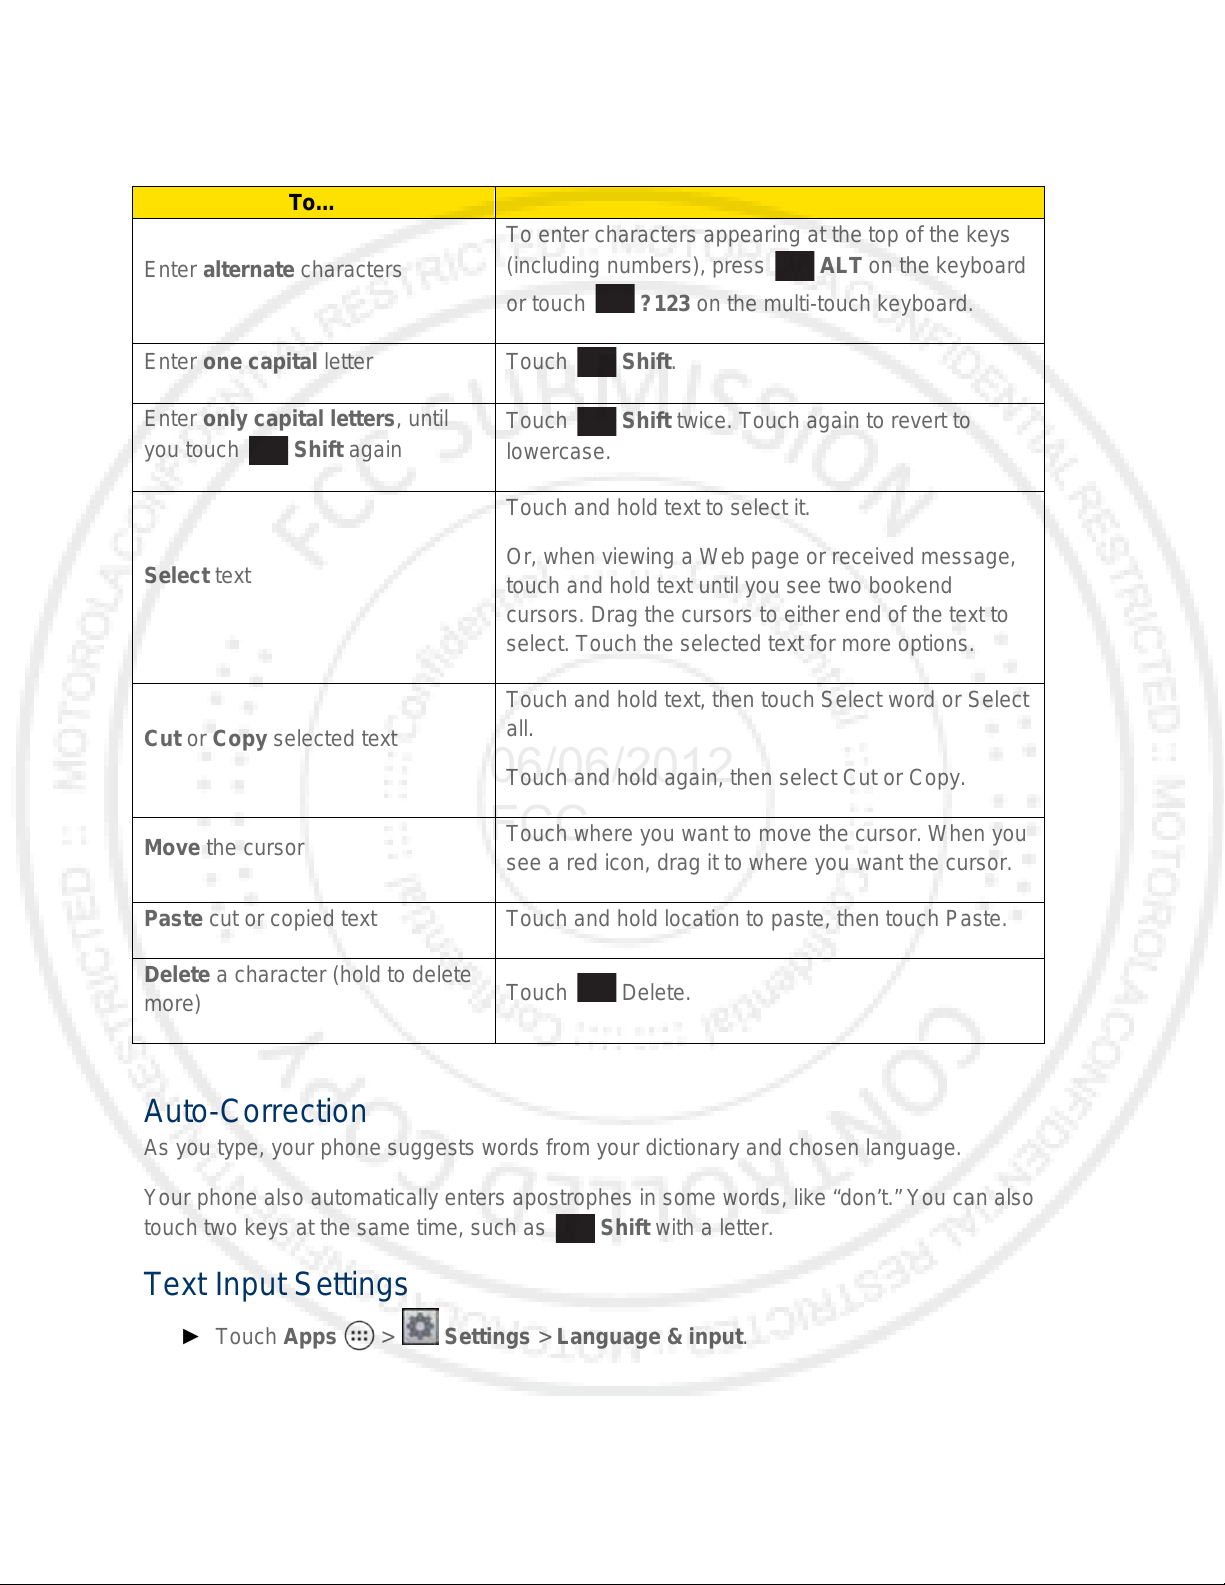
Tips for Editing Text
To…
To enter characters appearing at the top of the keys
Enter one capital letter
Touch Shift.
Enter only capital letters, until
Touch Shift twice. Touch again to revert to
Touch and hold text to select it.
Touch and hold text, then touch Select word or Select
Touch where you want to move the cursor. When you
Paste cut or copied text
Touch and hold location to paste, then touch Paste.
Delete a character (hold to delete
06/06/2012
FCC
Enter alternate characters
you touch Shift again
Select text
Cut or Copy selected text
(including numbers), press ALT on the keyboard
or touch ?123 on the multi-touch keyboard.
lowercase.
Or, when viewing a Web page or received message,
touch and hold text until you see two bookend
cursors. Drag the cursors to either end of the text to
select. Touch the selected text for more options.
all.
Touch and hold again, then select Cut or Copy.
Move t he cursor
more)
Auto-Correction
As you type, your phone suggests words from your dictionary and chosen language.
Your phone also automatically enters apostrophes in some words, like “don’t.” You can also
touch two keys at the same time, such as Shift with a letter.
Text Input Settings
► Touch Apps > Settings > Language & input.
see a red icon, drag it to where you want the cursor.
Touch Delete.
Phone Basics 15
Page 26
Phone
06/06/2012
FCC
With the Sprint National Network and your phone’s phone, you can enjoy clear calling across
the country.
Make Phone Calls
Receive Phone Calls
Phone Call Options
Making a Conference Call
Make Phone Calls
There are several convenient ways to place calls from your phone.
Call Using the Phone Dialer
Call from Call log
Call from Contacts
Call from Favorites
Call a Number in a Text Message
Call Emergency Numbers
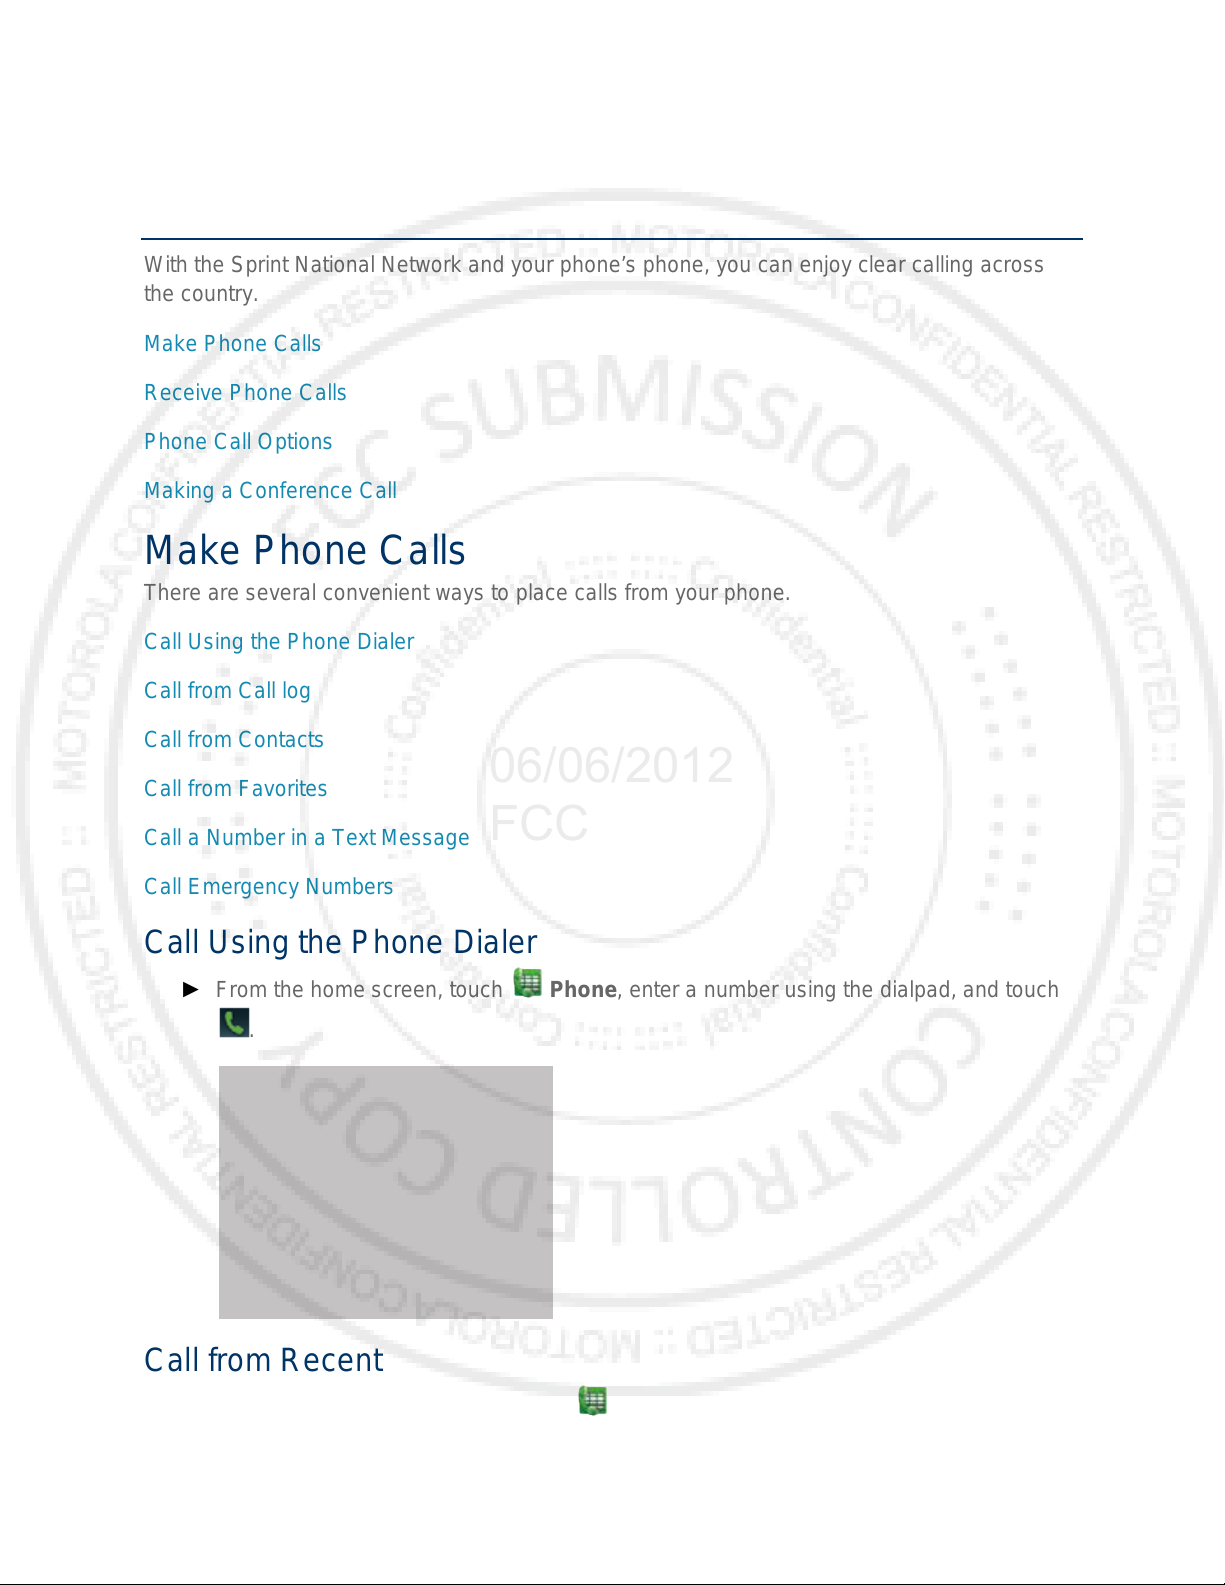
Call Using the Phone Dialer
► From the home screen, touch Phone, enter a number using the dialpad, and touch
.
Call from Recent
► To see recent or missed calls, touch Phone > Recent.
Phone 16
Page 27
To call a number, touch Call.
06/06/2012
FCC
To send a text message, touch and hold an entry, and then select Send text
message.
To clear the list, touch Menu > Clea r list.
Call from Contacts
1. Touch .People
2. Touch a contact, and then touch Call [number type] (for example, Call work).
Call from Favorites
► Touch .People > Favorites.
To call a number, touch Call on the right. If necessary, select the type of number.
To send a text message, view a contact, or other options, touch an entry.
Call a Number in a Text Message
1. With the message open, touch the number.
2. When the dialer screen opens, touch .
Call Emergency Numbers
Note: Your service provider programs one or more emergency phone numbers (such as 911 or
112) that you can call under any circumstances, even when your phone is loc ked.
Emergency numbers vary by country. Your pre-programmed emergency number(s) may
not work in all locations, and sometimes an emergency call cannot be placed due to
network, environmental, or interference issues.
1. Touch Phone. (If your phone is locked, touch Emergency Call.)
2. Enter the emergency number (for example, 911).
3. Touch to call the emergency number.
Note: Your mobile phone can use GPS and AGPS signals to help emergency services find
you.
Enhanced 911 (E911) Information
This phone features an embedded Global Positioning System (GPS) chip necessary for utilizing
E911 emergency location services where available.
Phone 17
Page 28
When you place an emergency 911 call, the GPS feature of your phone seeks information to
06/06/2012
FCC
calculate your approximate location. Depending on several variables, including availability and
access to satellite signals, it may take up to 30 seconds or more to determine and report your
approximate location.
Important: Always report your location to the 911 operator when placing an emergency
call. Some designated emergency call takers, known as Public Safety
Answering Points (PSAPs) may not be equipped to receive GPS location
information from your phone.
Receive Phone Calls
Answer an Incoming Call
► To answer a call touch and flick to .
Mute the Ringing Sound
► To mute the ringer without rejecting the call, press the volume button down.
Reject an Incoming Call
► To send an incoming call to your voicemail, touch and flick to .
When you ignore a call, you can automatically send a text message to the caller. See Text
Message Reply.
Phone Call Options
During a call:
● To use a Bluetooth
Connect New Devices.)
®
device, touch Bluetooth. (First, turn on your phone and pair it. See
● To mute a call, touch Mute.
● To use the speakerphone, touch Speaker.
Phone 18
Page 29
Note: Using a mobile phone or accessory while driving may cause distraction and may be
06/06/2012
FCC
illegal. Always obey the laws and drive safely.
Note: Your phone includes a proximity sensor. When you hold the phone to your ear, the
display goes dark to prevent accidental touches. When you move your phone away f r om
your ear, the display lights up again.
Tip: You can touch Home or Back to leave the active call display. To reopen it, touch
Home > Phone > Return to call in progress.
Making a Conference Call
With 3 -way calling, you can talk to two people at the same time. When using this feature, the
normal airtime rates will be charged for each of the two calls.
► To start a conference call, call the first number. After the call connects, touch Add Call.
Dial the next number, or select it from contacts or favorites. When the next number
answers, touch Merge.
Phone 19
Page 30
Phone Settings
06/06/2012
FCC
Wireless & Network Settings
Call Settings
Sound Settings
Display Settings
Battery & Data Manager Settings
Location & Security Settings
Account Settings
Applications Settings
Privacy Settings
Storage Settings
Language & Keyboard Settings
Voice Input & Output Settings
Accessibility Settings
Date & Time Settings
About Phone
Wireless & Network Sett i ngs
Airplane Mode
Wi-Fi Settings
Bluetooth® Settings
Tethering & Wi-Fi Hotspot Settings
VPN Settings
Mobile Network Settings
Airplane Mode
Airplane Mode turns off all your wireless connections and allows you to use many of your
phone’s features when you are in an airplane or in any other area where making or receiving
Phone Settings 20
Page 31

calls or data is prohibited. When you set your phone to Airplane Mode, it cannot send or receive
06/06/2012
FCC
any calls or access online information.
► Press and hold Power/Lock button and touch Airplane mode.
Wi-Fi Settings
Your phone lets you take advantage of Wi-Fi hotspots for high-speed data access using
available computer networks. For details on your phone’s Wi-Fi features and settings, see Wi-Fi.
► Touch Apps > Settings > Wi-Fi to access the Wi-Fi settings menu.
Bluetooth® Settings
Your phone’s Bluetooth capabilities let you use wireless headsets, send and receive pictures
and files, and more. For details on your phone’s Bluetooth settings, see Bluetooth®
Connections.
► Touch Apps > Settings > Bluetooth to access the Bluetooth setti ngs menu.
Tethering & Mobile Hotspot Settings
Share your phone's mobile data connection via USB or as a Mobile Hotspot.
► Touch Apps > Settings > Tethering & Mobile Hotspot to access the USB
Tethering & Mobile Hotspot settings menus.
VPN Settings
You can set up a Virtual Private Network (VPN). Select either basic or advanced options.
► Touch Apps > Settings > More… > VPN to access the VPN settings menu.
Mobile Network Settings
Set options for roaming or change your CDMA subscription. For more about roaming and data
guard, see Roaming.
► Touch Apps > Settings > More… > M obile networks to access the Mobile
network settings menu.
Call Settings
Your phone’s Call Settings menu lets you configure your voicemail options and a number of
other settings for the phone application.
Voicemail Settings
Other Call Settings
Phone Settings 21
Page 32

Voicemail Settings
06/06/2012
FCC
► Touch Phone > Menu > Settings > Voicemail settings to access the voicemail
settings menu.
For more about voicemail, see Voicemail.
Other Call Settings
Plus Code Dialing
► To select the plus code for domestic dialing or set an international dialing code, touch
Phone > Menu > Settings > Plus Code Dialing > Domestic Dialing or
International Dialing.
Caller ID Readout
Your phone can read out your incoming caller’s name.
► Touch Phone > Menu > Settings > Caller ID Readout and select Ring only,
Caller ID then Ring, or Caller ID repeat.
TTY Mode
A TTY (also known as a TDD or Text Telephone) is a telecommunications device that allows
people who are deaf, hard of hearing, or who have speech or language disabilities to
communicate by telephone.
Your phone is compatible with select TTY devices. Please check with the manufacturer of your
TTY device to ensure that it is compatible with digital cell phones. Your phone and TTY device
will connect via a special cable that plugs into your phone’s headset jack. If this cable was not
provided with your TTY device, contact your TTY device manufacturer to purchase the
connector cable.
To turn TTY Mode on or off:
► Touch Phone > Menu > Settings > TTY mode and select an option.
For additional information about Sprint Relay Services and TTY compatibility, call Sprint Relay
Customer Service at 800-676-3777 or visit sprintrelay.com.
Warning: 911 Emergency Calling
Sprint recommends that TTY users make emergency calls by other means,
including Telecommunications Relay Services (TRS), analog cellular, and
landline communications. Wireless TTY calls to 911 may be corrupted when
received by public safety answering points (PSAPs), rendering some
communications unintelligible. The problem encountered appears related to
software used by PSAPs. This matter has been brought to the attention of the
FCC, and the wireless industry and the PSAP community are currently working
to resolve this.
Phone Settings 22
Page 33

HAC Mode Settings
06/06/2012
FCC
If you wear a hearing aid, select this setting for compatibility.
► Touch Phone > Menu >Settings > > HAC Mode Settings.
Auto Answer With Headset
Your phone can automatically answer incoming calls when you are wearing a headset.
► Touch Phone > Menu >Settings > Auto answer on headset > On.
Text Message Reply
When you Ignore an incoming call, your phone can automatically send a text message to the
caller.
► To send a text message to an ignored call, touch and flick to .
► To edit the outgoing message, touch Phone > Menu > Settings > Quick
responses, and touch a quick response to edit it.
Voice Privacy
Enable enhanced privacy mode to make it harder for devices to pick up your frequency.
► Touch Phone > Menu >Settings > Voice privacy.
Sound Settings
General Sound Settings
Silent Mode
► To silence all sounds except media and alarms, touch Apps > Settings >
Sound > Silent mode.
Vibrate
► To add a vibration to Silent Mode, touch Apps > Settings > Sound > Silent
mode > Vibrate.
Vibrate Patterns
► To select a vibration pattern, touch Apps > Settings > Sound > Vibrate
patterns and select a pattern.
Volume
► To set volume for ringtone, media, and alarms, touch Apps > Settings > Sound
> Volume.
Phone Settings 23
Page 34

06/06/2012
FCC
► Press the volume buttons to change the ring volume (in the home screen), or the
earpiece/speaker volume (during a call or while listening to music).
Incoming Call Sound Settings
Phone Ringtone
► To set a ringtone for incoming phone calls, touch Apps > Settings > Sound >
Phone ringtone. Select a ringtone, and touch OK.
Notifications
Notification Ringtone
► To set a ringtone for notifications, touch Apps > Settings > Sound > Default
notification. Select a ringtone, and touch OK.
Sound Feedback Settings
The Feedback settings menu lets you select whether you hear tones when touching numbers on
the dialpad, selecting onscreen options, and more.
● Dial pad touch tones: Play tones when using the dialpad.
● Touch sounds: Play sounds when making an onscreen selection.
● Screen lock sound: Play sounds when locking or unlocking the screen.
● Vibrate on touch: Vibrate when touching keys and during certain other instances.
● SD card notifications: Play sound for SD card notifications.
● Call connect: Set sound emitted when a call is connected.
● Network Lost tone: Play alert when phone loses network coverage.
● Software update alert: Play alert tone for software update notifications.
Phone Settings 24
Page 35

Display Settings
06/06/2012
FCC
Adjusting your phone’s display settings not only helps you see what you want, it can also help
increase battery life.
Brightness
► To set display brightness, touch Apps > Settings > Display > Brightness.
Auto-Rotate Screen
► To set the screen to rotate automatically when you rotate the phone from portrait to
landscape mode, touch Apps > Settings > Display > Auto-rot at e screen.
Screen Timeout
► To set the number of minutes before your screen goes dark, touch Apps >
Settings > Display > Sleep and select the number of minutes or Never timeout.
Note: Longer screen timeout settings increase battery usage.
Wallpaper Settings
To apply a new wallpaper:
1. Touch and hold an empty spot on your home screen, and then touch Wallpapers.
—or—
Touch Apps > Settings > Display > Wallpaper.
2. Touch Gallery, ID wallpapers, Live wallpapers, or Wallpapers, and choose a
wallpaper.
Battery Settings
Battery Remaining
► To see battery usage statistics, touch Apps > Settings > Battery.
Warning: Use only Sprint-approved or Motorola chargers with your phone. The failure to
use a Sprint-approved or Motorola charger may increase the risk that your
phone will overheat, catch fire, or explode, resulting in serious bodily injury,
death, or property damage.
Sprint-approved or Motorola batteries and accessories can be found at Sprint Stores or through
Motorola; or call 1-866-866-7509 to order. They’re also available at sprint.com.
Phone Settings 25
Page 36

Battery Capacity
06/06/2012
FCC
Your phone is equipped with a Lithium Ion (Li-Ion) battery. It allows you to recharge your battery
before it is fully drained.
Your phone warns you with an audible alert when the battery reaches 15% and 5% of its
capacity. When there are approximately two minutes of talk time left, the phone plays anot her
alert and then turns off.
Note: Long backlight settings, searching for service, vibrate mode, browser use, and other
variables may reduce the battery’s talk and standby times.
Tip: Watch your phone’s battery level indicator and charge the battery before it runs out of
power.
Warning: Do not handle a damaged or leaking Li-Ion battery as you can be burned.
Charging the Battery
Keeping track of your battery’s charge is important. If your battery level becomes too low, your
phone automatically turns off, and you will lose any information you were just working on.
Always use a Sprint-approved or Motorola desktop charger, travel charger, or vehicle power
adapter to charge your battery.
1. Insert the small end of the USB cord into the charger/accessory jack on the left side of
your phone.
2. Insert the larger end of the USB cord into the AC adapter.
3. Plug the AC adapter into an electrical outlet and charge for at least three hours.
With the Sprint-approved Li-Ion battery, you can recharge the battery before it becomes
completely run down.
Battery Cool Down
In very limited circumstances, such as where your phone has been exposed to extreme heat,
“Cool Down” message screens will appear. To avoid possible damage to your battery and
phone, you should follow these instructions until the phone is within its recommended
temperature range. When your phone is in “Cool Down” mode, only emergency calls can be
made.
Battery mode
► To set how your phone uses battery charge, touch Apps > Smart Actions > Battery
Extender > or Nighttime saver.
Phone Settings 26
Page 37

Location Settings
06/06/2012
FCC
My Location
Your phone is equipped with a Location feature for use in connection with location-based
services.
The Location feature allows the network to detect your position. Turning Location off will hide
your location from everyone, except 911.
Note: Turning Location on will allow the network to detect your position using GPS technology,
making some Sprint applications and services easier to use. Turning Location off will
disable the GPS location function for all purposes except 911, but will not hide your
general location based on the cell site serving your call. No application or service may
use your location without your request or permission. GPS-enhanced 911 is not
available in all areas.
To enable your phone’s Location feature:
► Touch Apps > Settings > Location services and select one or more services
to use, such as Google’s location service or GPS satellites.
Security Settings
Set Up Screen Lock
Note: You can make emergency calls on a locked phone (see Call Emergency Numbers). A
locked phone still rings, but you need to unlock it to answer.
You can increase the security of your phone by creating a screen lock. When enabled, you have
to draw the correct unlock pattern on the screen, enter the correct PIN, or enter the correct
password to unlock the phone’s control keys, buttons, and touchscreen.
To lock the screen:
1. Press the Power/Lock button on top of the phone.
2. Let the screen time out (don’t press anything).
3. Switch the power off.
To unlock the screen, press the Power/Lock button. Then, drag to the right.
Pattern
1. To set the lock pattern, touch Apps > Settings > Security > Screen lock >
Pattern.
2. Follow the instructions to draw your lock pattern, and then touch Continue.
Phone Settings 27
Page 38

3. When prompted, draw the pattern to unlock the phone, and then touch Confirm.
06/06/2012
FCC
If you fail to draw the correct unlock pattern on the screen after five attempts, you wil l be
prompted to wait for 30 seconds before you can try again.
PIN Lock
1. Touch Menu Apps > Settings > Security > Screen lock > PIN.
2. Enter a numeric PIN, and then confirm it.
3. When prompted, enter PIN to unlock the phone.
Password Lock
1. Touch Menu Apps > Settings > Security > Screen lock > Password.
2. Enter password, and then confirm it.
3. When prompted, enter the password to unlock the phone.
Face Unlock
Use face recognition software to unlock your phone.
Note: This feature is less secure than a pattern, PIN, or password.
1. Touch Menu Apps > Settings > Security > Screen lock > Face Unlock > Set
it up.
2. Hold your phone at eye level, look into the front camera, and follow the instructions on
the screen.
3. When the face capture is complete, you will be prompted to choose a pat ter n or PIN as a
backup security measure you can use when the phone cannot see your face clearly.
To unlock the phone, flick to the right and look toward the front camera lens.
Disable the Screen Lock
1. Touch Menu Apps > Settings > Security > Change screen lock > None.
2. Draw your unlock screen pattern or enter password or a numeric PIN, and then confirm
it.
Forgot Your Pattern or Passcode?
If you forget your pattern, password, or your PIN, contact Sprint.
Security Lock Timer
► Touch Apps > Settings > Security > Security lock timer, and then select a
length of time your phone is idle before it locks.
Phone Settings 28
Page 39

Note: Security lock timer is only available if you have a screen lock enabled.
06/06/2012
FCC
Allow Bluetooth® Bypass
Allow voice commands to be launched via Bluetooth even if your phone is locked.
► Touch Apps > Settings > Security > Allow Bluetooth bypass.
Data Encryption
1. To encrypt data on your phone, first set up a screen lock (see Set Up Screen Lock).
2. Touch Apps > Settings > Security > Data encryption.
3. Select Device data encryption to encrypt all personal data on your phone.
4. Select Storage encryption to include files you save on your optional memory card (sold
separately) and in phone storage.
5. Touch Apply.
Passwords
Select whether to show passwords as you enter them instead of ******.
► Touch Apps > Settings > Security > Visible passwords.
Device Administration
Activate the device administrator role so that you can have further control over erasing phone
data, changing passwords, setting password rules, monitoring failed screen unlock attempts,
and locking the screen.
► Touch Apps > Settings > Security > Device administrators.
Credential Storage
Use secure credential information from an SD card.
► Touch Apps > Settings > Security and select from the following options:
Install from SD card: install credentials from a memory card.
Clear storage: clear all credential storage and reset the password.
Certificates
Manage your security certificates:
► Touch Apps > Settings > Security > Manage all certificates.
Phone Settings 29
Page 40

Account Settings
06/06/2012
FCC
The Accounts menu lets you add and manage all your email, social networking, and picture and
video sharing accounts.
Set Up a New Account
1. Touch Apps > Settings > Accounts & sync > Add account.
2. Touch an account type:
Corporate, Email, MotoCast ID, Google.
3. Enter your account information and touch Next.
Depending on the account type, you may need to enter an email address or user
address, password, domain name, or other information. For Corporate accounts,
contact your server administrator to determine what information you will need.
4. Touch Done when you are finished.
Manage Existing Accounts
1. Touch Apps > Settings > Accounts & sync.
2. Touch an account to manage its settings.
Touch a field to edit it.
Touch Remove account to delete it from your phone.
3. Touch Back when you are finished.
Applications Settings
Unknown Sources
Allow installation of applications from vendors other than the Google Play Store™.
► Touch Apps > Settings > Security > Unknown sources.
Manage Applications
Remove, stop, and manage your apps.
1. Touch Apps > Settings > Apps.
2. Touch an app for more options.
Phone Settings 30
Page 41

3. To remove an app, touch Uninstall.
06/06/2012
FCC
Running Services
View apps that are currently running.
► Touch Apps > Settings > Apps > Running.
To stop an app, touch the app and then touch Stop.
Privacy Settings
Backup and Restore
Back Up My Data
Select whether to back up your personal data (passwords and settings) to Google™ servers.
► Touch Apps > Settings > Privacy > Back up my data.
Automatic Restore
Set whether to automatically restore backed up data if you reinstall an app.
► Touch Apps > Settings > Privacy > Automatic restore.
Resetting Your Phone
Selecting Reset phone resets all phone settings back to their default values and clears all
information (text messages, contacts, emails, etc.) and downloaded apps.
1. Touch Apps > Settings > Privacy > Factory data reset.
2. Select Erase internal storage (media area) or Erase SD card, and then touch Reset
Phone.
3. Read the prompt and touch Erase everything to complete the reset. (Touch Back to
cancel.)
Warning: All data on your phone will be deleted. (Nothing on your memory card is deleted
unless you select Erase SD card.)
Storage Settings
Internal Storage
Format Internal Storage
To format and erase your internal storage.
Phone Settings 31
Page 42

► Touch Apps > Settings > Storage > Format internal storage.
06/06/2012
FCC
SD Card
Mount/Unmount SD Card
To insert or remove a memory card:
► Touch Apps > Settings > Storage > Mount/Unmount SD card.
Format SD Card
To format and erase your memory card:
► Touch Apps > Settings > Storage > Erase SD card.
Note: You must first unmount an SD card before you can erase it.
Language & Keyboard Settings
Language Settings
Select Locale
To set your menu language and region:
► Touch Apps > Settings > Language & input > Locale and select English or
Español.
Personal Dictionary
Add words to your personal dictionary so they appear as suggestions when you enter text:
1. Touch Apps > Settings > Language & input > Personal dictionary.
2. To add a word, touch Menu , type the word, and touch Ok.
Keyboard Settings
Input Method
Your phone has options for text entry.
Motorola Input
Your phone’s touchscreen input method is the multi-touch keyboard.
► Touch Apps > Settings > Language & input > Motorola Input setting to set
the following options:
Phone Settings 32
Page 43

• Input languages: Slide your finger on the spacebar to quickly change to a
06/06/2012
FCC
secondary language.
Text Correction
• Add-on dictionaries: Install additional dictionaries.
• Auto correction: Automatically correct your spelling and typing errors.
• Show correction suggestions: Show word suggestions as you type.
• General
• Auto-capitalization: Automatically capitalize the next word after a period (.).
• Auto-punctuate: Press the spacebar twice to insert a period (.).
• Vibrate on keypress: Vibrate when you press a key.
• Sound on keypress: Make a sound when you press a key.
• Auto-correct errors: Automatically correct your spelling and typing errors.
• Popup on keypress: Keys pop up as you touch them.
• Show settings key: Display settings key on keypad.
• Voice input key: Select where voice input key appears on keypad.
• Other Options
• Transfer learned words: Import or export your user dictionary (learned words
and phrases) using the memory card.
• Clear learned words: Clear all saved words from your user dictionary.
• Advanced settings: Options for expert users
Built-In Keyboard
Your phone’s built-in keyboard has options for text entry.
► Touch Apps > Settings > Language & input > Built-in keyboard to set the
following options:
Auto-replace: Correct mistyped words.
Auto-capitalization: Automatically capitalize the first letter in sentences.
Auto-punctuate: Press the spacebar twice to insert a period (.).
Phone Settings 33
Page 44

Voice Input & Output S ettings
06/06/2012
FCC
Voice Input
► Touch Apps > Settings > Language & input > Voice Search to set the
following settings for voice recognition:
Language: Set the language.
SafeSearch: Filter out explicit images when using Google Voice Search™.
Block offensive words: Hide offensive words during recognition.
Voice Output
► Touch Menu > Settings > Voice input & output > Text-to-speech settings for the
following settings :
Preferred Engine: Your speech synthesis engine is Google Text-to-speech.
Speech rate: Select the speed of spoken text.
Listen to an example: Play a short demonstration of speech synthesis.
Accessibility Settings
► Touch Apps > Settings > Accessibility for the following settings:
TalkBack, Large text, Power button ends call, and more.
Date & Time Settings
Changing the Date & Time
To set date, time, and time zone:
► Touch Apps > Settings > Date & time and select Automatic or a manual
setting (Set date, Select time zone, or Set time).
To set date and time formats:
► Touch Apps > Settings > Date & time > Use 24-hour format or Select date
format.
Phone Settings 34
Page 45

About Phone
06/06/2012
FCC
The About Phone menu lets you access important phone information, search for and apply
updates, and view legal and safety information.
System Updates
Check for software updates directly on your phone:
► Touch Apps > Settings > About phone > System updates.
Status
View battery status, phone number, network information, and more:
► Touch Apps > Settings > About phone > Status.
Legal Information
► Touch Apps > Settings > About phone > Legal information.
Phone Settings 35
Page 46

Contacts
06/06/2012
FCC
Get Started with Contacts
Add a Contact
Save a Phone Number
Edit a Contact
Sync or Transfer Contacts
Share Contacts
Call or Text Contacts
Make Groups
Get Started with Contacts
Before using Contacts, it’s best to learn the basics.
Access Contacts
► Touch People
Tip: To search the list, begin typing a name.
► Touch Menu to display options:
Contacts to display: Filter and sort your contact list.
Import/Export: Import or export contacts from a memory card.
Accounts: Touch Add account to add another account from which to use contacts,
or touch an account, and then touch Remove account to delete it from your phone.
Contacts 36
Page 47

Share contacts: Begin typing to search for a contact to share; touch Done; select
06/06/2012
FCC
the information to share; select how you want to share the information; and then
select a recipient for the information.
Settings: Touch Display options to show suggested Groups and Favorites or touch
Contact storage to choose where to store new and imported contacts.
Add a Contact
Note: Before entering contacts, you must set up at least one email account on your phone.
See Complete the Setup Application or Setting Up Messaging Accounts.
1. Touch People > .
2. Choose an account for storing your contact.
3. Fill in as much or as little information as you'd like.
4. When you’re finished, touch Save.
Save a Phone Number
You can save a phone number directly from the dialpad.
1. Touch Phone.
2. Enter the phone number and touch Add to Contacts.
3. To add the number to an existing contact, touch Existing. To create a new contact for
the number, touch New.
4. For an existing contact, touch the contact name, select a number type for the new
number, and then touch Save.
—or—
For a new contact, enter the first and last name and any additional information, and then
touch Save.
Contacts 37
Page 48

Edit a Contact
06/06/2012
FCC
After you add a contact, you can add or edit it, assign a caller ID picture, customize with a
unique ringtone, and more.
1. Touch People.
2. Touch a contact, touch Menu > Edit contact.
To edit the contact: Touch any field you want to add or change. When you are
finished, touch Save.
To assign a stored picture to a contact: Touch the picture icon at the top of the
entry, and then touch Select existing photo. Select Files (for a picture in internal
storage, memory card, or shared network folders) or Gallery (for a picture in your
gallery). Then touch a photo to select it.
To assign a new picture to a contact: Touch the picture icon at the top of the entry,
and then touch Take photo. Your camera opens. Touch the Shutter icon to take
the photo. Touch Checkmark to continue. (Touch and drag the square to crop the
picture.) Touch Crop to assign th e pictur e.
3. To assign a ringtone to a contact, touch the contact, touch Menu > Set ringtone.
Touch Ringtone to select a tone. Then touch OK.
4. To delete a contact, touch the contact, touch Menu > Delete. Then touch OK.
Sync or Transfer Conta ct s
When you change one of your contacts, your phone automatically updates your other social
networking accounts. Also, your phone updates your contacts and social networking account
whenever you change a friend in your social networking accounts.
Get all your contacts, all in one place. Here are a few helpful hints:
● Use Gmail™: All your Gmail contacts are automatically synced to your phone. Various
computer applications for mobile phones and email accounts allow you to export your
contacts as a “.CSV” file. You can then use Gmail to import the file. For details, see
motorola.com/transfercontacts or log in to your Gmail account on your computer and
select “Help”.
● Use a microSD card: You can transfer contacts from your old phone to your new
Motorola phone using a microSD card. See Transfer Contacts Using a microSD Card.
● More: Find other methods and tools to help you at motorola.com/transfercontacts.
Contacts 38
Page 49

Transfer Contacts Using a microSD Card
06/06/2012
FCC
1. On your old phone, copy all the contacts to your microSD card. (They'll be copied as a
VCard file.)
2. Insert the microSD card in your new phone. See Optional microSD Card.
3. To import the contacts from your microSD card, touch People > Menu >
Import/Export > Import from Storage.
Share Contacts
You can share contacts via Bluetooth, email, Gmail, or text messaging.
1. Touch
2. Touch a contact, touch Menu > Share.
3. Select the information that you want to share, and then touch OK.
4. Select the method you want to use to share the contact:
Bluetooth to use a Bluetooth connection. See Bluetooth® Connections for details
about pairing and sharing.
Email to send the information as an email attachment. If prompted, select an email
account. Address the message, add a subject and a message, and then touch the
Send icon. See Email for details about sending email.
Gmail to send the information as a Gmail attachment. Address the message, add a
subject and a message, and then touch . See Gmail™ and Google™ for details.
Messaging to send the information in a text message. Select a contact or enter a
wireless phone number or email address, enter any additional information, and then
touch the Send icon. For more information on text messaging, see Text Messages
and MMS.
People
Call or Text Contacts
1. Touch
—or—
Touch Phone > Phonebook.
2. For View contact, Call contact, Text contact, or other options, touch and hold the
contact.
Contacts 39
People
Page 50

Make Groups
06/06/2012
FCC
You can set up groups in Contacts for Group Connect calls or for quick messaging.
1. Touch People > Groups > .
2. Enter a name for your group.
3. Type in a name to search for people to add to the group. When the list of People entries
pops up, touch a name to add that person to the group.
--or--
Touch Menu > Add members, and select members from the list. When finished touch
OK.
4. Touch Save.
Note: You may see different options based on the information you have for the contact.
Contacts 40
Page 51

Calendar & Tools
06/06/2012
FCC
Calendar
File Manager
Alarm Clock and Timer
Help Center
Calculator
Tasks
Quickoffice
Update Your Phone Software
Bluetooth
®
Connections
Calendar
Create and manage events, meetings, and appointments.
► Touch Apps > > Calendar.
Touch the date to view your calendar events by Agenda, Day, Week, or Month. When you
highlight an event, more details appear.
Tip: You can set up multiple calendars through your Gmail account so you can access them
from your phone wherever you go.
Add Calendar Events
1. From any view, touch . Enter the event start time and other details. You can even set
a reminder so you don’t forget about the event. (When you set the reminder time to 0
minutes, it plays at the event start time.)
2. When you finish entering event details, touch Done.
Manage Calendar Events
► To edit an event, touch and hold it, and then touch Edit event. When you’re done, touch
Save.
► To delete an event, touch and hold it, and then touch Delete event.
► To go to a specific day, touch Menu > Go to date. Enter a date and touch Go.
Calendar & Tools 41
Page 52

File Manager
06/06/2012
FCC
File Manager allows you to manage files such as pictures, videos, music, and applications
stored on a microSD card.
► Touch Apps > Files > SD card.
Touch a file or folder to open, and then touch and hold a file to Delete or Share.
Alarm Clock and Timer
Alarm Clock
Your phone has multiple alarm capabilities.
► Touch Apps > Alarm & Timer.
To turn on an alarm, touch the check box.
When an alarm sounds, slide to Dismiss to turn it off or Snooze to delay for ten
minutes.
To add an alarm, touch Add alarm, and enter alarm details. Touch OK when you are
finished.
To enable or disable an alarm, touch the check box.
Timer
To set a timer:
1. Touch Apps > Alarm & Timer > Timer.
2. Set a time and touch Start.
Calendar & Tools 42
Page 53

Help Center
06/06/2012
FCC
► Touch Apps > Help Center.
You can also flick your home screen left or right to see the Tips & Tricks widget.
Calculator
Your phone comes with a handy calculator.
► Touch Apps > Calculator.
Your calculator has basic and advanced views. To change views touch Menu > Advanced
panel/Basic panel. To clear history, touch Menu > Clear history.
Tasks
1. Touch Apps > Tasks.
2. To add a task, touch .
Touch All tasks to view your tasks by due date, priority, and more.
Quickoffice
► Touch Apps > Quickoffice.
Quick Office Programs
● Quickword: Create and edit Microsoft Word® documents.
● Quicksheet: Create and edit Microsoft Excel
● Quickpoint: Create and edit Microsoft PowerPoint
● QuickPDF: View Adobe Acrobat
Calendar & Tools 43
®
PDF files.
®
spreadsheets.
®
presentations.
Page 54

Create a New File
06/06/2012
FCC
► To create a new file, touch the icon of the type of file you want to create, and then touch
Create New Document.
Open a Document
► To open an existing file, touch the icon of the type of file you want to edit, touch SD Card
to search for a file, or touch Recent Documents.
Browse Files
► To browse files on your optional memory card (sold separately), touch Browse > SD
Card. Touch a file or folder to open, or touch and hold a file for options. You can edit
most text or spreadsheet files.
Tips
● Place your cursor by touching the text.
● Select text by double-touching it.
● Choose formatting, save the file, or to choose other options, touch Menu .
● To manage your folders and transfer files, see File Manager.
Update Your Phone Soft ware
Stay up to date with the latest software updates for your phone. You can check, download and
install updates using your phone, or using your computer:
● Using your phone:
You may get an automatic notification of an available update on your phone. Simply
follow the instructions to download and install.
To manually check for updates, press Menu > Settings > System Updates >
Update Motorola software.
Your phone downloads any updates over your mobile network. Remember, these
updates can be quite large (25MB or more) and may not be available in all countries.
If you don’t have an unlimited data plan, or mobile network updates are not available
in your country, you can update using a computer.
● Using your computer:
On your computer, go to motorola.com, search for your phone model, and check the
“Software” links. If an update is available, follow the installation instructions.
Calendar & Tools 44
Page 55

Voice Commands
To…
Say…
Map a route
“navigate to”
Send a text message
“send text”
Make a call
“call”
Send email
“send email”
Find local businesses
“map of...”
Browse the Web
“go to”
Make a voice note
“note to self”
Get directions
“directions to”
06/06/2012
FCC
Voice Actions
► To begin a voice search, press the Voice key on the keyboard.
Note: If you’re writing a text message, press the Voice key to begin dictation mode. Your
phone recognizes words you speak and enters them into your message.
► Or, press the Voice key and say one of the following commands:
Tip: To learn more about voice actions, press the Voice key on the keyboard, and then
select Watch Video.
Voice Commands
For more voice commands, touch Apps > Voice Commands and follow the prompts.
Tip: For quick access to Voice Commands, add a shortcut to a home screen page. Touch
and hold an empty area, and then touch Shortcuts > Applications > Voice
Commands.
Bluetooth® Connections
Bluetooth is a short-range communications technology that allows you to connect wirelessly to a
number of Bluetooth devices, such as headsets and hands-free car kits, and Bluetooth-enabled
handhelds, computers, printers, and wireless phones. The Bluetooth communication range is
usually up to approximately 30 feet.
Calendar & Tools 45
Page 56

► Touch Apps > Settings > Wireless & networks > Bluetooth settings.
06/06/2012
FCC
Turn Bluetooth On or Off
► Touch Apps > Settings > Bluetooth > On.
Note: To extend battery life, turn Bluetooth power off when not in use.
Connect New Devices
Note: This feature requires an optional accessory.
Standard Method
To connect with a new device, you need to pair with it. You only need t o do this once for each
device. To connect again, just turn on the device.
1. Make sure the device you are pairing with is in discoverable mode.
Note: Refer to the guide that came with the device for details.
2. Touch Apps > Settings > Bluetooth.
3. Touch ON to turn on and scan. If Bluetooth power is already on, touch SEARCH FOR
DEVICES.
4. Touch a device to connect.
5. If necessary, touch OK, or enter the device passkey (like 0000) to connect to the device.
When the device is connected, the Bluetooth indicator appears in the status bar.
Note: Using a mobile device or accessory while driving may cause distraction and may be
illegal. Always obey the laws and drive safely.
NFC Method
You can also use Near Field Communication (NFC) to pair an NFC enabled Bluetooth device to
your phone.
1. To turn NFC on, touch Apps > Settings > More… > NFC.
Calendar & Tools 46
Page 57

2. Make sure your phone’s screen is on, and then touch the Bluetooth device to your
06/06/2012
FCC
phone’s NFC tag location. Hold the device to the phone until pairing is complete.
Reconnect Devices
► To automatically reconnect your phone with a paired device, simply turn on the device.
► To manually reconnect your phone with a paired device, touch the device name in the
Bluetooth devices list.
Disconnect Devices
► To automatically disconnect your phone from a paired device, simply turn off the device.
► To manually disconnect your phone from a paired device, touch the device name in the
devices list, and then touch OK.
Edit the Device Name
► Touch Apps > Settings > Bluetooth > Menu > Rename phone. Enter a
name and touch OK.
MOTOPRINT
Print email, documents, pictures, and contacts directly to shared printers on a Wi-Fi network –
no printer drivers necessary. MOTOPRINT automatically discovers networked printers for you.
You can even save your favorite printers and geo-tag their location for future use
Print a Document or File
To print somet hing from Email, Quickoffice, or Gallery, open it and touch Menu > Print.
Add a Printer
Open the document or file you want to print, then touch Menu > Print > Find printers.
Smart Actions
Tired of doing the same tasks over and over again? Let smart actions do them for you. You can
create rules to do things like automatically dim the touch screen when the battery is low, set
your ringer to vibrate at work, and set different wallpaper at home.
► Apps > Smart Actions
For more information, open the Smart Actions app and touch Menu > Help.
Calendar & Tools 47
Page 58

microSD Card
06/06/2012
FCC
Optional microSD Card
microSD Card Settings
microSD Card Files
Connect Your Phone to Your Computer
Optional microSD Card
You can purchase an optional microSD (Secure Digital) memory card to expand the phone’s
available memory space. It allows you to store images, videos, music, and voice data in your
phone.
Note: You can easily damage the microSD card by improper operation. Please be careful
when inserting, removing, or handling them.
Insert the microSD Card
1. Remove the battery cover by pulling up from the notch at the bottom of the phone. (See
Set Up Your Phone.)
2. Open the memory card slot cover, and slide in the memory card until it clicks into place.
3. Close the memory card slot cover and replace the battery cover.
Note: Be sure to use only recommended microSD cards. Using non-recommended microSD
cards could cause data loss and damage your phone.
Note: DO NOT remove a microSD card while files are being accessed or transferred. Doing so
will result in loss or damage of data.
Note: Make sure your battery is fully charged before using the microSD card. Your data may
become damaged or unusable if the battery runs out while using the microSD card.
microSD Card 48
Page 59

microSD Card Settings
06/06/2012
FCC
View Memory in the microSD Card
► With the microSD card inserted, touch Apps > Settings > Storage. (The used
and available memory space will be displayed.)
Format the microSD Card
Note: Do not remove your memory card while your phone is using it or writ ing files on it.
1. Before you remove or format your memory card you need to unmount it. Touch Apps
> Settings > Storage > Unmount SD card.
2. To format your memory card, touch Format SD card.
Note: The formatting procedure erases all the data on the microSD card, after which the files
CANNOT be retrieved. To prevent the loss of important data, please check the contents
before you format the card.
microSD Card
1. Touch Apps >
2. Touch a file or folder to open.
Files > SD card.
Connect Your Phone to Y our Computer
You can connect your phone to a computer with a USB cable.
Note: The first time you use a USB connection, your computer may indicate that drivers are
being installed. Follow any prompts you see to complete the installation. This may take a
few minutes.
Note: You also may see MotoHelper installation for using Motorola Media Link, an easy way to
transfer files to your phone.
1. Connect a Motorola micro USB data cable from your phone’s micro USB port to a USB
port on your computer. Your phone should show in the status bar.
Note: Make sure to connect the phone to a high power USB port. Typically, these are located
directly on your computer.
2. On your phone, flick down the status bar and touch the USB notification to see the USB
connection options.
microSD Card 49
Page 60

Note: If the USB connection options do not appear, you can change the settings by touching
06/06/2012
FCC
Apps > Settings > Storage > Menu > USB computer connection > Media
device (MTP).
3. Touch an option:
Mass Storage: Drag and drop files between your computer and memory card
folders. When you’re done, use “Safely Remove Hardware” before disconnecting
the USB cable.
Media device (MTP): Transfer media files between your phone and computer
Note: To transfer media files between your phone and a Mac, you wi ll need to use Android File
Transfer. For more information on Android file transfer see www.android.com/filetransfer.
Camera (PTP): Transfer photos using camera software, and transfer any files that do
not support MTP.
Note: You can’t use the files on your memory card with your phone while it is connected to the
computer.
microSD Card 50
Page 61

Camera
06/06/2012
FCC
Take Photos
Record Videos
View Photos & Videos
Edit Photos and Videos
Take Photos
Take that family photo, and post it online for everyone to see.
1. Touch Apps > Camera or press and hold the camera button on the side of the
phone. Rotate the phone counter-clockwise to view the camera screen.
Note: Photos can be stored either on an optional microSD memory card or in the phone’s
internal storage. Touch Menu > Settings > Storage Location to set your default
storage location.
2. To take the photo, touch the viewfinder to lock the focus, and then touch or press the
camera button to take the photo.
To send the photo in a message or post it online, and then touch .
To delete the photo, open it and then touch Delete.
Photo Options
You can make adjustments to optimize your shot. Drag open the panel at the bottom left of the
viewfinder (or touch Menu ):
● Settings: Change Widescreen, Volume Key Function, Geo-tag, Storage
Location, or Shutter Tone.
Camera 51
Page 62

● Effects: Change photo look: Normal, Negative, Black and White, and more.
06/06/2012
FCC
● Scenes: Adjust for better image capture in different environments: Auto, Portrait,
Landscape, Sport, and more. Touch the screen when finished to return to the
viewfinder.
● Modes: Select Single shot, Panorama, Multi-shot, or Timer.
● Brightness: Adjust for better image capture in different environments.
● Flash: Set Flash On, Flash Off, or Auto Flash.
Record Videos
1. Touch Apps >
2. To record the video, touch . Touch again to stop the recording.
3. Open your gallery and touch a video to view options:
To play the video, touch .
To send the video in a message or post it online, and then touch .
To delete the video, touch Menu > Delete.
Camera and switch over to camcorder mode.
Video Options
You can make adjustments to optimize your video. Drag open the panel at the bottom left of the
viewfinder (or touch Menu ):
● Settings: Change Video Resolution, Volume Key Function, Geo-tag, Storage
Location, or Shutter Tone.
● Effects: Change video look: Normal, Negative, Black and White, and more.
Camera 52
Page 63

● Audio Scenes: Adjust for better audio capture in different environments.
06/06/2012
FCC
● Modes: Select Normal video, Video Message, Time Lapse.
● Brightness: Adjust for better video capture in different environments.
● Light: Turn a light on or off to adjust for the lighting where you are recording.
View Photos & Videos
Using the Gallery application, you can view photos and watch videos that you’ve taken with your
phone’s camera, downloaded, or copied onto your storage card. You can also take a look at
your photos and your friends’ photos that are on your social networks (Facebook™ and Flickr
only).
For photos that are on your phone or storage card, you can do basic editing such as rotating
and cropping. You can also easily make a photo as your contact picture or wallpaper and share
photos with your friends.
► Touch Apps > Gallery.
Touch a folder to display all of its photos or videos.
Change Gallery Settings
1. While you’re viewing a photo or video, touch Menu > More.
2. Choose from these options:
Slideshow: Play a slideshow.
Edit: Edit the picture.
Rotate left: Rotate the picture to the left
Rotate right: Rotate the picture to the right.
Crop: Crop the picture
Camera 53
Page 64

Set picture as: Set th e pi cture as a Contact photo or Wallpaper.
06/06/2012
FCC
Details: View more info about the picture or video.
Print: Print the picture.
Share Photos and Videos
1. Touch Apps > Gallery.
2. Touch a photo or video, and then touch .
3. Choose how you want to share—like Bluetooth, Email, Messaging, or an online album.
Manage Photos and Videos
1. Touch Apps > Gallery.
2. Touch a thumbnail image from your camera roll or library, and then:
To delete the photo or video, touch Menu > Delete, or touch [Trash Icon].
To set the photo as a contact picture or wallpaper, touch Menu > Set as.
Touch to share it.
Touch Menu for more options.
Tip: To copy photos to/from a computer, go to Connect Your Phone to Your Computer.
Edit Photos and Videos
► Touch Apps > Gallery > picture > Menu > Edit.
You can choose advanced editing features to resize, crop, change the color, and more.
Camera 54
Page 65

Sprint Basics
06/06/2012
FCC
Voicemail
Accounts and Messaging
Roaming
Voicemail
Visual Voicemail
Visual Voicemail gives you a quick and easy way to access your voicemail. Now you can find
exactly the message you are looking for without having to listen to every voicemail message
first. This new feature periodically goes out to your voicemail, and gathers the caller information
from the current voicemails. It then creates a list with the caller name and number, along with
the length of time and priority level of the voicemail message.
Setting up Visual Voicemail
To set up voicemail, see Set Up Voicemail.
Reviewing Visual Voicemail
Visual Voicemail lets you easily access and select which messages you want to review.
1. Touch Apps > Voicemail
2. Touch a message to review it.
Note: Touch Menu > Lock to prevent the message from accidentally being deleted.
Featured available while reviewing messages include:
● Timeline: Provides a visual timeline for the current message. Touch and drag the bar to
move to different points in the message.
Touch Pause to pause the playback. Touch Play to resum e.
● Call: Call the person who left the voicemail message.
● Reply: Reply to the message. You can then reply to the sender or forward the message
to anyone with an email account or phone number. This allows you to send a voicemail
message to several recipients at the same time. You can tag the reply message for both
Urgency and Privacy.
Touch Send to deliver the new message.
Sprint Basics 55
Page 66

● Speaker Off/On: Turn the speakerphone on or off during playback. If the speakerphone
06/06/2012
FCC
feature was enabled within the Voicemail settings menu, the speakerphone will always
be automatically enabled during voicemail playback.
● Delete: Delete the current voicemail message.
Listen to Multiple Voicemail Messages
When you are done listening to a voicemail message, you can easily listen to other messages
without returning to the main voicemail screen.
► After listening to a voicemail, flick the screen left or right to move to the previous or next
message. (It will begin playing automatically.)
You can navigate through voicemail messages as frequently as you like. You can even move to
the next or previous message before you are finished listening to the current one.
Configuring Visual Voicemail
To access the voicemail options:
1. Touch Apps > Voicemail.
2. Touch Menu and select from the following:
Compose to compose a new voicemail message.
Move to SD to move voicemails to your microSD card.
Play all new to listen to all new messages.
Undelivered to list all undelivered voicemail messages.
Delete to delete selected messages from your current list of available voicemail
messages.
Search to search through voicemail messages for keywords.
Settings to configure your voicemail application settings.
To access a voicemail messages options:
1. Touch Apps > Voicemail.
2. Touch a voicemail message, touch Menu , and select from the following:
Lock/Unlock to prevent deletion of the selected voicemail message.
Text message to create and deliver a new text message to the sender’s phone
number.
Sprint Basics 56
Page 67

Reply to reply to the voicemail. You can reply to the sender or forward it to anyone
06/06/2012
FCC
with an email account or phone number. This allows you to send this voicemail
message to several recipients at the same time.
Forward to forward the voicemail to another recipient.
Add to contacts to add the sender’s phone number to People.
Configuring Visual Voicemail Settings
The visual voicemail settings menu lets you access settings for notifications, pictures, greetings,
and more.
1. Touch Apps > Voicemail.
2. Touch Menu > Settings and select from the following:
Touch Notifications to determine how you are notified of new voicemails. Choose
from: Notifications, Select ringtone, and Vibrate.
Touch Pictures to replace the default Visual Voicemail icon with a specific People
entry’s image. This image is pulled from the entry’s People details.
Touch Speakerphone to automatically activate the speakerphone when you review
your Visual Voicemail.
Touch Personalize voicemail to adjust your voicemail greeting.
Touch Display name to enter a name or a number that is attached to your outgoing
voicemails as part of an identification string.
Touch Check for update to search for an upgrade to your visual message software.
Touch About Voicemail to view information about the Visual Voicemail application,
such as the version.
Automatically Enable the Speakerphone
Every time you access a message from your Visual Voicemail list, you can configure your phone
to automatically turn on the speakerphone so you can clearly hear the message.
1. Touch Apps > Voicemail.
2. Touch Menu > Settings > Speakerphone to activate the feature. You will see a light
blue check mark on the right.
► To deactivate the speakerphone, touch Speakerphone again. The checkmark will
disappear.
Changing your Main Greeting via the Voicemail Menu
Your main greeting can be changed directly via the Visual Voicemail system, This direct access
saves you from having to navigate within the voicemail menu.
Sprint Basics 57
Page 68

1. Touch Apps > Voicemail.
06/06/2012
FCC
2. Touch Menu > Settings > Personalize voicemail.
3. Touch OK to connect to the Sprint voicemail system. Follow the prompts to change your
current greeting.
Edit the From Name vial the Voicemail Menu
1. Touch Apps > Voicemail.
2. Touch Menu > Settings > Display name.
3. Touch the existing identification field and enter a new identifying name or number (used
to identify you to recipients of your voice messages
4. Touch OK to save your information.
Traditional Voicemail
Set Up Your Voicemail
To set up voicemail, see Set Up Voicemail.
Voicemail Notification
When you have a new voicemail, shows at the top of your screen.
Retrieve Your Voicemail Messages
When you have a new voicemail, shows at the top of your screen. To hear the message,
touch Phone to open the dial screen, and then touch and hold
If you need to change your voicemail number, in the home screen, touch Menu > Settings >
Call settings > Voicemail settings.
.
Accounts
Setting Up Accounts
► To add other messaging accounts, touch Apps > Settings > Accounts & sync
> Add account.
Corporate Sync is for Exchange server work email accounts. Enter details from your
IT administrator.
Tip: You might need to enter your domain name with your user name (like
domain/username).
Email is for most personal email accounts. For account details, contact the account
provider.
Sprint Basics 58
Page 69

Gmail™ and Google™
06/06/2012
FCC
You will need a Google account to access several phone features such as Gmail, Google
Maps™, Google Talk™, and Google Play Store™ apps. Before you can use Google apps, you
need to enter your account information. These apps sync between your phone and your online
Google account.
Create a Google Account
If you do not already have a Google account, you can create one online or using your phone.
Create a Google Account Online
1. On your computer, launch a browser and go to google.com.
2. Click Sign in > Create an account now and follow the instructions to create your free
account.
3. Check your email for a message from Google confirming your account. Respond to the
email to activate your account.
Create a Google Account Using Your Phone
1. Touch Apps > Settings > Accounts > Add account.
2. Touch Google > Next > Create.
3. Enter your information, and then touch Next.
4. When prompted, enter and reenter your password.
5. Create a security question and answer, enter a secondary email address to help you
recover your password if you ever lose it, and then touch Create.
6. Follow the prompts to read and accept the Google terms of service.
7. After your phone connects with Google servers, select the items you want to sync with
your phone, and then touch Sync Now.
8. Touch Finish setup, and your phone will sync with the Google servers.
Sign In To Your Google Account
1. Touch Apps > Settings > Accounts > Add account.
2. Touch Google > Next > Sign in.
3. Enter your Google password, and then touch Sign in.
4. After your phone connects with Google servers, select the items you want to sync with
your phone, and then touch Sync Now.
5. Touch Finish setup and your phone will synchronize the selected items.
Sprint Basics 59
Page 70

Access Gmail
06/06/2012
FCC
► Touch Apps > Gmail.
To view more email messages: If the inbox is full, swipe your finger up the screen
to view more messages and conversations.
Read a new email message: Touch the unread message or the conversation with
an unread message (just-arrived items display in bold).
Select messages and conversations: Touch the box before the email or
conversation.
View the Inbox of your other Gmail account: Touch Menu > Settings >
Accounts and then touch the account that you want.
Refresh the inbox: Touch Menu > Refresh.
Send a Gmail Message
1. Touch Apps > Gmail.
2. Touch .
3. Enter the message recipient’s email address in the To field. If you are sending the email
message to several recipients, separate the email addresses with a comma. As you
enter email addresses, any matching addresses from your contacts list are displayed.
Touch a match to enter that address directly.
4. Enter the email subject, and then compose your email.
5. After composing your message, touch .
Read and Reply to Gmail Messages
1. Touch Apps > Gmail.
2. Touch a message.
To Reply or Reply to all, touch or Menu > Reply all, and enter an additional
message.
To Forward a message, Touch Menu > Forward, enter or select recipients, and
then enter an additional message.
3. After composing your message, touch .
Use the Email app to send and receive email from your webmail or other accounts, using POP3
or IMAP. You can also access your Corporate Sync email and other features on your phone.
Sprint Basics 60
Page 71

Add an Email Account (POP or IMAP)
06/06/2012
FCC
1. Touch Apps > Accounts > Add an Account > Email.
2. Enter your existing email account address and password.
3. Select Automatically configure account.
—or—
De-select Automatically configure account to enter server settings manually.
4. Touch Next to enter account settings:
General Settings: Enter your account name, real name, and email address.
Incoming server: Enter your POP or IMAP incoming server information.
Outgoing server: Enter your SMTP server information.
5. Touch OK to set up your account.
Add a Corporate Sync Account
1. Touch Apps > Settings > Accounts > Add account.
2. Touch Corporate Sync.
3. Enter the Corporate Sync account details and then touch Next.
4. Select the type of information you want to synchronize and touch Finish setup.
Compose and Send Email
Compose and send email using any account you have set up on your phone. Increase your
productivity by attaching files such as pictures, videos, or documents to your email messages.
1. Touch Apps > Email.
2. Touch .
3. Enter an address or select a contact.
4. Enter a subject, and then compose your message.
5. To add an attachment, touch .
6. Touch the Send to send the message immediately, or Menu > Save draft to send it
later.
View and Reply to Email
1. Touch Apps > Email.
Sprint Basics 61
Page 72

2. Touch the message you want to view.
06/06/2012
FCC
3. Touch the Reply/Forward icon and select Reply or Reply all.
Manage Your Email Inbox
1. Touch Apps
2. Touch the message account you want to view.
3. For a single message account, touch to switch to your Trash, Outbox, or Sent, or
folders.
Refresh an Email Account
Whatever your automatic synchronization settings are, you can synchronize your email
messages manually at any time.
► W hile in the account you want to synchronize, Touch .
Delete Email Messages
1. Touch a message or messages that you want to delete.
2. Touch Menu > Delete.
Edit Email Account Settings
You can edit settings for your individual email accounts, such as email address and password,
name display and signature, frequency of retrieval, and more.
>
Email.
► Touch Apps > Email > .
Delete an Email Account
1. Touch Apps > Settings > Accounts and select the account you want to delete.
2. Touch Remove account to delete it from your phone.
Text Messages and MMS
With Text Messaging (SMS), you can send and receive instant text messages between your
wireless phone and another messaging-ready phone.
Multimedia messages, or MMS, can contain text and pictures, recorded voice, audio or video
files, picture slideshows, contact cards (vCard), or appointments (vCalendar).
See your service plan for applicable charges for messaging.
Compose Text Messages
Compose and send text messages.
1. Touch Apps > Messages > .
Sprint Basics 62
Page 73

2. Enter one or more recipients:
06/06/2012
FCC
Enter phone numbers directly in the To field. If you’re sending the message to
several phone numbers, separate the phone numbers with a comma. As you enter
information, any matching phone numbers from your contacts list are displayed.
Touch a match to enter that number or address directly.
Enter a contact from your list by beginning to type the contact’s name. Touch the
name to enter it.
3. Touch the Compose message field to begin entering your message.
4. Touch the Send icon to send the message.
Send a Multimedia Message (MMS)
1. Touch Apps > Messages > .
2. Enter one or more recipients:
Enter phone numbers directly in the To field. If you’re sending the message to
several phone numbers, separate the phone numbers with a comma. As you enter
information, any matching phone numbers from your contacts list are displayed.
Touch a match to enter that number or address directly.
Enter a contact from your list by beginning to type the contact’s name. Touch the
name to enter it.
3. Touch the Compose message field to begin entering your message.
4. Touch and select an item to insert.
Tip: To send and receive large attachments faster, use Wi-Fi. See Wi-Fi Search and
Connect.
5. Touch the Send to send the message.
Save and Resume a Draft Message
Any message that you do not send is automatically saved as a draft unless you delete it.
To resume composing the message:
1. In the Text Messaging screen, touch the message that you want to resume editing.
2. When you are finished, touch the Send icon.
New Messages Notification
Depending on your notification settings, the phone plays a ringtone, vibrates, or displays an icon
in the status bar when you receive a new text or multimedia message. To change the
notification for new text and multimedia messages, see Text and MMS Options for deta i ls.
Sprint Basics 63
Page 74

To open the message, slide the status bar down to open the Notifications panel. Tap the new
06/06/2012
FCC
message to open and read it.
Text and MMS Options
► Touch Apps > Messages > Menu > Settings for options.
General Settings
• Message limit: Choose the maximum number of text messages to store in each
conversation thread. (This does not include locked messages.)
• Display suggestions: Show suggestions while composing messages.
• Group message type: Choose whether group messages will be Group
conversations, where everyone can reply to all, or if they will be individual
conversations.
• Send location cards: Uses MMS messaging when inserting a location.
• Message signature: Include a signature at the end of every message.
• Edit signature: Edit your message signature.
• Clear search history: Clears your search history.
• Creation mode restricted: Avoid sending attachments that may not be
supported by the receiving device.
Notification Settings
• Notifications: Set the phone to display message notifications in the status bar.
• Select ringtone: Select a ringtone for message notifications.
• Vibrate: Set the phone to vibrate when a new text or multimedia message
arrives.
Google Talk™
To send and receive instant messages, your phone comes preloaded with Google Talk™.
You can also download an instant messaging app from the Google Play Store™: touch Apps
> Play Store > Apps > Communication, and then choose an app for your provider.
Once you download the app, you’ll see it in the app menu. See App Menu.
Note: Your IM options will depend on your IM provider. To browse instant messaging apps
from your computer, go to android.com/market.
Sprint Basics 64
Page 75

Roaming
06/06/2012
FCC
Roaming Icon
Your phone lets you know when you’re off the Nationwide Sprint Network. Anytime you are
roaming, the phone shows the roaming icon ( ).
Setting Roam Mode
Control your roaming capabilities.
► Touch Apps > Settings > More… > Mobile networks, and then make
selections under CDMA Roaming Settings
Call Guard
Your phone has two ways of alerting you when you are roaming off the Nationwide Sprint
Network: the onscreen roaming icon and Call Guard. Call Guard requires an extra step before
you can place or answer a roaming call. (This extra step is not required when you make or
receive calls on the Nationwide Sprint Network.)
To turn Call Guard on or off:
1. Touch Apps > Settings > More… > Mobile networks > Roaming Guards.
2. Check or uncheck Call Guard under Domestic Roaming and International Roaming.
Note: Call Guard is turned on by default on your phone.
Note: Voice dialing is not available when you are roaming with Call Guard enabled.
Note: If the Call Guard feature is set to On, you need to take extra steps to make and receive
roaming calls.
Data Roam Guard
Depending on service availability and roaming agreements, your phone may be able to access
data services while roaming on certain digital systems. You can set your phone to alert you
when you are roaming off the Nationwide Sprint Network and try to use data services such as
messaging.
Note: Data Roam Guard is turned on by default on your phone.
To set your Data Roam Guard notification:
1. Touch Apps > Settings > More… > Mobile networks > Roaming Guards.
2. Check or uncheck Data Guard under Domestic Roaming and International Roaming.
Sprint Basics 65
Page 76

To use data services when Data Roam Guard is active:
06/06/2012
FCC
► W hen a notification appears informing you that data roam charges may apply, touch
Roam to connect.
Sprint Basics 66
Page 77

Apps and Entertainment
06/06/2012
FCC
Google Play Store™
Download Apps from the Web
Navigation
Google Play Music
Google Play Store™
The Google Play Store is the place to go to find new apps for your phone. Choose from a wide
variety of free and paid apps ranging from productivity apps to games. When you find an app
you want, you can easily download and install it on your phone.
Note: You must first connect to the Internet using your phone’s Wi-Fi, Sprint 4G, or data
connection and you must set up a Google™ account (see Set Up Your Phone) in order
to buy and download apps from the Google Play™ Store.
► Touch Apps > Play Store.
Get all the fun games and cool apps you want. The Google Play Store provides access to
applications created by developers worldwide, so you can find the app you want. If you need
help or have questions about the Google Play Store, touch Menu > Help.
Find and Install Apps
1. Touch Apps > Play Store.
2. When you open the Google Play Store for the first time, you must agree to the terms of
service. Touch Accept to continue.
3. To browse:
Featured apps: Scroll through the list of featured apps when you open the Google
Play Store.
Categories: Touch Apps or Games, and then touch a category. Under a category,
you can filter the apps by Top paid, Top free, or Just in.
Apps recommended by Sprint: Touch Sprint, and then scroll through the list.
Search by name: Touch Search on the Google Play Store home screen, enter
the name or type of app you’re looking for, and then touch Search to the right of
the search box.
Apps and Entertainment 67
Page 78

4. Touch the app you want to install. Then, touch FREE (if app is free) or touch the price.
06/06/2012
FCC
5. If an app you are downloading requires access to your data or control of functions on
your phone, you’ll be asked to give your permission. After selecting FREE, the app will
download. After touching the price, you may be asked to sign in to an additional
Google™ account. Sign in and select Purchase now to proceed. Follow the on-screen
instructions. To see the download progress, open the notifications window.
After you download an app, the icon for that app appears on the App menu. (See App Menu.)
Create a Google Checkout™ Account
You need a Google Checkout account to purchase items from the Google Play Store.
► On your computer, go to checkout.google.com to create a Google Checkout account.
—or—
► The first time you use your phone to buy an item from the Google Play Store, you’re
prompted to enter your billing information to set up a Google Checkout account.
Request a Refund for a Paid App
If you are not satisfied with an application, you can ask for a refund within 24 hours of the
purchase. Your credit card is not charged and the application is uninstalled from your phone.
If you change your mind, you can install the application again, but you can’t request a refund a
second time.
1. Touch Menu > Manage apps > Downloaded.
2. Touch the application to uninstall.
3. Touch Uninstall & refund. Your application is uninstalled and the charge is cancelled.
4. Touch the reason for removing the app, and then touch OK.
Manage or Remove Apps
1. Touch Menu > Manage apps.
2. Touch an app in the list, and then touch Uninstall (for apps you downloaded), Clear
cache, or other options.
Note: To reinstall any downloaded items, touch Apps > Play Store.
Download Apps from the Web
Warning: Apps downloaded from unknown sources can include spyware, phishing, or
viruses that affect your phone, phone performance, and personal data. For
security, download apps only from trusted sites, like Play Store.
Apps and Entertainment 68
Page 79

1. To download apps from any Web page, touch Apps > Settings > Applications
06/06/2012
FCC
> Unknown sources.
2. To launch the browser, touch Browser.
3. Find the app you want to download and touch the download link.
Note: Downloaded apps are stored in your phone’s memory.
Manage Your Downloads
► To view files or apps you’ve downloaded, touch Browser, touch Menu > More >
Downloads.
► To clear your download history, touch Menu > Clear list. To cancel, touch Menu >
Cancel all downloads.
Navigation
Your phone offers a number of location-based navigation programs to help you figure out where
you are and get you where you’re going.
Google Maps™
► Touch Apps > Maps.
Google Maps offers powerful, user-friendly mapping technology and local business
information—including business locations, contact information, and driving directions.
For help, touch Menu > More > Help.
Note: Want to know what’s in your immediate area? Try Google Places™. Touch Apps >
Places to see listing s for Restaurants, ATMs, Gas Stations, and more based on
your current location.
Apps and Entertainment 69
Page 80

Set Your Location Sources
06/06/2012
FCC
Set your phone to determine your location using GPS satellite signals (highly accurate, but uses
battery power) or using the mobile network (less accurate, but conserves battery power ) .
► To set your location source, touch Apps > Settings > Location & security >
Use GPS satellites and/or Use wireless networks.
Find Any Location
1. Touch Menu > Search.
2. Enter text in the search box, like an address, business, or city, and then touch
Search.
Tip: If it’s an address you have visited before, select from the list shown.
3. Touch the location you’re searching for in the results list.
Get Directions
1. Touch Menu > Directions.
2. Enter a starting point address or touch Bookmark and select My current location,
Contacts, or Point on map.
3. Enter an end point address, or touch Bookmark and select Contacts or Points on
map.
4. Select your mode of transport (car, public transport or walk), and then touch Go. Your
directions are shown as a list. To view your directions on a map, touch Show on map.
To have your phone provide turn by turn driving directions, touch Navigate.
5. When you have finished, touch Layers > Clear map.
Select Map Mode
► Touch Layers to select from Map (standard map view), Satellite (m ap with photos),
Traffic (map with traffic conditions).
Touch Layers > Clear Map to clear your selections.
Google Latitude™
See where your friends and family are on Google Maps™. Plan to meet up, check that your
parents got home safely, or just stay in touch.
Don’t worry, your location is not shared unless you agree to it. You need to join Google Latitude,
and then invite your friends to view your location or accept their invitations. When using Google
Maps, touch Menu > Join Latitude. Read the privacy policy and if you agree with it, touch
Agree & Share.
Apps and Entertainment 70
Page 81

Adding and Removing Friends
06/06/2012
FCC
► Touch Apps > Latitude.
To add friends:
1. Touch Menu > Add friends or touch .
2. Touch Select from Contacts, and then touch a contact. Or, touch Add via email
address, and then enter an email address.
3. Touch Yes.
If your friends already use Google Latitude, they’ll receive an email request and a notification. If
they have not yet joined Google Latitude, they’ll receive an email request that invites them to
sign in to Google Latitude with their Google account.
To remove friends:
1. Touch Menu > Latitude to show your friends list, and then touch a friend in your list.
2. Touch Delete.
Sharing Location
When you receive a request to share location details you can choose to:
● Accept and share back: See your friend’s location, and your friend can see yours.
● Accept, but hide my location: See your friend's location, but they can't see yours.
● Don't accept: Location information is not shared between you and your friend.
Hiding Your Location
► To hide your location from a friend, touch Menu > Latitude to show your friends list.
Touch your contact name, and then touch Menu > Edit privacy settings > Hide your
location.
Turning Off Google Latitude
► Touch Menu > Latitude to show your friends list. Touch Menu > Edit privacy
settings > Sign out of Latitude.
Google Play Music
Listen and create playlists anytime with music on your phone.
► Touch Apps
>
Play Music.
Apps and Entertainment 71
Page 82

06/06/2012
FCC
● Go back: When you open a song or artist list, touch in the to p l eft to go back.
● Shuffle or repeat: During a song, touch to show shuffle and repeat at the
bottom. Touch once to repeat the current song list, or twice to repeat only the
current song.
● Volume: Press the volume keys.
Get Music
Note: Copyright – do you have the right? Always follow the rules. See Content Copyright.
Transferring Music from a Windows Computer
1. Using a USB cable, connect your phone to your computer.
2. Flick down the status bar, and make sure that your phone’s USB connection is set to
Media device (MTP).
Note: If the USB connection options do not appear, you can change the settings by touching
Apps > Settings > Storage > Menu > USB computer connection > Media
device (MTP).
3. Your phone’s internal storage or microSD card will appear on your computer as a drive.
You can now copy music files on to your phone’s storage as you would t o any other
drive.
4. When finished, disconnect your phone from your computer.
Apps and Entertainment 72
Page 83

Transferring Music from a Macintosh Computer
06/06/2012
FCC
Note: Mac OS does not natively support Media device (MTP) file transfer. To transfer media
files between your phone and a Mac, you will need to use Android File Transfer. For
more information on Android file transfer see www.android.com/filetransfer.
1. Install Android File Transfer, and then open it.
Note: Once you have used Android File Transfer for the first time, you will no longer need to
open it before connecting your phone. It will open automatically when you connect your
phone to your computer.
2. Using a USB cable, connect your phone to your computer.
3. A window displaying the contents of your phone appears. You can then copy music
files on to your phone.
4. When finished, disconnect your phone from your computer.
Tips and Tricks
● Hide the music player: To use another app while your music plays, touch Home .
To return to the music player, flick down the status bar and touch the song title.
Tip: Control music playback from the home screen by adding the Google Play Music widget.
● Playlists: Touch and hold a song in your library to add it to a playlist or show other
options. To edit, delete, and rename a playlist, touch and hold its name in the music
library.
● Help: to get help or access your Google Play Music with a computer visit
www.google.com/music.
Apps and Entertainment 73
Page 84

Web and Data
06/06/2012
FCC
Wi-Fi
Wi-Fi Hotspot
Browser
YouTube™
Wi-Fi
Wi-Fi provides wir eless Int er net access over distances of up to 300 feet. To use your phone’s
Wi-Fi, you need access to a wireless access point or “hotspot.”
The availability and range of the Wi-Fi signal depends on a number of factors, including
infrastructure and other objects through which the signal passes.
To use a Wi-Fi computer network for even faster Internet access:
► Touch Apps > Settings > Wi-Fi.
Turn Wi-Fi On or Off
► Touch Apps > Settings > Wi-Fi. Drag the Wi-Fi power switch to the right to
turn it on, drag it to the left to turn it off.
Note: To extend battery life, turn off Wi-Fi power when not in use.
Wi-Fi Search and Connect
To find networks in your range
1. Touch Apps > Settings > Wi-Fi.
Web and Data 74
Page 85

2. Turn Wi-Fi to scan. If Wi-Fi is already on, touch Scan. Your phone lists the networks it
06/06/2012
FCC
finds within range.
Tip: To see your phone’s MAC address or other Wi-Fi details, touch Menu > Advanced.
3. Touch a network to connect.
4. If necessary, enter Network SSID, Security, and Wireless password, and touch
Connect. When your phone is connected to the network, the wireless indicator
appears in the status bar.
Tip: When you are in range and Wi-Fi is on, you will automatically reconnect to available
networks you’ve connected to before.
Wi-Fi Modes
For those who like to get a bit more technical, your phone supports the following Wi-Fi modes:
802.11 b, g, n.
Wi-Fi Hotspot
You can set up your phone as a Wi-Fi hotspot to provide portable, convenient internet access
for up to 5 other Wi-Fi enabled devices.
Note: You need to subscribe to Wi-Fi hotspot service to use this feature. Contact Sprint for
details.
Note: You cannot use a Wi-Fi hotspot when your phone is roaming.
Setting up the Hotspot
Note: Risks can be associated with connecting to the public internet. Your phone allows you to
create a 3G Mobile Hotspot, which may be accessible by unauthorized users. It is highly
recommended that you use a password other possible steps to protect your computer
from unauthorized access.
To add security to your Wi-Fi hotspot:
1. Touch Apps > Settings > Tethering & Mobile Hotspot > Mobile Hotspot
settings > Configure Mobile Hotspot if you have already turned it on.
2. Touch a setting to modify it:
SSID: Enter a unique name for your hotspot.
Security: Select the type of security you want, and touch Save: WEP, WPA, or
WPA2. Enter a unique Wireless password. Other users can access your Wi-Fi
hotspot only if they enter the correct password.
Note: WEP is the weakest option because it is highly vulnerable to hacking. WPA2 is
recommended by IEEE.
Web and Data 75
Page 86

Channel: Select a channel that minimizes potential interference. You may need to
06/06/2012
FCC
try different channels after your hotspot is active for a time.
3. Touch Save when the settings are complete.
Activating the Hotspot
► Touch Apps > Settings > Tethering & Mobile Hotspot > Mobile Hotspot.
When your Wi-Fi hotspot is active, other Wi-Fi enabled devices can connect by entering your
hotspot’s SSID, selecting a Security type, and entering the correct Wireless password.
Browser
► To open the browser, touch Apps > Browser.
► To go to a Web page, touch the URL area to enter a Web address.
Your Browser
Web pages look like the following example:
Note: If you can’t connect, contact Sprint.
Connect
Your phone uses the mobile phone network (over the air) or a Wi-Fi connection to automatically
access the Web.
To use a Wi-Fi connection, touch Apps > Settings > Wi-Fi, and drag the power switch
to the left to turn on and search for nearby wireless networks. Touch a network to connect.
Select Links
When you touch a link, your phone outlines it and goes to that page. If you touch and hold the
link, your phone shows options, such as Open in new window or Bookmark link.
See Options
Touch Menu with the browser open to see these options:
Web and Data 76
Page 87

Options
Refresh
Reload the current page.
Back/Forward
Navigate to previously viewed pages.
Homepage
View the browser windows that are currently open.
Bookmarks
See your bookmarks.
Back/Forward
Navigate to previously viewed pages.
Save to bookmarks
Bookmark the current webpage.
Share page
Share page via Bluetooth, Email, and more.
Find on page
Find a word or phrase on current website.
Request desktop site
Open the standard desktop website instead of the
mobile version.
Save for offline reading
Save current webpage for offline viewing.
Settings
Open page and privacy settings.
Print
Print the current webpage.
Exit
Close the browser app.
06/06/2012
FCC
Go to a Specific Website
To enter a URL (Web address):
1. Touch the URL field at the top of the browser screen.
2. Use the keyboard to type the address. If the website you want appears within the
suggested sites list, tap the entry to begin surfing.
3. Press Enter.
Adjust Browser Settings
You can change the page settings for your browser, including default zoom level, pop-up
blocking, display options, setting your home page, and more.
1. Touch Browser > Menu > More > Settings.
Web and Data 77
Page 88

2. Choose from these options:
06/06/2012
FCC
General: Set the homepage and auto-fill setting.
Privacy & security: Manage the browser’s privacy and security settings..
Accessibility: Set browser accessibility features such as text size and zoom.
Advanced: Manage advanced browser features such as blocking pop-ups and
default zoom.
Bandwidth management: Set how your browser manages images and search result
preloading.
Labs: Set up Quick controls and Fullscreen mode..
YouTube™
Share videos with YouTube users everywhere. You don’t need a YouTube account to browse
and view videos.
► Touch Apps > YouTube.
Note: If you want a YouTube account, go to youtube.com.
To sign in to your YouTube account:
1. Touch Apps > YouTube > Accounts > Add account.
2. Touch your Google Account or touch Add account to enter your information.
Web and Data 78
Page 89

Sprint Worldwide W ireless Service
06/06/2012
FCC
Getting started with Sprint Worldwide Service
Activating Global Roaming Mode
Making and Receiving Worldwide Calls
Sprint Voicemail Service
International Data Roaming
International Data Roaming
Contacting Sprint
Getting started with Sprint Worldwi de Service
Before using your device in global roaming mode, you must activate Sprint Worldwide
Service.
To activate Spri nt Wor ldwi d e servi c e:
► Chat with or email an international support rep by visiting www.sprint.com/international
and clicking the Chat with us or Email us link on the right side of the screen.
► Call Sprint Worldwide customer support at 1-888-226-7212, option 2.
Activating Global Roami ng M ode
Your phone is designed to enter global roaming mode automatically when you activate your
Sprint Worldwide service, meaning that it should automatically connect to an appropriate CDMA
network or GSM/UMTS network when you travel. You may also set global roaming options
through the settings menu.
To set your global roaming options manually:
► Touch Apps > Settings > More… > Mobile networks > Network Mode.
To allow connections to the Nationwide Sprint Network only, touch Sprint Only.
To allow connections to CDMS networks only, touch Any CDMA.
To allow connections to GSM or UMTS networks only, touch Any GSM/UMTS.
To allow connections to available CDMA or GSM/UMTS networks, touch Automatic.
Sprint Worldwide Wireless Service 79
(This is the recommended setting.)
Page 90

Making and Receiving Worldwide Calls
06/06/2012
FCC
When travelling on international networks, you can place and answer calls as you would on the
Sprint network (see Make Phone Calls and Receive Phone Calls), although some additional
instructions may be required to place a call. Some features and services are not available in all
countries. For more information on services that are available while roaming, visit
www.sprint.com/sww.
Making Calls Using Plus (+) Code Dialing
Placing calls from one country to another country is simple with the Plus (+) Code Dialing
feature. When placing international calls, you can use Plus Code Dialing to enter the
appropriate international access code for your location (for example, 011 for international calls
placed from the United States).
Note: Plus Code Dialing is only available when roaming internationally on GSM networks and
on certain CDMA networks in the United States, Canada, and the Caribbean.
International access codes and dialing information are available online at
www.sprint.com/sww.
To use Plus Code Dialing to place an international call:
1. Touch Phone to display the phone dial screen.
2. If you are on the GSM network, touch and hold on the dialpad to insert a “+” on the
phone dial screen. (The “+” symbol automatically inserts the international access code
for the country from which you are calling.)
3. If you are on the CDMA network outside of Canada or the Caribbean, enter the
international access code for the country from which you are calling.
4. Enter the US country code, and then enter the area code and num ber.
5. Touch [Call] to place the call.
Sprint Voicemail Service
Your Sprint voicemail will follow you as you travel. All of you unanswered calls will be forwarded
to your Sprint voicemail. You will need to be sure your voicemail box is already set up and that
you know your voicemail password.
Note: In India, Sprint voicemail is not available while roaming on the GS network; it does wor k
with the CDMA network.
Setting Up Your Voicemail Access Number
To simplify accessing your Sprint Voicemail while traveling, you can set up your voicemail
access number as a People entry. This will make it faster and easier to access your messages
while roaming internationally.
1. Touch People > . Type the contact information (for example “Voicemail”).
Sprint Worldwide Wireless Service 80
Page 91

2. Touch and hold and then touch , your area code, and your wireless phone
06/06/2012
FCC
number.
3. Touch Save.
Accessing Your Voicemail
New Message Indicators
Your voicemail message indicators may be displayed differently when roaming internationally.
● A “Message Waiting” indicator icon or a text message is displayed when a voicemail
message is received.
● You may see “Missed Call” on your screen prior to receiving a message notification.
● You must call voicemail in order to retrieve messages. Follow the instructions on the
previous page to store your voicemail number for easy access.
Retrieving Voicemail Messages
The voicemail retrieval process while travelling is the same as on the Sprint Network; however,
you will be required to enter your voicemail password.
To retrieve your voicemail messages:
1. Touch People, touch the voicemail entry and then touch the number to call it.
2. When your voicemail answers, touch , enter the password and press to
access your voicemail.
Voicemail Troubleshooting
Please keep the following tips in mind when using Sprint voicemail while traveling:
● Some carriers may not support voicemail indicators. It may be necessary to call your
voicemail to see if you have any new messages.
● If you hear the message ”Please enter the number of the subscriber you wi sh to call,”
enter your 10-digit wireless phone number.
International Data Roaming
Sprint Worldwide Wireless Service can also keep you connected via email and Web browsing
when travelling in countries in which Sprint offers data service. Data services are available on
both CDMA and GSM/UMTS networks; check www.sprint.com/sww to determine the services
available where you are travelling.
Note: Prior to using your Sprint Worldwide GSM/UMTS Data Services, you must establish and
utilize your CDMA data services domestically on the Sprint Network.
Sprint Worldwide Wireless Service 81
Page 92

Getting Started with Data Services
Number Not in Service
The number that you entered is not valid.
06/06/2012
FCC
To use Sprint Worldwide Data Services, you will need to have these services activated on your
account.
► To activate, call Sprint Worldwide Customer Support at 1-888-226-7212, option 2.
Representatives are available 24 hours a day, 7 days a week to assist you.
Once your services are activated, you may need to select a GSM data services provider for the
country you are in.
Accessing Your Email and Data Services on GSM/UMTS Networks
To access your email and browse the Web when travelling, you may need to manually select
the carrier that provides Sprint service in your location. You can find a list of carriers for each
country where GSM data service is offered at www.sprint.com/sww. Then, follow the instructions
below to select the appropriate carrier network on your phone.
To select a GSM data service for a specific country:
1. Touch Apps > Settings > More… > Mobile networks.
2. Touch Network Mode, and select Any GSM/UMTS.
3. Under GSM/UMTS Settings, touch Select Network and select a wireless network that
supports Sprint International GSM Data Roaming.
Note: Be sure you have the Allo w GSM Data option checked.
Accessing Your Email and Data Services on CDMA Networks
f data service is available on a CDMA network, then you only need to set the phone to CDMA;
you will not need to select the specific carrier. Selecting a specific carrier is only necessary for
providers on the GSM network. If your device has automatically selected a GSM network while
travelling, then you will need to set the phone to CDMA to access CDMA data services. (See
Activating Global Roaming Mode.) Visit www.sprint.com/swwfor a list of services available in
each country.
Understanding Status Messages
You may receive status messages under certain conditions. Before contacting Sprint Worldwide
Customer Support, note the message, numeric code, and the conditions under which it
appeared. The following table lists and describes the status messages.
Status Messages Message Description
Sprint Worldwide Wireless Service 82
Page 93

Status Messages Message Description
User Not Available
The phone that you called is either busy, out-of-range, or
turned off. Please try again later.
User Not Authorized
The phone that you called is either busy, out-of-range, or
turned off. Please try again later.
Please Try Later
This service is temporarily not available. Please try again
later.
Service Restricted
Service may not be activated properly. Please contact
Sprint Customer Service to report the issue for resolution.
Service Not Available
This feature is not available on the current network.
Emergency Calls Only
Either the service is not activated properly or the current
resolution.
System Busy. Try Later
The system is experiencing heavy traffic. Please try again
later.
Service Conflict
This service cannot be enabled because an incompatible
service has already been turned on.
Please Try Again
An error occurred. Note the error code and try again.
Self Check Error
A fault was detected with your phone. If this error recurs,
note the error and contact Sprint Customer Service.
Self Check Fail
An operational fault was detected with your phone. Note
Customer Service.
Wrong PIN
You have entered an incorrect SIM PIN number. You have
default PIN and PUK.
PIN Blocked. Call Your
An incorrect SIM PIN was entered three consecutive times.
contact Sprint for the default PIN and PUK.
Insert SIM
Your SIM Card is not being detected. Please check to
ensure that you have inserted the SIM Card.
Check SIM Card
Please check your SIM card to make sure it is properly
inserted.
06/06/2012
FCC
network is available for emergency calling only. Adjust your
network settings to check for other available networks. If
service is still not available after adjusting the settings,
contact Sprint Customer Service to report the issue for
the numeric code, turn your phone off, and contact Sprint
only three attempts to enter your PIN. After a third
unsuccessful attempt, your phone will be locked and you
will have to call Sprint Customer Service to have it
unlocked. Sprint sets the default to PIN off; if you elect to
enable the PIN then you will need to contact Sprint for the
Provider
Sprint Worldwide Wireless Service 83
You will be unable to send or receive calls on your phone.
Contact Sprint Customer Service to obtain the PIN
Unblocked Key (PUK) code. Sprint sets the default to PIN
off; if you elect to enable the PIN then you will need to
Page 94

Contacting Sprint
06/06/2012
FCC
If you experience any issues with voice or data services while outside of the United States,
Sprint offers customer support 24 hours a day. In the event that you do experience an issue, try
the following actions:
● First try powering your device off and then back on; this will force your phone to
reregister with the network.
● Try manually selecting another network. Information for selecting networks can be found
in the phone guide.
If neither of these actions resolves your issue, you will need to contact customer service (see
below). When calling to report an issue, the following information will be beneficial in trying to
resolve your issue as quickly as possible:
● Your wireless phone number.
● The city and country you are travelling in.
● Any error message that displays on your phone or that you heard when tr ying to place a
call.
● If the issue is with data, were you able to place voice calls?
● If the issue is with voice service, were you able to access data?
Please call the numbers below if you need assistance:
While in the United States:
● Call 1-888-226-7212, opti on 2.
While traveling outside the United States:
● In GSM mode: touch and hold 0 and then dial 1-817-698-4199, option 3.
● In CDMA mode: enter the country code and then dial 1-817-698-4199, option 3.
There is no charge for this call from your wireless phone.
From a landline phone when outside the United States:
Sprint Worldwide Customer Support can be reached from a landline phone at 1-817-698-4199,
option 3. Access or connection fees may apply. The toll free numbers below can also be used
to contact Sprint Worldwide Customer Support in the following countries:
Sprint Worldwide Wireless Service 84
Page 95

Country From Landline Phone
06/06/2012
FCC
Caribbean (Anguilla, Barbados, Cayman Islands, and Dominica)
France
Germany
Italy
Mexico
Trinidad and Tobago
United Kingdom
Note: This toll free service is available on ordinary landline phones and some public pay
phones. This service does not cover and hotel access charges.
1-88-226-7212
0800-903200
0800-180-0951
800-787-986
001-877-294-9003
1-800-201-7545
0808-234-6616
Sprint Worldwide Wireless Service 85
Page 96

Important Safety Information
06/06/2012
FCC
General Precautions
Battery Use & Safety
Battery Charging
Third Party Accessories
Driving Precautions
Seizures/Blackouts
Caution About High Volume Usage
Repetitive Motion
Children
Glass Parts
Operational Warnings
Radio Frequency (RF) Energy
Specific Absorption Rate (IEEE)
Information from the World Health Organization
European Union Directives Conformance Statement
FCC Notice to Users
Industry Canada Notice to Users
Location Services
Navigation
Smart Practices While Driving
Privacy & Data Security
Use & Care
Recycling
California Perchlorate Label
Important Safety Information 86
Page 97

Hearing Aid Compatibility with Mobile Phones
06/06/2012
FCC
Software Copyright Notice
Content Copyright
Open Source Software Information
Export Law Assurances
Product Registration
Service & Repairs
Owner’s Record
Copyright & Trademarks
This phone guide contains important operational and safety information that will help you safely
use your phone. Failure to read and follow the information provided in this phone guide may
result in serious bodily injury, death, or property damage.
General Precautions
There are several simple guidelines to operating your phone properly and maintaining safe,
satisfactory service.
● To maximize performance, do not touch the bottom portion of your phone where the
internal antenna is located while using the phone.
● Speak directly into the mouthpiece.
Note: For the best care of your phone, only Sprint-authorized personnel should service your
phone and accessories. Failure to do so may be dangerous and void your warrant y.
Maintaining Safe Use of and Access to Your Phone
Do Not Rely on Your Phone for Emergency Calls
Mobile phones operate using radio signals, which cannot guarantee connection in all conditions.
Therefore you should never rely solely upon any mobile phone for essential communication
(e.g., medical emergencies). Emergency calls may not be possible on all cellular networks or
when certain network services or mobile phone features are in use. Check with your local
service provider for details.
Following Safety Guid eli nes
To operate your phone safely and efficiently, always follow any special regulations in a given
area. Turn your phone off in areas where use is forbidden or when it m ay cause interfer ence or
danger.
Important Safety Information 87
Page 98

Turning Off Your Phone Before Flying
06/06/2012
FCC
Turn off your phone before boarding any aircraft. To prevent possible interference with aircraft
systems, the U.S. Federal Aviation Administration (FAA) regulations require you to have
permission from a crew member to use your phone while the plane is on the ground. To prevent
any risk of interference, FCC regulations prohibit using your phone while the plane is in the air.
Battery Use & Safety
The following battery use and safety information applies to all Motorola mobile devices. If your
mobile device uses a non-removable main battery (as stated in your product information),
details related to handling and replacing your battery should be disregarded—the battery should
only be replaced by a Motorola-approved service facility, and any attempt to remove or replace
your battery may damage the product.
Important: Handle and store batteries properly to avoid injury or damage. Most battery
safety issues arise from improper handling of batteries, and particularly from the
continued use of damaged batteries.
DON’Ts
● Don’t disassemble, crush, puncture, shred, or otherwise attempt to change the
form of your battery.
● Don’t use tools, sharp objects, or excessive force to insert or remove the battery
as this can damage the battery.
● Don’t let the mobile device or battery come in contact with liquids.* Liquids can get
into the mobile device’s circuits, leading to corrosion.
● Don’t allow the battery to touch metal objects. If metal objects, such as jewelry, stay
in prolonged contact with the battery contact points, the battery could become very hot.
● Don’t place your mobile device or battery near a heat source.* High temperatures
can cause the battery to swell, leak, or malfunction.
● Don’t dry a wet or damp battery with an appliance or heat source, such as a hair
dryer or microwave oven.
DOs
● Do avoid leaving your mobile device in your car in high temperatures.*
● Do avoid dropping the mobile device or battery.* Dropping these items, especially on
a hard surface, can potentially cause damage.*
● Do contact your service provider or Motorola if your mobile device or battery has
been damaged in any of the ways listed here.
Important Safety Information 88
Page 99

Note: * Always make sure that any battery, connector and compartment covers are closed and
06/06/2012
FCC
secure to avoid direct exposure of the battery to any of these conditions, even if your
product information states that your mobile device can resist damage from these
conditions.
Important: Motorola recommends you always use Motorola-branded batteries and
chargers for quality assurance and safeguards.
Motorola’s warranty does not cover damage to the mobile device caused by non-Motorola
batteries and/or chargers. To help you identify authentic Motorola batteries from non-original or
counterfeit batteries (that may not have adequate safety protection), Motorola provides
holograms on its batteries. You should confirm that any battery you purchase has a “Motorola
Original” hologram.
If you see a message on your display such as Invalid Battery or Unable to Charge, take the
following steps:
● Remove the battery and inspect it to confirm that it has a “Motorola Original” hologram;
● If there is no hologram, the battery is not a Motorola battery;
● If there is a hologram, replace the battery and try charging it again;
● If the message remains, contact a Motorola authorized service center.
Warning: Use of a non-Motorola battery or charger may present a risk of fire, explosion,
leakage, or other hazard.
Proper and safe battery disposal and recycling: Proper battery disposal is not only important
for safety, it benefits the environment. You can recycle your used batteries in many retail or
service provider locations. Additional information on proper disposal and recycling can be found
at motorola.com/recycling.
Disposal: Promptly dispose of used batteries in accordance with local regulations. Contact your
local recycling center or national recycling organizations for more information on how to dispose
of batteries.
Warning: Never dispos e of batter ies in a fire because they may explode.
Battery Charging
Notes for charging your product’s battery:
● During charging, keep your battery and charger near room temperature for efficient
battery charging.
● New batteries are not fully charged.
Important Safety Information 89
Page 100

● New batteries or batteries stored for a long time may take more time to charge.
06/06/2012
FCC
● Motorola batteries and charging systems have circuitry that protects the battery from
damage from overcharging.
Third Party Accessories
Use of third party accessories, including but not limited to batteries, chargers, headsets, covers,
cases, screen protectors and memory cards, may impact your mobile device’s performance. In
some circumstances, third party accessories can be dangerous and may void your mobile
device’s warranty. For a list of Motorola accessories, visit motorola.com/products.
Driving Precautions
Responsible and safe driving is your primary responsibility when behind the wheel of a vehicle.
Using a mobile device or accessory for a call or other application while driving may cause
distraction, and may be prohibited or restricted in certain areas – always obey the laws and
regulations on the use of these products.
While driving, NEVER:
● Type, read, enter or review texts, emails, or any other written data.
● Surf the Web.
● Input navigation information.
● Perform any other functions that divert your attention from driving.
While driving, ALWAYS:
● Keep your eyes on the road.
● Use a handsfree device if available or required by law in your area.
● Enter destination information into a navigation device before driving.
● Use voice activated features (such as voice dial) and speaking features (such as audible
directions), if available.
● Obey all local laws and regulations for the use of mobile devices and accessories in the
vehicle.
● End your call or other task if you cannot concentrate on driving.
Remember to follow the “Smart Practices While Driving” in t his guide and at
motorola.com/callsmart (in English only).
Important Safety Information 90
 Loading...