

Page 1
MOTOROLA XT621
08/02/2012
FCC
EN
Page 2
08/02/2012
FCC
Page 3
Congratulations
08/02/2012
FCC
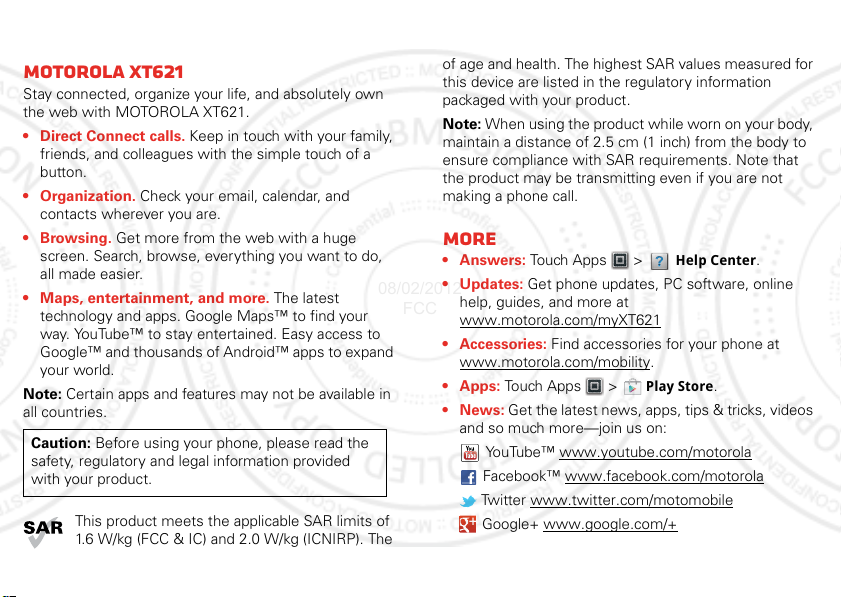
MOTOROLA XT621
Stay connected, organize your life, and absolutely own
the web with MOTOROLA XT621.
• Direct Connect calls. Keep in touch with your family,
friends, and colleagues with the simple touch of a
button.
• Organization. Check your email, calendar, and
contacts wherever you are.
•Browsing. Get more from the web with a huge
screen. Search, browse, everything you want to do,
all made easier.
• Maps, entertainment, and more. The latest
technology and apps. Google Maps™ to find your
way. YouTube™ to stay entertained. Easy access to
Google™ and thousands of Android™ apps to expand
your world.
Note: Certain apps and features may not be available in
all countries.
Caution: Before using your phone, please read the
safety, regulatory and legal information provided
with your product.
This product meets the applicable SAR limits of
1.6 W/kg (FCC & IC) and 2.0 W/kg (ICNIRP). The
limits and guidelines include a substantial safety margin
designed to assure the safety of all persons, regardless
of age and health. The highest SAR values measured for
this device are listed in the regulatory information
packaged with your product.
Note: When using the product while worn on your body,
maintain a distance of 2.5 cm (1 inch) from the body to
ensure compliance with SAR requirements. Note that
the product may be transmitting even if you are not
making a phone call.
More
•Answers: Touch Apps > Help Center.
• Updates: Get phone updates, PC software, online
help, guides, and more at
www.motorola.com/myXT621
• Accessories: Find accessories for your phone at
www.motorola.com/mobility.
• Apps: Touch Apps > Play Store.
•News: Get the latest news, apps, tips & tricks, videos
and so much more—join us on:
YouTube™ www.youtube.com/motorola
Facebook™ www.facebook.com/motorola
Twitter www.twitter.com/motomobile
Google+ www.google.com/+
1Congratulations
Page 4
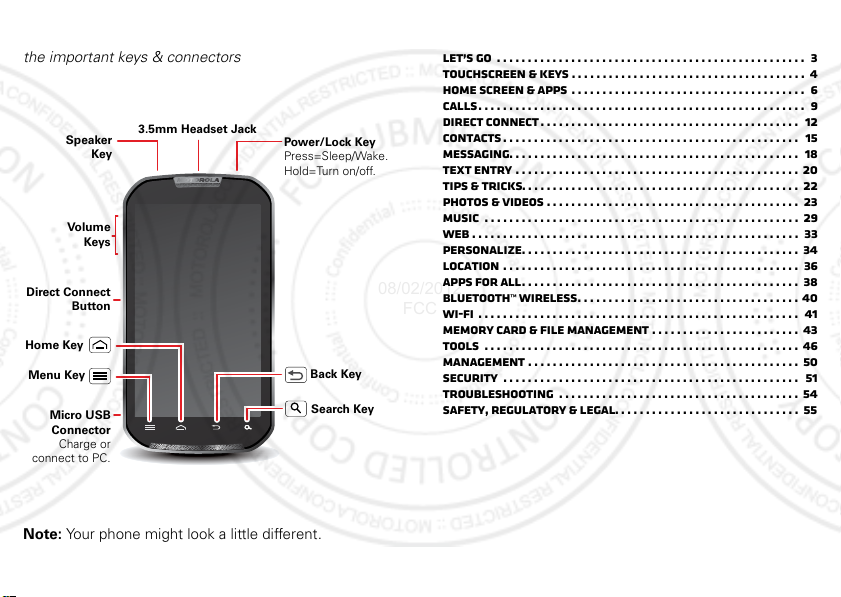
Your phone
Speaker
Key
Home Key
Back Key
Menu Key
Micro USB
Connector
Charge or
connect to PC.
Volume
Keys
Search Key
Direct Connect
Button
Power/Lock Key
Press=Sleep/Wake.
Hold=Turn on/off.
3.5mm Headset Jack
08/02/2012
FCC
the important keys & connectors
Note: Your phone might look a little different.
2 Your phone
Contents
Let’s go . . . . . . . . . . . . . . . . . . . . . . . . . . . . . . . . . . . . . . . . . . . . . . . . . . 3
Touchscreen & keys . . . . . . . . . . . . . . . . . . . . . . . . . . . . . . . . . . . . . . 4
Home screen & apps . . . . . . . . . . . . . . . . . . . . . . . . . . . . . . . . . . . . . . 6
Calls. . . . . . . . . . . . . . . . . . . . . . . . . . . . . . . . . . . . . . . . . . . . . . . . . . . . . 9
Direct Connect . . . . . . . . . . . . . . . . . . . . . . . . . . . . . . . . . . . . . . . . . . 12
Contacts . . . . . . . . . . . . . . . . . . . . . . . . . . . . . . . . . . . . . . . . . . . . . . . . 15
Messaging. . . . . . . . . . . . . . . . . . . . . . . . . . . . . . . . . . . . . . . . . . . . . . . 18
Text entry . . . . . . . . . . . . . . . . . . . . . . . . . . . . . . . . . . . . . . . . . . . . . . 20
Tips & tricks. . . . . . . . . . . . . . . . . . . . . . . . . . . . . . . . . . . . . . . . . . . . . 22
Photos & videos . . . . . . . . . . . . . . . . . . . . . . . . . . . . . . . . . . . . . . . . . 23
Music . . . . . . . . . . . . . . . . . . . . . . . . . . . . . . . . . . . . . . . . . . . . . . . . . . . 29
Web . . . . . . . . . . . . . . . . . . . . . . . . . . . . . . . . . . . . . . . . . . . . . . . . . . . . . 33
Personalize. . . . . . . . . . . . . . . . . . . . . . . . . . . . . . . . . . . . . . . . . . . . . 34
Location . . . . . . . . . . . . . . . . . . . . . . . . . . . . . . . . . . . . . . . . . . . . . . . . 36
Apps for all. . . . . . . . . . . . . . . . . . . . . . . . . . . . . . . . . . . . . . . . . . . . . 38
Bluetooth™ wireless. . . . . . . . . . . . . . . . . . . . . . . . . . . . . . . . . . . . 40
Wi-Fi . . . . . . . . . . . . . . . . . . . . . . . . . . . . . . . . . . . . . . . . . . . . . . . . . . . . 41
Memory card & file management . . . . . . . . . . . . . . . . . . . . . . . . 43
Tools . . . . . . . . . . . . . . . . . . . . . . . . . . . . . . . . . . . . . . . . . . . . . . . . . . . 46
Management . . . . . . . . . . . . . . . . . . . . . . . . . . . . . . . . . . . . . . . . . . . . 50
Security . . . . . . . . . . . . . . . . . . . . . . . . . . . . . . . . . . . . . . . . . . . . . . . . 51
Troubleshooting . . . . . . . . . . . . . . . . . . . . . . . . . . . . . . . . . . . . . . . 54
Safety, Regulatory & Legal. . . . . . . . . . . . . . . . . . . . . . . . . . . . . . 55
Page 5
Let’s go
B
08/02/2012
FCC
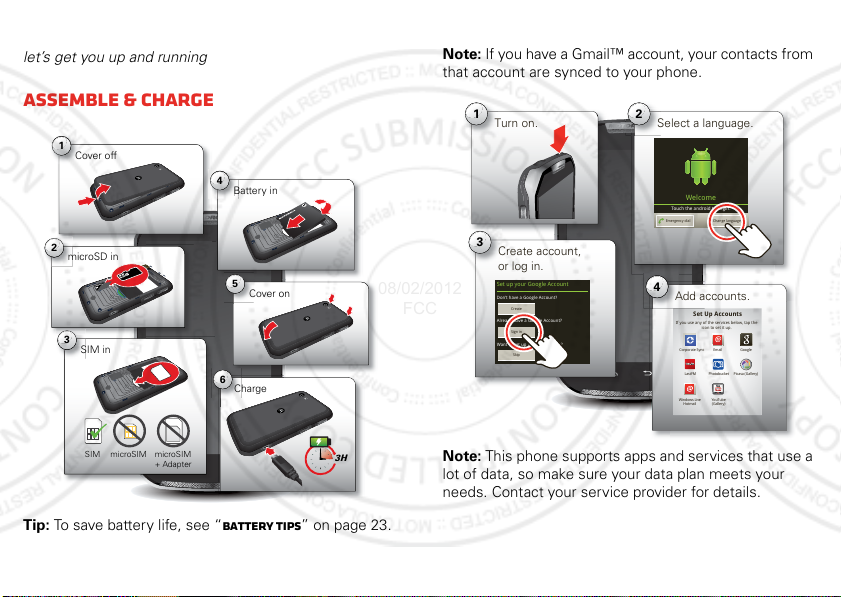
let’s get you up and running
Assemble & charge
1
Cover off
2
microSD in
3
SIM in
4
6
Battery in
5
Cover on
Charge
Set up & go
Note: If you have a Gmail™ account, your contacts from
that account are synced to your phone.
1
Turn on.
3
Create account,
or log in.
Set up your Google Account
Don’t have a Google Account?
Create
Already have a Google Account?
Sign in
Want to set up an account later?
Skip
2
Select a language.
Kim Vonesh
Welcome
Touch the android to begin.
Emergency dial Change language
4
Add accounts.
Set Up Accounts
If you use any of the services below, tap the
Corporate Sync Email Google
Windows Live
Hotmail
icon to set it up.
Photobucket Picasa (Gallery)LastFM
YouTube
(Gallery)
SIM microSIM microSIM
+ Adapter
Tip: To save battery life, see “Battery tips” on page 23.
3H
Note: This phone supports apps and services that use a
lot of data, so make sure your data plan meets your
needs. Contact your service provider for details.
3Let’s go
Page 6
Wi-Fi connect
08/02/2012
FCC
If you want to use a Wi-Fi network for even faster
Internet access, touch Apps > Settings
> Wireless & networks > Wi-Fi settings. Touch Wi-Fi to
search for and connect to wireless networks. There’s
more in “Wi-Fi” on page 41.
Cool content & more
Browse and download thousands of the coolest apps on
the planet from Google Play™ Store. See “Browse &
install apps” on page 38.
Your phone can use a microSD memory card (sold
separately)—you can load it up with photos, videos, and
music from your computer (see “Memory card” on
page 43).
4 Touchscreen & keys
Touchscreen & keys
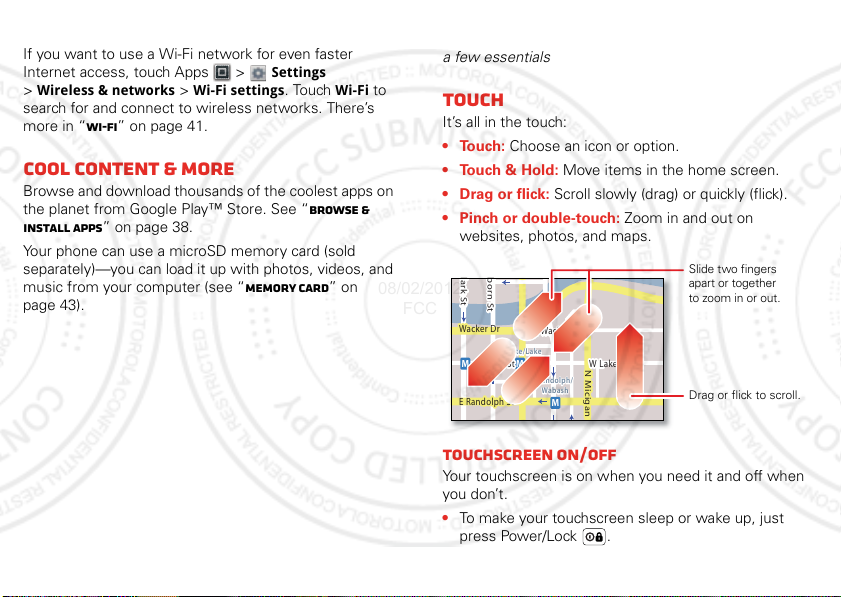
a few essentials
Touch
It’s all in the touch:
•Touch: Choose an icon or option.
• Touch & Hold: Move items in the home screen.
• Drag or flick: Scroll slowly (drag) or quickly (flick).
• Pinch or double-touch: Zoom in and out on
websites, photos, and maps.
lark St
born St
Wacker D r
M
E Randolph St
E Wacker Pl
State/Lake
W Lake St W Lake St
M
Lake
M
Randolph/
Wabash
M
N Micigan
Touchscreen on/off
Your touchscreen is on when you need it and off when
you don’t.
• To make your touchscreen sleep or wake up, just
press Power/Lock .
Slide two fingers
apart or together
to zoom in or out.
Drag or flick to scroll.
Page 7

• When you hold the phone to your ear during calls,
08/02/2012
FCC
your touchscreen sleeps to prevent accidental
touches.
• To change how long your phone waits before the
screen goes to sleep, touch Apps > Settings
> Display > Screen timeout.
• To make the screen lock when it goes to sleep, use
“Screen lock” on page 51. To unlock the screen,
press Power/Lock . Then, drag to the right.
Note: Your touchscreen might stay
dark if the sensor just above it is
covered. Don't use covers or
screen protectors (even clear ones)
that cover this sensor.
Keys
Menu, home, back, & search
Home to show the recent apps you used, then
touch an app to open it.
Touch Search for text search, or touch and hold for
voice search.
Touch Menu to open menu options, or touch
Back to go back.
Power key menu
Press and hold Power/Lock to turn off your phone
(Power off), or turn Airplane mode or Silent mode on or
off.
Volume
Press the volume keys to change the ring
volume (in the home screen) or the
earpiece volume (during a call).
When playing music or video files, press
the volume keys to adjust media volume.
Menu
Key
Home
Key
Touch Home to close any menu or app and return to
the home screen. In the home screen, touch and hold
Search
Key
Back
Key
Rotate the screen
In many apps, the touchscreen can rotate to stay
right-side up when you turn your phone sideways:
Find it: Apps > Settings > Display > Auto-rotate
screen
5Touchscreen & keys
Page 8

Home screen & apps
SCREEN NOT YET AVAILABLE
8
3pm
Budget Meeting
THU
JUL
pm
g
THU
JUL
08/02/2012
FCC
quick access to the things you need most
Quick start: Home screen
The home screen gives you all your latest information in
one place. It’s what you see when you turn on the phone
or touch Home from a menu. It’s basically like this:
Note: Your home screen might look a little different.
6 Home screen & apps
Use & change your home screen
On your home screen, shortcuts are icons that open
your favorite apps, bookmarks, contacts, mail labels, or
music playlists. Widgets show you news, weather,
messages, and other updates right on your homescreen
without having to open a separate app or web page.
• To open something, touch it. Touch Home to
return to the home screen.
Tip: When you open a widget, touch Menu to see
any options or settings (you can choose accounts for
Messages or Calendar widgets).
• To resize Motorola widgets,
touch and hold a corner
until you feel a vibration,
then drag.
• To add something or
change your wallpaper,
touch and hold an empty
spot until you see the Add
to Home screen
menu.
Tip: You can add a folder to organize your shortcuts.
• To change the shortcuts in the dock at the bottom of
the home screen (except Apps ), touch and hold a
shortcut, and select an app from the Add to Dock
menu.
3
Budget Meetin
Page 9

• To move or delete something, touch and hold it until
08/02/2012
FCC
you feel a vibration, then drag it to another spot,
another panel, or the trash at the top of the
screen.
Search
Touch Search , or use a Search widget on your home
screen.
Touch here to enter text.
Touch to search
by voice.
Phone status & notifications
The status bar at the top of the screen has icons that tell
you about messages and phone status.
To view your notifications,
touch the status bar and
drag it down. Touch
a notification to select it.
Tip: To see today’s date,
touch the status bar at the
top of the screen.
Motorola
Priority
Missed call
Rohan Grant
Notifications
New Business Presentation
(2 more reminders)
Taylor Malloy (Facebook)
Dinner Party Invite
Bluetooth active network (full signal)
GPS active network (roaming)
Wi-Fi active airplane mode
downloading sync active
vibrate alarm set
silent battery (charging)
mute call battery (full charge)
DC speaker active DC offline
DC speaker off active DC call
group call alert
invite missed phone call
10:47 am
11:24 am
11:16 am
11:35
Clear
Clear
7Home screen & apps
Page 10

Notification light
All apps
New group
All apps
Recent
Downloaded
View apps by group.
Choose which group
you want to see.
Create a new group.
Find new apps
on Android Market™.
08/02/2012
FCC
No need to wake your screen to see
if you have a message. The
notification light blinks when you
have a new message, email, text
message, an appointment, or your battery is low.
Apps
You can find all of your apps in one place. From the
home screen, touch Apps .
To return to the home screen, touch Home or
Back .
Recent apps
Touch and hold Home to see the most recent apps
you used. Touch an app to open it, or touch Home to
return to the home screen.
Tip: You can also open recent apps. Touch >
8 Home screen & apps
Google Play™ store
One of the great things about a smartphone is the apps.
Whatever you’re into, whatever you want to do, there’s
probably an app that can help you. So, go to the place
that has it all, the Google Play Store.
Find it: Apps > Play Store
If you need help or have questions about the Google
Play Store, touch Menu > Help.
Tip: Choose your apps and updates carefully, as some
may impact your phone’s performance—see “Choose
carefully” on page 39.
Recent.
Page 11

Calls
Dialer Call log
25 matches
ARMONDO SMITH
Mobile (545) 234-4567
Contacts Favorites
Recent Calls List
Touch to open, then touch
an entry to call.
Delete
Touch to delete digits
you entered.
Add to Contacts
Search Results
Voice Dial
Call
Enter a phone number
& touch here to call it.
Moobile555-555-25454
1
Uri
e
g
g
08/02/2012
FCC
it’s good to talk
Dialing options
From the home screen, touch Dialer.
In-call options
Connected
Jen Uriegas
Jen
as
Mobile 555-555-2541
00:12
Call Timer
End Call
Dialpad
Enter numbers during a call.
Add call DialpadEnd call
MuteBluetooth Speaker
Speakerphone
Turn the speakerphone
on or off.
Mute
Mute or unmute the call.
To use a Bluetooth™ device, touch Bluetooth. (Be sure
the device is turned on and paired—see “Connect new
devices” on page 40.)
Note: Using a mobile device or accessory while driving
may cause distraction and may be illegal. Always obey
the laws and drive safely.
Tip: You can touch Home or Back to leave the
active call display. To reopen it, touch Home
9Calls
Page 12

> Dialer, or flick down the Notifications bar and
Answer
Create new message
”Sorry I was unable to
answer your call”
”Please call me again
in a few minutes”
Turn off text message
reply
Ok Cancel
”I will call you back in
a few minutes”
Text Message Reply
Ignore
End call
08/02/2012
FCC
touch the Current Call notification.
Make & answer calls
To make a call, touch Dialer, enter a number, then
touch to make a call.
Tip: If the screen is locked, drag to the right.
To answer a call while the display is active, touch
. When the display is not active, answer by
dragging toward the right.
Note: When you hold the phone to your ear, the display
goes dark to prevent accidental touches. When you
move your phone away from your ear, the display lights
up again.
To ignore a call, touch
when the display is active. Drag
toward the left if the display
is not active.
If you ignore a call, your phone
gives you the option to send a
text message to the caller.
Select a message and touch Ok
to send it or touch Cancel to exit
without sending a message.
You can enable or disable text
message reply for ignored calls, touch Apps >
10 Calls
Settings> Call settings > Text message reply and
check or uncheck the check mark next to Text message
reply
.
To create or edit a preset text message reply, touch Edit
messages
.
End calls
To uc h End Call.
Missed phone call
If you receive a phone call during a push-to-talk call, and
don’t answer it, you’ll receive a missed call notification.
To return the phone call, touch End PTT Call, and then
Return call when prompted. To continue the push-to-talk
call, touch Dismiss.
Recent calls
Find it: Dialer > Call log
• To call a number, touch .
• To send a text message, create a contact, view a
contact, or other options, touch and hold an entry.
• To clear the list, touch Menu > Clear list.
Page 13

Frequent calls
08/02/2012
FCC
Find it: Dialer > Favorites
• To call a number, touch .
• To send a text message, view a contact, or other
options, touch and hold an entry.
• To add a contact to Favorites, select the contact, and
touch the star in the upper right corner. The star turns
green.
Three way calls
To start a conference call, call the first number. After the
call connects, touch Add Call. Dial the next number, or
select it from contacts or favorites. When the next
number answers, touch Merge.
Your phone number
Find it: Apps > Settings > About phone > Status
> My Phone number
Emergency calls
Note: Your service provider programs one or more
emergency phone numbers that you can call under any
circumstances, even when your phone is locked.
Emergency numbers vary by country. Your
pre-programmed emergency number(s) may not work in
all locations, and sometimes an emergency call cannot
be placed due to network, environmental, or
interference issues.
1 To u ch Dialer (if your phone is locked, touch
Emergency Call at the bottom of the screen).
2 Enter the emergency number.
3 Touch to call the emergency number.
Note: Your phone can use location based services (GPS
and AGPS) to help emergency services find you. See
“Location Services” on page 60.
Cool down
In very limited circumstances, such as where your
phone has been exposed to extreme heat, you may see
“Cool Down” messages. To avoid possible damage to
your battery and phone, you should follow these
instructions until the phone is within its recommended
temperature range. When your phone is in “Cool Down”
mode, only emergency calls can be made.
11Calls
Page 14

Direct Connect
08/02/2012
FCC
one or more, talk to them all
Direct Connect calls
Direct Connect calls are calls between two people.
Make and answer Direct Connect calls
To make a Direct Connect call:
• Touch Dialer, and enter the
recipient’s DC (Direct Connect)
number.
• Touch Dialer > Contacts, Call log or
Favorites, and select an entry that has
a DC number.
To talk, press and hold the DC (Direct Connect) Button.
To listen, release the DC Button.
To answer a Direct Connect call, press the DC Button
after the caller has stopped talking.
To add a person to a call, touch Add member.
To end a Direct Connect call, touch End.
12 Direct Connect
Resume DC
You can extend the automatic timeout of a DC call by
about 30 seconds.
Find it: > Settings > Call settings > Direct
Connect settings
> Resume DC
One touch DC
You can customize the DC Button for quick access to
Direct Connect functions.
Find it: > Settings > Call settings > Direct
Connect settings > One Touch DC
Options
Off Turn off One Touch DC.
Launch DC
Contacts List
Launch DC Call
log list
DC selected
contact
DC most recent
number
Open a list of Direct Connect
contacts on your phone.
Open the Direct Connect Call log
list.
Start a Direct Connect call with
the selected contact.
Start a Direct Connect call with
the most recent DC number in
the Call log.
Page 15

Tip: To add a widget for One Touch
One touch PTT:
OFF
08/02/2012
FCC
DC
, touch and hold a blank spot on
your home screen, then touch
Motorola Widgets > One Touch DC.
Alerts
Use alerts to tell someone you want to speak to them.
To send a call alert:
• Touch Dialer, enter a DC number, and press
Menu > Send Alert. When prompted, press the
DC Button.
• Touch Dialer > Contacts, Call log, or Favorites,
and select a contact containing a DC number. Touch
, and press the DC Button when prompted.
When you receive a call alert, you can:
•Answer: Press the DC Button to begin a Direct
Connect call with the sender.
•Later: Store the call alert to Notifications.
•Dismiss: Dismiss the call alert.
Note: Alerts are moved to Notifications after a few
minutes of inactivity. You won’t be able to make
phone calls or Direct Connect calls until the call alert
is moved, or you’ve chosen an option.
Switch from a Direct Connect call to a
phone call
For longer calls, you can switch from a Direct Connect
call to a phone call if the Direct Connect call recipient
has a phone number stored in Contacts.
During a Direct Connect call, Touch Menu > Call
Contact.
Direct Connect permissions
You can choose who can contact you via Direct Connect.
Find it: > Settings> Call settings > Direct
Connect Settings
type
You can set the Permissions type to Block List if you
want to accept all Direct Connect calls, except those
from people whose Direct Connect numbers you’ve
blocked.
Select Allow List if you want to block all Direct Connect
calls, except those from people whose Direct Connect
number you’ve added to your Allow List.
To edit your Block or Allow lists, touch >
Settings> Call settings > Direct Connect Settings >
Permission settings > Block List or Allow List.
Note: You can’t edit or add Direct Connect numbers to
the Allow List when the Permission type is set to Block
> Permission settings > Permissions
13Direct Connect
Page 16

List. If the Permission type is set to Allow List, you can’t
08/02/2012
FCC
edit or add Direct Connect numbers to the Block List.
Tip: You can also add Direct Connect numbers to the
Block or Allow lists from contacts. Touch Dialer >
Contacts > Menu > Block DC or Allow DC.
Group calls
Need to talk to more than one person at a time? With
group calls you can talk to up to many people at a time.
To create a group, touch Dialer > Contacts >
> > DC Group, and select the group members. Touch
Save to save it in your contacts.
Note: If you don’t enter a name for the group, it will be
stored as “Group”.
To make a group call, touch Dialer > Contacts > ,
select the group you wish to call and press the DC
Button.
Tip: You can also begin a group call with an invite. To
send an invite, touch and hold a group to open the
options menu. Touch Send invite. When prompted, push
the DC Button.
Interrupts
When someone else is talking during a Direct Connect
or group call, and you’d like to talk, you can send the
person talking an interrupt request.
14 Direct Connect
To send an interrupt request, a Direct Connect or group
call, touch Menu > Interrupt.
Missed calls, invites, & alerts
If you receive a Direct Connect or group call, an alert, or
an invite while you’re on a call, you’ll receive a missed
DC call notification. To return the missed call, accept the
invite, or reply to the alert, touch Hold current call, and
then press the DC Button.
Direct Connect speaker
You can listen to Direct Connect calls
through your phone’s speaker or earpiece.
Press Speaker to turn the speaker on
or off.
Page 17

Contacts
08/02/2012
FCC
contacts like you’ve never had before
Quick start: Contacts
Find it: Dialer > Contacts
Tip: You can also get to Contacts by touching Apps
> Contacts.
Add a new group.
Dialer Call log FavoritesContacts
Displaying 41 contacts
Alexander Brown
Amit Ming
Al’s Cake Shop
Angel Wang
Ben Miller
Casidy Ambers
Add a new contact.
Search contacts.
Contacts List
Touch to view
contact information.
Touch & hold to edit,
delete, and more.
Press to create,
filter, and sync
contacts.
Transfer contacts
Get all your contacts, all in one place. Here’s a few
helpful hints:
• Use Gmail™
All your Gmail contacts will automatically get synced
to your phone. Various computer apps for mobile
phones and email accounts allow you to export your
contacts as a “.CSV” file. You can then use Gmail to
import the file. For more details, go to
www.motorola.com/transfercontacts or log in to your
Gmail account on your computer and select ”Help”.
• Use a microSD card
You can transfer contacts from your old phone to your
new Motorola phone using your microSD card.
•Use a SIM card
You can transfer contacts from your old phone to your
new Motorola phone using your SIM card.
•More
There are other methods and tools to help you at
www.motorola.com/transfercontacts.
Transfer contacts using your microSD card
1 On your old phone, copy all the contacts you want to
transfer to your microSD card.
15Contacts
Page 18

Tip: For Motorola Android™ phones, Dialer >
08/02/2012
FCC
Contacts > Menu > Manage Contacts > Export
contacts to: SD card.
2 Insert your microSD card in your new phone, see
“Assemble & charge” on page 3.
3 Import the contacts from your microSD card,
touch Dialer > Contacts >Menu > Manage
Contacts
Note: You might have done this during “Set up & go”
on page 3.
Transfer contacts using your SIM card
1 On your old phone, copy all the contacts you want to
transfer to your SIM card.
Tip: For Motorola Android phones, touch Dialer >
Contacts > Menu > Manage Contacts > Export
contacts to: SIM card.
2 Insert your SIM card in your new phone, see
“Assemble & charge” on page 3.
3 Import the contacts from your SIM card, touch
Contacts > Import contacts from: SIM card.
Note: You might have done this during “Set up & go”
on page 3.
16 Contacts
> Import contacts from: SD card.
Dialer > Contacts >Menu > Manage
Call or email contacts
Find it: Dialer > Contacts
For View contact, Call contact, Text contact, or other
options, touch and hold the contact.
View & use contacts
Find it: Dialer > Contacts
Touch a contact to open its details. While viewing
details, you can start a call or message by touching a
phone number or other info.
SORT contacts
To sort contacts or set display options, touch Menu
> Display options and touch:
• Filter by: Choose which types of contacts you want to
see. Select All contacts, Contacts with PTT numbers,
or Contacts with phone numbers.
• Sort list by: Sort by first or last name.
• View contact names as: View contacts as first name
or last name first.
• Choose contacts to display: Select which accounts
will display contacts.
Page 19

Create contacts
08/02/2012
FCC
Find it: Dialer > Contacts >
Add contact
Google contact
from moto@motorola.com
Add a picture.
First name
Last name
Phone
Mobile
Push to Talk
PTT
Email
Home
Phone
PTT
Email
Save Cancel
Touch any entry area to open the touchscreen keypad.
When you’re finished, touch Save.
Where are contacts saved? Your phone saves new
contacts in its memory and on the Google™ Server.
Add another entry.
Open label options.
Remove this entry.
Edit or delete contacts
Find it: Dialer > Contacts
Touch the contact, then touch Menu > Edit contact
or Delete contact.
Contacts from social networks (like Facebook) will
become hidden if you select Delete contact. To view
these contacts, or delete them permanently, use the
social network’s app or Website.
Groups
Find it: Dialer > Contacts > >
You can put your Contacts into a Talkgroup for
push-to-talk calls, or a Message Group to easily send text
messages to a group of people.
Edit Groups
Touch and hold a group to open the options menu. Touch
Edit group.
To add a member, touch , and select a contact.
Tip: You can also add a member to a group during a
group call. Touch Add member.
Note: Adding a new member during a group call creates
a new group. To save this new group, touch Menu
> Save.
Touch to delete a member.
17Contacts
Page 20

Delete Groups
08/02/2012
FCC
Touch and hold a group, then touch Delete group.
18 Messaging
Messaging
sometimes it’s best to text, or IM, or email . . .
Text messages
Read & reply to text messages
Find it: Apps > Text Messaging
• To open a text message and all of its replies, touch it.
• To respond to a message, just open it and enter your
response in the text box at the bottom.
To forward a text message, touch and hold a message
in the conversation, then touch Forward message.
• To open options, touch and hold a message.
Create text messages
Find it: Apps > Text Messaging >
Enter the recipient and message. In text messages and
emails, touch Menu for options, like Insert... or
Attach Files.
Send & receive attachments
To send a file in a text message, open a new message
and touch Menu > Insert....
When you receive a text message with an attachment,
open the message and touch the file name to download
it. Then, touch the name again to open it. Some file
 Loading...