

Page 1

APPLICANT: MOTOROLA MOBILITY, INC. FCC ID: IHDT56NG1
Temporary Confidentiality Requested
Exhibit 8: Draft User’s Manual -- 47 CFR 2.1033(b)(3)
The attached User’s Manual is the final production-intended version of the generic Motorola
International English User Manual. This guide will be adapted to carrier-specific versionsi, but the key
information herein will be retained. Translations into other languages will also be done to support the
needs of other markets. Minor revisions may be made to these manuals, prior to and subsequent to,
placing this product onto the market. Selected portions of the User Guide can be found as indicated
below:
8.1 Safety and Regulatory Section: Part 3, Page 21
8.2 Specific Absorption Rate (SAR) Data: Part 3, Page 24
8.3 Guidance for use with Hearing Aids
(Pursuant to 47 CFR 20.19(f)(1):
Part 3, Page 12, 27
i
Motorola Mobility attests that the User’s Guide provided with product shipping into Canada will provide any required Industry
Canada notices and/or statements in both English and French, per the requirements of RSS-Gen.
Motorola Mobility, Inc.; 8000 W. Sunrise Blvd, Suite A; Plantation, FL 33322, USA www.motorola.com
Page 8 - 1
Page 2
Congratulations
2012.05.29
FCC DRAFT
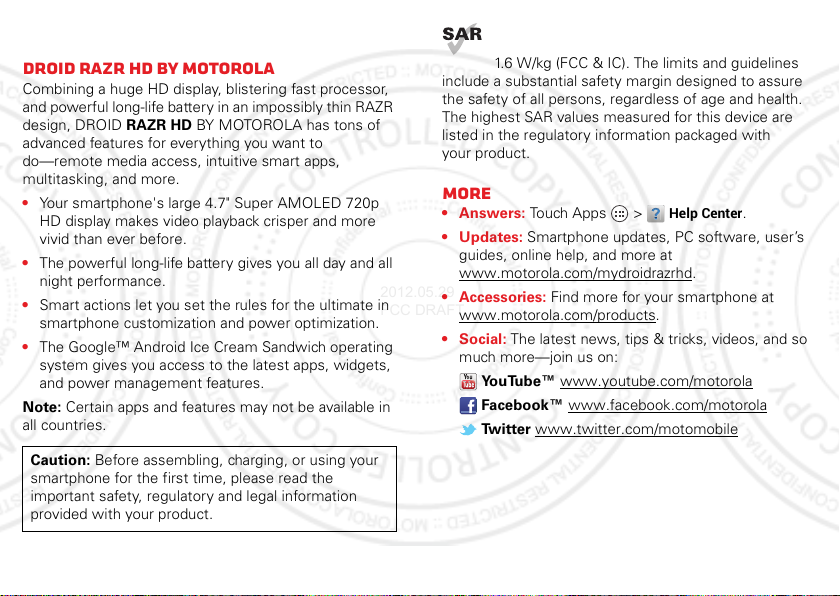
DROID RAZR HD BY MOTOROLA
Combining a huge HD display, blistering fast processor,
and powerful long-life battery in an impossibly thin RAZR
design, DROID RAZR HD BY MOTOROLA has tons of
advanced features for everything you want to
do—remote media access, intuitive smart apps,
multitasking, and more.
• Your smartphone's large 4.7" Super AMOLED 720p
HD display makes video playback crisper and more
vivid than ever before.
• The powerful long-life battery gives you all day and all
night performance.
• Smart actions let you set the rules for the ultimate in
smartphone customization and power optimization.
• The Google™ Android Ice Cream Sandwich operating
system gives you access to the latest apps, widgets,
and power management features.
Note: Certain apps and features may not be available in
all countries.
Caution: Before assembling, charging, or using your
smartphone for the first time, please read the
important safety, regulatory and legal information
provided with your product.
This product meets the applicable limit for
exposure to radio waves (known as SAR) of
1.6 W/kg (FCC & IC). The limits and guidelines
include a substantial safety margin designed to assure
the safety of all persons, regardless of age and health.
The highest SAR values measured for this device are
listed in the regulatory information packaged with
your product.
More
•Answers: Touch Apps >
• Updates: Smartphone updates, PC software, user’s
guides, online help, and more at
www.motorola.com/mydroidrazrhd
• Accessories: Find more for your smartphone at
www.motorola.com/products
• Social: The latest news, tips & tricks, videos, and so
much more—join us on:
Yo u Tu b e ™ www.youtube.com/motorola
Facebook™ www.facebook.com/motorola
Twitter www.twitter.com/motomobile
Help Center
.
.
.
1Congratulations
Page 3
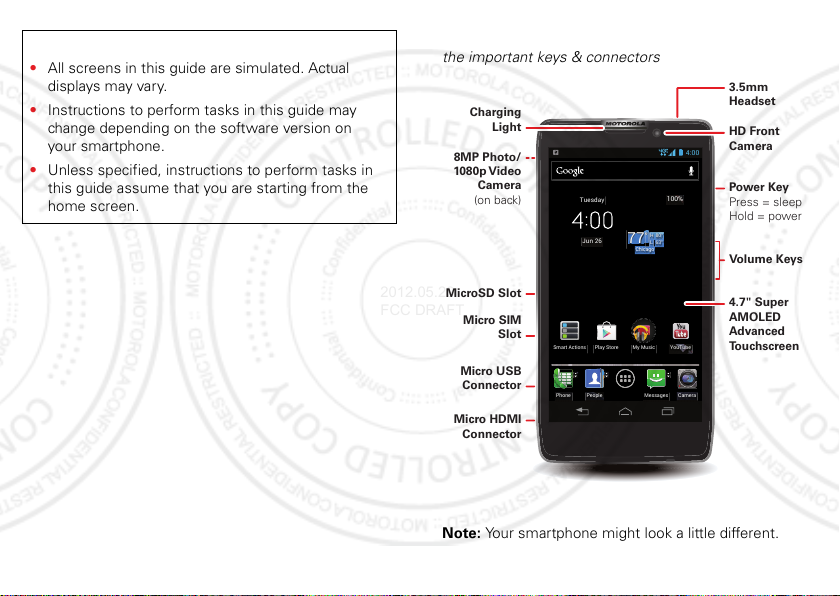
Notes:
63°L
80°H
77
°
Chicago
100%
Jun 26
Tuesday
My Music
PeoplePhone CameraMessages
Smart Actions Play Store YouTube
4:00
Micro USB
Connector
Micro HDMI
Connector
HD Front
Camera
MicroSD Slot
Micro SIM
Slot
Charging
Light
8MP Photo/
1080p Video
Camera
(on back)
Volume Keys
4.7" Super
AMOLED
Advanced
To u chscreen
Power Key
Press = sleep
Hold = power
3.5mm
Headset
2012.05.29
FCC DRAFT
• All screens in this guide are simulated. Actual
displays may vary.
• Instructions to perform tasks in this guide may
change depending on the software version on
your smartphone.
• Unless specified, instructions to perform tasks in
this guide assume that you are starting from the
home screen.
Your smartphone
the important keys & connectors
2 Your smartphone
Note: Your smartphone might look a little different.
Page 4
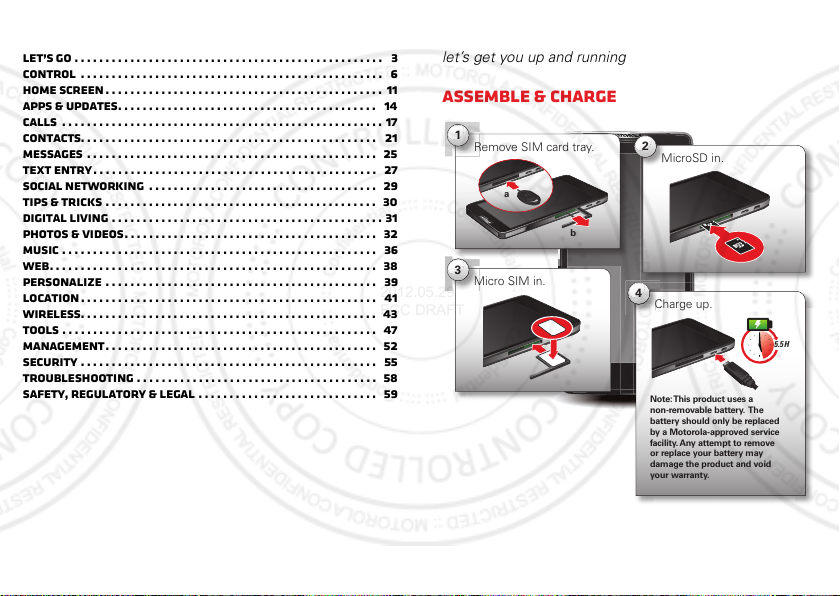
Contents
Micro SIM in.
M
3
MicroSD in.
M
2
Remove SIM card tray.
R
1
b
a
Charge up.
C
4
5.5 H
Note: This product uses a
non-removable battery. The
battery should only be replaced
by a Motorola-approved service
facility. Any attempt to remove
or replace your battery may
damage the product and void
your warranty.
2012.05.29
FCC DRAFT
Let’s go . . . . . . . . . . . . . . . . . . . . . . . . . . . . . . . . . . . . . . . . . . . . . . . . . . 3
Control . . . . . . . . . . . . . . . . . . . . . . . . . . . . . . . . . . . . . . . . . . . . . . . . . 6
Home screen . . . . . . . . . . . . . . . . . . . . . . . . . . . . . . . . . . . . . . . . . . . . . 11
Apps & updates. . . . . . . . . . . . . . . . . . . . . . . . . . . . . . . . . . . . . . . . . . 14
Calls . . . . . . . . . . . . . . . . . . . . . . . . . . . . . . . . . . . . . . . . . . . . . . . . . . . . 17
Contacts. . . . . . . . . . . . . . . . . . . . . . . . . . . . . . . . . . . . . . . . . . . . . . . . 21
Messages . . . . . . . . . . . . . . . . . . . . . . . . . . . . . . . . . . . . . . . . . . . . . . . 25
Text entry . . . . . . . . . . . . . . . . . . . . . . . . . . . . . . . . . . . . . . . . . . . . . . 27
Social networking . . . . . . . . . . . . . . . . . . . . . . . . . . . . . . . . . . . . . 29
Tips & tricks . . . . . . . . . . . . . . . . . . . . . . . . . . . . . . . . . . . . . . . . . . . . 30
Digital living . . . . . . . . . . . . . . . . . . . . . . . . . . . . . . . . . . . . . . . . . . . . 31
Photos & videos. . . . . . . . . . . . . . . . . . . . . . . . . . . . . . . . . . . . . . . . . 32
Music . . . . . . . . . . . . . . . . . . . . . . . . . . . . . . . . . . . . . . . . . . . . . . . . . . . 36
Web. . . . . . . . . . . . . . . . . . . . . . . . . . . . . . . . . . . . . . . . . . . . . . . . . . . . . 38
Personalize . . . . . . . . . . . . . . . . . . . . . . . . . . . . . . . . . . . . . . . . . . . . 39
Location . . . . . . . . . . . . . . . . . . . . . . . . . . . . . . . . . . . . . . . . . . . . . . . . 41
Wireless. . . . . . . . . . . . . . . . . . . . . . . . . . . . . . . . . . . . . . . . . . . . . . . . 43
Tools . . . . . . . . . . . . . . . . . . . . . . . . . . . . . . . . . . . . . . . . . . . . . . . . . . . 47
Management. . . . . . . . . . . . . . . . . . . . . . . . . . . . . . . . . . . . . . . . . . . . 52
Security . . . . . . . . . . . . . . . . . . . . . . . . . . . . . . . . . . . . . . . . . . . . . . . . 55
Troubleshooting . . . . . . . . . . . . . . . . . . . . . . . . . . . . . . . . . . . . . . . 58
Safety, Regulatory & Legal . . . . . . . . . . . . . . . . . . . . . . . . . . . . . 59
Let’s go
let’s get you up and running
Assemble & charge
3Let’s go
Page 5
un2
26
esssd
Tu
4:00
S
ore
e
C
2012.05.29
FCC DRAFT
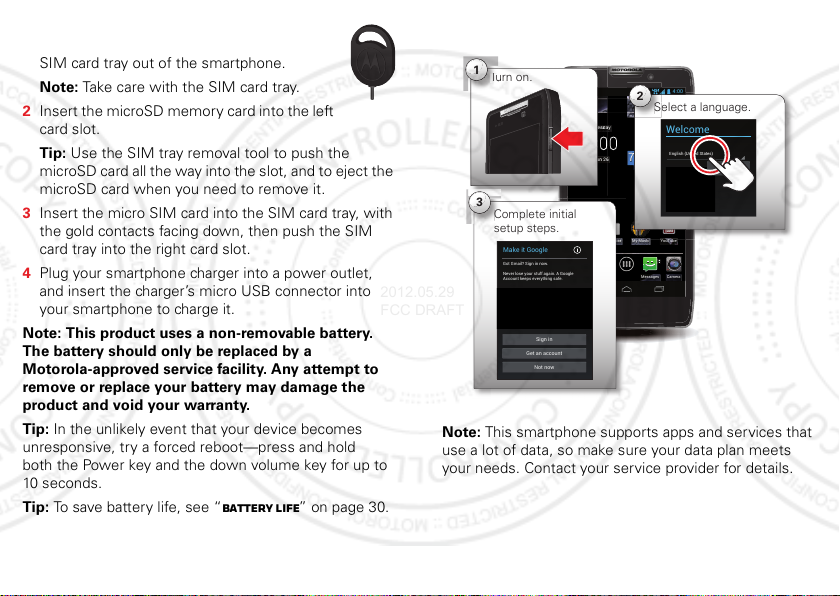
1 Insert the SIM tray removal tool into the hole
to unlock the SIM card tray, then slide the
SIM card tray out of the smartphone.
Note: Take care with the SIM card tray.
2 Insert the microSD memory card into the left
card slot.
Tip: Use the SIM tray removal tool to push the
microSD card all the way into the slot, and to eject the
microSD card when you need to remove it.
3 Insert the micro SIM card into the SIM card tray, with
the gold contacts facing down, then push the SIM
card tray into the right card slot.
4 Plug your smartphone charger into a power outlet,
and insert the charger’s micro USB connector into
your smartphone to charge it.
Note: This product uses a non-removable battery.
The battery should only be replaced by a
Motorola-approved service facility. Any attempt to
remove or replace your battery may damage the
product and void your warranty.
Tip: In the unlikely event that your device becomes
unresponsive, try a forced reboot—press and hold
both the Power key and the down volume key for up to
10 seconds.
Tip: To save battery life, see “Battery Life” on page 30.
4 Let’s go
Set up & go
1
Turn on.
Tuesday
Jun 26
3
Complete initial
setup steps.
Make it Google
Got Gmail? Sign in now.
Never lose your stuff again. A Google
Account keeps everything safe.
Sign in
Get an account
Not now
Smart Actions Play Store YouTube
Phone CameraMessages
People
Note: This smartphone supports apps and services that
use a lot of data, so make sure your data plan meets
your needs. Contact your service provider for details.
4:00
2
Select a language.
100%
Welcome
English (United States)
80°H
°
77
63°L
Chicago
My Music
Start
Page 6
Initial setup
ON
2012.05.29
FCC DRAFT
Create or log in to your Google™ account to get access
to all of your Google services, like Gmail™, Google
Play™, and more. Registration is secure and only takes a
few minutes. Your Gmail contacts are synced to your
smartphone when you log in to your Google account.
To set up additional personal email accounts or a
corporate email account, follow the on-screen
instructions.
For more information about setting up accounts on your
smartphone, see “Manage accounts” on page 53.
2 Install and run the application on your computer.
3 Follow the application instructions on your computer
to transfer information from your old phone to your
Motorola smartphone.
The Welcome Home To Motorola application will prompt
you to connect your old phone to the computer with a
USB cable, and backup the data you want to transfer.
Next, install the Welcome Home To Motorola app on
your Motorola smartphone, connect the smartphone to
your computer with a USB cable, then transfer and
unpack the data onto the Motorola smartphone.
Welcome home to Motorola
Switching from an Apple™ or Blackberry phone? Get all
your important information set up on your new Motorola
smartphone in a few easy steps. The Welcome Home To
Motorola application transfers contacts, email
addresses, calendar meetings, events, tasks, music,
playlists, photos, and videos from your old phone to your
new Motorola smartphone.
To move information from your old phone to your
Motorola smartphone:
1 Use your computer browser to navigate to
www.markspace.com/welcomehome/
the free Microsoft® Windows® or Apple™
Macintosh™ version of the Welcome Home To
Motorola application to your computer.
, and download
Wi-Fi connect
To use a Wi-Fi network for even faster Internet access,
touch the status bar at the top of the home screen and
drag it down. Touch the
notification to select a preferred network.
You can also touch Apps >
touch the
and connect to wireless networks. There’s more
in “Wi-Fi networks” on page 43.
Wi-Fi
power switch to turn it , to scan
Wi-Fi networks available
Settings >Wi-Fi
, then
Wi-Fi enhanced connectivity
Conserve your monthly data allowance by switching
from the Verizon network to a Wi-Fi network for your
Internet connections.
5Let’s go
Page 7
When you use the browser or other Internet apps, your
Slide two fingers
apart or together
to zoom in or out.
Drag or flick to scroll.
2012.05.29
FCC DRAFT
smartphone scans for Wi-Fi networks (even when Wi-Fi
is turned off) and prompts you to switch to a Wi-Fi
network. If you have a usage-based data plan, you can
conserve your monthly data allowance by using a Wi-Fi
connection.
Cool content & more
Browse hundreds of thousands of the coolest apps on
the planet, and download the newest music, movies,
books, magazine, and games, all from Google Play™.
Touch Apps >
Download new apps with “Browse & install apps” on
page 15. You can install a microSD memory card in your
smartphone, and load it up with photos, videos, and
music from your computer (see “Memory card & file
management” on page 52).
Play Store
.
Control
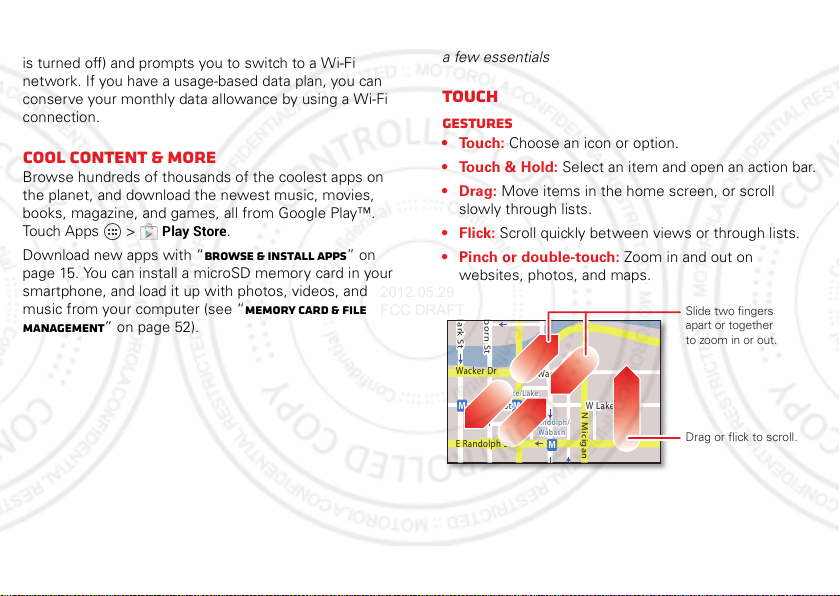
a few essentials
Touch
Gestures
• Touch: Choose an icon or option.
• Touch & Hold: Select an item and open an action bar.
•Drag: Move items in the home screen, or scroll
slowly through lists.
•Flick: Scroll quickly between views or through lists.
• Pinch or double-touch: Zoom in and out on
websites, photos, and maps.
lark St
born St
6 Control
Wacker D r
M
E Randolph St
E Wacker Pl
State/Lake
W Lake St W Lake St
M
Lake
Randolph/
Wabash
M
M
N Micigan
Page 8
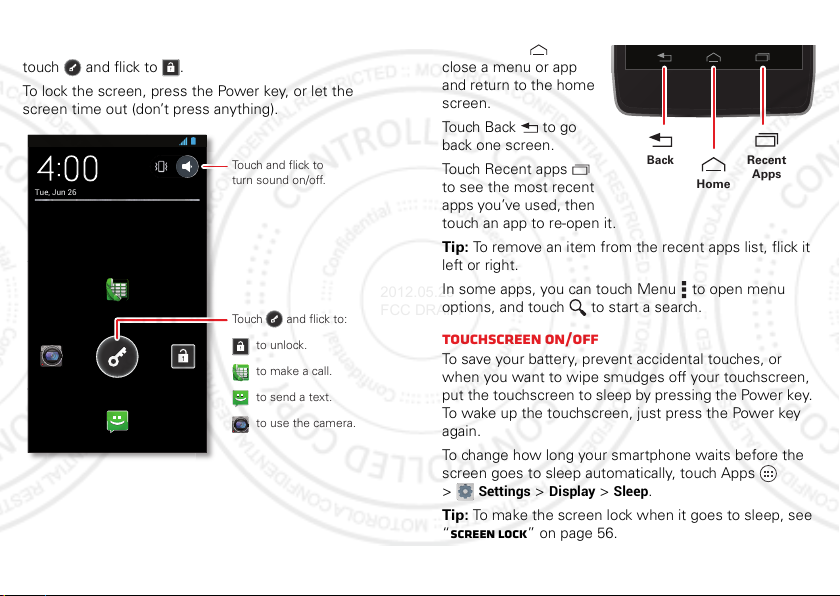
Unlock & lock touchscreen
Tue, Jun 26
Touch and flick to
turn sound on/off.
Touch and flick to:
to unlock.
to use the camera.
to make a call.
to send a text.
2012.05.29
FCC DRAFT
To unlock the screen, press the Power key, then
touch and flick to .
To lock the screen, press the Power key, or let the
screen time out (don’t press anything).
Home, back, recent apps, and menu
Touch Ho m e t o
close a menu or app
and return to the home
screen.
Touch Back to go
back one screen.
Touch Recent apps
to see the most recent
Back
Home
Recent
Apps
apps you’ve used, then
touch an app to re-open it.
Tip: To remove an item from the recent apps list, flick it
left or right.
In some apps, you can touch Menu to open menu
options, and touch to start a search.
Touchscreen on/off
To save your battery, prevent accidental touches, or
when you want to wipe smudges off your touchscreen,
put the touchscreen to sleep by pressing the Power key.
To wake up the touchscreen, just press the Power key
again.
To change how long your smartphone waits before the
screen goes to sleep automatically, touch Apps
Settings >Display >Sleep
>
Tip: To make the screen lock when it goes to sleep, see
“Screen lock” on page 56.
.
7Control
Page 9

Note: Your
2012.05.29
FCC DRAFT
touchscreen m ight stay
dark if the sensor just
above it is covered.
Don't use covers or
screen protectors (even clear ones) that cover
this sensor.
Rotate the screen
When you turn your smartphone, the touchscreen can
rotate to stay right-side up:
Find it: Apps >
screen
Settings >Display >Auto-rotate
Press
Power key menu
Press and hold the Power key to turn off your
smartphone (
and put the smartphone into low-power
turn
setting.
8 Control
Power off
Airplane mode
), turn off all wireless connections
on and off, or change the sound
Sleep
mode,
Volume keys
Press the volume keys to change
ring volume (in the home screen) or
earpiece volume (during a call).
When playing music or videos, press
the volume keys to adjust media
volume.
Tip: When your smartphone rings,
press a volume key to quickly silence
your ringtone.
Speak
Voice actions
You can do a lot of things just by talking to your
smartphone—call or text your friends, get directions, set
an alarm, and more.
1 Touch in the Google™ Search widget in the home
screen.
2 Say what you want to do.
If voice actions doesn’t understand what you said, it
shows a list of search terms and actions you can touch
to choose.
Some actions, like “send email” and “note to self,”
prompt you to complete the action by saying or typing
more information.
Page 10

Voice Action Commands
2012.05.29
FCC DRAFT
Say Followed by
words you
Example: “Motorola accessories.”
want to
search for
contact
name
Example: “Mike LeBeau” (opens
Mike’s contact card).
“Call” Contact name & optionally, “home”,
“mobile”, or “work.”
Example: “Call Mike LeBeau at
home.”
“Call” Digits of a phone number.
Example: “Call 650 555 1234.”
“Call” Business name.
Example: “Call Ruth’s Floral Shop.”
“Map of” Address, name, business name, type
of business, or other location.
Example: “Map of Golden Gate Park,
San Francisco.”
Say Followed by
“Directions
to” or
“Navigate
to”
Address, name, business name, type
of business, or other destination.
Example: “Directions to 1299 Colusa
Avenue, Berkeley, California,” or
“Navigate to Union Square, San
Francisco.”
“Go to” Search string or URL.
Example: “Go to Google.com.”
“Send text”
or “Send
SMS”
“To” & contact names, “Message” &
message text (speak punctuation).
Example: “Send text to Hugh Briss,
subject, new shoes, message, I can’t
wait to show you my new shoes,
period.”
“Send
email”
One or more of: “To” & contact
names, “Cc” & contact names, “Bcc”
& contact names, “Subject” & subject
text, “Message” & message text
(speak punctuation).
Example: “Send email to Hugh Briss,
subject, new shoes, message, I can’t
wait to show you my new shoes,
period.”
9Control
Page 11

Say Followed by
SAVE CANCEL
Meeting Rule
TRIGGERS
ACTIONS
Calendar events
from all calendars
Location
Select a location
Ringer volume
Silent - Vibrate
Touch here to add
Auto reply text
“Auto-reply: In a mtg, I’ll...
See Smart Actions options.
Save your changes.
Add triggers (like events,
times, or places) that
activate the actions.
Deactivate triggers or
actions by dragging them
to the right.
Add actions (like silencing
the ringer) to make them
happen when trigger
conditions are met.
2012.05.29
FCC DRAFT
“Note to
self”
Message text.
Example: “Note to self: remember
the milk.”
“Set alarm” “Time” or “for” & time (such as
“10:45 a.m.” or “20 minutes from
now”), “Label” & name of alarm.
Example: “Set alarm for 7:45 p.m.,
label, switch the laundry.”
“Listen to” Words to search YouTube for (such as
the name of a song, artist, or album).
Example: “Listen to: Black Hole Sun.”
For more information, touch Apps >
Help >Help Center >Tutorial
>
Voice text entry
Touch a text entry field to open the touchscreen keypad.
Touch , then say what you want to type. You can
speak for as long as you like, pause whenever you want,
and dictate punctuation to create correct sentences.
10 Control
Search
.
>
Smart actions
Tired of doing the same tasks over and over again? Let
smart actions do them for you. You can create rules to
do things, like automatically dim the touch screen when
the battery is low, set your ringer to vibrate at work, or
send auto-reply messages when you’re busy.
Find it: Apps >
Touch to create a smart actions rule.
Smart Actions
Page 12

For more information, touch Apps >
2012.05.29
FCC DRAFT
Help
>Menu >
.
Smart Actions
Quick tips
If you’re not sure what to do next, try one of these:
To .. .
Open a text message,
see contact details, or
open items in a list.
See options for
the current screen
(if available).
Select an item and
open an action bar
(if available).
Go back to the home
screen.
Wake up your
smartphone.
Reboot an
unresponsive
smartphone.
Touch the message,
contact, or item.
Touch Menu .
Touch & hold the item.
Touch Ho m e .
Press the Power key.
Press and hold the
Power key and the down
volume key for up to
10 seconds.
Home screen
quick access to the things you need most
Quick start: Home screen
The home screen gives you all your latest information in
one place. It’s what you see when you turn on your
smartphone or touch Home .
4:00
Status Bar
Notifications
Drag this bar down
to see details.
Widgets
Flick left or right to see
more pages of shortcuts
& widgets.
Shortcuts
Touch to open.
Favorites Tray
Touch Apps to see
all your apps & widgets.
Back
Home
Recent Apps
77
Chicago
My Music
100%
80°H
°
63°L
Tuesday
Jun 26
Smart Actions Play Store YouTube
PeoplePhone CameraMessages
11Home screen
Page 13

Note: Your home screen might look a little different.
2012.05.29
FCC DRAFT
Use & change your home screen
Shortcuts on the home screen are icons that open your
favorite apps. Widgets are apps or tools that provide
additional smartphone functionality and live content.
People
Some shortcuts (like
can open by flicking up or down on the shortcut—look
for quick view arrows next to the shortcut.
To see other pages of shortcuts and widgets, flick the
home screen left or right.
• Add, reorder, or delete pages: From your home
screen touch Home . Touch to add a page.
Touch and hold an existing page, then drag it left or
right to reorder. Drag a page up to
• Add shortcuts & widgets: Touch Apps , touch and
hold an app or widget, then drag it to a spot on a
home screen page.
• Create shortcut folders: To create a folder of
shortcuts on your home screen, touch and hold a
shortcut, then drag it on top of another shortcut. To
add more shortcuts, drag them onto the folder. To
name the folder, touch it and enter a name at the
bottom.
• Resize widgets: You can resize some
widgets—touch and hold a widget until you feel a
12 Home screen
) have a quick view that you
Remove
.
vibration, then release. Drag the blue diamonds at the
edges to resize.
• Move or delete shortcuts & widgets: Touch and
hold a shortcut or widget until you feel a vibration,
then drag it to another spot, another page, or
Remove
at the top of the screen.
• Change wallpaper: Touch and hold an empty spot on
the home screen.
Shortcuts in the favorites tray at the bottom of the home
screen appear in all home screen pages. You can drag
shortcuts or folders in or out of the favorites tray (except
Apps ) for inst ant access from any home page.
Search
Touch the Google™ Search widget in the home screen
(or touch Apps >
search text.
As you type, suggestions appear below the search field:
• To search for a suggestion, touch it.
Search
), then start typing your
Touch here to enter text.
Touch to search
by voice.
Page 14

• To add a suggestion to the search field, touch the
4:00
June 26, 2012
New voicemail
Dial *86
10:41 AM
Wi-Fi networks available
Select a Preferred Network
11:20 AM
Jim Somers: Meeting time?
paul.wang.6@gmail.com
11:23 AM
3 new messages
Yahoo!
10:49 AM
3
6
1
2012.05.29
FCC DRAFT
arrow beside it.
• To search for the text in the search field, touch on
the touchscreen keypad.
The browser shows a list of search results.
To set where Google™ Search looks on your
smartphone, touch Menu >
items
. To adjust Google Search privacy settings, touch
Menu >
Settings >Google Search
Settings >Searchable
.
Smartphone status & notifications
Icons at the top right of
the home screen show
status information, like
signal strength, battery
level, and time.
Icons at the top left show
messages and app
notifications. To see your
notifications, touch the
status bar and drag it
down. Touch a
notification to select it.
Tip: To remove a notification from the list, flick it left or
right. To clear all notifications, touch .
Status & notification icons
network (full signal) 4G (fastest data)
Wi-Fi in range Wi-Fi connected
Bluetooth™ on Bluetooth
connected
GPS active warning
USB connected background
data sync
active call missed call
airplane mode microSD card
new text message alarm set
new email calendar event
reminder
new voicemail music player active
vibrate speakerphone on
sound off call muted
battery (charging) downloading
battery (full charge)
Tip: Network and Wi-Fi connection icons turn blue when
your smartphone exchanges data with your Google™
account.
13Home screen
Page 15

Note: Apps you download from Google Play™ may
ALL APPS
WIDGETS
All apps
New group
Downloaded
Frequent
Add to Home
Select the apps screen view.
Choose the app group
you want to see.
Find new apps
on Google Play™.
Create a new app group.
Add app group shortcut
to home screen.
2012.05.29
FCC DRAFT
show other icons in the status bar to alert you to specific
events.
Apps & updates
get the app you want
Quick start: Apps & updates
Touch Apps in any home screen page, then flick left
or right to see all your apps.
All apps
In the apps screen, touch
groups.
to view or create app
14 Apps & updates
To add an app group shortcut to the home screen, touch
its name in the apps screen and touch
Add to home
.
To close the apps screen, touch Home or Back .
Page 16

Browse & install apps
2012.05.29
FCC DRAFT
One of the great things about a smartphone is the apps.
Whatever you’re into, whatever you want to do, there’s
probably an app that can help you. So, go to the place
that has it all, Google Play™ Store, where you can
choose from hundreds of thousands of apps.
Find it: Apps >
Scroll to and touch the app you want to install. Then,
Install
touch
New apps that you install are added to the apps screen.
Tip: Choose your apps and updates carefully, from
trusted sites, like
your smartphone’s performance—see “Choose
carefully” on page 15.
Note: When installing an app, make sure you read the
alerts that tell you what information the app will access.
If you don’t want the app to have access to this
information, cancel the installation.
(if app is free) or
Play Store
Play Store
Buy
.
, as some may impact
To name the folder, touch it and enter a name at the
bottom.
Recent apps
Touch Recent apps to see the most recent apps
you’ve used, then touch an app to re-open it.
Tip: To remove an item from the recent apps list, flick it
left or right.
Manage & restore apps
Touch Ap p s >
Touch an app to see its file size, access permissions, and
other details, then touch
(for apps you downloaded),
To reinstall apps from Google Play, touch Apps
Play Store
>
that you have previously purchased from Google Play are
listed and available for download.
Settings >Apps
Disable, Force stop, Uninstall
Clear cache
, then touch Menu >
.
, or other options.
My Apps
. Apps
Create shortcut folders
You can use home screen folders to logically group and
store your app shortcuts in a single location.
To create a shortcut folder in the home screen, drag one
shortcut onto another to put them both in a folder. To
add other shortcuts, drag them onto the folder icon.
Choose carefully
Apps are great. There's something for everyone. Play,
communicate, work, or have fun. But remember, choose
your apps carefully. Here are a few tips:
• To help prevent spyware, phishing, or viruses from
affecting your smartphone or privacy, use apps from
trusted sites, like
Play Store
.
15Apps & updates
Page 17

• In
2012.05.29
FCC DRAFT
Play Store
comments before installing.
• If you doubt the safety of an app, don't install it.
• Like all apps, downloaded apps will use up memory,
data, battery, and processing power—some more
than others. For example, a simple battery level
widget will use less than a streaming music player
app. After installing an app, if you're not happy with
how much memory, data, battery or processing
power it's using, uninstall it. You can always install it
again later.
• Just like web browsing, you may want to monitor
children’s access to apps to help prevent exposure to
inappropriate content.
• Certain apps may not provide completely accurate
information. Take care, especially when it comes to
personal health.
, check an app’s ratings and
Important customer information
Please be advised that many ser vices and applications
offered through this unique device are provided by
Google™ and various application developers. If you use,
link to, or download a Google service, or an application
such as a non-Verizon Wireless location based GPS-type
service, chat room, marketplace or social network from
this device, you should carefully review the terms of
such service or application. If you use any of these
16 Apps & updates
non-Verizon Wireless services or applications, personal
information you submit may be read, collected, or used
by the service or application provider and/or other users
of those forums.
Motorola Mobility, Inc. and Verizon Wireless are not
responsible for your use of those applications or
information you choose to submit or share with others.
Specific terms and conditions, terms of use, and privacy
policies apply to those applications and services. Please
review carefully any and all terms and conditions
applicable to those applications and services including
those related to any location-based services for any
particular privacy policies, risks or waivers.
Your Verizon Wireless customer agreement terms and
conditions and certain other specifically identified terms
govern your use of any Verizon Wireless products and
services.
Update my smartphone
You can check, download, and install smartphone
software updates using your smartphone, or using your
computer:
Page 18

• Using your smartphone:
DIALER PHONEBOOKRECENT
1 2
ABC
3
DEF
4
GHI
5
JKL
6
MNO
7
PQRS
8
TUV
9
WXYZ
0
Most recent
Victor Harp
June 26, 2012
Mobile 555-555-4570
Add Number to Contacts
Voice Dial
See phone options.
Call
Enter a phone number
& touch here to call it.
Flick the screen left or right
to see dialer, recent calls, or
phonebook.
2012.05.29
FCC DRAFT
You may get an automatic notification of an available
update on your smartphone. Simply follow the
instructions to download and install.
To manually check for updates, touch Apps
Settings >About phone >System updates
>
Your smartphone downloads any updates over your
mobile network. Remember, these updates can be
quite large (25MB or more) and may not be available
in all countries. If you don’t have an unlimited data
plan, or mobile network updates are not available in
your country, you can update using a computer.
• Using your computer:
On your computer, go to
www.motorola.com/myrazrhd
“Software” links. If an update is available, follow the
installation instructions.
and check the
Calls
it’s good to talk
Quick start: Calls
.
In the home screen, touch
Tip: When the smartphone is locked, touch and flick
to .
Dialer
Phone
.
17Calls
Page 19

Tip: Search for contacts right from the dialpad! For
Victor Harp
Mobile (555) 555-4570
00:12
MuteBluetooth Speaker
Add call
DialpadEnd call
Call Timer
End Call
Connect to a Bluetooth
headset or car kit.
Mute/Unmute
Speakerphone On/Off
Add another person
for a conference call.
Enter numbers during a call.
2012.05.29
FCC DRAFT
Jeff
example, to find
in your contacts list, touch 5-3-3-3.
Matching contacts appear above the number field.
During a call
To use a Bluetooth™ device, touch
Bluetooth
. (The
device must be turned on and previously paired—see
“Connect new Bluetooth devices ” on page 44.)
Tip: You can touch Home or Back to leave the
active call display. To reopen it, touch Home
Phone
>
.
Note: Using a mobile device or accessory while driving
may cause distraction and may be illegal. Always obey
the laws and drive safely.
18 Calls
Make & answer calls
To make a call, touch
touch .
Tip: When the smartphone is locked, touch and flick
to to make a call.
Tip: When you hold your smartphone to your ear, the
display goes dark to prevent accidental touches. When
you move the smartphone away from your ear, the
display lights up again.
To answer a call, touch and flick to .
To send an incoming call to your voicemail, touch
and flick to .
Phone
, enter a number, then
Page 20

To send a pre-set text
2012.05.29
FCC DRAFT
message to the caller,
touch and flick to .
Select a message to
immediately send it.
Tip: To silence an incoming
call alert, press the
Power key or the
volume keys.
Can’t talk now. What’s up?
I’ll call you right back.
I’ll call you later.
Can’t talk now. Call me later?
Custom message...
Conference calls
To start a conference call, call the first number. After the
call connects, touch
select it from contacts or favorites. When the next
number answers, touch
Add call
. Dial the next number, or
Merge
.
Your phone number
Find it: Apps >
My Phone number
>
Settings >About phone >Status
Recent calls
Find it:
• To call a number, touch next to the entry.
• To see call details, touch the entry.
• To send a text message, create a contact, view a
• To search the recent calls list, touch .
• To clear the list, touch Menu >
Phone >Recent
contact, or other options, touch and hold the entry.
Clear list
.
Favorites
Find it: Apps >
• To call, text, email, or view contact information, touch
the contact.
• To edit, share, delete, or set a ringtone for a contact,
touch the contact, then touch Menu .
People >FAVORITES
Emergency calls
Note: Your service provider programs one or more
emergency phone numbers that you can call under any
circumstances, even when your smartphone is locked.
Emergency numbers vary by country. Your
pre-programmed emergency number(s) may not work in
all locations, and sometimes an emergency call cannot
be placed due to network, environmental, or
interference issues.
1 Touch
Emergency Call
2 Enter the emergency number.
3 Touch to call the emergency number.
Note: Your phone can use location based services (GPS
and AGPS) to help emergency services find you. See
“Location Services” on page 63.
Phone
(if your smartphone is locked, touch
).
19Calls
Page 21

Cool down
2012.05.29
FCC DRAFT
In very limited circumstances, such as where your
phone has been exposed to extreme heat, you may see
“Cool Down” messages. To avoid possible damage to
your battery and phone, you should follow these
instructions until the phone is within its recommended
temperature range. When your phone is in “Cool Down”
mode, only emergency calls can be made.
More calling features
Feature
speed dial Your phone can store nine phone
voice dial Touch in the Google™ Search
20 Calls
numbers that you can call with a
single keypress. To store a speed
dial number, touch
>Menu >
insert a number in an empty speed
dial slot.
To call a speed dial number, touch
and hold the single-digit speed dial
number in the dialer.
widget, then say the contact name,
business name, or phone number
you want to call.
Speed dial setup
Phone
, and
Feature
international
calls
voicemail To listen to your voicemail
If your smartphone service includes
international dialing, press and hold
to insert your local international
access code (indicated by
enter the country code and phone
number.
messages, touch & hold
dialer.
+
). Then
1
in the
0
Page 22

Contacts
2012.05.29
FCC DRAFT
be a people person
Quick start: Contacts
Find it: Apps >
GROUPS FAVORITESPEOPLE
ME
Set up my profile
A
Abe Baudo
Allie Smyth
Anna Medina
Astrid Fanning
Avery Durning
B
People
297 contacts
A
B
C
D
E
F
G
H
I
J
K
L
M
N
O
P
Q
R
S
T
U
V
W
X
Y
Z
Create & view
groups of contacts.
Contacts List
Touch to view contact
information, call, send a text
message, & more.
Touch a letter to jump to
contact names that start
with that letter.
See more options.
Add contacts.
Search for contacts.
Transfer contacts
Get all your contacts, all in one place. Here are a few
helpful hints:
SM
• Use Backup Assistant
Backup Assistant Plus is a free service from Verizon
Wireless that saves your smartphone’s contacts to a
secure server. If your smartphone is lost or damaged,
or if you upgrade to a new smartphone, Backup
Assistant Plus will restore your contacts. From the
home screen, touch Apps >
Backup Assistant Plus Contacts
>
password.
Note: Backup Assistant Plus is subject to specific
terms of use. Results may vary based on backup
schedule and other factors. See
verizonwireless.com/baplus
• Use Gmail™
When you first set up your smartphone and sign in to
your Google™ account, all your Gmail contacts are
synced automatically with your People app. After that,
your contacts stay in sync whether you make changes
on your smartphone, from another device, or from a
web browser. Most contact applications for mobile
phones and email accounts allow you to export your
contacts as a “.csv” file. You can then use Gmail to
import the file. For more details, go to
Plus
Backup Assistant+
, and then enter your
for more details.
21Contacts
Page 23

www.motorola.com/transfercontacts or log in to your
2012.05.29
FCC DRAFT
Gmail account on your computer and select “Help”.
• More
There are other methods and tools to help you at
www.motorola.com/transfercontacts
.
Link contacts
You might have two or more contacts for the same
person, maybe a Gmail contact who is also stored on
your smartphone, or one friend with two email
addresses. To combine these contacts:
Find it: Apps >
Touch a contact to open it, touch Menu >
>Menu >
Join
People
Edit
, then touch the second contact.
Call or email contacts
Find it: Apps >
• To call a contact, touch the contact’s name, then
touch the number you want to call. To send a text
message, touch next to the number.
• To email a contact, touch the contact’s name, then
touch the contact’s email address.
People
View & use contacts
Find it: Apps >
22 Contacts
People
• To find a contact, touch and type the contact
name.
Touch a contact to open its details. You can start a call
or message by touching the phone number,
message , or email address.
• To change which group of contacts is shown (like
contacts
or contacts from your Gmail account) touch
Menu >
• To change how you view the list of contacts, touch
Menu >
Contacts to display
Settings >Display options
.
.
All
Page 24

Create contacts
your.account@gmail.com
Google contact
SAVE CANCEL
Add contact
PHONE
EMAIL
ADDRESS
EVENTS
Name
Add organization
Add new
Email
Address
Date
MOBILE
HOME
BIRTHDAY
HOME
Phone
Set a contact picture.
Set the number type.
Remove this number.
Set the contact type.
Add another number.
2012.05.29
FCC DRAFT
Find it: Apps >
People
are backed up, and are accessible from every device you
>
use to access your Google account.
Favorites
To add a contact to your favorites list, touch the contact
to open it, then touch .
To see your favorites list:
Find it: Apps >
People >FAVORITES
Edit or delete contacts
Find it: Apps >
Delete
or
People
> contact >Menu >
Edit
Touch any entry area to open the touchscreen keypad.
When you’re finished, touch
Where are contacts saved? Your phone saves new
contacts in its memor y, and syncs them remotely with
your Google™ account. Contacts on the Google Server
Done
.
Synchronize contacts
When you change one of your contacts, your
smartphone automatically updates your other accounts.
When you change a contact in one of your other
accounts, your smartphone updates the contact
information in your
People
app.
23Contacts
 Loading...