

Page 1

FCC Filing Package for Motorola i680 Transceiver FCC ID: IHDT56KD1
Exhibit 8: Draft User’s Manual -- 47 CFR 2.1033(b)(3)
The attached User’s Manual is a draft version, but sufficiently captures the essentials of device
operation. Selected portions of the User Guide can be found as indicated below:
8.1 Part 15B Declaration of Conformity: Page 4
8.2 Safety Section: Page 109
8.3 Specific Absorption Rate (SAR) Data: Page 107
8.4 Guidance for use with Hearing Aids: Page 49, 122
iDEN, Motorola Inc., 600 North US Hwy 45, Libertyville, IL 60048, USA WWW.MOT.COM/iDEN
Page 2

User’s Guide
i680
Page 3

Page 4

DECLARATION OF CONFORMITY
Per FCC CFR 47 Part 2 Section 2.1077(a)
Responsible Party Name: Motorola, Inc.
Address: 8000 West Sunrise Boulevard
Plantation, FL 33322 USA
Phone Number: 1 (800) 453-0920
Hereby declares that the product:
Product Name: i680
Model Number: H85XAH6JR5AN
FCC-ID: IHDT56KD1
Conforms to the following regulations:
FCC Part 15, subpart B, section 15.107(a), 15.107(d) and section 15.109(a)
FCC Notice to Users
The following statement applies to all products that have
received FCC approval. Applicable products bear the FCC logo,
and/or an FCC ID in the format FCC-ID: IHDT56KD1 on the product
label.
Motorola has not approved any changes or modifications to this device by
the user. Any changes or modifications could void the user’s authority to
operate the equipment. See 47 CFR Sec. 15.21.
Class B Digital Device
As a personal computer peripheral, this device complies with part 15 of
the FCC Rules. Operation is subject to the following two conditions: (1)
This device may not cause harmful interference, and (2) this device must
accept any interference received, including interference that may cause
undesired operation. See 47 CFR Sec. 15.19 (3).
Note:
This equipment has been tested and found to comply with the limits for
a Class B digital device, pursuant to part 15 of the FCC Rules. These limits are
designed to provide reasonable protection against harmful interference in a
residential installation. This equipment generates, uses and can radiate radio
frequency energy and, if not installed and used in accordance with the
instructions, may cause harmful interference to radio communications.
However, there is no guarantee that interference will not occur in a particular
installation.
If this equipment does cause harmful interference to radio or television
reception, which can be determined by turning the equipment off and on,
the user is encouraged to try to correct the interference by one or more of
the following measures:
•
Reorient or relocate the receiving antenna.
•
Increase the separation between the equipment and receiver.
•
Connect the equipment into an outlet on a circuit different from
that to which the receiver is connected.
•
Consult the dealer or an experienced radio/TV technician for
help.
Industry Canada Notice to Users
Operation is subject to the following two conditions: (1) This device may
not cause interference and (2) This device must accept any interference,
including interference that may cause undesired operation of the device.
See RSS-GEN 7.1.5.
Page 5

Motorola, Inc.
Consumer Advocacy Office
600 North US Highway 45
Libertyville, IL 60048
www.hellomoto.com
Note:
Do not ship your phone to the above address. If you need to
return your phone for repairs, replacement, or warranty service,
please contact the Motorola Customer Support Center at:
1-800-453-0920 (United States)
1-877-483-2840 (TTY/TDD United States for hearing impaired)
Certain mobile phone features are dependent on the capabilities
and settings of your service provider’s network. Additionally,
certain features may not be activated by your service provider,
and/or the provider's network settings may limit the feature’s
functionality. Always contact your service provider about feature
availability and functionality. All features, functionality, and other
product specifications, as well as the information contained in this
user's guide are based upon the latest available information and
are believed to be accurate at the time of printing. Motorola
reserves the right to change or modify any information or
specifications without notice or obligation.
MOTOROLA and the Stylized M Logo are registered in the US
Patent & Trademark Office. All other product or service names are
the property of their respective owners. Java and all other
Java-based marks are trademarks or registered trademarks of Sun
Microsystems, Inc. in the U.S. and other countries.
© Motorola, Inc., 2009.
Manual Number: NNTN7797A
Page 6

contents
check it out . . . . . . . . . . . 2
menu map. . . . . . . . . . . . 6
use and care . . . . . . . . . . 8
essentials . . . . . . . . . . . . 9
about this guide . . . . . . 9
SIM card. . . . . . . . . . . 10
microSD card . . . . . . . 10
battery . . . . . . . . . . . . 12
turn it on & off . . . . . . 15
enable security . . . . . . 15
make a phone call. . . . 16
answer a phone call . . 16
advanced calling . . . . . 16
make a private call . . . 17
answer a private call . . 18
store a phone number
or private ID . . . . . . . . 19
contacts . . . . . . . . . . . 20
call a stored phone
number or private ID . 20
finding your phone
number and private ID 21
messaging . . . . . . . . . 21
MMS features . . . . . . 22
inbox. . . . . . . . . . . . . . 26
outbox . . . . . . . . . . . . 31
sent items . . . . . . . . . 31
customize messaging. 32
using your handset as
a modem . . . . . . . . . . 38
basics. . . . . . . . . . . . . . . 39
display . . . . . . . . . . . . 39
main menu . . . . . . . . . 40
carousel menu . . . . . . 40
text entry . . . . . . . . . . 41
volume . . . . . . . . . . . . 44
navigation key. . . . . . . 45
handsfree speaker . . . 45
transmitters . . . . . . . . 45
use GPS with map
software . . . . . . . . . . . 45
features for the
hearing impaired. . . . . 46
TTY . . . . . . . . . . . . . . . 47
security features. . . . . 48
main attractions . . . . . . 49
water resistance. . . . . 49
multimedia . . . . . . . . . 49
my music . . . . . . . . . . 54
my images . . . . . . . . . 62
my videos . . . . . . . . . . 63
camera . . . . . . . . . . . . 64
camcorder . . . . . . . . . 67
PTX features . . . . . . . . 69
contents
3
Page 7

one touch PTT . . . . . . . 76
PT manager . . . . . . . . . 78
Bluetooth
®
. . . . . . . . . 79
call features . . . . . . . . . . 83
turn off a call alert . . . . 83
recent calls . . . . . . . . . 83
redial . . . . . . . . . . . . . . 84
caller ID . . . . . . . . . . . . 84
call forward . . . . . . . . . 85
voice names . . . . . . . . 85
emergency calls . . . . . 86
international calls. . . . . 87
speed dial . . . . . . . . . . 87
voicemail . . . . . . . . . . . 87
selective dynamic
group (SDG) calls. . . . . 88
MOTOtalkTM. . . . . . . . . . 92
switching to
MOTOtalk . . . . . . . . . . 93
exiting MOTOtalk. . . . . 93
channels and codes. . . 93
private MOTOtalk calls 96
contents
4
making emergency
calls while in
MOTOtalk
TM
mode . . . 97
setup options. . . . . . . . 98
customize. . . . . . . . . . . 100
ring tones . . . . . . . . . 100
backlight . . . . . . . . . . 101
wallpaper . . . . . . . . . . 101
datebook . . . . . . . . . . 102
hide or show location
information . . . . . . . . 103
reorder apps menu . . 105
Legal and Safety . . . . . 106
Safety and General
Information . . . . . . . . 106
Operational
Precautions . . . . . . . . 107
RF Energy
Interference/
Compatibility . . . . . . . 107
Bluetooth. . . . . . . . . . 108
Caring for the
Environment by
Recycling . . . . . . . . . . 109
Driving Precautions . . 109
Operational Warnings 109
Open Source
Software Information. 111
Service and Repairs. . 112
Export Law
Assurances . . . . . . . . 112
Battery Use and
Safety . . . . . . . . . . . . 112
Battery Charging . . . . 114
Specific Absorption
Rate. . . . . . . . . . . . . . 114
AGPS and
Emergency Calls . . . . 115
Limited Warranty
Motorola
Communications
Products
(International). . . . . . . 116
Page 8

Hearing Aid
Compatibility With
Mobile Phones . . . . . . 119
Information From
the World Health
Organization . . . . . . . 120
Product Registration. 120
Wireless: The New
Recyclable . . . . . . . . 120
California Perchlorate
Label. . . . . . . . . . . . . 121
Patent and
Trademark
Information. . . . . . . . 121
Software Copyright
Notice. . . . . . . . . . . . 121
Privacy and Data
Security . . . . . . . . . . 122
Smart Practices
While Driving . . . . . . 122
index . . . . . . . . . . . . . . 124
contents
5
Page 9

main menu
B
Recent Calls
L
Contacts
• [New Contact]
• [New SDG List
E
Messages
• [Create Message]
•Voice Mail
• Inbox
•Drafts
• Outbox
• Sent Items
•Fax Mail
• Net Alert
1
Web
•Net
j
Multimedia
• Media Center
• My Images
• My Music
• My Videos
•Camera
• Camcorder
• Ring Tones
•VoiceRecord
S
Push To Talk
• Call Alert
• PT Manager
•Quick PTT
• PTT Options
6
menu map
•MOTOtalk
T
Games and Apps
•Buy More
• Alarm Clock Plus
• My Images
• My Music
• My Videos
• Java System
• Memory Card
C
To o l s
• My Info
•My Name
• Mobile
• Private1
• Private2
•Work1
•Work2
•Home
• Email1
• Email2
•Fax
• Pager
• Talkgroup
•IP
• Other
•IP1 Address
•IP2 Address
•Profiles
• [New Profile]
• Standard
•Car
• Meeting
•Office
• Outdoors
• Headset
•PRVT Only
•CNTCS Only
• Alarm Clock Plus
• Bluetooth
• Audio Devices
• Pair to Devices
• Device History
• Setup
• Find Me
• File Transfer Help
• GPS
• Position
• Privacy
•Interface
• Datebook
• [New Event]
• Call Timers
•Last Call
• Phone Reset
• Phone Lifetime
•Prvt/Grp Reset
• Prvt/Grp Lifetime
• Kbytes Reset
•Memo
u
Settings (see next page)
This is the standard main menu layout. Your
phone’s menu may be a little different.
Page 10

settings menu
Display/Info
• Wallpaper
•[Buy More]
• Internal
• External
•Text Size
• Theme
• Backlight
•Timer
• Java Timer
•Clock
•Display
• Screen Saver
•Time Format
• Date Format
•Year
• Menu View
• Icon View
•List View
•Tab View
• Large Dialing
• Language
Phone Calls
• Set Line
•Any Key Ans
• Auto Redial
• Call Waiting
• Auto Ans
• Flip Activation
• Minute Beep
• Call Duration
• TTY
• Hearing Aid
• Notifications
• DTMF Dialing
• Call Forward
• Prepend
Per sona lize
• Reorder Menu
• Shortcuts
• Carousel
•Up Key
•Down Key
•Left Softkey
• Right Softkey
•Power Up
Vol u me
• Ringers/Alerts
• Speaker
• Earpiece
• Multimedia
•Keypad
Voice Pl ayback
• Speak Text
• Speak Caller
•Voice
• Multimedia Volume
Memory Card
• Remove Card
• Store Media
• Format Card
•Help
Security
• Phone Lock
• Keypad Lock
• SIM PIN
•GPS PIN
• Change Passwords
Advan ced
• Alert Timeout
• Call Completion
• Headset/Spkr
• Connectivity
• Reset Defaults
• Return to Home
• Transmitters
• Phone Only
Connections
• Bluetooth
•USB
• Memory Card Access
•Data Modem
• Application Access
•GPS NMEA
•Help
7
Page 11
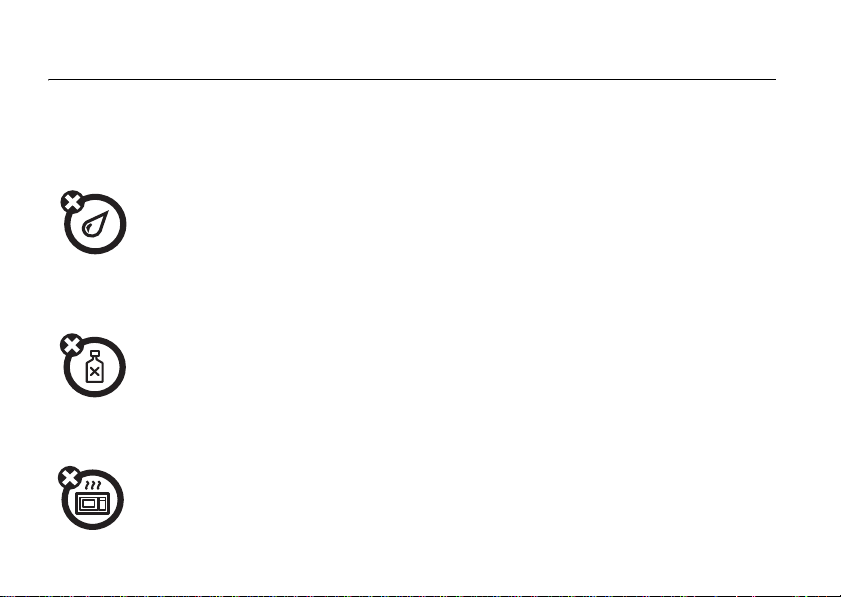
use and care
Use and Care
To care for your Motorola phone, please keep it away from:
liquids
The i680 may be immersed in up to one
meter of water for no longer than 30
minutes when the battery door is
attached properly, and the headset jack
and micro-USB connector are properly
covered and sealed.
cleaning solutions
To clean your phone, use only a dry soft
cloth. Don’t use alcohol or other
cleaning solutions.
microwaves
Don’t try to dry your phone in a
microwave oven.
8
Page 12
essentials
Caution:
time, read the Important Safety and Legal
information included in the gray-edged pages
at the back of this guide.
Before using the phone for the first
about this guide
This guide shows how to locate a menu
feature as follows:
Find it: / > u >
This means that, from the home screen:
1
Press the menu key / and then press
Settings
the
Phone Calls
menu option u.
2
Press the navigation keys ; to scroll to
Phone Calls
select it.
symbols
, and press the center key r to
This means a feature is network or
subscription dependent and may
not be available in all areas, or might
not be offered by your service
provider. Contact customer service
for more information.
This means a feature requires an
optional accessory.
essentials
9
Page 13

SIM card
microSD card
insert the SIM card
Warning:
remove your SIM card from your phone
unless absolutely necessary.
10
To avoid loss or damage, do not
essentials
Your handset may come with a microSD
card, microSD card adapter, and microSD card
1
reader
.
A microSD card is removable flash memory
you can use to store pictures, videos, and
audio files.
You can connect your phone using a
Motorola data cable directly to your
computer, access the microSD card
loaded in the phone to save or delete music,
images, videos, or audio files.
Find it: / > u >
1. Depending on your service provider, the memory card,
memory card adapter, and memory card reader may not
be included with your phone. Your handset can be used
with a MicroSD memory card.
Connections > USB
Page 14
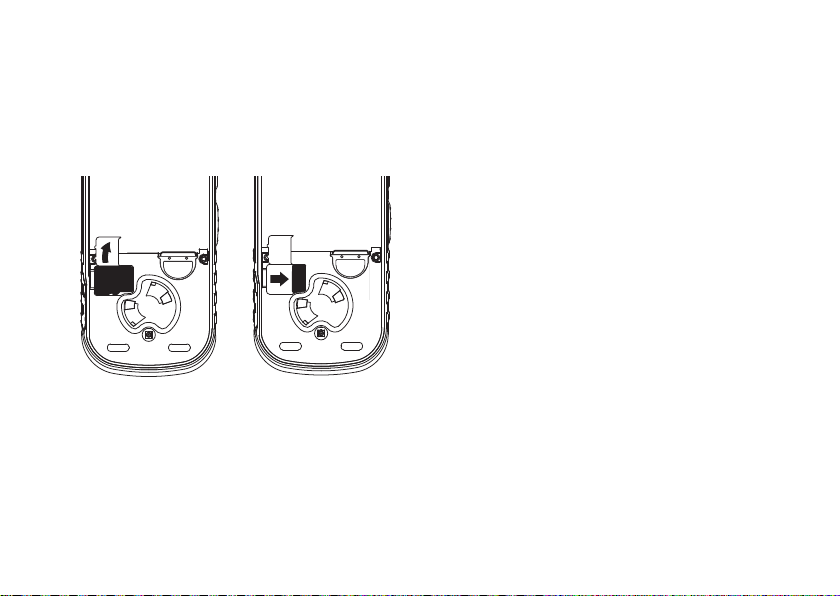
insert the microSD card
1
Remove the battery door, lift the black
plastic indicator and slide the microSD
card in place. Return the battery cover
when you are done.
Note:
The first time you insert a microSD card
in your phone, you will see the following
options:
and
choice and continue.
[Do Nothing], Go To Music Player, Go To Camera
Go To Media Center
. Select the option of your
remove the microSD card
Warn ing:
before selecting the
Settings
selecting the
loss of data.
1
2
3
,
Do not remove the microSD card
Remove Card
. Removing the microSD card before
Remove Card
From the home screen press
Memory Card > Remove Card
Once the handset confirms it is safe to
remove the micorSD card, press
under
OK
.
Remove the battery door.
option under
option could result in
/ > u >
.
K
essentials
11
Page 15
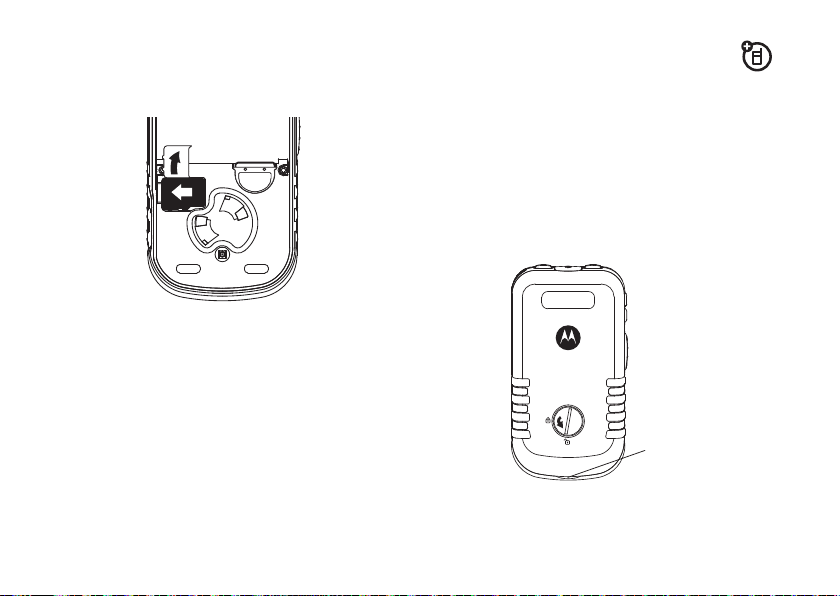
4
Lift the black plastic indicator and, with
your fingernail, slide the memory card out
of the slot.
5
Close the memory card slot cover.
essentials
12
battery
Note:
Please consult “Battery Use and
Safety” on page 112 before using this
product.
battery installation
1
With a coin, turn the battery door latch
to the unlocked position.
Finger Recess
Note:
Do not use a sharp object as it may
damage the lock.
Page 16
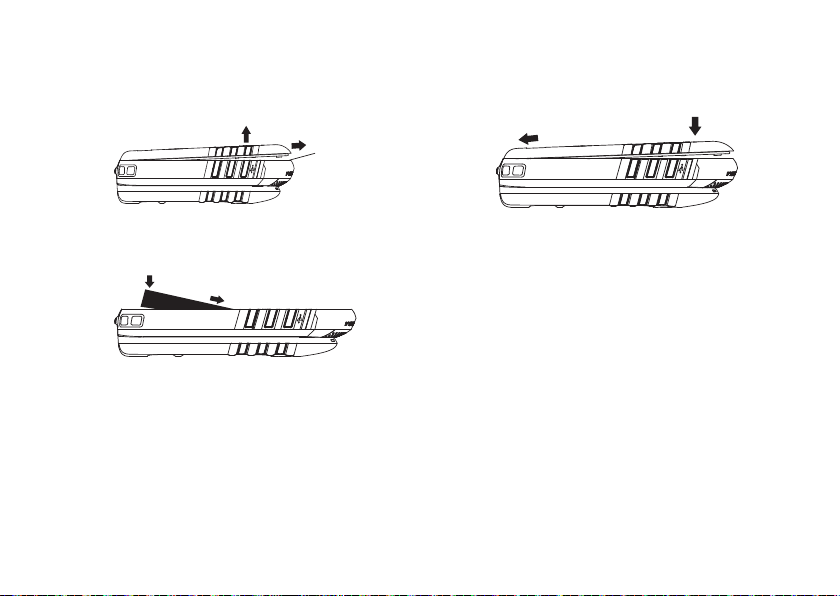
2
Finger Recess
Place the tip of your finger in the finger
recess, and gently lift the battery door
to remove it from the phone.
3
Push the battery down until it snaps in
place.
Note:
You may proceed to attach a
lanyard (sold separately) on your phone.
4
Replace the battery door and press
down on it gently. With a coin, turn the
battery door latch to the locked position.
essentials
13
Page 17
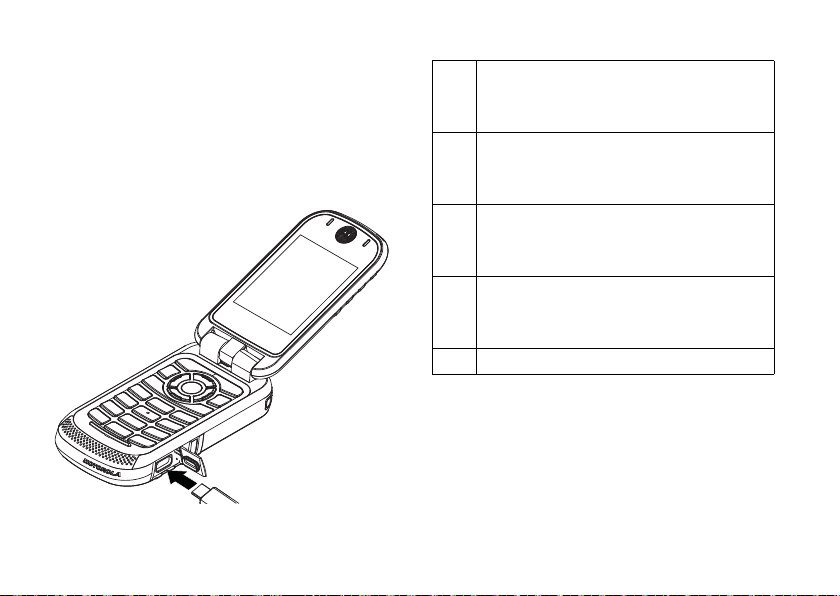
battery charging
New batteries are not fully charged.
charge using the charger
1
Pull out the connector cover, and insert
the charger into the micro USB connector
on your phone as shown.
essentials
14
battery indicators
d
The battery is at approximately 100%
to 90% capacity when the indicator is
blue and displaying three bars.
e
The battery is at approximately 65%
capacity when the indicator is green
and displaying two bars.
f
The battery is at approximately 10%
capacity when the indicator is yellow
and displaying one bar.
g
The battery is at approximately 5%
capacity when the indicator is red
and has a flashing red bar.
h
The battery is charging.
Page 18
charge from your
computer
You can partially charge your phone’s battery
by connecting a Motorola-approved USB cable
from your phone’s micro-USB port to a high
power USB connector on a computer (not a
low-power one, such as the USB connector
on your keyboard or bus-powered USB hub).
Typically, USB high-power connectors are
located directly on your computer.
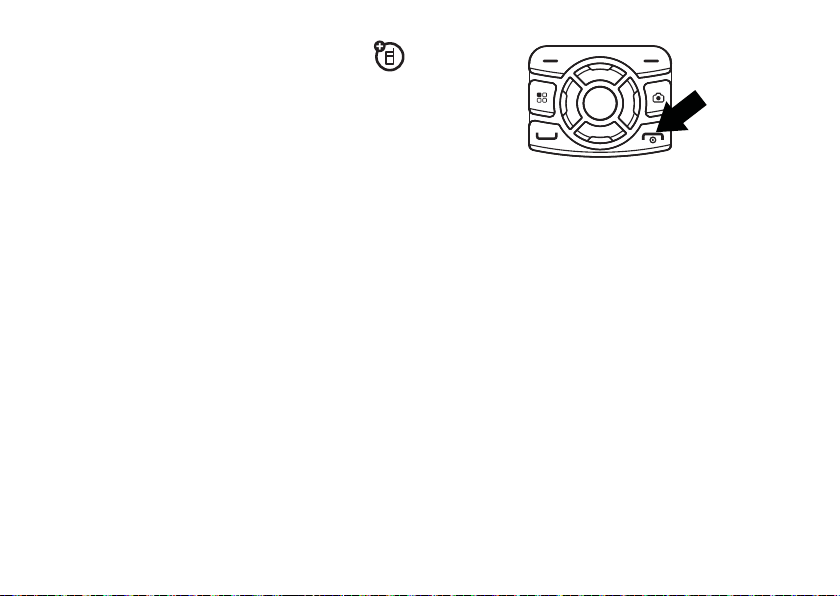
turn it on & off
To turn off your phone, press and hold
two seconds.
Note:
If you press the @ for more than four
seconds, the handset will power “On” in
Transmitters Off
page 45.
mode. See “transmitters” on
@
for
To turn on your phone, press and hold @ for
a few seconds or until the display turns on. If
prompted, enter your four-digit unlock code.
enable security
You must enable security the first time you
power on your phone or within 10 days of first
activation of your phone.
1
Press K under Ok.
essentials
15
Page 19
2
You are prompted to enable security.
Press
K
under
Yes
. A series of screens
followed by the default home page
displays.
3
Press @ to return to the home screen.
3
If you are using a Bluetooth headset,
press the answer key on your headset. To
hang up press the key again.
advanced calling
make a phone call
Enter a phone number and press ` or use a
voice command. See “place a call using a
voice name” on page 86.
To hang up press
@
.
answer a phone call
1
If you want to answer the call on speaker
phone, press the speaker key
2
If you want to answer the call using the
handset, press
essentials
16
`
. To hang up press @.
)
.
feature
call waiting
3-way call
To accept the second call
and put the active call on
hold press
To accept the second call
and end the active call press
`
.
Make or receive a phone call
and press
the second phone number,
press
You cannot make any other
calls during a three-way call,
even if one party hangs up.
K
under
/
>
3 Way
`
and K under
Yes
.
. Enter
Join
.
Page 20
feature
any key
answer
To answer phone calls by
pressing any key on the
keypad press
Phone Calls
>
Any Key Ans
/
> u >
> On.
make a private call
Your Private ID is the number at which you
receive one-to-one Private calls.
Talkgroup numbers are numbers through
which you receive one-to-many group calls.
to make a Private call
1
Enter the Private ID you want to call.
2
Press and hold the PTT button. Begin
talking after your phone emits a chirping
sound.
3
Release the PTT button to listen.
@
To end the call press
.
Note:
A Private call ends automatically if there
is no activity on the call for a few seconds.
send call alerts
Sending a call alert discretely lets the
recipient know that you want to talk to him or
her on a Private call.
When you send a call alert, the recipient’s
handset displays your name and emits a
series of beeps or vibrations.
to send a call alert
1
Enter the Private ID you want to call as
you would when making a Private call.
2
Press K under
When the message
the display, press the PTT button until the
message
Alert Successful
Alert
.
Ready To Alert
appears.
appears on
essentials
17
Page 21
answer a private call
1
When your phone emits a chirping sound
or vibrates to indicate you are receiving a
Private call, wait for the caller to finish
speaking.
2
Press and hold the PTT button and begin
talking after your phone emits a chirping
sound.
3
Release the PTT button to listen.
To end the call press
answer a call alert
When you receive a call alert, you must:
option
Answer:
Begin a Private call with the sender.
Queue:
Store the call alert to the call alert
queue.
Clear:
Dismiss and delete the call alert.
essentials
18
@
.
You cannot receive phone calls or Private calls
until you do.
to answer a call alert
1
Press the PTT button to start a Private call
with the sender.
or
2
Queue the call alert by pressing K under
Queue
.
or
3
Clear the call alert by pressing K under
Clear
.
making a phone call while in a
private call
When you are in a Private call, you can make a
phone call to the other participant if that
person’s phone number is stored in
1
While in a Private call press `.
Contacts.
Page 22

2
A confirmation screen will appear asking
to
Start Call To:
3
Press K under
the call.
.
Yes
or press r to begin
call status and completion
This allows you the option of sending a
message to a caller after declining an
incoming call, PTT call or call alert.
Find it: />u >
Advanced> Call Completion
To send a message after receiving
incoming or outgoing calls.
1
After a failed incoming or outgoing, PTT
call or call alert, within five seconds,
Text Message To
2
Press K under
or press
3
To edit a message before sending press
/
>
Edit
will appear.
K
under
.
Yes
to send the message
No
not to.
Send
To setup a message for incoming calls
or outgoing calls.
1
Press / >u >
Incoming call
2
Select
Off, Ask First
3
Select
Message
sent or press
predefine message.
4
Press r and then press K
Advanced> Call Completion >
or
Outgoing calls.
or
Automatic.
and create a message to be
K
under
QNotes
and select a
Back.
store a phone number
or private ID
You can store a phone number or private ID in
Contacts
:
Find it: / > L >
1
Enter a name for the new entry. Each
entry’s name can contain 20 characters.
2
Select a specific
[New Contact]
Ring Tone
essentials
.
19
Page 23
3
Select a type for the entry (
Private2
,
Work1, Work2, Home, Email1, Email2, Fax
Pager, Talkgroup, IP
ID choose
4
Enter the number for the entry and press
K
under
or
Other
Private1 or Private2
Save
when done
Mobile, Private1,
)
. To store a private
.
.
contacts
feature
,
set picture IDPress K under
Contacts.
Select a contact and press
/
>
Edit > [Ring Tone/Picture]
Picture
Select
your desired picture and
press
Back
> K under
and choose
r
. Press K under
Save
.
.
feature
edit/delete
contact
entry
set ringer ID
essentials
20
Press K under
Select a contact and press
/
>
Edit
desired content and press
r
. Press K under
Press K under
Select a contact and press
/
>
Edit > [Ring Tone/Picture]
Select
Ringer
desired ring tone. Press
under
Back
Contacts
. Change the
Contacts.
and chose your
.
Save
.
.
K
call a stored phone
number or private ID
Find it: / > L.
1
Scroll to the
2
If the Contacts entry contains more than
.
one number, scroll left or right until the
type of the number you want to call is
displayed (
Work2, Home
Contacts
entry.
Mobile, Private1, Private2, Work1
, etc.).
,
Page 24

3
If you chose a phone number, press ` to
call the entry, or if you chose a Private ID,
Talkgroup ID, or SDG List, press and hold
the PTT button to call the number.
finding your phone
number and private ID
Find it: / > m >
My Info
.
messaging
Your phone has the ability to use both
MOSMS and Multimedia Messaging Service
(MMS) messaging. The type of messaging
your phone uses will be determined by your
service provider. If your service provider offers
messaging through MOSMS, your phone
sends and receive messages using MOSMS.
If your service provider offers MMS, your
phone sends and receives messages using
MMS. Additionally, MMS allows you to send
and receive messages that may include text,
pictures, videos, and audio files.
create and send messages
1
From the home screen press K under
Messages
>
[Create Message]
2
Enter the phone number of the person
you want to send the message to and
press
r
or press K under
Contacts
or
Recent Calls
want.
3
Select
Message
: and enter the text of the
message or to use a quick note press
under
QNotes
and scroll to the quick note
you want then press
4
If you want to send the message, press
K
under
Send
or to delete the message
without sending it, press
.
Search
. Select
to find the number you
K
r
.
K
under
Cancel
.
essentials
21
Page 25
quick notes
When you are filling in the
fields, you can add ready-made words or short
phrases called Quick Notes. After you add
these words or phrases, you can edit them as
you would any other text.
1
While you are creating a message, scroll
to or select
2
Press K under
3
Select the quick note you want to insert
into the message.
4
Press K under
Message
or
QNotes
Send
.
Message
Subject
.
.
and
Subject
MMS features
Note:
The following features are available only
when using MMS.
essentials
22
more message options
To view more message fields in a message
you are creating, select
The following options become available:
option
Subject
: Create or edit the subject line.
Attach
: Attach a picture, audio file, voice
record or video file.
Cc
: Send a copy of this message to
someone else.
Auto Replies
possible short answers for the recipient to
choose when replying to your message.
Priority
Valid Until:
deliver the message end, or press
under
: Allows you to create a list of
: Set priority
Set a date after which attempts to
No Date
.
Normal
....More....
or
High
.
K
Page 26

insert a picture, video, and
audio recording
You can insert one or more pictures, videos,
and audio files from the media center into the
body of the message. You can include text in
the body of your message in addition to these
items.
insert items
While you are filling in the
/
, select
Insert
and choose from
Insert Picture, Insert Audio, Insert Video, Capture Video,
or
Capture Picture
A list of available pictures, videos, or audio
files appears. You can only insert one item at a
time.
Select the picture, video, or audio recording
you want to insert.
Record Voice
.
Message
field, press
Insert QNotes,
remove an inserted item
To remove an item from the message you are
creating, highlight it and press
K
under
Delete
attach a picture, video, or audio
recording
You can attach one or more pictures, audio or
voice recordings from your phone into the
body of the message. You can include text in
the body of your message in addition to these
items.
1
While you are filling in the
press
[New Attach]
Pictures
,
Capture Picture, Browse Audio, Record Voice,
Browse Video
A list of available pictures, audio files, or
voice recordings appears.
2
Select the picture, audio or voice record
you want to attach.
> and select from
, or
Record Video
Attach
field,
Browse
.
.
essentials
23
Page 27

If you want to attach more items, select
[New Attach]
3
When finished, press K under
Note:
files, and pictures if they are not forward
locked and if their DRM settings do not
prevent you from sending.
Forward locked items are usually copyright
protected, and you cannot share them with
anyone, such as in Private calls or by
uploading them from your phone.
.
Done
.
You can only attach audio files, video
take a new picture
1
While you are creating a message, scroll
to any message field and press
Attach
>
[New Attach]
Capture Picture
. This accesses the
2
24
select
Select
camera.
essentials
/
or
.
3
Take the picture. For instructions on how
to take the picture see “camera” on
page 64.
4
When you have captured the picture you
want, press
To discard the picture, press
Discard
5
When finished, press K under
The picture is attached to the message
and saved to the default storage location.
K
under
Save
.
K
under
. You can then take another picture.
Done
record a video
You can record a video to send with a
message:
1
Select
Attach > [New Attach] > Record Video
2
Record and adjust video.
To view the video without saving it, press
K
under
Review
.
.
.
Page 28

3
To save the video, press r.
To discard the video without saving it,
press
K
under
Discard
.
4
The video is attached to the message and
saved to the media center in the default
storage location.
create a new voice record
You can create a new voice record to send
with a message:
1
Press / or select
2
Select
Record Voice
3
Say the message you want to record into
the microphone.
4
When you are finished recording, press
r
.
5
When finished, press K under
.
Attach
>
[New Attach]
Done
.
.
6
The voice record is attached to the
message and saved to the media center
and the list of voice records.
remove an attachment
To remove an attachment in a message you
are creating:
1
Select
Attach
.
2
Scroll to the attachment you want to
remove.
3
Press / >
Unattach
.
use drafts
When you save a message as a draft, it is
saved in the drafts folder.
Find it:
1
Press / > E >
Select the draft you want to edit.
Drafts
.
essentials
25
Page 29

2
To edit the fields you want to change,
follow step 2 through step 4 in “create
and send messages” above.
delete a draft
When you send a draft, it is removed from the
Drafts folder.
1
To delete a message in the Drafts folder
without sending it, scroll to the message
you want to delete and press
Delete
.
2
Press K under
Yes to confirm.
K
under
inbox
Find it:
Press / > E >
receive a message
1
To view the message press K under
essentials
26
Inbox
.
Read
2
To dismiss the message notification press
K
under
Exit
.
While reading a text and numeric message
that contains a phone number, you can press
`
to call that number.
threaded inbox
The threaded Inbox allows you to organize
your messages by subject or sender.
1
From the Message Center, Press / >
Threading
, and select from
Sender
.
Note:
Threading by subject is dependant
upon your service provider.
None, Subject
read from the message center
1
From the home screen press K under
Messags
>
Inbox
.
2
Select the message you want to read.
.
, or
Page 30

3
To reply to the message, press K under
Reply
.
delete unread messages
1
Scroll to the message you want to delete.
2
Press K under
confirm.
Delete
and K under
Yes
to
forward a message
1
Press / >
2
Create and send your message.
Embedded objects and attachments are
included when you forward a message.
Forward
.
lock and unlock messages
Locked messages cannot be deleted until you
unlock them.
1
View the message you want to lock or
unlock.
2
Press / >
Lock Message
or
Unlock Message
.
call a number in a message
If a message you receive contains a phone
number, Private ID, or Talkgroup ID in the
field, the
the body of the message, you can call or send
a call alert to that number.
To
field, the Cc field, the
Subject
From
field, or
send a call alert
1
View the message.
2
Highlight the Private ID or Talkgroup ID
you want to alert.
3
Press / >
4
Push the PTT button.
Alert
.
make a group call
1
View the message.
2
Press /.
essentials
27
Page 31

3
Highlight the Talkgroup ID you want to
call.
4
Select
Talkgroup
.
5
Push the PTT button.
store message information to
contacts
If a message you receive contains a phone
number, Private ID, Talkgroup ID, or an email
address in the
field, the
message, you can store this information to
Contacts
.
1
View the message.
2
Highlight the number or email address
you want to save.
3
Press / >
4
To store the number or email address as a
new entry, select
28
From
field, the To field, the Cc
Subject
field, or the body of the
Save Number
[New Contact]
essentials
or
Save Address
.
.
To store the number or email address to
an existing entry, select the entry.
5
With the Contacts type field highlighted,
press
;
left or right to display the
Contacts type you want to assign the
number or email address.
6
Press K under
Save
.
reply to a message
To reply to a message:
1
View the message you want to reply to.
2
To reply to the sender only, press K
Reply
under
to reply to all recipients.
3
A list of short phrases appears. Select any
of these phrases to add it to your
messages or select
4
Edit any message fields you want to
change.
or press / and select
[Create Reply]
.
Reply All
Page 32

5
Press K under
use auto replies
If the message you are replying to was sent
with auto replies, it contains a numbered list
of possible replies for you to send. Press the
number of the reply you want to send. The
reply is sent immediately without further
action.
Send
.
go to a website
If a message contains one or more website
URLs, you can go to that website.
1
View the message.
2
Highlight the website URL you want to go
to.
3
Press
/ > Go To Website.
Note:
The entire URL must appear in the
message to allow you to open the website.
embedded objects and
attachments
If a message contains pictures, videos, or
audio files in the body of the message,
highlight each picture, video, or audio
recording to view or play it.
If a message contains a picture, video, or
audio recording as an attachment, open the
attachment to view the picture or play the
video or audio recording.
open attachments
1
View the message.
2
Highlight the attachment you want to
open. Attachments appear at the end of a
message.
3
Press r.
Attachments of an unknown type cannot be
opened, but can be deleted.
essentials
29
Page 33

save an embedded picture,
video, or audio recording
To save a picture, video, or audio recording
that is part of the body of a message you
receive:
1
View the message.
2
Highlight the picture, video, or audio
recording you want to save.
3
Press /.
4
Select
Save Picture, Save Video
The item will save in the default storage
location.
, or
Save Audio
.
delete an embedded picture,
video, or audio recording
To delete a picture, video, or audio recording
that is part of the body of a message you
receive:
essentials
30
1
View the message.
2
Highlight the picture, video, or audio
recording you want to delete and
press
/
.
3
Select
Delete Picture, Delete Video
, or
Delete Audio
save attachments
1
View the message.
2
Highlight the attachment you want to
save.
3
Press / >
Selected items save to the default storage
location.
Save Attachment
.
delete attachments
1
View the message.
2
Highlight the attachment you want to
delete.
.
Page 34

3
Press / >
4
Press K under
Delete Attachment
Yes
to confirm.
.
outbox
The Outbox holds all unsent messages.
Find it:
resending failed messages
from the outbox
1
2
cancel an unsent message
1
2
Press / > E >
Scroll to the message you want to resend
or press the number of the message you
want to resend.
Press K under
Highlight the message you want to
cancel.
Press /.
Resend
Outbox
.
.
3
Press K under
Cancel
.
sent items
The Sent Items box holds sent messages.
forward items from sent items
1
Scroll to the message you want to
forward.
2
Press / >
3
Make edits if you wish, select the
recipient and press
setting up read receipts
While creating a message you can set up read
receipts. Press
options
.
Forward
/
>
.
K
Report
under
Send
to view the
.
essentials
31
Page 35

Off:
read receipts will not be generated.
On Delivery:
when a message is delivered.
When Read:
when a message is read.
Both:
message is delivered and read.
Note:
read receipt will be generated
read receipt will be generated
read receipt will be generated when a
Available with MMS only.
check delivery status
If a message was successfully sent and you
set the message to confirm delivery, you can
check the delivery status:
1
Scroll to the message you want to view.
2
Press / >
Delivery Status
.
delete sent messages
1
Scroll to the message you want to delete.
essentials
32
2
Press K under
3
Press K under
delete all unlocked sent messages
1
Press / >
2
Press K under
Delete
Yes
to confirm.
Delete All
.
Yes to confirm.
.
customize messaging
Find it: / > E > / >
This option is available from many
context-sensitive menus.
The following options become available:
option
Signature:
Allows you to create a signature
that is automatically inserted at the end of
your messages. Signatures can be edited
before sending the message.
Setup
.
Page 36

option
Quick Notes:
and edit or delete Quick Notes you created.
Cleanup:
in the
deleted.
Report Default:
notified when your message is delivered.
Memory Size:
memory in your phone.
MMS Setup:
options.
Note:
Text Message Setup:
text messaging options.
Note:
Lets you create new Quick Notes
Controls how long messages remain
Inbox
and
Sent Items
before being
Allows you to be automatically
Shows a report on used and free
opens a submenu to set MMS
Available with MMS only.
opens a submenu to set
Available with MOSMS only.
manage memory
Your text Inbox and Sent Items hold 200
messages each. The Outbox, and Drafts
folder hold up to 30 messages each. If they
are full, you cannot receive messages, send
messages, or save drafts until you delete
some items.
Note:
Media files and Java applications can
affect the available amount of memory on
your phone. If you run out of memory and
your Inbox, Sent Items, Outbox, and Drafts
folder are empty, delete unwanted media files
and Java applications to free up memory.
To view the amount of memory available in
your text inbox:
Find it:
Memory Size
Press / > E > / >
.
Setup
>
MMS setup
Find it: / > E > / >
Setup
>
MMS Setup
.
essentials
33
Page 37

This option is available from many
context-sensitive menus when you are using
MMS.
The following options become available:
option
Friendly Name:
name. Your friendly name is displayed in the
From
field on other iDEN handsets when
your message is received.
Download Options:
downloads new messages. Set this option
to
Automatic
download new messages automatically.
Select
prompt you before downloading new
messages.
Replies:
reply phrases you created.
34
Allows you to create a friendly
Controls whether your phone
if you want your phone to
Manual
if you want your phone to
Lets you create or edit and delete
essentials
text message setup
Find it: / > E > / >
This option is available from many
context-sensitive menus when you are using
MOSMS.
The following options become available:
option
Srvc Cntr No:
center number.
Expire After:
days before a message expires.
Allows you to enter a service
Allows you to set the number of
Setup
>
Text Msg setup
new quick notes and reply
phrases
create quick notes or replies
1
From the Setup menu, select
select
2
Select
MMS Setup
[New Quicknote]
>
Replies
, or
Quick Notes
.
[New Reply]
, or
.
.
Page 38

3
Enter text from the keypad and press r.
edit quick notes or replies
You can edit only Quick Note phrases you
have created.
1
From the Setup menu, select
select
MMS Setup
2
Select the quick note or reply you want to
edit.
3
Edit the text and press r.
delete quick notes and reply phrases
1
From the Setup menu, select
MMS Setup
2
Scroll to the quick note or reply you want
to delete.
3
Press K under
4
Press K under
Note:
You can delete only reply phrases you
have created.
>
Replies
>
Replies
.
Delete
.
Yes
to confirm.
Quick Notes
.
Quick Notes or
, or
delete all quick notes
1
From the Setup menu, select
2
Press / >
3
Press K under
Delete All
Yes
.
to confirm.
Quick Notes
.
cleanup options
The cleanup option controls how long
messages remain in the Inbox and Sent Items
before they are deleted. You set the cleanup
option for the Inbox and Sent Items
separately.
The clean up option deletes only read,
unlocked messages and sent messages.
Find it: / > E > / >
1
Select
Inbox
or
Sent Items
Setup
>
.
essentials
Cleanup.
35
Page 39

2
Choose a clean up option from the
following list:
option
Off:
Messages are never automatically
deleted.
5 Messages:
messages, messages are deleted in the
order they were received, starting with the
oldest, until 5 are left.
10 Messages:
messages, messages are deleted in the
order they were received, starting with the
oldest, until 10 are left.
1 Day:
than 1 day.
3 Days:
older than 3 days.
With these options, messages are deleted
when you exit the message center after
setting the option.
36
If you have more than 5
If you have more than 10
Messages are deleted if they are older
Messages are deleted if they are
essentials
option
FirstIn FirstOut:
necessary on a FirstIn FirstOut basis.
Custom:
up to 199 messages or 99 days for the
Inbox and Sent Items.
3
Press K under
messages now or press
delete messages later.
Messages are deleted as
Lets you create a clean-up option of
Yes
to automatically delete
K
under No to
delete all messages
To delete all read, unlocked messages from
the Inbox, all messages in the Drafts folder, all
successfully sent messages in Sent Items, or
unsent messages in the Outbox:
Find it: / > E.
1
Select
2
Press / >
Inbox, Drafts, Sent Items
Delete All
, or
Outbox
.
.
Page 40

3
Press K under
Yes
to confirm.
delete a thread
To delete a thread from the Inbox:
1
From the Inbox, select a thread.
2
Press / >
3
Press K under
Delete Thread
Yes
to confirm.
.
message notifications
When you receive a message, your phone
notifies you with text on the display, a
notification tone or vibration.
You can access the message or dismiss the
notification.
If you dismiss the notification, the message is
not deleted. It can be accessed through the
message center.
If you are not on a phone call when you
receive a message, your phone sounds a
notification tone every 30 seconds until you
access the message or dismiss the alert.
If you are on a call when you receive a
message, your phone may sound a
notification tone during the call or after you
end the call, depending on how you set your
notification options.
set notification options
To control whether your phone sounds
message notification tones while you are on a
phone call:
Find it: / > u >
Select from the following options:
option
Receive All
types of messages.
: Tones sound during calls for all
Phone Calls> Notifications
.
essentials
37
Page 41

option
Message Mail Only
mail messages; tones for all other types of
messages are held until you end calls.
Delay All
held until you end calls.
Note:
To set notification options during a call press
/
>
Call Setup
: Tones sound during calls for
: Tones for all types of messages are
Delay All
is the default setting.
>
Notifications
.
using your handset
as a modem
Your phone can be connected to a computer
via USB for use as a modem. For more
specific information on how to setup your
phone for use with your computer please visit
www.motorola.com/support
section.
essentials
38
and look under the FAQ
Page 42

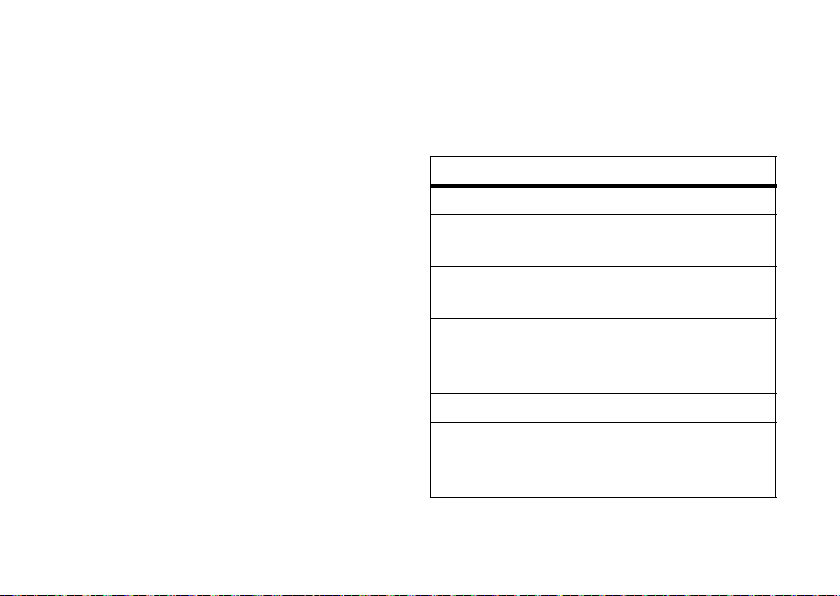
basics
Contcs Mesgs
Ready
5/10/09
Date
Right
Soft Key Label
Left
Soft Key Label
Time
1 2 3 4 5 6 7
Contcs Mesgs
Ready
5/10/09
See page 1 for a basic phone diagram.
display
The home screen shows when you turn on
the phone. To dial a number from the home
screen, press number keys and press
Note:
Your home screen may look different.
Soft key labels show the current soft key
functions. For soft key locations, see page 1.
`
status indicators
Status indicators are shown at the top of the
home screen:
.
1Signal Strength Indicator:
show the strength of the network
connection. You can’t make or receive
calls when
~
shows.
Vertical ba rs
basics
39
Page 43

2Active Phone Line: % indicates phone
line 1 is ready to make calls;
phone line 2 is ready to make calls.
3Speaker On/Off:
Private calls and group calls can be set to
come through the earpiece rather than
through the speaker.
4 Ringer Vibe On/Off:
not ring.
5Message Indicator:
you receive a text message, MMS
message, and voice mail.
6 Packet Data:
transfer packet data or is transferring
packet data when it shows a blinking
arrow.
7 Battery Charge Indicator:
indicates a greater charge. Recharge the
battery when your phone shows
basics
40
Sounds associated with
Your handset is ready to
'
indicates
Your phone is set to
Shows when
A fuller battery
Low Battery
main menu
All your phone’s features can be accessed
through the main menu. You can set the main
menu to appear as
Find it: / > u >
List View, Tab View
Display/Info
>
Menu View
carousel menu
The Carousel Menu allows you to access up
to nine applications from your phone’s idle
screen.
accessing an application
1
Using the navigation key, scroll left or right
until you highlight the desired application.
2
Press r to launch the application.
Note:
Availability of the Carousel Menu is
dependent on your service provider.
.
or
Icon View
.
.
Page 44

auto hide
1
Press / > u >
Auto Hide
.
2
Select from
8 seconds
.
Note:
When
Auto Hide
Carousel Menu will always be visible on the
idle screen.
Personalize
Always On, 2 seconds, 4 seconds
is set to
>
Carousel
Always On
>
, the
, or
assigning applications
1
Press / > u >
2
Highlight the position on the Carousel
Menu you would like the application to
occupy and press
3
Highlight an application and press r to
select it.
Personalize
r
.
>
Carousel
.
text entry
Your phone provides convenient ways to enter
words, letters, punctuation, and numbers
whenever you are prompted to enter text (for
example, when adding a Contacts entry or
when using Text Messaging).
change the character input mode
1
When you see a screen where you can
enter text, press
character input mode.
2
Select one of the following options:
entry method
Alpha
Word
Press a key several times for
different characters.
Enter words using a predictive
text entering system that lets
you enter a word with fewer
keypresses.
/
to change the
basics
41
Page 45

entry method
Symbols
Numeric
Text Input
Settings
Insert
Tip:
to change letter capitalization (
Enter symbols.
Enter numbers by pressing the
numbers on the keypad.
Selects the desired entry
languages and Word Prediction
features.
Selects a item to be inserted,
such a picture, an audio/video clip
or a voice recording.
Note:
available only when using
MMS messaging.
When entering text, press and hold #
Abc
>
ABC
>
word method
The Word text input method lets you enter
text into your phone by pressing keys just
once per letter.
basics
42
abc
The Word text input method combines the
groups of letters found on each phone key
with a fast-access dictionary of words, and
recognizes what you want to text as you type.
It first offers the most commonly-used word
for the key sequence you enter and lets you
access other choices with one or more
presses of the
navigation key up or down. You may also hold
the navigation key down to display a pop-up
list of choices.
enter a word using “word” method
character input
1
Select the
2
).
Press the corresponding keys once per
letter to enter a word (for example, to
enter the word
(If you make a mistake, press
a single character. Press and hold
delete an entire entry.)
0
key or ny pressing the
Word
character input method.
Bill
, press
2455
*
to erase
*
).
to
Page 46

3
To accept a word and insert a space,
press
#
.
To accept a word completion (such as
Billion when you entered Bill), press
right.
If you get a word you don’t want, you can
press the
choices and pick the one you want.
0
key to see more word
;
alpha method
To enter characters by tapping the keypad:
1
Select the
2
Press the corresponding keys repeatedly
until the desired letter appears. (For
example, to enter the word
twice,
and
mistake, press
character. Press and hold
entire word.)
Alpha
method.
Bill
, press 2
4
three times, 5 three times,
5
three times again. If you make a
Delete
to erase a single
Delete
to erase an
By default, the first letter of an entry is
capitalized and the following letters are
lowercased. After a character is entered, the
cursor automatically advances to the next
space after two seconds or when you enter a
character on a different key.
Characters scroll in the following order:
characters
1
2
3
4
5
6
7
8
9
Space . 1 ? ! , @ & : ; “ - ( ) ‘ ¿ ¡ %
£ $ ¥
A B C 2 Á Ã Â À Ç
D E F 3 É Ê È
G H I 4 Í Ì
J K L 5
M N O 6 ñ Ó Õ Ô Ò
P Q R S 7 ß
T U V 8 Ú Ü Û Ù
W X Y Z 9
basics
43
Page 47

characters
0
#
*
When entering text, press and hold # to
switch between lowercase and uppercase
letters. The icons in the upper left-hand corner
of the screen show the character type.
character type
Q or T
R or U
S or V
W
X
44
+ - 0 * / \ [ ] = > < # §
Space / Shift
Back
Lowercase
Uppercase
Shift Lock
Numerical
Symbols
basics
volume
Press the volume keys up
or down to:
•
turn off an incoming
call alert
•
change the earpiece
volume during calls
•
change the ringer
volume from the
home screen
Tip:
You can quickly set your ringer to
Vibrate All
by holding the down volume
key in the home screen.
Page 48

navigation key
transmitters
Press the navigation key
up, down, left, or right to
scroll to items in the
display. When you
highlight the desired
item, press
it.
r
to select
handsfree speaker
You can use your phone’s handsfree speaker
to make calls without holding the phone to
your ear.
During a call, press
the handsfree speaker On.
The handsfree speaker stays on until you
press
K
under
K
Speaker
under
again.
Speaker
to turn
Consult airline staff about the use of the
Transmitters Off feature during flight. Turn off
your phone whenever instructed to do so by
airline staff.
Transmitters Off turns off your phone’s calling
and Bluetooth features in situations where
wireless phone use is prohibited, but you can
use the phone’s other non-calling features
when Transmitters is turned Off.
Find it: / > u >
Advanced
>
Transmitters
>
Off
.
use GPS with map
software
Your phone can be connected to a PC, laptop,
or PDA via Bluetooth and USB for use as a
GPS receiver. For more specific information
on how to setup your phone for use with your
basics
45
Page 49

computer please visit
and look under the FAQ section.
www.motorola.com/support
features for the hearing
impaired
using your phone with a
hearing aid
For best results use the following optimization
procedures and handset setting. They
generally apply as well for users with cochlear
implants:
optimize your handset position and
orientation
While in a phone call slide your phone up and
down, then left and right until best
microphone coupling is obtained. You also
may need to adjust your hearing aid (HA)
volume setting
46
.
basics
If your HA has a telecoil, activate its switch,
then also rotate the handset as illustrated to
align the telecoils.
Note:
Some automatically switched hearing
aids may need an auxiliary switching magnet.
If you are unsure whether your HA is telecoil
equipped or needs an auxiliary magnet,
please refer to your HA user guide or contact
a hearing aid professional or supplier.
Page 50

choose your hearing aid setting
Approximate telecoil location is just
above the battery.
Approximate telecoil location is within
6-13 mm of this location.
Off - Shut off
M - Microphone
T - Telecoil
Find it: / > u >
1
Set this option to Microphone
Phone Calls
>
Hearing Aid
. Microphone
coupling is now optimized.
or
2
Set this option to Telecoil
US federal requirements for telecoil
coupling sound or set this option to
(factory default). This is the setting for non
. Handset meets
HA users.
TTY
feature
turn On TTY
feature
choose TTY
mode
change the
TTY baud
.
rate
change TTY
mode
during a call
Note:
Off
The TTY device must be connected to
the phone through the micro-USB port.
A 2.5 mm to micro USB adapter is required to
support TTY.
Press / > u >
Phone Calls
>
TTY
>
Use TTY
> On.
Press / > u >
Phone Calls
Select from
>
TTY
>
TTY, VCO
Type
or
.
HCO
.
Press / > u >
Phone Calls
Select
>
45.45
TTY
or
>
50.00
Baud
.
.
While in the TTY call, press
/
>
In Call Setup
Select from
>
TTY, VCO
basics
TTY
or
>
HCO
Type
.
.
47
Page 51

security features
feature
phone lock
keypad lock
enable SIM
PIN
basics
48
To lock the phone press
/
> u >
Phone Lock
Auto Lock
To lock the keypad press
/
>u >
Keypad Lock
Auto Lock
Press / > u >
SIM PIN
>
.
>
.
> On.
Security
Lock Now
Security
Lock Now
>
or
>
or
Security
>
feature
enable GPS
PIN
change SIM
PIN
Note:
You can make emergency calls on a
locked phone (see page 86).
lock and unlock keypad
To lock your phone’s keypad, press
Note:
When you receive
your phone, your GPS PIN is
0000.
To change your GPS PIN
/
press
Change Passwords
Enter the current GPS PIN
and enter the new four to
eight digit GPS PIN.
Re-enter the new four- to
eight-digit GPS PIN to
confirm.
Press / > u >
Change Passwords
> u >
>
>
GPS PIN
SIM PIN
Security
Security
/*
>
.
>
.
.
Page 52

main attractions
MicroUSB
Port
Battery Door
Latch
Headset Jack
water resistance
Your phone is water resistant and can be
immersed in up to one meter of water for no
more than 30 minutes.
Warn ing:
In order for your phone to be water
resistant the battery door must be properly
attached and locked, and the headphone jack
and microUSB port must be properly sealed.
Failure to do so will result in water damage to
your phone. If the phone is immersed in more
than one meter of water or is submerged for
more than 30 minutes, water damage will
occur.
multimedia
Your phone comes with several multimedia
applications to let you access pictures, videos,
and audio files stored in your phone’s memory
or in the Audio, Music, Podcast, Image and
Video folders on a memory card inserted in
your phone’s memory card slot:
main attractions
49
Page 53

•
Media Center
is a central repository to
view all supported multimedia files on
your device or your memory card.
Note:
The Media Center cannot read
the Music and Podcast folder from the
SD card.
•
My Music
provides an enhanced music
player for music and podcast files.
•
My Images
provides a slide show, image
browser and image editor.
•
My Videos
plays video files on the display.
•
Camera
lets you take still pictures.
•
Camcorder
lets you take short movies.
•
Ringtones
lets you purchase and preview
ringtones for your phone.
•
VoiceRecord
lets you record audio notes to
yourself.
main attractions
50
In addition, the following audio files can be
accessed through the media center:
•
VoiceRecords
•
Musical ring tones in the list of ring
tones
•
Audio files saved from MMS messages
received
•
Audio files downloaded to your phone
Because the memory card inserted in your
phone may contain files saved to it using a
device other than your phone, not all types of
pictures, videos, and audio files on the
memory card may be accessed through your
phone’s media center.
Items in the media center can be sent in
MMS messages and with Bluetooth. See
“MMS features” on page 22 and
“Bluetooth
®
” on page 79.
Page 54

Pictures in the media center can be sent in
Private calls using Send via PTT. See “PTX
features” on page 69.
Note:
If the picture size exceeds 95k, it will
be resized before it is sent in an MMS
message. However, the original image stored
in the Media Center will remain unchanged.
Media files supported by the Media Center
include:
Format Bit Rate / Info Sampling
AAC
(MPEG4
AAC-LC)
.aac* , .3gp,
.m4a, .3ga,
.mp4
AAC+
.aac*, m4a,
.3ga, .mp4
Up to 320kbps 48 kHz
Up to 128 kbps
(16 to 128 kbps)
Rate
Max: 48
kHz
Format Bit Rate / Info Sampling
Rate
AAC+
Enhanced
.aac*, .m4a,
.3ga, .mp4
AMR-NB
.amr, .3gp,
.3ga, .mp4
AMR-WB
.awb, .3ga,
.3gp
iMelody
.imy
MIDI XMF
.xmf, .mmf,
.xmf0, .xmf1,
.mxmf
Up to 320 kbps
(16 to 320 kbps)
4.75 kbps – 12.20
kbps (supports all
3GPP specified
rates)
6.6 kbps - 23.85
Kbps (supports all
3GPP specified
rates)
1 – 3.5 kHz
Monophonic
64 channels N/A
Up to
48 kHz
8 kHz
16 kHz
N/A
main attractions
51
Page 55

Format Bit Rate / Info Sampling
Rate
MIDI
64 channels N/A
Stand
.mid, .midi,
.smf
MP3
.mp3*,
*
.mpga
PCM 16-bit
Linear
.wav, .au
Up to 320kbps Up to
48 kHz
Up to 1536 kbps Up to 48
kHz (8,
11.05, 12,
16, 22, 24,
3, 44, 48
kHz)
PCM 8-bit
Linear
Up to 1536kbps Up to
48 kHz
.wav, .au
PCM 8-bit
A-law
Up to 704 kbps Up to
48 kHz
.wav, .au
main attractions
52
Format Bit Rate / Info Sampling
Rate
PCM 8-bit
mu-law
.wav, .au
Up to 704 kbps Up to 44
kHz (8,
11.05, 12,
16, 22, 44
kHz)
Real Audio
LBR (Cook)
.rm, .ra, ram
Up to 96 kbps Up to
44.1 kHz (8,
11, 22, 44
kHz)
Real Audio
Sipro
(ACELP
.rm, .ra, ram
®
.net)
5 kbps (fixed
rate)
8.5/6.5 kbps (dual
rate)
16 kpbs (wide
8 kHz
8 kHz
16 kHz
band)
Real
Aud io 10
.rm, .ra, ram
Up to 192 kbps Up to
48 kHz (8,
11, 12, 16,
22.05, 24,
32, 44.1, 48
kHz)
Page 56

Format Bit Rate / Info Sampling
Rate
WMA v9 L2
(also WMA
v3, v7, v8)
*
.wma
(*) These formats support album art and lyrics.
Up to 320 kbps 48 kHz
Supported video file formats include:
Format Resolution /
Bit and
Frame Rate
MPEG4 +
AMR-NB
MPEG4 +
AMR-WB
MPEG4 + AAC /
AAC+ /Enhanced
AAC+
352 x 288
and 320 x
240 (up to
256 kbps);
176 x 144 and
128 x 96 (up
to 128 kbps);
up to 30 fps
Extension
.mp4, .3gp
Format Resolution /
Bit and
Frame Rate
H.263 + AMR-NB
H.263 + AMR-WB
H.263 + AAC /
AAC+ /Enhanced
AAC+
Real Video G2 / 8
/ 9
H.264
WMV8 / WMV 9
352 x 288 (up
to 256 kbps);
176 x 144 and
128 x 96 (up
to 64 kbps);
15 fps
Up to 320
kbps, 320 x
240, 15 fps
Up to 320
kbps, 320 x
240, 15 fps
Up to 384
kbps, 320 x
240, 24 fps
Extension
.3gp
.rm, .rmvb
.mp4, .3gp
.wmv, .asf
The Media Center also supports the
JPEG, PNG
, and
WBMP
image file formats.
GIF
,
main attractions
53
Page 57

my music
Your handset includes a music player that you
can use to play music files stored in the
phone memory and the MUSIC/AUDIO/
PODCAST directories on the memory card
inserted in your phone.
The music player will display the name of the
song playing and the artist.
Now Playing...
The Song
The Band
0:39
Pause Back
The music player groups the music files into
folders and lists. When you select a music file
main attractions
54
3:38
to play, the music player plays this file, then
plays the other music files grouped with it.
The music player also plays podcasts you
download to your computer and then save on
the Podcast directory on your phone’s
memory card. You can mark highlights within
a podcast file to help you find the parts you
most want to listen to.
If your service provider offers MMS, you can
send details of the podcast to a friend and
send feedback to the podcast creator using
MMS messages.
understanding the memory
card folder structure
When you first insert the memory card into
your phone, five folders are created:
Image, Music, Podcast
, and
Video
. In order to view
files stored on the memory card, you must
store the given file in its corresponding format
Audio
,
Page 58

folder: audio files such as ring tones, and
voice recordings to the
Image
the
the
and videos to the
filename rules
When naming files stored on the memory
card, the following rules apply:
Warn ing:
255 characters, including the file format
(.MP3), the song will not be visible on the
player and therefore can not be played. This
folder, music files such as songs to
Music
folder, Podcasts to the
•
The filename can contain UTF8
characters, including ASCII, however
only supported characters will be
displayed.
•
The filename can be up to 255
characters long, including the file
extension, however only the first 32
characters will be displayed.
If a music file name is longer than
Video
Audio
folder, pictures to
Podcast
folder.
folder
can be corrected by renaming the file and
replacing it on the card.
play music files
Find it: / > j>
1
Scroll to choose how you want your music
played (Songs, Playlists, Albums, etc.).
Tip:
The Songs folder contains all the
music files on the memory card in a single
list.
2
To play the first music file in the folder,
press
K
contains subfolders, this plays the first
music file in the first of the subfolders.)
Press
r
Scroll to a music file and press
Play to play the first music file in it.
Any time you are viewing a list of folders with
the music player, you can scroll to a folder and
press
K
under
My Music.
under
Play
. (If the selected folder
to view the folder’s contents.
K
under
Play to start playing the
main attractions
55
Page 59

contents of that folder or press K to view the
contents of the folder.
To stop viewing a folder and return to the
folder or list that contains it, press
Back
.
K
under
play music while loading files
The first time the music player finds music
files on your memory card, it loads and
organizes these files. This may take a long
time for a large number of files.
To play music while files are loading:
Find it: / > j >
1
Scroll through songs and folders while
loading is going on the background.
2
Scroll to a music file or folder and press K
under
Play or r
main attractions
56
My Music
.
.
The following options become available
through the navigation panel:
option
Pause and Resume:
to pause, and press
resume playing paused music files.
Skip to Next or Previous:
right or left to skip to the next or previous
music file.
Fast Forward and Rewind:
or left for 2 seconds to fast forward or to
rewind.
Press K under
K
under
Press and release
Press and hold ; right
Pause
Play
or r
or r to
;
set up the music player
Find it: / > j >
My Music > /
>
Setup
Page 60

The music player can be set up with the
following options by pressing
option
Shuffle:
Lets you set the music player to play
the music files in a list or folder in random
order.
Repeat:
Lets you set the music player to play
one or all the music files in a list or folder
repeatedly.
Visuals:
Lets you choose among different
types of visual equalizers which sync with
the Music.
3D Music:
Lets you experience surround
effects when the handset is tethered
to a stereo headset.
Setting the
to select effects from the list of
Album View:
list view or an image view.
3D Music
feature to On, allows you
Lets you choose to view either a
/ > Setup
Music Reverbs
:
option
Auto Update:
every time you launch My Music. If you set
Auto Update
music library configuration in order to save
loading time.
Equalizer:
music player.
View:
and
Music Reverbs:
effect for use with the 3D Music feature.
Lets you reload all music files
to
Off
, it will follow the last known
Lets you customize the sound of the
Lets you choose between
Folder
view.
Lets you choose a 3D sound
Default
view
work with playlists
Playlists are lists of music files you create
from the files already available through My
Music.
.
Playlists enable you to organize music files,
but they do not change anything in other
folders or on the memory card. Adding or
main attractions
57
Page 61

deleting a file on a playlist does not copy,
delete or move it.
create a playlist
Find it: / > j >
[Create New]
1
.
Enter a playlist name.
Note:
If you do not assign a name, the
playlist is named
My Music > Playlists >
Playlist
followed by a
number. For example, the first playlist you
create without naming is automatically
named
Playlist-1
.
2
Select
[Add Songs]
. A list of all music files
appears.
Tip:
For options to help you sort through
this list, press
3
Select each file you want on the playlist. A
/
.
checkmark appears by each selected file.
Tip:
To deselect a selected item, scroll to
a selected file and press
main attractions
58
r
.
4
When you are finished selecting files,
press
K
under
Done
and K under
Save
.
The following options are available for existing
playlists:
option
Reorder Songs in a Playlist:
You can change the
order of the music files while creating or
editing the playlist by pressing
Reorder Songs
move, press
. Scroll to the song you want to
K
under
/
>
Grab
, and then scroll
to the place where you want the song to
appear and press
Remove Songs:
K
under
Insert
.
You can remove some or all
songs while creating or editing a playlist.
Before you have saved a new playlist or
while editing a playlist, scroll to the song
/
Yes
>
to
you want to remove and press
Remove Song
Remove All Songs
confirm and
and press r, or you can select
. Press K under
K
under
Save
.
Page 62

option
Reorder Playlists:
the playlists in the
Edit playlist
playlist you want to move and press
under
where you want the playlist to appear and
press
Delete a Playlist:
select
to delete and press
K
under
Edit a Playlist:
add music files, remove music files, and
change the order of the music files. Select a
playlist and press
changes and press
You can change the order of
Playlists
folder. Press / >
>
Reorder Playlists
Grab
, and then scroll to the place
K
under
While in the music player
Playlists
. Scroll to the playlist you want
Yes
to confirm.
You can change a playlist name,
Insert
/
.
/
K
. Scroll to the
>
Delete Playlist
>
Edit Playlist
under
Save
K
. Press
. Make
.
option
Delete all Playlists:
select
and press
Note:
Favorites playlist.
Reload Music:
music files.
While in the music player
Playlists
. Press / >
K
under
This deletes all playlists except the
Searches your memory card for
Yes
to confirm.
Delete All Playlists
use the favorites playlist
The
Favorites
playlist is a permanent playlist. You
can
Add To Favorites
order of the music files, but you cannot
rename or delete music files.
Find it: / > j >
Select the song you want to add to your
favorites and press
, remove and change the
My Music > Songs
/
>
.
Add To Favorites
.
main attractions
59
Page 63

work with podcasts
Find it: / > j >
Note:
The Podcasts folder is empty until you
download podcasts from your computer.
1
Scroll to view individual podcast episodes
or folders containing multiple episodes of
the same program.
2
Press r to view the podcast episodes
within a folder or the details screen of an
individual podcast episode.
You can pause, resume, fast-forward, and
rewind just as with any other music file.
Some functions differ when playing a podcast:
•
Pressing r when you have scrolled to
a podcast displays a screen showing
podcast details, but does not play the
podcast. To play the podcast, press
under
main attractions
60
My Music
>
Podcasts
.
Play
. After you begin playing the
K
r
podcast, pressing
resumes the podcast.
•
If the podcast you are playing contains
highlights, pressing and releasing the
;
right or left skips to the next or
previous highlight within the podcast,
or to the beginning or end of the
podcast.
highlights
Highlights are portions of a podcast that are
marked to help you find them more easily. You
can use the music player to add and delete
highlight markers. Press and release (don’t
hold) the
You can play all the highlights in a podcast and
skip everything that is not marked as a
highlight using
;
right or left to find them.
Highlights Only
pauses and
.
Page 64

add a highlight marker
1
While playing a Podcast press / >
Add Highlights
2
Press K under On to mark the beginning.
3
Go to the point in the podcast that you
want to mark as the end of the highlight
and press
4
Press K under
Tip:
Highlight markers can be deleted by
pressing
Edit Highlights
Podcasts menu.
send podcast information
You can only share podcast details with
others. If you want to share podcast details,
you have saved to your memory card, you can
send it in an MMS message that can be saved
and downloaded onto their computer.
.
K
/
>
Clear
> / >
under
Off.
Back
.
or pressing / >
Clear All Highlights
from the
Find it: / > j>
Forward Details
My Music > Podcasts
>
Send.
> / >
background music
Your handset has the capability to play music
in the background while you are accessing
other features like
GPS, Contacts, MMS, Datebook, Memo, Recent Calls
others.
You can also enjoy listening to your favorite
background music while browsing the web,
reading news or checking the weather.
play music in the background
Find it: / > j>
1
Select a music file and press r to play
the song.
2
Press / >
Settings, Media Center, Bluetooth
My Music
>
Songs
.
Hide Player
.
, and
,
main attractions
61
Page 65

The music player continues playing and the
handset returns to the home screen. To jump
back to the music player, press
K
under
Music
my images
My Images lets you easily browse, edit and
view a slide show of images on your phone or
memory card.
my images menu
The My Images menu has many photo
management features. The following options
are available for images by pressing
My Images
following:
62
>
/ >
and choose one of the
main attractions
/ >j
>
option
Edit:
.
Displays several options for editing your
photos including:
Resize, Borders, Stamps, Text
Slideshow:
images from the currently highlighted
image.
Save as New:
new filename.
Preview:
Rename:
filename.
Delete Current:
image.
Delete Multiple:
to delete at one time.
Switch to Card/Switch to Phone:
images stored on the phone or memory
card.
Starts a slide show containing
Displays the highlighted image.
Lets you rename the image
Crop, Rotate/Flip, Color Adjustment,
and
Lets you save an image with a
Deletes the current highlighted
Lets you chose multiple images
Toggles between
Text Bubble.
Page 66

option
Set as Wallpaper:
the device wallpaper.
Set As Caller ID:
highlighted image to a Contact.
Send Via BLuetooth:
Bluetooth.
Sets the highlighted image as
Allows you to assign the
Lets you send the image via
viewing images
Find it: / > j >
1
Press / >
images in the current folder.
2
Press ; left or right to switch between
viewing images on the phone and the
memory card. The
also be used to scroll the images.
My Images
Slideshow
.
to view a show of all
#
or * keys can
my videos
My Videos lets you easily browse and view
video files on your phone or memory card.
Find it: / > j >
viewing videos
To view a video, select a folder, highlight the
video file you want to play, and press
Play or r
My Videos will display the video in portrait
mode by default.
Tip:
press
to begin playback.
To change the default to landscape mode
/
>
my videos setup menu
Find it: / > j >
Full Screen
My Videos
.
.
My Videos > /
>
K
Setup
under
main attractions
63
Page 67

The My Videos Setup Menu allows you to
change the following settings:
option
View:
Displays options for viewing your
videos as
3D Audio:
Reverbs:
3D audio settings.
Default
and
Folder
view.
Lets you turn 3D audio On and
Lets you choose from a number of
Off
.
camera
You can save pictures taken with the
integrated camera in your phone’s memory or
memory card, and can access them through
the Media Center.
Pictures can be sent via Private Calls,
Bluetooth, or MMS message. You can also
assign them to Contacts entries, or set them
as your phone’s wallpaper.
main attractions
64
access the camera
To access the camera with the flip open,
press
?
or press / > j >
To take pictures aim the camera lens and
press
K
under
Capture
or press r.
To save the picture, press
To discard the picture without saving it, press
K
under
Discard
.
To take a picture with the flip closed, press
?
or press / > j >
and press
From the camera viewfinder, you can press
/
The following options become available:
option
[Help]:
picture with the flip closed.
)
to take the picture.
to enter
Menu Options
Provides information on taking a
r
Camera
.
Camera
.
.
, close the flip,
Page 68

option
Record Video
: To switch the camera to
camcorder mode.
Media Center
: Opens the Media Center
application.
Zoom
: To set the camera’s zoom to 1x, 2x, or
4x
.
Remove Card:
To safely remove the memory
card from the phone.
Spotlight:
Allows you to turn the spotlight on
or off.
Session On
when phone is in camera mode.
keeps spotlight turned on
Only Once
turns the spotlight on for a single picture.
Session Off
keeps the spotlight turned off.
Self Timer: Delay capturing the picture for a
selected number of seconds. The values
are:
Off
seconds
(default),
.
10 seconds, 15 seconds, 20
To turn off the timer before the picture is
captured, press
:
under
Cancel
.
option
GPS Tag:
Allows you to turn
or
Off
.
Picture Quality
Normal
Picture Size
(1200x1600)
: Adjust the picture quality to
or
Fine
.
: Set up the picture size to
,
XL (1024x1280), L (480x640)
M (240x320), S (96x128), Wallpaper1(176x220)
Wallpaper2 (120x160)
. You can also set picture
GPS Tag
feature On
Max
,
or
size from the viewfinder by pressing left
and right.
White Balance: Sets the white balance to
Automatic, Sunny, Cloudy, Fluorescent, Tungsten
or
Night.
Exposure Control:
Adjusts the exposure of the
picture from -2 to +2.
Style: Sets the type of picture effect to
Black and White, Sepia, Solarization
and
Negative
Normal
.
,
main attractions
65
Page 69

option
Memory Usage
Free
and of the SD memory card.
Memory Card:
memory card,
On Phone
card, and to display
Camera Setup
screen.
: Shows the total amount of
, and total
Capacity
of the phone’s memory
Allows you to remove the
set where videos are stored:
or
Prefer On Card
: To access the camera set up
, format the memory
Help
.
Used,
access the media center
You can access the media center from the
camera at any time by pressing
Media Center
Camera Setup
screen.
The media center contains all your pictures,
music files, and videos located on your
66
, except when you are using the
menu or viewing the memory
main attractions
/
>
*
phone’s memory. Press
your results.
or # to filter
customize the camera
Find it: / > j >
The following options become available:
option
Ask for Name
prompted to enter a name for each picture
before saving. Otherwise, pictures are
automatically saved with the date and a
number as their names.
Shutter Sound: Set the default sound the
camera makes when is taking a picture.
Default Size: Sets the default value for the
Size
option.
Default Quality
quality of the picture.
Spotlight Setting:
Camera
> / >
: If this option is On, you are
: Sets the default value for the
Select from
Always On
Camera Setup
Picture
or
Off
Page 70

option
GPS Tag
: If this option is On, pictures will be
tagged with the geographic location of
where they were taken.
camcorder
You can use your phone’s camcorder feature
to record videos.
Find it: / > j >
record video
1
Press K under
2
To stop recording and discard the partially
recorded video, press
3
To stop recording the video press K
under
Stop
4
To save the recorded video, press r.
Camcorder
Record
, or press r.
K
under
Cancel
.
.
From the camcorder viewfinder, you can
/
press
The following options become available:
option
Media Center
application.
Capture Picture
mode.
Zoom
4x
Remove Card:
card from the phone.
Spotlight:
or off.
when phone is in camcorder mode.
turns the spotlight on for a single video.
Session Off
to enter
: To set the camera’s zoom to 1x, 2x, or
.
Allows you to turn the spotlight on
Session On
keeps the spotlight turned off.
Menu Options
: Opens the Media Center
: To switch the camera to picture
To safely remove the memory
keeps spotlight turned on
.
Only Once
main attractions
67
Page 71

option
Video Size
: Set up the picture size to
(128x96)
,
Med (176x144)
can also set picture size from the viewfinder
by pressing left and right.
Video Length
Short
MMS message, or
videos.
Note:
limited to 60 seconds when stored to your
phone’s memory. When stored to a
memory card, video length is limited to
available space on the memory card, or two
hours.
Memory Usage
Free
and of the memory card.
68
: Allows you to choose between
, to limit video length for sending via
When set to
: Shows the total amount of
, and total
main attractions
, or
Max (352x288)
Maximum
Maximum
Capacity
of the phone’s memory
Min
. You
for longer
, video length is
Used,
option
Memory Card:
memory card,
On Phone
card, and to display
Camera Setup
screen.
Allows you to remove the
set where videos are stored:
or
Prefer On Card
: To access the camera set up
, format the memory
Help
.
customize the camcorder
Find it: / > j >
The following options become available:
option
Ask for Name
prompted to enter a name for each picture
before saving. Otherwise, pictures are
automatically saved with the date and a
number as their names.
Shutter Sound: Set the default sound the
camera makes when is taking a picture.
: If this option is On, you are
Camcorder
> / >
Camera Setup
Page 72

option
Default Video Size: Sets the default value for the
Video Size
option.
Spotlight Setting:
Select from
Always On
or
Off
deleting a recorded video
If you do not want to save the recorded video,
press
K
under
Discard
to delete the recorded
video and return to the video viewfinder.
sending video via MMS
message
To send the recorded video via an MMS
K
under
Send
message, press
be automatically attached to a new MMS
message.
Note:
To ensure the video file is small enough
to be sent via MMS, set the
length to
Short
.
. The video will
Camcorder
video
PTX features
With Push To View features, your phone can
send and receive the following items through
Private calls with other phones that have this
capability:
or
Location
Recent Calls
Contacts
1
1
information to
list, and
.
•
Short text messages
•
•
•
•
•
1
Pictures
Datebook events
My Info
Contact information
Location information
You can choose to send messages, pictures,
events,
My Info, Contacts
the Private ID you are engaged in a Private call
with, Private IDs on the
Private IDs stored in
1. Additional charges may apply.
main attractions
69
Page 73

When you make or receive a Private call, your
phone automatically determines whether the
phone you are engaged in a Private call with is
able to receive each of these items. Your
phone saves this information for as long as
the Private ID is on your
saved in your
saved information each time you make or
receive a call to or from that Private ID.
Note:
during Talkgroup calls or SDGC calls.
Contacts
You cannot send PTT feature items
Recent Calls
. Your phone updates the
list or is
send messages
The Push to Send Messages feature
lets you send short text messages through
Private calls.
When you send a message, it appears on the
display of the phone you are engaged in the
Private call with.
main attractions
70
begin a message and choose a
recipient
You can begin a message during a Private call,
from the
the
begin a message during a Private call
While in a Private call, press / >
Use PTT Feature
Note:
Messaging Fees May Apply Continue?
are prompted to respond. Press
to acknowledge the message.
begin a message from the Contacts or
the Recent Calls list
1
2
Contacts
list, the
PT Manager
From the
select the entry containing the Private ID
you want to send the message to.
Press / >
.
>
Send Message
The first time you send a message,
Contacts
Use PTT Feature
Recent Calls
or the
list, or from
.
appears and you
K
under
Recent Calls
>
Send Message
list,
Yes
.
Page 74

begin a message from the PT Manager
The
PT Manager
you want to send the message to from
or the
Find it: / > N >
Then select
of entries from the
that can receive messages.
lets you select the Private ID
Recent Calls
list.
A Contact
PT Manager
or
A Recent Call
Contacts
or the
>
Send Message.
to see a list
Recent Calls
Contacts
list
create messages
After you have begun a message and chosen
a recipient, a screen appears that lets you
create the text of the message you want to
send. Your message may be up to 765
characters long.
You can choose from a list of ready-made
words or short phrases called Quick Notes.
You can use a Quick Note as it is or edit it
before you send it. Editing a Quick Note
changes the Quick Note for this message only
and will not change the Quick Note on the list.
send a completed message
After you have completed your message,
press the PTT button to send it.
receive messages
When you receive a message, a message
notification appears on the display.
To view the message: Press
To dismiss the message: Press
Dismiss
.
K
under
K
reply to a message
1
View the message.
2
Press K under
3
Create the message and press the PTT
button to send it.
Reply
.
View
under
.
main attractions
71
Page 75

send pictures
You can send pictures stored in the
Center
through Private calls. The picture you
send appears on the Private call recipient’s
display.
If the recipient accepts the picture, their
phone saves the picture. The picture then
appears in that phone’s recent call list.
The first time you send a stored picture after
turning the phone on,
Continue?
appears and you are prompted to
respond.
Note:
You cannot make or receive Private
calls while transmitting or receiving a picture.
Picture Fees May Apply
Media
send a picture during a call
1
While in a Private call, press K under
Picture
Send Picture.
main attractions
72
or press / >
Use PTT Feature
>
A list of pictures that can be included in a
Private call appears.
2
Select the picture you want to send.
3
Press the PTT button to send the picture.
4
Wait while the picture is transmitted. The
Private call is temporarily interrupted
while a picture is transmitted.
5
When prompted, press the PTT button to
resume the Private call.
start a call by sending a picture
from the media center
Find it: / > j >
1
Scroll left or right to
2
Select the picture you want to send.
3
Press / >
4
Select
A Contact
Media Center
Send Via...
or
A Recent Call
Media: Pictures
>
Send Via PTT
.
.
Page 76

A list of contacts that have Private IDs and
are able to receive pictures appears.
5
Select the name of the person you want
to send the picture to.
6
Press the PTT button to send the picture.
7
When prompted, press the PTT button to
resume the Private call.
from the PT Manager:
Find it: / > S >
1
Select
A Contact
A list of contacts that have Private IDs and
are able to receive pictures appears.
2
Select the name of the person you want
to send the picture to.
3
Select
Browse Picture
4
Press the PTT button to send the picture.
PT Manager
or
A Recent Call
or
>
Send Picture
Capture Picture
.
5
Once picture has been sent, when
prompted press the PTT button to resume
the call.
receive a picture
When someone sends you a picture, your
phone emits a tone or vibrates and a message
appears asking if you want to accept the
picture.
.
Pictures you receive are saved either to your
phone’s memory or SD card. They are
accessible through the media center.
When you see a message asking if you want
to accept the picture, press
to decline.
Yes
to accept or No
clear a picture from the display
If you want to clear a picture from your
phone’s display while still on a call, press
/
>
Clear Screen
.
main attractions
73
Page 77

send a datebook event
to send a datebook event during a
private call
1
While in a Private call press / >
Use PTT Feature
Note:
the menu, the Private ID you are engaged
in a private call with is not able to receive
Datebook events.
2
If you want to create a new datebook
event, press
event in your datebook. If you want to
chose an existing event do so.
3
If the event is a recurring event: Select
This Event Only to send only the event
selected. Select
occurrences of the event.
4
Push the PTT button to send the event.
main attractions
74
>
Send Event
If these options do not appear on
K
.
under
New and create the
Repeat Events
to send all
send my info
1
While in a Private Call press / >
Send My Info via PTT
to send.
or
2
From the home screen press / > C >
My Info
> / >
Private ID or press
chose a recipient from Contacts, Recent
Calls or Memo, and press
PTT button to send.
set my info sending option
You can control what portion of the
information in
sent automatically in every call or only when
you choose to send it.
Find it: / > S >
PTT My Info
>
., and push the PTT button
Send My Info via PTT
K
under
My Info
is sent and whether it is
PT Manager
Info to Send
>
. Enter a
Browse
r
. Push the
Configure
to
>
Page 78

1
Select or remove the fields you want to
send.
2
Press : under
The information your phone sends always
includes
send
Email1, Email2, Fax
sending options.
automatic sending
To control whether you send your information
automatically:
Find it: / > S >
PTT My Info
1
2
My Name
Mobile, Other, IP, Private2, Work1, Work2, Home,
>
Auto Send
Select On or
When you make a call in which your
information is sent automatically, the
name you entered in the
My Info
appears on the display of the
recipient’s phone, even if your name and
, and
and
Off
Done
.
Private ID1
Pager
PT Manager
. You may also
depending on your
>
Configure
My Name
>
field of
Private ID are not stored in the recipient’s
Contacts.
send contact information
1
While in a Private Call press / >
Use PTT Feature
2
Select
information you want to send.
3
Push the PTT button to send.
or
1
From the home screen press / > S >
PT Manager
2
Enter the Private ID number of the person
you want to send the Contact information
to or press
3
Select from
.
Send Contact
>
Send Contact.
K
under
Recent Calls, Contacts
and select the contact
Browse
.
, or
Memo
.
main attractions
75
Page 79

Select the contact information you want to
send and push the PTT button.
send your location
You can transfer your approximate
location information through Private calls to
other enabled phones. Using the integrated
GPS feature, the following location
information can be shared:
•
Time Stamped Latitude/Longitude
•
Relative Location or Direction and
distance from the sender in Miles or
Kilometers
Find it: / > S >
1
Select
A Contact
A list of contacts that have Private IDs and
are able to receive locations appears.
2
Select the name of the person you want
to send your location to.
main attractions
76
PT Manager > Send Location.
or
A Recent Call.
3
Press the PTT button to send your
location.
Note:
The location information can be stored
in the recipient’s recent call list.
turn PTT features on and off
You can turn your phone’s ability to send and
receive messages, pictures, and Datebook
events and location info on and off.
You cannot turn your phone’s ability to send
and receive My Info and contact information
on and off.
Find it: / > S >
1
Check or uncheck Messages, Pictures,
Events or Location.
PTT Options > On/Off PTT Features
one touch PTT
Find it: / > S >
PTT Options > One Touch PTT.
.
Page 80

One Touch PTT sets your phone to do any of
the following each time you press the PTT
button from the home screen:
option
Off
: Nothing happens when you press the
PTT button from the home screen.
Quick PTT
: Go to Quick PTT. See “quick PTT”
on page 78.
Last Call
: Call the most recent Private ID or
Group on the recent calls list.
Assigned Number
: Call a Private ID you assign.
Enter the number using your keypad, or
press
K
under
Search
. Select
Calls
, or
Memo
.
Note:
If you are entering a Talkgroup
number, enter
PT Manager
#
before the number.
: Go to PT Manager. See “PT
Contacts, Recent
manager” on page 78.
option
Send Message
: Go to the first screen to send a
message.
Send Picture
: Go to the first screen to send
pictures. See “send pictures” on page 72.
Send Event
: Go to the first screen to send a
Datebook event.
Send My Info
: Go to the first screen to send My
Info. See “send my info” on page 74.
Send Contact
: Go to the first screen to send a
contact. See “send contact information” on
page 75.
Send Location
: Go to the first screen to send
your location. See “send your location” on
page 76.
main attractions
77
Page 81

quick PTT
Quick PTT lets you quickly make a call,
create an SDG list or make a SDG call when
accessing any Private IDs on your phone.
To view a list of Contacts and SDG lists with
Contacts
Private IDs in
Find it: / > S >
To move between
use the
To make a Private call or SDG call:
1
2
3
To save your selections as a SDG list press
/
SDG lists, see “selective dynamic group
(SDG) calls” on page 88.
78
;
left or right, or press * or #.
Select the entries you want.
Press : under
Push the PTT button.
>
Save SDG
main attractions
:
Quick PTT
Contacts, Recent Calls
Done
.
. For more information about
, or
Memo
If you want to assign a name to the SDG list,
enter the name.
Note:
If you do not assign a name, the SDG
list is named SDG followed by the number of
members in the SDG list. For example, SDG
(8) for a SDG list with 8 members.
PT manager
,
The
PT Manager
features, and other Private call features, from
the main menu.
Find it: / > S >
1
Select
Event
Configure
are sending, select a contact and press
the PTT button to send.
or
lets you quickly access PTT
PT Manager
Quick PTT, Send Message, Send Picture, Send
,
Send My Info, Send Contact, Send Location
. After choosing what PTT item you
, or
Page 82

2
Select Configure
Notes
,
On/Off PTT Features
to configure your
PTT My Info, PTT Location, One Touch PTT
.
PTT Quick
, or
You can turn off Bluetooth if you want to
prolong battery life or if you enter an area
where Bluetooth is prohibited.
Bluetooth®
Find it: / >
turn Bluetooth on or off
You can turn your phone’s Bluetooth feature
on or off. While Bluetooth power is on, your
phone can communicate with other devices.
Find it: / > C >c >
1
Select On to power Bluetooth On.
2
Select
to your handset.
3
Select
time in which your handset can be found
by other Bluetooth devices.
c
Setup > Power
Name
if you wish to assign a name
Find Me
to determine the amount of
make a Bluetooth connection
connect your handset with a Bluetooth
headset
Find it: / > C > c >
[Look for Devices]
1
Follow the instructions on your Bluetooth
headset to set it up to be found.
2
Once your Bluetooth headset is set to be
found press
phone will scan for the Bluetooth headset
until it finds it. Press
the name of the Bluetooth headset on
your screen.
3
Your handset requires that you create a
bond in order to connect with a Bluetooth
Audio Devices>
r
on your handset. Your
r
when you see
main attractions
79
Page 83

headset. Press K under
prompted to bond with the headset.
4
Enter the Bluetooth pass key.
Some Bluetooth devices ship with
Bluetooth PINs. Please refer to your
Bluetooth device’s user guide to locate
this information.
If a device ships without a Bluetooth PIN,
then you can enter any PIN for that
device. To establish a connection to that
device, enter the same PIN for both your
phone and the device. For example, if you
enter 1234 as the device’s PIN, then enter
1234 as your phone’s PIN.
5
Press K under Ok.
This handset offers the Bluetooth auto pair
feature with auto pair compatible Motorola
devices. When bonded via Bluetooth with a
certain device, the pin will not be required
main attractions
80
Yes
when you are
pair your handset with another
Bluetooth device
Find it: / > C > c >
1
Select the device you want from the list of
found devices on your screen.
2
Create a bond if you are prompted to do
so.
If you have previously paired to a device, the
device will be stored in the device history so
you can connect with it easily.
Pair to Devices
use Bluetooth during a call
You can connect with available Bluetooth
devices during a call.
1
While in a call, press / >
2
Select the audio device you want to
connect to from the list of
Audio Devices
If the
your phone will try to connect to it.
list contains only one device,
Use Bluetooth
Audio Devices
.
.
Page 84

send information via Bluetooth
Your handset can transfer Contacts entries,
Datebook events, audio files, pictures and
videos to another Bluetooth device.
The receiving device must be within 32 feet
(10 meters) of your phone in order to connect.
Note:
Files sent or received may be up
to 10 MB, depending on your service
provider. Bluetooth FTP file transfers will not
work if a microSD card is not installed in your
phone.
sending information
1
From within
select the Contacts entry, Datebook
event, audio file, video, or picture you
want to send.
2
Press / >
Contacts, Datebook
Send Via...
>
Bluetooth
, or
Media Center
.
3
Select the device you want to transfer the
contact information to, or search for the
device by selecting
4
If prompted, bond with the device.
Your phone connects with the devices and
transfers the information.
how to check if your PC
supports Bluetooth FTP
1
Right click on the Bluetooth icon in the
system tray and open Bluetooth
configuration.
2
,
Click on the Client Applications tab and
check that File Transfer is active.
Note:
This process may be different
depending on the PC manufacturer.
[Look for Devices]
.
main attractions
81
Page 85

file browsing with the
Bluetooth file transfer service
1
Double click the My Computer Icon on the
desktop.
2
Double click on My Bluetooth Places.
3
Double click on FIle Transfer Service.
4
Drag and drop the files to the appropriate
1
folder.
See “understanding the memory
card folder structure” on page 54.
Note:
This process may be different
depending on the PC manufacturer.
1. If a music file is not visible in My Music, press / >
Reload Music
music files within the Music folder on your microSD
card will be loaded into My Music.
82
while in the music player application. All
main attractions
Page 86

call features
turn off a call alert
You can press the volume keys to turn off a
call alert before answering the call.
recent calls
The recent calls list contains information
associated with calls you have made and
received and call alerts you have received.
When you send or receive Private calls, the
recent call list contains the following PTX
items with those calls:
•
contact information received
•
My Info received
•
short text messages received
•
pictures sent or received
•
Datebook events received
The recent calls list displays up to 20 of the
most recent calls and call alerts.
1
Press / >
screen, press
2
Scroll through the list.
3
To view more details of the item
press
Note:
All Private, Blocked or Anonymous calls
received will be displayed as Private in recent
calls.
r
Recent Calls
.
or from the idle
`
to access Recent Calls
.
call features
83
Page 87

store an item to contacts from
recent calls
Phone calls, Private calls, My Info, Contacts or
Location entries received from other phones
can be stored to the Contacts list from the
Recent Calls list.
Find it: / >
1
Scroll to or select the item you want to
store.
2
Press K under
information as a new entry in the
Contacts list.
or
3
Select an existing contact and update the
information.
4
Press K under
84
Recent Calls
call features
.
Save
to store the
Save
to save your changes.
redial
To redial your last outgoing call, press and
hold
`
. If your last outgoing call was a
Private Call, and you have set
Last Call
, push the PTT button to initiate a new
Private call.
One Touch PTT
to
caller ID
Caller ID allows people to identify a caller
before answering the phone by displaying the
number of the incoming call. If you do not
want your number displayed when you make
a call, just follow these easy steps.
To block your phone number from being
displayed for a specific outgoing call:
1
Press
*67
2
Enter the number you want to call.
3
Press `.
.
Page 88

To permanently block your number, call your
customer service provider.
call forward
Call forwarding sends calls to the phone
numbers you specify. You can forward all calls
to one number or forward missed calls to
different numbers depending on the reason
you missed the call. You can forward phone
lines 1 and 2 independently.
Find it: / u >
1
To forward all calls select
To
to enter the phone number you want all
your calls forwarded to.
or
2
You can specify a forwarding number for
each type of missed call by selecting
Detailed
Phone Calls
and choosing the following options:
>
Call Forward
All Calls
.
and select
If Busy
: When your handset is on a call or
transferring data.
If No Answer
the first 4 rings.
If Unreachable
coverage or powered off.
: When you do not answer on
: When your handset is out of
voice names
You can place calls by speaking commands to
your phone if you have previously assigned a
voice name to your contacts.
assign voice names to contacts
1
Press K under
[New Contact]
2
Assign a name, phone number and select
[Options]
.
Contacts
and select
.
call features
85
Page 89

3
Select
Voice Name
record the voice name. Press
recording and store the voice name.
4
Press K under
Save
.
place a call using a voice name
1
Press the speaker key ) until you are
prompted to say the voice name.
The handset will automatically place the call.
and follow the prompt to
r
to stop
Back
and press K under
emergency calls
Your service provider programs one or more
emergency phone numbers that you can call
under any circumstances. Emergency calls
can be made without a SIM card, when your
phone is locked, or when the SIM card is
blocked.
Note:
Emergency numbers vary by country.
Your phone’s preprogrammed emergency
call features
86
number(s) may not work in all locations, and
sometimes an emergency call cannot be
placed due to network, environmental, or
interference issues.
Dial 911 or your local emergency number to
be connected to an emergency response
center. If you are on an active call, you must
end it before making an emergency call.
When you make an emergency call, your
phone’s GPS Enabled feature can help
emergency service personnel find you, if you
are in a location where your phone's GPS
antenna has established a clear view of the
open sky and your local emergency response
center has the equipment to process location
information. Because of the limitations of this
feature, always provide your location, to the
best of your knowledge, to the emergency
response center when you make an
emergency call
.
Page 90

Note:
Emergency calls cannot be placed
while the keypad is locked, or if your phone is
displaying a
To unlock the keypad, if the flip is closed,
open the flip to reveal the keypad. If the flip is
open, press
No Service
message on the screen.
/*
.
1
From the home screen, use the keypad to
enter the Speed Dial number assigned to
the phone number you want to call.
2
Press #.
3
Press `.
international calls
If your phone service includes international
dialing, press and hold
international access code (indicated by +).
Then, press the keypad keys to dial the
country code and phone number.
0
to insert your local
speed dial
Each phone number stored in Contacts is
assigned a Speed Dial number, which you can
use to call that number.
turbo dial
The first nine entries in your contacts are set
for turbo dial. They can be called by pressing
and holding the speed dial number
(1 through 9).
voicemail
To receive voice mail messages, you must
first set up a voice mail account with your
service provider.
call features
87
Page 91

receiving a message
When you receive a voice mail message,
New VoiceMail Message
To call your service provider’s voice mail
system and listen to the message:
1
Press K under
2
To dismiss the message notification:
•
Press r or K under
If the caller leaves a message, this icon
appears on the display, reminding you that
you have a new message.
appears on the display.
Call
.
Back
.
3
selective dynamic
group (SDG) calls
A SDG call is similar to a Private call, but is
made to all members of a SDG list at once. A
SDG list is a group of Private IDs that you
create using your phone. A SDG list must
call features
88
contain at least 2 members and can contain
up to 20 members.
You can create a SDG list for one call only or
store it to Contacts so you can call it any time.
Note:
In order to store SDG lists to your
phone, you must use a SDG-capable SIM
card. For more information about
SDG-capable SIM cards, contact your service
provider. SDG lists created with your phone
are not readable by an older iDEN SIM-based
phone.
You can use Send via PTT to send SDG
lists to other phones that have this
capability.
create SDG lists in contacts
Find it: / > L.
1
Select
[New SDG List]
2
If you want to assign a name to the SDG
list, enter the name.
.
Page 92

If you do not assign a name, the SDG list
is named “SDG” followed by the number
of members in the SDG list. For example,
“SDG (8)” for a SDG list with 8 members.
3
Add Private IDs. See “Add Private
Numbers” below.
4
Press K under
Save
.
add private numbers
You can add Private IDs to a SDG list by
selecting them from Contacts, the recent
calls list, or memo. You can add all members
in an existing SDG list by selecting the list.
You can select more than one member from
Contacts and the recent calls list. A
checkmark appears next to each selected
item.
add members from contacts,
the recent calls list, or memo
1
While creating a SDG list, select
[Add Member] or select
K
under
Browse
2
Scroll to the members you want from
Contacts, the recent calls list, or Memo,
and press
to each selected member.
If you chose
enter a Private ID number from the keypad.
3
Press K under
r
[Add Number]
[Add Number]
.
. A checkmark appears next
in step one, you can
Done
.
and press
remove members or SDG lists
remove a member from a SDG list
1
From Contacts, scroll to the SDG list you
want to delete the member from.
2
Press K under
Edit
.
call features
89
Page 93

3
Scroll to the member you want to remove.
4
Press / >
5
Press K under
remove all members from a SDG list
1
From Contacts, scroll to the SDG list you
want to delete the member from.
2
Press K under
3
Press / >
4
Press K under
delete a SDG list from Contacts
1
Scroll to the SDG list you want to delete.
2
Press / >
Remove Member
Save
.
Edit
.
Remove All
Delete SDG List
.
Yes
to confirm.
.
.
make SDG Calls
1
From Contacts or the recent calls list,
scroll to or select the SDG list you want.
2
Push the PTT button.
call features
90
start a SDG call with a private
ID
You can start a SDG call with any Private ID
you want to call.
1
From the home screen, enter the Private
ID, or from the Contacts list or the recent
Calls List, scroll to an entry containing the
Private ID.
2
Press / >
3
Add more Private IDs. See “add private
numbers” on page 89.
If you want to save the SDG list you have
created press
not want to save the SDG list, press
under
4
Push the PTT button to make the call.
Done
Call SDG
.
/
.
>
Save SDG
, or if you do
K
Page 94

SDG call Information
While you are in a SDG call, the following
appears on the screen:
•
The name of the SDG list
•
The name or the Private ID of the
person speaking
•
The number of participants in the SDG
call
SDG Call Details
During a SDG call, you can view details about
the other SDG list members, such as their
name or Private ID, and their status on the
call. To view SDG call details, press
Details
.
In the SDG Call Details view, these icons
appear next to member names or Private IDs:
K
under
F
The member of the SDG list who is
speaking.
E
A member of the SDG list who is active
on the SDG call, but not speaking.
D
A member of the SDG list who has
exited the call.
H
A member of the SDG list who could
not be reached on the SDG call.
G
A member of the SDG list whose
status is unknown.
call features
91
Page 95

MOTOtalk
Note:
This feature may not be offered by your
service provider.
With MOTOtalk, you can make and receive
Two-Way Radio calls without network
coverage. If you are travelling outside your
service provider's coverage area, receiving a
poor signal, or otherwise want to temporarily
avoid using your service provider's network,
you can switch to MOTOtalk and talk with
anyone on your code and channel who is
within range.
Note:
Range will vary based on terrain,
man-made structures and atmospheric
conditions.
MOTOtalk lets you:
•
Use code or private mode operation
TM
•
Use up to 10 channels
•
Communicate with standalone
MOTOtalk radios
Note:
You cannot use MOTOtalk with older
Family Radio Services products.
The following features and main menu items
are unavailable while in MOTOtalk:
•
On-network phone or Private calls
•
Data transmission
•
Incoming message notification
•
Datebook
•
Call forwarding
•
Call Timers
•
Call alerts
92
MOTOtalk
TM
Page 96

switching to MOTOtalk
To set your phone to MOTOtalk:
1
From the home screen press / > p >
MOTOtalk and press r.
2
Select
Go to MOTOtalk
Switching to MOTOtalk Please Wait
After a few seconds, the MOTOtalk idle
screen displays. When
you can begin using MOTOtalk.
While in MOTOtalk, this icon
.
displays.
MT Ready
4
displays.
displays,
exiting MOTOtalk
To switch to network mode:
1
From the MOTOtalk idle screen, press
/
> p >
2
Select
MT Options
Exit MOTOtalk
and press r.
.
Switching to Network Please Wait
seconds, the network idle screen appears.
displays. After a few
talk range
While in MOTOtalk mode, phones should be a
minimum of 6 feet apart to maximize
performance and improve transmission range.
channels and codes
Your phone has 10 channels and 15 codes.
Channels are divided into sets of frequencies.
Other parties may be talking on the same
channel. Codes minimize interference from
other parties when you are sharing the same
channel.
MOTOtalk opens to the last code and channel
used on your phone. You can view the code
and channel your phone is currently set to on
the MOTOtalk idle screen.
MOTOtalk
TM
93
Page 97

For code calls, all parties must be on the
same channel and code. For private MOTOtalk
calls, the person you are calling must be in
MOTOtalk and set to the same channel to
receive your call.
Note:
When making a code call, all parties
that are on your code and channel can hear
your conversation.
setting channels and codes
To set a channel:
1
From the MOTOtalk idle screen, press K
Edit
under
2
Scroll to
3
Press K under
4
Select a channel.
5
When you are finished, press K under
Back
94
.
Channel
.
Edit
.
to return to the MOTOtalk idle screen.
MOTOtalk
TM
To set a code:
1
From the MOTOtalk idle screen, press K
under
Edit
.
2
Scroll to
3
Press K under
4
Select a code.
5
When you are finished, press K under
Back
Code
.
Edit
.
to return to the MOTOtalk idle screen.
making code calls
To make a code call:
1
From the MOTOtalk idle screen or the
channel and code edit screen, press and
hold the PTT button.
the first line of display. Begin speaking
after your phone emits the MOTOtalk
tone.
Note:
The MOTOtalk tone consists of 4 rapid
beeps.
Transmit
appears on
Page 98

2
Release the PTT button to listen.
If you receive an error message:
•
No one is on your channel or code.
•
You are out of range.
receiving code calls
When you receive a code call,
appear on the display. After hearing the
MOTOtalk tone, you have 6 seconds to reply
before the call times out.
To reply to the call, press the PTT button.
Note:
An incoming MOTOtalk call can be
terminated at any time by pressing
Receive
will
@
.
receiving all MOTOtalk calls
If you set the code to
can receive MOTOtalk transmissions from any
phone that is set to the same channel,
regardless of the code (1-15). When you
Receive All
, your phone
receive transmissions with the code set to
Receive All
received on will replace
, the code that the transmission was
Receive All
on the
display.
Note:
You cannot initiate a code call when the
code is set to
Receive All
To set the code to
1
From the MOTOtalk idle screen, press K
under
Edit
.
2
Scroll to
3
Press K under
4
Select
5
When you are finished, press K under
Back
Code
Receive All
to return to the MOTOtalk idle screen.
To reply to a call with the code set to
•
Press the PTT button.
Receive All
.
.
Edit
.
:
.
Receive All
:
MOTOtalk
TM
95
Page 99

private MOTOtalk calls
If you want to have a private conversation
without other parties listening in, you can
make a private MOTOtalk call. The person you
are calling must be in MOTOtalk and set to
the same channel to receive your call.
private only
To set MOTOtalk to ignore code calls, so that
you only make or receive private MOTOtalk
calls, set your code to
To set the code to
1
From the MOTOtalk idle screen, press K
under
Edit
.
2
Scroll to
3
Press K under
4
Select
Code
Pvt Only
.
.
Pvt Only
Pvt Only
Edit
.
.
:
5
When you are finished, press K under
Back
to return to the MOTOtalk idle screen.
making a private MOTOtalk call
1
Enter the PTN of the person you want to
call on your channel. If the PTN is more
than 10-digits, enter the last 10-digits of
the PTN, or scroll to a number or name in
Contacts or the Recent Calls List.
2
Press and hold the PTT button. Begin
speaking after your phone emits the
MOTOtalk tone.
3
Release the PTT button to listen.
The number or name of the person you
are calling will appear in the display.
If you receive an error message:
•
The PTN you entered is invalid.
•
The person that you are trying to reach
is in network mode.
96
MOTOtalk
TM
Page 100

•
The person that you are trying to reach
is set to a different channel.
•
The person that you are trying to reach
is out of range.
making emergency calls
while in MOTOtalkTM
mode
receiving a private MOTOtalk
call
The number or name of the person who is
calling will appear in the display.
To reply, press the PTT button.
ending code calls and private
MOTOtalk calls
Code calls and private MOTOtalk calls will end
automatically after 6 seconds of inactivity.
The MOTOtalk idle screen will display.
Note:
A private or code MOTOtalk call can be
interrupted during the 6 second idle time by
another code call or private call.
If you attempt to make an Emergency 911 call
while in MOTOtalk mode, your phone will
automatically exit MOTOtalk mode and
attempt to find a network signal.
If you are out of network coverage your phone
will not be able to make an emergency 911
cellular call until you go back into the network
coverage area.
You must wait until the phone reconnects to
the network before attempting to make an
emergency 911 cellular call.
MOTOtalk
TM
97
 Loading...