

Page 1

Z6m CDMA 02/27/07
Dummy Page - To be discarded before printing
Use this template with A6MotoLandscape StructApps.
This template provides formatting for a User Guide and an embedded Legal Guide.
All semantically-named elements within the Legal Guide content must have their
Role attributes set to LG.
Page 2

Page 3

HELLOMOTO
Introducing your new
Connect on So Many Levels
messaging, downloads, or swapping an optional memory card – you’ll be on top of all the latest
news and views to share!
Rich Multimedia Experience
commute. Slip a microSD card into the removable memory slot to save many more songs!
An easy to use digital camera lets you take great quality pictures. Save images on your phone or
on the memory card. Or instead, make a mini-movie with the video camera, if you prefer.
Handsfree Convenience
or music.
MOTO
RIZR™ Z6m CDMA wireless phone!
– Whether it’s work or friends, connect in a variety of ways – voice,
– Use the robust music player to set your playlist for your morning
– Use your phone with Bluetooth® wireless headsets to hear calls
1
Page 4

Here’s a quick anatomy lesson.
Push Bar
Push down to close slider.
Light Sensor
Right Soft Key
Left Soft Key
Camera Key
Send Key
Make & answer calls.
I
G
H
J
Lock Switch
Clear/Back Key
Power/End Key
Turn on/off, hang up, exit menus.
Microphone
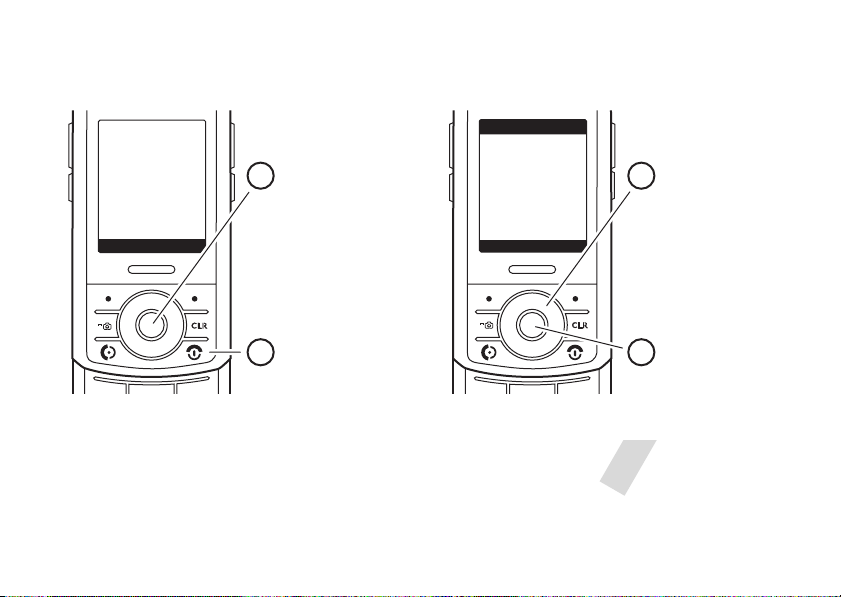
Scroll up, down, left, or right.
Navigation Key
Center Key
Open main menu & select menu items.
2
Page 5
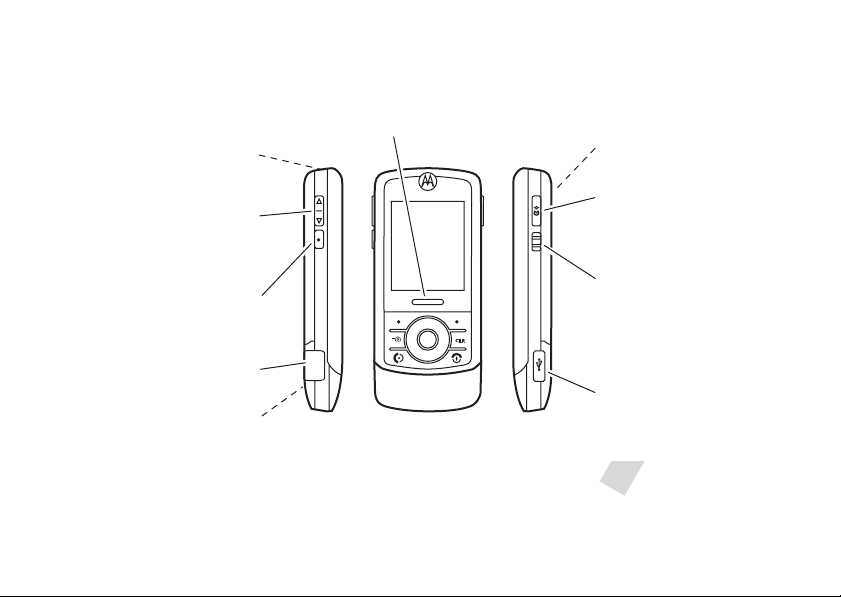
MicroSD
Memory Card Slot
(on top of phone)
Volume Keys
Set ring volume when
slider is closed.
Smart/Seakerphone Key
Select menu items.
3.5mm Headset Jack
Handsfree Speaker
(on back of phone)
Push Bar
Push up to open slider.
\
Camera Lens
(on back of phone)
Voice Command Key
Use voice commands to make
calls & perform basic phone
>
functions.
Lock Switch
Lock the slider to prevent
I
G
H
J
accidental key presses.
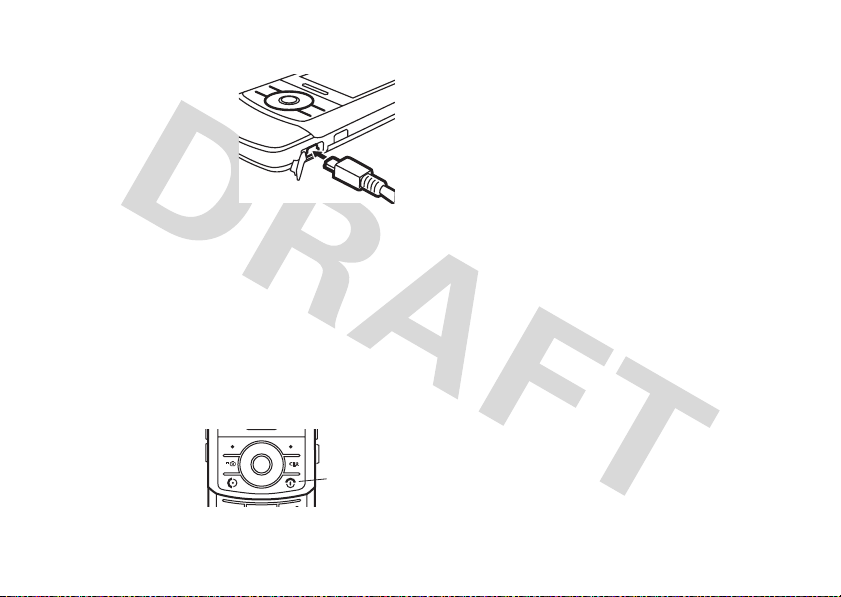
Mini-USB Port
Insert battery charger
& phone accessories.
3
Page 6
Home Screen Main Menu
0
❙❙❙
P
6
MON 1/15/07
Recent Messaging
Îì
&
h
&
J
L
e
&
8:45am
I
H
G
J
N
&
Press the
2
s to open
Key
the
Main Menu
Press & hold the
1
Power Key P
Center
.
until
0
n
J
w
Select
❙❙❙
❙❙❙
Recent Calls
s
É
G
L
OK
I
J
P
e
h
m
H
3
Exit
4
the display lights up,
to turn on your
phone.
This is the standard main menu layout.
Your phone’s menu may be a little different.
To change your home screen shortcuts and main menu appearance, see page 83.
4
Press the
Navigation Key S
up/down/left/right to
highlight a menu
feature.
Press the
Center Key s
to select it.
Page 7

Motorola, Inc.
Consumer Advocacy Office
1307 East Algonquin Road
Schaumburg, IL 60196
www.hellomoto.com
1-800-331-6456 (United States)
1-888-390-6456 (TTY/TDD United States for hearing impaired)
1-800-461-4575 (Canada)
Certain mobile phone features are dependent on the capabilities
and settings of your service provider’s network. Additionally,
certain features may not be activated by your service provider,
and/or the provider’s network settings may limit the feature’s
functionality. Always contact your service provider about feature
availability and functionality. All features, functionality, and other
product specifications, as well as the information contained in this
user’s guide are based upon the latest available information and
are believed to be accurate at the time of printing. Motorola
reserves the right to change or modify any information or
specifications without notice or obligation.
MOTOROLA and the Stylized M Logo are registered in the US
Patent & Trademark Office. All other product or service names are
the property of their respective owners. The Bluetooth trademarks
are owned by their proprietor and used by Motorola, Inc. under
license. Java and all other Java-based marks are trademarks or
registered trademarks of Sun Microsystems, Inc. in the U.S. and
other countries. Microsoft and Windows are registered trademarks
of Microsoft Corporation; and Windows XP is a trademark of
Microsoft Corporation.
© Motorola, Inc., 2007.
Caution:
Changes or modifications made in the radio phone, not
expressly approved by Motorola, will void the user’s authority to
operate the equipment.
Software Copyright Notice
The Motorola products described in this manual may include
copyrighted Motorola and third-party software stored in
semiconductor memories or other media. Laws in the United
States and other countries preserve for Motorola and third-party
software providers certain exclusive rights for copyrighted
software, such as the exclusive rights to distribute or reproduce
the copyrighted software. Accordingly, any copyrighted software
contained in the Motorola products may not be modified,
reverse-engineered, distributed, or reproduced in any manner to
the extent allowed by law. Furthermore, the purchase of the
Motorola products shall not be deemed to grant either directly or
by implication, estoppel, or otherwise, any license under the
copyrights, patents, or patent applications of Motorola or any
third-party software provider, except for the normal, non-exclusive,
royalty-free license to use that arises by operation of law in the
sale of a product.
Manual Number: 6809509A46-O
5
Page 8

contents
menu map . . . . . . . . . . . . 8
Use and Care . . . . . . . . . 10
essentials . . . . . . . . . . . . 11
about this guide. . . . . . 11
battery . . . . . . . . . . . . . 12
turn it on & off . . . . . . . 14
lock & unlock slider . . . 14
make a call. . . . . . . . . . 15
answer a call . . . . . . . . 15
adjust volume . . . . . . . 15
change the call alert. . . 15
store a phone
number . . . . . . . . . . . . 16
call a stored phone
number . . . . . . . . . . . . 16
view your phone
number . . . . . . . . . . . . 16
contents
6
tips & tricks . . . . . . . . . . 17
basics . . . . . . . . . . . . . . . 18
home screen . . . . . . . . 18
shortcuts & main
menu . . . . . . . . . . . . . . 20
enter text. . . . . . . . . . . 22
slider closed . . . . . . . . 27
continue or end task
when closing slider . . . 28
handsfree speaker. . . . 29
codes & passwords . . . 30
lock & unlock phone . . 30
airplane mode . . . . . . . 31
memory card. . . . . . . . 31
customize. . . . . . . . . . . . 38
ring styles & alerts. . . . 38
wallpaper . . . . . . . . . . . 39
set screen saver . . . . . 39
brightness . . . . . . . . . . 40
backlight . . . . . . . . . . . 40
talking phone settings . 40
AGPS & your location . 41
AGPS limitations
& tips. . . . . . . . . . . . . . 42
calls. . . . . . . . . . . . . . . . . 44
turn off a call alert . . . . 44
redial a number . . . . . . 44
automatic redial . . . . . . 44
recent calls . . . . . . . . . 44
return a missed call . . . 46
answer options . . . . . . 46
notepad . . . . . . . . . . . . 46
attach number . . . . . . . 46
(continued next page)
Page 9

messages (continued)
emergency calls . . . . . 47
AGPS during an
emergency call . . . . . . 47
speed dial . . . . . . . . . . 48
voicemail . . . . . . . . . . 49
messages . . . . . . . . . . . 50
send a multimedia
message. . . . . . . . . . . 50
receive a multimedia
message. . . . . . . . . . . 53
connections . . . . . . . . . 55
Bluetooth®
connections . . . . . . . . 55
cable connections. . . . 58
entertainment. . . . . . . . 59
music player . . . . . . . . 59
take & send photo . . . 71
record & play video
clips . . . . . . . . . . . . . . . 74
other features . . . . . . . . 76
advanced calling . . . . . 76
phonebook . . . . . . . . . 76
messages . . . . . . . . . . 79
personalize . . . . . . . . . 81
call times . . . . . . . . . . 86
handsfree . . . . . . . . . . 86
data & fax calls . . . . . . 88
network . . . . . . . . . . . 89
personal organizer . . . 89
security. . . . . . . . . . . . 91
fun & games. . . . . . . . 92
service & repairs. . . . . . 94
SAR Data. . . . . . . . . . . . 95
Safety Information . . . . 98
Industry Canada
Notice . . . . . . . . . . . . . 103
FCC Notice . . . . . . . . . 104
Warranty . . . . . . . . . . . 105
Hearing Aids . . . . . . . . 109
WHO Information . . . . . 110
Registration . . . . . . . . . 110
Export Law . . . . . . . . . . 111
Recycling. . . . . . . . . . . . 111
Perchlorate Label . . . . 112
Driving Safety . . . . . . . 113
index . . . . . . . . . . . . . . 115
contents
7
Page 10

main menu
n
Contacts
s
Recent Calls
• Received
• Dialed
• Notepad
• Call Times
•Data Times
•Data Volumes
e
Messaging
• Create Message
• Message Inbox
•Voicemail
• Browser Alerts
• Outbox
•Drafts
• Templates
menu map
8
menu map
J
BREW
L
Web Br ows er
h
Media Gallery
•Camera
• MP3 Player
•Pictures
• Sounds
• Videos
• Video Camera
• Themes
w
Settings
• (see next page)
* optional features
This is the standard main menu layout.
Your phone’s menu may be a
little different
.
É
m
To o l s
Phone Status
•Calculator
• Datebook
•Voice Records
•Alarm Clock
• Airplane Mode
• My Tel. Number
• Battery Meter
• Storage Devices
• Other Information
Page 11

settings menu
t
Ring Styles
•Style
• Style Det ail
l
Perso nalize
• Home Screen
• Main Menu
•Voice Dial Setup
•Skin
• Greeting
• Wallpaper
• Screen Saver
• Slide Tone
• Sound Settings
U
In-Call Setup
• In-Call Timer
• Answer Options
•MSG Alert
Æ
Z
j
Security
Initial Setup
Network
• Phone Lock
• Lock Application
• Restrict Calls
• New Passwords
• SpeakerPhone
• Auto Redial
• Backlight
• TTY Setup
•Scroll
• Slide Closed
• Language
• Battery Save
• Brightness
•DTMF
• Hyphenation
• Master Reset
• Master Clear
• Current Network
• Set Mode
• Service Tone
• Call Drop Tone
J
S
P
L
Car Settings
• Auto Answer
• Auto Handsfree
• Power-off Delay
• Charger Time
Headset
• Auto Answer
• Voice Dial
Location
Connection
• Incoming Call
• Bluetooth Link
• USB Settings
menu map
9
Page 12
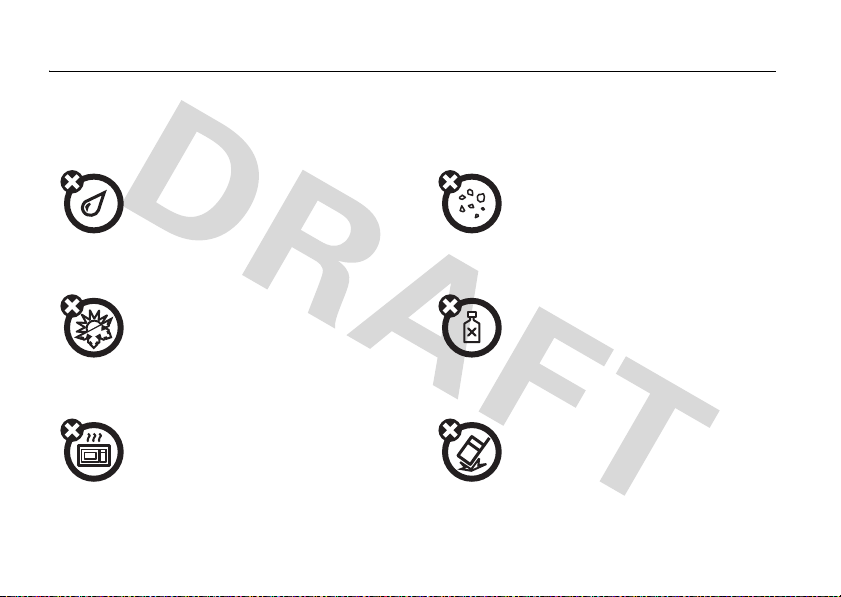
Use and Care
Use and Care
To care for your Motorola phone, please keep it away from:
liquids of any kind dust and dirt
Don’t expose your phone to water, rain,
extreme humidity, sweat, or other moisture.
extreme heat or cold cleaning solutions
Avoid temperatures below -10°C/14°F or
above 45°C/113°F.
microwaves the ground
Don’t try to dry your phone in a microwave
oven.
Use and Care
10
Don’t expose your phone to dust, dirt, sand,
food, or other inappropriate materials.
To clean your phone, use only a dry soft cloth.
Don’t use alcohol or other cleaning solutions.
Don’t drop your phone.
Page 13
essentials
CAUTION: Before using the
phone for the first time, read the
Important Safety and Legal
Information
edged pages at the back of this
guide.
included in the gray-
about this guide
This guide shows how to locate a menu
feature as follows:
Find it: s >
s Recent Calls >Received
This means that, from the home screen:
1
Press the center keys to open
the menu.
2
Press the navigation keyS to scroll to
s Recent Calls
to select it.
3
Press the navigation keyS to scroll to
Received Calls
to select it.
symbols
, and press the center keys
, and press the center keys
This means a feature is network/
subscription dependent and may
not be available in all areas. Contact
your service provider for
more information.
essentials
11
Page 14

symbols
This means a feature requires an
optional accessory.
battery
battery tips
Battery life depends on the network, signal
strength, temperature, features, and
accessories you use.
•
Always use Motorola
Original batteries and
chargers. The warranty does
not cover damage caused by
non-Motorola batteries and/
or chargers.
•
New batteries or batteries stored for a
long time may take more time
to charge.
essentials
12
•
When charging your battery, keep it
near room temperature.
When storing your battery, keep it
uncharged in a cool, dark, dry place.
•
Never expose batteries to
temperatures below -10°C (14°F) or
above 45°C (113°F). Always take your
phone with you when you leave
your vehicle.
•
It is normal for batteries to gradually
wear down and require longer charging
times. If you notice a change in your
battery life, it is probably time to
purchase a new battery.
Contact your local recycling center for
032375o
proper battery disposal.
Warning:
Never dispose of batteries in a fire
because they may explode.
Page 15

Before using your phone, read the battery
safety information in the “Safety and General
Information” section included in this guide.
To save battery life:
Don’t block the light sensor on the
•
front of your phone (see page 2). The
light sensor helps conserve battery by
sensing when to dim the backlight.
•
Adjust the backlight to turn off more
quickly (see page 40).
•
Turn off Bluetooth power when you are
not using it (see page 55).
install the battery
12
34
essentials
13
Page 16
battery charging
New batteries are not
fully charged. Plug the
battery charger into
your phone and an
electrical outlet. Your
phone might take
several seconds to
start charging the battery. The phone shows
Charge Complete
Tip:
when finished.
Relax, you can’t overcharge your battery.
It will perform best after you fully charge and
discharge it a few times.
turn it on & off
To t ur n o n y o u r
phone, press and
hold
O
for a few
essentials
14
I
G
H
J
Power
Key
seconds or until the display turns on.
If prompted, enter your four-digit unlock code.
Your phone’s four-digit
originally set to
1234
unlock code
or to the last four digits
is
of your phone number.
O
To turn off your phone, press and hold
for
two seconds.
lock & unlock slider
You can lock your phone to keep from
accidentally pushing external keys when the
slider is closed.
To lock the phone, push the lock switch
(see page 2).
When the phone is
on and locked
open the slider, the keypad unlocks. When
you close the slider, the phone goes back into
the locked state. When the phone is
up
, if you
off and
Page 17

the locked
briefly displays a white padlock to remind you
that the phone is locked.
, the phone will not turn on, but
make a call
Open your phone
and press
To “hang up,” close the slider or press
Tip:
Make sure your finger is not covering the
microphone (see page 3).
N
Is your caller saying they can’t hear you?
, enter a phone number
to make a call.
O
.
adjust volume
With the slider open or closed, press the
volume keys (see page 3) up or down to:
•
increase or decrease earpiece volume
during a call
•
increase or decrease the ringer volume
setting when the home screen is
visible (with the slider open)
•
turn off an incoming call alert
change the call alert
answer a call
When your phone rings and/or vibrates, just
open the slider or press
To “hang up,” close the slider or press
N
to answer.
O
.
With the slider open or closed, press the
down volume key (see page 3) to switch to
lower call alert volume, then vibrate, and
finally silent alert. Press the up volume key to
cycle back from silent alert to vibrate and then
to the lowest alert volume setting.
essentials
15
Page 18

store a phone number
call a stored phone
You can store a phone number in
1
Open the slider and enter a phone
number in the home screen.
2
Press
Store
.
3
Enter a name and other details for the
phone number. To select a highlighted
item, press the center key
4
Press
Done
to store the number.
Note:
To edit or delete a
page 76.
To store an email address, press
s>n Contacts>[New Entry] >Email
name and email address.
essentials
16
Contacts
s
entry, see
Contacts
:
.
. Enter the
number
Find it: s >
1
Scroll to the
2
Press N to call the entry.
Shortcut:
an entry you want. You can also press
*
and# to see the entries you use
frequently, or entries in other categories.
n Contacts
In
Contacts
Contacts
entry.
, enter the first letters of
view your phone number
Find it: s >
>
My Tel. Number
Tip:
Want to see your phone number while
you’re on a call? Press
w Settings >m Phone Status
Options>My Tel. Number
.
Page 19
tips & tricks
From the home screen
use the following shortcuts:
To... Do this...
Play music
Tu r n
speakerphone on
or off
Call
voicemail
See recent
calls
(page 18), you can
Press the music/camera key
l
or press the Smart/
Speakerphone Key (see
page 3) to open the music
player.
Press and hold the Smart/
Speakerphone Key
(see page 3).
Open the slider. Press and
hold
1
.
Press the send key N.
To... Do this...
Change
ring style
Ta k e a
picture
Lock the
slider
external
keys
Use voice
commands
Record a
voice note
Press the side volume keys
(see page 3).
Press and hold the music/
camera key
the camera.
Push the side lock key up
(see page 3).
Press the side voice
command key (see page 3).
Press and hold the side
voice command key (see
page 3).
l
to activate
tips & tricks
17
Page 20
basics
See page 2 for a basic phone diagram.
home screen
When you turn on your phone, it displays the
home screen. To dial a number from the
home screen, open the slider, press number
keys and
Note:
different from this example.
Left Soft Key
18
N
.
Your home screen might look a little
6
WED 10/10/07
Îì
&
h
&
J
L
&
e
Label
Recent Messaging
basics
&
10:51am
Right Soft Key
Label
Soft key labels show the current soft key
functions. For soft key locations, see page 2.
Press the navigation key
S
up, down, left, or
right to select items in the home screen.
Status indicators can appear across the top of
the home screen:
indicator
6
Signal
Strength
W
Roaming
Vertical bars show the
strength of the network
connection.
Indicates phone is in a
digital coverage area and
is roaming off network.
Page 21
indicator
/
Digital
I
1X
×
Missed Call
+
Data Call,
Te t h e re d , o r
Embedded
WAP/BREW
Application
÷
No Service
Indicates phone is in a
CDMA digital coverage
area.
Indicates phone is in a
1x-RTT coverage area.
Indicates that you
received an unanswered
call.
Shows during data call,
tethered mode, or WAP/
BREW application.
Phone is in area with no
service coverage.
indicator
h
Voice Call/
Incoming Call
ë
Location On
Keypad Locked
Phone Locked
ì
Battery Level
õ
Sounds Loud
ô
Sounds Soft
Î
All Sounds Off
Shows during an active
voice call.
Shows when
set to
Shows when phone is
locked.
Shows battery charge
level. The more bars, the
greater the charge.
Indicates
Styles
) is set to
Indicates
Styles
) is set to
Indicates
Styles
) is set to
Location
is
On
.
Style
(in
Ring
Loud
.
Style
(in
Ring
Soft
.
Style
(in
Ring
Silent
.
basics
19
Page 22
indicator
Ì
Sound On,
Vibrate On
Spkrphone On
Speakerphone
On
Q
New Text
Message
t
New Voicemail
Message
0
Airplane Mode
basics
20
Indicates
Styles
Ring
Style
) is set to
.
(in
Ring
Vibe then
Indicates speakerphone
is on.
Appears when you
receive a new text
message.
Appears when you
receive a new voicemail
message.
Shows when
Airplane Mode
is turned on. (You cannot
make or answer calls,
but you can use other
non-calling features of
your phone.)
indicator
E
Bluetooth
Connection
Your phone is paired to
another Bluetooth
device.
Active
shortcuts & main menu
Your phone displays four menu icons in the
middle of the home screen.
h
e
&
&
Îì
L
10:51am
&
6
WED 10/10/07
&
Press
S
left, right, up, or down to open the
J
Recent Phonebook
menu for the corresponding icon.
Page 23

home screen shortcuts
You can change the
features when you press the navigation key
and soft keys in the home screen. For key
locations, see page 2.
Note:
This option might be restricted or
unavailable if your home screen shows
scrolling headlines from your service provider.
Find it: s>
>
Home Screen >Home Keys
options
Icons
shortcuts
w Settings>Personalize
Show or hide your
navigation key shortcut
icons in the home screen.
that open
options
Up, Down, Left
Right
Left Soft Key
Right Soft Key
,
Choose the features that
open when you press the
navigation key up, down,
left, or right in the home
screen.
Choose the feature that
opens when you press the
left soft key in the home
screen.
Choose the feature that
opens when you press the
right soft key in the home
screen.
main menu appearance
To change your
>
w Settings >Personalize >Home Screen >Home Keys
>
Icons
.
main menu icons
, presss
basics
21
Page 24
To make your
icons or a text-based list, press
>
w Settings >Personalize >Main Menu >View
main menu appearance
s
either
.
For even more ways to personalize your home
screen, see page 83.
set entry modes
Set text entry modes to make it easier for you
to enter names, numbers, and messages.
*
In a text entry screen, press
any of these entry modes:
to switch to
enter text
Some screens require you to enter text, such
as when you compose a message or create a
new contact, as this example shows:
Entry Details
Îì
t
Highlighted
Option
Press
Cancel
to exit
without
making
changes
.
6
Name: John Smith
No.: 2125551212
Type: Mobile
Speed No.: 6
Done
Done Cancel
.
Category: General
Ringer ID: None
Press
to save
all changes
Use the keypad to enter text.
basics
22
entry modes
Primary
Enter text using a method that
you set.
Numeric
Enter numbers only (see
page 27).
Symbol
Secondary
Enter symbols only (see page 27).
Enter text using a method that
you set.
To assign a Primary or Secondary text
entry mode:
1
In any text entry screen, press
2
Scroll to
Text Setup
and press
Select
Options
.
.
Page 25
3
Scroll to
press
4
Scroll to one of the following choices and
press
Primary Setup
Change
.
Select
:
or
Secondary Setup
options
iTAP
English
iTAP
Español
iTAP
Portuguêse
Let the phone predict each
English word as you press keys.
Let the phone predict each
Spanish word as you press keys.
Let the phone predict each
Portuguese word as you
press keys.
Tap
English
Enter letters and numbers by
pressing a key one or more
times.
Tap
Extended
Enter letters, numbers, and
symbols by pressing a key one or
more times.
and
Note:
Your phone may not contain all of the
languages listed above.
To select a text entry mode:
Press
Options
in any text entry screen, scroll to
and select
Text Setup
, then scroll to and select
the desired entry mode.
capitalization
Press 0 in any text entry screen to change
the text case. The following indicators show
capitalization status:
capitalization status
Á
á
Â
no capital letters
all capital letters
capitalize next letter only
basics
23
Page 26
text entry mode indicators
When you select the
Primary
or
Secondary
text
entry mode, the following indicators identify
the text entry setting:
primary secondary
gm
Tap, no capital
letters
hq
Tap, capitalize
next letter only
fl
Tap, all capital
letters
jp
iTAP™, no
capital letters
kn
iTAP, capitalize
next letter only
io
iTAP, all capital
letters
basics
24
The following indicators identify
Symbol
entry mode:
Numeric
or
non-text entry mode
Ã
Ä
numeric mode
symbol mode
tap method
This is the standard method for entering text
on your phone.
Tap
Regular
and numbers of the key you press. The
Extended
numbers,
1
2
method cycles through the letters
Tap
method cycles through letters,
and
symbols.
Press a key one or more times to select a
letter, number, or symbol.
Repeat the step above to enter
all characters.
Page 27

Tip:
Press S right or # to insert a space.
*
In a text entry screen you can press
switch entry modes. If
available as the
Primary
Tap
or
or
Tap Extended
Secondary
to
is not
entry mode,
see page “set entry modes” on page 22.
When you enter three or more characters in a
row, your phone may guess the rest of the
prog
word. For example, if you enter
, you might
see:
6
ÁÔ Msg
This is a prog ram
Recent Phonebook
Îì
436
Press S right
to accept
Program
up or
prog
, or
.
press
S
down to reject it.
Press # to enter
a space after
If you want a different word, continue
pressing keys to enter the remaining
characters.
•
Press a keypad key repeatedly to cycle
through its characters.
•
Press S left or right to move the
flashing cursor to the left or right in a
text message.
•
The first character of every sentence is
capitalized. If necessary, press
S
down to change the character to
lowercase before the cursor moves to
the next position.
•
If you don’t want to save your text or
text edits, press
O
to exit without
saving.
basics
25
Page 28
iTAP® method
The iTAP software combines your key presses
into common words, and predicts each word
as you enter it. This can be faster than
Tap method.
1
Press keypad keys to show possible letter
combinations at the bottom of the screen.
2
Scroll left or right to highlight the
combination you want.
3
Press
Select
to lock a highlighted
combination.
You can press keys to add more letters to
the end of the combination.
or
Press * to enter the highlighted
combination when it spells a word.
A space is inserted after the word.
basics
26
For example, if you press
7764
, your
phone displays the corresponding
letter combinations:
Îì
433
Press
Delete
to delete
last letter.
Press S up
to accept
program
.
Press S right
to select
another
combination.
Press
Select
to lock
highlighted
combination.
6
ÁÛ Msg
This is a prog ram
prog proh proi pro4
Select Delete
If you enter a word your phone does not
recognize, your phone stores the word to use
as a future word option. When you run out of
phone memory for unrecognized words, your
phone deletes the oldest word to add
new words.
Page 29

numeric method
In a text entry screen, press * to switch
entry methods until your phone displays the
Ã
(numeric) indicator.
Press keypad keys to enter the numbers you
want. When you finish entering numbers,
press
*
to switch to another entry method.
delete letters & words
Place the cursor to the right of the text you
want to delete and then:
•
Press B to delete one letter at a time.
• Press and hold B
entire message.
to delete the
symbol method
In a text entry screen, press * to switch
entry methods until your phone displays the
Ä
(numeric) indicator.
1
Press a key one or more times to show
possible symbol combinations at the
bottom of the screen.
2
Scroll left or right to highlight the symbol
you want.
3
Press
Select
to enter the
highlighted symbol.
slider closed
With your phone closed, you can use
feature that doesn’t require the keypad
•
answering calls
•
viewing message notifications
•
calling people in your contacts
•
sending text or MMS templates to
people on your contacts list
•
taking pictures or videos
any
basics
:
27
Page 30

•
playing music
•
setting phone alert styles
To set the phone alert style with slider
closed
:
1
Press the volume keys up or down to
scroll through styles.
2
Press the smart/speakerphone key to
select the displayed style.
3
Press the volume keys up or down to
return to the home screen.
To view an unanswered call when you see
X Missed Calls
1
:
Press the smart/speakerphone key to
view the received calls list.
2
Press the volume keys up or down to
scroll through and select a call.
3
Press the smart/speakerphone key to
view the selected call.
basics
28
continue or end task when closing slider
You can set your phone to either end or
continue a task when you close the slider. For
example, if you want to be able to close your
slider during a phone call without hanging up,
set the
Slide Closed
Find it: s>
Slide Closed
Note:
When you set your slider to
tasks end
Bluetooth, wired headset, or the
speakerphone. If you are downloading any
applications, closing the slider doesn’t
interrupt the download. If the download hasn’t
started yet, closing the slider stops
the download.
option to
w Settings> InitialSetup
except
calls while you’re using
Continue Task
End Task
.
>
, all
Page 31

handsfree speaker
Note:
The slider does not have to be open to
use the speakerphone.
You can use your phone’s handsfree speaker
to make calls without holding the phone to
your ear.
Note:
The handsfree speaker won’t work
when your phone is connected to a handsfree
car kit or headset.
To activate the
speakerphone
during a call, press
and hold the smart/
speakerphone key.
You will see
Spkrphone On
and
hear an audio alert.
To end the call
, press
Volume
Keys
Smart/
Speaker-
phone
Key
End Call
or press O.
I
G
J
Note:
Closing the slider while using the
speakerphone does not end the call.
To deactivate the speakerphone
hold the smart/speakerphone key again or
turn off the phone. You will see
You can also set your phone to turn off the
speakerphone automatically after 20 seconds
of inactivity:
Find it: s >
1
Scroll to
2
Scroll to
To use the speakerphone with your
H
phone’s slider closed
1
Open the slider.
2
Press and hold the smart/speakerphone
w Settings >InitialSetup
SpeakerPhone
20 sec timeout
and press
and press
:
key to turn on the speakerphone.
3
Enter the number you want to call and
press
N
.
, press and
Speakerphone Off
Change
.
Select
.
.
basics
29
Page 32

4
When the call connects, close the slider
and continue your conversation.
5
To end the call, press and hold the smart/
speakerphone key. You will see
and hear a soft audio alert.
Call Ended
codes & passwords
Your phone’s four-digit
originally set to
of your phone number. The six-digit
code
is originally set to
provider may reset these codes before you
get your phone.
If your service provider didn’t change these
codes, you should change them to prevent
others from accessing your personal
information. The unlock code must contain
four digits. The security code must contain
six digits.
basics
30
unlock code
1234
or to the last four digits
000000
. Your service
is
security
To change a code or password
Find it: s >
>
New Passwords
If you forget your unlock code:
Enter Unlock Code
last four digits of your phone number. If that
doesn’t work, contact your service provider.
If you forget your security code
your service provider.
w Settings >Security
prompt, try entering 1234 or the
lock & unlock phone
You can lock your phone to keep others from
using it. To lock or unlock your phone, you
need the four-digit unlock code.
Note:
You can make emergency calls on a
locked phone (see page 47). A locked phone
still rings or vibrates for incoming calls or
:
At the
, contact
Page 33

messages,
to answer
To lock your phone
Find it:
>
Phone Lock >Lock Now
Enter the four-digit unlock code, then pressOk.
To unlock your phone
When you see
four-digit unlock code and press
but you need to unlock it
.
:
Presss>
w Settings>Security
or
Automatic Lock
:
Enter Unlock Code
, enter your
Ok
.
airplane mode
Note:
Consult airline staff about the use of
Airplane Mode
whenever instructed to do so by airline staff.
Airplane mode turns off your phone’s calling
features in situations where wireless phone
use is prohibited. You can use the phone’s
during flight. Turn off your phone
other non-calling features when
turned on.
Find it:
Your phone can prompt you to activate or
deactivate each time you turn on the phone:
Find it:
>
s É Tools >Airplane Mode >OnorOff
s É Tools >Airplane Mode
Prompt At Startup >OnorOff
Airplane Mode
memory card
You can store multimedia content such as
songs and photos on your phone’s internal
memory or on a removable microSD
(TransFlash) memory card.
Notes:
•
If you download a copyrighted file and
store it on your memory card, you can
use the file only when your memory
card is inserted in your phone. You
is
basics
31
Page 34

cannot send, copy, or change
copyrighted files.
•
If you don’t have a memory card, you
can copy files from your computer to
your phone via Bluetooth (page 55) or
by using Motorola Phone Tools
(page 60).
•
Your phone supports microSD memory
cards with up to 2 GB capacity (greater
than 1 GB capacity is guaranteed only
for SanDisk microSD cards).
install memory card
1
Open the memory card slot cover on the
top of your phone (see page 3).
2
Slide the memory
card into the card
slot until it clicks.
basics
32
{
3
Replace the memory card slot cover.
To remove the card, press it once quickly to
release it from the slot, and then pull it out.
Do not remove your memory card while your
phone is using it or writing files on it.
format memory card
Note:
You must format a memory card before
using it for the first time. This procedure is
critical because it creates the “Mobile” and
“Motorola” directories. If you do not format a
memory card before using it for the first time,
your phone may not be able to read the
contents of the card.
Caution:
erase all content currently stored on the card.
Find it:
>
Find it:
Formatting the memory card will
Presss>
m Phone Status
Storage Devices
Page 35

1
Scroll to
2
Scroll to
3
When prompted, press
No
Memory Card-T-Flash
Format
and press
to cancel formatting.
and press
Select
.
Yes
to continue or
view memory card contents
Find it:
1
2
3
4
Press
s h Media Gallery
Select the desired multimedia object type
(
Pictures, Sounds
Press
, or
Videos
).
Options
to open the menu for the
selected object type.
Scroll to
Scroll to
View Storage Devices
All
(to view contents of the
and press
memory card and phone memory),
Memory
, or
center key
Memory Card
s
, and press the
.
Options
Select
Phone
.
copy or move files between
phone & memory card
You can copy or move files (such as photos or
music files) from your phone to the memory
card to free up phone memory.
Note:
Moving a file to the memory card
deletes the original file from phone memory.
Find it:
1
.
2
3
4
Press
s h Media Gallery
Scroll to
Select
Note:
Pictures, Sounds
, or
Videos
.
Pictures that came preloaded on
your phone cannot be moved to the
memory card.
Scroll to the picture or video clip you want
to move or copy and press
Scroll to
Scroll to
or
Mark
and pressSright.
Current
(to mark the selected file)
All
(to mark all files) and press
Options
and press
.
Select
.
basics
33
Page 36

5
Press
Options
, then scroll to
Files
and pressSright.
6
Scroll to
7
Scroll to the device where you want to
Copy
or
Move
Manage Marked
and press
Select
.
copy or move the file and press the
center key
s
.
transfer files from computer to
memory card
To transfer files from a computer to your
phone’s memory card, you can use either a
Bluetooth connection, cable connection, or a
card reader.
For details about Bluetooth connections, see
page 55. Memory cards, USB cables, and
card readers are not included with your
phone, but you can buy them separately.
basics
34
Note: You must format your memory card
before you use it for the first time (see
page 32).
To use a USB cable connection
1
Disconnect the cable from your phone if
it’s already connected.
2
On your phone, presss>
>
Connection >USB Settings
3
With
Default
highlighted, press
4
Scroll to
5
Press O to return to the home screen.
6
Connect the cable to your phone and to an
USB Drive
and press
.
w Settings
Change
Select
.
.
available USB port on your computer.
Note:
When your phone is connected to a
computer, you cannot access the memory
card through the phone. For more details
about cable connections, see page 58.
Page 37

7 On your computer
, open your “My
Computer” window, where your phone’s
memory card displays as a “Removable
Disk” icon.
8
Click on the “Removable Disk” icon to
access your phone’s memory card.
9
In the “Removable Disk” (memory card)
window, create one or more folders for
the files you will copy onto the
memory card.
You can save up to 50 files in each folder
that you create. When the music player
looks for music files on the card, it will
search all folders on the card if the
option is set to
Always
or
Ask
(see page 68).
A file name (including the path) must be
less than 241 characters. For example, if
you copy songs into a folder you create
that is named “MyMotoSongs,” the name
of any song PLUS the name of the folder
Search
“MyMotoSongs” must be less than 241
characters.
Note:
You may see “Mobile” and
“Motorola” folders in the memory card
window. These folders are used by your
phone.
Do not delete these folders
10
Copy desired files onto the memory card
.
by dragging and dropping them into the
“Removable Disk” window,
that you have created
to the main directory
11
When you finish, disconnect your phone
into a folder
.
Do not copy files
.
by clicking on the “Safely Remove
Hardware” icon in the system tray on your
computer screen, then selecting “Safely
Remove USB Mass Storage Device.”
12
Disconnect the cable from your phone
and computer.
basics
35
Page 38

To use a memory card reader
1
Insert your memory card into the card
reader.
Note:
You may first need to insert the
card into an adapter that fits into the
card reader.
2
Insert the card reader into an available
USB port on your computer.
3
Open your “My Computer” window on
your computer, where your phone’s
memory card shows as a “Removable
Disk” icon.
4
Click on the “Removable Disk” icon to
access your phone’s memory card.
5
In the “Removable Disk” (memory card)
window, create one or more folders for
the files you will copy onto the
memory card.
basics
36
You can save up to 50 files in each folder
that you create. When the music player
looks for music files on the card, it will
search all folders on the card if the
option is set to
Always
or
Ask
(see page 68).
A file name (including the path) must be
less than 241 characters. For example, if
you copy songs into a folder you create
that is named “MyMotoSongs,” the name
of any song PLUS the name of the folder
“MyMotoSongs” must be less than 241
characters.
Note:
You may see “Mobile” and
“Motorola” folders in the memory card
window. These folders are used by your
phone.
Do not delete these folders
6
Copy desired files onto the memory card
by dragging and dropping them into the
“Removable Disk” window,
that you have created
into a folder
.
Search
.
Page 39

Do not copy files to the main directory
(where the “Mobile” and “Motorola”
folders are located).
7
When you finish, disconnect the card
reader by clicking on the “Safely Remove
Hardware” icon in the system tray on your
computer screen, then selecting “Safely
Remove USB Mass Storage Device.”
8
Remove the card reader from
the computer.
9
If necessary, remove the memory card
from the adapter.
10
Insert the memory card into your phone
(see page 31).
basics
37
Page 40

customize
ring styles & alerts
Your phone rings and/or vibrates to notify you
of an incoming call or to signal certain other
events. This ring or vibration is called an alert.
set a style
Find it: s>
1
Scroll to
key
2
Scroll to the desired ring style and press
Select
38
w Settings >Ring Styles
Style
and press
s
.
or the center keys.
customize
Change
or the center
set alerts
Your phone includes alerts for
Voicemail, Alarms, Data Calls, Fax Calls
You can specify a detailed setting for each
type of alert:
Find it: s>
1
Scroll to Style
center key
2
Scroll to the desired alert type and press
Change
w Settings >Ring Styles
Detail
s
.
or the center keys.
Calls, Inbox
, and
and press
Reminders
Change
,
or the
.
Page 41

3
Scroll to the desired detail setting and
press
Select
or the center keys.
Note:
Your phone plays a sample of each
highlighted setting as you scroll through
the settings.
wallpaper
Set a photo, picture, or animation as a
wallpaper (background) image in your
home screen.
Note:
Yo u r theme can set your wallpaper
(page 40).
s>w Settings >Personalize >Wallpaper
To select a wallpaper image
1
Scroll to
center key
2
Scroll to the picture you want and press
the center key
Picture
s
and press
.
s
:
Change
or the
.
(None)
Select
to turn off wallpaper.
To adjust wallpaper image layout
1
Scroll to
center key
2
Scroll to
Select
Layout
and press
s
.
Center, Tile
, or
Fit-to-screen
or the center keys.
Change
or the
, and press
To set a monthly calendar as your
wallpaper
1
2
:
Scroll to
center key
Calendar
s
and press
.
Scroll to On and press
key
s
.
Change
Select
or the center
:
or the
customize
39
Page 42

set screen saver
Set a photo or picture as a screen saver
image.
The screen saver image appears when the
slider is open and no activity is detected for a
specified time period. The image shrinks to fill
the display, if necessary.
Tip:
Turn off the screen saver to extend
battery life.
Find it: s>
>
Screen Saver
To select a picture to use as a screen saver
1
Scroll to
center key
2
Scroll to the picture you want and press
Select
Select
40
w Settings >Personalize
Picture
and press
s
to view available pictures.
or the center keys.
(None)
to turn off the screen saver.
customize
Change
or the
To specify how long your phone must be
inactive before it displays the screen saver
1
2
Scroll to
Scroll to
minutes
Delay
and press
Change
1 minute, 2 minutes, 5 minutes
, and press
Select
.
brightness
Find it: s >
Use the left and right navigation keys to adjust
the brightness.
:
backlight
Set the amount of time that the display
and keypad backlights remain on, or turn
off backlights to extend battery life.
Find it: s >
w Settings
w Settings
>
InitialSetup >Brightness
>
InitialSetup >Backlight
:
.
, or
10
Page 43

talking phone settings
AGPS & your location
You can set your phone to speak aloud the
name of a Contacts entry when you highlight
that entry in the phonebook. You can also set
it to speak the names of digits as you enter a
number to call.
To s e t u p
Find it: s >
>
Sound Settings >Talking Phone Settings
Select
Change
To a c ti v a t e
Find it: s >
>
Sound Settings >Talking Phone >On
the talking phone feature:
w Settings
Contact List Entries
, then select On or
the talking phone feature:
w Settings
>
or
Keypad Digits
Off
>
Personalize
.
Personalize
and press
Note:
This Motorola mobile phone
incorporates Assisted Global Positioning
System (AGPS) technology that can be used
by emergency services to help determine a
user’s location. This functionality is required
by law and cannot be deactivated. However,
AGPS technology also can be used with
certain location-based software
applications—for example, to provide driving
directions—which may track and monitor a
user’s location. Users who prefer not to
permit such tracking and monitoring should
avoid using such applications.
Your phone uses the Automatic Location
Information (ALI) feature, along with AGPS
satellite signals, to tell the network where you
are physically located.
customize
41
Page 44

Note:
ALI may not work in all locations and
may not be available due to network,
environmental, or interference issues.
When ALI is set to
shows the
may use your known location to provide
useful information (for example, driving
directions, or the location of the nearest
bank). Your phone prompts you when the
network or a service asks for your location.
You can refuse at this point.
When ALI is set to
displays the
phone does not send location information
unless you call the emergency phone number
(such as 911).
Find it: s >
To view or change the location transmission
status of your phone during a call, press
s>Location
42
O
customize
Location >On
(ALI on) indicator. Services
Location >Off
P
(ALI off) indicator, and the
w Settings >Location >On
.
, your phone
, your phone
or
Off
AGPS limitations & tips
Your phone uses Assisted Global
Positioning System (AGPS) satellite
signals to estimate your location. If your
phone cannot find strong satellite signals,
your AGPS might be slower, less accurate, or
it might not work at all. AGPS provides only an
approximate location, often within 150 feet
(45 meters) but sometimes much farther from
your actual location.
To improve AGPS accuracy:
•
Go outside and away from
underground locations, covered
vehicles, structures with metal or
concrete roofs, tall buildings, and
foliage. Indoor performance might
improve if you move closer to
windows, but some window sun
Page 45

shielding films can block satellite
signals.
•
Move away from radios, entertainment
equipment, and other electronic
devices that might interfere with or
block AGPS satellite signals.
•
Hold your phone away from your body,
and point the phone antenna toward
the sky. Do not cover the antenna area
with your fingers
AGPS uses satellites controlled by the U.S.
government and subject to changes
implemented in accordance with the
Department of Defense AGPS user policy and
the Federal Radio Navigation Plan. These
changes might affect AGPS performance.
customize
43
Page 46

calls
To make and answer calls, see page 15.
turn off a call alert
You can press the volume keys to turn off a
call alert before answering the call.
redial a number
1
Press N from the home screen.
2
Scroll to the entry you want to call and
press
N
.
automatic redial
When you receive a
phone displays
calls
44
busy signal
Call Failed, Number Busy
, your
.
When you set
automatically redials a busy number for four
minutes. When the call connects, your phone
rings or vibrates once, displays
and completes the call.
Find it: s >
When automatic redial is turned off, you can
manually activate the feature to redial a phone
number. When you hear a fast busy signal and
see
Call Failed
Auto Redial
w Settings >InitialSetup >Auto Redial
, press N or
to On, your phone
Redial Successful
RETRY
.
,
recent calls
Your phone keeps lists of the calls you
recently received and dialed, even if the calls
didn’t connect. The lists are sorted from
Page 47

newest to oldest calls. The oldest calls are
deleted as new calls are added.
Tip:
Press N from the home screen to view
the dialed calls list.
Find it: s>
1
Scroll to
Select
2
Scroll to an entry.
Note: A %
s Recent Calls
Received Calls
or
Dialed Calls
.
next to a call means the call
and press
connected.
3
Press N to call the number.
To see call details (like time and date),
press the center key
s
.
To access a menu of options (see the
table following these steps), press
Options
Options
When you press
while viewing a list of
recent calls, you see a menu that can include
these options:
option
Store
Create a Contacts entry
with the number in the
Number
field.
Store
appear if the number is
already in your Contacts.
Delete
Delete All
Send Message
Delete the entry.
Delete all entries in the list.
Open a new text message
with the number in the
field.
.
Add Digits
Attach Number
Add digits after the number.
Attach a number from the
Contacts
or recent calls lists.
does not
To
calls
45
Page 48

return a missed call
notepad
Your phone keeps a record of your
unanswered calls, and shows
X
where
1
2
is the number of missed calls.
Press the
Calls
Scroll to the call you want to return, then
press
list.
N
View
.
key to see the
answer options
You can change how you answer a call:
Find it: s>
>
Answer Options
Multi-Key
Open To Answer
46
w Settings >In-Call Setup
Answer by pressing any key.
Answer by opening the
slider.
calls
X Missed Calls
Received
The most recent set of digits that you enter
,
are stored in your phone’s notepad memory.
To retrieve a number stored in the notepad
Find it: s>É
Press N to call the number.
Press
Options
a number or insert a special character.
Press
Store
to create a Contacts entry with the
number in the
Recent Calls >Notepad
to open the
Number
field.
Options
menu to attach
:
attach number
While dialing (with digits visible on the
screen), press
number from the phone book or a recent
calls list.
s >Attach Number
to attach a
Page 49

emergency calls
AGPS during an
Your service provider programs emergency
phone numbers, such as 911 or 112, that you
can call under any circumstances, even when
your phone is locked.
1
Enter the emergency number.
2
Press N.
Note:
Emergency numbers vary by country.
Your phone’s preprogrammed emergency
number(s) may not work in all locations, and
sometimes an emergency call cannot be
placed due to network, environmental, or
interference issues.
emergency call
When you make an emergency call,
your phone can use Assisted Global
Positioning System (AGPS) satellite signals to
tell the emergency response center your
approximate location.
The AGPS feature has limitations, so always
tell the emergency response center your best
knowledge of your location. Remain on the
phone for as long as the emergency response
center instructs you.
AGPS
might not work
•
Your phone’s AGPS feature must be
turned on (see page 41).
•
Your local emergency response center
might not process AGPS location
for emergency calls:
calls
47
Page 50

information. For details, contact your
local authorities.
For best results:
•
Go outside and away from
underground locations, covered
vehicles, structures with metal or
concrete roofs, tall buildings, and
foliage. Indoor performance might
improve if you move closer to
windows, but some window sun
shielding films can block satellite
signals.
•
Move away from radios, entertainment
equipment, and other electronic
devices that might interfere with or
block AGPS satellite signals.
If your phone cannot find strong AGPS
satellite signals, the location of the nearest
cell tower in contact with your phone is
calls
48
automatically provided to the emergency
response center.
speed dial
You can assign a unique speed dial number to
each entry in your Contacts.
Note:
Your service provider may have already
assigned speed dial number 1 to your voice
mail number.
To speed dial a number:
1
Enter the speed dial number for the entry
#
you want to call and press
2
Press N to call the number.
To assign speed dial numbers to contacts, see
page 77.
.
Page 51

voicemail
Your network stores the voicemail
messages you receive. To listen to your
messages, call your voicemail number.
Note:
Your service provider may include
additional information about using
this feature.
receive
When you
phone shows a voicemail message indicator
and
New Voicemail
message.
check
To
Find it: s >
Tip:
pressing and holding
voicemail messages:
Use the shortcut to dial voicemail by
a voicemail message, your
. Press
Call
to listen to the
e Messaging >Voicemail >Call
1
.
calls
49
Page 52

messages
send a multimedia message
A multimedia message contains embedded
media objects (including photos, pictures,
animations, sounds, and voice records). You
can send a multimedia message to other
wireless phones with multimedia messaging
capabilities and to email addresses.
create & send message
Find it: s >
1
Enter message text.
50
e Messaging >Create Message
messages
2
Press
Options
to view MMS
message options.
Note:
See “mms message options” on
page 52 for descriptions of all
menu options.
3
Scroll to
4
To insert a stored multimedia object, scroll
to
New Video
Then scroll to the desired object and
press
or
To take and insert a new photo, scroll to
New Picture
photo and press
Insert
and press
Picture, New Picture, Voice Record, Sound, Video,
, and
Text Template
Insert
.
and press
Insert
Select
.
, and press
Select
. Then take the
.
Select
.
Page 53

or
To record and insert a new video clip,
scroll to
record the video clip and press
5
Press
6
Select an entry.
New Video
Send To
.
and press
Select
. Then
Insert
or
Press
Options
to enter the recipient’s
phone number or email address. Press
when finished.
Note:
You can send the message after
entering a recipient phone number or
email address and the message text. You
do not need to complete the other
entry fields.
7
Press
SEND
to send the message.
or
Press
Options
to see these choices:
Send To options
.
Unselect All
Unselect all recipient phone
numbers and/or email
addresses.
View Selected
See a list of all recipient
phone numbers and/or
email addresses.
Back to Message
Ok
Enter Number
Return to the message text
entry screen.
Enter a recipient phone
number.
Enter Email
Enter a recipient email
address.
Change to MMS
Change a text-only message
type to a multimedia
message.
messages
51
Page 54

Send To options
Sending Options
Message Details
Save to Drafts
Cancel Message
messages
52
Copy other recipients, enter
a message subject, add
attachments, set message
priority, request a message
delivery report, or specify
when to deliver
the message.
View detailed information
about the message.
Save the message to the
Drafts
folder.
Cancel the message and
return to the
Message Center
.
mms message options
While creating a multimedia message, press
Options
to open the
mms message options
Insert
Change to SMS
Preview
Page Options
MMS Menu
Insert a multimedia object.
Change a multimedia
message type to a text
message.
See the message and see or
listen to inserted multimedia
objects.
Specify how long each
multimedia object is
displayed.
:
Page 55

mms message options
Sending Options
Message Details
Save as Template
Cancel Message
Editing Options
Change Text
Mode #
Copy other recipients, enter
a message subject, add
attachments, set message
priority, or request a
message delivery report.
View detailed information
about the message.
Save the message as a text
message template or MMS
message template (see
page 79).
Cancel the message and
return to the
Select
Copy Text, Cut Text
Copy All Text
Select a text entry mode (for
details, see page 22).
Message Center
.
, or
mms message options
Text Setup
Specify default primary and
secondary entry modes (for
details, see page 22).
receive a multimedia message
When you receive a multimedia message,
your phone plays an alert and displays the
(message waiting) indicator and a
notification.
.
Open the slider and press
message immediately, or save it in your
Message Inbox
To read messages in your
Find it: s>
1
for viewing later.
e Messaging >Message Inbox
Scroll to the message you want to read.
New Message
Read
to read the
Message Inbox
<
:
messages
53
Page 56

2
Press the center keys to open the
message. Your phone displays the media
object, then the message.
Multimedia messages can contain different
media objects:
•
Photos, pictures, and animations are
displayed when you read the message.
•
A sound file begins playing when the
message text is displayed. Use the
volume keys to adjust the volume.
Note:
You may have to select an
indicator embedded in the message
text to play a sound file.
If the message includes an attached file
,
select the file indicator or filename and press
View
(for an image file),
Open
(for an object such as a
Play
(for a sound file), or
Contacts
or
datebook entry or an unknown file type).
messages
54
Page 57

connections
Bluetooth® connections
Your phone supports Bluetooth wireless
connections. You can connect your phone to a
Bluetooth headset or car kit, or connect to
another device to transfer files.
Your phone currently supports the following
Bluetooth profiles:
•
headset (optional Motorola Original™
accessory)
•
Handsfree Car Kit (optional Motorola
Original accessory)
For more Bluetooth wireless connections
support, go to
Bluetoothsupport
Note:
All multimedia (video player, audio
player, shutter tones) will play from the
speakerphone when your phone is connected
to another Bluetooth device.
www.motorola.com/
.
turn Bluetooth power on/off
You can set Bluetooth power to be on
whenever your phone is on.
Find it: s >
>
Bluetooth Link >Setup
1
Scroll to
2
Scroll to On and press
w Settings >Connection
Power
and press
Change
Select
connections
.
.
55
Page 58

Note:
To extend battery life, use the above
procedure and set Bluetooth power to
Off
when not in use. If you turn Bluetooth power
Off
, your phone will not connect to accessories
until you turn Bluetooth power
On
and
reconnect to the accessories.
pair with headset, handsfree
device, or computer
Before you try to connect to another
Bluetooth device
Bluetooth power is
pairing mode (see the user guide for the
device you are attempting to pair with). You
cannot perform pairing while your phone is
connected to another device.
To pair your phone to a headset accessory,
handsfree car kit, or computer that
supports Bluetooth wireless connections:
connections
56
, make sure your phone’s
On
and the device is in
Find it:
>
s >w Settings >Connection
Bluetooth Link >Audio Devices >[Look For Devices]
Your phone displays a list of device(s) within
range of the phone. If your phone is already
connected to a device, your phone lists that
device with a
%
(in-use indicator). After your
phone connects with a device, no other
device can connect to your phone until you
disconnect the current device.
1
Scroll to a device in the list of devices your
phone found.
2
Press the center keys to connect
the device.
3
If the device requests permission to bond
with your phone, select
YES
and enter the
device PIN code to create a secure
connection with the device.
Note:
The default PIN code is 0000.
Page 59

When the connection is made, the à
(Bluetooth) indicator or a
Bluetooth
message
displays in the home screen.
If you are connecting to a computer, use the
Bluetooth wizard or online help to determine
what services are available.
Tip:
For details about an accessory, refer to
the instructions that came with it.
connect with another phone
You can use Bluetooth to connect directly
with another phone.
To transfer a contact from one phone to
another phone
1 On the destination phone
Bluetooth and then press
Connection >Bluetooth Link
>
2 On the origin phone
phonebook by pressing
:
, turn on
s >w Settings
>
Find Me
.
, open the
s >n Contacts
.
3
Highlight the entry you want to transfer
and press
4
Select
Note:
Options
.
Send Contact > Bluetooth
.
If the origin phone does not already
have Bluetooth power turned on, it prompts
you to turn it on.
5
Select
[Look for Devices]
and select the
destination phone.
When the origin phone connects with the
destination phone, it transfers the entry.
To transfer a file from one phone to
another phone
1 On the destination phone
Bluetooth and press
>
Connection >Bluetooth Link
2 On the origin phone
:
s >w Settings
>
Find Me
, select the file you
want to transfer by pressing
s>h Media Gallery >Videos, Sounds, or
, turn on
.
connections
57
Page 60

Pictures
, highlighting the file, and
pressing
3
Select either
Note:
have Bluetooth power turned on, it
prompts you to turn it on.
4
Select
destination phone.
When the origin phone connects with the
destination phone, it transfers the file.
Options
.
Copy
or
Move
.
If the origin phone does not already
[Look for Devices]
and select the
cable connections
You can use your
phone’s mini-USB port
to connect to
a computer.
Note:
Motorola
Original™ USB data
connections
58
cables and supporting software may be sold
separately. Check your computer to
determine which cable you need.
If you use a USB cable connection:
•
Be sure to connect the phone to a
high-power USB port
computer
as the USB port on your keyboard or
bus-powered USB hub).
Note:
low-power USB port, the computer
may not recognize your phone.
•
Make sure both your phone and the
computer are turned on.
(not a low-power one such
If you connect your phone to a
on your
Page 61

entertainment
Have fun with your phone!
music player
Use your phone’s music player to
music files
your phone or on to an optional memory card
(see page 31).
Note:
WMA, M4A, and MP4 files. To play music
files in formats other than MP3 use the
option of the
However, the
the music player capabilities.
Some wireless providers offer music
that you can buy and download from a
. You can copy MP3 files on to
Your phone can play MP3, AAC, AAC+,
Media Gallery
Sounds
menu (see page 93).
option doesn’t have all of
play MP3
Sounds
Web site. Contact your wireless provider for
more information.
transfer songs
You can load music directly on to your phone
or on to a removable memory card. If you
don’t have a memory card, the music player
stores music on the phone. If you have a
memory card in your phone, the music player
stores music on it.
Tip:
Although your phone can hold enough
songs for a short morning commute, using
the extra storage space of a memory card is a
must for a music lover.
Note:
You cannot send, copy, or change
copyrighted files. If you download a
entertainment
59
Page 62

copyrighted file and store it on your memory
card, you can use the file only while your
memory card is inserted in your phone.
transfer songs to your phone
To load music on your phone, you need a USB
cable and Motorola Phone Tools version
4.4.2c or later. Motorola Phone Tools is
available for purchase at:
http://
direct.motorola.com/ens/MPT/
MPT_Feature.asp
1 On your computer
.
, install Motorola
Phone Tools version 4.3.6c or later.
2 On your phone
Default: Modem/COM
to
>
w Settings
Default: Modem/COM.c
3
Connect your phone to the computer by
, set the connection type
by pressing s
>
Connections
>
USB Settings
.
>
using the USB cable.
entertainment
60
4 On your phone
, use the Phone Setup
Wizard to set up your phone to use
Motorola Phone Tools.
5 On your computer
and select
File Transfer Studio
6 On your computer
, choose
Multimedia Studio
.
, browse for the music
file that you want and click “Transfer
to phone.”
transfer songs to your memory card
You can add music to the removable memory
card by connecting your phone to a computer
via a USB cable.
1
Insert the removable microSD card into
your phone (see page 31).
Note:
If the memory card has never been
used before, you must format it before
you can use it. To format it, press
>
w Settings
>
Phone Status
>
s
Storage Devices
>
Page 63

Memory Card Options
Format
>
Yes
2
Set your phone to mass storage mode by
pressing
>
USB Settings >USB Drive
3
Connect the phone to your computer
> and then press
.
s >w Settings >Connections
.
using the USB data cable.
Options
>
content in this directory is saved on the
removable memory card.
6
When you are finished selecting files on
your computer, disconnect your phone by
clicking the “safely remove hardware” and
disconnect the phone from the
USB cable.
On your computer, your phone appears as
a new removable memory device in the
“My Computer” directory.
4 On your computer
, locate and
double-click on the new removable
memory device (your phone).
Caution:
Your phone has directories
called “Mobile” and “Motorola.” Do not
delete these required directories.
5 On your computer
, drag and drop music
files into the removable memory drive. All
import songs from an audio CD
To transfer music to your phone from a CD,
you need Windows Media Player version 10
or later. You can download Windows Media
Player from http://www.microsoft.com/
windows/windowsmedia/default.mspx.
Note:
You must change the format to MP3 in
the Rip Settings. This can be found under
Tools > Options > Rip Music > Under Rip
settings change the Format to MP3.
1 On your computer
Media Player.
, launch Windows
entertainment
61
Page 64

2
Insert an audio CD into your computer’s
CD ROM drive.
3
In the Windows Media Player window,
click on the “Rip” tab.
4
Highlight the songs you want to import
and click “Rip Music.
The songs are imported to the Windows
Media Player Library.
To transfer songs to your phone, see “transfer
songs” on page 59.
update song list
After you load songs onto a memory card, you
must let your phone scan for music to update
the playlist.
Press
l
then press
Note:
Scanning for new songs can take
several minutes depending on the size of your
entertainment
62
Options
and
Search for songs
memory card. If scanning takes more than
five minutes, check your card to remove any
spaces in the names of the artists, albums,
titles, or years. Sometimes there’s a space at
the beginning of a word.
To turn scanning off
and select
ASK, NEVER
, press l >
, or
ALWAYS
.
play music
To activate your phone’s music player, press
the music/camera key
or
Open your phone and press s >
>
MP3 Player
Gallery
.
l
.
.
ScanOptions
h Media
Page 65

Your phone displays the
.
My Music
Playlists
Recently Played
Artists
Albums
Songs
Genres
Press
Options
Options
The
to open
menu.
My Music
Options Exit
menu includes:
menu items
Playlists
Recently Played
Create or play a playlist.
View & play songs you
played recently.
Artists
Find & play music by an
artist.
My Music
menu:
Highlighted
Selection
Press
Exit
to exit
MP3 player
menu items
Albums
Find & play music from a
specific album.
Songs
Find & play a song from the
entire list of songs on your
phone.
Genres
Find & play music from a
specific genre (type of
music) such as rock or jazz.
Tip:
When you’re browsing through any of
these lists, to quickly jump to an entry, press
the first letter of the entry.
entertainment
63
Page 66

While a song is playing on the music player,
your screen looks like this example:
All Songs
ne a Little Bit Closer.mp3
05 Come a Little Bit Clos. . .
Hello Moto.mp3
adrenaline
flawless
e a Little Bit Closer.mp
1:33 4:49
Options Back
When lit, indicates
Replay
turned on.
When lit,
indicates
Shuffle
turned on.
Use these keys to control the music player:
controls
pause/play
fas t forwa rd
Press &
key
ÄPress &
release the center
s
.
holdSright
for at
least two seconds.
entertainment
64
controls
skip to next
song
Ä
rewind
Ã
skip back to
previous
song
Ã
return to
song
beginning
Ã
scroll up/
down
Press &
Press &
releaseSright
holdSleft
for at
.
least two seconds.
Within first two seconds of
song, press &
releaseSleft
.
After first two seconds of
song, press &
releaseSleft
.
Press S up or down.
Page 67

controls
turn off
music
player
Press
the
My Music
press
Back
until you return to
menu, then
Exit
.
or
Press O.
play music from a playlist
Find it: l >
1
Scroll to the playlist you want and press
the center key
2
To play the entire playlist beginning with
the first song, press the center key
or
To play one song, scroll to the song you
want to play and press the center key
Playlists
s
.
s
.
s
Tip:
To play all songs from all playlists, press
l >Playlists
press
Select
. Press
.
Options
. Scroll to
play music from the recently
played list
Find it: l >
Scroll to a song and press the center keys.
Recently Played
find & play music by artist
Find it: l >
1
2
3
.
Scroll to the artist you want and press the
center key
Scroll to the album you want and press
the center key
To play the entire album beginning with
the first song, press the center key
or
Artists
s
.
s
.
Play
and
s
.
entertainment
65
Page 68

To play one song, scroll to the song you
want to play and press the center key
Tip:
To play all songs, press l >
Options
Press
Options
. Scroll to the artist and press
. Scroll to
Play
and press
Select
Artists
.
find & play music by album
Find it: l >
1
Scroll to the album you want and press
the center key
2
To play the entire album beginning with
the first song, press the center key
or
To play one song, scroll to the song you
want to play and press the center key
Tip:
To play all songs on an album, press l
Albums
>
press
Select
66
Albums
s
. Press
Options
. Scroll to
.
entertainment
.
Play
and
.
s
s
.
s
find & play music by songs
.
Find it: l >
Songs
To play all songs beginning with the first song
on the list, press the center key
s
or
To play one song, scroll to the song you want
and press the center key
s
.
find & play music by genre
Find it: l >
1
2
.
3
Scroll to the genre you want and press the
center key
Scroll to the artist you want and press the
center key
Scroll to the album you want and press
the center key
Genres
s
s
.
.
s
.
.
Page 69

4
To play the entire album beginning with
the first song, press the center key
or
To play one song, scroll to the song you
want to play and press the center key
Tip:
To play all songs in a genre, press l
>
Genres
. Press
Options
press
Select
. Scroll to
.
Play
s
s
and
replay, shuffle, & other options
Press
Options
while using the music player to
choose from these options:
option
Now Playing
Hide
View the name of the song
currently playing.
Hide the music player
screen.
.
option
Play
Resume
Song Details
Repeat
Shuffle
Visualization
Begin playing the current
selection.
Pause/resume play.
View information about the
current selection.
Replay one song (when you
select a single song for
play—does not play a
playlist or album).
Play songs in random order.
Select an animation to play
with the music.
.
entertainment
67
Page 70

option
Search?
Search for Songs?
About
entertainment
68
Set whether the player
searches for new music on
the memory card
first activate the player
Always
—Search
automatically.
Ask
—Prompt you to begin or
skip searching.
Never
—Do not allow a search
when the player is activated.
Search for new music on the
memory card at any time
while using the player.
View detailed information
about the music player.
when you
:
wake up music player
While the music player is active, your phone
may conserve battery power by turning off the
display and keypad backlights if the slider is
open (see page 40).
To turn display and lights back on:
slider position
closed
open
Press the center keys.
Press a number key.
Page 71

turn off music player
slider position
closed
open
PressO.
Press
Back
the
My Music
press
Exit
or
PressO.
until you return to
menu, then
.
music player tips
•
If you are navigating music player
menus while a song is playing and
don’t press a key for more than twenty
seconds, the player returns to the
current song list screen.
•
Turn off the player before connecting
the phone to a computer. If you
connect the phone to a computer while
the player is turned on, the phone
automatically turns off the player.
•
If you receive a call while playing
music, the music is paused. Playing
resumes when you end the call.
•
If the music player is hidden, you can
use other phone features. Using
applications like the camera or video
recorder pauses the music player. After
you close the applications, the player
resumes.
•
If you use a headset with the
phone while using the music
player, the music plays through the
headset. Music plays through the
phone speaker when the headset is
disconnected.
entertainment
69
Page 72

create & manage playlists
Personalize your music collection by creating
your own playlists.
When you name a playlist:
•
The name must be all lowercase
characters.
•
The name must be fewer than 32
characters.
•
The name cannot include these
characters:
/ \ : * ? < > | " !
Create
a playlist:
Find it: l >
1
Enter a name for the playlist and press Ok.
2
Scroll to a desired song and press the
center key
70
Playlists >[Create New Playlist]
s
.
entertainment
When you select a song, a
\
appears
beside the song. (To unselect a song,
scroll to the song and press the center
key
s
again.)
Repeat this step until you have selected
all songs you want to add to the playlist.
3
Press
Done
when you have finished adding
songs.
Edit
a playlist:
Find it: l >
1
Scroll to a desired playlist and press
Options
2
Scroll to
key
3
Follow the steps for creating a playlist in
.
s
Playlists
Edit Playlist
.
and press the center
the previous section.
Reorder
Find it: l >
a playlist:
Playlists
Page 73

1
Scroll to
key
2
Scroll to
key
3
Scroll to the song whose position you
want to change press
4
Scroll to the position in the playlist where
Options
s
.
Reorder Playlist
s
.
and press the center
and press the center
Grab
.
you want to move the song, and press
Insert
.
5
Repeat these steps until you have
reordered the playlist as you prefer.
6
Press
Done
to return to the
Delete
a playlist:
Find it: l >
1
Scroll to a desired playlist and press
Options
2
Scroll to
key
s
.
.
Playlists
Delete Playlist
Playlists
and press the center
menu.
3
When prompted to confirm the deletion,
press
Yes
.
take & send photo
You can take a photo with your phone and
sent it in a multimedia message to other
wireless phone users.
Your camera lens is on the back of your phone
when the phone is open (see page 3).
the clearest video clips, wipe the lens
clean with a soft, dry cloth before you
capture a video clip.
take & send photo
To activate your phone’s camera,
the music/camera key l.
hold
or
To g e t
press and
entertainment
71
Page 74

Open your phone and press s >
Gallery
>
Camera
.
Your phone displays the active
viewfinder image:
ß
Displays when
you press
1
S
change photo
to
settings.
Press left soft
Options
Zoom
1x
Options
key to view
menu.
Point the camera lens at the subject.
Press
S
up and down
621
480x640
Press right soft
key to return to
previous screen.
to select and
adjust one of the following settings
Zoom
—Increase or decrease image size.
entertainment
72
h Media
N
Exit
Style
—Set to
Negative
Lighting Conditions
Cloudy
To view other options,
Color, Black and White, Antique
.
—Set to
, I
ndoor (Home), Indoor (Office)
Automatic, Sunny
, or
Night
press
Options
, or
,
.
(see
page 73).
2
Press the center keys.
3
Press
Options
, then select
the photo,
Print
Discard
to discard the photo, or
to print the photo using a
Store Only
to save
Bluetooth connection.
or
Press
Send
to save the photo and go to the
Send Options
Message
screen. Then select
or
Send to Online Album
Send in
.
:
Page 75

adjust camera settings
When the camera is active, press
view and select these options:
option
Go To Pictures
Go To Video
Mode
Auto-Timed
Capture
Camera Setup
Switch Storage
Device
View pictures and photos
stored on your phone.
Switch to the video camera
viewfinder.
Set a timer for the camera
to take a photo.
Change
Quality
Tone
Store photos in phone
memory or on an
optional memory card
(see page 31).
Resolution
, or activate a
.
Options
to
or image
Shutter
option
Free Space
Capture Title
See how much memory
remains for storing pictures.
Assign a name to a captured
photo.
change screen orientation
When you turn on the camera with the slider
closed, the view finder is in landscape mode.
To use the camera in portrait mode, activate
the camera with the slider closed.
entertainment
73
Page 76

record & play video clips
You can record a video clip with your phone
and send it in a multimedia message to other
wireless phone users.
Your camera lens is on the back of your phone
when the phone is open (see page 3).
the clearest video clips, wipe the lens
clean with a soft, dry cloth before you
capture a video clip.
record a clip
To activate your phone’s video camera:
Find it: s >
74
h Media Gallery >Video Camera
entertainment
To g e t
The active video camera viewfinder image
appears on your phone’s screen:
Remaining
Video Minutes
N
Exit
Storage
(Phone or
Memory
Card)
28
Lighting Conditions
480x640
Indoor (Home)
Options
Press left soft key to
Options
view
1
Point the camera lens at the video
menu.
Press right soft key to
return to previous screen.
subject.
Press
S
left and right to specify lighting
conditions (
(Home)
Automatic, Sunny, Cloudy, Indoor
,
Indoor (Office)
, or
Night
.
Page 77

Press
Options
to view and select other
options (see the next section).
2
Press the center keys to begin
recording.
3
Press
Stop
to stop recording.
4
Press
Options
, then select
the video clip or
or
Press
Send
Send Options
the
Message
or
Discard
to discard the clip.
to save the video clip and go to
screen. Then select
Send to Online Album
Store Only
.
to save
Send in
option
Go To Photo Mode
Video Camera
Setup
Switch Storage
Device
Free Space
Switch to the still photo
camera viewfinder.
Change
Recording Sound
Specify where you want to
save video clips (phone
memory or memory card).
See how much memory
remains for storing video
clips.
Video Length
.
or
adjust video camera settings
When the video camera is active, press
to view and select these options:
option
Go To Videos
View video clips stored on
your phone.
Options
play video clip
To play a video clip stored on your phone:
Find it: s >
Scroll to the clip you want to view and press
the center key
h Media Gallery >Videos
s
.
entertainment
75
Page 78

other features
advanced calling phonebook
features
voice dial
Press and release the voice key (on the
right side of the phone), then (within two
seconds) say:
•
“Name dial,” followed by the name of
a
Contacts
entry.
or
•
“Digit dial,” followed by a number.
Digit Dial
You can use
Contacts.
other features—advanced calling
76
for numbers stored in
features
create entry
s >n Contacts >[New Entry]
edit entry
s>n Contacts
Scroll to the entry and press
scroll to
entry. Press
You can also edit an entry just before calling
the number by pressing
scrolling to
edit the entry.
Edit Contact
and press
Done
to save your changes.
Edit Before Call
Options
Select
to edit the
Options
, then
and pressing
, then
Select
to
Page 79

features
delete entry
s>n Contacts
Scroll to the entry and press
scroll to
Delete Contact
and press
Options
Select
, then
.
set ringer ID for an entry
Assign a ring alert (ringer ID) to an entry:
s>n Contacts
Scroll to the entry and press
scroll to
Ringer ID
Edit Contact
and press
and press the center keys. Scroll
to the desired ringer_name and press
then press
Done
to save the setting.
Options
Select
, then
. Scroll to
Select
Activate ringer IDs:
s>t Ring Styles
> style
Detail >Ringer IDs
features
set picture ID for an entry
Assign a photo or picture to show when you
receive a call from an entry:
s>n Contacts
Scroll to the entry and press
scroll to
Picture
either
Select Picture
already have. Press
Edit Contact
and press
and press the center keys. Select
Take Picture
to activate the camera or
to select from the pictures you
Done
Options
, then
Select
. Scroll to
to save your choice.
set speed dial number
,
s>n Contacts
Scroll to the entry and press
scroll to
to a number and press
AddtoSpeedDial
and press
Select
Options
.
, then
Select
. Scroll
other features—phonebook
77
Page 80

features
print entry
s>n Contacts
Scroll to the entry and press
scroll to
Print
and press
Select
Options
. When
, then
prompted, select a Bluetooth printer or
connect to a computer by using a USB
cable. See page 58.
set entry view
List contacts by first or last name and view
picture or list format.
s>n Contacts
Press
Options
, then scroll to
Select
Last Name
Picture
78
. Scroll to
. Press
Sort by
. Scroll to
other features—phonebook
View by
Done
to save your selection.
Setup
and select
and select
and press
First Name
or
List
or
features
set category for an entry
s>n Contacts
Scroll to the entry and press
scroll to
Category
Press
Edit Contact
and press
, then scroll to and select a category.
Done
to save your selection.
Options
Select
, then
. Scroll to
create mailing list
Create a message list (mailing list) as a
single Contacts entry:
s >n Contacts >[New Entry] >Options
>
Create New >Message List
You can add or delete entries to or from a
message list. When you send a message to
a message list, the message goes to all
Contacts entries in that list.
Page 81

features
sort entries
You can show
predefined category, or entries in a
category you create.
s>n Contacts
Press
Options
Select
. Choose from
Category
Exit
to save your selection.
manage entries
s>n Contacts
Press
Options
press
Select
speed dial entries,
categories, or
space you have used for entries.
All
entries, entries in a
, then scroll to
and press the center keys. Press
, then scroll to
. Choose
Phone Capacity
Filter by
and press
All Phone Contacts, Email
Manage Contacts
Speed Dial
Edit Categories
to manage all
to manage all
to see how much
, or
and
messages
features
send text message
s>e Messaging >Create Message
Press
Options
to perform various actions on
the message.
You can also select a contact first, press
Options
, and select
message.
use MMS template
Open an MMS template with
preloaded media:
s>e Messaging >Create Message
>
Picture Msg Templates
Send Message
to compose a
other features—messages
79
Page 82

features
view sent messages
s>e Messaging >Outbox
Scroll to the message and press
Press
Options
to perform various actions on
Open(r
the message.
send quick text
Quick Text is a prewritten message
that you can quickly select and send. Your
phone comes with several quick notes, and
you can create additional ones.
s>e Messaging >Quick Text
Scroll to the quick text you want to send
Options
and press
press
Select
other features—messages
80
, then scroll to
.
Send
and
features
read received messages
s
>
e Messaging >Inbox
).
Scroll to the message and press
Press
Options
to perform various actions on
Open(r
).
the message.
drafts
View messages saved in
Drafts
folder:
s >e Messaging >Drafts
Scroll to the message and press
Press
Options
to perform various actions on
Open(s
).
the message.
Page 83

features
erase messages
Delete all messages or only
messages from the
s >e Messaging
Press
Options
, then scroll to and select
Erase Messages
. Then select
Outbox
or
Drafts
All, Outbox
folder:
, or
Drafts
.
personalize
speech commands
Advanced Speech Recognition enables you to
place calls and access some menu options by
speaking commands to your phone.
1
Press and release the voice key on the
right side of the phone.
Your phone displays and speaks
command
, followed by a list of voice
commands.
Note:
If the speakerphone is not turned
on and you want to activate it, press the
smart/speakerphone key.
2
Say one of the following commands:
Dial
,
Digit Dial, Voicemail, Redial
Tip:
Speak numbers at a normal speed
and volume, pronouncing each digit
distinctly. Avoid pausing between digits.
Your phone opens the corresponding
menu or performs the corresponding
action.
, or
Say a
Received
adapt advanced speech
recognition to your voice
For most people, Advanced Speech
Recognition works well for voice dialing
Name
.
other features—personalize
81
Page 84

without any initial setup. However, if the
phone is frequently unable to recognize
numbers correctly when you use voice
dialing, you may be able to improve your
results by adapting it to your voice.
Note:
If the phone is used by several people,
reset voice dialing to the original setting
before proceeding. This ensures that you are
not saving your settings over someone else’s.
Find it: s >
>
Voice DialSetup >Adapt Digits
1
Press
2
When the phone prompts you to say the
w Settings >Personalize
START
.
first digit sequence, wait for the beep,
then repeat the digits in a normal tone of
voice.
3
If the recording sounds acceptable (no
mistakes or background noises), say
“Yes” or press
other features—personalize
82
YES
.
or
If the recording is not acceptable, say
“No” or press
NO
. When prompted to say
the digits again, wait for the beep and say
the digits again. The phone will prompt
you to repeat this process with up to
twelve additional sets of digits.
4
When the phone prompts, “More
Adaptation?”, press
YES
to continue or NO
to end the process.
When the adaptation process is complete,
the phone will say “Adaptation Complete.”
Tip:
When adapting speech recognition to
your voice:
•
Choose a quiet place for recording.
•
Wait for the beep before you speak.
Page 85

•
Speak at a normal speed and volume,
pronouncing each digit distinctly. Avoid
pausing between digits.
•
If you make a mistake while recording
a sequence of digits, or if an
unexpected noise spoils the recording,
record that sequence again.
To reset speech recognition to the factory
defaults:
Find it:
>
s >w Settings >Personalize
Voice DialSetup >Reset Digits
more personalizing features
features
ring volume
s >t Ring Styles
keypad volume
s >t Ring Styles
> Style
> Style
Detail >Ring Volume
Detail >Key Volume
features
reminders
Set your phone to play reminder alerts for
picture, text, or voicemail messages that
you receive:
s >t Ring Styles
skin
Choose a phone skin that sets the look and
feel of your phone’s screen:
s >w Settings >Personalize >Skin
greeting
Change the greeting that appears
when you turn on your phone:
s >w Settings >Personalize >Greeting
change home screen soft key labels
s >w Settings >Personalize >Home Screen
>
Home Keys >Left Soft Key
> Style
or
Detail >Reminders
RightSoftKey
other features—personalize
83
Page 86

features
banner
Create a heading to display on your phone’s
home screen:
s >w Settings >Personalize >Main Menu
>
Banner
text layout
Set home screen text to be left justified or
centered:
s >w Settings >Personalize >Home Screen
>
Layout
clock view
Display an analog clock or digital time
readout in the home screen:
s >w Settings >Personalize >Home Screen
>
Clock
other features—personalize
84
features
menu view
Display the main menu as icons or a text
list:
s >w Settings >Personalize >Main Menu >View
show or hide menu icons
Show or hide menu feature icons in the
home screen:
s >w Settings >Personalize >Home Screen
>
Home Keys >Icons
menu language
s >w Settings >Initial Setup >Language
scroll
Set the scroll bar to stop or wrap around in
menu lists:
s>w Settings >Initial Setup >Scroll
Page 87

features
master reset
Reset all options except unlock code,
security code, and lifetime timer:
s >w Settings >Initial Setup >Master Reset
To reset all options, you need to enter the
Security Code
(000000).
features
master clear
Reset all options except unlock code,
security code, and lifetime timer, and clear
all user settings and entries:
This option erases all user-entered
information stored in your phone memory,
including Contacts entries and downloaded
files. Once you erase the information, it
cannot be recovered. It resets all options to
their factory settings except for the unlock
code, security code, and lifetime timer.
s >w Settings >Initial Setup >Master Clear
To reset all options, you need to enter the
Security Code
(000000).
other features—personalize
85
Page 88

call times
Network connection time
time from the moment you connect to your
service provider’s network to the moment
you end the call by pressing
includes busy signals and ringing.
The amount of network connection time
you track on your resettable timer may not
equal the amount of time for which you
are billed by your service provider. For
billing information, please contact your
service provider directly.
features
set in-call timer
s>w Settings >In-Call Setup
>
In-Call Timer
other features—call times
86
is the elapsed
O
. This time
features
view call times
s >s Recent Calls >Call Times
Scroll to
Lifetime Calls
view data times
s >s Recent Calls >Data Times
view data volumes
s >
Last Call, Dialed, Received, All Calls
, and press
s Recent Calls >Data Volumes
Select
.
, or
handsfree
Note:
The use of wireless devices and their
accessories may be prohibited or restricted in
Page 89

certain areas. Always obey the laws and
regulations on the use of these products.
features
accessory volume settings
(car kit or headset)
Adjust volume levels of car kit accessory:
During an active call, press the up or down
volume keys.
external speakerphone
Activate a connected external
speakerphone during a call:
Press the smart/speakerphone key on the
side of the phone.
features
auto answer
(car kit or headset)
Automatically answer calls when connected
to a car kit or headset:
s>w Settings >Car Settings
>
Auto Answer
or
Headset
voice dial
(headset)
Enable voice dial with headset send/end
key:
s>w Settings >Headset >Voice Dial
auto handsfree
(car kit)
Automatically route calls to a car kit when
connected:
s>w Settings >Car Settings >Auto Handsfree
other features—handsfree
87
Page 90

features
power-off delay
(car kit)
Set the phone to stay on for a period of
time after the ignition is switched off:
s>w Settings >Car Settings >Power-off Delay
charger time
(car kit)
Charge your phone for a period of time after
the ignition is switched off:
s >w Settings >Car Settings >Charger Time
other features—data & fax calls
88
data & fax calls
features
data settings
Specify call type for next call:
s >w Settings >Connection >Incoming Call
Scroll to
Normal, Data In Only
send data or fax
Connect your phone to the device,
then place the call through the device.
receive data or fax
Connect your phone to the device,
then answer the call through the device.
Next Call
and press
, or
Fax In Only
Change
, then select
.
Page 91

features
talk then fax
Connect your phone to the device,
then:
s >Dialing Menu >Talk Then Fax
Press N to make the call.
network
features
network settings
View network information and adjust
network settings:
s >w Settings >Network Options
personal organizer
features
add datebook event
s
>
É Tools >8 Datebook
Scroll to the desired day and press
then scroll to
view datebook event
View or edit event details:
s
>
Scroll to the desired day and press s, then
scroll to the event and press
event reminder
Press
Press
New
and press
É Tools >8 Datebook
View
to view an event reminder.
Exit
to dismiss an event reminder.
Select
s
Options
.
.
,
other features—network
89
Page 92

features
copy datebook event
Copy a datebook event to another
date and/or time:
s
>
É Tools >8 Datebook
Scroll to the desired day and press s, then
scroll to the event and press
Copy
and press
Select
.
Options
. Scroll to
set alarm
s >É Tools >Alarm Clock
turn off alarm
To turn off an alarm, press
or
O
.
To set an eight-minute delay, press
90
Disable
SNOOZE
other features—personal organizer
features
create voice record
Recording phone calls is
Note:
subject to varying state and federal laws
regarding privacy and recording of
conversations.
Press and hold the voice key and begin
recording. Release the voice key when
finished.
play voice record
s
>
É Tools >Ü Voice Records
Scroll to the voice record you wish to play
and press
calculator
.
Calculate numbers:
s
.
s >É Tools >Calculator
Page 93

features
convert currency
s >É Tools >Calculator
Press
Options
, then scroll to
press
Select
. Enter the desired exchange rate
and press
converted, then press
Currency
Ok
. Enter the amount to be
and press
Select
Options
.
Exchange Rate
. Scroll to
and
Convert
security
features
lock application
s >w Settings >Security >Lock Application
When prompted, enter the unlock code and
press
Ok
. Then scroll to the application you
wish to lock and press
Change
.
features
restrict calls
Restrict outgoing or incoming calls:
s >w Settings >Security >Restrict Calls
When prompted, enter the unlock code and
press
Ok
. Select
Outgoing Calls
and press Change. With
press
Change
, then select
and press
change unlock and security codes
s >w Settings >Security >New Passwords
>
Unlock Code
control location
Set up a location code to control access to
the
s >w Settings >Security >New Passwords
>
Location Code
Location
Select
.
or
Security Code
function:
or
Incoming Calls
Allow:
highlighted,
All, None
, or
Contacts
,
other features—security
91
Page 94

fun & games
features
launch browser
Start a browser session:
s >J BREW
Note:
The menu option on your phone for
starting a browser session may be different
than the one shown above.
other features—fun & games
92
features
manage pictures
s >h Media Gallery >Pictures
To view a picture, scroll to the picture title
and press
Press
Options
can include the following options:
Message
,
Send to online album, Apply As, Zoom, New
Details, Change Details, Delete, Move, Copy, Mark, Mark
All
,
Assign to Category, View Free Space
Note:
The
options for locked or preloaded images.
s
.
to open the
Pictures Menu
Pictures Menu
includes different
, which
Send In
.
,
Page 95

features
manage sounds
Manage sounds and create playlists:
s >h Media Gallery >Sounds
To play a sound, scroll to the sound title and
press
s
.
To create a playlist, scroll to
s
press
Press
.
Options
to open the
[New Playlist]
Sounds Menu
can include the following options:
Categories, Sounds Setup, View Free Space
, which
New
.
and
,
other features—fun & games
93
Page 96

service & repairs
If you have questions or need assistance,
we’re here to help.
www.motorola.com/consumer/
Go to
support
number of customer care options. You can
also contact the Motorola Customer Support
Center at 1-800-331-6456 (United States),
1-888-390-6456 (/TDD United States for
hearing impaired), or 1-800-461-4575
(Canada).
94
, where you can select from a
service & repairs
Page 97

Specific Absorption Rate Data
SAR Data
This model wireless phone meets the
government’s requirements for exposure to radio
waves.
Your wireless phone is a radio transmitter and receiver. It is
designed and manufactured not to exceed limits for exposure to
radio frequency (RF) energy set by the Federal Communications
Commission (FCC) of the U.S. Government and by the Canadian
regulatory authorities. These limits are part of comprehensive
guidelines and establish permitted levels of RF energy for the
general population. The guidelines are based on standards that
were developed by independent scientific organizations through
periodic and thorough evaluation of scientific studies. The
standards include a substantial safety margin designed to assure
the safety of all persons, regardless of age or health.
The exposure standard for wireless mobile phones employs a unit
of measurement known as the Specific Absorption Rate, or SAR.
The SAR limit set by the FCC and by the Canadian regulatory
authorities is 1.6 W/kg.
standard operating positions accepted by the FCC and by Industry
Canada with the phone transmitting at its highest certified power
level in all tested frequency bands. Although the SAR is
determined at the highest certified power level, the actual SAR
1
Tests for SAR are conducted using
level of the phone while operating can be well below the
maximum value. This is because the phone is designed to operate
at multiple power levels so as to use only the power required to
reach the network. In general, the closer you are to a wireless
base station, the lower the power output.
Before a phone model is available for sale to the public in the U.S.
and Canada, it must be tested and certified to the FCC and Industry
Canada that it does not exceed the limit established by each
government for safe exposure. The tests are performed in
positions and locations (e.g., at the ear and worn on the body)
reported to the FCC and available for review by Industry Canada.
The highest SAR value for this model phone when tested for use at
1.23W/kg, and when worn on the body, as described in
the ear is
this user guide, is
among phone models, depending upon available accessories and
regulatory requirements).
While there may be differences between the SAR levels of various
phones and at various positions, they all meet the governmental
requirements for safe exposure. Please note that improvements to
this product model could cause differences in the SAR value for
later products; in all cases, products are designed to be within the
guidelines.
1.07 W/kg. (Body-worn measurements differ
2
SAR Data
95
Page 98

Additional information on Specific Absorption Rates (SAR) can be
found on the Cellular Telecommunications & Internet Association
(CTIA) Web site:
http://www.phonefacts.net
or the Canadian Wireless Telecommunications Association (CWTA)
Web site:
http://www.cwta.ca
1. In the United States and Canada, the SAR limit for mobile phones used
by the public is 1.6 watts/kg (W/kg) averaged over one gram of tissue.
The standard i ncorporates a substantial mar gin of safety to give
additional protection for the public and to account for any variations in
measurements.
2. The SAR information includes the Motorola testing protocol,
assessment proce dure, and measurement uncertainty range for this
product.
SAR Data
96
Page 99

Important Safety and
Legal Information
97
Page 100

Safety and General Information
Safety In formatio n
This section contains important information on the safe and
efficient operation of your mobile device. Read this
information before using your mobile device.
*
Exposure to Radio Frequency (RF)
Energy
Your mobile device contains a transmitter and receiver. When it is
ON, it receives and transmits RF energy. When you communicate
with your mobile device, the system handling your call controls the
power level at which your mobile device transmits.
Your Motorola mobile device is designed to comply with local
regulatory requirements in your country concerning exposure of
human beings to RF energy.
Operational Precautions
For optimal mobile device performance and to be sure that human
exposure to RF energy does not exceed the guidelines set forth in
* The information provided in this document supersedes the general
safety information in user’s guides published prior to May 1, 2006.
Safety Information
98
the relevant standards, always follow these instructions and
precautions.
External Antenna Care
If your mobile device has an external antenna, use only a
Motorola-supplied or approved replacement antenna. Use of
unauthorized antennas, modifications, or attachments could
damage the mobile device and/or may result in your device not
complying with local regulatory requirements in your country.
DO NOT hold the external antenna when the mobile device is IN
USE. Holding the external antenna affects call quality and may
cause the mobile device to operate at a higher power level than
needed.
Product Operation
When placing or receiving a phone call, hold your mobile device
just like you would a landline phone.
If you wear the mobile device on your body, always place the
mobile device in a Motorola-supplied or approved clip, holder,
holster, case, or body harness. If you do not use a body-worn
accessory supplied or approved by Motorola, keep the mobile
device and its antenna at least 2.5 centimeters (1 inch) from your
body when transmitting.
 Loading...