

Page 1

APPLICANT: MOTOROLA, INC. FCC ID: IHDT56EV1
INSTRUCTION MANUAL
A preliminary draft copy of the Users Manual follows:
EXHIBIT 8
Page 2

MPx220
GSM
START HERE >
Page 3

Page 4

Welcome
Welcome to the world of Motorola MOTOPro devices. Your
Motorola MPx220 wireless phone delivers to you simplified
communications, increased productivity and the control to
develop a superior mobile experience whether at work, at
home, on the road or at play.
DR
Left soft key
Headset jack
Volume key
Action button
Home key
Send key
Power button
Sync/charger
port
AFT
Earpiece
Main display
Right soft key
Mini SD slot
4-way navigation
key
Back key
End key
Camera button
Infrared port
Keypad
Microphone
1
Page 5

Motorola, Inc.
Consumer Advocacy Office
1307 East Algonquin Road
Schamburg, IL 60196
1-800-331-6456 (United States)
1-888-390-6456 (TTY/TDD United States)
1-800-461-4575 (Canada)
www.motorola.com
www.motorola.ca
MOTOROLA and the Stylized M Logo are registered in the US Patent &
Trademark Office. The Bluetooth trademarks are owned by their proprietor and
used by Motorola, Inc. under license. Microsoft, Windows, ActiveSync and
Windows Media are registered trademarks of Microsoft Corporation; and
Windows XP and Windows Mobile are trademarks of Microsoft Corporation. All
other product or service names are the property of their respective owners.
© Motorola, Inc. 2004.
Caution:
expressly approved by Motorola, will void the user's authority to operate
the equipment.
Software Copyright Notice
The Motorola products described in this manual may include copyrighted
Motorola and third-party software stored in semiconductor memories or other
media. Laws in the United States and other countries preserve for Motorola
and third-party software providers certain exclusive rights for copyrighted
software, such as the exclusive rights to distribute or reproduce the
copyrighted software. Accordingly, any copyrighted software contained in the
Motorola products may not be modified, reverse-engineered, distributed, or
reproduced in any manner to the extent allowed by law. Furthermore, the
purchase of the Motorola products shall not be deemed to grant either directly
or by implication, estoppel, or otherwise, any license under the copyrights,
patents, or patent applications of Motorola or any third-party software
provider, except for the normal, non-exclusive, royalty-free license to use that
arises by operation of law in the sale of a product.
Manual number: ___________
DR
(United States)
(Canada)
AFT
Changes or modifications made in the radio phone, not
2
Page 6

Menu Map
This is the default menu on your Motorola phone. It can be
accessed by pressing
phone.
DR
Start
from the Home screen of your
Main Menu Display
Note:
This is the standard main menu layout. Menu
organization and feature names may vary on your phone. Not
all features may be available on your phone.
Messaging
• Text Messages
• Outlook E-Mail *
• Media Messages *
Contacts
Calendar
Internet Explorer *
ActiveSync
Call History
MSN Messenger *
Settings
• Phone *
• Sounds
• Profiles
• Home Screen
• About
• Accessibility
• Beam
•Bluetooth
* Optional network, SIM card, or subscription-dependent feature.
# The voice recognition application works only via the phone directly or a wired
headset attached to the phone, but not with a Bluetooth® headset.
AFT
• Certificates
• Data Connections
• Date and Time
•Owner Information
• Power Management
• Regional Settings
• Remove Programs
• Security
• Phone Settings
Camera
Favorites Manager
File Manager
File Viewer
Game Room
Media Manager
MMSSettings *
PhotoAlbum
Pocket MSN *
3
Page 7
Resource Manager
• Task Manager
• Space Manager
Speed Dial
Tasks
Speech Recognition
Voice Recorder
Windows Media
Accessories
Games
Go to dialed calls list:
Press (in idle).
Use Speech Recognition or
Voice Recorder:
Press and hold up or down
(in idle).
Take photos:
Press
Camera
Open Quick List:
Press and hold (in idle).
Exit menu system:
Press .
DR
•Calculator
• Camcorder
• Modem Link
•Video Player
•Jawbreaker
• Solitaire
Shortcuts
Start
, and then press .
>
More >
#
AFT
4
Page 8

Contents
Menu Map
Safety and General Information
Getting Started
What’s in the Box? . . . . . . . . . . . . . . . . . . . . . . . . . . . . . 17
About This Guide . . . . . . . . . . . . . . . . . . . . . . . . . . . . . . 17
Installing the SIM Card . . . . . . . . . . . . . . . . . . . . . . . . . . 18
Installing the Battery. . . . . . . . . . . . . . . . . . . . . . . . . . . . 19
Charging the Battery. . . . . . . . . . . . . . . . . . . . . . . . . . . . 20
Battery Use . . . . . . . . . . . . . . . . . . . . . . . . . . . . . . . . . . . 21
Turning Your Phone On/Off. . . . . . . . . . . . . . . . . . . . . . . 22
Adjusting Volume . . . . . . . . . . . . . . . . . . . . . . . . . . . . . . 23
Making a Call . . . . . . . . . . . . . . . . . . . . . . . . . . . . . . . . . 23
Answering a Call. . . . . . . . . . . . . . . . . . . . . . . . . . . . . . . 25
Learning to Use Your Phone
Using the Internal Display. . . . . . . . . . . . . . . . . . . . . . . . 26
Using the External Display . . . . . . . . . . . . . . . . . . . . . . . 28
Using the Home Key. . . . . . . . . . . . . . . . . . . . . . . . . . . . 29
Using the 4-Way Navigation Key. . . . . . . . . . . . . . . . . . . 30
Using the Action Button . . . . . . . . . . . . . . . . . . . . . . . . . 31
Using the Soft Keys . . . . . . . . . . . . . . . . . . . . . . . . . . . . 31
Using the Back Button . . . . . . . . . . . . . . . . . . . . . . . . . . 33
Using Menus. . . . . . . . . . . . . . . . . . . . . . . . . . . . . . . . . . 33
Entering Text and Numbers . . . . . . . . . . . . . . . . . . . . . . 34
Viewing Phone Information. . . . . . . . . . . . . . . . . . . . . . . 38
Setting Up Your Phone
Setting the Time and Date . . . . . . . . . . . . . . . . . . . . . . . 39
Entering Owner Information . . . . . . . . . . . . . . . . . . . . . . 39
. . . . . . . . . . . . . . . . . . . . . . . . . . . . . . . . . . . . . . 3
DR
. . . . . . . . . . . . . . . . . . . . 9
. . . . . . . . . . . . . . . . . . . . . . . . . . . . . . . . . 17
AFT
. . . . . . . . . . . . . . . . . . . . . . 26
. . . . . . . . . . . . . . . . . . . . . . . . . . . 39
5
Page 9

Configuring Power Management. . . . . . . . . . . . . . . . . . . 40
Calling Features
Redialing a Number . . . . . . . . . . . . . . . . . . . . . . . . . . . . 41
Calling a Contacts Entry . . . . . . . . . . . . . . . . . . . . . . . . . 41
Making a Call with Voice Dialing. . . . . . . . . . . . . . . . . . . 44
Making a Call from the Call History List . . . . . . . . . . . . . 50
Calling a Number in a Message . . . . . . . . . . . . . . . . . . . 51
Calling an Emergency Number. . . . . . . . . . . . . . . . . . . . 51
Managing Call History. . . . . . . . . . . . . . . . . . . . . . . . . . . 52
Calling with Speed Dial. . . . . . . . . . . . . . . . . . . . . . . . . . 53
Using Voicemail . . . . . . . . . . . . . . . . . . . . . . . . . . . . . . . 55
Using Call Waiting. . . . . . . . . . . . . . . . . . . . . . . . . . . . . . 55
Putting a Call on Hold . . . . . . . . . . . . . . . . . . . . . . . . . . . 56
Muting a Call . . . . . . . . . . . . . . . . . . . . . . . . . . . . . . . . . . 57
Turning the Speaker On/Off . . . . . . . . . . . . . . . . . . . . . . 57
Messages and Chat
Composing an MMS Message . . . . . . . . . . . . . . . . . . . . 58
Sending Your MMS Message
Viewing Your MMS Message . . . . . . . . . . . . . . . . . . . . . 63
Configuring the MMS Setting . . . . . . . . . . . . . . . . . . . . . 64
Configuring an Email Account . . . . . . . . . . . . . . . . . . . . 65
Receiving Email from the Internet. . . . . . . . . . . . . . . . . . 67
Composing and Sending an Email/SMS Message . . . . . 70
Importing SMS Messages from Your SIM Card to
Messaging
Opening Email/SMS Messages . . . . . . . . . . . . . . . . . . . 75
Receiving Meeting Requests . . . . . . . . . . . . . . . . . . . . . 79
Viewing Your Message Folders. . . . . . . . . . . . . . . . . . . . 80
Using Message Notifications. . . . . . . . . . . . . . . . . . . . . . 81
Communicating with MSN® Messenger . . . . . . . . . . . . . 82
Personalizing Your Phone
Using Phone Settings . . . . . . . . . . . . . . . . . . . . . . . . . . . 88
6
. . . . . . . . . . . . . . . . . . . . . . . . . . . . . . . . 41
DR
AFT
. . . . . . . . . . . . . . . . . . . . . . . . . . . . . 58
. . . . . . . . . . . . . . . . . . . . . . .
. . . . . . . . . . . . . . . . . . . . . . . . . . . . . . . . . . . . . . . .
. . . . . . . . . . . . . . . . . . . . . . . . 88
62
75
Page 10

Using Sound Settings . . . . . . . . . . . . . . . . . . . . . . . . . . . 90
Using Profiles . . . . . . . . . . . . . . . . . . . . . . . . . . . . . . . . . 91
Changing the Home Screen . . . . . . . . . . . . . . . . . . . . . . 94
Changing Regional Settings . . . . . . . . . . . . . . . . . . . . . . 95
DR
Setting Font Size, Time-Out, and Alert Volume . . . . . . . 95
Using Advanced Phone Settings . . . . . . . . . . . . . . . . . . 95
Getting More Out of Your Phone
Making a Conference Call . . . . . . . . . . . . . . . . . . . . . . . 96
Forwarding Calls. . . . . . . . . . . . . . . . . . . . . . . . . . . . . . . 97
Barring Calls . . . . . . . . . . . . . . . . . . . . . . . . . . . . . . . . . . 98
Monitoring Phone Use . . . . . . . . . . . . . . . . . . . . . . . . . . 98
Opening Applications with Speed Dial . . . . . . . . . . . . . . 99
Using Voice Activation . . . . . . . . . . . . . . . . . . . . . . . . . 100
Making Data Calls. . . . . . . . . . . . . . . . . . . . . . . . . . . . . 104
Synchronizing Information among Devices. . . . . . . . . . 110
Using a Bluetooth® Connection . . . . . . . . . . . . . . . . . . 123
Using Your Phone as a Modem . . . . . . . . . . . . . . . . . . 126
Changing the Order of Applications Displayed on
the Start List . . . . . . . . . . . . . . . . . . . . . . . . . . . . . . . . . 132
Using File Viewer . . . . . . . . . . . . . . . . . . . . . . . . . . . . . 133
Managing Files . . . . . . . . . . . . . . . . . . . . . . . . . . . . . . . 138
Managing Phone System Resources . . . . . . . . . . . . . . 140
Removing Programs . . . . . . . . . . . . . . . . . . . . . . . . . . . 142
Personal Organizer
Using Contacts
Using Calendar . . . . . . . . . . . . . . . . . . . . . . . . . . . . . . . 148
Using Schedule. . . . . . . . . . . . . . . . . . . . . . . . . . . . . . . 149
Using Tasks . . . . . . . . . . . . . . . . . . . . . . . . . . . . . . . . . 152
Using Voice Recorder . . . . . . . . . . . . . . . . . . . . . . . . . . 153
Using Calculator . . . . . . . . . . . . . . . . . . . . . . . . . . . . . . 154
AFT
. . . . . . . . . . . . . . . . . . . . . . . . . . . . . 143
. . . . . . . . . . . . . . . . . . . . . . . . . . . . . . . . . .
. . . . . . . . . . . . . . . . . . . 96
143
7
Page 11

Security
News and Entertainment
Troubleshooting
Specific Absorption Rate Data
Microsoft End User License Agreement
Index
. . . . . . . . . . . . . . . . . . . . . . . . . . . . . . . . . . . . . . 156
Locking and Unlocking the Keypad. . . . . . . . . . . . . . . . 156
Locking and Unlocking Your Phone . . . . . . . . . . . . . . . 157
Locking and Unlocking Your SIM Card . . . . . . . . . . . . . 159
Taking Pictures . . . . . . . . . . . . . . . . . . . . . . . . . . . . . . . 160
Managing Pictures . . . . . . . . . . . . . . . . . . . . . . . . . . . . 166
Creating Video Clips . . . . . . . . . . . . . . . . . . . . . . . . . . . 172
Playing Video Clips . . . . . . . . . . . . . . . . . . . . . . . . . . . . 174
Using Internet Explorer® . . . . . . . . . . . . . . . . . . . . . . . 177
Using Media Player. . . . . . . . . . . . . . . . . . . . . . . . . . . . 180
Managing Digital Rights Management (DRM) Content. 183
Playing Games . . . . . . . . . . . . . . . . . . . . . . . . . . . . . . . 185
Managing Java . . . . . . . . . . . . . . . . . . . . . . . . . . . . . . . 188
DR
. . . . . . . . . . . . . . . . . . . . . . . . 160
AFT
. . . . . . . . . . . . . . . . . . . . . . . . . . . . . . . 191
. . . . . . . . . . . . . . . . . . . 196
. . . . . . . . . . . 198
. . . . . . . . . . . . . . . . . . . . . . . . . . . . . . . . . . . . . . . . 205
8
Page 12

Safety and General Information
IMPORTANT INFORMATION ON SAFE AND EFFICIENT OPERATION.
READ THIS INFORMATION BEFORE USING YOUR PHONE.
The information provided in this document supersedes the general safety
information in user guides published prior to December 1, 2002.
Exposure To Radio Frequency (RF) Energy
Your phone contains a transmitter and a receiver. When it is ON, it
receives and transmits RF energy. When you communicate with your
phone, the system handling your call controls the power level at which
your phone transmits.
Your Motorola phone is designed to comply with local regulatory
requirements in your country concerning exposure of human beings to RF
energy.
Operational Precautions
To assure optimal phone performance and make sure human exposure to
RF energy is within the guidelines set forth in the relevant standards,
always adhere to the following procedures.
External Antenna Care
Use only the supplied or Motorola-approved replacement antenna.
Unauthorized antennas, modifications, or attachments could damage the
phone.
Do NOT hold the external antenna when the phone is IN USE. Holding
the external antenna affects call quality and may cause the phone to
operate at a higher power level than needed. In addition, use of
unauthorized antennas may result in non-compliance with the local
regulatory requirements in your country.
DR
AFT
9
Page 13

Phone Operation
When placing or receiving a phone call, hold your phone as you would a
wireline telephone.
Body-Worn Operation
To maintain compliance with RF energy exposure guidelines, if you wear
a phone on your body when transmitting, always place the phone in a
Motorola-supplied or approved clip, holder, holster, case, or body harness
for this phone, if available. Use of accessories not approved by Motorola
may exceed RF energy exposure guidelines. If you do not use one of the
body-worn accessories approved or supplied by Motorola, and are not
using the phone held in the normal use position, ensure the phone and its
antenna are at least 1 inch (2.5 centimeters) from your body when
transmitting.
Data Operation
When using any data feature of the phone, with or without an accessory
cable, position the phone and its antenna at least 1 inch (2.5 centimeters)
from your body.
Approved Accessories
Use of accessories not approved by Motorola, including but not limited to
batteries and antenna, may cause your phone to exceed RF energy
exposure guidelines. For a list of approved Motorola accessories, visit our
website at
RF Energy Interference/Compatibility
Note:
interference from external sources if inadequately shielded, designed, or
otherwise configured for RF energy compatibility. In some circumstances
your phone may cause interference.
DR
AFT
www.Motorola.com
Nearly every electronic device is susceptible to RF energy
.
10
Page 14

Facilities
Turn off your phone in any facility where posted notices instruct you to do
so. These facilities may include hospitals or health care facilities that may
be using equipment that is sensitive to external RF energy.
Aircraft
When instructed to do so, turn off your phone when on board an aircraft.
Any use of a phone must be in accordance with applicable regulations per
airline crew instructions.
Medical Devices
Pacemakers
Pacemaker manufacturers recommend that a minimum separation of
6 inches (15 centimeters) be maintained between a handheld wireless
phone and a pacemaker.
Persons with pacemakers should:
•
•
•
•
Hearing Aids
Some digital wireless phones may interfere with some hearing aids. In the
event of such interference, you may want to consult your hearing aid
manufacturer to discuss alternatives.
Other Medical Devices
If you use any other personal medical device, consult the manufacturer of
your device to determine if it is adequately shielded from RF energy. Your
physician may be able to assist you in obtaining this information.
DR
AFT
ALWAYS keep the phone more than 6 inches (15 centimeters) from
your pacemaker when the phone is turned ON.
NOT carry the phone in the breast pocket.
Use the ear opposite the pacemaker to minimize the potential for
interference.
Turn OFF the phone immediately if you have any reason to suspect
that interference is taking place.
11
Page 15

Use While Driving
Check the laws and regulations on the use of phones in the area where
you drive. Always obey them.
When using your phone while driving, please:
•
Give full attention to driving and to the road.
•
Use hands-free operation, if available.
•
Pull off the road and park before making or answering a call if driving
conditions so require.
Responsible driving best practices may be found in the “Wireless Phone
Safety Tips” at the end of this manual and at the Motorola website:
www.Motorola.com/callsmart
Operational Warnings
For Vehicles With an Air Bag
Do not place a phone in the area over an air bag or in the air bag
deployment area. Air bags inflate with great force. If a phone is placed in
the air bag deployment area and the air bag inflates, the phone may be
propelled with great force and cause serious injury to occupants of the
vehicle.
Potentially Explosive Atmospheres
Turn off your phone prior to entering any area with a potentially explosive
atmosphere, unless it is a phone type especially qualified for use in such
areas and certified as “Intrinsically Safe.” Do not remove, install, or
charge batteries in such areas. Sparks in a potentially explosive
atmosphere can cause an explosion or fire resulting in bodily injury or
even death.
Note:
include fueling areas such as below decks on boats, fuel or chemical
transfer or storage facilities, areas where the air contains chemicals or
DR
.
AFT
The areas with potentially explosive atmospheres referred to above
12
Page 16

particles, such as grain, dust, or metal powders. Areas with potentially
explosive atmospheres are often but not always posted.
Blasting Caps and Areas
To avoid possible interference with blasting operations, turn OFF your
phone when you are near electrical blasting caps, in a blasting area, or in
areas posted “Turn off electronic devices.” Obey all signs and
instructions.
Batteries
Batteries can cause property damage and/or bodily injury such as burns if
a conductive material such as jewelry, keys, or beaded chains touch
exposed terminals. The conductive material may complete an electrical
circuit (short circuit) and become quite hot. Exercise care in handling any
charged battery, particularly when placing it inside a pocket, purse, or
other container with metal objects.
and chargers.
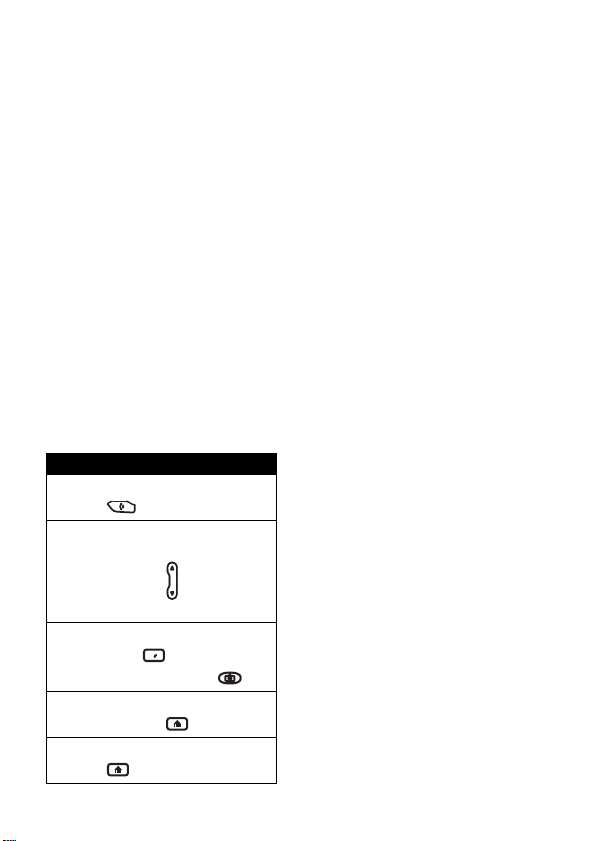
Your battery or phone may contain symbols, defined as follows:
DR
AFT
Symbol Definition
Important safety information will follow.
Your battery or phone should not be disposed of in a
fire.
Your battery or phone may require recycling in
accordance with local laws. Contact your local
regulatory authorities for more information.
Your battery or phone should not be thrown in the
trash.
LiIon BATT
Your phone contains an internal lithium ion battery.
Use only Motorola original batteries
13
Page 17

Seizures/Blackouts
Some people may be susceptible to epileptic seizures or blackouts when
exposed to blinking lights, such as when watching television or playing
video games. These seizures or blackouts may occur even if a person
never had a previous seizure or blackout.
If you have experienced seizures or blackouts, or if you have a family
history of such occurrences, please consult with your doctor before
playing video games on your phone or enabling a blinking-lights feature
on your phone. (The blinking-light feature is not available on all products.)
Parents should monitor their children's use of video game or other
features that incorporate blinking lights on the phones. All persons should
discontinue use and consult a doctor if any of the following symptoms
occur: convulsion, eye or muscle twitching, loss of awareness, involuntary
movements, or disorientation.
To limit the likelihood of such symptoms, please take the following safety
precautions:
•
Do not play or use a blinking-lights feature if you are tired or need
sleep.
•
Take a minimum of a 15-minute break hourly.
•
Play in a room in which all lights are on.
•
Play at the farthest distance possible from the screen.
Repetitive Motion Injuries
When you play games on your phone, you may experience occasional
discomfort in your hands, arms, shoulders, neck, or other parts of your
body. Follow these instructions to avoid problems such as tendonitis,
carpal tunnel syndrome, or other musculoskeletal disorders:
•
Take a minimum 15-minute break every hour of game playing.
•
If your hands, wrists, or arms become tired or sore while playing,
stop and rest for several hours before playing again.
DR
AFT
14
Page 18

•
If you continue to have sore hands, wrists, or arms during or after
play, stop playing and see a doctor.
DR
AFT
15
Page 19

European Union Directives Conformance Statement
Hereby, Motorola declares that this product is in compliance
with
•
The essential requirements and other relevant provisions
DR
of Directive 1999/5/EC
•
All other relevant EU Directives
IMEI: 350034/40/394721/9
0168
Type: MC2-41H14
The above gives an example of a typical Product Approval Number.
You can view your product's Declaration of Conformity (DoC) to Directive
1999/5/EC (the R&TTE Directive) at www.motorola.com/rtte - to find your
DoC, enter the product Approval Number from your product's label in the
"Search" bar on the Web site.
AFT
Product
Approval
Number
16
Page 20

Getting Started
What’s in the Box?
Your wireless mobile phone comes with a battery,
travel charger, USB data cable, mono headset, companion
CD, user manual, product and service user data, and
cables*. You can purchase other accessories to customize
your phone for maximum performance and portability.
To purchase Motorola Original™ accessories, contact the
Motorola Customer Call Center at 1-800-331-6456 in the
United States or 1-800-461-4575 in Canada.
Note:
on product promotions.
* In-box content may vary by Regions.
About This Guide
This user guide describes how to use your Motorola phone
to its maximum potential.
Note:
indicates the feature's position from the Home screen.
Optional Features
geographical areas.
DR
Additional accessories may be available depending
In this user’s guide, “Find the Feature” always
This label identifies an optional network, SIM
card, or subscription-dependent feature that may
not be offered by all service providers in all
AFT
Getting Started
17
Page 21
Optional Accessories
This label identifies a feature that requires an
optional Motorola Original™ accessory.
DR
Installing the SIM Card
Your Subscriber Identity Module (SIM) card contains your
phone number, service details, and phonebook/message
information. It is stored in a recess in the battery
compartment.
Caution:
Getting Started
exposing your SIM card to static electricity, water, or dirt.
18
Do not bend or scratch your SIM card. Avoid
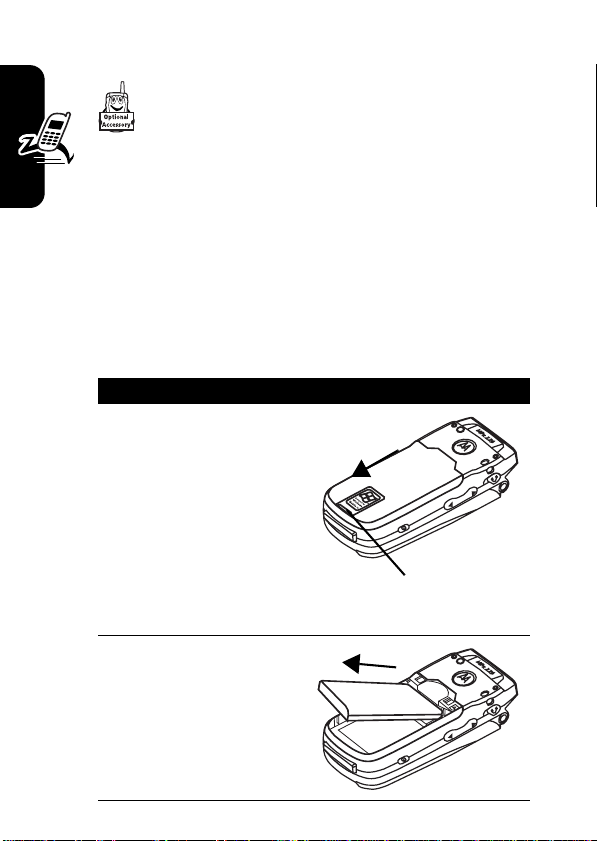
Action
1
If the phone’s battery
door is already in
place, push down the
battery door release
latch and lift the battery
door off the phone.
Note:
phone every time when
you remove/insert the SIM card.
2
Lift the battery up from
the bottom end and
remove it from the
phone.
AFT
Tur n o ff your
Latch
Page 22
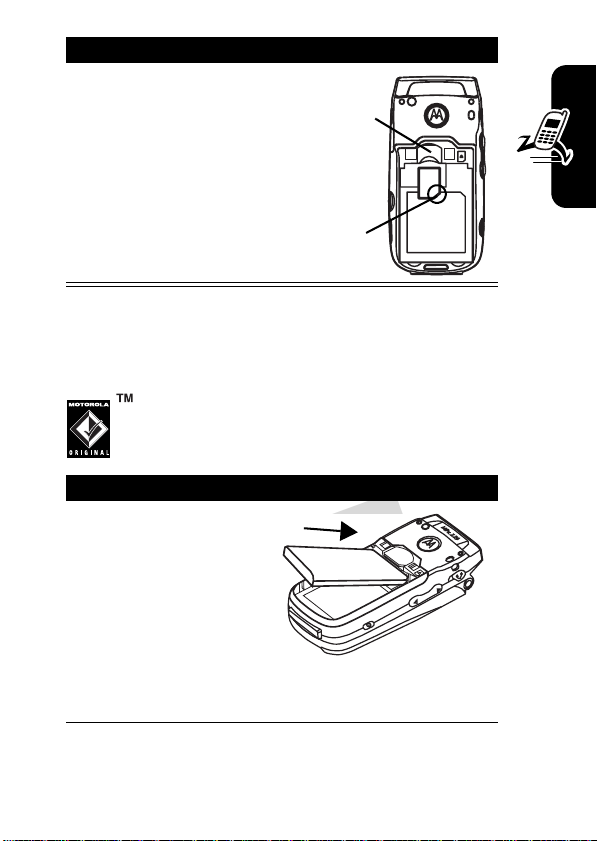
Action
3
Hold the SIM card
with the gold
contact side facing
DR
down and the cut
corner on the
bottom right. Slide
the SIM card all the
way into the SIM
card holder.
Installing the Battery
You must install and charge the battery to use your phone.
Your phone is designed to use only Motorola
Original™ batteries and accessories
Action
1
Insert the battery into
the back of the
phone, with the
contacts on the top
end of the battery in
alignment with the
contacts on the
phone. Push the bottom end of the battery into
the phone until it clicks into the compartment.
SIM card holder
Cut corner
AFT
MPx220
Getting Started
19
Page 23
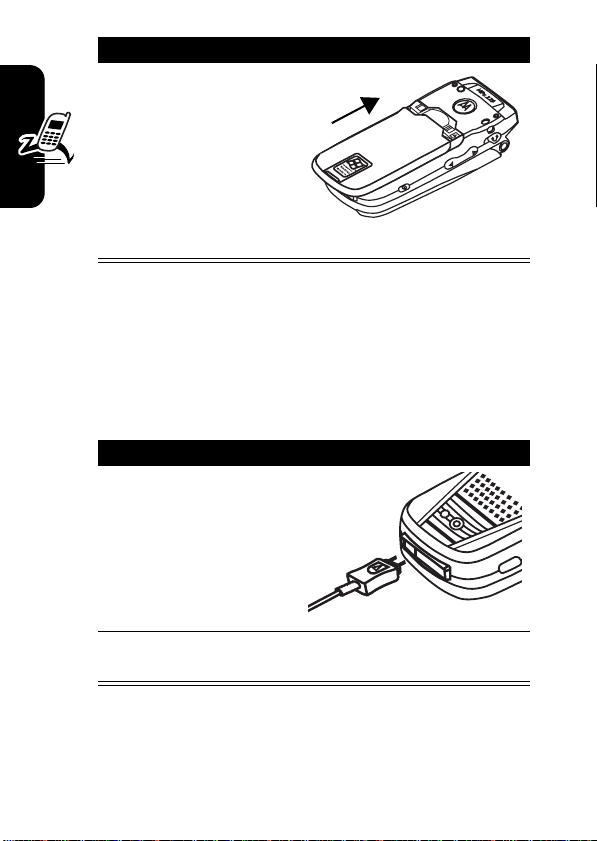
Action
2
Place the battery
cover back on the
phone, aligning the
DR
tabs on the cover with
the groove on the
phone. Slide the
battery cover in the
direction shown until it locks into place.
Charging the Battery
New batteries are partially charged. Before using your
Getting Started
phone, charge the battery as described below. Some
batteries perform best after several full charge/discharge
cycles.
Action
1
Plug battery charger
connector into the
sync/charger port.
Note:
is keyed and can only
be inserted 1 way.
AFT
The connector
20
2
Plug the other end of the charger into the
electrical outlet.
Notes:
•
When you charge the battery, the battery power level
indicator in the external display shows how much of
Page 24

the charging process is complete. At least 1 segment
of the battery power level indicator must be visible to
ensure full phone functionality while charging. You
can use the phone during the charging process.
DR
However, the battery will take longer to fully
charge.
•
Your phone will indicate a full charge before 24 hours
have passed, however, allow your phone to charge for
the full 24 hours before 1st use.
•
When battery power is low, a low battery message
displays. Charge the battery immediately.
•
If battery power is completely drained, the phone
turns off automatically.
•
The charging indicator may take several minutes
before appearing in the external display.
Battery Use
To maximize your battery’s performance:
•
Always use Motorola Original™ batteries and battery
chargers. The phone warranty does not cover damage
caused from using non-Motorola batteries and/or
battery chargers.
•
Battery life would be shorter than normal if users play
games or use phones in low signal strength areas.
•
Maintain the battery at or near room temperature
when charging.
AFT
Getting Started
21
Page 25

•
Do not expose batteries to temperatures below -10°C
(14°F) or above 45°C (113°F). Always take your
phone with you when you leave your vehicle.
•
When you do not intend to use a battery for a
DR
while, store it uncharged in a cool, dark, dry place,
such as a refrigerator.
•
Over time, batteries gradually wear down and require
longer charging times. This is normal. If you charge
your battery regularly and notice a decrease in talk
time or an increase in charging time, then it is
probably time to buy a new battery.
Getting Started
for proper disposal methods. Never dispose of batteries in
a fire because they may explode. Refer to your battery’s
label for battery type.
Turning Your Phone On/Off
The rechargeable batteries that power this phone
must be disposed of properly and may need to
be recycled. Contact your local recycling center
Press To
Power
(p)
AFT
turn on or off your phone
22
Page 26
Adjusting Volume
Press To
1
DR
up/down
2
Action
(A) save the setting
Tip:
When a call is ringing/incoming, press to mute the
ring.
increase/decrease earpiece
volume in idle or during a call
Note:
You can adjust the
volume only when the phone
flip is opened.
Getting Started
Making a Call
There are several ways to make a call. The easiest way is
to dial a phone number from the Home screen.
Press To
1
keypad keys enter the phone number
2
Send
3
End
Tip:
To enter an extension, press and hold to insert a
“P” (pause character); then enter the extension following it.
AFT
Tip:
Press
Back
the last digit; press and hold
Back
make the call
end the call
to delete all digits.
to delete
23
Page 27
Tip:
To make an international call, press and hold to
insert a “+”; then enter the country code, area code
(omitting the starting 0), and phone number following it.
Some international calls require a 3-second pause in
DR
the dialing sequence for the call to process
successfully. Follow the steps:
Find the Feature
Press To
1
2
Action
Edit
Menu
Action
Done
(A)
left/right
(A)
Getting Started
3
4
5
6
7
8
9
The letter “p” appears where the 3-second pause will occur
in the dialing sequence. You can also add a “p” via text
entry.
Start
scroll to a desired entry
select the entry
scroll to a desired phone
number
AFT
edit the phone number
move the cursor between the
numbers where you want to
insert a 3-second pause
open the options menu
scroll to
insert a 3-second pause
save the setting
>
Contacts
Insert Pause
24
Page 28
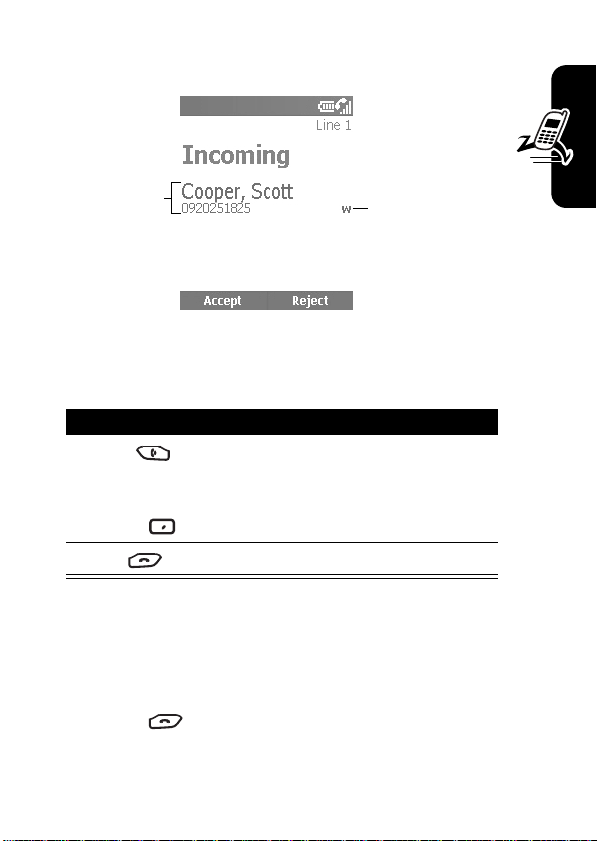
Answering a Call
DR
Caller ID
information is
matched to a
contact
When you receive a call, your phone rings and/or vibrates
and displays an incoming call message.
Press To
1
Send
or
Accept
2
End
Tip:
When
Flip Answer
call. (To activate, see “Using Advanced Phone Settings” on
page 95.)
Tip:
When
Any key answer
except
End
Phone Settings” on page 88.)
AFT
answer the call
end the call
is active, open the flip to answer the
is active, press any of the keys
to answer the call. (To activate, see “Using
Phone number
is identified as
Work
number in
Contacts
Getting Started
25
Page 29
Learning to Use Your
Phone
DR
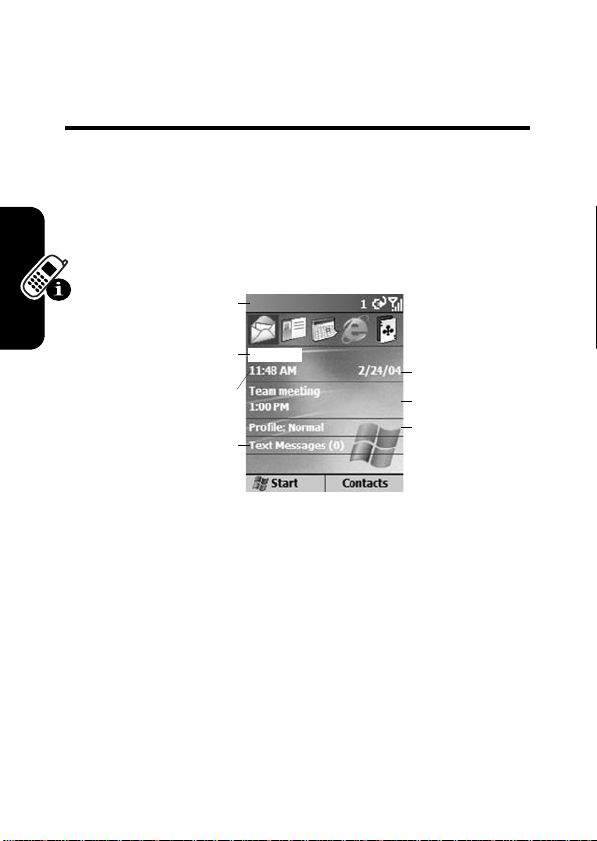
Using the Internal Display
The Home screen (shown) is the standard display when
you are not on a call or using the menu.
Status indicators
Service provider
Current time
Number of unread
messages
On the Home screen, you will find:
•
The top of the display shows status indicators about
Learning to Use Your Phone
26
your phone’s current mode.
•
The center of the display shows the Home screen, as
well as
icons, appointments, other types of
information, and
•
The bottom of the display shows the soft key
commands.
AFT
messages.
Current date
Next appointme
Ring type or
volume profile
Page 30
Note:
The display shown may be different based on the
specific Home screen configuration chosen.
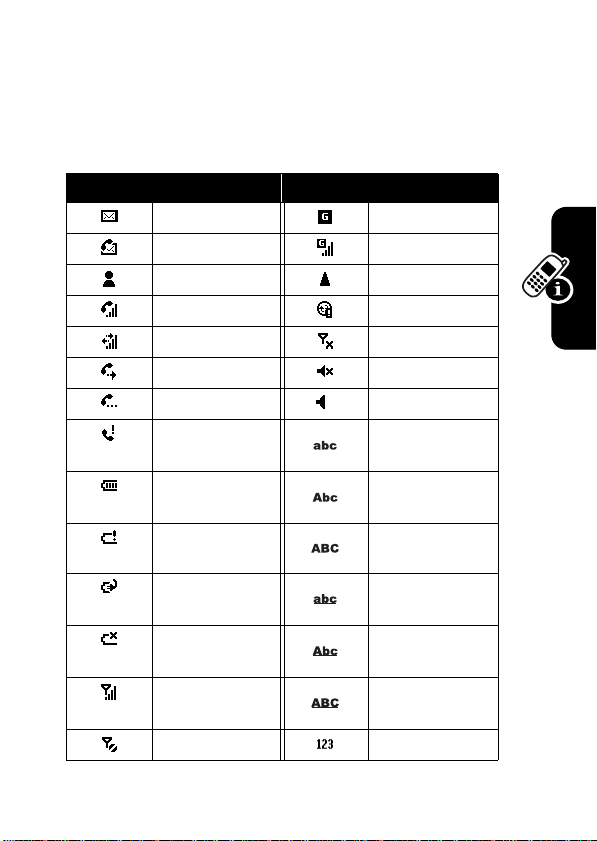
Status indicators display at the top of your phone’s internal
screen. The following table lists common status indicators
and their meanings.
DR
Icon Meaning Icon Meaning
New email or SMS GPRS available
New voicemail GPRS in use
New instant message Roaming
Voice call active Sync error
Data call active Radio off
Call forwarding Ringer off
Call on hold Speaker
Missed call Multi-Tap text input
Battery level Multi-Tap text input
Low battery Multi-Tap text input
Battery charging iTAP text input mode,
No battery iTAP text input mode,
Signal strength iTAP text input mode,
No signal Numeric input mode
AFT
mode, lowercase
mode, uppercase
mode, caps lock
lowercase
uppercase
caps lock
Learning to Use Your Phone
27
Page 31

Using the External Display
Battery level
DR
Current date
The following table lists the icons and their meanings
that appear on the external display.
Icon Meaning Icon Meaning
Signal strength Battery level
Call in progress Battery low
Data call active No battery
No signal Charging
Radio off Ringer off
You have unread new
message(s)
You have missed call(s) GPRS in use
Learning to Use Your Phone
When enabled, the external display shows the incoming
photo Caller ID (see “Taking Pictures” on page 160).
Call forwarding Roaming
New instant message
AFT
Signal strength
Current time
Speaker
Your phone’s display may differ based on the specific
external LCD style chosen (see “Using Advanced Phone
Settings” on page 95).
28
Page 32

Using the Home Key
Use the Home key to do the following:
•
From the Home screen, press and hold
DR
access the
Power
profile types and commands, such as turn off your
phone, turn on/off the
phone’s keypad, and lock your phone.
Note:
Be aware that when the
on, then your phone cannot receive and make a call,
including an emergency call. In order to receive and
make a call, you must turn off the
engage your phone’s RF capability. Always obey the
instructions of your airline crew.
•
Display the Home screen to dial a number.
•
The Home screen is your starting place for most
tasks. You can easily navigate to any program or
setting from this screen. The top of the Home screen
displays the last 10 icons you browsed. Just select a
program and press
can also press
Start list. The Home screen also displays the current
time and date, your next appointment, your current
profile, and the number of unread messages in
Messaging
(
) to open
A
appointments for the day. To view
messaging status showing the number of unread
Quick List
, or quickly press and release
(p). The
Quick List
displays a list of available
Flight mode
feature, lock your
Flight mode
Flight mode
AFT
Action
(A) to open the program. You
Start
. Select your next appointment and press
Calendar
to enter the programs on the
, and you can see all of your
Home
feature is turned
feature and re-
Messaging
, select the
to
Action
Learning to Use Your Phone
29
Page 33

messages you have, and press
Contacts
, press
Contacts
•
The Home screen automatically displays when you
turn on the phone or leave the phone idle, but you can
DR
navigate to it at any time by pressing
•
To change Home screen settings, see “Changing the
Home Screen” on page 94.
Using the 4-Way Navigation
Key
Use the 4-Way Navigation key to navigate the menu
system, change feature settings and play games.
Tip:
Down and up are your primary movements within
menus and navigation through contacts. Move left and
right to change feature settings and edit text.
From the Home screen, press to do the following:
•
Select a program at the top of the screen, and then
press
Action
•
Learning to Use Your Phone
Select an item in the center of the Home screen, such
as your next appointment, your profile type, or your
messaging information, and then press
open the program or access the settings associated
with the item selected.
AFT
(A) to open the program.
Action
(A). To view
.
Home
Action
.
(A) to
30
Page 34

Using the Action Button
The Action button confirms your selection. Pressing
Action
(A) is similar to pressing “Enter” on a keyboard. In
some cases, confirming your selection accesses a
program or setting. You can also press
or uncheck a feature.
Using the Soft Keys
The 2 Soft keys on your phone are located directly
below the display screen. Each soft key performs the
command displayed immediately above it on the
screen. Both soft keys are context sensitive — their
function changes according to the phone’s status, for
example, when in a particular application or making a
phone call.
On the Home screen:
1
DR
AFT
Press To
Left soft
key
(
Start
access programs in the Start
list
)
Tip:
The phone comes preinstalled with programs that
you can start using
immediately. To install
additional programs on your
phone, refer to the Motorola
MPx220 companion CD that
came with the phone.
Action
(A) to check
Learning to Use Your Phone
31
Page 35

Press To
2
Right soft key
DR
You can also use numbers to navigate quickly to programs
and settings on the phone. Press the number on the
keypad that corresponds to the number of the program or
setting you want. For example, in the Start list,
press to open
You can also use numbers to select menu options by
pressing the number that corresponds to the menu option
in descending order. For example, to select
Contacts
of
Learning to Use Your Phone
menu options, press .
Calendar
access the following during
normal use:
•
Contacts
: displays to open
your contacts list.
•
Voicemail
: displays to play
a received voicemail.
•
Messages
: displays to read
new messages in
Messaging
.
AFT
.
Filter
in the list
32
Page 36

Using the Back Button
Press the Back button to navigate to the previous screen,
or move the cursor back to delete 1 or more characters in a
text field.
1
2
DR
Press To
Back
Back
while
for a
backspace and remove 1
character in a text field
backspace and remove
multiple characters in a text
field
Using Menus
On many screens, the Menu soft key is the Right soft key.
Menu
Press
to the screen you are viewing. Selecting a menu option will
either perform the command or take you to another part of
AFT
to display a list of options that are relevant
Learning to Use Your Phone
33
Page 37

the user interface where you can perform the command.
DR
Press
Menu
menu options
Tip:
Press up to move to the bottom of the menu.
to display
AFT
Entering Text and Numbers
You can enter text and numbers on the phone using the
keypad. The phone supports 3 input modes for entering
text and numbers:
iTAP
modes are used for entering text, and the
is used for entering numbers. When you select a field that
requires text or numeric entry, the phone automatically
defaults to the appropriate input mode. The status
Learning to Use Your Phone
indicator on the top of the display shows the input mode
you are currently using.
Multi-Tap, iTAP
, and
Numeric
. The
Multi-Tap
Numeric
and
mode
34
Page 38

Changing Input Modes
Action
Press and hold until the status indicator for the
input mode you want is shown at the top of the
display.
The following table shows the complete list of input
mode status indicators.
Indicator Mode
Entering Text in Multi-Tap Mode
DR
Multi-Tap
text input mode, lower case
Multi-Tap
text input mode, temporarily
upper case
Multi-Tap
iTAP
iTAP
case
iTAP
Numeric
AFT
text input mode, caps lock
text input mode, lower case
text input mode, temporarily upper
text input mode, caps lock
input mode
Learning to Use Your Phone
You can enter a letter in
number key on which the letter appears. To enter the 1st
letter on the number key, press the key once. To enter the
2nd letter, press the key twice, and so on. The letter
entered remains underlined until you complete the
Multi-Tap
mode by pressing the
35
Page 39

keypresses and the cursor moves to the next position. For
example:
Press To
DR
1
2
When you enter letters that are on the same number
key, wait until the underline disappears before entering
the next letter so that your phone can process the 1st
letter. This pause is called the
can adjust the length of the pause between keypresses.
enter the letter
enter the word
Multi-Tap
time out, and you
s
hat
To change the
Learning to Use Your Phone
36
Multi-Tap
Find the Feature
Press To
1
2
left/right
Done
time out:
AFT
Start
select the time interval you
want for the pause between
keypresses under
time out
save the setting
>
Settings > Accessibility
Multipress
Page 40

Entering Punctuation in Multi-Tap Mode
Press To
repetitively
DR
Entering Numbers in Numeric Mode
scroll through common
punctuation:
.,?! - @:1
When you are in
want to enter on the keypad. If a field permits a
numerical entry only, such as the
Contacts
, the input mode will automatically default to
Numeric
mode. To enter an asterisk (*) or a hash sign (#),
press the corresponding key on the keypad.
Inserting Symbol
Press To
1
2
3
Tip:
Using Special Key Functions
The following is a list of the keys and their corresponding
functions in input mode.
for a while
Done
You can also press to select and enter a symbol.
Numeric
mode, press the number(s) you
Work
phone field in
AFT
open the
scroll to a symbol
select and enter the symbol
Pick a symbol
list
Learning to Use Your Phone
37
Page 41

To enter a space in
Press To
DR
To start a new line:
Press To
Action
(A)
To change among uppercase, lowercase, and caps
lock:
Multi-Tap
mode:
enter a space
start a new line
Press To
Tip:
In text mode, the 1st letter of a sentence is
automatically capitalized.
Viewing Phone Information
Use
About
Learning to Use Your Phone
phone’s operating system, including version numbers,
copyright information and available storage.
settings to display information about your
Find the Feature
AFT
change among uppercase,
lowercase, and caps lock
Start
>
Settings > About
38
Page 42

Setting Up Your Phone
Setting the Time and Date
Use
the current date and time, and to set the alarm.
Find the Feature
1
2
DR
Date and Time
Press To
Action
settings to change the local time zone and
Start
scroll to
(A)
set
Date and Time
AFT
>
Settings > More
Date and Time
settings
Entering Owner Information
Use
Owner Information
information, such as your name, phone number, and email
address. In the event that you lose your phone and it is
found, you can be contacted.
Find the Feature
Press To
1
settings to enter and display personal
Start
scroll to
>
Settings > More
Owner Information
Setting Up Your Phone
2
Action
(A)
set
Owner Information
settings
39
Page 43

Configuring Power
Management
Use
Power Management
DR
display time-outs, and to check the battery level.
settings to change the backlight and
Find the Feature
1
2
Setting Up Your Phone
Start
Press To
scroll to
Action
(A)
set
AFT
>
Settings > More
Power Management
Power Management
settings
40
Page 44

Calling Features
Redialing a Number
To redial the last number called from the Home screen:
Press To
Send
Calling a Contacts Entry
As you enter a contact name, the phone searches
Call History, Speed Dial
name and number.
DR
twice
Number matches contact
Number matches entry
place a call to the last dialed
number
AFT
lists, and the SIM card to find a matching
in Call History
Contacts
Calling Features
,
41
Page 45

Making a Call from the Home Screen
Press To
1
keypad keys enter the contact name
DR
2
3
Send
Making a Call from Contacts
(For example, to call Scott,
press
.)
select the name from your
contacts list
make the call
You can select a person’s name from your contacts list and
Send
press
1 phone number, such as
Calling Features
phone number is set as the default.
Find the Feature
Press To
1
2
Send
Tip:
If you have a long list of contacts, enter the 1st few
letters of a contact’s name. Your phone searches the entire
contacts list to display the name.
42
AFT
to place the call. If a contact has more than
Work, Home
Start
scroll to the contact name to
call
make the call
, and
>
Contacts
Fax
, the
Work
Page 46

Changing the Default Number for a Contact
Find the Feature
Press To
DR
1
2
Making a Call to a Desired Phone Number
left/right
Start
scroll to a desired contact
change the default number
(For example, if you change
w
changes from
Mobile
>
Contacts
to m, the default number
Work
phone to
phone.)
AFT
Find the Feature
Press To
1
2
Action
(A)
3
4
Send
Start
scroll to the contact to call
open the contact
scroll to the number you want
to call
place the call
>
Contacts
Calling Features
43
Page 47

Making a Call with Voice
Dialing
You can dial a phone number by speaking a word.
Note:
phone directly or a wired headset attached to the phone,
but not with a Bluetooth headset.
Dialing a Phone Number by Saying the
Name Exactly Saved in Contacts
On the Home screen:
DR
The voice recognition application works only via the
Action
AFT
1
Calling Features
Press and hold up to open
2
Wait for the audio and visual cue and begin
saying
Voice Dial
.
3
Wait for the audio and visual cue and begin
saying the name exactly stored in your contacts
list.
4
If there is only 1 number for this contact, the
phone dials the number automatically. If there
are multiple numbers, the phone displays the
different locations and asks you which 1 to call.
Say the name of the location you want to call, for
example,
and then dials the number.
Work
. The phone repeats the location
Speech Recognition
.
44
Page 48

Changing How Voice Dial Works with Names
If you want to review and confirm names before dialing the
associated numbers, you must enable
say a name, your phone prompts you
the name that most nearly matches the name you spoke.
You can confirm the name by saying
Yes
to 3 names displayed on the screen.
by default. To enable it, follow the steps from the Home
screen:
DR
, or by selecting the correct name from a list of up
Choice Lists
Did you say
Yes
or pressing
Choice Lists
. After you
followed by
is disabled
Action
Press and hold up to open
Press To
1
Settings
2
3
Action
(A)
4
Action
(A)
5
6
OK
AFT
open the settings menu
scroll to
select
select
scroll to
save the setting
Speech Recognition
Choice Lists
Choice Lists
Name dialing
Always On
Calling Features
.
45
Page 49

Adjusting the Name Sensitivity Setting
If the phone seldom recognizes your name commands,
follow the steps from the Home screen:
DR
Action
Press and hold up to open
Press To
1
Settings
2
3
Action
(A)select
4
Calling Features
5
Action
(A)select
6
7
OK
Changing How Speech Recognition Updates
Contacts
When you start
added or changed names in your contacts list. If the
contacts list has changed,
reloads the entire list of names. You can also turn off
AFT
down
Speech Recognition
Speech Recognition
Speech Recognition
open the settings menu
scroll to
scroll to
adjust the
toward
save the setting
Sensitivity
Sensitivity
Names
Names
Names
Reject Less
, it checks to see if you have
automatically
.
setting
46
Page 50

automatic update and then update the list manually at your
convenience. To turn off automatic update:
Action
DR
Press and hold up to open
Press To
1
Settings
2
3
Action
(A)
4
Action
(A)
5
AFT
Speech Recognition
open the settings menu
scroll to
select
select
scroll to
Contacts Update
Contacts Update
Configure
Manual
.
Calling Features
6
OK
Dialing a Phone Number by Speaking the
Number Continuously
You can dial valid 7-digit or 10-digit phone numbers
simply by speaking the number continuously, without
pausing between the digits.
Note:
The phone recognizes the digits “one,” “two,” “three,”
“four,” “five,” “six,” “seven,” “eight,” “nine,” “zero,” and “oh.”
The phone cannot recognize numbers such as “1 eight
hundred” for “1 800.” Say “one eight zero zero” instead.
save the setting
47
Page 51

On the Home screen:
Action
DR
1
Press and hold up to open
2
Wait for the audio and visual cue and begin
saying
Voice Dial
.
3
Say a valid 7-digit or 10-digit number
distinctively, without pausing between digits.
Optionally, you can say the 1st digit of the
number and the phone displays a list of up to 3
numbers and prompts you
the 1st number in the list.
4
If the number is correct, say
If the number is not correct, say
next match or select the correct number from the
Calling Features
dialing them. If you disable
automatically dials the recognized number, without
list.
Changing How Voice Dial Works with Phone
Numbers
By default,
allows you to review and confirm numbers before
AFT
Choice Lists
for
Digit Dialing
Choice Lists
Speech Recognition
Did you say
Yes
to initiate dialing.
is enabled, which
, the phone
followed by
No
to hear the
.
48
Page 52

requiring you to confirm it. To disable
Home screen:
Choice Lists
from the
Action
Press and hold up to open
1
2
3
4
5
6
7
Customizing Digit Dialing to Your Voice
You can adapt
necessary. Adaptation involves recording 12 sequences of
4 digits each to teach the system your voice.
DR
Press To
Settings
Action
Action
OK
(A)
(A)
Digit Dialing
open the settings menu
scroll to
select
scroll to
AFT
select
scroll to
save the setting
to your personal accent, if
Speech Recognition
Choice Lists
Choice Lists
Digit Dialing
Digit Dialing
Always On
.
Calling Features
49
Page 53

On the Home screen:
Action
DR
Press and hold up to open
Press To
1
Settings
2
Action
3
4
Action
5
OK
Calling Features
Making a Call from the Call
(A)
(A)
Speech Recognition
open the settings menu
select
Digit Dialing
scroll to
select
AFT
to start recording
Tip:
then repeat the digits of the
1st sequence displayed on
the screen. Then follow the
instructions on the screen to
complete the adaptation.
Adapt Digits
Adapt Digits
Wait for the beep and
.
History List
The
Call History
received, or missed. Choose a name or number to call
from the list.
Find the Feature
50
list displays the last 25 calls you made,
Start
>
Call History
Page 54

Press To
1
2
Calling a Number in a Message
When you see an underlined phone number as a hyperlink
in a message, you can place a call to the phone number.
After opening a message:
DR
Send
scroll to the number or entry
to call
place the call
Press To
1
2
Action
(A)
Calling an Emergency Number
Calls to emergency service numbers can be made under
any circumstances, even if you have locked the SIM
card and/or the phone.
Note:
Be aware that when the
on, the phone cannot receive and make a call, including an
emergency call. In order to receive and make a call, you
must turn off the
phone’s RF capability. Always obey the instructions of your
airline crew.
scroll to the phone number as
a hyperlink
AFT
place the call
Flight mode
Flight mode
feature and re-engage the
feature is turned
Calling Features
51
Page 55

On the Home screen:
Press To
1
keypad keys dial your local emergency
DR
2
Send
number
place the call
Managing Call History
Call History
received, and missed. Each entry in
start time of the call, the duration, the caller’s name, if
available, and the caller’s number. The oldest calls are
automatically deleted from the list to make room for new
calls.
Calling Features
Tip:
pressing
52
displays the last 25 calls you have made,
Call History
AFT
Find the Feature
You can filter
Menu
you want.
Sending an Email from Call History
Press To
1
2
Menu
3
Missed Calls, Incoming Calls
, selecting
Start
Filter
scroll to a desired entry
open the options menu
scroll to
>
Call History
, and
, and selecting the filter
E-mail
contains the
Outgoing Calls
by
Page 56

Press To
4
Action
(A)
edit and send an email to the
entry’s recipient
DR
Creating a New Contact from a Number in
Call History
Press To
1
scroll to a desired entry
2
Menu
3
4
Action
(A)
5
Action
(A)
open the options menu
scroll to
AFT
select
Note:
highlighted.
enter the contact information
Save to Contacts
Save to Contacts
Make sure
<New Item>
is
Calling with Speed Dial
You can quickly dial phone numbers by assigning
speed dial numbers. Press and hold 1 or 2 keys from the
Home screen to make a speed dial call. Choose speed dial
entries from 2-99. The speed dial entry 1 is often reserved
to set up or dial your voicemail after initial setup.
Note:
The
Speed Dial
setting is available only for a phone
number stored in the phone memory.
Calling Features
53
Page 57

To create a speed dial shortcut 1st:
Find the Feature
DR
Press To
1
2
Action
(A)
3
4
Menu
5
Action
(A)
6
keypad keys enter the speed dial number
7
Done
Calling Features
Tip:
You can also assign speed dial numbers to Web
addresses and email addresses that are stored in
of your phone.
To make a speed dial call from the Home screen:
Action
Press and hold the keypad number that you have
assigned as a speed dial number. If the keypad
assignment has 2 digits, press the 1st digit, then
press and hold the 2nd digit.
Start
scroll to a desired contact
open the contact
scroll to a desired phone
number
open the options menu
select
AFT
under
save the setting
>
Contacts
Add Speed Dial
Keypad assignment
Contacts
54
Page 58

Using Voicemail
On the Home screen:
Action
Press and hold to automatically call voicemail
after initial setup.
Using Call Waiting
Press To
Accept
Send
To end the 1st call before answering the incoming call:
1
2
DR
To answer the incoming call when you are talking
on the phone:
AFT
place the 1st call on hold, and
or
Press To
End
Accept
or
answer the 2nd call
end the 1st call
answer the 2nd call
Calling Features
Send
55
Page 59

Tip:
If the 2nd call is answered but the caller hangs up,
press
Menu
Press
Send
that is on hold.
To reject the incoming call when you are talking on the
phone:
Press To
Reject
This will keep your current call in progress, but will reject
the
Call Waiting
and select
to change between an active call and a call
Unhold
to rejoin the original call.
DR
reject the 2nd call
call.
Putting a Call on Hold
While a call is in progress, you can hold the call and then
reconnect it.
Calling Features
Press To
1
Menu
2
3
Action
(A)
AFT
open the options menu
scroll to
place the active call on hold
Tip:
the call on hold.
Hold
Select
Unhold
to activate
56
Page 60

Muting a Call
You can mute the microphone for the active call. The other
party will not hear anything you say, but you can still hear
the other party.
1
2
3
DR
Press To
Menu
Action
(A)
open the options menu
scroll to
mute the active call
Tip:
Select
microphone back on for the
active call.
AFT
Mute
Unmute
to turn the
Turning the Speaker On/Off
You can turn the speaker on or off during a call.
Press To
1
Menu
2
3
Action
(A)
open the options menu
scroll to
Speakerphone Off
turn the speaker on/off
Speakerphone
/
Calling Features
Tip:
During an incoming or outgoing call, you can toggle
between the earpiece and speakerphone by holding down
Send
.
57
Page 61

Messages and Chat
Composing an MMS Message
text.
Adding a Photo/Video
You can add a still image or video clip to each slide in your
MMS message.
Messages and Chat
DR
MMS messages are created by combining
various slides. Each slide can consist of a photo
or video, audio (only when photos are used), and
Find the Feature
Start
Messages
>
Messaging > Media
>
New
AFT
Press To
1
2
Action
(A)
3
4
Select
highlight the
open
scroll to a desired photo or
video clip
add the photo or video clip
Picture/Video
My Pictures
area
58
Page 62

Adding Text
You can add new text or preset words/phrases to each
slide in your MMS message.
Using Preset Words or Phrases
1
2
3
4
5
6
7
Editing Preset Words or Phrases
1
DR
Press To
highlight the
Action
Menu
Action
(A)
(A)
open the text field
open the options menu
select
scroll to a desired phrase
AFT
Select
Done
Press To
select the phrase
add the phrase
highlight the
Text
area
Insert Canned Text
Text
area
Messages and Chat
2
Action
(A)
3
Menu
4
Action
(A)
5
open the text field
open the options menu
select
Insert Canned Text
scroll to a desired phrase
59
Page 63

Press To
6
Menu
7
DR
8
Action
(A)
9
keypad keys edit the phrase
10
Save
Adding Audio
You can add preset or recorded audio clips to each slide,
except when videos are used.
open the options menu
scroll to
select
save the phrase
Edit
Edit
Using a Preset Audio Clip
Press To
1
2
Action
(A)
3
4
Messages and Chat
60
Select
Using a Recorded Audio Clip
Press To
1
2
Action
(A)
AFT
highlight the
open
scroll to a desired audio clip
add the audio clip
highlight the
open
My Sounds
My Sounds
Audio
Audio
area
area
Page 64

Press To
3
Menu
4
5
6
7
8
9
DR
Action
(A)
Record
Play
Stop
Done
open the options menu
scroll to
select
record your audio clip
Tip:
recording, if necessary.
play your audio clip
stop playing your audio clip or
confirm your audio clip
add the audio clip
AFT
Capture Audio
Capture Audio
Press
Stop
to stop
Managing Slides
You can add, remove, or jump to additional slides in your
MMS message.
Press To
1
Menu
2
3
Action
(A)
open the options menu
scroll to
select
Slides
Slides
Messages and Chat
61
Page 65

Previewing Your MMS Message
You can preview your message before sending it.
Press To
DR
1
Menu
2
3
Action
(A)
open the options menu
scroll to
preview your MMS message
Preview Message
Sending Your MMS
Message
62
Messages and Chat
Press To
1
keypad keys
or
Menu
Recipients
2
AFT
enter in your recipient’s
phone number/email address
in the
To
field
>
>
down
Add
or
select a recipient from your
contacts list.
Tip:
You can add other phone
numbers/email addresses/
recipients separated by
semicolons.
highlight the
Subject
3
keypad keys enter in a subject of your
message
field
Page 66

Press To
4
Send
send your MMS message
Configuring the Sending Performance
You can customize how your MMS message is going to be
sent using the menu options.
1
2
3
DR
Press To
Menu
Action
(A)
open the options menu
scroll to
configure the sending
performance
AFT
Send Options
Viewing Your MMS Message
You can view MMS messages in different
message boxes.
Find the Feature
Press To
1
2
Action
(A)
3
Start
Messages
scroll to a desired message
box
select the message box
scroll to a desired message
>
Messaging > Media
>
Menu
>
Folders
Messages and Chat
63
Page 67

Press To
4
Action
(A)
5
Action
(A)
DR
Viewing Objects in an MMS Message
You can view objects included in an MMS message.
Press To
1
2
Action
(A)
3
4
Action
(A)
5
6
Action
(A)
Messages and Chat
select the message
view the message
Tip:
Press to navigate to
other slides if more than one
are present.
scroll to a desired message
box
AFT
select the message box
scroll to a desired message
select the message
scroll to a desired object
view the object
Configuring the MMS Setting
You can save the messages you sent,
download new messages automatically, sort
messages by different ways, define the
maximum size limit for messages that you send and
receive, set the number of times you attempt to send your
64
Page 68

messages before stopping, and select your type of Internet
connection.
Find the Feature
Tip:
gateway using the menu options. You will likely never need
to change these settings.
DR
You might view and edit your MMSC URL and WAP
Start
>
More > MMSSettings
Configuring an Email Account
Before sending and receiving email messages,
you may have to complete the email account
setup. You can send email messages by
synchronizing, or by connecting directly to an email server
through your Internet Service Provider (ISP) or a corporate
network. Your service provider may have configured email
settings for your phone before you received it; otherwise,
you must configure your phone to send/receive emails.
Find the Feature
Fill in the blanks with the appropriate information.
Tip:
Press
Next
complete the email setup.
AFT
Start
Outlook E-Mail > Menu
>
to continue and press
>
Messaging
Account Setup > Menu
>
Finish
>
Options
>
New
to
Messages and Chat
Option Description
Your name
E-mail address
enter in your name
enter in your email address
65
Page 69

Messages and Chat
Option Description
Automatic setup
DR
User name
Password
Domain (if necessary)
Save password
Server type
Account name
Network
Incoming mail server
Require SSL connection
Outgoing mail server
Outgoing server requires
authentication
If you check this feature, your
phone will obtain email
settings from the Internet. If
you uncheck this feature,
continue the following
options.
enter in your user name
enter in your password
enter in your domain name, if
necessary
Check this feature and you
need not to enter your
password repeatedly before
AFT
you can send/receive emails.
select either
enter in your account name
select
The Internet
enter in your incoming mail
server
check this feature, if
necessary
enter in your outgoing mail
server
check this feature, if
necessary
POP3
or
IMAP4
66
Page 70

Option Description
Download the following
messages
DR
Connect automatically and
check for messages
Note:
You can only have one configurable
one time and therefore only synchronize one type of email,
either POP3 or desktop. If you choose to synchronize your
desktop email, it will wipe out your POP3 settings.
press left/right to select
features
press left/right to select
a feature
Outlook E-Mail
at
Receiving Email from the
Internet
You can receive email messages through
synchronization or by connecting to your email
server. You can then view all of your email
messages in
the email server or synchronize
computer, only the first 5 KB of each new message are
downloaded by default to your phone. If you are using an
IMAP4 or POP3 server, only the first 1 KB of each new
message is downloaded by default. Small attachments are
downloaded and the original messages remain on the
email server or your desktop computer.
Messaging
AFT
Inbox
>
Outlook E-Mail
. When you connect to
Inbox
with your desktop
Messages and Chat
67
Page 71

Tip:
For more information about synchronizing
“Synchronizing Information among Devices” on page 110.
Inbox
, see
Find the Feature
DR
Receiving Complete Email Messages
You can specify to receive email messages in full, instead
of receiving only the first 5 KB set by default. The complete
message will be retrieved the next time you synchronize or
connect to your email server.
Find the Feature
Press To
1
2
Menu
3
4
Action
Messages and Chat
Tip:
phone, it will also be deleted from the email server the
next time you connect.
(A)
When you delete an email message on your
Start
Outlook E-Mail > Menu
Receive
Start
Outlook E-Mail
AFT
scroll to a desired email
message
open the options menu
scroll to
receive the email message in
full
>
Messaging
>
Messaging
Mark for Download
>
>
>
Send/
68
Page 72

Receiving Email Attachments
You can download email attachments to your phone.
Attachments display as a list of hyperlinks at the bottom of
the email message, and are preceded by an attachment
icon. The text of the hyperlink contains the file name
followed by the size of the attachment, so that you can
determine whether to download the attachment. The
attachment icon has 3 states:
Marked for Download
Tip:
DR
Not downloaded, Downloaded
.
On POP3 messages, the attachment size is omitted.
, and
Find the Feature
Press To
1
2
Action
(A)
3
4
Action
(A)
Viewing a Downloaded Attachment
Find the Feature
Start
Outlook E-Mail
AFT
scroll to a message that
contains an attachment(s)
select the message
scroll to a desired attachment
receive the attachment
Start
Outlook E-Mail
>
Messaging
>
Messaging
>
Messages and Chat
>
69
Page 73

Press To
1
DR
2
Action
(A)
3
4
Action
(A)
Note:
You can view attachments only for file types that are
supported by your phone, such as .txt, .JPEG, .asf, .asx,
.wax, .wm, .wma, .wmv, .wmx, .wvx, .mp3. A third party
application must be downloaded to your phone to view
attachment in other formats.
scroll to a message that
contains a downloaded
attachment(s)
select the message
scroll to a desired attachment
you downloaded
view the attachment
AFT
Composing and Sending an
Email/SMS Message
There are several ways to edit and send email and SMS
messages with your phone. The most common way is from
Messaging
Composing and Sending an Email/SMS
Messages and Chat
Message from Messaging
or from
Contacts
.
70
Find the Feature
Start
Text Messages/Outlook E-Mail
New
>
Messaging
>
>
Page 74

Press To
1
keypad keys
DR
or
Menu
Contact
2
3
keypad keys enter in your message
4
Send
Tip:
To insert the @ sign in an email address in
mode, press once. Then, when you need to insert the
period in the email address, press again.
>
down
Insert
enter in your recipient’s
(SMS) phone number/email
address in the
or
select a recipient from your
contacts list.
Tip:
To add multiple recipients
either in
(
Outlook E-Mail
each with a semicolon by
repeatedly pressing in
Multi-Tap
AFT
mode. Enter in your
subject in the
email message.
highlight the body text field
send your message
To
field
To
and/or Cc field
only), separate
Subj
field for your
Multi-Tap
Messages and Chat
71
Page 75

Composing and Sending an Email/SMS
Message from Contacts
You can quickly edit and send a message to a contact if
you have an email address or SMS number (phone
number) included in
Messages and Chat
DR
Contacts
.
Find the Feature
Press To
1
2
Action
(A)
3
4
Action
(A)
5
6
Action
(A)
7
keypad keys enter in your subject in the
8
down
Start
scroll to a desired contact
select the contact
scroll to a desired email
AFT
address or (SMS) phone
number
select the email address or
(SMS) phone number
Tip:
select a (SMS) phone
number for your SMS
message.
scroll to
E-Mail
select
Mail
Subj
highlight the body text field
>
Contacts
Skip steps 5-8 if you
Text Messages
for your email message
Text Messages
field
or
or
Outlook
Outlook E-
72
Page 76

Press To
9
keypad keys enter in your message
10
Send
send your message
DR
Requesting a Delivery Receipt for Your Message
Before You Send It
In the body text field:
Press To
1
Menu
2
3
Action
(A)
4
Action
(A)
5
Done
Inserting Predefined Text into Your Message
Save time when composing messages by inserting
predefined text into your messages. You can edit the
predefined text to create words or phrases that you
frequently use in messages. In the body or subject text
field:
open the options menu
scroll to
select
AFT
check
notification
save the setting
Message Options
Message Options
Request message delivery
Messages and Chat
Press To
1
Menu
2
open the options menu
scroll to
Insert Text
73
Page 77

Press To
3
Action
(A)
4
DR
5
Insert
Editing Predefined Text
select
Insert Text
scroll to a desired preset text
insert the preset text
Find the Feature
Press To
1
2
keypad keys edit the text
3
Done
Inserting a Voice Recording into Your Email
Insert a voice recording into an email message when you
want to verbally explain information that is contained in the
Messages and Chat
email message. In the body text field:
Press To
1
Menu
2
74
Start
Text Messages/Outlook E-Mail/Media
Messages
>
AFT
scroll to a desired preset text
to modify
save the text
open the options menu
scroll to
>
>
Edit My Text
Insert Recording
Messaging
Menu
>
>
Options
Page 78

Press To
3
Record
DR
4
Done
Note:
You can create only one voice recording at a time. A
new voice recording replaces the prior recording.
start recording
Tip:
Press
Stop
recording.
insert the recording
to stop
Importing SMS Messages from
Your SIM Card to Messaging
Find the Feature
Note:
You cannot export messages from your phone to a
SIM card. SMS messages are not removed from the SIM
card after they are imported to
Start
AFT
Messages
>
>
Messaging > Text
>
Menu
Import SIM Messages
Messaging
of your phone.
>
Options
Opening Email/SMS Messages
Email and SMS messages that are sent to you are stored
in
Messaging
messages display at the top of the
options to quickly compose, delete, forward, and reply
to messages. You can also customize
to control the way you send, receive, and view
messages.
. By default, the most recently received
Inbox
list. Use the menu
Messaging
settings
Messages and Chat
75
Page 79

Indicates opened
DR
email
Indicates new
email
Find the Feature
Press To
1
2
Action
(A)
Tip:
If you want to create a contact card for the sender,
press
Menu
Using Messaging Menu Options
Messages and Chat
76
Find the Feature
The following table lists
functions.
Option Description
Delete
and select
Start
Messages
AFT
scroll to a desired message
view the message
Save to Contacts
Start
Messages
Messaging
delete the selected message
>
Messaging > Text
/
Outlook E-Mail
.
>
Messaging > Text
/
Outlook E-Mail > Menu
menu options and their
Page 80

Option Description
Reply
Reply All
Forward
Folders
Switch Accounts
Move
Mark as Read
Mark as Unread
Mark for Download
Options
Send/Receive
DR
reply to an open or selected
message
reply to the sender and all recipients
included in an open or selected
message
forward the selected message
display all
change among
move the selected message to a
desired folder
change the selected unread
message to a read message
change the selected read message
to an unread message
retrieve the entire email message
from the email server the next time
you connect
display a list of
you can customize (see below)
connect to your email server to
send and receive messages
Messaging
AFT
folders
Messaging
Messaging
accounts
Messages and Chat
options that
77
Page 81

Customizing Messaging Options
You can optimize your phone’s
way your messages display and send, specifying how to
sort your messages, creating your text phrase and
signature, and more.
The following table lists the
functions.
Messages and Chat
DR
Find the Feature
Option Description
Display
Sending
Edit My Text
Signatures
change the message information
AFT
displayed on the screen
specify whether you want to
include an original copy of the
message in your reply, save a
copy of your sent messages, or
use Unicode for SMS messages
edit the predefined text that you
can insert in messages
edit your own signature that you
can insert in messages
Messaging
Start
Messages
>
Options
Messaging
by changing the
>
Messaging > Text
/
Outlook E-Mail > Menu
options and their
78
Page 82

Option Description
Account Setup
DR
Import SIM Messages
configure your phone to send and
receive email messages (Your
service provider or network
administrator can provide you with
the necessary information to
connect to your email server.)
import SMS messages from your
SIM card to
(The messages are not removed
from the SIM card after they are
imported.)
Messaging
>
Text Messages
Receiving Meeting Requests
When you accept a meeting request that arrives in
Messaging
your phone, and a message will be sent back to the
meeting organizer the next time you synchronize
Tip:
“Synchronizing Information among Devices” on page 110.
, the meeting immediately appears in
For more information about synchronizing
Find the Feature
Press To
1
2
Action
(A)
3
Accept
AFT
Calendar
on
Calendar
.
Calendar
, see
Start
Messages
scroll to a desired meeting
request
select the meeting request
accept the meeting request
>
Messaging > Text
/
Outlook E-Mail
Messages and Chat
79
Page 83

Viewing Your Message Folders
Your phone stores messages in the following folders:
DR
Folder Description
Deleted Items
Drafts
Inbox
Outbox
Sent Items
To view your message folder:
Deleted messages are stored until you
empty this folder.
Messages that you save before
sending are stored.
All received messages arrive by default.
Sent email messages are stored until
you synchronize or connect to your
email server. SMS messages are sent
immediately over the network and will
AFT
appear in your
few seconds.
Copies of email messages that you
send are stored.
Outbox
folder for only a
80
Messages and Chat
Find the Feature
Press To
1
2
Action
(A)
Start
Messages
>
Folders
scroll to a desired folder
view the folder
>
Messaging > Text
/
Outlook E-Mail > Menu
Page 84

Tip:
If your email account supports folders, you can view
multiple folders that reflect the folder structure you have
created on your email server. Messages you download
from the server will automatically be placed in the
appropriate folders on your phone.
DR
Using Message Notifications
Your phone makes a sound to alert you when new
messages arrive. The number of unopened messages
displays on the Home screen, depending on your Home
screen settings, and an envelope icon is shown on the
top of the display. You are notified in different ways for the
types of messages you receive.
Note:
SMS messages that are sent to you instantly appear
in
Messaging
cannot use them to send or receive attachments.
Message Description
Email/SMS Message
>
Text Messages
AFT
, and are not synchronized. You
When you connect to your email
server or service provider, you are
notified of new email or SMS
messages by the closed envelope
icon shown at the top of the
display, accompanied by an email
or SMS sound alert. You can view
new email or SMS messages in
Messaging
Messages
>
Outlook E-Mail
.
or
Text
Messages and Chat
81
Page 85

Message Description
Voicemail Message
DR
Modifying a Sound Alert for Notifications
You are notified of new voicemail
messages by the new voicemail
icon shown at the top of the
display. To listen to your new
voicemail messages, press
Voicemail
hold from the Home screen to
dial your voicemail service
number.
, or press and
Find the Feature
Press To
1
2
3
Messages and Chat
Communicating with MSN®
Messenger
82
left/right
Done
You can use
send instant messages.
phone provides the same chat environment as
Start
AFT
scroll to a desired option to
modify
select a new sound
save the setting
MSN Messenger
>
MSN Messenger
Settings > Sounds
on your phone to
on your
Page 86

MSN Messenger
features of this environment you can:
•
Send and receive instant messages.
•
View the status of others in your messenger contacts
list, or change your own status (
Lunch
•
Invite others to a chat conversation.
•
Block contacts from seeing your status or sending you
messages.
Getting Started with MSN Messenger
To use
account unless you already have a hotmail account. To set
up a Microsoft.NET Passport account, go to:
www.passport.net
need:
•
To connect to the Internet with a modem or wireless
connection on your phone.
•
To sign in to
Passport.
Signing In and Out of MSN® Messenger
on your desktop computer. With the
DR
).
MSN Messenger
, you need a Microsoft.NET® Passport
AFT
. Once you have this account, you will
MSN Messenger
using your Microsoft.NET
Available, Busy, Out To
http://
Messages and Chat
Find the Feature
Press To
1
Sign In
Start
prepare to sign in
Messenger
>
MSN Messenger
MSN
83
Page 87

Press To
2
keypad keys enter your sign-in name
(for example, name_123@
DR
3
Sign In
4
Menu
5
6
Action
(A)
Note:
If you do not sign out of
data connection, which may result in additional charges
from your service provider.
Sending an Instant Message
hotmail.com) and password
sign in
MSN Messenger
open the options menu
scroll to
sign out of
Sign out
MSN Messenger
MSN Messenger
, you remain on a
AFT
After signing into
Messages and Chat
84
MSN Messenger
Press To
1
2
Send
3
keypad keys enter your message
4
Send
:
scroll to the person to whom
you want to send an instant
message
select the person
send your message
Page 88

The menu options when you edit an instant message are
described in the following table.
Option Description
My Text
Invite
Chats
In the messenger contacts list, there are several menu
options for you to use.
Option Description
Add Contact
Delete Contact
Block/Unblock
DR
add common text messages
invite a contact to an ongoing chat
see who is already chatting, or change
between chats
create a contact
AFT
delete the selected contact
block/unblock the selected contact
from seeing your status and sending
you messages
Messages and Chat
85
Page 89

Changing Your Status
DR
In the messenger contacts list:
Press To
1
2
Action
(A)
3
4
Action
(A)
Changing Your Displayed Name
Messages and Chat
After signing into
Press To
1
Options
2
Action
(A)
AFT
scroll to your name
select your name
scroll to a desired status
description
select the status description
MSN Messenger
:
open the options menu
select
Highlight your status
and press
Passport Account
Action
(A)
86
Page 90

Press To
3
keypad keys enter the name you want
others to see when you send
DR
Note:
You must sign into
display name. When using
not time out or end unless one of the following occurs:
•
User ends instant messenger session.
•
User “Accepts” an incoming voice call.
•
An outgoing voice call is placed.
•
The device is turned off or moves out of range.
instant messages
MSN Messenger
MSN Messenger
to change your
, the session will
AFT
Messages and Chat
87
Page 91

Personalizing Your
Phone
DR
You can view and change settings to personalize your
phone for the way you work. For example, you can change
the sounds or use your own sounds for ring tones,
notifications and reminders. You can also set up
Forwarding
images to customize the Home screen background.
Using Phone Settings
and
Call Waiting
, as well as download your own
Call
Personalizing Your Phone
Find the Feature
88
Use
Phone
Call Waiting
AFT
settings to set options for
, and
Caller ID
.
Start
>
Call Forwarding
Settings > Phone
,
Page 92

The following table lists the
functions.
Phone
settings and their
Option Description
Call Barring
Call Forwarding
Call Options
Call Waiting
Caller ID
Channels
Fixed Dialing
Networks
DR
block incoming and/or outgoing calls
forward all or selected calls to another
number
change phone numbers, such as your
voicemail and SMS service center,
answer incoming calls by pressing any
key, use advanced call options
turn
Call Waiting
let your identification be known to all
callers, only your contacts, or no
AFT
callers
configure cell broadcast
limit your calling area to one or more
specific phone numbers and/or area
codes
identify your current network and
change your network selection from
Automatic
to
Manual
on or off
Personalizing Your Phone
89
Page 93

Using Sound Settings
Sounds
settings are used to customize the sounds for ring
tones, notifications, and reminders.
Using Your Own Sound
Personalizing Your Phone
DR
Find the Feature
Action
1
Locate the sound file on your desktop computer
and copy the file. The file format must be .wav
or .mid (MIDI type 0).
2
Connect the phone to your desktop computer via
the USB data cable or infrared.
3
Open
ActiveSync® on your desktop computer,
click
Explore
click
IPSM
, double-click
click
Sounds
the
Sounds
folder.
Note:
If a
Sounds
directory, create a new one.
4
On your phone’s Home screen, press
select
Settings
Start
AFT
, double-click
Application Data
, and then paste the sound file into
folder does not exist in this
, and then select
>
Settings > Sounds
My Smartphone
, double-
Start
Sounds
.
, double-
,
90
5
Select the option to customize, press left/
right to select the sound.
6
Press
Done
to save the setting.
Page 94

Using Profiles
Use
Profiles
settings to configure how your phone notifies
you about an incoming call, an approaching appointment,
or an arriving message. You can use
notifications quickly based on your situation. For example,
you may want the phone to ring louder if a client is calling,
or you may not want the phone to ring at all, but want to
hear calendar reminders. The default profile used with
your phone is the
profile displays on the Home screen.
DR
Normal
profile. The name of the current
Profiles
to change
Indicates your current
AFT
Find the Feature
Tip:
You also can either assign
Profile: [Type]
profile using the
down
Note:
profile is used automatically.
from the Home screen, or select a different
Quick List
Home
When a headset is plugged into the phone, the
from the Home screen.
profile
Start
by pressing
>
Settings > Profiles
Profiles
settings by selecting
Power
(p) or holding
Headset
Personalizing Your Phone
91
Page 95

Modifying a Profile
Find the Feature
DR
Press To
1
2
Menu
3
Action
(A)
4
5
Done
Observe the following from your phone when in the
following modes:
Profile Description
Headset
Personalizing Your Phone
This can only be activated when a
headset is connected to your device.
The
you remove the headset from your
device. You cannot select or unselect
Headset
screen. It has been placed in the
menu in order to allow you to confirm
(via a check mark) that it has been
automatically selected upon connecting
to the headset.
Start
scroll to a desired profile
open the options menu
select
scroll to a desired option to
modify
save the settings
AFT
Headset
profile is deactivated when
from the
>
Settings > Profiles
Edit
Profile
item on the Home
Profiles
92
Page 96

Profile Description
Car
Speakerphone
This can only be activated when a car
kit specifically designed for your phone
is connected to your device. The
DR
profile is deactivated when you remove
the car kit from your device. You cannot
select or unselect
item on the Home screen. It has been
placed in the
allow you to confirm (via a check mark)
that it has been automatically selected
upon connecting to a car kit.
This is automatically selected by the
device while you are in a call and after
you have activated the speakerphone.
The
when you turn off speakerphone during
or just as you are ending a call. You
cannot select or unselect
from the
screen. It has been placed in the
menu in order to allow you to confirm
(via a check mark) that it has been
automatically selected upon turning on
the speakerphone.
AFT
Speakerphone
Profile
Car
from the
Profiles
menu in order to
profile is deactivated
item on the Home
Profile
Speakerphone
Car
Profiles
Personalizing Your Phone
93
Page 97

Changing the Home Screen
Use
Home Screen
the color scheme, the background image, and the time
delay in the idle display.
settings to change the Home screen layout,
DR
Find the Feature
Customizing the Home Screen with Your
Own Image
Action
1
Locate your image file on your desktop computer
and copy the image file. The file format must
be .gif, .jpg, or .bmp.
Tip:
200 screen resolution to fit on your phone’s
Home screen.
2
Connect the phone to your desktop computer via
the USB data cable or infrared.
3
Open
Personalizing Your Phone
click
click
click
Home
Note:
directory, create a new one.
4
On your phone’s Home screen, press
select
Start
>
Settings > Home Screen
AFT
For best results, use images with a 176 x
ActiveSync® on your desktop computer,
Explore
, double-click
IPSM
, double-click
Home
, and then paste the image file into the
folder.
If a
Home
folder does not exist in this
Settings
, and then select
My Smartphone
Application Data
Home Screen
, double-
, double-
Start
.
,
94
Page 98

Action
5
Under
Background image
select your image.
DR
6
Press
Done
, press left/right to
to save the setting.
Changing Regional Settings
Use
Regional Settings
time style of the phone, as well as number and
currency formatting options.
to change the language, date, and
Find the Feature
Start
Regional Settings
AFT
>
Settings > More
>
Setting Font Size, Time-Out,
and Alert Volume
Use
Accessibility
confirmation time-out, and in-call alert volume.
Find the Feature
to configure the system font size, Multi-Tap/
Start
>
Settings > Accessibility
Using Advanced Phone
Settings
Use
Phone Settings
display style, and screen contrast.
Find the Feature
to customize flip answer on/off control,
Start
>
>
Settings > More > More
Phone Settings
Personalizing Your Phone
95
Page 99

Getting More Out of
Your Phone
DR
Making a Conference Call
You can join together all existing calls to make a
conference call, if you have subscribed to this
service.
On the Home screen:
Press To
1
keypad keys enter a phone number for the
2
3
keypad keys enter a phone number for the
4
5
Menu
6
AFT
1st call
call the number
2nd call
call the 2nd number
Note:
The 1st call is
automatically put on hold
when the 2nd call is active.
open the options menu
scroll to
Conference
96
7
Action
(A)
Getting More Out of Your Phone
make a conference call
Page 100

Making a Call from a Conference Active
You can break 1 call out of a conference and make this call
active while the rest of the conference is on hold.
In a conference call:
1
2
3
4
5
Tip:
parties are connected.
DR
Press To
Menu
Action
Action
Press
(A)
(A)
End
open the options menu
scroll to
select
scroll to a desired call
make the call active
AFT
to end an active call when multiple
Private
Private
Forwarding Calls
You can forward all or selected calls to another
number.
Find the Feature
Start
Forwarding
>
Settings >Phone >Call
Getting More Out of Your Phone
97
 Loading...