

Page 1
USER’S GUIDE
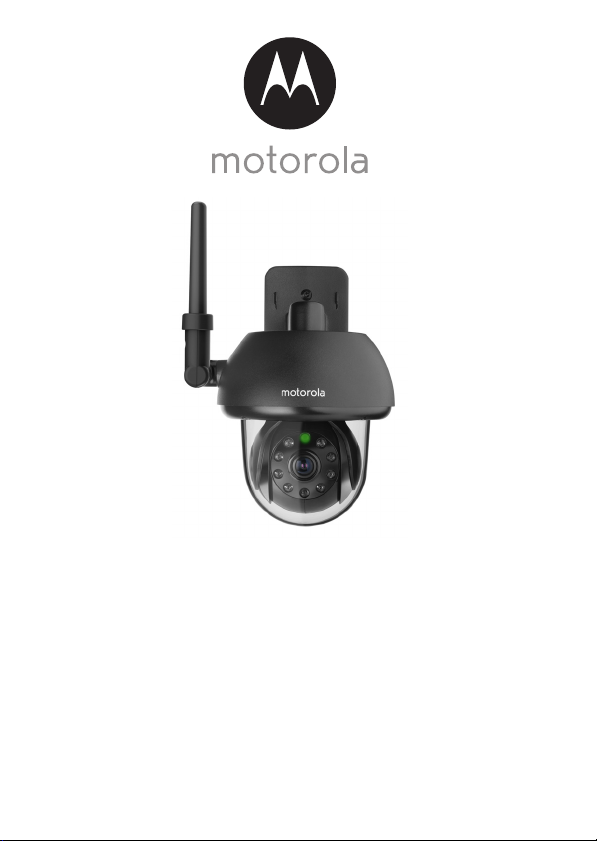
Wi-Fi® Outdoor Pet Video Camera
Models: SCOUT73, SCOUT73-2
The features described in this user’s guide are subject to modifications without prior notice.
Page 2

Welcome...
to your new Motorola Wi-Fi® Outdoor Pet Video
Camera!
Thank you for purchasing your new Motorola Wi-Fi® Outdoor Pet Video
Camera.
If you have always wondered what happens when you are away, wonder no
more. Now you can monitor your pets with this easy to use system. You can
install the camera from your iPhone
addition to your iPhone®/iPad® or Android™ devices you can also view the
camera’s video from your PC or Notebook.
Please keep your original dated sales receipt for your records. For warranty
service of your Motorola product, you will need to provide a copy of your dated
sales receipt to confirm warranty status. Registration is not required for warranty
coverage.
For product related questions, please call:
+49 (0) 1805 938 802 (Europe)
Email: motorola-mbp@tdm.de
This User’s Guide has all the information you need to make the most out of your
product.
Please read the Safety Instructions on pages 5 - 6 before you install the unit.
Inside the Box
• 1 x Wi-Fi® Camera Unit
• 1 x Power Adapter
• 1 x Quick Start Guide
• 1 x User Guide
• 4 x Mounting Screws and Dry Wall Plugs
• 1 x Tamper-proof Screw
• 1 x Metal Bracket
• 1 x Wrench Key
• 1 x Y-Shaped Power/LAN Cable connector
®
/iPad® or Android™ devices only. In
Page 3
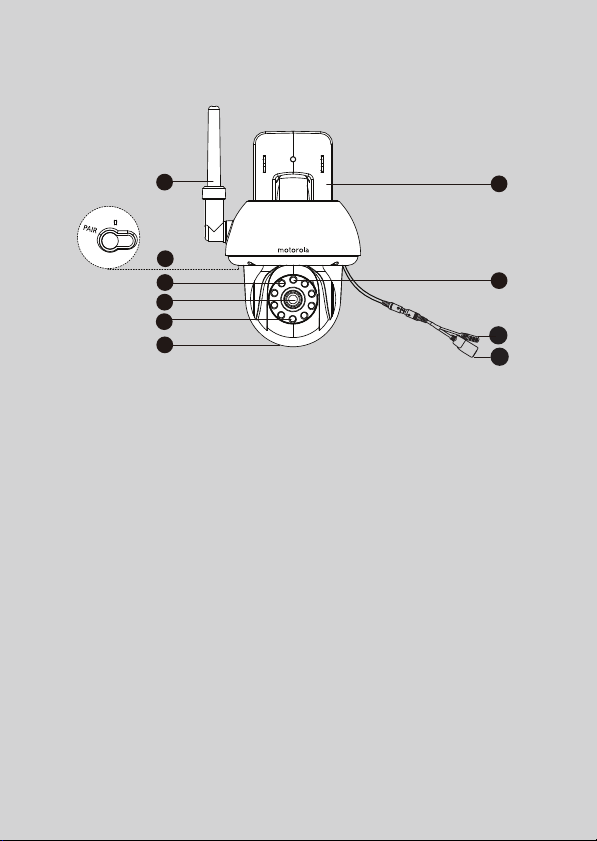
Overview of your Camera
1
2
3
6
7
8
4
5
9
10
Antenna
1.
2.
Wall mount base
Infrared LEDs (for night vision)
3.
4.
Camera Lens
Light Sensor (for night mode
5.
detection)
6.
PAIR Button
Powe r / Sta tus Indica tor
7.
8.
Dome Shape Cover
Power connection socket
9.
10.
LAN socket*
(Adaptive Enthernet socket for
connecting with various network
devices,such as hub, router, etc.)
* An Ethernet connection is required when the Wi-Fi® connection is
not optimal. Connect the Ethernet cable (not supplied) to the LAN
interface, and then connect the other end to a spare port on your
router.
Important guidelines for installing your Wi-Fi
• Use of other 2.4 GHz products, such as other wireless networks, Bluetooth®
systems or microwave ovens may cause interference with this product. Keep
®
the Wi-Fi
they appear to be causing interference.
• Always ensure that you have a good Wi-Fi
Camera Unit away from these types of products, or turn them off if
®
Camera Unit
®
connection available.
Page 4

Table of contents
1. Safety Instructions .....................................................................................5
2. System Requirements ...............................................................................9
3. Getting started - Connecting Devices....................................................10
3.1 Setup..........................................................................................................10
3.2 User Account and Camera Setup on Android™ Devices....................... 11
3.2.1 Power on and connect the SCOUT73 camera ........................ 11
3.2.2 Download the Hubble for Motorola Monitors App .................. 11
3.2.3 Run Hubble for Motorola Monitors App on Android™
device ........................................................................................ 12
3.2.4 Add SCOUT73 Camera to your account ................................. 13
3.3 User Account and Camera Setup:
Working with iPhone®/iPad®................................................................... 17
3.3.1 Power ON and Connect SCOUT73 camera ............................17
3.3.2 Download Hubble for Motorola Monitors App ........................17
3.3.3 Run Hubble for Motorola Monitors on your iPhone®/iPad® ... 18
4. Camera ....................................................................................................24
5. Procedure for resetting the Camera.......................................................41
6. Help..........................................................................................................42
7. General Information ................................................................................48
8. Technical Specifications .........................................................................53
4 Table of contents
3.3.4 Add SCOUT73 Camera to your account ................................. 19
4.1 Install your Camera and setting up........................................................... 24
4.2 Camera Functions:
Working with devices for Android™ ...................................................... 25
4.2.1 Add more cameras ...................................................................25
4.2.2 Remove a camera .....................................................................26
4.2.3 Change your Account Information .......................................... 27
4.2.4 Camera settings ........................................................................ 28
4.2.5 General setting .........................................................................29
4.2.6 Features of Hubble for Motorola Monitors Application .......... 30
4.3 Camera Functions:
Working with devices for iPhone®/iPad®...............................................33
4.3.1 Add more cameras ...................................................................33
4.3.2 Remove a camera .....................................................................34
4.3.3 Change your Account Information .......................................... 35
4.3.4 Camera settings ........................................................................ 36
4.3.5 General settings ........................................................................ 36
4.3.6 Hubble for Motorola Monitors Settings .................................... 38
4.3.7 Features of the Hubble for Motorola Monitors App ................ 39
4.4 Camera Functions:
Working with PC/Notebook .................................................................... 40
Page 5
1. Safety Instructions
WARNING:
STRANGULATION HAZARD - In case this unit is being used to monitor
infants or children, keep the unit and adapter cord more than 1 metre
from the cot and out of their reach. Never place camera or cords inside a
cot or nea r a be d. Sec ure th e cord away f rom ch ildre n's re ach. N ever u se
extension cords with AC Adapters. Only use the AC Adapters provided.
As with any electrical device, supervision of your pet's usage should be
exercised until your pet is acclimated to the product. If your pet is prone to
chewing, we strongly recommend you keep this and all other electrical
devices out of its reach.
Wi-Fi® CAMERA UNIT SET UP & USE:
● Determine a location for the Wi-Fi® Camera Unit that will provide
the best view of the area you would like to monitor (ie back yard or
front door).
● Fix the camera to a flat wall using the wall mounting plate and following
the instructions provided.
ENGLISH
Safety Instructions 5
Page 6

WARNING
This Wi-Fi® Camera Unit is compliant with all relevant electromagnetic field
standards and is, when handled as described in the User’s Guide, safe to use.
Therefore, always read the instructions in this User’s Guide carefully before
using the device.
• Adult assembly is required due to small parts. Keep all small parts away from
children.
• This product is not a toy. Do not allow children to play with it.
• This Wi-Fi® Camera Unit is not a substitute for responsible adult supervision.
• Keep this user’s guide for future reference.
• Do not place the Wi-Fi® Camera Unit or cords in the cot or within reach of
the baby (the unit should be at least 1 metre away).
• Keep the cords out of reach of children and pets.
• Do not cover the Wi-Fi® Camera Unit with a towel or blanket.
• Test the Wi-Fi® Camera Unit and all its functions so that you are familiar with
it prior to use.
• Do not use the Wi-Fi® Camera Unit near water.
• Do not install the Wi-Fi® Camera Unit near a heat source.
• Only use the power adapter provided. Do not use other power adapters as
this may damage the device.
• Never use extension cords with power adapters.
• Do not touch the plug contacts with sharp or metal objects.
Important instructions:
• Read and Follow Instructions - Please read all the safety and operating
instructions before operating the product. Follow all operating instructions.
• Retain Instructions - The safety and operating instructions should be
retained for future reference.
• Heed Warnings - Comply with all warnings on the product and in the
operating instructions.
• Pola riza tion - Do not defeat the safety purpose of the polarized or
grounding-type plug. A polarized plug has two blades with one wider than
6 Safety Instructions
Page 7

the other. A grounding type plug has two blades and a third grounding
prong. The wide blade or the third prong is provided for your safety. If the
supplied plug does not fit into your outlet, consult an electrician for
replacement of the obsolete outlet.
• Power Sources - This product should be operated only from the type of
power source indicated on the marking label. If you are not sure of the type
of power supplied to your location, consult your camera dealer or local
power company. For products intended to operate from battery power, or
other sources, please refer to the operating instructions
• Overloading - Do not overload wall outlets or extension cords as this can
result in the risk of fire or electric shock. Overloaded AC outlets, extension
cords, frayed power cords, damaged or cracked wire insulation, and broken
plugs are dangerous. They may result in a shock or fire hazard. Periodically
examine the cord, and if its appearance indicates damage or deteriorated
insulation, have it replaced by your service technician.
• Power-Cord Protection - Power supply cords should be routed so that they
are not likely to be walked on or pinched by items placed upon or against
them. Pay particular attention to cords at plugs, convenience receptacles,
and the point where they exit from the product.
• Surge Protectors - It is highly recommended that the camera equipment be
connected to a surge protector. Doing so will protect the equipment from
damage caused by power surges. Surge protectors should bear the UL listing
mark or CSA certification mark.
• Uninterruptible Power Supplies (UPS) - Because this product is designed for
continuous, 24/7 operation, it is recommended that you connect the product
to an uninterruptible power supply. An uninterruptible power supply has an
internal battery that will keep the product running in the event of a power
outage. Uninterruptible power supplies should bear the UL listing mark or
CSA certification mark. CAUTION: Maintain electrical safety. Power line
operated equipment or accessories connected to this product should bear
the UL listing mark or CSA certification mark on the accessory itself and
should not be modified so as to defeat the safety features. This will help avoid
any potential hazard from electrical shock or fire. If in doubt, contact
qualified service personnel.
Safety Instructions 7
ENGLISH
Page 8

• Ventilation - Slots and openings on the case are provided for ventilation to
ensure reliable operation of the product and to protect it from overheating.
These openings must not be blocked or covered. The openings should
never be blocked by placing the camera equipment on a bed, sofa, rug, or
other similar surface. This product should never be placed near or over a
radiator or heat register. This product should not be placed in a built-in
installation such as a bookcase or rack unless proper ventilation is provided
and the product manufacturer's instructions have been followed.
• Attachments - Do not use attachments unless recommended by the product
manufacturer, as they may cause a hazard.
• Heat - The product should be located away from heat sources such as
radiators, heat registers, stoves, or other products (including amplifiers) that
produce heat.
• Accessories - This camera should not be used with any unapproved
accessories and should be secured to a wall using the wall mount provided.
The mounting of this camera should be according to the manufacturer's
instructions and use a mounting accessory recommended by the
manufacturer. The camera must be mounted securely to a wall to avoid the
camera falling and potentially causing serious damage.
• Camera Extension Cables - Check the rating of your extension cable to
verify its compliance prior to installation.
• Mounting - The cameras provided with this system should be mounted only
as instructed in this guide or the instructions that came with your cameras,
using the supplied mounting brackets.
• Camera Installation - Cameras are not intended for submersion in water.
When installing cameras outdoors, installation in a sheltered area is
recommended.
8 Safety Instructions
Page 9

2. System Requirements
Web Portal
• Windows® 7
• Mac OS® 10.7
• Chrome™ 24
• Internet Explorer
• Safari® 6
• Java™ 7
• Firefox
• Adobe® Flash® Player 15.0
®
18.0
®
9
Android™ System
• Version 4.2 or above
iPhone®/iPad® iOS
• Version 7.0 or above
Wi-Fi requirements:
• At least 0.6 Mbps upload bandwidth per camera. Test your Internet speed at:
http://www.speedtest.net/
ENGLISH
System Requirements 9
Page 10
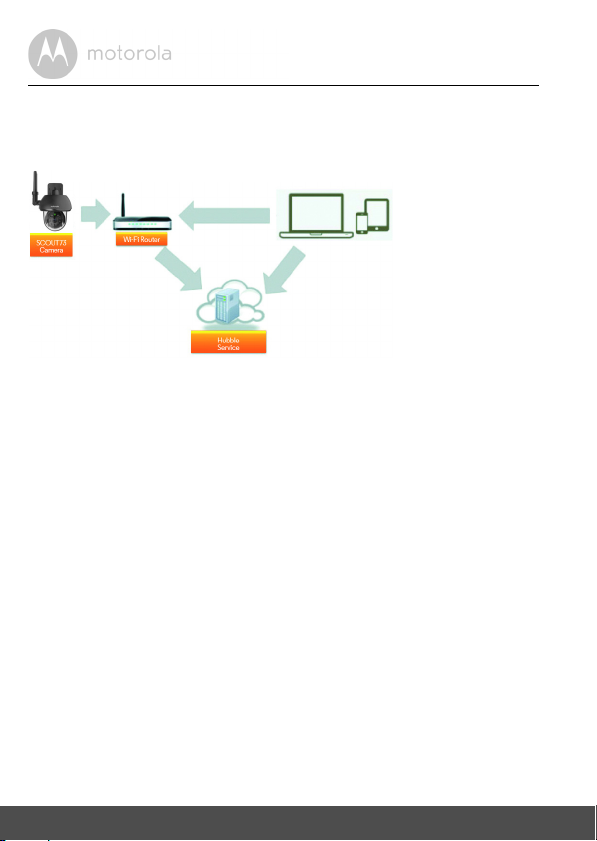
3. Getting started - Connecting Devices
Access your
Camera locally
View your Camera from any
compatible device remotely
How does it work?
When a user tries to access the Camera, our secure server authenticates the
user’s identity and permits access to the Camera.
3.1 Setup
Connect the Camera to the power adapter, then plug into an suitable mains
power socket and make sure the power switch is in the ON position. The
Camera must be within range of the Wi-Fi
connect it to. Make sure the password of the router is available for entering
during the in-app setup process.
Status of LED Indication:
- Pair / Setup state: LED is red and blue and flashing slowly
- Unconnected state: LED is red and flashing slowly
- Connected state: LED is blue and always on
- Ready for connection state: LED is blue and flashing slowly
Note:
You can only setup via a compatible smartphone or tablet and not via a PC.
®
router with which you want to
10 Getting started - Connecting Devices
Page 11

3.2 User Account and Camera Setup on Android™
Devices
What you need
• SCOUT73 camera
• SCOUT73 camera power adapter
• Device with Android™ system version 4.2 or above
3.2.1 Power on and connect the SCOUT73 camera
• Connect the SCOUT73 adapter to a suitable mains power socket, insert the
power adapter plug into the socket of the Power Cable.
• The camera’s green LED blinks after the camera has finished booting.
3.2.2 Download the Hubble for Motorola Monitors App
• Go to the Google Play™ Store to search “Hubble for Motorola Monitors”
application.
• Download the Hubble for Motorola Monitors App from the Google Play™
Store and install it on your Android™ device.
ENGLISH
Android™
Getting started - Connecting Devices 11
Page 12
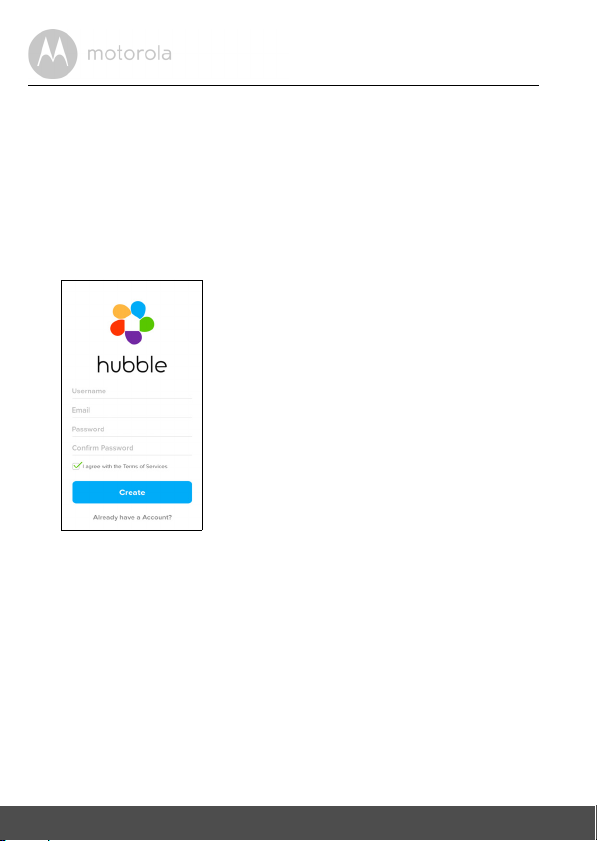
3.2.3 Run Hubble for Motorola Monitors App on Android™ device
A1
• Ensure your Android™ device is connected to your Wi-Fi® router.
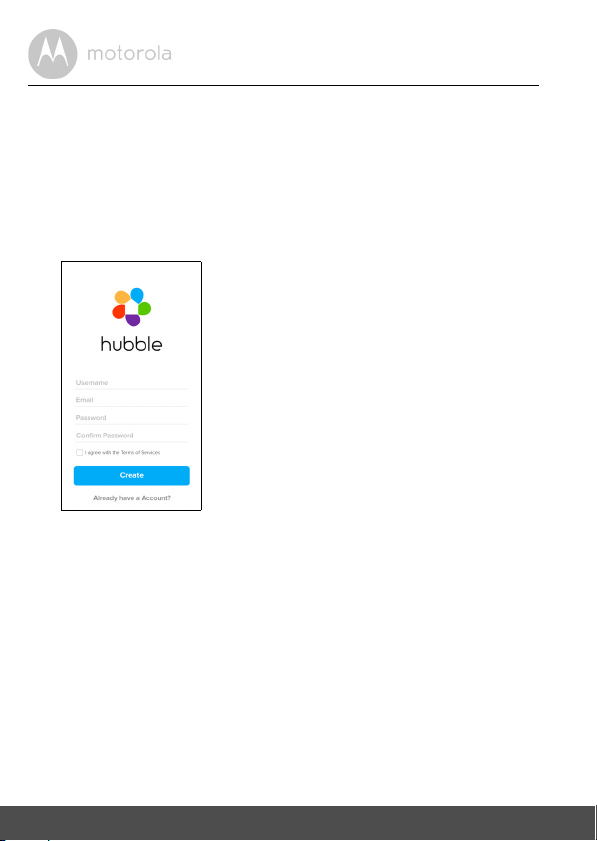
• Run Hubble for Motorola Monitors application and key in your Hubble for
Motorola Monitors account information, select “I agree to the Terms of Use”
before you tap on Create. (Picture A1)
Note: If you have a Hubble account, please select Already have an Account?
to go to the next step.
12 Getting started - Connecting Devices
Page 13
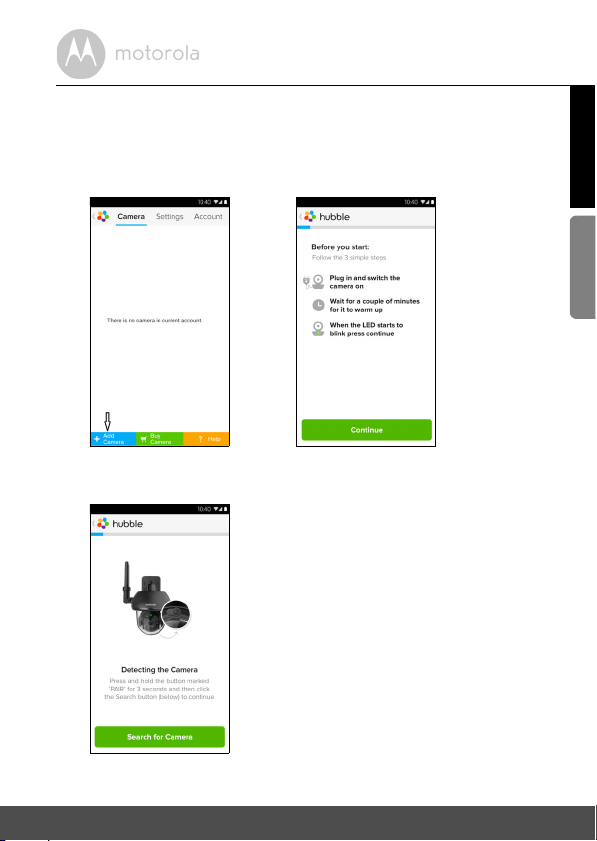
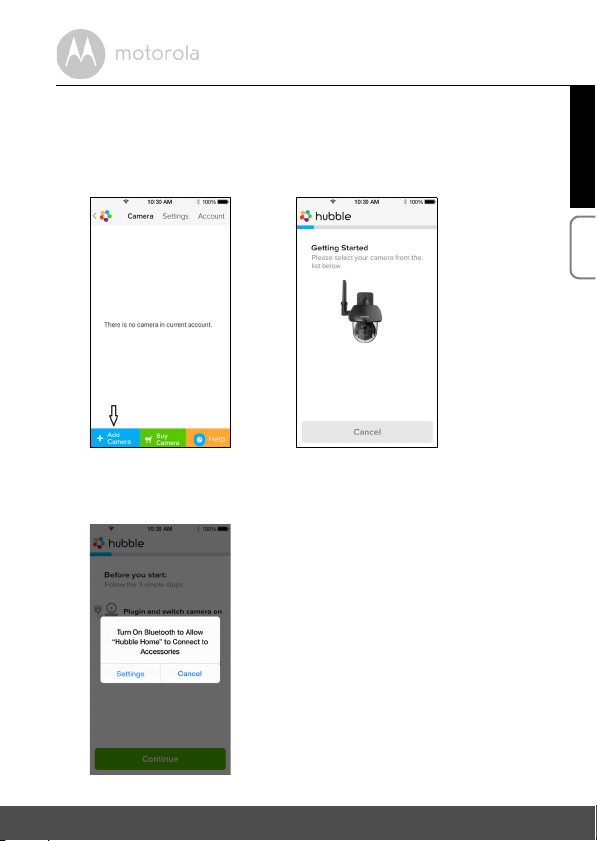
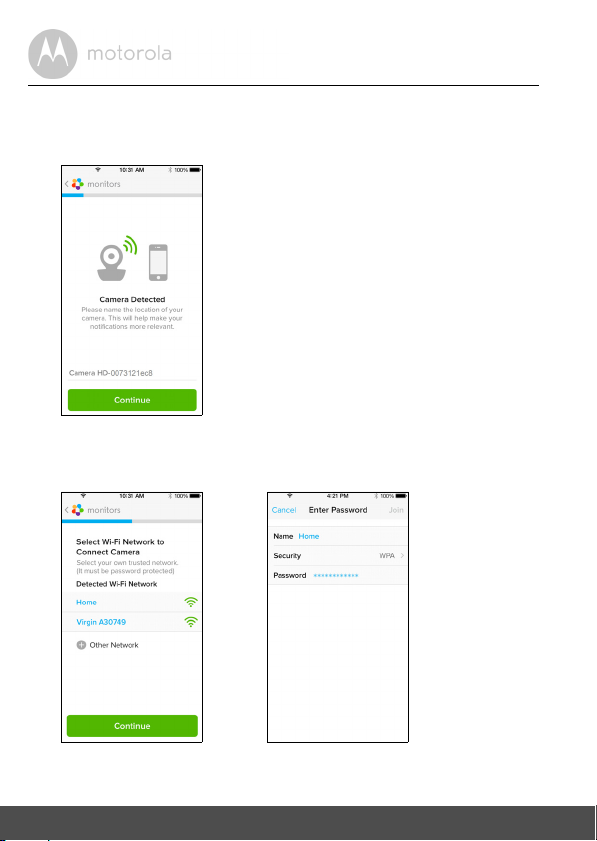
3.2.4 Add SCOUT73 Camera to your account
A2 A3
A4
• Once you have created your account and are logged in.
• Tap on Add Camera. (Picture A2)
• Tap on Continue. (Picture A3)
• On the screen, it shows the setup instructions. (Picture A4)
ENGLISH
Android™
Getting started - Connecting Devices 13
Page 14
• Press and hold the PAIR button for 3 seconds on the side of SCOUT73
A5 A6
A7 A8
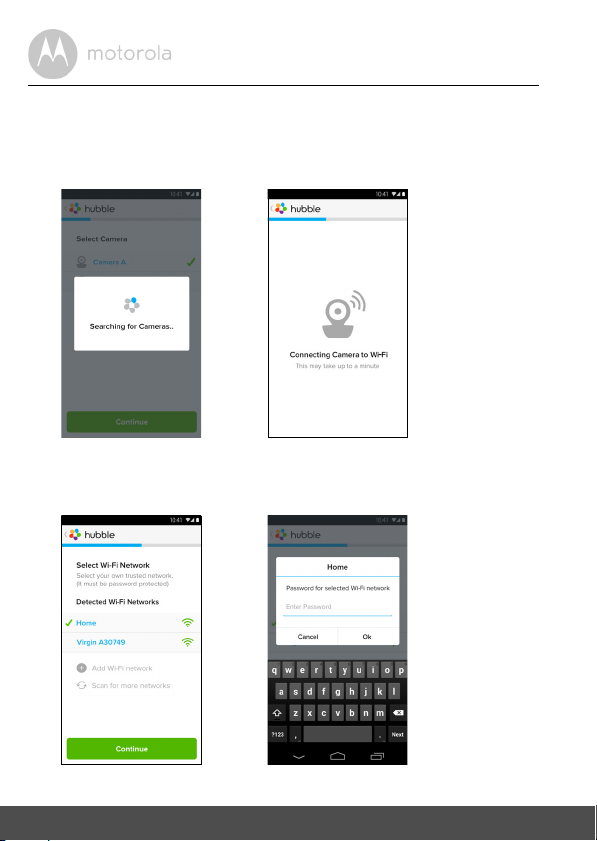
camera and the indicator will flash rapidly. Then tap on Search for Camera.
• The app will auto-search and connect to your Camera as shown on the
pictures below. (Pictures A5 & A6)
• Select Wi-Fi® Network and tap Continue, enter password then tap on
Connect. (Picture A7, A8)
14 Getting started - Connecting Devices
Page 15
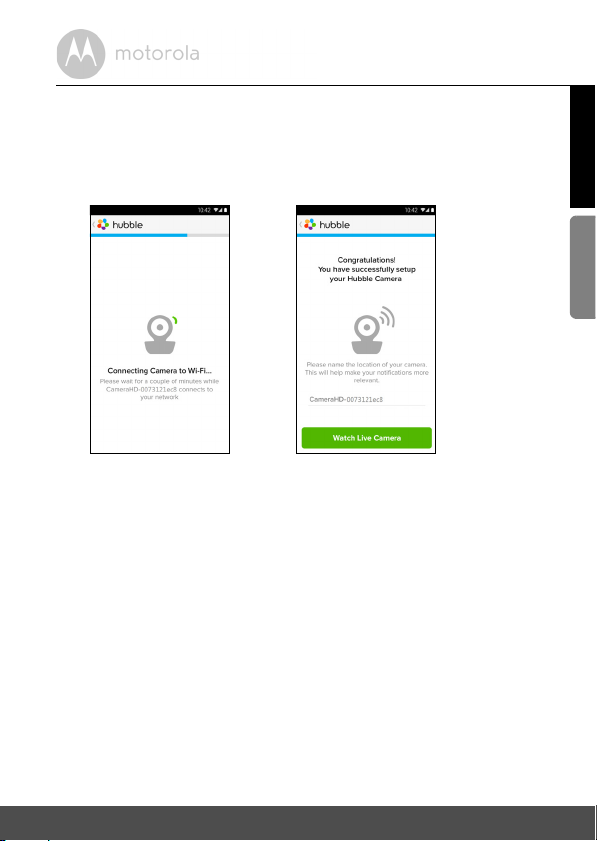
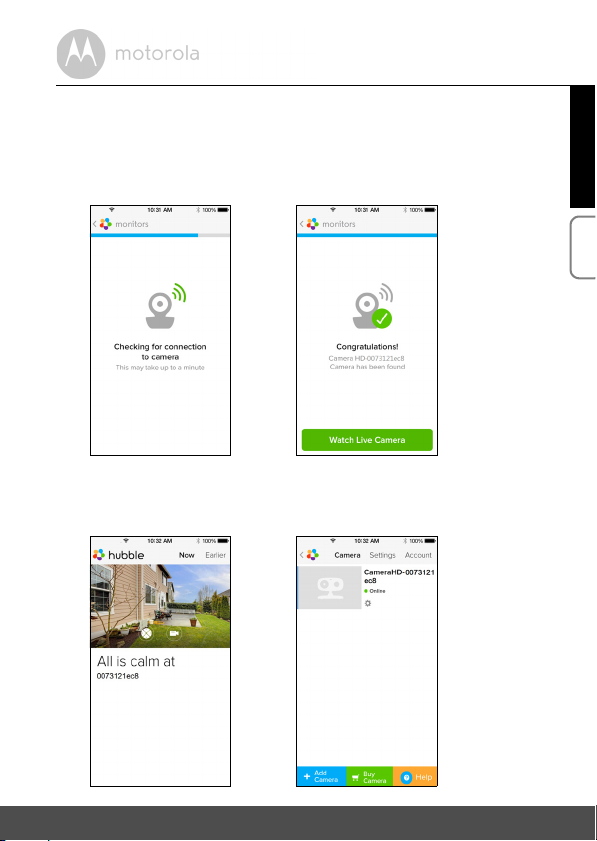
• When the camera is connecting to the Wi-Fi® Network, please wait a few
A9 A10
minutes whilst the camera searches for a connection. Once it has finished
searching it will display the result of the connection attempt (Picture A9,
A10). If the connection has failed, please tap on the Ret ry button and repeat
the steps described in 3.2.4.
ENGLISH
Android™
Getting started - Connecting Devices 15
Page 16

• Tap on Watc h Live Camera to view camera video and the LED indicator will
A11 A12
turn on. (Picture A11)
• Tap on Hubble logo and go back to the camera list. (Picture A12)
16 Getting started - Connecting Devices
Page 17

3.3 User Account and Camera Setup:
Working with iPhone®/iPad
What you need
• SCOUT73 camera
• SCOUT73 camera power adapter
• iPhone
3.3.1 Power ON and Connect SCOUT73 camera
• Connect the SCOUT73 adapter to a suitable mains power socket, insert the
• The camera's green LED will blink after the camera has finished booting up;
3.3.2 Download Hubble for Motorola Monitors App
• Go to App Store to search “Hubble for Motorola Monitors”.
• Download Hubble for Motorola Monitors App and install it on your iPhone®/
®
/ iPad® with iOS 7.0 version or newer
plug into the socket of the Power Cable.
this indicates that the camera is ready to be setup.
iPad®.
®
ENGLISH
iOS
Getting started - Connecting Devices 17
Page 18
3.3.3 Run Hubble for Motorola Monitors on your iPhone®/iPad
i1
®
• Ensure your iPhone®/iPad® is connected to your Wi-Fi® Router.
• Run Hubble for Motorola Monitors application and key in your Hubble for
Motorola Monitors account information, read through the Terms of Service
then select “I agree to the Terms of Service” before you tap on Create.
(Picture i1)
Note: If you have a Hubble for Motorola Monitors account, please select Already
have an Account? to continue to the next steps.
18 Getting started - Connecting Devices
Page 19
3.3.4 Add SCOUT73 Camera to your account
i2 i3
i4
• Once you have created your account and are logged in:
• Tap on Add Camera. (Picture i2)
• Tap on “SCOUT73”. (Picture i3)
ENGLISH
iOS
• Follow the instruction on screen to turn on the Bluetooth™ function of your
Getting started - Connecting Devices 19
®
/iPad®.
iPhone
Page 20
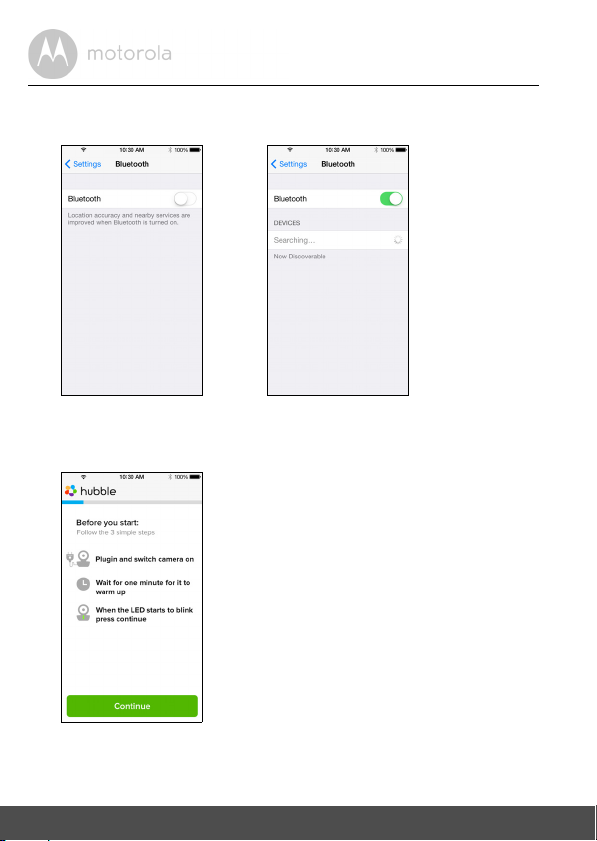
• Tap on Home button, then enter the “Settings” menu to turn on the
i5 i6
i7
Bluetooth™ function of your iPhone®/iPad®.
• Press the HOME key to exit the Settings menu and tap on the “Hubble
Home” app to enter the start up screen.
20 Getting started - Connecting Devices
Page 21
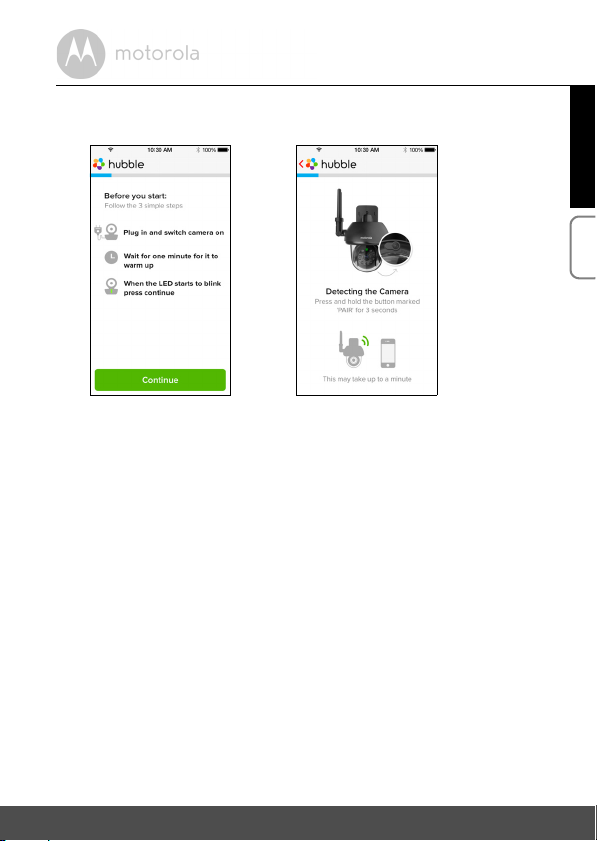
• Tap on Continue and follow the steps indicated as shown below.
i8 i9
(Pictures i8-i9)
ENGLISH
iOS
Getting started - Connecting Devices 21
Page 22
• Follow the steps above to locate the camera with identification number
i10
i11 i12
“CameraHD-xxxxxxxxxx”, then tap on Continue once your iPhone® or iPad®
has connected to the camera. (Picture i10)
• Select Wi-Fi® Network then tap Continue. Then, enter password and tap
Next. (Pictures i11, i12)
22 Getting started - Connecting Devices
Page 23
• When the camera is connecting to the Wi-Fi® Network, please wait a few
i13 i14
i15 i16
minutes whilst the camera searches for a connection. Once it has finished
searching it will display the result of the connection attempt (Picture i13, i14).
If the connection has failed, please tap on the Retry button and repeat the
steps described in 3.3.4.
• Press Watch Li ve Camera to view Camera video. (Picture i15)
• Tap on Hubble logo to go back to Camera list. (Picture i16)
ENGLISH
iOS
Getting started - Connecting Devices 23
Page 24
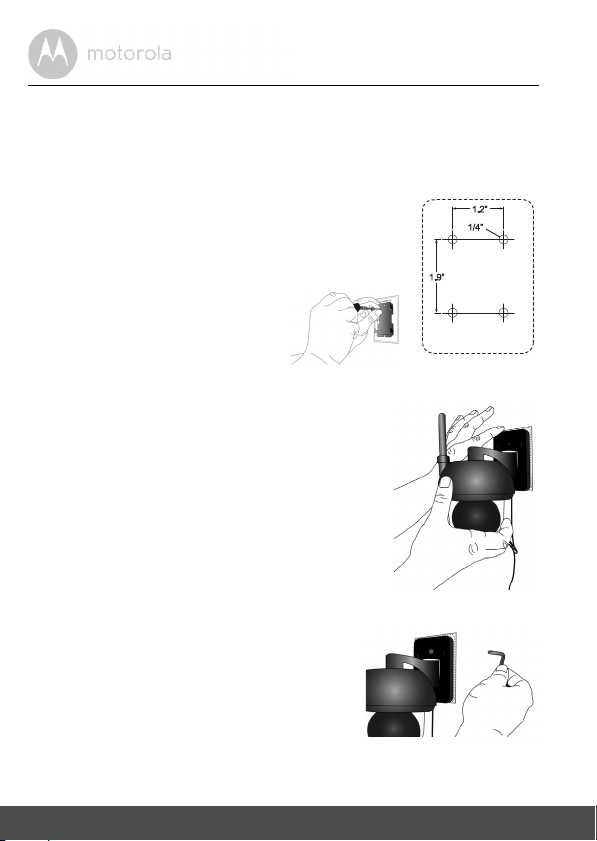
4. Camera
• Mark the position of the screw holes on the wall.
• Drill 4 holes and hammer the drywall plugs
(included) into the holes as needed.
• Fasten the mounting plate on the wall
with the 4 Philips head screws
(provided).
• Place the 4 mounting slots of the camera
base on to 4 catches on the mounting plate.
• Make sure the unit sits firmly on the
mounting plate with the center holes of 2
parts lined up.
• Fasten the unit to the mounting plate at
the center hole with the tamper-proof
screw by the wrench key provided.
4.1 Install your Camera and setting up
A. Fixing Mounting Plate on the wall.
B. Hanging the Camera unit on the Mounting Plate.
C. Secure the Camera Unit.
24 Camera
Page 25
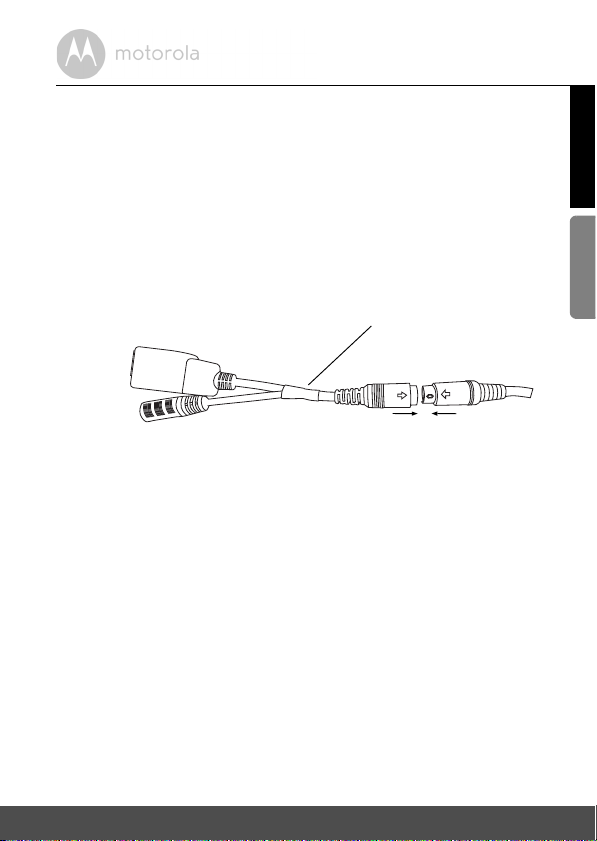
D. Connecting the Camera Unit's Power Supply.
• Connect the camera's round plug to the Y-shaped Power/LAN
cable connector.
• Insert the power adapter plug into the Power Socket and connect
other end of the power adapter to a suitable mains power socket.
(LAN socket provides an option for you to connect via LAN cable if
it is necessary)
• The LED indicator will light up.
Power/LAN cable connector
Camera Round Plug
LAN Socket for LAN cable
connection (use if necessary)
Power Socket for connecting to
power adapter
4.2 Camera Functions:
Working with devices for Android™
• Run the Hubble for Motorola Monitors application on your Android™ device.
• The Camera view appears on the screen.
4.2.1 Add more cameras
• On Camera view, tap on Hubble logo to go to Add Camera page. (Picture A13)
• Tap on Add Camera to add one more camera follow steps of Android™
device setup Section 3.2.4. (Picture A14)
• Once the Camera has been added, the Camera view will be automatically
displayed.
ENGLISH
Android™
Camera 25
Page 26
4.2.2 Remove a camera
A13 A14
A15 A16
You can remove a camera from your account by following these steps:
• Tap the Setting icon on General page, then tap on Camera Details.
(Picture A15)
• Select Remove Camera and tap on Ye s to delete the unit from camera list.
(Picture A16)
26 Camera
Page 27
4.2.3 Change your Account Information
A17
You can change the account information using Android™ device.
• Tap Account on General page, the account setting appears on screen.
(Picture A17)
• Tap on Change Password to change your password following the
instruction.
• Tap on Log Out to leave the account.
• Tap on Fre emiu m plan, it will go to the link of Cloud Video Recording
Service, to obtain more information, please visit our website
http://www.hubbleconnected.com.
• Tap on Use Remote Only to access Remote Connection Setting, confirm
Use by Selecting Ye s .
• Enable Disconnect Alert , when disconnect it will be "beeps" alert,enable
the disconnect Alert by selecting Ye s .
• Tap on Send Log to send your Hubble for Motorola Monitors Android App
report to our server via e-mail; this should be sent if requested by a customer
service agent.
ENGLISH
Android™
Camera 27
Page 28
4.2.4 Camera settings
A18 A19
A20
You can change the Camera settings by tapping the Setting icon on the
Camera list page. (Picture A18)
• Tap on Camera Details to review Camera Name, Change Image &
Firmware version. (Picture A19)
• Tap on Notification Sensitivity to set the sensitivity of motion detection.
(Picture A20)
28 Camera
Page 29

4.2.5 General setting
A21 A22
• Tap Settings on General page.
• Tap on
• Tap on Do Not Disturb, set the timer which you prefer and select ON, the
General Settings
to shift the format of
Clock
(12hr/24hr). (Picture A21)
Camera will not send any alert to your Android™ device in the duration of
your setting (Picture A22).
ENGLISH
Android™
Camera 29
Page 30
4.2.6 Features of Hubble for Motorola Monitors Application
A23
On Camera view, tap the viewing area, Function Icons will appear as following,
Pan and Tilt Function:
Tap the up and down buttons to tilt, the left and right buttons to pan. (Pictures A23)
30 Camera
Page 31

Photo/Video - Take a photo or record a video from your Camera.
A24 A25
A26
Tap Video icon to activate the video function and press the red dot to start and
release to stop recording. (Pictures A24, A25)
Tap Camera icon to switch to Camera mode, you can capture photos from
camera view. (Picture A26)
ENGLISH
Android™
Camera 31
Page 32

Note:
Photos and videos will be stored on the internal flash memory of your Android™
device, and can be accessed via the Gallery or Media Player. To play videos,
please use the “Hubble for Motorola Monitors” application or a 3rd party
application, such as MX player (i.e. Google Play™ Store), which is able to play
MJPG (Motionjpeg).
32 Camera
Page 33

4.3 Camera Functions:
i17 i18
Working with devices for iPhone®/iPad
• Run the Hubble for Motorola Monitors application on your iPhone®/iPad®.
• The Camera view appears on the screen.
4.3.1 Add more cameras
• On Camera view, tap on the Motorola logo to go to Add Camera page.
(Picture i17)
• Tap on Add Camera to add one more camera follow steps of iPhone®/iPad®
setup Section 3.3.4. (Picture i18)
• Once the Camera has been added, the Camera view will be automatically
displayed.
Note:
You can ONLY add up to 4 cameras in one account.
®
ENGLISH
iOS
Camera 33
Page 34

4.3.2 Remove a camera
i19 i20
You can remove a camera from your account by following these steps:
• Tap the Setting icon on General page, then tap on Camera Details.
(Picture i19)
• Select Remove Camera and tap on Ye s to delete the unit from camera list.
(Picture i20)
34 Camera
Page 35

4.3.3 Change your Account Information
i21
You can change the account information using iPhone®/iPad®.
• Tap Account on General page, the account setting appears on screen.
(Picture i21)
• Tap on Change Password to change your password following the
instruction.
• Tap on Log Out to leave the account.
• Tap on Current plan, it will go to the link of Cloud Video Recording Service,
to obtain more information, please visit our website
www.hubbleconnected.com/motorola/plans.
• Tap on Send app log to send your Hubble for Motorola Monitors App report
to our server via e-mail; this should be sent if requested by a customer
service agent.
ENGLISH
iOS
Camera 35
Page 36

4.3.4 Camera settings
i22 i23
i24 i25
You can change the Camera settings by tapping on the Setting icon on the
General page (Picture i22). Here you can review the Camera Name and
Firmware version (Picture i23). Additionally you are allowed to change camera
name by tapping on the existing camera name and following the instructions.
4.3.5 General settings
• Tap Settings on General page. (Picture i24)
• Tap on General Settings to shift the format of Clock (12hr/24hr). (Picture i25)
36 Camera
Page 37

• Tap on Notification Sensitivity to set motion detection. (Picture i26)
i26 i27
• Tap on Do Not Disturb, set the timer which you prefer and select ON, the
Camera will not send any sound or alert to your iPhone®/iPad® in the
duration of your setting. (Picture i27)
ENGLISH
iOS
Camera 37
Page 38

4.3.6 Hubble for Motorola Monitors Settings
i28
• Tap on Settings on your iPhone®/iPad®, and the applications will appear, tap
on Hubble for Motorola Monitors App , the settings in the Hubble
for Motorola Monitors app will be shown on screen. (Picture i28)
38 Camera
Page 39

4.3.7 Features of the Hubble for Motorola Monitors App
i29 i30
On Camera view, tap the viewing area, Function Icons will appear as following,
Pan and Tilt Function:
Tap the up and down buttons to tilt, the left and right buttons to pan. (Pictures i29)
Take P ic tu re - Tap Camera icon to capture photos from camera view.
(Picture i30)
Note:
Photos will be stored on the internal flash memory of your iPhone
®
/iPad®.
ENGLISH
iOS
Camera 39
Page 40

4.4 Camera Functions:
Working with PC/Notebook
• Go to URL: http://www.hubbleconnected.com/motorola/login/
• Enter your User Name and Password and then click Login if you have already
created an account.
• Click on the Camera list paired in your account via Android™ device or
iPhone®/iPad®, and the Camera view will appear on screen. You can easily
stay connected with your favorite people, places and pets with live video
streaming.
• On the website, you can change the settings by following the Menu instruction
steps.
40 Camera
Page 41

5. Procedure for resetting the Camera
Note: If your Camera is moved from one router (e.g. home) to another router
(e.g. office) or you have Camera setup issues, then this Camera must be reset
again. Please reset the Camera with the following procedure:
1. Unplug the Power Adapter.
2. Press and hold the PAIR button on the underside of the Camera, then plug
the Power Adapter to the mains power socket, the LED indicator turns ON.
3. Release the PAIR button and wait for the Camera to complete the internal
reset procedure, the LED indicator will turn Off.
4. You can add your camera again by following the steps 3.2.4 for Android
device or 3.3.4 of iOS device.
ENGLISH
Procedure for resetting the Camera 41
Page 42

6. Help
Noise interference
To avoid background noise or echoes, ensure that there is enough distance
between your device and the Wi-Fi® Camera Unit.
Use of other 2.4 GHz products, such as Bluetooth® systems or microwave
ovens, may cause interference with this product. Keep the Wi-Fi® Camera Unit
at least 1.5m away from these types of products, or turn them off if they appear
to be causing interference.
Lost connection
Check your Wi-Fi® settings. If necessary reconnect your Wi-Fi®. Ensure the
Wi-Fi ® Camera Unit is switched ON. Wait a few minutes to make the connection
with the Wi-Fi
If you forgot your password
If you do not remember your password, tap Forgot password and submit
your e-mail address. A new password will be sent to your e-mail address
immediately.
Trouble Shooting
Category Problem
Account I am unable to login
Account I receive an error
®
system.
Description / Error
even after registration.
message saying: "Email
ID is not registered".
Solution
Please check your user name and
password.
Please ensure that you have
registered with us. Tap Create
Account to create an account tobe
able to use the Wi-Fi
®
Pet Video
Camera.
42 Help
Page 43

Account What do I do if I forgot
my password?
Account I am unable to receive a
new password although
I have used the "Forgot
password" option.
Connectivity
Issues
I get a message: We
are having problems
accessing your
camera. This could be
due to lack of internet
connection. Please
wait and try again later.
Viewing
Camera
When I am in "remote
mode", the video stops
after 5 minutes. How
do I view for longer?
Click on the "Forgot Password" link on
the http://
www.hubbleconnected.com/
motorola/login/ website OR your
Android™ or iOS application. An email
will be sent to your registered email
address.
1. The e-mail might have been sent
to your Junk Mail Folder. Please
check your Junk Mail Folder.
2. There might be a delay in getting
your e-mail. Please wait a few
minutes and refresh your email
account.
1. Please try again in a few minutes.
This could be because of any
issue with your internet
connection.
2. If the problem remains, please
restart your Camera to check if
this fixes the problem.
3. Please restart your Wireless
Rout er.
When you are accessing your Camera
via a network different from your
home network (over internet) your
video times out after 5 minutes.
You can click on the Camera again
from the Android™/iOS application
to start streaming again.
If you are accessing from your webbrowser, then you can press on the
Reloa d button to start viewing your
Camera video stream again.
ENGLISH
Help 43
Page 44

Connectivity
®
®
®
®
Issues
My Phone application
displays the following
message: "Unable to
connect to BMS
server".
Setting Up While I am adding a
new camera to my
account, I am not able
to find any Cameras to
add.
General What are the
supported browsers f or
accessing from my PC/
®
Mac
?
Connectivity
issues
I found interference
caused by my other
web cam devices.
1.
Check the Wi-Fi network
strength.
2. Check if you are connected to
the internet by starting the
phone browser and going to a
website like www.google.com
.
3. Try again if you are successful
connecting to the internet.
4. Plug the LAN wire into RJ45
socket directly and connect to
the internet in case the Wi-Fi
signal is not good.
If you are trying to add a Camera
which has previously been added into
your account or another account, you
will first have to reset the Camera. This
can be done by pressing and holding
the PAIR button at the bottom of the
Camera for 5 seconds.
On PC and Mac , we recom mend to
use Google Chrome. However the
following browsers are also
supported: PC: Internet Explorer 8
and above. Mac : Safari.
Video streaming performance is
related to internet bandwidth,
especially if you have 2 or more video
streaming devices that are working
through the same router.
44 Help
Page 45

General What is the
®
®
®
®
significance of LED
flashing?
Connectivity
Issues
I am not able to access
my Camera.
Setting Up During setup on device
for Android™ and iOS,
during the last step I am
not able to find my
Camera and the setup
fails.
A blinking LED indicates the following
status:
Rapid blinking: 1. Your Camera is in
setup mode. You can add the Camera
to your account in this mode. Out of the
box, the Camera is in setup mode. To
reset to setup mode, press and hold the
PAIR button on the bottom of the
Camera until the LED indicator flashes
rapidly.
Slow blinking: 2. The Camera is either
connecting to the router or lost the link
to the router. Please ensure that the
Camera is in the Wi-Fi signal range.
LED is stable: The Camera is
connected to the Wi-Fi network.
Please check if the Camera is within
Wi-Fi range. If the LED on your
Camera is slow blinking, please try to
move the Camera closer to the router
for better Wi-Fi range and try again.
Please reset the Camera to setup
mode and try again. Press and hold
the PAIR button on the bottom of the
Camera until you hear a beep. The
LED indicator flashes rapidly,
indicating that it is in setup mode.
Now restart the setup from your
Smartphone again.
ENGLISH
Help 45
Page 46

Connectivity
®
®
®
®
®
®
®
®
®
Issues
Even though I am
accessing my Camera
from the same Wi-Fi
network, I still find my
Camera is shown as
remote. I can only
access it for 5 minutes
at a time.
Camera When I try to view the
Camera, I get a prompt
for Camera firmware
upgrade. What should I
do?
General Which platforms are
supported for
accessing my Camera?
General What is the meaning of
"Local Camera" and
"Remote Camera"?
Please check your wireless router
settings. For example, in Buffalo brand
routers there is an option called
Wireless Isolation. Please disable this
option.
Please upgrade your firmware. This
takes around 5 minutes. We push
upgrades from time to time to
improve the Camera features.
Windows 7*, Windows 8*
*Java browser plug-in needed
Mac iOS version 10.7 or above
Internet Explorer version 8.0 or above
Firefox version 11.0 or above
Chrome™ version 18.0 or above
Safari version 5.1 or above
Java™ version 7 or above
Android™ version 4.0 or above
iPhone /iPad iOS version 7.0 or
above.
When you are accessing your camera
from the same wireless network (Home)
in which it is configured, it is a local
camera. When you are accessing your
Camera away from your home it is a
remote camera. You may be using 3G,
4G or 4G LTE or a Wi-Fi connection
outside of your home.
46 Help
Page 47

General How do I download the
APP for Android™ and
iOS devices?
Setting up When the video is cut
off, the application
attempts to reconnect
and and results in lost
sound and choppy
video.
Features How many users can
access the Camera at
one time?
Android™:
- Open Google Play App on your
Android™ device
- Select Search
- Type "Hubble for Motorola
Monitors"
- The results will have Hubble for
Motorola Monitors App by
Binatone
- Select to install it
iOS Device:
- Open iOS APP Store™
- Select search
- Type "Hubble for Motorola
Monitors"
- The results will have Hubble for
Motorola Monitors App by
Binatone
- Select to install it
You will need to turn off the auto lock
function of your smart device to
ensure continuous video/audio
feeding.
If you are accessing in local more, two
users are supported, after two users all
streaming will go through remote
server. This allows for unlimited user
access to a single Camera at one time.
ENGLISH
Help 47
Page 48

7. General Information
If your product is not working properly....
1. Read this User's Guide.
2. Contact Customer Service at:
+49 (0) 1805 938 802 (Europe)
Email: motorola-mbp@tdm.de
Consumer Products and Accessories Limited Warranty
("Warranty")
Thank you for purchasing this Motorola branded product manufactured under
license by Binatone Electronics International LTD ("BINATONE").
What Does this Warranty Cover?
Subject to the exclusions contained below, BINATONE warrants that this
Motorola branded product ("Product") or certified access ory ("Accessory") sold
for use with this product that it manufactured to be free from defects in materials
and workmanship under normal consumer usage for the period outlined below.
This Warranty is your exclusive warranty and is not transferable.
Who is covered?
This Warranty extends only to the first consumer purchaser, and is not transferable.
What will BINATONE do?
BINATONE or its authorised distributor at its option and within a commercially
reasonable time, will at no charge repair or replace any Products or Accessories
that does not conform to this Warranty. We may use functionally equivalent
reconditioned/ refurbished/ pre-owned or new Products, Accessories or parts.
48
General Information
Page 49

What Other Limitations Are There?
ANY IMPLIED WARRANTIES, INCLUDING WITHOUT LIMITATION THE
IMPLIED WARRANTIES OF MERCHANTABILITY AND FITNESS FOR A
PARTICULAR PURPOSE, SHALL BE LIMITED TO THE DURATION OF THIS
LIMITED WARRANTY, OTHERWISE THE REPAIR OR REPLACEMENT
PROVIDED UNDER THIS EXPRESS LIMITED WARRANTY IS THE EXCLUSIVE
REMEDY OF THE CONSUMER, AND IS PROVIDED IN LIEU OF ALL OTHER
WARRANTIES, EXPRESS OR IMPLIED. IN NO EVENT SHALL MOTOROLA OR
BINATONE BE LIABLE, WHETHER IN CONTRACT OR TORT (INCLUDING
NEGLIGENCE) FOR DAMAGES IN EXCESS OF THE PURCHASE PRICE OF
THE PRODUCT OR ACCESSORY, OR FOR ANY INDIRECT, INCIDENTAL,
SPECIAL OR CONSEQUENTIAL DAMAGES OF ANY KIND, OR LOSS OF
REVENUE OR PROFITS, LOSS OF BUSINESS, LOSS OF INFORMATION OR
OTHER FINANCIAL LOSS ARISING OUT OF OR IN CONNECTION WITH THE
ABILITY OR INABILITY TO USE THE PRODUCTS OR ACCESSORIES TO THE
FULL EXTENT THESE DAMAGES MAY BE DISCLAIMED BY LAW.
Some jurisdictions do not allow the limitation or exclusion of incidental or
consequential damages, or limitation on the length of an implied warranty, so
the above limitations or exclusions may not apply to you. This Warranty gives
you specific legal rights, and you may also have other rights that vary from one
jurisdiction to another.
ENGLISH
General Information 49
Page 50

Products Covered Length of Coverage
Consumer Products Two (2 ) y ea r s from the date of the
products original purchase by the first
consumer purchaser of the product.
Consumer Accessories Ninety (90) days from the date of the
accessories original purchase by the
first consumer purchaser of the
product.
Consumer Products and Accessories
that are Repaired or Replaced
The balance of the original warranty or
for Ninety (90) days from the date
returned to the consumer, whichever is
longer.
Exclusions
Normal Wear and Tear. Periodic maintenance, repair and replacement of parts
due to normal wear and tear are excluded from coverage.
Batteries. Only batteries whose fully charged capacity falls below 80% of their
rated capacity and batteries that leak are covered by this Warranty.
Abuse & Misuse. Defects or damage that result from: (a) improper operation,
storage, misuse or abuse, accident or neglect, such as physical damage (cracks,
scratches, etc.) to the surface of the product resulting from misuse; (b) contact
with liquid, water, rain, extreme humidity or heavy perspiration, sand, dirt or the
like, extreme heat, or food; (c) use of the Products or Accessories for
commercial purposes or subjecting the Product or Accessory to abnormal
usage or conditions; or (d) other acts which are not the fault of MOTOROLA or
BINATONE, are excluded from coverage.
Use of Non-Motorola branded Products and Accessories. Defects or damage
that result from the use of Non-Motorola branded or certified Products or
Accessories or other peripheral equipment are excluded from coverage.
Unauthorised Service or Modification. Defects or damages resulting from
service, testing, adjustment, installation, maintenance, alteration, or
modification in any way by someone other than MOTOROLA, BINATONE or its
authorised service centres, are excluded from coverage.
50 General Information
Page 51

Altered Products. Products or Accessories with (a) serial numbers or date
tags that have been removed, altered or obliterated; (b) broken seals or that
show evidence of tampering; (c) mismatched board serial numbers; or (d)
nonconforming or non-Motorola branded housings, or parts, are excl uded from
coverage.
Communication Services. Defects, damages, or the failure of Products or
Accessories due to any communication service or signal you may subscribe to
or use with the Products or Accessories is excluded from coverage.
How to Obtain Warranty Service or Other Information?
To obtain service or information, please call:
+49 (0) 1805 938 802 (Europe)
Email: motorola-mbp@tdm.de
You will receive instructions on how to ship the Products or Accessories at your
expense and risk, to a BINATONE Authorised Repair Centre.
To obtain service, you must include: (a) the Product or Accessory; (b) the
original proof of purchase (receipt) which includes the date, place and seller of
the Product; (c) if a warranty card was included in your box, a completed
warranty card showing the serial number of the Product; (d) a written
description of the problem; and, most importantly; (e) your address and
telephone number.
These terms and conditions constitute the complete warranty agreement
between you and BINATONE regarding the Products or Accessories purchased
by you, and supersede any prior agreement or representations, including
representations made in any literature publications or promotional materials
issued by BINATONE or representations made by any agent employee or staff
of BINATONE, that may have been made in connection with the said purchase.
ENGLISH
General Information 51
Page 52

Declare under our sole responsibility that the following products
Wi-Fi Video Camera
Radio Spectrum: EN300328 V1.8.1:2012
IEC 60950-1:2005 (Second Edition) + Am 1:2009 + Am 2:2013
RF Safety:
EMC: EN301489-17 V2.2.1:2012
EN301489-1 V1.9.2:2011
BINATONE TELECOM PLC
1 Apsley Way London NW2 7HF,United Kingdom.
Tel: +44(0) 20 8955 2700 Fax: +44(0) 20 8344 8877
e-mail: binatoneuk@binatonetelecom.co.u
k
________________________________________ .
EC Declaration of Conformity
We the manufacturer / Importer : Binatone Telecom Plc
1 Apsley Way London
NW2 7HF, United Kingdom.
Type of equipment:
Model Name:
Country of Origin: China
Brand: Motorola
complies with the essential protection requirements of R&TTE Directive 1999/5/EC on the
approximation of the laws of the Member States relating to Radio Spectrum Matters, the
Council Directive
/108/EC on the approximation of the laws of the Member States
relating to electromagnetic compatibility (EMC) and the European Community Directive
2006/95/EC relating to Electrical Safety. Directive 2011/65/EC on the restriction of use of
hazardous substances (RoHS) and 2009/125/EC relating to ecodesign requirement for
Energy-Related Products (ErP).
Assessment of compliance of the product with the requirements relating to the essential
requirements according to Article 3 R&TTE was based on Annex III of the Directive
1999/5/EC and the following standard:
Electrical Safety:
The product is labelled with the European Approval Marking CE as show. Any Unauthori
ed
modification of the product voids this Declarat
ion.
Manufacturer / Importer
(Signature of authori
ed person)
Karl Heinz Mueller / Chief Technical Officer Place & Date
FOCUS73, FOCUS73-2, SCOUT73, SCOUT73-2
London, 8 July, 2014
EN 62311:2010
52 General Information
Page 53

®
8. Technical Specifications
Camera Unit
Wi-Fi 802.11 b/g/n
Image sensor Colour CMOS 1M Pixels
Lens f = 2.3 mm, F = 2.4
IR LED 8 pcs
Power Adapter Zhongshan Baolijin Electronic Co.,Ltd.
Input: 100-240V AC, 50/60Hz, 300mA
Output: 5V DC, 2000mA
Water Resistance IP66
ENGLISH
Technical Specifications
53
Page 54

Manufactured, distributed or sold by Binatone Electronics International LTD.,
official licensee for this product. MOTOROLA and the Stylized M logo are
trademarks or registered trademarks of Motorola Trademark Holdings, LLC.
and are used under license. Apple logo and Safari aretrademarks of Apple Inc.,
registered in the U.S. and ot her countries. App Store is a service mark of Apple I nc.
Google Play, Android, and Chrome are trademarks of Google Inc. Wi-Fi is a
trademark of the Wi-Fi Alliance. Internet Explorer and Windows are trademarks of
the Microsoft group of companies. Firefox is a registered trademark of the Mozilla
Foundation. Adobe and Flash are either registered trademarks or trademarks of
Adobe Systems Incorporated. Java is a registered trademark of Oracle and/or its
affiliates. All other trademarks are the property of their respective owners.
© 2014 Motorola Mobility LLC. All rights reserved.
EU_EN Version 3.0
Printed in China
Page 55

BEDIENUNGSANLEITUNG
Wi-Fi® Outdoor-Haustier-Videokamera
Modell: SCOUT73, SCOUT73-2
Die in der Bedienungsanleitung beschriebenen Funktionen können ohne Vorankündigung
geändert werden.
Page 56

Herzlichen Glückwunsch
zu Ihrer neuen Motorola Wi-Fi® Outdoor-HaustierVideokamera!
Vielen Dank, dass Sie die neue Motorola Wi-Fi® Outdoor-Haustier-Videokamera
gekauft haben.
Wenn Sie sich schon immer gefragt haben, was Ihr Tier tut, wenn Sie nicht da sind,
erhalten Sie jetzt die Antwort. Jetzt können Sie Ihre Haustiere mit diesem
benutzerfreundlichen System beobachten. Sie können die Kamera-App auf Ihrem
iPhone /iPad oder Android™-Gerät installieren und Sie können den
Videostream der Kamera von Ihrem PC oder Notebook sowie von Ihrem
Android™-Gerät oder iPhone /iPad aus anzeigen.
Bitte bewahren Sie Ihren datierten Original-Verkaufsbeleg bei Ihren Unterlagen
auf. Für den Garantieservice Ihres Motorola-Produkts benötigen Sie eine Kopie
Ihres datierten Verkaufsbelegs als Bestätigung des Garantiestatus. Für
Garantiezwecke ist keine Registrierung erforderlich.
Bei Fragen zum Produkt können Sie unter der folgenden Nummer anrufen:
Diese Bedienungsanleitung liefert Ihnen alle Informationen, die Sie benötigen,
um das Produkt optimal zu nutzen.
Bitte lesen Sie die Sicherheitshinweise auf Seite 5 - 6 durch, bevor Sie das Gerät
installieren.
Lieferumfang
• 1 Wi-Fi®-Kamera
• 1 Netzteil
• 1 Kurzanleitung
• 1 Bedienungsanleitung
• 4 Montageschrauben und Trockenwanddübel
• 1 Sicherheitsschraube
• 1 Metallhalterung
• 1 Schraubenschlüssel
• 1 x Y-förmiger Strom-/LAN-Kabelanschluss
®
®
® ®
+49 (0) 1805 938 802 (Europa)
E-Mail: motorola-mbp@tdm.de
Page 57

Übersicht über die Kamera
1
2
3
6
7
8
4
5
9
10
Antenne
1.
2.
Basis für die Wandmontage
IR-LEDs (für die Nachtsicht)
3.
4.
Kameraobjektiv
Lichtsensor (für die Erkennung im
5.
Nachtmodus)
6.
PAI R-Tast e
Ein/Aus-/Status-Anzeige
7.
8.
Kuppelförmige Abdeckung
Stromanschlussbuchse
9.
10.
LAN-Schnittstelle*
(Adaptive Ethernet-Schnittstelle für
das Anschließen verschiedener
Netzwerkgeräte wie Hub, Router usw.)
* Für den LAN-Kabelanschluss (nicht mitgeliefert), wenn keine
Wi-Fi® - Verbindung vorhanden ist. Der LAN-Anschluss gilt nicht
für die Einrichtung der Smartgeräte-App.
Wichtige Richtlinien für das Installieren Ihrer Wi-Fi
• Die Verwendung anderer 2,4-GHz-Produkte wie drahtlosen Netzwerken,
Bluetooth
®
-Systeme oder Mikrowellenöfen kann Störungen bei diesem Gerät
verursachen. Stellen Sie die Wi-Fi-Kamera von solchen Produkten entfernt auf
oder schalten Sie sie aus, wenn sie Störungen verursachen.
• Stellen Sie immer eine gute Wi-Fi
®
-Verbindung sicher.
®
-Kamera
Page 58

Inhaltsverzeichnis
1. Sicherheitshinweise .................................................................................. 5
2. Systemanforderungen.............................................................................10
3. Erste Schritte – Anschließen der Geräte ................................................11
3.1 Einrichtung................................................................................................11
3.2 Einrichtung eines Benutzerkontos und der Kamera auf Android™-
Geräten ..................................................................................................... 12
3.2.1 Einschalten und Verbinden der SCOUT73-Kamera ................ 12
3.2.2 Herunterladen der Anwendung „Hubble for Motorola Monitors“ ...12
3.2.3 Ausführen der App „Hubble for Motorola Monitors“ auf
einem Android™-Gerät ........................................................... 13
3.2.4 Hinzufügen der SCOUT73-Kamera zu Ihrem Konto ............... 14
3.3 Einrichtung eines Benutzerkontos und der Kamera
Verwendung mit iPhone®/iPad®............................................................. 18
3.3.1 Einschalten und Verbinden der SCOUT73-Kamera ................ 18
3.3.2 Herunterladen der App „Hubble for Motorola Monitors“ ....... 18
3.3.3 Ausführen von „Hubble for Motorola Monitors“ auf Ihrem
iPhone®/iPad® ..........................................................................19
4. Kamera.....................................................................................................25
5. Zurücksetzen der Kamera.......................................................................42
6. Fehlersuche & -beseitigung ....................................................................43
7. Allgemeine Informationen ......................................................................51
8. Technische Daten.................................................................................... 57
4 Inhaltsverzeichnis
3.3.4 Hinzufügen der SCOUT73-Kamera zu Ihrem Konto ............... 20
4.1 Installieren und Einrichten der Kamera....................................................25
4.2 Kamerafunktionen:
Betrieb mit Android™-Geräten ............................................................... 26
4.2.1 Hinzufügen weiterer Kameras .................................................. 26
4.2.2 Entfernen einer Kamera ........................................................... 27
4.2.3 Ändern Ihrer Kontoinformationen ............................................28
4.2.4 Kameraeinstellungen ................................................................ 29
4.2.5 Allgemeine Einstellung ............................................................. 30
4.2.6 Funktionen der Anwendung „Hubble for Motorola Monitors“ ... 31
4.3 Kamerafunktionen:
Betrieb mit iPhone®/iPad®....................................................................... 34
4.3.1 Hinzufügen weiterer Kameras .................................................. 34
4.3.2 Entfernen einer Kamera ........................................................... 35
4.3.3 Ändern Ihrer Kontoinformationen ............................................36
4.3.4 Kameraeinstellungen ................................................................ 37
4.3.5 Allgemeine Einstellungen ........................................................ 37
4.3.6 „Hubble for Motorola Monitors“-Einstellungen ....................... 39
4.3.7 Funktionen der Anwendung „Hubble for Motorola Monitors“ ... 40
4.4 Kamerafunktionen:
Betrieb mit PC/Notebook......................................................................... 41
Page 59

1. Sicherheitshinweise
WARNUNG:
STRANGULIERUNGSGEFAHR – Falls dieses Gerät zur Überwachung von
Kleinkindern oder Kindern verwendet wird, müs sen sich das Gerät und das
Adapterkabel mindestens 1 Meter vom Bett entfernt und außerhalb der
Reichweite des Kindes befinden. Legen Sie die Kamera oder das Kabel nie
in oder in die Nähe des Bettes. Befestigen Sie das Kabel immer außerhalb
der Reichweite des Kindes. Verwenden Sie keine Verlängerungskabel mit
Netzteilen. Verwenden Sie nur das mitgelieferte Netzteil.
Wie bei jedem elektrischen Gerät sollte eine Überwachung der Nutzung
durch das Tier erfolgen, bis sich Ihr Tier an das Produkt gewöhnt hat. Wenn
die Gefahr des Anknabberns durch Ihr Tier besteht, sollten Sie dieses und
alle anderen elektrischen Geräte außerhalb seiner Reichweite aufstellen.
EINRICHTUNG UND VERWENDUNG DER Wi-Fi®KAMERA
● Legen Sie einen Ort für die Wi-Fi®-Kamera fest, der den besten Blick
auf Ihr Haustier bietet (oder auf das, was Sie sonst beobachten
möchten).
●
Stellen Sie die Wi-Fi®-Kamera auf eine ebene Fläche, z. B. auf eine
Komm ode ,
mithilfe der Schlüssellochschlitze in der Kamerabasis an einer Wand.
● Legen Sie die Wi-Fi®-Kamera oder die Kabel NIE in das Bett.
einen Schreibtisch oder ein Regal oder montieren Sie sie
DEUTSCH
Sicherheitshinweise 5
Page 60

ACHTUNG!
Die Wi-Fi®-Kamera erfüllt alle relevante Normen in Bezug auf
elektromagnetische Felder und ihr Gebrauch ist bei Handhabung wie in der
Bedienungsanleitung beschrieben sicher. Daher sollten Sie vor Verwendung
des Geräts immer die Bedienungsanleitung sorgfältig durchlesen.
• Aufgrund der kleinen Teile muss das Gerät von einem Erwachsenen
zusammengebaut werden. Halten Sie alle kleinen Teile von Kindern fern.
• Dieses Produkt ist kein Spielzeug. Lassen Sie Kinder nicht mit ihm spielen.
• Die Wi-Fi®-Kamera ist kein Ersatz für die Überwachung durch einen
verantwortlichen Erwachsenen.
• Bewahren Sie diese Bedienungsanleitung zum späteren Nachschlagen auf.
• Legen Sie die Wi-Fi®-Kamera oder Kabel nicht in das Bett und oder in die
Reichweite des Babys (das Gerät und die Kabel sollten sich mindestens 1 m
entfernt befinden).
• Verlegen Sie die Kabel außerhalb der Reichweite von Kindern.
• Decken Sie die Wi-Fi®-Kamera nicht mit einem Handtuch oder einer Decke ab.
• Testen Sie die Wi-Fi®-Kamera und alle ihre Funktionen, damit Sie vor dem
Gebrauch damit vertraut sind.
®
• Verwenden Sie die Wi-Fi
• Installieren Sie die Wi-Fi
-Kamera nicht in der Nähe von Wasser.
®
-Kamera nicht in der Nähe einer Wärmequelle.
• Verwenden Sie nur das mitgelieferte Netzteil. Verwenden Sie keine anderen
Netzteile, da dadurch das Gerät beschädigt werden kann.
• Verwenden Sie keine Verlängerungskabel mit Netzteilen.
• Berühren Sie die Steckerkontakte nicht mit spitzen oder metallenen
Gegenständen.
Wichtige Anweisungen:
• Lesen Sie die Anleitungen durch und befolgen Sie sie – Bitte lesen Sie alle
Sicherheits- und Bedienungsanleitungen durch, bevor Sie das Produkt
betreiben. Befolgen Sie alle Bedienungsanleitungen.
•
Bewahren Sie die Anleitungen auf
sollten zum späteren Nachschlagen aufbewahrt werden.
– Die Sicherheits- und Bedienungsanleitungen
6 Sicherheitshinweise
Page 61

• Beachten Sie die Warnhinweise – Befolgen Sie alle Warnhinweise auf dem
Produkt und in der Bedienungsanleitung.
• Pola risi erun g – Machen Sie den Sicherheitsmechanismus des gepolten oder
geerdeten Steckers nicht zunichte. Ein gepolter Stecker hat zwei Stifte,
wobei einer davon breiter ist. Ein geerdeter Stecker hat zwei Stifte und einen
dritten Erdungsstift. Der breite bzw. der dritte Stift dienen Ihrer Sicherheit.
Wenn der mitgelieferte Stecker nicht in Ihre Steckdose passt, wenden Sie
sich an einen Elektriker, um die veraltete Steckdose auszutauschen.
• Stromquellen – Dieses Produkt sollte nur mit den auf dem Markierungsschild
genannten Stromquellen betrieben werden. Wenn Sie nicht sicher sind,
welche Stromversorgung an Ihrem Standort vorhanden ist, wenden Sie sich
an Ihren Händler oder Ihr Stromversorgungsunternehmen vor Ort. Bei
Produkten, die mit Batterien oder anderen Stromquellen betrieben werden
können, beachten Sie bitte die Bedienungsanleitung.
• Überlastung – Überlasten Sie die Netzsteckdose oder Verlängerungskabel
nicht, da dies zu einem Brand oder Stromschlag führen kann. Überlastete
Netzsteckdosen, Verlängerungskabel, ausgefranste Netzkabel, beschädigte
oder gerissene Leiterisolierung und gebrochene Stecker sind gefährlich. Sie
können zu einem Stromschlag oder einer Feuergefahr führen. Untersuchen
Sie regelmäßig das Kabel und lassen Sie es von einem Techniker des
Kundendiensts ersetzen, wenn es beschädigt erscheint oder die Isolierung
nicht mehr in Ordnung ist.
•
Netzkabelschutz
– Das Netzkabel sollte so verlegt werden, dass niemand
darauf tritt und es nicht von Gegenständen eingequetscht wird, die darauf
gestellt oder dagegen gelehnt werden. Achten Sie insbesondere auf Kabel an
Steckern, Steckdosen und die Stelle, an der das Kabel aus dem Produkt kommt.
• Überspannungsschutz – Die Kamera sollte an einen Überspannungsschutz
angeschlossen werden. Dadurch wird das Gerät vor Schäden geschützt, die
durch Stro mspitzen verursacht werden. Der Überspannungsschutz sollte das
UL-Kennzeichen oder das CSA-Zertifizierungskennzeichen tragen.
DEUTSCH
Sicherheitshinweise 7
Page 62

• Unterbrechungsfreie Stromversorgung (USV) – Da dieses Produkt für den
ununterbrochenen Betrieb rund um die Uhr gedacht ist, sollten Sie das
Produkt an eine unterbrechungsfreie Stromversorgung anschließen. Eine
unterbrechungsfreie Stromversorgung hat eine interne Batterie, die dafür
sorgt, dass das Produkt bei einem Stromausfall weiter läuft. Die
unterbrechungsfreie Stromversorgung sollte das UL-Kennzeichen oder die
CSA-Sicherheitszertifizierung tragen. ACHTUNG: Halten Sie die elektrische
Betriebssicherheit aufrecht. Geräte mit Stromkabel oder an dieses Produkt
angeschlossenes Zubehör sollten das UL-Kennzeichen oder die CSASicherheitszertifizierung auf dem Zubehörteil selbst tragen. Es sollte nicht
verändert werden, damit die Sicherheitsfunktionen nicht zerstört werden. Es
hilft dabei, mögliche Schäden durch elektrischen Schlag oder Brand zu
verhindern. Wenden Sie sich im Zweifelsfall an qualifizierte Fachleute.
•
Belüftung
– Schlitze und Öffnungen am Gehäuse dienen der Belüftung und
sollen einen zuverlässigen Betrieb des Produkts sicherstellen und es vor
Überhitzung schützen. Diese Öffnungen dürfen nicht blockiert oder abgedeckt
werden. Die Öffnungen dürfen nicht blockiert werden, indem die Kamera auf
ein Bett, ein Sofa, einen Teppich oder eine ähnliche Oberfläche gestellt wird.
Das Produkt sollte nie in die Nähe oder über ein Heizgerät oder eine andere
Wärmequelle platziert werden. Dieses Produkt sollte nicht eingebaut werden,
z.B. in ein Bücherregal oder ein Gestell, es sei denn, die richtige Belüftung ist
sichergestellt oder die Herstelleranweisungen wurden befolgt.
• Zusatzgeräte – Verwenden Sie keine Zusatzgeräte, die nicht vom Hersteller
des Produkts empfohlen werden, da sie Gefahren bergen könnten.
• Wär me – Das Produkt darf nicht in der Nähe von Wärmequellen wie
Radiatoren, Öfen und anderen Geräten (einschl. Verstärkern), die Wärme
entwickeln, aufgestellt werden.
• Zubeh ör – Stellen Sie diese Kamera nicht auf instabile Handwagen, Ständer,
Stative oder Tische. Die Kamera kann herunterfallen und stark beschädigt
werden. Verwenden Sie dieses Produkt nur mit einem Wagen, einem Ständer,
einem Dreifuß, einer Halterung oder einem Tisch, die/der vom Hersteller
empfohlen oder mit dem Produkt verkauft wird. Beachten Sie bei d er Montage
des Produkts die Anweisungen des Herstellers und verwenden Sie vom
Hersteller empfohlenes Zubehör.
8 Sicherheitshinweise
Page 63

• Kameraverlängerungskabel – Prüfen Sie vor Installation die Nennleistung
Ihres Verlängerungskabels, um die Eignung sicherzustellen.
• Montage – Die mit diesem System mitgelieferten Kameras sollten nur wie in
dieser Anleitung oder in den Anleitungen, die mit den Kameras mitgeliefert
wurden, angegeben und unter Verwendung der mitgelieferten
Montagehalterungen montiert werden.
• Kamerainstallation – Die Kameras sind nicht in das Eintauchen in Wasser
gedacht. Nicht alle Kameras können im Freien installiert werden. Prüfen Sie
die Schutzklasse der Kamera, um zu erkennen, ob sie im Freien installiert
werden kann. Wenn Kameras im Freien installiert werden, ist eine Installation
in einem geschützten Bereich erforderlich.
DEUTSCH
Sicherheitshinweise 9
Page 64

2. Systemanforderungen
Webportal
• Windows® 7
• Mac OS® 10.7
• Chrome™ 24
• Internet Explorer
• Safari® 6
• Java™ 7
• Firefox
• Adobe® Flash® Player 15.0
®
Android™-System
• Version 4.2 oder höher
iPhone®/iPad® iOS
• Version 7.0 oder höher
18.0
®
9
10 Systemanforderungen
Page 65

3. Erste Schritte – Anschließen der Geräte
SCOUT73
Kamera
Wi-Fi
®
Routers
Hubble
Service
Lokaler Zugriff auf
die Kamera
Remote-Anzeige der Kamera
auf jedem kompatiblen Gerät
Wie funktioniert es?
Wenn ein Benutzer versucht, auf die Kamera zuzugreifen, authentifiziert unser
sicherer Server die Identität des Benutzers und erlaubt den Zugriff auf die Kamera.
3.1 Einrichtung
Schließen Sie die Kamera an das Netzteil und dann an eine geeignete
Netzsteckdose an. Vergewissern Sie sich, dass der Netzschalter eingeschaltet ist.
Die Kamera muss sich innerhalb der Reichweite des Wi-Fi
dem Sie sie verbinden möchten. Achten Sie darauf, dass Sie das Passwort des
Routers während des Einrichtungsvorgangs in der App zur Hand haben.
Status der LED-Anzeige:
- Abstimm-/Setup-Zustand: LED ist grün und blinkt schnell
- Nicht verbundener Zustand: LED ist grün und blinkt langsam
- Verbundener Zustand: LED ist grün und leuchtet
- Verbindungsbereitschaftszustand: LED ist grün und blinkt langsam
Hinweis:
Sie können das Gerät nur über ein kompatibles Smartphone oder Tablet
und nicht über einen PC einrichten.
®
-Routers befinden, mit
DEUTSCH
Erste Schritte – Anschließen der Geräte 11
Page 66

3.2 Einrichtung eines Benutzerkontos und der Kamera auf
Android™-Geräten
Das benötigen Sie
• SCOUT73-Kamera
• Netzteil der SCOUT73-Kamera
• Gerät mit Android™-System Version 4.2 oder höher
3.2.1 Einschalten und Verbinden der SCOUT73-Kamera
• Schließen Sie das SCOUT73-Netzteil an eine geeignete Netzsteckdose an
und stecken Sie den Stecker des Netzteils in die Stromanschlussbuchse.
• Die grüne LED der Kamera blinkt, wenn die Kamera das Booten
abgeschlossen hat.
3.2.2 Herunterladen der Anwendung „Hubble for Motorola
Monitors“
• Gehen Sie zum Google Play™ Store, um nach der Anwendung „Hubble for
Motorola Monitors“ zu suchen.
• Laden Sie die Anwendung „Hubble for Motorola Monitors“ vom Google
Play™ Store herunter und installieren Sie sie auf Ihrem Android™-Gerät.
DEUTSCH
Android™
12 Erste Schritte – Anschließen der Geräte
Page 67

3.2.3 Ausführen der App „Hubble for Motorola Monitors“ auf
A1
einem Android™-Gerät
• Stellen Sie sicher, dass Ihr Android™-Gerät mit Ihrem Wi-Fi®-Router
verbunden ist.
• Führen Sie die Anwendung „Hubble for Motorola Monitors“ aus und geben
Sie Ihre „Hubble for Motorola Monitors“-Kontoinformationen ein, wählen Sie
„I agree to the Terms of Use“ (Ich bin mit den Nutzungsbedingungen
einverstanden), bevor Sie auf Create tippen. (Bild A1)
Hinweis: Wenn Sie ein „Hubble for Motorola Monitors“-Konto haben, wählen
Sie bitte Already have a Account?, um zu den nächsten Schritten zu gehen.
DEUTSCH
Android™
Erste Schritte – Anschließen der Geräte 13
Page 68

3.2.4 Hinzufügen der SCOUT73-Kamera zu Ihrem Konto
A2 A3
A4
• Neues Konto erstellt und direkte Anmeldung.
• Tippen Sie auf Add Camera. (Bild A2)
• Tippen Sie auf Continue. (Bild A3)
• Auf dem Bildschirm werden die Setup-Anweisungen angezeigt. (Bild A4)
14 Erste Schritte – Anschließen der Geräte
Page 69

• Halten Sie die
A5 A6
A7 A8
gedrückt und die Anzeige blinkt schnell. Tippen Sie dann auf
PAI R
-Taste an der Seite der SCOUT73-Kamera 3 Sekunden lang
Search for Camera
• Die App sucht automatisch und verbindet Ihre Kamera wie unten dargestellt.
(A5 & A6)
• Wählen Sie Ihr Wi-Fi®-Netzwerk und tippen Sie auf Continue, geben Sie Ihre
Passwort ein und tippen Sie dann auf Connect. (Bild A7, A8)
.
DEUTSCH
Android™
Erste Schritte – Anschließen der Geräte 15
Page 70

• Das Verbinden der Kamera mit dem Wi-Fi®-Netzwerk dauert einige Minuten
A9 A10
und dann wird das Verbindungsergebnis angezeigt (Bild A9, A10). Falls die
Verbindung fehlgeschlagen ist, tippen Sie auf die Taste Retry und
wiederholen Sie die Schritte ab 3.2.4.
16 Erste Schritte – Anschließen der Geräte
Page 71

• Tippen Sie auf Watch Live Camera, um das Kamerabild anzuzeigen und die
A11 A12
LED-Anzeige leuchtet. (Bild A11)
• Tippen Sie auf das Hubble-Logo, um zur Kameraliste zurückzugehen. (Bild A12)
DEUTSCH
Android™
Erste Schritte – Anschließen der Geräte 17
Page 72

3.3 Einrichtung eines Benutzerkontos und der Kamera
Verwendung mit iPhone®/iPad
Das benötigen Sie
• SCOUT73-Kamera
• Netzteil der SCOUT73-Kamera
• iPhone
3.3.1 Einschalten und Verbinden der SCOUT73-Kamera
• Schließen Sie das SCOUT73-Netzteil an eine geeignete Netzsteckdose an
• Die grüne LED der Kamera blinkt, wenn das Booten der Kamera beendet ist.
3.3.2 Herunterladen der App „Hubble for Motorola Monitors“
• Gehen Sie zum App Store, um „Hubble for Motorola Monitors“ zu suchen.
• Laden Sie die App „Hubble for Motorola Monitors“ herunter und installieren
®
/ iPad® mit iOS 7.0 Version oder höher
und stecken Sie den Stecker in die Stromanschlussbuchse.
Dies bedeutet, die Kamera ist für das Einrichten bereit.
Sie sie auf Ihren iPhone®/iPad®.
®
18 Erste Schritte – Anschließen der Geräte
Page 73

3.3.3 Ausführen von „Hubble for Motorola Monitors“ auf Ihrem
i1
iPhone®/iPad
®
• Stellen Sie sicher, dass Ihr iPhone®/iPad® mit Ihrem Wi-Fi®-Router
verbunden ist.
• Führen Sie die Anwendung „Hubble for Motorola Monitors“ aus und geben
Sie Ihre „Hubble for Motorola Monitors-Kontoinformationen ein. Lesen Sie
die Nutzungsbedingungen durch und wählen Sie „I agree to the Terms of
Service“ (Ich bin mit den Nutzungsbedingungen einverstanden), bevor Sie
auf Create tippen. (Bild i1)
Hinweis: Wenn Sie ein „Hubble for Motorola Monitors“-Konto haben, wählen
Sie bitte Already have a Account?, um zu den nächsten Schritten zu gehen.
DEUTSCH
iOS
Erste Schritte – Anschließen der Geräte 19
Page 74

3.3.4 Hinzufügen der SCOUT73-Kamera zu Ihrem Konto
i2 i3
SCOUT73
Blink83 / Scout83 /
MBP36HD
i4
• Neues Konto erstellt und direkte Anmeldung.
• Tippen Sie auf Add Camera. (Bild i2)
• Tippen Sie auf „SCOUT73“. (Bild i3)
• Befolgen Sie die Anweisungen auf dem Bildschirm, um die Bluetooth™Funktion auf Ihrem iPhone
20 Erste Schritte – Anschließen der Geräte
®
/iPad® einzuschalten.
Page 75

• Tippen Sie auf die Home-Taste und rufen Sie das Menü „Settings“ auf, um die
i5 i6
i7
Bluetooth™-Funktion auf Ihrem iPhone®/iPad® einzuschalten.
• Drücken Sie die HOME-Taste, um das Menü „Einstellungen“ zu beenden,
und tippen Sie auf die App „Hubble Home“, um den Startbildschirm
aufzurufen.
DEUTSCH
iOS
Erste Schritte – Anschließen der Geräte 21
Page 76

• Tippen Sie auf Continue und befolgen Sie die unten dargestellten Schritte.
i8 i9
(Bilder i8-i9)
22 Erste Schritte – Anschließen der Geräte
Page 77

• Befolgen Sie die obigen Schritte, um die aktuelle Kamera-ID „CameraHD-
i10
i11 i12
xxxxxxxxxx“ zu finden und tippen Sie dann auf Continue, um sicherzustellen,
dass Ihr iPhone® oder iPad® verbunden ist. (Bild i10)
• Wählen Sie das Wi-Fi®-Netzwerk, tippen Sie auf Continue, geben Sie das
Passwort ein und tippen Sie auf Next. (Bilder i11, i12)
DEUTSCH
iOS
Erste Schritte – Anschließen der Geräte 23
Page 78

• Das Verbinden der Kamera mit Wi-Fi® dauert einige Minuten und dann wird der
i13 i14
i15 i16
Verbindungsstatus wie unten angezeigt (Bildi13, i14). Falls die Verbindung
fehlschlägt, tippen Sie bitte auf die Taste
Retr y
und wiederholen Sie 3.3.4, wie
oben angegeben.
• Drücken Sie Watch Live Camera, um das Kamerabild anzuzeigen. (Bild i15)
• Tippen Sie auf das Hubble-Logo, um zur Kameraliste zurückzugehen. (Bild i16)
24 Erste Schritte – Anschließen der Geräte
Page 79

4. Kamera
• Markieren Sie die Position der Schraubenlöcher an
der Wand.
• Bohren Sie 4 Löcher und schlagen Sie die
Trockenwanddübel (mitgeliefert) bei Bedarf in das
Loch.
• Befestigen Sie die Montageplatte
mit den 4 Kreuzschlitzschrauben
(mitgeliefert) an der Wand.
• Platzieren Sie die 4 Montageschlitze des
Kamerasockels an den 4 Einrastungen an
der Montageplatte.
• Achten Sie darauf, dass das Gerät fest auf
der Montageplatte sitzt und die mittleren
Löcher der 2 Teile aneinander ausgerichtet
sind.
• Befestigen Sie das Gerät mit den
Sicherheitsschrauben im mittleren
Loch der Montageplatte. Verwenden
Sie dazu den mitgelieferten
Schraubenschlüssel.
4.1 Installieren und Einrichten der Kamera
A. Befestigung der Montageplatte an der Wand
B. Aufhängen der Kamera an der Montageplatte
DEUTSCH
iOS
C. Befestigen der Kamera
Kamera 25
Page 80

D. Anschließen der Kamera an die Stromversorgung
• Schließen Sie den runden Stecker der Kamera an den Stecker des
Y-förmigen Strom-/LAN-Kabels an.
• Schließen Sie den Stecker des Netzteils an die Strombuchse und
den anderen Stecker des Netzteils an eine geeignete
Netzsteckdose an. (Über die LAN-Buchse ist nötigenfalls der
Anschluss über ein LAN-Kabel möglich.)
• Die LED-Anzeige leuchtet.
Strom-/LAN-Kabelanschluss
Runder Kamerastecker
LAN-Buchse für den Anschluss
des LAN-Kabels (falls nötig)
Strombuchse für das Anschließen
des Netzteils
4.2 Kamerafunktionen:
Betrieb mit Android™-Geräten
• Führen Sie die App „Hubble for Motorola Monitors“ auf Ihrem Android™-
Gerät aus.
• Die Kameraansicht wird auf dem Bildschirm angezeigt.
4.2.1 Hinzufügen weiterer Kameras
• Tippen Sie in der Kameraansicht auf das Hubble-Logo, um zur Seite
zu gelangen. (Bild A13)
• Tippen Sie auf Add Camera, um eine weitere Kamera hinzufügen und
befolgen Sie dabei die Schritte für die Einrichtung von Android™-Geräten
in Abschnitt 3.2.4. (Bild A14)
Add Camera
• Sobald die Kamera hinzugefügt wurde, wird die Kameraansicht automatisch
angezeigt.
26 Kamera
Page 81

A13 A14
A15 A16
DEUTSCH
4.2.2 Entfernen einer Kamera
Sie können eine Kamera wie folgt von Ihrem Konto entfernen:
• Tippen Sie auf das Einstellungen-Symbol auf der allgemeinen Seite und
tippen Sie dann auf Camera Details. (Bild A15)
• Wählen Sie Remove Camera und tippen Sie auf Yes , um das Gerät aus der
Kameraliste zu entfernen. (Bild A16)
Kamera 27
Android™
Page 82

4.2.3 Ändern Ihrer Kontoinformationen
A17
Sie können die Kontoinformationen mithilfe Ihres Android™-Geräts ändern.
• Tippen Sie auf Account auf der allgemeinen Seite. Die Kontoeinstellungen
werden auf dem Bildschirm angezeigt. (Bild A17)
• Tippen Sie auf Change Password, um Ihr Passwort gemäß der Anleitung zu
ändern.
• Tippen Sie auf Log Out, um das Konto zu verlassen.
• Tippen Sie unter auf Freem ium-Plan und Sie gelangen zum Link des Cloud-
Videoaufzeichnungsdienstes. Weitere Informationen finden Sie auf unserer
Website http://www.hubbleconnected.com.
• Tippen Sie auf Use Remote Only, um die Remote-Verbindungseinstellung
aufzurufen, und bestätigen Sie die Verwendung durch Auswahl von Ye s .
• Bei Enable Disconnect Alert ertönt beim Trennen ein akustisches
Warnsignal. Aktivieren Sie das Warnsignal beim Trennen, indem Sie Ye s
auswählen.
• Tippen Sie auf Send Log, um den Bericht der Android-App „Hubble for
Motorola Monitors“ per E-Mail an unseren Server zu senden, wenn Sie von
einem Kundendienstvertreter dazu aufgefordert werden.
28 Kamera
Page 83

4.2.4 Kameraeinstellungen
A18 A19
A20
Sie können die Kameraeinstellungen ändern, indem Sie auf das EinstellungenSymbol auf der Kameralistenseite tippen. (Bild A18)
• Tippen Sie auf Camera Details, um Camera Name, Change Image &
Firmware version anzuzeigen. (Bild A19)
• Tippen Sie auf Notification Sensitivity, um die Empfindlichkeit der
Bewegungserkennung einzustellen. (Bild A20)
DEUTSCH
Android™
Kamera 29
Page 84

4.2.5 Allgemeine Einstellung
A21 A22
• Tippen Sie auf Settings auf der allgemeinen Seite.
• Tippen Sie auf
umzustellen. (Bild A21)
• Tippen Sie auf Do Not Disturb, stellen Sie den gewünschten Timer ein und
wählen Sie ON. Die Kamera sendet während der eingestellten Zeit keine
Warnungen an Ihr Android™-Gerät (Bild A22).
General Settings
, um das Format für
Clock
(12hr/24hr)
30 Kamera
Page 85

4.2.6 Funktionen der Anwendung „Hubble for Motorola Monitors“
A23
Tippen Sie in der Kameraansicht auf den Anzeigebereich. Folgende
Funktionssymbole werden angezeigt:
Schwenk- und Neigefunktion:
Tippen Sie auf die Nach oben- und Nach unten-Tasten zum Neigen und die Nach
links- und Nach rechts-Tasten zum Schwenken. (Bilder A23)
DEUTSCH
Android™
Kamera 31
Page 86

Photo/Video - Nehmen Sie ein Foto auf oder zeichnen Sie ein Video mit der
A24 A25
A26
Kamera auf.
Tippen Sie auf das Video-Symbol, um die Videofunktion zu aktivieren, und
drücken Sie auf den roten Punkt, um die Aufzeichnung zu starten, und lassen Sie
ihn los, um die Aufzeichnung zu stoppen. (Bilder A24, A25)
Tippen Sie auf das Kamera-Symbol , um zum Kameramodus umzuschalten.
Sie können jetzt Fotos der Kamerasicht aufnehmen. (Bild A26)
32 Kamera
Page 87

Hinweis:
Fotos und Videos werden im internen Flash-Speicher Ihres Geräts gespeichert.
Bei einem Android™-Gerät können Sie über die Galerie oder den Media-Player
darauf zugreifen. Um Videos wiederzugeben, verwenden Sie bitte die App
„Hubble for Motorola Monitors“ oder die Anwendung eines Fremdanbieter, z. B.
MX Player (vom Google Play™ Store), die MJPG-Dateien wiedergeben kann.
DEUTSCH
Android™
Kamera 33
Page 88

4.3 Kamerafunktionen:
i17 i18
Betrieb mit iPhone®/iPad
• Führen Sie die Anwendung „Hubble for Motorola Monitors“ auf Ihrem
• Die Kameraansicht wird auf dem Bildschirm angezeigt.
4.3.1 Hinzufügen weiterer Kameras
• Tippen Sie in der Kameraansicht auf das Motorola-Logo, um zur Seite Add
• Tippen Sie auf Add Camera, um eine weitere Kamera hinzufügen, und
• Sobald die Kamera hinzugefügt wurde, wird die Kameraansicht automatisch
®
iPhone
/iPad® aus.
Camera zu gelangen. (Bild i17)
befolgen Sie dabei die Schritte für die Einrichtung von iPhone®/iPad® in
Abschnitt 3.3.4. (Bild i18)
angezeigt.
®
Hinweis:
Sie können nur 4 Kameras zu einem Konto hinzufügen.
34 Kamera
Page 89

4.3.2 Entfernen einer Kamera
i19 i20
Sie können eine Kamera wie folgt von Ihrem Konto entfernen:
• Tippen Sie auf das Einstellungen-Symbol auf der allgemeinen Seite und
tippen Sie dann auf Camera Details. (Bild i19)
• Wählen Sie Remove Camera und tippen Sie auf Yes , um das Gerät aus der
Kameraliste zu entfernen. (Bild i20)
DEUTSCH
iOS
Kamera 35
Page 90

4.3.3 Ändern Ihrer Kontoinformationen
i21
Sie können die Kontoinformationen mithilfe Ihres iPhone®/iPad® ändern.
• Tippen Sie auf Account auf der allgemeinen Seite. Die Kontoeinstellungen
werden auf dem Bildschirm angezeigt. (Bild i21)
• Tippen Sie auf Change Password, um Ihr Passwort gemäß der Anleitung zu
ändern.
• Tippen Sie auf Log Out, um das Konto zu verlassen.
• Tippen Sie unter auf Current plan-Plan und Sie gelangen zum Link des
Cloud-Videoaufzeichnungsdienstes. Weitere Informationen finden Sie auf
unserer Website www.hubbleconnected.com/motorola/plans.
• Tippen Sie auf Send app log um den Bericht der App „Hubble for Motorola
Monitors“ per E-Mail an unseren Server zu senden, wenn Sie von einem
Kundendienstvertreter dazu aufgefordert werden.
36 Kamera
Page 91

4.3.4 Kameraeinstellungen
i22 i23
i24 i25
Sie können die Kameraeinstellungen ändern, indem Sie auf das EinstellungenSymbol auf der allgemeinen Seite tippen (Bild i22). Hier können Sie auch
Camera Name und Firmware version überprüfen (Bild i23) und den
Kameranamen ändern, wenn Sie auf einen vorhandenen Namen tippen und der
Anleitung folgen.
4.3.5 Allgemeine Einstellungen
• Tippen Sie auf Settings auf der allgemeinen Seite. (Bild i24)
• Tippen Sie auf General Settings, um das Format für Clock (12hr/24hr)
umzustellen. (Bild i25)
DEUTSCH
iOS
Kamera 37
Page 92

• Tippen Sie auf Notification Sensitivity, um die Bewegungserkennung
i26 i27
einzustellen. (Bild i26)
• Tippen Sie auf Do Not Disturb, stellen Sie den gewünschten Timer ein und
wählen Sie ON. Die Kamera sendet während der eingestellten Zeit keine
Töne oder Warnungen an Ihr iPhone®/iPad®. (Bild i27)
38 Kamera
Page 93

4.3.6 „Hubble for Motorola Monitors“-Einstellungen
i28
• Tippen Sie auf Settings auf Ihrem iPhone®/iPad® und die Anwendung wird
angezeigt. Tippen Sie auf die App „Hubble for Motorola Monitors“
und die Einstellungen der App „Hubble for Motorola Monitors“ werden
angezeigt. (Bild i28)
DEUTSCH
iOS
Kamera 39
Page 94

4.3.7 Funktionen der Anwendung „Hubble for Motorola Monitors“
i29 i30
Tippen Sie in der Kameraansicht auf den Anzeigebereich. Folgende
Funktionssymbole werden angezeigt:
Schwenk- und Neigefunktion:
Tippen Sie auf die Nach oben- und Nach unten-Tasten zum Neigen und die Nach
links- und Nach rechts-Tasten zum Schwenken. (Bilder i29)
Take P ic tu re - Tippen Sie auf das Kamerasymbol , um Fotos von der
Kameraansicht aufzunehmen. (Bild i30)
Hinweis:
Fotos werden im internen Flash-Speicher Ihres iPhone®/iPad® gespeichert.
40 Kamera
Page 95

4.4 Kamerafunktionen:
Betrieb mit PC/Notebook
• Gehen Sie zur URL: http://www.hubbleconnected.com/motorola/login/
• Geben Sie Ihren Benutzernamen und Ihr Passwort ein und klicken Sie auf
„Login“, wenn Sie bereits ein Konto erstellt haben.
• Klicken Sie über Ihr Android™-Gerät oder iPhone®/iPad® auf die Liste der
abgestimmten Kameras in Ihrem Konto und die Kamera wird angezeigt. Sie
können ganz einfach über Live-Videostreaming mit Ihren Freunden,
bevorzugten Orten oder geliebten Haustieren in Verbindung bleiben.
• Sie können die Einstellungen auf der Website ändern, indem Sie die
Menüanweisungsschritte befolgen.
DEUTSCH
Kamera 41
Page 96

5. Zurücksetzen der Kamera
Hinweis: Wenn Sie mit Ihrer Kamera von einem Router (z. B. zu Hause) zu einem
anderen Router (z. B. im Büro) wechseln möchten oder Probleme beim
Einrichten der Kamera haben, muss die Kamera erneut zurückgesetzt werden.
Bitte setzen Sie die Kamera wie folgt zurück:
1. Trennen Sie das Netzteil.
2. Halten Sie die PAIR-Taste auf der Unterseite der Kamera gedrückt und
schließen Sie dann das Netzteil an die Netzsteckdose an. Die LED-Anzeige
leuchtet.
3. Lassen Sie die Taste PAIR los und warten Sie, bis die Kamera das interne
Zurücksetzen abgeschlossen hat. Die LED-Anzeige erlischt.
4. Sie können Ihre Kamera erneut hinzufügen, indem Sie die Schritte 3.2.4 bei
einem Android Gerät oder 3.3.4 bei einem iOS-Gerät befolgen.
42 Zurücksetzen der Kamera
Page 97

6. Fehlersuche & -beseitigung
Störgeräusche
Um Hintergrundgeräusche oder Echos zu verhindern, stellen Sie sicher, dass
der Abstand zwischen Ihrem Gerät und der Wi-Fi®-Kamera groß genug ist.
Die Verwendung anderer 2,4-GHz-Produkte wie Bluetooth®-Systeme oder
Mikrowellenöfen kann Störungen bei diesem Gerät verursachen. Stellen Sie die
Wi-Fi®-Kamera mindestens 1,5 m von solchen Produkten entfernt auf oder
schalten Sie sie aus, wenn sie Störungen verursachen.
Getrennte Verbindung
Prüfen Sie Ihre Wi-Fi®-Einstellungen. Stellen Sie, falls nötig, die Wi-Fi®Verbindung erneut her. Vergewissern Sie sich, dass die Wi-Fi ®-Kamera
eingeschaltet ist. Warten Sie einige Sekunden, bis Sie die Verbindung zum
®
Wi-Fi
-System herstellen.
Wenn Sie Ihr Passwort vergessen haben
Wenn Sie Ihr Passwort nicht mehr wissen, tippen Sie auf „Forgot password“
und geben Sie Ihre E-Mail-Adresse an. Es wird umgehend ein neues
Passwort an Ihre E-Mail-Adresse gesendet.
Fehlerbehebung
Kategorie Problem-
beschreibung/
Feh le r
Konto Ich kann mich
auch nach der
Registrierung
nicht anmelden.
Konto Ich erhalte
folgende
Fehlermeldung:
„Email ID is not
registered“.
Bitte überprüfen Sie Ihren Benutzernamen
und Ihr Passwort.
Bitte stellen Sie sicher, dass Sie bei uns
registriert sind. Tippen Sie auf Create
Account, um ein Konto zu erstellen, damit
Sie die Wi-Fi
verwenden können.
Lösung
®
-Heimtier-Videokamera
DEUTSCH
Fehlersuche & -beseitigung 43
Page 98

Konto Was kann ich tun,
wenn ich mein
Passwort
vergessen habe?
Konto Ich kann kein
neues Passwort
empfangen,
obwohl ich die
Option „Forgot
password“
verwendet habe.
Verbindungsprobleme
Ich erhalte die
Meldung: „We are
having problems
accessing your
camera. This
could be due to
lack of internet
connection.
Please wait and try
again later.“
Klicken Sie auf der Link „Forgot Password“
auf der Website http://
www.hubbleconnected.com/motorola/
login/ ODER in Ihrer Android™- oder
iOS-Anwendung. Es wird eine E-Mail an
Ihre registrierte E-Mail-Adresse gesendet.
1. Die E-Mail ist möglicherweise in
Ihrem Spamordner gelandet. Bitte
sehen Sie in Ihrem Spamordner nach.
2. Der Empfang der E-Mail kann etwas
dauern. Bitte warten Sie einige
Minuten, bevor Sie Ihre
E-Mails erneut abrufen.
1. Bitte versuchen Sie es in einigen
Minuten erneut. Es könnte ein
Problem mit Ihrer
Internetverbindung vorliegen.
2. Falls das Problem weiterhin besteht,
starten Sie Ihre Kamera erneut, um zu
prüfen, ob dies das Problem behebt.
3. Bitte starten Sie Ihren drahtlosen
Router neu.
44 Fehlersuche & -beseitigung
Page 99

Anzeigen der
®
®
Kamera
Im RemoteModus stoppt das
Video nach 5
Minuten. Wie
kann ich es länger
anzeigen?
Verbindungsprobleme
Meine
Telefonanwendun
g zeigt die
folgende
Meldung an:
„Unable to
connect to BMS
server“.
Einrichten Während ich eine
neue Kamera zu
meinem Konto
hinzufüge, kann
ich keine Kameras
zum Hinzufügen
finden.
Beim Zugriff auf Ihre Kamera über ein
anderes Netzwerk als Ihr Heimnetzwerk
(über das Internet) erfolgt ein Timeout des
Videos nach 5 Minuten.
Sie können in der Android™/iOSAnwendung erneut auf die Kamera
klicken, um das Streamen wieder zu
starten.
Wenn Sie von Ihrem Webbrowser aus
zugreifen, können Sie die Schaltfläche
Reloa d drücken, um die Anzeige Ihres
Kameravideostreams wieder zu starten.
1.
Prüfen Sie die Signalstärke des WiFi -Netzwerks.
2. Prüfen Sie, ob Sie mit dem Internet
verbunden sind, indem Sie den
Telefonbrowser starten und zu einer
Website wie www.google.com
gehen.
3. Versuchen Sie es erneut, wenn Sie
sich erfolgreich mit dem Internet
verbinden konnten.
4. Schließen Sie das LAN-Kabel direkt an
die RJ45-Buchse an und verbinden
Sie sich mit dem Internet, falls das WiFi -Signal nicht gut ist.
Wenn Sie versuchen, eine Kamera
hinzuzufügen, die bereits vorher zu Ihrem
Konto oder einem anderen Konto
hinzugefügt wurde, müssen die Kamera
zuerst zurücksetzen. Halten Sie dazu die
Taste PAIR unten an der Kamera 5
Sekunden lang gedrückt.
DEUTSCH
Fehlersuche & -beseitigung 45
Page 100

Allgemein Welche Browser
®
®
®
®
®
®
werden für den
Zugriff von
meinem PC/
®
Mac
unterstützt?
Allgemein Was bedeutet die
blinkende LED?
Verbindungsprobleme
Ich kann auf
meine Kamera
nicht zugreifen.
Auf einem PC oder Mac empfehlen wir
die Verwendung von Google Chrome.
Die folgenden Browser werden jedoch
ebenfalls unterstützt: PC: Internet Explorer
8 und höher. Mac : Safari.
Eine blinkende LED gibt den folgenden
Status an:
Schnelles Blinken: 1. Ihre Kamera befindet
sich im Setup-Modus. In diesem Modus
können Sie die Kamera zu Ihrem Konto
hinzufügen. Im neuen Zustand befindet si ch
die Kamera im Setup-Modus. Um den
Setup-Modus zurückzusetzen, halten Sie die
PAIR-Taste unten an der Kamera gedrückt,
bis die LED-Anzeige schnell blinkt.
Langsames Blinken: 2. Die Kamera
verbindet sich entweder gerade mit dem
Router oder sie hat die Verbindung zum
Router verloren. Bitte stellen Sie sicher, dass
sich die Kamera innerhalb der Reichweite
des Wi-Fi -Signals befindet.
LED leuchtet:
Die Kamera ist mit dem Wi-
Fi -Netzwerk verbunden.
Bitte prüfen Sie, ob sich die Kamera
innerhalb der Wi-Fi -Reichweite
befindet. Wenn die LED an Ihrer Kamera
langsam blinkt, versuchen Sie, die Kamera
näher zum Router zu stellen, um ein
besseres Wi-Fi -Signal zu erhalten, und
versuchen Sie es erneut.
46 Fehlersuche & -beseitigung
 Loading...