


SCOUT
SCOUT
TETRA network air interface monitoring
and recording software for Windows
Software User Manual
Dept: GEMS / EMEA / S3D
Mail: RNBPE@Motorola.com

SCOUT User Manual
Computer Software Copyrights
The Motorola products described in this manual may include copyrighted Motorola computer programs.
Laws in the United States and other countries preserve for Motorola certain exclusive rights for copyrighted
computer programs. Including the exclusive right to copy or reproduce in any form the copyrighted
computer program.
Accordingly, any copyrighted Motorola computer programs contained in the Motorola products described in
this Instruction manual may not be copied or reproduced in any manner without the express written
permission of Motorola. Furthermore, the purchase of Motorola products shall not be deemed to grant
either directly or by implication, estoppel or otherwise, any license under the copyrights, patents or patent
applications of Motorola, except for the normal nonexclusive, royalty free license to use that arises by
operation of law in the sale of a product.
Copyrights
© 2003, 2004 Motorola GmbH. All rights reserved.
No part of this manual may be reproduced, transmitted, stored in a retrieval system, or translated into any
language or computer language, in any form or by any means, without the prior written permission of
Motorola Inc.
Trademark Information
Motorola, the Motorola Logo and all other trademarks identified as such herein are trademarks of Motorola
Inc. All other product or service names are the property of their respective owners.
Your Input
...is much appreciated. If you have any comments, corrections, suggestions or ideas regarding this
publication or the software , please send an e-mail to RNBPE@Motorola.com.
• Windows is a trademark of Microsoft Corporation.
• Other company and product names are trademarks or registered trademarks of the respective
companies.
• The contents of this document are subject to change without notice.
• The document has been prepared with our utmost effort. However, please contact us if there are
any queries or errors.
• This document may not be copied in part or in entirety without permission.
• We assume no responsibility for any damage or loss or claims from third parties resulting from the
use of Motorola SCOUT.
Revision History
Issue Date Author(s) For SCOUT release
2.0 11.11.2003 U.Heinrich 2.0
2.1 11.10.2004 U.Heinrich 2.1
5.6 1.06.2005 U.Heinrich 5.6.x
5.12 1.12.2005 U.Heinrich 5.12
GEMS/EMEA/S3D Page 2 of 52
Email: RNBPE@Motorola.com

Terms Used
AACH Access Assignment Channel
CMCE Circuit Mode Control Entity
Cx C1 / C2 TETRA Path loss Parameters [dBm]
GGA Global Positioning System Fix Data
GPS Global Positioning System
GSSI Group Short Subscriber Identity
LA Location Area
LAID Location Area Identity (Number)
MCC Mobile Country Code
MCCH Main Control Channel
MER Message Erasure Rate
MLE Mobile Link Entity
MM
MNC Mobile Network Code
NMEA National Marine Electronics Association
NMEA-0183 General Sentence Format
PCMCIA Personal Computer Memory Card International Association
PDU Protocol Data Unit
RMC Recommended minimum specific GPS/Transit data
RSSI Radio Signal Strength Indication
SSI Short Subscriber Identity
STCH Stealing Channel
TCH Traffic Channel
UART Universal Asynchronous Receiver/Transmitter
USB Universal Serial Bus
WGS84 World Geodetic System 1984
Mobility Management
SCOUT User Manual
GEMS/EMEA/S3D Page 3 of 52
Email: RNBPE@Motorola.com

Table of Contents
1 SCOUT software user license agreement...................................................8
2 Introduction.................................................................................................11
3 How to read this manual.............................................................................11
4 Overview......................................................................................................11
5 Features.......................................................................................................12
5.1 New features, fixes and enhancements in current SCOUT release.............13
6 System requirements..................................................................................14
6.1.1 Computer..........................................................................................14
6.1.2 Radio................................................................................................14
6.1.3 GPS..................................................................................................14
6.1.4 Software...........................................................................................14
6.1.5 Test system......................................................................................15
7 Installation...................................................................................................15
8 Updates........................................................................................................16
SCOUT User Manual
9 Radio configuration for recording.............................................................16
10 Radios internal GPS....................................................................................17
11 Functionality................................................................................................17
12 Database files..............................................................................................18
12.1 Alias database...............................................................................................18
12.2 Locations database.......................................................................................19
13 PDUs supported by SCOUT.......................................................................20
14 Main application window............................................................................21
15 Control and status bar................................................................................22
16 The menu bar...............................................................................................23
16.1 File.................................................................................................................23
16.1.1 Record (Ctrl-R).................................................................................23
16.1.2 Quick record (Ctrl-Q)........................................................................23
16.1.3 Monitoring (Ctrl-M)...........................................................................23
16.1.4 Play (Ctrl-P).....................................................................................23
16.1.5 Play again (Ctrl-A)...........................................................................23
16.1.6 Play files in order (Ctrl-O)................................................................23
16.1.7 Pause...............................................................................................23
16.1.8 Stop (Ctrl-S).....................................................................................23
16.1.9 Save file part from start to log file position as…...............................23
16.1.10 Save file part from log file position to end as …...............................23
16.1.11 Load configuration............................................................................23
16.1.12 Save configuration...........................................................................24
16.1.13 Create default configuration file.......................................................24
16.1.14 File info.............................................................................................24
16.1.15 Print active window..........................................................................24
GEMS/EMEA/S3D Page 4 of 52
Email: RNBPE@Motorola.com

SCOUT User Manual
16.1.16 Exit...................................................................................................24
16.1.17 Last files played...............................................................................24
16.2 Configuration.................................................................................................25
16.2.1 Log options.......................................................................................25
16.2.2 Database files and keys...................................................................26
16.2.3 Display options.................................................................................27
16.2.4 PDU selection..................................................................................27
16.2.5 Radio and GPS settings...................................................................28
16.2.6 Geodetic information........................................................................28
16.2.7 Voice settings 1................................................................................29
16.2.8 Voice settings 2................................................................................29
16.2.9 Update..............................................................................................30
16.3 Tools..............................................................................................................31
16.3.1 Data export.......................................................................................31
16.3.2 Database editor................................................................................33
16.3.3 Database import...............................................................................33
16.3.4 Cell reselection simulator.................................................................34
16.3.5 Group call generator........................................................................36
16.4 View...............................................................................................................37
16.5 Map...............................................................................................................37
16.5.1 Standard...........................................................................................37
16.5.2 Navigation........................................................................................37
16.5.3 Drawing............................................................................................37
16.5.4 Location and scale...........................................................................37
16.5.5 Import data file.................................................................................37
16.5.6 Load MapPoint map.........................................................................37
16.5.7 Save MapPoint map.........................................................................37
16.5.8 Copy map to clipboard.....................................................................38
16.5.9 Print map..........................................................................................38
16.5.10 Zoom in, Zoom out, Last view..........................................................38
16.5.11 Status bar.........................................................................................38
16.6 Configure map...............................................................................................38
16.6.1 Plot settings......................................................................................38
16.6.2 Load base stations(s).......................................................................39
16.6.3 Delete base station(s)......................................................................39
16.6.4 Find base station..............................................................................39
16.6.5 Point and click base station add......................................................39
16.6.6 Delete trace......................................................................................39
16.6.7 Delete hand over markers................................................................39
16.6.8 Delete link failure markers................................................................39
16.6.9 Delete trace and markers.................................................................39
16.6.10 Show base station labels.................................................................39
16.6.11 Save the base station notes.............................................................39
16.7 Help...............................................................................................................39
16.7.1 Help..................................................................................................39
16.7.2 Report a problem.............................................................................39
16.7.3 Ask for support.................................................................................39
GEMS/EMEA/S3D Page 5 of 52
Email: RNBPE@Motorola.com

SCOUT User Manual
16.7.4 Look for new version........................................................................40
16.7.5 SCOUT internet page.......................................................................40
16.7.6 About................................................................................................40
17 Application sub windows...........................................................................40
17.1 Serving cell....................................................................................................40
17.2 Radio status..................................................................................................41
17.3 PDU decode..................................................................................................42
17.4 Find PDU.......................................................................................................42
17.5 Adjacent sites................................................................................................43
17.6 RSSI / Cx Graph...........................................................................................44
17.7 Access assignment channel (AACH)............................................................45
17.8 Easy GPS......................................................................................................45
17.9 VoiceNotes (Ctrl-V).......................................................................................46
17.9.1 SCOUT in RECORD mode..............................................................46
17.9.2 SCOUT in PLAY mode.....................................................................46
17.9.3 SCOUT in STOP mode....................................................................46
17.10 Levelbars (Ctrl-L)..........................................................................................47
17.11 New file buttons (Ctrl-N)................................................................................47
17.12 GPS events monitor (Ctrl-E).........................................................................48
17.13 Radio info (Ctrl-I)...........................................................................................48
17.14 Microsoft MapPoint (F12)..............................................................................49
17.15 Map plot settings...........................................................................................50
18 Quick start guide.........................................................................................51
18.1 Recording......................................................................................................51
18.2 Monitoring......................................................................................................52
18.3 Playing...........................................................................................................52
18.3.1 Play..................................................................................................52
18.3.2 Play again.........................................................................................52
18.3.3 Play files in order..............................................................................52
19 Help...............................................................................................................52
GEMS/EMEA/S3D Page 6 of 52
Email: RNBPE@Motorola.com

SCOUT User Manual
List of Figures
Figure 1: Sample configuration of a SCOUT measurement system 15
Figure 2: Example of alias database 18
Figure 3: Example of location area database 19
Figure 4: Title bar, menu bar, control and status bar 21
Figure 5: Main application window 21
Figure 6: Control and status bar buttons 22
Figure 7: Control and status bar indicators and control 22
Figure 8: Log options 25
Figure 9: Database files and keys 26
Figure 10: Display options 27
Figure 11: PDU selection 27
Figure 12: Radio and GPS settings 28
Figure 13: Geodetic information 28
Figure 14: Voice settings 1 29
Figure 15: Voice settings 2 29
Figure 16: Update 30
Figure 17: Data export 31
Figure 18: Database micro editor 33
Figure 19: Database import 33
Figure 20: Cell reselection simulator 34
Figure 21: Service level 35
Figure 22: Group call generator 36
Figure 23: Serving cell data 40
Figure 24: Radio status 41
Figure 25: PDU decode 42
Figure 26: Find PDU 42
Figure 27: Adjacent sites data 43
Figure 28: Extended adjacent sites data 43
Figure 29: RSSI graph 44
Figure 30: Cx graph 44
Figure 32: Easy GPS 45
Figure 33: VoiceNotes 46
Figure 34: Level bars 47
Figure 36: GPS events monitor 48
Figure 37: Radio info 48
Figure 38: Main window with MapPoint 49
Figure 39: Map window showing MER and reselection marker 49
Figure 40: Map plot settings 50
GEMS/EMEA/S3D Page 7 of 52
Email: RNBPE@Motorola.com

SCOUT User Manual
1 SCOUT software user license agreement
SOFTWARE LICENSE AGREEMENT
This is a legal agreement between you (being a sole trader, partnership, company or other organization)
and Motorola, Inc. and/or the Motorola affiliate named on the invoice (“Motorola”). It concerns your rights to
use the SCOUT Software Version 1.0 or later version and any accompanying written materials (the
“Software”). In consideration for Motorola allowing you to access the Software, you are agreeing to be
bound by the terms of this Agreement. If you do not agree to all of the terms of this Agreement, do not run,
download or install the Software. If you change your mind later, stop using the Software and delete all
copies of the Software in your possession or control. Any copies of the Software that you have already
distributed, where permitted, and do not destroy will continue to be governed by this Agreement. Your prior
use of the Software will also continue to be governed by this Agreement.
USE OF SOFTWARE PRODUCT: The Software has been designed for use in conjunction with the
following Motorola terminals: MTH500, MTH650, MTP700/MTM700, MTP750, MTH800. However, Motorola
GmbH does not guarantee or warrant the availability or functionality of the Software within current or future
releases of the radio terminals. You are advised that use of the Software may result in a degradation
of performance in the terminals. Notwithstanding the foregoing, you have relied upon your own skill,
expertise and judgement in deciding to acquire the Software.
0 Microsoft MapPoint
TM
SOFTWARE: Prior to the use the mapping functionality of the Software,
you must obtain a User License for the Microsoft MapPoint™ software. You are solely responsible
for acquiring the requisite number of MapPoint™ User Licenses from Microsoft Corporation and the
payment of any User License Fee in respect thereof.
1 LICENSE GRANT. Motorola grants to you, the non-exclusive, non-transferable right (1) to use the
Software and (2) to reproduce the Software, in the number of copies and/ or on the number of
machines for which you have paid the License Fee. The Software is provided to you only in object
(machine-readable) form. You may not distribute or sub-license the Software to others. You may
exercise the rights above only with respect to such object form. You may not translate, reverse
engineer, decompile, or disassemble the Software except to the extent applicable law specifically
prohibits such restriction.
2 LICENSE FEE. Motorola will invoice you for the Software at the License Fee as specifically agreed
with you in writing, or failing any written agreement with you, in accordance with Motorola’s then
current standard rates with delivery of the Software. Where applicable, value added tax and/ or
any other sales taxes, customs duties or levies will be paid additionally by the Licensee at the then
prevailing rate. Upon Motorola’s request, Licensee shall provide Motorola with a certificate of
compliance verifying that Licensee’s use of the Software is in compliance with the terms and
conditions of this Agreement. Motorola may, at its expense, during regular business hours and in a
manner that will not unreasonably interfere with Licensee’s business activities, conduct an audit to
verify that Licensee’s use of the Software complies with the terms and conditions of this
Agreement. If the audit reveals an underpayment of any license, maintenance or support fees,
Licensee shall promptly pay all amounts owing as well as a reasonable fee for the audit.
3 COPYRIGHT. The Software is licensed to you, not sold. Motorola owns the Software, and United
States and German copyright laws and international treaty provisions protect the Software. You
may not use or copy the Software for any other purpose than what is described in this Agreement.
Except as expressly provided herein, Motorola does not grant to you any express or implied rights
under any Motorola or third party patents, copyrights, trademarks, or trade secrets. Additionally,
you must reproduce and apply any copyright or other proprietary rights notices included on or
embedded in the Software to any copies or derivative works made thereof, in whole or in part, if
any.
GEMS/EMEA/S3D Page 8 of 52
Email: RNBPE@Motorola.com

SCOUT User Manual
4 SUPPORT. Motorola shall provide standard technical support for the Software as appropriate in
Motorola’s reasonable business discretion, which may be automated and/ or provided by technical
support personnel by telephone during Motorola’s normal business hours. Motorola shall make
reasonable efforts to address reproducible, material errors in the Software and issue interim
maintenance releases to address the same, all in the reasonable business judgement of Motorola.
Motorola shall inform Licensee from time to time of any new releases of the Software, as opposed
to interim maintenance releases, and shall offer to license such new releases to Licensee upon the
terms on which they are generally made available to Motorola’s customers by Motorola. All new
releases and maintenance releases delivered to the Licensee shall become part of the Software.
Motorola shall have no obligation to maintain or support any version of the Software that is more
than twelve (12) months old from the day of purchase unless Licensee has executed a
maintenance and support agreement with Motorola and paid applicable fees in connection with
ongoing maintenance of such Software.
5 TERM AND TERMINATION. This Agreement will continue until terminated. You may terminate it
at any time by deleting the Software together with all copies in any form. This Agreement will also
terminate automatically if you fail to comply with any term of this Agreement. The Agreement will
also terminate without further action or notice by Motorola if you become bankrupt go into
liquidation, suffer or make any winding up petition, make an arrangement with your creditors, have
an administrative receiver or receiver appointed or suffer or file any similar action in consequence
of a debt. Upon termination for any reason must stop using the Software and delete all copies of
the Software in your possession or control. Any copies of the Software that you have already
distributed, where permitted, and do not destroy will continue to be governed by this Agreement.
Your prior use of the Software will also continue to be governed by this Agreement.
6 LIMITED WARRANTY. Motorola warrants that the Software will function substantially in
accordance with its associated documentation delivered therewith for the period of sixty (60) days
from the date of delivery. If within such warranty period you notify Motorola in writing that the
Software does not perform in the manner specified, Motorola may, at its option and as your
exclusive remedy, repair or replace the Software or failing this, reimburse the license fee
associated with such Software and terminate this Agreement. This warranty does not apply to
Software that has been subjected to improper testing, assembly, mishandling, modification, repair
or misuse, whether by you or by others. MOTOROLA DOES NOT WARRANT THAT THE
FUNCTIONS CONTAINED IN THE SOFTWARE WILL MEET YOUR REQUIREMENTS OR THAT
THE OPERATION OF THE SOFTWARE WILL BE UNINTERRUPTED OR ERROR FREE. THE
WARRANTIES IN THIS CLAUSE ARE IN PLACE OF AND EXCLUDE ALL OTHER
WARRANTIES, TERMS AND CONDITIONS, WHETHER EXPRESS, IMPLIED OR STATUTORY.
IMPLIED TERMS OF FITNESS AND QUALITY SHALL NOT APPLY. YOU ASSUME THE
ENTIRE RISK ARISING OUT OF THE USE OR PERFORMANCE OF THE SOFTWARE, OR ANY
SYSTEMS YOU DESIGN USING THE SOFTWARE (IF ANY). NOTHING IN THIS AGREEMENT
MAY BE CONSTRUED AS A WARRANTY OR REPRESENTATION BY MOTOROLA THAT THE
SOFTWARE OR ANY DERIVATIVE WORK DEVELOPED WITH OR INCORPORATING THE
SOFTWARE WILL BE FREE FROM INFRINGEMENT OF THE INTELLECTUAL PROPERTY
RIGHTS OF THIRD PARTIES.
7 LIMITATION OF LIABILITY. MOTOROLA SHALL NOT IN ANY CIRCUMSTANCES BE LIABLE
FOR ANY LOSS OF USE, LOSS OF DATA, PRODUCTION, PROFIT TO BUSINESS,
CONTRACTS, REVENUES OR ANTICIPATED SAVINGS, ANY INCREASE IN OPERATING
COSTS OR ANY OTHER FINANCIAL OR ECONOMIC LOSS OR ANY SPECIAL, PUNITIVE,
INDIRECT OR CONSEQUENTIAL LOSS OR DAMAGE WHATSOEVER. MOTOROLA’S TOTAL
LIABILITY FOR ALL OTHER CLAIMS OF ANY KIND FOR ANY COSTS, DAMAGES, CLAIMS,
INDEMNIFIABLE CLAIMS, OR LOSSES ARISING OUT OF OR IN CONNECTION WITH THIS
AGREEMENT OR SOFTWARE SUPPLIED UNDER THIS AGREEMENT IS LIMITED TO THE
AGGREGATE AMOUNT PAID BY YOU TO MOTOROLA IN CONNECTION WITH THE
PARTICULAR SOFTWARE LICENSED HEREUNDER WITH RESPECT TO WHICH LOSSES OR
DAMAGES ARE CLAIMED. NOTHING IN THIS AGREEMENT SHALL LIMIT MOTOROLA’S
LIABILITY FOR DEATH OR PERSONAL INJURY CAUSED BY ITS NEGLIGENCE OR FOR
FRAUD OR FRAUDULENT MISREPRESENTATION.
GEMS/EMEA/S3D Page 9 of 52
Email: RNBPE@Motorola.com

SCOUT User Manual
8 YOUR INDEMNITY. You agree to fully defend and indemnify Motorola from any and all claims,
liabilities, and costs (including reasonable legal fees) related to (a) your use (including your sublicensee’s use, if permitted) of the Software or (b) your breach of the terms and conditions of this
Agreement. Notwithstanding the above, Motorola shall have the right to defend any action, suit or
proceeding brought against Motorola, at its own expense, with counsel of its own choosing.
9 PRODUCT LABELING. You are not authorized to use any Motorola trademarks, trade names,
brand names, or logos.
10 GENERAL
10.1 COMPLIANCE WITH LAWS. You must comply with all applicable laws and regulations including
but not limited to export laws of the United States and Germany. Specifically, but without limitation,
you agree that you will not in any form export, sell or transfer directly or indirectly, any products,
documentation, technical data or software or a direct product thereof to any third party without first
obtaining the appropriate licenses or other governmental approval required from the United States,
Germany and/or any other applicable countries.
10.2 ASSIGNMENT. You may not assign this Agreement or any rights hereunder, and any attempt to
do so shall be void.
10.3 SEVERANCE. If any provision of this Agreement shall be found by any court or administrative body
of competent jurisdiction to be invalid or unenforceable, such invalidity or unenforceability shall not
affect the other provisions of this Agreement which shall remain in full force and effect. If any
provision of this Agreement is so found to be invalid or unenforceable but would be valid or
enforceable if some part of the provision were deleted, the provision in question shall apply with
such modification as may be necessary to make it valid.
10.4 HEADINGS. The headings to the Clauses of this Agreement are for reference only and shall not
affect the interpretation or construction of this Agreement.
10.5 WAIVER. Failure or delay on the part of Motorola to exercise any right, power or privilege shall not
operate as a waiver of such right, power or privilege.
10.6 ENTIRE AGREEMENT. This Agreement constitutes the entire agreement and understanding
between you and Motorola and supersedes any previous agreement between us relating to the
subject matter of this Agreement, if any. You acknowledge and agree that in entering into this
Agreement you do not rely on, and shall have no remedy in respect of, any statement,
representation, warranty or understanding (whether negligently or innocently made) of any person
(whether party to this Agreement or not) other than as expressly set out in this Agreement. Nothing
in this clause shall, however, operate to limit or exclude any liability for fraud or fraudulent
misrepresentation. No amendment shall be binding unless in writing and signed by or on behalf of
each party by an authorized representative.
10.7 LAW AND JURISDICTION. This Agreement shall be governed by and construed in accordance
with German Law and both parties irrevocably agree to submit to the jurisdiction of the German
Courts over any claim or matter arising under or in connection with this Agreement.
GEMS/EMEA/S3D Page 10 of 52
Email: RNBPE@Motorola.com

2 Introduction
This document describes the Motorola SCOUT software (hereafter called SCOUT in this
document).
SCOUT is a software application that runs on Microsoft Windows. This document does not
describe how to use Windows.
This document assumes that SCOUT users are familiar with the following basic operations.
• Mouse operations such as clicking, dragging, dragging and dropping
• Menu operation using the mouse
• Character entry using the keyboard
• Window operation using Windows
Read the instruction manual of your PC and Windows for these basic operations.
All operations on this manual are described for Windows 2000.
This document assumes that users are familiar with the operation of a GPS receiver and the
respective requirements. Please refer to GPS manufacturer’s documentation or third party
publications.
This document assumes that you are familiar with Microsoft MapPoint software.
Microsoft MapPoint is not a part of SCOUT. SCOUT uses an existing installation of MapPoint to
display data. Please refer to the MapPoint documentation on how to use these features.
SCOUT User Manual
3 How to read this manual
Operation conventions
All operations on this manual are described for Windows 2000.
The description assumes that a mouse is used.
Display screens
The display screens in this document are from Windows 2000 and may differ slightly from other
versions of Windows®.
Note that the display screens used in this document may differ slightly from the actual screens, but
this does not mean that the contents will be different.
4 Overview
SCOUT is a Motorola designed application that is used with a Motorola TETRA radio, enabling
users to monitor and record information that is transmitted / received by the radio through the air
interface. Data is collected during a recording session and is stored in log files, which can be
accessed later during a playback session and displayed in various windows for analysis.
The application is menu driven and has a comprehensive graphical user interface (GUI) displaying
the data received by the application during the recording session.
Several filtering options can be used to hide unwanted PDUs and provide uncluttered screen
presentations.
SCOUT is protected by a hardware key (dongle), which is available either as parallel port or USB
port version. This key is necessary to operate the SCOUT software and needs to be present during
runtime of SCOUT.
DO NOT remove the hardware key at runtime. Make sure that the dongle is connected safely
and will not shake loose during operation. SCOUT will abort recording, playing, etc. and
halts with an error message.
GEMS/EMEA/S3D Page 11 of 52
Email: RNBPE@Motorola.com

SCOUT User Manual
5 Features
• Serving cell data display
• Foreground cell data display
• Adjacent cell data display
• Radio status information
• Two Microsoft Access type databases for location aliases and TETRA subscriber aliases.
• Selectable automatic append of new TETRA aliases to database during monitoring or
record.
• Call state information
• RSSI / Cx of serving cell and adjacent cells
• Estimated radio Tx power
• MER (Message Erasure Rate)
• RDC (Radio Downlink Counter)
• GPS location data, speed, altitude in different formats (UTM, GK, …; km/h, m/ph, …; m, ft)
• Colored trace of RSSI or MER (if Microsoft MapPoint is installed)
• ‘Voice Notes’ audio recording during the test drive to remember occurrences.
• Full decoding of PDUs listed in the Radio Status window.
• Monitoring of the TETRA air interface without creating log files.
• Data Export to various formats.
• Scrolling forward and backward through the loaded file by simply clicking and dragging the
timeline of the RSSI / Cx graph display.
• Cell Reselection Simulator to understand the mechanism of TETRA reselection process.
• ‘Microeditor’ integrated database editor (if Microsoft Access is not available)
• Link failure balloon display in MapPoint
• Floating average of MER
• Export of MER
• Floating average of RDC (Radio Downlink Counter)
• Export of RDC (Radio Downlink Counter)
• Group call generator
• New ETSI V+D recommendations 300 392-2 V2.4.2(2004-02)
• DMO PDU decode (partially)
• Line in record (VoiceNotes record triggered when radio enters call)
• Selectable recording sample rate for VoiceNotes
• Single instance of SCOUT (Double click .atp file from Explorer plays file in single instance of
SCOUT)
• Cell reselector 2 (latest Motorola features included. I.e. changes in service level calculation,
different neighbor cell parameters taken into account)
• Quality indicator display.
• TETRA Power control display in Radio status window
• TETRA Network Time display in Radio status window
• Traffic slots display in PDU decode window
• 'New file' button for manual start of a new data file (Marker function if no GPS is available.
Implements the ability to split the dataset into known segments)
• 'New file and pause' button for manual start of a new data file and pause recording until
pressed again to continue
• 'Set marker’ button for manual set of up-counting marks into the recorded file.
• Export of markers
• One touch record (To continue a stopped recording session simply press and hold down the
record button for at least one second, recording starts after release of button. Recording
doesn't start if you have left the button area before release)
GEMS/EMEA/S3D Page 12 of 52
Email: RNBPE@Motorola.com

SCOUT User Manual
• Decoding of MTH800/MTM800 GPS event messages (list)
• Display of MTH800/MTM800 GPS radios position in MapPoint map
• Support of MTP850
• Automatic detection of connected radio.
• Radio info window (type, serial, TEI, model no., software ver, codeplug ver.)
• Selectable startup configuration file
• Use of radios GPS
• Save from / to position in loaded file.
• fix GPS timing delay fixed.
• fix Sizing of RSSI and Cx windows re-established.
• new adjustable MER values in Map plot settings
• new adjustable MER values in Data export settings
• new Handover Marker selectable in .txt and .csv export format
• new Data export restructured and new options (Cell reselect info...)
• enh Quality indicator is now 'Levelbars' and moved to the Radio Status window
• new Levelbars parameters adjustable (Configuration, Display Options)
• new Alias and Location database imports data from .csv or txt file
• new Custom icons and bitmaps in MapPoint
• new Service level and cell status can be announced (Configuration, Voice settings 1)
• new Quick record (Ctrl-Q) starts immediate recording. Picks filename from date and
time.
• new Drag ‘n’ Drop files (Radio Status, Adjacent Sites, Data export source file line)
• new ‘Save Basestations’ event at closing of MapPoint window now with a dialog.
Saving can be cancelled now.
• fix Several minor bug fixes, enhancements of error handling.
• fix Cx graph doesn't scroll if width is less than RSSI graph
• fix Paint problem in RSSI graph if level drops below -120dB
• fix No car icon, no line, only reselect icons after reselection
• fix Missing PDUs (not listed) when transmitted together with downlink acknowledge
(BL-ACK)
• fix .dxf file export fixed. Now compatible with AutoCAD 2000, too.
5.1 New features, fixes and enhancements in current SCOUT release
• new Point and click base-station entry from MapPoint map.
• new Custom colors at MapInfo .mif export.
• new Custom pen width selectable at .mif and .dxf export.
• new Accurate time display (based on slot timing) in PDU list with time advance
measurement.
• enh Improved Location Database import with selectable coordinate system.
• enh Bugfix comma/dot issue at database editor entry. Improved editing capabilities.
• new Integrated compression of data files (zipping).
• new New installation and setup software for easier updates
• new Automatically search for updates (if enabled)
• new Play button with drop down list of last played files (selectable)
• new Coodinate system and zone selectable/changeable at Easy GPS window.
• fix Lots of minor fixes in decoding, window behaviour and design.
• fix LST display issue fixed
• fix Wrong display if cell is priority cell
• chn Separation of voice files from installation package
GEMS/EMEA/S3D Page 13 of 52
Email: RNBPE@Motorola.com

SCOUT User Manual
6 System requirements
6.1.1 Computer
The SCOUT application runs on any PC that fulfils the following minimum requirements:
• IBM compatible Intel Pentium 3 or AMD K7 at 500 MHz
• Memory size according to operating system recommendation.
• One serial communication port for radio connection; 115200 baud.
• Sufficient disk space to store the recorded data (this depends on the duration of the
monitoring period, approx. 2.6 MB per 10 minutes of recording.
• For GPS support, depending on the brand and model, additional serial interface, PCMCIA
slot or USB port is required.
• One USB port or parallel port for SCOUT hardware protection key.
6.1.2 Radio
• Motorola TETRA radio. MTx500/650/700/750/800/850 and newer radios.
6.1.3 GPS
Any GPS receiver supporting NMEA standard data interface.
Recommended (tested) GPS receivers:
• GARMIN GPS35 available as USB, Serial and PCMCIA version. Verify your computers
capabilities regarding the amount of USB ports, serial ports.
• Trimble Pathfinder® Series.
• Socket cordless GPS Bluetooth receiver.
6.1.4 Software
• Microsoft Windows 2000, Microsoft WindowsXP.
• SCOUT software version 2.1 or later.
• Microsoft MapPoint 2002 (or later) software for map plotting and navigation.
It is strongly recommended to shutdown any other application affecting the processing
performance of the computer.
This is antivirus software, schedulers or any other gadget software running as background
tasks.
GEMS/EMEA/S3D Page 14 of 52
Email: RNBPE@Motorola.com

SCOUT User Manual
6.1.5 Test system
The basic requirements for a test drive set-up with GPS feature are:
• Motorola TETRA radio.
• Suitable data cable, radio to PC. (Model dependant. This is Motorola accessory)
• A GPS receiver supporting NMEA message format.
• USB or parallel port for SCOUT hardware protection key. (dongle)
Figure 1: Sample configuration of a SCOUT measurement system
7 Installation
To install the application, proceed as follows:
From disc:
Put the disk into your drive. If autostart is enabled the installation will start automatically. Otherwise
go to the disks root directory and run Setup.exe.
From download:
Extract the zip–file into a temporary subdirectory and run the Setup.exe or .msi file. This file starts
the installation of the necessary hardware key driver and the SCOUT software.
Make your decisions regarding location and drive. After successful installation you find a shortcut in
the START menu of Windows and on the desktop. Additionally a subfolder in your Programs tree
called ‘Motorola’, ‘SCOUT’, is installed where you find a shortcut to the SCOUT Users Manual.
If you use Microsoft MapPoint:
It is recommended to install the full Microsoft MapPoint 2002 (or later) software (refer to Microsoft’s
instructions). If the full installation is not performed, the map MapPoint CD has to be present in the
drive. During drive access the SCOUT application may be delayed until MapPoint has the
necessary data loaded. This is serious during a SCOUT recording session. Messages from the
radio are not received on time and a receive buffer overflow may occur.
GEMS/EMEA/S3D Page 15 of 52
Email: RNBPE@Motorola.com

SCOUT User Manual
8 Updates
Updates are available FREE OF CHARGE from the Motorola webpage.
http://www.motorola.de/scout
This webpage is in german, but don’t worry, you will find these links at the top of the page.
Download SCOUT installation 17MB
Download additional voices 24MB
Download SCOUT update 6MB
Release notes
The upper link is the full installation package.
The second link lets you download the additional voice file from Microsoft
The third link lets you download the upgrade file if you already have a SCOUT 5.x installation.
The fourth link shows a text file with the enhancements, fixes and changes.
Click the appropriate link and save the zip file to a temporary location of your choice.
Unzip and run the setup.exe file for installation.
9 Radio configuration for recording
Although there are no special requirements for the radio hardware and any radio can be used with
SCOUT, a radio that has been configured for use with SCOUT should be used solely for that
purpose. It should not be used for normal radio communications.
The following actions should be done in order to get messages from the radio:
1. Turn the radio on.
2. Access the test page by pressing in sequence:
MTH500
Volume down button, Keypad <1>, Menu button, Keypad <2>,
Menu button, Keypad <3>.
Smart button 2, Keypad <1>, Menu button, Keypad< 2>,
MTP700
MTP750
Menu button, Keypad <3>.
Hint: Smart button 2 is the one below the PTT,
marked with one dot
MTM700
MTM800
Cursor right button, Keypad <1>, Menu button, Keypad <2>,
Menu button, Keypad <3>.
Smart button 2, Keypad <1>, Menu button, Keypad< 2>,
MTH650
Menu button, Keypad <3>.
Hint: Smart button 2 is the one below the PTT
MTH800
MTP850
Keypad <*> (Asterisk), Keypad <#>, Menu button,
Cursor right button.
3. On the test page, Select <Data Svc>. Select <AirTracer>. Select <AirTrc On>.
4. Go back to default screen.
Note: You will need to make arrangements with Motorola for any radios which are to be used with
SCOUT to have the correct code plug setup as this can only be done with CPS with "Lab Access".
GEMS/EMEA/S3D Page 16 of 52
Email: RNBPE@Motorola.com

SCOUT User Manual
10 Radios internal GPS
The MTH800/MTP850 and MTM800 are equipped with an internal GPS receiver. It is possible to
use this receiver with SCOUT instead of an external GPS receiver. However, care must be taken
when using this feature.
ATTENTION!
When using the internal GPS, under no circumstances any GPS events have to be enabled in the
GPS section of CPS. The radio MUST run with an enabled GPS only. Again, no events have to be
programmed. Otherwise the radios internal requests to the GPS chip and the external requests
from SCOUT will interfere. This may lead to an unpredictable behavior and malfunction of the
radio.
The GPS chip in the MTH/MTP radios has a very powerful energy saving functionality that is being
used during the normal operation mode of the radio.
If the GPS is used by SCOUT, this power saving feature is disabled to get accurate position fixes
every second as from any other common GPS receiver.
This ‘constant-on’ mode increases the power consumption of the radio. Be aware that the battery
will last only the third of the time than usually.
IMPORTANT!
SCOUT does NOT re-set the GPS chip back to the energy saving mode. The chip continues to run
on full power after it was enabled by SCOUT. You have to power the radio off and on again to have
the GPS chip reinitialized properly.
Be aware that when using the internal GPS the GPS button of SCOUT has a different behavior.
You have to establish a data connection to the radio first. This is done by entering either the
recording or monitoring mode. Turn on recording or monitoring then press the GPS button.
11 Functionality
The SCOUT functionality consists of:
• The AirTracer task in the radio, which sends raw data via the UART interface of the radio
• The SCOUT application, which receives and records the data from the radio, then parses the
information and displays in different windows.
GEMS/EMEA/S3D Page 17 of 52
Email: RNBPE@Motorola.com
SCOUT User Manual
12 Database files
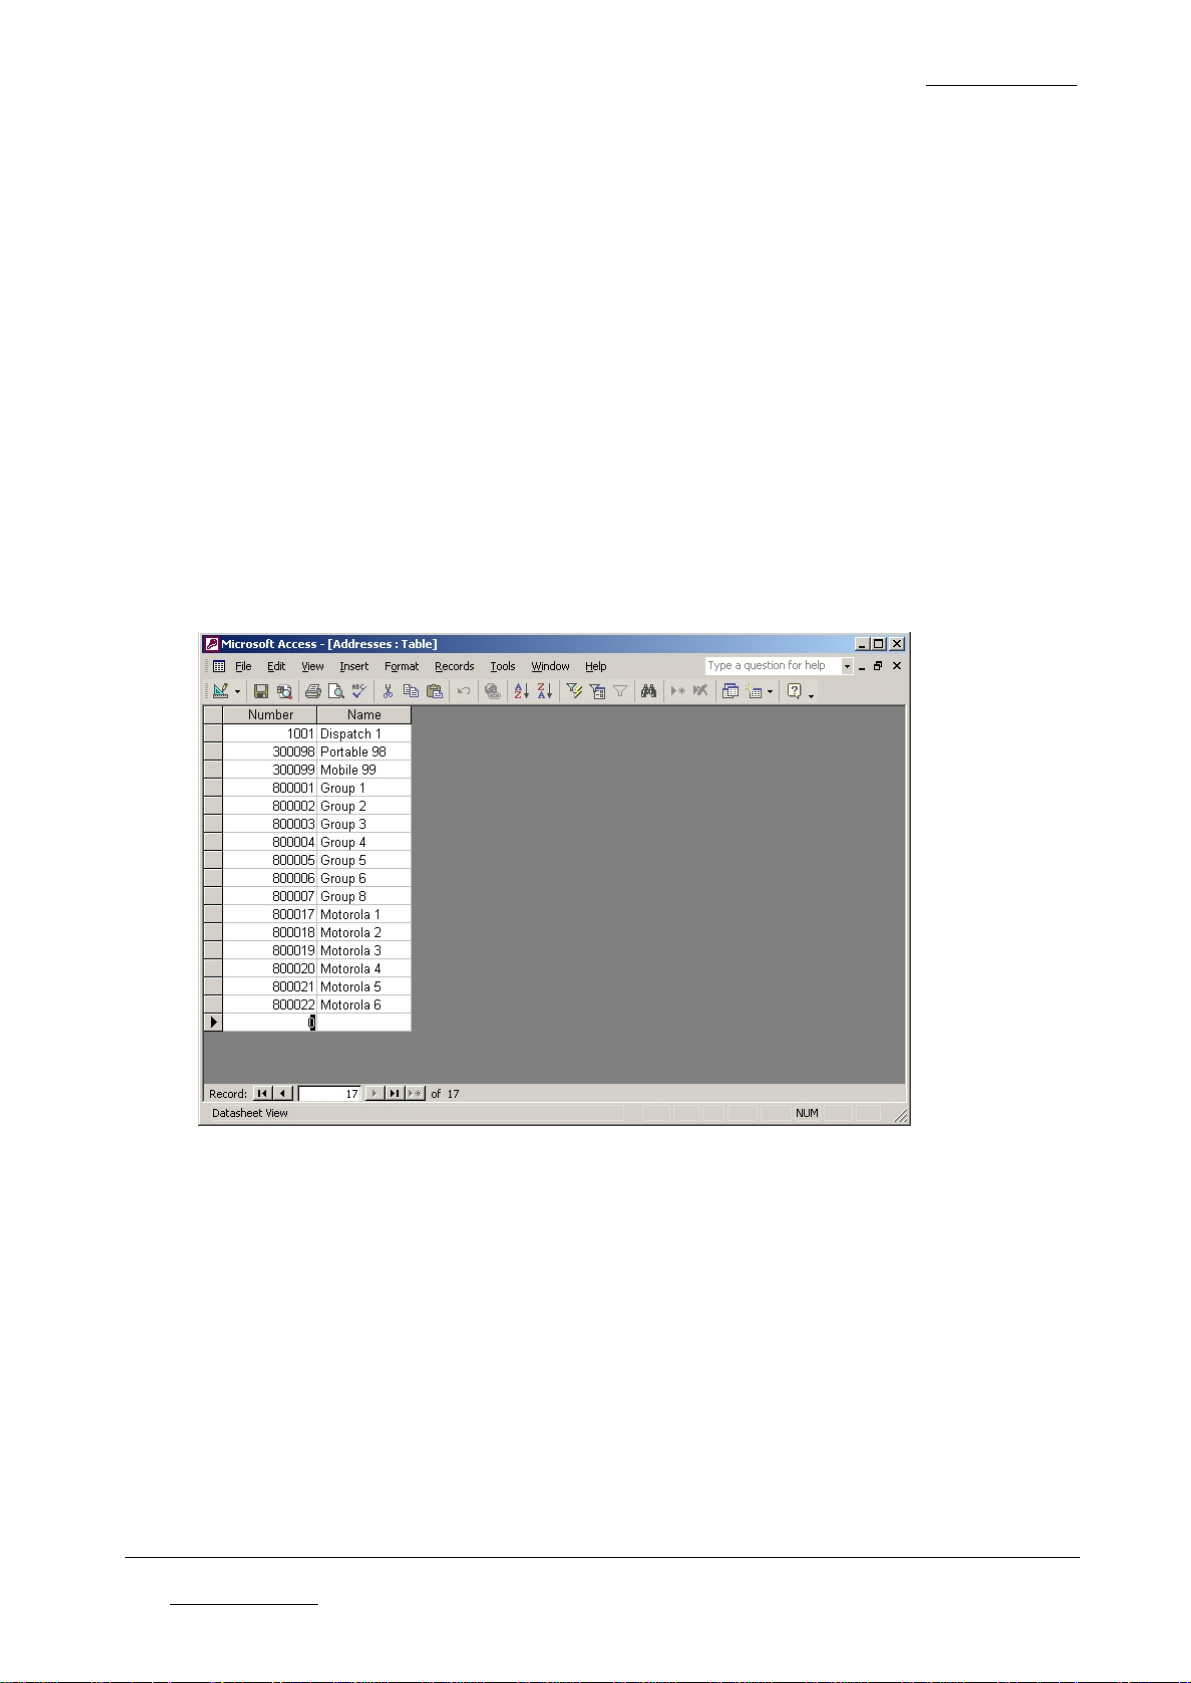
Two Microsoft Access databases are used by the application.
• The Alias.mdb, table Addresses – contains alias information for SSI, GSSI, phone numbers.
• The Locations.mdb, table LA - contains the site location information, color assignments and
notes.
These files are loaded by default when SCOUT is started, unless you have specified different files
and saved in the Default.cfg configuration file.
12.1 Alias database
The Alias database contains subscriber numbers, group numbers as well as phone numbers and
the associated names. This data is used to display the name instead of the number.
Use the default database as a template to create your own database for additional networks.
Rename the database filename with one of your choice and modify the new one according to your
requirements.
Load the appropriate database before you start recording or monitoring.
If you save a configuration of SCOUT a reference to the currently selected databases is stored in
the configuration file.
Figure 2: Example of alias database
GEMS/EMEA/S3D Page 18 of 52
Email: RNBPE@Motorola.com

SCOUT User Manual
12.2 Locations database
A TETRA base site is identified at least by the TETRA RF-Channel. Additional information like
location area id, channel number and color code refine the identity of a site.
Since the information the radio receives consists of the channel number, the location area id and
the color code only, this database is utilized to fetch the individual name of a site and display it in
the windows of the SCOUT application. If Microsoft MapPoint is installed the site coordinates are
taken to display a site icon. The Easy GPS feature ‘Distance to sites’ takes the coordinates to
calculate the distance from the current location to the serving site and sites currently in foreground
scan.
Database entries:
• LAId: Holds the location area id number of the site. When entering data into these fields, the
location area Id must be entered as a six-character hexadecimal string. For example,
location area C07 must be entered as 000C07; i.e., leading zeros must be used to expand
entries to six characters.
• Longitude, Latitude: Site coordinates in WGS84 and decimal format. (11.12345, 51.67890)
• Location: The name of the site to be displayed in SCOUT
• Orientation: Future versions of SCOUT display the antenna direction in the map. Not used.
• Channel: The TETRA channel number
• Color code: The sites individual color code
• Graph Color: Color index number of the line color of the RSSI graph and Cx graph.(See the
Configuration menu, Display)
• Notes: Additional site notes displayed in the MapPoint window as balloon information. This
database entry works in both directions. If you enter the information in the database then it
will be displayed in the balloon at MapPoint. If you modify the balloon entry in MapPoint the
database will be updated at program exit or closing of the MapPoint window.
Use the default database as a template to create your own database for additional networks.
Rename the database filename with one of your choice and modify the new one according to your
requirements.
Load the appropriate database before you start recording or monitoring.
If you save a configuration of SCOUT a reference to the currently selected databases is stored in
the configuration file.
Figure 3: Example of location area database
GEMS/EMEA/S3D Page 19 of 52
Email: RNBPE@Motorola.com

13 PDUs supported by SCOUT
SCOUT User Manual
MM Downlink
D-ATTACH-DETACH-GROUP-IDENTITY
D-ATTACH-DETACH-GROUP-IDENTITY-ACK
D-AUTHENTICATION
D-Authentication Demand
D-Authentication Reject
D-Authentication Response
D-Authentication Result
D-CK-CHANGE-DEMAND
D-DISABLE
D-ENABLE
D-LOCATION_UPDATE-ACCEPT
D-LOCATION-UPDATE-COMMAND
D-LOCATION-UPDATE-REJECT
D-LOCATION-UPDATE-PROCEEDING
D-MM-STATUS
D-OTAR
D-OTAR CCK Provide
D-OTAR GCK Provide
D-OTAR SCK Provide
D-OTAR GSKO Provide
D-OTAR Key Associate Demand
D-OTAR Newcell
CMCE Downlink
D-ALERT
D-CALL-PROCEEDING
D-CALL-RESTORE
D-CONNECT
D-CONNECT-ACK
D-DISCONNECT
D-FACILITY
D-INFO
D-RELEASE
D-SDS-DATA
D-SETUP
D-STATUS
D-TX-CEASED
D-TX-CONTINUE
D-TX-GRANTED
D-TX-WAIT
D-TX-INTERRUPT
MLE Downlink
D-NETWORK-BROADCAST
D-NEW-CELL
D-PREPARE-FAIL
D-RESTORE-ACK
D-RESTORE-FAIL
MM Uplink
U-ATTACH-DETACH-GROUP-IDENTITY
U-ATTACH-DETACH-GROUP-IDENTITY-ACK
U-AUTHENTICATION
U-Authentication Demand
U-Authentication Reject
U-Authentication Response
U-Authentication Result
U-CK-CHANGE-RESULT
U-DISABLE-STATUS
U-ITSI-DETACH
U-LOCATION-UPDATE
U-MM-STATUS
U-OTAR
U-OTAR CCK Demand
U-OTAR CCK Result
U-OTAR GCK Demand
U-OTAR GCK Result
U-OTAR SCK Demand
U-OTAR SCK Result
U-OTAR GSKO Demand
U-OTAR GSKO Result
U-OTAR Key Associate Status
U-OTAR Prepare
U-TEI-PROVIDE
CMCE Uplink
U-ALERT
U-CALL-RESTORE
U-CONNECT
U-DISCONNECT
U-FACILITY
U-INFO
U-RELEASE
U-SDS-DATA
U-SETUP
U-STATUS
U-TX-CEASED
U-TX-DEMAND
MLE Uplink
U-PREPARE
U-RESTORE
Broadcast PDUs
D-MLE-SYSINFO
D-MLE-SYNC
GEMS/EMEA/S3D Page 20 of 52
Email: RNBPE@Motorola.com

SCOUT User Manual
14 Main application window
Figure 4: Title bar, menu bar, control and status bar
The main window of the SCOUT application contains a series of sub windows that can be
displayed individually, moved and scaled within the main window.
The main window has four areas:
1. The title bar shows the application name, version and the current filename in use.
2. The menu bar displays the available menus.
3. The control and status bar contains the buttons and status information of the application.
4. The windows area contains the various sub windows:
• The serving cell data window
• The adjacent sites data window
• The radio status window
• The RSSI/Cx graph window
• The Easy GPS window
• The AACH information window
• The PDU decode window
• The MapPoint map window (if Microsoft MapPoint is installed)
• Database editor
• Data export
• Cell reselection simulator
5. The bottom status bar show the available free space on the used disk and the power status
of the computer. (AC or Batt. and the remaining capacity)
Figure 5: Main application window
GEMS/EMEA/S3D Page 21 of 52
Email: RNBPE@Motorola.com

SCOUT User Manual
15 Control and status bar
1 2 3 4 5 6 7 8 9 10 11
Figure 6: Control and status bar buttons
Clicking buttons on the toolbar works in the same way as if the corresponding command is
selected from the menu.
This document mainly describes how to select commands from the menu bar.
1 [Record] button
2 [Play] button
3 [Stop] button
4 [Pause] button
5 [GPS] button
6 [Sound] button
7 [Monitoring] button
8 [Play again] button
9 [Play in order] button
10 [Cell reselection simulator] button
11 [Data export] button
1 2 3 4 5
Figure 7: Control and status bar indicators and control
1 Buffer level
2 Logfile position slider
3 Application status display
4 Log counter
5 Log time
1. The buffer level progress bar gives you during record and monitoring an indication of the
radios serial interface input buffer. Usually the bar should remain mostly unseen or
occasionally flash to the middle of the scale. If the bar remains at the right side or close to
the right end, your computers speed is either too low or the computer is busy with other
tasks. This is serious. The messages from the radio will not get the proper time stamp and
an input buffer overflow may occur.
2. The logfile position slider is functional as soon as file is loaded. Move the slider to scroll
through the loaded file. After selection of the slider by a mouse click use the left and right
arrow keys of the keyboard to step message by message through the loaded file.
3. The status display shows what status SCOUT is currently in. The display changes between
‘Stopped’, ‘Recording’, ‘Playing’, ‘Monitoring’ and ‘Pausing’.
4. The log counter is a line (message) counter of the loaded file or, during record, counts the
number of received messages from the radio.
5. The log time displays the time stamp of the currently selected message. At record the
display shows the current computer time.
GEMS/EMEA/S3D Page 22 of 52
Email: RNBPE@Motorola.com

SCOUT User Manual
16 The menu bar
16.1 File
16.1.1 Record (Ctrl-R)
This starts a recording session, same as pressing the record button.
See Page 50.
16.1.2 Quick record (Ctrl-Q)
This starts the recording session session immediately.The filename is derived from date and time.
See Page 51
16.1.3 Monitoring (Ctrl-M)
This starts the monitoring session, same as pressing the monitor button.
See Page 51.
16.1.4 Play (Ctrl-P)
This replays a previously recorded file, same as pressing the play button.
See Page 52.
16.1.5 Play again (Ctrl-A)
This replays a previously recorded file again, without Open File dialog.
See Page 52.
16.1.6 Play files in order (Ctrl-O)
This replays a previously recorded sequence of files; select the first file to start with.
See Page 52.
16.1.7 Pause
Playing is paused.
16.1.8 Stop (Ctrl-S)
Any recording, monitoring or play is stopped.
16.1.9 Save file part from start to log file position as…
Move the log file position slider, click the PDU list or move to a location in the graph display to
select a position within the loaded file. Data from the beginning to the current position is saved into
a new file.
16.1.10 Save file part from log file position to end as …
Move the log file position slider, click the PDU list or move to a location in the graph display to
select a position within the loaded file. Data from the current position to the end of file is saved into
a new file.
16.1.11 Load configuration
Load your favorite configuration file.
GEMS/EMEA/S3D Page 23 of 52
Email: RNBPE@Motorola.com

SCOUT User Manual
16.1.12 Save configuration
This saves your current configuration. The configuration file saves the following parameters:
Database filenames: Locations and alias database currently loaded.
Database keys: Key to retrieve the site name from database.
Filter button state: Filter button state of the radio status window.
Main window state: Size and position of the main application window.
Active windows: Size and position of currently active windows.
Display options: Width and no. of columns of the PDU-list in radio status window.
Communication ports: Assigned serial port and baud rate for radio and GPS.
Type of recording: Timed or message related
Log file size: Selected number of messages per file.
Number of log files: Selected number of files per recording session.
Time per log file: Selected max. record time per file.
MM filters: Selected mobility management filters.
CMCE filters: Selected circuit mode control entity filters.
MLE filters: Selected mobile link entity filters.
All settings for the MapPoint Navigation window and map plot settings are stored in the Microsoft
Windows registry.
16.1.13 Create default configuration file
This option resets SCOUT to default parameters and creates a new Default.cfg file.
16.1.14 File info
Shows the header of the currently loaded SCOUT data file.
16.1.15 Print active window
Prints the selected (highlighted) sub window. (Screen copy)
16.1.16 Exit
This closes the SCOUT application.
16.1.17 Last files played
Up to five filenames are listed here for faster selection and replay.
GEMS/EMEA/S3D Page 24 of 52
Email: RNBPE@Motorola.com

SCOUT User Manual
16.2 Configuration
This section provides information on how to set-up various parameters of the SCOUT application.
16.2.1 Log options
Figure 8: Log options
Log file size depends on…
…the recording time - Select if you want a time or number-of-messages related recording.
Adjust the maximum time recorded in each log file.
Range: 1 minute to 9 minutes
…the number of messages - Adjust the maximum number of messages recorded in each file.
Message range: 20 message to 30000 messages
Total log files
Maximum numbers of log files - Adjust the maximum number of log files per session. By default
it’s the maximum.
Log file range: 1 log file to 10.000 log files
Note: If message related recording is selected and the maximum time of nine minutes is reached,
a new log file is created even if the amount of messages received is less than selected.
Default config file – Select the configuration file that will be loaded at next start of SCOUT.
Create temp file while monitoring - Mark the checkbox if you want to have a temporary file
created while monitoring. If checked a file named ‘Monitoring.atp’ is created in the current log file
directory. The log file size depends on the previously described selections. The difference is that no
new file is created when the condition for creating a new file is met. The file ‘Monitoring.atp’ will
be overwritten. (Loop recording)
Enable sound during record - Mark the checkbox if you want to have always sound during
record.
Turn GPS on when recording – Check this box if you want to turn GPS automatically on when
you start a recording.
Disable screensaver – If checked the current Windows screensaver is disabled during SCOUT
runtime and enabled again after SCOUT application is closed.
No pop-up window on comm errors – Disables the nagging ‘No data from radio’ and ‘No data
from GPS’ window.
Use file compression – This feature zips the atp files by 80 percent to save disk space.
Don’t forget to save the changes you’ve made to a configuration file.
GEMS/EMEA/S3D Page 25 of 52
Email: RNBPE@Motorola.com

SCOUT User Manual
16.2.2 Database files and keys
Figure 9: Database files and keys
Database Key - A TETRA site is identified by at least the frequency (channel) or the location area
identity (LAid). Depending on the networks topology, frequency reassignment or size of location
areas it is necessary to select a combination of individual features for the exact identification of a
site.
Select which key(s) SCOUT will use to retrieve a site name from the database.
Alias database - If you want to have your alias database extended during record or monitoring,
mark the box and SCOUT will add new entries to your database. The state of the checkbox is not
saved and has to be set every time because SCOUT can not determine if the currently loaded
database has to be extended with information from the monitored network. By default the box is
unchecked. The entries in the database are the received id number and the name field is ‘new’.
During replay the entry ‘new’ is ignored and the number is displayed even if ‘Display id aliases’ in
the radio status window is checked. Use Microsoft Access or the ‘Micro edit’ of SCOUT to update
the entries.
Database files - Select the databases you want to use for recording, monitoring or replay of files.
The buttons for creating a template are making a copy of the currently loaded database. The new
database files are located in the same directory as the loaded ones. Use these files to create new
databases for other networks or groups.
The import data button lets you select a text or Excel .csv file to update, expand or create a new
Location database or Alias database.
Don’t forget to save the changes you’ve made to a configuration file.
GEMS/EMEA/S3D Page 26 of 52
Email: RNBPE@Motorola.com

SCOUT User Manual
16.2.3 Display options
Figure 10: Display options
Radio Status - Select which columns are displayed in the PDU list of the Radio status window.
Buttons - Select the text orientation and the style of the filter buttons in the Radio status window.
Select the button style of the main window.
Level bars – define the boundaries of the level bars displayed above the MER and RDC bar.
Don’t forget to save the changes you’ve made to a configuration file.
Graph line colors - Customize the color of the graph lines by clicking the colored box and assign a
new color from the color select dialog. Color index number of the line color of the RSSI graph and
Cx graph.Adjust the entry in the locations database file to point to the corresponding color.
Select the color for local site trunking and wide trunking.
The color information is stored immediately in the windows registry. There is no need to save a
configuration file if changes are made here.
16.2.4 PDU selection
Figure 11: PDU selection
GEMS/EMEA/S3D Page 27 of 52
Email: RNBPE@Motorola.com

SCOUT User Manual
Select which PDUs are filtered during record, monitoring or replay from the PDU list of the radio
status window.
Don’t forget to save the changes you’ve made to a configuration file.
16.2.5 Radio and GPS settings
Figure 12: Radio and GPS settings
Radio - Select the serial interface the radio is connected to.
Choose if SCOUT will try to auto-detect the connected radio or select manually the radio type.
GPS - Select the serial interface the GPS receiver is connected to.
SCOUT uses the standard NMEA-0183 protocol with standard communication parameters, 4800
Baud, no parity, 8 data bits, 1 stop bit. Additionally you can select the baud rate used by the
receiver. SCOUT uses any available message to decode the latitude, longitude, time information
and validity of coordinates. The GGA message gives additional altitude information.
Use GPS from radio - check this box if you have a Motorola radio with GPS support attached and
you want to use this receiver for location information.
Local time adjustment - turn GPS on and off with the button. As soon as you get a valid GPS
position fix, the Status line shows you the number of satellites being tracked and the ‘Synchronize’
button is enabled. Now you can synchronize the computers clock to GPS time.
Don’t forget to save the changes you’ve made to a configuration file.
16.2.6 Geodetic information
Figure 13: Geodetic information
GEMS/EMEA/S3D Page 28 of 52
Email: RNBPE@Motorola.com
SCOUT User Manual
If you want to use a different geodetic datum or map projection displayed, select here your
preferred system. By enabling the Auto Zone Adjust checkbox, SCOUT determines the right zone
of the selected geodetic datum as soon as a valid coordinate is present. This can be either from the
GPS or during replay of a recorded file.
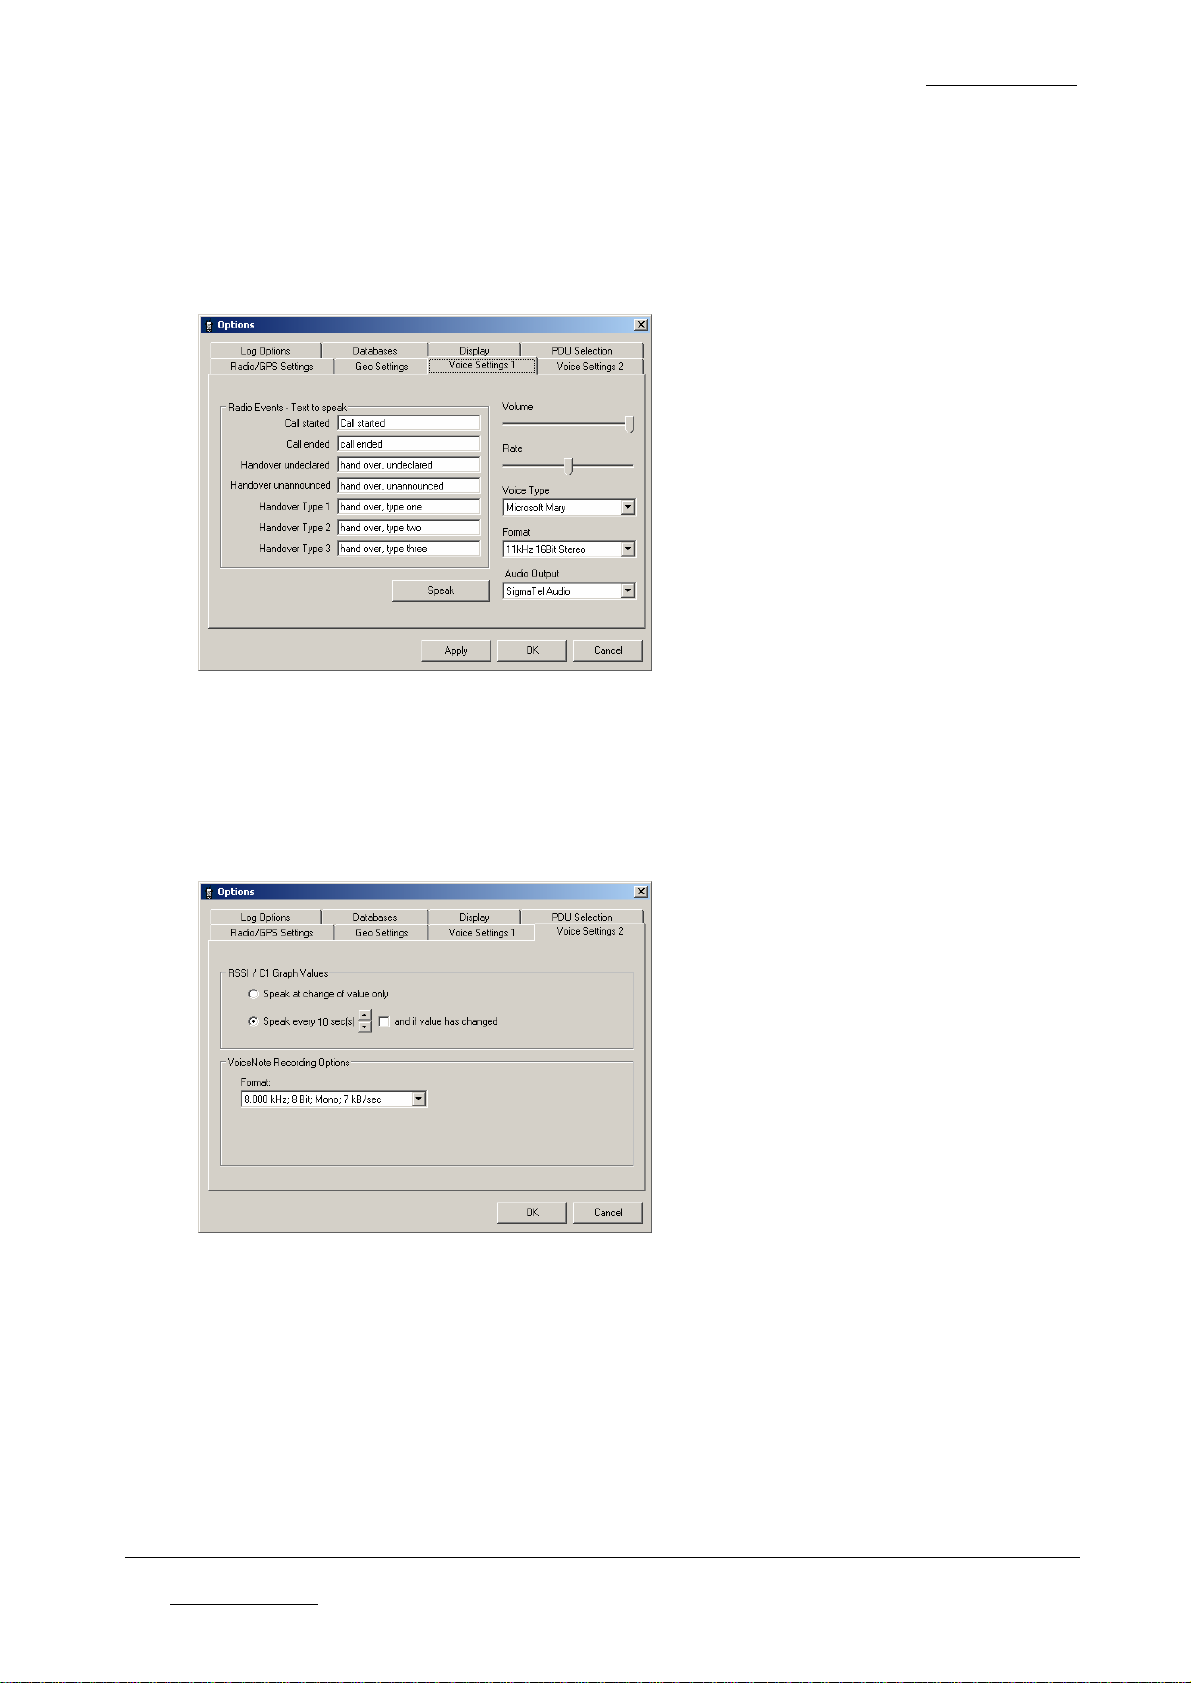
16.2.7 Voice settings 1
Figure 14: Voice settings 1
SCOUT uses the Microsoft Speech Engine for audible events. Here you can edit and test the
associated text spoken. Select the voice type and the audio quality as well as the volume and
speech rate (speed).
16.2.8 Voice settings 2
Figure 15: Voice settings 2
- Select /adjust the interval the RSSI or C-value is spoken.
- Select /adjust the recording format of the VoiceNotes audio recorder.
GEMS/EMEA/S3D Page 29 of 52
Email: RNBPE@Motorola.com

16.2.9 Update
Figure 16: Update
If you want Scout to look for new version make your selection accordingly.
SCOUT User Manual
GEMS/EMEA/S3D Page 30 of 52
Email: RNBPE@Motorola.com
SCOUT User Manual
16.3 Tools
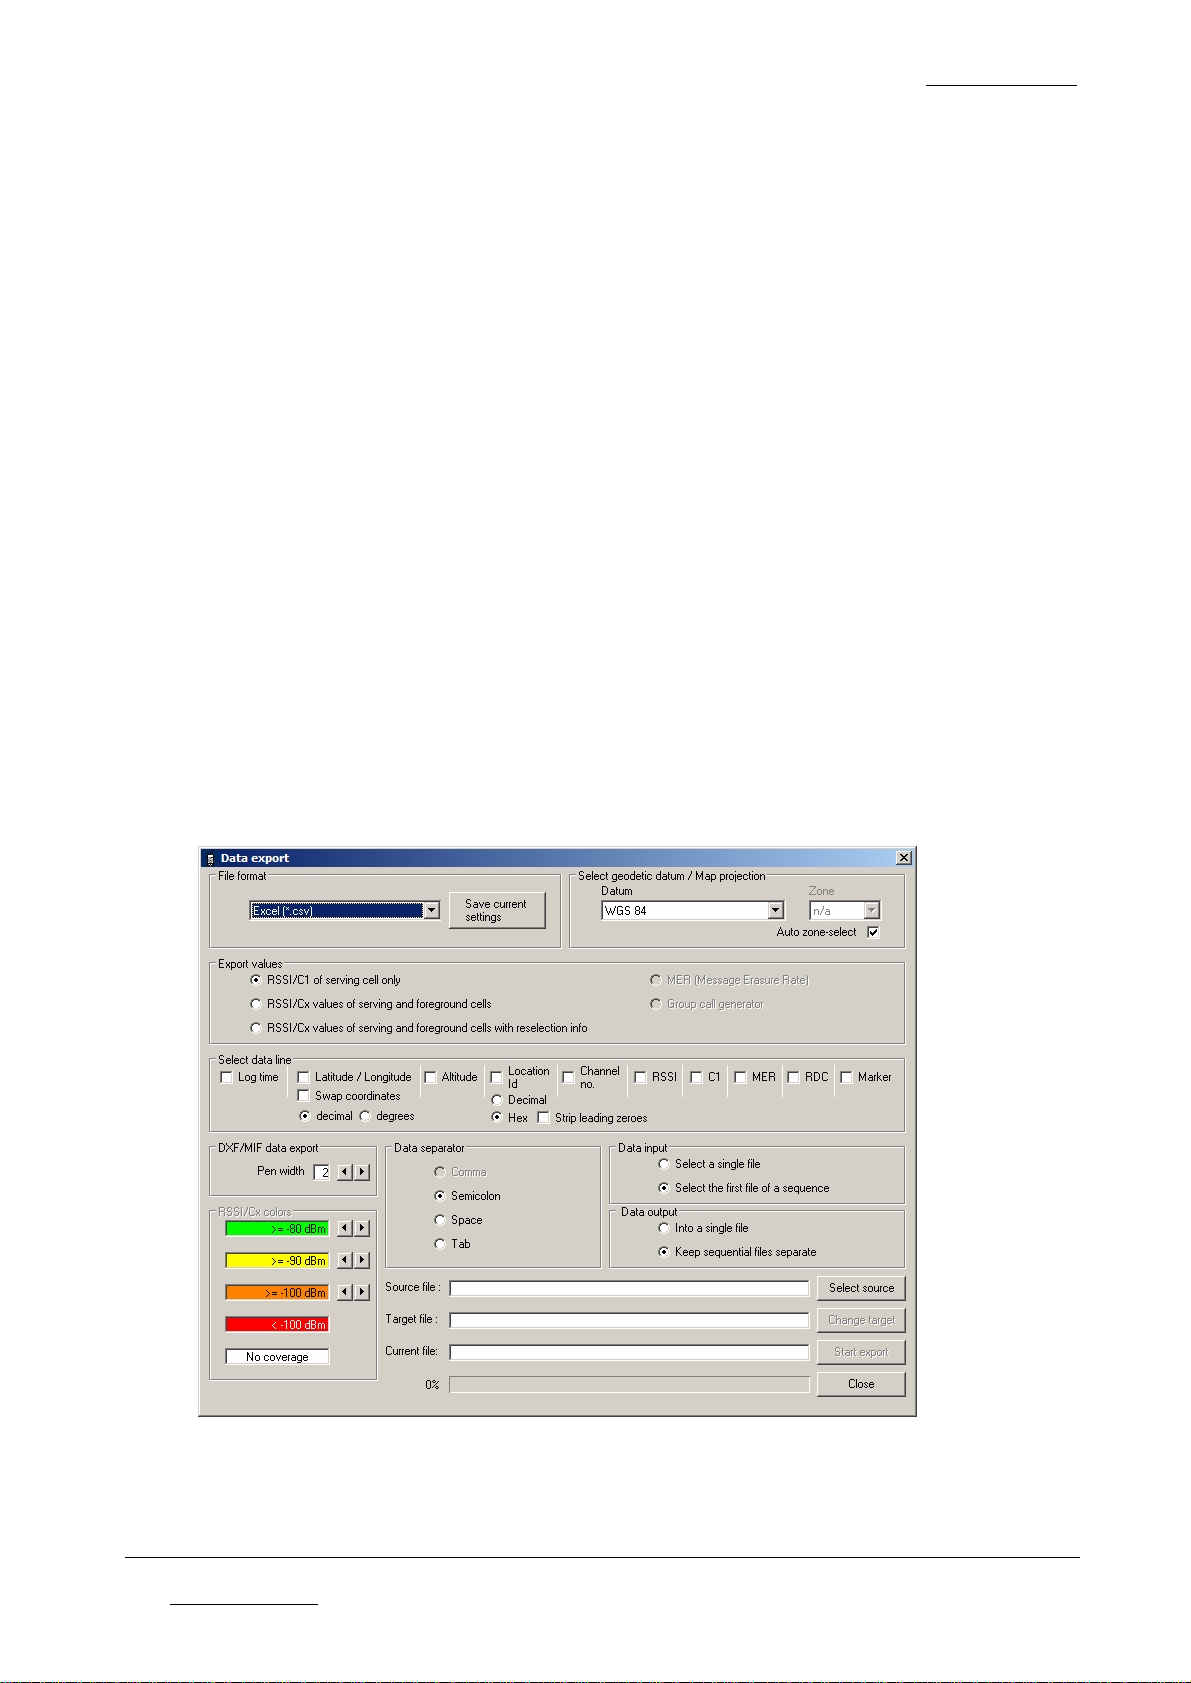
16.3.1 Data export
Make your selections from the top to the bottom and from left to right.
• Select the file format you want to have the data exported to.
• Select the geodetic datum / map projection.
• Select the export values.
• Select your preferred data separator.
• Select the data you want to have exported in each line.
• Select the data input. If either a single file has to be converted or a sequence.
• Select the data output. The data export will go into one single file or sequential files are kept
separate.
• Select the source/start file.
• If you want to have the data into a different directory as the source data, change the target
directory.
• Press Start Export and watch the progress bar.
Options that are not available are greyed, depending on the selected export format.
Supported formats:
.txt simple line output
.csv Excel csv file
.dxf AutoCAD® import/export file format
.mif MapInfo interchange format
.mre MapPoint re-import. This creates a file for faster file loading into MapPoint.
.s3d Combo data format
Figure 17: Data export
GEMS/EMEA/S3D Page 31 of 52
Email: RNBPE@Motorola.com

SCOUT User Manual
Some examples:
Text file format (txt)
Selection: RSSI/C1 if serving cell only
Data separator : Semicolon
Data line: Logtime, Latitude,Longitude, Location id, Channel, RSSI, C1
This is the resulting line:
07:43:51:011;13.2952890;52.5765970;000003;3612;-96;14
Selection: RSSI/Cx values of serving and foreground cells
Data separator : Semicolon
Data line: Logtime, Latitude,Longitude, Location id, Channel, RSSI, C1
This is the resulting line:
07:43:51:011;13.29528 …. -96;14;000001;3627; -96;14;000002; 3611;-101;9;000004;3631; -101;9
The data line is extended by three blocks of foreground cell information each formatted in the
order:
Location id(1);Channel no.(1);RSSI(1);Cx(1);
Location id(2);Channel no.(2); RSSI(2);Cx(2);
Location id(3);Channel no.(3);RSSI(3);Cx(3)
Selection: RSSI/Cx values of serving and foreground cells with reselection info
Data separator : Semicolon
Data line: Logtime, Latitude,Longitude, Location id, Channel, RSSI, C1
This is the resulting line:
07:43:51:011;13.29528 …. -96;14;0;000001;3627; -96;14;000002; 3611;-101;9;000004;3631; -101;9
The line is extended by the “Reselection information”, three blocks of “foreground cell information”,
"Type", "CurrentChannel", "Timeslot", "LogChannel".
Reselection is either “0” or “1” to indicate a cell reselection event
Type is the reselection type. (undeclared, unannounced,Type1,Type2,Type3)
CurrentChannel is the actual TETRA channel the radio is using.
Timeslot shows the used time slot.(1, 2, 3, 4)
LogChannel shows the logical channel (MCCH, TCH, FACCH, SACCH)
RSSI;C1;Reselection;LocID(1);….;Type;CurrentChannel;Timeslot;LogChannel
… -103;7;1;000005;3612;-99;9;000002;3611;-101;9;000004;3631;-102;8;Undeclared;3612,1,MCCH
GEMS/EMEA/S3D Page 32 of 52
Email: RNBPE@Motorola.com

SCOUT User Manual
16.3.2 Database editor.
If you do not have Microsoft Access installed on your computer you can use this editor to modify
the currently loaded locations database or alias database.
Select the tab to select either the locations database or the alias database.
Click the header, then right click to sort the entries.
Press the Import Data button to open a dialog window for data import.
The files have to be text format and the same structure as the database.
The selected font size is saved and present the next time the window is opened.
Figure 18: Database micro editor
16.3.3 Database import
Figure 19: Database import
Select the delimiter of your input file. Semicolon, comma or tab.
Select the action to be done.
• Append the data to the currently loaded database. CAUTION! Duplicate entries causing an
import error. Make sure that the appended data are different.
• Update the loaded database.
• Create new database.
Specify if the source location id data are decimal or hexadecimal.
Press to <Go> button to continue. If you selected to Create a new database a file save dialog
appears where you have to enter the filename. Be aware that the currently loaded database cannot
be overwritten with this new file.
GEMS/EMEA/S3D Page 33 of 52
Email: RNBPE@Motorola.com

SCOUT User Manual
16.3.4 Cell reselection simulator
This tool gives you the opportunity to simulate cell reselection offline and to understand the cell
reselection behaviour of TETRA radios.
Figure 20: Cell reselection simulator
The Serving cell parameters shows at start always the Motorola standard system parameters.
Use the <Pick data from serving cell window> button to copy the entries from the serving cell data
window. This works only if data are present.
The Neighbor cell parameters section lets you select the service level relationship of the serving
cell and neighbor cell. You will see that, depending on your selection - better, same, worse - the
availability of reselection options, shown at the bottom in the MS’s cell reselection decision
section, is restricted.
If you want to determine by detail the service lLevel, press the ‘Determine service level’ button. A
dialog window opens where you can select the status of the serving cell and the neighbor cell. At
the bottom of this window you will see the result of your selection immediately and the main cell
reselector window is updated, too.
GEMS/EMEA/S3D Page 34 of 52
Email: RNBPE@Motorola.com

SCOUT User Manual
Figure 21: Service level
The mobile subscriber parameters section lets you select the maximum TX power of the radio.
The value is usually 30 dBm for a portable and 35 dBm for a mobile.
Depending on the parameters entered at the serving cell parameters section the MSs personal
MinRXAccessLevel is being calculated. This value is affected by the serving cell parameters
MinRXAccessLevel and MaxTXPower and the radios own Max TX Power.
This parameter equals C1 = 0 for the radio. TETRA sites received with this RSSI level or less are
ignored. Change the MinRXAccessLevel and MaxTXPower values to see when the radio starts
monitoring cells and how the radios TX power affects this parameter.
The <MS’s reduced power> selector and the <MS will reduce power at…> are related to each
other. According to the serving cells AccessParameter the radio will reduce its TX power to the
value you have entered at <MSs reduced power> if the RSSI level of the serving cell is above the
value shown at <MS will reduce power at…>. This shall show you the influence of the Access
Parameter value and the open loop power control of the radio.
The two sliders <MS receives serving cell with…> and <MS receives neighbor cell with…> let you
simulate the RSSI levels from the serving cell and the first scanned neighbor.
MSs cell reselection decision
This part shows the three reselection options available according to the shown levels.
Play with the threshold and hysteresis parameters in the serving cell parameters section at the top
and see the values changing and as well the conditions for a cell reselection. Move the sliders to
find a reselect condition. The corresponding type is highlighted in green.
The current serving cell state indicator shows you the relationship of the serving cell to the
neighbor cell.
These states are:
Exclusive:
The RSSI level of the serving cell is higher than the sum of:
Fast Reselect Threshold + Slow Reselect Threshold Above Fast + Start Monitoring Threshold Delta + Stop
Monitoring Delta*
The radio does not monitor neighbor cells because the received RSSI from the serving cell is more
than sufficient.
* The start monitoring threshold delta and the stop monitoring delta values are programmed in the
radios code plug.
Being in EXCLUSIVE mode and the RSSI is less than:
Fast Reselect Threshold + Slow Reselect Threshold Above Fast + Start Monitoring Threshold Delta
The radio starts monitoring for neighbor cells.
GEMS/EMEA/S3D Page 35 of 52
Email: RNBPE@Motorola.com

SCOUT User Manual
Superior:
This state is determined when none of the level criteria shown in the reselection condition part is
met.
Usable:
If the levels required for the USABLE type reselection are met.
Improvable:
If the levels required for the IMPROVABLE type reselection are met.
Relinquishable:
If the levels required for the RELINQUISHABLE type reselection are met.
Read the text of the reselection options to understand when and what levels are necessary to fulfill
the respective reselection condition.
Click the green boxes with the question mark to get some help text for the section related
parameters.
16.3.5 Group call generator
The group call generator is pushing the PTT. Enter a value for the duration of how long the PTT is
pressed and a time for the pause in between. Select at the radio a suitable talk group and start
monitoring or recording.
Right-click the colored text fields ‘Successful’, ‘Unsuccessful’ or ’No Service’ to select a different
color for display. The same color is used in the MapPoint window to paint the trace. The color
values are stored in the windows registry after the color select dialog is closed.
Figure 22: Group call generator
GEMS/EMEA/S3D Page 36 of 52
Email: RNBPE@Motorola.com

SCOUT User Manual
16.4 View
Opens and brings to front the selected sub window. You can use the short keys F5 to F9 and F11,
F12 to do the same. This is useful if some window is hidden or partially overlapped by another.
Caution: Do not use the menu bar during record. As soon as you select a menu topic
Windows stops all background activity. This includes the radio message reception and
decoding. Use the function keys F4 to F9 and F11, F12 instead.
16.5 Map
(Only available when Microsoft MapPoint is installed and activated)
16.5.1 Standard
Toggle the visibility of the Microsoft MapPoint standard menu.
16.5.2 Navigation
Toggle the visibility of the Microsoft MapPoint navigation menu.
16.5.3 Drawing
Toggle the visibility of the Microsoft MapPoint drawing menu.
16.5.4 Location and scale
Toggle the visibility of the Microsoft MapPoint location and scale menu.
These four menu items are part of the Microsoft MapPoint application and made accessible
through SCOUT. Please refer to the MapPoint documentation for details.
16.5.5 Import data file
The files written as MapPoint re-import .mre from the SCOUT data export section are loaded here.
The format is a standard text format and has to met these conditions:
Latitude;Longitude;RSSI
52.4599200;13.3620230;-93
52.4599200;13.3620200;-93
52.4599220;13.3620180;-93
52.4599220;13.3620170;-93
First line text contains ‘Latitude;Longitude;RSSI’
Then data as text separated by semicolon.
This function imports RSSI values only.
16.5.6 Load MapPoint map
Load a previously stored map.
16.5.7 Save MapPoint map
Store the currently displayed map with all entries shown, plots, base station, labels, etc.
GEMS/EMEA/S3D Page 37 of 52
Email: RNBPE@Motorola.com

SCOUT User Manual
16.5.8 Copy map to clipboard
Copy the currently displayed map to the Windows clipboard. The map can be pasted into other
applications from here.
16.5.9 Print map
Open a printer dialog window where you can select your preferred printer, print orientation and
paper size. Print a hardcopy of the currently displayed map.
16.5.10 Zoom in, Zoom out, Last view
You can zoom here even if the MapPoint window has not the focus.
Last view gives you, the last zoom factor and position of the map.
16.5.11 Status bar
• Visible
Toggles the status bar at the bottom of the MapPoint window on and off.
The status bar gives you information of the current speed, the GPS location, the selected geodetic
datum / map projection and the geographical position where the mouse cursor is pointing at.
By double-clicking on the latitude panel or longitude panel you can toggle the coordinates display
between decimal format and degrees, minutes, seconds (DMS) format.
• Coordinates
Select your preferred display decimal or degrees.
• Speed
Select your favored unit; km/h, miles, knots, mach.
16.6 Configure map
(Only available when Microsoft MapPoint is installed and activated)
16.6.1 Plot settings
• Set plot color for range of RSSI values. Click on the desired color box. A color dialog
appears where you can select your favored color. The color selection is saved when you
close the Plot settings dialog with the OK button.
• Set range of RSSI values. Use the up and down buttons to change.
• Set plot color for range of MER values.
• Select if you want to plot a trail with selected colors in the map or not.
• Adjust the line thickness of the plotted trail.
• Select the plot type RSSI or MER.
• Set the minimum line segment length of the plotted line. The shorter the line segments are,
the more information has to be storedand managed by MapPoint. This will decrease the
speed of painting if you play many log files in sequence or during a long drive test. Use
longer segments to increase painting speed. This will not affect the accuracy. The points in
between are stored anyway and are available at replay.
• Select if the map shall be re-centered when the car icon leaves the map screen.
• Select the icon for the car and the different base station states.
• Select if markers at reselect locations, link failure locations, are displayed in the map.
• Markers from the ‘Set Marker’ function
• Marker and balloon from a GPS location from a radios SDS message
GEMS/EMEA/S3D Page 38 of 52
Email: RNBPE@Motorola.com

SCOUT User Manual
16.6.2 Load base stations(s)
This is basically the same as loading a different database in the <Configuration> <Database>
menu.
The current icons are erased, the new data is loaded, and the base station icons are painted to the
map.
16.6.3 Delete base station(s)
Erase all base station icons from the map.
16.6.4 Find base station
Opens a dialog where all loaded base stations are listed. Highlights the selected station in the map.
16.6.5 Point and click base station add
Opens a dialog where easy adding of base stations to the database can be done. Point on the map
and copy the location to the data field by a click. Fill the additional data and save them to the
currently loaded database.
16.6.6 Delete trace
Erase all plotted traces from the map.
16.6.7 Delete hand over markers
Delete the handover marker in the map.
16.6.8 Delete link failure markers
Delete the link failure marker in the map.
16.6.9 Delete trace and markers
Erase all plotted traces and handover marker in the map.
16.6.10 Show base station labels
Toggle the display of name labels of the base stations.
16.6.11 Save the base station notes
Manually save then added notes.
16.7 Help
16.7.1 Help
Open the SCOUT help file.
16.7.2 Report a problem
Open your e-mail program for sending a problem report, questions and comments.
16.7.3 Ask for support
Open your e-mail program to cry for help.
GEMS/EMEA/S3D Page 39 of 52
Email: RNBPE@Motorola.com

SCOUT User Manual
16.7.4 Look for new version
Connect to the Motorola Scout webpage to verify if a new version is available.
16.7.5 SCOUT internet page
This opens a link to the Motorola SCOUT webpage. Check for updates here.
16.7.6 About
Show the logo button with the SCOUT version information.
17 Application sub windows
The following section describes the various parameters shown in each of the sub windows. When
applicable, reference is made to the relevant standards (ETSI 392.2, TETRA).
17.1 Serving cell
The serving cell data window displays information about the cell the radio is currently attached to.
These parameters are displayed in the serving cell data window.
• Trunking: (wide or local site trunking)
• Location area id in hexadecimal and decimal
• RF-Ch.: the MCCH channel number (MCCH: Main Control CHannel)
• Frequency calculated from the channel number and system information
• Cell name (as entered in locations database file Location field)
• RSSI and C1 levels
• The cell state of the serving cell (Exclusive, Superior, Usable, Improvable, Relinquishable )
• The cell load (unknown, low, medium, high)
• The service level ( Better than neighbor, Same as neighbor, Worse than neighbor)
• The current security class of the serving cell
• The subscriber classes allowed on the serving cell
• Fast reselect threshold
• Fast reselect hysteresis
• Slow reselect threshold above fast
• Slow reselect hysteresis
• Minimum RX access level
• Maximum TX power
• Access parameter
• Number of currently scanned foreground cells
• Number of adjacent cells
Figure 23: Serving cell data
GEMS/EMEA/S3D Page 40 of 52
Email: RNBPE@Motorola.com
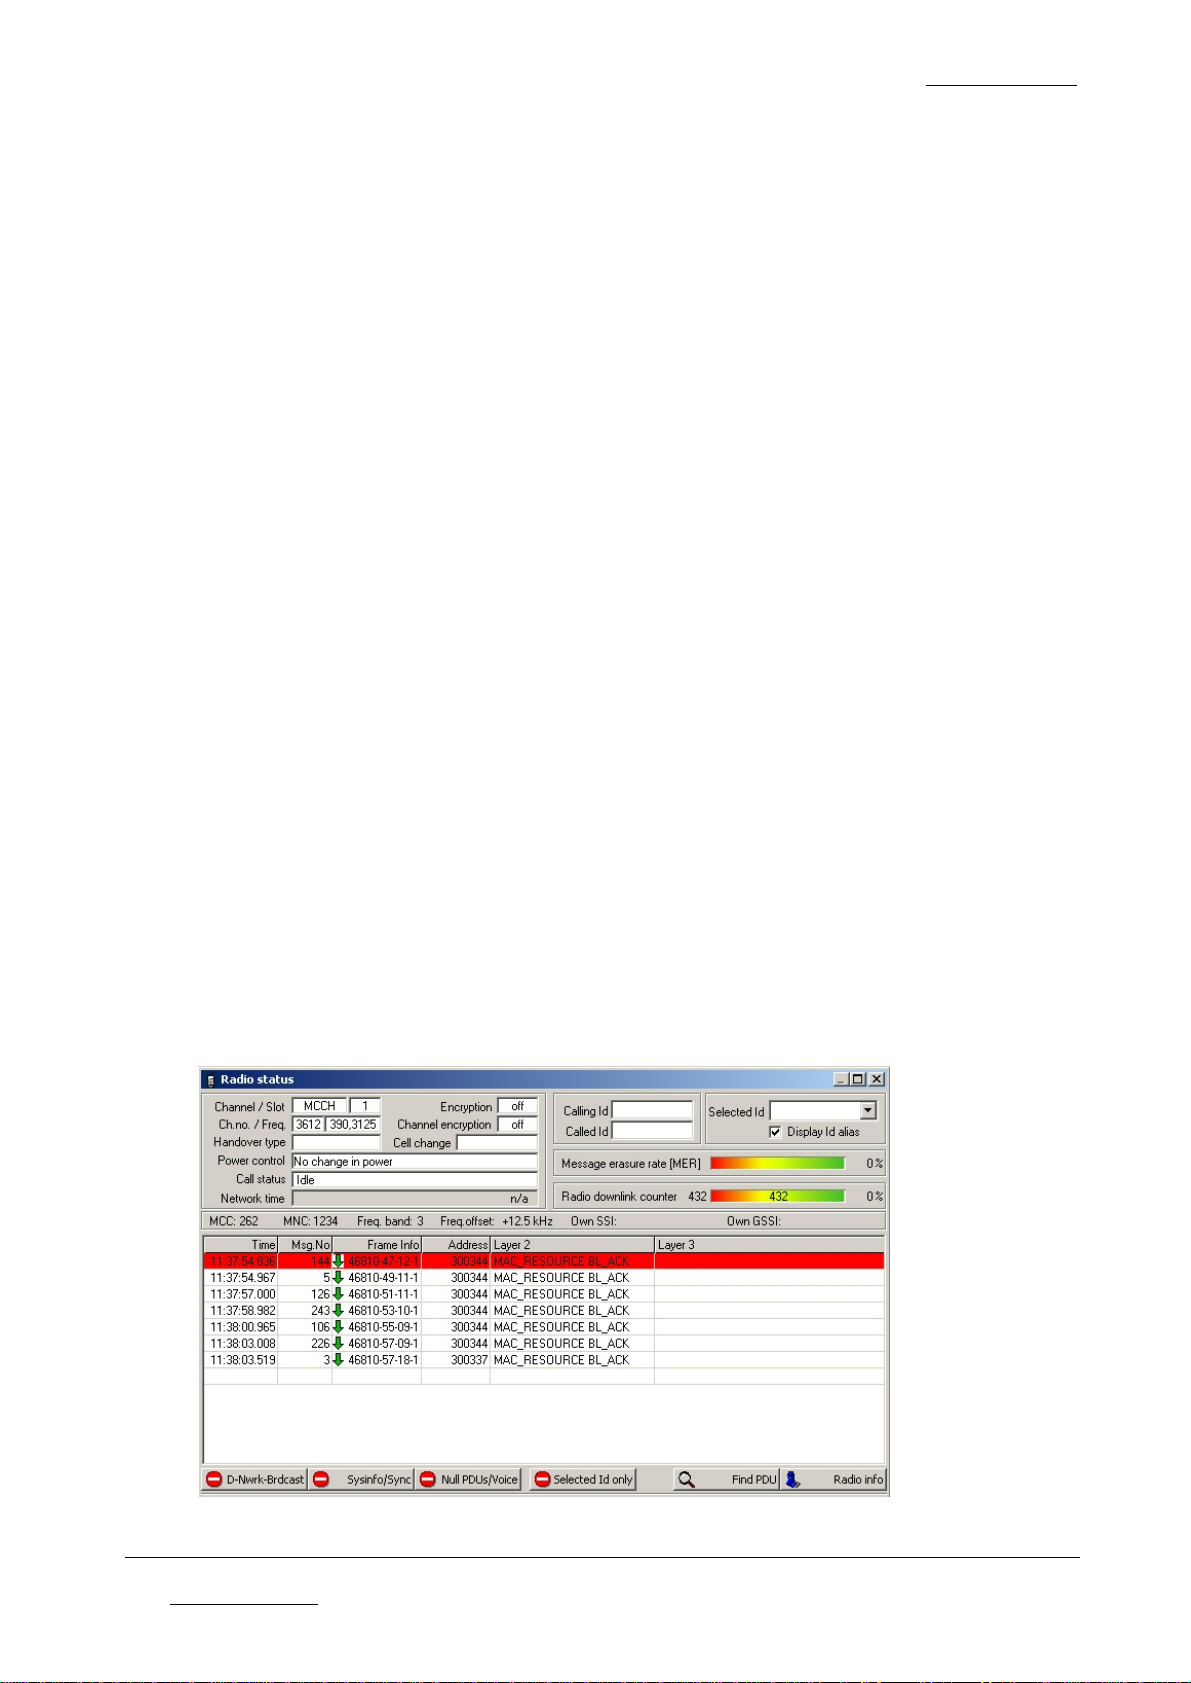
SCOUT User Manual
17.2 Radio status
The Radio status window displays information about the status of the radio and the Layer 2 and
Layer 3 PDU information.
The following parameters and related information are displayed in the Radio status window:
• The physical channel currently assigned, i.e. ‘MCCH’, ‘TCH’, STCH
• The assigned timeslot
• The assigned RF channel
• The frequency of the RF channel
• The cell reselection type
• The cell change status
• Current radios call state, i.e. ‘Idle’, ‘Ringing’, ‘Connecting’
• Encryption mode of the radio
• Encryption of the used traffic channel
• MER Message Erasure Rate
• RDC Radio Downlink Counter
• Calling Id
• Called Id
• Selected Id
• Display numbers / alias checkbox
• MCC – Mobile Country Code
• MNC – Mobile Network Code
• Freq. band - TETRA frequency band.
• Freq. offset - TETRA frequency offset.
• Layer 2 and Layer 3 PDUs. (The messages displayed and their interpretations are fully
described in ETS 300 392-2, ETS 300 392-7).
• Filter buttons to suppress frequent messages
• Display a selected Id only
• Info about the attached radio
If you want to use the filtering of Ids, type the SSI or GSSI in the ‘Selected Id’ box or choose from
the drop down list. This list reflects the contents of the alias database. Activate the ‘Selected Id
only’ button at the filter bar.
Figure 24: Radio status
GEMS/EMEA/S3D Page 41 of 52
Email: RNBPE@Motorola.com

SCOUT User Manual
17.3 PDU decode
The Layer 2 and Layer 3 PDU information can be decoded to display the full information of a
message.
Click the PDU list to select a message.
All other windows are updated, reflecting the state of the radio at the selected time.
Double-click the line to display the decoded PDU in a separate window or press the <Enter> key
alternatively to open the PDU decode window.
Click a different line of the PDU list. The PDU decode window contents are updated if possible.
Use the up and down arrow keys to scroll through the list.
The PDU decode window has six buttons at the top.
From left to right:
• Exit Close the PDU decode window.
• Save Save the currently displayed text in the window to a text file.
• Copy Copy the contents of the window to the clipboard.
• Print Print the contents of the window.
• Left, Right Arrow Select and decode the previous or next message from the PDU list.
Press <Esc> alternatively to close the PDU decode window.
Figure 25: PDU decode
17.4 Find PDU
The Find PDU button at the bottom of the radio status window can be used to search the list for a
specific PDU. When clicked, a window (Find PDU) is opened. This window is used to navigate and
find PDUs that are listed in the current table. The search can be done forward (Find Next) or
backwards (Find Previous).
The Goto Timestamp feature allows you to jump to a specific time in the layer 2 / layer 3 PDU
information log.
Figure 26: Find PDU
GEMS/EMEA/S3D Page 42 of 52
Email: RNBPE@Motorola.com
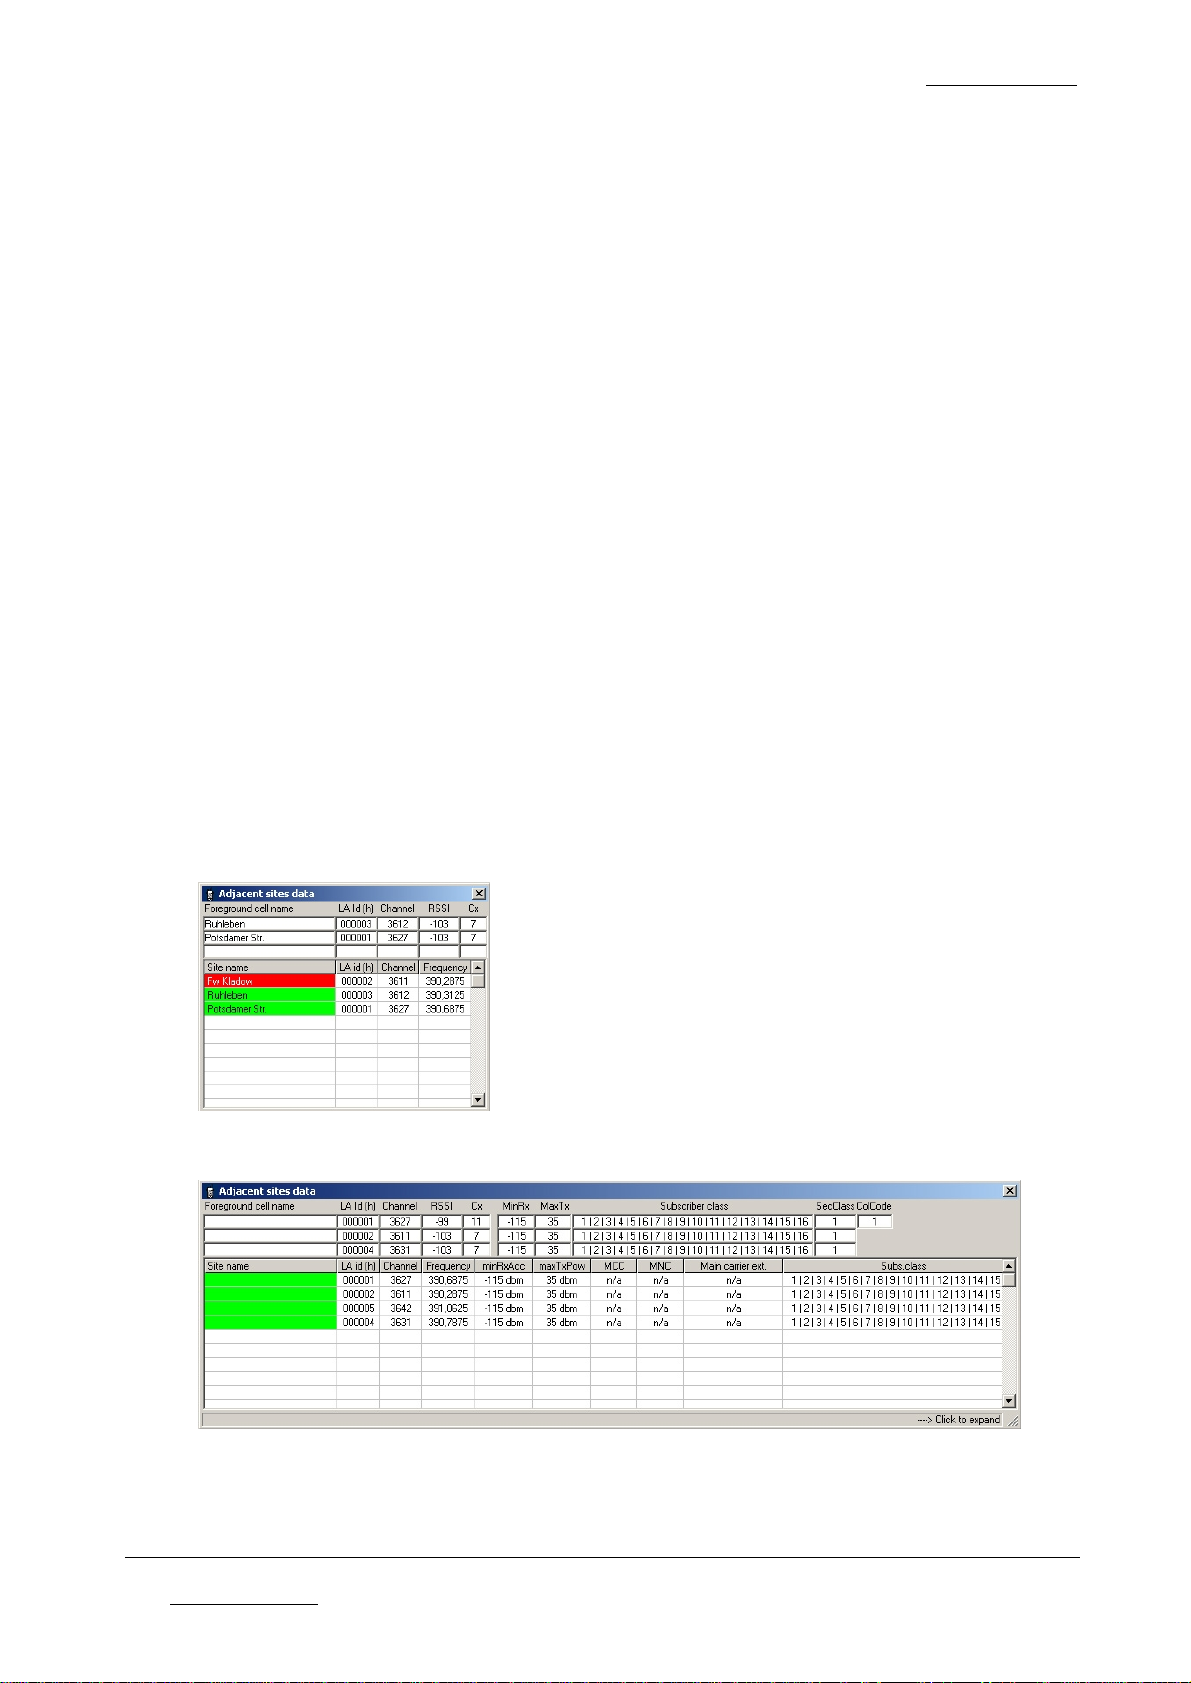
17.5 Adjacent sites
This window displays foreground and adjacent cell information.
The following parameters are displayed in the adjacent sites data window.
Foreground cells (upper three rows)
• Cell name (if available from locations database)
• Location area Id
• MCCH channel number
• RSSI and Cx level.
Adjacent cells (lower list)
• Cell name (if available from locations database)
• Location area Id
• MCCH channel number
• MCCH Frequency
• Min Rx Access Level
• Max Tx Power*
• MCC(Mobile Country Code)*
• MNC(Mobile Network Code)*
• Main Carrier Extension(Band, Offset, Duplex space)*
• Subscriber classes*
• Security class*
• Color Code of first foreground cell*
• in extended view
Green entry: Site available in wide area trunking.
Red entry: Site off or in local site trunking.
SCOUT User Manual
Figure 27: Adjacent sites data
Figure 28: Extended adjacent sites data
Extended view can be activated either by resizing the window manually, or double click into the
Neighbor Sites list (the lower list). Double click into the list again to resize to the previous window
size.
GEMS/EMEA/S3D Page 43 of 52
Email: RNBPE@Motorola.com

SCOUT User Manual
17.6 RSSI / Cx Graph
The RSSI window opens when you select it from the view menu or by pressing F8.
The Cx window opens when you select it from the view menu or by pressing F9.
These windows are displaying graphically the received signal strength (RSSI) or path loss (C) of
the serving cell and the foreground cells. The color at the bottom of the graph indicates the current
serving cell. All other colors correspond to cells that are in foreground scan. The calculated
(estimated) transmit power for the radio can also be displayed in this sub window.
You can activate or deactivate the display of the estimated TX-power of the radio anytime. This line
is derived from calculation of received TETRA parameters, NOT from measured data or messages
from the radio. (The white line)
The activation of the MER box gives you an indication of the Message Erasure Rate along the
driven route. (The cyan line at the bottom)
The colors of the graph lines can be selected at the <Configuration>, <Display> window.
After loading a file, click into the graph area to synchronize the PDU list of the Radio Status
window.If you hold down the mouse button the cursor changes to a double arrow. Move the cursor
to the left or to the right to scroll through the loaded data.
The screen is updated, reflecting the state of the radio at the selected time.
You can use as well the keyboard to navigate the graph.
Use the left/right arrow keys to move in small steps. Pressing and holding down the CTRL key
while using the arrow keys increases the size of the steps. Pressing and holding down the CTRL
and SHIFT keys while using the arrow keys increases the size of the steps again.
Use the PgUp, PgDown, Home or End keys to scroll two minutes to the left or right, or jump to the
beginning or end of the graph.
This feature is not available during record or monitoring.
Figure 29: RSSI graph
Figure 30: Cx graph
GEMS/EMEA/S3D Page 44 of 52
Email: RNBPE@Motorola.com

SCOUT User Manual
17.7 Access assignment channel (AACH)
The content of the window shows the timeslot dependant information of the AACH.
Figure 31: Access assignment channel (AACH)
17.8 Easy GPS
The easy GPS window opens when you select it from the view menu or by pressing F11.
The window consists of an upper and a lower part.
If you press the <Show distance to sites> button, the upper part is visible. Press the button again to
hide the upper part.
The upper part of the window:
Here are the distances to the current serving cell and scanned foreground cells displayed. The
distance is calculated using the latitude, longitude entries of the locations database and the current
coordinates when a valid GPS fix is available. The site names are taken from the Locations
database, too.
The lower part of the window:
The header shows the currently used geodetic datum. See <Configuration>, <Geodetic Datums>.
On obtaining a valid coordinate (either from a locked GPS received or from a recorded trace) the
background color changes from red to green.
You can select decimal display or degrees, minutes, seconds by marking the DMS checkbox. The
status line gives you information about the current status of the GPS receiver.
Click the 'U'(nit) button or the speed label to scroll through the different units. I.e. km/h, miles,
knots, mach.
The altitude information is only available if your GPS receiver supports the GGA message.
Click the 'U'(nit) button or click the altitude label to toggle the display between meters and feet.
The selected units are stored immediately and are present at next application start.
The x,y button rotates through the available coordinate systems.
The ||| button selects a different zone if available.
Figure 32: Easy GPS
GEMS/EMEA/S3D Page 45 of 52
Email: RNBPE@Motorola.com

SCOUT User Manual
17.9 VoiceNotes (Ctrl-V)
The VoiceNotes feature gives you the opportunity to record short voice notes to remember
incidents, landmarks or circumstances along the drive test. SCOUT does NOT check the settings
of your computers audio system. Verify that the microphone is selected as the recording source
and that the recording level suits your requirements. You can record some test notes in advance
before you go to a drive test. Read SCOUT in STOP mode paragraph below.
Check the ‘Stay On Top’ box to prevent VoiceNotes from being hidden by other windows.
The Record trigger let you select to start the recording manually with the space bar or buttons or by
radio. If you select >by radio< you have to ensure that SCOUT ‘knows’ the attached radios ISSI
and GSSI. Press the PTT once or change the group during record. Now SCOUT records as long as
the radio is part of a call.
It’s the responsibility of the user to establish a suitable interface from the radios audio connector to
the computers line-in input and to set up the computers record source properly.
SCOUT just starts and stops the recording the selection of the proper input has to be done by the
user.
17.9.1 SCOUT in RECORD mode
Press the VoiceNotes RECORD button to start the recording of your voice note and the VoiceNotes
STOP button to halt.
The status display shows either ‘Stop’ or ‘Rec’. You can use alternatively the SPACEBAR to start
and stop the recording. The first press starts the recording, the second press stops. The
SPACEBAR function is only available during record mode.
The VoiceNotes PLAY and REPEAT buttons have no function while SCOUT is in record mode.
The voice note is saved in the Windows ‘.wav’ format. The filename consists of the current
recorded filename and a counting number starting from zero and is stored in the same directory as
the SCOUT data file.
The SCOUT data file records a reference to the recorded voice note file. You must have the
VoiceNotes files and the corresponding SCOUT data files in the same directory while replaying a
data file. During replay the notes are played back when the VoiceNotes window is open. If the
VoiceNotes window is closed the playback of audio is disabled.
17.9.2 SCOUT in PLAY mode
To listen to the recorded voice notes the VoiceNotes window has to be opened and visible.
If the VoiceNotes window is closed no voice notes are played.
17.9.3 SCOUT in STOP mode
Click the RECORD button to record a voice note. Enter a filename for the note at the FILESAVE
dialog. After clicking the dialogs SAVE button the recording starts. Click the STOP button to halt
the recording.
Use the PLAY button to play the notes you have previously recorded. Select from the FILEOPEN
dialog window the audio file you want to play. Use the REPEAT button to play the last note again.
Figure 33: VoiceNotes
GEMS/EMEA/S3D Page 46 of 52
Email: RNBPE@Motorola.com

SCOUT User Manual
17.10 Levelbars (Ctrl-L)
The former Quality indicator window became a Level bars window and is now part of the Radio
Status window showing RSSI and C1 level of the serving cell.
Figure 34: Level bars
17.11 New file buttons (Ctrl-N)
The New data file window lets you start a new file during a recording session and/or to set markers.
If you have to record in areas where no GPS is available (i.e. subway) you can split the files in
segments according to predefined landmarks (train stations).
This window is always on top. Move it to your desired location on the screen and use the buttons
either with mouse or keyboard.
Figure 35: New file buttons
- The >New file< button starts immediately a new data file and increments the index number.
- The >New file and pause< button does the same but additionally pauses the recording. The
button text changes to >Continue< . After pressing this button again the recording continues with a
new data file.
- The >Set marker< button sets a mark into the data file and into the RSSI graph and Cx graph
display. The markers are numbered and are a set within a recording session. If you continue a
recording, SCOUT is looking for the last markers index number and continues up-counting.
The markers are exported, too. (See Data export window)
GEMS/EMEA/S3D Page 47 of 52
Email: RNBPE@Motorola.com
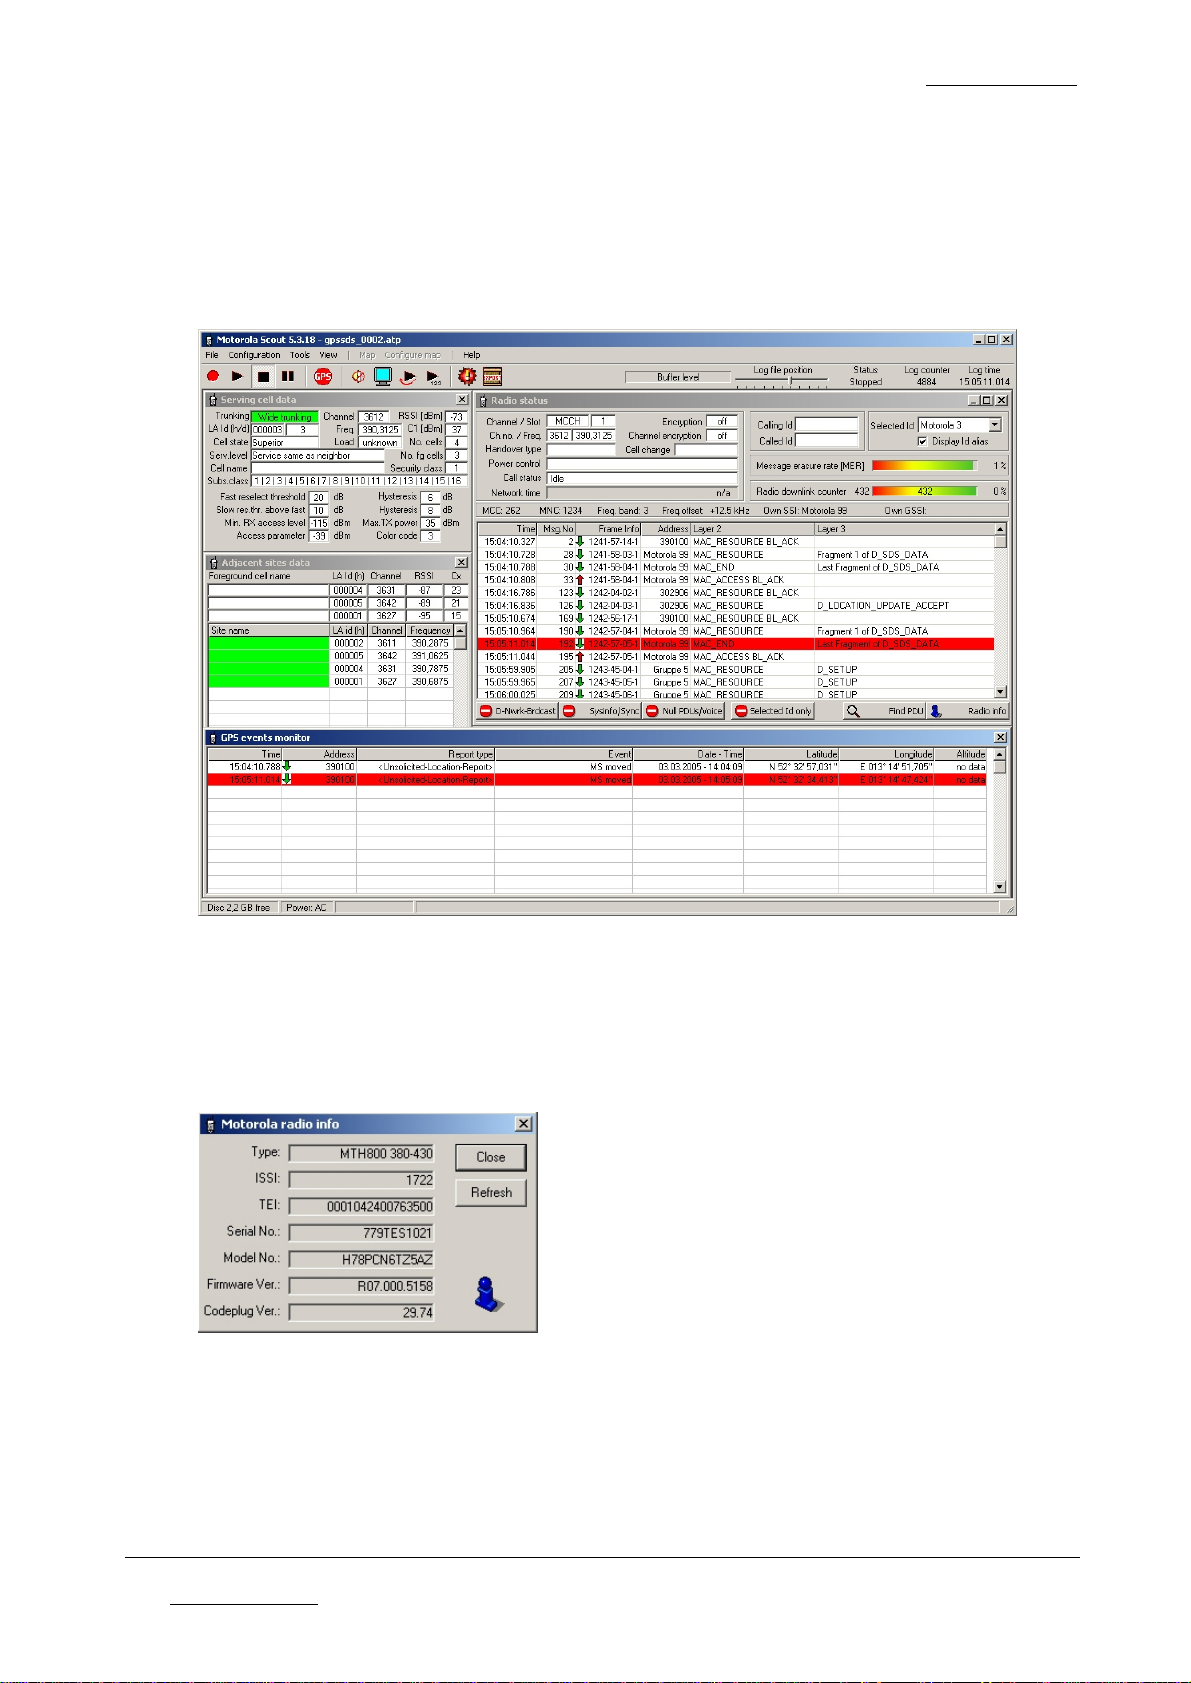
SCOUT User Manual
17.12 GPS events monitor (Ctrl-E)
The GPS events monitor window lists the decoded GPS SDS messages of Motorola radios
Click a line of the list to synchronize with PDU list.
Program an attached radio as target for SDS messaging to capture data from moving radios. The
location is shown in the MapPoint window, too.
Figure 36: GPS events monitor
17.13 Radio info (Ctrl-I)
This window shows detailed information about the connected Motorola radio.
Figure 37: Radio info
GEMS/EMEA/S3D Page 48 of 52
Email: RNBPE@Motorola.com

SCOUT User Manual
17.14 Microsoft MapPoint (F12)
Microsoft MapPoint is a standalone product with its own documentation. Please refer to the
MapPoint manual or any third party publication.
The displayed or selected menu bars are part of MapPoint and therefore the explanation out of the
scope of this document.
Figure 38: Main window with MapPoint
The bottom status bar of the Microsoft MapPoint window is showing from the left to the right:
1. Vehicle speed
2. Y - Coordinate of the GPS.
3. X - Coordinate of the GPS.
4. Currently used geodetic datum / map projection.
5. Y - Coordinate of the cursor.
6. X - Coordinate of the cursor.
Figure 39: Map window showing MER and reselection marker
GEMS/EMEA/S3D Page 49 of 52
Email: RNBPE@Motorola.com

17.15 Map plot settings
SCOUT User Manual
Figure 40: Map plot settings
• Set the range of RSSI values. Use the up and down buttons to change.
• Set the plot colors for the range of MER values.
• Select if you want to have plotted a trail in the map with selected colors or not.
• Adjust the thickness of the plotted line.
• Select the plot type RSSI or MER.
• Set the minimum line segment length of plotted line. The shorter the line segments, the more
information have to be handled by MapPoint. This will decrease the speed of painting if you
play many log files or during a long drive test. Use longer segments to increase painting
speed. This will not affect the accuracy. The points in between are stored anyway and are
available at play.
• Select if the map has to be re-centered when the car icon leaves the map screen.
• Select the icon for the car and the different base station states.
• Select if markers at handover locations are displayed in the map.
• Select if markers at link failure locations are displayed in the map.
• Select if markers at marked locations are displayed in the map.
• Select if markers at GPS locations from sent SDS messages are displayed in the map.
GEMS/EMEA/S3D Page 50 of 52
Email: RNBPE@Motorola.com

SCOUT User Manual
18 Quick start guide
18.1 Recording
DO NOT remove the hardware key at runtime. Make sure that the dongle is connected safely and
will not shake loose during operation. SCOUT will abort recording, playing, etc. and halts with an
error message.
Prepare the radio as described in section 6.3. Connect the data cable to the radio and the PC. Go
through the configuration section of SCOUT and verify all adjustments if they meet your
requirements. Make sure you have set-up and selected the radio and GPS receiver interfaces
properly.
Press the GPS button at the toolbar.
The Easy GPS window will give you information about the received satellites and quality of
position.
If the receiver has a valid position fix, the latitude and longitude display changes from red to green.
If the receiver lost satellite reception, the latitude and longitude display changes from green to red.
Wait for the display to become green. This may take some time, please refer to the GPS
manufacturers users manual.
Press the RECORD button.
A file dialog opens where you have to enter the name of the current recording session.
You don’t need to type the extension, SCOUT appends automatically.
You don’t need to type the index number of the filename, SCOUT appends automatically.
If you want to continue a sequence of files after having a pause, just double-click one of the
filenames of the sequence.
SCOUT looks automatically for the last filename of the sequence and creates a new one with the
next available index number.
IMPORTANT
Since SCOUT is not able to determine the GSSI of the attached radio on its own, it is
recommended to press the PTT of the radio once, or change the talkgroup back and forth.
SCOUT reads these information from the exchanged PDUs and displays in the Radio Status
window the ‘Own SSI’ and ‘Own GSSI’.
Now SCOUT is able to display the Call State of the radio properly.
Press the STOP button to halt the recording.
During record information are stored in the file only. What you see on the screen are the last
events. You have to load a file to analyse the data and scroll through the file. By simply pressing
the PLAYAGAIN button you will load the last recorded file into memory.
To prevent accidental shutdown of the SCOUT application, the usual termination keys, like
the main windows <x> button, CTRL+F4, and <Exit> from the <File> menu, are disabled.
Termination of SCOUT is only possible when SCOUT is in Stop mode.
One touch record
To continue a stopped recording session simply press and hold down the record button for at least
one second, recording starts after release of button. Recording doesn't start if you have left the
button area before release.
Quick record
Press Ctrl-Q to start recording immediately. The filename is composed from the date and time.
(i.e 20051101_135521_0000.atp)
GEMS/EMEA/S3D Page 51 of 52
Email: RNBPE@Motorola.com

SCOUT User Manual
18.2 Monitoring
DO NOT remove the hardware key at runtime. Make sure that the dongle is connected safely and
will not shake loose during operation. SCOUT will abort recording, playing, etc. and halts with an
error message.
IMPORTANT
Since SCOUT is not able to determine the GSSI of the attached radio on its own, it is
recommended to press the PTT of the radio once, or change the talkgroup back and forth.
SCOUT reads these information from the exchanged PDUs and displays in the Radio Status
window the ‘Own SSI’ and ‘Own GSSI’.
Now SCOUT is able to display the Call State of the radio properly.
Press the MONITORING button when you want to have a quick look to the radio and the network
without recording the information to a file. Press the button again to STOP or use the STOP button.
To prevent accidental shutdown of the SCOUT application, the usual termination keys, like
the main windows <x> button, CTRL+F4, and <Exit> from the <File> menu, are disabled.
Termination of SCOUT is only possible when SCOUT is in Stop mode.
18.3 Playing
DO NOT remove the hardware key at runtime. Make sure that the dongle is connected safely and
will not shake loose during operation. SCOUT will abort recording, playing, etc. and halts with an
error message.
To prevent accidental shutdown of the SCOUT application, the usual termination keys, like
the main windows <x> button, CTRL+F4, and <Exit> from the <File> menu, are disabled.
Termination of SCOUT is only possible when SCOUT is in Stop mode.
18.3.1 Play
Press the PLAY button at the toolbar; select the file you want to play back. Wait for the file to be
loaded into memory. You may PAUSE or STOP anytime.
18.3.2 Play again
Press the PLAYAGAIN button to play the last loaded file again. If you have no file loaded, the file
open dialog appears. You may PAUSE or STOP anytime.
18.3.3 Play files in order
Press the PLAYINORDER button, select the first file of a sequence or a file from within a sequence
to play this and the following files. You may PAUSE or STOP anytime.
19 Help
Bug Reporting and Questions please mail to: RNBPE@Motorola.com
GEMS/EMEA/S3D Page 52 of 52
Email: RNBPE@Motorola.com
 Loading...