

Page 1
©2011 Sprint. SPRINT and the logo are trademarks of Sprint.
MOTOROLA PHOTON
TM
4G
Other marks are the property of their respective owners.
9/13/12
User Guide
www.sprint.com
Page 2
Consejo:
Para encontrar esta guía para usuarios en español,
por favor visita a
Support > Devices
To find this user guide in Spanish, please visit
www.sprint.com
www.sprint.com
.
and click
Support > Devices
y haz clic en
.
Important Privacy Message
apply to third-party applications. Third-party applications may
access your personal information or require Sprint to disclose
– Sprint’s policies often do not
your customer information to the third-party application
provider. To find out how a third-party application will collect,
access, use, or disclose your personal information, check the
application provider’s policies, which can usually be found on
their website. If you aren’t comfortable with the third-party
application’s policies, don’t use the application.
Sprint UG_11a_092110
Page 3
Table of Contents
Tip:
Looking for something? If you don’t see it in the headings
listed here, try the Index on page 145.
Introduction . . . . . . . . . . . . . . . . . . . . . . . . . . . . . . . i
Section 1: Getting Started . . . . . . . . . . . . . . . . . 1
1A. Setting Up Service . . . . . . . . . . . . . . . . . . . 2
Setting Up Your Phone . . . . . . . . . . . . . . . . . . . . . . 2
Activating Your Phone . . . . . . . . . . . . . . . . . . . . . . . 3
Completing the Setup Application . . . . . . . . . . . . 3
Setting Up Your Voicemail . . . . . . . . . . . . . . . . . . . 4
Sprint Account Passwords . . . . . . . . . . . . . . . . . . . 5
Getting Help . . . . . . . . . . . . . . . . . . . . . . . . . . . . . . . 6
Section 2: Your Phone . . . . . . . . . . . . . . . . . . . . 9
2A. Phone Basics . . . . . . . . . . . . . . . . . . . . . . . 10
Your Phone . . . . . . . . . . . . . . . . . . . . . . . . . . . . . . . 10
Turning Your Phone On and Off . . . . . . . . . . . . . 11
Touchscreen and Keys . . . . . . . . . . . . . . . . . . . . . 12
Kickstand . . . . . . . . . . . . . . . . . . . . . . . . . . . . . . . . . 15
Home Screen . . . . . . . . . . . . . . . . . . . . . . . . . . . . . 16
Viewing Your Phone Number . . . . . . . . . . . . . . . 22
Entering Text . . . . . . . . . . . . . . . . . . . . . . . . . . . . . . 22
Tips and Tricks . . . . . . . . . . . . . . . . . . . . . . . . . . . 24
Making and Answering Calls . . . . . . . . . . . . . . . 25
Battery Cool Down . . . . . . . . . . . . . . . . . . . . . . . . 30
2B. Settings . . . . . . . . . . . . . . . . . . . . . . . . . . . . 31
Personalize . . . . . . . . . . . . . . . . . . . . . . . . . . . . . . . 31
Location Settings . . . . . . . . . . . . . . . . . . . . . . . . . . 34
Messaging Settings . . . . . . . . . . . . . . . . . . . . . . . 34
Security Settings . . . . . . . . . . . . . . . . . . . . . . . . . . 35
Resetting Your Phone . . . . . . . . . . . . . . . . . . . . . 37
Update Your Phone . . . . . . . . . . . . . . . . . . . . . . . 37
Troubleshooting . . . . . . . . . . . . . . . . . . . . . . . . . . . 38
2C. Contacts . . . . . . . . . . . . . . . . . . . . . . . . . . . . 39
Viewing and Using Contacts . . . . . . . . . . . . . . . . 39
Creating Contacts . . . . . . . . . . . . . . . . . . . . . . . . . 40
Transferring Contacts . . . . . . . . . . . . . . . . . . . . . . 41
Calling or Emailing Contacts . . . . . . . . . . . . . . . 42
Editing or Deleting Contacts . . . . . . . . . . . . . . . . 42
Synchronizing Contacts . . . . . . . . . . . . . . . . . . . . 42
Making Groups . . . . . . . . . . . . . . . . . . . . . . . . . . . 42
Page 4

2D. Calendar and Tools . . . . . . . . . . . . . . . . . 43
Calendar . . . . . . . . . . . . . . . . . . . . . . . . . . . . . . . . 43
Alarm Clock and Timer . . . . . . . . . . . . . . . . . . . . 44
Help Center . . . . . . . . . . . . . . . . . . . . . . . . . . . . . . 44
Tasks . . . . . . . . . . . . . . . . . . . . . . . . . . . . . . . . . . . . 45
Calculator . . . . . . . . . . . . . . . . . . . . . . . . . . . . . . . . 45
Quickoffice . . . . . . . . . . . . . . . . . . . . . . . . . . . . . . . 45
Accessibility . . . . . . . . . . . . . . . . . . . . . . . . . . . . . . 46
2E. Voice Services . . . . . . . . . . . . . . . . . . . . . . 51
Voice Actions . . . . . . . . . . . . . . . . . . . . . . . . . . . . . . 51
Voice Commands . . . . . . . . . . . . . . . . . . . . . . . . . 51
2F. microSD Card and File Transfer . . . . . . 52
Using a microSD Card With Your Phone . . . . . . 52
microSD Settings . . . . . . . . . . . . . . . . . . . . . . . . . 54
File Manager . . . . . . . . . . . . . . . . . . . . . . . . . . . . . 54
Connecting Your Phone to Your Computer . . . 55
View and Transfer Files . . . . . . . . . . . . . . . . . . . . 56
2G. Camera . . . . . . . . . . . . . . . . . . . . . . . . . . . . 60
Taking Photos . . . . . . . . . . . . . . . . . . . . . . . . . . . . 60
Recording Videos . . . . . . . . . . . . . . . . . . . . . . . . . 62
Photos and Videos Tips and Tricks . . . . . . . . . . 63
Viewing Photos and Videos . . . . . . . . . . . . . . . . . 63
Managing Photos and Videos . . . . . . . . . . . . . . . 65
2H. Wireless and Network Connections . . 66
Wireless Manager . . . . . . . . . . . . . . . . . . . . . . . . . 66
Using Bluetooth
Connecting With Wi-Fi . . . . . . . . . . . . . . . . . . . . . 68
Sprint Hotspot . . . . . . . . . . . . . . . . . . . . . . . . . . . . . 70
Sprint 4G . . . . . . . . . . . . . . . . . . . . . . . . . . . . . . . . . 71
Mobile Networks . . . . . . . . . . . . . . . . . . . . . . . . . . 72
Airplane Mode . . . . . . . . . . . . . . . . . . . . . . . . . . . . 73
Virtual Private Networks (VPN) . . . . . . . . . . . . . . 73
. . . . . . . . . . . . . . . . . . . . . . . . . . . 67
Section 3: Sprint Service . . . . . . . . . . . . . . . . 77
3A. Sprint Service: The Basics . . . . . . . . . . . 78
Voicemail . . . . . . . . . . . . . . . . . . . . . . . . . . . . . . . . . 78
Messaging . . . . . . . . . . . . . . . . . . . . . . . . . . . . . . . 83
Social Networking . . . . . . . . . . . . . . . . . . . . . . . . . 86
Making a Conference Call . . . . . . . . . . . . . . . . . . 87
Roaming . . . . . . . . . . . . . . . . . . . . . . . . . . . . . . . . . 87
3B. Web and Data Services . . . . . . . . . . . . . 89
Surfing the Web . . . . . . . . . . . . . . . . . . . . . . . . . . . 89
Android Market™ . . . . . . . . . . . . . . . . . . . . . . . . . . 91
Page 5

Downloading Apps . . . . . . . . . . . . . . . . . . . . . . . . 92
YouTube™ . . . . . . . . . . . . . . . . . . . . . . . . . . . . . . . . 93
Google Books™ . . . . . . . . . . . . . . . . . . . . . . . . . . . 95
3C. Entertainment: TV and Music . . . . . . . . 96
Music . . . . . . . . . . . . . . . . . . . . . . . . . . . . . . . . . . . . 96
Connections . . . . . . . . . . . . . . . . . . . . . . . . . . . . . 103
Digital Living . . . . . . . . . . . . . . . . . . . . . . . . . . . . . 103
Webtop Application . . . . . . . . . . . . . . . . . . . . . . . 104
Sprint Entertainment Options . . . . . . . . . . . . . . . 105
3D. GPS Navigation . . . . . . . . . . . . . . . . . . . . 107
Google Maps™ . . . . . . . . . . . . . . . . . . . . . . . . . . . 107
Google Maps Navigation™ Beta . . . . . . . . . . . . 109
Google Latitude™ . . . . . . . . . . . . . . . . . . . . . . . . . 109
TeleNav GPS Navigator . . . . . . . . . . . . . . . . . . . 110
3E. Sprint Worldwide Wireless Service . . 111
Getting Started With Sprint Worldwide Service 111
Activating Global Roaming Mode . . . . . . . . . . . 112
Making and Receiving Worldwide Calls . . . . . 113
Sprint Voicemail Service . . . . . . . . . . . . . . . . . . . 114
International Data Roaming . . . . . . . . . . . . . . . . 115
Understanding Status Messages . . . . . . . . . . . 116
Contacting Sprint . . . . . . . . . . . . . . . . . . . . . . . . 119
Section 4: Safety and Warranty
Information . . . . . . . . . . . . . . . . . . . . . . . . . . . . . 121
4A. Important Safety Information . . . . . . . . 122
General Precautions . . . . . . . . . . . . . . . . . . . . . . 123
Battery Use & Safety . . . . . . . . . . . . . . . . . . . . . . 124
Battery Charging . . . . . . . . . . . . . . . . . . . . . . . . . 125
Third Party Accessories . . . . . . . . . . . . . . . . . . . 125
Driving Precautions . . . . . . . . . . . . . . . . . . . . . . . 125
Seizures/Blackouts . . . . . . . . . . . . . . . . . . . . . . . 126
Caution About High Volume Usage . . . . . . . . 126
Repetitive Motion . . . . . . . . . . . . . . . . . . . . . . . . . 127
Children . . . . . . . . . . . . . . . . . . . . . . . . . . . . . . . . 127
Glass Parts . . . . . . . . . . . . . . . . . . . . . . . . . . . . . . 127
Operational Warnings . . . . . . . . . . . . . . . . . . . . 127
Radio Frequency (RF) Energy . . . . . . . . . . . . . 128
Specific Absorption Rate (IEEE) . . . . . . . . . . . . 129
Information from the World Health
Organization . . . . . . . . . . . . . . . . . . . . . . . . . . . . . 130
European Union Directives Conformance
Statement . . . . . . . . . . . . . . . . . . . . . . . . . . . . . . . 131
FCC Notice to Users . . . . . . . . . . . . . . . . . . . . . . 131
Page 6

Industry Canada Notice to Users . . . . . . . . . . . 132
Location Services (GPS & AGPS) . . . . . . . . . . 132
Navigation . . . . . . . . . . . . . . . . . . . . . . . . . . . . . . 133
Smart Practices While Driving . . . . . . . . . . . . . 133
Privacy & Data Security . . . . . . . . . . . . . . . . . . . 134
Use & Care . . . . . . . . . . . . . . . . . . . . . . . . . . . . . 135
Recycling . . . . . . . . . . . . . . . . . . . . . . . . . . . . . . . 136
California Perchlorate Label . . . . . . . . . . . . . . . 136
Hearing Aid Compatibility with Mobile
Phones . . . . . . . . . . . . . . . . . . . . . . . . . . . . . . . . . . 137
Software Copyright Notice . . . . . . . . . . . . . . . . 138
Content Copyright . . . . . . . . . . . . . . . . . . . . . . . 138
Open Source Software Information . . . . . . . . . 138
Export Law Assurances . . . . . . . . . . . . . . . . . . . 139
Product Registration . . . . . . . . . . . . . . . . . . . . . . 139
Service & Repairs . . . . . . . . . . . . . . . . . . . . . . . . 139
Owner’s Record . . . . . . . . . . . . . . . . . . . . . . . . . 139
Copyright & Trademarks . . . . . . . . . . . . . . . . . . 140
4B. Manufacturer’s Warranty . . . . . . . . . . . . 141
Motorola Limited Warranty for the
United States and Canada . . . . . . . . . . . . . . . . . 141
Index. . . . . . . . . . . . . . . . . . . . . . . . . . . . . . . . . . . 145
Page 7
Introduction
This
User Guide
all the features of your new phone. It’s divided into four
sections:
⽧
Section 1: Getting Started
⽧
Section 2: Your Phone
⽧
Section 3: Sprint Service
⽧
Section 4: Safety and Warranty Information
Note:
introduces you to Sprint® service and
Because of updates in phone software, this printed
guide may not be the most current version for your
phone. Visit
to access the most recent version of the user guide.
www.sprint.com
and sign on to
My Sprint
WARNING:
Please refer to the
section on page 122 to learn about information
that will help you safely use your phone. Failure to
read and follow the Important Safety Information
in this phone guide may result in serious bodily
injury, death, or property damage.
Important Safe ty Information
i
Page 8

Page 9

Section 1
Getting Started
Page 10
⽧
1A. Setting Up Service
HD VIDEO
3H
Power/Lock
Button
Setting Up Your Phone (page 2)
⽧
Activating Your Phone (page 3)
⽧
Completing the Setup Application (page 3)
⽧
Setting Up Your Voicemail (page 4)
⽧
Sprint Account Passwords (page 5)
⽧
Getting Help (page 6)
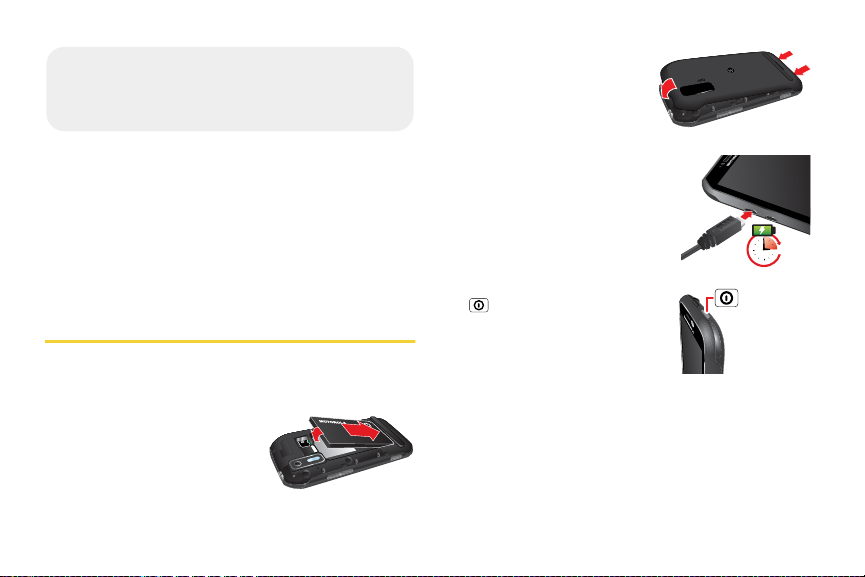
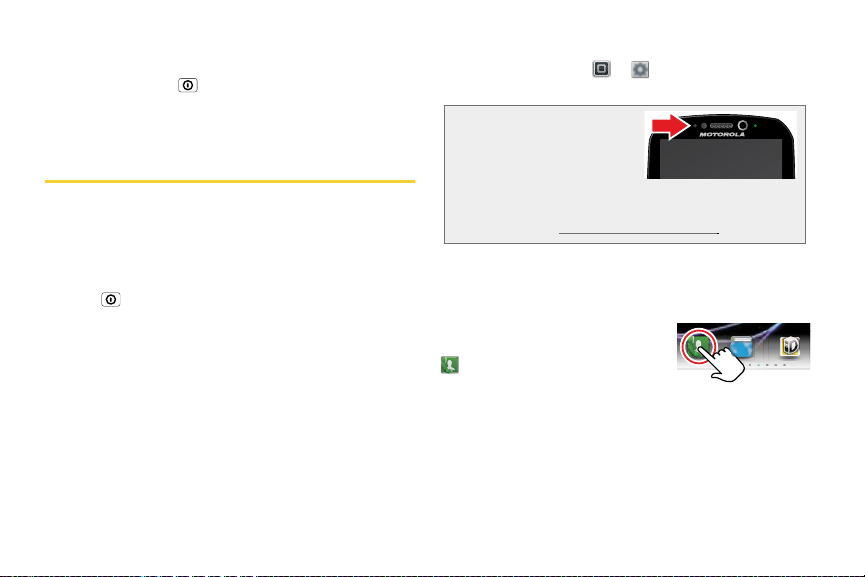
Setting Up Your Phone
1.
Install the battery.
䡲
Remove the battery from its packaging.
䡲
Insert the battery into the
opening in the back of
the phone, making sure
the connectors align.
Gently press down to
secure the battery.
2 1A. Setting Up Service
䡲
Position the battery cover
over the battery
compartment and press
down until you hear a
click.
2.
Charge your battery for at
least three hours.
3.
Press and hold the
Power/Lock
button on
top of your phone to turn it
on.
䡲
If your phone is activated, it
will turn on and show some
setup instructions.
䡲
If your phone is not yet activated, see “Activating
Your Phone” on page 3 for more information.
Page 11
Note:
Please read the battery use and safety text in the
Important Information booklet packaged with your
phone.
Activating Your Phone
䢇
If you purchased your phone at a Sprint Store
probably activated and ready to use.
䢇
If you received your phone in the mail and it is for a new
Spr int ac count or a ne w line of ser vice
activate automatically. To confirm your activation,
make a phone call.
䢇
If you received your phone in the mail and you are
activating a new phone for an existing number on your
, you will need to go online to activate your
account
new phone.
䡲
From your computer’s Web browser, go to
www.sprint.com/activate
and complete the
onscreen instructions to activate your phone.
When you have finished, make a phone call to
confirm your activation. If your phone is still not
activated or you do not have access to the Internet,
, it is
, it is designed to
contact Sprint Customer Service at
1-888-211-4727
for assistance.
Tip:
Do not press
activated. Pressing it cancels the activation process.
Note:
If you are having difficulty with activation, contact Sprint
Customer Service by dialing
other phone.
Power/Lock
while the phone is being
1-8 88-211- 4727
from any
Completing the Setup Application
After activation and any required updates, you phone
should power off and then back on again. After the
restart, you’ll see a Welcome screen.
1.
Touch the Android™ icon to begin the setup
application. Follow the prompts to set up you
phone and accounts.
䡲
View a Tutorial:
on getting started.
䡲
Set up your Google™ Account:
your Google (Gmail
䡲
Use Google location:
select your Google location options.
Touch
Begin
to see a brief tutorial
Create or sign in to
™
) account.
Touch the check marks to
1A. Setting Up Service 3
Setting Up Service
Page 12
䡲
Backup and restore:
back up data with your Google
Note:
You do not need to sign up for a Google account to
use your phone. However, to download applications
from the Android™ Market, you must link your phone to
a Google account.
2.
Touch
Finish setup
Choose whether or not to
™
account.
when you have finished setting
up your Google options. You will see a
page.
accounts
3.
Touch any of the services listed and follow the
prompts to set up accounts such as Corporate
Sync (Exchange), Email, Facebook, or Twitter.
䡲
You will need your sign-in information and
passwords for each account you set up.
䡲
When you are finished adding accounts, touch
Done adding accounts
Note:
To skip account setup and go directly to the home
screen, touch
set up accounts in the Accounts settings menu.
.
Skip
from the Welcome page. You can
4 1A. Setting Up Service
Setup
Setting Up Your Voicemail
Setting Up Visual Voicemail
Your phone automatically transfers all unanswered
calls to your voicemail, even if your phone is in use or
turned off. You should set up your Sprint voicemail and
personal greeting as soon as your phone is activated.
To set up your Visual Voicemail:
1.
Touch >
2.
Touch
prompts to:
䡲
Create a password (part of standard voicemail).
䡲
Record your name announcement.
䡲
Record your greeting.
3.
When prompted to enter information, touch
to bring up the onscreen dialpad to enter your
numeric responses.
4.
Once you have completed the setup process,
return to the voicemail page (see step 1).
Voic email
Personalize now
.
and follow the system
Dialpad
Page 13
5.
1
Touch the Welcome to Voicemail message on the
screen to play a brief explanation of the voicemail
services.
Setting Up Traditional Voicemail
In addition to Visual Voicemail, your phone and Sprint
service always offer traditional voicemail service
accessed through the Phone application.
To set up your voicemail:
1.
Touch
touch and hold .
2.
Follow the system prompts to:
䡲
Create your password.
䡲
Record your name announcement.
䡲
Record your greeting.
Note:
Dialer
to open the dial screen, and then
Voicemail Password
Sprint strongly recommends that you create a
password when setting up your voicemail to protect
against unauthorized access. Without a password,
anyone who has access to your phone is able to
access your voicemail messages.
For more information about using your voicemail, see
“Voicemail” on page 78.
Sprint Account Passwords
As a Sprint customer, you enjoy unlimited access to
your personal account information, your voicemail
account, and your data services account. To ensure
that no one else has access to your information, you
will need to create passwords to protect your privacy.
Account Username and Password
If you are the account owner, you will create an account
username and password when you sign on to
www.sprint.com
to get started.) If you are not the account owner (if
now!
someone else receives the bill for your Sprint service),
you can get a sub-account password at
Voicemail Password
You’ll create your voicemail password when you set up
your voicemail. See “Setting Up Your Voicemail” on
page 4 for more information on your voicemail
password.
. (Click
Sign in
and then click
Sign up
www.sprint.com
1A. Setting Up Service 5
Setting Up Service
.
Page 14
Data Services Password
*
*
*
With your Sprint phone, you may elect to set up an
optional data services password to control access and
authorize Premium Service purchases.
For more information, or to change your passwords,
sign on to
Service at
www.sprint.com
1-888-211-4727
or call Sprint Customer
.
Getting Help
Managing Your Account
Online: www.sprint.com
䢇
Access your account information.
䢇
Check your minutes used (depending on your Sprint
service plan) .
䢇
View and pay your bill.
䢇
Enroll in Sprint online billing and automatic payment.
䢇
Purchase accessories.
䢇
Shop for the latest Sprint phones.
䢇
View available Sprint service plans and options.
6 1A. Setting Up Service
䢇
Learn more about data services and other products
like Sprint Picture Mail, games, ringers, screen
savers, and more.
From Your Sprint Phone
GHI
䢇
Touch
Dialer
4
to check minute usage
and account balance.
DEF
䢇
䢇
Touch
Touch
Dialer
Dialer
3
to make a payment.
ABC
2
to access a summary
of your Sprint service plan or get answers to other
questions.
From Any Other Phone
䢇
Sprint Customer Service:
䢇
Business Customer Service:
1-888-211-4727
1-888 -788-4727
.
.
Page 15
Sprint 411
1
0
+
Sprint 411 gives you access to a variety of services and
information, including residential, business, and
government listings; movie listings or showtimes;
driving directions, restaurant reservations, and major
local event information. You can get up to three pieces
of information per call, and the operator can
automatically connect your call at no additional charge.
There is a per-call charge to use Sprint 411, and you
will be billed for airtime.
GHI
1
䊳
Touch
4
Dialer
.
Sprint Operator Services
Sprint Operator Services provides assistance when you
place collect calls or when you place calls billed to a
local telephone calling card or third party.
䊳
Touch
For more information or to see the latest in products
and services, visit us online at
Dialer
.
www.sp rint.com
Setting Up Service
.
1A. Setting Up Service 7
Page 16

Page 17

Section 2
Your Phone
Page 18
⽧
2A. Phone Basics
.
h
Text Mes
Your Phone (page 10)
⽧
Turning Your Phone On and Off (page 11)
⽧
Touchscreen and Keys (page 12)
⽧
Kickstand (page 15)
⽧
Home Screen (page 16)
⽧
Viewing Your Phone Number (page 22)
⽧
Entering Text (page 22)
⽧
Tips and Tricks (page 24)
⽧
Making and Answering Calls (page 25)
⽧
Battery Cool Down (page 30)
Tip:
Phone Software Upgrades
software may become available from time to time. Sprint
will automatically upload critical updates to your phone.
You can also use the menu to check for and download
updates. Touch
System updates > Update Firmware
download available updates.
10 2A. Phone Basics
– Updates to your phone’s
>Settings > About phone >
to search for and
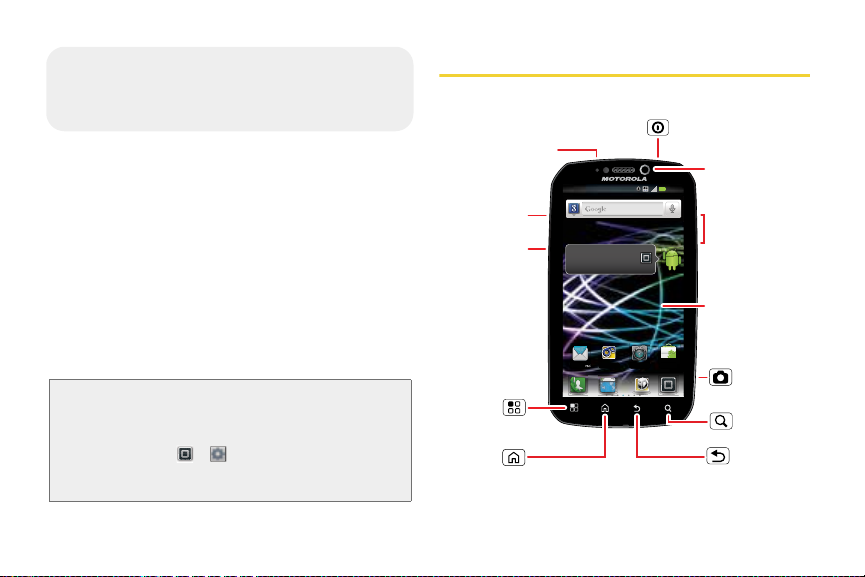
Your Phon e
1. 3.5 mm Headset
2. Micro USB
Connector
3. Micro HDMI
Connector
4. Menu
Key
5. Home
Key
See all your apps.
Touch the Launcher icon.
Text Mess
ttp://www
12. Power/Lock
Button
11:35
1 of 6
MarketCameraVoicemail
11. Front Facing
Camera
10. Volume
Button
9. Touchscreen
8. Camera
Button
7. Search
Key
6. Back
Key
Page 19
Key and Connector Functions
1.
3.5mm Headset Jack
2.
Micro USB Connector
other accessories to your phone.
3.
Micro HDMI Connector
definition display device such as a television.
4.
Menu Key
(including
context-sensitive menus from other screens.
5.
Home Key
screen. Press and hold to display the recent apps
menu.
6.
Back Key
7.
Search Key
application.
8.
Camera Button
camera app. Press to take pictures.
9.
Touchscreen
menus and features, enter text, dial phone
numbers, and more, using just your fingertips.
10.
Volume Button
from the home screen, the voice or speaker
( ) lets you access the options menus
Settings
( ) brings you back to the home
( ) returns you to the previous screen.
( ). Press to open the search
lets you attach a headset.
lets you connect a charger or
lets you connect to a high
) from the home screen and
() Press and hold to launch the
input lets you access all the phone’s
lets you adjust the ringer volume
volume during a call, and the speaker volume
while using the music player or other applications.
11.
Front Facing Camera
for use with video chat programs.
12.
Power/Lock Button
the phone options menu where you can turn the
phone off, turn Airplane mode on or off, turn Silent
mode on or off, or put the phone to sleep. Press to
lock and unlock the touchscreen.
lets you take video of yourself
(). Press and hold to open
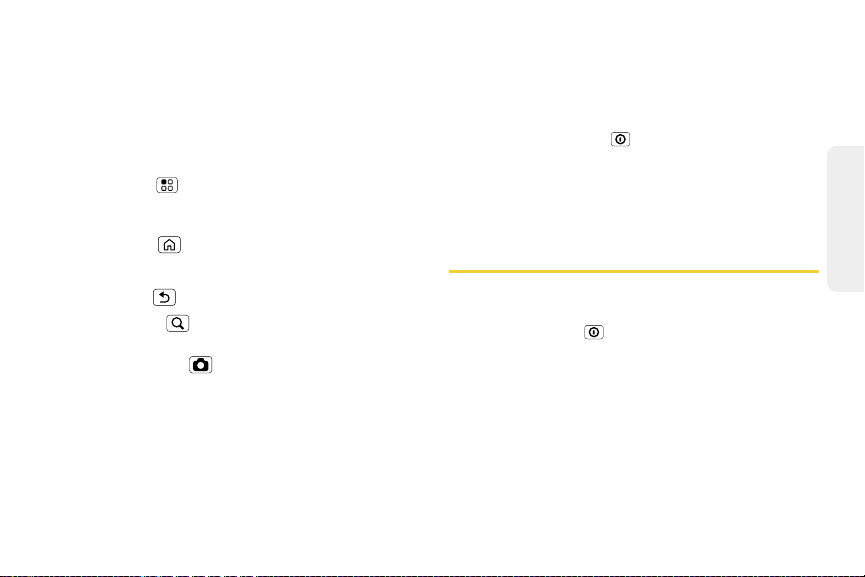
Turning Your Phone On and Off
Turning Your Phone On
䊳
Press and hold
two seconds.
As your phone connects to the network, you see a
connecting message. Your phone may require you to
enter identifying information to use it or to access
specific features.
Power/Lock
for approximately
2A. Phone Basics 11
Phone Basics
Page 20
Turning Your Phone Off
http
䊳
Press and hold to open a phone options menu,
where you can turn off the phone (
turn
Airplane mode, Silent mode
, or
Power off
Sleep
Touchscreen and Keys
Touchscreen On/Off
Your touchscreen is on when you need it and off when
you don’t.
䢇
To make your touchscreen sleep or wake up, just
press .
䢇
When you hold the phone to your ear during calls,
your touchscreen sleeps to prevent accidental
touches.
12 2A. Phone Basics
), or
on or off.
䢇
To let the touchscreen adjust brightness
automatically, touch
Brightness
Note:
and check
Your touchscreen might
stay dark if the sensor
just above it is covered.
Don't use covers or
screen protectors (even
clear ones) that cover
this sensor. To find Motorola accessories for your
phone, visit
> Settings >Display >
Automatic brightness
www.motorola.com/products
Touch Tips
Touch
To choose an icon or option, touch
it. Try it: In the home screen, touch
Dialer
.
.
.
://www.
Page 21
Touch and Hold
01
02030405060
08
09101112131415
161718192021
22
23
8
29
3031
3
1
M
THU
01
02030405060
08
0910
15
161718192021
161718192021
232425262728
29
3031
3
1
M
THU
To open special options, touch
and hold an icon or other item.
Try it: In the home screen,
touch a blank space to open
options.
Drag
To scroll through a list or move
slowly, drag up or down the
touchscreen. Try it: In the home
screen, touch
, then drag your
Contacts
list up or down.
When you drag or flick a list, a
scroll bar appears on the right.
Drag the scroll bar to move the
list to a letter.
Dialer >
Contacts
See all your apps.
Touch the Launcher icon.
Text Mess MarketCameraVoicemail
Add to Home screen
ARCH
7
11121314
Motorola widgets
ARCH
7
Android widgets
242526272
1 of 6
Shortcuts
Folders
Wallpapers
11:35
Flick
To scroll through a list or move quickly, flick across the
touchscreen (drag quickly and release).
Tip:
When you flick a long list, touch the screen to stop it from
scrolling.
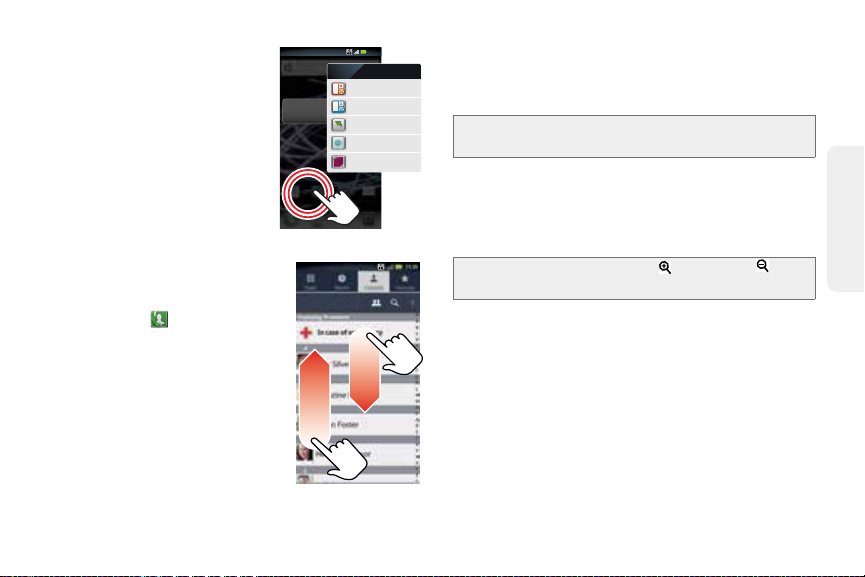
Zoom
Get a closer look at maps or pictures. To zoom in,
double-touch the screen. To zoom out, double-touch
the screen again.
Tip:
For maps you can also touch to zoom in, or to
zoom out.
2A. Phone Basics 13
Phone Basics
Page 22
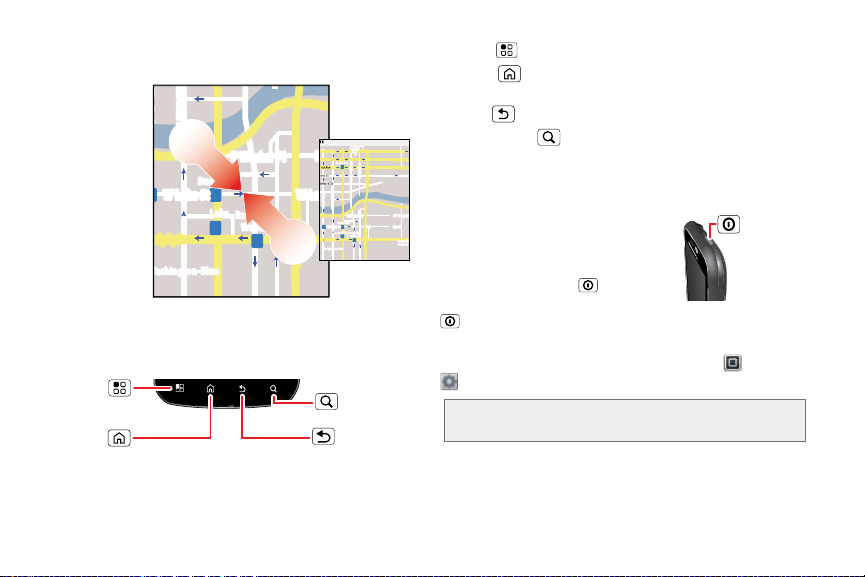
You can also zoom in or out by pinching your fingers
a
e
Menu
Key
Back
Key
Home
Key
Search
Key
Power/Lock
Button
together or moving them apart on the screen.
Pinch to zoom out.
rborn St
cker Dr
W Lake St W Lak
andolph St
Messaging
ashington-Blue
State/Lake
M
Lake
M
E Wacker Pl
Randolph/
Wabash
M
E Ontario St
Ontario St
E S
N Wabash Ave
Grand Red
M
N Dearborn St
N Clark St
N Micigan Ave
Wacker Dr
E Wacker Pl
State/Lake
W Lake St W Lake St
M
M
Lake
Randolph/
Wabash
M
E Randolph St
Messaging
Washington-Blue
Key Tips
Front Keys
䢇
䢇
Menu
Home
– Open options.
– Press to return to the home screen.
Press and hold to see recently used apps.
䢇
Back
䢇
Search Key
E Ohio St
N Rush St
N Micigan Ave
E S WaterSt
N Micigan Ave
M
application.
E Grand Av
Sleep and Wake Up
To save your battery, prevent
accidental touches, or when you
Randolph
St Metra
want to wipe smudges off your
– Return to the previous screen.
( ) – Press to open the search
touchscreen, put the touchscreen
to sleep by pressing . To wake
up the touchscreen, just press
again.
To change how long your phone waits before the
screen goes to sleep automatically, touch
Settings >Display > Screen timeout
Tip:
To make the screen lock when it goes to sleep, use
“Screen Lock” on page 36.
>
.
14 2A. Phone Basics
Page 23
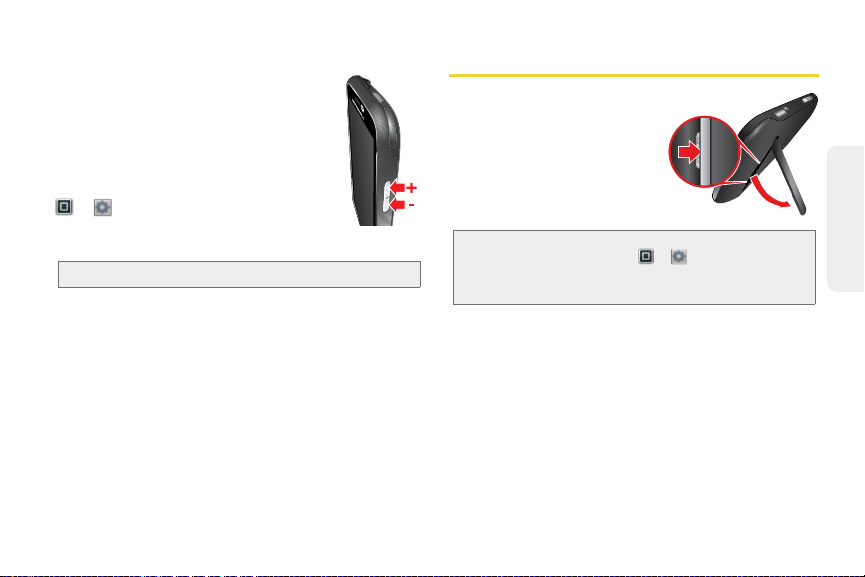
Adjust Volume
Press the volume keys to change the
ring volume (in the home screen), or the
earpiece volume (during a call).
Rotate the Screen
To set the touchscreen to stay right-side
up when you turn your phone, touch
> Settings >Display
uncheck the
Auto-rotate screen
box.
Note:
Not all applications are designed to rotate.
and
check
Kickstand
You can use the kickstand to
place your phone in an
upright position for viewing
videos.
To open the kickstand, use the
recess to lift it up and into an
open position.
Tip:
To set your phone to display the dock screen when you
open the kickstand, touch
and make sure the
selected.
If you need to plug an HDMI or micro USB cable into
your phone while it is resting on the kickstand, you can
also rotate the phone and rest it with the micro USB
and HDMI connectors on the top.
>Settings >Display
Kickstand Enable
check mark is
2A. Phone Basics 15
Phone Basics
Page 24
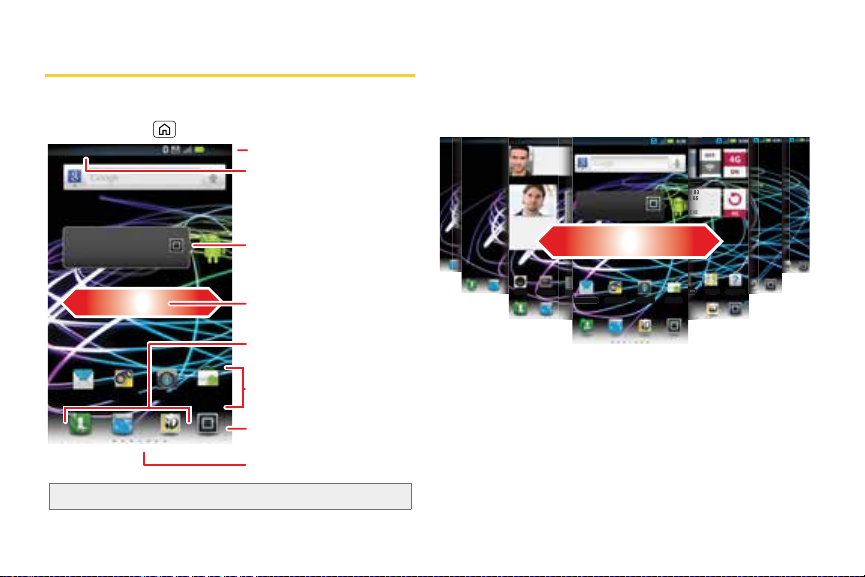
Home Screen
See all your apps.
Touch the Launcher icon.
1 of 6
11:35
Notications Bar
Touch & drag this bar down to
check notications.
Status Indicators
Shortcuts
Touch to open.
Touch to open.
App Menu
Widgets
Touch to open, or touch &
hold to move or delete.
Flick left or right to open
more panels.
Panel Indicators
Quick Launch Area
See all your apps.
Touch the Launcher icon.
1 of 6
Text Mess
a
g
Market
Camera
Voicemail
CHICAGO
H 83
L 65
unts
Maps
Help Cente
8
3
665
t
s
15 minutes ago
Scott Wilke
Tomorrow is our
big launch - wish
me luck everyone!
Looking forwa
weekend!
5 minutes ago
Music Camcorde Gal
The home screen gives you all your latest information
in one place. It’s what you see when you turn on the
phone or press . It’s basically like this:
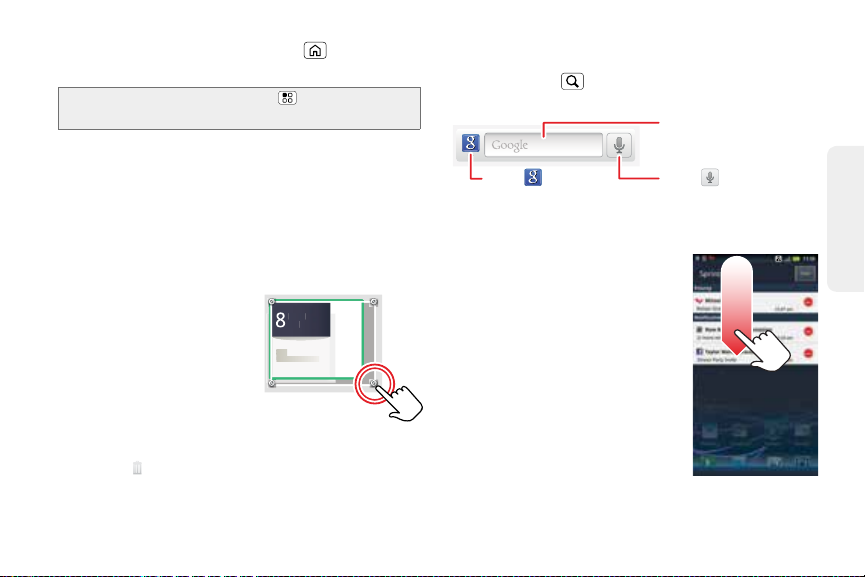
The home screen extends beyond what you see on the
screen to give you more room for adding shortcuts,
widgets, and more. Flick the home screen left and right
to see more panels or to find available space to add
widgets or shortcuts.
Note:
Your home screen might look a little different.
16 2A. Phone Basics
Use and Change Your Home Screen
On your home screen, shortcuts are icons that open
your favorite apps, Web bookmarks, contacts, email, or
music. Widgets show you news, weather, messages,
and other updates.
Page 25
8
3pm
Budget Meeting
THU
JUL
pm
g
THU
JUL
䢇
To
open
something, touch it. Press to return to
the home screen.
Tip:
When you open a widget, touch to see any options
or settings.
䢇
To
add
something or change your wallpaper, touch
and hold an empty spot until you see the
Home screen
menu.
You can also change the apps in the Quick Launch
Area along the bottom of the home screen. To
change an app, touch and hold it for a few seconds.
When the
Add to Dock
menu appears, select the new
app.
䢇
To
resize
Motorola widgets,
touch and hold a corner
until you feel a vibration,
and then drag it to the
3
Budget Meetin
desired size.
䢇
To
move
or
delete
something, touch and hold
it until you feel a vibration,
and then drag it to another spot, another panel, or
the trash at the top of the screen.
Add to
Search
To search, press , touch the text field, and enter your
search using the keypad.
Touch here to enter text.
Touch for more
search options.
Touch to search
by voice.
View Notifications and Phone Status
At the top of the screen, icons on
the left notify you about new
messages or events
(notifications). Icons on the right
tell you about phone status. Flick
the bar down to show notification
details.
This list identifies the symbols
you’ll see on your phone’s display
screen:
2A. Phone Basics 17
Phone Basics
Page 26
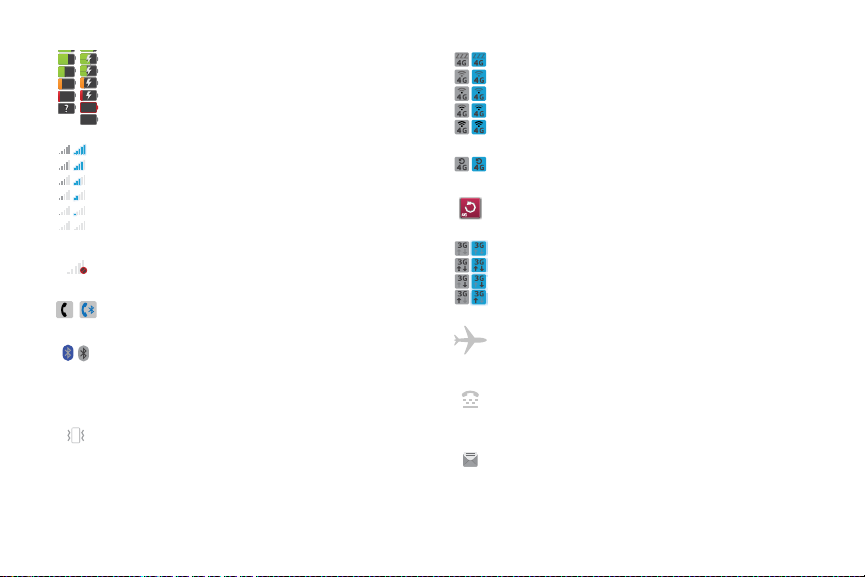
Battery Strength
— A fuller battery indicates a
greater charge. The “lightning” icon (bottom
rows) indicates the phone is charging.
4G Connection
— You are connected to the
Sprint 4G network. More lines indicate a
stronger signal.
Signal Strength
stronger signal.
No Service
You cannot make or receive any type of call.
— Your phone is without service.
Phone In Use
phone call.
Bluetooth® In Use
Bluetooth. If this icon is black, your phone is in
discoverable mode. If this icon is light gray, a
Bluetooth connection is active.
Vibrate
— Your phone is set to vibrate and not
to ring.
18 2A. Phone Basics
— More bars indicate a
— Your phone is active on a
— Your phone is using
4G Scan
— You phone is acquiring a signal
from the Sprint 4G network.
4G Manual Scan
— Use the 4G scan widget to
manually scan for a 4G signal.
3G Connection
— You are connected to the
Sprint 3G network.
Airplane Mode
receive calls and other transmissions. See
“Airplane Mode” on page 73.
TTY
— You are ready to use your phone to
make calls using a TTY (text telephone) device.
See “TTY” on page 49.
Text Message
messages. See “Reading and Replying to
— Your phone is set not to
— You have one or more text
Messages” on page 84.
Page 27
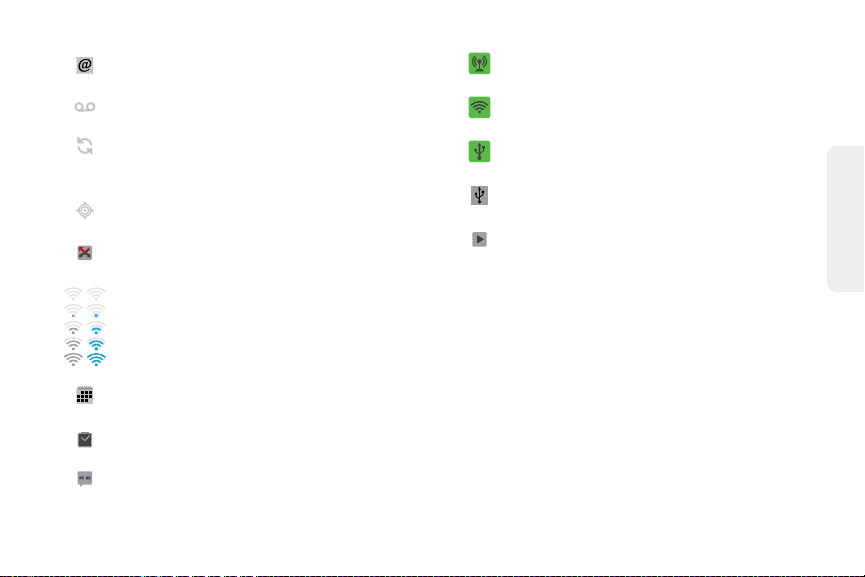
Email
— You have one or more emails.
Voic email
Data Sync
and synchronizing your calendar with your
— You have one or more voicemails.
— Your phone is downloading email
personal, Exchange accounts.
GPS
— Your phone’s GPS is active.
Missed Call
calls.
Wi-Fi
— You have one or more missed
— Your phone is connected to a Wi-Fi
Hotspot
— Your phone’s Sprint Mobile Hotspot
is turned on.
Hotspot Connected
— One or mo re wireless
devices are connected to your phone’s hotspot.
Tet her ed
— Your phone has established a data
connection for a device via a USB connection.
USB
— Your phone is connected to a computer
or other USB device.
Music Player
— Music playe r is playing music.
Phone Basics
network. More lines indicate a stronger signal.
Calendar Event
event on you calendar.
Alarm Clock
Chat
— You have an active Google Talk™ chat.
— Notification for an upcoming
— Your alarm clock is set to ring.
2A. Phone Basics 19
Page 28
Notification Light
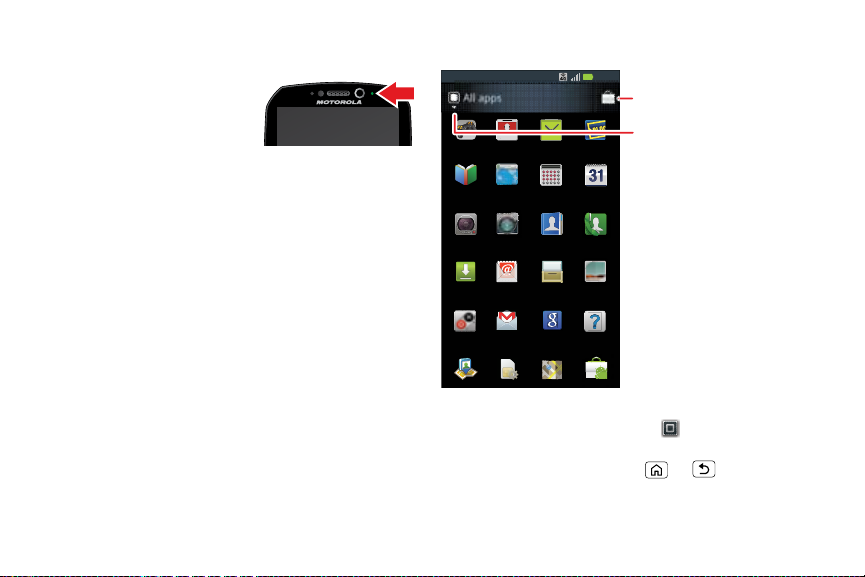
All apps
11:35
Gallery
Market
Calendar
Alarm &
Timer
Accounts100 HD
Games
ContactsCamera
Latitude
Email Files
Gmail Google
Search
Help Center
Downloads
Camcorder
Calculator
Games
Blockbuster
Browser
Manage SIM
Dialer
Maps
r
\\\
\
\\\
[
[
[
[
[[[
WWW
]]]
12345
Books
Touch to open Market.
Touch to change app
tray view and create
app groups.
Your phone has a light that
blinks whenever you receive
voicemail, email, text
message, have an
appointment, Bluetooth is in
use, or your battery is low.
Light Status Indication
Flashing green New notification.
Low battery.
Bluetooth in use.
Flashing red
Flashing blue
App Menu
Account Manage
20 2A. Phone Basics
You can find all of your apps in one place. From the
home screen, touch the app tab to open the app
menu.
To close the app menu, press or .
Page 29
Recent Apps
In the home screen, touch and hold to see the
most recent apps you used. Touch an app to open it, or
touch to return to the home screen.
Widgets
A widget is small app on the home screen that displays
information, such as weather, news, and social
networking updates. You can add a widget, such as a
clock, music player, or a calendar that shows
upcoming appointments. To open a widget, touch it.
Creating Widgets
1.
Find an empty spot on your home screen where
you want to add a widget. You can flick left or right
to open other panels on your home screen.
2.
Touch and hold the empty spot until you see the
Add to Home screen
3.
Touch
Motorola widgets
4.
Touch the type of widget. If necessary, enter the
widget settings.
menu.
or
Android widgets
.
Tip:
You can change a widget’s size. Just touch and hold the
widget. When the widget’s outline turns white, drag one of
the corners to make it the size you want.
Note:
If you install apps from Android Market™ that have
widgets, touch and hold the home screen, and then
select a widget to add to the home screen.
Setting Up Widgets
You can customize some widgets. Touch a widget to
open it, and then touch .
You may already have several useful widgets on your
home screen:
䢇
Messages
long it shows new messages. To add email
accounts, see “Setting Up Messaging” on page 85.
䢇
News
shows new stories, or choose a news source. To
choose a source, touch , and then choose preset
Bundles
URL for a
䢇
Weather
To add locations, touch , enter a city, and touch
: Change the widget name or choose how
: Change the widget name, choose how long it
or
Channels
Webpage
, or choose
or an
RSS feed
Custom
.
to enter a
: Change temperature units or add locations.
2A. Phone Basics 21
Phone Basics
Page 30
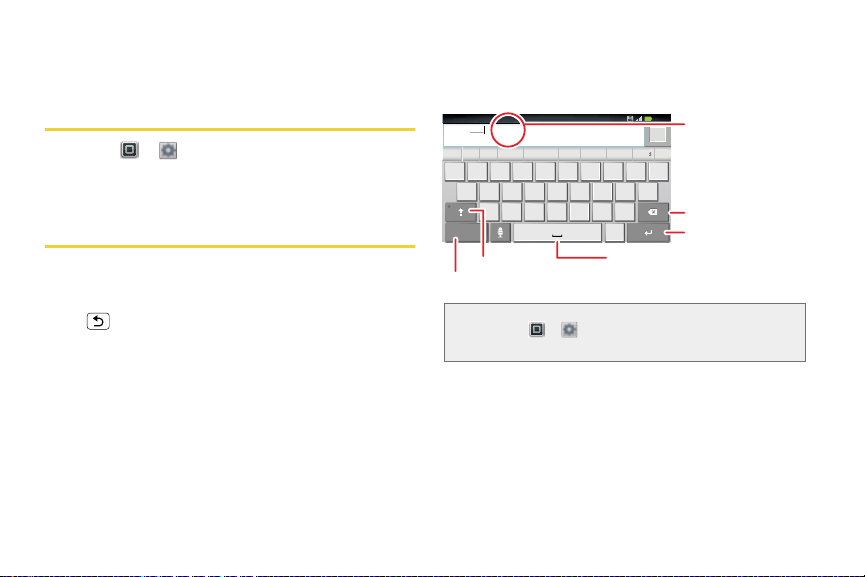
Search
zxcvbnm
asdfgh jkl
qwe r t yu i o p
.
?123
then them than themselvesthence theme themes themed turned
...
Done
See you then
11:35
Delete
Return
Space
Symbols/Numbers
Shift
Text Entry
Touch to
open
the
touchscreen
keyboard.
. When you open the weather widget, flick left
to see other locations you added.
Viewing Your Phone Number
䊳
Touch >
Settings > About phone > Status
(Your phone number and other information about
your phone and account appear.)
Entering Text
Touchscreen Keyboards
Touch a text field to open a touchscreen keyboard.
Press to close it.
To
move the cursor
to go.
22 2A. Phone Basics
, touch the location where you want
Multi-touch Keyboard
Use the multi-touch keyboard to enter letters one at a
time.
.
Note:
To set your screen to rotate when you turn the phone,
>Settings >Display
touch
Auto-rotate screen
check mark is selected.
and make sure the
Page 31

General Tips Swype keyboard
ALT
x
Anne
a
e
n
To…
Enter
Enter
Enter
Enter
Delete
delete more)
Start a
text messaging)
Select text, Cut, Copy
Paste
numbers
or
symbols
alternate
characters Touch
one capital
only capital
letter
letters
a character (hold to
new line
(email or
, or
Touch
Symbols
?123
.
Alternate
from the
numbers &
screen.
symbols
Shift
Touch
Touch
(touch
Touch
Touch
.
Shift Lock
Shift
twice).
Delete
Return
.
.
Touch and hold a blank
spot in a text entry area.
Swype™ lets you enter a word with one continuous
motion. To enter a word, just drag your finger over the
letters.
:-)
䢇
䢇
䢇
䢇
To enter a word, just
Anne
Anne
@#
qwe r t yu i op
12 3
e
&$456+:;
asdfghj k l
a
!7890
z
xcvbnm
,
SYM
EN
_
%()
?
/
n
,
.
Send
trace a path through the
letters.
To capitalize, go above
the keypad.
“
For double letters, circle
the letter.
To enter the small number or symbol at the top of a
key, touch and hold the key.
To enter several symbols, touch
SYM
.
To enter apostrophes in common words (like “I’ll”),
drag through the apostrophe key.
To correct a word, double-tap it. Swype shows a
small menu of other word options. Swype might also
show a menu if it can’t guess your word.
2A. Phone Basics 23
Phone Basics
Page 32

䢇
If Swype doesn’t know a word, touch individual
letters to enter it. Swype remembers, so next time
you can just drag over the letters.
Text Entry Settings
Touch
䢇
䢇
䢇
䢇
>Settings > Language & keyboard
To change your Swype settings, touch
Swype
To change the language and the style for your
touchscreen keyboard, touch
Select locale
.
To edit your word suggestion dictionary for the
multi-touch keyboard, touch
User dictionary
.
To change your multi-touch keyboard settings, touch
Multi-touch keyboard
.
Tips and Tricks
General Tips
To…
Return to the
home screen
24 2A. Phone Basics
Press .
To…
See
recently
numbers
dialed
.
.
Sleep/wake
your phone
screen
Set
timeout
Tur n
sound
Touch
Press .
Touch
>Screen timeout
Press and hold >
Dialer > Recent
>Settings > Display
.
.
Silent mode
.
on or off
Search
Show
apps
Tur n
mode
last few
used
airplane
on/off
Press .
Press and hold .
Press and hold
.
mode
> Airplane
Page 33

Battery Tips
Your phone is like a small computer, giving you a lot of
information and apps, with a touch display. Depending
on what you use, that can take a lot of power.
To save battery life, you could reduce:
䢇
Recording or watching videos, listening to music, or
taking pictures.
䢇
Widgets that stream information to your home
screen, like news or weather. (See “Home Screen”
on page 16.)
䢇
Email updates: Touch >
>
settings
Data push
schedule
䢇
Turn off Bluetooth power: touch
Email delivery
to uncheck it, and then touch
>
Manually
.
Wireless & networks >Bluetooth
䢇
Turn off Wi-Fi: touch
Wireless & networks
䢇
Display brightness: Touch
Display > Brightness >
䢇
Display timeout delay: Touch
>Wi-Fi
(dimmer setting).
Display > Screen timeout >
Email >
>
Email
. Touch the check box next to
Fetch
>Settings >
.
> Settings >
.
> Settings >
>Settings >
(shorter setting).
Making and Answering Calls
Making Calls
䊳
From the home screen, touch
Recent Calls List
Touch to open, then touch
an entry to call.
Return Call
Backspace
Touch to delete digits
you entered.
Add to Contacts
Call
Enter a phone number
& touch here to call it.
Voice Call
2A. Phone Basics 25
Dialer
.
Phone Basics
Page 34

Speed Dial
Connected
Rohan Grant
003-361-2345678
00:38 Sprint
SpeakerMute
DialpadAdd call
End call
Bluetooth
11:35
Call Timer
Mute
Touch to mute or
unmute the call.
End Call
Touch to hang up.
Speaker
Touch to turn the
speaker on or o.
Dialpad
Touch to enter
numbers during a call.
Your phone can store eight speed dial contacts.
Assigning a Speed Dial Contact
To assign a speed dial to a contact:
1.
From the home screen, touch
2.
Touch and hold any of the keys from two through
9, and follow the prompts to assign a contact to
that key.
Note:
Making a Call Using Speed Dial
To make a call using speed dial:
䊳
Touch and hold the speed dial key assigned to the
contact you want to call.
26 2A. Phone Basics
The first speed dial key (1) is assigned to voicemail.
Dialer
In-Call Options
.
Page 35

During a call, you will see a number of options. Touch
an option to select it.:
䢇
Add call:
Put current call on hold and make a second
call.
䢇
Merge:
Initiate a conference call.
䢇
End call:
End the current call.
䢇
Dialpad/Hide:
Toggle the appearance of the
on-screen dialpad.
䢇
Speaker:
Route the device’s audio through the
speaker (On) or through the earpiece (Off).
WARNING:
Note:
Because of higher volume levels, do not place
your phone near your ear during speakerphone
use.
Using a mobile device or accessory while driving may
cause distraction and may be illegal. Always obey the
laws and drive safely.
Your phone includes a proximity sensor. When you
hold the phone to your ear, the display goes dark to
prevent accidental touches. When you move your
phone away from your ear, the display lights up again.
Tip:
You can touch or to leave the active call display.
To reopen it, touch
progress.
䢇
Mute:
Mute the microphone during an active call.
> > Return to call in
Touch again to unmute the microphone.
Note:
If Mute is activated, the speakerphone is deactivated.
䢇
Bluetooth:
connected Bluetooth
Route the phone’s audio through a
®
headset (On) or through the
speaker (Off). (First, turn on your phone and pair it.
See “Connecting New Devices” on page 67.)
䡲
When the call is routed to a Bluetooth headset,
the Bluetooth call icon is displayed on the
status bar.
䡲
To route the current call back to your phone,
touch
Bluetooth
. Touch it again to route the call
back to the connected Bluetooth headset.
䡲
When Bluetooth or the Bluetooth headset is
turned off, the call is routed through either the
earpiece or the speaker and shows .
2A. Phone Basics 27
Phone Basics
Page 36

Answering Calls
Answer
䊳
To answer a call while the display is active, touch
. When the display is not active, answer by
dragging to the right.
䊳
To ignore a call while the display is active, touch
Ignore
. When the display is not active, ignore by
dragging to the left. To send a text message to
the caller you ignored, select a message from the
list and touch
If the incoming call is from one of your Contacts, the
person’s name is displayed. You may also see the
caller’s phone number, if available.
Ending a Call
䊳
To end a call, touch
Note:
Screen protectors can interfere with touchscreen
performance. Aftermarket screen protectors must have
an opening for the proximity sensor to operate properly.
You may experience abnormal function if an aftermarket-protector or protective film covers proximity
sensor area at the top of the phone.
28 2A. Phone Basics
Ok
.
End Call
End call
.
Missed Phone Calls
Missed phone calls are forwarded to voicemail. When
you do not answer an incoming call, you will see a
Missed Call notification.
To display a Missed Call entry from the notification bar:
䊳
Drag the notification bar down and touch the
missed call notification.
To display a Missed Call entry from the home screen:
1.
Touch
2.
Touch an entry.
Dialer > Recent
.
Recent Calls
To see all recent calls (call history):
䊳
To see recent or missed calls, touch
Recent
䡲
To call a number, touch .
䡲
To send a text message, create a contact, view a
contact, or other options, touch and hold an entry.
䡲
To clear the list, touch
> Clear list
Dialer >
.
Page 37

Making a Conference Call
1
1
With conference calls, you can talk to two people at the
same time. When using this feature, the normal airtime
rates will be charged for each of the two calls.
䊳
To start a conference call, call the first number.
After the call connects, touch
Add Call
number, or select it from contacts or favorites.
When the next number answers, touch
䊳
To end a conference call, touch
End Call
Emergency Calls
Your phone supports emergency calling. Emergency
phone calls can be made even when your SIM card is
blocked or not in your phone.
䊳
Touch
Dialer
to be connected to an emergency response center.
If you are on an active call, you must end it before
calling 911. If your phone is locked, touch the
Emergency call
button at the bottom of the screen.
When you make an emergency call, your phone’s GPS
Enabled feature can help emergency service
personnel find you, if you are in a location where your
WXYZ
9
, enter and touch
. Dial the next
Merge
.
.
phone's GPS antenna has established a clear view of
the open sky and your local emergency response
center has the equipment to process location
information. See “Location Services (GPS & AGPS)” on
page 132. Because of the limitations of this feature,
always provide your best knowledge of your location to
the emergency response center when you make an
emergency call.
Note:
Your service provider programs one or more
emergency phone numbers that you can call under
any circumstances, even when your phone is locked.
Emergency numbers vary by country. Your preprogrammed emergency number(s) may not work in
all locations, and sometimes an emergency call cannot
be placed due to network, environmental, or
interference issues.
Important:
Always report your location to the 911 operator
when placing an emergency call.
designated emergency call takers, known as
Public Safety Answering Points (PSAPs) may not
be equipped to receive GPS location information
from your phone.
Some
2A. Phone Basics 29
Phone Basics
Page 38

Note:
Your phone can use location based services (GPS and
AGPS) to help emergency services find you. See
“Location Services (GPS & AGPS)” on page 132.
Battery Cool Down
In very limited circumstances, such as where your
phone has been exposed to extreme heat, you may
see “Cool Down” messages. To avoid possible
damage to your battery and phone, you should follow
these instructions until the phone is within its
recommended temperature range. When your phone is
in “Cool Down” mode, only emergency calls can be
made.
30 2A. Phone Basics
Page 39

2.
2B. Settings
Touch a language to select it.
Tip:
You can also access settings by touching >
from any home page.
Settings
⽧
Personalize (page 31)
⽧
Location Settings (page 34)
⽧
Messaging Settings (page 34)
⽧
Security Settings (page 35)
⽧
Resetting Your Phone (page 37)
⽧
Update Your Phone (page 37)
⽧
Troubleshooting (page 38)
Personalize
Display Language
You can choose to display your phone’s onscreen
menus in English or Spanish.
1.
Touch
Select locale
>Settings > Language & keyboard >
.
Sound Settings
Ringtones
Your phone provides a variety of ringer options that
allow you to customize your ring and volume settings.
These options allow you to identify incoming calls and
messages by the ring.
Selecting Ringtones
To personalize your ringtones:
1.
Touch
or
2.
Touch a ringtone to preview and select it, and
touch
>Settings > Sound > Phone ringtone
Notification ringtone
OK
to assign it.
.
2B. Settings 31
Settings
Page 40

Assigning a Ringtone to a Contact
You can also assign a ringer to a specific contact entry
so you know who's calling without looking at the
phone.
1.
Touch
2.
Touch a contact to open it, and then press
Options > Ringtone
3.
Touch a ringtone to preview and select it, and
touch
Dialer > Contacts
OK
to assign it.
.
.
Vibrate Settings
Vibrate
The Vibrate All option allows you to be notified of calls
and messages with a vibration instead of an audible
alert.
To activate Vibrate All:
䊳
Press and hold the Volume button down while on
the home screen until the phone vibrates.
To deactivate Vibrate All:
䊳
Press and hold the Volume button up.
32 2B. Settings
Ring and Vibrate
To set your phone to ring and vibrate when you receive
phone calls:
䊳
Touch
>Settings >Sound > Vibrate
touch an option to select it.
>
Silent Mode
The Silent Mode option allows you to mute all sounds
without turning your phone off.
To activate and deactivate Silent Mode:
䊳
Press and hold
Phone Options menu and touch
Power/Screen Lock
Silent mode
Adjusting the Phone’s Volume Settings
Adjust your phone’s volume settings to suit your needs
and your environment.
1.
Touch
2.
Select
>Settings >Sound > Volume
Ringtone, Media
, or
Alarm
.
and
to open the
.
.
Page 41

3.
Choose a volume level and touch OK.
Tip:
You can adjust the ringer volume while on the home
screen (or the earpiece volume during a call) by using
the Volume button on the left side of your phone.
Display Settings
Changing the Screen Timeout
Select how long the display screen remains backlit
after any screen touch or keypress is made.
䊳
Touch
and then touch a duration.
Note:
Changing the Wallpaper
Choose what you see on the display screen while
powering on or off and while on the home screen.
䊳
From the home screen, touch
Wallpaper settings > Gallery
wallpapers
>Settings >Display > Screen timeout
Long backlight settings reduce the battery’s talk and
standby times.
>Settings >
,
, or
Wallpapers
ID wallpapers, Live
.
To select a wallpaper from ID wallpapers, Live wallpapers,
or Wallpapers:
1.
Flick the thumbnail images left or right to select a
wallpaper
2.
Touch
.
Set wallpaper
to assign an image.
To select a wallpaper from Gallery:
1.
Touch
2.
Touch an image to open it.
3.
Crop the picture if prompted, and then touch
to set the image as your wallpaper.
Tip:
Gallery
.
You can also set an image as a wallpaper from within
Gallery
by touching and holding the image thumbnail
and then touching
Set as > Wallpaper
.
Changing the Clock Display
Select a format for the time and date display.
䊳
Touch
䡲
Touch
24-hour time display and 12-hour time display.
>Settings > Date & time
Use 24-hour format
to toggle between
.
2B. Settings 33
Save
Settings
Page 42

䡲
Touch
Select date format
, and then touch a date
format to assign it.
Note:
The time, time zone, and date are set by the network,
and even though they show up as options, they cannot
be changed.
To enable your phone’s Location feature:
䊳
Touch >
Settings >Location & security
select one or more services to use.
Messaging Settings
and
Location Settings
Your phone is equipped with a Location feature for use
in connection with location-based services.
The Location feature allows the network to detect your
position. Turning Location off will hide your location
from everyone, except 911.
Note:
Turning Location on will allow the network to detect
your position using GPS technology, making some
Sprint applications and services easier to use. Turning
Location off will disable the GPS location function for all
purposes except 911, but will not hide your general
location based on the cell site serving your call. No
application or service may use your location without
your request or permission. GPS-enhanced 911 is not
available in all areas.
34 2B. Settings
Messaging settings make messaging easier by letting
you decide how you would like to be notified of new
messages, create a signature with each sent message,
and create your own preset messages.
Setting Message Notification
When you receive a message, your phone notifies you
by displaying an icon in the notification bar. You can
also choose to be notified with a sound while making a
phone call.
To turn messaging notifications on and off:
䊳
Touch >
settings > Text Messaging, Email,
Messaging > Notifications
Messaging >
.
> Messaging
or
Social
Page 43

To select a message notification ringtone:
Location & security settings
Location & security settings
Location determined by Wi-Fi and/or mobile
networks
Use wireless networks
Security
Manage restriction lock
SIM card lock
My Location
Locate to street-level (requires more battery
plus view of sky)
Use GPS satellites
Lock screen with a pattern, PIN, or password
Set up screen lock
Allow Voice Commands to be launched via
Bluetooth Multi-function button while device
is locked
Allow Bluetooth bypass
Set up restriction lock
Set up SIM card lock
20 minutes
Security lock timer
11:35
Set lock timer.
Set up screen lock.
Bluetooth bypass.
䊳
Touch >
settings > Text Messaging
Select ringtone
then touch
Messaging >
> Messaging
or
Social Messaging >
, touch a ringtone to select it, and
OK
. For Email, touch
Messaging
settings > Email > Notifications > Select Ringtone
To set your phone to vibrate when you receive a message:
䊳
Touch >
Messaging >
> Messaging
settings > Text Messaging or Social Messaging >
Vibrate
Email > Notifications > Vibrate
. For Email, touch
Messaging settings >
.
Security Settings
䊳
Touch
.
> Settings > Location & security
2B. Settings 35
.
Settings
Page 44

Your Phone’s Lock Feature
1
1
Screen Lock
Note:
You can make emergency calls on a locked phone
(see “Emergency Calls” on page 29).
To lock the screen:
䊳
Press on the top of the phone.
– or –
Let the screen time out (don’t press or touch
anything).
To unlock the screen:
䊳
Press and then drag to the right.
Security Lock
To access the Security lock menu:
䊳
Touch
up screen lock
䡲
䡲
36 2B. Settings
>Settings >Location & security > Set
, and then select an option.
To set a password or an unlock pattern that you
need to draw to unlock your screen, touch
Pattern, PIN
, or
To turn the lock off, touch
Password
.
None
䡲
To change the password or lock pattern, touch
Change screen lock > Pattern, PIN
, or
Password
.
Unlocking Your Phone
䊳
At the “Enter password to unlock” or “Enter PIN to
unlock” prompt, enter your password or PIN and
touch
Enter
.
– or –
At the “Draw pattern to unlock” prompt, draw the
saved pattern to unlock the phone.
Calling in Lock Mode
You can place calls to 911 when in lock mode.
䊳
Touch the
the screen, dial and touch .
.
Emergency call
WXYZ
9
button at the bottom of
Page 45

Resetting Your Phone
Update Your Phone
Phone Reset
Selecting
their default values, and clears all information (text
messages, contacts, emails, etc.) and downloaded
apps.
Reset phone
1.
Touch
.
Reset
2.
Select
Erase Internal Storage (media area)
Erase SD card
WARNING:
3.
Read the prompt and touch
complete the reset. (Press to cancel.)
resets all phone settings back to
>Settings > Privacy > Factory Data
, and then touch
All data on your phone will be deleted.
Reset phone
Erase everything
and/or
.
to
Stay up to date with the latest software for your phone.
You can check, download, and install updates using
your phone or your computer:
䢇
Using your phone:
You may get an automatic notification of an available
update on your phone. Follow the instructions to
download and install.
To manually check for updates, touch
Settings > About phone > System updates >
Update Firmware
Your phone downloads any updates over your
mobile network. Remember, these updates can be
quite large (25MB or more) and may not be available
in all countries. If you don’t have an unlimited data
plan, or mobile network updates are not available in
your country, you can update using a computer.
䢇
Using your computer:
On your computer, go to
and check the “Software” links. If an update is
available, simply follow the installation instructions.
.
www.motorola.com/myphoto n
2B. Settings 37
>
Settings
Page 46

Troubleshooting
Crash Recovery
In the unlikely event that your phone stops responding
to touches and key presses, try a quick reset. Remove
the back cover and battery, and then replace the
battery and switch your phone on as usual.
38 2B. Settings
Page 47

⽧
2C. Contacts
Contacts List
Touch to view contact
information. Touch &
hold to edit, delete,
and more.
Press to create,
filter, and sync
contacts.
Touch to add a new contact.
Touch to search contacts.
Touch to add a new contact
group.
Viewing and Using Contacts (page 39)
⽧
Creating Contacts (page 40)
⽧
Transferring Contacts (page 41)
⽧
Calling or Emailing Contacts (page 42)
⽧
Editing or Deleting Contacts (page 42)
⽧
Synchronizing Contacts (page 42)
⽧
Making Groups (page 42)
Viewing and Using Contacts
䊳
Touch
䡲
To find a contact, type the contact name. Touch a
contact to open its details.
Tip:
Dialer > Contacts
.
To search the list, press to search for a name, or
touch a letter on the right to go directly to contacts
beginning with that letter.
2C. Contacts 39
Contacts
Page 48

Sort Contacts
Google contact
from arthurbaudo1453@gmail.com
Phone
Email
Postal address
Organization
First name
Last name
Phone
Home
Home
Email
Add contact
Add contact
Save Cancel
11:35
Add another entry.
Remove this entry.
Open label options.
Add a picture.
To sort contacts or set display options, press >
Display options
䢇
Only contacts with phones:
䢇
Sort list by:
䢇
View contac t names as:
last name first.
䢇
Choose contacts to display:
use contacts from.
Favorites
䊳
To see your list of favorite numbers, touch
䡲
To call a number, touch .
䡲
To send a text message, view a contact, or other
options, touch and hold an entry.
䊳
To add a number to Favorites, open a contact and
touch the star in the upper right corner.
40 2C. Contacts
and touch:
Hide email-only contacts.
Sort contacts by first or last name.
view contacts as first name or
Select which source to
Dialer > Favorites
Creating Contacts
Note:
Before entering contacts, you must set up at least one
email account on your phone. See “Completing the
Setup Application” on page 3 or “Setting Up
Messaging” on page 85.
Page 49

1.
Touch
2.
Fill in as much or as little information as you'd like.
3.
When you’re finished, touch
Dialer > Contacts > >Add contact
Save
.
.
Transferring Contacts
Keep track of all your contacts in one place. Here are a
few hints:
䢇
Use Gmail™
automatically synced to your phone. Various
computer applications for mobile phones and email
accounts allow you to export your contacts as a
“.CSV” file. You can then use Gmail to import the file.
For details, see www.motorola.com/transfercontacts
or log in to your Gmail account on your computer
and select “Help”.
䢇
Use a SIM card or a microSD card
contacts from your old phone to your new Motorola
phone using your SIM card or a microSD card. See
“Transfering Contacts Using Your SIM Card” on
page 41 or “Transferring Contacts Using a microSD
Card” on page 41.
: All your Gmail contacts are
: You can transfer
䢇
More
: Find other methods and tools to help you at
www.motorola.com/transfercontacts
.
Transfering Contacts Using Your SIM Card
1.
On your old phone, copy all the contacts you want
to your SIM card.
Tip:
For Motorola Android™ phones, touch >
SIM card
>
your SIM card.
2.
Insert your SIM card in your new phone. See “Your
Export contacts
to save your contacts to
SIM Card” on page 112.
3.
To import the contacts from your SIM card,
touch
Import/Export > Import contacts from: SIM card
Dialer > Contacts
, and then touch >
Transferring Contacts Using a microSD Card
1.
On your old phone, copy all the contacts to your
microSD card. (They'll be copied as a VCard file.)
2.
Insert the microSD card in your new phone. See
“Inserting the microSD Card” on page 52.
2C. Contacts 41
Contacts
Manage
.
Page 50

To import the contacts from your SIM card,
3.
touch
Import/Export > Import contacts from: SD card
Dialer > Contacts
, and then touch >
.
Calling or Emailing Contacts
1.
Touch
2.
For
options, touch and hold the contact.
Dialer > Contacts
View contact, Call contact, Text contact
.
, or other
Editing or Deleting Contacts
1.
Touch
2.
Touch the contact, and then press
contact
Dialer > Contacts
or
Delete contact
.
>Edit
.
Synchronizing Contacts
When you change one of your Contacts, your phone
automatically updates your other social networking
accounts. Also, your phone updates your Contacts and
social networking account whenever you change a
friend in your social networking accounts.
42 2C. Contacts
Making Groups
䊳
Touch
You can put your Contacts into groups that you
create (like “friends”, “family”, or “work”). Then, you
can find contacts faster by showing one group at a
time.
Tip:
Dialer > Contacts > Groups > Add
Touch to choose which groups to show, such as
or
Favorites
.
.
All
Page 51

⽧
2D. Calendar and Tools
Calendar (page 43)
⽧
Alarm Clock and Timer (page 44)
⽧
Help Center (page 44)
⽧
Tasks (page 45)
⽧
Calculator (page 45)
⽧
Quickoffice (page 45)
⽧
Accessibility (page 46)
Calendar
䊳
Touch
Your calendar events can be viewed in different ways.
Touch an d s e l ect
When you highlight an event, more details appear.
Tip:
Adding Calendar Events
1.
From any view, touch
time and other details. You can even set a
reminder so you don’t forget about the event.
(When you set the reminder time to
plays at the event start time.)
2.
When you finish entering event details, touch
Tip:
> Calendar
You can set up multiple calendars through your Gmail™
account so you can access them from your phone
wherever you go.
If you have more than one calendar synced to your
phone (for example, Phone and Gmail), touch
and select a calendar for the event.
.
Agenda, Day, Week
Add.
Enter the event start
, or
Month
0 minutes
Calendar
, it
Save
.
Calendar / Tools
.
2D. Calendar and Tools 43
Page 52

Managing Calendar Events
7:00
every day
Mon, Tue, Wed, Thu, Fri
8:30
9:00
Alarm
Timer
AM
PM
AM
PM
AM
PM
11:35
䊳
To edit an event, touch and hold it, and then
touch
Edit event
䊳
To delete an event, touch and hold it, and then
touch
Delete event
䊳
To go to a specific day, touch
. When you’re done, touch
Enter a date and touch
Alarm Clock and Timer
Alarm Clock
Your phone has multiple alarm
capabilities.
䊳
Touch
> Alarm
䡲
䡲
44 2D. Calendar and Tools
>Alarm & Timer
.
To turn on an alarm, touch
the check box.
When an alarm sounds,
slide to
Dismiss
or
Snooze
to turn it off
to delay for five
minutes.
䡲
Save
To add an alarm, touch
then enter alarm details. Touch
.
are finished.
䡲
To enable or disable an alarm, touch the check
> Add alarm
Done
when you
, and
box.
.
Go
> Go to date
.
.
Timer
To set a timer:
1.
Touch
2.
Set a time and touch
䡲
For timer details, touch >
your settings, and then touch
> Alarm & Timer > Timer
Start
.
Settings
Done
.
.
, change
Help Center
䊳
Touch
> Help Center
.
You can also flick your home screen left or right to
see the Tips & Tricks widget.
Page 53

Ta sk s
䊳
Touch
To add a task, touch .
Touch an icon to view your
tasks by due date, priority,
and more.
> Tas ks
Quickoffice
.
Tasks
Overdue
Tasks
Starred
Due today
Pick Up Cake
Due on: Fri, May 27, 2011
Due today
By priority
䊳
Touch >
Quickoffice
Quick Office Programs
䢇
Quickword:
documents.
䢇
Quicksheet:
spreadsheets.
䢇
Quickpoint:
presentations.
䢇
QuickPDF:
Create and edit Microsoft Word®
Create and edit Microsoft Excel®
Create and edit Microsoft PowerPoint®
View Adobe Acrobat® PDF files.
.
Calendar / Tools
Calculator
Your phone comes with a handy calculator.
䊳
Touch >
Your calculator has basic and advanced views. To
change views, touch
. To clear history, touch
panel
12345
Calculator
.
>Advanced panel/Basic
>Clear history
.
Create a New File
To create a new file, touch the icon of the type of file
you want to create, and then touch
Document
.
Create New
Open a Document
To open an existing file, touch the icon of the type of file
you want to edit, touch
touch
Recent Documents
SD Card
to search for a file, or
.
2D. Calendar and Tools 45
Page 54

Browse Files
To browse files on your memory card, touch
SD Card
. Touch a file or folder to open, or touch and
hold a file for options. You can edit most text or
spreadsheet files.
Tips:
䢇
Place your cursor by touching the text.
䢇
Select text by double-touching it.
䢇
Choose formatting, save the file, or choose other
options by touching .
To manage your folders and transfer files, see “File
Manager” on page 54.
Browse >
Accessibility
See, hear, speak, feel, and use. Accessibility features
are there for everyone, helping to make things easier.
Note:
For general information, accessories, and more, visit
www.motorola.com/accessibility
46 2D. Calendar and Tools
.
Voice Recognition
Use your voice — just touch and speak.
䢇
Dialing and commands:
Commands
. To dial, say “
name or phone number. Or, say a command from
the list shown, like “
䢇
Search:
Touch >
what you want to search for, like “Motorola
accessories”.
䢇
Text e ntry:
Touch a text entry field to open the
touchscreen keypad. Touch , and then say what
you want to type.
Tip:
Speak naturally, but clearly. Use the microphone in a
similar way to a speakerphone, so no need to shout or
hold the phone close to your mouth.
To change your voice settings, see “Voice Settings” on
page 47.
Touch >
Call
” and then a contact
Send Message
Voic e Search
Voic e
” or “
Go To
, and then say
”.
Page 55

Voice Readouts (TalkBack)
Note:
This feature is only available in English and Spanish.
Voice Readouts lets you hear all your interactions with
the phone, from navigation and selections to text entry.
䊳
To turn on voice readouts (similar to TalkBack),
touch
Accessibility
Voic e Readouts
Note:
To use voice readouts:
䢇
Menus and screens:
item to highlight it (the item will be read out loud),
and double-touch to open it.
Note:
䢇
Dialer & text entry:
is read out loud.
> Settings > Accessibility
. Touch
to enable the settings, and then touch
.
You may be asked to download additional “text-tospeech” software (data charges may apply).
In menus and screens, touch an
Touching a home screen widget or shortcut will open it.
As you type, each number or letter
䢇
Notification:
When you flick the notifications bar
down, all notifications are read out loud.
Tip:
Navigate through your apps and menus to hear how
voice readouts work on your phone.
To change your voice settings, see “Voice Settings” on
page 47.
Caller ID
When you want to hear who’s calling:
䢇
Read out loud:
> Settings > Call settings > Caller ID Readout
䢇
Ringtones:
touch
press
Have your caller announced — touch
Assign a unique ringtone to a contact —
Dialer > Contacts
> Options > Ringtone
, open a contact, and then
.
Voice Settings
Personalize your voice settings:
䢇
Voice recognition:
input & output
you can set options like language and censorship.
䢇
Voice commands:
> Settings
Touch >
>
Voice recognizer settings
Touch >
Settings > Voic e
. From here,
Voice Commands >
. From here, you can refine recognition
2D. Calendar and Tools 47
Calendar / Tools
.
Page 56

of your voice (
Confirmation
䢇
Tex t-t o- spe ech :
Voice input & output > Text-to-speech settings
Adaptation
and
Prompts
Touch >
) and set options like
.
Settings >
. From
here, you can set options like speed and language.
Volume and Vibrate
Choose volume and vibrate settings that work for you.
Touch
䢇
䢇
> Settings > Sound
Volu me:
Touch
or
Alert
Tip:
To set separate ring and notification volumes, uncheck
Use incoming call volume for notifications
Vibrate:
Volu me
. Use the sliders to select a volume level.
Touch
Vibrate
and select an option to feel
:
and then touch
Ringer, Media
.
your phone ring.
Zoom
Get a closer look. Open a magnification window that
you can drag around the screen, or pinch to zoom in
on maps, Web pages, and photos.
48 2D. Calendar and Tools
䢇
Magnification window:
Accessibility
. Touch
settings, and then touch
䢇
Pinch to zoom:
Touch >
Accessibility
Zoom Mode
Settings >
to enable the
.
To zoom in, touch the screen with two
fingers and then slide them apart. To zoom out, drag
your fingers together.
Display Brightness
Set a brightness level that works for you. Touch
> Settings > Display >Brightness
,
that
Automatic brightness
is unchecked so you can set
. Make sure
your own level.
Touchscreen and Keys
All these touch features are great, and sometimes it is
nice to hear or feel your touches too. Touch
Settings > Sound
䢇
Touchscreen:
Audible selection
䢇
Keys:
To feel key touches (vibrate), touch
feedback
䢇
Dial pad:
.
To hear touch tones when you dial a phone
number, touch
:
To hear screen touches (click), touch
.
Audible touch tones
.
Haptic
>
Page 57

䢇
Screen lock:
screen (click), select
To hear when you lock/unlock the
Screen lock sounds
.
Hearing Aids
To help get a clear sound when using a hearing aid or
cochlear implant, your phone may have been rated for
use with hearing aids. If your phone’s box has “Rated
for Hearing Aids” printed on it, then please read the
following guidance.
Note:
Ratings are not a guarantee of compatibility. See
“Hearing Aid Compatibility with Mobile Phones” on
page 137. You may also want to consult your hearing
health professional, who should be able to help you get
the best results.
䢇
Settings:
Touch
HAC Mode Settings
䢇
Call volume:
keys to set a call volume that works for you.
> Settings > Call settings >
.
During a call, press the side volume
䢇
Position:
During a call, hold the phone to your ear as
normal, and then rotate/move it to get the best
position for speaking and listening.
TTY
You can use your phone in TTY mode with standard
teletype machines. Touch
settings > TTY mode
䢇
TTY Full
: Type and read text on your TTY device.
䢇
TTY HCO
and select the mode you need:
: Hearing-Carry-Over — type text on your
TTY device and listen to voice replies on your
phone’s speaker.
>Settings >Call
2D. Calendar and Tools 49
Calendar / Tools
Page 58

䢇
TTY VCO
: Voice-Carry-Over — speak into your phone
and read text replies on your TTY device.
Note:
You’ll need a cable/adapter to connect your TTY
device to the headset jack on your phone.
Refer to your TTY device guide for mode and usage
information.
50 2D. Calendar and Tools
Page 59

⽧
2E. Voice Services
Voice Actions (page 51)
⽧
Voice Commands (page 51)
Voice Actions
䊳
To begin a voice search, press and hold .
Note:
If you’re writing a text message, press the Voice key to
begin dictation mode. Your phone recognizes words
you speak and enters them into your message.
Or, press and say one of the following commands:
To... Say...
Map a route “navigate to”
Send a text message “send text”
Make a call “call”
Send email “send email”
Find local businesses “map of...”
To... Say...
Browse the web “go to”
Make a voice note “note to self”
Get directions “directions to”
Tip:
To learn more about voice actions, press and hold ,
and then touch
Help > Watch a video.
Voice Commands
For more voice commands, touch >
Commands
Tip:
and follow the prompts.
For quick access to Voice Commands, add a shortcut to
one of the home screens. Touch and hold an empty area,
and then touch
Commands
Shortcuts > Applications > Voi ce
.
2E. Voice Services 51
Voic e
Voice Services
Page 60

⽧
2F. microSD Card and File
Transfer
Using a microSD Card With Your Phone (page 52)
⽧
microSD Settings (page 54)
⽧
File Manager (page 54)
⽧
Connecting Your Phone to Your Computer (page 55)
⽧
View and Transfer Files (page 5 6)
Using a microSD Card With Your Phone
Using the microSD Card Slot
Your phone is equipped with a microSD (Secure
Digital) memory card slot to expand the phone’s
available memory space. It allows you to store images,
videos, music, and voice data in your phone.
52 2F. microSD Card and File Transfer
Note:
You need the memory card installed for some features
on your phone, such as the
Music Player
.
Inserting the microSD Card
1.
Remove the battery cover. (See “Setting Up Your
Phone” on page 2.)
2.
Open the memory card
slot cover, and slide in the
memory card until it clicks
into place.
Note:
Be sure to use only recommended microSD cards.
Using non-recommended microSD cards could cause
data loss and damage your phone. Your phone can be
used with Transflash or microSD memory cards.
3.
Close the memory card slot cover and replace the
battery cover.
Page 61

Removing the microSD Card
Important:
1.
2.
3.
Note:
4.
Do not remove the memory card until you select
Unmount SD card
the
Storage
. Removing the memory card before
selecting the
result in loss of data.
option under
Unmount SD card
Settings >
option could
Before you remove your memory card you need to
unmount it. Select
Unmount SD card
> Settings > Storage >
.
Once your phone confirms that it is safe to remove
the microSD card, remove the battery cover and
open the memory card slot cover.
Grasp the raised edge of
the microSD card and
slide the card out.
The microSD card and its adapter can be easily
damaged by improper operation. Please be careful
when inserting, removing, or handling them.
Close the memory card slot cover and replace the
battery cover.
Formatting Your Memory Card
If you are having difficulty with a memory card, you may
format the card using your phone. This process
removes any data on the card and sets up a new folder
system.
1.
Before you format your memory card you need to
unmount it. Select
Unmount SD card
2.
Select
card > Format SD card
WARNI NG:
> Settings > Storage > Format SD
The formatting procedure erases all the data on
the microSD card, after which the files CANNOT
be retrieved. To prevent the loss of important data,
please check the contents before you format the
card.
> Settings > Storage >
.
.
Using the microSD Adapter
The microSD adapter allows microSD cards to be used
in SD-compatible devices such as digital cameras,
printers, and computers. Before using, you will need to
insert the microSD card into the microSD adapter.
2F. microSD Card and File Transfer 53
Tra ns fe r
microSD Card and File
Page 62

To insert the microSD card into the microSD adapter:
䊳
With the label side of the microSD card facing up,
insert the card into the supplied microSD adapter,
and gently slide the card until it is fully inserted.
To remove the microSD card from the microSD adapter:
䊳
Hold the front edge of the microSD card, and
gently pull outward to remove it from the adapter.
Tip:
If yo ur com put er has an S D card s lot or if you have a n SD
card adapter, you can use the microSD card and adapter
to transfer files such as audio files, pictures, and videos
directly between your computer and your microSD card.
When you insert the card into your computer, select
Open folder to view files using Windows Explorer
similar option) and drag and drop files using the available
folders.
54 2F. microSD Card and File Transfer
(or a
microSD Settings
Viewing Memory in the microSD Card
1.
With the microSD card inserted, select
Settings > Storage
2.
The following information will be displayed:
䡲
Total space
displays the capacity of the memory
card.
䡲
Available space
memory space.
.
displays the amount of free
File Manager
䊳
To see the files on your phone and memory card,
touch
Touch and hold a file to see options such as
Rename
Note:
>Files
, or
Do not remove your memory card while your phone is
using it or writing files on it.
. Touch a file or folder to open it.
Delete
.
>
Share
,
Page 63

Connecting Your Phone to Your Computer
You can connect your phone to a computer with a USB
cable.
Note:
The first time you use a USB connection, your
computer may indicate that drivers are being installed.
Follow any prompts you see to complete the
installation. This may take a few minutes.
1.
With a memory card inserted, and your phone
showing the home screen, connect a Motorola
micro USB data cable from your phone’s micro
USB port to a USB port on your computer. Your
phone should show in the status bar.
Note:
Make sure to connect the phone to a high power USB
port. Typically, these are located directly on your
computer.
2.
On your phone, flick down the status bar to see the
USB connection options.
3.
Touch an option and then touch OK.
䡲
Motorola Phone Portal
computer with a cable or a Wi-Fi network to share
files through an easy-to-use home screen.
䡲
Windows® Media Sync
: Connect your phone and
: Share media files between
your computer and phone.
Note:
This device can be administered through Microsoft
Exchange server security policies. Additional security
policies may be applied to your device depending on
rules set by your company.
䡲
USB Mass Storage
: Drag and drop files between
your computer and memory card folders. When
you’re done, use “Safely Remove Hardware”
before disconnecting the USB cable.
Note:
You can’t use the files on your memory card with your
phone while it is connected to the computer.
䡲
Charge Only
: Use the connection only to charge a
device.
2F. microSD Card and File Transfer 55
Tra ns fe r
microSD Card and File
Page 64

View and Transfer Files
Recent Photos
See All >>
English (US)
All
ComposeDelete All
Show All recent activity, or only
your SMS (text messages) or
Calls.
Open your recent activity (Home),
Contacts, Photos, Settings, File
Manager, or Support.
Choose your language.
Open details about your phone’s
network signal, battery, or
memory.
Note:
Copyright — do you have the right? Always follow the
rules. See “Content Copyright” on page 138.
Motorola Phone Portal
Your can use Motorola Phone Portal to connect your
phone and computer with a cable or a Wi-Fi network.
When you connect your phone or type the Phone
Portal URL into your computer’s browser. You will see
the Phone Portal home screen.
56 2F. microSD Card and File Transfer
Note:
Phone Portal works best with Internet Explorer 7 or
newer, with JavaScript and cookies enabled.
Page 65

Connect Through a Wi-Fi Network
http://###.###.#.###:###
Note:
Most public Wi-Fi networks (like the ones at coffee
shops) don’t let devices connect to each other. In that
case, you need a USB cable connection.
1.
Touch >
2.
If your phone is
connected to a
Wi-Fi network, it
shows a URL. Use a
computer on the
network to enter the
URL in a browser. It
opens the Phone
Portal home screen.
Tip:
When your phone’s Wi-Fi is on, it automatically
reconnects to nearby networks it has used. To turn Wi-Fi
on or off, touch
networks
If your phone is not connected to a Wi-Fi network, it
asks you to connect. Touch
settings screen, then turn on
to connect.
Phone Portal
> Settings > Wireless &
>
Wi-Fi
.
.
OK
to open the Wi-Fi
Wi-Fi
and touch a network
For network passwords, ask other network users or
administrators. For your phone’s MAC address and
Wi-Fi details, touch
> Advanced
.
When your phone is connected ( appears in the
status bar), touch to close the settings. Soon,
Phone Portal shows a URL at the bottom of your
screen. Using a computer on the same Wi-Fi network,
just type the URL into the browser to open the Phone
Portal home screen.
Connect Through a USB Cable
1.
Turn on your phone and
computer, and connect
them with a USB-to-micro
USB cable.
If your computer needs to
download drivers for your
phone, visit
connection window opens, just close it.
2.
Once your computer has the correct Motorola
drivers, it opens the Phone Portal home page in
your browser. A Motorola icon appears in your
task bar, in the lower right of your computer
screen.
www.motorol a.com/support
. If a camera
Tra ns fe r
microSD Card and File
2F. microSD Card and File Transfer 57
Page 66

If you have Motorola Media Link, it may launch instead
of Phone Portal. To use Phone Portal, right-click in
your task bar, select “when device connects,” and
choose
Moto Phone Portal
. Disconnect and reconnect
your phone to launch Phone Portal.
If you want to connect your phone as a memory card
rather than using Phone Portal, flick down the status
bar at the top of your screen, touch
and choose
USB Mass Storage
USB connection
.
,
Motorola Media Link
Motorola Media Link lets you transfer music, podcasts,
videos, and photos between your phone and your
computer. You can also use it to back up your contacts.
microUSB
USB
Sync music,
photos, videos,
or podcasts.
Device Tools Help
PHOTON 4G - Internal Storage
Music
Last Sync
06/14/2011
Photos
Last Sync
06/14/2011
Videos
Last Sync
Never
Podcasts
Last Sync
Never
Contacts
Last Sync
Never
Music
VideosPhotos
0.0B0.0B 12.4 MB
Sync toDevice
Sync Music from:
All Playlists
Selectted Playlists:
Sunfire(3)
3 Songs
Podcasts
0.0B
Sync fromDevice
Capacity: 9 GB
Other
454.7 MB
Free
8.5 GB
Windows Media Player
Refresh
Sync
58 2F. microSD Card and File Transfer
Sync to or from your
䢇
To choose which media types to sync, check the
device.
Start the sync.
boxes on the left side of the Media Link window.
Page 67

䢇
To start the sync, click
䢇
For more information on transferring music with
Sync
.
Motorola Media Link, see “Transferring Music With
Motorola Media Link” on page 100.
Note:
You will need to have iTunes installed on your
computer to transfer podcasts on to your phone.
For help or to download Motorola Media Link, visit
www.motorola.com/medialink
.
Tra ns fe r
microSD Card and File
2F. microSD Card and File Transfer 59
Page 68

⽧
2G. Camera
Scenes
Effects
Flash
Front
Switch to
Settings
Picture Counter
Zoom Out Zoom In
Touch to open Gallery.
Camera
Options
Taking Photos (page 60)
⽧
Recording Videos (page 62)
⽧
Photos and Videos Tips and Tricks (page 63)
⽧
Viewing Photos and Videos (page 63)
⽧
Managing Photos and Videos (page 65)
Taking Photos
Take that family photo, and post it online for everyone
to see.
60 2G. Camera
1.
Press and hold
phone. Rotate the phone counter-clockwise to
view the camera scree n.
Tip:
You can also touch
camera.
Camera
on the side of the
> Camera
to launch the
Note:
Photos can be stored either on your microSD memory
card or in the phone’s internal storage. Touch
Settings > Storage Location
to set your default
storage location.
2.
To take the photo, touch the viewfinder to lock the
focus, and then touch to take the photo.
䡲
To upload the photo to an online photo album,
touch the thumbnail in the lower left corner, and
then touch . You can set your Quick upload
album when you upload your first picture.
>
Page 69

䡲
To send the photo in a message or post it online,
touch .
䡲
To delete the photo, touch
> Delete
.
Photo Options
You can make adjustments to optimize your shot.
Touch a button on the right side of the screen to make
changes (touch the screen to turn on the buttons if
necessary):
䢇
Scenes
: Adjust for better image capture in different
environments:
more. Touch the screen when finished to return to the
viewfinder.
䢇
Effects
and White
䢇
Flash
: Set
䢇
Front/Back
rear facing cameras
䢇
Switch to
modes.
Auto, Portrait, Landscape, Sport
: Change photo look:
Normal, Negative, Black
, and more.
Flash On, Flash Off
, or
Auto Flash
: Switch between the forward facing and
: Toggle between photo and camcorder
, and
.
Camera Settings
In the viewfinder, touch
camera menu and adjust these settings:
䢇
Picture Resolution
䢇
Video Resolution
: Adjust for best resolution for your
needs.
䢇
Exposure
: Increase or decrease the amount of
aperture time.
䢇
Storage Location
: Select whether you want your
photos store on the
.
storage
>Settings
to open the
: Adjust for optimal resolution.
SD Card
or on
Internal phone
Picture Modes
In the viewfinder, touch
from:
䢇
Single shot
䢇
Panorama
: Take one photo at a time.
: Take multiple photos of wide scenes and
join them together to make one large image. Use
Capture Direction
joined:
Move up, Move right, Move left, Move down
䢇
Multi-shot
: Take several photos in rapid succession
when you touch and hold .
> Picture modes
to choose
to specify how photos will be
2G. Camera 61
Camera
.
Page 70

Recording Videos
w
5
5
4
4
0
6
6
-
7
Scenes
Effects
Light
Front
Switch to
HD 1:23;54
Video
Capture
Settings
Adjust for
greater
creative
contol.
Go to your
gallery.
Zoom in or out.
Settings
Counter
1.
Touch
62 2G. Camera
2.
To record the video, touch . Touch to stop
the record ing.
3.
Open your gallery and touch a video to view
options:
䡲
To play the video, touch .
䡲
To upload the video to an online album,
touch .
>Camcorder
.
䡲
To send the video in a message or post it online,
touch .
䡲
To delete the video, touch
> Delete
.
HD Videos
You can capture HD-quality videos to watch on an
HDTV or monitor.
To record and HD quality video, be sure to select the
correct video resolution. From the active camcorder
viewfinder, touch
High Definition (720p)
To enhance the video quality, touch
> Settings > Video resolution >
.
Scenes
or
Effects
on the right side of the camcorder viewfinder. (You may
need to touch the screen to see these options.)
Video Options
You can make adjustments to optimize your video.
Touch one of the buttons on the right side of the
viewfinder to make changes (you may need to touch
the screen to make the buttons appear):
䢇
Scenes
: Adjust for better video capture in different
environments:
and
Subject
Everyday, Outdoors, Concert, Narrative
.
,
Page 71

䢇
11:35
Camera roll
My library
Friends
Online
DLNA servers
View your captured photos &
videos.
Sort your photos & videos.
See your online albums (like
Picasa, Flickr, or Facebook).
Go to your friends’
online albums.
See media from DNLA Connected
devices on your Wi-Fi network.
Effects
: Change video look:
and White
䢇
Light
, and more.
: Turn a light on or off to adjust for the lighting
Normal, Negative, Black
where you are recording.
䢇
Front/Back
: Switch between the forward facing and
rear facing cameras
䢇
Switch to
: Toggle between camcorder and camera.
Viewing Photos and Videos
䊳
Touch
> Gallery
.
Camera
Camcorder Settings
In the viewfinder, touch
>Settings
camcorder menu and adjust these settings:
Resolution
Storage Location
, and more.
,
Photos and Videos Tips and Tricks
䢇
For the clearest photos and videos, clean the lens
with a soft, dry cloth.
䢇
To send a video in a message, set the video
quality to Medium. Touch
Video resolution > Medium (QVGA)
䢇
To zoom in or out, press the volume keys.
> Settings >
to open the
Video
.
Touch a folder to display all of its photos or videos.
2G. Camera 63
Page 72

䢇
Miami, Florida Miami, Florida
2011-05-05_16-14-29_956
May 5, 2011
Share
Upload
Comment
Camera roll
: All of the captured photos and videos on
your camera’s memory.
䢇
My library
: Photos and videos saved on your phone
or SD card.
䢇
Friends
: Your friend’s photos and videos from their
social networking accounts.
䢇
Online
: All photos and videos from your social
networking accounts.
䢇
DLNA Servers
: All photos and video stored on DLNA
servers.
Tip:
Turn the phone sideways for a widescreen view.
The
Gallery
first shows photos and videos as
thumbnails. Scroll through the thumbnails by flicking
them left or right. Touch a thumbnail to select it for
viewing or playback.
When you select a thumbnail, it is enlarged to normal
viewing size. Videos are paused at the beginning.
Touch the play and pause buttons on the screen
to control video playback.
Note:
To see the buttons while a video is playing, touch the
display.
64 2G. Camera
To zoom in on a photo,
touch the screen with
two fingers and then
drag them apart. To
zoom out, pinch your
fingers together.
Share Photos and Videos
To send your photo in a message or post it online:
1.
Touch >
2.
Touch an image to display it.
Gallery
.
Page 73

3.
Touch the photo or video to display the options,
and then touch .
4.
Choose how you want to share, such as
Email, Text Messaging
Tip:
With
Photo Sharing
one social network at the same time.
, and more.
, you can post a photo to more than
Managing Photos and Videos
1.
Touch
2.
Touch an image to display it.
3.
Touch the photo or video to display options, and
then touch an option at the bottom. For additional
options, press .
Tip:
Editing Photos and Videos
䊳
Touch
picture or a video, and press
> Gallery
To copy photos to/from a computer, go to “Connecting
Your Phone to Your Computer” on page 55.
> Gallery > Camera Roll
.
, select a
> Edit
.
Bluetooth
You can choose advanced editing features to resize,
crop, change the color, or trim video.
,
Deleting Photos and Videos
䊳
To delete a photo or video, touch and hold a
thumbnail, and then touch
䊳
To delete multiple files, press >
Delete
.
Select multiple
check the thumbnails, and then touch
More > Delete
.
Setting a Photo as Wallpaper, Profile Picture, or a Contact Photo
䊳
To set a photo as your wallpaper, profile picture, or
contact photo, touch and hold a thumbnail, and
then touch
Set as
.
Playing a Slideshow
䊳
To play a slideshow, open a picture, and then
press
slideshow, touch the display. To return to the
gallery, touch .
Tip:
> More > Slideshow
Turn the phone sideways for a widescreen view.
. To stop the
2G. Camera 65
Camera
,
>
Page 74

Wireless Manager
2H. Wireless and Network
Connections
V t
t
g
g
g
g
⽧
Wireless Manager (page 66)
⽧
Using Bluetooth (page 67)
⽧
Connecting With Wi-Fi (page 68)
⽧
Sprint Hotspot (page 70)
⽧
Sprint 4G (page 71)
⽧
Mobile Networks (page 72)
⽧
Airplane Mode (page 73)
⽧
Virtual Private Networks (VPN) (page 73)
66 2H. Wireless and Network Connections
Manage all your wireless connections: Wi-Fi,
Bluetooth
®
, airplane mode, and mobile networks.
䊳
Touch >
Wireless & network settings
Airplane mode
Disable all wireless connections
4G
WiMax Disabled
4G Stats
4G Properties
Wi-Fi
Turn on Wi-Fi
Wi-Fi settings
Set up & manage wireless access points
Bluetooth
Turn on Bluetooth
Bluetooth settings
Manage connections, set device name &
discoverability
Tethering & mobile hotspot
Share your phone’s mobile data connection via USB
or as a mobile Wi-Fi hotspot
VPN settings
Settings > Wireless & networks
11:35
Turn Airplane mode on or off.
Turn Wi-Fi on or off.
Turn Wi-Fi on or off.
Turn Bluetooth on or off.
Page 75

Using Bluetooth
Pair with this device
Computer3
Pair with this device
Computer4
Bluetooth
Scan for devices
Bluetooth devices
MB855
Device name
Make device discoverable
Discoverable
Scanning
Bluetooth settings
Bluetooth settings
11:35
Touch to turn on & scan.
Touch to re-scan.
Touch to connect.
Bluetooth is a short-range communications technology
that allows you to connect wirelessly to a number of
Bluetooth devices, such as headsets and hands-free
car kits, and Bluetooth-enabled handhelds, computers,
printers, and wireless phones. The Bluetooth
communication range is usually up to approximately
30 feet.
䊳
Touch >
Bluetooth settings
Settings > Wireless & networks >
.
Turning Bluetooth On or Off
䊳
Touch >
Bluetooth
Note:
To extend battery life, turn Bluetooth power off when not
in use.
Tip:
Turn off Bluetooth power to
extend battery life or stop
connections. To add a quick
switch, touch and hold a blank
spot on your home screen, and
then touch
Settings > Wireless & networks >
.
Motorola Widgets > Bluetooth Toggle
Connecting New Devices
Note:
This feature requires an optional accessory.
To connect with a new device, you need to pair with it.
You only need to do this once for each device. To
connect again, just turn on the device.
1.
Make sure the device you are pairing with is in
discoverable mode.
Note:
Refer to the guide that came with the device for details.
2H. Wireless and Network Connections 67
.
Connections
Wireless and Network
Page 76

Touch >
2.
Bluetooth settings
3.
Touch
Bluetooth
power is already on, touch
4.
Touch a device to connect.
5.
If necessary, touch OK, or enter the device passkey
(like
0000
Settings > Wireless & networks >
.
to turn on and scan. If Bluetooth
Scan for devices
) to connect to the device. When the
device is connected, the Bluetooth indicator
appears in the status bar.
Note:
Using a mobile device or accessory while driving may
cause distraction and may be illegal. Always obey the
laws and drive safely.
The Bluetooth Enhanced Audio setting is not
recommended for older Bluetooth headsets, as it may
not deliver acceptable sound quality.
.
Reconnecting Devices
䊳
To automatically reconnect your phone with a
paired device, simply turn on the device.
䊳
To manually reconnect your phone with a paired
device, touch the device name in the
list.
devices
68 2H. Wireless and Network Connections
Bluetooth
Disconnecting Devices
䊳
To automatically disconnect your phone from a
.
paired device, simply turn off the device.
䊳
To manually disconnect your phone from a paired
device, touch the device name in the devices list,
and then touch
>Disconnect
.
Editing Settings
䊳
Touch >
Bluetooth settings > Device name
and touch
Settings > Wireless & networks >
. Enter a name
OK
.
Connecting With Wi-Fi
To use a Wi-Fi computer network for even faster Internet
access:
䊳
Touch >
Wi-Fi settings
Note:
Your phone's Wi-Fi features and power levels are not
allowed for outdoor operation in France. To avoid
unlawful interference with radio signals, do not use the
Wi-Fi features in France unless you are indoors.
Settings > Wireless & networks >
.
Page 77

Wi-Fi settings
Wi-Fi settings
Wi-Fi
Connected to HPD Network
Network notification
Open Network
Notify me when an open network is available
Secure Network
Notify me when a secure network is available
Wi-Fi networks
HPD Network
Connected
bthomas1
WPS Available, secured with WPA/WPA2 PSK
Basilnet
WPS Available, secured with WPA/WPA2 PSK
zunophoto
WPS Available, secured with WPA/WPA2 PSK
2WIRE074
Secured with WEP
11:35
Turning Wi-Fi On or Off
䊳
Touch >
.
Wi-Fi
Settings > Wireless & networks >
Touch to turn on & scan.
Touch to connect.
Tip:
Turn off Wi-Fi power to extend
battery life or stop connections.
Turn it off and on to search for
networks. To add a quick switch,
touch and hold a blank spot on
your home screen, and then touch
Wi-Fi Toggle
.
Motorola Widgets >
Wi-Fi Search and Connect
To find networks in your range:
1.
Touch >
Wi-Fi settings
2.
Touch
Wi-Fi
on, touch
networks it finds within range.
Tip:
To see your phone’s MAC address or other Wi-Fi details,
touch
3.
Touch a network to connect.
4.
If necessary, enter
Wireless password
phone is connected to the network, the wireless
indicator appears in the status bar.
2H. Wireless and Network Connections 69
Settings > Wireless & networks >
.
to turn on and scan. If Wi-Fi is already
>Scan
. Your phone lists the
>
Advanced
.
Network SSID, Security
, and touch
Connect
Connections
Wireless and Network
, and
. When your
Page 78

Tip:
Tethering & Mobile Hotspot
Tethering & Mobile Hotspot
USB connected, check to tether
USB tethering
Mobile Hotspot
Help
Set up & manage Mobile Hotspot
Mobile Hotspot settings
11:35
Turn USB tethering on or off.
Turn Mobile Hotspot on or off.
Set up Mobile Hotspot.
When you are in range and Wi-Fi is on, you will
automatically reconnect to available networks you’ve
connected to before.
Sprint Hotspot
You can set up your phone as a Wi-Fi hotspot to
provide portable, convenient Internet access for up to 8
other Wi-Fi enabled devices.
Note:
You need to subscribe to Wi-Fi hotspot service to use
this feature. Contact Sprint for details.
70 2H. Wireless and Network Connections
A Wi-Fi hotspot is not available when roaming
domestically. You can use a Wi-Fi hotspot for one
device when roaming internationally.
Setting Up
Note:
Risks can be associated with connecting to the public
Internet. Your phone allows you to create a Mobile
Hotspot, which may be accessible by unauthorized
users. It is highly recommended that you use a
password other possible steps to protect your
computer from unauthorized access.
To add security to your mobile hotspot:
1.
Touch
Configure Mobile Hotspot
2.
Touch a setting to modify it:
䡲
Network SSID
hotspot.
䡲
Security
touch
Wireless password
Wi-Fi hotspot only if they enter the correct
password.
䡲
Channel
potential interference. You may need to try
different channels after your hotspot is active for a
time.
> Mobile Hotspot > Mobile Hotspot >
.
: Enter a unique name for your
: Select the type of security you want, and
Save: Open
or
WPA2 PSK
. Enter a unique
. Other users can access your
: Select a channel that minimizes
Page 79

3.
Touch
Save
when the settings are complete.
Activating the Hotspot
䊳
Touch
> Mobile Hotspot > Mobile Hotspot
.
When your Wi-Fi hotspot is active, other Wi-Fi enabled
devices can connect by entering your hotspot’s
selecting a
Wireless password
Security
type, and entering the correct
.
SSID
,
Sprint 4G
Sprint 4G provides your device with wireless Internet
access over greater distances than Wi-Fi and delivers
data transfer rates of up to 30 Mbps. To connect your
device to the Sprint 4G network, you need access to a
Sprint 4G base station.
For more information about the availability of Sprint 4G
in your area, go to
Note:
The availability and range of the Sprint 4G network
depends on your distance from the Sprint 4G base
station, network coverage in your area, and objects
through which the signal passes.
www.sprint.com/coverage
.
Connect to Sprint 4G Network
䊳
Touch >
4G
. The check box will turn green when Sprint 4G
Settings
> Wireless & networks >
is enabled.
Scan for Sprint 4G Networks
䊳
Touch >
4G Stats > Scan for 4G networks
Tip:
To add a quick switch for 4G,
touch and hold a blank spot on
your home screen, then touch
Motorola Widgets > 4G Toggle
To add a quick switch for
and hold a blank spot on your home
screen, then touch
4G Scan Now
2H. Wireless and Network Connections 71
Settings
4G Scan
Motorola Widgets >
.
> Wireless & networks >
.
.
, touch
Connections
Wireless and Network
Page 80

Mobile Networks
Mobile network settings
Mobile network settings
Network Mode
Any CDMA
Roaming settings
CDMA Roaming Settings
Domestic call, International call
Roaming Guards
Provide warning message while in a roaming area
GSM/UMTS settings
Select network
Operator selection
Select a network operator
Allow GSM Data
Access point names
72 2H. Wireless and Network Connections
11:35
Touch to select network type.
Touch to set up CDMA roaming.
Touch to set up roaming
guards.
Voice Services
In a few countries where both CDMA and GSM
networks are present or where multiple GSM networks
are available, you may have to manually switch to the
appropriate network to get global data.
䊳
To manually switch the network mode on your
phone, touch
networks
select from
or
Automatic
>
Settings
>
Mobile networks > Network Mode
> Wireless &
Sprint Only, Any CDMA, Any GSM/UMTS
.
and
Depending on your network, your phone shows
additional options for network roaming, network
selection, operator selection, and access point names.
Data Roaming
Data roaming is turned off for your phone. You can turn
it on to connect to data services when roaming
globally.
䊳
Touch >
Mobile networks
CDMA Roaming Settings > Domestic Data
International Data
Settings
and select
.
> Wireless & networks >
Allow GSM Data
or
or
,
Page 81

Depending on your network, your phone shows
additional options for network roaming, network
selection, operator selection, and access point names.
For more information on global roaming see “3E. Sprint
Worldwide Wireless Service” on page 111
Airplane Mode
Sometimes you may want to have your phone on, but
turn off its ability to make and receive calls and other
transmissions.
To set your phone so that it cannot make or receive phone
calls or transfer data:
䊳
Press and hold
Phone Options menu and touch
When in Airplane Mode, appears in your
notifications bar.
Power/Screen Lock
Airplane mode
to open the
.
To turn Airplane Mode off:
䊳
Press and hold to open the Phone Options
menu and touch
Note:
When you select airplane mode, all wireless services
are disabled. You can then turn Wi-Fi back on, if
permitted by your airline. Other wireless voice and data
services (such as calls and text messages) remain off
in airplane mode. Emergency calls to your region's
emergency number can still be made.
Tip:
To add a quick switch for
Airplane mode
blank spot on your home screen,
then touch
Airplane mode toggle
Airplane mode
, touch and hold a
Motorola Widgets >
.
.
Virtual Private Networks (VPN)
From your phone, you can add, set up, and manage
virtual private networks (VPNs) that allow you to
connect and access resources inside a secured local
network, such as your corporate network.
2H. Wireless and Network Connections 73
Connections
Wireless and Network
Page 82

Prepare Your Phone for VPN Connection
Before your phone can connect to a VPN, it must first
establish a Wi-Fi, 4G, or data connection. For more
information about setting up and using these
connections, see “Connecting With Wi-Fi” on page 68
and “Sprint 4G” on page 71.
Adding a VPN Connection
1.
Touch
VPN settings
2.
If you chose
VPN type, enter the VPN information, and then
press
– or –
If you chose Advance
enter the VPN information, and then touch
> Settings > Wireless & networks >
> Basic VPN
Basic VPN
> Save
.
or
Advanced IPSec VPN
, touch
Add VPN
IPSec VPN
, press
, select your
> New
Finish
Connecting to a VPN
1.
Touch
VPN settings > Basic VPN
2.
Touch the VPN you want to connect to.
74 2H. Wireless and Network Connections
> Settings > Wireless & networks >
or
Advanced IPSec VPN
3.
When prompted, enter your login credentials, and
then touch
4.
Open the Web browser to access resources such
as intranet sites on your corporate network.
Connect
Disconnecting From a VPN
1.
Flick the status bar down to open the Notifications
panel.
2.
.
Touch the VPN connection to go back to
, and then tap the VPN connection to
settings
disconnect from it.
Editing a VPN
1.
,
.
2.
3.
Deleting a VPN
.
1.
Touch
VPN settings > Basic VPN
Touch and hold the VPN you want to edit. Touch
Edit network
Make your changes, and then press
Touch
VPN settings > Basic VPN
> Settings > Wireless & networks >
in the options menu that opens.
> Settings > Wireless & networks >
.
or
Advanced IPSec VPN
or
Advanced IPSec VPN
VPN
> Save
.
.
.
Page 83

2.
Touch and hold the VPN you want to delete. Touch
Delete network
3.
When prompted to confirm you want to delete the
VPN, touch
in the options menu that opens.
OK
.
Setting Up Secure Credential Storage
You may need security certificates to access VPNs.
Contact your network administrator to see if you need
any security certificates. If certificates are needed, you
will need to set up your phone’s secure credential
storage before attempting to connect to a VPN.
1.
Touch
Set password
2.
Fill in the password dialogue box, and press OK,
and make sure the box next to
credentials
> Settings > Location and security >
.
Use secure
is checked.
3.
Touch
Install from SD card
, and follow the prompts
to install the certificate.
Note:
Your network administrator should provide you with the
security certificates you need. You will need to place the
certificates on to your phone’s microSD card in order to
install them on your phone. For more information on
transferring files on to your microSD card, see “View
and Transfer Files” on page 56.
2H. Wireless and Network Connections 75
Connections
Wireless and Network
Page 84

Page 85

Section 3
Sprint Service
Page 86

⽧
3A. Sprint Service:
The Basics
Voicemail (page 78)
⽧
Messaging (page 83)
⽧
Social Networking (page 86)
⽧
Making a Conference Cal l (page 87)
⽧
Roaming (page 87)
Voicemail
Visual Voicemail
Visual Voicemail gives you a quick and easy way to
access your voicemail. Now you can find exactly the
message you are looking for without having to listen to
every voicemail message first. This new feature
periodically goes out to your voicemail, and gathers the
caller information from the current voicemails. It then
creates a list with the caller name and number, along
78 3A. Sprint Service: The Basics
with the length of time and priority level of the voicemail
message.
Setting Up Visual Voicemail
To set up Visual Voicemail, see “Setting Up Visual
Voicemail” on page 4.
Reviewing Visual Voicemail
Visual Voicemail lets you easily access and select
which messages you want to review.
1.
Touch >
2.
Touch a message to review it.
Note:
Press >
accidentally being deleted.
Features available while reviewing messages include:
䢇
Timeline
provides a visual timeline for the current
message. Touch and drag this bar to move to
different points in the message.
䡲
Touch
Play
䢇
Call
to call the person who left the voicemail
message.
Voic email
Lock
Pause
to pause the playback. Touch
.
to prevent the message from
to resume.
Page 87

䢇
Reply
to reply to the message. You can then reply to
the sender or forward the message to anyone with
an email account or phone number. This allows you
to send this voicemail message to several recipients
at the same time. You can tag the reply message for
both Urgency and Privacy.
䡲
Touch
Send
to deliver the new message.
䢇
Speaker Off/On
to turn the speakerphone on or off
during playback. If the speakerphone feature was
enabled within the Voicemail settings menu, the
speakerphone will always be automatically enabled
during voicemail playback.
䢇
Delete
to delete the current voicemail message.
touch
OK
to confirm the deletion.
Listen to Multiple Voicemail Messages
When you are done listening to a voicemail message,
you can easily listen to other messages without
returning to the main voicemail screen.
䊳
After listening to a voicemail, flick the screen left or
right to move to the previous or next message. (It
will begin playing automatically.)
You can navigate through voicemail messages as
frequently as you like. You can even move to the next
or previous message before you are finished listening
to the current one.
Configuring Visual Voicemail
To access the voicemail options:
1.
Touch >
2.
Press and select from the following:
䡲
Compose
䡲
Play all new
䡲
Undelivered
messages.
䡲
Delete
to delete selected messages from your
current list of available voicemail messages.
䡲
Search
keywords.
䡲
Settings
settings.
To access a voicemail message’s options:
1.
Touch >
Voicemail
.
to compose a new voicemail message.
to listen to all new messages.
to list all undelivered voicemail
to search through voicemail messages for
to configure your voicemail application
Voicemail
.
3A. Sprint Service: The Basics 79
Sprint Service
Page 88

Touch a voicemail message, press , and select
2.
from the following:
䡲
Lock/Unlock
to prevent deletion of the selected
voicemail message.
䡲
Text message
to create and deliver a new text
message to the sender’s phone number.
䡲
Reply
to reply to the voicemail. You can reply to
the sender or forward it to anyone with an email
account or phone number. This allows you to
send this voicemail message to several recipients
at the same time.
䡲
Forward
to forward the voicemail to another
recipien t.
䡲
Add to contacts
to add the sender’s phone
number to your Contacts list.
Configuring Visual Voicemail Settings
The Visual Voicemail settings menu lets you access
settings for notifications, pictures, greetings, and more.
1.
Touch >
2.
Press >
80 3A. Sprint Service: The Basics
Voic email
Settings
.
and select from the following:
䡲
Touch
Notifications
to determine how you are
notified of new voicemails. Choose from:
Notifications, Select ringtone
䡲
Touch
Pictures
to replace the default Visual
, and
Vibrate
.
Voicemail message icon with a specific Contacts
entry’s image. This image is pulled fro the entry’s
Contacts details.
䡲
Touch
Speakerphone
to automatically activate the
speakerphone when you review your Visual
Voicemail.
䡲
Touch
Change greeting
to adjust your voicemail
greeting.
䡲
Touch
From name
to enter a name or a number
that is attached to your outgoing voicemails as
part of an identification string.
䡲
Touch
Check for upgrade
to search for an
upgrade to your visual message software.
䡲
Touch
About Voicemail
to view information about
the Visual Voicemail application, such as the
version.
Note:
Voicemail settings can also be accessed by touching
> Settings > Call settings > Voicemail
settings
.
Page 89

Automatically Enable the Speakerphone
Every time you access a message from your Visual
Voicemail list, you can configure your phone to
automatically turn on the speakerphone so you can
clearly hear the message.
1.
Touch >
2.
Press >
the feature. You will se a green check mark on the
right.
䊳
To deactivate the speakerphone, touch
Speakerphone
grayed out.
Voicemail
Settings > Speakerphone
again. The check mark will be
.
to activate
Changing Your Main Greeting via the Voicemail
Menu
Your main greeting can be changed directly via the
Visual Voicemail system. This direct access saves you
from having to navigate within the voicemail menu.
1.
Touch >
2.
Press >
Voicemail
Settings > Change greeting
.
.
3.
Touch OK to connect to the Sprint voicermail
system. Follow the prompts to change your current
greeting.
Edit the From Name via the Voicemail Menu
From your Visual Voicemail menu, you can quickly
change the name or number attached to your
voicemail messages.
1.
Touch >
2.
Press >
3.
Touch the existing identification field and enter a
new identifying name or number (used to identify
you to recipients of your voice messages).
4.
Touch OK to save your information.
Voicemail
Settings > From name
.
.
3A. Sprint Service: The Basics 81
Sprint Service
Page 90

Traditional Voicemail
1
Setting Up Your Voicemail
To set up traditional voicemail, see “Setting Up
Traditional Voicemail” on page 5
Voicemail Notification
Your phone alerts you to new messages in several
ways:
䢇
By sounding the assigned ringer type.
䢇
By displaying within the Notifications area of the
Status bar when a new unheard voicemail message
is received.
䢇
By blinking the notification light.
82 3A. Sprint Service: The Basics
.
Note:
Your device accepts messages even when it is turned
off. However, your devices notifies you of new
messages only when it is turned on and you are in a
Sprint service area.
When you are roaming off the Nationwide Sprint
network, you may not receive notification of new
voicemail messages. sprint recommends that you
periodically check your voicemail by dialing 1 + area
code + your wireless phone number. When your
voicemail answers, touch [Star Key] and enter your
password. Roaming rates apply when you access
voicemail while roaming off the Nationwide Sprint
network.
Retrieving Your Voicemail Messages
When you have a new voicemail, shows at the top
of your screen. To hear the message, touch
, and then touch and hold .
Contacts
Tip:
If you have a shortcut on your home screen, just touch
Voice mail
shortcut, touch and hold an empty spot on a home
screen and select
Voi cema il
to retrieve your voicemail. To add the
Shortcuts > Applications >
.
Dialer >
Page 91

If you need to change your voicemail number,
*
Universal Inbox (15)
Universal Inbox (15)
11:34 AM
9:53 AM
Christine Fanning
UPDATE: Presentation has been
rescheduled at 11:30 instead!
Heather Connor
Movie night, my pick is Younger Than Ever
Ravi Thakkar
Funny Video!
Christine Fanning
Presentation tomorrow has been moved
to noon in main conference room.
Christine Fanning
Call me once you have reviewed the n...
Email with Attachment
Paris Photos!
Jeff Cook
11:03 AM
10:23 AM
10:11 AM
9:22 AM
11:35
Create Message
Touch to open a
message. Touch &
hold to move,
delete, & more.
Check for
Messages Now
Message Type
touch
Voicemail settings
> Settings > Call settings >
.
Using Another Phone to Access Messages
1.
Dial your wireless access phone number.
2.
When your voicemail answers, press .
3.
Enter your password.
Messaging
View your text, IM, and email messages all in one
place.
View Your Inbox
䊳
Touch
Tip:
> Messaging >Universal Inbox
To see more messages, flick or drag up.
3A. Sprint Service: The Basics 83
.
Sprint Service
Page 92

Reading and Replying to Messages
䊳
Touch
Note:
䡲
To
message and all of its replies, touch it.
䡲
To
response in the text box at the bottom.
䡲
To
message in the conversation, and then touch
Forward message
a reply or forward option.
䡲
To open
Note:
84 3A. Sprint Service: The Basics
> Messaging >Universal Inbox
Universal Inbox
— text, email, and social networking messages. To
show only one type of message, touch a message
account type instead of
open
reply
forward
shows all of your messages together
Universal Inbox
.
a text message or social networking
to a message, just open it and enter your
a text message, touch and hold a
. For email, touch to choose
options
, touch and hold a message.
Try t he
Messages
widget in “Widgets” on page 21.
Creating Messages
.
1.
Touch >
2.
Choose a message type, such as
Facebook
Messaging >
.
Tex t m essag e
. Then, enter the recipient and message.
In text messages and emails, touch for options
such as
Insert...
or
Insert smiley
.
or
Sending and Receiving Attachments
䊳
To send a file in a message, begin a new message
and touch
When you receive a message with an attachment,
open the message and touch the file name to
download it. Then, touch the name again to open it.
Some file formats can be converted to HTML for faster
viewing, and your phone will show
While viewing the attachment, touch it to save it, share
it, and more.
Tip:
To send and receive large attachments faster, use Wi-Fi.
See “Connecting With Wi-Fi” on page 68.
>Insert
.
Get HTML version
.
Page 93

Setting Up Messaging
䊳
To add other messaging accounts, touch >
Settings > Accounts > Add account
䡲
Corporate Sync
accounts. Enter details from your IT administrator.
Tip:
You might need to enter your domain name with your
user name (like domain/username).
䡲
is for most personal email accounts. For
account details, contact the account provider.
䡲
You can also add social networking accounts
such as
more from the
䊳
To change your settings, touch >
Messaging >
䡲
Manage accounts
䡲
Edit Universal Inbox
show messages in the
䡲
Messaging settings
options for each account type.
is for Exchange server work email
Facebook, LinkedIn, Twi tte r, MySpace
Setup accounts
page.
, and then touch:
to add or remove an account.
to choose which accounts
Universal Inbox
to set the notification and other
Email
The first time you turned on your phone (see page 2),
.
you were prompted to log in to your Gmail™ account.
You can add any other email account that you set up.
To add other email accounts to your
and
Universal Inbox
and then touch
the
Setup accounts
and enter your email account information.
Sync
, touch
Manage accounts > Add account
screen, touch
Messaging
> Messaging >
Email
or
Corporate
widget
,
. On
Instant Messages
, and
.
To send and receive messages, use an instant
messaging app or your browser. Your device comes
preloaded with Google Talk™. You can also download
an instant messaging app from the Android Market
™
Google Talk
Google Talk instant messaging lets you chat via text,
video, or audio with other Google Talk users on
phones or the Web.
3A. Sprint Service: The Basics 85
.
Sprint Service
Page 94

䊳
http
://
.
Touch >
Touch to change your online status message.
Touch to
change your
picture.
Friends list
Android Market
Tal k
.
heatherconnor
Offline
jeffcook
Busy
ravithakkar
Available
scottwilke
Available
taylormalloy
Offline
™
also offers other instant message
apps:
䢇
To download and use an instant messaging app,
touch
>Market >Apps > Communication
then choose an app for your provider. Once you
86 3A. Sprint Service: The Basics
Touch to change
your status.
Touch a contact
to chat with a
friend.
Online
status:
Available
Idle
Busy
Offline
, and
download the app, you’ll see it in the app menu. See
“App Menu” on page 20.
䢇
If you don’t see an app for your IM provider, you can
use your Web browser. Touch
www
> Browser
, and
then enter your provider’s Web address. Once you’re
there, follow the link to sign in.
Note:
Your IM options will depend on your IM provider. To
browse instant messaging apps from your computer,
go to
www.and roid.com/market
.
Social Networking
Your Social Networking Account
Integrate and sync all of your contacts, emails, and
social networking sites. No opening and closing apps
and menus. Just touch the
Social Status
widgets.
When you sign into social networking accounts, you’ll
see your friends and contacts in your
your status and updates can appear in
and
Social Networking
Social Networking
widgets.
and
Contacts
Social Status
list, and
Page 95

Tw itt er
and
MySpace
“read” on your phone, but your phone notifies you
when you receive a new message.
messages will always appear as
Adding Accounts
You can add your
accounts to
accounts on these sites, visit their websites to set them
up.
䊳
Touch >
To add an account, touch it. Then enter your user
name and password for that account.
Facebook, MySpace, Twitter
Social Networking
Accounts > Add account
. If you do not have
or other
.
Editing and Removing Accounts
䊳
Touch >
Touch and hold an account, and then touch and hold
Open account
remove it along with all of its contacts and messages.
Note:
Accounts
to edit it, or touch
You cannot remove the Google™ account you used or
created when you set up your phone.
.
Remove account
to
Making a Conference Call
With 3-way calling, you can talk to two people at the
same time. When using this feature, the normal airtime
rates will be charged for each of the two calls.
䊳
To start a conference call, call the first number.
After the call connects, touch
number, or select it from contacts or favorites.
When the next number answers, touch
Add Call
. Dial the next
Merge
.
Roaming
Roaming Icon
Your phone lets you know when you’re off the
Nationwide Sprint Network. Anytime you are roaming,
the phone shows the roaming icon ( ).
Setting Roam Mode
Control your roaming capabilities.
䊳
Touch >
Mobile networks
CDMA Roaming Settings
Settings > Wireless & networks >
, and then make selections under
.
3A. Sprint Service: The Basics 87
Sprint Service
Page 96

Call Guard
Your phone has two ways of alerting you when you are
roaming off the Nationwide Sprint Network: the
onscreen roaming icon and Call Guard. Call Guard
requires an extra step before you can place or answer
a roaming call. (This extra step is not required when
you make or receive calls on the Nationwide Sprint
Network.)
To turn Call Guard on or off:
1.
Touch >
Mobile networks > Roaming Guards
2.
Check or uncheck options under
Roaming
Note:
Call Guard is turned off by default on your phone.
Voice dialing is not available when you are roaming
with Call Guard enabled.
Note:
If the Call Guard feature is set to On, you need to take
extra steps to make and receive roaming calls.
88 3A. Sprint Service: The Basics
Settings > Wireless & networks >
and
International Roaming
.
Domestic
.
Data Roam Guard
Depending on service availability and roaming
agreements, your phone may be able to access data
services while roaming on certain digital systems. You
can set your phone to alert you when you are roaming
off the Nationwide Sprint Network and try to use data
services such as messaging.
Note:
Data Roam Guard is turned off by default on your
phone.
To set your Data Roam Guard notification:
1.
Touch >
Mobile networks > Roaming Guards
2.
Check or uncheck
and
Data
To use data services when Data Roam Guard is active:
䊳
When a notification appears informing you that
data roam charges may apply, touch
connect.
Settings > Wireless & networks >
International Data
Data Guard
under
.
.
Domestic
Roam
to
Page 97

Surfing the Web
3B. Web and Data Services
http
://
.
e
⽧
Surfing the Web (page 89)
⽧
Android Market™ (page 91)
⽧
Downloading Apps (page 92)
⽧
YouTube™ (page 93)
⽧
Google Books™ (page 95)
To launch the browser:
䊳
Touch
Google
Web Images
See places near:
New window
Refresh
Note:
If you can’t connect, contact Sprint.
www
> Browser
Local News
Chicago -
Sign in
Bookmarks
Forward
3B. Web and Data Services 89
more
update
updat
Windows
More
11:35
11:35
.
Touch a link to
select it. Touch
and hold for more
options.
Touch for
browser options.
Web and Data
Page 98

Select Web Links
source/android.com/ - Options
Android Community - Tracking the Android
Platform
application developer sreern
When you touch a link,
your phone outlines it and
goes to that page. If you
touch and hold the link,
your phone shows options, such as
.
window
Browser Options
Press to see browser options:
Options
New Window
Bookmarks
Windows
Refresh
Back/Forward
90 3B. Web and Data Services
Open a new browser window.
(Becomes “Windows” when more
than one are open.)
Add delete and manage
bookmarks.
View the browser windows that are
currently open.
Reload the current page.
Navigate to previously viewed
pages.
Open in new
Options
More
Show browser options, such as
Add bookmark, Find on page, Save
,
Select text, Page info, Share
page
,
page
Downloads
, and
Settings
.
Going to a Specific Website
To go to a particular website by entering a Web address
(URL):
䊳
Touch the address bar, enter a Web address, and
touch
Go
.
Note:
Not all websites are viewable on your phone.
Creating a Bookmark
Bookmarks allow you to store the address of your
favorite websites for easy access at a later time.
1.
Press
> Bookmarks > Add.
Page 99

2.
Confirm or edit the bookmark title, and then
touch
OK
.
Note:
Bookmarking a page does not store the page contents,
just its address.
Some pages cannot be bookmarked. Whether a
particular Web page may be marked is controlled by its
creator.
Accessing a Bookmark
1.
Press >
2.
Touch a bookmark to open the Web page.
Bookmarks
.
Reloading a Web Page
Press
browser will reload the current Web page.
> Refresh
at the bottom of the screen. (The
Zoom
www.google.com: Google
www.google.com: Google
News results for android
Verizon Droid Success Limited by Android Market -
7 hours ago
The idon't ad campaign pits the Android-based Droid head-to-head
against the formidable iphone. Based on preliminary predictions ..
PC World - 1778 related articles »
Zoom
To zoom in or out, pinch
two fingers together or
apart.
Android Market™
Note:
You must set up a Gmail™ account (see “Setting Up
Your Phone” on page 2) in order to buy and download
apps from the Android Market.
䊳
Touch
Get all the fun games and cool apps you want! Android
Market provides access to applications created by
developers worldwide, so you can find the app you
want. If you need help or have questions about Android
Market, touch
>Market
>Help
.
.
3B. Web and Data Services 91
Web and Data
Page 100

Browsing and Installing Apps
http
://
.
䊳
Scroll to and touch the app you want to install.
Then, touch
Install
(if app is free) or
If an app you are downloading requires access to your
data or control of functions on your phone, you’ll be
asked to give your permission. After selecting
the app will download. After selecting
Buy
asked to sign in to an additional Google™ account.
Sign in and select
Purchase now
to proceed. Follow the
on-screen instructions. To see the download progress,
open the notifications window.
After you download an app, the icon for that app
appears on the App menu. (See “App Menu” on
page 20.)
Managing and Restoring Apps
1.
Touch >
applications
2.
Touch an app in the list, and then touch
(for apps you downloaded),
options.
92 3B. Web and Data Services
Settings > Applications > Manage
.
Clear cache
Buy
.
Install
, you may be
Uninstall
, or other
Tip:
To reinstall any downloaded items, touch >
Market
Downloading Apps
WARNI NG:
,
To download apps:
1.
2.
3.
Note:
Apps downloaded from unknown sources can
include spyware, phishing, or viruses that affect
your phone, phone performance, and personal
data. For security, download apps only from
trusted sites like
To download apps from any Web page, you will
need to grant your phone permission to download
apps from unknown sources. Touch
Settings > Applications > Unknown sources
To launch the browser, touch
Find the app you want to download and touch the
download link.
Downloaded apps are stored in your phone’s memory.
.
Market
.
>
.
www
Browser
.
 Loading...