

Page 1

motorola TN20/TN30
User’s Guide
Page 2

welcome
Your MOTONAV™ TN20/TN30 Personal Navigation
Device (PND) helps you find the best route with GPS
accuracy. Features and benefits with your PND
include:
• Hear directions and street names
street names and turn-by-turn directions in
clear, easy to understand voice, eliminate
second-guessing when making a turn. You can
feel as confident as you would in your own
neighborhood.
• Save time and gas
avoid getting lost. Your PND helps you find the
best route with GPS accuracy. If you miss your
turn, it will show you how to get back on track.
Select between fastest and shortest modes,
or bypass tolls if you prefer.
—Get there quickly and
—Spoken
• Find what you need
restaurant, nearest ATM, or see what is
available along your route. Search over a
million of points of interests to find
destinations while in-town or away.
• Make handsfree calls (TN30 only)
with your compatible Bluetooth® enabled
phone for hands-free calls. It works as a
speakerphone, displays contacts and callerID
on the screen, and automatically quiets
directions while a call is being made.
Navigation and hands-free calls help you keep
your hands on the wheel, and eyes on the
road.
—Locate your favorite
—Connect
1
Page 3
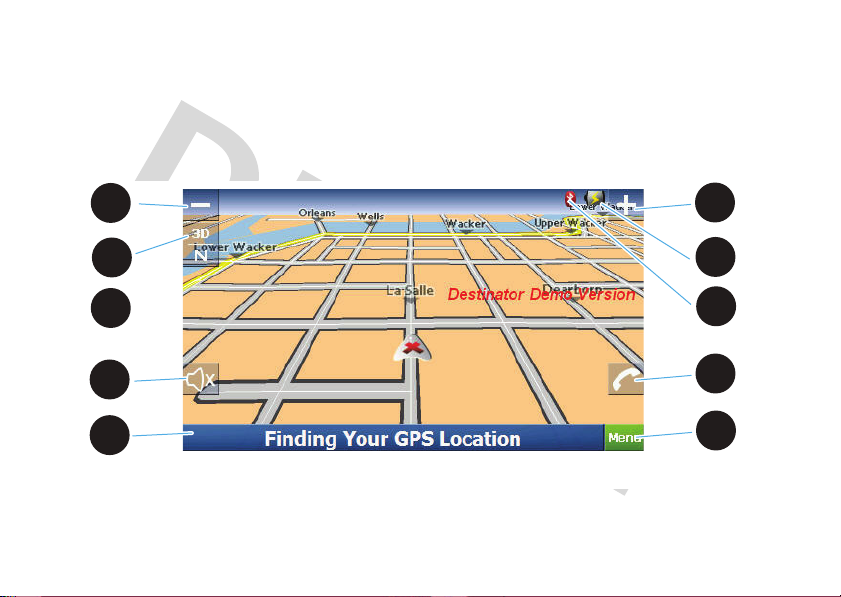
Map View Screen
1
2
3
4
5
6
7
8
9
10
Map Control Icons
Here’s a quick guide for using the map view screen icons to control TN20/TN30 PND operation.
1
10
2
Page 4
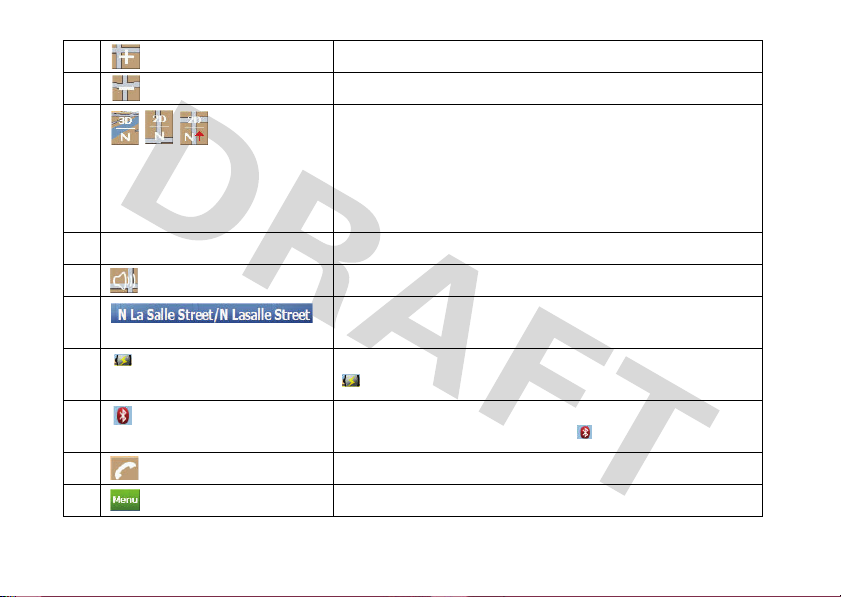
1 Tap to view a larger area in less detail.
2 Tap to view a smaller area in greater detail.
3 Tap to change map view display:
•
3D view with forward direction at top of map
•
2D view with forward direction at top of map
•
2D view with north direction at top of map
4 View compass direction,
5 Tap to adjust/mute volume.
6 View current street location. If no GPS, tap to view GPS
Information screen.
7 View battery charge status. Status is displayed as follows:
8 (TN30 only) View Bluetooth connection status. Status is
9 (TN30 only) Tap to make a handsfree call.
10 Tap to display main menu.
Connected for power source, Full, Half full, Empty.
displayed as follows: Connected, Not Connected.
3
Page 5
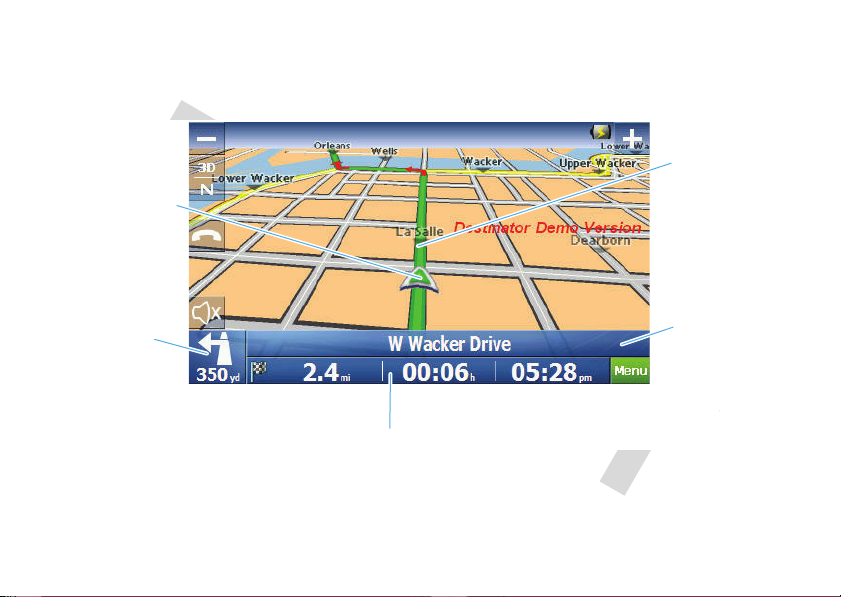
Route Screen
Here’s a quick guide for using the map view screen to view and control route information.
current
location
next
turn
route status bar
4
route
next
street
bar
Page 6

Tap the
route status bar
•
travel distance, time remaining, and estimated time of arrival,
•
current street name, or
•
current speed and altitude.
To manage the route, tap the
•
display driving directions,
•
view route map overview, or
•
cancel route.
to switch between viewing:
next street name bar
to:
5
Page 7

Motorola, Inc.
Consumer Advocacy Office
1307 East Algonquin Road
Schaumburg, IL 60196
www.motorola.com
www.motorola.com/bluetoothsupport
1-877-MOTOBLU (Motorola Bluetooth support)
1-800-331-6456 (United States)
1-888-390-6456 (TTY/TDD United States for hearing impaired)
1-800-461-4575 (Canada)
The use of wireless devices and their accessories may be
prohibited or restricted in certain areas. Always obey the laws and
regulations on the use of these products.
All features, functionality, and other product specifications, as well
as the information contained in this user’s guide are based upon
the latest available information and are believed to be accurate at
the time of printing. Motorola reserves the right to change or
modify any information or specifications without notice or
obligation.
MOTOROLA and the Stylized M Logo are registered in the US
Patent & Trademark Office. All other product or service names are
the property of their respective owners.
© 2008 Motorola, Inc. All rights reserved.
6
Software Copyright Notice
The Motorola products described in this manual may include
copyrighted Motorola and third-party software stored in
semiconductor memories or other media. Laws in the United
States and other countries preserve for Motorola and third-party
software providers certain exclusive rights for copyrighted
software, such as the exclusive rights to distribute or reproduce
the copyrighted software. Accordingly, any copyrighted software
contained in the Motorola products may not be modified,
reverse-engineered, distributed, or reproduced in any manner to
the extent allowed by law. Furthermore, the purchase of the
Motorola products shall not be deemed to grant either directly or
by implication, estoppel, or otherwise, any license under the
copyrights, patents, or patent applications of Motorola or any
third-party software provider, except for the normal, non-exclusive,
royalty-free license to use that arises by operation of law in the
sale of a product.
Manual Number: 68000xxxxxx-A
Bluetooth QD ID: Bxxxxxx
Page 8

contents
Map View Screen . . . . . . . . . 2
contents . . . . . . . . . . . . . . . . . . 7
getting started . . . . . . . . . . . . . 9
initial setup . . . . . . . . . . . . . . 9
map view screen. . . . . . . . . . 9
main menu screen . . . . . . . 10
routes . . . . . . . . . . . . . . . . . . . 11
create a route . . . . . . . . . . . 11
manage a route . . . . . . . . . . 15
cancel a route . . . . . . . . . . . 18
save a route. . . . . . . . . . . . . 18
use the keyboard. . . . . . . . . 19
maps . . . . . . . . . . . . . . . . . . . . 21
map display controls . . . . . . 21
manage maps . . . . . . . . . . . 22
browse map . . . . . . . . . . . . 23
view GPS information . . . . . 23
settings . . . . . . . . . . . . . . . . . . 25
set your language . . . . . . . . 25
set your time zone. . . . . . . . 25
set your units of measure . . 26
set display look & feel . . . . . 26
set voice prompts . . . . . . . . 27
handsfree calls (TN30 only). . 28
answer a call . . . . . . . . . . . . 28
reject/ignore a call . . . . . . . . 28
make a call. . . . . . . . . . . . . . 28
mute/unmute a call . . . . . . . 29
end a call . . . . . . . . . . . . . . . 29
Safety Information . . . . . . . . . 30
Driving Safety. . . . . . . . . . . . . 32
Industry Canada Notice . . . . . 34
FCC Notice . . . . . . . . . . . . . . . 34
Warranty . . . . . . . . . . . . . . . . 35
Registration . . . . . . . . . . . . . 40
Export Law . . . . . . . . . . . . . . 40
Recycling Information . . . . . 41
index . . . . . . . . . . . . . . . . . . . 43
welcome
7
Page 9

getting started
initial setup
Before you navigate with your PND, you need to
perform the following initial setup steps:
1
Charge PND battery.
2
Mount PND in your car.
3
Configure initial PND device settings.
4
Find satellite signal to obtain your location.
For details on performing these steps, see the Quick
Start Guide included in the box:
getting started
8
map view screen
Upon powering on your PND, you always see the map
view screen.
For details on using the map view screen, see page 2
and 3.
To directly access the map view screen from all other
Map
menu screens, press the
corner.
button in lower-left
Page 10

main menu screen
From the map view screen, press the
access the main menu screen.
Menu
button to
From the main menu, you can access all PND
operations via the following icons:
Let’s you create and manage destination
routes on your PND.
TN30
TN20
Displays map view screen with route and
map control options.
(TN30 only) [???]
Let’s you configure PND setting options.
getting started
9
Page 11

routes
create a route
go to an address
To create a route to an address, do the following:
From the main menu:
1
2
10
Press the
Press the
routes
Go!
icon.
Address
icon. You see:
Note:
To change state of destination, press
Change
button and select new state. See
“search and select item” on page 18 for details
on searching for a selecting items using the
keyboard screen.
3
Press
Address
button.
4
Select destination address (city, street, and
address number). See “search and select item”
on page 18 for details on searching for and
selecting items using the keyboard screen.
5
Press Go button to generate route. A route
screen is displayed.
Page 12

go to an intersection
To create a route to an intersection, do the following:
From the main menu:
1
Press the
2
Press the
Note:
Change
“search and select item” on page 18 for details
on searching using the keyboard screen.
3
Press
4
Select destination intersection (city and streets).
See “search and select item” on page 18 for
Go!
button.
Address
button. You see:
To change state of destination, press
button and select new state. See
Intersection
button.
details on searching for and selecting items using
the keyboard screen.
5
Press Go button to generate route. A route
screen is displayed.
go to location on map
To create a route to a location on the map, do the
following:
From the map view screen:
1
Press destination location on map. You see a
pop-up menu:
2
Press
Go There
route. A route screen is displayed.
from pop-up menu to generate
routes
11
Page 13

go to home location
To create a route to your home location, do the
following:
Note:
To set your home location, see “select home
location” on page 16.
From the main menu:
1
Press the
2
Press
screen is displayed.
Go!
icon.
Home
icon to generate route. A route
go to recent location
To create a route to a recent location, do the following:
From the main menu:
1
Press the
2
Press
3
Select location from list and press OK.
12
Go!
icon.
Recent Locations
routes
icon.
4
Press Go button to generate route. A route
screen is displayed.
go to favorite location
To create a route to a favorite location, do the
following:
Note:
To set a favorite location , see
From the main menu:
1
Press the
2
Press
3
Select location from list and press OK.
4
Press Go button to generate route. A route
screen is displayed.
Go!
icon.
My Locations
icon.
go to a point of interest
To create a route to your favorite restaurant, nearest
gas station, or see what is available along your route,
do the following:
Page 14

1
Press the
2
Press the
3
Select location to search near:
•
•
•
Go!
icon.
Food, Fuel, Lodging...
Press
My Current Location
near your current location.
Press
My Destination
your route destination.
Press
Another Location
another location. To search for and select a
specific location, see “search and select item”
on page 18.
button to search
button to search near
to search near
icon. You see:
Once location is selected, you see:
4
Search for and select point of interest (POI):
•
To search for a POI by category, press a
category icon (or
categories) to search for and select a POI.
•
To search for a POI by name, press Spell Place
to search for and select a POI.
5
Press Go button to generate route. A route
screen is displayed.
More Places
icon for more
routes
13
Page 15

manage a route
select route options
To select route type (quickest, shortest), and road
types to avoid when generating a route, do the
following:
From the main menu:
1
2
3
14
Press the
Press
Press
Settings
Route
icon.
Road Settings
routes
icon.
icon. You see:
4
Select desired route type and press right arrow.
Yo u s e e:
5
Press road types to avoid and press OK. The
route is regenerated and displayed on map
screen.
create route detour
You can select a detour distance to instruct your PND
to calculate an alternate route. For example, if you
know there is traffic for the next three miles, you can
have your PND calculate a detour that takes you off
your current route and then returns you back to that
route after a distance of three miles. To do this:
Page 16

From the route screen:
1
Press next street bar.
2
Press
Create Detour
3
Press a detour distance button. The route is
regenerated and displayed on map screen.
. You see:
view route directions list
To view a driving directions list, do the following:
From the route screen:
1
Press next street bar.
2
Press
Directions List
3
To view detail about a specific route step, select
the step and do the following:
•
Select
Tu r n s
Next/Prior
Select
previous step on map.
•
Select
Avoid
avoid select step.
•
Select
Route
icon. You see:
button to view turn on map.
button to view next or
button to recalculate route to
to view overall route on map.
routes
15
Page 17

view route map overview
To view a map of the complete route, do the following:
From the route screen:
1
Press next street bar.
2
Press
Route Overview
The distance and estimate time of arrival are displayed
at the bottom of the screen.
icon. You see:
view route status information
To view route status information, from the route
screen, press the route status bar. You can switch
between the following details:
routes
16
•
Travel distance, time remaining, and estimated
time of arrival
•
Current street location
•
Current speed and altitudelocation
select home location
To select a home location, do the following:
From the main menu:
1
2
Press the
Press
Settings
Home
icon.
icon. You see:
Page 18

3
Do one of the following:
•
Search for and select an address (city, street,
and address number) by pressing
and
Address
•
Search for and select nearest POI by category
by pressing
and
Set Address
Go To Nearest POI in Category
Set POI Category
buttons.
buttons.
view traffic information
???
cancel a route
To cancel a route, do the following:
From the route screen:
1
Press next street bar.
2
Press
Cancel Route
from the map view screen.
icon. The route is removed
Go To This
save a route
To save a route, do the following:
From the route screen:
1
Press on map. You see:
2
Press
Save
3
Enter a route name. See “text entry” on page 19
for details on entering text using the keyboard
screen.
from pop-up menu.
routes
17
Page 19

use the keyboard
A keyboard screen is provided to search and select
items as well as enter text with your PND.
search and select item
To search for and select from a list of items (such as
cities or streets), you can:
•
Press
See List
button to select from a
complete list of items.
routes
18
•
Using keyboard, begin entering item name. As
you select characters, matching items are
listed like shown:
OK
Press an item to select it then press
To redisplay keyboard, press
To switch keyboard to display numbers or other
characters, press
ABC>
press
123>
button.
Show Keyboard
button. To redisplay letters,
button.
button.
Page 20

text entry
To enter text (such as when saving a location), press
keys to define entry.
Press
OK
to save entry.
routes
19
 Loading...