

Page 1
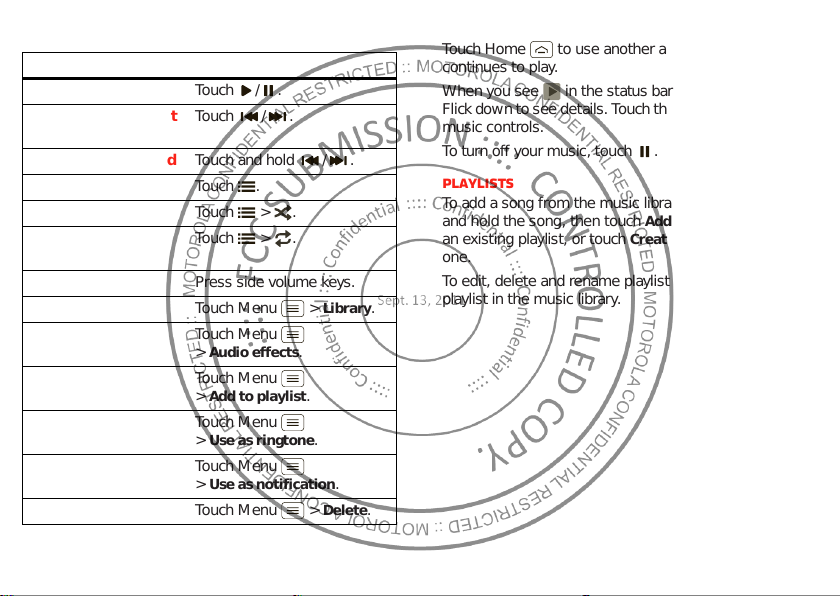
Music player controls
To...
Play/pause Touch / .
Select previous/next
song
Fast forward/rewind Touch and hold / .
View playlist Touch .
Shuffle on/off Touch > .
Repeat
all/current/off
Adjust volume Press si de volume keys.
View library Touch Menu >
Manage speakers Touch Menu
Add to playlist Touch Menu
Use as ringtone Touch Menu
Use as notificat ion Touch Menu
Delete Touch Menu >
Touch / .
Touch > .
Audio effects
>
Add to playlist
>
Use as ringtone
>
Use as notification
>
.
.
.
Library
.
Delete
Hide, wake, turn off
Touch Ho me to use a nother app. Your music
continues to play.
When you see in the status bar, a song is playing.
Flick do wn to se e details. Tou c h th e song t o ret urn to t he
music controls.
To turn off your music, touch .
Playlists
To add a song from the music library to a playlist, touch
and hold the song, then touch
an existing playlist, or touch
one.
To edit, delete and rename playlists, touch and hold the
.
playlist in the music library.
.
Add to playlist
Create playlist
. Choose
to create
35Music
Page 2
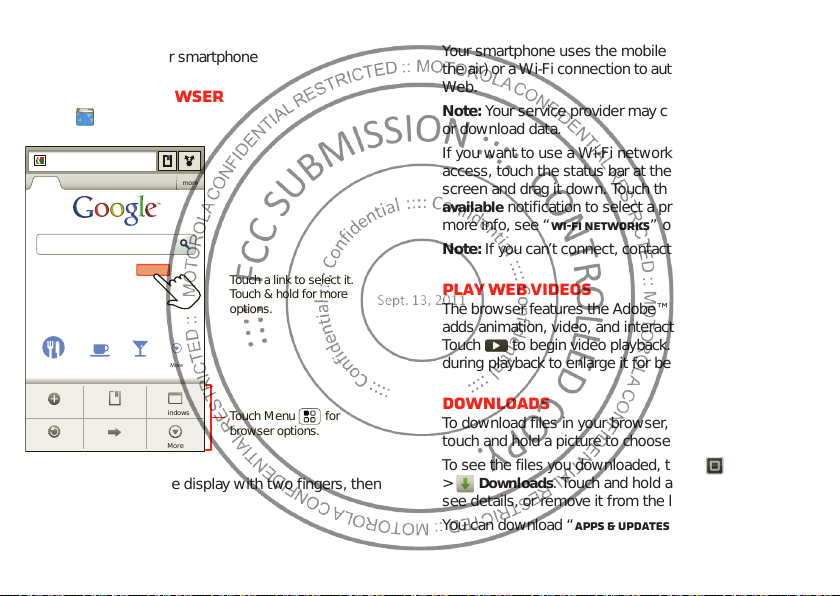
Web
p
:
.
Sign in
SettingsiGoogle Help
Turn onInstant (beta) is off:
Restaurants Coee Bars More
http://www.google.com/...
Web Images Places News more
ForwardRefresh
WindowsNew window Bookmarks
More
Touch a link to select it.
Touch & hold for more
options.
Touch Menu for
browser options.
surf the web with your smartphone
Quick start: Browser
htt
Find it:
//www
Browser
Connect
Your smartphone uses the mobile phone network (over
the air) or a Wi-Fi connection to automatically access the
Web.
Note: Your service provider may charge to surf the Web
or download data.
If you want to use a Wi-Fi networ k for faster Internet
access, touch the status bar at the top of the home
screen and drag it down. Touch the
available
notification to select a preferred network. For
more info, see “Wi-Fi n etworks” on page 42.
Note: I f y ou can’t connect, contact your service provider.
Wi-Fi networks
Tip: To zoom, touch the display with two fingers, then
move them apart.
36 Web
Play web videos
The browser features the Adobe™ Flash™ Pla y er, which
adds animation, video, and interactivity to web pages.
Touch to begin video playback. Double-tap the video
during playback to enlarge it for better viewing.
Downloads
To download files in your browser, touch a file link or
touch and hold a picture to choose
To see the files you downloaded, touch
>
Downloads
. Touch and hold an item to open it,
see details, or remove it from the list.
You can download “Apps & updates” on page 10.
Save image
.
Page 3
Browser options
Touch Menu to see browser options:
Options
New window
Bookmarks
Windows
Refresh
Forward
More
Open a new browser window.
See your bookmarks .
View open browser wi nd ows.
Reload the current page.
Go forward through viewed pages
(touch Back to go back).
View additional browser options.
YouTube™
Share videos with YouTube users ev erywhere. You don’t
need a YouTube account to browse and view videos.
Find it: >
Note: If you want a YouTube account, go to
www.youtube.com
touch Menu >
videos, touch Menu .
YouTube
. To create an account or sign in,
My account
. To
Browse
or
Upload
Personalize
add your personal touch
Widgets
Add widgets
1 Touch and hold an empty spot on your home scr een.
Tip: Flick left or right to see other panels.
Widgets
2 Touch
Set up widgets
You can customize some widgets. Touch a widget to
open it, then touch Menu .
Your hom e screen may already have these widgets:
Universal Inbox
•
how long it shows new messages. To add email
accounts, “Set up messaging” on page 20.
Music
•
playlist, genre, or just touch Menu >
There’s more about “Music” on page 32.
News
•
shows new stories, or choose a news source. To
choose a sourc e, touch , then choose preset
Bundles
URL for a
and choose a widget.
: Change the widget name or choose
: Set this widget to an artist, album, song,
: Change the widget name, choose how long it
or
Channels
Webpage
, or choose
or an
RSS feed
Custom
.
Shuffle all
to enter a
.
37Personalize
Page 4
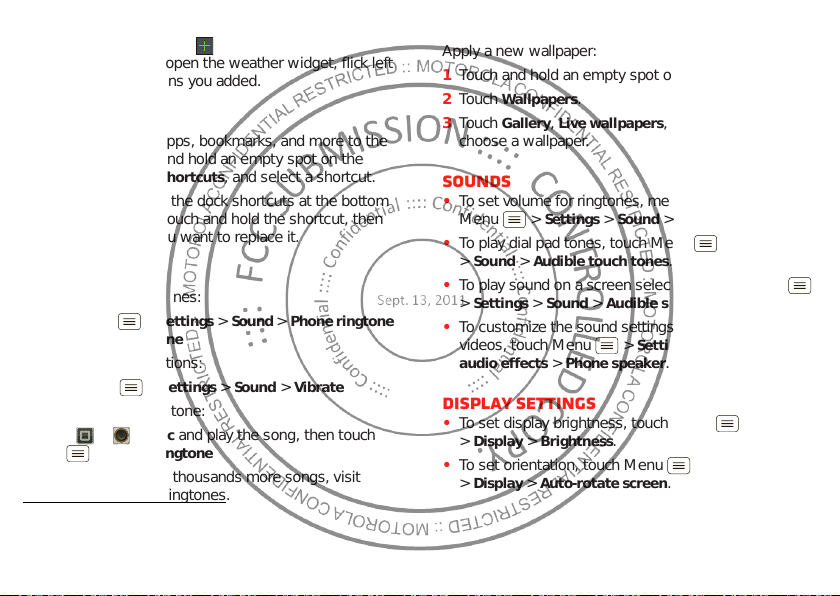
•
Weather
: Change temperature units or add locations.
To add locations, touch , enter a city, and touch
Search
. When you open the weather widget, flick left
to see other locations yo u added.
Shortcuts
To add shortcuts for apps, bookmarks, and more to the
home screen, touch and hold an empty spot on the
home screen, touch
Shortcuts
, and select a shortcut.
Tip: To change one of the dock shortcuts at the bottom
of the home screen, touch and hold the shortcut, then
select the shortcut you want to replace it.
Ringtones
Personalize your rin gt ones:
Find it: Menu >
Notification ringtone
or
To set your vibrate options:
Find it: Menu >
To set a song as a ringtone:
Find it: >
Menu >
Note: To choose from thousa nds more songs, visit
verizonwireless.com/ringtones
38 Personalize
Settings>Sound >Phone ringtone
Settings >Sound >Vibrate
Music
Use as ringtone
and play the song, then touch
.
Wallpaper
Apply a new wallpaper:
1 Touch and hold an empty spot on your home scr een.
Wallpapers
2 Touch
Gallery, Live wallpapers
3 Touch
.
, or
Wallpapers
choose a wallpaper.
Sounds
• To set volume for ringtones, media, and alarms, to uch
Menu >
• To play dial pad tones, touch Menu >
Sound >Audible touch tones
>
• To play sound on a screen selection, touch Menu
Settings >Sound >Audible selection
>
• To customize the sound settings for media and
videos, touch Menu >
audio effects
Settings >Sound >Volume
.
>
Phone speaker
Settings >Sound >Media
.
Display settings
• To set display brightness, touch Menu >
Display >Brightness
>
• To set orientation, touch Menu >
Display >Auto-rotate screen
>
.
.
.
Settings
.
Settings
, and
Settings
Page 5
• To set animation, touch Menu >
g
ghts
Elmhurst
Addison
Cicero
East
oChicago
Evanston
Des Plaines
Elmwood
La Grange
Harvey
Calumet
City
Hammond
Orland Park
GG
Tinley Park
Blue Island
Northbrook
Chicago
Heights
Highland
Highland Park
Grove
e
elein
g
o
G
g
e
A
Search Maps
Directions
Join Latitude
My PlacesSearch
Clear Map More
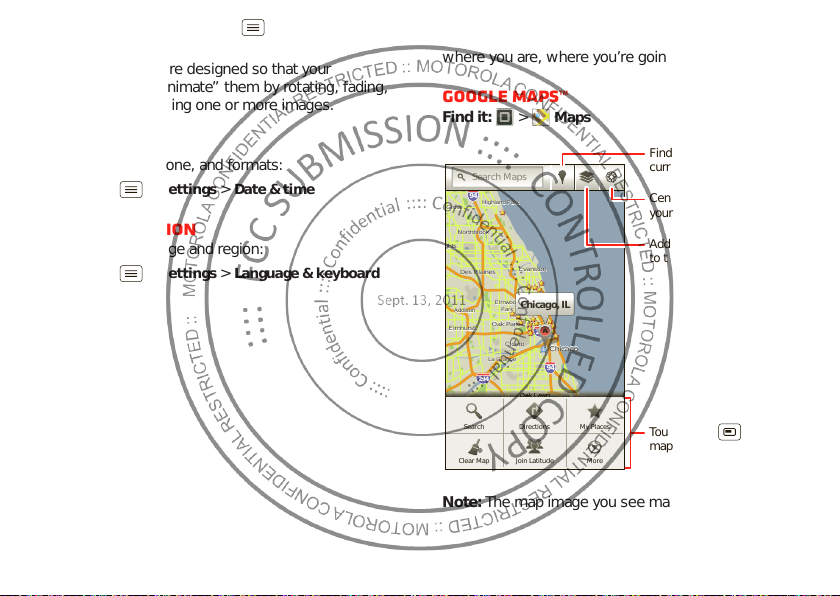
Find places near your
current location.
Add layers of information
to the map view.
Center the map on
your current location.
Touch Menu for
map options.
Display >Animation
>
.
Settings
Note: Some apps are designed so that your
smartphone can “animate” them by rotating, fading,
moving, and stretching one or more images.
Date & time
Set date, time, time zone, and form ats:
Find it: Menu >
Settings >Date & time
Language & region
Set your menu language and region:
Find it: Menu >
Select locale
>
Settings >Language & keyboard
Location
where you are, where you’re going
Google Maps™
Find it: >
lein
lein
94
Highland Park
Highland Park
Grove
Grove
Northbrook
Northbrook
hts
hts
Des Plaines
Elmhurst
Elmhurst
55
Des Plaines
Addison
Addison
80
294
Orland Park
Orland Park
Oak Park
Oak Park
La Grange
La Grange
Tinley Park
Tinley Park
Note: The map image you see may be a li ttle di fferent.
Elmwood
Elmwood
Park
Park
Cicero
Cicero
Evanston
Evanston
Chicago, IL
A
290
Chicago
Chicago
94
Oak Lawn
Oak Lawn
Blue Island
Blue Island
Harvey
Harvey
Chicago
Chicago
Heights
Hei
Maps
Calumet
Calumet
City
City
Hammond
Hammond
hts
90
East
East
Chicag
Chicag
Highland
Highland
39Location
Page 6
Google Maps offers powerful, user-friendly mapping
technology and local business information—including
business locations, contact information, and driving
directions.
For help, touch Menu >
More >Help
.
Tip: Want to know what’s in your immediate area? Try
Places
Google Places™. Touch >
Restaurants, ATMs, Gas Stati ons
for
to see listings
, and more based on
your current location.
Google Maps™ Navigation
Google Maps Navigation is an Inter net-connected GPS
navigation system with voice guidance.
Find it: >
Navigation
Follow the prompts to speak or type your destination.
For more information, go to
www.google.com/mobile/navigation
.
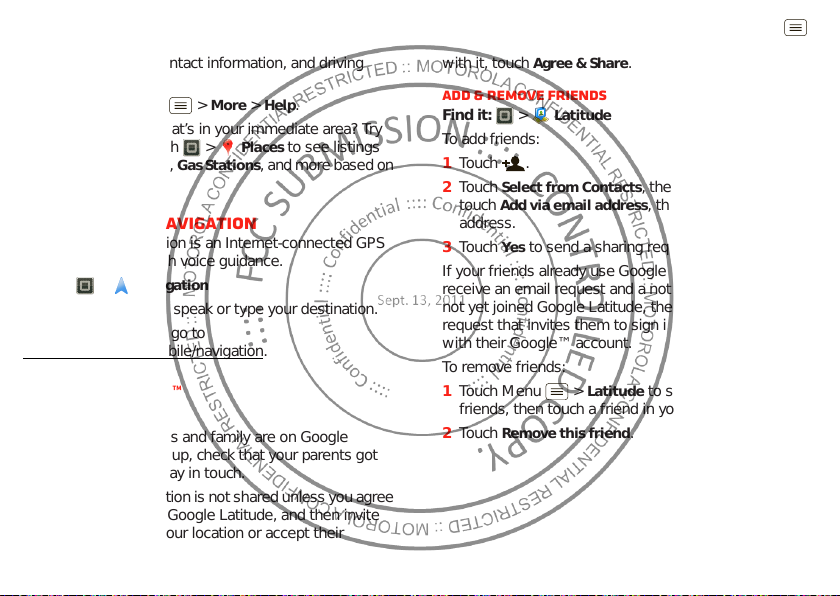
Google Latitude™
Join Latitude
See where your friends and family are on Google
Maps™. Plan to meet up, check that your parents got
home safely, or just stay in touch.
Don’t w orry , your location is not shared unless you agree
to it. You need to join Google Latitude, and then in vite
your friends to view your location or accept their
40 Location
invitations. When using Google Maps, touch Menu
Join Latitude
>
with it, touch
. Read the privacy policy and if you agree
Agree & Share
.
Add & remove friends
Find it: >
To add friends:
1 Touch .
2 Touch
touch
address.
3 Touch
If your friends already use Google Latitude, they’ll
receive an email request and a notification. If they have
not yet joined Google Latitude, they’ll receive an email
request that invites them to sign in to Google Latitude
with their Google™ account.
To remove friends:
1 Touch Menu >
friends, then touch a friend in your list.
2 Touch
Latitude
Select fro m Contacts
Add via email address
Yes
to send a sharing request.
Latitude
Remove this friend
.
, then touch a contact . Or,
, then enter an email
to show your list of
Page 7
Share location
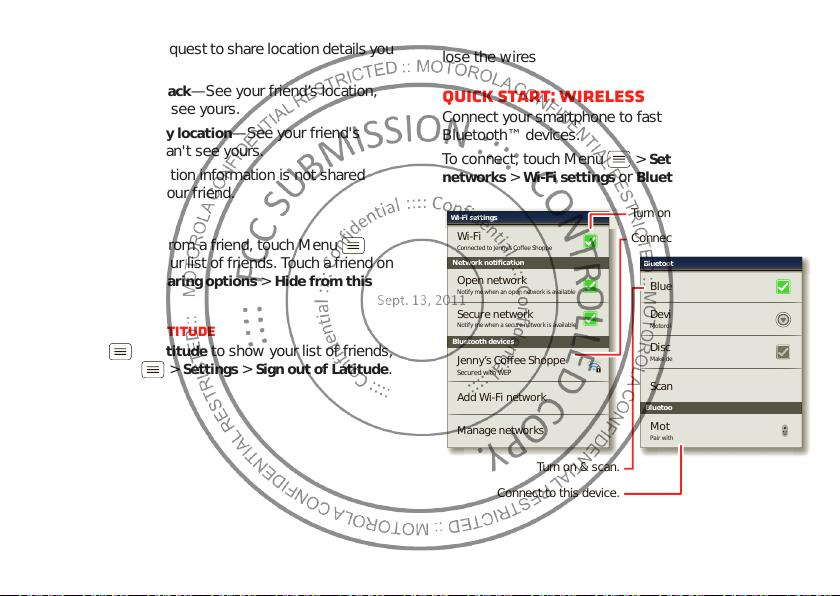
Bluetooth devices
Wi-Fi settings
Secured with WEP
Jenny’s Coffee Shoppe
Add Wi-Fi network
Manage networks
Notify me when an open network is available
Open network
Connected to Jenny’s Coffee Shoppe
Wi-Fi
Network notification
Secure network
Notify me when a secure network is available
Bluetooth devices
Bluetooth settings
Scan for devices
Motorola Phone
Device name
Bluetooth
Discoverable
Make device discoverable
Motorola Handset
Pair with this device
Turn on & scan.
Connect to this network.
Turn on & scan.
Connect to this device.
When you receive a request to share loc ation details you
can choose to:
Accept and share back
•
—See your friend’s location,
and your friend can see yours.
Accept, but hide my location
•
—See your frien d's
location, but they can't see yours.
Don't accept
•
—Location information is not shared
between you and your friend.
Hide your location
To hide your location from a friend, touchMenu
Latitude
>
the list, then touch
friend
Turn off Google Latitude
Touch Menu >
then touch Menu >
to show your list of frie nds. Touch a fr iend on
Sharing options >Hide from this
.
Latitude
to show your list of fri ends ,
Settings >Sign out of Latitude
Wireless
lose the wires
Quick start: Wireless
Connect your smartphone to fast Wi-Fi networks or
Bluetooth™ devices.
To connect, touch Menu >
networks
>
.
Wi-Fi settings
Settings >Wireless &
or
Bluetooth settings
.
41Wireless
Page 8
Wi-Fi networks
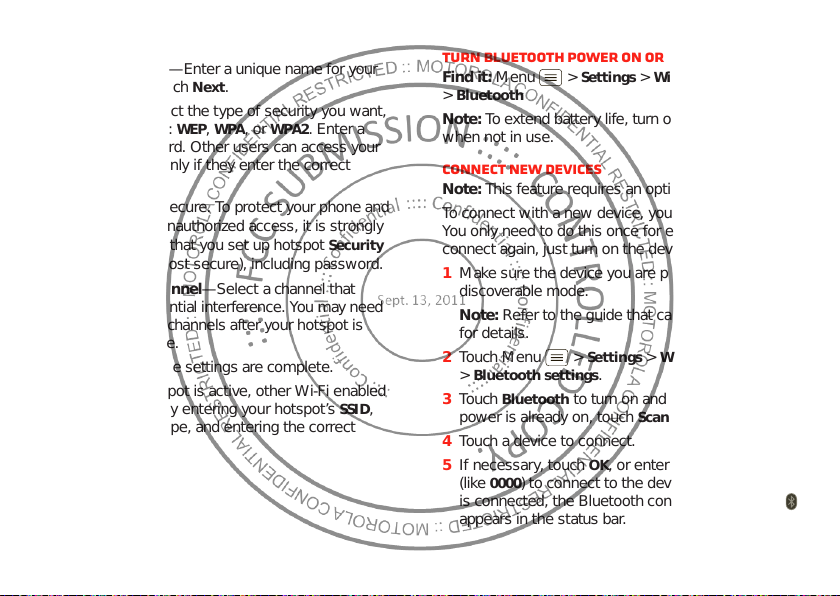
Turn Wi-Fi power on or off
Find it: Menu >
Wi-Fi
>
Note: To extend battery life, turn off Wi-Fi po wer when
not in use.
Note: Your phone’s Wi-Fi features and power levels are
not allowed for outdoor operation in France. To a void
unlawful interference with radio signals, do not use the
Wi-Fi features in France unless you are indoors.
Wi-Fi search & connect
When Wi-Fi is turned on, the Wi-Fi in range indicator
appears in the status bar when a network is available.
Drag down the status bar an d touch the
available
network.
To search for a network when Wi-Fi is tu rne d off:
1 Touch Menu >
2 Touch
42 Wireless
notification to select and connect to a
Wi-Fi settings
>
Wi-Fi
already on, touch Menu >
lists the networks it finds within range.
Tip: To see your smartphone’s MAC address or other
Wi-Fi details, touch Menu >
Settings >Wireless & networks
Wi-Fi networks
Settings >Wireless & networks
.
to turn on and scan. If Wi-Fi power is
Scan
. Your smartphone
Advanced
.
3 Touch a network to connect. If necessary,
Network SSID, Security
enter
password
, and touch
Connect
, and
.
Wireless
When your smartphone is con nected to the network,
the Wi-Fi connected indicator ap pears in the status
bar.
Tip: When you are in range and Wi-Fi power is on, you
will automatically reconnect to available networks you’ ve
connected to before.
Wi-Fi hotspot
You can make your smartphone a Wi- Fi hotsp ot to
provide portable, convenient internet access to other
Wi-Fi enabled devices.
Caution: This application significantly impacts battery
life. You may want to run this application with the
charger connected.
Note: You need to subscribe to Wi-Fi hotspot service to
use this feature. Contact your service provider.
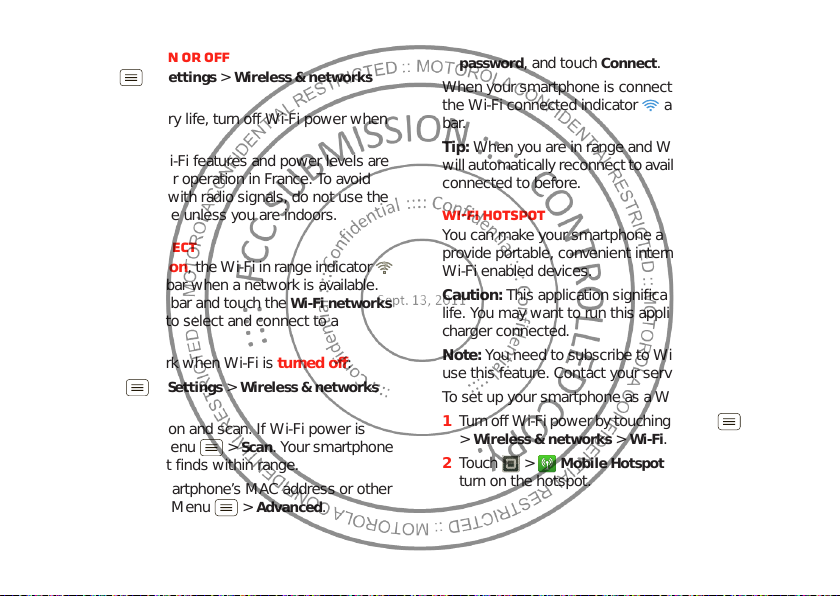
To set up your smartphone as a Wi-Fi hotspot:
1 T urn of f Wi-Fi po wer b y touc hing Menu >
Wireless & networks >Wi-Fi
>
2 Touch >
Mobile Hotspot >Mobile Hotspot
.
turn on the hotspot.
Settings
to
Page 9
3 Touch
Configure Mobile Hotspot
to change hotspot
security and configuration settings:
•Network SSID—Enter a unique name for your
Next
hotspot and touc h
.
•Security—Select the type of security you want,
and touch
Save: WEP, WPA
, or
WPA2
. Enter a
unique password. Other users can access your
Wi-Fi hotspot only if they enter the correct
password.
Note: Keep it secure. To protect your phone and
hotspot from unauthorized a ccess, it is strongly
recommended that you s et up hotspot
(
WPA2
is the most secure), inc lud i ng password.
Security
• Broadcast Channel—Select a channel that
minimizes potential interference. You may need
to try different channels after your hotspot is
active for a time.
Save
4 Touch
when the settings a r e complete.
When your Wi-Fi hotspot is active, other Wi-Fi enabled
SSID
devices can connect by entering your hotspot’s
Security
selecting a
Wireless password
type, and entering the correct
,
,
Bluetooth™ handsfree devices
Turn Bluetooth power on or off
Find it: Menu >
Bluetooth
>
Note: To extend batte ry life, turn off Bluetooth power
when not in use.
Connect new devices
Note: This feature requires an optional accessory.
To connect with a new device, you need to pair with it.
You only need to do this once for each device—to
connect again, just turn on the device.
1 Make sure the device you are pairing with is in
discoverable mode.
Note: Refer to the guide that came with the device
for details.
2 Touch Menu >
Bluetooth settings
>
Bluetooth
3 Touch
power is already on, touch
4 Touch a device to connect.
5 If necessary, touch
0000
(like
is connected, the Bluetooth co nnec ted indicator
appears in the status bar.
) to connect to the devi ce. When the device
Settings >Wireless & networks
Settings >Wireless & networks
.
to turn on and scan. If Bluetooth
Scan for devices
OK
, or enter the device passkey
.
43Wireless
Page 10
Note: Using a mobile device or accessory while driving
may cause distraction and may be illegal. Always obey
the laws and drive safely.
Reconnect devices
To automatically reconnect your smartphone with a
paired device, simply turn on the device.
To manually reconnect your smartphone with a paired
device, touch the device name in the
Bluetooth devices
list.
Disconnect devices
To automatically disconnect your smartphone from a
paired device, simply turn off the devi c e.
To manually disconnect your smartphone from a paired
device, touch the device name in the devices list, th en
OK
touch
.
Change device name
Touch Menu >
Bluetooth settings >Device name
>
OK
touch
44 Wireless
.
Settings >Wireless & networks
. Enter a name and
DLNA™ media devices
Note: Copyright—do you have the right? Always follow
the rules. See “Content Copyright” in your legal and
safety information.
Use DLNA Certified computers, TVs, and other devices
to play or transfer the video, pictures, and music stored
on your smartphone.
1 Make sure your smartphone is connected to a Wi-Fi
network that has another DLNA Certified device.
DLNA
2 Touch >
Play media, Copy media to server, Copy media
3 Touch
to phone
, or
.
Share media
.
Your smartphone searches for DLNA devices on your
network. To search again, touch Menu >
4 Touch a device to connect.
For more about DLNA devices, visit www.dlna.org
MOTOPRINT
Print email, documents, pictures, and contacts directly
to shared printers on a Wi-Fi network —no prin ter driv ers
necessary. MOTOPRINT automatically discovers
networked printers for you. You can even save your
favorite printers and geo-tag their location for future use.
Refresh
.
.
Page 11

Print a document or file
To print something from the
Gallery
apps, open it and touch Menu >
To print something directly from the
touch >
type and follow the on-screen instructions.
MOTOPRINT
Email, Quickoffice
MOTOPRINT
, then select a document
, or
Print
.
app,
Add a printer
Find it: >
Manage printers
>
MOTOPRINT
, touch Menu >
, touch Menu
Add printer
MOTOPRINT host
To print to a non-compatible or non-networked printer
connected to your Windo ws™ computer, you need to
install free MOT OPRI NT Host sof tware on the computer.
You can download MOTOPRINT Host at
www.motorola.com
To print something using MOTOPRINT Host:
Find it: >
Manage printers
>
MOTOPRINT host
>
Select MOTOPRINT Host running on your computer,
then select the printer yo u want to use.
.
MOTOPRINT
, touch Menu >
, touch Menu
Add printer
Memory card & file
management
copy photos, music, and more
Memory card
Note: Your music, photos, and other files are
automatically stored on your smartphone’s internal
memory. You can set individual applications (camera,
camcorder, etc.) to store files on the mic roSD card.
Delete or share files on your smartphone
Find it: >
card
Touch a file or folder to open, then touch and hold a file
Delete
to
Remove or format your memory card
Note: Do not remo ve your memory card while your
smartphone is using it or writing files on it.
Before you remove or format your memory card you
need to unmount it. Touch Menu >
Storage >Unmount SD card
>
To format your memory card, touch
Warning: All data on your memory card will be deleted.
Files >Internal phone storage
or
Share
.
.
Format SD card
Settings
or
SD
.
45Memory card & file management
Page 12

USB connection
You can connect your smartphone to a computer with a
USB cable.
Note: The f i rst time you use a USB connection, your
computer may indicate that drivers are being installed.
Follow an y prom pts y ou se e to comple te the installation.
This may take a few minutes.
1 With your smartphone showing the home screen,
connect a Motorola micro USB data cabl e fr om your
smartphone’s micro USB port to a USB port on your
computer. Your smartphone should show in the
status bar.
Note: Make sure to co nnect the smar tphone to a hi gh
power USB port. Typically, these are located directly
on your computer.
2 Drag and drop files between your computer and
smartphone folders. When you’re done, use “Safely
Remove H ardware” before disconnect ing the USB
cable.
Note: If you’re using a memory card, you can’t us e the
files on your memory card with your smartphone while it
is connected to the computer.
46 Tools
Tools
stay on top of things
Calendar
Find it: >
Your calendar events can be
viewed in different ways:
Touch >
Week
, or
highlight an eve nt, more details
appear.
Tip: Add a calendar widget to
your home screen by touching
and holding an empty space.
Then touch
Calendar
>
Add calendar events
From an y view, touch . Enter the event start time and
other details. You can even set a reminder so you don’t
forget about the ev ent. (When y ou set the rem inder time
0 minutes
to
Tip: Reminders w i ll play only if you’ve selected a
notification ringtone (see “Ringtones” on page 38).
When you finish entering event details, touch
Calendar
Agenda, Day
Month
. When you
Widgets
,
Sun Mon Tue Wed Thu Fri Sat
.
, it plays at the event start time.)
All calendars
July 2011
Save
.
Page 13

Manage calendar events
To edit an event, touch and hold it , then touch
event
. When you’re done, touch
Save
.
To delete an event, touch and hold it, then touch
event
.
To go to today, touch >
Show today
.
Tasks
Find it: >
To add a task, touch .
Touch an icon to view your
tasks by due date, priority,
and more.
Tasks
All tasks
Phone task
Show completed
All tasks
Overdue Due today
Starred By priority Tags
Edit
Delete
OFF
Alarm clock
Find it: >
To turn on an alarm, touch the
check box.
When an alarm sounds, select
Dismiss
to turn it off or touch
the screen to snooze for five
minutes.
To add an alarm, touch
Menu >
enter alarm details.
To enable or disable an alarm,
touch the check box.
Alarm & Timer
Add alarm
, then
AlarmAlarmAlarmAlarmAlarmAlarm Timer
AM
7:00
PM
every day
AM
8:30
PM
Mon, Tue, Wed, Thu, Fri
AM
9:00
PM
Calculator
Find it: >
12345
Calculator
To switch between basic and adva nced functions, touch
Menu >
Advanced panel
history, touch Menu >
or
Basic panel
Clear history
. To clear
.
47Tools
Page 14

Accessibility
See, hear , speak, f eel, and use. A ccessibility f eat ures are
there for everyone, helping to make things easier.
Note: For general information, accessories, and more,
visit www.motorola.com/accessibility
Voice recognition
Use your voice—just tou ch and speak.
Go To
Voice
”.
• Dialing and commands: Touch >
Commands
name or phone number. Or, sa y a command from the
list shown, like “
•Search: Touch and hold Search , then say what
you want to search for, like “Motorola accessories”.
• Text entry: Touch a text entry field to open the
touchscr een keypad. T ouch , then say what you
want to type.
Tip: Speak nat urally, but clearly . Use the mi crophone in a
similar way to a speakerphone, so no need to shout or
hold the phone close to your mouth.
To change your voice settings, see “Voice settings” on
page 49.
48 Tools
. To dial, say “
Send Message
Call
” and then a contact
” or “
Voice readouts (TalkBack)
Your navigation and selections, read out loud.
To turn on voice readouts (similar to TalkBack), touch
Menu >
to enable the settings, then touc h
Note: You may be asked to download additional
“text-to-sp eech” software (data charges may apply).
To use voice readouts:
• Menus and screens: In menus and screens, touc h an
item to highlight it (the item will be r ead out loud) , and
double-touch to open it.
Note: Touch a home screen widget or shortcut to
open it.
• Dialer & text entry: As you type, each number or
letter is read out loud.
• Notification: When you drag the notificati ons bar
down, all notifications are read out loud.
Tip: Navigate throug h your apps and me nus to hea r ho w
voice readouts work on your phone.
To change your voice settings, see “Voice settings” on
page 49.
Settings >Accessibility
. T ouc h
Accessibility
Voice Readouts
.
Page 15

Caller ID
When you want to hear who’s calling:
• Read out loud: Have your caller announced —touch
Menu >
Readout
Settings >Call settings >Caller ID
.
• Ringtones: Assign a unique ringtone to a
Contacts
contact—touch
touch Menu >
Options >Ringtone
, touch a contact, then
.
To change your voice settings, see “Voice settings” on
page 49.
Voice settings
Personaliz e your voice settings:
Settings
• Voice recognition: Touch Menu >
Voice input & output >Voice recognizer settings
>
From here, you can set options like language and
censorship.
• Voice commands: Touch >
Settings
>Menu >
recognition of your voice (
. From here, you can refine
Adaptation
Voice Commands
) and set options
like prompts and shortcuts.
• Text-to-speech: Touch Menu >
input & output
>
Text-to-speech settings
Settings >Voice
you can set options like speed and language.
. From here ,
Volume & vibrate
Choose volume and vibrate settings that work for you.
Touch Menu >
•Volume: Touch
Tip: To set separate ring and notification volumes,
uncheck
• Vibrate: Select
ring.
Settings >Sound
Volume
and use the sliders.
Use incoming call volume for notifications
Vibrate >Always
:
to feel your ph one
.
Zoom
Get a closer look. Open a magnification windo w that you
can drag around the screen, or slid e you r fingers apart to
zoom in on maps, web pages, and photos.
Settings
.
Accessibility
>
. Touch
settings, then touch
Accessibility
Zoom Mode
to enable the
.
• Magnification window: Touch Menu >
• Pinch to zoom: To zoom in, touch the screen with
two fingers and then slide them apart. To zoom out,
slide your fingers toget her.
Display brightness
Set a brightness level that works for you. Touch
Menu >
that
your own level.
Settings >Display >Brightness
Automatic brightness
is unchecked so you can set
. Make sure
49Tools
Page 16

Touchscreen & keys
All these touch features are great, and sometimes it’s
nice to hear or feel your touches too. Touch Menu
Settings >Sound
>
:
• Touchscreen: To hear screen touches (click), select
Audible selection
•Keys: To feel k ey touches (vibrate), select
feedback
.
Haptic
.
• Screen lock : To hear when you lock/u nloc k the screen
(click), select
Screen lock sounds
.
Messages
From a simple text message to IM, email, and more.
Create, send, and receive them all, in one place.
Find it: >
Messaging >Universal In bo x
And to make text entry even easier, you can use
featu r es like auto-correct, auto-punctuate, and
Settings
auto-capitalization—touch Menu >
Language& keyboard >Multi-touch keyboard
>
. Of
course if you don’t want to type at all, then use your
voice—touch on the touchscreen keypad.
Hearing aids
To help get a clear sound when using a hearing aid or
cochlear implant, your phone may have been rated for
use with hearing aids. If y our pho ne ’s box has “Rated f or
50 Tools
Hearing Aids” printed on it, then plea se read the
following guidance.
Note: Rati ngs are not a guarantee of compatibility, see
”Hearing Aid Compatibility with Mobile Phones” in your
legal and safety information. You ma y also want to
consult your hearing health professi onal, who should be
able to help you get the best results.
• Settings: Touch Menu >
HAC Mode Settings
>
Settings >Call settings
. Select
Microphone
to optimize
your phone for microphone coupling, or select
Telecoil
to optimize your phone for telecoil coupling.
• Call volume: During a call, press the side volume
keys to set a call v olume that works for you.
•Position: During a call, hold the phone to your ear as
normal, and then rotate/move it to get the best
position for speaking and lis tening.
Page 17

TTY
You can use your phone in TTY mode with standard
teletype machin es. Touch Menu >
settings > TTY mode
TTY Full
•
•
•
Note: You’ll need a cable/adapter to conne ct your TTY
device to the headset jack on your phone.
Refer to your TTY device guide for mode and usage
information.
: Type and read text on your TTY device.
TTY HCO
: Hearing-Carry-Over—type text on your TTY
device and listen to voice replies on your phone’s
speaker.
TTY VCO
: Voice-Carry-Over—speak into your phone
and read text replies on your TTY device.
and select the mode you need:
Settings >Call
Apps
Want more? No problem. Android Market™ provides
access to thousands of apps, and many provide useful
accessibility features.
Find it: >
Select a category or touch Sea r ch to find the app
you want.
Tip: Choose your apps carefully, from trusted sites like
Market
performance.
Market
, as some may impact your phone’s
Management
stay in control
Smart actions
Fed up doing the same tasks over and over again? Let
smart actions do them for you. You can create smart
actions to do things like automatically dim the touch
screen when the bat tery is low, set your ringer to vibrate
at work, and activate a Wi-Fi connection at home.
Find it: >
For more information, open the Smart Actions app and
touch Menu >
Wireless manager
Find it: Menu >
Manage all your wireless connections: Wi-Fi,
Bluetooth™, airplane mode, & mobile networks.
Airplane mode
Use airplane mode to turn all your wireless connections
off—useful when fly i ng. Press and hold Power
Airplane mode
>
Note: When you select airplane mode, all wireless
services are disabled. You can then turn Wi-Fi and/or
Bluetooth back on, if permitted by your air line. Other
wireless voice and data services (suc h as calls and text
Smart Actions
Help
.
Settings >Wireless & networks
.
51Management
Page 18

messages) remain o f f i n air plane mo de. Em ergency c alls
SIM card lock
Security
Location & security settings
Security lock timer
Allow Voice Commands to be launched via
Bluetooth Multi-Function button while device
is locked
Allow Bluetooth bypass
Set up screen lock
Set up SIM card lock
Protect the data on your phone or memory card.
Requires screen lock
Data encryption
Data encryption
Lock screen with a pattern, PIN, or password
20 minutes
Passwords
Show password as you type.
Visible passwords
Set lock timer.
Select & set up a
screen lock method.
See the passwords
you enter.
to your region's emergency number can still be made.
Network
You should not need to change any network settings.
Contact your service provider f or help.
Touch Menu >
Mobile networks
>
networks, network selection, operator selection, and
access point names.
52 Security
Settings >Wireless & networks
to show options for roam ing
Security
help keep your smartphone safe
Quick start: Security
Find it: Menu >
Screen lock
To prevent accidental touche s, y ou c an make the screen
lock when it goes to sl ee p . Touch Menu >
Settings >Location & security
Settings
Page 19

>
Location & security >Change screen lock
, then select
the lock type:
Pattern lock
•
PIN
•
Password lock
•
—draw a pattern to unlock.
—enter a numeric PIN to unlock.
—enter a password to unlock.
Note: You can make emergency calls on a locked
smartphone (see “Emergency calls” on page 15). A
locked smartphone still rings, but you need to unlock it
to answer.
Lock pattern
To set the lock pattern, touch
Settings
Menu >
Location & security
>
Change screen lock
>
Pattern lock
>
.
Follow the instructions to draw
your lock pattern.
When prompted, draw the
pattern to unlock the
smartphone.
Draw an unlock pattern
PIN lock
To set a PIN, touch Menu >
security
>
Change screen lock >PIN
Enter a numeric PIN, then confirm it.
Settings >Location &
.
When prompted, enter the PIN to unlock the
smartphone.
Password lock
To set the password, touch Menu >
Location & security >Change screen lock >Set
>
password
.
Enter a password (up to eight characters), then confirm
it.
When prompted, enter the password to unlock the
smartphone.
Settings
Personalize your lock screen
To change your timeout, touch Menu >
Location & security >Security lock timer
>
touch the screen or press any keys for the amount of
time you select, the screen locks automatically.
Settings
. If you don ’t
Lock & unlock
To lock the screen/smartphone:
• Press Power .
• Let the screen time out (don’t press anything).
• Switch off the power.
To unlock the screen/smartphone, press Power , or
touch Home . Or switch on the smartphone to view
the lock screen.
53Security
Page 20

Forgot your pattern or passcode?
If you forget your pattern or passcode, contact your
serv i c e p rovi der.
Reset
To reset your smartphone to factory settings and erase
all the data on your smartphone, touch Menu
Settings >Privacy >Factory data reset >Reset
>
phone
.
Warning: All data on your smartphone will be deleted.
(Nothing on your memo ry card is deleted.)
Remote wipe a lost or stolen
smartphone
Don't you just hate it when your life is on your
smartphone and it all goes wrong? Lost, or even
worse—stolen! If ne ce ssary, you can use your email
account on a Microsoft™ Exchange ActiveSync 2007
server to clear the personal data from you r smartphone
and memory card.
You need to be assigned permissions before you can
remote wipe data from your smartphone and me mory
card. Contact your IT system administrator for the
information and permissions you need to perform the
remote wipe procedure.
Warning: All downloaded apps and us er data on your
smartphone and memory card will be deleted.
54 Troubleshooting
Troubleshooting
we’re here to help
Crash recovery
In the unlikely event that your smartphone stops
responding to touches and key presses, try a forced
reboot—press and hold both Power and the down
volume key for three seconds.
Service & Repairs
If you have questions or need assistance, w e're here to
help.
Go to www.motorola.com/repair
www.motorola.com/support
select from a number of c ustom er ca re opti ons . You can
also contact the Motorola Customer Support Center at
1-8 00-734-5870 (United States), 1-888-390-6456
(TTY/TDD United States for hearing impaired), or
1-800-461-4575 (Canada).
(United States) or
(Canada), where you can
Page 21

Safety, Regulatory & Legal
032375o
Battery Use & Safety
Battery Use & Safety
The following battery use and safety information applies to all Motorola mobile devices. If
your mobile device uses a non-removable main battery (as stated in your product
information), details relate d to handling and replacing you r battery should be
disregarded—the batte ry sh oul d on ly be replaced by a Motorola-approved service facility ,
and any attempt to remove or replac e y our battery may damage the produc t.
Important: Handle and store batteries properly to avoid injury or damage.
battery issues arise from improper handling of batteries, and particularly from the continued
use of damaged batteries .
DON’Ts
• Don’t disassemble, crush, puncture, shred, or otherwise attempt to change the
form of your battery.
• Don’t let the mobile device or battery come in contact with liquids.*
get into the mobile device’s circuits, leading to corrosion.
• Don’t allow the ba ttery to to uch m eta l objec ts.
in prolonged contact with the battery contact points, the battery cou ld bec om e very hot.
• Don’t place your mobile device or battery near a heat source.*
can cause the battery to swell, lea k , or malf un c tio n.
• Don’t dry a wet or damp battery with an appliance or heat source
dryer or microwave oven.
DOs
• Do avoid leaving your mobile device in your car in high temperatures.*
• Do avoid dropping the mobile device or battery.*
on a hard surface, can poten tia lly caus e damage.*
• Do contact your service provider or Motorola if your mobile device or battery
has been damaged by dropping, liquids or high temperatures.
* Note:
Always make sure that the battery compartment and any connector covers are
closed and secure to avoid direc t ex pos ure of the battery to any of these conditions, even if
your product information states that your
conditions.
If metal objects, such as jewelry, stay
Dropping these items, es peci al l y
mobile device
can resist damage from these
Most
Liquids can
High temperatures
, such as a h air
Important: Motorola recommends you always use Motorola-branded batteries and
chargers for quality assurance and safeguards.
damage to the mobile d evi ce caus ed by non-Motorola batteri es and/or chargers. To help you
identify authentic Motorol a batteries from non-original or counterfeit batteries (that may no t
have adequate safety prote ctio n) , Motorola provides holograms on its batte ri es . You should
confirm that any battery you purchase has a “Motorola Original” hologram.
If you see a message on your display such as
take the following steps:
•
Remove the battery and inspect it to confirm that it has a “Motorola Original” hologram;
•
If there is no hologram, the battery is not a Motorola battery;
•
If there is a hologram, replace the battery and try charging it again;
•
If the message remains, con tac t a Motorola authorized service center.
Warning:
Use of a non-Motorola battery or ch arger may present a risk of fire, explosion,
leakage, or other hazard.
Proper and safe battery disposal and recycling:
important for safety , it bene fits the envi ronme nt. You can recycle your used batteries in many
retail or service provider locations. Additional information on proper disposal and recycling
can be found at
Disposal:
regulations. Contact your local recycling center or national recycling organizations
for more information on how to dis pos e of batteries.
Warning:
Battery Charging
Battery Charging
Notes for charging your product’s battery:
•
•
•
•
www.motorola.com/recycling
Promptly dispose of used ba tteri es in acc ordance with local
Never dispose of batterie s in a fir e bec au s e they m ay expl ode.
During charging, keep your battery and charger near room temperature for efficient
battery charging.
New batteries are not fully char ged.
New batteries or batteries stored for a lo ng ti m e m ay tak e more ti m e to c harg e.
Motorola batteries and chargin g syste m s have circu itry that protects the battery from
damage from overcharg in g.
Motorola’s warranty does not cover
Invalid Battery
or
Unable to Charge
Proper battery disposal is not only
,
55
Page 22

Third Party Accessories
Use of third party accessories, includi ng but not limited to batteries, chargers, headsets,
covers, cases, screen prot ec tors and memory cards, may impac t your m obi l e dev i c e’s
performance. In som e c ircum s tances, third party acc es sori es c an be dangerous and may void
your mobile device’s warranty. For a list of Motorola accessories, visit
www.motorola.com/products
Driving Precautions
Responsible and safe drivi ng is your primary responsibility w hen behind the wheel of a
vehicle. Using a mobile device or accessory for a call or other application while driving may
cause di s traction. U s i ng a mobile device or accesso r y may be prohibited or restr i c ted in
certain areas, always obey the l aw s and regul ati ons on the use of these products.
While driving, NE VE R :
•
Type or read texts.
•
Enter or review written data.
•
Surf the web.
•
Input navigation informa ti on.
•
Perform any other functions th at di vert y our attention from driving.
While driving, ALWAYS:
•
Keep your eyes on the road.
•
Use a handsfree device if ava ilable or required by law in your area.
•
Enter de s tination inf ormation in to a navigation device
•
Use voice activated features (such as voice dial) and spea k in g features (such as audible
directions), if available.
•
Obey all local laws and regulati ons for the use of mobile devices an d acc es s ories i n the
vehicle.
•
End your call or other task if you cannot con c entra te on driving.
Remember to follow the “Smart Practices While Driving” in this guide and at
www.motorola.com/callsmart
(in English only).
before
driving.
Seizures/Blackouts
Some people may be susceptible to epile pti c s ei zu r es or blackouts when ex posed to flashing
lights, such as when playing v i deos or games. These may occur ev en i f a pers on has never
had a previous seizure or bl ack out.
56
If you have experienced seiz ures or blackouts, or if you have a family hi s tory of suc h
occurrences, please consul t with y our phys ician before pl aying vi deos or gam es or en abling a
flashing-lights feature (if available) on your mobile device.
Discontinue use and cons ul t a phy si cian if any of the following symptoms oc c ur: co nv ul s ion,
eye or muscle twitching, loss of aw areness, involuntary mov em ents, or disorientation. It is
always a good idea to hold the scre en aw ay from your eyes, leave the lights on in the room,
take a 15-minute break every hour, and stop us e if you are tired.
Caution About High Volume Usage
Warning:
Exposure to loud noise from an y sou r ce for ex tended periods of time may affect
your hearing. The loude r the vo lume s ound l evel, the less time is re quired before y our he aring
could be affected. To protect your hearing:
•
Limit the amount of time you use headsets or headphones at high volu m e.
•
Avoid tur ning up the vol ume to block out noisy surroundings.
•
Turn the volume down if you can’t hear people speaking near you.
If you experience hearing discomfort, including the sensation of pressure or fullness in your
ears, ringing in your ears, or muffled sp eec h , you s ho ul d s top l istening to the device through
your headset or headpho nes and have your hearing check ed.
For more information about he ari ng, s ee our website at
direct.motorola.com/hellomoto/nss/AcousticSafety.asp
(in English only).
Repetitive Motion
When you repetitively perform ac ti ons s uch as pressing keys or entering finger-written
characters, you may experience occasional discomfort in your hands, arms, shoulders, neck,
or other parts of your body . If you conti nue to have discomfort during or after suc h us e, s top
use and see a physician.
Children
Keep your mobile device and its accessories away from small children.
products are not toys and may be ha zardous to small children. For exampl e:
•
A choking hazard may exist for sm al l, detachable parts.
•
Improper use could result in lo ud s ounds, possibly causing hea rin g in ju ry.
•
Improperly handled batteri es c ould overheat and cause a bur n.
Similar to a computer, if a child does use your mobile device, you may want to monitor their
access to help prevent expos ure to ina ppropriate apps or content.
These
Page 23

Glass Parts
032374o
032376o
032375o
Some parts of your mobile device m ay be made of gl ass . This glass could break if the prod uc t
receives a substantial impa c t. If gla ss break s, do not touch or attempt to remove. Stop usi ng
your mobile device until the gla s s is repl aced by a qualified service center.
Operational Warnings
Obey all posted signs when using mobile device s in pub lic areas.
Potentially Explosive Atmospheres
Areas with potentially exp lo sive atmospheres are often, but no t alwa y s , po st ed and can
include fueling areas, suc h as bel ow decks on boats, fuel or chemical trans fer or storage
facilities, or areas where the air contains chemicals o r parti c l es, su ch as grain dust, or metal
powders.
When you are in such an area , turn off yo ur m obi l e dev i ce, and do not remove, install, or
charge batteries unles s it is a radi o product type especial l y qualified for use in such a r eas as
“Intrinsically Safe” (for example , Factory Mutu al, CSA, or UL approve d). In such area s, sparks
can occur and cause an expl os i on or fire.
Symbol Key
Your battery, charger, or mobile device may contain symbols, defined as follows:
Symbol Definition
Important safety informati on foll ow s .
Do not dispose of your battery or mobile device in a fire.
Your battery or mobile device may require recycling in accordance with
local laws. Contact your local regulatory authorities for more
information.
Symbol Definition
Do not dispose of your battery or m obile device with your househol d
waste. See “Recycling” for more information.
Do not use tools.
For indoor use only .
Radio Frequency (RF) Energy
Exposure to RF Energy
Your mobile device contains a transmitter and receiver. When it is ON, it receives and
transmits RF energy. When you communicate with your mobile device, the system handling
your call controls the power level at which your mobile device transmits.
Your mobile device is designed to comply with local regulatory requirements in your country
concerning exposure of human beings to RF energy.
RF Energy Operational Precautions
For optimal mobile device performance, and to be sure that human exposure to RF energy
does not exceed the guidel ines se t forth in the rel ev ant standards, always follow the s e
instructions and precauti ons :
•
When placing or receiving a phone call, hold your mobile device just like you would a
landline phone.
•
If you wear the mobile device on your body, always place the mobile device in a
Motorola-supplied o r approved clip, holder, holster, case, or body harness. If you do not
use a body-worn ac cessor y s upplied or appr oved by M oto rola, kee p the mob ile devi ce a nd
its antenna at least 2.5cm (1 inch) from your body when transmitting.
•
Using accessories not supp lied or approve d by Moto rola may cause your m obile devi ce to
exceed RF energy exposu re guidelines. For a list of Motorola-supplied or approved
accessories, visit our website at:
www.motorola.com
.
57
Page 24

RF Energy Inte rference/Compatibility
[Only Indoor Use Allowed In France
for Bluetooth and/or Wi-Fi]
0168
Nearly every electronic devic e i s sub jec t to RF energy interference from externa l sour ce s if
inadequately shielded, des i gned, or otherwise configured for R F en ergy com patibility. In
some circumstances, your m obile device may cause interferenc e w i th other devices.
Follow Instructions to Avoid Interference Problems
Turn off your mobile device in any location where posted notices instruct you to do so.
In an aircraft, turn off your mobile dev ice w henever instructed to do so by airline s taff. I f your
mobile device offers a n airp lane mo de or s imilar fe ature, co nsul t airline s taff abo ut usi ng it in
flight.
Implantable Medi cal Devices
If you have an implantable medical device, such as a pacemaker or defibrillator, consult your
physician before using this mobile device.
Persons with implantable m edical devices should observe the fol lo w ing precautions:
•
ALW AYS keep the mobile device more than 20centimeters (8inches) from the
implantable medica l device when th e m obile device i s turned ON.
•
DO NOT carry the mobile devic e in the breast pocket.
•
Use the ear opposite the im pl anta bl e m edi c al devi c e to m in imi ze the potential for
interference.
•
Turn OF F the mobile device immediate ly i f you hav e any reason to suspect that
interference is taking place.
Read and follow the directions from the manufacturer of your imp la ntable medical device. If
you have any questions about using your mobile device with your implantable medical
device, consult your heal thc are prov i der.
Specific Absorption Rate (FCC)
SAR (IEEE)
YOUR MOBILE DEVICE MEETS FCC LIMITS FOR EXPOSURE
TO RADIO WAVES.
Your mobile dev ic e is a rad io trans m i tter and rec ei ver. It is designed not to exceed the limits
for exposure to radio waves (ra dio frequency electromagnetic fields ) ado pted by the Federal
Communications Commission (FCC). These limits inclu d e a substanti al safety margin
designed to assure the safe ty of all persons, regardless of age and health.
The radio wave exposure gui del i nes us e a unit of measurement known as the Sp ec i fic
Absorption Rate, or SAR. The SAR lim i t for mo bi le dev i ces is 1.6W/kg.
Tests for SA R are co nducted using standard operati ng positions with the device transm itt in g
at its highest certified power leve l in all te ste d frequency bands.
58
During use, the actual SAR values for your device are usually well bel ow the v al ues s tated.
This is because, for purposes of system efficiency and to minimize interference on the
network, the operating powe r of y our m obile device is automatically decrea s ed w hen full
power is not needed for the call. The lower the p ow er output of the d evice, the lower its S AR
value.
If you are interested in fu rther redu cing y our R F expo sure t hen y ou can e asily do so by l imiting
your usage or simply using a hand s- free k i t to ke ep the device away from the head and body.
Additional information can be found at
www.motorola.com/rfhealth
.
European Union Directives Conformance
Statement
EU Conformance
The following CE comp liance information is app licabl e to Motorola mobile dev ice s t hat c arry
one of the following CE marks:
0168
Hereby, Motorola declares that this product is in compliance with:
•
The essential requirem ents and other relevant provisions of Directive 1999/5/EC
•
All other relevant EU Directives
0168
The above gives an exampl e of a ty pi c al Product Approval Number.
You can view y our product’s Declaration of Conformity (DoC) to Directive 1999/5/EC (to
R&TTE Directive) at
the Product Approval Num ber from your product’s label in the “Search” bar on the website.
www.motorola.com/rtte
Product
Approval
Number
(in English only). To find your DoC, enter
Page 25

FCC Notice to Users
FCC Notice
The following statement applies to all products that bear the FCC logo on the
product label.
This equipment has been tes ted and found to comply with the limits for a Class B digi tal
device, pursuant to part 15 of the FCC Rules . Se e 47 C F R S ec. 15. 105(b). These limits are
designed to provide reaso nable protection against harmful in terference in a residential
installation. This equipment generates, uses and can ra di ate radio frequency energy and , if
not installed and use d in acco rdan ce with th e ins truction s, may cause h armful i nterfere nce to
radio communications. H ow ever, there is no guarantee that interference will not occ ur i n a
particular installation. If this equipment does cause harmful interference to radio or
television reception, which can be determined by turning the equipment off and on, the user
is encouraged to try to correct the interference by one or more of the following m eas ures:
•
Reorient or relocate the receiving antenna.
•
Increase the separation be tw een the equipment and the receive r.
•
Connect the equipm ent to an outle t on a c ircuit di fferent fro m that to whi ch the re cei ver is
connected.
•
Consult the dealer or an experienced radio/TV technician for hel p.
This device complies w i th part 15 of the FCC Ru les . O peration is subject to t he following two
conditions: (1) This device may not cause harmful interfer ence, and (2) this device must
accept any interference received, inc ludi ng interference that may cause undesire d operation.
See 47 CFR Sec. 15.19(a)( 3).
Motorola has not approved any c hanges or modifications to this device by the us er. Any
changes or modification s could vo id the user’s authority to operate the equipment. See 47
CFR Sec. 15.21.
For products that support Wi-Fi 802.11a (a s defi ned in the product spec i fi c ati ons available at
www.motorola.com
capability to operate Wi-Fi in the 5 GHz Unlicensed National Information Infrastructure
(U-NII) band. Because this band is shared with MSS (Mob ile Satellite Service), the FCC ha s
restricted such devices to ind oor us e only (see 47 CFR 15.407(e)). Sinc e w i rel es s hot spots
operating in this band have th e sam e res tri ct ion, outdoor services are not offered.
Nevertheless, please do not operate this device in Wi-Fi mode w hen outdoors.
), the following informa tio n applies. This equipment has the
Industry Canada Notice to Users
Industry Canada Notice
Operation is subject to the follow i ng tw o c onditions: (1) This device may not caus e
interference and (2) This device must acc ept any interference , including interfere nce that may
cause undesired oper ati on of the device. See RSS-GEN 7.1 .5 . Th is Clas s B digital apparatus
complies with Canadian ICES-003.
Location Services (GPS & AGPS)
GPS & AGPS
The following information is appl i cabl e to Motorola mobile devices that provide location
based (GPS and/or AGPS) functi onality.
Your mobile device can use Global Pos itioning System (GPS) signals for location-based
applications. GPS uses satel lites controlled by the U.S. government that are subject to
changes implemented in acc ordance with the Department of Defe ns e pol i cy and the Federal
Radio Navigation Pl an. These changes may affect the performance of loc ati on technology on
your mobile device.
Your mobile device can also use As sisted Global Positioning Sys tem (AGPS), which obtains
information from the c ell ul ar netw ork to improve GPS p erformance. AGPS uses your wireless
service provider's network and therefore airtime, data charges, and/ or additional charges
may apply in accordance wit h your s ervi c e pl an. Co ntact y our wireless service provider for
details.
Your Location
Location-based information includes information that can be used to determine the
approximate location of a mo bi le dev i ce. M obile devices which are connected to a wireless
network transmit loc ation-based information. Devices enabled with GPS or AGPS technology
also transmit location-based information. Additionally, if you use applications that require
location-based information ( e.g. driving directi ons), such app lications transm it location-base d
information. This lo cati on-based information m ay be shared with thi rd parties, including yo ur
wireless service provider, applications providers, Motorola, and other thi rd parties providing
services.
Emergency Calls
When you make an emergenc y call, the cel lu la r netw ork may activate the AGPS technol ogy
in your mobile device to tell the em ergency responders your approx i m ate loc ati on.
AGPS has limitations and
•
Always tell the emergency responder your location to the best of you r abi l ity; and
•
Remain on the phone for as long as the emergency responder instructs you.
might not w o rk in your area
. Therefore:
59
Page 26

Navigation
Navigation
The following information is applicable to Motorola mobi l e devi c es that provide navigation
features.
When using navigation features, note that mapping inform ation, directions and other
navigational data may contai n i nac c ura te or i nc om pl ete data. In some countries, complete
information may no t be av ailab le. The refor e, you shou ld vi sually confirm that the na vig ational
instructions are consistent w it h w hat y ou see. All drivers should pay attention to road
conditions, closures, traffic , and al l other fact o r s that m ay impact driving. Always obey
posted road signs.
Smart Practices While Driving
Driving Safety
Check the laws and regulations on the use of mobile devices and their accessories
in the areas where you drive. Always obey them. The use of these devices may be
prohibited or restricted in certain areas—for example, handsfree use only may be
required. Go to
information.
Your mobi le dev i c e lets you com m uni c ate by voice and data—almost anywhere, anytime,
wherever wireless se rvice is available and safe con di tio ns al lo w. When driving a car, dri vin g
is your first responsibility. If you choose to use your mobile device while driving, remember
the following tips:
• Get to know your Motorola mobile device and its features such as speed dial,
• When available, use a handsfree device.
• Position your mobile device within easy reach.
• Let the person you are speaking with know you are driving; if necessary,
• Do not take notes or look up phone numbers while driving.
60
www.motorola.com/callsmart
redial and voice di al.
taking your attention off the road.
convenience to your mo bi le devi c e with one of the many MotorolaOriginal handsfree
accessories available to day.
device without removi ng your ey es from the road. If you receive an inco m in g ca ll at an
inconvenient time, if possi bl e, let you r voicemail answer it for you.
suspend the call in heavy traffic or hazardous weather conditions.
snow, ice, an d even heavy traffic can be hazardou s.
list or going through your addre ss book takes attention away from yo ur pri m ary
responsibility—driving safely.
If available, these features help you to place your call without
(inEnglish only) for more
If possible, add an additi ona l lay er of
Be able to access your mobile
Rain, sleet,
Jotting down a “to do”
• Dial sensibly an d a sse ss th e tr a ffic; if p o ssib le , p la ce ca lls when you r c ar is not
moving or before p ulling into traffic.
few numbers, check the road and your mirrors, then continue.
• Do not engage in stressful or emotional conversations that may be distracting.
Make people you are talki ng with aware you are driving and s us pend conversations that
can divert your attention away from the road.
• Use your mobile devic e to c a ll for he lp .
the case of fire, traffic accident, or medi cal em ergencies (wherever wireless ph one
service is available).
• Use your mobile device to help others in emergencies.
crime in progress, or oth er s eri ous emergency where l iv es are in danger, call 911 or other
local emergency number (wherever wireless phone service is available), as you would
want others to do for you.
• Call roadside assistance or a special non-em ergency wireless assistance
number when necessary.
broken traffic signal, a minor traf fic acc i dent where no one appears injured, or a ve hi cle
you know to be stolen, call road sid e as s istance or other special non-emergency wireless
number (wherever wireless phone service is available).
Privacy & Data Security
Privacy & Data S e cu rity
Motorola understands that pri v acy and data security are important to ever yone. B ec aus e
some features of your mobile devi ce may affec t y our priv ac y or data security, pleas e fol low
these recommendation s to enhance protection of your informati on:
• Monitor acce ss
may have unmonitored acc es s. U se yo ur dev i c e’s security and lock features, where
available.
• Keep software up to date
patch or software fix for your m obile devi ce that upd ates the devic e’s security, install it as
soon as pos s ible.
• Secure Personal Information
various locations including your SIM card, memory card, and phone memory. Be su re to
remove or clear all personal information before you recycle, return, or give away your
device. You c an also backup your personal data to transfer to a new device.
Note:
www.motorola.com/support
—Keep your mobile de vice w i th y ou and do not leave it where others
For information on how to ba ckup or wipe data from your mobile devi c e, go to
If you must make a call while moving, dial only a
Dial 911 or other local em ergency number in
If you see an auto acc i dent,
If you see a broken-down veh icle posing no serio us hazard, a
—If Motorola or a software/application vendor releases a
—You r mo bi le devi ce can s tore personal information in
Page 27

• Online accounts
MOTOBLUR). Go to your account for in form ation on how to manage the accou nt, and how
to use security features such as remote wipe and device location (where available).
• Applications and updates
trusted sources only. Some apps can impact your phone’ s performance and/or have
access to private informati on i nc lu di ng acc ount details, call data, locatio n details and
network resources.
•Wireless
networks. Also, when usi ng your device as a hotspot (where avai l abl e) use network
security. These precautions will help prevent unauthorized access to your device.
• Location- based information
can be used to determine the approximate location of a mobile device. Mobile phones
which are connected to a wire less network transmit location-based information. Devices
enabled with GPS or AGPS technology also transmit location-b ased information.
Additionally, if you use applications that require locatio n-ba s ed i nformation (e.g. driving
directions), such applicati ons transmit location-based informati on. This location-based
information may be shared w ith thir d parties , in clud in g your w i rel es s se rv ice prov i der,
applications providers, Motorola, and other third parties providing services.
• Other information your device may transmit
and other diagnostic (including location-based) information, and other non-personal
information to Motorola or other thi rd-party servers. This information is us ed to hel p
improve products and services offered by Motorola.
If you have further questions regarding how the use of your mobi le dev i c e m ay impact your
privacy or data security, please contac t Moto rol a at
your service provider.
Use & Care
Use & Care
To care for your Motorola mobile device, please observe the following:
—Some mobile devi c es pr ovi de a Motorola online account ( s uch as
—Choose your apps and updates carefully , and install from
—For mobile devices with Wi-Fi featu res , on ly con nec t to trus ted Wi-Fi
—Location-based information includes information that
—You r dev i ce m ay al so transmit testing
privacy@motorola.com
liquids
Don’t expose your m obi le dev i c e to w ater, rain, extreme humidity, sweat, or
other liquids. If it does get wet, don ’t try to ac celera te drying w ith the use of an
oven or dryer, as this may damag e the m obile device.
, or contact
extreme heat or cold
Don’t store or use you r mo bi le dev i ce in temperatures below -10°C (14°F ) or
above 60°C (140°F). Don’t recharge your mobile device in temperatures below
0°C (32°F) or above 45 °C (1 13°F).
microwaves
Don’t try to dry your mobi le devi ce in a mic row av e oven.
dust and dirt
Don’t expose your m obile dev ice to du st, dirt, s and, food, or other in appropri ate
materials.
cleaning solut ions
To cl ean y our mo bile devi ce, us e only a dry soft cl oth. Do n’ t use alcohol or othe r
cleaning solutions.
shock and vibration
Don’t drop your mobile device.
protection
To he lp protec t your mobile device, always make sure that the battery
compartment and any co nnector covers are closed and secure .
Recycling
Recycling
Mobile Devices & Accessories
Please do not dispose of mo bi le devi c es or el ectri ca l accessories (such as
chargers, headsets, or batteries ) w ith yo ur household waste, or in a fire. These
items should be disposed of i n acc ordance with the national collec tio n and
recycling schemes operated by your local or regional authority. Alternatively , you
may return unwanted mobile devices and electrical accessori es to any Motorola
Approved Service Center in your region. Details of Motorol a approved national recycling
61
Page 28

schemes, and further inform ati on on Motorola recycling activities can be found at:
www.motorola.com/recycling
Packaging & Pr oduct Guides
Product packagin g and p rodu ct gu ides sho uld o nly be di spose d of in accor dan ce wi th nati onal
collection and recycling req uir em ents. Please contact your region al autho r it ies for mor e
details.
California Perchlorate Label
Perchlorate Label
Some mobile phones use an in terna l, perm anent backup battery on the printe d circ uit board
that may contain very small am ou nts of perc hlorate. In such cases, Californ ia law requires
the following label:
Perchlorate Material – special handling may apply when the battery is recycled or dis posed
of. See
www.dtsc.ca.gov/hazardouswaste/perchlorate
There is no special handling required by consumers.
(in English only).
Hearing Aid Compatibil ity with Mobile
Phones
Hearing Aid Compatibility
Some Motorola phones are m easured for compatibility with hea rin g aids . If the bo x for yo ur
particular model has “Rated for Hearing Aids” printed on it, the follow i ng explanation
applies.
When some mobile pho nes are used near some hearing devices (hearing aids and co c hl ear
implants), users m ay detect a buzzing, h um m in g, or whining noise. S ome hearing devices are
more immune than others to thi s int erference noise, and phones als o vary in the am ount of
interference they generate.
The wireless telephone in dus try has developed ratings for some of thei r m obi l e phones, to
assist hearing device users in find in g pho nes that may be compatible with the ir heari ng
devices. Not all pho nes h ave be en rated . Phon es tha t are rated have the rating o n their box o r
a label on the box. To maintain the published Hearing Aid Compatibil ity ( HA C ) rating for this
mobile phone, use only the original equipment batt ery mo del .
This phone has been tested and rated for use with hearing aids for so m e of the wirel es s
technologies that it uses. H ow ever, there may be some newer wireless technol ogi es us ed in
this phone that have not been test ed y et for use with hearing aids. It is important to try the
different features of this phon e thoroughly and in different locatio ns , usin g yo ur hearing aid
or cochlear implant, to determi ne if you hear any interfering noise. Contact your service
provider or Motorola for info rmation o n he aring a id compati bility. If you have questions about
return or exchange policies , co ntact y our service provider or phone ret aile r.
62
The ratings are not guara ntees. Results will vary depending on the user’s hearing device and
hearing loss. If your h eari ng dev i c e h appens to be vulnerabl e to interference, you may no t be
able to use a rated phone succe ss ful ly. Trying out the phone with yo ur hearing device is the
best way to evaluate it for your perso nal needs.
M-Ratings:
Phones rated M3 or M4 mee t FCC requirements and are like ly to ge nerate less
interference to hearing devi ces than phones that are not labeled. M4 is the better/higher of
the two ratings.
T-Ratings:
Phones rated T3 or T4 meet FCC requirements and are likely to be mo re us able
with a hearing device’s telecoil (“T Switch” or “Telephone Switch”) than unrated phones. T4
is the better/higher of the two ratings . (Note that not all hearing devices have telec oil s in
them.)
Hearing devices ma y also be m easure d for im mun ity to this type of interferenc e. Your hearing
device manufacturer or h earing health profess ional m ay help you find re sults fo r your heari ng
device. The more immune y our hearing aid is, the less likely you are to ex peri ence
interference noise from mobile phones.
Software Copyright Notice
Software Copyright Notice
Motorola products may inc l ude copyrighted Motorola and thi rd-party software stored in
semiconductor memories or other media. Laws in the United State s and oth er c ountries
preserve for Motorola and third-party software providers cert ain ex c lu sive ri gh ts fo r
copyrighted software, such as the exclusive rights to distribute or reproduce the copyrighted
software. Accordingly, any copyrighted software contained in Motorol a products may not be
modified, reverse-engi neered , distribu ted, or repro duce d in any man ner to the exten t allow ed
by law. Furtherm ore, the purchase of Motorola prod uc ts shal l no t be deemed to grant either
directly or by implication, es toppel, or otherwise, any licen se under the copyrights, patents ,
or patent applications of M otorola or any third -party software prov ider, except for the normal,
non-exclusive, royalty-free license to use that arises by operation of law in the sale of a
product.
Content Copyright
Content Copyright
The unauthorized copying of co py ri ghted materials is contrary to the provisions of the
Copyright Laws of the United S tates and other countries. This device is intended solely for
copying non-copyrighted ma teri al s, materials in which you own the copyri ght, or materials
which you are authori zed or l egally permitted to copy. If you are uncertain about your right to
copy any material, please co ntac t your legal advisor.
Page 29

Open Source Software Information
OSS Information
For instructions on how to obtain a copy of any s ourc e c ode being made publicl y av ail abl e by
Motorola related to softw are us ed in th is Moto rola mo bile device, you m ay sen d your re que st
in writing to the address below. Please make sure that the request includes the mo del
number and the software ve rsio n num ber.
MOTOROLA MOBILITY, INC.
OSS Management
600 North US Hwy 45
Libertyville, IL 60048
USA
The Motorola website
information regarding Motorola's use of open source.
Motorola has created the
interaction with the software com muni ty -at-l arge.
To view additional information rega rdi ng l ice ns es , ac know l edgments and required cop yrigh t
notices for open source pack ages used in this Motorola mobile device, please
pressMenu Key >
>
Open source licenses
applications that present supplemental notices for open so urce packages used in those
applications.
Export Law Assurances
Export Law
This product is controlled und er the ex port regulations of the United States of Am eri c a and
Canada. The Governme nts of the Uni ted States of America and Canada may restrict the
exportation or re-exportation of this product to certain destinations. For furth er in form ation
contact the U.S. Depa rtment of Com me rce o r the C anadi an Depa rtmen t of Foreign Affairs a nd
International Trade.
Product Registration
Registrati on
Online Product Registration:
www.motorola.com/us/productregistration
Product registration is an impor tant s tep toward enjoying your new Moto rol a product.
Registering permits us to cont act y ou for product or software updates and al l ow s yo u to
subscribe to updates on ne w products or special promotions. Re gi s trati on i s not requ ir ed for
warranty coverage.
opensource.motorola.com
opensource.motorola.com
Settings >About phone >Legal information
. In addition, this Motorola device may include self-contained
(in English only) also conta in s
website to serve as a portal for
(in English only)
Please retain your original dated sal es rec eipt for your records. For warranty service of yo ur
Motorola Personal Comm unications Product you will need to provide a copy of your dated
sales receipt to confirm warranty status .
Thank you for choosing a Motorola product.
Service & Repairs
If you have questions or nee d ass i st anc e, w e' re here to help.
Go to
www.motorola.com/support
care options. You can also contact the Motorola C ustomer Support Cen t er at 1-800-331-6456
(United States), 1-888-390-6456 (TTY/TDD United States for hearing impaired), or
1-800-461-4575 (Canada).
How to Obtain Service or Other Information
1. Please access and rev i ew the online Customer Support s ec ti on of M otorola's consumer
website prior to requesting wa rranty service.
2. If the Product is still not functioning properly after making use of thi s reso urc e, pl ease
contact the Warrantor listed at the Motorola website or the contact infor m ation for the
corresponding location.
3. A representative of Moto rol a, or of a Motorola Authorized Repair C enter, will help
determine whether your Pro duct requires service. You may be required to download, or
otherwise obtain and accept software updates from Motorola or a Motorola Authorized
Repair Center. You are responsible for any applicable carrier service fees incurred while
obtaining the required downl oads. Complying with the warr anty pro ce s s, rep ai r
instructions and accept ing such softwa re updates i s required in order to receive add itional
warranty support.
4. If the software updat e does not fix the problem, you will recei v e ins truc ti ons on how to
ship the Product to a Motorola Authorized Repair Center or other entity.
5. To obtain wa rranty servi ce, as permi tted b y ap plica ble law , you are req uired to in clude: ( a)
a copy of your receipt, bill of sale or other c om pa r able proof of purchase; (b) a written
description of the problem; (c ) the name of y our service provider, if applicable ; (d) yo ur
address and telephone nu m ber. In the ev ent the Product is not covered by the Mo torol a
Limited Warranty, Motorola wil l inform the consumer of the availabi l ity, pri c e and ot her
conditions applicable to the repair of the Product.
To obtain service or other information, please access and review the online
Customer Support section of Motorola's consumer website at
www.motorola.com
.
, where you can select from a nu m ber of customer
63
Page 30

Motorola Mobility Inc . Limited Global
Warranty Mobile Phones
Warranty
FOR CONSUMERS WHO ARE COVERED BY CONSUM ER PROTECTION LAWS OR
REGULATIONS IN THEIR COUNTR Y OF PURCH ASE OR, IF DIFFERENT, THEIR
COUNTRY OF RESIDENCE, THE BENEFITS CONFERRED BY THIS LIMITED
WARR A NTY ARE IN A D DITION TO ALL RIGHTS AND R E MEDIES CONVEYED BY
SUCH CONSUMER PROTECTION LAWS AND REGU LATIONS.
Who is Covered?
This Limited W arranty extends only to the first consumer purchaser of the Pro duct, and is not
transferable.
What Does this Limited Warranty Cover?
Motorola Mobility Inc. or its sub sidiaries' warranty obligations are limi ted to the terms and
conditions set forth h erein. Subject to the exclu s io ns c ontained below, Motorola Mobility In c
or its subsidiaries (“Motoro la”) warran t this Mobi le Pho ne, and any in-box ac cessori es whi ch
accompany such Mobil e Phone (“Product”) against defects in materials and workman s hi p,
under normal consum er use, for a period of ONE ( 1) YE AR from the date of retail purchase by
the original end-user purch as er, or the period of time required by the laws of the country
where the Product is purchased, whichever is longer (“Warranty Period”).
Repairs made under this Lim ited Warranty are covered for the balance of the original
Warranty Period, or 90 day s from the date of service, which ever is longer. Any upgrade to the
original product will be covere d onl y for the duration of the original Warra nty Peri od.
This Limited Warranty is only available in the country whe re the Product was purchased.
Motorola may provide serv ice ou tside the cou ntry of pu rchase, to the exte nt that i t is po ssible
and under the terms and conditi ons of the country of purchase.
This Limited Warranty applies only to new Products which are a) manufactured by or for
Motorola as identified by the “M otorola” trademark, trade name, or log o le gall y affixe d to
them; b) purchased by consumers from an authorized rese ller or di s tri butor of Motorola
Products; and c) accompanied by this written Limited Warranty.
What Will Motorola Do?
If a covered defect or damage ari s es and a valid warranty claim is recei v ed w it hi n the
applicable Warran ty Pe ri od, Mo torol a, at i ts sole op tio n, unl ess otherwise required by
applicable law, will either (1) repair, at no charge, the defect or damage usin g new, used or
reconditioned/refurbis hed functionally equivalent rep la c em ent parts; or (2) exchange the
Product with a replacem ent Produ ct t hat is new or w hich ha s been recon ditio ned/ref urbishe d
64
or otherwise remanufactured from new or used parts and is functionally equivalent to the
original Product; or (3) refund the purc hase price of any Products covered by the term s and
condit i ons of this Lim i ted Warranty.
Products, parts and supportin g doc umentation provided to Motorola as part of the warranty
process, shall become the property of Motorola, and may not be returned. When a
replacement or refund is give n, the Product for which the replacemen t or refund is provided
must be returned to Motorola and shall become the property of M otorola.
Exclusions (Products and Accessories)
This warranty does not apply to:
(a)
Consumable parts
time unless failure has occurre d due to a defect in materials or workmans hi p. O nl y batteri es
whose fully charged capac ity fall s below 80% of their rated capacity and batter ie s that le ak
are covered by this Limited Warranty.
(b)
Cosmetic damage
cosmetic damage.
(c)
Damage caused by use with non-Motorola products.
from the use of non-Motorola branded or certified Products, ac c ess ori es or other peripheral
equipment, including wi thout limitation housings, parts, or softw are, are ex c l ud ed from
coverage.
(d)
Damage caused by accident , abuse, misuse, liquid contact, fire, earthquake or
other external causes
operating the Product outside their permitted or intended uses as defi ned by Motorola,
including but not limited to a s set forth by M otorola i n the Pro ducts' Use r Manua l, Quick S tart
Guide, Online Tutorials, and other documentation), improper st orage (e.g. subjecting the
Product to extreme temperat ures), abuse or neglect (e.g. broken /b ent/missing
clips/fasteners/connectors); impact damage (e.g. dropping the Product) (ii) contact w i th
liquids, water , ra in, extreme hum idity, heavy perspiration or other moisture; sand , food, dirt or
similar substances (except for Products sold as resistant to such sub stanc es, but only to the
extent the damage was no t cau sed by incorrectl y secu ring th e phone 's prote ctive elemen ts or
subjecting the Produ ct t o conditions beyond its st ated specifications or lim its) ; (iii) us e of the
Products for commercial renta l pu rpos es; or (iv) external causes or acts which are not the
fault of Motorola, inc ludi ng but not limited to flood, fire, earthquake, to rnado or other acts of
God, are excluded from cove rage.
(e)
Unauthorized Service or Modification.
testing, adjustment, insta llation, maintenance, alteration , or mod ific ation in any way,
including but not limited to tamperi ng with or altering the software, by someone other than
, such as batteries or protective coatings designed to dimini sh ov er
, including but not limited to scratches, dents, cracks or other
Defects or damage that result
; including but not limited to: (i) imp roper usage or operation (e.g.
Defects or damage resulting from service,
Page 31

Motorola, or its authoriz ed service c enters , are e xcluded from cov erage. Notw ithstand ing the
foregoing, any Product whi c h has had its bootloader unloc ke d, or w hos e operating system
has been altered, includin g any fai led attempts to unlock the bootloader or alter such
operating system, is not covered by this warranty, regardless of whether such modifications
are authorized, approved, or otherwise sanctioned by M otorola.
(f)
A product or part that h as be en m o d ifie d in an y m a n ner with o ut the wr itte n
permission of Motorola.
Motorola from determining whether such Products are covered under the terms of this
Limited Warranty a re e xcluded from coverag e. Th e fo rgoing shall i nclude but no t be limited to
(i) serial numbers, date tags or othe r m anufacturer coding that has bee n rem oved, altered or
obliterated; (ii) mismatc hed or duplicated serial numbers; or (ii i) brok e n s eal s or other
evidence of tampering. Do not open the Product or attempt to repair the Product yourself;
such conduct may cause da mage that is not covered by this warranty.
(g)
Normal wear and tear or otherwise due to the normal aging of the Product.
(h)
Defects, damages, or the failure of the Product due to any communication
service or network you subscribe to or use with the Products.
(i)
All software, inc ludin g op er atin g sy ste m so ftware, third-party softw ar e ,
applications, and all other software of any kind.
provided “AS-IS” and “AS AVAILABLE,” “WITH ALL FAULTS” and without a warranty of any
kind. The Limited Warranty does not apply to any non-Motorola product or any software,
even if packaged or sold with the Motorola hardware, unles s oth erw is e required by
applic able local law.
(j)
Products that have been refurbished, reconditioned, or remanufactured
Products repaired or replac ed pursuant to the terms of this Limited W arranty.
If damage is outside the sc ope of w arranty c overage, repai r service s may be a vaila ble, but all
costs associated with such out of warranty repair will be your responsibility.
What Other Limitations are There?
•
TO THE EXTENT PERM IT TED BY APPLICABLE LA W, THIS LIMITED WARRA NTY AND THE
REMEDIES SET FORTH HEREIN ARE EXCLUSIVE AND IN LIEU OF ALL OTHER
WARRANTIES AND REMEDIES, WHETHER ORAL OR WRITTEN, S T ATUTORY, EXPRESS OR
IMPLIED. NO ORAL OR WRITTEN REPRESENTATIONS MADE BY MOTOROLA OR ANY
SELLER, RESELLER OR DISTRIBUTOR OF THE PRODUCTS, INCLUDING EMPLOYEES AND
AGENTS THEREOF, SHALL CREATE ANY ADDITIONAL WARRANTY OBLIGATIONS,
INCREASE THE SCOPE, OR OTHERWISE MODIFY IN ANY MANNER THE TERMS OF THIS
LIMITED WARRANTY.
Products that have been altered in any manner so as to prevent
Software distributed by Motoro la is
, except for
•
TO THE EXTENT PERMITTED BY A PPLICABLE LAW, MOTOROLA S PECIFICALLY
DISCLAIMS ANY AND ALL STA TUTORY OR IMPLIED W AR RANTIES, INCLUDING,
WITHOUT LIMITATION, WARRANTIES OF MERCHANTABILITY, FITNESS FOR A
PARTICULAR PURPOSE, NONINFRINGEMENT AND ALL WARRANTIES AGAINST HIDDEN
OR LATENT DEFECTS. WHERE SUCH STATUTORY OR IMPLIED WARRANTIES CANNOT
LAWFULLY BE DISCLAIMED, THEN TO THE EXTENT PERMITTED BY LAW, ALL SUCH
WARRANTI ES SHALL BE LIMITED IN DURATION TO THE DURATION OF THE EXPRESS
LIMITED WARRANTY CONTAINED HEREIN AND THE REMEDIES OF REPAIR,
REPLACEMENT, OR REFUND AS DETERMINED BY MOTOROLA IN ITS SOLE DISCRETION
SHALL BE THE EXCLUS IV E REMEDY OF THE CONSU M ER.
•
TO THE EXTENT PERMITTED BY APPLICABLE LAW, MOTOROLA DOES NOT WARRANT
THAT THE OPERATION OF ANY PRODUCTS OR SOFTWARE COVERED UNDER THIS
LIMITED WARRANTY WILL MEET YOUR REQUIREMENTS, WORK IN COMBINATION
WITH ANY HARDWARE OR SOFTWARE APPLICATIONS OR THIRD PARTY SERVICES, BE
UNINTERRUPTED, ERR O R -F R EE, O R WI TH OUT RISK TO, OR LOSS OF, ANY
INFORMATION, DATA , SOF TWARE OR APPLICATIONS CONTAINED THEREIN, OR TH AT
DEFECTS IN THE PRODUCTS OR SOFTW A RE WILL BE CORRECTED.
•
TO THE EXTENT PERM IT TED B Y AP PL I CAB L E L AW, IN NO EVENT SHALL MOTOROL A B E
LIABLE, WHETHER IN CONTRACT, TORT OR UNDER OTHER LEGAL THEORY (INCLUDING
NEGLIGENCE), FOR DAMAGES IN EXCESS OF THE PURCHASE PRICE OF THE PRODUCTS,
OR FOR ANY INDIRECT, INCIDENT AL, SPECIAL OR CONSEQUENTIAL DAMAGES OF ANY
KIND, OR LOSS OF REVENUE OR PROFITS; LOSS OF BUSINESS; BUSINESS
INTERRUPTION; LOSS OF OPPORTUNITY; LOSS OF GOODWILL; LOSS OF REPUTA T ION;
LOSS OF, DAMAGE TO, OR CORRUPTION OF INFORMATION, DATA, SOFTWARE OR
APPLICATIONS (INCLUDING ANY COSTS ASSOCIATED WITH RECOVERING,
PROGRAMMING, OR REPRODUCING ANY INFORMATION, DATA, SOFTWARE OR
APPLICATIONS STORED ON OR USED WITH MOTOROLA PRODUCTS, OR ANY FAILURE
TO MAINTAI N THE CONF IDEN TIAL ITY OF AN Y INFORMATION OR DATA STORED ON THE
PRODUCTS); OR OTHER FINANCIAL LOSS ARISING OUT OF OR IN CONNECTION WITH
THE ABILITY OR INABILITY TO USE THE PRODUCTS.
•
SOME STATES OR JURISDICTIONS DO NOT ALLOW THE LIMITATION OR EXCLUSION OF
INCIDENTAL OR CONSEQUENTIAL DAMAGES, OR THE EXCLUSION OR LIMITATION ON
THE LENGTH OF AN IMPLIED WARRANTY , OR THE LIMIT ATION OR EXCLUSION OF
DAMAGES FOR PERSONAL INJURIES CAUSED BY NEGLIGENCE, SO THE ABOVE
LIMITATIONS OR EXCLUSIONS MAY NOT APPLY TO YOU. THIS WAR RANT Y GIVES YOU
SPECIFIC LEGAL RIGHTS, AND YOU MAY ALSO HAVE OTHER RIGHTS THAT VARY FROM
STATE OR JURISDI CTION.
65
Page 32

• DATA BACKUP:
INCLUDING BUT NOT LIMITED TO PERSONAL CONTACTS, ADDRESS BOOKS, PICTURES,
MUSIC AND GAMES WILL BE ERASED DURING THE REPA IR PROCESS, AND CAN NOT BE
REINSTALLED BY MOTOROLA. TO AVOID LOSING SUCH INFORMATION, DATA,
SOFTWARE OR OTHER APPLICATION S PLEASE CREA TE A BACK UP BEFORE YOU DELIVER
YOUR PRODUCT FOR WARRANTY SERVICE, REMOVE ANY CONFIDENTIAL, PROPRIETARY
OR PERSONAL INFORMATION AN D DISABLE ANY SEC URITY P ASSWORDS. YOU W ILL BE
RESPONSIBLE FOR REINSTALLING ALL SUCH INFORMATION, DATA, SOFTWARE, OTHER
APPLICATIONS AND PASS WOR DS. MOTOROLA AND/OR ITS AUTHORIZED SERVICE
CENTERS ARE NOT RESPONSIBLE FOR THE LOSS OR MISUSE OF ANY DATA, FILES,
CONTENT, APPLICATIONS AND PROGRAMS WHEN THE PRODUCT IS DELIVERED FOR
WARRANTY SERVICE. YOUR PRODUCT OR A REPLACEMENT PRODUCT WILL BE
RETURNED TO YOU AS YOUR PRODUCT WAS CONFIGURED WHEN ORIGINALLY
PURCHASED, SUBJECT TO APPLICA BLE SOFTWARE UPDATES. MOTOROLA MAY
INSTALL OPERATING SYSTEM SOFTWARE UPDATES AS PART OF WARRANTY SERVICE
THAT MAY PREVENT THE PRODUCT FROM REVERTING TO AN EARLIER VERSION OF THE
OPERATING SYSTEM SOFTWARE. THIRD PARTY APPLICATIONS INSTALLED ON THE
PRODUCT MAY NOT BE COMPATIBLE OR WORK WITH THE PRODUCT AS A RESULT OF
THE OPERATING SYSTEM SOFTWARE UPDATE. MOTOROLA AND ITS AUTHORIZED
SERVICE CENTER S AR E NOT RESPONSI BLE FOR THE LOSS OF, OR INABILITY TO USE,
SUCH INFORMATION, DATA, SOFTWARE OR OTHER APPLICATIONS.
• WARNING AGAINST UNLOCKING THE BOOTLOADER OR ALTERING A
PRODUCT'S OPERATING SYSTEM SOFTW ARE :
RECOMMENDS AGAINST ALTERING A PRODUCT'S OPERATING SYSTEM, WHICH
INCLUDES UNLOCKING THE BOOTLOADER, ROOTING A DEVICE OR RUNNING ANY
OPERATING SOFTWA R E O THER THAN THE APPROV ED VERSIONS ISSUED BY
MOTOROLA AND ITS PARTNERS. SUCH ALTERATIONS MAY PERMANENTLY DAMAGE
YOUR PRODUCT, CAUSE YOUR PRODUCT TO BE UNSAFE AND/OR CAUSE YOUR
PRODUCT TO MALFUNCTION. IN SUCH CASES, NEITHER THE PRODUCT NOR ANY
DAMAGE RESULTING THEREFROM WILL BE COVERED BY THIS WARRANTY.
• IMPORTANT FC C INF ORM ATION:
TO THE PRODUCT THAT WILL IMPACT ITS FCC GRANT OF EQUIPMENT AUTHORIZATION.
THE FCC GRANT IS BASED ON THE PRODUCT'S EMISSION, MODULATION, AND
TRANSMISSION CHARACTERISTICS, INCLUDING: POWER LEVELS, OPERATING
FREQUENCIES AND BANDWIDTHS, SAR LEVELS, DUTY-CYCLE, TRANSM ISSION MODE S
(E.G., CDMA, GSM), AND INTENDED METHOD OF USING THE PRODUCT (E.G., HOW THE
PRODUCT IS HELD OR USED IN PROXIMITY TO THE BODY). A CHANGE TO ANY OF THESE
66
ALL INFORMATION, DATA, SOFTWARE OR OTHER APPLICATIONS,
MOTOROLA STRONGLY
YOU MUST NOT MAKE OR ENABLE ANY CHANGES
FACTORS WILL INVALIDATE THE FCC GRANT. IT IS ILLEGAL TO OPERATE A
TRANSMITTING PRODUCT WITHOUT A VALID GRANT.
Page 33

Copyright & Trademarks
Motorola Mobility, Inc.
Consumer Advocacy Office
600 N US Hwy 45
Libertyville, IL 60048
www.motorola.com
1-800-734-5870 (United States)
1-888-390-6456 (TTY/TD D U nited States for hearing impai red )
1-800-461-4575 (Canada)
Certain features, services and applications are network dep endent and may not be availabl e
in all areas; additional terms, co ndi ti ons an d/or charges may apply. Contact your service
provider for details.
All features, functionality, and other product specifications, as well as the inform ation
contained in this guide, are ba s ed upon the latest available inform ation and believed to be
accurate at the time of printing. Moto rol a res erves the right to change or modify any
information or specificatio ns w ith out notice or obligation.
Note:
The images in this guide are examples only.
MOTOROLA and the Styli ze d M L og o are trademarks or registered tradem arks of Motorola
Trade mark Holdings, LLC. DROID is a trademark of Lucasfilm Ltd. and its rela ted com panies.
Used under license. LTE is a trademark of ETSI. Google, the Googl e l ogo , Google Maps,
Google T alk, Google Latitude, Gmai l, YouTube, Picasa, Google Books, Google Docs, G oogle
Goggles, Google Financ e, Google Places, Google Ma ps Navi gation Beta, Google Calen dar,
Android and Android Market are trademarks of Google, Inc. All other product or service
names are the property of their respective owners.
© 2011 Motorola Mobility, Inc. All rights reserved.
Caution:
Motorola does not take respons ibi l ity for changes/modification to the trans ceive r.
Product ID: MOTOROLA
Manual Number: 68XXXXXXXX-X
XT912
67
Page 34

68
 Loading...