


User Guide
A1260
APPLICANT MOTOROLA INC
1

The Motorola A1260 touch screen phone does it all. It gives you so much and, with its stand out from the crowd design, it’s sure to get attention.
•Connect on many levels —Stay connected with voice, text messaging and Email.
•Rich Music Experience —Use the music player and the FM Radio to listen to your favorite songs.
•Photos and Videos made clear — Capture the moment with photos and videos
•Internet experience — Capture the internet information and access your social networking sites.
2
Contents |
|
Introduction.............................................................. |
5 |
Basic......................................................................... |
6 |
About the Phone ..................................................... |
12 |
Phone calls.............................................................. |
20 |
Contacts.................................................................. |
30 |
Messages................................................................ |
36 |
Email ...................................................................... |
41 |
Personalize ............................................................. |
44 |
Entertainment......................................................... |
47 |
Videos .................................................................. |
49 |
Music...................................................................... |
50 |
FM radio ................................................................. |
53 |
Web........................................................................ |
54 |
Connection.............................................................. |
56 |
Cable connections ................................................... |
61 |
3
Memory card .......................................................... |
64 |
Tools....................................................................... |
65 |
Others..................................................................... |
69 |
Secuirty................................................................... |
73 |
Service & Repairs .................................................... |
74 |
Safety, Regulatory & Legal...................................... |
75 |
4
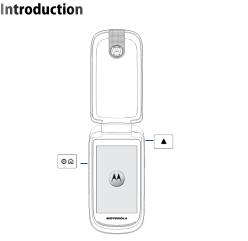
Volume up Key
Power & Home Key

 Volume down Key

 Back Key

 Camera Key
CAUTION Before using your phone for the first time, please read the important Legal and Safety information at the back of this guide.
More information
Go to www.motorola.com/support on your computer.
5
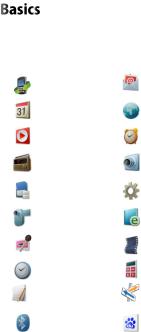
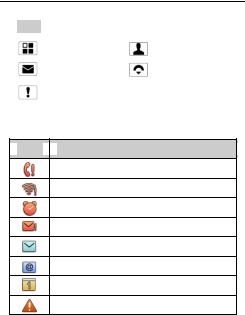
The phone contains the following features:
Icons |
Description |
Icons |
Description |
|
Call log |
|
|
|
|
|
|
|
Calendar |
|
Browser* |
|
|
|
|
|
Music |
|
Alarm |
|
|
|
|
|
FM radio |
|
Camera |
|
|
|
|
|
File manager |
|
Settings |
|
|
|
|
|
Camcorder |
|
Ebook |
|
|
|
|
|
Voice recorder |
|
Video player |
|
|
|
|
|
Time |
|
Calculator |
|
|
|
|
|
Notes |
|
Mini map* |
|
|
|
|
|
Bluetooth |
|
Baidu* |
|
|
|
|
|
6 |
|
|
|
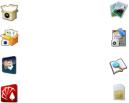
Shop4apps * |
|
Gallery |
|
|
|
|
|
Business |
|
Campage |
|
|
|
|
|
Leisure 4in1 |
|
YoudaoDict |
|
|
|
|
|
Hexin Stock* |
|
SIM Toolkit |
|
|
|
|
Features need the Tflash to be installed.
*Features dependent on the SIM, network, and your data service. You may be charged
Note: This phone supports data-intensive apps and services. It is strongly recommended that you purchase a data plan that meets your needs. Contact your service provider for details.
CAUTION This is a standard features list, you list may
be different.
7
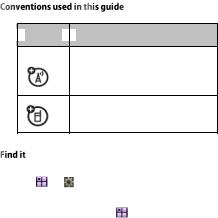
 Symbols
 Explanation
This means the feature is network, SIM card, or subscription dependent and may not be available in all areas. Contact your service provider for more information.
This means the feature requires an optional accessory.
Let’s find a feature! Here’s an example:
Find it: |
> |
Settings > Wallpaper |
|
It means: |
|
|
|
1. From the home screen, tap |
open the main menu. |
||
2. Tap Settings to open the phone setup menu, and then tap
Wallpaper.
3. Tap to highlight and select Wallpaper, then tap OK. In certain screens, you can tap  to show the menu options.
8
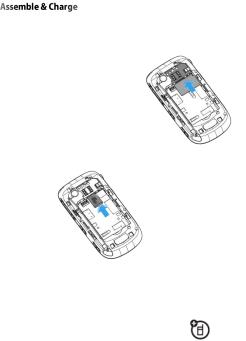
Remove the back cover
1.Holding the phone and open the back cover with the small notch at the bottom.
SIM card install
2.Insert the SIM card in SIM card slot.
SIM card install
3.The Tflash socket is under the SIM card socket. Inset
the Tflash card in the Tflash slot.
Note: To remove the SD card, push it in and release it.
Battery install
Use only Motorola original batteries and accessories for your Phone
9

4.Insert the contacts side of the battery first then gently push the battery into place
Replace the back cover
5.To replace the back cover, make sure it is sealed to the phone.
CAUTION: To protect the data in the phone, the phone should be powered off before you remove the battery.
10
Charge up the Phone
6.Insert the charge into the phone’s sort which located in the left bottom of the phone, then insert the charger plug into the power socket.
7.After the phone has
been fully charged, remove the charger.
To turn on your phone, press and hold Power Key  (below the
earphone port).
To turn off your phone,
press |
hold Power |
key |
, then select |
Power off on the
option menu and confirm the selection.
Tap OK when prompted to turn off the phone.
11
Here are some tips on how to navigate around your phone
Touch
To choose an icon or option, simply touch it.
Try it: tap to open the application main menu.
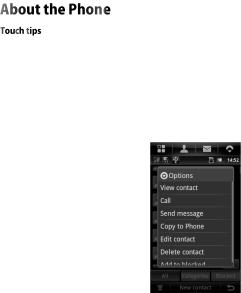
Touch & hold
To open special options, touch and hold an icon or other item. Try it: tap  , then touch & hold a
contact to open options
Try it: touch & hold a widget on home screen to move it, or drag it to the delete button to delete it.
Drag
To scroll through a list or move slowly, drag across the touch screen.
Try it: tap  enter Contacts,
and then drag your contacts list up and down
12
Tip: when you drag or flick a list, a scroll bar appears on the right. Drag the scrollbar to move the list to a letter A-Z.
Flick
To scroll through a list or move quickly, flick across the touch screen (drag quickly and release).
Tip: when you flick a long list, touch the screen to stop it from scrolling.
13
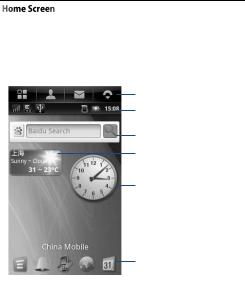
Quick access to the things you need most
The home screen gives all your latest information in one place.
It’s what you see when you turn on the phone or any time you press Home Key , it is basically like this:
Global Navigation Bar
Status Bar
Widget (Baidu search)
Widget (Weather)
Widget (Analog clock)
Application shortcuts bar
|
|
|
|
|
|
|
|
Menu |
Ring alert style shortcut |
||
Tap to change the ring alert style |
|||
|
|
||
Note: Your home screen might look a little different.
14
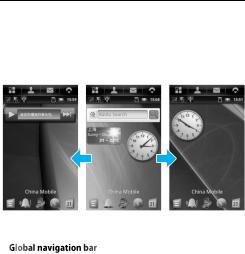
The home screen extends beyond what you see on the screen to give you more room for adding widgets. Flick the home screen left and right to see more panels or to add widgets.
The global navigation bar gives you the way to easily access to your phone’s primary functions:
15
|
Icons |
Explanation |
Icons |
|
Explanation |
|
|
Application main |
|
|
Contacts |
|
|
menu |
|
|
|
|
|
|
|
|
|
|
|
Messages |
|
|
Dialer |
|
|
|
|
|
|
|
|
Notifications |
|
|
|
|
|
|
|
|
|
Tip: The icons show in the notifications  .
.
 Icons
Icons 
 Explanation
Missed call
An open wireless network is available
Unsettled alarm event
SMS/ MMS sent failed
New SMS / MMS message
New Email message
Upcoming event
General notification for system error
16
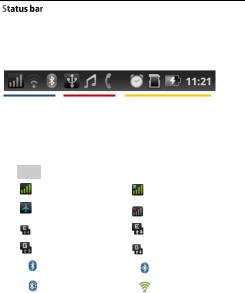
The status bar under the Global navigation bar contains icons that tell you about the phone status. Touch the icons on status bar will reveal the corresponding status panel.
Wireless status Ongoing process |
System info |
These are the icons that may appear on the wireless status area of the status bar:
|
Icons |
Explanation |
Icons |
|
Explanation |
|
|
Signal strength |
|
|
Roaming |
|
|
|
|
|
|
|
|
Airplane mode |
|
|
No signal |
|
|
|
|
|
|
|
|
EDGE connected |
|
|
EDGE in use |
|
|
|
|
|
|
|
|
GPRS connected |
|
|
GPRS in use |
|
|
|
|
|
|
|
|
Bluetooth is on |
|
|
Connected to a |
|
|
|
|
Bluetooth device |
|
|
|
|
|
|
|
|
|
Bluetooth is |
|
|
Connected to a |
|
|
discoverable |
|
|
WLAN network |
17
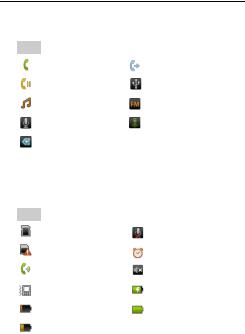
These are the icons that may appear on the ongoing process area of the status bar:
|
Icons |
Explanation |
Icons |
Explanation |
|
|
Call in progress |
|
Call forwarding on |
|
|
|
|
|
|
|
Call on hold |
|
USB connected |
|
|
|
|
|
|
|
Music is playing |
|
FM radio in use |
|
|
|
|
|
|
|
In recording |
|
Downloading data |
|
|
|
|
|
|
|
More notifications |
|
|
|
|
|
|
|
These are the icons that may appear on the system info area of the status bar:
|
Icons |
Explanation |
Icons |
|
Explanation |
|
|
SD card installed |
|
|
Phone microphone is |
|
|
|
|
mute |
|
|
|
|
|
|
|
|
|
No SIM card |
|
|
Alarm is set |
|
|
installed |
|
|
|
|
|
|
|
|
|
|
|
Speakerphone on |
|
|
Mute mode |
|
|
|
|
|
|
|
|
Vibrate mode |
|
|
Battery is charging |
|
|
|
|
|
|
|
|
Battery is very low |
|
|
Battery is full |
|
|
|
|
|
|
|
|
Battery is low |
|
|
|
|
|
|
|
|
|
18
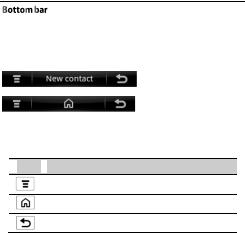
The bottom bar provides the basic functions you can use in the active application. The bottom bar could change accoding the contextual content of application
Icons on bottom bar:
 Icons
Icons  Explanation
Tap to show menu.
Return to home screen.
Go back to previous screen.
19

There are 3 kinds of text input methods.
Full screen handwriting
Qwerty
Bell
Try this: Tap  enter Messages and compose a new message, then tap the text box, the input methods will be displayed, tap
  to select one of following input methods:
Full screen handwriting
20

Qwerty keyboard input |
Bell input |
Typing tips
Here are some tips for the text entering:
To choose symbols or numbers from a list, tap .
.
 Go Back
 Chinese symbols
 English symbols
 Face symbols
  Web address
To hide the input method tap  on the bottom bar.
To switch input language press  for English, and
21
for Chinese.
To delete a character(hold to delete more), tap delete  .
.
To start a new line, tap Return  .
.
To enter one capital letter, press Shift  .
.
Enter only capital letter, until your tap Shift  again, tap Shift
  twice.
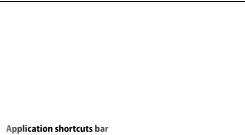
The application shortcuts bar contains 4 customized application shortcuts and the shortcut of ring alert style.
Change the shortcuts on Application shortcuts bar:
Find it:  >
>  > Home screen setup
1.Tap  to enable the Home screen shortcuts.
2.Tap the shortcut you would like to change, select the shortcut from the list of the applications that are installed on your phone.
3.Tap OK to make sure the selection.
22
Quick access to the things you need most
Find it:  Phone
Phone
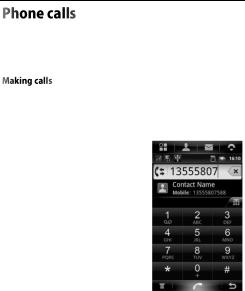
You can either dial a number directly, or you can use the Smart Dial feature to search and call a contact in your contacts list.
1.Tap , enter the number.
2.As you enter digits or letters, the panel displays numbers and names that match the keys you tapped.
If you enter a wrong digit, Tap  to erase that digit, to
erase the entire number, press and hold  .
.
3.Tap  to close the dial pad
and to see if there are more matching numbers or contacts.
4.To make a call, do one of the following:
If there are no matching contacts in the list, after entering
23
the number, Tap Call  .
.
Tap the phone number or contact from the list.
The phone dialer’s Smart Dial feature makes it quick and easy for you to place a call. Simply enter the phone number or first few letters of the person you want to call. Smart Dial automatically searches and filters your contacts list.
Tip: Tap Redial will put the number you dialed last time into the number field.
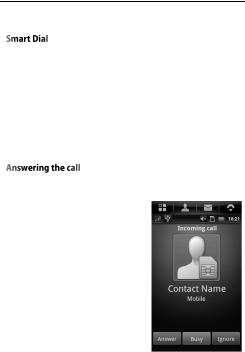
When you receive a phone call from a contact, the Incoming call screen appears and
displays the caller ID icon, name, and number type of the calling party. When you receive a phone call from someone who is not stored in Contacts, only the default caller ID icon and phone number appear on the Incoming call screen.
24
Tap  to answer the call, tap
  to ignore the call or tap
  to make the phone in busy mode.
Tip: To mute the ringing sound without rejecting the call you can press the volume up or down key  /
/  .
.
Call a speed dial number
To call a stored speed dial number, press and hold a number button.
To Set up speed dial numbers:
Find it:  >
>  > Turbo dialing
Tap the speed dial number in the list, then tap the contact number you want to assign to.
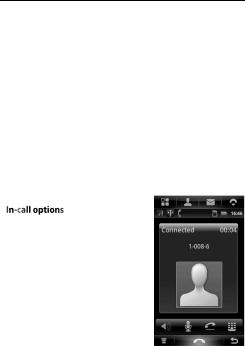
When a call is in progress:
To hang up, tap End call button  .
.
To put the call on hold, tap  and tap
  to recover.
Tap  for hands free mode,
and tap  to take the phone off the hands free mode.
25
To mute the microphone tap ,and tap
  to recover.
To enter extend number, tap  to prompt the dial pad, tap it again to hide the dial pad.
Tip: To record the call, tap Menu  then tap start recording.
Note: Using a mobile device or accessory while driving may cause distraction and may be illegal. always obey the laws and drive safely.
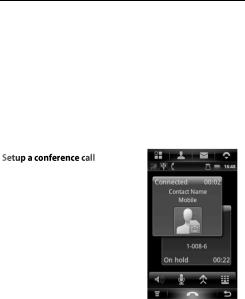
1.Make a call to the first conference call participant.
2.When connected, press Menu  , tap Add call, and then dial the number of the second participant. The first participant is put on hold when you dial the second participant.
3.When connected to the second participant, tap merge  .
.
4.When finished, tap end call  .
.
26
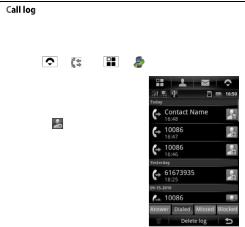
The Call log record all your missed calls, dialed numbers, received calls and blocked calls.
Find it: |
> |
or |
> |
Tap the call log type indicator icon  to call back.
Tap the icon after the
unsaved number to save it to your contacts list.
Tap the contact ID  to show the detail of the contact.
Tap the tab at the bottom to switch between Answered,
Dialed, Missed and Blocked calls
27

Find it:  >
>  > Setup
You can adjust the phone setup of your phone such as set speed dial numbers, or enable additional call services from you wireless service provider.
Options |
|
Description |
Call waiting |
|
Set the option for the incoming call during a call |
|
|
|
|
|
Select how you want your phone to handle busy, |
Call forwarding |
|
unanswered, and unreachable calls. You can also |
|
|
set the call forwarding option for all incoming calls. |
Turbo dialing |
|
Set the speed dial number. |
|
|
|
Prepend |
|
Go back to previous screen. |
|
|
|
Auto redial |
|
Enable or disable redial the number not connected |
|
automatically |
|
|
|
|
Auto answer |
|
Enable or disable auto answer the call with headset |
|
or Bluetooth connected. |
|
|
|
|
Flip Answer |
|
Enable or disable open flip to answer the call |
|
|
|
My number |
|
Set my name and phone number |
|
|
|
28

Note: Your service provider programs one or more emergency phone numbers (such as 911 or 112) that you can call under any circumstances, even when your phone is locked. Emergency numbers vary by country. Your pre-programmed emergency number(s) may not work in all locations, and sometimes an emergency call cannot be placed due to network, environmental, or interference issues.
1.Tap  Phone (if your phone is locked, touch Emergency call).
2.Enter the emergency number.
3.Tap  to call the emergency number.
Note: Your mobile device can use GPS
signals to help emergency services find you. See
‖GPS‖ in your legal and safety information.
29

Contacts like you’ve never had before
Find it:  Contacts
Contacts gives you quick and easy success to the people you want to reach.
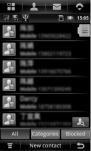
All of your contacts are displayed alphabetically in a scrolling list. Each contact is followed by the default phone number.
The Contacts has the following tabs:
All |
Give you access to all contacts on your phone including |
|
Phone contacts and contacts stored on your SIM card. |
||
|
||
|
|
|
|
Let you assign contacts to categories so you can easily |
|
Categories |
send an SMS, MMS, or email message to the whole |
|
|
category. |
|
|
|
|
Blocked |
List all the contacts or numbers you phone have blocked. |
|
|
|
Tip: you can drag the list up to down to scroll it, or slide your finger up to down to scroll quickly. Either way, a tab
30
 Loading...