

Page 1

APPLICANT MOTOROLA INC. FCC ID: IHDP56KD1
INSTRUCTION MANUAL
A representative version of the user's manual follows:
Exhibit 8
Page 2

Let’s go
2 minutes
3H
MOTOBLUR ID:
Enter email address
Your name:
e.g. John Smith
Password:
Password
NextBack
Creating your
MOTOBLUR account...
let’s get you up and running
Assemble & charge
1 cover off 2 microSD in
3 SIM in 4 battery in
5 cover on 6 charge up
Caution: Please read the battery use and safety text in
the Safety, Regulatory & Legal guide provided. with
your phone
Set up & go
Time varies
Create or log into a MOTOBLUR
account to get your contacts, email, messages, and
status information, for all your accounts, all in one
place, all the time. There’s more in “Your MOTOBLUR
account” on page 7. Registration is secure, and should
only take a few minutes:
1 Turn on.
2 Select a language.
3 Register or log in.
Tip: Open your phone
to type.
If you have not created
a MOTOBLUR
account, you’ll need to
register: Enter your
name, your current
email address (where
MOTOBLUR can send
account information),
and a new
MOTOBLUR account
password.
1Let’s go
Page 3

4 Add your accounts to
MOTOBLUR.
To add an account, tap
it. Then, enter the user
name or email and
Facebook MyspaceGMail Twitter
Last FM
PicasaPhotobucket
password that you set
up on that account.
Tip: For more, or to
add accounts anytime,
go to “Add accounts”
on page 7.
5 Import your SIM
contacts.
After you sign in, your
phone shows your
home screen. Tap
press Menu
Settings >Import
>
from SIM card
to confirm.
Turn it on & off
To turn on your phone,
press Power (on the right side).
To turn off your phone, press and
hold Power , then tap
in the menu that opens.
2 Let’s go
Power off
Contacts
, then
. TapOK
Wi-Fi connect
2 minutes
If you want to use a Wi-Fi network for
even faster Internet access, press Menu
Settings >Wireless controls >Wi-Fi settings
>
Wi-Fi
Tap
to search for and connect to wireless
.
networks. There’s more in “Wi-Fi” on page 39.
Cool content & more
Browse and download thousands of the coolest apps
on the planet from Android. On top of that, you get a
full HTML browser, so you can surf in style.
Download new apps with “Android Market™” on
page 37. Your phone comes with a microSD memory
card installed—you can load it up with photos, videos,
and music from your computer using “USB drag &
drop” on page 40.
Security
Your contacts are backed-up on MOTOBLUR, so don’t
worry. Even if you lose your phone, MOTOBLUR can
help you find it or wipe it. And when you get your next
MOTOBLUR product, your stored info makes it a snap
to set up with just a username and password.
Of course it doesn't stop there. There are plenty of
ways to protect your phone and your information,
in “Security” on page 45.
Page 4

Touchscreen & keys
a few essentials
Touch tips
Here are some tips on how to navigate around your
phone.
Tap
To choose an icon or
option, Tap it. Try it: In the
home screen, tap
Contacts
.
Tap & hold
To open special options,
tap and hold an icon or
other item. Try it: In the
home screen, tap
Contacts
, then tap
and hold a contact to open
options.
Contacts
Alex Pico
Alex Pico
View contact
Call
Send Text Message
Delete contact
Drag
To scroll through a list or
move slowly, drag across
the touchscreen. Try it: In
the home screen, tap
Contacts
your
Contacts
, then drag
list up or
down.
Tip: When you drag or flick
a list, a scroll bar appears
on the right. Drag the scroll
Contacts
Alex Pico
Dan Smith
Kate Shunney
Keith Zang
Luke Carmody
Mariana Bukvic
B
StatusHistory A-Z
bar to move the list to a
letter A - Z.
Flick
To scroll through a list or move quickly, flick across the
touchscreen (drag quickly and release).
Tip: When you flick a long list, tap the screen to stop it
from scrolling.
Flipside touch pad
Once you know how to tap, drag, and
To u ch Pad
flick, you can do that on the back of
your display, too! Open your phone,
then flick and tap the square pad on
the back of the display to move and select items.
3Touchscreen & keys
Page 5
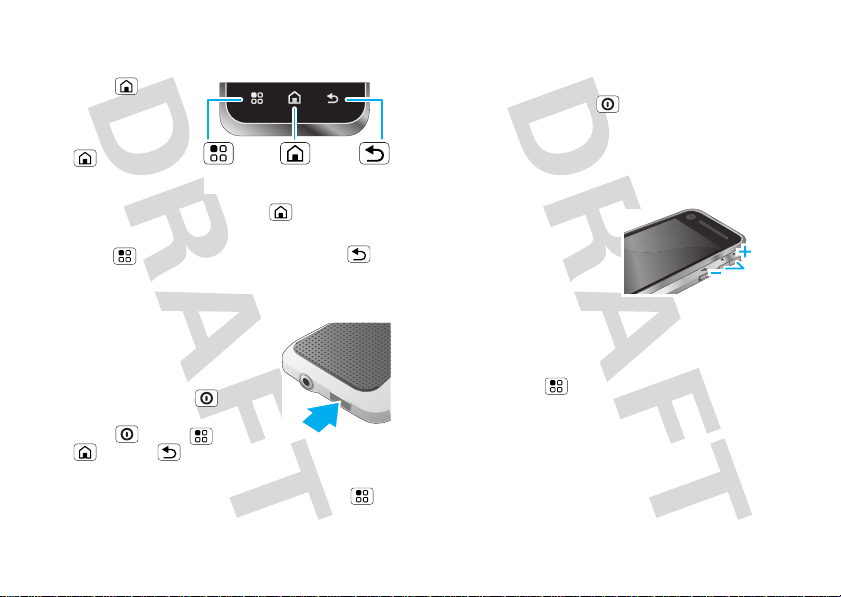
Key tips
Volume
Keys
Menu, home, & back
Press Home to
close any menu or app
and return to the home
screen. Press and hold
Home to show the
last few apps you used,
then tap an app to open
Menu
Key
it. In the home screen, press Home to open or
close the main menu.
Press Menu to open menu options, or Back to
go back.
Sleep & wake up
To save your battery, prevent
accidental taps, or when you want
to wipe smudges off your
touchscreen, put the touchscreen to
sleep by pressing Power . To
wake up the touchscreen, just
press Power , Menu ,
Home , or Back , or open the phone.
To change how long your phone waits before the
screen goes to sleep automatically, press Menu
Settings >Display & security >Screen timeout
>
Home
Key
Back
.
Key
Tip: To make the screen lock when it goes to sleep,
use “Screen lock” on page 46.
Power key menu
Press and hold Power to open the power key
menu, where you can turn off the phone (
or turn off features (
GPS
).
or
Airplane mode, Bluetooth, Wi-Fi
Power off
Adjust volume
Press the volume keys
to change the ring
volume (in the home
screen), or the earpiece
volume (during a call).
Spin the screen
The touchscreen can spin to stay right-side up when
you rotate your phone:
Find it: Menu >
Orientation
>
Settings >Display & security
),
,
4 Touchscreen & keys
Page 6
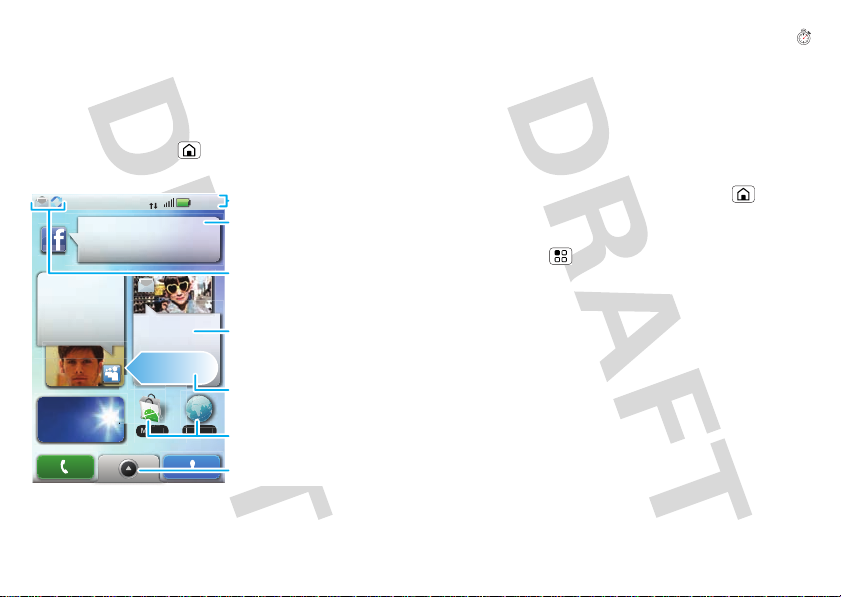
Home screen
Trevor Gilley
Black turtleneck
and a beret, and
he thought I was
serious?
5 min ago
298 minutes away from cake.
15 min ago
Browser
Vanessa Eskridge
Ultra secret
double-agent
party agenda
London
Partly Sunny
20
˚
11:35
3G
Market
B
Market
Status Indicators
Your Online Status
Tap to change your status.
Widgets
Tap to open, or tap & hold to
move or delete.
Flick left or right to open
more panels of widgets.
Shortcuts
Tap to open.
Open the main menu.
Notifications
Flick this bar down to see
details.
quick access to the things you need most
Quick start: Home screen
The home screen gives you all your latest information
in one place. It’s what you see when you turn on the
phone or press Home from a menu. It’s basically
like this:
Use & change your home
Time varies
screen
On your home screen, shortcuts are icons that you
open your favorite apps, Web bookmarks, contacts,
mail labels, or music playlists. Widgets show you
news, weather, messages, and other updates.
Flick the home screen left or right to open other panels
of shortcuts and widgets.
• To open something, tap it. Press Home to
return to the home screen.
To change a widget’s settings, open it and then
press Menu >
You can find details about the settings for
Happenings
(“Set up messaging” on page 16),
on page 28),
page 7), or
page 22).
• To add something or change your wallpaper, tap
and hold an empty spot until you see the
Home screen
You can add a folder to organize your shortcuts.
• To move or delete something, tap and hold it until
you feel a vibration, then drag it to another spot,
another panel, or the trash at the bottom of the
screen.
Settings
.
(“Add accounts” on page 7),
Music
Social Status
News
(“Update your status” on
or
Weather
(“Set up widgets” on
menu.
Messages
(“Music”
Add to
5Home screen
Page 7
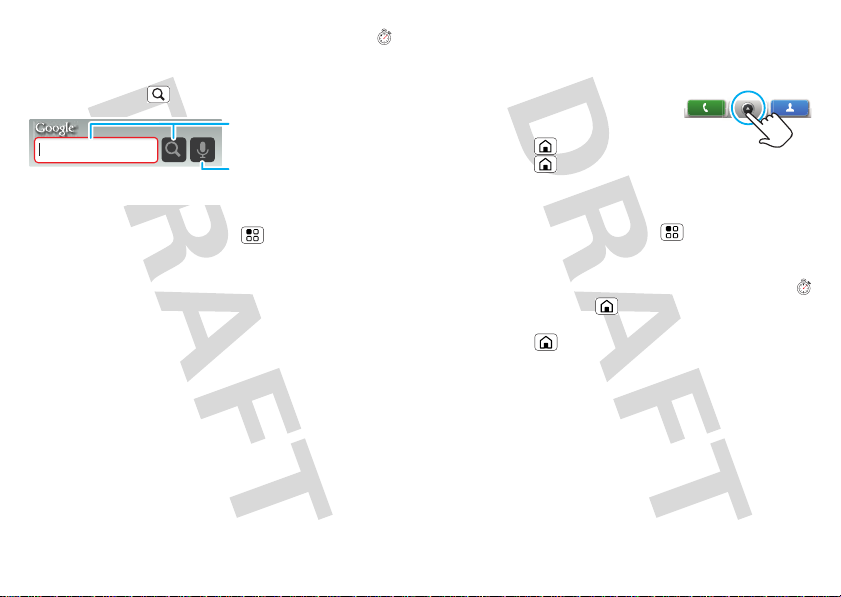
Search
Google Search
Tap the icon, then speak for
a voice search.
Type, then tap the icon for a
text search.
< 1 minute
< 1 minute
To search, use a Search widget (if you
have one on your home screen), or open your phone
and press Search .
Contacts
Tip: In your main menu or
, you can open your
phone (or press and hold Menu to open a display
keypad), then type an entry name to find it.
6 Main menu
Main menu
Quick start: Main menu
The main menu shows you all of
your applications. To open it from
the home screen,
press Home . To close it,
press Home again.
Note: Your main menu will vary.
Tip: To find an app in the main menu, open your
phone (or press and hold Menu to open a display
keypad), then type the app name.
Switching apps
Press and hold Home to see the
last few apps you used, then tap the app you want.
Press Home to close an app and return to the
home screen.
Page 8

Social networking
2 minutes
my life, your life
Your MOTOBLUR account
The first time you turned on your phone, you
registered for a MOTOBLUR account that manages
your messages, contacts, and more (“Set up & go” on
page 1). You can log into this account from a computer
to upload contacts, manage the account, get help, or
even locate your phone: www.motorola.com/
mymotoblur
What is MOTOBLUR?
Only MOTOBLUR synchs contacts, posts, feeds,
messages, e-mails, photos and much more—from
sources like Facebook, Twitter, MySpace, your work
e-mail, Picasa, Photobucket—and automatically serves
it up just the way you want it. No opening and closing
apps and menus, it’s all front and center on your home
screen and integrated throughout the entire phone so
you can communicate anyway you like.
Update your status
After you add a social networking
account, you can update and see your current status in
Social Status
a
widget on your home screen.
2 minutes
To update your status, just tap your
Social Status
widget and enter text. If you have more than one
account, you can use the pull-down menu to limit
which accounts are updated. If you don’t see a
Status
widget, flick your home screen left or right to
Social
check all panels.
Social Status
To add a
1 Tap and hold an empty spot on your home screen to
open the
2 Tap
Choose widget
Social Status
widget:
menu.
. The widget appears in the empty
spot, and will show your status the next time your
phone updates from the network.
Add accounts
Note: You can add your
MySpace, Twitter
you don’t have accounts, you can visit their Web sites
to set them up.
Find it: Menu >
New account
>
To sign into your account, use the user name or email
and password that you set up on that account (the
same as on your computer).
When you sign into social networking accounts, you’ll
see your friends and contacts in your
Facebook
,
, or other accounts to your phone. If
Settings >Accounts
> Menu
Contacts
list, and
7Social networking
Page 9

your status and updates can appear in
Time varies
Happenings
and
widgets.
Social Status
Twitter and MySpace messages will always appear
as “read” on your phone, but your phone notifies you
when you receive a new message. MySpace marks
your messages as “read” online.
For email accounts, see “Set up messaging” on
page 16.
Tip: To download updates faster, use “Wi-Fi” on
page 39.
View account updates & features
After you add a social networking account, you can see
and respond to friends’ updates with the
widget on your home screen. If you don’t see one, set
one up in “Widgets” on page 22.
When you tap the
Happenings
widget to open an
update, you can tap on the social network’s icon to
open its Web site.
Note: Your network or other factors might affect the
speed of widget updates.
Happenings
Tap and hold an account, then tap
edit it, or tap
Delete account
Open account
to
to remove it (along with
its contacts and messages).
Edit & delete accounts
Find it: Menu >
Accounts
>
8 Social networking
Settings
2 minutes
Page 10

Calls
Alex Pico
Mobile (555) 555-2505
Just found $100 on the street! Drinks on
me tonight!
End call
SpeakerMute
Active Call ( 00:12 )
Call Timer
Mute
Tap to mute or unmute the
call.
End Call
Tap to hang up.
Speakerphone
Tap to turn the speakerphone
on or off.
Dial Pad
Tap to open a dial pad, to
enter numbers during a call.
it’s good to talk
Quick start: Calls
Dialing options
Recent Frequent
ABC DEF
5
JKL
8
TUVPQRS WXY
0
+
Call
Dialer
Find it:
Dialer
123
4
GHI
7
*
Speed Dial List
Tap to open, then press
Speed Dial
to add or edit.
Delete
Tap to delete a digit you
entered.
Frequent Call List
Tap to open, then tap an
6
entry to call.
MNO
Recent Calls
9
Tap to open, then tap an
entry to call.
#
Open Your Contacts
Voice Dial
Call
Enter a phone number and
tap here to call it.
In-call options
During a call, press Menu to choose
call
, or
Use Bluetooth
, or to wake up the touchscreen
Hold, New
if it’s dark.
Tip: You can press Home or Back to hide the
Dialer
active call display. To reopen it, tap
Make & answer calls
To make a call, tap
a number, then tap
Call
.
Dialer
, enter
.
< 1 minute
9Calls
Page 11

Tip: To enter the international dialing code, tap and
Slide to Answer
Press Power/Lock button to ignore
Time TBD
Call
< 1 minute
End call
SpeakerMute
< 1 minute
hold .
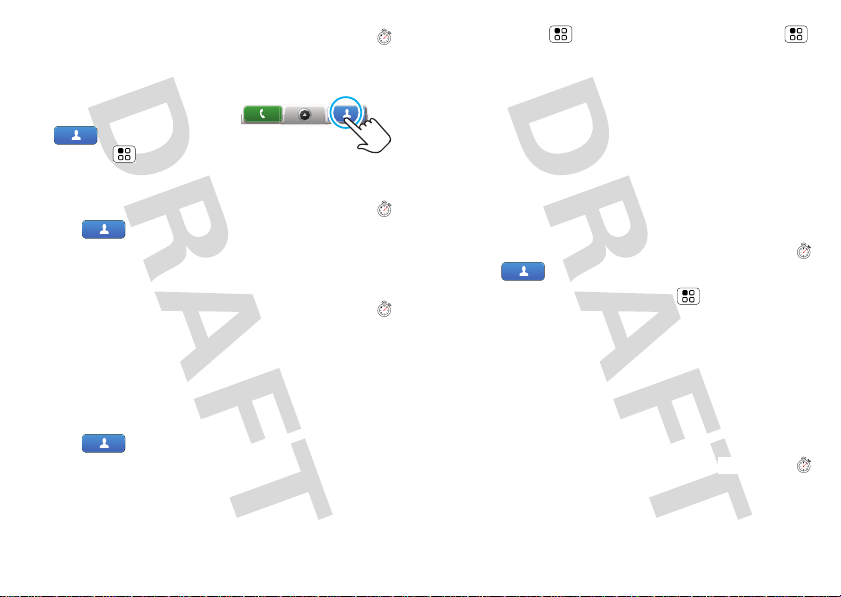
Answer
To answer a call, drag
to
the right (when your phone is
Answer
unlocked,
is just a tap
button).
End calls
Tap
End call
.
Note: When you hold your phone
to your ear, the display goes dark
to avoid accidental taps. When
you move your phone away from your ear, the display
lights up again.
Tip: You can press Home or Back to hide the
active call display. To reopen it, tap
Speed dial
Find it:
• To call a number, tap it.
• To add, edit, or clear entries, press Menu .
Dialer >Spd Dial
Voice dial
Find it:
Say a number, or a name from
Contacts
your
10 Calls
Dialer
>
.
End call
Dialer
< 1 minute
< 1 minute
Handsfree
< 1 minute
Note: Using a mobile device or
accessory while driving may cause distraction and may
be illegal. Always obey the laws and drive safely.
During a call:
Speaker
• To use the speakerphone, tap
• To use a Bluetooth® device, press Menu >
SpeakerMute
Bluetooth
.
.
Use
Mute & hold
During a call:
Mute
• To mute the current call, tap
• To put a call on hold, press Menu >
.
Enter numbers during a call
.
Hold
.
< 1 minute
To enter numbers during a call,
tap and then tap the dial pad.
Recent calls
Find it:
• To call a number, tap it.
• To send a text message, create a contact, view a
contact, add the call to speed dial, or other options,
tap and hold an entry.
Dialer >Recent
Page 12
• To filter the list, tap the view name (like
< 1 minute
1 minute
1 minute
All calls
the top.
• To clear the list, press Menu .
Frequent calls
Find it:
• To call a number, tap it.
• To send a text message, view a contact, add the call
to speed dial, or other options, tap and hold an
entry.
Conference calls
To start a conference call, call the first
number. After they answer, press Menu >
call
and call the next number. When the next number
answers, press Menu >
Your phone number
Find it: Menu >
phone
Dialer >Frequent
>
Status >Phone number
Settings >About
Join
2 minutes
New
.
1 minute
Your caller ID
To hide your number from the people
you call, press Menu >
Additional call settings >Caller ID
>
Settings >Call settings
.
) at
Emergency calls
< 1 minute
Note: Your service provider programs
one or more emergency phone numbers (such as 911
or 112) that you can call under any circumstances, even
when your phone is locked. Emergency numbers vary
by country. Your pre-programmed emergency
number(s) may not work in all locations, and
sometimes an emergency call cannot be placed due to
network, environmental, or interference issues.
1 Tap
tap
Dialer
Emergency Call
(if your phone is locked,
).
2 Enter the emergency number.
Call
3 Tap
to call the emergency number.
Note: Your mobile device can use AGPS satellite
signals to help emergency services find you (see the
important legal and safety information packaged with
your phone).
Call forwarding & waiting
You can forward calls all the time, or
only when your phone is busy, unanswered, or
unreachable (not on the network):
Find it: Menu >
forwarding
When you’re on a call and a second call comes in,
waiting
lets you answer it by tapping
Settings >Call settings >Call
Answer
. You can
Call
11Calls
Page 13
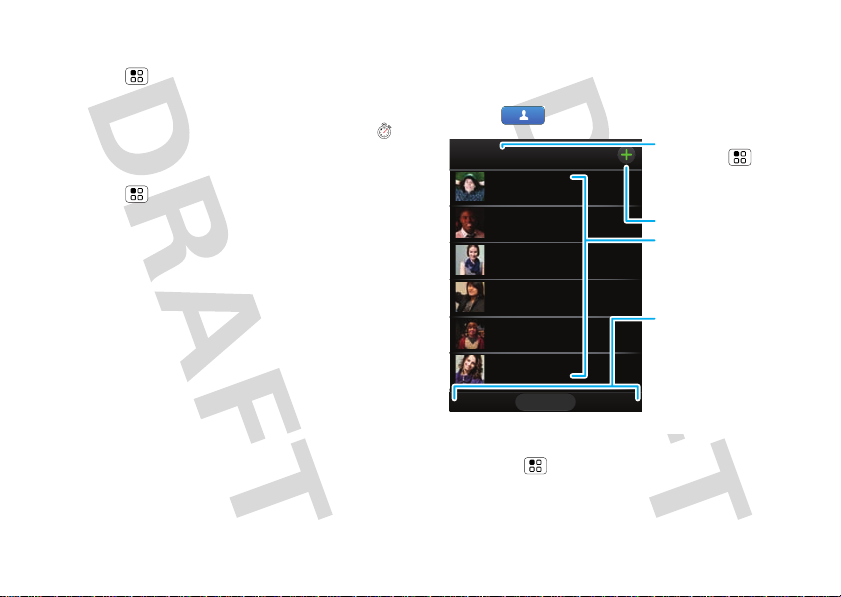
turn off
1 minute
Contacts
StatusHistory A-Z
Alex Pico
Mariana Bukvic
Luke Carmody
Dan Smith
Keith Zang
Kate Shunney
Group
Press Menu to choose
which group to show (like
All, Favorites, or Facebook).
Create Contacts
Views
Tap a list view, or flick the
display right or left to
show:
History - recently used
A-Z - list without status
Status - list with status
Contacts List
Tap to view contact
information. Tap & hold to
edit, delete, and more.
Call waiting
, to send second calls straight to
your voicemail:
Find it: Menu >
Additional call settings >Call waiting
>
Settings >Call settings
Restrict outgoing calls
To restrict your phone so that it can
only dial a few numbers:
Find it: Menu >
dialing number
• To turn fixed dialing on, tap
• To add or delete the allowed numbers, tap
FDN list
.
12 Contacts
Settings >Call settings >Fixed
FDN disabled
.
Manage
Contacts
contacts like you’ve never had before
Quick start: Contacts
Find it:
Tip: To search the list, open your phone (or press and
hold Menu to open a display keypad), then type a
name. When you flick or drag this list, a scroll bar
appears on the right. Drag the scroll bar to move the
list faster.
Contacts
Page 14
Import contacts from your SIM
Time varies
2 minutes
Time varies
Note: You might have already done
this during “Set up & go” on page 1.
If you need to import the
contacts from your SIM card,
Contacts
tap
press Menu >
Import from SIM card
>
, then
Settings
.
Call, text, or email contacts
Find it:
For
Call, Send Text Message, Email, View contact
other options, tap and hold the contact.
View & use contacts
With a MOTOROLA MOTUS with
MOTOBLUR, you’ll know what everybody’s up to and
when. Every time you pick up a call, check a message,
or look up a friend’s contact info, sure, you’ll see their
name and number, but you’ll see their social network
status and smiling face, too.
Find it:
• To filter the contacts by group (
on) tap the filter name at the top.
Tip: To change which account provides the pictures
for your
Contacts
Contacts
Contacts
, from the home screen
Time varies
All, Facebook
, and so
, or
press Menu >
Picture Source
>
• To change the list view, tap
A-Z
(list without status), or
Settings >Accounts
.
History
Status
>Menu
(recently used),
(list with status) at
the bottom.
• To find a contact, just type the name.
Tap a contact to open their details. To start a call or
message, just tap their phone number or other info.
Yo u c an t ap
History, Info
, or
Happenings
at the
bottom of the screen to see more.
Edit or delete contacts
Find it:
Tap the contact, then press Menu >
Delete
that will be saved on your phone and your MOTOBLUR
account.
Where are contacts edited or deleted? Your phone
edits the contacts in its memory, and also updates
your MOTOBLUR account. Your changes won’t affect
your SIM card.
Link contacts
You might have two
same person, maybe a Facebook friend who is also
Contacts
Edit
or
. You can set a ringer, address, and other details
2 minutes
Contacts
for the
13Contacts
Page 15

stored on your SIM card, or one friend with two email
2 minutes
< 1 minute
addresses. To combine these two contacts:
Find it:
Contacts
Tap a contact to open it, then press Menu >
contact
and tap the second entry. Your MOTOBLUR
account remembers this connection.
Create contacts
Find it:
Add contact
>
Open your phone to type the name and details.
Tap Mobile to choose a
different type for this
entry.
To see more details, flick up.
14 Contacts
Edit Contact
First Last
Adam Aaronson
Phone number
Mobile
Phone
Exchange
Home
Phone
Exchange, Gmail
Contacts
>Menu
Tap + to add another
Tap - to remove this
entry.
entry.
Link
When you’re finished, press Menu >
Save
.
Where are contacts saved? Your phone saves new
contacts in its memory, and also updates your
MOTOBLUR account. So, if you get another
MOTOBLUR phone, you can just log into MOTOBLUR
to download your contacts. You can’t save new
contacts on your SIM card, but you can update your
accounts: In
Contacts
, press Menu >
Settings
to
choose which accounts are updated with new
contacts.
Synchronize contacts
When you change one of your
Contacts
, your phone automatically updates your
MOTOBLUR account online. Also, your phone updates
Contacts
your
change a friend in your social networking accounts.
So, you don’t have to do anything to synchronize your
Contacts
care of it for you.
My details
Find it:
View my details
>
To edit details, tap them.
and MOTOBLUR account whenever you
with your other accounts! MOTOBLUR takes
1 minute
Contacts
>Menu
Page 16

Groups
8:34 PM
Alex Pico
Some guys have all the luck - me...
Right now, you’re busy flexing...
Sep 25
Keith Zang
Job
It’s only a freelance gig, but it pays...
Sep 25
Kate Shunney
I have so much energy today, I have
no IDEA why.
Universal Inbox (4)
Sep 25
Seth Rementer
The cinnamon bun place is right
next to the store. It’s like 8 hours...
Create Message
Tap to create a new
message, and see a list of
your drafts (indicated by the
number).
Message List
Tap to open a message. Tap
& hold to move, delete, and
more.
Check for Messages Now
Message Type
Message Status
Icons indicate a message:
unread
urgent
has attachments
2 minutes
You can put your
Contacts
into groups
2 minutes
that you create (like “friends,” “family,” or “work”).
Then, you can find contacts faster by showing one
group at a time.
Contacts
To create a group in your
Add group
>
member
. Enter a group name, then tap
to add members.
To show only one group in your
, press Menu
Add
Contacts
, tap
Contacts
at the top of your screen and choose the group name.
Messaging
sometimes it’s best 2 text, or IM, or email . . .
Quick start: Messaging
Find it:
Messaging >Universal Inbox
Tip: To see more messages, flick or drag up.
Read & reply to messages
Every text, email, friend-feed, wall
post, and bulletin is automatically delivered to you,
ready for your immediate reply with the keypad. The
best part is you don’t have to dig through any apps,
15Messaging
Page 17

screens or menus—every message streams right to
2 minutes
Messaging
Time varies
the phone, viewable exactly the way you want.
Find it:
Note:
Messaging >Universal Inbox
Universal Inbox
shows all of your messages
together—text, email, and social networking
messages. To show only one type of message, tap a
message account type instead of
Universal Inbox
• To open a message and all of its replies, tap it.
• To respond to a message, just open it and enter
your response in the text box at the bottom.
For email, tap to show the
text box.
• To open options, tap and hold
a message.
Tip: Try the
Messages
widget in “Widgets” on
page 22.
Create messages
Find it:
Choose a message type. Then,
enter the recipient and message.
In text messages and emails, press Menu for
options like
16 Messaging
Messaging
Insert...
>
or
Attach Files
.
Send & receive attachments
2 minutes
To send a file in a message, open a
Insert...
new message and press Menu >
Attach Files
.
or
When you receive a message with an attachment,
open the message and tap the file name to download
.
it. Then, tap the name again to open it. Some file
formats can be converted to HTML for faster viewing,
and your phone will show a button that says
version
.
Get HTML
Tip: To send and receive large attachments faster, use
a Wi-Fi connection, in “Wi-Fi” on page 39.
Set up messaging
To add email accounts,
press Menu >
New account
>
Corporate Sync
•
Microsoft® Exchange Server. Enter details from
your IT administrator.
Tip: You might need to enter your domain name
with your user name (like domain/username)
Note: Some work accounts might require you to
add a password lock to your phone, for security. To
stop an account from showing the contacts you
create on your phone, tap
Settings >Accounts
>Menu
.
is for work email accounts on a
Contacts
,
Page 18

press Menu >
Time varies
account under
Email
is for most personal email accounts. For
•
Settings
New contacts
, then uncheck the
.
account details, contact the account provider.
Note: While you are using a Wi-Fi network, you
cannot access
Yahoo Mail
accounts. You can still
use your browser to see these accounts at
mail.yahoo.com
.
To change your settings, press Home
Messaging
>
Manage accounts
•
> Menu , then tap:
to change your user name or
password (or server settings, for email).
Edit Universal Inbox
•
show messages in the
Messaging Settings
•
to choose which accounts
Universal Inbox
to set the notification for each
account type (along with other preferences, for
email).
To g e t Gmail™ in your Messages widget and
Universal Inbox
account: Tap
Email
>
Google
your
, you’ll need to add it as an
Messaging Settings >Add account
and enter your Gmail™ details. If you added
account too, turn off its email sync to
avoid duplicate email notices: Press Home
Accounts
>
checkmark to turn off
, tap your Google™ account, and tap the
Gmail
.
.
Email
Tip: For social network accounts, see “Add accounts”
on page 7.
Instant messages
To send and receive instant messages,
you can use an instant messaging app or your browser.
• To download and use an instant messaging app,
press Home >
Communication
>
provider. Once you download the app, you’ll see it in
“Main menu” on page 6.
• If you don’t see an app for your IM provider, you can
use your Web browser. Press Home
Browser
>
your provider’s Web site and tap
there, follow the link to sign in.
Note: Your IM options will depend on your IM provider.
To browse instant messaging apps from your
computer, go to www.android.com/market
Voi c emai l
When you have a new voicemail,
shows at the top of your screen. To hear the
voicemail, tap
If you need to change your voicemail number, in the
home screen press Menu >
settings
>
Voicemail
Market >Applications
, then choose an app for your
>Menu >
Dialer
Settings
Go
. Once you’re
, then tap and hold .
Settings >Call
.
, then enter
.
1 minute
17Messaging
Page 19

Text entry
think keyboard, now think smaller
Typing tips
To use the full keypad, open your phone:
To .. .
Enter symbols chosen from
a list
Enter alternate characters
in the corners of keys
Enter several alternate
characters, until you press
Alternate again
Enter one capital letter Press Shift
Enter only capital letters,
until you press Shift
again
Select text (Scroll left/
right), or skip pages
(Scroll up/down)
Cut selected text Press Menu > X
Copy selected text Press Menu > C
Paste cut or copied text Press Menu > V
18 Text entry
Press Symbols
Press Alternate
Press Alternate
twice
Press Shift twice
Press Shift +
Scroll
To...
Delete a character (hold to
delete more)
Delete the current line Press Alternate +
Jump to the beginning/end
of a line
Start a new line (email or
social networking) or send
the message (text
messages)
To change your text entry settings and see the
dictionary of terms you’ve used, from the home
screen, press Menu >
Press Delete
Delete
Press Alternate +
Scroll
Press Return
Settings >Locale & text
Touchscreen keypad
When your phone is closed, you can open a display
keypad by tapping a text field, or pressing and
.
Page 20

holding Menu . To close the keypad, press
Back .
Text Entry
Tap to open the
touchscreen keypad.
Delete
Return
Format text in emails
When you create an email, you can format your
message. To select text for formatting, press and
hold Shift , then press Scroll left or right.
New gmail message
To:
Subject:
Font
Shift
Symbols/Numbers
Tap to open a keypad for symbols and numbers.
Space
To change your settings for this keypad, from the home
screen, press Menu >
Android keyboard
>
.
Settings >Locale & text
Send Discard
Bold, Italic,
or Underline
Bullet FontSmiley
Text entry settings
When you use the touchscreen keypad, your phone
suggests words from your dictionary and chosen
language. Your phone also automatically enters
apostrophes in some words, like “dont.”
Find it: Menu >
• To edit your dictionary, tap
Settings >Locale & text
User dictionary
.
19Text entry
Page 21

• To change the language and the style for your
touchscreen keypad, tap
Select locale
.
• To change the sounds, corrections, and other
settings for your touchscreen keypad, tap
keyboard
.
Android
• To change the automatic correction settings for your
full keypad, tap
20 Tips & tricks
Device keyboard
.
Tips & tricks
Things you can do
Stop
pocket
dialing.
Go home. Press Home . When you’re in the
Call again. Tap
Do
whatever
again.
Do stuff on
a plane.
Find stuff. Press Search . To use your voice,
If you put your phone in your pocket,
the touchscreen might get touched,
and accidentally call people.
To avoid this, press Power to put
the display to sleep. To wake it up,
press Power again. You can also
set up “Security” on page 45.
home screen, pressing Home
opens the main menu.
Dialer
Frequent
or
, then tap the
tabs.
Recent
Press and hold Home to show the
last few apps you used.
Press and hold Power >
mode
.
Airplane
press and hold Search .
Page 22

Find
Bluetooth
Press and hold Power
Bluetooth
>
.
® stuff.
Find Wi-Fi
Press and hold Power >
Wi-Fi
stuff
Let stuff
Press and hold Power >
GPS
find you.
Zoom in
on stuff.
Skip stuff. When you’re in a list like
In a Web page, tap to zoom in. It’s
great for tiny links you want to tap.
Contacts
can press Scroll to scroll up and
down. To skip a page at a time, press
Shift > Scroll . To skip to the top
or bottom of the list, press
Alternate > Scroll .
Battery tips
To help extend your battery life:
• Stop synchronizing Google™ app data: Press
Menu >
Background data
>
• Choose 2G networks: Press Menu >
Wireless controls >Mobile networks >Select
>
network
Settings >Google Synchronization
.
>
2G Only
Settings
.
.
, you
• Turn off GPS, Wi-Fi, and Bluetooth®: Press and hold
Power to open the Power key menu, then tap
items to turn them on or off.
• Only check email once an hour: Tap
>Menu >
new email
Messaging settings >Email >Get
>
Every hour
• Dim the display: Press Menu >
Display & security >Brightness
>
Messaging
Settings
21Tips & tricks
Page 23

Personalize
1 minute
2 minutes
2 minutes
add your personal touch
Widgets
Create widgets
1 Find an empty spot on your home
screen where you want to add a widget. You can
flick left or right to open other panels on your home
screen.
2 Tap and hold the empty spot until you see the
to Home screen
Widgets
3 Tap
4 Tap the type of widget. If necessary, enter the
widget settings.
Set up widgets
You can customize some widgets. Tap
a widget to open it, then press Menu :
Happenings
•
accounts appear in this widget, or manage your
accounts (the same as “Add accounts” on page 7).
Messages
•
long it shows new messages. To add email
accounts, “Set up messaging” on page 16.
22 Personalize
menu.
.
: Update your status, choose which
: Change the widget name or choose how
Add
•
Music
: Set this widget to an artist, album, song,
playlist, or just press Menu >
Party shuffle
There’s more about “Music” on page 28.
News
: Change the widget name, choose how long it
•
shows new stories, or choose a news source. To
choose a source, tap , then choose preset
Bundles
or
URL for a
Weather
•
Channels
Webpage
: Change temperature units or add
, or choose
or an
RSS feed
Custom
.
to enter a
locations. To add locations, tap , enter a city, and
Search
tap
. When you open the weather widget,
flick left to see other locations you added.
Ringtones
To personalize your ringtones:
Find it: Menu >
Phone ringtone
>
To set your ringer and vibrate options:
Find it: Menu >
Ringer & Vibrate Modes
>
Settings>Sound & ringtones
or
Notification ringtone
Settings >Sound & ringtones
.
Page 24

Sounds
1 minute
To .. .
set volume for
media and videos
hear tones when
you dial numbers
hear sounds when
you select screen
items
Menu >
Sound & ringtones
>
Media volume
>
Menu >
Sound & ringtones
>
Audible touch tones
>
Menu >
Sound & ringtones
>
Audible selection
>
Display settings
To .. .
set display
brightness
set orientation Menu >
set animation Menu >
Menu >
Display & security
>
Brightness
>
Display & security
>
Orientation
Display & security
>
Animation
>
Settings
Settings
Settings
Settings
Settings
Settings
Quick launch shortcuts
2 minutes
To use a quick launch shortcut, press
Search and the assigned key, like Search and B
to launch the browser.
Date & time
>
Set date, time, time zone, and
formats:
Find it: Menu >
Settings >Date & time
Language & region
Set your menu language and region:
Find it: Menu >
locale
Settings >Locale & text >Select
1 minute
23Personalize
Page 25

Photos & videos
2 minutes
245
5MP
New York, New York 10006
United States
Autofocus Box
Tap the screen to show a
thumbnail of your last photo.
see it, capture it, share it!
Photos
Take & share photos
Take that family photo, and post it
online for everyone to see.
Find it: Press Camera
Note: Photos are stored on your microSD memory
Picture Resolution
card.
24 Photos & videos
is 3MP, unless you change it.
To take the photo, lightly press Camera halfway
until the autofocus box turns green, then press all the
way to take the photo.
Tap the viewfinder to see a thumbnail of the photo
you’ve just taken (on the right). Tap the thumbnail,
then:
Gallery
• To see all your photos, tap
.
• To set the photo as a wallpaper, contact photo, or
Set as
social network profile photo, tap
.
• To send the photo in a message or post it online,
Share
tap
. For more info on sharing your photos,
see “Share your photo gallery” on page 25.
• To delete the photo and return to the viewfinder, tap
Delete
.
Photo options
In the viewfinder, press Menu >
Settings
to open
the camera menu:
options
Store
location in
pictures
Picture
Resolution
Save the details of where the photo
was t aken.
Set the resolution of your photo.
Page 26

options
All Pictures (10/43) 2010-07-12 12.00.00
201
0
0
20099
7
6
5
432
)
2010-0
00
A
i
i
My Pictures AllPictures
Picture Dates
Tap on the left to open the
date list, then drag the dates
to find pictures.
Categories
Tap at the top to open, then
tap a category.
Color Effects
Advanced
settings
View your photos
Find it: Home >
Gallery
ctures (10/43
ll P
Choose your color settings, like
None, Negative
Set the
photo, or choose your
Balance
Daylight
, or
B/W
.
Picture Quality
of your
White
light settings, like
, or
Cloudy
..
Auto
1 minute
Picture
7-12 12.00.
Play a slideshow
Press Home >
Picture Gallery
, tap a picture,
then tap to start a slideshow. To stop the
slideshow, tap the display. To return to the gallery,
press Back .
,
Share your photo gallery
Find it: Home >
To send your photo in a message or post it online:
1 Tap and hold a photo, then tap
2 Choose how you want to share—like
MySpace, Social sharing
Tip: With
Social sharing
Picture Gallery
Share
.
Email
or
Text Messaging
,
.
, you can post a photo to more
than one social network at the same time.
Manage your photos
Find it: Home >
Picture
2 minutes
Gallery
Tap and hold a photo, then:
Delete
• To delete the photo, press Menu >
.
• To set the photo as a contact picture, social network
More
Set
25Photos & videos
profile picture, or wallpaper, press Menu >
as
.
• To open file details, press Menu >
Picture Info
>
.
Page 27

• To set your photo order list, press Menu
0:00
Tap the screen to show a thumbnail of your last
recording.
Settings >Picture Sort
>
.
Tip: To copy photos to/from a computer, go to “USB
drag & drop” on page 40.
Edit your photos
Find it: Home >
Gallery
> picture >Menu >
Picture
Edit
2 minutes
To crop a photo, tap the crop tool, stretch and drag the
crop square to the image you want, then tap the crop
save icon.
Videos
Record & share videos
Find it: Home >
2 minutes
Camcorder
26 Photos & videos
Tip: To send your video in a message, set the video
quality to
Menu >
Low (for MMS messages)
Settings >Select Video Quality
: Press
.
To record the video, press Camera . To stop the
video recording, press Camera again. Tap the
viewfinder to see a thumbnail of the video you’ve just
taken. Tap the thumbnail, then:
Gallery
• To see all your videos, tap
• To play the video, tap
Play
.
.
Page 28

• To send the video in a message or post it online, tap
1:14
3:45
Video ControlsProgress Bar
Share
. For more info on sharing your photos, see
“Share your video gallery” on page 27.
Delete
• To delete the video, tap
Play your videos
Find it: Home >
Video Gallery
.
2 minutes
> video
2 Choose how you want to share—like
Facebook
or
MySpace
.
Manage your videos
Find it: Home >
Video Gallery
MMS
,
2 minutes
To delete a video, tap and hold a video, then tap
Delete
.
Share your video gallery
Find it: Home >
To send your video in a message or post online:
1 Tap & hold a video, then tap
Video Gallery
Share
.
2 minutes
27Photos & videos
Page 29

Music
when music is what you need...
Quick start: Music
Tap, tap, play—instant music. Just open your music
library, then select what you want to play.
Find it: Home >
Music
Artists Albums
Songs Playlists
Tap a category, then
tap a song or playlist.
Tip: When a song is playing, you can add it to a playlist
by pressing Menu >
28 Music
Music
Music Artist
Album Title
Song Title
1:14 3:45
Music ControlsCategories
Add to playlist
.
Set up music
Things you need
To put music on your computer and then load it on
your phone, you need a:
• Microsoft® Windows® PC, or Apple® Macintosh®.
• USB data cable, to connect your phone and
computer.
• microSD memory card in your phone, to store
music (up to 32 GB).
Tip: To make sure your memory card is installed, go
to “Assemble & charge” on page 1. To see the
available memory on your memory card, press
Menu >
File formats you can play
Your phone can play MP3, M4A, AAC, ACC+, MIDI,
WAV, and OGG Vorbis files.
Note: Your phone does not support DRM protected
files.
Headphones you can use
Your phone has a 3.5mm headset jack for wired stereo
headsets. You can go wireless with Bluetooth® stereo
headphones or speakers (see “Bluetooth® wireless”
on page 38).
Settings >SD card & phone storage
.
Page 30

Get music
Rip a CD
Not literally. If you’re new to digital
music transfer, this means transferring music from a
music CD to your computer.
To rip a music CD on your computer, you can use
Microsoft® Windows® Media Player. You can
download Windows Media Player from
www.microsoft.com
1 On your computer, open Windows Media Player.
.
2 Insert a music CD into the computer’s CD
ROM drive.
Note: Make sure you change the format to MP3 in
“Rip > Format > Rip Settings”.
3 In the Windows Media Player window, click on the
“Rip” tab.
4 Highlight the songs you want to import, and click
“Start Rip“.
The songs are imported to the Windows Media Player
Library.
Transfer using W indows® Media
Player
Transfer music files from a computer to your memory
card.
Time varies
Time varies
Note: Copyright—do you have the right? Always follow
the rules (see the important legal and safety
information packaged with your phone).
1 With a memor y card inserted, and your phone
showing the home screen, connect a Motorola
micro USB data cable from your phone’s micro USB
port to a USB port on your computer. Your phone
should show in the status bar.
Note: Your phone supports
Microsoft® Windows® XP, W indows Vista®, and
Apple® Macintosh®. Other operating systems may
not be compatible.
2 Your phone shows a USB connection dialog. Tap
USB drive
. You can’t use the files on your memory
card while it is connected.
3 On your computer, open Windows Media Player.
4 On the “Sync” tab, select “More Options”. Under
“Device”, select your phone.
5 Select “Properties”, check the “Create folder
hierarchy on device” box, and click “OK”.
6 Drag your music files over to the “Sync List” and
press “Start Sync”.
Transfer using USB
Time varies
Transfer music files from a computer
to your memory card.
29Music
Page 31

Time varies
1 With a memory card inserted, and your phone
showing the home screen, connect a Motorola
micro USB data cable from your phone’s micro USB
port to a USB port on your computer. Your phone
should show in the status bar.
Note: Your phone supports
Microsoft® Windows® XP, Windows Vista®, and
Apple® Macintosh®. Other operating systems may
not be compatible.
2 Your phone shows a USB connection dialog. Tap
USB drive
. You can’t use the files on your memory
card while it is connected.
3 Find “Removable Device” (your memory card) in the
“My Computer” window.
4 Drag and drop your music to a folder on your
memory card.
Tip: To help manage your music, create a “Music”
folder on your memory card.
5 When you’re done, use the “Safely Remove
Hardware” feature to finish.
Play music
Music library
Open your music library, then select
what you want to play.
30 Music
Find it: Home >
Music
Artists Albums
Songs Playlists
Music Artist
Song Title
Music
Categories
Tap to list songs or
playlists.
Last Played
Tap to play again.
Your music is stored by artists, albums, songs, and
playlists. Tap a category, then tap the song or playlist
you want to play. Press Menu >
randomly play all your songs, or tap
Party shuffle
Search
to
to look for a
song.
Page 32

Music player
Music Artist
Album Title
Song Title
1:14 3:45
Open Playlist
Shuffle On/Off
Repeat Off/All
/Current
Artist
Album
Song T itle
Music Controls
To t al Song T ime
Progress Bar
Just tap a song or playlist to get going.
controls
view playlist Tap .
shuffle Tap .
repeat Tap .
volume Press the side volume keys.
view library Press Menu >
turn shuffle on/off Press Menu >
shuffle
.
add to playlist Press Menu >
playlist
.
use as ringtone Press Menu >
ringtone
.
delete Press Menu >
Library
Party
Add to
Use as
Delete
.
.
Music player controls
controls
play/pause Tap / .
previous/next Tap / .
fast forward/rewind Tap & hold / .
Hide, wake, turn off
< 1 minute
Press Home to use another app.
Your music continues to play.
When you see in the status bar a song is playing,
flick down to see details. Tap the song to return to the
music controls.
To turn off your music tap .
31Music
Page 33

Playlists
2 minutes
To add a song from the music library to
a playlist, tap and hold the song then tap
playlist
. Choose an existing playlist, or tap
Add to
New
to
create a new playlist.
To add a song to the playlist you're playing, press
Menu >
Add to playlist
in the music player.
To edit, delete and rename playlists, tap and hold the
playlist, in the music library.
32 Web
Web
you don’t need a computer, surf the web with your
phone
Quick start: Browser
Find it: Home >
www.google.com: Google
Web
Images
Local
News more
Google Search
My Location: Off - Turn On
Sign in --Preferences Help
View Google in: Mobile
©2009 Google
Go Bookmarks New window
Refresh Forward More
Note: If you can’t connect, contact your service
provider.
Browser
3G
12:00 PM
The page is loading.
Connection
Over the air:
Mobile Network: , ,
Wi-Fi:
Links
Tap to open.
Web Address
To go to a URL, press
Classic
> Go.
Drag or flick to scroll.
Press to open a menu
where you can open a Web
page, your bookmarks, a
new window, and more.
Page 34

Connect
www.google.com: Google
Android | Official Website
Official site for the development of the open source project. Provides a directory
of applications and links to download the source of the project.
Market - Official Website - Android application developer site
www.android.com/ - Cached - Similar
Android (operating system) - Wikipedia, the free encyclopedia
Android is a software platform for mobile devices, running on the Linux operating
system. It was initially developed by Google and later the Open Handset ...
en.wikipedia.org/wiki/Android_(mobile_phone_platform) - Cached - Similar
What is Android? | Android Developers
Android is a software stack for mobile devices that includes an operating system,
middleware and key applications. The Android SDK provides the tools and ...
developer.android.com/guide/basics/what-is-android.html - Cached - Similar
Android Developers
The Android SDK has the tools, sample code, and docs you need to create ...
AndroidOpen Source Project gives you access to the entire platform source. ...
developer.android.com/ - Cached - Similar
More results from developer.android.com »
Open Handset Alliance
Android™ delivers a complete set of software for mobile devices: an ... Android is
built on the open Linux Kernel. Furthermore, it utilizes a custom virtual ...
www.openhandsetalliance.com/android_overview.html - Cached - Similar
Android Community - Tracking the Android Platform
myTouch 3G Android phone is getting its day in the sun on July 8 when T-Mobile
introduce it to the world – in NYC. We'll be there to bring you live coverage ...
androidcommunity.com/ - Similar
Welcome (Android Open Source Project)
Oct 21, 2008 ... Android is the first free, open source, and fully customizable
mobile platform. Android offers a full stack: an operating system, ...
source.android.com/ - Cached - Similar
Blog posts about android
SciPhone Dream G2 Android charger is best ever - Engadget - 14 hours ago
Google Android Mobile Phones are now in India - HTC Magic from Airtel - Digital
Inspiration - Technology Blog - 6 days ago
T-Mobile Will Drop Its Second Android Phone, The myTouch 3G, This ... -
TechCrunch - Jun 21, 2009
source/android.com/ - Options
Android Community - Tracking the Android
Platform
Apr 26, 2009 .. HTC and Google have released
Android 1.5 Cupcake for owners of the Android
Dev Phone, available as a free ..
androidcommunity.com/ - Options
application developer sreern
Magnify
Tap to open a magnifying
window that you can drag.
Zoom In/Out
application developer sreern
Time varies
Your phone uses the mobile phone
network (over the air) to automatically connect to the
Web.
Note: Your service provider may charge to surf the
Web or download data.
To use a wireless network, press Menu >
Wireless controls
>
Wi-Fi settings
. Tap
Wi-Fi
to turn it on, then tap
to search for nearby wireless networks.
Tap a network to connect. There’s more in “W i-Fi” on
page 39.
Settings
Web touch tips
Zoom & magnify
In Web pages, when you scroll (drag or flick), zoom
icons appear at the bottom of your screen.
Select links
When you tap a link, your
phone outlines it. If you tap
and hold the link, your
phone shows options, like
Bookmark link
.
source/android.com/ - Options
Android Community - Tracking the Android
Platform
Open in new window
or
33Web
Page 35

Browser options
Press Menu to see browser options:
options
Go
Search
Bookmarks
New window
Refresh
More
Enter the Web address (URL) you
want.
Tip: Some sites are optimized for
mobile phones, and they use an
“m” in the URL instead of
“www” (like m.youtube.com
Enter text to find.
Shows a list of your bookmarks.
Add bookmark...
Tap
current page to your list.
Opens a new window.
Reloads the current page.
Shows browser options, like
on page
,
Share page, Downloads
Settings
Select text, Page info
.
).
to add the
Find
, and
phone and personal data, only download apps from
sources you trust, like “Android Market™” on page 37.
Note: All apps downloaded are stored in your phone
memory.
To download apps:
1 If you want to download apps from any Web page,
press Menu >
Unknown sources
>
Settings >Applications
.
2 To launch the browser, press
Browser
Home >
.
3 Find the app you want to download and tap the
download link.
Manage your downloads
2 minutes
To view files or applications you have
Browser
Clear list
>
. To
downloaded, press Home >
More >Downloads
>
.
To clear your download history, tap
,
cancel, tap
Cancel all downloads
.
Download apps
Time varies
Warning: Apps downloaded from the
Web can be from unknown sources. To protect your
34 Web
Page 36

Yo u Tu be ™
Time varies
44 West Street
A
E Ontario St
E Onta
E Ohio St
N Rush St
N Park St
N New St
N Wabash Ave
N Dearborn St
N Clark St
E Grand Ave
Wacker Dr
E Randolph St
N Micigan Ave
N Micigan Ave
rD submuloC N
W Lake St W Lake St
E Wacker Pl
State/Lake
Grand Red
Lake
Randolph
St Metra
Randolph/
Wabash
Washington-Blue
a
E S WaterSt
Water St
M
MM
M
M
a
Search Directions Map mode
My Location Clear map More
Map View
Drag or flick to scroll.
Tap to show zoom.
Press to open a menu
where you can open a Web
page, your bookmarks, a
new window, and more.
go and create your own classic
Google Maps™
where you are, where you’re going
Watch YouTube videos
See popular video categories, like
Featured, Most viewed, and Top rated. Tap a category,
then tap the video to start playing it. To see more video
categories, press Menu >
Categories
.
Search for YouTube videos
Find it: Menu >
Enter text, then tap
history, press Menu >
history
.
Search
Search
.To clear your search
Settings >Clear search
2 minutes
Quick start: Google Maps
Where am I? What's around here? Don't worry—let
Google Maps help you explore your surroundings and
find what you're looking for.
Find it: Home >
Ontario St
io St
nd Ave
ois St
ubbard St
rk/Lake
ubway
andolph St
Google Maps opens by default in “Map mode.”
Google Maps
E S W
35YouTube™
Page 37

Latitude
2 minutes
1 minute
where are your friends & family?
Join Latitude
See where your friends and family are
on Google Maps™. Plan to meet up, check that your
parents got home safely, or just stay in touch.
Don’t worry, your location is not shared unless you
agree to it. You need to join Latitude, and then invite
your friends to view your location or accept their
invitations. When using Google Maps (in any mode
except in Street View), press Menu >
Read the privacy policy and if you agree with it, tap
Agree & share
.
Add & remove friends
Find it: Home >
Maps
Menu >
To add friends:
1 Press Menu >
Select from Contacts
2 Tap
then tap a contact and
If your friends already use Latitude, they’ll receive an
email request and a notification. If they have not yet
joined Latitude, they’ll receive an email request that
36 Latitude
Google
Latitude
Add friends
Add friends>OK
or
Add via email address
Latitude
2 minutes
.
.
invites them to sign in to Latitude with their Google
account.
To remove friends:
1 Press Menu >
Latitude
to show your friend’s
list, then tap a friend in your list.
Remove
2 Tap
.
Share location
When you receive a request to share
location details you can choose to:
Accept and share back
.
•
and your friend can see yours.
Accept, but hide my location
•
location, but they can't see yours.
Don't accept
•
—location information is not shared
between you and your friend.
Hide your location
You can hide your location. Press
,
Menu >
your contact name, then press Menu >
Hide your location
>
Latitude
—see your friend’s location,
—see your friend's
1 minute
to show your friend’s list. Tap
Privacy
.
Page 38

Turn off Latitude
Press Menu >
your friend’s list. Tap Menu >
Latitude
.
Latitude
to show
< 1 minute
Privacy >Turn off
Apps for all
get the app you want
Android Market™
get the app you want
About Android Market™
Find it: Home >
Get all the fun games and cool apps you want! Android
Market provides access to applications developed by
developers worldwide, so you can find the app you
want. If you need help or have questions about
Android Market, press Menu >
Browse & install apps
Scroll to and tap the app you want to
install. Then, tap
Manage & restore apps
Find it: Menu >
Applications >Manage applications
>
Tap an app in the list, then tap
downloaded),
Clear cache
To reinstall any downloaded items, press Home
Market >My downloads
>
apps are listed and available for download.
Market
Install
(if app is free) or
Settings
Help
.
Buy
Uninstall
(for apps you
, or other options.
. All previously installed
1 minute
.
1 minute
37Apps for all
Page 39

Bluetooth® wireless
Bluetooth devices
Bluetooth settings
(#########) 38.4 MHz Class 1.5
Device name
Pair with this device
(found device name)
Make device discoverable
Discoverable
Scan for devices
Bluetooth
Tap to turn on & scan.
Tap to re-scan.
Tap to connect.
< 1 minute
lose the wires and go wireless
Quick start: Bluetooth wireless
Find it: Menu >
controls
>
Bluetooth settings
Turn Bluetooth power on or off
Find it: Press and hold Power
Bluetooth
>
Note: To extend battery life, turn Bluetooth power
off when not in use.
38 Bluetooth® wireless
Settings >Wireless
Connect new devices
2 minutes
Note: This feature requires an optional
accessory.
To connect with a new device, you need to pair with it.
You only need to do this once for each device—to
connect again, see “Reconnect devices” on page 39.
1 Make sure the device you are pairing with is in
discoverable mode.
Note: Refer to the guide that came with the device
for details.
2 Press Menu >
Bluetooth settings
>
Bluetooth
3 Tap
already on, tap
to turn on and scan. If Bluetooth is
Scan for devices
Settings >Wireless controls
.
.
4 Tap a device to connect.
OK
5 If necessary, tap
0000
(like
) to connect to the device. When the
, or enter the device passkey
device is connected, the Bluetooth indicator
appears in the status bar.
Note: Using a mobile device or accessory while
driving may cause distraction and may be illegal.
Always obey the laws and drive safely.
Page 40

Reconnect devices
< 1 minute
< 1 minute
To automatically reconnect your phone
with a paired device, simply turn on the device.
To manually reconnect your phone with a paired
device, tap the device name in the
Bluetooth devices
list.
Disconnect devices
To automatically disconnect your
phone from a paired device, simply turn off the device.
To manually disconnect your phone from a paired
device, tap the device name in the devices list, then
press Menu >
Edit properties
Press Menu >
controls
>
name and tap
Disconnect
Settings >Wireless
Bluetooth settings >Device name
OK
.
.
1 minute
. Enter a
Wi-Fi
home, office, or hotspot
Quick start: Wi-Fi
Find it: Menu >
controls
>
Wi-Fi settings
Note: Your phone's Wi-Fi features and power levels
are not allowed for outdoor operation in France. To
avoid unlawful interference with radio signals, do not
use the Wi-Fi features in France unless you are
indoors.
Use a wireless network for fast Internet access and to
download data.
Wi-Fi settings
Wi-Fi
Network notification
Notify me when an open network is
available
Wi-Fi networks
Your network
Add Wi-Fi network
Settings >Wireless
Tap to turn on & scan.
Tap to connect.
39Wi-Fi
Page 41

Turn Wi-Fi on or off
2 minutes
Time varies
< 1 minute
Find it: Press and hold Power
Wi-Fi
>
Note: To extend battery life, turn off Wi-Fi power when
not in use.
Wi-Fi search & connect
To find networks in your range:
1 Press Menu >
Wi-Fi settings
>
Wi-Fi
2 Tap
to turn on and scan. If Wi-Fi is already on,
press Menu >
networks it finds within range.
Tip: To see your phone’s MAC address or other
Wi-Fi details, press Menu >
3 Tap a network to connect.
4 If necessary, enter
Wireless password
phone is connected to the network, the wireless
indicator appears in the status bar.
Tip: When you are in range and Wi-Fi is on, you will
automatically reconnect to available networks you’ve
connected to before.
40 USB & memory card
Settings >Wireless controls
.
Scan
. Your phone lists the
Advanced
Network SSID, Security
, and tap
Connect
. When your
.
, and
USB & memory card
connect your phone and computer, then drag & drop
USB drag & drop
Note: This feature requires an optional
accessory.
You can transfer your pictures, videos, music,
ringtones, and more, from your computer to your
phone’s memory card.
1 With a memory card inserted, and
your phone showing the home
screen, connect a Motorola micro
USB data cable from your phone’s
micro USB port to a USB port on
your computer. Your phone should
show in the status bar.
Note: Make sure to connect the phone to a high
power USB port. Typically, these are located directly
on your computer.
2 Your phone shows a USB connection dialog. Tap
USB drive
. You can’t use the files on your memory
card while it is connected.
3 On your computer, use the “My Computer”
window to find “Removable Disk”.
4 Click on the “Removable Disk” icon to access the
memory card.
Page 42

5 Drag and drop your pictures, videos, music,
1 minute
2 minutes
ringtones, and more, to your phone folder. To help
manage your files, you can create more folders in
your phone folder.
6 When you’re done, use the “Safely Remove
Hardware” feature to finish.
Memory card
Note: You need the memory card installed for some
features on your phone, like
Manage files
Find it: Home >
Memory card
>
Tap a file or folder to open, tap and hold a file to
Share
.
or
To manage your folders and move stuff around use
your USB connection, see “USB & memory card” on
page 40.
Remove or format your memor y card
Before you remove or format your
memory card you need to unmount it. Press Menu
Settings >SD card & phone storage >Unmount SD
>
card
.
Camera
Quickoffice
.
Delete
To format your memory card, tap
Format SD card
.
Warning: All data on your memory card will be
deleted.
41USB & memory card
Page 43

Synchronize
2 minutes
keep up-to-date
Google™ data synchronization
Find it: Menu >
synchronization
The Google apps on your phone give you access to the
same personal information (emails, events, and
contacts) that you have on a computer using Gmail™,
Google Calendar™, and Contacts. It’s easy to
synchronize the Google apps information you want to
keep up-to-date.
Select apps to synchronize
1 Tap
Background data
Tip: To save battery power do not tap
data
.
2 Tap the apps you want to synchronize, like
Calendar
, or
Contacts
Settings >Google
and
Auto-sync
.
.
Background
Gmail
,
Find it: Menu >
New account>Corporate Sync
>
1 Enter your username (username@company.com),
Settings >Accounts
> Menu
password, email address, and server details (server
address is the same URL you use to access your
company’s email using the Web on your computer).
Note: Contact your business IT department for
server details.
Next
2 Tap
.
Synchronize with Microsoft®
Time varies
Office Outlook
If you use Microsoft Office Outlook on your work
computer, your phone can synchronize emails, events,
and contacts with your Microsoft Exchange Server.
42 Synchronize
Page 44

Too l s
1 minute
Alarm
7:00am
Wake Up
8:30am Tuesday
9:00am Tue, Fri
Alarm Clock
January 2009
Sun
Mon Tue Wed Thu Sat
282930 31 123
456 8910
11 12 13 15 16 17
18 19 20 22 23 24
25 26 27 29 30 31
123 567
7
14
21
28
4
Fri
2 minutes
stay on top of things
Alarm clock
Find it: Home >
To turn on an alarm, tap the check
box.
When an alarm sounds, tap
Dismiss
to turn it off or
delay.
To add an alarm, press Menu
Add alarm
>
details.
To set a snooze period, tap the
alarm, then press Menu
Snooze time
>
Calendar
Find it: Home >
, then enter alarm
.
Alarm Clock
Snooze
to
Calendar
Your calendar events can be
viewed in different ways:
Month
Press Menu >
Agenda, Week
, or
Day
. When you
,
highlight an event in the day and
week views, more details appear.
The calendar on your phone can
be synchronized with your Google
Calendar™. Press Home
CalendarSync
>
to manually
sync your calendar.
Add calendar events
From any calendar view, press
Menu >
Save
.
New event
. Enter event details and tap
Manage calendar events
To edit an event, press Menu
Edit event
>
done, tap
. Edit event details, then when you’re
Save
.
To delete an event, press Menu >
To go to today, press Menu >
Today
Calculator
Find it: Home >
Calculator
2 minutes
2 minutes
Delete event
.
.
43Tools
Page 45

Your calculator has two views: basic and advanced. To
< 1 minute
< 1 minute
change your views, press Menu >
Basic panel
or
Clear history
>
. To clear history, press Menu
.
Advanced panel
Quickoffice
Use Quickoffice to view recent
documents and files on your memory card.
Find it: Home >
Quickoffice
Management
stay in control
Wireless manager
Find it: Menu >
Manage all your wireless connections: Wi-Fi,
Bluetooth®, airplane mode, & mobile networks
(“Network” on page 45).
Shortcut: Press and hold Power to display the
power menu—from here you can control Bluetooth,
Wi-Fi and GPS as well as turn the phone off and set
airplane mode.
Airplane mode
Use airplane mode to turn all your
wireless connections off—useful when flying. Press
Power >
Settings >Wireless controls
Airplane mode
.
44 Management
Update my phone
To keep your phone current, software
updates may be available. Press Menu >
About phone >System updates
>
is up to date. If it isn’t, tap
to see if your phone
Update
.
Time varies
Settings
Page 46

Network
Time varies
You should not need to change any
network settings. Contact your service provider for
help.
Press Menu >
Mobile networks
>
Settings >Wireless controls
to show options for roaming
networks, network selection, operator selection, and
access point names.
Security
help keep your phone safe
Quick start: Security
Find it: Menu >
You have lots of ways to keep your phone safe.
Display & security
Brightness
Adjust the brightness of the screen
Wallpaper settings
Set the phone’s background wallpaper
Security
Screen lock
Display a screen preventing
accidental touches
Security lock
SIM card lock
Set up SIM card lock
Passwords
If you lose your phone, you can access your
MOTOBLUR account www.motorola.com/mymotoblur
(and remotely locate your phone, clear the data on
your phone, and more).
Settings >Security & location
Tap to turn on.
Tap to set lock type, code,
and timer.
Tap to set SIM card lock and
change SIM PIN.
45Security
Page 47

Screen lock
Draw Pattern to unlock
E
mergency Call
2 minutes
Set your phone to display a lock
screen, and prevent accidental key presses, press
Menu >
lock
Settings >Security & location >Screen
. You can also set a security lock to prevent others
from using your phone.
To set your security level, press Menu >
Security & location >Security lock >Security lock
>
type
:
None
- press Menu , then Menu again to
•
Settings
unlock.
Pattern lock
•
- press Menu , then draw a pattern
to unlock.
Passcode lock
•
- press Menu , then enter a code
to unlock.
Note: You can make emergency calls on a locked
phone (“Emergency calls” on page 11). A locked
phone still rings, but you need to unlock it to
answer.
46 Security
Lock pattern
2 minutes
To set the lock pattern, press
Menu >
& location
Security lock type >Pattern
>
lock
Follow the instructions to draw
Settings >Security
>
.
Security lock
your lock pattern.
When prompted, draw the
pattern to unlock the phone.
Passcode lock
2 minutes
To set the passcode, press Menu
Settings >Security & location >Security lock
>
Security lock type >Passcode lock
>
Enter a passcode, then tap
again to confirm it, and tap
OK
OK
.
. Enter the passcode
.
When prompted, enter the passcode to unlock the
phone.
Personalize your lock screen
2 minutes
To change your timeout, press
Menu >
timeout
Settings >Security & location >Screen
. If you don't tap the screen or press any keys
for this amount of time, the screen locks automatically.
To unlock, see “Lock & unlock” on page 47.
Page 48

To change your lock screen picture, press Menu
2 minutes
2 minutes
Settings >Display & security >Wallpaper settings
>
Lock & unlock
< 1 minute
To lock the screen/phone:
• Press Power .
• Let the screen time out (don’t press anything).
• Switch the power off.
To unlock the screen/phone:
• Press Menu or switch the phone on to display
the lock screen.
• Press Menu to unlock—if you've set a lock
pattern or passcode, you'll be asked to enter it.
Forgot your pattern or passcode?
If you forget your pattern or passcode you will need to
reset your phone to its initial factory settings, see
“Reset” on page 47.
Lock your SIM
Enable SIM PIN
To lock your SIM (the next time you
power up the phone you will need to enter your SIM
PIN), press Menu >
Settings >Security & location
>
.
Set up SIM card lock >Lock SIM card
SIM PIN code.
. Enter your
Caution: If you enter an incorrect PIN code three
times, your phone locks your SIM card and asks for
your PIN unlock code, see “PUK code” on page 47.
Change SIM PIN
2 minutes
To change your SIM PIN, press
Menu >
SIM card lock
Settings >Security & location >Set up
>
Change SIM PIN
.
PUK code
To unlock your SIM PIN, you need to enter your PIN
unlock code (PUK code) when prompted.
Note: Your PUK code is provided by your service
provider.
Reset
To reset your phone to factory settings
and erase all the data on your phone, press Menu
Settings >SD card & phone storage >Factory data
>
reset
>
Reset phone
Warning: All data on your phone will be deleted.
Lost, stolen, broken, cleared
Don't you just hate it when your life is on your phone
and it all goes wrong. Lose it, break it, reset it, or even
.
47Security
Page 49

worse - stolen! Relax, MOTOBLUR can help find your
phone, clear it (if you need to) and best of all, restore
all your stuff.
Track your phone
Time varies
Access your MOTOBLUR account and
remotely locate your phone.
1 Log into your MOTOBLUR account at:
www.motorola.com/mymotoblur
.
2 In the MOTOBLUR window, click on “Locate
Device”. Your phone’s location is shown on a map.
Remote clear
Time varies
Access your MOTOBLUR account and
remotely clear the data on your phone.
1 Log into your MOTOBLUR account at:
www.motorola.com/mymotoblur
.
2 In the MOTOBLUR window, click “Wipe Device”.
3 A warning notification is displayed, enter your
MOTOBLUR password again.
Warning: All downloaded apps and user data will be
deleted.
Restore your phone
If you lose your phone don’t worry, your contacts are
backed-up on MOTOBLUR.
48 Security
When you get your next MOTOBLUR product, just log
into your existing MOTOBLUR account on your phone
to recover all your stuff automatically.
To recover your Android Market apps, see “Manage &
restore apps” on page 37.
Page 50

Troubleshooting
we’re here to help
Crash recovery
In the unlikely event that your phone stops responding
to taps and key presses, try a quick reset. Remove the
back cover and battery (“Assemble & charge” on
page 1), then replace and turn on your phone as usual.
Service & repairs
If you have questions or need assistance, go to
www.motorola.com/support
from a number of customer care options. You can also
contact the Motorola Customer Support Center at
1-800-331-6456 (United States), 1-888-390-6456 (TTY/
TDD United States for hearing impaired), or
1-800-461-4575 (Canada).
, where you can select
49Troubleshooting
Page 51

Motorola, Inc.
Consumer Advocacy Office
600 N US Hwy 45
Libertyville, IL 60048
www.hellomoto.com
1-800-331-6456 (United States)
1-888-390-6456 (TTY/TDD United States for hearing impaired)
1-800-461-4575 (Canada)
Certain mobile phone features are dependent on the capabilities and settings of
your service provider’s network. Additionally, certain features may not be activated
by your service provider, and/or the provider’s network settings may limit the
feature’s functionality. Always contact your service provider about feature
availability and functionality. All features, functionality, and other product
specifications, as well as the information contained in this guide, are based upon
the latest available information and believed to be accurate at the time of printing.
Motorola reserves the right to change or modify any information or specifications
without notice or obligation.
MOTOROLA and the Stylized M Logo are registered in the US Patent & Trademark
Office. The Bluetooth trademarks are owned by their proprietor and used by
Motorola, Inc. under license. Microsoft, Windows, Windows Me, and Windows
Vista are registered trademarks of Microsoft Corporation in the United States and
other countries. Macintosh is a registered trademark of Apple Computer, Inc.
Google, YouTube, Picasa, Gmail, and the Google logo are trademarks of Google, Inc.
is a Certification Mark of the Wireless Fidelity Alliance, Inc. All other product
or service names are the property of their respective owners.
© 2009 Motorola, Inc. All rights reserved.
Caution:
Changes or modifica tions made in the radio phone, not expressly approved
by Motorola, will void the user’s authority to operate the equipment.
Bluetooth ID: TBD
MOTOROLA
MOTUS
U.S. patent Re. 34,976
50
with MOTOBLUR (MB300)
Page 52

Specific Absorption Rate Data
SAR Data
This model wireless phone meets the
government’s requirements for exposure to radio
waves.
Your wireless phone is a radio transmitter and receiver. It is
designed and manufactured not to exceed limits for exposure to
radio frequency (RF) energy set by the Federal Communications
Commission (FCC) of the U.S. Government and by the Canadian
regulatory authorities. These limits are part of comprehensive
guidelines and establish permitted levels of RF energy for the
general population. The guidelines are based on standards that
were developed by independent scientific organizations through
periodic and thorough evaluation of scientific studies. The
standards include a substantial safety margin designed to assure
the safety of all persons, regardless of age or health.
The exposure standard for wireless mobile phones employs a unit
of measurement known as the Specific Absorption Rate, or SAR.
The SAR limit set by the FCC and by the Canadian regulatory
authorities is 1.6 W/kg.
standard operating positions accepted by the FCC and by Industry
Canada with the phone transmitting at its highest certified power
level in all tested frequency bands. Although the SAR is
determined at the highest certified power level, the actual SAR
1
Tests for SAR are conducted using
level of the phone while operating can be well below the
maximum value. This is because the phone is designed to operate
at multiple power levels so as to use only the power required to
reach the network. In general, the closer you are to a wireless
base station, the lower the power output.
Before a phone model is available for sale to the public in the U.S.
and Canada, it must be tested and certified to the FCC and Industry
Canada that it does not exceed the limit established by each
government for safe exposure. The tests are performed in
positions and locations (e.g., at the ear and worn on the body)
reported to the FCC and available for review by Industry Canada.
The highest SAR value for this model phone when tested for use at
the ear is
this user gui
among phone models
regulatory requirements).
While there may be differences between the SAR levels of various
phones and at various positions, they all meet the governmental
requirements for safe exposure. Please note that improvements to
this product model could cause differences in the SAR value for
later products; in all cases, products are designed to be within the
guidelines.
g, and when worn on the body, as described in
0.79 W/k
de, is 0.62 W/kg. (Body
, depending upon available accessories and
-worn measurements differ
2
51
service & repairs
Page 53

FCC Notice to Users
FCC Notice
The following statement applies to all products that have
received FCC approval. Applicable products bear the FCC
logo, and/or an FCC ID in the format FCC-ID:xxxxxx on the
product label.
Motorola has not approved any changes or modifications to this
device by the user. Any changes or modifications could void the
user’s authority to operate the equipment. See 47 CFR Sec. 15.21.
This device complies with part 15 of the FCC Rules. Operation is
subject to the following two conditions: (1) This device may not
cause harmful interference, and (2) this device must accept any
interference received, including interference that may cause
undesired operation. See 47 CFR Sec. 15.19(3).
This equipment has been tested and found to comply with the
limits for a Class B digital device, pursuant to part 15 of the FCC
Rules. These limits are designed to provide reasonable protection
against harmful interference in a residential installation. This
equipment generates, uses and can radiate radio frequency energy
and, if not installed and used in accordance with the instructions,
may cause harmful interference to radio communications.
However, there is no guarantee that interference will not occur in a
particular installation. If this equipment does cause harmful
interference to radio or television reception, which can be
determined by turning the equipment off and on, the user is
52
encouraged to try to correct the interference by one or more of the
following measures:
•
Reorient or relocate the receiving antenna.
•
Increase the separation between the equipment and the
receiver.
•
Connect the equipment to an outlet on a circuit different
from that to which the receiver is connected.
•
Consult the dealer or an experienced radio/TV technician
for help.
Page 54

Hearing Aid Compatibility with Mobile Phones
Hearing Aids
Some Motorola phones are measured for compatibility with
hearing aids. If the box for your particular model has “Rated for
Hearing Aids” printed on it, the following explanation applies.
When some mobile phones are used near some hearing devices
(hearing aids and cochlear implants), users may detect a buzzing,
humming, or whining noise. Some hearing devices are more
immune than others to this interference noise, and phones also
vary in the amount of interference they generate.
The wireless telephone industry has developed ratings for some of
their mobile phones, to assist hearing device users in finding
phones that may be compatible with their hearing devices. Not all
phones have been rated. Phones that are rated have the rating on
their box or a label on the box.
The ratings are not guarantees. Results will vary depending on the
user’s hearing device and hearing loss. If your hearing device
happens to be vulnerable to interference, you may not be able to
use a rated phone successfully. Trying out the phone with your
hearing device is the best way to evaluate it for your personal
needs.
M-Ratings:
are likely to generate less interference to hearing devices than
phones that are not labeled. M4 is the better/higher of the two
ratings.
53
Phones rated M3 or M4 meet FCC requirements and
Hearing Aids
T-Ratings:
Phones rated T3 or T4 meet FCC requirements and are
likely to be more usable with a hearing device’s telecoil (“T
Switch” or “Telephone Switch”) than unrated phones. T4 is the
better/higher of the two ratings. (Note that not all hearing devices
have telecoils in them.)
Hearing devices may also be measured for immunity to this type of
interference. Your hearing device manufacturer or hearing health
professional may help you find results for your hearing device. The
more immune your hearing aid is, the less likely you are to
experience interference noise from mobile phones.
 Loading...