

Page 1

Lucent Technologies
User’s Guide
C
AJUN
P120
10/100/1000 S
TANDALONE
S
WITCH
Catalog No. 130017 Rev. B. March 2000
Page 2

Page 3

Preface
Quick Start
This section provides an overview of the steps required to get your Cajun P120 up
and running. Please refer to the relevant sections in the User’s Guide for further
details.
Cajun P120 User’s Guide I
Page 4

Quick Start
II Cajun P120 User’s Guide
Page 5

Contents
Quick Start................................................................................................ I
List of Figures......................................................................................... vii
List of Tables............................................................................................ ix
Chapter 1
Overview.................................................................................................. 1
Summary of Features............................................................................... 1
Cajun P120 Functionality ........................................................................ 3
Switched Ports ...............................................................................3
Layer 2 Security ............................................................................. 3
Virtual LANs ..................................................................................4
Port-based Vlans ............................... ...... ....... ...... ....... ...... ... 4
VLAN/Priority Tagging .........................................................4
Full Duplex ....................................................................................4
Auto-negotiation ............................................................................5
Port Mirroring ................................................................................5
FEFI ...................... .......................... .......................... ...................... 5
Address Aging ................................................................................5
Spanning Tree ................................................................................6
Redundant Links ............................................................................6
Congestion Control (Flow Control) ...............................................6
Link Aggregation ............................................................................6
Early Packet Drop (HOLB-P) .........................................................7
Priorities ...................... .......................................................... ......... 7
IP Multicast Filtering ......................................................................7
Switch Management ................................................................................ 8
SNMP Agent ...................................................................................8
Cajun P120 Software ........................... ....... ...... .............................8
Configuration Upload/Download ..................................................8
Chapter 2
Chapter 3
Cajun P120 User’s Guide i
Cajun P120 Front and Back Panels.......................................................... 9
Cajun P120 Front Panel ........................................................................... 9
Applications ........................................................................................... 13
Application 1.......................................................................................... 13
Application 2.......................................................................................... 14
Application 3.......................................................................................... 15
Page 6

Chapter 4 Installation and Setup ............................................................................ 17
Positioning.............................................................................................. 17
Rack Mounting ....... ...... ....................................... ...... ....... ...... ....... ...... ... 17
Powering On .......................................................................................... 18
Installing Expansion Modules................................................................ 19
Configuring the Switch .......................................................................... 20
Cajun P120 Default Settings ........................................................20
Switch Settings ...................................................................20
Port Settings .......................................................................21
Cabling ......................................................................................... 22
Connecting to the Serial Ports ...........................................23
Chapter 5 Introduction to the Command Line Interfaces....................................... 25
Switching Between CLI Versions ........................................................... 25
Establishing a Serial Connection for Configuration ...................... ...... ... 25
Establishing a Telnet Session (Ethernet port or modem)....................... 26
Assigning Cajun P120’s IP Address ..............................................27
Changing the IP Address using the Command Line Interface
(CLI, Terminal Emulation) ................................ ....... ...... ....27
Navigation, Cursor Movement and Shortcuts........................................ 29
Getting Help ........................................................................................... 29
Command Syntax................................................................................... 30
Conventions Used ........................................................................30
Chapter 6 Legacy CLI (Command Line Interface) .................................................. 31
Running the CLI..................................................................................... 32
Easily Configuring the Mandatory Parameters ............................32
Using the Simple-Setup Command ....................................32
Security Levels ....................................................................................... 36
Entering the Privileged Level .......................................................36
Exiting the Privileged Level .........................................................36
Changing the Privileged Level Password ......................................37
Command Syntax................................................................................... 38
Command Abbreviations .............................................................38
Command Line Prompt ................................................................38
Saving and Exiting ................................................................................. 39
Normal Level Commands....................................................................... 39
Privileged Level Commands ................................................................... 41
Sample Session .............................................................................43
Subcommands ....................... ...................................... ................. 43
List Subcommand [list] .......................................................43
Index_value Subcommand <Index_value> .......................44
Repetitive Command Mode [r] ....................................... .... 44
ii Cajun P120 User’s Guide
Page 7

Using the SHOW Command ........................................................45
Listing the Groups You Can Set ...................................................45
Using the SET Command .............................................................46
Using the SHPORT Command .....................................................46
Using the VLANTAB Command ...................................................47
Using the SHLAG Command .......................................................48
Configuration Upload and Download Commands .......................49
Copy Command ......................... ....... ...... ...........................49
Security Commands .....................................................................50
Lock Port Command ..........................................................50
Unlock Port Command ..................................................... .50
Add MAC Command .................................................. ...... .50
Delete MAC Command ......................................................51
Groups, Parameters and Default Settings............................................... 52
How Groups are Organized - Finding Parameters .......................52
MIB-II System Group (MIB-II SYST) ...........................................53
CAM Configuration Group (CAM) ..............................................53
IP Configuration Group (IP) ........................................................54
IP-Multicast System Group (IP-MULTICAST) .............................55
Spanning Tree Group (STA-GEN) ................................................57
Spanning Tree Group (STA-PORT) ..............................................58
P120 Port Configuration Group (P120) .......................................59
Expansion Module Group (X120xx) ............................................62
Agent VLAN Group (VLAN) ........................................................63
Port Mirroring Group (COPY-PORT) ........................................... 63
TFTP Configuration Group (TFTP) ...............................................64
SNMP Configuration Group (SNMP) ...........................................65
Things to Keep in Mind ...............................................................66
Error Messages .............................................................................66
Chapter 7 Cajun Campus CLI (Command Line Interface) ..................................... 67
Commands............................................................................................. 68
How Commands are Organized ...................................................68
Sample Session ........................ ...... ...... ....... ...... ....... ...... ....... ...... . 71
User Level Commands ........................................................................... 72
Password Commands ...................................................................72
Set Password Command ....................................................72
Set Enablepass Command ..................................................72
Set Techpass Command .....................................................73
Set Defpass Command .......................................................73
Enable Command ........................................................................74
Enable Command ..............................................................74
Show Commands .........................................................................74
Show IP Route Command .................................................74
Show System Command ...................................................74
Cajun P120 User’s Guide iii
Page 8

Show Image Version Command ........................................75
Show SNMP Command .....................................................75
Show Interface Command .................................................76
Show Port Command .........................................................76
Show Module Command ...................................................78
Show Port Flowcontrol Command ....................................79
Show Cam Command ........................................................80
Show Port Mirror Command .............................................81
Show Download Status Command ....................................81
Privileged Level Commands ................................................................... 82
Security Commands .....................................................................82
Lock Port Command ..........................................................82
Unlock Port Command ......................................................82
Add MAC Command .........................................................82
Delete MAC Command ......................................................83
Configuration Upload and Download Commands .......................83
Copy Command .................................................................83
Returning to Normal Mode ..........................................................84
Disable Command ..............................................................84
Downloading a Software Image ...................................................84
Download Command .........................................................84
Set Commands .............................................................................86
Set Logout Command ........................................................86
Set Port Mirror Command .................................................86
Set Port Flow Control Command .......................................87
Set IP Route Command ......................................................87
Set License Command ........................................................88
Set SNMP Community Command .....................................88
Set SNMP Trap Command .................................................89
Set System Location Command .........................................89
Set System Name Command .............................................89
Set System Contact Command ..........................................89
Set Interface Command .....................................................90
Set Port Level Command ...................................................90
Set Port Negotiation Command .........................................91
Set Port Enable Command .................................................92
Set Port Disable Command ................................................92
Set Port Speed Command ..................................................92
Set Port Duplex Command ................................................93
Set Port Flowcontrol Command ........................................94
Set Vlan Command ............................................................95
Clear Commands ..........................................................................96
Clear Port Mirror Command ..............................................96
Clear IP Route Command ..................................................96
iv Cajun P120 User’s Guide
Page 9

Clear SNMP Trap Command ..............................................97
Clear Vlan Command ........................................................97
Clear Cam Command ........................................................98
Reset Commands .........................................................................99
Reset Command .................................................................99
Reset System Command ....................................................99
Show License Command ...................................................99
Error Messages ...........................................................................100
Appendix A Specifications................................................................................................... 101
Cajun P120 Switch............................................................................... 101
Physical ...................................................................................... 101
Power Requirements ..................................................................101
Environmental ......................... .................................................. 101
Safety ......................................................................................... 101
EMC Emissions ........... ...... ....... ...... ...... ....... ...... ....... ...... ............102
Emissions ......................................................................... 102
Immunity .......................................... ............................... 102
Interfaces .............. ............. ............. ............. ............. ............. .....102
Standards Compliance ...............................................................102
MTBF ......................................................................................... 102
Expansion Sub-modules ...................................................................... 103
Gigabit Ethernet Expansion Sub-module ..................................103
Laser Safety ......................................................................103
Laser Classification ...........................................................103
Usage Restriction .............................................................104
Laser Data ........................................................................104
Fast Ethernet Fiber Expansion Sub-module ..............................104
Ethernet/Fast Ethernet Expansion Sub-module ........................104
GBIC Expansion Sub-module ....................................................105
Safety Information ........................................................... 105
Laser Classification ...........................................................105
Usage Restriction .............................................................105
Lucent Approved GBIC Transceivers ...............................106
Specifications ................................................................... 106
Cajun P120 User’s Guide v
Page 10

Appendix B Software Download ......................................................................................... 109
Download Procedure............................................................................ 109
Preparing the File for Download ................................................109
Download the Software Using Cajun P120 Download Manager 109
Download the Software Using TFTP (via the CLI) .....................111
Creating the “.lst” file .................................................................111
Configuring the Cajun P120 TFTP parameters ...........................112
Start the Software Download .....................................................112
Reset the Cajun P120 .................................................................112
Appendix C Cajun P120 Standalone Manager ................................................................... 113
System Requirements........................................................................... 113
Installation.............. ...... ....... ...... ....... ...................................... ....... ...... . 113
Documentation and Online Help ......................................................... 114
Software Download.............................................................................. 114
vi Cajun P120 User’s Guide
Page 11

List of Figures
Figure 2.1 Cajun P120 Front Panel........................................................ 9
Figure 2.2 Cajun P120 LEDs................................................................10
Figure 2.3 Cajun P120 Back Panel.......................................................10
Figure 3.1 Cajun P120 and P110 at the edge with a Cajun P550
Figure 3.2 Cajun P120 and P110 at the Edge with a Cajun M770
Figure 3.3 Cajun P120 and P110 on the floors of a Small/Medium
Figure 4.1 Cajun P120 Rack Mounting ...............................................18
Figure B.1 TFTP Software Download Procedure - Overview.............111
Backbone...........................................................................13
Switch Backbone ...............................................................14
size Enterprise (SME) network with a Cajun P220G and
Cajun P110 Backbone........................................................15
Cajun P120 User’s Guide vii
Page 12

List of Figures
viii Cajun P120 User’s Guide
Page 13

List of Tables
Table 2.1 Cajun P120 LED Descriptions ............................................10
Table 2.2 Cajun P120 <- -> Select buttons.........................................12
Table 4.1 Default Switch Settings.......................................................20
Table 4.2 Default Port Settings...........................................................21
Table 4.3 Gigabit Ethernet Cabling ....................................................22
Table 4.4 Pinout of the Serial Interface (RJ-45) and the
Connection to SLIP Modem (D9) ......................................23
Table 5.1 Navigation, Cursor Movement and Shortcuts....................29
Table 6.1 Normal Level Commands ..................................................39
Table 6.2 Privileged Level Commands ..............................................41
Table 6.3 VLANTAB Parameters.........................................................48
Table 6.4 SHLAG Parameters .............................................................48
Table 6.5 Parameter Summary...........................................................52
Table 6.6 CAM Group Parameters......................................................53
Table 6.7 IP Group Parameters...........................................................54
Table 6.8 IP-multicast Group Parameters ..........................................55
Table 6.9 STA-GEN Group Parameters...............................................57
Table 6.10 STA-PORT Group Parameters.............................................58
Table 6.11 P120 Group Parameters......................................................59
Table 6.12 Module Name Abbreviations..............................................62
Table 6.13 VLAN Group Parameters ....................................................63
Table 6.14 COPY-PORT Group Parameters..........................................63
Table 6.15 TFTP Group Parameters......................................................64
Table 6.16 SNMP Group Parameters....................................................65
Table 7.1 User Level Commands........................................................68
Table 7.2 Privileged Level and Security Commands (this level
includes all the show commands from the previous level)69
Table 7.3 Mean Time Between Failure (MTBF) for all Cajun P120
Configurations ................................................................. 102
Table A.1 Gigabit Ethernet Expansion Units ....................................103
Table A.2 Fiber Fast Ethernet Expansion Sub-module.....................104
Table A.3 Ethernet/Fast Ethernet Expansion Sub-module...............104
Cajun P120 User’s Guide ix
Page 14

List of Tables
x Cajun P120 User’s Guide
Page 15

Chapter 1
Overview
The Cajun P120 is a standalone 10/100 Mbps Ethernet workgroup switch with a
range of optional expansion modules that provide additional Ethernet, Fast
Ethernet and Gigabit Ethernet connectivity.
The Cajun P120 is fully compatible with IEEE standards for VLAN Tagging, Gigabit
Ethernet, flow control, priority queuing and LAG (Link Aggregate Grouping - also
known as Trunking). The full standards-compliance, combined with autonegotiation (10/100) makes expanding your network to match your company’s
growing needs “plug and play” simple.
Summary of Features
• Basic module providing 24 x 10/100BaseTX ports
• Expansion modules:
— 2 x 1000Base-SX ports named Cajun X120S2
— 2 x 1000Base-LX ports named Cajun X120L2
— 1 x 1000Base-SX ports named Cajun X120S1
— 1 x 1000Base-LX ports named Cajun X120L1
— 2 x 100Base-F ports named Cajun X120F2
— 8 x 10/100Base-TX ports named Cajun X120T8
— 2 x Gigabit GBIC named Cajun X120G2
— 2 x 1000BaseT named Cajun X120GT2 (future).
• Full and half duplex on all 10/100 and 100 Mbps ports
• 2 fans included for redundancy
• RS-232 interface (RJ-45) on front panel (for Terminal set-up)
• RS-232 interface for SLIP on back panel
• Standard Auto-Negotiation advertising the following set of capabilities:
10/100, HDX/FDX
• Support for Port Partition mode
• Back Pressure in HDX mode, activated through Technician CLI only (default is
OFF)
• OpenTrunk™ (Link Aggregation Grouping). Up to four trunks can be
operational at a time – three groups of up to eight 10/100Base-T ports and one
on the expansion modules (two 1000Base-X, two 100Base-FX or up to eight
10/100Base-TX ports on expansion modules), based on one Base-Port per-LAG.
• Per port VLAN number allocation from VLAN number 1 to 3071
• Possibility to assign a dedicated VLAN for the agent, from 1 to 3071, for creating
a virtual side band port for management
Cajun P120 User’s Guide 1
Page 16

Chapter 1 Overview
• VLAN-Tagging modes: STD IEEE 802.1Q-Tagging. The product identifies and
supports 3071 tagged VLANs.
• Both Priority-per-Port and Priority-per-Packet (by 802.1p) are supported
• Support for IEEE 802.1D standard Spanning Tree Algorithm (STA)
• Port Mirroring support (a single source-destination pair active at a time), and
copying both Rx and Tx port traffic from a source port into the destination port.
• Link Redundancy support – up to 4 pairs
• Aging of MAC addresses
• Built-in SNMP Agent
• Cajun P120 Manager (stand-alone SNMP management) is provided with the
unit without the need for a softwa re management umbrella suite
• Managed by CajunView™ and CajunView Plus
• Supports secure Telnet (2-lev el pa sswo rd access)
• MIB II: System, Interface, SNMP
•Bridge MIB
• IGMP snooping allows dynamic Multicast filtering
• RMON 4 groups: Statistics, History, Alarm, and Events
• Fully featured CLI support
• Port Security
• Configuration Upload/Download activated via CLI and/or Update Master
application
• SMON support: VLAN statistics, Priority statistics, Copy port configuration
2 Cajun P120 User’s Guide
Page 17

Cajun P120 Functionality
This section describes many of the functions that are supported by the Cajun P120
modules. For the default settings refer to the ”Default Settings” section.
Switched Ports
Switching provides high performance by confining traffic between any pair of ports
to a single path in the fabric, allowing other traffic to move on other paths. The
Cajun P120’s high performance is based on the internal high speed switching fabric
(and a separate control bus) that prevents blocking. The 24 internal ports and
expansion modules inserted into a Cajun P120 enclosure form a single switching
fabric that communicates over that internal high speed switching fabric.
A Cajun P120 switch is functionally equivalent to a standard IEEE 802.1D multiport bridge. It learns source MAC addresses on the fly and stores them, along with
the source port, in a large internal CAM. The efficient forwarding p rocess is based
on the information in the CAM. The Cajun P120 can age CAM entries by erasing
the entries that have not been recently used.
Unicast frames that e nter any s witched por t are st ored and f orwarded t o the spe cific
destination port, thus providing a high-performance path through the switching
fabric. Unknown, Multicast/Broadcast frames are flooded to all ports in the same
VLAN to ensure that they arrive at the proper destination. Frames with errors are
discarded to prevent error flooding.
The Cajun P120 Ethernet ports are 10/100 Mbps auto-negotiating. The Cajun P120
expansion module ports are 10/100Base-TX, 100Base-FX, 1000Base-SX or
1000Base-LX.
Each port is an independent switched port and has the availability of the whole
media bandwidth. The ports are grouped internally. Frames whose source and
destination addresses are in the same group will stay local to that group, thus not
loading the switching fabric at all. The Cajun P120 forwards frames that are not
local to their proper destination through the switching fabric to the end stations, in
a mode transparent to the end sta tions.
Each port may be enabled or disabled by either management, the Spanning Tree
Algorithm (STA) - IEEE 802.1D, or due to the port partition state of the link.
Chapter 1 Overview
Layer 2 Security
The security function detects packets of unknown origin, prevents them from
entering the switch, and alerts the Device Manager in case of such intrusion
attempts. Once a station is registered in a Secured port address table it cannot
communicate via any other port. However, if such a station does try to
communicate via another port, the management will not receive an intrusion
detection warning.
Cajun P120 User’s Guide 3
Page 18

Chapter 1 Overview
The security commands ar e available in the Cajun Campus CLI, Legacy CLI or via
the Standalone Manager.
Virtual LANs
A Virtual LAN (VLAN) is a group of LAN stations that communicate as if they were
on the same physical segment even though they are located on any port
throughout the network. The main purpose of VLANs is to confine Multicast and
broadcast traffic to particular parts of the network, reduce potential problems such
as broadcast storms and enhance overall performance. Virtual LANs al so simplify
adds, moves, and changes throughout the network, ensuring a higher level of
security.
Cajun P120 allows the network administrator to superimpose a Virtual LAN
structure over the switching fabric by assigning Cajun P120 ports to VLANs.
Initially, all Cajun P120’s ports are assigned the IEEE 802.1Q Default VLAN
(VLAN=1), thus enabling the users to communicate with all other users
immediately after the physical connection is established.
Port-based Vlans
Port-based VLANs are created by assigning the Cajun P120 port to VL ANs . All the
stations connected to that port are members of this VLAN. The VLAN value which
can be set per port is 1-3071 (only values 1-255 can be set in Version 1.0). All the
untagged packets are mapped to the Port VLAN.
VLAN/Priority Tagging
Cajun P120 VLANs may span multiple switches. The VLAN information is conveyed
by one switch to the other by tagging. The Cajun P120 uses the standard IEEE
802.1Q tagging format, thus assuring interoperability with third party switches that
support the standard.
Ports that connect to other Cajun P120 switches, to third party switches, or to
stations that are ‘VLAN aware’, should be configured to support tagging.
The priority field in the Tag is also supported, and tagged packets are forwarded to
the line with the priority value.
Full Duplex
The Cajun P120 supports full duplex mode on all ports. When both the Cajun P120
port and the station at the other end of the link are configured to full duplex, then
frames may be transmitted and received simultaneously which doubles the
bandwidth available on the link.
4 Cajun P120 User’s Guide
Page 19

Auto-negotiation
Auto-negotiation is a protocol between two link partners that enables a port to
advertise its transmission rate and duplex mode to its partner. Both ports then
operate at the highest common denominator between them. T his saves you from
having to configure the Cajun P120 10/100BASE-TX ports’ speed and duplex mode
to match that of the connected device.
On 1000Base Expansion Sub-module ports, Auto-negotiation controls the Flow
Control Mode (Symmetric/Disabled).
Note: Auto-negotiation works only when both link partners are set to autonegotiation mode. If you connect a NIC (or a Cajun P120 Uplink-100 port) that
does not support autoneg (or autoneg disabled) to a Cajun P120 port, then we
recommend that you manually set both the P120 port and the NIC to the same
speed and duplex mode.
Port Mirroring
The Cajun P120 has a built-in ”mirroring” capability, that allows forwarding of all
the traffic to/from specific ”copy source” to a ”copy destination” (also called a
probe-port or sniffer-port), excluding errors and frames with errors.
When you require detailed information about the traffic at a particular port, rather
than attaching an expensive analyzer to each port (or moving such a probe from
port to port), the network administrator may attach an external probe to any
Cajun P120 port defined as a destination port and analyze any switched port by
mirroring its Rx/Tx traffic to that destination port.
Port mirroring should be activated on ports that belong to the same VLAN.
Chapter 1 Overview
FEFI
The Cajun P120 supports FEFI (Far End Fault Indication) on the 100Base-FX ports.
This enables the Cajun P120 to detect and report a link failure even if it is only a Tx
line failure (while the Rx line is still OK).
When a 100Base-FX port receives a FEFI indication, a switchover to a redundant
link occurs, if there is one assigned to this port. If the port is part of a LAG, then the
traffic from this link will be moved to the other links of the LAG, until the link's
fault status is corrected.
Address Aging
The Cajun P120 supports the aging of addresses in the CAM table.
Cajun P120 User’s Guide 5
Page 20

Chapter 1 Overview
Spanning Tree
The Cajun P120 implements the IEEE 802.1D Spanning Tree (SPT) algorithm in
order to allow backup paths and prevent loops throughout the Physical LAN. You
should avoid using Spanning Tree when redundant links are defined or Security is
activated.
Redundant Links
A redundant link (or resilient link) enables you to protect critical links and prevent
network downtime if that link fails. Setting up redundancy ensures that should a
main link fail, a standby duplicate link will immediately and automatically take
over the task of the failed link.
You may set a link (between two switched ports) that will only become operational
when the primary link is down. Up to four redundant link pairs can be configured
for each switch.
Avoid using redundant links when Spanning Tree or Security are enabled.
Congestion Control (Flow Control)
Congestion control is a mechanism designed to reduce the loss of frames.
In full-duplex mode the Cajun P120’s congestion control conforms to the IEEE
802.3x (both sides must conform to this Standard), using PAUSE packets to stop
and auto-restart the transmission of the source of the congestion.
In 10/100M half duplex mode, the Cajun P120 supports forward pressure and
backpressure. These mechanisms reduce the load on the switch and free its buffers
more rapidly without frame loss.
Forward pressure helps to free the switch’s transmit buffers more quickly by
limiting the maximum backoff time that a station waits before transmitting after a
collision.
Backpressure prev ents f rame loss by causi ng a carr ier se nse on t he segme nt when a
frame to be received cannot be handled by Cajun P120 because its input buffer is
full.
On 1000Base Expansion Sub-module ports, Auto-negotiation controls the Flow
Control Mode (Symmetric/Disabled).
Link Aggregation
Link aggregation (or a trunk link) is used to increase bandwidth by connecting two
devices, switches or stations via multiple point-to-point links. Link aggregation also
makes the connection more resilient since traffic on a failed link is supported by the
other link(s) in the Link Aggregation Group (LAG). LAG implementation ensures
traffic load balancing between the links of the LAG and allows load sharing for
resiliency if one of the LAG links fails.
6 Cajun P120 User’s Guide
Page 21

Traffic is distributed between the ports according to the packet s' addresses, which
are learned on the LAG ports using the Round-Robin algorithm. The session’s order
is retained at all times. There is no possibility of Broadcast loops occurring in a LAG.
The LAG is considered a single logical port for the switch and its functionality,
including the Spanning Tree Protocol (STP), where BPDUs are sent only through
one of the LAG ports.
Early Packet Drop (HOLB-P)
This feature prevents incoming frames from being forwarded to ports that are
blocked. Although this leads to a loss of frames, it prevents the entire switched from
becoming blocked.
Priorities
Priorities for queuing may be established to enhance the Quality of Service (QoS).
Each port can be configured for high or low priority. Priority is also supported using
the priority field in tagged packets. The Cajun P120 supports port-based priority
and Standard IEEE 802.1p tagging.
IP Multicast Filtering
IP Multicast allows you to send a single copy of an IP packet to multiple
destinations and can be used for various applications including video streaming and
video conferencing.
The Multicast packet is forwarded from the sender to the recipients, duplicated
when needed by routers along the way and sent to multiple destinations such that
it reaches all the members of the Multicast group. Multicast addresses are a special
kind of IP addresses (class D), each identifying a Multicast group. Stations join and
leave Multicast groups using IGMP. This is a control-plane protocol through which
IP hosts register with their router to receive packets for certain Multicast addresses.
In addition, routers support one or more Multicast routing protocols (e.g. DVMRP,
PIM) that construct Multicast delivery trees on which the Multicast traffic is
forwarded.
On LANs, IP Multicast packets are transmitted in MAC Multicast frames. Traditional
LAN switches flood these Multicast packets like broadcast packets to all stations in
the VLAN. In order to av oid sen ding Multi cast packets where they ar e not required ,
Multicast filtering functions may be added to the Layer 2 switches, as described in
the IEEE standard 802.1D (802.1p). Layer 2 switches capable of Multicast filtering
send the Multicast packets only to ports connecting members of that Multicast
group. This is typically based on IGMP snooping, GMRP or CGMP.
Chapter 1 Overview
Cajun P120 User’s Guide 7
Page 22

Chapter 1 Overview
Switch Management
You can configure and manage the Cajun P120 using either the Standalone
Cajun P120 Manager supplied (see the Cajun P120 Standalone Manager User Guide),
CajunView, or the text-based Terminal Emulation (see the ”Terminal Emulation”
chapter). Access to Terminal Emulation is via either a serial connection or Telnet.
SNMP Agent
The Cajun P120 is man aged through SNMP, either in-band (by connecting the
manager to any LAN port) or out-of-band using the SLIP port.
The Cajun P120 supports two types of MIBs (Management Information Bases):
proprietary MIBs and standard MIBs.
Cajun P120 Software
The Cajun P120 software is firmware running on the Cajun P120 supervisor
engine. The software provides support for the switch modules and their features.
You may occasionally need to update the software to a newer version to support
new hardware expansion modules or increase functionality. Download is available
from the Download Manager (part of the Cajun P120 Standalone Manager) or by
using the TFTP process for updating the software - both are described in Appendix
B, “Software Download”.
Under normal conditions, the Cajun P120 boots up from its Cajun P120 switching
software. However, should that software become damaged, the Cajun P120 may
bootup from a basic version of the software which is stored in a separate secured
bank.
Configuration Upload/Download
This function provides ease of configuration. The user can download a
configuration file to all switches or simply copy the configuration of one switch to
another.
Loading the configuration file is achieved either via Cajun Campus CLI, Legacy CLI
or via the Update Master.
8 Cajun P120 User’s Guide
Page 23
Chapter 2
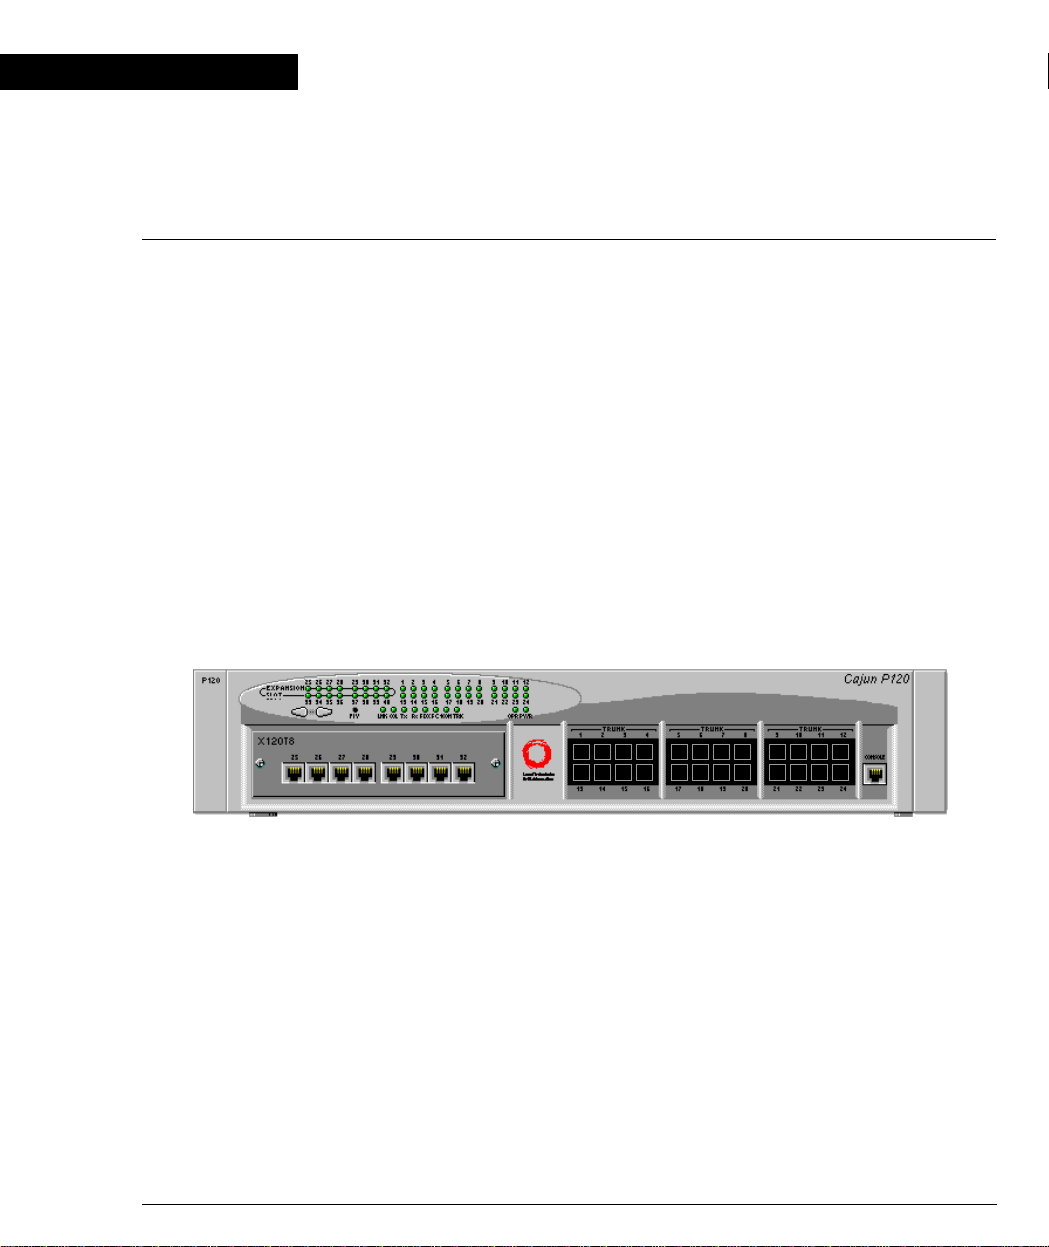
Cajun P120 Front and Back Panels
Cajun P120 Front Panel
In addition to the connectors, the Cajun P120 front panel contains status LEDs and
control buttons which provide at-a-glance information.
The Port LEDs display information for each port according to the function selected
by the left and right switches. The parameter you select is shown by one of the
Function LEDs. For example, if the COL LED is illuminated, then all Port LEDs
show the collision status of their respective port. If you wish to select the LAG
(Trunk) function, then press the Right button until the TRK Function LED is lit; if
you then wish to select Rx then press the Left button several times until the Rx
function LED lights ON.
The LEDs, controls and RJ-45/CONSOLE connector (bottom right) on the
Cajun P120 front panel are shown below in Figure 2.1 and Figure 2.2 and described
in Table 2.1. Figure 2.3 shows the power supply and DB-9 connectors at the back of
the switch.
Figure 2.1 Cajun P120 Front Panel
Cajun P120 User’s Guide 9
Page 24
Chapter 2 Cajun P120 Front and Back Panels
Figure 2.2 Cajun P120 LEDs
Figure 2.3 Cajun P120 Back Panel
Table 2.1 Cajun P120 LED Descriptions
LED Name Description LED Status
OFF – Power is off
PWR Power status
Blink – P120 BUPS power supply is active
ON – Internal P120 power supply is active
OFF – CPU is booting
OPR CPU operation
ON – CPU boot operation completed
The following Function LEDs apply to ports 1 to 40
OFF –
•Port disabled
LNK Port status
• Port enabled and the link is down
ON – Port enabled and link is OK
10 Cajun P120 User’s Guide
Page 25

Chapter 2 Cajun P120 Front and Back Panels
Table 2.1 Cajun P120 LED Desc riptions (Continued )
LED Name Description LED Status
COL Collision
Tx Transmit to line
Rx Receive from line
FDX Half/Full Duplex
FC
Symmetric Flow
Control
100M 10/100 Mbps
Link Aggregation
LAG
Group (LAG or
Trunking)
OFF – No collision or FDX port
ON – Collision occurred on line
OFF – No transmit activity
ON – Data transmitted on line
OFF – No receive activity
ON – Data received from the line
OFF – Half duplex mode
ON – Full duplex mode
OFF – Asymmetric Pause mode is enabled for
the Gigabit Ethernet port or Flow Control is
disabled for the 10/100 port.
ON – Flow Control (Symmetric Pause only)
mode is enabled for the 10/100 or Gigabit
Ethernet port.
OFF – 10Base-T port or 1000Base-X port
ON – 100Base-TX or 100Base-FX port
OFF – No LAG defined for this port
ON – Port belongs to a LAG
Note: All LEDs are lit during a reset.
Cajun P120 User’s Guide 11
Page 26

Chapter 2 Cajun P120 Front and Back Panels
Table 2.2 Cajun P120 <- -> Selec t buttons
Description Function
Left/Right Individual – select LED function (see table above)
Reset Press both Right and Left buttons together for five
seconds
FIV Force Initial Version – boot from initial version of the
Cajun P120 software, from Bank A (see Note below).
Note: To perform “Force Initial Version” reset the switch while pressing the FIV
button by using an opened paper clip or other pointed object.
12 Cajun P120 User’s Guide
Page 27

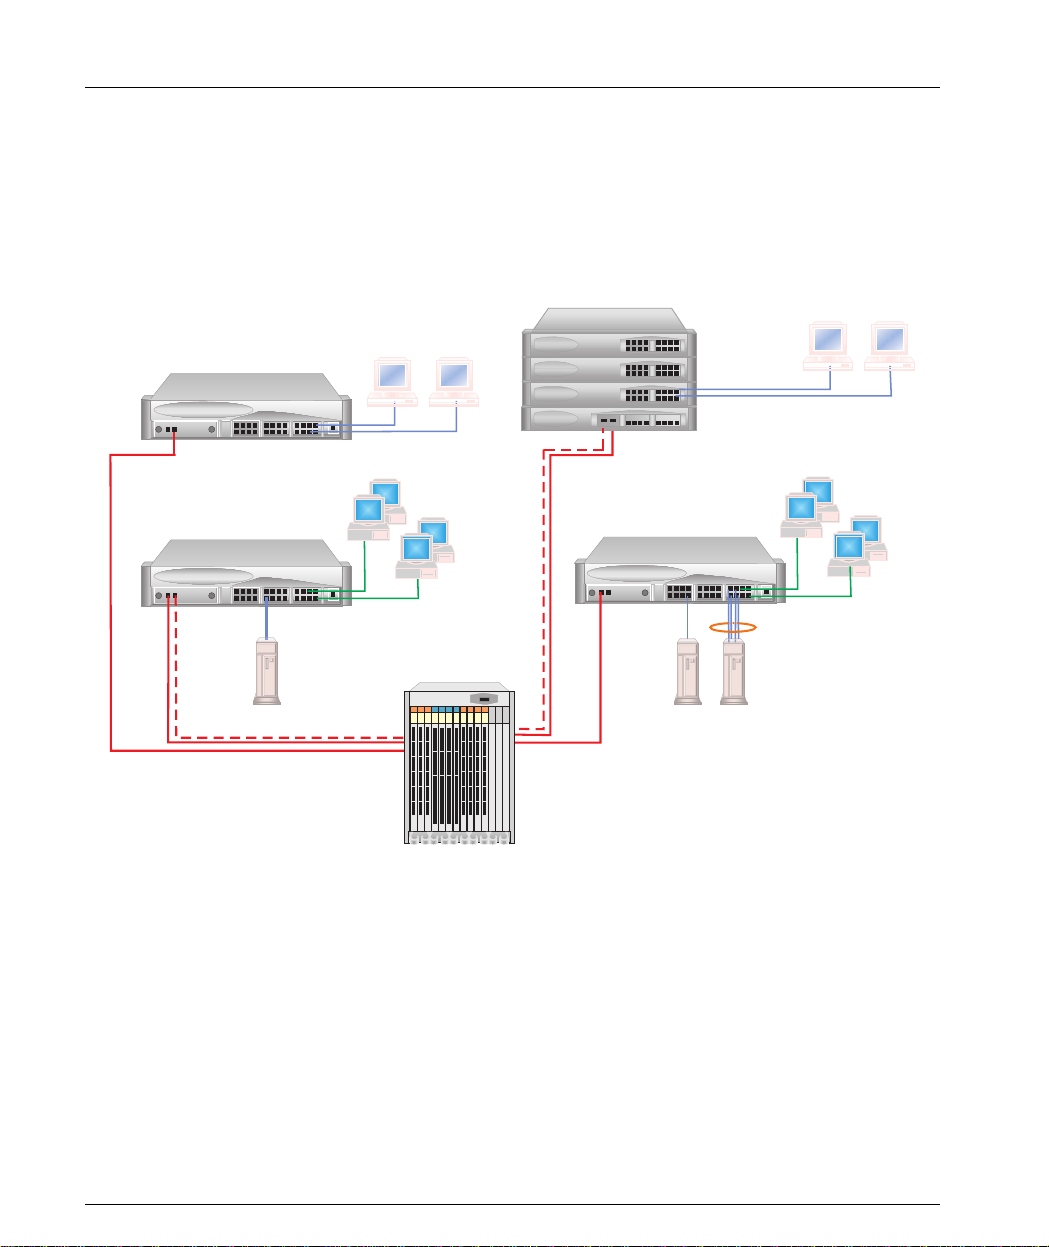
Chapter 3
Applications
The following sections describe typical applications for the Cajun P120 in a network
with other Cajun Campus products.
Application 1
This application shows two Cajun P120 switches connected to another P120 switch
and a P110 stack via a Cajun P550 backbone. On the left side of the drawing, the
Cajun X120S2 SX Expansion modules in the P120 provide a Gigabit Ethernet link
with redundancy to the Cajun P550. On the right, the connection is via the
Cajun X120F2 100 Mbit Fiber Expansion module.
Figure 3.1 Cajun P120 and P110 at the edge with a Cajun P550 Backbone
Cajun P120 User’s Guide 13
Page 28
Chapter 3 Applications
Application 2
This application shows two Cajun P120 switches connected to another P120 switch
and a P110 stack using a Cajun M770 Switch backbone. In this drawing, the
Cajun X120S2 SX Expansion modules in the P120 switches provide a Gigabit
Ethernet link with redundancy to the Cajun M770 Multifunction switch.
Figure 3.2 Cajun P120 and P110 at the Edge wit h a Cajun M770 Switch Backbone
Cajun P120
Cajun P120
Gigabit Ethernet
with Redundancy
100 Mbps Ethernet
10 Mbps Ethernet
Cajun M770
Multifunction Switch
Gigabit Ethernet
with Redundancy
Cajun P120
Cajun P116T
x 3
Cajun P118
4x100 Mbps
Trunking
100 Mbps Ethernet
10 Mbps Ethernet
14 Cajun P120 User’s Guide
Page 29

Application 3
This application shows a P120 switch and a P110 stack on the floors of a building as
part of a Small/Medium-sized Enterprise (SME) network. Cajun P220G and
Cajun P110 form the backbone. On the left side of the drawing, the Cajun X120F2
100Mbit (with redundancy) Fiber Expansion module in the P120 switch connect to
a Cajun P110 stack. On the right, the connection to the Cajun P220G is via
Cajun X120S2 SX Gigabit Ethernet Expansion modules.
Figure 3.3 Cajun P120 and P110 on the floors of a Small/Medium size Enterprise (SME)
Chapter 3 Applications
network with a Caju n P220G and Cajun P110 Backbo ne.
Cajun P120 User’s Guide 15
Page 30

Chapter 3 Applications
16 Cajun P120 User’s Guide
Page 31

Chapter 4
Installation and Setup
The Cajun P120 works out of the box, namely, after following the simple
installation instructions, all the Cajun P120 ports provide complete connectivity. No
configuration is required in order to make the system work.
Positioning
Cajun P120 can be mounted in a standard 19-inch equipment rack in a wiring
closet or equipment room. Alternatively, it can be free standing. When deciding
where to position the unit, ensure that:
• It is accessible and cables can be connected easily and according to the
configuration rule.
• Cabling is away from sources of electrical noise such as radio transmitters,
broadcast amplifiers, power lines and fluorescent lighting fixtures.
• Water or moisture cannot enter the unit’s case.
• Air-flow around the unit and through the vents in the back and sides of the
case is not restricted.
Note: Use cross cables to interconnect to other switches.
Rack Mounting
The Cajun P120 enclosure fits in most standard 19-inch racks. Cajun P120 is 2U (88
mm, 3.5”) high.
Warning: Disconnect all cables from the unit before continuing.
Place the switches in the rack as follows:
1 Snap open the ends of the front panel to reveal the fixing holes.
2 Insert the unit into the rack. Ensure that the Cajun P120 screw holes are
aligned with the rack hole positions as shown in Figure 4.1.
Cajun P120 User’s Guide 17
Page 32

Chapter 4 Installation and Setup
Figure 4.1 Cajun P120 Rack Mounting
3 Secure the unit in the rack using the screws. Use one screw on each side. Do
not overti gh t e n th e scr ew s.
4 Snap close the hinged ends of the front panel.
5 Ensure that the ventilation holes are not obstructed.
Powering On
To power on the unit, insert a power cord into the power inlet in the back of the
unit.
After power up or reset, the Cajun P120 performs a self test procedure.
18 Cajun P120 User’s Guide
Page 33

Installing Expansion Modules
Caution: The expansion modules contain components sensitive to electrostatic
discharge. Do not touch the circuit board unless instructed to do so.
To install an expansion module:
1 Remove the blanking plate or other module (if installed).
2 Insert the module gently in the slot, ensuring that the board is aligned with the
rails.
3 Press the module in firmly until the connector at the back of the module is
completely inserted into the internal Cajun P120 connector.
4 Gently tighten the two screws on the front panel of the expansion module by
turning the knobs.
5 We recommend that you reset the Cajun P120.
To remove an existing expansion module:
1 Loosen the two screws on the front panel of the expansion module by turning
the knobs.
2 Grasp the two knobs one near each side of the front panel, and pull gently but
firmly towards yourself.
Chapter 4 Installation and Setup
Note: The Cajun P120 switch must not be operated with the expansion slot
uncovered; the expansion module should be covered with the supplied blanking
plate if necess ary.
3 Insert another expansion module or the blanking plate.
4 We recommend that you reset the Cajun P120.
Cajun P120 User’s Guide 19
Page 34

Chapter 4 Installation and Setup
Configuring the Switch
The configuration of the Cajun P120 and its port settings may be performed from a
text-based utility, from the stand-alone Cajun P120 Manager or from CajunView.
For instructions on the text-based utility, see the “Command Line Interface”
chapter.
For instructions on the graphi cal user interfaces, refer to the “Cajun P120 Manage r”
Appendix and the Manager User’s Guide on the Management CD.
Cajun P120 Default Settings
The default settings for the Cajun P120 switch and its ports are determined by the
Cajun P120 software and might change in newer versions of the Cajun P120
software. See the Release Notes for the most up-to-date default settings.
Switch Settings
Table 4.1 Default Switch Settings
Function Default Setting
Cajun P120 IP Address 149.49.32.134
Bootp Mode Never
Default Gateway 0.0.0.0
SLIP Address 192.168.10.1
Management PC SLIP Address 192.168.10.2
VLANs VLAN 1
Spanning Tree Enabled
(Disabled in
Version 1.0)
TFTP Mode Limited
TFTP Server 0.0.0.0
TFTP File Name p120.lst
Address Aging (CAM) Enabled
20 Cajun P120 User’s Guide
Page 35

Port Settings
Table 4.2 Default Port Settings
Function Default Setting
Port Speed and Mode • 10/100M copper ports: auto-
Port Administration State Enabled
Port VLAN Tagging No Tagging
Flow Control • 10/100 and 100 Mbps – Disabled
Port Mirroring Disabled
Early Packet Drop (HOLB-P) • 10/100T and 100F Mbps – Disabled
Chapter 4 Installation and Setup
negotiation
• 100Base-FX ports: 100 full
• 1000Base ports: 1000 full
• 1000 Mbps – Auto-negotiation
• 1000 Mbps - Enabled
Link Aggregate Grouping
None
(LAG or “Trunking”)
Redundant Link None
Duplex Mode • 10/100 Mbps ports: auto
• Gigabit Ethernet ports: full
• 100 Mbps fiber ports: full
Port Priority Regular
Port Security Not Secured
Functions operate in their default settings unless configured otherwise.
Cajun P120 User’s Guide 21
Page 36

Chapter 4 Installation and Setup
Cabling
Cajun P120 modules include the following types of ports (according to the speed
and standard they support): 10Base-T, 100Base-TX, 100Base-FX, 10/100 Mbps
auto-negotiating, 1000Base-SX and 1000Base-LX. To interconnect Cajun P120
switches with copper wire crossed cables are required .
• The maximum UTP cable length connected to a 10/100 Mbps port operating as
10Base-T, is 100 m (328 ft.).
• A UTP Category 5 cable may be connected to any 100Base-TX port, via an
RJ-45 connector. The maximum UTP cable length connected to a 100Base-TX
port, or a 10/100 Mbps port operating as 100Base-TX, is 100 m (328 ft.).
• A fiber-optic cable may be connected to any 100Base-FX port, via a pair of SC
connectors. The maximum fiber cable length connected to a 100Base-FX port is
412 m (1,352 ft.) when operating in half duplex, and 2 km (6,562 ft.) when
operating in full duplex.
Appropriate cables are available from your local supplier.
Table 4.3 Gigabit Ethernet Cabling
Gigabit Interface Fiber Type
Diameter
(µm)
Model
Bandwidth
Maximum
Distance (m)
1000BASE-SX MM 62.5 160 220
1000BASE-SX MM 62.5 200 275
1000BASE-SX MM 50 400 500
1000BASE-SX MM 50 500 550
1000BASE-LX MM 62.5 500 550
1000BASE-LX MM 50 500 550
1000BASE-LX SM 9 NA 5,000
*1000BASE-LX over Multimode fiber requires a special Patch cord cable which you
can obtain from your local cable supplier.
22 Cajun P120 User’s Guide
Page 37

Chapter 4 Installation and Setup
Connecting to the Serial Ports
The Cajun P120 has two serial ports – one on the front panel for connecting a PC or
terminal, and one on the back panel of the unit for connecting a modem.
The RJ-45 port on the front panel of the Cajun P120, labeled Console, may be used
for configuration of the switch using the built-in Command Line Interface (CLI,
Terminal Emulation). The SLIP serial port, on the back panel of the Cajun P120,
may be used for out-of-band SNMP management, Telnet or a TFTP server.
Their settings are as follows
• Baud Rate - 9600 bps
• Character Size - 8
•Parity - None
• Stop Bit - 1
• Flow Control - None
The terminal connected to the serial port must be configured with the same
settings; this setting should work with any PC COM port over a DB-9 to RJ-45
connector.
Table 4.4 Pinout of the Serial Interface (RJ-45) and the Connection to SLIP Modem (D9)
RJ-45 PINS (front connector) D9 PINS (back connector)
1 – NC 1 – CDB
2 – RXDA 2 – RXDB
3 – TXDA 3 – TXDB
4 – CDA 4 – DTRB/REQB
5 – GND 5 – GND
6 – DTRA/REQA 6 – NC
7 – RTSA 7 – RTSB
8 – CTSA 8 – CTSB
9 – NC
* The above pinout reflects the functionality of the signals, as seen from the
Cajun P120.
Cajun P120 User’s Guide 23
Page 38

Chapter 4 Installation and Setup
24 Cajun P120 User’s Guide
Page 39

Chapter 5
Introduction to the Command Line Interfaces
This chapter describes how to begin configuring the Cajun P120 switch using the
text-based Command Line Interface (CLI or Terminal Emulation). You can choose
and switch between two CLI versions, the Cajun Campus CLI (Chapter 7) and the
Legacy CLI (Chapter 6).
You can also configure your Cajun P120 using the Cajun P120 Manager with its
graphical user interface (see Appendix C).
The CLI configuration procedure involves establishing a Telnet session or a serial
connection and then using the Cajun P120’s internal CLI. The CLI is command-line
driven and does not have any menus. To activate a configuration option, you must
type the desired command at the prompt and press Enter. The commands are
arranged in a hierarchy such that a command contains a group of related functions.
Switching Between CLI Versions
There are two CLI versions, the Legacy CLI and the Cajun Campus CLI. By default,
the Cajun P120 opens up with the L egacy CLI. To switch fr om the Le gacy CLI to the
Cajun Campus CLI type the command
the command
legacy
.
native
. To return to the Legacy CLI type
Establishing a Serial Connection for Configuration
Perform the following steps to connect a VT-100 terminal or PC with VT-100
emulation (local connection) to the Cajun P120 switch Console port for
configuration of switch parameters:
1 Use the serial cable supplied to attach the RJ-45 console connector to the
Console port and the DB-9 connector to the serial (COM) port on your PC/
terminal.
2 Make sure that the serial port settings on the PC are 9600 baud, 8 bits, 1 stop
bit, no parity and no local echo.
3 If you connected a PC, run a VT-100 emulation session (you can use the
Windows® HyperTerminal).
Cajun P120 User’s Guide 25
Page 40

Chapter 5 Introduction to the Command Line Interfaces
Establishing a Telnet Session (Ethernet port or modem)
Follow these instructions to establish a Telnet session (remote connection) and
then use the internal CLI to configure the switch.
1 Verify that the Cajun P120 and your PC are on the same local network. If the
Cajun P120 is set with its default IP address, then change your PC’s IP address
so that it will be on the same IP subnet as the Cajun P120 ’s defa ult address. The
port to which the PC is connected must be on the same VLAN as the agent.
Note:
i) If you establish a serial connection to the Cajun P120, you will not have to
change your station’s IP address.
ii) The Cajun P120 default IP address is 149.49.32.134 and subnet mask is
255.255.255.0.
2 Click Start Settings Control Panel Network from the Windows
task bar.
3Select TCP/IP from the list of installed network components.
4 Click Properties.
5In the IP Address property sheet, enter the address 149.49.32.134 and
net mask 255.255.255.0.
6 Click OK.
7 Connect a shared port or switched port on the Cajun P120 switch front panel to
your network.
8 Connect your PC to the network.
9 At the prompt, start the Telnet session by typing:
telnet
For example, telnet 149.49.32.134
<Cajun_P120_IP_address>
Note: If there is a serial connection to the Cajun P120, the Telnet session will
terminate the serial session.
10 Enter the default passwo rd norm in lower case letters (do NOT use uppercase).
The CajunP120>
communications with the Cajun P120.
11 You can now configure the Cajun P120 and change its default IP address. See
the Section “Navigation, Cursor Movement and Shortcuts” below.
12 If you changed your PC’s IP address, you must return it to its original address.
13 Insert the Cajun P120 into your network and ping to verify that there are
proper Ethernet communications.
26 Cajun P120 User’s Guide
prompt will display when you have established
Page 41

Assigning Cajun P120’s IP Address
Note: All Cajun P120 switches are shipped with the same default IP address. You
must change the IP ad d ress of t he Ca ju n P 120 in or de r to g uarantee that the switch
has its own unique IP address in the network.
Changing the IP Address using the Command Line Interface (CLI, Terminal Emulation)
Via a Serial Connection or Telnet
You may use the CLI to assign the Cajun P120 an IP address and net mask. Once
this address had been assigned and the switch inserted into the network, the
CajunView station may establish communications with it.
1 Establish a serial connection or Telnet session as described in the "Command
Line Interface" chapter.
2 At the > prompt, enter login to enter the Privileged level.
3 Enter the password. The default is enable (lucent in S/W Version 1.0)
4 At the CajunP120-priv# prompt, enter set ip .
Note: Alternatively you can use the simple-setup command to configure all the
mandatory parameters. Refer to the "Command Line Interface" chapter for details.
Chapter 5 Introduction to the Command Line Interfaces
5 Enter mng-port-ip <<x.x.x.x>> 255.255.255.0 where you replace
<<x.x.x.x>> with the IP address of Cajun P120 and replace the net mask if
necessary. For example, set mng-port-ip 194.3.2.16 255.255.255.0
6 Press Ctrl+Q to exit the group.
7 Enter write and y to confirm. Wait 15 seconds for confirmation of the
procedure.
Note: If there are any errors, the new configuration settings are not saved. You
must correct these errors with the simple-setup or set command, and re-issue the
write command.
8 Exit the Privileged mode, by typing exit at the prompt.
For example, CajunP120-priv# exit.
The prompt changes to CajunP120> to indicate that you are in Normal mode.
9 Exit the CLI session.
10 Insert the Cajun P120 into your network.
Cajun P120 User’s Guide 27
Page 42

Chapter 5 Introduction to the Command Line Interfaces
Configuring the Cajun P120’s IP Address using Bootp
1 Configure your Bootp client server with: the Cajun P120’s IP address and
subnet mask (mng-port-ip), Default gateway address (def-gateway) and TFTP
file name (tftp-filename).
Note:
a. Use the revision command from the CLI to list the Mng MAC address.
b. Set your Bootp server to always broadcast a reply to your MAC address.
c. The IP address of the Bootp server will be inserted as the TFTP server’s IP address
(tftp-server).
d. TFTP mode can be enabled and disabled in the Command Line Interface
(IP group).
2 Connect the Cajun P120 to the network with the Bootp server.
3 Power on the Cajun P120 (with default settings). If it is successful, the
parameters are configured and saved in the switch’s flash memory. Each time
that the switch is subsequently powered on it will use the parameters saved in
flash memory.
Note: There is no indication of the success or failure of Bootp on the front panel.
You can see the results in the CLI (not Telnet). Progress can be monitored from the
station if you are using a SLIP connection.
If the Bootp is unsuccessful or there is no Bootp server connected (it takes
approximately 1 minute for the Cajun P120 to respond), the Cajun P120 will start
with the parameters saved in flash memory (either the default settings or last ones
you saved).
Reasons that Bootp is unsuccessful include:
• Problems in communications between the client and server.
• Parameters set in the server are incorrect (therefore, it cannot save them).
• A router installed between the switch and the Bootp server is not configured to
pass Bootp requests.
28 Cajun P120 User’s Guide
Page 43

Chapter 5 Introduction to the Command Line Interfaces
Navigation, Cursor Movement and Shortcuts
The CLI contains a simple text editor with these functions:
Table 5.1 Nav igation, Cursor Movement and Shortcuts
Keyboard Functions
Backspace Deletes the previous character
Ctrl+U Deletes the line
Ctrl+R Refreshes the last command typed
Ctrl+Q Breaks the current command
Up arrow/Down arrow Scrolls back and forward through the command history
buffer
Left arrow/Right arrow Moves the cursor left or right
Tab Completes the abbreviated command. You need to type
a minimum of four characters.
Enter Executes a single-line command
Getting Help
On-line help may be obtained at any time by typing help on the command line.
To obtain help for the syntax/usage of a specific command, type the command
followed by a space and help. In addition, in the Legacy CLI you can obtain a
description of a specific command by typing the command followed by a space and
.
a question mark (?
Cajun P120 User’s Guide 29
)
Page 44

Chapter 5 Introduction to the Command Line Interfaces
Command Syntax
Commands are not case-sensitive. That is, uppercase and lowercase characters may
be interchanged freely.
To perform a command, you will need to specify the command followed by the
Path.
For example: Console>show ip route (this shows routes in the routing table).
Conventions Used
The following conventions are used in this document to convey instructions and
information:
• Commands are in boldface
• Variables that you supply are in pointed brackets <>
• Optional keywords are in square brackets [ ]
• Alternative but mandatory keywords are grouped in braces { } and separated by
a vertical bar |
• Information displayed on screen is displayed in
text
font.
30 Cajun P120 User’s Guide
Page 45

Chapter 6
Legacy CLI (Command Line Interface)
This chapter provides instructions for the configuration of your Cajun P120 using
the text-based Legacy CLI (Command Line Interface or Terminal Emulation).
The configuration pr oced ur e in vol ves ei the r esta bl is hing a Te ln et s essi on or a s eria l
connection and then using the Cajun P120’s internal CLI (see Chapter 5,
Introduction to the Command Line Interfaces). The CLI is command-line driven
and does not have any menus. You type the desired command at the prompt and
press Enter.
If you are configuring your Cajun P120 for the first time we suggest that you use
the simple-setup command. This command provides you with a selection of all the
relevant parameters that need to be configured initially.
Cajun P120 User’s Guide 31
Page 46

Chapter 6 Legacy CLI (Command Line Interface)
Running the CLI
After running Telnet or connecting to the Console port, press Enter until the CLI
begins and the CajunP120> prompt displays.
You are now in the Normal security level. Now you either need to us e the simplesetup command as described below to easily configure the mandatory parameters,
or enter the Privileged level. See the ”Entering the Privileged Level” section.
Factory default values, or the current defaults if the system was previously
configured, are provided in square brackets after each parameter. You may use the
default settings for any parameters that you desire . Although there are settings ,
such as IP addresses, that require you to enter a parameter value.
Note: Refer to the section “Command Syntax” on Page 38 for general information
on the CLI user interface.
Easily Configuring the Mandatory Parameters
Using the Simple-Setup Command
The simple-setup command provides an easy way to configure the mandatory
parameters on the Cajun P120.
To use the simple-setup command:
1From the CajunP120> prompt, enter simple-setup on the command line:
CajunP120> simple-setup.
2 Enter the password at the prompt to enter the Privileged level. Th e default
password is
>Enter password: enable
The prompt changes to setup> to indicate that you are in the simple-setup
command.
The group name, a short description of the group, the first parameter and its
current value display are shown below:
Group: ip - Management IP parameter setup.
You are now going to conf igur e t he I P gr oup. Th e fir st p aramet er is the C ajun P12 0
IP address. Its default setting is 149.49.32.134 255.255.255.0.
setup> mng-port-ip [149.49.32.134 255.255.255.0]?
You may now set the Cajun P120’s IP address. Either:
• Keep the default setting by pressing Enter, or
• Type a new value and press Enter. For example, to change the IP address,
enter: 194.90.121.114 255.255.255.0
enable
(lower case, without quotation marks).
32 Cajun P120 User’s Guide
Page 47

Chapter 6 Legacy CLI (Command Line Interface)
Note:
1) After entering a value, you cannot go back and change it at this time. You must
either complete the setup command or break the se tup command with Ctrl-Q.
Then re-enter simple-setup or use the set command for a specific
group/parameter.
2) If keyboard activity is not detected for 10 minutes, then you are automatically
removed from the simple-setup command and Privileged level. Any changes
you have made are lost. You can re-enter the simple-setup command.
The next parameter displays automatically.
setup> def-gateway [0.0.0.0]?
You may now set the Cajun P120’s default gateway IP address. Either:
• Keep the default setting by pressing Ent er, or
• Type a new value and press Enter. For example, to change the IP address,
enter: 194.90.121.1
The next parameter displays automatically.
setup> bootp-mode [never]?
You may now set the Cajun P120’s Bootp mode. Either:
• Keep the default setting by pressing Ent er, or
• Type a new mode and press Enter. The possible values are:
— once – Attempts to configure parameters from the Bootp client server when
the Cajun P120 is powered on. Once Bootp is successful, then the setting is
automatically changed to ’never’.
— always – Attempts to co nfigure para meters from the Bo otp server each time
the Cajun P120 is powered on.
— never – Does not attempt Bootp.
For example, to stop the bootp process, enter: never.
Note: We recommend that you set the bootp-mode to
never
.
The next parameter displays automatically.
setup> slipip [192.168.10.1 255.255.255.0]?
You may now set the Cajun P120’s SLIP address. Either:
• Keep the default setting by pressing Ent er, or
• Type a new value and press Enter. For example, to change the IP address,
enter: 194.90.120.2 255.255.255.0
The next parameter displays automatically.
setup> slip-peer-ip [192.168.10.2]?
Cajun P120 User’s Guide 33
Page 48

Chapter 6 Legacy CLI (Command Line Interface)
You may now set the SLIP address of the management station. Either:
• Keep the default setting by pressing Enter, or
• Type a new value and press Enter. For example, to change the IP address,
enter: 194.90.120.115
The next parameter displays automatically.
>Group: snmp - Configuration of SNMP community names and trap
managers.
setup> community 1 [community public r]?
Note: If you would like the SNMP traps to display in the OpenView Alarm Log,
you should set the IP address and net mask of the OpenView station under trap
manager (community 1 trap).
You are now going to configure the SNMP group. The first parameter is the SNMP
community name. Its default setting is public read-only.
You may now set an SNMP community name. Either:
• Keep the default setting by pressing Enter, or
• Type a new value and press Enter. For example, to change the community
name, enter: newname r
The r parameter defines the community as read only; the rw parameter defines it as
read/write.
Continue with the other four community names until you come to the following
prompt:
setup> community 1 trap [0.0.0.0]?
You may now set the IP address of a management station to receive traps. Either:
• Keep the default setting by pressing Enter, or
• Type a new value and press Enter. For example, to change the IP address,
enter: 194.90.121.233. (If you are running CajunView in conjunction with
HP OpenView, you should enter the IP address of the OpenView station here
for it to receive traps from the Cajun P120.)
Continue until you come to the following prompt:
Save the new configuration (y/n)?
Either:
•Enter y to save your configuration and write it to the flash memory.
•Enter n to discard this configuration.
If you wish to make any corrections or modifications, either exit the Privileged level
and re-run the simple-setup command, or use the set command to set a particular
group/parameter. (Be sure to use the write command to save your changes.)
Wait 15 seconds for confirmation of the write process.
34 Cajun P120 User’s Guide
Page 49

Chapter 6 Legacy CLI (Command Line Interface)
Now exit the privileged level by entering exit.
CajunP120-priv# exit
The prompt changes to CajunP120> to indicate that you are in Normal level.
Verify that all the parameters were accurately saved by using the show all or show
all list command.
Now exit your CLI session.
You have now completed the configuration of the Cajun P120 and it is ready for
cabling and operation.
Cajun P120 User’s Guide 35
Page 50

Chapter 6 Legacy CLI (Command Line Interface)
Security Levels
There are three security access levels – Normal, Privileged and Technician.
A password is required to access the Privileged level and gain access to all the
commands. The Technician level is reserved for Lucent technical support
representatives.
Entering the Privileged Level
To enter the Privileged level, use the login command and enter the password. The
default password is
command.
For example:
CajunP120>
Enter password:
The prompt
level.
Note:
1) You will be denied access to the Privileged level while an SNMP session is in
progress. If you would like to break the SNMP session, use the
login) command.
2) You may use the prompt command to change the text that prefixes the
Privileged level (-priv#) and Normal level (#) prompt.
CajunP120-priv#
enable
login
enable
. However, it may be changed with the
setpw
displays indicating that you are in Privileged
flogin
(forced
Exiting the Privileged Level
To exit the Privileged level and return to the Normal level enter the
command.
Note:
1) If keyboard activity is not detected for 10 minutes, you are automatically
removed from the Privileged level and returned to the Normal level. Any
configuration changes you made are lost
2) While the Cajun P120 is in Privileged level, it cannot be configured by another
manager, such as CajunView.
36 Cajun P120 User’s Guide
exit
Page 51

Changing the Privileged Level Password
Use the setpw Command to change the password for the Privileged Security
Level (you can make this change from any level or prompt in the Legacy CLI):
The syntax for this command is: setpw
Example:
CajunP120> setpw
Enter old password: <old_password>
Enter new password: <new_password>
Retype new password: <new_password>
CajunP120>
Chapter 6 Legacy CLI (Command Line Interface)
Cajun P120 User’s Guide 37
Page 52

Chapter 6 Legacy CLI (Command Line Interface)
Command Syntax
The CLI may display error messages if it encounters a problem. For details see the
Section “Error Messages” on Page 66.
Command Abbreviations
All commands and parameters in the CLI can be truncated to an abbreviation of 4
characters or less, as long as the abbreviation is not ambiguous. For example,
revision can be abbreviated revi.
For ambiguous commands, type the beginning letters on the command line and
then use the Tab key to toggle through all the possible commands beginning with
these letters.
Command Line Prompt
The default prompt for the Privileged level is
change Cajun P120 to the text of your choice using the prompt command.
However, once you enter a group of parameters, the prompt will indicate which
group you are in (
prompt appears as
While in a group, all commands that you enter will be performed on this group
only. For example, ip> show will only display the current settings for the IP
group.
If you have entered an index value for the group then it will also be indicated at the
prompt. For example, CajunP120-priv# set P120 will display the P120>
prompt.
To exit a group and return to the CajunP120> or CajunP120-priv# prompt,
press Ctrl-Q.
group>
ip>
). For example, if you are in the IP group then the
.
Cajun P120#
, however you may
38 Cajun P120 User’s Guide
Page 53

Saving and Exiting
After changing all the necessary parameters using the CLI, use the write
command to save your system configuration. If you receive any error messages,
your configuration has not been sav ed. You must correct the erro rs and re-issue the
write command.
Notification of write errors is presented in a two column display:
• The left column contains the parameter values that you set in this session and
need to be changed.
• The right column contains the parameter values currently save d in the
Cajun P120.
Wait 15 seconds for confirmation of the write process. Then exit Privileged level by
typing exit at the prompt . For example, CajunP120-priv# exit.
The cursor changes to CajunP120> to indicate that you are in Normal level.
Verify that all the parameters were accurately saved by using the show all or
show all list command.
The Cajun P120 is now ready for cabling and operation. You may exit your CLI
session.
Normal Level Commands
Chapter 6 Legacy CLI (Command Line Interface)
The following is a list of commands that can be used in the Command Line
Interface (CLI).
Table 6.1 Normal Level Commands
Command Syntax Function
flogin Breaks the current SNMP session and forcibly
enters the Privileged level.
getmib <object_ID> Gets a MIB value.
getnextmib <object_ID> Gets the next MIB value
help Displays a list of the commands.
login Enters the Privileged password level. (You
cannot enter this level when an SNMP session
is active. See also flogin.)
native Changes CLI to native mode
partition Enables/Disables partition on all HD ports
Cajun P120 User’s Guide 39
Page 54

Chapter 6 Legacy CLI (Command Line Interface)
Table 6.1 Normal Level Commands (Continued)
Command Syntax Function
Ping <IP_address> {#times} Pings the IP address; default is four times
revision Displays revision information for the various
rnds [on|off] This is reserved for technical personnel only.
service This is reserved for technical personnel only.
Use the Ctrl+Q command to stop the pinging.
components.
show <all|group> [list]
<port#|index_value>
Example: show ip
Displays the current configuration settings for
a specific group or port. If you have made any
changes using the CLI, they are listed in a
column on the left (administration) and the
current operational configuration is in a
column on the right.
shLAG <group#|all> Shows all ports that are assigned to a link
aggregation group.
shport Display a table of all ports.
simple-setup
This command is only available in
Normal leve l.
For the configuration of the initial parameters
needed for the Cajun P120, including its IP
address.
vlantab Displays a table with VLAN assignments of
ports.
40 Cajun P120 User’s Guide
Page 55

Privileged Level Commands
You must enter the Privileged level, with the login or flogin command, before
accessing these commands. These commands are available in addition to all the
Normal level commands, except for the simple-setup command.
Table 6.2 P rivileged Level Commands
Command Syntax Function
cam-find Lookup for specific MAC address in the
exit Saves and exits the Privileged level (not the
factory-def <group_name|all> Reset parameter values to their factory defaults
genstat Displays general traffic statistics for the
prompt <prompt_text> Changes the CajunP120 prompt to the text that
reload Rereads the last saved configuration settings
Chapter 6 Legacy CLI (Command Line Interface)
soft-CAM
session) and returns to the Normal level
Cajun P120
you specify. The new prompt only takes effect after
performing the write command.
reset Resets the Cajun P120. This is equivalent to
powering the switch off and on again.
rmonreset Sets the Rmon MIB factory values.
set <group>
<port#|index_value> [list]
Example: set ip list
setmib <object_ID> <value> Sets a MIB value
setpw Changes the Privileged level password
sh-swt-stat <slot#>
<port#> [r]
stopr Disables the repetitive command level
tftp-cmd [start|sto p|status]
If you use the tftp-cmd stop
command, after resetting the
Cajun P1 20, it will boot up from
its INIT software.
write Saves the current configuration in the Cajun
Cajun P120 User’s Guide 41
Set parameter values for a specific group
Displays received statistics for the port that you
specified
(option [r])
Starts, stops or displays the status of the TFTP
process.
TFTP will not start if TFTP-OP is set to notftp in the
TFTP group.
P120’s flash memory
Page 56

Chapter 6 Legacy CLI (Command Line Interface)
Table 6.2 Privileged Level Commands (Continued)
Command Syntax Function
copy {tftp | running-config}
{running-config | tftp}
<filename*> <server IP>
lock port {module number/
port_number | all}
unlock port {module number/
port_number | all}
add mac {MAC_address
port_number [vlan_number]}
delete mac {MAC_address
[port_number
[vlan_number]]}
Allows you to upload or download a
configuration file.
Use this command to secure ports
Use this command to unlock ports and return
them to not-secured mode
Use this command to add an address to the
secure list of a locked ports.
Use this command to delete an address from the
secure table.
42 Cajun P120 User’s Guide
Page 57

Sample Session
Contained below is a step-by-step configuration for the Cajun P120 unit. This
sample configuration is based on a Cajun P120 with factory default settings.
Screen Display Explanation
Chapter 6 Legacy CLI (Command Line Interface)
CajunP120> login
enters the Privileged security
level
Enter password: enable
CajunP120-priv# set ip list
enter your password
set parameters for the IP gro up
one by one
CajunP120-priv# set snmp ip
set parameters in the SNMP
group one by one
CajunP120-priv# set vlan list
set relevant parameters in the
Agent VLAN group
CajunP120-priv# set p120 list
displays the parameters that can
be set on your Cajun P120
CajunP120-priv# set tftp list
CajunP120-priv# write
Save the new configuration (y/n) y
set TFTP parameters one by one
Saves the new configuration
confirmation
If you receive an error, correct it and reissu e the write command.
CajunP120-priv# exit
exits the Privileged level
Verify that all parameters were accurately saved by using the
all list
command. Exit your CLI session.
show all or show
Subcommands
There are two optional subcommands that can be used with both the
commands. These subcommands:
[list], <index_value>
and
show
[r]
, can be
and
set
used either separately or combined.
List Subcommand [list]
When the
list
subcommand is used on the command line, each parameter and its
set value in a group will be displayed one by one on the screen.
With the
show
command the system will wait for you to press Enter to display the
next line.
Cajun P120 User’s Guide 43
Page 58

Chapter 6 Legacy CLI (Command Line Interface)
With the set command, the system will wait for you to either press Enter to keep
the current value for the parameter, or enter a new value for the parameter.
The next parameter in the group will display and it will wait for your action. It
continues through every parameter in the group one-by-one.
Note: It is recommended to use the list subcommand until you are very familiar
with the CLI parameters.
Use the list subcommand in this format:
<command> <group> list
The following example allows you to set parameters in the IP group one-by-one:
CajunP120-priv# set ip list
The following example will display all the current parameter settings one-by-one:
CajunP120-priv# show all list
Index_value Subcommand <Index_value>
When an index value is used on the command line, enter the desired port number
to be configured.
To configure a specific port with several parameter values, enter commands in the
format:
<command> <group> <index_value>
The following example allows you to configure parameters in the P120 group for
port 4:
CajunP120-priv# set P120 4 list
The parameters display one-by-one.
Depending upon the command, you may sometimes use all for the index value.
Repetitive Command Mode [r]
When the repetitive mode command is used on the command line, the command is
automatically repeated every few seconds. This is a good way to see what happens
as you make system modifications.
The following example will repeatedly show the statistics for switched port #2:
CajunP120-priv# sh-swt-stat 2 r
To cancel the repetitive mode, enter stopr on the command line.
CajunP120-priv# stopr
44 Cajun P120 User’s Guide
Page 59

Using the SHOW Command
The show command is used to display the current settings for a particular group of
parameters. If you have never changed parameter settings, then these are the
factory default values.
The following example will display the current settings for the IP group:
CajunP120>
show ip
Listing the Groups You Can Set
If you enter set on the command line, a list of the groups that can be set with this
command displays.
Note: This is useful for displaying the syntax for use in your configuration.
The available groups are:
CajunP120-priv#
Group list:
mibII-syst
MIB-II system group params
Chapter 6 Legacy CLI (Command Line Interface)
set
Cam
ip
IP-multi-
cast
STA-GEN
STA-PORT
P120
vlan
copy-port
tftp
snmp
Cam parameters
Management IP parameters setup.
IP-multicast parameters
Parameters for configuring general spanning tree.
Parameters for configuring spanning tree per port.
Port configuration group
Vlan group
Destination (network analyzer) and source ports setup
TFTP parameters setup.
Configuration of SNMP community names and trap
managers
Cajun P120 User’s Guide 45
Page 60

Chapter 6 Legacy CLI (Command Line Interface)
Note: One additional group is available when an Expansion module is installed.
The group name depends on the type of Expansion module: X120F2, X120S2,
X120S1, X120L2, X120L1 or X120T8.
Using the SET Command
The set command is used to change a particular parameter setting. Since all
parameters are organized into groups, you must first enter the group and then
configure the parameter.
For example, to set parameters in the IP group one-by-one with the list
subcommand, enter:
CajunP120-priv# set ip list
ip> mng-port-ip [149.49.32.134 255.255.255.0]?
You must either:
• Press Enter to accept the parameter value displayed in square brackets, or
• Enter another IP address and net mask such as 194.3.4.1 255.255.255.0
Note: The parameter dis played in square brackets in the para meter value s changed
during this session (administrative parameters).
After performing either of these options, the next parameter and its value display.
ip> def-gateway [0.0.0.0]?
Again you must either:
• Press Enter to accept the parameter value displayed in square brackets, or
• Enter another IP address and net mask, such as 194.4.3.2 255.255.255.0
After performing either of these options, the next parameter and its value display.
This continues until you have completed all the parameters in the group. You are
then returned to the Privileged level prompt (CajunP120-priv#).
Using the SHPORT Command
The shport command provides the current settings of all the ports in the
Cajun P120 and expansion module. Port numbering is sequential and will differ
depending upon the type of expansion module.
46 Cajun P120 User’s Guide
Page 61

Chapter 6 Legacy CLI (Command Line Interface)
For example, to view port settings for all the ports, type the following command:
CajunP120>
shport
port#| Admin| Duplex| Link| Speed| FC mode| Redunda nt
------ ------- ------- ----- ------- -------- ---------1 ena half up 10 Mbps dis none
2 ena half up 10 Mbps dis none
3 ena half up 10 Mbps dis none
4 dis half down 10 Mbps dis none
5 ena half down 10 Mbps dis none
6 ena half up 10 Mbps dis none
7 ena half up 10 Mbps ena none
8 ena half up 10 Mbps dis none
... ... ... ... ... ... ...
32* ena auto down auto dis none
Note: The total number of ports displayed is 24 for the Cajun P120 plus those in
the expansion module.
Using the VLANTAB Command
The vlantab command displays a table containing the port type, and VLAN# for
the ports.
To display the port table type the following:
CajunP120>
vlantab
port#| Port Type| Vlan#
--------- ---------------- -------------1 no-Tagging 1
2 no-Tagging 1
3 no-Tagging 1
.
.
.
Cajun P120 User’s Guide 47
.
.
.
.
.
.
Page 62

Chapter 6 Legacy CLI (Command Line Interface)
Table 6.3 VLANTAB Parameters
Parameter Definition
port # Number of port (1-40).
Port Type Type of port. Options are dot1Qtagging or no tagging.
VLAN# VLAN to which the port is assigned.
Using the SHLAG Command
The SHLAG command displays a table containing the ports that are associated with
a link aggregati on group or all link aggregation groups.
For example, to show the ports assigned to all link aggregation groups:
CajunP120> shlag all
1. LAG# 1, Members = 2
Port Role Link Duplex Speed Stations
1 Base Down auto auto 0
2 Link Down half 10MB 0
Table 6.4 SHLAG Parameters
Parameter Definition
Port Number of the ports.
Role Base port or Link
Duplex Duplex mode
Speed Speed of the port (auto, 10MB or 100MB)
station # Number of stations (MAC addresse s) whose frames have
passed through this port.
Note: You should set all ports of a LAG to the same Duplex, Speed, VLAN, VLAN
Tagging and Administration settings.
48 Cajun P120 User’s Guide
Page 63

Chapter 6 Legacy CLI (Command Line Interface)
Configuration Upload and Download Commands
Copy Command
The syntax of this command is: copy {tftp | running-config}{running-
config | tftp} <filename*> <server IP>
tftp Keyword that allows the user to copy to or from a TFTP server.
running-config Specifies the currently running configuration.
*
i) The default name of the configuration file is P120.cfg.
ii) You must also include the full path where the file is located.
Examples:
To upload the configuration file:
CajunP120-priv# copy running-config tftp C:\p120.cfg
149.49.38.41
IP address of remote host [149.49.38.41]? y
Upload configuration to [C:\P120.cfg]? y
Output:
Loading configuration please wait…………………………….
Configuration has been copied successfully. (12316 bytes).
CajunP120-priv#
Caution: Before you can upload a configuration file to the TFTP server you must
first create an empty file on the server. This file must have the same name and path
as the file that you want to upload. Otherwise you will get an ‘access violation’
error message.
To download the configuration file:
CajunP120-priv# copy tftp running-config C:\config1.cfg
149.49.38.41
IP address of remote host [149.49.38.41]? y
Download configuration from [C:\config1.cfg]? y
Configure using config1.cfg from 149.49.38.41 (y/n)? y
Output:
Loading configuration please wait…………………………….
Finished network download. (10067 bytes).
CajunP120-priv#
Cajun P120 User’s Guide 49
Page 64

Chapter 6 Legacy CLI (Command Line Interface)
Security Commands
Lock Port Command
Use this command to secure ports. The syntax of this command is: lock port
{module number/port_number | all}.
all - a shortcut for securing all ports of the device.
Examples:
CajunP120-priv# lock port 1/1
Port 1 locked
CajunP120-priv#
CajunP120-priv# lock port all
All ports locked!
CajunP120-priv#
Unlock Port Command
Use this command to unlock ports and return them to not-secured mode. The
syntax of this command is:
unlock port { module number/port_number | all }
all - a shortcut for unsecuring all ports of the device
Example:
CajunP120-priv# unlock port 1/10
Port 10 unlocked
CajunP120-priv#
Add MAC Command
Use this command to add an address to the secure list of a locked ports (see Lock Port
Command on page 50). The minimal parameters are address and port. It is optional
to specify the VLAN of the address. If the VLAN is not specified the default is port's
VLAN.
The syntax of this command is:
add mac {MAC_address port_number [vlan_number]}
Examples:
CajunP120-priv# add mac 00-60-5c-86-5b-81 2 3
Address 00-60-5c-86-5b-81 was added to the secure list !
CajunP120-priv#
50 Cajun P120 User’s Guide
Page 65

Chapter 6 Legacy CLI (Command Line Interface)
If you try to add a MAC address to a non-secured port (Port #1 in this case) you get
the following error message:
CajunP120-priv# add mac 00-65-5b-86-5b-82 1 2
ERROR: Try to add secured MAC to non-secured port 1
Delete MAC Command
Use this command to delete an address from the secure table. The required
parameter is the address and the VLAN number. If the port was not specified, the
address shall be cleared from all ports.
The syntax of this command is:
Delete MAC {MAC_address [port_number [vlan_number]]}
Examples:
CajunP120-priv# delete mac 00-60-5c-86-5b-81 2 3
Address 00-60-5c-86-5b-81 was deleted from the secure list !
CajunP120-priv#
If you try to delete a MAC address from a non-secured port (Port #1 in this case)
you get the following error message:
CajunP120-priv# delete mac 00-65-5b-86-5b-82 1 2
ERROR: Try to delete secured MAC to non-secured port 1
Cajun P120 User’s Guide 51
Page 66

Chapter 6 Legacy CLI (Command Line Interface)
Groups, Parameters and Default Settings
This section provides all the CLI parameters and their default values. Not all groups,
parameters and commands are available when the Cajun P120 boots up from its
INIT software.
How Groups are Organized - Finding Parameters
All parameters are divided into groups of related parameters. Since parameters
within a group are interrelated, you cannot change a single parameter within a
group.
Table 6.5 Parameter Summary
Configuration
Topic
MIB-II System MIB-II SYST MIB-II System 53
CAM
Configuration
IP Configuration IP IP and SLIP addresses 54
IP-Multicast
System Group
Spanning Tree
P120 Port
Configuration
Expansion Module
Configuration
Agent VLAN
Configuration
Port Mirroring COPY-PORT Source and destination ports
Group Name Used for Setting
CAM CAM softwa re 53
IP-MULTICAST IP-Multicast configuration 55
STA-GEN General spanning tree parameters 57
STA-PORT Port spanning tree parameters 58
P120 Cajun P120 Base port settings 59
X120xx Cajun P120 Expansion module port
settings
VLAN Agent VLAN 63
(mirroring)
See
Page
62
63
TFTP
Configuration
SNMP
Configuration
52 Cajun P120 User’s Guide
TFTP TFTP parameters 64
SNMP SNMP communities and trap
managers
65
Page 67

MIB-II System Group (MIB-II SYST)
This group provides the MIB-II configuration according to the IETF standard
MIB-II, System Group.
To view or change these parameters, type the command:
set|show mibII-syst list
The output is as follows:
mibII-syst>contact-system [UNKNOWN ]
mibII-syst>name-system [CajunP120 ]
mibII-syst>location-system [UNKNOWN ]
CAM Configuration Group (CAM)
This group includes parameters for the configuration of the CAM software. The
table below displays the parameters, a description of the parameters, the default
values, and the valid range of values.
The syntax for this command is:
Table 6.6 CAM Group Para meters
Chapter 6 Legacy CLI (Command Line Interface)
set|show cam list
Parameter Des cription
Default
Value(s)
Valid Range
for Values
AGINGMODE Enables aging dis ena, dis
AGETIMEOUT Time interval for
63 1-63
CAM aging
AGINGMODE De t ermines whether or not aging is enabled on the CAM.
When enabled, the MAC addresses that have not been used
recently are deleted. The CAMENA parameter must also be set
to enable for the aging function to work.
AGETIMEOUT The time interval for CAM aging. One (1) is the minimum
timeout and 63 is the maximum. Each timeout unit is about 8
seconds.
Cajun P120 User’s Guide 53
Page 68

Chapter 6 Legacy CLI (Command Line Interface)
IP Configuration Group (IP)
This group includes parameters for the configuration of IP addresses. The table
below displays the parameter, a description of the parameters, the default values,
and the valid range of values.
To view or change these parameters, type the command set|show ip list at
the prompt.
Table 6.7 I P Group Parameters
Parameter Description
MNG-PORT-IP Cajun P120 IP address
and net mask
DEF-GATEWAY Default gateway IP
address
BOOTP-MODE Bootp client server
support
SLIPIP Serial IP address and
net mask
SLIP-PEER-IP Serial IP address of the
management station
Default
Value(s)
x.x.x.x
255.255.255.0
0.0.0.0 IP address
never always,
x.x.x.x
255.255.255.0
x.x.x.x IP address
Valid Range
for Values
IP address
format
format
never, once
IP address
format
format
MNG-PORT-IP Enter the IP address and net mask for the Cajun P120. This is
required for CajunView network management.
DEF-GATEWAY Enter the IP address of the default gateway to access the
network.
54 Cajun P120 User’s Guide
Page 69

Chapter 6 Legacy CLI (Command Line Interface)
BOOTP-MODE There are three settings for the Bootp-mode command:
• once – Attempts to configure parameters from the Bootp
client server when the Cajun P120 is powered on. Once
Bootp is successful , then the settin g is automat icall y changed
to ‘never’.
• always – Attempts to configure parameters from the Bootp
server each time that the Cajun P120 is powered on.
• never – Does not attempt Bootp
See also ”Configuring Cajun P120 IP Address with Bootp” in the
Installation and Setup chapter.
We recommend that you set the bootp-mode to “never” if you will not be
using a Bootp server. If you change this setting, it will not take affect
until the switch is reset or powered off an d on.
SLIPIP Enter the IP address and net mask for the SLIP connection. The
IP addresses for the Cajun P120 and management station must be on the
same subnet.
SLIP-PEER-IP Enter the IP address for the management station with the SLIP
connection.
IP-Multicast System Group (IP-MULTICAST)
This group provides the IP Multicast configuration according to IGMP standards.
The table below displays the parameters, a description of the parameters, the
default values, and the valid range of values.
To view or change these parameters, type the command:
set|show IP-multicast list
Table 6.8 IP-multicast Group Parameters
Parameter Description
IPMCFILTERING
IPMC-HOSTAGING
Enables/Disables IP-multicast
mode
Time after which a host who
has stopped sending IGMP
Default
Value(s)
Disabled Enabled/
10 Minutes 30 Seconds to
Valid Range
for Values
Disabled
30 Minutes
reports is removed from a
Multicast Group
IPMC-ROUTERAGING
Time after whi c h the ro u te r
port information is deleted
30 Minutes 30 Seconds to
2 Hours
when the router is inactive
Cajun P120 User’s Guide 55
Page 70

Chapter 6 Legacy CLI (Command Line Interface)
Table 6.8 IP-multicast Group Parameters (Continued)
Parameter Description
IPMC-DELAY Delay before a newly learned
entry is inserted into the
Default
Value(s)
10 Seconds 1 Second to
Valid Range
for Values
5 Minutes
hardware
IPMC-FILTERING Allows you to enable/disable IP-multicasting.
IPMC-HOST-AGING The time delay after which ports that no longer send IGMP
reports are removed from a Multicast Group.
IPMC-ROUTERAGING
The time delay after which the router port information is
deleted if a router is found to be inactive.
IPMC-DELAY When the Cajun P120 becomes aware of a Multicast Group
on a certain VLAN there is a time delay before the Cajun
P120 begins filtering traffic for that group.
56 Cajun P120 User’s Guide
Page 71

Spanning Tree Group (STA-GEN)
This group includes parameters to enable the spanning tree algorithm (IEEE 802.1D
and RFC 1493) and set its parameters. The table below displays the parameters, a
description of the parameters, the default values, and the valid range of values.
The syntax for this command is:
set|show sta-gen
Table 6.9 S TA-GEN Group Parameter s
Chapter 6 Legacy CLI (Command Line Interface)
Parameter Description
Default
Value(s)
Valid Range
for Values
STA-PRIO Switch priority 8000 00 00- FFF F
STA-MODE Enables Spanning Tree dis ena, dis
STA-PRIO Priority setting (hexadecimal value) used for determining the
Root switch/bridge. The Bridge ID, based on the priority and
the MAC address, is a unique value for each participant in the
Spanning Tree algorithm.
STA-MODE Enables or disables Spanning Tree for the Cajun P120 switch.
Cajun P120 User’s Guide 57
Page 72

Chapter 6 Legacy CLI (Command Line Interface)
Spanning Tree Group (STA-PORT)
This group includes parameters for the configuration of the spanning tree
parameters per Cajun P120 port. The table below displays the parameters, a
description of the parameters, the default values, and the valid range of values.
The syntax for this command is:
set|show sta-port
If you do not enter a port#, all ports will be displayed.
Table 6.10 STA-PORT Group Parameters
Parameter Description Default Value( s)
Valid Range
for Values
PORT-PRIO Port priority 80 Hex 00-FF
PATH-COST Port path cost 13 Hex (Port 25/26
1-FFFF
4 Hex)
TOP-CHG Enables topology
ena ena, dis
changes
PORT-PRIO This is the priority (hexadecimal value) of the port used in
determining its state.
PATH-COST This is the path cost of the port used in determining its state.
Faster ports should be set with a lower path cost. We
recommend a path cost of 4 for Gigabit ports, 19 (Decimal) for
100M ports, and 100 for 10M ports.
TOP-CHG Determines whether changes in this link will or will not cause
a topology change. Ports with end-stations connected to them
should be set t o dis abl e (di s ) t o prevent changes in the state of
the end-station (such as poweri ng off the PC) from generatin g
a topology change. Ports with all devices, other than endstations, connected to them should be set to Enable (ena;
default).
58 Cajun P120 User’s Guide
Page 73

P120 Port Configuration Group (P120)
This group includes parameters for the configuration of switched ports. The table
below shows the parameter names, default values, range of values, and value to be
used with the index keyword.
The syntax for this command is:
set|show P120 <all|port#> list
Table 6.11 P120 Group Parameters
Chapter 6 Legacy CLI (Command Line Interface)
Parameter Description
ADMIN Enables the port
Default
Value(s)
Valid Range for Values
ena dis, ena
to forward frames
DUPLEX Duplex type and
speed depending
on the device to
be connected
REDUNDANT Creates up to 4
redundant pairs
auto (if supported), full
(for 1000M
ports)
none 1 primary, 1 backup
100-half, 100-full,
10-half, 10-full, auto
2 primary, 2 backup
3 primary, 3 backup
4 primary, 4 backup
LAG Sets link
none base, link, none
aggregation
FLOW-CONTROL Enables flow
dis ena, auto, dis
control
HOLB-P Allows early
dis ena, dis
packet drop
PORT-PRI Sets port priority regular regular, high
PORT-VLAN Sets port VLAN 1 1-255
VLAN-MODE Sets VLAN
tagging
Cajun P120 User’s Guide 59
No tagging (no
802.1q tagging)
tagging, no tagging
Page 74

Chapter 6 Legacy CLI (Command Line Interface)
ADMIN Enable or disable the forwarding of frames by the port.
DUPLEX Select the duplex mode of device that is connected to each
switch port:
• 100-half – use this to set the port to half duplex and
100 Mbps.
• 100-full – use this to set the port to full duplex and
100 Mbps.
• 10-half – use this to set the port to half duplex 10 Mbps.
• 10-full – use this to set the port to full duplex and 10 Mbps.
• auto – use this for a 10/100 Mbps port that is co nnected to a
device that supports auto-negotiation.
REDUNDANT Use this to configure redundant links. If one link should fail,
the other link will automatically take over the load. You may
create four separate redundant links per Cajun P120. One link
should be configured as Primary and the other link should be
configured as Backup. The link designated Primary is then the
operational link and Backup is its redundant link.
Both the operational link and the redundant link should be assigned to
the same VLAN. Redundancy should be configured on one side of the
connection. Only 4 pairs of redundant lin ks are permitted.
Avoid using redundancy when Spanning Tree is enabled.
LAG Use this to configure Link Aggregation Groups - LAG (trunk). A
link may consists of up to 8 ports. The available groups are:
1-4, 13-16
5-8, 17-20
9-12, 21-24.
Each Cajun P120 supports up to 4 LAGs.
• none – normal operation, no link aggregation.
• base port (flood port) – sets this port to the primary port.
This is the port that transfers broadcasts and multicasts as
well as the one used for the active spanning tree algorithm.
Each LAG must have one port set to base.
• link – sets the port to participate in the link aggregation
group.
The same port may not be set as both a link aggregation and a
redundant link. For link aggregations to operate, the cables must be
connected to match your settings (i.e. Primary-to -P rimary and
Secondary-to-Secondary). All members of a link aggregation group,
should be assigned to the same VLAN.
60 Cajun P120 User’s Guide
Page 75

Chapter 6 Legacy CLI (Command Line Interface)
FLOW-CONTROL Use this to enable flow control on a full duplex port or enable
the auto-negotiation process to determine whether the port
and device connected can operate using flow control.
When you disable the flow control setting of 10 Mbps or 100 Mbps
ports, the change will not take effect until the switch is reset or powered
off and on again.
HOLB-P Use this to release traffic overload scenarios by early packet
drop.
PORT-PRI Use this to change the priority settings for the port.
A Round Robin chain ensures that low priority frames will not
be starved.
• regular– all frames received on this port will have a regular
priority, unless the frame is tagged with high priority.
• high – forces all frames received on this port to have a high
priority.
The Cajun P120 treats all the received BPDUs as high priority
packets - regardless of the Port-Priority and to the Port Tagging
Mode. Unknown frames are always set to lo w priority.
PORT-VLAN Use this to set ports to a VLAN or show which ports are on
which VLAN.
VLAN-MODE Use this to set the port VLAN tagging mode. There are two
available modes:
• Tagging - In this mode all packets are transmitted tagged
with their VLAN and Priority in the 802.1Q format (in SW
V er. 1.0, packets belonging to the Port V LAN are tra nsmitted
untagged). The port is “BindToAll” VLANs within the Cajun
P120 switch.
Use this mode when connecting 802.1Q-compliant devices
to such a port.
• No Tagging - In this mode all packets are transmitted
untagged. The port is “bindTo” only the Port VLAN.
Use this mode when connecting legacy or 802.1Q prioritytagged devices.
In both modes, received tagged packets are mapped to their
VLAN in the tag, while untagged or priority-tagged (VIDEO)
packets are mapped to the Port VLAN.
Cajun P120 User’s Guide 61
Page 76

Chapter 6 Legacy CLI (Command Line Interface)
Note:
1. To create a true backbone link (Tx and Rx packets are VLAN tagged), set PortVLAN of such a link to an unused VLAN number, and set its VLAN-tagging mode to
“tagging”.
2. To create a hybrid segment (on which both tagging and non-tagging devices are
connected), set Port-VLAN of such a link to the VLAN number of the non-tagging
devices, and set its VLAN-tagging mode to “tagging”.
3. When connecting two switches, users should always set the same Port-VLAN
number on both sides of the link - regardl ess of the VLAN Tagging mode.
4. In a P120 environment, VLAN #255 is not used as a Global-VLAN. This means
that when connecting with Cajun P110, M770, or M440 environments, packets
that belong to VLAN #255 may be forwarded differently in each environment. Do
not use #255 in a mixed environment with switches that do support the VLAN
Global concept.
Expansion Module Group (X120xx)
This group includes parameters for the configuration of the expansion modules.
The table below displays the module name and its abbreviation.
The syntax for this command is:
set|show X120
Where
is the module type (e.g., L2, T8...)
xx
xx
Table 6.12 Module Name Abbreviations
Module Name Abbreviation
Cajun X120S2 X120S2
Cajun X120L2 X120L2
Cajun X120S1 X120S1
Cajun X120L1 X120L1
Cajun X120F2 X120F2
Cajun X120T8 X120T8
Cajun X120G2 X120G2
For a description of the Expansion Module Group Parameters see the Section “P120
Port Configuration Group (P120)” on Page 59 (see Note below.)
Note: Autoneg is not a valid value for 100 Mbps Fiber Expansion modules when
setting Duplex Mode.
62 Cajun P120 User’s Guide
Page 77

Agent VLAN Group (VLAN)
This group includes parameters for the configuration of the Agent VLAN. The table
below displays the parameters, a description of the parameters, the default values,
and the valid range of values.
To view or change these parameters, type the command:
set|show vlan list
at the prompt.
Table 6.13 VLAN Group Parameters
Chapter 6 Legacy CLI (Command Line Interface)
Parameter Description
MNGVLAN # Defines the VLAN of
the Cajun P120 agent
Note: The Agent VLAN must be the same as the Management Station VLAN.
Port Mirroring Group (COPY-PORT)
This group includes parameters for the configuration of the destination port (the
port to which you wish to connect the netw ork ana ly zer) a nd sour ce port (th e port
that you want to analyze/monitor). The table below d isplays the parameters, a
description of the parameters, the default values, and the valid range of values.
The syntax for this command is:
set|show copy-port
Table 6.14 COPY-PORT Group Parameters
Parameter Des cription
DEST-PORT Destination port none 1-40, none
Default
Value(s)
Valid Range for
Values
VLAN 1 1-3071 (1-255 in S/W
Version 1.0)
Default
Value(s)
Valid Range
for Values
SOURCE-PORT Source port none 1-40, none
DEST-PORT Port to be connected to an external probe/network analyzer.
SOURCE-PORT The port that will be mirrored to the destination port.
Cajun P120 User’s Guide 63
Page 78

Chapter 6 Legacy CLI (Command Line Interface)
Note: These limitations apply when config uring the destination a nd source ports:
* The same switched port cannot be configured to be both a source port
and a destination p ort.
* Only a single destination port can be set at one time in the Cajun P120.
* If the destination port is 10 Mbps, you may loose packets.
* Source and destination ports should be in the same VLAN.
TFTP Configuration Group (TFTP)
This group includes TFTP configuration parameters. The table below displays the
parameters, a description of the parameters, the default values, and the valid range
of values.
To view or change these parameters, type the command set|show tftp list
at the prompt.
Table 6.15 TFTP Group Parameters
Parameter Description
Default
Value(s)
Valid Range for Values
TFTP-OP TFTP operation setting limited limited, tftp-forever, notftp
TFTP-IP IP address of TFTP host 0.0.0.0 IP address format
TFTP-FILENAME TFTP file name P120.lst 54 characters max.
TFTP-OP Select the TFTP operation setting:
• limited – automatically attempts TFTP. If the attempt is
unsuccessful, it makes 10 more attempts. This setting is
recommended.
• tftp-forever – automa tically attempts TFTP. If the attempt
is unsuccessful, it continues to try indefinitely.
• notftp – does not perform TFTP.
use the tftp-cmd command to start or stop the TFTP
process.
TFTP-IP Enter the IP address of the TFTP host. This is required for the
TFTP process.
TFTPFILENAME
Enter the path and name of the TFTP list file (text file with a
list of files to be downloaded from the TFTP server). See
Appendix B, Software Download.
64 Cajun P120 User’s Guide
Page 79

SNMP Configuration Group (SNMP)
This group includes parameters for the configuration of SNMP communities and
management stations to receive traps. The table below displays the Index values,
the parameter names, the community name, and their privileges.
To view or change these parameters, type the command set|show snmp list
at the prompt.
Table 6.16 SNMP Group Parameters
Chapter 6 Legacy CLI (Command Line Interface)
Index Value Parameter Community Name
Privileged
16 characters max.
read and
write (rw)
read only
(r)
Community 1 COMMUNITY public r
Community 2 COMMUNITY pl rw
Community 3 COMMUNITY null r
Community 4 COMMUNITY null r
Community 5 COMMUNITY null r
Index Value Parameter IP Address of IP Management Stations
Community 1 TRAP ______.______.______.______
Community 2 TRAP ______.______.______.______
Community 3 TRAP ______.______.______.______
Community 4 TRAP ______.______.______.______
Community 5 TRAP ______.______.______.______
COMMUNITY Allows you to change the list of community names and
Privileges. Up to 5 community names can be defined for the
Cajun P120.
TRAP Enter the IP address of each management station that you
would like to receive SNMP traps from the Cajun P120. Up to
5 trap managers can be defined.
If you would like the SNMP traps to display in the OpenView Alarm
Log, you should set the IP address and net mask of the OpenView
station under trap manager (community 1 trap).
Cajun P120 User’s Guide 65
Page 80

Chapter 6 Legacy CLI (Command Line Interface)
Things to Keep in Mind
When you use the CLI and perform the write command, the CLI checks for
inconsistencies in your configuration. If inconsistencies are found, it displays
two columns of values – those already stored in the Cajun P120 and those that
you have just configured and it cannot save. Your configuration cannot be
saved until you correct these inconsistencies and re-issue the write
command.
• You should change the Cajun P120’s default IP address and net mask.
Error Messages
You may receive the following error messages when using the CLI.
• The Privileged level timer has expired. You have been
removed from the Privileged level.
After 10 minutes without keyboard activity, you are automatically removed
from the Privileged level and returned to the non Privileged level. To re-enter
the Privileged level use the login or flogin command and enter the password.
• This parameter is invalid. It is not found in the
enumeration list.
The value you entered is not found in the list of valid values for this parameter.
Check the list of valid values and check your spelling.
• The number is out of range.
The value you entered is not within the valid range for this parameter.
• This command can only be executed in the Privileged level.
Enter Privileged level with LOGIN.
You must be in Privileged level to use the command you entered. To enter
Privileged level use the login command and enter the password.
• This command cannot be executed in the Privileged level.
Exit Privileged level with EXIT.
You must be in Privileged level to use the command you entered. To enter
Privileged level use the exit command.
• This command cannot be nested.
You have attempted to perform a new command before completing the
previous command. You are still in a command when the prompt appears as
group>. To break the previous command press Ctrl-Q.
• Bad configuration setup. The parameters are restored to
their previous values.
Your configuration could not be saved due to incorrect parameter settings. Your
previous configuration has been restored.
• Field is missing.
Most likely there are two values for this parameter, for example an IP address
and net mask, and you have only entered one. You must enter both values
even if you are only changing one value.
66 Cajun P120 User’s Guide
Page 81

Chapter 7
Cajun Campus CLI (Command Line Interface)
This chapter provides instructions for the configuration of the Cajun P120 switch
using the text-based Cajun Campus CLI (Command Line Interface or Terminal
Emulation).
The configuration procedure involves establishing a Telnet session or a serial
connection and then using the Cajun P120’s internal CLI (see Chapter 5,
Introduction to the Command Line Interfaces). The CLI is command-line driven
and does not have any menus. To activate a configuration option, you must type
the desired command at the prompt and press Enter.
Cajun P120 User’s Guide 67
Page 82

Chapter 7 Cajun Campus CLI (Command Line Interface)
Commands
Table 7.1 shows the commands for Normal level commands. Normal level
commands are also available from the Privileged and Technical levels.
How Commands are Organized
Command descriptions are organized by groups. A full description of the command
is found on the page shown in Table 7.1 and Table 7.2.
Table 7.1 User Level Commands
Commands See page
Console> set enablepass 72
Console> set password 72
Console> set techpass 73
Console> set defpass 73
Console> enable 74
Console> show ip route 74
Console> show system 74
Console> show image version 75
Console> show snmp 75
Console> show interface interface 76
Console> show port 76
Console> show
Console> show port flowcontrol 79
Console> show cam 80
Console> show cam mac 80
Console> show port mirror 81
Console> show download status 81
Console> copy 83
68 Cajun P120 User’s Guide
module
78
Page 83

Chapter 7 Cajun Campus CLI (Command Line Interface)
Table 7.2 Privileged Level and Security Commands (this level includes all the show
commands from the previous level)
Command See page
Console>(enable) lock port 82
Console>(enable) unlock port 82
Console>(enable) add mac 82
Console>(enable) delete mac 83
Console>(enable) disable 84
Console>(enable) download 84
Console>(enable) set logout 86
Console>(enable) set port mirror 86
Console>(enable) set port flowcontrol 87
Console>(enable) set ip route 87
Console>(enable) set license 88
Console>(enable) set snmp community 88
Console>(enable) set snmp trap 89
Console>(enable) set system location 89
Console>(enable) set system name 89
Console>(enable) set system contact 89
Console>(enable) set interface 90
Console>(enable) set port level 90
Console>(enable) set port negotiation 91
Console>(enable) set port enable 92
Console>(enable) set port disable 92
Console>(enable) set port speed 92
Console>(enable) set port duplex 93
Cajun P120 User’s Guide 69
Page 84

Chapter 7 Cajun Campus CLI (Command Line Interface)
Table 7.2 Privileged Level and Security Commands (this level includes all the show
commands from the previous level)
Command See page
Console>(enable) set vlan 95
Console>(enable) clear port mirror 96
Console>(enable) clear ip route 96
Console>(enable) clear snmp trap 97
Console>(enable) clear vlan 97
Console>(enable) clear cam 98
Console>(enable) reset 99
Console>(enable) reset system 99
Console>(enable) show license 99
70 Cajun P120 User’s Guide
Page 85

Sample Session
Contained below is a step-by-step configuration for the Cajun P120 unit. This
sample configuration is based on a Cajun P120 with factory default settings.
Screen Display Explanation
Chapter 7 Cajun Campus CLI (Command Line Interface)
password:
Console>
norm
enable
enter Normal level password
enter Login Name for
Privileged level
Enter password:
enable
enter Privileged level
password
console>(enable)
console>(enable)
console>(enable)
console>(enable)
set ip route
set interface...
set snmp community
set port...
set IP parameters
set interface parameters
set snmp community
parameters that can be set on
your Cajun P120
console>(enable)
disable
exits the Privileged level
Verify that all parameters were accurately saved using the show command. Exit
your CLI session.
Cajun P120 User’s Guide 71
Page 86

Chapter 7 Cajun Campus CLI (Command Line Interface)
User Level Comma nd s
Password Commands
Set Password Command
Use the set password command to change the login password on the CLI. The
command prompts you to enter the old password. If the password is valid, you are
prompted to enter a new password and to verify the new password.
The syntax for this command is: set password
Example:
Console>(enable) set password
Enter old password: <old_password>
Enter new password: <new_password>
Retype new password: <new_password>
Console>(enable)
Set Enablepass Command
Use the set enablepass command to change the password for the Privileged
level of the CLI. The command prompts you to enter the old password. If the
password is valid, you ar e prompt ed to ente r a new pass word and to verify the new
password.
The syntax for this command is: set enablepass
Example:
Console>(enable) set enablepass
Enter old password: <old_password>
Enter new password: <new_password>
Retype new password: <new_password>
Console>(enable)
Note: You can change the User, Pri vileged or Technician Le vel password s from any
level.
72 Cajun P120 User’s Guide
Page 87

Chapter 7 Cajun Campus CLI (Command Line Interface)
Set Techpass Command
Use the set techpass command to change the password for the Technician
level of the CLI. The command prompts you to enter the old password. If the
password is valid, you are prompted to enter a new password and to verify the new
password.
Note: Although you can change this password, the commands for the Technician
level are intended for use by a qualified Lucent Technician only.
The syntax for this command is: set techpass
Example:
Console>(enable) set techpass
Enter old password: <old_password>
Enter new password: <new_password>
Retype new password: <new_password>
Console>(enable)
Set Defpass Command
Use the set defpass command to change all passwords back to their default
settings.
Note: To use the set defpass command your Terminal must be physically
connected to the Cajun P120’s Console Port.
The syntax for this command is: set defpass
Example:
Console>(enable) set defpass
Password were set to their default values!
Console>(enable)
Cajun P120 User’s Guide 73
Page 88

Chapter 7 Cajun Campus CLI (Command Line Interface)
Enable Command
Enable Command
The enable command is used to enter the Privileged level. In Privileged level,
additional commands are available. The (enable) in the prompt indicates that the
system is in Privileged level and either Normal level or Privileged level commands
can be entered.
The syntax for this command is: enable
Example:
Console> enable
Enter password:
Console>(enable)
Show Commands
Show IP Route Command
Use the show ip route command to display IP routing table entries.
The syntax for this command is: show ip route
Example:
Console> show ip route
Destination
------------
Gateway
-------------
Interface
------------
0.0.0.0 172.20.22.201 ib1
Console>
Show System Command
The show system command provides the following system information:
console> show system
System-Up-Time : 0 Day(s), 1 Hour(s), 44 Minute(s), 39 Second(s)
MIB-II System-Name : CajunP120
MIB-II System-Contact : John-Smith
MIB-II System-Location : Atidim
console>
74 Cajun P120 User’s Guide
Page 89

Chapter 7 Cajun Campus CLI (Command Line Interface)
Show Image Version Command
Use the show image version command to display the software version of the
image on both Banks of the Cajun P120.
The syntax for this command is: show image version [slot_num]
slot_num Module number (always 1)
Example:
Console> show image version
Mod
-------
Module-Type
----------------
Bank
-------
Version
----------
1 CajunP120 Base A 2.5.7
B 2.0.8
Show SNMP Command
Use the show snmp command to display SNMP information.
The syntax for this command is: show snmp
Example:
Console> show snmp
Community-Access
---------------read-only public
read-write private
trap public
Trap-Rec-Address
----------------
192.122.173.42 all
0.0.0.0 all
192.122.178.44 all
Community-String
----------------
Traps Enabled
-----------------
Console>
Cajun P120 User’s Guide 75
Page 90

Chapter 7 Cajun Campus CLI (Command Line Interface)
Show Interface Command
Use the show interface command to display information on network interfaces.
The syntax for this command is: show interface
Example:
To display the sl0, sb1 and sb2:
Console> show interface
ib1: vlan 1 172.16.25.130 netmask 255.255.0.0
sl0: slip 0.0.0.0 dest 0.0.0.0
Console>
Show interface Command Output Fields:
sl0
Information on the SLIP interface
slip IP address of the SLIP interface
slip dest IP address of the host to which the console port will be
connected
ib1 Information on the Agent interface
vlan Number of the VLAN to which the ib1 interface has been
assigned (known as the management VLAN)
inet IP address of the interface
netmask Network mask for the interface
Show Port Command
Use the show port command to display port status.
The syntax for this command is: show port [slot_num[/port_num]]
slot_num Module number (always 1).
port_num (Optional) Number of the port. If you do not specify a number,
all the Cajun P120 ports are shown.
76 Cajun P120 User’s Guide
Page 91

Chapter 7 Cajun Campus CLI (Command Line Interface)
Example:
To display the status for port 4 on Cajun P120 (1):
Console> show port 1/4
Admin
Port
---1/4 disable down 203 normal enable fdx 100 10_100
Status
-------
Link
State
-----
Vlan
----
Level
-----
Neg
----
Duplex
------
Speed
-----
Type
-----
BaseT
Console>
Port Table: show port Command Output Fields
Field Description
Port Cajun P120 (always 1) and port number
Admin Status Administration status of the port (enable, disabled
Link State Status of the port (up, down)
Vlan Port-VLAN of the port
Level Priority level for the port (normal or high)
Neg The negotiation status of the port (enable, disable)
Duplex Duplex setting for the port (fdx, hdx)
Speed Speed setting for the port (10, 100).
Type Port type, for example, 10_100BaseT, 10BaseFL,
100BaseTX, 100BaseFX MM, 100BaseFX SM, 10/
100BaseTX.
Cajun P120 User’s Guide 77
Page 92

Chapter 7 Cajun Campus CLI (Command Line Interface)
Show Module Command
Use the show module command to display the Cajun P120 status and information.
If an expansion sub-module is installed it’s type and status are also shown.
The syntax for this command is: show module [slot_num]
slot_num Module number (always 1)
Example:
Console> show module
Mod
--1 CajunP120 Base 24 4.0 Bank A: 1.0
Mod
--1 CajunX120S2 2
Module-Type
-----------
Expansion-Type
--------------
Ports
-----
Ports
-----
Serial-Num
----------
Serial-Num
----------
C/S
----Hw----
C/S
----Hw----
SwVersion
----------
Bank B: 1.0
SwVersion
----------
Output Fields
Field Description
Mod Module number (always 1)
Module-Type Module type: Cajun P120 Base module or Expansion sub-module
Expansion-
Expansion board Type
Type
Ports Number of ports
Serial-Num Serial number
C/S Configuration Symbol
Hw Hardware version
Sw Version Current Software version running on the Cajun P120
78 Cajun P120 User’s Guide
Page 93

Chapter 7 Cajun Campus CLI (Command Line Interface)
Show Port Flowcontrol Command
Use the show port flowcontrol command to display per-port status
information related to flow control.
The syntax for this command is:
show port flowcontrol [slot_num[/port_num]
slot_num Module number (always 1)
port_num (Optional) Number of the port on the module. If you do not specify
a number, filters configured on all the Cajun P120 ports are shown.
Example:
This example shows how to display the flow-control port status and statistics:
Console> show port flowcontrol
Port Send-Flow Control Receive-Flow Control
-----
Admin
----------
Oper
------
Admin
--------
Oper
-------1/1 on on on on
1/2 off off off off
Output Fields
Field Description
Port Module and port number.
Send-Flow
Control- Admin
and
Send-Flow
Control- Oper
Receive-Flow
Control- Admin
and
Receive-Flow
Control- Oper
Cajun P120 User’s Guide 79
Flow-control administration. Possible settings:
• ON indicates the local port sends flow control to the far
end;
• OFF indicates the local port does not send flow control
to the far end;
Flow-control administration. Possible settings:
• ON indicates the local port requires the far end to send
flow control;
• OFF indicates the local port does not allow the far end
to send flow control;
Page 94

Chapter 7 Cajun Campus CLI (Command Line Interface)
Show Cam Command
Use the show cam command to display the CAM table or a specific MAC.
The syntax for this command is:
show cam slot_num | port_num
show cam mac mac_addr [vlan]
vlan (Optional) Number of the VLAN. If a VLAN is not specified, all
VLANs are displayed.
slot_num Module number (always 1)
port_num Number of the port.
mac_addr MAC address.
Example:
To display dynamic CAM entries for all VLANs:
Console> show cam
VLAN
---1 00-60-5c-86-5b-81 1/1
1 00-60-2f-35-48-17 1/1
1 00-80-24-f3-47-20 1/2
1 00-60-09-78-96-fb 1/1
1 00-80-24-1d-d9-ed 1/2
1 00-80-24-1d-da-01 1/2
1 08-00-20-7a-63-01 1/1
DestMAC/Route Des
-----------------
Destination Ports
-----------------
Total Matching CAM Entries Displayed = 7
Console>
This example shows routers listed as the CAM entries. When the MAC address
belongs to a router, it is shown by appending an "R" to the MAC address. When a
VLAN is specified, only those CAM entries matching the VLAN number are
displayed.
Console> show cam mac 00-00-81-01-23-45
VLAN
---1 00-00-81-01-23-45 1/9
Dest MAC/Route
--------------
Destination Ports
-----------------
Total Matching CAM Entries = 1
Console>
80 Cajun P120 User’s Guide
Page 95

Chapter 7 Cajun Campus CLI (Command Line Interface)
Show Port Mirror Command
Use the show port mirror command to display mirroring info. The syntax of
this command is: show port mirror [module_num[/port_num]]
mod_num (Oprional) number of the module.
port_num (Optional) number of the source or the destination port.
Example:
Console>(enable) show port mirror 4/1.
Mirroring both Rx and Tx packets from port 1/1 to port 1/12 is enabled.
Console>(enable)
Show Download Status Command
Use the show download command to display the status of the download process.
One session of download is active on the system.
The syntax for this command is:
show download status [slot_num]
slot_num Module number (always 1)
Example:
Console>(enable) show download status
TFTP is looking for server.
Download Host IP Address is 149.49.39.110
TFTP Destination Bank is B
Transferred file name - c:\p120\lucent_ver\1_1_2\p120.exe
Received bytes: 0
Request retry counter: 2
Block retry counter: 0
Cajun P120 User’s Guide 81
Page 96

Chapter 7 Cajun Campus CLI (Command Line Interface)
Privileged Level Comman ds
Security Commands
Lock Port Command
Use this command to secure ports. The syntax of this command is: lock port
{module number/port_number | all}. all - a shortcut for securing all ports of
the device.
Examples:
Console>(enable) lock port 1/1
Port 1 locked
Console>(enable)
Console>(enable) lock port all
All ports locked!
Console>(enable)
Unlock Port Command
Use this command to unlock ports and return them to not-secured mode. The
syntax of this command is:
unlock port { module number/port_number | all }
all - a shortcut for unsecuring all ports of the device
Example:
Console>(enable) unlock port 1/10
Port 10 unlocked
Console>(enable)
Add MAC Command
Use this command to add an address to the secure list of a locked ports (see Lock Port
Command on page 82). The minimal parameters are address and port. It is optional
to specify the VLAN of the address. If the VLAN is not specified the default is port's
VLAN.
The syntax of this command is:
add mac {MAC_address port_number [vlan_number]}
Examples:
Console>(enable) add mac 00-60-5c-86-5b-81 2 3
Address 00-60-5c-86-5b-81 was added to the secure list !
Console>(enable)
82 Cajun P120 User’s Guide
Page 97

Chapter 7 Cajun Campus CLI (Command Line Interface)
If you try to add a MAC address to a non-secured port (Port #1 in this case) you get
the following error message:
Console>(enable) add mac 00-65-5b-86-5b-82 1 2
ERROR: Try to add secured MAC to non-secured port 1
Delete MAC Command
Use this command to delete an address from the secure table. The required
parameter is the address and the VLAN number. If the port was not specified, the
address shall be cleared from all ports.
The syntax of this command is:
Delete MAC {MAC_address [port_number [vlan_number]]}
Examples:
Console>(enable) delete mac 00-60-5c-86-5b-81 2 3
Address 00-60-5c-86-5b-81 was deleted from the secure list !
Console>(enable)
If you try to delete a MAC address from a non-secured port (Port #1 in this case)
you get the following error message:
Console>(enable) delete mac 00-65-5b-86-5b-82 1 2
ERROR: Try to delete secured MAC to non-secured port 1
Configuration Upload and Download Commands
Copy Command
The syntax of this command is: copy {tftp | running-config}{running-
config | tftp} <filename*> <server IP>
tftp Keyword that allows the user to copy to or from a TFTP
server.
running-
Specifies the currently running configuration.
config
*
i) The default name of the configuration file is P120.cfg.
ii) You must also include the full path where the file is located.
Caution: Before you can upload a configuration file to the TFTP server you must
first create an empty file on the server. This file must have the same name and path
as the file that you want to upload. Otherwise you will get an ‘access violation’
error message.
Cajun P120 User’s Guide 83
Page 98

Chapter 7 Cajun Campus CLI (Command Line Interface)
Examples:
To upload the configuration file:
Console>(enable) copy running-config tftp C:\P120.cfg
149.49.38.41
IP address of remote host [149.49.38.41]? y
Upload configuration to [C:\P120.cfg]? y
Output:
Loading configuration please wait…………………………….
Configuration has been copied successfully. (12316 bytes).
Console>(enable)
To download the configuration file:
Console>(enable) copy tftp running-config config1.cfg
149.49.38.41
IP address of remote host [149.49.38.41]? y
Download configuration from [config1.cfg]? y
Configure using config1.cfg from 149.49.38.41 (y/n)? y
Output:
Loading configuration please wait…………………………….
Finished network download. (10067 bytes).
Console>(enable)
Returning to Normal Mode
Disable Command
Use the disable command to return to normal mode from privileged mode.
The syntax for this command is: disable
Example:
Console>(enable) disable
Console>
Downloading a Software Image
Download Command
Use the download command to copy a so ftwar e image f rom a sp ecifie d hos t to the
Flash memory of the Cajun P120.
84 Cajun P120 User’s Guide
Page 99

Chapter 7 Cajun Campus CLI (Command Line Interface)
The syntax for this command is:
download <host_IP><file_full_name><mod_num>
host IP address of host
file Name of file to be downloaded
slot_num Module number (always 1)
Cajun P120 User’s Guide 85
Page 100

Chapter 7 Cajun Campus CLI (Command Line Interface)
Set Commands
Set Logout Command
The set logout command is used to set the number of minutes until the system
automatically disconnects an idle session.
The syntax for this command is: set logout <timeout>
<timeout> Number of minutes (0 to 10,000) until the system
automatically disconnects an idle session. Setting the v alue to 0
disables the automatic disconnection of idle sessions
Default = 20
Examples:
To set the number of minutes until the system disconnects an idle session
automatically:
Console>(enable) set timeout 20
Sessions will be automatically logged out after 20 minutes of
idle time.
Console>(enable)
To disable the automatic disconnection of idle sessions:
Console>(enable) set timeout 0
Sessions will not be automatically logged out.
Console>(enable)
Set Port Mirror Command
Use the set port mirror command to define a port mirroring sourcedestination pair in the module. the syntax for this command is:
set port mirror source-port mod_num/port_num mirror-port
mod_num/port_num sampling {always | disable } [direction both]
mod_num Number of the source or destination module.
port_num Number of the source or destination port.
always keyword to activate this copy port entry.
disable keyword to pass this copy port entry to the "not ready" state.
both keyword to copy both incoming and outgoing traffic.
86 Cajun P120 User’s Guide
 Loading...