

Page 1
M-Series
Professional Two-way Radio
Owner’s Manual
Page 2
Copyright Information
The Motorola products described in this manual may include copyrighted Motorola programs stored in semiconductor memories or
other media. Laws in the United States and
other countries preserve for Motorola, certain
exclusive rights for copyrighted computer
programs, including the exclusive right to
copy or reproduce in any form, the copyrighted Motorola programs. Accordingly, any
copyrighted Motorola computer programs
contained in the Motorola products described
in this manual may not be copied or reproduced in any manner without the express
written permission of Motorola. Furthermore,
the purchase of Motorola products shall not
be deemed to grant either directly or by implication, estoppel, or otherwise, any license
under the copyrights, patents or patent applications of Motorola, except for the normal
non-exclusive royalty free license to use that
arises by operation of law in the sale of a
product.
To help you easily locate important information in this manual, the following icons are
used to signal warnings and cautions.
Here’s what the symbols mean:
!
CAUTION
Indicates a potentially hazardous situation
which, if not avoided, may result in minor or
moderate injury.
!
WARNING
Indicates a potentially hazardous situation
which, if not avoided, may result in death or
serious injury.
Please see pages 16 and 17 for complete
information.
Page 3

TABLE OF CONTENTS
FCC Licensing Information ............................................................................................ 2
Getting Started
Your New Radio................................................................................................ 3
Contents Of Package........................................................................................3
Spirit M-Series Radio.........................................................................................4
To Attach/Remove Antenna ..............................................................................5
To Attach/Remove Belt Clip............................................................................... 5
Batteries.......................................................................................................... 6
Low Battery Alert.............................................................................................. 6
To Install/Remove Batteries .............................................................................. 6
To Charge Battery With Charger Adapter ........................................................... 7
To Charge Battery With 10 Hour Desktop Charger (Optional) ..............................7
Programming
Understanding Frequencies and Codes.............................................................. 8
To Change Frequency and Code Settings........................................................... 8
1 Channel Models........................................................................................ 8
2 And 4 Channel Models.............................................................................. 9
Frequency Tables.........................................................................................................10
Code Tables................................................................................................................ 11
Operations
Turn The Radio On/Off...................................................................................... 12
Adjust The Volume........................................................................................... 12
To Send/Receive Messages.............................................................................. 12
Time-out Timer................................................................................................ 12
Scan (Optional)................................................................................................ 12
Built-In VOX (Optional)...................................................................................... 13
Accessories..................................................................................................... 13
Other Information
Troubleshooting............................................................................................... 14
Radio Care......................................................................................................15
Spirit Talk Range..............................................................................................15
Safety Information..................................................................................................16-17
One Year Limited Warranty......................................................................................18-19
Recycling Of Nickel-Cadmium Batteries........................................................................ 20
1
Page 4

LICENSING
FCC Licensing Information
Your Motorola radio operates on FM radio
communication frequencies and is subject
to the Rules and Regulations of the Federal
Communications Commission (FCC). The
FCC requires that all operators using Private
Land Mobile frequencies obtain a radio
license before operating their equipment.
Application for your FCC license is made on
FCC Form 600 and schedules D, E, and G.
To have the forms faxed to you by the FCC,
call the FCC Fax-On-Demand system at
1-202-418-0177 from your Fax machine
and request document 000600 for all forms
and instructions.
To have the forms mailed to you, call the
FCC forms hotline at:
1-800-418-FORM
(1-800-418-3676)
For questions concerning the license appli-
cation, contact the FCC at:
1-888-CALL-FCC
(1-888-225-5322)
Before filling out your application, you must
decide which frequency(ies) you can operate
on. See frequency tables on page 10.
For questions on determining your radio
frequency, please call Motorola Product
Services at:
1-800-448-6686
2
Page 5
GETTING STARTED
Your New Radio
Thank you for purchasing a Motorola Spirit
radio. Your radio is a product of Motorola’s
50 years of experience as a world leader in
the designing and manufacturing of communications equipment. With proper care
and use, your Motorola radio should give
you years of reliable communication.
Please read this manual carefully to ensure
you know how to properly operate the radio
before use.
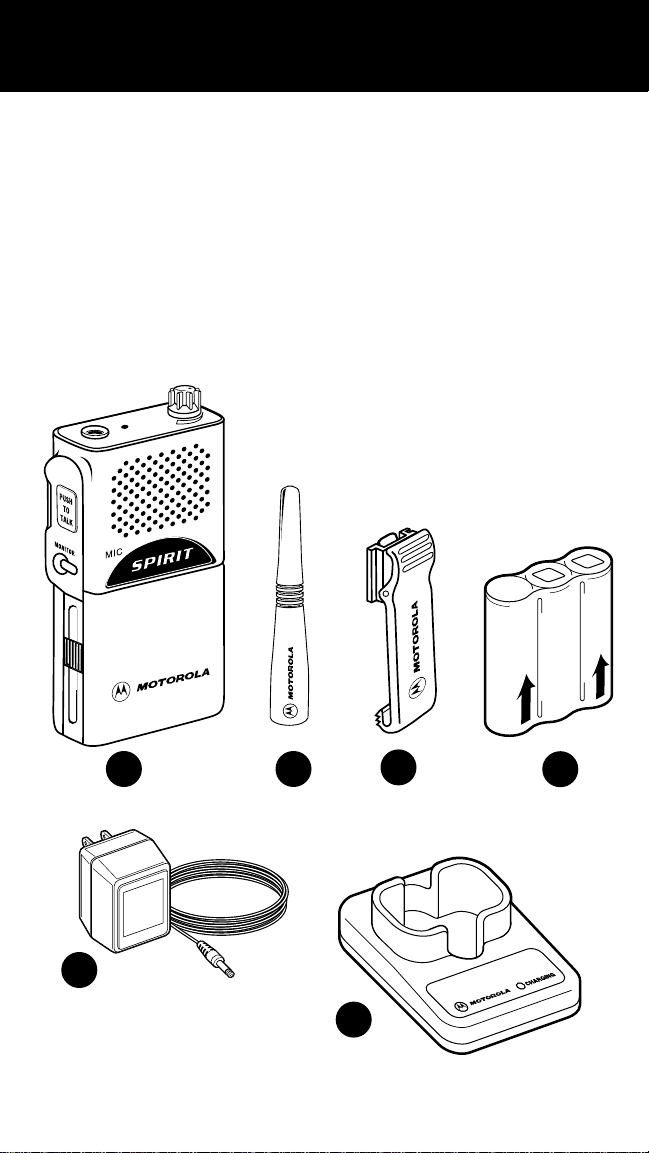
Contents of Package
1. Radio (1 channel model shown)
2. Antenna (UHF shown)
3. Belt Clip
4. Ni-Cad Battery Pack
5. 10 Hour Charger Adapter
6. 10 Hour Desktop Charger (Optional) Literature (Not shown)
Owner’s Manual
Quick Reference Guide
Warranty Card
1 2
5
3
4
6
The 10 Hour Desktop Charger is optional
and may not be included in your package.
3
Page 6
GETTING STARTED
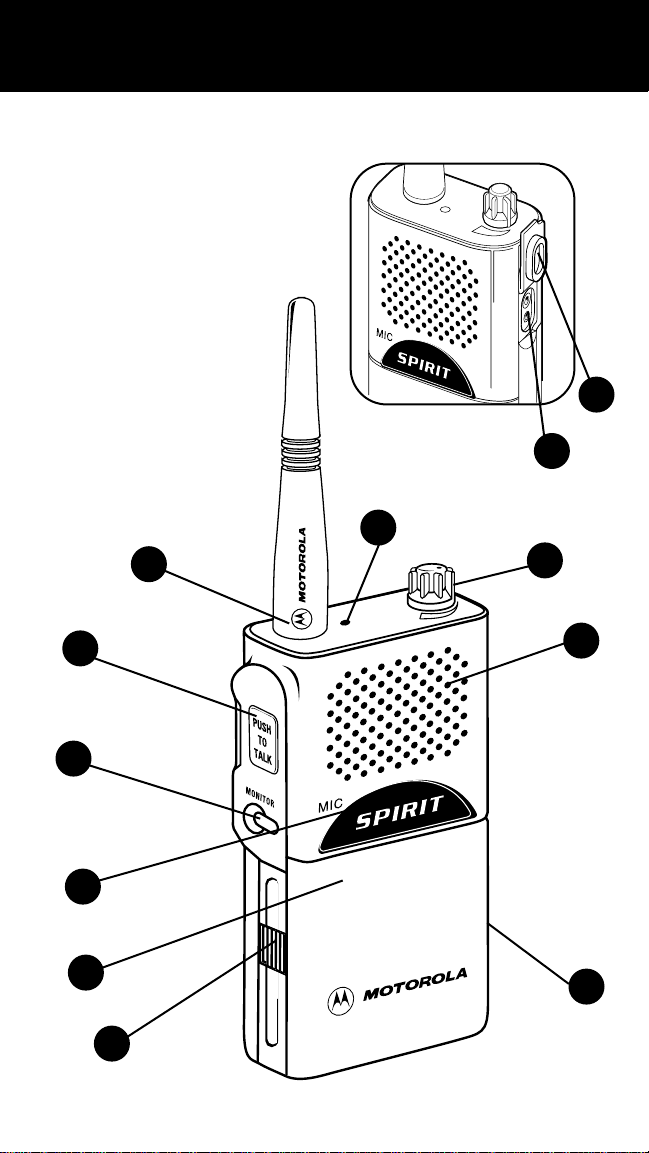
Spirit M-Series Radio
1. Antenna
2. Push-To-Talk Button
3. Monitor Button
4. Microphone
5. Battery Cover
6. Battery Cover Latches
7. Speaker
8. On-Off/Volume Knob
9. T ransmit Light
10. Accessory Jack
11. Accessory Jack Cover
1
11
10
9
8
2
7
3
4
5
6
6
4
Multi-channel models have a Channel
Selector Knob on top of the radio.
Page 7
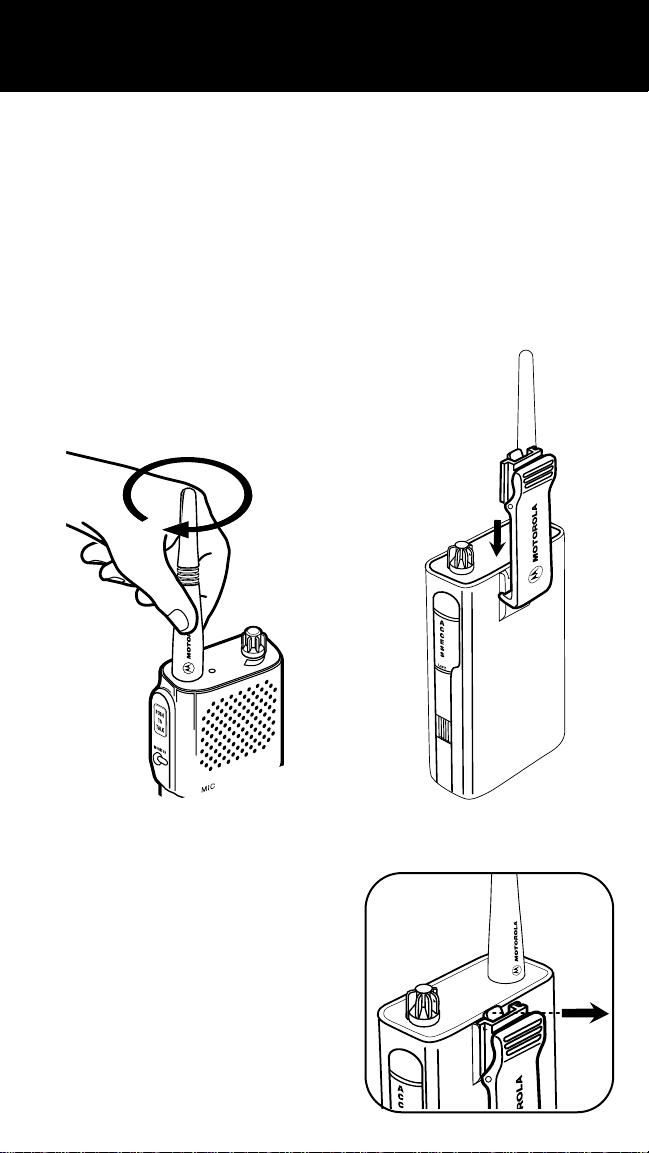
To Attach/Remove Antenna
To attach the antenna, rotate the antenna
clockwise onto the top of the radio until
hand tight. Reverse to remove. Fig. A
Note:
The antenna should always be
installed when operating the radio. Operating the radio without an antenna greatly
reduces the range of the radio.
To Attach/Remove Belt Clip
1. Align the belt clip to the mounting rails on
the back of the radio. Fig. B
2. Push the belt clip down until it clicks into
place.
3. To remove, pull tab on belt clip away from
radio to release. Fig. C
4. Slide belt clip up and off.
FIG. A
FIG. C
FIG. B
5
Page 8
GETTING STARTED
Batteries
The Ni-Cad battery ships uncharged, it must
be fully charged for 16 hours before use (first
charge only). It is recommended that only
Motorola batteries and chargers are used
with the radio.
The Ni-Cad rechargeable battery pack will
provide approximately 8 hours of operation
for your radio with normal use (5% sending
messages, 5% receiving messages and 90%
in standby mode).
Low Battery Alert
When the battery is low, the radio will beep:
• 3 to 4 seconds after turning power on
• Every 10 minutes in standby mode
• After release of the Push-To-Talk button
Recharge the battery pack immediately to
avoid interrupted use.
Note:
Remove battery pack before storing
your radio for extended periods. Batteries
may corrode over time if left in radio and can
cause permanent damage to your radio.
To Install/Remove Batteries
Note:
Radio must be OFF before installing/
removing battery.
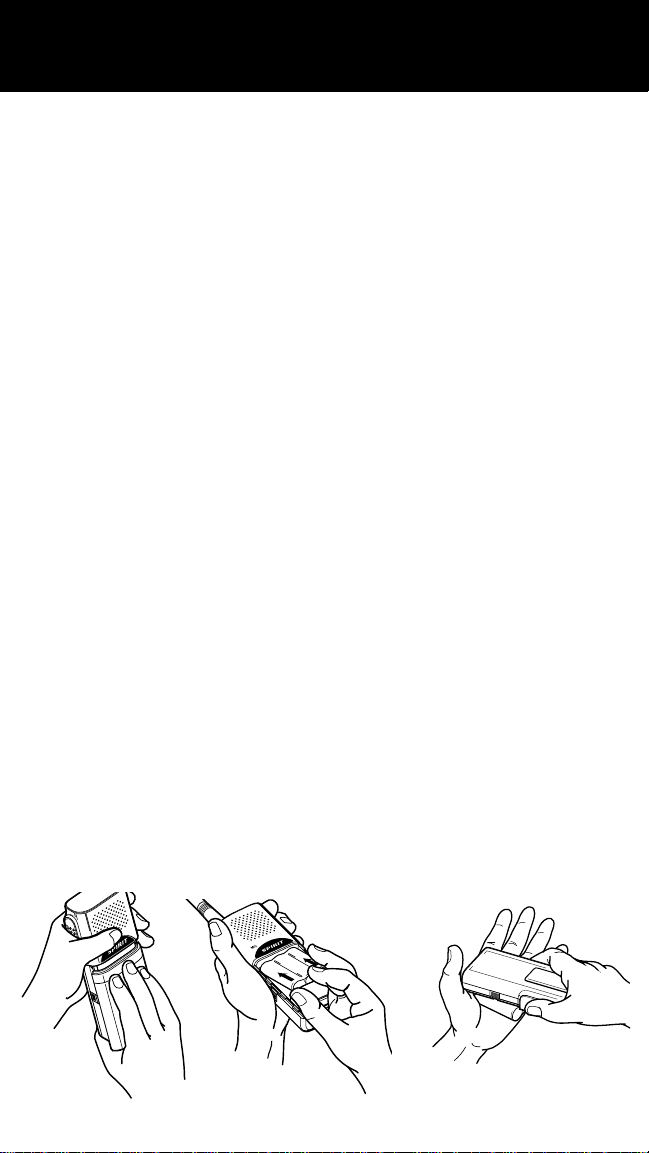
1. Push back both battery cover latches until
you see the orange tabs.
2. Slide battery cover down and lift to remove.
Fig. D
To replace/install battery, insert the battery
pack with arrows pointing towards the top of
the radio. Fig. E
3. Replace battery cover and lock latches.
4. To remove battery, remove cover, turn the
radio over and tap the battery end of the
radio against the palm of your hand. The
battery will drop into your hand. Fig. F
Note:
Do not remove the plastic wrap from
the battery pack. This will permanently damage the battery.
FIG. D
6
FIG. E
FIG. F
Page 9

To Charge Battery With Charger Adapter
1. Turn the radio off.
2. Lift accessory cover and plug the Charger
Adapter firmly into the small jack (lower
hole). Fig. G
3. Plug the charger into an electric outlet. The
light on the charger will glow continuously
if charging properly.
4. Allow 10 hours for the battery to fully
charge.
Notes:
• For optimum battery life, the battery
should not be left charging for prolonged
periods after reaching full charge. Charging the battery over the weekend is
acceptable.
• Do not transmit while radio is charging.
Transmitting while radio is charging can
cause the radio transmitter or the charger
to operate improperly.
• Turn radio off when charging. If radio is
on while charging, at least twice as much
time is required to charge the battery.
To Charge Battery With 10 Hour Desktop Charger
Note:
The Desktop Charger is optional and
may not be included in your package.
1. Connect Desktop Charger and Charger
Adapter. Fig. H
2. Charge the battery while inside the radio by
placing the radio in the Desktop Charger
with radio facing towards you.
You can also charge the battery by removing battery from radio and placing it in
Desktop Charger. Silver contacts must
face down and arrow points toward front
of charger. Fig. H
3. The light on top of the Desktop Charger will
glow continuously when radio / battery is
inserted. If light does not come on, check
radio / battery is properly inserted and
check battery/ charger contacts to be sure
they are clean. The light will continue to
glow until the radio / battery is removed
from Desktop Charger.
4. Allow 10 hours for the battery to fully
charge.
FIG. G
FIG. H
7
Page 10

PROGRAMMING
Understanding Frequencies and Codes
Frequencies:
Your radio operates on a group of frequencies
(see page 10 for complete listing). You
access frequency(ies) through radio channel(s). You can operate on any of your radio’s
frequencies, but each must be licensed
through the FCC (see page 2).
To understand the difference between frequencies and channels, think of channels as
pre-set buttons on your car stereo and the
frequencies as the many radio stations available. You can select and save different stations (frequencies) to pre-set buttons
(channels) for easy access.
Interference Eliminator Codes:
Codes filter out static, noise and unwanted
chatter on radio channels (see page 11 for
complete listing). When you operate on a frequency with a code set, you block out most
interference on the frequency. This allows you
to communicate with less interference than
when operating without a code. Remember,
since radio frequencies can be monitored,
codes will not make your conversations private.
• For compatibility with radios that do not
have codes, the radio can be set to Code
“Off" in the programming mode. See following instructions.
IMPORTANT
To talk to others in your group all radios
must be set to the same channel and code.
To Change Frequency and Code Settings
1 Channel Models
1. Hold Push-To-Talk button down while
turning radio on. Fig. J
Radio announces current frequency
setting. Example: “frequency one”
2. Press Push-To-Talk button to scroll
through frequencies.
Radio announces each frequency as
you scroll. Example: “two...three...”
3. Release Push-To-Talk when you have
reached desired frequency.
4. Press Monitor button to select and save
new frequency setting. Fig. L
Radio announces current code setting.
Example: “code two nine”
5. Press Push-To-Talk to scroll through
codes.
Radio announces each code as you
scroll. Example: “three zero...three
one”
6. Release Push-To-Talk when you have
reached desired code.
7. Press Monitor button to select and save
new code setting.
Radio “beeps” to indicate it has exited
programming and is ready for use.
Fig. K
There are settings programmed into your radio
for frequencies and codes. If it is necessary to
confirm settings or to change them for licensing purposes, the radio will audibly guide you
through a series of programming steps. If you
have questions, please call Motorola Product
Services at 1-800-448-6686.
8
FIG. J
1 Channel Model
Page 11

2 and 4 Channel Models
1. Turn Channel Selector knob to channel 1.
Fig. I
2. Hold Push-To-Talk button down while
turning radio on.
Radio announces current frequency setting for that channel. Example: “frequency one”
3. Press Push-To-Talk button to scroll
through frequencies.
Radio announces each frequency as you
scroll. Example: “two...three...”
4. Release Push-To-Talk when you have
reached desired frequency.
5. Turn Channel Selector knob to channel 2
and repeat steps 3 and 4 above.
4 Channel Models: Repeat to set channels 3 and 4.
6. Press Monitor button to select and save
new frequency setting. Fig. L
Radio announces current code setting.
Example: “code two nine”
7. Press Push-To-Talk button to scroll
through codes.
Radio announces each code as you
scroll. Example: “three zero...three
one”
8. Release Push-To-Talk when you have
reached desired code.
9. Press Monitor button to select and save
new code setting.
Radio “beeps” to indicate it has exited
programming and is ready for use.
Fig. J
Channel Selector Knob
FIG. I
2 or 4 Channel Model
Notes:
• To use this radio with other Spirit models,
please see tables on pages 10-11.
• Code numbers with two digits (10-38) will
be announced “one zero...three eight”.
• You can only scroll forward when selecting frequency or code.
• When you are changing frequency or
code, you can not send messages.
• The Code setting applies to all channels.
You can not select a different code for
each channel.
• For Radios With Scan: The radio will
sound a warning tone if you accidentally
switch to the “s” position while programming. See page 12 for more information.
Push-To-Talk
FIG. K
Monitor
FIG. L
9
Page 12

FREQUENCY TABLES
Spirit M-Series Radio Frequencies
Your Spirit M-Series radio operates on the following frequencies.
Spirit M-Series UHF* Spirit M-Series VHF**
Frequency Frequency Frequency Frequency Frequency Frequency
Number MHz Color Number MHz Color
1 464.5000 Brown 1 151.6250 Red
2 464.5500 Yellow 2 151.9550 Purple
3 467.7625 J 3 154.5700 Blue
4 467.8125 K 4 154.6000 Green
5 467.8500 Silver Star
6 467.8750 Gold Star
7 467.9000 Red Star
8 467.9250 Blue Star
Your M-Series UHF radio is pre-set to these frequency(ies):
Channel 1:
Channel 2:
Frequency 2
Frequency 8
Channel 3:
Channel 4:
Frequency 5
Frequency 6
New FCC licensees should not use frequencies 467.7625 MHz (J) and 467.8125 MHz (K).
Call 1-888-CALL-FCC (1-888-225-5322) with your questions.
*Series number begins with MU.
**Series number begins with MV.
Your M-Series VHF radio is pre-set to these frequency(ies):
Channel 1:
Channel 2:
Frequency 3
Frequency 4
Channel 3:
Channel 4:
Frequency 1
Frequency 2
Other Spirit Radio Frequencies
radio, please use the following tables to match frequency settings:
1 AND 2 WATT MODELS
1 Channel UHF Spirit Models
Freq. MHz Color S1 S2 S3 S4
464.5000 Brown OFF OFF ON ON
464.5500 Yellow ON ON OFF OFF
467.7625 J ON ON ON ON
467.8125 K OFF OFF OFF OFF
467.8500 Silver Star ON ON ON OFF
467.8750 Gold Star OFF OFF OFF ON
467.9000 Red Star ON OFF OFF OFF
467.9250 Blue Star OFF ON ON ON
2 Channel UHF Spirit Models
Channel 1 Channel 2 Dip Switch Positions
Freq. MHz Color Freq. MHz Color S1 S2 S3 S4
464.5500 Yellow 464.5000 Brown OFF OFF OFF OFF
467.7625 J 464.5000 Brown OFF ON OFF OFF
464.5500 Yellow 467.8125 K OFF OFF ON OFF
467.7625 J 467.8125 K OFF ON ON OFF
467.8500 Silver 467.8125 K OFF OFF OFF ON
464.5500 Yellow 467.9250 Blue Star OFF ON OFF ON
467.7625 J 467.9250 Blue Star OFF OFF ON ON
467.8500 Silver 467.925O Blue Star OFF ON ON ON
4 AND 5 WATT MODELS
Spirit UHF Model SU42 Spirit VHF Model SV52
Channel Frequency MHz Color
1 464.5000 Brown
2 464.5500 Yellow
To program other Spirit radios to the same frequency(ies) as your M-Series
†
Dip Switch Positions
†
1 Channel VHF Spirit Models
Freq. MHz Color S1 S2 S3 S4
151.6250 Red ON ON OFF OFF
151.9550 Purple OFF OFF ON ON
154.5700 Blue OFF OFF OFF OFF
154.6000 Green ON ON ON ON
2 Channel VHF Spirit Models
Channel 1 Channel 2 Dip Switch Positions
Freq. MHz Color Freq. MHz Color S1 S2 S3 S4
151.6250 Red 154.6000 Green OFF OFF OFF OFF
151.6250 Red 154.5700 Blue OFF ON OFF OFF
151.6250 Red 151.9550 Purple OFF OFF ON OFF
154.6000 Green 154.5700 Blue OFF ON ON OFF
†
Series number begins with SU or states Spirit Pro +.
††
Series number begins with SV, AV, PC, CS,CV or states
Spirit 2-Way or Spirit Pro.
Channel Frequency MHz Color
1 151.6250 Red
2 151.9550 Purple
††
Dip Switch Positions
††
10
Page 13

CODE TABLES
M-Series
Radios
Freq.
Code
No. Hz No. Hz S1 S2 S3 S4 S5 S6 S7 S8 (PLXXX) Hz
1 67.0 XZ 67.0 D D D D D D U U 001 67.0
2 71.9 XA 71.9 U D D D D D U U 002 71.9
3 74.4 WA 74.4 D D D D D U U U N/A N/A
4 77.0 XB 77.0 U U D D D D U U 003 77.0
5 79.7 WB 79.7 D D D D U D U U N/A N/A
6 82.5 YZ 82.5 U D D D D U U U 004 82.5
7 85.4 YA 85.4 D D D D U U U U N/A N/A
8 88.5 YB 88.5 U U D D D U U U 005 88.5
9 91.5 ZZ 91.5 D D D U D D U U N/A N/A
10 94.8 ZA 94.8 U D D D U D U U 006 94.8
11 97.4 ZB 97.4 D D D U D U U U N/A N/A
12 100.0 1Z 100.0 U U D D U D U U N/A N/A
13 103.5 1A 103.5 U D D D U U U U 007 103.5
14 107.2 1B 107.2 U U D D U U U U 008 107.2
15 110.9 2Z 110.9 U D D U D D U U 009 110.9
16 114.8 2A 114.8 U U D U D D U U 010 114.8
17 118.8 2B 118.8 U D D U D U U U 011 118.8
18 123.0 3Z 123.0 U U D U D U U U 012 123.0
19 127.3 3A 127.3 U D D U U D U U 013 127.3
20 131.8 3B 131.8 U U D U U D U U 014 131.8
21 136.5 4Z 136.5 U D D U U U U U 015 136.5
22 141.3 4A 141.3 U U D U U U U U 016 141.3
23 146.2 4B 146.2 U D U D D D U U 017 146.2
24 151.4 5Z 151.4 U U U D D D U U 018 151.4
25 156.7 5A 156.7 U D U D D U U U 019 156.7
26 162.2 5B 162.2 U U U D D U U U 020 162.2
27 167.9 6Z 167.9 U D U D U D U U 021 167.9
28 173.8 6A 173.8 U U U D U D U U 022 173.8
29 179.9 6B 179.9 U D U D U U U U 023 179.9
30 186.2 7Z 186.2 U U U D U U U U 024 186.2
31 192.8 7A 192.8 U D U U D D U U 025 192.8
32 203.5 M1 203.5 U U U U D D U U 026 203.5
33 210.7 M2 210.7 U D U U D U U U 027 210.7
34 218.1 M3 218.1 U U U U D U U U 028 218.1
35 225.7 M4 225.7 U D U U U D U U 029 225.7
36 233.6 M5 233.6 U U U U U D U U 030 233.6
37 241.8 M6 241.8 U D U U U U U U 031 241.8
38 250.3 M7 250.3 U U U U U U U U 032 250.3
OFF None — None X X X X X X X D 000 None
Other Spirit Radios
1 & 2 Watt Models
Freq.
Code
Dip Switch Positions Code
4 & 5 Watt Models
Freq.
Your Spirit M-Series radio is pre-set to code 29.
CODE TABLE KEY
D
= Down
U
= Up
X
= Either Up or Down
N/A
= Not Available
None
= Interference Eliminator Code is off. This allows you
to monitor all activity on the channel you are using.
11
Page 14

OPERATIONS
Turn the Radio On/Off
Turn the On-Off/Volume knob clockwise. You
will hear a beep and see the Transmit Light
flash momentarily to indicate the radio is on.
To turn the radio off, turn the On-Off/Volume
knob counterclockwise. You will hear a click
to indicate the radio is turned off.
Adjust the Volume
Hold Monitor button down to listen to audio
level while rotating On-Off/Volume knob.
Rotate knob clockwise to increase and counterclockwise to decrease volume.
To Send/Receive Messages
Check channel activity by pressing Monitor
button. You will hear static if the channel is
clear to use. Do not transmit if someone is
talking on channel.
1. To send messages, press Push-T o-T alk and
speak into radio. (To maximize clarity, hold
radio 1 to 2 inches from mouth). Fig. M
2. The Transmit Light will glow continuously
when sending messages.
3. T o listen for messages, release the Push-T oTalk button.
Scan (Optional)
Some M-Series models have Scan. Scan
allows you to monitor the radio’s programmed channels and code. When the
radio detects someone talking, it stops
scanning and locks in on the active channel. It allows you to listen and talk back
automatically to the person transmitting
without having to switch channels.
Note:
To communicate in scan, your radio
must be set to the same frequency and
code as the other radio(s) in your group.
To Use Scan Feature
1. Move the Channel Selector knob to the
“s” position (Fig. N). The radio will scan
the radio’s programmed channels and
code in sequential order.
2. When the radio detects someone talking,
you will hear the message.
3. Press Push-T o-T alk button to talk back on
the channel.
In scan, you will always transmit back to
the channel which last sent a message.
FIG. M
See page 15 for range information.
Time-out Timer:
The Time-out Timer feature prevents channel
congestion and helps extend battery life. The
radio will sound a warning tone if the PushTo-Talk button is pressed for 60 continuous
seconds and will stop transmitting.
12
s
2
1
FIG. N
4 Channel Model
Notes:
• In scan, after you receive a message, the
radio will remain on that channel for three
seconds before returning to scan mode.
• If you set the Channel Selector knob to
the “s” position (scan mode) and no activity is detected, you will transmit on channel 1 when you press the Push-To-Talk
Page 15

Built-In VOX (Optional)
Some M-Series models have built-in VOX
(Voice Activated Transmission). This feature
allows hands-free operation of your radio.
The sound of your voice activates transmission when the radio is used with a Headset
With Swivel Boom Mic (HMN9038) or Earpiece With Microphone (HMN9039) (Both
headset and earpiece are sold separately).
To Use VOX Feature
1. Turn the radio off.
2. Open Accessory Jack Cover and plug
accessory’s connector firmly into jack.
Fig. O.
3. Turn radio on and lower volume before
placing accessory on head or in ear.
Press Monitor button while rotating
Volume knob to adjust volume to a comfortable listening level.
4. To transmit, speak into accessory microphone. To receive, stop talking.
There will be a one second delay
between when you start or stop talking
and radio transmission.
Accessories
There are many audio, charging and carrying
accessories (sold separately) available for
Spirit M-Series radios. Accessories allow you
to customize radios to suit your business
communication needs. The right accessory
can enhance productivity and that can help
you increase customer satisfaction.
For information, contact your place of purchase or call Motorola at:
1-800-448-6686
Exit VOX Feature
1. Press Push-To-Talk button once.
2. T o transmit, press Push-T o-T alk button.
3. To receive messages, release PushTo-Talk button.
4. To return to VOX mode, turn the radio
off, then on again.
Note:
The Accessory Jack Cover is not
detachable and should be closed when
not in use.
13
Page 16

TROUBLESHOOTING
Problem
Radio Has No Power
Battery Does Not Charge or Last Long Enough
Message Not Transmitted
Message Not Received
Hearing Other Conversations or Noise on Radio
Solution
Reposition or charge battery pack.
If using Charger Adapter, make sure the plug is firmly connected into jack and the light on the adapter glows indicating
correct charging status.
If Desktop Charger is used, make sure battery is positioned
properly and light on tray is on.
Radio should be turned off when charging. Charge time will be
longer if it is left on.
Heavy usage may require a spare battery or recharging.
Make sure the Push-To-Talk button is completely pressed and
the Transmit Light is on while you talk.
Insert, reposition or charge battery pack.
Confirm radios are set on the same Channel and Interference
Eliminator Code settings. See pages 8-11.
Obstructions, operating indoors or in vehicles may interfere
with communication. Change your location.
Check to make sure the radio is on and the volume is set to a
comfortable listening level.
The code must be set to “OFF” on your radio to receive a message from a radio without code capability.
Make sure Push-To-Talk is not inadvertently being pressed on
receiving radio.
Check that your Interference Eliminator Code is set
(Active settings are 1 - 38).
Other users may be using channel - change code. If you are
part of a group, change the code on all radios.
Limited Talk Range
14
Steel/concrete structures, heavy foliage and use in buildings
and in vehicles will decrease range, check for clear line of
sight to improve transmission.
Wearing radio close to body such as in a pocket or on a belt
will decrease range, change location of radio.
Radios too far apart. Obstacles interfere with transmission.
Talk range is up to 5 miles in clear unobstructed conditions.
If the radio still doesn’t work properly, contact your place of purchase or call Motorola Product Services.
1-800-448-6686
Page 17

Radio Care
• To clean the radio housing, wipe with a
soft cloth dampened with water.
• Don’t use cleaners or solvents on the
radio, they can harm the body and leak
inside, causing permanent damage.
• Battery contacts may be wiped with a dry ,
lint-free cloth.
Spirit Talk Range
Spirit radios can communicate at distances
of up to 5 miles. But, range will decrease as
the surroundings become more obstructive.
Buildings and vehicles as well as trees and
heavy foliage will limit range.
Radio Range VHF UHF
Maximum Range
OutdoorFlat Ground with no Obstructions Up To 5 Miles Up To 5 Miles
Medium Range
OutdoorNear Residential Buildings Up To 2 Miles Up To 2 Miles
Minimum Range
IndoorSteel and Concrete Reinforced Buildings Up To 150,000 Sq. Ft Up To 250,000 Sq. Ft
IndoorMulti-Level Buildings Up To 8 Floors Up To 20 Floors
Note:
The talk ranges above are averages based on field study using two watt radios. Actual
radio range may vary.
15
Page 18

SAFETY INFORMATION
Information For Safe and Efficient Operation
EXPOSURE TO RADIO FREQUENCY ENERGY
The design of your Motorola two-way radio, which
generates radio frequency (RF) electromagnetic
energy, complies with the following national and
international standards and guidelines.
The Relevant Guidelines and Standards Are:
• FCC Report and Order FCC 96-326 (August,
1996)
• American National Standards Institute (C95-1 -
1992)
• National Council on Radiation Protection and
Measurements (NCRP - 1986)
• International Commission on Non-Ionizing Radiation Protection (ICNRP - 1866)
• CENELEC
- Env. 50166-1 1995E - Human Exposure to
Electromagnetic Fields Low Frequency (0Hz
to 10kHz)
- Env. 50166-2 1995E - Human Exposure to
Electromagnetic Fields High Frequency
(10kHz to 300GHz)
- Proceedings of SC 211/8 1996 - Safety Considerations for Human Exposure to EME’s
from Mobile T elecommunications Equipment
(MTE) in the Frequency Range 30 MHz - 6 GHz
(EME - Electromagnetic Fields)
To assure optimal radio performance and to
insure that exposure to RF energy is within the
guidelines in the above standards, the following
operating procedures should be observed:
FOR PORTABLE TWO-WAY RADIOS
• For hand-held operation: The radio should
be held in a vertical position with the micro-
phone one to two
inches away from
the mouth, and the
antenna should be
kept one to two inches
from the head or body
when transmitting.
• For body worn operation: The antenna
should be kept at least one inch from the body
when transmitting.
VEHICLE-INSTALLED MOBILE TWO-WAY RADIOS
• Properly install antennas externally on the
vehicle, following recommended installation
procedures.
• Transmit only when people inside or outside the
vehicle are at least 1 to 3 feet away from the
properly installed, externally mounted antenna;
distance guidelines for the different power levels are summarized in the table below:
Rated Power of
Vehicle-Mounted Radio
7 to 15 Watts
16 to 50 Watts
More than 50 Watts
Minimum Distance of People
From Transmitting Antenna
1 Foot
2 Feet
3 Feet
16
ELECTROMAGNETIC INTERFERENCE/
COMPATIBILITY
Nearly every electronic device is susceptible to
electromagnetic interference (EMI) if inadequately
shielded, designed or otherwise configured for
electromagnetic compatibility.
• Turn your radio OFF in any facilities where
posted notices instruct you to do so. Hospitals
or health care facilities may be using equipment that could be sensitive to external RF
energy.
• Turn your radio off when on board aircraft
when instructed to do so. Any use of the radio
must be in accordance with airline regulations
or crew instructions.
Page 19

!
WARNING
POTENTIALLY EXPLOSIVE
ATMOSPHERES
• Turn your radio OFF when in any area with
a potentially explosive atmosphere, unless
it is a type especially qualified for such use
(for example, FMRC Approved). Sparks in
such areas could cause an explosion or
fire resulting in bodily injury or even death.
• Do not replace or charge batteries in a
hazardous atmosphere. Contact sparking
may occur while installing or removing batteries and cause an explosion.
Areas with potentially explosive atmospheres
are often, but not always, clearly marked.
They include fueling areas such as below
deck on boats, fuel or chemical transfer or
storage facilities; areas where the air contains
chemicals or particles, such as grain, dust, or
metal powders; and any other area where you
would normally be advised to turn off your
vehicle engine.
BLASTING CAPS AND AREAS
• To avoid possible interference with blasting
operations, turn your radio OFF near electrical blasting caps or in a “blasting area”
or in areas posted: “Turn off two-way
radio”. Obey all signs and instructions.
FOR VEHICLES WITH AN AIR BAG
• An air bag inflates with great force. Do not
place objects, including portable or mobile
two-way radios, in the area over the air
bag or in the air bag deployment area. If
improperly installed or placed wireless
equipment is in the air bag deployment
area and the air bag inflates, serious injury
could result.
!
CAUTION
• Do not use radio with a damaged antenna. If
a damaged antenna comes into contact
with the skin, a minor burn may result.
• All batteries can cause property damage,
injury or burns if a conductive material such
as jewelry, keys or beaded chains touches
exposed terminals. The material may complete an electrical circuit (short circuit) and
become quite hot. Exercise care in handling
any charged battery, particularly when placing it inside a pocket, purse or other container with metal objects.
ANTENNAS
BATTERIES
!
CAUTION
CHARGERS AND POWER CORD
• To reduce risk of damage to electric plug
and cord, pull by the plug rather than the
cord when disconnecting the charger.
• Make sure cord is located so that it will not
be stepped on, tripped over, or otherwise
subjected to damage or stress.
• Do not operate charger with damaged cord
or plug, replace them immediately. Do not
operate charger if it has received a sharp
blow, been dropped, or otherwise damaged
in any way; contact place of purchase or call
1-800-448-6686.
• Do not expose chargers to rain or snow.
An extension cord should not be used unless
absolutely necessary. Use of an improper
extension cord may result in a fire or electric
shock. However, if an extension cord must be
used, make sure:
• That pins and plug of extension cord are the
same number, size and shape as those on
the plug of the charger.
• That extension cord is properly wired and in
good condition.
• Cord size is 18AWG for lengths of up to 100
feet, and 16AWG for lengths up to 150 feet.
• Do not disassemble charger; contact place
of purchase or call 1-800-448-6686 if
charger is not functioning. Incorrect reassembly can result in electric shock or fire.
• To reduce risk of injury, charge only Motorola Ni-Cad rechargeable batteries. Other
types of batteries may burst, causing personal injury and damage.
• Use of an attachment not sold or recommended by Motorola can result in a risk of
fire, electric shock, or injury to personnel.
• To reduce risk of electric shock, unplug
charger from outlet before cleaning. Turning off controls does NOT reduce this risk.
17
Page 20

ONE YEAR LIMITED WARRANTY
Spirit M-Series radios and accessories have a one (1) year limited warranty.
Limited Warranty Motorola Communication Products
This warranty applies within the fifty (50) United States and the District of Columbia.
I.WHAT THIS WARRANTY COVERS AND FOR HOW LONG:
MOTOROLA INC. ("MOTOROLA") warrants the MOTOROLA products listed below in the product warranty schedule section of this warranty document ("Product") against defects in material and workmanship under normal use and service for a period of time from the date of purchase as scheduled below:
MOTOROLA, at its option, will, at no charge, either repair the Product (with new or reconditioned parts),
replace it (with a new or reconditioned Product), or refund the purchase price of the Product during the
warranty period provided it is returned in accordance with the terms of this warranty. Replaced parts or
boards are warranted for the balance of the original applicable warranty period. All replaced parts of
Product shall become the property of MOTOROLA.
This express limited warranty is extended by MOTOROLA to the original end user purchaser only and is
not assignable or transferable to any other party. This is the complete warranty for the Product manufactured by MOTOROLA. MOTOROLA assumes no obligations or liability for additions or modifications to
this warranty unless made in writing and signed by an officer of MOTOROLA. Unless made in a separate
agreement between MOTOROLA and the original end user purchaser, MOTOROLA does not warrant the
installation, maintenance or service of the Product.
MOTOROLA cannot be responsible in any way for any ancillary equipment not furnished by MOTOROLA
which is attached to or used in connection with the Product, or for operation of the Product with any
ancillary equipment, and all such equipment is expressly excluded from this warranty. Because each
system which may use the Product is unique, MOTOROLA disclaims liability for range, coverage, or
operation of the system as a whole under this warranty.
II.GENERAL PROVISIONS:
This warranty sets forth the full extent of MOTOROLA's responsibilities regarding the Product. Repair, replacement or refund of the purchase price, at MOTOROLA'S option, is the exclusive remedy. THIS WARRANTY IS
GIVEN IN LIEU OF ALL OTHER EXPRESS WARRANTIES. IMPLIED WARRANTIES, INCLUDING WITHOUT LIMITATION IMPLIED WARRANTIES OF MERCHANTABILITY AND FITNESS FOR A PARTICULAR PURPOSE, ARE LIMITED
TO THE DURATION OF THIS LIMITED WARRANTY. IN NO EVENT SHALL MOTOROLA BE LIABLE FOR DAMAGES
IN EXCESS OF THE PURCHASE PRICE OF THE PRODUCT, FOR ANY LOSS OF USE, LOSS OF TIME, INCONVENIENCE, COMMERCIAL LOSS, LOST PROFITS OR SAVINGS OR OTHER INCIDENTAL, SPECIAL OR CONSEQUENTIAL DAMAGES ARISING OUT OF THE USE OR INABILITY TO USE SUCH PRODUCT, TO THE FULL EXTENT SUCH
MAY BE DISCLAIMED BY LAW.
III.STATE LAW RIGHTS:
SOME STATES DO NOT ALLOW THE EXCLUSION OR LIMITATION OF INCIDENTAL OR CONSEQUENTIAL DAMAGES, OR LIMITATION ON HOW LONG AN IMPLIED WARRANTY LASTS, SO THE ABOVE LIMITATIONS OR
EXCLUSIONS MAY NOT APPLY.
This warranty gives specific legal rights, and there may be other rights which may vary from state to
state.
IV.HOW TO GET WARRANTY SERVICE:
To receive warranty service, deliver or send the Product item, transportation and insurance prepaid, to
the place of purchase along with your proof of purchase or lease and Product item serial number. For
other locations, alternatively call:
1-800-448-6686
18
, Motorola and Spirit are trademarks of Motorola, Inc.
Page 21

V.WHAT THIS WARRANTY DOES NOT COVER:
a) Defects or damage resulting from use of the Product in other than its normal and customary manner.
b) Defects or damage from misuse, accident, liquid, or neglect.
c) Defects or damage from improper testing, operation, maintenance, installation, alteration, modifica-
tion, or adjustment.
d) Breakage or damage to antennas unless caused directly by defects in material workmanship.
e) A Product subjected to unauthorized Product modifications, disassemblies or repairs (including, with-
out limitation, the addition to the Product of non-Motorola supplied equipment) which adversely affect
performance of the Product or interfere with Motorola’s normal warranty inspection and testing of the
Product to verify any warranty claim.
f) Product which has had the serial number removed or made illegible.
g) Rechargeable batteries if:
1) any of the seals on the battery enclosure of cells are broken or show evidence of tampering.
2) the damage or defect is caused by charging or using the battery in equipment or service other
than the Product for which it is specified.
h) Freight costs to the repair depot.
i) A Product which, due to illegal or unauthorized alteration of the software/firmware in the Product, does
not function in accordance with Motorola’s published specifications or the FCC type acceptance labeling
in effect for the Product at the time the Product was initially distributed from Motorola.
j) Scratches or other cosmetic damage to Product surfaces that does not effect operation of the Product.
k) Normal and customary wear and tear.
VI.PATENT AND SOFTWARE PROVISIONS:
MOTOROLA will defend, at its own expense, any suit brought against the end user purchaser to the
extent that it is based on a claim that Product or parts infringe a United States patent, and MOTOROLA
will pay those costs and damages finally awarded against the end user purchaser in any such suit which
are attributable to any such claim, but such defense and payments are conditioned on the following:
a) that MOTOROLA will be notified promptly in writing by such purchaser of any notice of such claim;
b) that MOTOROLA will have sole control of the defense of such suit and all negotiations for its settle-
ment or compromise; and
c) should the Product or parts become, or in MOTOROLA's opinion be likely to become, the subject of a
claim of infringement of a Unites States patent, that such purchaser will permit MOTOROLA, at its option
and expense, either to procure for such purchaser the right to continue using the Product or parts or to
replace or modify the same so that it becomes non-infringing or to grant such purchaser a credit for the
Product or parts as depreciated and accept its return. The depreciation will be an equal amount per year
over the lifetime of the Product or parts as established by MOTOROLA.
MOTOROLA will have no liability with respect to any claim of patent infringement which is based upon
the combination of the Product or parts furnished hereunder with software, apparatus or devices not furnished by MOTOROLA, nor will MOTOROLA have any liability for the use of ancillary equipment or software not furnished by MOTOROLA which is attached to or used in connection with the Product. The
foregoing states the entire liability of MOTOROLA with respect to infringement of patents by the Product
or any parts thereof.
Laws in the United States and other countries preserve for MOTOROLA certain exclusive rights for copyrighted MOTOROLA software such as the exclusive rights to reproduce in copies and distribute copies of
such Motorola software. MOTOROLA software may be used in only the Product in which the software
was originally embodied and such software in such Product may not be replaced, copied, distributed,
modified in any way, or used to produce any derivative thereof. No other use including, without limitation,
alteration, modification, reproduction, distribution, or reverse engineering of such MOTOROLA software
or exercise of rights in such MOTOROLA software is permitted. No license is granted by implication,
estoppel or otherwise under MOTOROLA patent rights or copyrights.
VII.PRODUCT WARRANTY SCHEDULE:
Spirit Radios:One (1) year Spirit Accessories: One (1) year.
Rechargeable Batteries will be replaced during the applicable warranty period if:
a) the battery capacity falls below 80% of rated battery capacity or,
b) the battery develops leakage.
19
Page 22

RECYCLING
Recycling of Nickel- Cadmium Batteries
Nickel-cadmium (Ni-Cad) rechargeable batteries can be recycled. However, recycling
facilities may not be available in all areas.
Under various U.S. state laws, Ni-Cad batteries must be recycled or disposed of properly
and cannot be disposed of in landfills or
incinerators.
Motorola fully endorses and encourages the
recycling of Ni-Cad batteries. In the U.S. and
Canada, Motorola participates in the nationwide Rechargeable Battery Recycling Corporation (RBRC) program for nickel-cadmium
battery collection and recycling. Many retailers participate in the program. For the name
of the retailer nearest your location, call
1-800-BATTERY. This number also provides
access to other useful information for consumers, businesses and governmental agencies concerning recycling options.
20
Page 23

Page 24

Communication
Solutions for
Workgroups
Multi-channel model shown on cover.
*6880905Z70*
 Loading...