

Page 1
Motorola Moto X 2nd Generation Battery
Replacement
How to remove and replace the battery on a Motorola Moto X 2nd Generation Smartphone
Redigido por: Sophia
Motorola Moto X 2nd Generation Battery …
Rascunho: 2020-04-22ID do guia: 40717 -
Este documento foi gerado em 2021-02-02 04:23:35 AM (MST).
© iFixit — CC BY-NC-SA pt.iFixit.com Página 1 de 7
Page 2

INTRODUÇÃO
The battery is a delicate and critical component of a cell phone, and great care should be taken
when replacing it. The Motorola Moto X 2nd generation phone battery can be replaced without any
specialized skills and only a few standard maintenance tools. Make sure to power off the phone
completely and disconnect from all cables. You should always back up your phone data when
replacing a critical component to avoid any losses due to accidental damage. Take additional care if
the battery is swollen..
FERRAMENTAS:
T4 Torx Screwdriver (1)
Spudger (1)
iFixit Opening Picks set of 6 (1)
SIM Card Eject Tool (1)
PEÇAS:
Motorola Moto X (2nd Gen) Replacement
Battery (1)
Moto X2 back cover adhesive sticker (1)
Motorola Moto X 2nd Generation Battery …
Rascunho: 2020-04-22ID do guia: 40717 -
Este documento foi gerado em 2021-02-02 04:23:35 AM (MST).
© iFixit — CC BY-NC-SA pt.iFixit.com Página 2 de 7
Page 3
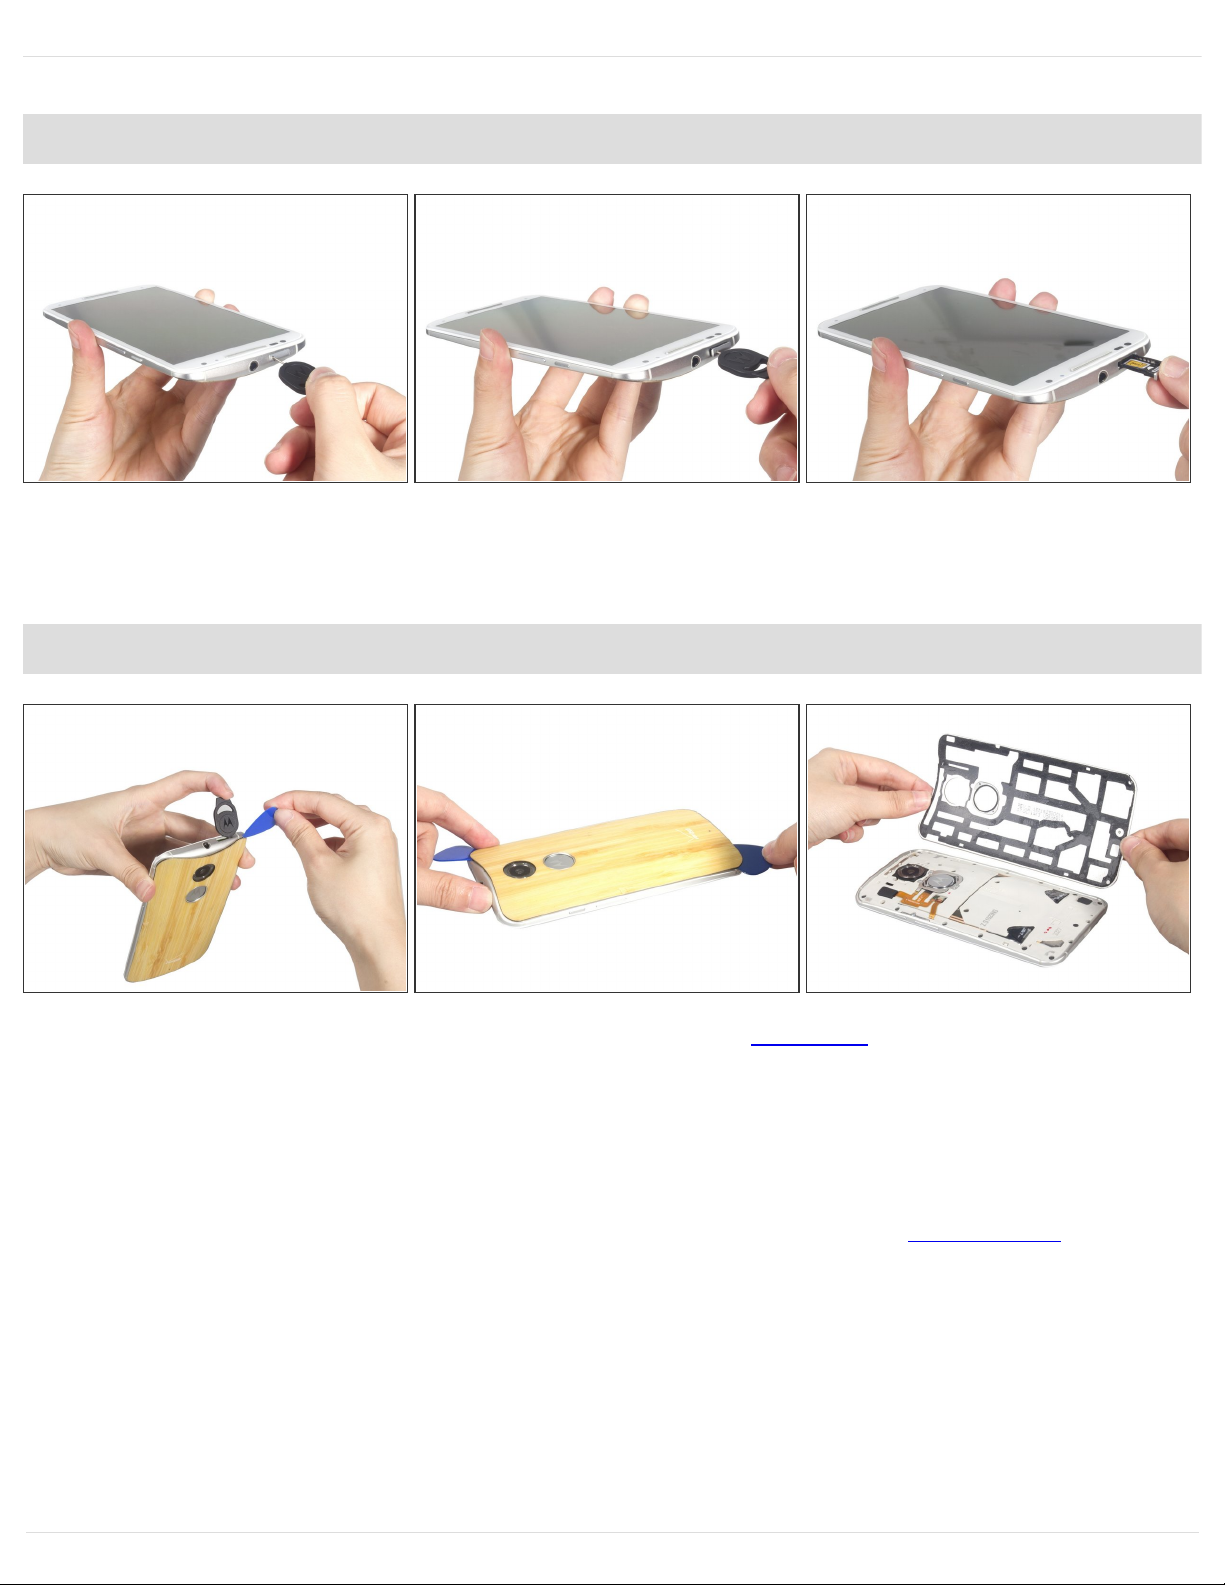
Passo 1 — Battery
Remove the SIM card tray by inserting the SIM card eject tool into the small hole on the tray.
Passo 2
Insert a SIM eject tool into the SIM tray slot, and through a small hole in the mid frame.
Push the SIM eject tool through the hole and against the back cover to lift the cover slightly.
Insert an opening pick into the gap created with the SIM eject tool, and slide the pick around the
edge of the cover to cut the cover's adhesive.
Cut carefully near the volume buttons, to avoid damaging the delicate ribbon cables in that area
under the cover.
Remove back cover.
Motorola Moto X 2nd Generation Battery …
Rascunho: 2020-04-22ID do guia: 40717 -
Este documento foi gerado em 2021-02-02 04:23:35 AM (MST).
© iFixit — CC BY-NC-SA pt.iFixit.com Página 3 de 7
Page 4

Passo 3
Remove the rubber covers from the two connector pieces indicated in the photo
Passo 4
Use the spudger to release the connectors from under the covers.
Motorola Moto X 2nd Generation Battery …
Rascunho: 2020-04-22ID do guia: 40717 -
Este documento foi gerado em 2021-02-02 04:23:35 AM (MST).
© iFixit — CC BY-NC-SA pt.iFixit.com Página 4 de 7
Page 5

Passo 5
Remove the screws and then remove the middle housing from front assembly.
Passo 6
Remove the logo, as the flex cable under the logo is fastened to the back of the battery. This can
be done by removing the three surrounding screws, and then prying off the structure that
encapsulates the logo.
Motorola Moto X 2nd Generation Battery …
Rascunho: 2020-04-22ID do guia: 40717 -
Este documento foi gerado em 2021-02-02 04:23:35 AM (MST).
© iFixit — CC BY-NC-SA pt.iFixit.com Página 5 de 7
Page 6

Passo 7
Use the flat end of a spudger to gently pry up the ribbon cable in the two places where it is adhered
to the battery.
Passo 8
Lift one of the two battery adhesive tabs and pull firmly and steadily toward the bottom edge of the
phone, until the adhesive strip slides all the way out from between the battery and the phone.
Repeat for the other adhesive tab.
Remove the battery.
Motorola Moto X 2nd Generation Battery …
Rascunho: 2020-04-22ID do guia: 40717 -
Este documento foi gerado em 2021-02-02 04:23:35 AM (MST).
© iFixit — CC BY-NC-SA pt.iFixit.com Página 6 de 7
Page 7

To reassemble your device, follow these instructions in reverse order.
After completing this guide, calibrate your newly-installed battery.
Passo 9
If the adhesive strips do not fully come out you will need to pry it out from the other side, but be
VERY careful as the NFC coil is under the battery and can be ripped easily.
Motorola Moto X 2nd Generation Battery …
Rascunho: 2020-04-22ID do guia: 40717 -
Este documento foi gerado em 2021-02-02 04:23:35 AM (MST).
© iFixit — CC BY-NC-SA pt.iFixit.com Página 7 de 7
 Loading...