

Page 1

EN
MOTOACTV
TM
Page 2

Page 3
Congratulations
Work hard, play hard: your MOTOACTV™ is strong and
powerful, just like you. Set your workouts and load it up
with music. Then, sync up with MOTOACTV.com
track your progress and see results.
Note: Do not begin an exercise program without
seeking the advice of your physician.
• Set your workouts, then start them up with one press
of a button.
• Start training to your favorite tracks and see what
songs make you perform the best.
• Stream incoming messages and call notifications
from your Android™ smartphone.
• Hook up to ANT+ or BLE heart rate sensor that you
already own.
• Sync up with MOTOACTV.com
create long term goals, analyze your performance, or
challenge friends to beat your best results.
Note: Certain apps and features may not be available in
all countries.
Caution: Before assembling, charging, or using your
device for the first time, please read the important
safety, regulatory and legal information in this guide.
to plan workouts,
to
More
•Answers:
Online: User guides, online help, and more at
www.motorola.com/mymotoactv
• Accessories: Find more accessories at
www.motorola.com/products
• Social: The latest news, tips & tricks, videos, and so
much more—join us on:
YouTube™ www.youtube.com/motorola
Facebook™ www.facebook.com/motorola
Twitter www.twitter.com/motomobile
.
.
1Congratulations
Page 4
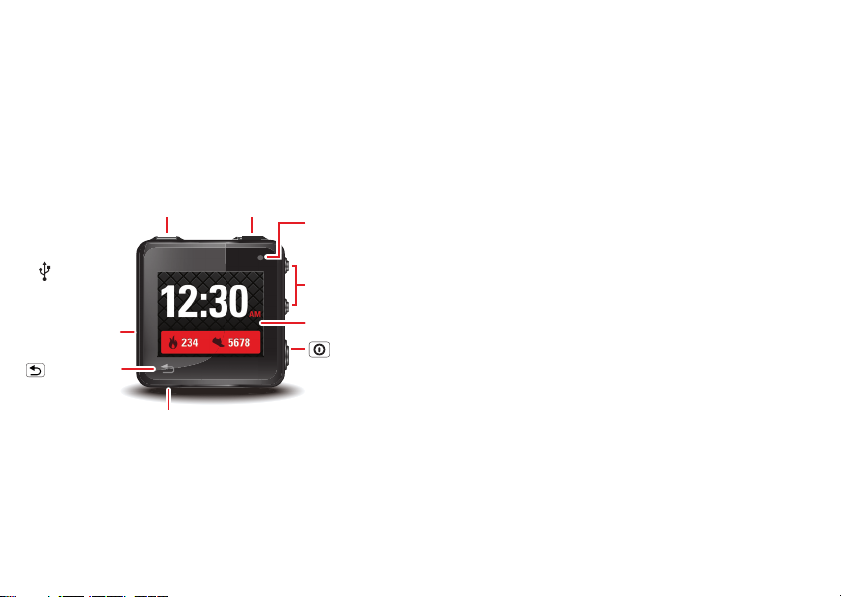
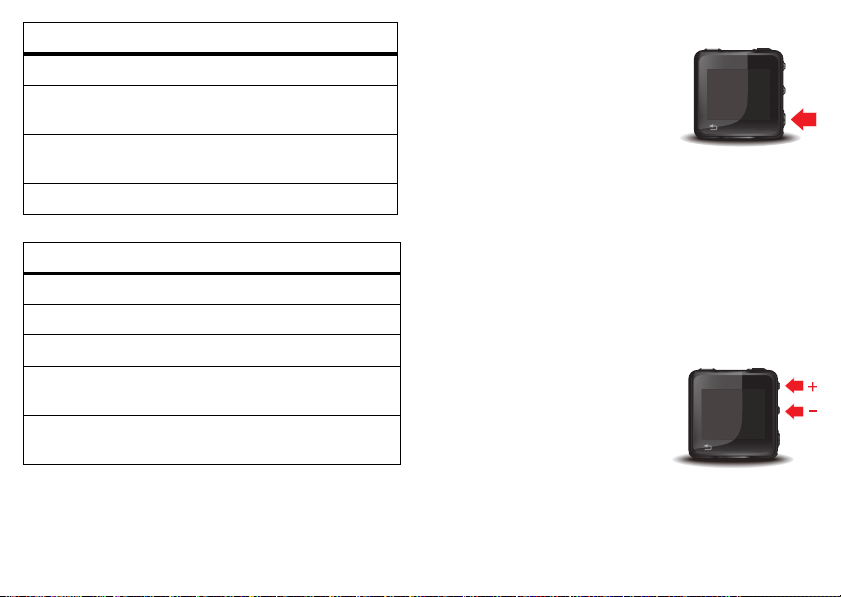
Your Device
the important keys & connectors
START WORKOUT Key
Workout shortcut
& more. (See page 8
for details.)
START
micro USB
Connector
Charge &
connect
to PC.
MUSIC Key
Control music.
(See page 8
for details.)
MUSIC
Notification
Light
Volume
Up/Down
Keys
To u chscreen
Contents
Let’s go . . . . . . . . . . . . . . . . . . . . . . . . . . . . . . . . . . . . . . . . . . . . . . . . . . 3
Touchscreen & keys . . . . . . . . . . . . . . . . . . . . . . . . . . . . . . . . . . . . . . 7
Home screens . . . . . . . . . . . . . . . . . . . . . . . . . . . . . . . . . . . . . . . . . . . . 9
MOTOACTV.COM. . . . . . . . . . . . . . . . . . . . . . . . . . . . . . . . . . . . . . . . . . . 11
Workout . . . . . . . . . . . . . . . . . . . . . . . . . . . . . . . . . . . . . . . . . . . . . . . . 13
Smartphone setup . . . . . . . . . . . . . . . . . . . . . . . . . . . . . . . . . . . . . . 23
Tips & tricks. . . . . . . . . . . . . . . . . . . . . . . . . . . . . . . . . . . . . . . . . . . . . 25
Music . . . . . . . . . . . . . . . . . . . . . . . . . . . . . . . . . . . . . . . . . . . . . . . . . . . 26
Personalize. . . . . . . . . . . . . . . . . . . . . . . . . . . . . . . . . . . . . . . . . . . . . 29
Theme color . . . . . . . . . . . . . . . . . . . . . . . . . . . . . . . . . . . . . . . . . . . . 29
Bluetooth® wireless. . . . . . . . . . . . . . . . . . . . . . . . . . . . . . . . . . . . 30
File management . . . . . . . . . . . . . . . . . . . . . . . . . . . . . . . . . . . . . . . . 31
Troubleshooting . . . . . . . . . . . . . . . . . . . . . . . . . . . . . . . . . . . . . . . 31
Motocast ID . . . . . . . . . . . . . . . . . . . . . . . . . . . . . . . . . . . . . . . . . . . . . 31
Safety, Regulatory & Legal. . . . . . . . . . . . . . . . . . . . . . . . . . . . . . 33
Back/Home
Key
Press=Go back.
Hold=Home
screen.
2 Your Device
3.5mm Headset Jack
Music on the go.
Power Key
Press=Display
on/off
Hold=
Turn on/off.
Page 5
Let’s go
3H
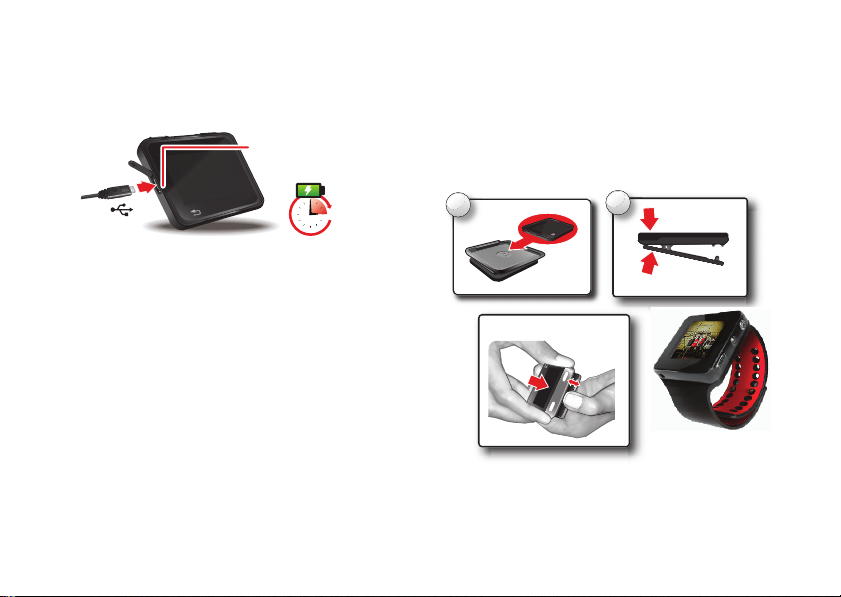
Charging
Indicator Light
2
1
(Shown with wristband)
To remove clip:
get up and running
Charge it up
Before using your MOTOACTV, make sure the battery is
fully charged. You can charge your MOTOACTV:
• using the wall charger (takes about an hour) provided
with your device or you can plug MOTOACTV to your
computer using a micro USB cable.
• using a USB cable and your computer (takes about
two hours)
Note: When charging your MOTOACTV using your
computer, it may take up to 20 minutes before your
MOTOACTV turns on.
The white light on your device indicates charging is in
progress.
Note: The MOTOACTV battery is non-removable. Any
attempt to remove or replace your battery may damage
the product.
Caution: Please read “Battery Use & Safety” on page 33.
Tip: To save battery life, see “Battery tips” on page 26.
Clip it on
Note: The product is designed for wearable use with a
Motorola accessory when it is not being hand operated.
3Let’s go
Page 6
Set up your device
START
MUSIC
The first time you turn on your device, it’ll ask you a few
questions to set itself up.
1 Press and hold the Power key to turn it on.
2 Select your country/region and language.
DEVICE SETUP to begin.
3 Touch
4 Select a time zone, time, date, and touch
PROFILE SETUP to enter your age, gender,
5 Touch
height, and weight so your device can calculate your
workouts accurately, then touch
OK.
Note: To adjust settings later, touch
Personal Profile or log on to MOTOACTV.com
6 Touch DONE.
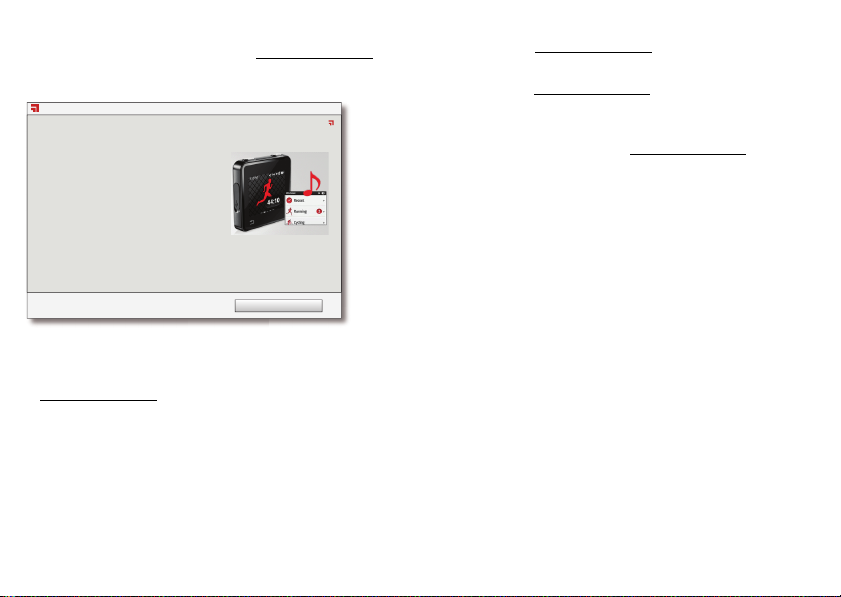
After setup, your device starts a short demo to show
you the main screens. Check out “Home screens” on
page 10 for more about the main screens.
4 Let’s go
NEXT.
Settings >
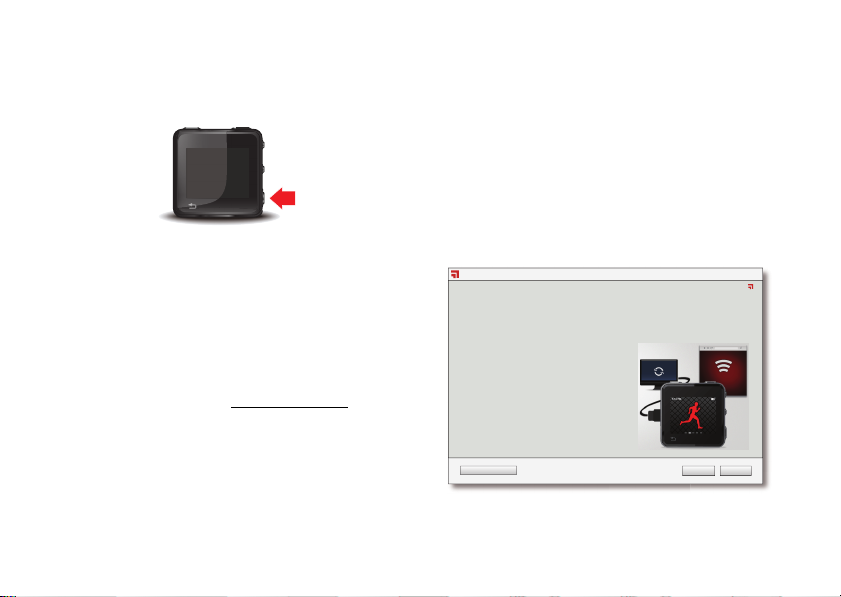
Set up your computer
1 Connect your device to your computer (PC or Mac)
using the USB cable. MotoCast™ installation
automatically begins. Installation may take a few
minutes.
Note: If installation doesn’t automatically begin, for
Windows™, open My Computer > MotoCast drive >
MotoCastSetup.exe. For Mac, open the MotoCast
drive on your desktop > Install MotoCast.app.
2 When installation is complete, click
Next on the
MotoCast welcome screen.
MotoCast USB Setup
Set up your MOTOACTV device with MotoCast
MotoCast will set up your MOTOACTV device to sync
fitness data with the MOTOACTV web site over Wi-Fi
networks. You can also sync music and podcasts to
your MOTOACTV device using MotoCast USB.
To complete your MOTOACTV device setup:
1. Sign in to your MotoCast account with a
MotoCast ID. If you don’t have one, create a new ID.
2. Set up wireless networks on your MotoCast device.
3. Sync music and podcasts to your MOTOACTV device
with MotoCast USB.
4. Sync your profile data to MOTOACTV.com.
Click Next to continue.
Set up Later
TM
MotoCast
Previous
Next
Page 7
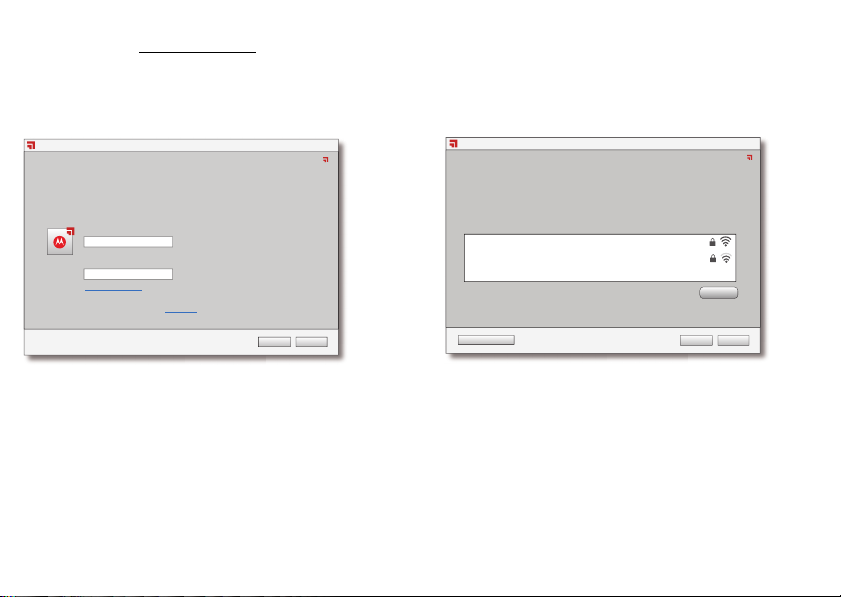
3 Create or sign in with your MotoCast ID, which you’ll
Previous
Next
MotoCast USB Setup
Sign in with your MotoCast ID
Sign in to link your MOTOACTV device with your MotoCast ID and start syncing
fitness data with the MOTOACTV.com portal. This ID is used with your MOTOACTV
device and any other Motorola devices you own.
MotoCast ID
Password
Forgot password?
Enter email address
Enter password
MotoCast
Don’t have a MotoCast ID? Create one.
Set up Later
Previous
Next
MotoCast USB Setup
Set up Wi-Fi on your MOTOACTV device
Your MOTOACTV can automatically sync fitness data with MOTOACTV.com over Wi-Fi.
To set up Wi-Fi on your MOTOACTV now, choose a network from the list. If you want to
set up Wi-Fi later, you can find it in the MotoCast USB menu.
MyHomeNetwork24
2WIRE8799
Refresh
MotoCast
use to log into MOTOACTV.com
.
Note: Your password needs to be at least six
characters long.
4 Follow the prompts to set up a wireless connection to
automatically sync fitness data between your
MOTOACTV device and MOTOACTV.com over Wi-Fi.
Note: To set up Wi-Fi later or to add more networks,
see “Connect Wi-Fi” on page 7.
5Let’s go
Page 8
5 After setup is complete, you can:
MotoCast USB Setup
Next
It can now automatically sync fitness data with MOTOACTV over
the “MyHomeNetwork24” Wi-Fi network. To set up additional Wi-Fi
networks on your MOTOACTV device, select “MOTOACTV Wi-Fi
Settings...” in the MotoCast USB Device menu.
Manage your fitness at MOTOACTV.com. Work out with your
MOTOACTV device for detailed tracking, motivating music and
real-time feedback.
To copy music and podcasts from your computer to your MOTOACTV
device, click Next to begin using MotoCast USB.
MotoCast
Your MOTOACTV device is all set for
your workouts!
• Access your fitness data on MOTOACTV.com
• Sync your music and podcasts to your device.
6 When MotoCast USB opens, use it to load music
onto your device and sync your workouts with
MOTOACTV.com
details.
Note: Your device also syncs any workout data you
haven’t synced yet. To sync workout data only,
unselect Sync Music.
. See “Load music” on page 26 for
7 After syncing is complete, click Open MOTOACTV.com
.
to log onto MOTOACTV.com
using a web browser.
Note: Use MOTOACTV.com
, or go there anytime
to set up workouts,
challenges, and track results. See “MOTOACTV.COM” on
page 12.
Tip: If you can’t log on to MOTOACTV.com
, check if
you successfully linked your device with your
MotoCast ID during web setup. On your device, touch
Settings > Personal Profile to s ee i f you r M otoCast ID
is listed.
6 Let’s go
Page 9
Connect Wi-Fi
Workout
Recent
Running
Cycling
Walking
Elliptical
Step Machine
Use Wi-Fi with your device, and your workouts are
automatically synced as soon as you get within range of
your network.
To set up Wi-Fi:
• During initial setup: See “Set up your computer” on
page 4.
• Anytime, on your computer: While your device is
connected to your computer, set up a Wi-Fi
connection (if available) in MotoCast USB by clicking
Device > MOTOACTV Wi-Fi Settings.
Note: When wearing the device and using Wi-Fi, always
wear a Motorola accessory (such as the clip or
wristband).
Touchscreen & keys
a few essentials
Touch tips
Here are some tips on how to navigate your device.
Touch
To choose a menu option, or
to start a feature, touch it.
Drag
To scroll through a list or
move between screens,
drag across the
touchscreen.
7Touchscreen & keys
Page 10
Tap
PACE
HR
CALORIES
ELEVATION
HR
CALO
S
N
E
ON
Outdoor Run
Ready: Press the Start
button to begin workout.
Quick Start
GPS Location
Found
START WORKOUT Key MUSIC Key
A tap is a pat using your
whole hand.Tap on the
screen while in a workout to
PACE
get audible feedback on your
progress or to start the next
lap.
RIE
Zoom
To get a closer look at maps, touch to zoom in or out.
413
ft
See “Maps” on page 18 for more about maps.
8 Touchscreen & keys
10.2
413
mi
ft
10.2
mi
LEVATI
Keys
Start WORKOUT & Music
How to use the START WORKOUT key
When not in a workout (display on):
Press (when not on the
Start Workout screen)
Press (when on the Start
Workout screen)
Press & hold Go to Start Workout
Go to Workout list
Begin workout
screen to repeat your last
workout
Page 11
How to use the START WORKOUT key
START
MUSIC
During a workout (display on):
Press (when on a
Pause/resume workout
workout screen)
Press (when not on a
workout screen)
Double press Mark new lap
Return to workout Live
Data screen
How to use the MUSIC key
Press Play/Pause
Double press Next song
Double press & hold Scan
Triple press Previous song or restart
current song
Press & hold
Go to Music Library
(if display is on)
Display on & off
MUSIC
To save batter y or prevent
START
accidental touches, or when you
want to wipe smudges off, turn
the display off by pressing the
Power key. To turn the display on,
press the Power key again.
To change how long your device waits before the screen
turns off, touch the
Timeout
.
Settings screen > Display > Screen
During a workout, to prevent accidental touches, double
press the Power key to lock the workout screen. Double
press it again to unlock the screen. You can also set your
device to automatically lock the workout screen after 10
seconds. Go to
Auto Screen Lock.
Settings > Workout > Auto-Behaviors >
Adjust volume
Press the Volume Up/Down keys
to adjust the sound level for your
headset.
9Touchscreen & keys
Page 12
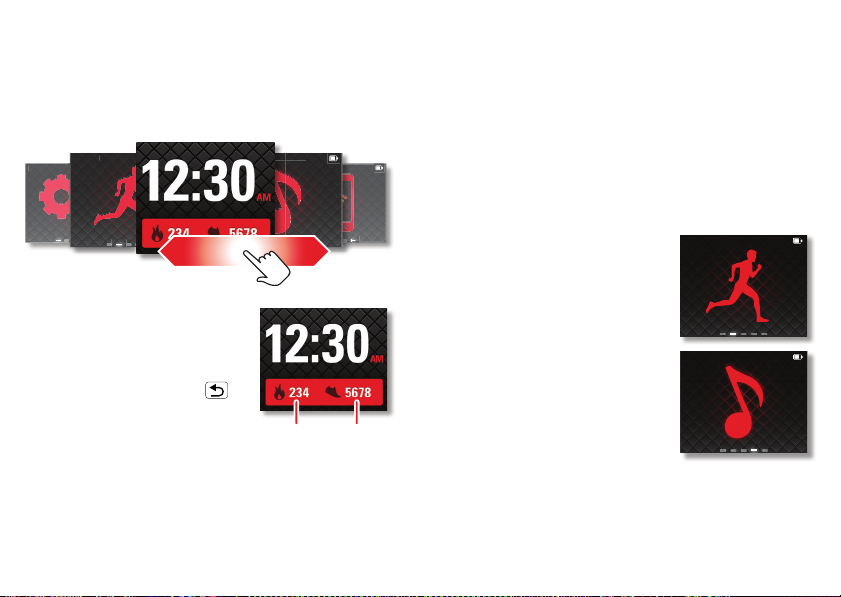
Home screens
out
Settings
Notifica-
tions
Workout
Music
Timepiece
Calories
Steps
quick access to workouts, music & more
Your device has five home screens. Drag the display left
and right to see them all.
Work
Settings
Touch the Timepiece screen for these options:
• Timepiece: Change the theme of your timepiece.
Note: To see your heart on the Timepiece screen,
select the Heart Rate clock face.
• Stopwatch: Tou c h
press the
START WORKOUT button to begin timing
Timepiece > Stopwatch. Then
your first lap.
•Timer: Touch
START WORKOUT button to start.
Timepiece > Timer. Then press the
Timepiece
The Timepiece screen is your
staring point. It’s what you see
when you turn on the device or
touch and hold Back/Home .
In addition to the current time,
the Timepiece screen shows
how many steps you take and
how many calories you burn each day starting from
midnight.
10 Home screens
Workout
Touch the Workout screen to
select your workout options and
see your recent workouts. See
“Workout” on page 14.
Music
Touch the Music screen to
access your music library with
your playlists, podcast episodes,
and FM radio. For help loading
music, see “Music” on page 26.
Workout
Music
Page 13
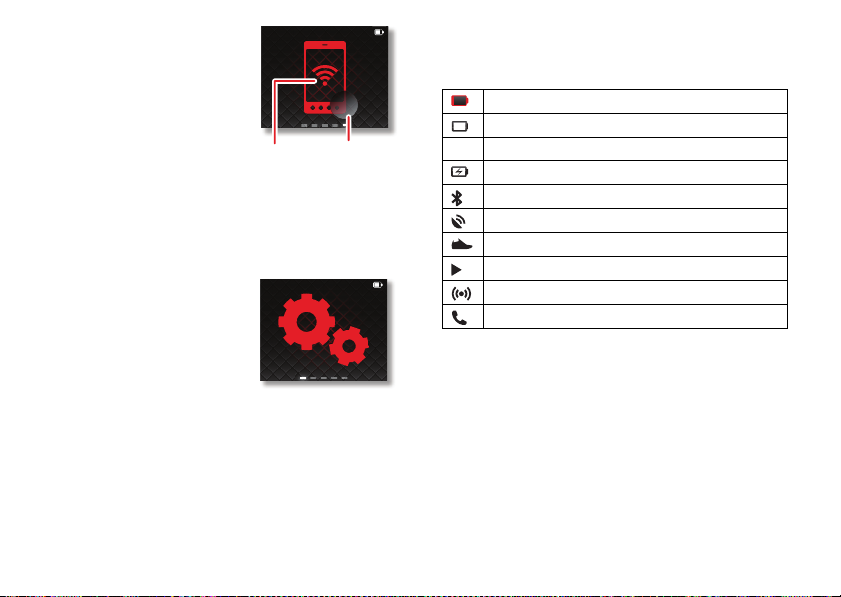
Notifications
2
Connected
to your
smartphone
New
notifications
Notifications
Drag to the Notifications
screen to check the
connection status between
MOTOACTV and your
smartphone and to see if you
have any new notifications.
Touch the screen to access
your calls, text messages,
and calendar reminders. See
“Smartphone setup” on page 24 for more.
Tip: Old notifications? Just touch
Settings
Delete to clear the list.
Settings
Touch the Settings screen to
customize your MOTOACTV.
Device status
Icons on the top right of your screen tell you about your
device’s status:
battery needs charging
battery fully charged
%
percentage of remaining battery charge
#
charging
Bluetooth® active
GPS active
active workout
music playing
sensors active
active call
If the Notification light is blinking (single blink), you have
new notifications. Touch the Notifications screen to stop
the blinking. Double-blinking means your battery is low,
and needs to be charged.
Note: To disable the blinking completely, touch
Notifications and uncheck LED.
>
Settings
11Home screens
Page 14
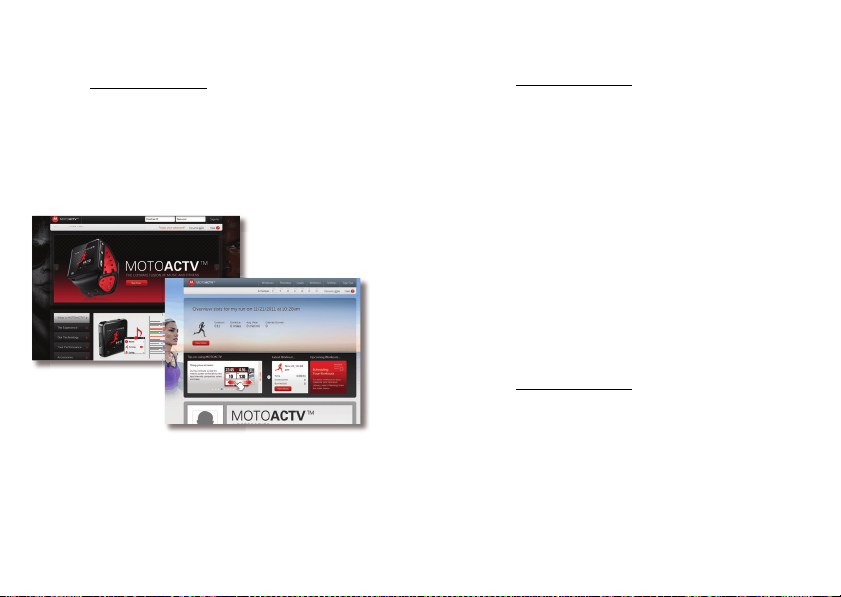
MOTOACTV.COM
Welcome to MOTOACTV.
manage your workouts, track your progress
Log on to MOTOACTV.com
Note: You don’t have to connect your MOTOACTV to
your computer to access your account.
There’s plenty of tips and information on the site, so feel
free to click around and explore.
12 MOTOACTV.COM
in your web browser.
Workouts
View all your workout data up till now.
on MOTOACTV.com, click Workouts
Find it:
• Latest Workout: See details of your latest workout.
Select metrics that you want to see, like pace,
distance, or calories burned. If your workout was
outdoors, see a map of your route. Add journal notes
about your activity.
Recent Workout: Chart your workouts by activity or
•
view them all. Select a view: distance, duration, or
calories burned.
Music: Some songs make you push harder. See which
•
ones cause your best performance.
Planning
Schedule a workout, sign up for a training plan, plot a
route for your upcoming workout, and more.
on MOTOACTV.com, click Planning
Find it:
• Calendar: Schedule a new workout by clicking on a
day in the calendar. Use a simple form or click
Options
for advanced choices, like interval workout,
zone training, and more. Save your favorite workouts.
Training Plans: Select a training plan to meet your
•
fitness goal, whether it be weight loss or staying fit.
Routing: Plan a route for your next workout.
•
More
Page 15

Tip: Your device has maps of all US states, Canada,
Mexico, Brazil, and Argentina. You can free up
memory space by deleting maps you don’t need.
Don’t worry: you can always go to MOTOACTV.com
to download previously deleted maps for free.
Goals
Set goals for weight, workout frequency, and increased
stamina, and track your progress.
on MOTOACTV.com, click Goals
Find it:
Competition
Use your competitive edge to get ahead.
on MOTOACTV.com, click Competition
Find it:
• Dashboard: See your recent competitions, invitations
to compete, and any badges you’ve earned.
My Competitions: View your competitions and chat
•
with fellow competitors.
Create: Create a competition and challenge others.
•
Choose from variety of competition types.
Browse: Search public competitions and join them.
•
Wellness
Wear your MOTOACTV all day to track how many
calories you burn and how many steps you take. Set a
weight goal and enter your changes to track your loss.
on MOTOACTV.com, click Wellness
Find it:
Settings
Enter your stats, upload a photo, or change your
password.
on MOTOACTV.com, click Settings
Find it:
• Personal Profile: Enter or edit your stats. Change your
password.
Fitness Zones: View your fit test score and see your
•
heart rate, pace, and power zones.
Sharing & Privacy: Share your workouts and progress
•
with your friends on Facebook™ and Twitter™.
Display Preferences: Adjust your device’s language,
•
time & date, and measurement units, all on the
MOTOACTV.com
Maps: Browse and download maps to your
•
MOTOACTV.
Device Management: View or remove devices
•
associated with your account.
site.
13MOTOACTV.COM
Page 16

Workout
Workout
Recent
Running
Cycling
Walking
Elliptical
Step Machine
it’s your way of life
Note: Using a mobile device or accessory (such as a
headset) while cycling may cause distraction and may be
illegal. Always obey the laws and ride safely.
To schedule a workout, use MOTOACTV.com
(“MOTOACTV.COM” on page 12), but you can also just start
a workout on your device, and go.
Note: Before you start your workout, you may want to
set up sensors to use with your MOTOACTV, like heart
rate monitor or bike sensors. See “Sensors” on page 21.
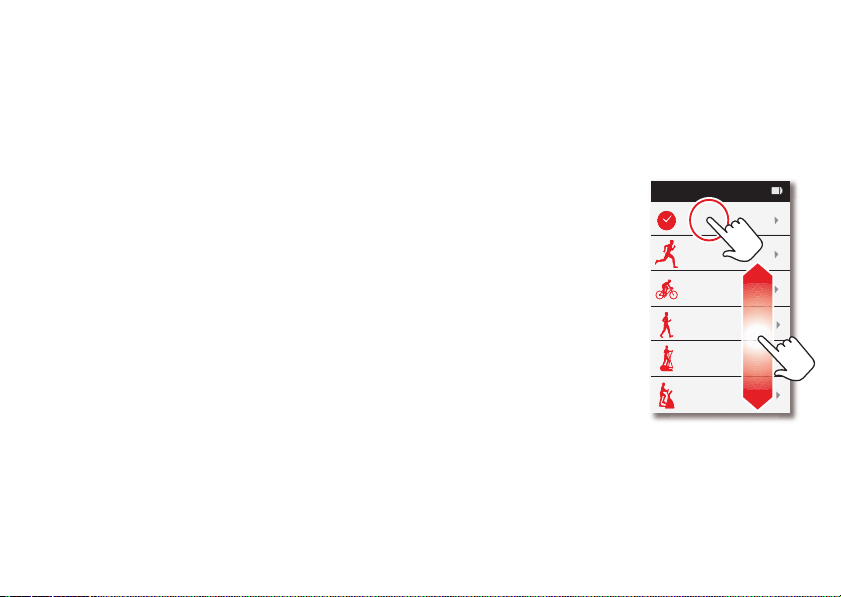
Start a Workout
1 Touch the Workout
screen.
2 Select the workout type:
Recent: Tr y a workout
•
that you’ve done
already. Select a
previous workout and
touch
Running: Select
•
Indoors or Outdoors.
Note: For accurate
tracking of your
14 Workout
RACE MYSELF.
indoor run, follow the prompts to calibrate your
MOTOACTV. You can always recalibrate your
device by going to
Calibration > Pedometer > Run.
•
Cycling: Select Indoors or Outdoors.
Settings > Workout >
Follow the prompts to set up your bike profile. To
add more bike profiles or edit one you already
created, go to
Bike Profiles.
Settings > Workout >
Note: To track your indoor cycling workout,
connect a bike sensor (speed/cadence/power) to
your device. See “Sensors” on page 21.
•
Walking: Select Indoors or Outdoors.
Note: For accurate tracking of your indoor walk,
follow the prompts to calibrate your MOTOACTV.
You can always recalibrate your device by going to
Settings > Workout > Calibration > Pedometer >
Walk.
Page 17

• Elliptical
Elliptical machines use many different distance
formulas (see your machine's user manual, or
measure the stride). The formula used on
MOTOACTV may be different. To make sure that
your MOTOACTV uses the same stride length as
your elliptical, go to
Settings > Workout >
Calibration > Elliptical stride and adjust the
stride length to match your equipment.
Step Machine
•
3 Set your workout options:
Quick Start Start your workout now.
•
Set a Target: Set time, distance (or both), or
•
calorie targets for your workout.
Planned: Select a planned workout that you’ve
•
scheduled on MOTOACTV.com
. You can access
workouts scheduled up to seven days ahead or
two days back. (See “Planning” on page 12.)
Challenges: Select a challenge that you have
•
accepted on MOTOACTV.com
. You can see your
open competitions until you take them or until
they expire.
Note: A number next to your activity shows how
many planned workouts and challenges you have.
Personal Bests: Try to beat your personal best
•
results. Personal bests are recorded after five
workouts.
Fit Test: Perform a running or cycling fit test to
•
customize your heart rate, pace, and power
zones. Fit tests should be taken on a flat surface.
Run or ride your bike for eight minutes at your
maximum pace/speed without stopping or
slowing. For best results, repeat the test every
six weeks.
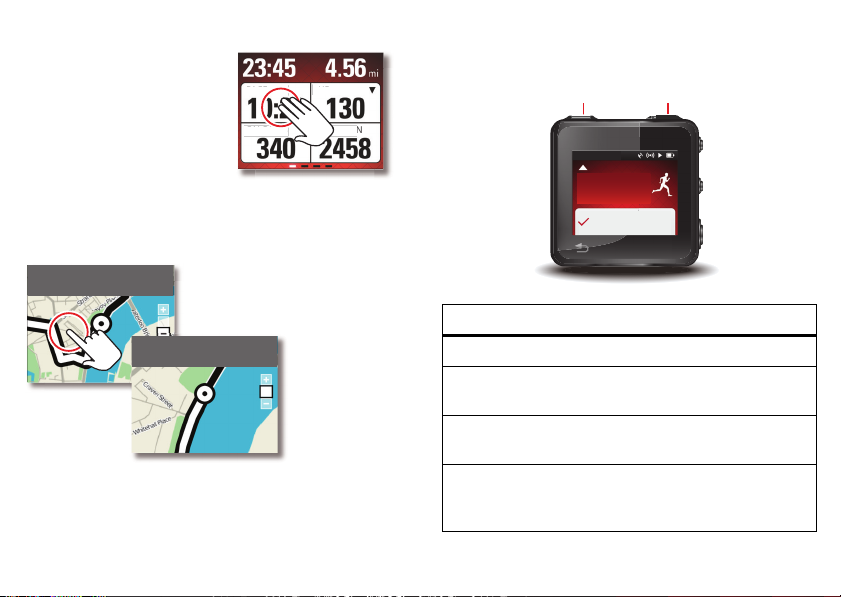
4 For outdoor workouts, check your GPS signal. (See
“GPS for outdoor workouts” on page 23.)
5 Confirm your sensors are
correctly connected and GPS is
locked on your location (check
mark on your screen), then press
the START WORKOUT key to
begin your workout.
Quick Start
Outdoor Run
Ready: Press the Start
button to begin workout.
GPS Location
Found
15Workout
Page 18

In a workout
PAC
S
N
ON
Touch to see more details. Indicates whether you’re
above or below target.
PACE
HR
CALORIES
ELEVATION
97
Elapsed Time Elapsed Distance
You have plenty of options and details to see while
you’re in a workout.
Press=Pause/resume workout
Press (when not workout screen)=Go to workout Live Data screen
Double press=Start a new lap
START
PACE
E
CALORIES
CALORIE
1 From the Live Data screen, drag left to see Laps,
Competitor, Zones, Intervals, and Route screens.
Tip: Set the display to automatically scroll through
these screens every five seconds. Just touch
Workout > Auto-Behaviors > Auto-Display. To
>
select which workout screens to see, touch
Workout > Customize Views.
>
2 Tap a metric to see details.
16 Workout
MUSIC
HR
ELEVATION
ELEVATI
Tap to set lap
Settings
Settings
3 Then tap the screen again to return to the Live Data
screen.
Live data
The Live Data screen is the first screen of your active
workout. You can customize it to show from one to four
metrics in addition to time and distance on the top of the
screen. Go to
Touching a metric shows you additional data. Tap on the
Detail View screen to return to the Live Data screen.
Settings > Workout > Customize Views.
Page 19

Laps
Tap to set lap
Tap anywhere on the
display to mark the end
of each lap.
Previous laps appear
below your current lap.
For running and bicycling, your MOTOACTV is set to
Auto-Laps. Touch
Auto-Lap to change laps:
>
Auto-Laps: Select Auto-Lap so transition to the next
•
lap happens automatically after you complete the
current lap. Choose time or distance based laps.
Manual: Uncheck Auto-Lap so you tap the Lap screen
•
to transition to the next lap. To adjust tap setting so
you can tap the device, go to
Device Tap.
Settings > Workout > Auto-Behaviors
Settings > Workout >
Competitor
Watch how you perform against a virtual opponent. See
if you are ahead or behind during a challenge (like in
One-Up competition), against a previous workout, or
when you set a Time & Distance target. Here’s how to
race against your own previous workout:
1 From the Workout screen, touch Recent.
2 Select a recent workout, scroll to the end, and touch
Race Myself.
3 Press the START WORKOUT key to start the workout.
4 Drag to the left until you see the Competitor screen.
Pace Difference
Competitor’s
Pace
Distance Difference
(running)
Your Current
Pace
On screen, you appear as the black racer while your
virtual opponent is white.
Note: Tap the screen to toggle between race view and a
more accurate chart view.
17Workout
Page 20

Zones
Work toward your target heart rate! To set heart rate,
pace, or power zone targets for your workout, first plan
your workout:
1 Go to MOTOACTV.com to plan a non-interval
workout.
2 Select HR Zone as your target, then save the
workout.
3 Sync the workout with your device.
4 On your device, touch the type of workout you
planned (for example,
the left until you see zones.
To t al Time Time in Current or Target Zone
Heart Rate (BPM)
Cycling > Outdoor), and drag to
Current & Target Zone
Your Current Heart Rate
Coaching
To hear a feedback in your headset on your workout
progress, during a workout tap your MOTOACTV display.
Note: To turn on device tapping to get coaching
feedback during cycling workout, touch
Device Tap > Cycling > Read Out Metrics.
Settings >
Maps
While in an outdoor workout, drag left until you see
Maps, then try these options:
Zoom: Tap the screen to toggle among three zoom
•
levels.
Pan: Touch and hold the screen to go into panning
•
mode and pan the map by dragging. Touch the screen
to exit panning mode.
View entire route: Double-touch the screen to view
•
your entire route. Double-touch again to exit this
mode
Tip: Go to MOTOACTV.com
rate zones.
18 Workout
for more details about heart
Page 21

• View progress against target: Watch the progress bar
ft
413 ft
i
10.2 mi
Current Location
Elevation Distance
Zoom
Level
NEXT INTERVAL
HIGH
Current Interval Pace
Current Set/
To t al Sets
Interval
Time
High to Low
Tr ansition
Touch to advance to
the next interval.
at the top of the screen to measure your progress
against your workout target, if you set one.
m
Note: To plan a route for your workout, go to
MOTOACTV.com
and click Planning > Routing.
Intervals
To plan an interval workout, go to MOTOACTV.com and
Planning to set targets for your high and low
click
intensity intervals. Transition between intervals can
occur automatically or when you touch the
INTERVAL
on the MOTOACTV screen, depending on
your Auto-Interval setting. (See “Workout settings” on
page 23.)
After you start your interval workout, drag left to the
Interval screen. Begin with a warm up period, then
follow the instructions on the screen.
Note: If you set your interval workout to auto-transition,
you can still manually transition to your next interval by
tapping the display and touching
NEXT INTERVAL.
NEXT
19Workout
Page 22

Multi-Sport workout
O
o
o
d
d
You can schedule a workout made up of multiple
activities on MOTOACTV.com
30-minute treadmill run, followed by 15 minutes of
elliptical, and 10 minutes of step machine.
1 Set up a multi-sport workout on MOTOACTV.com.
(When setting up a workout, click
Enter information for Activity 1 then click
to specify more activities. When finished, click
2 Sync your planned workout to your MOTOACTV
device.
3 On your device, select your workout from the Planned
workouts screen and press the START key.
4 After you complete an activity, touch
next one.
When you finish your workout, your MOTOACTV shows
stats for each activity as well as a summar y for the
entire workout.
20 Workout
. For example, make a
More Options.
Add Activity
NEXT to start the
Save.)
Workout summary
After you complete a workout,
you see a summary.
Note: To help MOTOACTV track
your future indoor workouts more
accurately, touch a metric in the
summary and edit it so it
matches your cardio equipment.
You can edit
(distance) or
Machine
Indoor Run
Elliptical and Step
(distance and calories).
Sync workout
When your workout is complete,
sync it with MOTOACTV.com
further analysis of your
performance. You can also sync
planned workouts or accepted
competitions from
MOTOACTV.com
To sync, use one of these
connections:
• USB cable: connect MOTOACTV to a computer via a
USB cable (“USB connection” on page 31).
• pre-configured WiFi network: if you’ve already set
up Wi-Fi on your MOTOACTV, syncing is automatically
triggered by your MOTOACTV after your workout is
to your device.
for
Quick StartSummary
Workout
Finished!
Time
Time
00:36:12
00:36:12
Distance (mi)
Distance (mi)
05.60
05.60
Calories Burned (kcal)
Calories Burned (kcal)
565
565
Avg/Max Pace (min/mi)
Avg/Max Pace (min/mi)
09:37 / 07:56
09:37 / 07:56
Avg/Max/Min HR (bpm)
Avg/Max/Min HR (bpm)
138 / 156 / 124
138 / 156 / 124
Rate Intensity
Rate Intensity
Not rated
Not rated
DONE
Page 23

completed. You can also initiate Wi-Fi sync by going
to going to
Workouts
Workout Sync > Sync Now (“Con nect Wi-Fi” on
Workout > Recent and touching Sync
or by touching Settings > Wireless >
page 7).
• Bluetooth: connect via Bluetooth with your Motorola
smartphone that has the MOTOACTV app installed
(“Smartphone setup” on page 24).
Sensors
Your MOTOACTV works with the latest wireless
sensors:
• Bluetooth Low Energy (BLE) heart rate monitor
• ANT+ heart rate monitor, bike sensors, or foot pod
Note: You can connect MOTOACTV with different ANT+
devices at the same time or with BLE sensors, but not
with both ANT+ and BLE devices at the same time.
To pair your MOTOACTV with
your sensor:
1 Turn on your sensor and
follow its pairing
instructions. Make sure the
Add Sensor
Heart Rate Monitor
Foot Pod
sensor is in range of your
MOTOACTV.
2 On your MOTOACTV, touch
Settings > Sensors > Add
Sensor
.
3 Touch the type of sensor
Speed/Cadence
Power Sensor
Cadence
you want to pair your
MOTOACTV with, then
follow instructions on your MOTOACTV screen.
Note: To pair with a heart rate monitor, select if your
monitor is ANT+ or BLE.
4 After scanning is complete, touch the sensor you
want to pair with, then touch
Done.
Your paired sensor appears in the Sensors list.
MOTOACTV automatically connects to it the next time
you begin a workout.
21Workout
Page 24

Pair with a cycling power meter
This product is ANT+ certified and complies with
the following specif ied ANT+ Device Profiles:
You can use your MOTOACTV with any cycling power
meter that is ANT+ compatible (such as SRM or
PowerTap).
1 Before your workout, pair your power sensor with
your MOTOACTV by touching
Add Sensor > Power Sensor. Make sure you pedal
Settings > Sensors >
your bike to activate the power sensor.
2 After the sensor is paired and you see its name in the
Sensors list, touch the sensor's name to calibrate the
sensor with your MOTOACTV device.
3 For correct tracking, it is important to calibrate the
sensor even if you have previously calibrated it with
other bike computers. To calibrate, touch the sensor
name and select
Zero
.
Calibrate > Auto Zero or Manual
Unpair sensors
To remove a sensor that you’ve previously paired with
your MOTOACTV, touch
touch and hold the sensor name, then touch
22 Workout
Settings screen > Sensors >
FORGET.
About ANT+
ANT+ allows real-time tracking of data indoors and
outdoors, anytime, anywhere. It’s the link among your
mobile device, computer/fitness console, and your
sensors, including:
• heart rate monitor
• bike speed and cadence sensor
• bike power
• foot pod
ANT+ technology provides wireless device
interoperability to a complete ecosystem of over 20
million (as of Oct 2011) sport, fitness and health
monitoring devices.
ANT+ standardizes device interoperability, giving you the
choice in creating the suite of cutting-edge devices to
suit your activity needs with the assurance of ANT+
features and simplicity. Visit
www.thisisant.com/modul
to view current ANT+ enabled devices.
es/mod_product-
directory.php
Page 25

Workout settings
Find it: Settings > Workout
• Auto-Behaviors: Set these automatic funtions:
Auto-Run: Automatically starts an outdoor
•
running workout when running is detected.
Auto-Pause: Automatically pauses and resumes
•
your workout when you stop and start moving for
running and cycling workouts.
Auto-Display: Automatically advances through
•
workout screens every five seconds.
Auto -Interval: Automatically advances to the
•
next interval when you complete one.
Auto -Lap: Set lap distance or time then select
•
Auto-Lap to automatically advance to the next lap
when you complete one.
Auto Screen Lock: Automatically lock the workout
•
screen after 10 seconds of being idle.
Customize Views: Select which screens to display
•
during each type of workout and which metrics to
show on the Live Data screen (like pace, calories,
etc.).
Coaching: Hear a coach’s voice giving you feedback on
•
your workouts.
Device Tap: Select the action to do when you tap the
•
display during a workout (
Next Lap
Bike profiles: Set a bike profile for each of your bikes.
•
Calibration: Set your stride for walking or running so
•
your device can monitor your progress more
accurately.
, or Off).
Read Out Metrics, Start
GPS for outdoor workouts
For best accuracy, your device needs to acquire a GPS
signal before you start an outdoor workout. The first
time you use your MOTOACTV, GPS acquisition may
take a couple minutes. Subsequent acquisitions are
much faster. Stand in an open area with a clear view of
the sky and remain still while holding your MOTOACTV
away from your body.
For optimized performance:
• For running and walking, use the wristband or
armband.
• For cycling, use the bike mount.
• If using the clip, put it at chest level or higher, like
upper arm.
For faster GPS acquisition, connect your MOTOACTV to
a computer before to your first outdoor workout. Using a
computer allows MOTOACTV to download satellite
information.
23Workout
Page 26

Smartphone setup
A
W
ANSWER
IGNORE
JJJ
John McConnell
Mobile
12:47
it’s good to talk
MOTOACTV app
Connect your MOTOACTV to your Motorola Android™
Smartphone so you can get calls, text messages, and
calendar reminders. Just download the free app from
Android Market™.
Tip: Check your phone! It may have come preloaded
with the MOTOACTV app.
1 Download and install the MOTOACTV app from
Android Market.
2 On your MOTOACTV, set your device to recognize
your smartphone by touching
Smartphone Setup > Start Setup.
3 On your smartphone, touch > and follow the
setup steps.
Tip: You can also use your phone to set up Wi-Fi on your
device.
24 Smartphone setup
Settings > General >
Calls & text messages
After you connect your device and smartphone, you can
receive calls, text messages, and calendar notifications
on your MOTOACTV.
Receive calls
With a headset connected
If you’re wearing a headset
(with microphone) plugged in or
connected to your phone via
Bluetooth, you can touch the
MOTOACTV display to receive
the call on your MOTOACTV.
• To answer a call, touch
Answer.
• To end a call, touch
• To mute a call, touch
• To ignore a call, touch
End.
Mute.
Ignore.
Without a headset
If you don’t have a headset connected to your
MOTOACTV, you can:
• Connect a headset with a microphone to your phone.
• Answer a call by using your phone.
• Silence your phone’s ringer by touching
o
GNORE
Silence.
Page 27

Return to an active call
A A A A
MARK ALL AS READ
Notifications (3)
J
J
J
A
A
a
uc
art
uc
tart
John McConnell
Where r u? Meet in 5,
corner of Michigan and
Wacker.
View details
a
utdoor Run
uc
art
uc
art
Meet Jenny
Toda y
08:00 PM to10:00 PM
View details
If you are on a workout screen,
to return to the call screen:
1 Touch and hold
Back/Home to return to
the home screen.
2 Drag to the Notifications
screen and touch it.
3 In the Notification list, touch
the active phone call to return
to call screen.
John McConnell
John McConnell
Active Call, 3:45
Active Call, 3:45
Taylor Malloy
Taylor Malloy
3:59 PM
3:59 PM
Peter Green
Peter Green
3:45 PM
3:45 PM
Outdoor Run
Outdoor Run
3:00 PM
3:00 PM
212-515-4256
212-515-4256
1:45 PM
1:45 PM
Tip: To return a missed call,
touch it, then touch
CALL BACK.
Pause Your Workout to Answer a call
Press the START WORKOUT key on the top of the
device to pause your workout while you’re on a call.
Press the START WORKOUT key again when you’re
ready to resume.
Receive messages
After you connect your
MOTOACTV to your phone,
when you receive a text
message, it appears on your
MOTOACTV.
Touch it to see details.
See Calendar alerts
After you connect your
MOTOACTV to your phone,
when you receive a calendar
reminder, it shows up on your
MOTOACTV display.
Touch it to see details.
Outdoor Run
Quick Start
Quick Start
Set a Target
Set a Target
Planned
Planned
Outdoor Run
Quick Start
Quick Start
Set a Target
Set a Target
Set a Target
Planned
Planned
uick Start
et a Target
3
uick Start
3
25Smartphone setup
Page 28

Tips & tricks
a few more handy hints
Music
when music is what you need...
Battery tips
Want to extend your battery life? Try these:
• To choose the best battery mode for you, touch
Settings > Battery Saver and select from Normal
(display refreshes every second),
Extended (displays refreshes every two seconds), or
Marathon (display refreshes every three seconds).
• To turn off the display quicker, touch
Display > Screen timeout.
>
• To make screen time out automatically when in a
workout, touch
Screen Time
26 Tips & tricks
Settings > Battery Saver > Workout
.
Settings
Load music
Note: Copyright—do you have the right? Always follow
the rules. See “Content Copyright” in your legal and
safety information.
1 Connect a Motorola micro
USB data cable from your
device to your computer to
open MotoCast USB.
2 If prompted, create or sign in
with your MotoCast ID.
Page 29

3 Use MotoCast USB to load music and podcasts onto
Fit Song
Performance Music
Body Language
3:95 PM
Fitness Music
Body Language
Scroll for
options.
your device.
Note: If you need help, check out the help menu item.
Device Tools Help
Music
Last Sync
06/14/2011
Podcasts
Last Sync
Never
Sync toDevice
Sync fromDevice
Sync Music from:
All Playlists
Selectted Playlists:
Music(3)
Windows Media Player
Select Music.
Choose music
library to sync
with.
Play music
1 On your device, touch the Music screen.
2 Touch a category:
Fitness Music, Playlists, Artists,
Songs, Albums, Genres, or Podcasts.
3 Touch the song or podcast to play it.
4 Drag left/right for shuffle, repeat, or other functions.
Music
3 Songs
MOTOACTV
Music
Sync fitness data with
MOTOACT V.co m and music
to or from your device.
Tip: You can also connect your device to your
computer as a mass storage device, and drag and
drop files to it.
Capacity: 6.5 GB
Other
Podcasts
MapsPodcasts
0.0B
1.7 MB
0.0B14.4 MB 0.0B
Free
4.8 GB
Start the sync.
Refresh
Sync
27Music
Page 30

Playlists & Fit songs
Make the station
a favorite.
Stop
playing.
98.5
Scan for stations.
Playlists
Find it: Music > Playlists
You can add your favorite playlists to your device by
connecting to your computer. See “Load music” on
page 26 for details.
Fit Song
Find it: Music > Fitness Music, then drag to the right
until you see
You probably have a song, that one that makes you work
harder and push to new levels. To set your fit song while
you’re playing the song, drag to the right twice and
touch .
To play your fit song, from the music player screen, drag
right and touch .
Tip: Start up your fit song by pressing the wired headset
button.
Performance music
Find it: Music > Fitness Music > Performance Music
Your MOTOACTV knows which songs get you pumped
the most. It keeps track and, over time, adds them to
your Performance Music playlist. After five workouts,
your MOTOACTV will have a great playlist ready for you.
28 Music
Fit Song
Radio
Find it: Music > FM Radio
Plug in a wired headset (required) to listen to your
favorite radio station.
• To manually select a radio station, touch
and drag left or right till you reach your station.
• To scan for stations, touch
• To add a favorite, tune to the station you like, then
touch the star to save it as a favorite.
• To stop the radio, press the MUSIC key on top of the
device (or touch on the radio).
Local Stations.
Listen Now
Page 31

Personalize
add your personal touch
clock
Customize the look of the clock. Just tap the clockface
to change it.
Notifications
Play tone (via the headset) when you receive a
notification.
Settings > Notifications > Tone
Find it:
Set the Notification light (LED) to blink when you receive
a notification.
Settings > Notifications > LED
Find it:
Display settings
• To set display brightness, touch Settings screen
Display > Brightness.
>
• To set how long your screen can be idle before it goes
dark, touch
Note: During an active workout, the display never
times out unless you have set the Screen Timeout
option (see
keep monitoring your progress. To turn the display off
manually, press the Power key.
Settings > Display > Screen Timeout.
Settings > Battery Saver), so you can
Theme color
Change the theme color of your screens.
Settings > Display > Theme Color
Find it:
Date & time
Set date, time, time zone, and formats.
Settings > General > Date & Time
Find it:
29Personalize
Page 32

Bluetooth® wireless
go wireless
Connect Bluetooth headsets
To connect with a new headset, you need to pair with it.
You only need to do this once for each headset—to
connect again, just turn on the headset.
1 Make sure the Bluetooth headset you are pairing with
is in discoverable mode.
Note: Refer to the guide that came with the headset
for details.
2 On your MOTOACTV, touch
Headsets
3 Touch a headset to connect.
4 Touch
MOTOACTV status bar.
Note: To extend battery life, either disconnect your
MOTOACTV or turn Bluetooth power off on the paired
headset when not in use.
30 Bluetooth® wireless
> Add New Device to begin scanning.
Done, and the Bluetooth icon appears in the
Settings > Bluetooth
Reconnect devices
To reconnect your MOTOACTV with a paired Bluetooth
headset, turn on the paired headset.
Disconnect devices
To disconnect your MOTOACTV from a paired headset:
• To disconnect your MOTOACTV from a connected
Bluetooth headset without unpairing it, turn off the
Bluetooth headset. Or, touch
Headsets
and touch
• To disconnect and unpair MOTOACTV from a
connected Bluetooth headset, touch
Bluetooth Headsets. Touch the Bluetooth headset
you want to unpair, then touch
, select the headset you want to disconnect,
DISCONNECT.
Settings > Bluetooth
Settings >
FORGET.
Page 33

File management
move music and more to your device
Troubleshooting
we’re here to help
USB connection
To transfer music from your computer to MOTOACTV,
use MotoCast USB. You can also drag and drop files to
MOTOACTV if you connect it to your computer as a
mass storage device.
Note: The first time you use a USB connection, your
computer may indicate that drivers are being installed.
Follow any prompts you see to complete the installation.
This may take a few minutes.
1 Connect a Motorola micro USB data cable from your
device’s micro USB port to a USB port on your
computer. Your device connects to your computer as
mass storage.
Note: Make sure to connect to a high power USB
port. Typically, these are located directly on your
computer.
2 Drag and drop files between your computer and
MOTOACTV. When you’re done, use “Safely Remove
Hardware” before disconnecting the USB cable.
Motocast ID
You can check to see if you successfully linked your
device with your MotoCast ID.
Settings > Personal Profile and look for your
Find it:
Motocast ID
Reset
To reset your device to factory settings, touch Settings >
General > Factory Reset, then touch Reset.
Warn in g: Resetting will erase all personal data on your
MOTOACTV, including your unsynced workouts. Your
music content will remain on the device. Your data on
MOTOACTV.com
In the rare event that your device locks up, press the
Power key and START WORKOUT key simultaneously
for more than seven seconds.
will not be deleted.
31File management
Page 34

Service & repairs
If you have questions or need assistance, we’re here to
help.
Go to www.motorola.com/repair
www.motorola.com/support
select from a number of customer care options. You can
also contact the Motorola Customer Support Center at:
1-800-734-5870 (United States), 1-888-390-6456
(TTY/TDD United States for hearing impaired), or
1-800-461-4575 (Canada).
32 Troubleshooting
(United States) or
(Canada), where you can
Page 35

Safety, Regulatory & Legal
032375o
Battery Use & Safety
Battery Use & Safety
The following battery use and safety information applies to all Motorola mobile devices. If
your mobile device uses a non-removable main battery (as stated in your product
information), details related to handling and replacing your battery should be
disregarded—the battery should only be replaced by a Motorola-approved service facility,
and any attempt to remove or replace your battery may damage the product.
Important: Handle and store batteries pr operly to avoid injury or damage.
battery issues arise from improper handling of batteries, and particularly from the continued
use of damaged batteries.
DON’Ts
• Don’t disassemble, crush, puncture, shred, or otherwise attempt to change the
form of your battery.
• Don’t let the mobile device or battery come in contact with liquids.*
get into the mobile device’s circuits, leading to corrosion.
• Don’t allow the battery to touch metal objects.
in prolonged contact with the battery contact points, the battery could become very hot.
• Don’t place your mobile device or battery near a heat source.*
can cause the battery to swell, leak, or malfunction.
• Don’t dry a wet or damp battery with an appliance or heat sour ce
dryer or microwave oven.
DOs
• Do avoid leaving your mobile device in your c ar in high temperatures.*
• Do avoid dropping the mobile device or battery.*
on a hard surface, can potentially cause damage.*
• Do contact your service provider or Motorola if your mobile device or battery
has been damaged by dropping, liquids or high temperature s.
* Note:
Always make sure that the battery compartment and any connector covers are
closed and secure to avoid direct exposure of the battery to any of these conditions, even if
your product information states that your
conditions.
Important: Motorola recommends you always use Motorola-branded batteries and
chargers for quality assurance and safeguards.
damage to the mobile device caused by non-Motorola batteries and/or chargers. To help you
If metal objects, such as j ewelry, stay
Dropping these items, especially
mobile device
can resist damage from these
Motorola’s warranty does not cover
Most
Liquids can
High temperatures
, such as a hair
identify authentic Motorola batteries from non-original or counterfeit batteries (that may not
have adequate safety protection), Motorola provides holograms on its batteries. You should
confirm that any battery you purchase has a “Motorola Original” hologram.
If you see a message on your display such as
Unable to Charge
•
Remove the battery and inspect it to confirm that it has a “Motorola Original” hologram;
•
If there is no hologram, the battery is not a Motorola battery;
•
If there is a hologram, replace the battery and try charging it again;
•
If the message remains, contact a Motorola authorized service center.
Warning:
Use of a non-Motorola battery or charger may present a risk of fire, explosion,
leakage, or other hazard.
Proper and safe battery disposal and recycling:
important for safety, it benefits the environment. You can recycle your used batteries in many
retail or service provider locations. Additional information on proper disposal and recycling
can be found at
Disposal:
Promptly dispose of used batteries in accordance with local
regulations. Contact your local recycling cente r or national recycling organizations
for more information on how to dispose of batteries.
Warning:
Never dispose of batteries in a fire because they may explode.
Battery Charging
Battery Charging
Notes for cha rging your product’s battery:
•
During charging, keep your battery and charger near room temperature for efficient
battery charging.
•
New batteries are not fully charged.
•
New batteries or batteries stored for a long time may take more time to charge.
•
Motorola batteries and charging systems have circuitry that protects the battery from
damage from overcharging.
, take the following steps:
www.motorola.com/recycling
Invalid Battery
Proper battery disposal is not only
or
Third Party Accessories
Use of third party accessories, including but not limited to batteries, chargers, headsets,
covers, cases, screen protectors and memory cards, may impact your mobile device’s
performance. In some circumstances, third party accessories can be dangerous and may void
your mobile device’s warranty. For a list of Motorola accessories, visit
www.motorola.com/products
Page 36

Seizures/Blackouts
032374o
032376o
Some people may be susceptible to epileptic seizures or blackouts when exposed to flashing
lights, such as when playing videos or games. These may occur even if a person has never
had a previous seizure or blackout.
If you have experienced seizures or blackouts, or if you have a family history of such
occurrences, please consult with your physician before playing videos or games or enabling a
flashing-lights feature (if available) on your mobile device.
Discontinue use and consult a physician if any of the following symptoms occur: convulsion,
eye or muscle twitching, loss of awareness, involuntary movements, or disorientation. It is
always a good idea to hold the screen away from your eyes, leave the lights on in the room,
take a 15-minute break every hour, and stop use if you are tired.
Caution About High Volume Usage
Warning:
Exposure to loud noise from any source for extended periods of time may affect
your hearing. The louder the volume sound level, the less time is required before your hearing
could be affected. To protect your hearing:
•
Limit the amount of time you use headsets or headphones at high volume.
•
Avoid turning up the volume to block out noisy surroundings.
•
Turn the volume down if you can’t hear people speaking near you.
If you experience hearing discomfort, including the sensation of pressure or fullness in your
ears, ringing in your ears, or muffled speech, you should stop listening to the device through
your headset or headphones and have your hearing checked.
For more information about hearing, see our website at
direct.motorola.com/hellomoto/nss/AcousticSafety.asp
(in English only).
Repetitive Motion
When you repetitively perform actions such as pressing keys or entering finger-written
characters, you may experience occasional discomfort in your hands, arms, shoulders, neck,
or other parts of your body. If you continue to have discomfort during or after such use, stop
use and see a physician.
Children
Keep your mobile device and its accessories away from small children.
products are not toys and may be hazardous to small children. For example:
•
A choking hazard may exist for small, detachable parts.
•
Improper use could result in loud sounds, possibly causing hearing injury.
These
•
Improperly handled batteries could overheat and cause a burn.
Similar to a computer, if a child does use your mobile device, you may want to monitor their
access to help prevent exposure to inappropriate apps or content.
Glass Parts
Some parts of your mobile device may be made of glass. This glass could break if the product
receives a substantial impact. If glass breaks, do not touch or attempt to remove. Stop using
your mobile device until the glass is replaced by a qualified service center.
Operational Warnings
Obey all posted signs when using mobile devices in public areas.
Potentially Explosive Atmospheres
Areas with potentially explosive atmospheres are often, but not always, posted and can
include fueling areas, such as below decks on boats, fuel or chemical transfer or storage
facilities, or areas where the air contains chemicals or particles, such as grain dust, or metal
powders.
When you are in such an area, turn off your mobile device, and do not remove, install, or
charge batteries unless it is a radio product type especially qualified for use in such areas as
“Intrinsically Safe” (for example, Factory Mutual, CSA, or UL approved). In such areas, sparks
can occur and cause an explosion or fire.
Symbol Key
Your battery, charger, or mobile device may contain symbols, defined as follows:
Symbol Definition
Important safety information follows.
Do not dispose of your battery or mobile device in a fire.
Page 37

Symbol Definition
032375o
Your battery or mobile device may require recycling in accordance
with local laws. Contact your local regulatory authorities for more
information.
Do not dispose of your battery or mobile device with your household
waste. See “Recycling” for more information.
Do not use tools.
For indoor use only.
Radio Frequency (RF) Energy
Exposure to RF Energy
Your mobile device c ontains a Wi-Fi and Bluetooth transmitter and receiver. When these
features are in use, they receive and transmits RF energy. Your mobile device is designed to
comply with local regulatory requirements in your country concerning exposure of human
beings to RF energy.
RF Energy Interference/Compatibility
Nearly every electronic device is subject to RF energy interference from external sources if
inadequately shielded, designed, or otherwise configured for RF energy compatibility. In
some circumstances, your mobile device may cause interference with other devices.
Follow Instructions to Avoid Interference Problems
Turn off your mobile device in any location where posted notices instruct you to do so.
In an aircraft, turn off your mobile device whenever instructed to do so by airline staff. If your
mobile device offers an airplane mode or similar feature, consult airline staff about using it in
flight.
Implantable Medical Devices
If you have an implantable medic al device, such as a pacemaker or defibrillator, consult your
physician before using this mobile device.
Persons with implantable medical devices should observe the following precautions:
•
ALWAYS keep the mobile device more than 20 centimeters (8 inches) from the
implantable medical device when the mobile device is turned ON.
•
Turn OFF the mobile device immediately if you have any reason to suspect that
interference is taking place.
Read and follow the directions from the manufacturer of your implantable medical device. If
you have any questions about using your mobile device with your implantable medical
device, consult your healthcare provider.
Specific Absorption Rate (FCC)
SAR (IEEE)
YOUR MOBILE DEVICE MEETS FCC LIMITS FOR EXPOSURE
TO RADIO WAVES.
Your mobile device is a radio transmitter and receiver. It is designed not to exceed the limits
for exposure to radio waves (radio frequency electromagnetic fields) adopted by the Federal
Communications Commission (FCC). These limits include a substantial safety margin
designed to assure the safety of all persons, regardless of age and health.
The radio wave exposure guidelines use a unit of measurement known as the Specific
Absorption Rate, or SAR. The SAR limit for mobile devices is 1.6 W/kg.
Tests for SAR are conducted using standard operating positions with the device transmitting
at its highest certified power level in all tested frequency bands. The highest SAR value
under the FCC guidelines for your device model is listed below:
Body SAR Wi-Fi, Bluetooth 0.46 W/kg
During use, the actual SAR values for your device are usually well below the values stated.
This is because, for purposes of system efficiency and to minimize interference on the
network, the operating power of your mobile device is automatically decreased when full
power is not needed for the wireless connection. The lower the power output of the device,
the lower its SAR value.
Page 38

European Union Directives Conformance
0168
[Only Indoor Use Allowed In France
for Bluetooth and/or Wi-Fi]
0168
Statement
EU Conformance
The following CE compliance information is applicable to Motorola mobile devices that carry
one of the following CE marks:
Hereby, Motorola declares that this product is in compliance with:
•
The essential requirements and other relevant provisions of Directive 1999/5/EC
•
All other relevant EU Directives
0168
The above gives an example of a typical Product Approval Number.
You can view your product’s Declaration of Conformity (DoC) to Directive 1999/5/EC (to
R&TTE Directive) at
the Product Approval Number from your product’s label in the “Search” bar on the website.
FCC Notice to Users
FCC Notice
The following statement applies to all products that bear the FCC logo on the
product label.
This equipment has been tested and found to comply with the limits for a Class B digital
device, pursuant to part 15 of the FCC Rules. See 47 CFR Sec. 15.105(b). These limits are
designed to provide reasonable protection against harmful interference in a residential
installation. This equipment generates, uses and can radiate radio frequency energy and, if
not installed and used in accordance with the instructions, may cause harmful interference to
www.motorola.com/rtte
Product
Approval
Number
(in English only). To find your DoC, enter
radio communications. However, there is no guarantee that interference will not occur in a
particular installation. If this equipment does cause harmful interference to radio or
television reception, which can be determined by turning the equipment off and on, the user
is encouraged to try to correct the interference by one or more of the following measures:
•
Reorient or relocate the receiving antenna.
•
Increase the separation between the equipment and the receiver.
•
Connect the equipment to an outlet on a circuit different from that to which the receiver is
connected.
•
Consult the dealer or an experienced radio/TV technician for help.
This device complies with part 15 of the FCC Rules. Operation is subjec t to the following two
conditions: (1) This device may not cause harmful interference, and (2) this device must
accept any interference received, including interference that may cause undesired operation.
See 47 CFR Sec. 15.19(a)(3).
Motorola has not approved any changes or modifications to this device by the user. Any
changes or modifications could void the user’s authority to operate the equipment. See 47
CFR Sec. 15.21.
For products that support Wi-Fi 802.11a (as defined in the product specifications available at
www.motorola.com
capability to operate Wi-Fi in the 5 GHz Unlicensed National Information Infrastructure
(U-NII) band. Because this band is shared with MSS (Mobile Satellite Service), the FCC has
restricted such devices to indoor use only (see 47 CFR 15.407(e)). Since wireless hot spots
operating in this band have the same restriction, outdoor services are not offered.
Nevertheless, please do not operate this device in Wi-Fi mode when outdoors.
Industry Canada Notice to Users
Industry Canada Notice
Operation is subject to the following two conditions: (1) This device may not cause
interference and (2) This device must accept any interference, including interference that may
cause undesired operation of the device. See RSS-GEN 7.1.5. This Class B digital apparatus
complies with Canadian ICES-003.
Location Services (GPS & AGPS)
GPS & AGPS
The following information is applicable to Motorola mobile devices that provide location
based (GPS and/or AGPS) functionality.
Your mobile device may use Global Positioning System (GPS) signals for location-based
applications. GPS uses satellites controlled by the U.S. government that are subject to
changes implemented in accordance with the Department of Defense policy and the Federal
), the following information applies. This equipment has the
Page 39

Radio Navigation Plan. These changes may affect the performance of location technology on
your mobile device.
Your mobile device may also use Assisted Global Positioning System (AGPS), which obtains
information from the cellular network to improve GPS performance. AGPS uses your wireless
service provider's network and therefore airtime, data charges, and/or additional charges
may apply in accordance with your service plan. Contact your wireless service provider for
details.
Your Location
Location-based information includes information that can be used to determine the
approximate location of a mobile device. Mobile devices which are connected to a wireless
network transmit location-based information. Devices enabled with GPS or AGPS technology
also transmit location-based information. Additionally, if you use applications that require
location-based information (e.g. driving directions), such applications transmit location-based
information. This location-based information may be shared with third parties, including your
wireless service provider, applications providers, Motorola, and other third parties providing
services.
Navigation
Navigation
The following information is applicable to Motorola mobile devices that provide navigation
features.
When using navigation features, note that mapping information, directions and other
navigational data may contain inaccurate or incomplete data. In some countries, complete
information may not be available. Therefore, you should visually confirm that the navigational
instructions are consistent with what you see. All drivers should pay attention to road
conditions, closures, traffic, and all other factors that may impact driving. Always obey
posted road signs.
Privacy & Data Security
Privacy & Data Security
Motorola understands that privacy and data security are important to everyone. Because
some features of your mobile device may affect your privacy or data security, please follow
these recommendations to enhance protection of your information:
• Monitor access
may have unmonitored access. Use your device’s security and lock features, where
available.
—Keep your mobile device with you and do not leave it where others
• Keep software up to date
patch or software fix for your mobile device that updates the device’s security, install it as
soon as possible.
• Secure Personal Information
various locations including your SIM card, memory card, and internal memory. Be sure to
remove or clear all personal information before you recycle, return, or give away your
device. You can also backup your personal data to transfer to a new device.
Note:
For information on how to backup or wipe data from your mobile device, go to
www.motorola.com/support
• Online accounts
MOTOBLUR). Go to your account for information on how to manage the account, and how
to use security features such as remote wipe and device location (where available).
• Applications and updates
trusted sources only. Some apps can impact your product’s performance and/or have
access to private information including account details, useage data, location details and
network resources.
•Wireless
—For mobile devices with Wi-Fi features, only connect to trusted Wi-Fi
networks. Also, when using your device as a hotspot (where available) use network
security. These precautions will help prevent unauthorized access to your device.
• Location-based information
can be used to determine the approximate location of a mobile device. Products which are
connected to a wireless network transmit location-based information. Devices enabled
with GPS or AGPS technology also transmit location-based information. Additionally, if
you use applications that require location-based information (e.g. driving directions), such
applications transmit location-based information. This location-based information may be
shared with third parties, including your wireless service provider, applications providers,
Motorola, and other third parties providing services.
• Other information your device may transmit
and other diagnostic (including location-based) information, and other non-personal
information to Motorola or other third-party servers. This information is used to help
improve products and services offered by Motorola.
If you have further questions regarding how the use of your mobile device may impact your
privacy or data security, please contact Motorola at
your service provider.
—If Motorola or a software/application vendor releases a
—Your mobile device can store personal information in
—Some mobile devices provide a Motorola online account (such as
—Choose your apps and updates carefully, and install from
—Location-based information includes information that
—Your device may also transmit testing
privacy@motorola.com
, or contact
Page 40

Use & Care
Use & Care
To care for your Motorola product, please keep it away from:
liquids of any kind
Don’t expose your product to water, rain, extreme humidity, or other moisture. If
it does get wet, don’t try to accelerate drying with the use of an oven or dryer,
as this may damage the product.
extreme heat or cold
Avoid temperatures below -10°C (14°F) or above 60°C (140°F). For battery
powered accessories, do not recharge your accessory in temperatures below
0°C (32°F) or above 45°C (113°F) .
microwaves
Don’t try to dry your product in a microwave oven.
dust and dirt
Don’t expose your product to dust, dirt, sand, food, or other inappropriate
materials.
cleaning solutions
To clean your product, use only a dry soft cloth. Don’t use alcohol or other
cleaning solutions.
shock and vibration
Don’t drop your product.
protection
To help protect your mobile device, always make sure that any battery,
connector and compartment covers are closed and secure.
Recycling
Recycling
Mobile Devices & Accessories
Please do not dispose of mobile devices or electrical accessories (such as
chargers, headsets, or batteries) with your household waste, or in a fire. These
items should be disposed of in accordance with the national collection and
recycling schemes operated by your local or regional authority. Alternatively, you
may return unwanted mobile devices and electrical accessories to any Motorola Approved
Service Center in your region. Details of Motorola approved national recycling schemes, and
further information on Motorola recycling activities can be found at:
www.motorola.com/recycling
Packaging & Product Guides
Product packaging and product guides should only be disposed of in accordance with national
collection and recycling requirements. Please contact your regional authorities for more
details.
California Perchlorate Label
Perchlorate Label
Some mobile devices use an internal, permanent backup battery on the printed circuit board
that may contain very small amounts of perchlorate. In such cases, California law requires
the following label:
Perchlorate Material – special handling may apply when the battery is recycled or disposed
of. See
www.dtsc.ca.gov/hazardouswaste/perchlorate
There is no special handling required by consumers.
Software Copyright Notice
Software Copyright Notice
Motorola products may include copyrighted Motorola and third-party software stored in
semiconductor memories or other media. Laws in the United States and other countries
preserve for Motorola and third-party software providers certain exclusive rights for
copyrighted software, such as the exclusive rights to distribute or reproduce the copyrighted
software. Accordingly, any copyrighted software contained in Motorola products may not be
modified, reverse-engineered, distributed, or reproduced in any manner to the extent allowed
by law. Furthermore, the purchase of Motorola products shall not be deemed to grant either
directly or by implication, estoppel, or otherwise, any license under the copyrights, patents,
or patent applications of Motorola or any third-party software provider, except for the normal,
non-exclusive, royalty-free license to use that arises by operation of law in the sale of a
product.
(in English only).
Page 41

Content Copyright
Content Copyright
The unauthorized copying of copyrighted materials is contrary to the provisions of the
Copyright Laws of the United States and other countries. This device is intended solely for
copying non-copyrighted materials, materials in which you own the copyright, or materials
which you are authorized or legally permitted to copy. If you are uncertain about your right to
copy any material, please contact your legal advisor.
Open Source Software Information
OSS Information
For instructions on how to obtain a copy of any source code being made publicly available by
Motorola related to software used in this Motorola mobile device, you may send your request
in writing to the address below. Please make sure that the request includes the model
number and the software version number.
MOTOROLA MOBILITY, INC.
OSS Management
600 North US Hwy 45
Libertyville, IL 60048
USA
The Motorola website
information regarding Motorola's use of open source.
Motorola has created the
interaction with the software community-at-large.
To view additional information regarding licenses, acknowledgments and required copyright
notices for open source packages used in this Motorola mobile device, please touch
Settings >General >MOTOACTV Status >Legal
>
Open source Software
self-contained applications that present supplemental notices for open source packages used
in those applications.
Export Law Assurances
Export Law
This product is controlled under the export regulations of the United States of America and
Canada. The Governments of the United States of America and Canada may restrict the
exportation or re-exportation of this product to certain destinations. For further information
contact the U.S. Department of Commerce or the Canadian Department of Foreign Affairs and
International Trade.
opensource.motorola.com
opensource.motorola.com
. In addition, this Motorola device may include
(in English only) also contains
website to serve as a portal for
Product Registration
Registration
Online Product Registration:
www.motorola.com/us/productregistration
Product registration is an important step toward enjoying your new Motorola product.
Registering permits us to contact you for product or software updates and allows you to
subscribe to updates on new products or special promotions. Registration is not required for
warranty coverage.
Please retain your original dated sales receipt for your records. For warranty service of your
Motorola Personal Communications Product you will need to provide a copy of your dated
sales receipt to confirm warranty status.
Thank you for choosing a Motorola product.
(in English only)
Motorola Limited Warranty for the United States and Canada
Warranty
What Does this Warranty Cover?
Subject to the exclusions stated below, Motorola Mobility, Inc., warrants its Products and
Accessories to be free from defects in materials and workmanship under normal consumer
usage for the period defined below. This limited warranty is a consumer's exclusive remedy
and applies as follows to new Motorola Products and Accessories purchased by consumers
in the United States or Canada, which are accompanied by this written warranty:
Products and Accessories
Products Covered Length of Coverage
Products and Accessories
defined above, unless otherwise
provided for below.
Decorative Accessories and
Cases.
Decorative covers, bezels,
PhoneWrap™ covers and cases.
Monaural Headsets.
and boom headsets that transmit
mono sound through a wired
connection.
Ear buds
as
One (1) year
from the date of purchase by the
first consumer purchaser of the product unless
otherwise provided for below.
Limited lifetime warranty
ownership by the first consumer purchaser of
the product.
Limited lifetime warranty
ownership by the first consumer purchaser of
the product.
for the lifetime of
for the lifetime of
Page 42

Products Covered Length of Coverage
Products and Accessories that
are Repaired or Replaced.
Exclusions (Products and Accessories)
Normal Wear and Tear.
normal wear and tear are excluded from coverage.
Batteries.
Only batteries whose fully charged capacity falls below 80% of their rated
capacity and batteries that leak are covered by this limited warranty.
Abuse & Misuse.
misuse or abuse, accident o r neglect, such as physical damage (cracks, scratches, etc.) to the
surface of the product resulting from misuse; (b) contact with liquid, water, rain, extreme
humidity or heavy perspiration, sand, dirt or the like, extreme heat, or food; (c) use of the
Products or Accessories for commercial purposes or subjecting the Product or Accessory to
abnormal usage or conditions; or (d) other acts which are not the fault of Motorola, are
excluded from coverage.
Use of Non-Motoro la Products and Accessories.
the use of non-Motorola branded or certified Products, Accessories, Software or other
peripheral equipment are excluded from coverage.
Unauthorized Service or Modification.
testing, adjustment, installation, maintenance, alteration, or modification in any way by
someone other than Motorola, or its authorized service centers, are excluded from coverage.
Altered Products.
been removed, altered or obliterated; (b) broken seals or that show evidence of tampering; (c)
mismatched board serial numbers; or (d) nonconforming or non-Motorola housings, or parts,
are excluded from coverage.
Communication Services.
Software due to any communication service or signal you may subscribe to or use with the
Products Accessories or Software is excluded from coverage.
Periodic maintenance, repair and replacement of parts due to
Defects or damage that result from: (a) improper operation, storage,
Products or Accessories with (a) serial numbers or date tags that have
The balance of the original warranty or
for ninety (90) days
the consumer, whichever is longer.
Defects or damages resulting from service,
Defects, damages, or the failure of Products, Accessories or
from the date returned to
Defects or damage that result from
Software
Products Covered Length of Coverage
Software.
Applies only to physical defects in the
media that embodies the copy of the software (e.g.
CD-ROM, or floppy disk).
Exclusions (Software)
Software Embodie d in Physical Media.
your requirements or will work in combination with any hardware or software applications
provided by third parties, that the operation of the software products will be uninterrupted or
error free, or that all defects in the software products will be corrected.
Software NOT Embodied in Physic al Media.
media (e.g. software that is downloaded from the Internet), is provided “as is” and without
warranty.
Who is Covered?
This warranty extends only to the first consumer purchaser, and is not transferable.
What Will Motorola Do?
Motorola, at its option, will at no charge repair, replace or refund the purchase price of any
Products, Accessories or Software that does not conform to this warranty. We may use
functionally equivalent reconditioned/refurbished/pre-owned or new Products, Accessories
or parts. No data, software or applications added to your Product, Accessory or Software,
including but not limited to personal contacts, games and ringer tones, will be reinstalled. To
avoid losing such data, software, and applications, please create a back up prior to
requesting service.
No warranty is made that the software will meet
Ninety (90) days
date of purchase.
Software that is not embodied in physical
from the
How to Obtain Warranty Service or Other
Information
USA
Canada
TTY
1-800-734-5870
1-800-461-4575
1-888-390-6456
Page 43

You will receive instructions on how to ship the Products, Accessories or Software, at your
expense, to a Motorola Authorized Repair Center. To obtain service, you must include: (a) a
copy of your receipt, bill of sale or other comparable proof of purchase; (b) a written
description of the problem; (c) the name of your service provider, if applicable; (d) the name
and location of the installation facility (if applicable) and, most importantly; (e) your address
and telephone number.
What Other Limitations are There?
ANY IMPLIED WARRANTIES, INCLUDING WITHOUT LIMITATION THE IMPLIED WARRANTIES
OF MERCHANTABILITY AND FITNESS FOR A PARTICULAR PURPOSE, SHALL BE LIMITED TO
THE DURATION OF THIS LIMITED WARRANTY, OTHERWISE THE REPAIR, REPLACEMENT, OR
REFUND AS PROVIDED UNDER THIS EXPRESS LIMITED WARRANTY IS THE EXCLUSIVE
REMEDY OF THE CONSUMER, AND IS PROVIDED IN LIEU OF ALL OTHER WARRANTIES,
EXPRESS OR IMPLIED. IN NO EVENT SHALL MOTOROLA BE LIABLE, WHETHER IN
CONTRACT OR TORT (INCLUDING NEGLIGENCE) FOR DAMAGES IN EXCESS OF THE
PURCHASE PRICE OF THE PRODUCT, ACCESSORY OR SOFTWARE, OR FOR ANY INDIRECT,
INCIDENTAL, SPECIAL OR CONSEQUENTIAL DAMAGES OF ANY KIND, OR LOSS OF
REVENUE OR PROFITS, LOSS OF BUSINESS, LOSS OF INFORMATION OR DATA, SOFTWARE
OR APPLICATIONS OR OTHER FINANCIAL LOSS ARISING OUT OF OR IN CONNECTION WITH
THE ABILITY OR INABILITY TO USE THE PRODUCTS, ACCESSORIES OR SOFTWARE TO THE
FULL EXTENT THESE DAMAGES MAY BE DISCLAIMED BY LAW.
Some states and jurisdictions do not allow the limitation or exclusion of incidental
or consequential damages, or limitation on the length of an implie d warranty, so
the above limitations or exclusions may not apply to you. This warranty gives you
specific legal rights, and you may also have other rights that v ary from state to state
or from one jurisdiction to another.
Page 44

Copyright & Trademarks
Motorola Mobility, Inc.
Consumer Advocacy Office
600 N US Hwy 45
Libertyville, IL 60048
www.motorola.com
Note:
Do not ship your product to the above address. If you need to return your product for
repairs, replacement, or warranty service, please contact the Motorola Customer Support
Center at:
1-800-734-5870 (United States)
1-888-390-6456 (TTY/TDD United States for hearing impaired)
1-800-461-4575 (Canada)
Certain features, services and applications are network dependent and may not be available
in all areas; additional terms, conditions and/or charges may apply. Contact your service
provider for details.
All features, functionality, and other product specifications, as well as the information
contained in this guide, are based upon the latest available information and believed to be
accurate at the time of printing. Motorola reserves the right to change or modify any
information or specifications without notice or obligation.
Note:
The images in this guide are examples only.
MOTOROLA and the Stylized M Logo are trademarks or registered trademarks of Motorola
Trademark Holdings, LLC. Android and Android Market are registered trademarks of Google,
Inc. All other product or service names are the property of their respective owners.
© 2012 Motorola Mobility, Inc. All rights reserved.
Caution:
Motorola does not take responsibility for changes/modification to the transceiver.
Product ID: MOTOACTV
Manual Number: 68016649001-B
Page 45

Page 46

 Loading...