

Page 1

Motorola ML25254
2-Line Corded Base Station with
Digital Answering System
Full User Guide
Page 2

1 Equipment Approval Information
Your telephone equipment is approved for connection to the Public Switched Telephone
Network and is in compliance with parts 15 and 68, FCC Rules and Regulations and the Technical
Requirements for Telephone Terminal Equipment published by ACTA.
Notification to the Local Telephone Company
On the bottom of this equipment is a label indicating, among other information, the US number,
Ringer Equivalence Number (REN), a product identifier in the format US: AAAEQ##TXXXX. You
must, upon request, provide this information to your telephone company.
The REN is useful in determining the number of devices you may connect to your telephone line
and still have all of these devices ring when your telephone number is called. In most (but not all)
areas, the sum of the RENs of all devices connected to one line should not exceed 5. To be certain
of the number of devices you may connect to your line as determined by the REN, you should
contact your local telephone company.
A plug and jack used to connect this equipment to the premises wiring and telephone network
must comply with the applicable FCC Part 68 rules and requirements adopted by the ACTA. A
compliant telephone cord and modular plug is provided with this product. It is designed to be
connected to a compatible modular jack that is also compliant. See installation instructions
for details.
NOTE
• This equipment may not be used on coin service provided by the telephone company.
• Party lines are subject to state taris, and therefore, you may not be able to use your own
telephone equipment if you are on a party line. Check with your local telephone company.
• Notice must be given to the telephone company upon permanent disconnection of your
telephone from your line.
• If your home has specially wired alarm equipment connected to the telephone line, ensure the
installation of this product does not disable your alarm equipment. If you have questions about
what will disable alarm equipment, consult your telephone company or a qualified installer.
• US Number is located on the cabinet bottom.
• REN number is located on the cabinet bottom.
Rights of the Telephone Company
Should your equipment cause trouble on your line which may harm the telephone network, the
telephone company shall, where practicable, notify you that temporary discontinuance of service
may be required. Where prior notice is not practicable and the circumstances warrant such
action, the telephone company may temporarily discontinue service immediately. In case of such
temporary discontinuance, the telephone company must:
(1) promptly notify you of such temporary discontinuance;
(2) aord you the opportunity to correct the situation; and
(3) inform you of your right to bring a complaint to the Commission pursuant to procedures set
forth in Subpart E of Part 68, FCC Rules and Regulations.
The telephone company may make changes in its communications facilities, equipment, operations
or procedures where such action is required in the operation of its business and not inconsistent
with FCC Rules and Regulations. If these changes are expected to aect the use or performance of
your telephone equipment, the telephone company must give you adequate notice, in writing, to
allow you to maintain uninterrupted service.
Interference Information
This device complies with Part 15 of the FCC Rules and the Industry Canada licence-exempt RSS
standard(s). Operation is subject to the following two conditions:
(1) This device may not cause harmful interference, and
(2) This device must accept any interference received, including interference that may cause
undesired operation.
Privacy of communications may not be ensured when using this phone.
This equipment has been tested and found to comply with the limits for a Class B digital device,
pursuant to Part 15 of the FCC Rules. These limits are designed to provide reasonable protection
against harmful interference in a residential installation.
This equipment generates, uses, and can radiate radio frequency energy and, if not installed and
used in accordance with the instructions, may cause harmful interference to radio communications.
2
Page 3
However, there is no guarantee that interference will not occur in a particular installation.
If this equipment does cause harmful interference to radio or television reception, which can be
determined by turning the equipment o and on, the user is encouraged to try to correct the
interference by one or more of the following measures:
• Reorient or relocate the receiving antenna (that is, the antenna for radio or television that is
“receiving” the interference).
• Reorient or relocate and increase the separation between the telecommunications equipment
and receiving antenna.
• Connect the telecommunications equipment into an outlet on a circuit dierent from that to
which the receiving antenna is connected.
If these measures do not eliminate the interference, please consult your dealer or an experienced
radio/television technician for additional suggestions. Also, the Federal Communications
Commission has prepared a helpful booklet, “How to Identify and Resolve Radio/TV Interference
Problems.” This booklet is available from the U.S. Government Printing Oce, Washington, D.C.
20402. Please specify stock number 004-000-00345-4 when ordering copies.
Warning: The changes or modifications to this unit not expressly approved by the party
responsible for compliance could void the user’s authority to operate the equipment.
FCC RF Radiation Exposure Statement
This equipment complies with FCC RF radiation exposure limits set forth for an uncontrolled
environment.
This equipment should be installed and operated with a minimum distance of 20 centimeters
between the base unit and your body. This transmitter must not be co-located or operated in
conjunction with any other antenna or transmitter.
Caution: To maintain the compliance with the Industry Canada’s RF exposure guideline,
place the base unit at least 20 cm from nearby persons.
Licensing
Licensed under US Patent 6,427,009.
Hearing Aid Compatibility
This telephone system meets FCC standards for Hearing Aid Compatibility.
Information for DECT Product
This telephone is compliant with the DECT 6.0 standard which operates in the 1.92GHz
to 1.93GHz frequency range.
WARNING:
TO PREVENT FIRE
OR ELECTRICAL
SHOCK HAZARD, DO
NOT EXPOSE THIS
PRODUCT TO RAIN
OR MOISTURE.
THE LIGHTNING
FLASH AND
ARROW HEAD
WITHIN THE
TRIANGLE IS A
WARNING SIGN
ALERTING YOU OF
“DANGEROUS
VOLTAGE” INSIDE
THE PRODUCT.
SEE MARKING ON BOTTOM / BACK OF PRODUCT
CAUTION:
RISK OF ELECTRIC SHOCK
DO NOT OPEN
CAUTION:
TO REDUCE THE RISK OF
ELECTRIC SHOCK, DO NOT
REMOVE COVER (OR BACK).
NO USER SERVICEABLE
PARTS INSIDE.
REFER SERVICING TO
QUALIFIED SERVICE
PERSONNEL.
THE EXCLAMATION
POINT WITHIN THE
TRIANGLE IS A
WARNING SIGN
ALERTING YOU OF
IMPORTANT
INSTRUCTIONS
ACCOMPANYING
THE PRODUCT.
3
Page 4

1 Equipment Approval Information ............................................................................ 2
2 Introduction ...................................................................................................................... 7
3 Important Safety Instructions ...................................................................................7
4 Parts Checklist ................................................................................................................. 9
5 Base Layout ....................................................................................................................10
6 Connections and Setup ...............................................................................................11
6.1 Important Installation Information ......................................................................................................11
6.2 Important Installation Guidelines .......................................................................................................11
6.3 Installing the Base and Connecting your System ..........................................................................11
6.4 Backup Battery Operation ....................................................................................................................14
7 Programming the Phone ........................................................................................... 14
7.1 Standby Screen ..........................................................................................................................................14
7.2 Programming Functions .........................................................................................................................14
7.3 Phone Settings ...........................................................................................................................................14
7.3.1 Date/Time .....................................................................................................................................14
7.3.2 Auto ANS Intercom ...................................................................................................................15
7.3.3 Tone/Pulse Dial ...........................................................................................................................15
7.3.4 Area Code .....................................................................................................................................15
7.3.5 Registration ..................................................................................................................................15
7.3.7 2nd Call Alert ...............................................................................................................................15
7.3.8 Update Handset List .................................................................................................................16
7.4 Display Settings .........................................................................................................................................16
7.4.1 Language.......................................................................................................................................16
7.4.2 Contrast .........................................................................................................................................16
7.4.3 Backlight ........................................................................................................................................16
7.5 Sound Settings ...........................................................................................................................................16
7.5.1 Ring Tone ......................................................................................................................................17
7.5.2 Ring Volume .................................................................................................................................17
7.5.3 Key Tones ......................................................................................................................................17
7.6 Voice Mail .....................................................................................................................................................17
7.6.1 Call Voice Mail .............................................................................................................................17
7.6.2 Voice Mail Settings ....................................................................................................................17
7.7 Answering System ....................................................................................................................................17
7.7.1 On/O Status ..............................................................................................................................18
7.7.2 Outgoing Message (OGA) Playback...................................................................................18
7.7.3 Outgoing Message (OGA) Record ......................................................................................18
7.7.4 Set Outgoing Message (OGA) .............................................................................................18
7.7.5 Set Oce Time ...........................................................................................................................19
7.7.6 Ring Delay .....................................................................................................................................19
7.7.7 Message Length ........................................................................................................................ 20
7.7.8 Call Screening ............................................................................................................................ 20
7.7.9 Message Alert ............................................................................................................................ 20
7.7.10 Remote Password .................................................................................................................... 20
7.8 Restore Settings ...................................................................................................................................... 20
8 Basic Operation .............................................................................................................21
8.1 Making Calls with the Corded Handset ............................................................................................21
8.2 Making Calls with the Speakerphone ................................................................................................21
8.3 Making Calls with a Wired Headset ...................................................................................................21
8.4 Pre-Dialing ...................................................................................................................................................21
8.5 Answering Calls .........................................................................................................................................21
8.6 Switching Between the Speakerphone, Handset and Headset Mode .................................22
8.7 Mute ...............................................................................................................................................................22
4
Page 5

8.8 Do Not Disturb (DND) ............................................................................................................................22
8.9 Line Privacy ...............................................................................................................................................22
8.10 Flash ..............................................................................................................................................................22
8.11 Inserting a Pause in the Dialing Sequence ..................................................................................... 22
8.12 Redial ............................................................................................................................................................22
8.12.1 Viewing a Redial Record ........................................................................................................23
8.12.2 Adding a Redial Record in the Directory .........................................................................23
8.13 Transferring a Call to Another Extension .......................................................................................23
8.14 Receiving a Transferred Call from Another Extension ..............................................................23
8.15 Ringer On/O and Ringer Volume ....................................................................................................23
8.16 Speakerphone, Handset and Corded Headset Volume .............................................................24
8.17 Hold ...............................................................................................................................................................24
8.18 Conference Calls.......................................................................................................................................24
8.18.1 Joining a call in progress .......................................................................................................24
8.18.2 3-way conference call by an intercom call ......................................................................24
8.18.3 3-way conference call with two lines ................................................................................24
8.18.4 4-way conference call (Line 1 + Line 2 + 2 extension) ................................................24
9 Intercom Calls ............................................................................................................... 24
9.1 Making an Intercom Call ........................................................................................................................24
9.2 Answering an Intercom Call .................................................................................................................25
10 Page .................................................................................................................................. 25
11 Caller ID (CID) ............................................................................................................... 25
11.1 Viewing a CID Record ............................................................................................................................25
11.2 Adding a CID Record in the Directory ............................................................................................25
11.3 Deleting a CID Record ...........................................................................................................................26
11.4 Deleting All CID Records ......................................................................................................................26
11.5 Dialing Back ...............................................................................................................................................26
11.5.1 If you have programmed your local area code .............................................................26
11.5.2 If you have not programmed your local area code .....................................................26
11.6 Call Waiting Caller ID ..............................................................................................................................27
12 Directory and One-Touch Memory Log ...............................................................27
12.1 Adding a New Directory Record ........................................................................................................27
12.2 Adding a Record in the One-Touch Memory Log ........................................................................27
12.3 Viewing a Directory Record .................................................................................................................28
12.4 Viewing a One-Touch Memory Record ............................................................................................28
12.5 Editing a Directory Record ...................................................................................................................28
12.6 Editing a One-Touch Memory Record ..............................................................................................28
12.7 Copying a Directory Record or All Directory Records ..............................................................28
12.8 Deleting a Directory Record ................................................................................................................28
12.9 Deleting All Directory Records ...........................................................................................................28
12.10 Deleting a One-Touch Memory Record ...........................................................................................29
12.11 Dialing a Directory Record ...................................................................................................................29
12.11.1 Dial a directory record while in Talk mode......................................................................29
12.11.2 Dial a directory record while viewing it............................................................................29
12.12 Dialing a One-Touch Memory Record ..............................................................................................29
12.12.1 Dial a One-Touch Memory record while in Talk mode ................................................29
12.12.2 Dial a One-Touch Memory record while viewing it ......................................................29
13 Answering System Operation ................................................................................. 29
13.1 Answering System On/O ...................................................................................................................29
13.2 Recording Incoming Messages ...........................................................................................................29
13.3 Monitoring Incoming Calls ................................................................................................................... 30
13.4 Memo Recording ..................................................................................................................................... 30
13.5 Playing Messages/Memo ..................................................................................................................... 30
5
Page 6

13.6 Erasing Messages .................................................................................................................................... 30
13.6.1 To erase a message while it is playing ............................................................................. 30
13.6.2 To erase all previously played messages in a mailbox............................................... 30
13.7 Accessing your Messages Remotely ............................................................................................... 30
13.8 Memory Full ................................................................................................................................................31
14 Display Messages ......................................................................................................... 31
15 Troubleshooting ........................................................................................................... 32
16 General information .................................................................................................... 34
6
Page 7

2 Introduction
Your Motorola multi-line / 2-line phone is a full-featured phone ideally suited for home or oce
use. It is designed to receive calls on up to two incoming telephone lines and serve up to 10
extensions. It is possible to expand your system with the additional purchase of the Motorola
ML25055 Cordless Handset.
Caution: When using telephone equipment, there are basic safety instructions that should
always be followed. Refer to the IMPORTANT SAFETY INSTRUCTIONS provided in the
section below.
IMPORTANT
Because cordless phones operate on electricity, you should have at least one phone in your home
that isn’t cordless, in case the power in your home goes out.
3 Important Safety Instructions
Some of the following information may not apply to your particular product; however, when using
telephone equipment, basic safety precautions should always be followed to reduce the risk of fire,
electric shock and injury to persons, including the following:
1. Read and understand all instructions.
2. Follow all warnings and instructions marked on the product.
3. Unplug this product from the wall outlet before cleaning. Do not use liquid cleaners or aerosol
cleaners. Use a damp cloth for cleaning.
4. Telephones should not be used while you are in a bathtub, shower or pool. Immersion of the
telephone or handset in water could cause an electrical shock.
5. Slots and openings in the cabinet back or bottom are provided for ventilation, to protect it
from overheating. Do not block or cover these openings. Do not block the openings by placing
the product on a bed, sofa, rug, or other similar surface. Do not place this product in a built-in
installation unless proper ventilation is provided.
6. Only operate this product from the type of power source indicated on the marking label.
If you are not sure of the type of power supply to your home, consult your dealer or local
power company.
7. Plug the adaptor into an easily accessible electrical outlet near the equipment.
8. Do not allow anything to rest on the power cord. Do not locate this product where the cord will
be abused by persons walking on it.
9. Do not overload wall outlets and extension cords as this can result in the risk of fire or
electric shock.
10. Never push objects of any kind into this product through cabinet slots as they may touch
dangerous voltage points or short out parts that could result in a risk of fire or electric shock.
Never spill liquid of any kind on the product.
11. Never spill liquid of any kind on the product.
12. To reduce the risk of electric shock, do not disassemble this product. If service or repair work
is required, take it to a qualified serviceman. Opening or removing covers may expose you to
dangerous voltages or other risks. Incorrect reassembly can cause electric shock when the
appliance is subsequently used.
13. Do not expose the product to extreme temperatures such as areas near a hot radiator, stove or
in a hot car. Do not place product upon other consumer electronic products such as; computer
monitors, power amplifiers, etc.
14. Do not place lighted candles, cigarettes, cigars, etc., on the telephone.
15. Never touch uninsulated telephone wires or terminals unless the telephone line has been
disconnected at the network interface.
16. Never install or modify telephone wiring during a lightning storm.
17. Never install telephone jacks in wet locations unless the jack is specifically designed for
wet locations.
18. Use caution when installing or modifying telephone lines to prevent electrical shock and/or fire.
19. Under the following conditions, unplug this product from the wall outlet and refer servicing to
qualified service personnel:
(a) The power supply cord or plug is damaged or frayed.
(b) The product has been exposed to rain or water.
7
Page 8

(c) The product does not operate normally by following the operating instructions.
(d) The product’s cabinet has been damaged.
(e) The product exhibits a distinct change in performance.
20. Avoid using a telephone (other than a cordless type) during an electrical storm. There may be
a remote risk of electric shock from lightning.
21. Do not use the telephone to report a gas leak in the vicinity of the leak.
22. Do not place this product on an unstable cart, stand, or table. The product may fall, causing
serious damage to the product.
23. Only use attachments/accessories specified by the manufacturer.
24. Unplug this apparatus during lightning storms or when unused for long periods of time.
Save these instructions
Battery Safety Instructions
IF YOUR PRODUCT UTILIZES BATTERIES, THE FOLLOWING ADDITIONAL PRECAUTIONS
SHOULD BE OBSERVED:
1. Use only the type and size battery(ies) specified in the user manual.
2. Do not use this product if the battery door is removed or missing.
3. Replace batteries that appear to be swollen or have damaged wiring.
4. Do not dispose of the battery(ies) in fire. They may explode. Check with local codes for
possible special disposal instructions.
5. Do not open or mutilate the battery(ies). Released electrolyte is corrosive and may cause
damage to the eyes or skin. It may be toxic if swallowed.
6. Exercise care in handling battery(ies) in order not to short out the battery(ies) with conducting
materials such as rings, bracelets, and keys. The battery(ies) or conductor may overheat and
cause burns.
7. Do not attempt to recharge the battery(ies) provided with or identified for use with this
product that are not rechargeable. The battery(ies) may leak corrosive electrolyte or explode.
8. Do not attempt to rejuvenate the battery(ies) provided with or identified for use with this
product by heating them. Sudden release of the battery(ies) electrolyte may occur causing
burns or irritation to eyes or skin.
9. When replacing battery(ies), all batteries should be replaced at the same time. Mixing fresh
and discharged batteries could increase internal cell pressure and rupture the discharged
battery(ies). (Applies to products employing more than one separately replaceable
primary battery.)
10. When inserting battery(ies) into this product, the proper polarity or direction must be
observed. Reverse insertion of battery(ies) may result in leakage or explosion.
11. When inserting battery(ies) into this product, do not twist or pinch the wires or allow wires to
become pinched in battery door.
12. If storing over 30 days, remove battery(ies) from this product because the battery(ies) could
leak and damage the product.
13. Discard “dead” battery(ies) as soon as possible since “dead” batteries are more likely to leak in
a product.
14. Do not store this product, or the battery(ies) provided with or identified for use with this
product, in high-temperature areas. Batteries that are stored in a freezer or refrigerator for the
purpose of extending shelf life should be protected from condensation during storage and
defrosting. Batteries should be stabilized at room temperature prior to use after cold storage.
15. If your product uses rechargeable battery(ies), charge the battery(ies) only in accordance with
the instructions and limitation specified in the User Guide.
16. Keep batteries out of the reach of children.
Save these instructions
8
Page 9
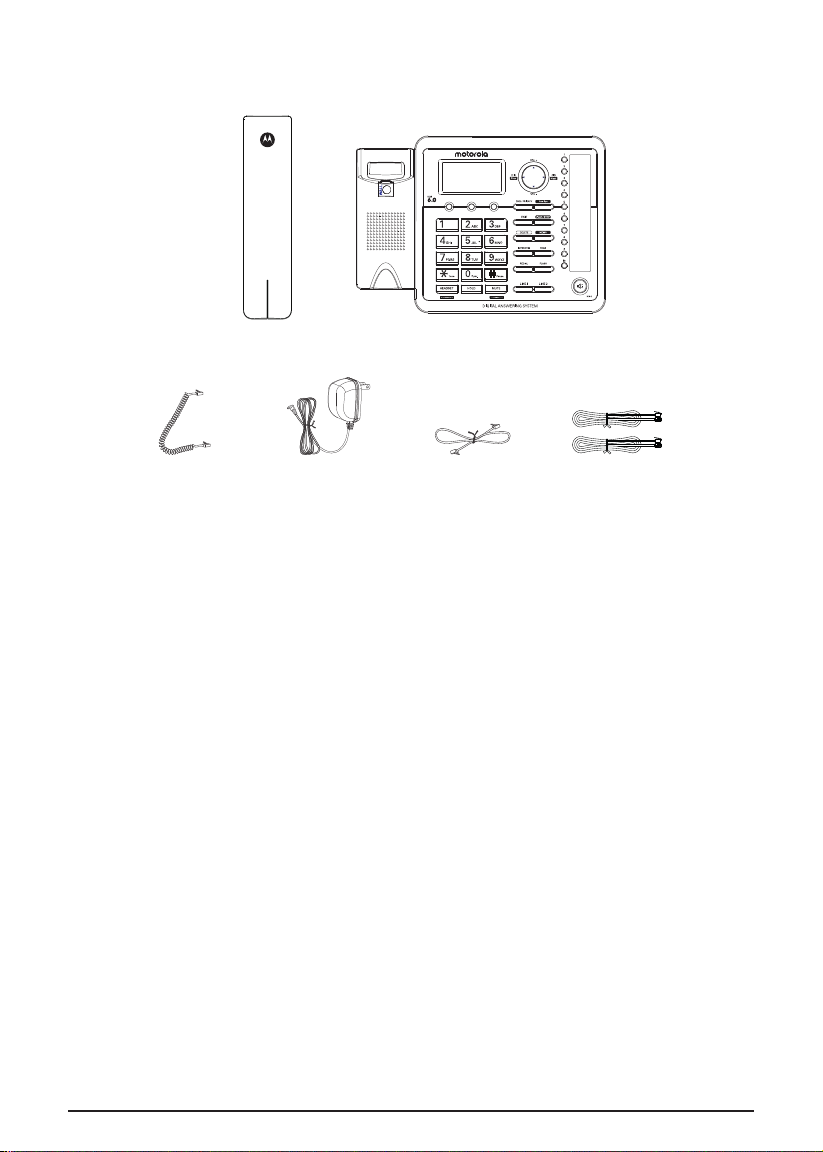
4 Parts Checklist
Make sure your package includes the following items:
Corded handset
Coiled handset
cord
AC power adaptor
Corded base & desk stand
(assembled together)
Wall mount
telephone cord
2 x 2-line telephone
cords
NOTE
Digital Security System
Your cordless phone uses a digital security system to protect against false ringing, unauthorized
access, and charges to your phone line.
Telephone Jack Requirements
To use this phone system, you will need an RJ11C (for a single line) or an RJ14C (for two lines) type
modular phone jack. If you do not have either modular jack available in your home or oce, call
your local phone company to find out how to get one installed.
9
Page 10
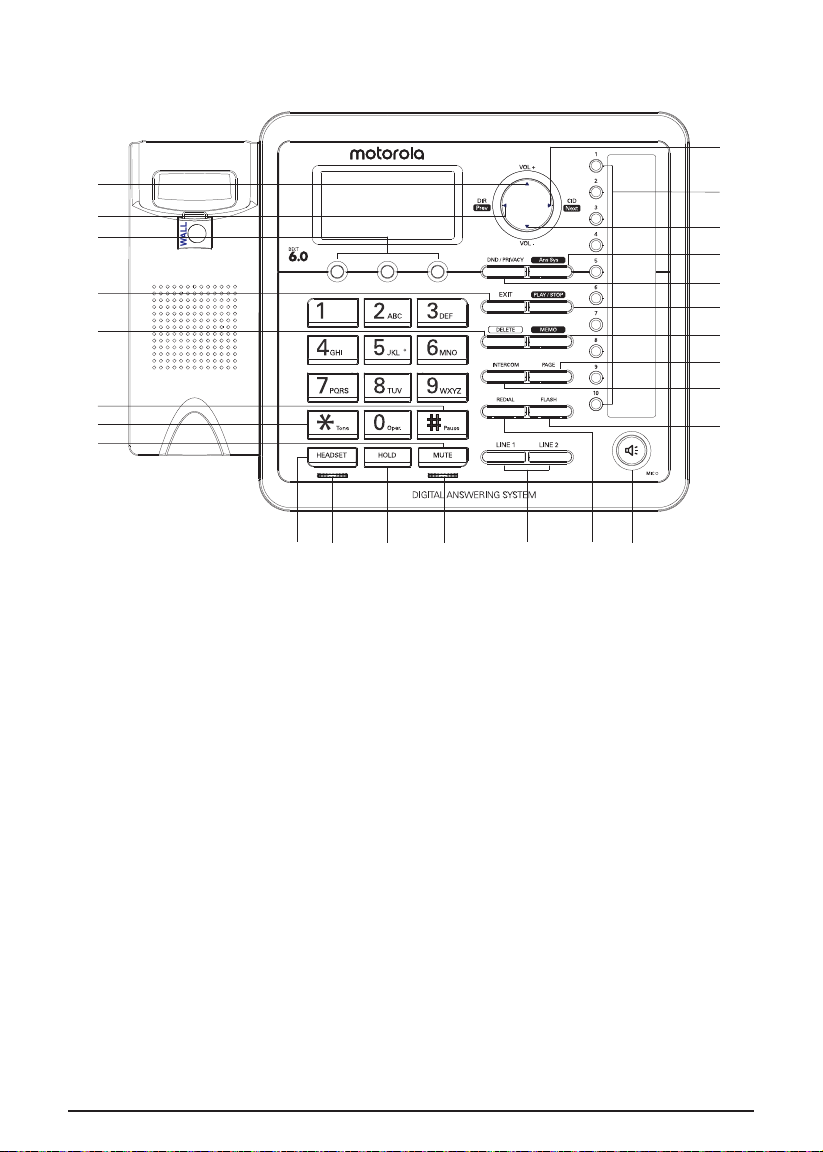
5 Base Layout
P
A
B
C
D
E
F
G
H
A Volume + N Redial Record
B Directory O Speakerphone
C 3 Softkeys P Caller ID Record
D Exit Q One-Touch Memory (1-10) Buttons
E Delete R Volume -
F # Pause S Answering System Button / Indicator
G * Tone T DND / Privacy Button / Indicator
H Mute U Play / Stop
I Headset V Memo
J Headset LED Indicator W Page
K Hold X Intercom
L Mute LED Indicator Y Flash
M Line 1, Line 2 Buttons /
Indicators
Q
R
S
T
U
V
W
X
Y
ONMLKJI
10
Page 11
6 Connections and Setup
6.1 Important Installation Information
• Never install telephone wiring during a lightning storm.
• Never install telephone jacks in wet locations unless the jack is specifically designed for
wet locations.
• Never touch uninsulated telephone wires or terminals unless the telephone line is disconnected
from the network.
• Use caution when installing or modifying telephone lines.
• Temporarily disconnect any other equipment connected to the telephone.
6.2 Important Installation Guidelines
• Install telephone near both a telephone jack and an electrical power outlet.
• Avoid sources of noise, such as a window or a busy street, and electrical noise, such as motors,
microwave ovens and fluorescent lighting.
• Avoid heat sources, such as heating air ducts, heating appliances, radiators and direct sunlight.
• Avoid areas of excessive moisture or extremely low temperature.
• Avoid dusty locations
• Avoid other cordless telephones or personal computers.
CAUTION
Always disconnect all phone cords from the base unit before battery installation or replacement.
NOTE
Some cordless telephones operate at frequencies that may cause or receive interference with
nearby TVs, microwave ovens, and VCRs. To minimize or prevent such interference, the base of the
cordless telephone should not be placed near or on top of a TV, microwave ovens, or VCR. If such
interference continues, move the cordless telephone farther away from these appliances.
Certain other communications devices may also use the 1.9 GHz frequency for communication, and,
if not properly set, these devices may interfere with each other and/or your new telephone. If you
are concerned with interference, please refer to the owner’s manual for these devices on how to
properly set channels to avoid interference. Typical devices that may use the 1.9 GHz frequency for
communication include wireless audio/video senders, wireless computer networks, multi-handset
cordless telephone systems, and some long-range cordless telephone systems.
6.3 Installing the Base and Connecting your System
The phone may be connected to two line (RJ14C) wall jacks to accommodate all two lines.
1. Choose an area near an electrical outlet and a telephone wall jack (RJ11C), and place your
cordless telephone on a level surface, such as a desktop or tabletop, or you may mount it on
the wall.
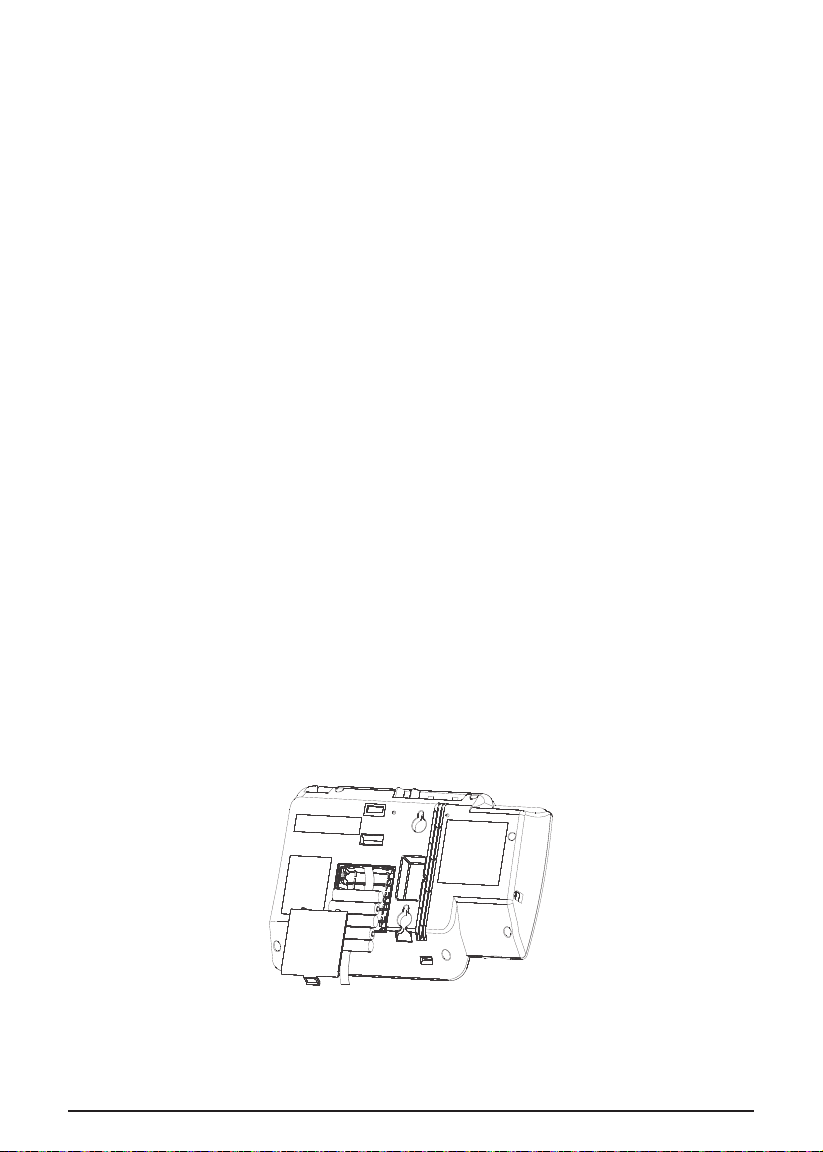
2. Install 5 AAA-size alkaline batteries (not included) for back up power in the event of a
power failure.
• Insert a flat-head screw driver or similar object into the battery door latch and gently pry
upward to release the battery door from the base.
• Insert the batteries inside the battery compartment as shown on the diagram.
11
Page 12

• Snap the battery compartment door back into place.
NOTE
If the low battery icon appears in the display, you need to replace the batteries. It is important that
you replace them as soon as possible to maintain unit operation when electrical power is o. As a
precaution, you may want to write down any stored information you do not want erased.
IMPORTANT
If you are not going to use the telephone for more than 30 days, remove the batteries because
they can leak and damage the unit.
3. Plug the power supply cord into the power jack on the back of the base and the other end into
an electrical outlet.
Caution: To reduce risk of personal injury, fire, or damage use only the base power
adaptor supplied. This power adaptor is intended to be correctly orientated in a vertical
or floor mount position.
4. Connect the telephone line cords:
If you have 2 single-line wall jacks installed in your home or oce, you can use adaptors/
couplers (not included) to combine the 2 single telephone lines into 1 dual lines. The adaptor/
coupler may look similar to the one pictured here and can be purchased from your local
telephone products retailer.
Line 2
Line 1
Or, you can use the 2 single telephone lines plug into the 2 jacks on the back of the telephone.
Line 2
Line 1
If you have Line 1 and Line 2 wired into one wall jack in your home or oce, you can use one
of the supplied telephone line cords to connect from the wall jack to the Line 1+2 jack on the
back of the phone as shown below.
Line 1 + 2
12
Page 13

5. If you want to mount the telephone on the wall, you can plug the 2 lines as below drawing:
Line 2
Line 1
-OR-
-OR-
Line 2
Line 1 & 2
Line 1
13
Page 14

6. Connect the handset cord:
Connect one end of the coiled handset cord to the jack on the side of the base and the other
end into the jack in the corded handset, and place the handset in the cradle.
6.4 Backup Battery Operation
If the power supply cord is not plugged into the base unit, and the battery is available, the unit
enters Battery Operation Mode. In this mode, the base is fully functional.
7 Programming the Phone
7.1 Standby Screen
The base displays the current date, time and the softkey labels.
The softkey labels will change according to the status of the unit.
The base display has a dedicated
PHONE SETTINGS - DATE/TIME
7.2 Programming Functions
The system uses a menu structure to give you access to all of the built-in features. You may
program the following items in main menu:
PHONE SETTINGS
DISPLAY SETTINGS
SOUND SETTINGS
ANSWERING SYS.
VOICE MAIL
RESTORE SETTINGS
NOTE
During programming, you may press
the main menu, or press EXIT key to exit programming and return to standby screen.
If no key is pressed for 30 seconds, the base will automatically exit programming and return to
standby screen.
7.3 Phone Settings
1. In idle mode, press
2. Using VOL + and VOL - of the navigation button to scroll to
3. Press
AUTO ANS INTERCOM
TONE/PULSE DIAL
AREA CODE
REMOVE HANDSET
2ND CALL ALERT
UPDATE HS LIST
7.3.1 Date/Time
From the
1. Using VOL + and VOL - of the navigation button to scroll to
2. The base will display the last-set time (or, if the device is new or has been reset to default, the
3. Using the dial pad to enter digits for the current time and date.
4. Using DIR and CID of the navigation button to move the cursor and the
5. When you are finished, press
NOTE
If you subscribe to Caller ID service, the current Date/Time is set automatically when you receive
your first CID record and will override manually set Date/Time. However, the Year must still be set
SELECT
DATE/TIME
PHONE SETTINGS
base will display
the time AM or PM.
MENU
softkey and you may program the following items:
12:00AM 01/01/11
SET CLOCK
to set the clock.
softkey to go to the main menu.
menu:
SAV E
icon flashing when the clock is not set. Go to
BACK
softkey at any time to exit the sub-menu and return to
)
softkey.
PHONE SETTINGS
DATE/TIME
. Press
AM/PM
.
SELECT
softkey.
softkey to set
14
Page 15

manually. The Year information is not in the CID record.
7.3.2 Auto ANS Intercom
When it is set to on, the base will auto answer the intercom call when it receives an intercom call.
From the
1. Using VOL + and VOL - of the navigation button to scroll to
2. Using VOL + and VOL - of the navigation button to scroll to ON or
3. Press
NOTE
The default setting is
7.3.3 Tone/Pulse Dial
The Dial Mode of Line 1 and Line 2 can be set individually for each line.
From the
1. Using VOL + and VOL - of the navigation button to scroll to
2. Using VOL + and VOL - of the navigation button to scroll to
3. Using VOL + and VOL - of the navigation button to scroll to
4. Press
7.3.4 Area Code
The telephone uses the pre-programmed area code to determine the number format to display
when a valid Caller ID record is received. The pre-programmed area code is also used for the
Dialing Back feature.
From the
1. Using VOL + and VOL - of the navigation button to scroll to
2. Using the dial pad to enter your 3-digit area code.
3. When you are finished, press
7.3.5 Registration
A cordless handset accessory will not operate until it is registered to the base.
During the registration process, keep the cordless handset near the base. Up to 10 cordless
handsets (in total) can be registered to one base.
Please refer to the User Guide of Motorola multi-line cordless handset accessory for instructions
on setup and use.
7.3.6 Remove Handset
De-registration cancels registration.
During the de-registration process, keep the handset near the base.
It is not recommended that a handset be deregistered unless absolutely necessary because once a
handset is deregistered, that handset’s telephone features cannot be used until the handset is
re-registered.
From the
1. Using VOL + and VOL - of the navigation button to scroll to
2. Using VOL + and VOL - of the navigation button to scroll to the cordless handset you wish to
3. The screen will display
4. Press
7.3.7 2nd Call Alert
When it is set to on, you will hear the alert tone when you are in conversation and there is an
incoming call from another line.
PHONE SETTINGS
softkey.
SELECT
softkey to save your selection.
OFF
PHONE SETTINGS
softkey.
softkey.
SELECT
softkey to save your selection.
PHONE SETTINGS
PHONE SETTINGS
softkey.
remove and press
YES
INITIATE REGISTRATION
softkey to confirm de-registration. The cordless handset will display
SELECT
menu:
.
menu:
menu:
SAV E
softkey.
menu:
softkey.
REMOVE HANDSET?
once the handset is de-registered.
AUTO ANS INTERCOM
OFF
.
TONE/PULSE DIAL
LINE 1
or
TONE
or
PULSE
AREA CODE
REMOVE HANDSET
LINE 2
. Press
. Press
and press
.
SELECT
. Press
PRESS “REG” TO
. Press
SELECT
SELECT
SELECT
SELECT
softkey.
15
Page 16

From the
1. Using VOL + and VOL - of the navigation button to scroll to
2. Use VOL + and VOL - of the navigation button to scroll to ON or
3. Press
NOTE
The default setting is ON.
7.3.8 Update Handset List
When a handset or extension changes their name, that name will automatically be updated on the
rest of the phones on the system. In certain situations, such as if a phone is temporarily removed
from the system or otherwise unreachable, may require a manual update to the extension list
names.
From the
1. Using VOL + and VOL - of the navigation button to scroll to
2. The latest handset name list stored in the base will be sent to all registered handsets.
PHONE SETTINGS
softkey.
SELECT
PHONE SETTINGS
softkey.
menu:
softkey to save your selection.
menu:
2ND CALL ALERT
OFF
.
UPDATE HS LIST
. Press
. Press
SELECT
SELECT
7.4 Display Settings
1. In idle mode, press
2. Using VOL + and VOL - of the navigation button to scroll to
3. Press
CONTRAST
BACKLIGHT
7.4.1 Language
From the
1. Using VOL + and VOL - of the navigation button to scroll to
2. Using VOL + and VOL - of the navigation button to scroll to
3. Press
7.4.2 Contrast
There are 5 levels of display contrast that can be set.
From the
1. Using VOL + and VOL - of the navigation button to scroll to
2. Using VOL + and VOL - of the navigation button to adjust the contrast. The display contrast
3. Press
7.4.3 Backlight
From the
1. Using VOL + and VOL - of the navigation button to scroll to
2. Using VOL + and VOL - of the navigation button to scroll to
3. Press
SELECT
LANGUAGE
DISPLAY SETTINGS
SELECT
DISPLAY SETTINGS
will adjust with each press of the button.
SELECT
DISPLAY SETTINGS
SELECT
MENU
softkey to go to the main menu.
DISPLAY SETTINGS
softkey and you may program the following items:
menu:
LANGUAGE
ENGLISH, FRANCAIS
softkey to save your selection.
menu:
CONTRAST
softkey to save your selection.
menu:
BACKLIGHT
ALWAYS ON
softkey to save your selection.
. Press
. Press
. Press
or
AUTOMATIC
.
SELECT
or
ESPAÑOL
SELECT
SELECT
softkey.
.
softkey.
softkey.
.
7.5 Sound Settings
1. In idle mode, press
2. Using VOL + and VOL - of the navigation button to scroll to
3. Press
RING TONE
RING VOL
KEY TONES
SELECT
MENU
softkey to go to the main menu.
SOUND SETTINGS
softkey and you may program the following items:
.
16
Page 17

7.5.1 Ring Tone
There are 8 tones for your selection. The ring tone can be set individually for each line.
From the
1. Using VOL + and VOL - of the navigation button to scroll to
2. Using VOL + and VOL - of the navigation button to scroll to
3. Using VOL + and VOL - of the navigation button to scroll to your selection.
4. Press
7.5.2 Ring Volume
There are 5 volume levels and O for your selection. The ring volume can be set individually for
each line.
From the
1. Using VOL + and VOL - of the navigation button to scroll to
2. Using VOL + and VOL - of the navigation button to scroll to
3. Using VOL + and VOL - of the navigation button to adjust the ring volume.
4. Press
7.5.3 Key Tones
From the
1. Using VOL + and VOL - of the navigation button to scroll to
2. Using VOL + and VOL - of the navigation button to scroll to
3. Press
SOUND SETTINGS
softkey.
SELECT
SOUND SETTINGS
softkey.
SELECT
SOUND SETTINGS
SELECT
menu:
softkey to save your selection.
menu:
softkey to save your selection.
menu:
softkey to save your selection.
RING TONE
LINE 1
or
LINE 2
RING VOL
LINE 1
or
LINE 2
KEY TONES
ON or OFF
. Press
. Press
. Press
.
SELECT
and press
SELECT
softkey.
and press
SELECT
softkey.
SELECT
SELECT
softkey.
7.6 Voice Mail
You must subscribe to telephone service provider-oered voicemail on at least one phone line in
order for this feature to operate.
This feature is used to conveniently access the voicemail feature oered by your telephone service
provider.
1. In idle mode, press
2. Using VOL + and VOL - of the navigation button to scroll to
3. Press
SETTINGS
7.6.1 Call Voice Mail
From the
1. Using VOL + and VOL - of the navigation button to scroll to
2. Using VOL + and VOL - of the navigation button to scroll to
3. The phone will dial your voicemail access number for that line. You may proceed to access your
7.6.2 Voice Mail Settings
From the
1. Using VOL + and VOL - of the navigation button to scroll to
2. Using VOL + and VOL - of the navigation button to scroll to
3. Using the dial pad to enter the call-in access number for your voicemail. Press
4. When you are finished, press
SELECT
CALL VM
VOICE MAIL
softkey.
voicemail per your service provider’s instructions.
VOICE MAIL
softkey.
delete numbers, if necessary.
MENU
softkey to go to the main menu.
VOICE MAIL
softkey and you may program the following items:
menu:
CALL VM
LINE 1
menu:
SETTINGS
LINE 1
SAV E
softkey.
or
or
.
. Press
LINE 2
. Press
LINE 2
SELECT
softkey.
and press
SELECT
softkey.
and press
CLEAR
SELECT
SELECT
softkey to
7.7 Answering System
1. In idle mode, press
MENU
softkey to go to the main menu.
17
Page 18

2. Using VOL + and VOL - of the navigation button to scroll to
3. Press
ON/OFF STATUS
OGA PLAYBACK
OGA RECORD
SET OGA
SET OFFICE TIME
RING DELAY
MESSAGE LENGTH
CALL SCREENING
MESSAGE ALERT
REMOTE PASSWORD
7.7.1 On/O Status
This is used to set the Answering System On or O for each telephone line individually.
From the
1. Using VOL + and VOL - of the navigation button to scroll to
2. Using VOL + and VOL - of the navigation button to scroll to
3. Using VOL + and VOL - of the navigation button to scroll to ON or
4. Press
7.7.2 Outgoing Message (OGA) Playback
From the
1. Using VOL + and VOL - of the navigation button to scroll to
2. Using VOL + and VOL - of the navigation button to scroll to
3. Using VOL + and VOL - of the navigation button to scroll to the OGA record you want to play
4. If there is no recording for the selected OGA, the screen will display
7.7.3 Outgoing Message (OGA) Record
From the
1. Using VOL + and VOL - of the navigation button to scroll to
2. Using VOL + and VOL - of the navigation button to scroll to
3. Using VOL + and VOL - of the navigation button to scroll to the OGA type you want to record
There are 4 types of OGA to select from:
ANNOUNCE ONLY
WORK HOURS
AFTER HOURS
4. Record your greeting after the beep. Press
The greeting will play back for you and automatically save. If you are not satisfied, simply
7.7.4 Set Outgoing Message (OGA)
From the
1. Using VOL + and VOL - of the navigation button to scroll to
2. Using VOL + and VOL - of the navigation button to scroll to
SELECT
ANSWERING SYS.
softkey.
softkey.
SELECT
ANSWERING SYS.
softkey.
softkey.
and press
softkey.
softkey.
over and press
select
softkey.
SELECT
ANSWERING SYS.
PERSONAL
OGA RECORD
ANSWERING SYS.
softkey and you may program the following items:
menu:
softkey to save your selection.
menu:
softkey.
menu:
SELECT
softkey.
FINISH
softkey to end the recording.
option again and re-record.
menu:
ANSWERING SYS.
ON/OFF STATUS
LINE 1
or
LINE 2
OFF
.
OGA PLAYBACK
LINE 1
or
LINE 2
EMPTY
OGA RECORD
LINE 1
SET OGA
LINE 1
or
or
. Press
LINE 2
. Press
LINE 2
.
. Press
SELECT
and press
. Press
SELECT
and press
.
SELECT
and press
SELECT
softkey.
and press
SELECT
SELECT
SELECT
SELECT
18
Page 19

3. Using VOL + and VOL - of the navigation button to scroll to your selection.
4. Press
NOTE
To set OGA to
recorded first.
When there is an incoming call, the ‘Work Hours’ OGA or ‘After Hours’ OGA will be played to the
caller according to the oce time you set.
7.7.5 Set Oce Time
From the
1. Using VOL + and VOL - of the navigation button to scroll to
2. Press
SET AFTER HOURS
7.7.5.1 Set Work Hours
This will allow you to program the start time for the working hour.
From the
1. Using VOL + and VOL - of the navigation button to scroll to
2. Using the dial pad to set the time, and the
3. When you are finished, press
4. Press
7.7.5.2 Set After Hours
This will allow you to program the start time for the after work hour.
From the
1. Using VOL + and VOL - of the navigation button to scroll to
2. Using the dial pad to set the time, and the
3. When you are finished, press
4. Press
NOTE
For example:
a) Set the
b) Set the
c) Select
When the call comes in within 9:00am to 5:00pm, the ‘Work Hours’ OGA will be announced to
the caller.
When the call comes in after 5:00pm up to 9:00am, the ‘After Hours’ OGA will be announced to
the caller.
7.7.6 Ring Delay
This feature lets you select the number of times you want the phone to ring before the Answering
System answers a call.
From the
1. Using VOL + and VOL - of the navigation button to scroll to
2. Using VOL + and VOL - of the navigation button to scroll to
3. Using VOL + and VOL - of the navigation button to scroll to your selection. You can choose
4. Press
SELECT
screen will display
SET WORK HOURS
SELECT
setting will not allow the caller to leave a message.
softkey.
after working hour. This setting will not allow the caller to leave a message.
SELECT
from
softkey to save your selection. If there is no recording for the selected OGM, the
EMPTY
.
TIMED
option, both the ‘Work Hours’ OGA and ‘After Hours’ OGA must be
ANSWERING SYS.
SELECT
softkey. You can program the following items:
SET OFFICE TIME
softkey.
YES
softkey if you want to set the OGA to
SET OFFICE TIME
YES
softkey if you want to set the OGA to
WORK HOURS
AFTER HOURS
TIMED
while setting the OGA.
ANSWERING SYS.
softkey.
2 RINGS
up to
SELECT
softkey to save your selection.
menu:
SET OFFICE TIME
menu:
SET WORK HOURS
AM/PM
softkey to set the time AM or PM.
SAV E
softkey.
ANNOUNCE ONLY
menu:
AM/PM
softkey to set the time AM or PM.
SAV E
softkey.
ANNOUNCE ONLY
to start at 9:00am, ‘Announce Only’ option as NO.
to start at 5:00pm, ‘Announce Only’ option as NO.
menu:
6 RINGS
, or
TOLL SAVER
.
during the working hour. This
SET AFTER HOURS
during the out of oce /
RING DELAY
LINE 1
or
. Press
LINE 2
.
. Press
. Press
SELECT
and press
SELECT
softkey.
19
Page 20

NOTE
‘Toll Saver’ can save you the cost of a call when you access your message from another phone.
• If you have new messages, the unit answers after the 3rd ring.
• If you have no new messages, the unit answers after the 5th ring.
• You can hang up after the 3rd or 4th ring and save the pay telephone or long distance charge.
7.7.7 Message Length
From the
1. Using VOL + and VOL - of the navigation button to scroll to
2. Using VOL + and VOL - of the navigation button to scroll to
3. Using VOL + and VOL - of the navigation button to scroll to
4. Press
7.7.8 Call Screening
If you wish incoming messages to be played over the speakerphone, activate the Call Screening
feature. To take the call, press the corresponding LINE button and the Answering System will
stop recording.
From the
1. Using VOL + and VOL - of the navigation button to scroll to
2. Using VOL + and VOL - of the navigation button to scroll to
3. Press
7.7.9 Message Alert
This feature set your Answering System to give an alert tone every 10 seconds when there are
new messages.
From the
1. Using VOL + and VOL - of the navigation button to scroll to
2. Using VOL + and VOL - of the navigation button to scroll to
3. Press
7.7.10 Remote Password
You can access the Answering System from a tone dialing telephone in another (remote) location.
To do this, you must turn on the remote function and set a three-digit remote password.
The remote password is required for remote access, and it prevents unauthorized access to your
Answering System.
From the
1. Using VOL + and VOL - of the navigation button to scroll to
2. The base will display the last-set remote password (or, if the device is new or has been reset to
3. Press
4. Using the dial pad to enter your new 3-digit remote password.
5. When you are finished, press
ANSWERING SYS.
softkey.
softkey.
SELECT
softkey to save your selection.
ANSWERING SYS.
softkey.
SELECT
softkey to save your selection.
ANSWERING SYS.
softkey.
SELECT
softkey to save your selection.
ANSWERING SYS.
softkey.
default, the base will display 000).
CLEAR
softkey to delete the current remote password.
menu:
menu:
menu:
menu:
SAV E
softkey.
MESSAGE LENGTH
LINE 1
or
1 MINUTE, 2 MINUTES or 3 MINUTES
CALL SCREENING
ON or OFF
MESSAGE ALERT
ON or OFF
REMOTE PASSWORD
LINE 2
.
.
. Press
and press
. Press
. Press
SELECT
. Press
SELECT
SELECT
SELECT
SELECT
7.8 Restore Settings
The feature allows you to reset some menu settings to the original default settings.
1. In idle mode, press
2. Using VOL + and VOL - of the navigation button to scroll to
softkey.
3. The screen will display
MENU
softkey to go to the main menu.
LOAD TO DEFAULT?
.
RESTORE SETTINGS
. Press
SELECT
.
20
Page 21

4. Press
If you do not want to reset, press NO softkey.
YES
settings.
softkey to reset the unit to default setting. The phone will reboot with the default
8 Basic Operation
8.1 Making Calls with the Corded Handset
1. Pick up the handset and the base will select the first available line. If both lines are available,
Line 1 will be used first.
Or, pick up the handset and press LINE 1 or LINE 2 button to select the line you want.
2. Wait for a dial tone, then dial a phone number.
3. Hang up the handset when finished.
8.2 Making Calls with the Speakerphone
1. Press s and the base will select the first available line. If both lines are available, Line 1 will be
used first.
Or, press LINE 1 or LINE 2 button to select the line, and the base speaker will activate.
2. Wait for a dial tone, then dial a phone number or press a One-Touch Memory (1-10) button to
dial stored phone number.
3. Press s when finished.
NOTE
After pick the line, the call timer starts to run until all the calls are hung up. The timer serves for
both 2 lines.
8.3 Making Calls with a Wired Headset
1. Plug the headset into the Headset jack on the side of the base.
2. Adjust the headset to rest comfortably on top of your head or over your ear.
3. Move the microphone to approximately 2 to 3 inches from your mouth.
4. Press HEADSET and the phone will select the first available line. If both lines are available,
Line 1 will be used first.
5. Wait for a dial tone, then dial the phone number.
6. Press HEADSET when finished.
NOTE
Although this device will accept a variety of standard 2.5mm telephone headsets, Motorola does
not guarantee compatibility with third party devices. Performance may vary depending on the
quality of the headset.
8.4 Pre-Dialing
1. With the phone idle, manually enter the telephone number. The telephone number will show in
the display. The maximum pre-dialing number length is 32 digits, if the number is over
32 digits, it will emit an error tone.
2. You can either press
to take a line and the number will automatically be dialed.
8.5 Answering Calls
1. Pick up the handset to answer the call in the receiver mode.
Or, press s to answer the call in speakerphone mode.
Or, press the corresponding LINE button to answer the call in speakerphone mode.
Or, press HEADSET to answer the call in headset mode.
2. When you are finished, hang up the corded handset.
Or, press s (if you are speaking in speakerphone mode) to end the call.
Or, press HEADSET (if you are speaking in headset mode) to end the call.
NOTE
You can adjust the call volume by pressing VOL + and VOL - of the navigation button during a call.
DIAL
softkey, s, LINE 1, LINE 2 or lift the corded handset up from the base
21
Page 22

8.6 Switching Between the Speakerphone, Handset and Headset Mode
1. To switch to the speakerphone mode, press s. The speakerphone indicator illuminates. Place
the corded handset back into the cradle.
2. To switch to the corded handset, pick up the handset. The speakerphone or wired headset
indicator will turn o.
3. To switch to the headset, press HEADSET to enable the headset, and the headset indicator
illuminates.
8.7 Mute
To have a private, o-line conversation, use the Mute feature. The party on the other end of the
line cannot hear you, but you can still hear them.
1. During a call, press MUTE to activate the Mute feature.
2. Press MUTE again to de-activate.
NOTE
The Mute LED indicator will illuminate when the Mute feature is activated.
8.8 Do Not Disturb (DND)
This feature will disable your telephone’s ringer for a set period of time to prevent incoming calls
from interrupting. When an incoming call or intercom call occurs, the status indicators will light up
but the phone will not ring.
1. In idle mode, press DND/PRIVACY. The last setting is displayed.
2. Using VOL + and VOL - of the navigation button to scroll to your selection. You can choose
from as short as
duration by 1-hour intervals up to
3. Press
4. To turn o DND feature at any time, press DND/PRIVACY.
SELECT
timer will appear on the display indicating how much time remains before the DND feature is
automatically turned o.
15 MINUTES, 30 MINUTES, 45 MINUTES, 1 HOUR
softkey to save your selection. The indicator on the base will blink and a DND
24 HOURS
.
or
2 HOURS
and increase the
8.9 Line Privacy
This feature will prevent other phones on the same system from accessing the line used by your
active call.
To turn on Line Privacy:
1. While on a call, press DND/PRIVACY.
2. The screen will display
PRIVACY
.
8.10 Flash
If you subscribe to Call Waiting Caller ID service from your local telephone company and you
receive an incoming call during a call, you will hear a beep to indicate another call is waiting on the
line and Caller ID information (if available) for the waiting call shows on the display.
1. To connect to the waiting call, press FLASH and your first call will be put on hold.
2. To switch between the two calls, press FLASH.
8.11 Inserting a Pause in the Dialing Sequence
Press j twice to insert a delay in dialing sequence when a pause is needed to wait for a dial
tone (for example, after you dial 9 for an outside line, or to wait for a computer access tone). Each
pause counts as one digit in the dialing sequence, and is shown as P in the display.
8.12 Redial
1. Pick up the handset, press s or HEADSET and the base will select the first available line. If
both lines are available, Line 1 will be used first.
Or, press LINE 1 or LINE 2 button to select the line you want.
2. Press REDIAL. The redial number list (last 3 previously dialed numbers) is shown.
3. Using VOL + and VOL - of the navigation button to scroll to the number you want to redial.
4. Press
DIAL
softkey to dial the phone number.
22
Page 23

NOTE
If the number you dialed is longer than 32 digitals, It will not be saved in the redial list and can’t
be redialed.
8.12.1 Viewing a Redial Record
Your phone records up to three previously dialed phone numbers.
1. In idle mode, press REDIAL.
2. Using VOL + and VOL - of the navigation button to scroll to the desired dialed numbers.
3. When the desired number is displayed, press s, HEADSET, a LINE button, or pick up the
corded handset to dial the phone number.
NOTE
If you do not select a line button, the line is automatically seized and the number is dialed
accordingly.
8.12.2 Adding a Redial Record in the Directory
1. In idle mode, press REDIAL.
2. Using VOL + and VOL - of the navigation button to scroll to the desired redial numbers.
3. Press
4. Using the dial pad to enter a name.
More than one letter is stored in each of the number keys. For example, to enter “Lorraine,”
If you make a mistake, press DIR or CID of the navigation button to move the cursor forward or
The name field cannot be left empty.
5. Press
To edit the number, press DIR or CID of the navigation button to move the cursor forward or
6. When you are finished, press
7. Using VOL + and VOL - of the navigation button to scroll to the desired
8. Press
NOTE
If an incoming call number matches this record the VIP Tone Melody will ring.
SAV E
softkey. The screen displays
press the 5 key three times for the letter L, press the 6 key three times for the letter O, press
the 7 key three times for the letter R, and so on.
backward. Or, press
SAV E
softkey. The screen displays
backward. Or, press
SELECT
CLEAR
softkey to delete one character at a time.
CLEAR
softkey to delete one digit at a time.
SAV E
softkey to complete.
ENTER NAME:
ENTER NUMBER:
softkey.
.
with the desired redial number.
VIP TONE MELODY
.
8.13 Transferring a Call to Another Extension
1. During a call, press XFER softkey. The current call is put on hold.
2. Using VOL + and VOL - of the navigation button to scroll to the handset you want to transfer
the call to. Press
3. This will initiate an intercom call to the selected handset.
Wait until the selected handset answers the intercom call and have a conversation and then
hang up to finish the transfer or press
If the selected handset rejects the intercom call, or the call is not answered within 30 seconds,
the call is transferred back to the original unit.
SELECT
softkey.
CONF
softkey to have a 3 way conference call.
8.14 Receiving a Transferred Call from Another Extension
If the unit receives a transfer call paging,
display.
1. Pick up the corded handset, or press s to answer the call.
2. If you press
will be stopped and the call is transferred back to the original unit.
REJECT
softkey or the call is not answered within 30 seconds, the intercom paging
INTERCOM CALL FROM BASE/HANDSET X
shows in the
8.15 Ringer On/O and Ringer Volume
1. In idle mode, using VOL + and VOL - of the navigation button to open the ring volume setting.
2. Press
3. Using VOL + and VOL - of the navigation button to adjust the ring volume.
LINE 1
or
LINE 2
softkey to select the line.
23
Page 24

4. Press
NOTE
If you set the ring volume to O, the screen will display
SELECT
softkey to save your selection.
L1/L2 RINGER OFF
.
8.16 Speakerphone, Handset and Corded Headset Volume
During a call, press VOL + and VOL - of the navigation button to adjust the call volume until you
reach a comfortable listening level. The phone stores the setting after the last button pressed.
8.17 Hold
1. During a call, press HOLD to put the line on hold. The screen will display
and the line icon will flash. The line button indicator will flash also.
2. When the line is on hold, the hold alert tone will be emitted to both the person on hold and to
the user that initiated the hold.
Press the corresponding LINE button to release the hold and return to the call again.
LINE 1/LINE 2 ON HOLD
8.18 Conference Calls
This system can support 3-way and 4-way conference calls.
8.18.1 Joining a call in progress
While a call is in progress, another user can join that call by pressing the corresponding LINE
button on the base. Both parties on the original call will hear a tone to alert them someone else
has joined the call.
NOTE
If the Line Privacy feature is On for the original call, the call cannot be joined by another user.
8.18.2 3-way conference call by an intercom call
1. While on a call, press INTERCOM.
2. Using VOL + and VOL - of the navigation button to scroll to the desired handset and press
SELECT
softkey.
3. The selected handset will emit a page tone. The user on the selected handset can press t or s
to answer the intercom / paging call.
4. The originating caller can then press
the external caller and the intercom call.
8.18.3 3-way conference call with two lines
1. While on a call on Line 1, press HOLD to put the call on hold.
2. Press LINE 2 to get a dial tone. Dial the phone number, and then talk to the other person.
3. The originating caller can then press
the two lines.
8.18.4 4-way conference call (Line 1 + Line 2 + 2 extensions)
1. While on a call with both Line 1 and 2 on hold, press INTERCOM and select the desired handset
to intercom.
2. The selected handset will emit a page tone. The user on the selected handset can press t or s
to answer the intercom / paging call.
3. The originating caller can then press
4. Since Line 1 and 2 are both on hold, the user will be prompted to select Line 1, Line 2 or Both
to conference with. If
originating caller, both lines and the intercom call.
BOTH
softkey is selected a 4-way conference is established between the
CONF
softkey to establish a 3-way conference between
CONF
softkey to establish a 3-way conference between
CONF
softkey to establish a conference.
9 Intercom Calls
9.1 Making an Intercom Call
1. In idle mode, press any One-Touch Memory (1 -10) button for the extension you want to
intercom. One-Touch Memory (1) button represents handset 01, (2) represents handset 02, etc.
The intercom / page tone will be emitted.
Or, press INTERCOM to bring up the list of all registered handsets and base (except itself).
Then using VOL+ and VOL- of the navigation button to scroll to the desired handset and press
SELECT
softkey.
,
24
Page 25

2. To cancel the intercom call, press
NOTE
If the receiving handset does not answer within 30 seconds, the intercom call is cancelled. You will
hear an error tone and the screen displays
STOP
softkey.
UNAVAILABLE
.
9.2 Answering an Intercom Call
When you receive an intercom call, the screen will display the Phone ID of the calling handset.
The call can be answered by lifting the corded handset, pressing s or HEADSET. The headset
must be already connected.
If you do not want to answer the intercom call, press
REJECT
softkey.
10 Page
The page feature helps you locate a misplaced handset.
1. Press PAG E. The cordless handset beeps and the visual indicator on the cordless handset
flashes. The cordless handset will display
2. To cancel the paging call from the base, either press PAGE or EXIT button, or
To stop the paging call on the cordless handset, press any key. Otherwise the paging call will
last for 2 minutes.
PAGING FROM BASE
.
STOP
softkey.
11 Caller ID (CID)
In order to use the Caller ID features, you must subscribe to either the standard Name/Number
Caller ID Service or Caller ID with Call Waiting Service. To know who is calling while you are on the
phone, you must subscribe to Caller ID with Call Waiting service.
When the unit receives an incoming call with CID information, the CID can be shown on the base.
This unit receives and displays information transmitted by your local phone company. This
information can include the phone number, date and time; or the name, phone number, date
and time.
If two incoming calls come in at the same time, the line 1 and Iine 2 caller information shows on the
display separately while ringing.
The unit can store up to 99 records. When the memory is full, a new call automatically replaces the
oldest call in memory.
11.1 Viewing a CID Record
1. In idle mode, press CID.
2. Using VOL + and VOL - of the navigation button to scroll through the call records.
NOTE
When viewing the CID records,
reviewed. The record number is shown to the right of the time along with the
softkeys. The line number for the call received is also displayed.
NEW
will appear in the display for calls received that have not been
FORMAT
and
STORE
11.2 Adding a CID Record in the Directory
If you want to adjust the format of the CID number to 7, 10 or 11 digits and save it in the Directory,
press
FORMAT
softkey to format the CID number first before pressing
For more formation on formatting a number, please refer to section 12.5.
1. While viewing a CID record, press
2. The screen displays
ENTER NAME:
STORE
softkey.
with name (if already stored in the Directory).
STORE
softkey.
25
Page 26

3. Using the dial pad to enter a name.
To edit the current name, press DIR or CID of the navigation button to move the cursor forward
or backward. Or, press
The name field cannot be left empty.
4. Press
To edit the number, press DIR or CID of the navigation button to move the cursor forward or
5. When you are finished, press
6. Using VOL + and VOL - of the navigation button to scroll to the desired
7. Press
NOTE
If an incoming call number matches this record the VIP Tone Melody will ring.
SAV E
softkey. The screen displays
backward. Or, press
SELECT
softkey to complete.
CLEAR
softkey to delete one character at a time.
ENTER NUMBER:
CLEAR
softkey to delete one digit at a time.
SAV E
softkey.
with the number.
VIP TONE MELODY
.
11.3 Deleting a CID Record
1. While viewing a CID record, press DELETE.
2. The screen will display
3. Press OK softkey to confirm.
CALLS LIST DELETE?
.
11.4 Deleting All CID Records
This feature allows you to clear all CID records at once.
1. While viewing a CID record, press and hold DELETE.
2. The screen will display
3. Press OK softkey to confirm. The screen will display
CALLS LIST DELETE ALL?
.
EMPTY
.
11.5 Dialing Back
When viewing CID records, you can dial back the numbers showing on the display by pressing s,
HEADSET, a LINE button, or pick up the corded handset.
11.5.1 If you have programmed your local area code
1. If the CID record shows a 7-digit number (i.e. 555-1234), then the call was received from within
your area code. However, this does not guarantee the call is a local call.
If the CID record shows an 11-digit number (i.e. 1-234-555-1234), then the call received was not
from your area code.
2. To adjust the phone number format, press
sometimes cannot be dialed because it requires a 10-digit or 11-digit format. Press
softkey to scroll through 7, 10 and 11-digit numbers.
Number of digits Explanation Example
7-digits: 7-digit telephone number (i.e. 555-5555)
10-digits: 3-digit area code
+ 7-digit telephone number
11-digits: Long distance code 1
+ 3-digit area code
+ 7-digit telephone number
FORMAT
softkey. For instance, a 7-digit local number
(i.e. 425-555-5555)
(i.e. 1-425-555-5555)
FORMAT
3. To dial the displayed phone number, press s, HEADSET, a LINE button, or pick up the corded
handset.
11.5.2 If you have not programmed your local area code
1. You will see 10-digit numbers (i.e. 234-555-1234).
2. To dial the displayed phone number, press s, HEADSET, a LINE button, or pick up the corded
handset.
You may adjust the number format by pressing
FORMAT
softkey before dialing.
26
Page 27

11.6 Call Waiting Caller ID
This feature allows you to see who is calling when you hear the call waiting beep. The caller
identification information appears in the display after you hear the tone.
1. To connect to the waiting call, press FLASH and your first call will be put on hold.
2. To switch between the two calls, press FLASH.
IMPORTANT
To use all the features of this unit, you must subscribe to either the standard Name/Number Caller
ID Service or Caller ID with Call Waiting Service. To know who is calling while you are on the phone,
you must subscribe to Caller ID with Call Waiting Service.
12 Directory and One-Touch Memory Log
You may store data in the Directory (up to 99 records) or the One-Touch Memory (10 buttons
located to the right of the number pad on the base). The Directory and each One-Touch Memory
Log stores up to 16 characters and 32 digits.
The records in the Directory are stored by alphabetic ascending order.
12.1 Adding a New Directory Record
1. In idle mode, press DIR.
2. Press
3. Using the dial pad to enter a name.
More than one letter is stored in each of the number keys. For example, to enter “Lorraine,”
If you make a mistake, press DIR or CID of the navigation button to move the cursor forward or
The name field cannot be left empty.
4. Press
5. Use the dial pad to enter a telephone number.
Press j twice to insert a pause in a number if necessary.
6. When you are finished, press
7. Using VOL + and VOL - of the navigation button to scroll to the desired
8. Press
NOTE
If an incoming call number matches this record the VIP Tone Melody will ring.
If
above steps to add a new directory record.
12.2 Adding a Record in the One-Touch Memory Log
1. In idle mode, press
2. The screen displays
3. Press a One-Touch Memory (1-10) button to save the record in that memory location.
If there is a record stored in selected memory location. Press
4. The screen displays
5. Using the dial pad to enter a name.
More than one letter is stored in each of the number keys. For example, to enter “Lorraine,”
If you make a mistake, press DIR or CID of the navigation button to move the cursor forward or
The name field cannot be left empty.
6. Press
7. Use the dial pad to enter a telephone number.
Press j twice to insert a pause in a number if necessary.
NEW
softkey. The screen displays
press the 5 key three times for the letter L, press the 6 key three times for the letter O, press
the 7 key three times for the letter R, and so on.
backward. Or, press
SAV E
softkey. The screen displays
SELECT
MEMORY FULL
overwrite or press
press the 5 key three times for the letter L, press the 6 key three times for the letter O, press
the 7 key three times for the letter R, and so on.
backward. Or, press
SAV E
softkey. The screen displays
CLEAR
softkey to delete one character at a time.
SAVE
softkey to complete.
shows in the display, you need to delete one or more records before repeating
STORE
softkey.
SELECT BUTTON LOCATION
BACK
softkey, then repeat the step 1-3 to select a new location.
ENTER NAME:
CLEAR
softkey to delete one character at a time.
ENTER NAME:
ENTER NUMBER:
softkey.
.
ENTER NUMBER:
.
.
VIP TONE MELODY
.
REPLACE
.
softkey to confirm
.
27
Page 28

8. When you are finished, press
SAVE
softkey.
12.3 Viewing a Directory Record
1. In idle mode, press DIR.
2. Using VOL + and VOL - of the navigation button to scroll through the records.
Or, press the number keys to go to the name of the records starting with the corresponding
character.
3. Press
4. Using VOL + and VOL - of the navigation button to scroll to
MENU
softkey.
view the record.
VIEW
. Press
SELECT
softkey to
12.4 Viewing a One-Touch Memory Record
1. In idle mode, press DIR.
2. Press One-Touch Memory (1-10) button of the record you wish to view.
12.5 Editing a Directory Record
1. In idle mode, press DIR.
2. Using VOL + and VOL - of the navigation button to scroll to the record you wish to edit.
3. Press
4. Using VOL + and VOL - of the navigation button to scroll to
NOTE
The DIR or CID of the navigation button allow the cursor to move forward or backward. The
DELETE button can be used to delete character or number to the left of the cursor.
MENU
softkey.
to edit the content according to the steps in section 12.1.
EDIT ENTRY
. Press
SELECT
softkey
12.6 Editing a One-Touch Memory Record
1. In idle mode, press DIR.
2. Press the corresponding One-Touch Memory (1-10) button you wish to edit.
3. Press
EDIT
softkey to edit the content according to the steps in section 12.2.
12.7 Copying a Directory Record or All Directory Records
You can copy one directory record or all directory records from the base to the desired handset
extension or from the handset extension to the base.
1. When viewing a directory record, press
2. The screen will display
3. Press
Or, press
4. Using VOL + and VOL - of the navigation button to scroll to the desired extension you wish the
5. Press
When finished, the number of directory records copied will be displayed.
The base will display
CURR
softkey to copy the current record.
ENTIRE
record(s) to be copied to.
SELECT
softkey to confirm.
will display
SAVED
COPY CURRENT RECORD OR ENTIRE DIRECTORY?
softkey to copy the whole directory.
RECORD COPIED!
.
COPY
softkey.
or
ENTIRE DIRECTORY COPIED!
.
and the receiving handset
12.8 Deleting a Directory Record
1. In idle mode, press DIR.
2. Using VOL + and VOL - of the navigation button to scroll to the record you wish to delete.
3. Press DELETE.
4. The screen will display
5. Press OK softkey to confirm.
DELETE?
.
12.9 Deleting All Directory Records
1. In idle mode, press DIR.
2. Press and hold DELETE.
3. The screen will display
DELETE ALL?
.
28
Page 29

4. Press OK softkey to confirm. The screen will display
EMPTY
.
12.10 Deleting a One-Touch Memory Record
1. In idle mode, press DIR.
2. Press the corresponding One-Touch Memory (1-10) button you wish to delete.
3. Press DELETE.
4. The screen will display
5. Press OK softkey to confirm.
NOTE
Press EXIT to cancel the Delete function.
DELETE?
.
12.11 Dialing a Directory Record
12.11.1 Dial a directory record while in Talk mode
1. Press s, HEADSET, a LINE button, or pick up the corded handset.
2. Press DIR.
3. Using VOL + and VOL - of the navigation button to scroll to the desired record.
4. Press
12.11.2 Dial a directory record while viewing it
1. In idle mode, press DIR.
2. Using VOL + and VOL - of the navigation button to scroll to the desired record.
3. When the desired number is displayed, press s, HEADSET, a LINE button, or pick up the
DIAL
softkey to dial the phone number.
corded handset to dial the phone number.
12.12 Dialing a One-Touch Memory Record
12.12.1 Dial a One-Touch Memory record while in Talk mode
1. Press s, HEADSET, a LINE button, or pick up the corded handset.
2. Press the corresponding One-Touch Memory (1-10) button you wish to dial and the number
will automatically be dialed.
12.12.2 Dial a One-Touch Memory record while viewing it
1. In idle mode, press DIR.
2. Press the corresponding One-Touch Memory (1-10) button you wish to dial.
3. Press s, HEADSET, a LINE button, or pick up the corded handset and the number will
automatically be dialed.
13 Answering System Operation
There are two mailboxes in the system.
For memo recording, you can select which mailbox is used to record the memo.
13.1 Answering System On/O
Press and hold Ans Sys for 2 seconds, the screen will display the
To set the Answering System On or O, please refer to section 8.7.1. The Answering a system light
illuminates when the function is activated.
If Ans Sys indicator on the base is flashing, pressing it will go to
Otherwise, pressing the button will display the
13.2 Recording Incoming Messages
The unit will answer incoming calls or routed calls after X rings (according to your Ring Delay
setting) and play the outgoing message greeting. After hearing the greeting followed by a long
beep, the caller can leave a message. If there is a new message recorded in the unit, the Ans Sys
indicator on the base will flash, and the envelope icon will flash on the display.
To set the maximum recording time/message length, please refer to section 8.7.10.
MAILBOX 1
ON/OFF STATUS
is for Line 1 and
setting menu for 3 seconds.
MAILBOX 2
ON/OFF STATUS
PLAY MESSAGES
is for Line 2.
setting menu.
menu.
29
Page 30

NOTE
Your unit will record a message up to the maximum length of time you set as long as the caller
continues speaking. To save recording capacity, your unit will automatically stop recording after
10 seconds of silence or if there is a steady dial tone for 7 seconds.
13.3 Monitoring Incoming Calls
Whenever an incoming message is being recorded you can hear it through the speaker if Call
Screening is On. To take the call, press the corresponding LINE button.
13.4 Memo Recording
1. In idle mode, press MEMO.
2. Using VOL + and VOL - of the navigation button to scroll to
the recording. Press
3. Record your memo after the beep. Press
NOTE
The maximum duration allowed for memo recording is the same as the message length setting in
the menu.
Your memo will be stored with your other incoming messages in your mailbox. To hear it again,
play your messages.
SELECT
softkey.
FINISH
softkey when your memo is complete.
MAILBOX 1
or
MAILBOX 2
to save
13.5 Playing Messages/Memo
1. In idle mode, press PLAY/STOP, or Ans Sys when the indicator is flashing.
2. The screen will display the status of messages for each line.
3. Using VOL + and VOL - of the navigation button to scroll to
softkey to play the messages for that line.
NOTE
If the unit has new messages, only the new messages will be played, otherwise all messages will be
played. The unit will play messages to the end.
During each message playback, the screen will display the current message information. If the
message playback is a stored incoming message from the telephone line, the screen will display
the message CID, including Date/Time, Name and Number. If it is a memo, the screen will display
MEMO
and Date/Time.
During each message playback:
• Press CID/Next to skip to the next message.
• Press DIR/Prev to replay the current message.
• Double press DIR/Prev to play the previous message.
If there are no messages, the unit will announce, “
You have no messages
LINE 1
or
”.
LINE 2
and press
SELECT
13.6 Erasing Messages
13.6.1 To erase a message while it is playing
1. Select and play the message you want to erase.
2. Press DELETE.
3. The screen will display
4. Press OK softkey to delete the message.
The current message is erased, and the unit will play the next message.
13.6.2 To erase all previously played messages in a mailbox
1. Play a message.
2. Press and hold DELETE for 2 seconds, the screen displays
MAILBOX?
3. Press OK softkey to delete all the old messages.
.
DELETE?
.
DELETE ALL MESSAGES IN LINE X
13.7 Accessing your Messages Remotely
1. Dial the telephone number to which the Answering System is connected.
2. Enter the remote password during the outgoing announcement or after you hear the tone.
30
Page 31

3. If the passcode is entered correctly, the Answering System will play the following voice
prompts:
Press (2) to play messages, press (2) again to stop
Press (0) while playing a message to erase
Press (1) to review the previous message
Press (3) to play the next message
Press (4) to turn On and O the Answering System
Press (7) to review menu again
4. Enter the remote commands.
5. To exit remote operation, hang up. The system will automatically disconnect the call if the user
does not enter a command within 10 seconds.
NOTE
The default remote password is 000.
Only the message being played can be erased in remote access mode.
13.8 Memory Full
When the Answering System memory is full, the system will answer after 10 rings. Memory full will
be announced and waits for you to enter 3-digit remote password. If you don’t enter the remote
password within 7 seconds, the phone hangs up.
You should erase some messages so the Answering System may record new messages.
NOTE
The unit will also answer after the 10th ring if Answering System set to O. To access the Answering
System, enter your 3-digit remote password.
14 Display Messages
The following messages show the status of the phone, provide Caller ID information, or help you
set up and use your phone.
DELETE ALL?
DELETE?
ENTER NAME:
ENTER NUMBER:
NEW CALLS
UNAVAILABLE
NO LINE
EMPTY
BLOCKED
UNKNOWN
INCOMPLETE DATA
Prompt asking if you want to erase all records.
Prompt asking if you want to erase the current record.
Prompt telling you to enter a name.
Prompt telling you to enter a telephone number.
Indicates call or calls which have not been reviewed.
Indicates that the function you want to initialize cannot work at that
moment or the function being worked cannot continue. The system
is busy or some other higher priority function is being performed.
For example, the message playback function will be stopped when
there is an incoming call.
Indicates that the telephone line is not connected.
Indicates there are no CID records in memory.
Indicates the person is calling from a number which is blocked from
transmission.
Indicates incoming call is from an area not serviced by CID or the CID
information was not sent.
Indicates incorrect CID information received.
31
Page 32

15 Troubleshooting
Operation by battery
• If the power cord is not plugged into the base unit, and the battery is available the unit will
enter Battery Operation Mode. The Battery Operation Mode is designed to allow users to
continue use of the phones during a power outage and is not intended for prolonged use.
REPLACE BATTERY
• The 5 AAA batteries need replacing or are improperly installed or not installed at all.
No dial tone
• Check or repeat installation steps.
Make sure the base power cord is connected to a working electrical outlet.
Make sure the telephone line cords are not damaged and are connected to the phone and the
wall jack.
• Make sure the hook switch pops up when the handset is lifted.
• Check the s button. Make sure the indicator is o.
• Disconnect the base station from the wall jack and connect another phone to the same jack. If
there is no dial tone in the second phone, the problem might be your wiring or local service.
Dial tone is ok, but can’t dial out
• Make sure the phone is set to the correct dial mode.
Phone does not ring
• Make sure the ringer is turned On.
• Make sure the Do Not Disturb feature is not activated.
• You may have too many extension phones on your line. Try unplugging some phones.
• See solutions for ‘No dial tone’.
You cannot be heard by the other party
• Make sure the Mute feature is not turned on.
• Make sure the handset or headset cord is inserted properly and securely.
Incoming voice too low or none at all
• Check call volume setting.
You experience static, noise, or fading in and out
• Make sure the base station is not plugged into an electrical outlet with another household
appliance. If necessary, relocate the base.
One-Touch Memory / Directory dialing doesn’t work
• Did you program the memory location keys correctly?
• Make sure the phone number is formatted properly.
No Caller ID
• You must subscribe to the standard Name/Number Caller ID service from your local telephone
company to receive CID information.
No Display
• Make sure the unit is connected to a non-switched electrical outlet. Disconnect the power
adaptor from the base and reconnect it.
Date/Time setting is restored to default setting
• This maybe caused by power failure. Set Date/Time again.
Intercom does not function correctly
• Make sure all extension phones are properly registered with the Motorola ML25254 base.
• Make sure all extension phones are within range of the Motorola ML25254 base and there are
no major sources of interference nearby.
shows in the display
32
Page 33

Causes of poor reception
• Aluminum siding.
• Foil backing on insulation.
• Heating ducts and other metal construction that can shield radio signals.
• You’re too close to appliances such as microwaves, stoves, computers, etc.
• Atmospheric conditions, such as strong storms.
• Base is installed in the basement or lower floor of the house.
• Base is plugged into AC outlet with other electronic devices.
• Baby monitor is using the same frequency.
• Make sure the hook switch pops up when the handset is lifted.
• The 5 AAA batteries need replacing or are improperly installed or not installed at all.
33
Page 34

16 General information
Cleaning
• Clean the phone with a damp (not wet) cloth, or an anti-static wipe.
• Never use household polish as this will damage the product. Never use a dry cloth as this may
cause static shock.
Environmental
• Do not expose to direct sunlight.
• The phone may become warm when the batteries are being charged or during prolonged
periods of use. This is normal. However, we recommend that to avoid damage, do not place the
product on antique / veneered wood.
• Do not place your product on carpets or other surfaces which generate fibres, or place it in
locations preventing the free flow of air over its surfaces.
• Do not submerge any part of your product in water and do not use it in damp or humid
conditions, such as bathrooms.
• Do not expose your product to fire, explosives or other hazardous conditions.
• There is a slight chance that your phone could be damaged by an electrical storm. We
recommend that you unplug the power cord during an electrical storm.
Product disposal instructions
Product disposal instructions for residential users
When you have no further use for it, please remove any batteries and dispose of them and the
product according to your local authority’s recycling processes. For more information, please
contact your local authority or the retailer where the product was purchased.
Product disposal instructions for business users
Business users should contact their suppliers and check the terms and conditions of the purchase
contract and ensure that this product is not mixed with other commercial waste for disposal.
Consumer Products and Accessories Warranty
Thank you for purchasing this Motorola branded product manufactured under license by Meizhou
Guo Wei Electronics Co. Ltd., AD1 section, Economic Development Area, Dongsheng Industrial
District, Meizhou, Guangdong, China. (“MZGW”)
What Does this Warranty Cover?
Subject to the exclusions contained below, MZGW warrants that this Motorola branded
product (“Product”) or certified accessory (“Accessory”) sold for use with this product that it
manufactured to be free from defects in materials and workmanship under normal consumer
usage for the period outlined below. This Limited Warranty is your exclusive warranty and is not
transferable.
Who is covered?
This warranty extends only to the first consumer purchaser, and is not transferable.
What will MZGW do?
MZGW or its authorized distributor at its option and within a commercially reasonable time, will
at no charge repair or replace any Products or Accessories that do not conform to this limited
warranty. We may use functionally equivalent reconditioned / refurbished / pre-owned or new
Products, Accessories or parts.
What Other Limitations Are There?
ANY IMPLIED WARRANTIES, INCLUDING WITHOUT LIMITATION THE IMPLIED WARRANTIES
OF MERCHANTABILITY AND FITNESS FOR A PARTICULAR PURPOSE, SHALL BE LIMITED TO
THE DURATION OF THIS LIMITED WARRANTY, OTHERWISE THE REPAIR OR REPLACEMENT
PROVIDED UNDER THIS EXPRESS LIMITED WARRANTY IS THE EXCLUSIVE REMEDY OF THE
CONSUMER, AND IS PROVIDED IN LIEU OF ALL OTHER WARRANTIES, EXPRESS OF IMPLIED.
IN NO EVENT SHALL MOTOROLA OR MZGW BE LIABLE, WHETHER IN CONTRACT OR TORT
(INCLUDING NEGLIGENCE) FOR DAMAGES IN EXCESS OF THE PURCHASE PRICE OF THE
PRODUCT OR ACCESSORY, OR FOR ANY INDIRECT, INCIDENTAL, SPECIAL OR CONSEQUENTIAL
DAMAGES OF ANY KIND, OR LOSS OF REVENUE OR PROFITS, LOSS OF BUSINESS, LOSS OF
INFORMATION OR OTHER FINANCIAL LOSS ARISING OUT OF OR IN CONNECTION WITH THE
ABILITY OR INABILITY TO USE THE PRODUCTS OR ACCESSORIES TO THE FULL EXTENT THESE
DAMAGES MAY BE DISCLAIMED BY LAW.
34
Page 35

Some jurisdictions do not allow the limitation or exclusion of incidental or consequential damages,
or limitation on the length of an implied warranty, so the above limitations or exclusions may not
apply to you. This warranty gives you specific legal rights, and you may also have other rights that
vary from one jurisdiction to another.
Products Covered Length of Coverage
Consumer Products Two (2) years from the date of the products original
Consumer Accessories (battery,
power supply(s) and line cords)
Consumer Products and Accessories
that are Repaired or Replaced
purchase by the first consumer purchaser of the
product.
Ninety (90) days from the date of the accessories
original purchase by the first consumer purchaser of the
product.
The balance of the original warranty or for ninety
(90) days from the date returned to the consumer,
whichever is longer.
Exclusions
Normal Wear and Tear. Periodic maintenance, repair and replacement of parts due to normal wear
and tear are excluded from coverage.
Batteries. Only batteries whose fully charged capacity falls below 80% of their rated capacity and
batteries that leak are covered by this
limited warranty.
Abuse & Misuse. Defects or damage that result from:
(a) improper operation, storage, misuse or abuse, accident or neglect, such as physical damage
(cracks, scratches, etc.) to the surface of the product resulting from misuse;
(b) contact with liquid, water, rain, extreme humidity or heavy perspiration, sand, dirt or the like,
extreme heat, or food;
(c) use of the Products or Accessories for commercial purposes or subjecting the Product
or Accessory to abnormal usage or conditions; or
(d) other acts which are not the fault of Motorola or MZGW are excluded from coverage.
Use of Non-Motorola branded Products and Accessories. Defects or damage that result from the
use of Non-Motorola branded or certified Products or Accessories or other peripheral equipment
are excluded from coverage.
Unauthorized Service or Modification. Defects or damages resulting from service, testing,
adjustment, installation, maintenance, alteration, or modification in any way by someone other
than Motorola, MZGW or its authorized service centers, are excluded from coverage.
Altered Products. Products or Accessories with:
(a) serial numbers or date tags that have been removed, altered or obliterated;
(b) broken seals or that show evidence of tampering;
(c) mismatched board serial numbers; or
(d) nonconforming or non-Motorola branded housings, or parts, are excluded from coverage.
Communication Services. Defects, damages, or the failure of Products or Accessories due to any
communication service or signal you may subscribe to or use with the Products or Accessories is
excluded from coverage.
How to Obtain Warranty Service or Other Information?
For service or information, please contact Customer Services on: 1-833-468-1468.
You will receive instructions on how to ship the Products or Accessories at your expense and risk,
to a MZGW Authorized Repair Center.
To obtain service, you must include:
(a) the Product or Accessory;
(b) the original proof of purchase (receipt) which includes the date, place and seller of the Product;
(c) if a warranty card was included in your box, a completed warranty card showing the serial
number of the Product;
(d) a written description of the problem; and, most importantly;
(e) your address and telephone number.
35
Page 36

Manufactured, distributed or sold by Meizhou Guo Wei
Electronics Co. LTD., ocial licensee for this product.
MOTOROLA and the Stylized M Logo are trademarks or
registered trademarks of Motorola Trademark Holdings,
LLC. and are used under license. All other trademarks
are the property of their respective owners. © 2020
Motorola Mobility LLC. All rights reserved.
Issue 1.3 (EN-US)
 Loading...