

Page 1

TM
MD4160 Series User Guide
Guía del Usuario de la Serie MD4160
2.4 GHz Digital Cordless Telephone
with Answering Machine
Teléfono inalámbrico digital de 2,4 GHz
con contestador automático
Page 2

For a copy of a large-print version of this
guide, or for product-related questions,
please visit us online:
www.motorola.com/cordless
or call us at:
1-800-353-2729 U.S.A.
1-800-461-4575 Canada
1-888-390-6456 TTY (Text Telephone)
Motorola reserves the right to revise this publication and
to make changes in content from time to time without
obligation on the part of Motorola to provide notification
of such revision or change. Motorola provides this guide
without warranty of any kind, either implied or
expressed, including but not limited to, the implied
warranties of merchantability and fitness for a particular
purpose. Motorola may make improvements or changes
in the product(s) described in this manual at any time.
MOTOROLA, Intelligence Everywhere, and the Stylized
M Logo are registered in the U.S. Patent and Trademark
Office. All other product or service names are the
property of their respective owners.
Copyright © 2005 Motorola, Inc.
All rights reserved. No part of this publication may be
reproduced in any form or by any means or used to
make any derivative work (such as translation,
transformation or adaptation) without written permission
from Motorola, Inc.
Page 3

Welcome
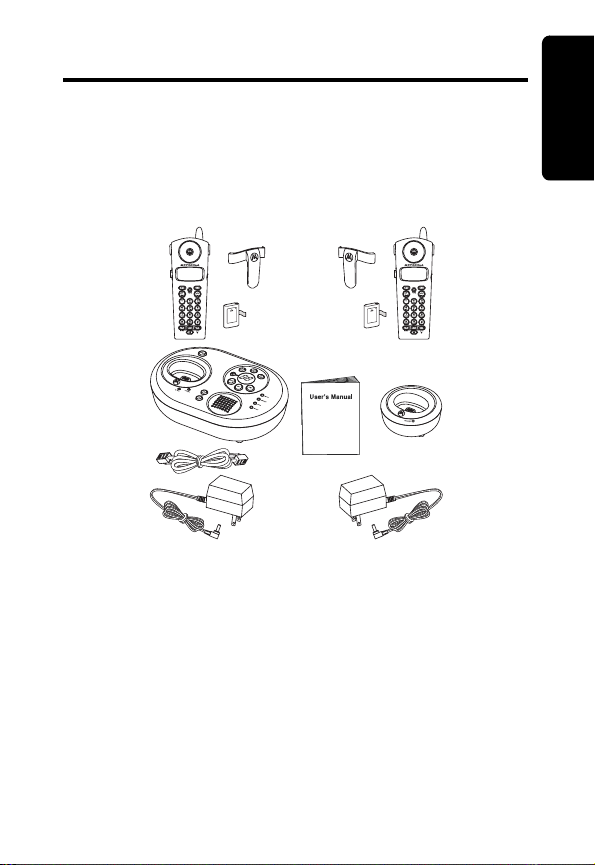
Congratulations on your purchase of a Motorola
MD4160 Series Cordless Telephone with Answering
Machine. Take a moment to ensure that your
purchase includes each of the items pictured below.
Welcome
Important:
toward enjoying your new Motorola product. Registering
helps us facilitate warranty service, and permits us to
contact you should your Motorola product require an
update or other service. Registration is not required for
warranty coverage. To register your product online, visit:
https://broadbandregistration.motorola.com
Please retain your original dated sales receipt for your
records. For warranty service of your Motorola product, you
will need to provide a copy of your dated sales receipt to
confirm warranty status.
Product registration is an important step
i
Page 4

MD4160 Series Handset
Welcome
Ringing status LED
Volume control
Access Call ID/
Scroll down
Make/Answer call/
Switch between
active calls
Switch between
Rotary(Pulse)/Tone
Mute/delete
caller information
Call second
Handset
Antenna
Earphone jack
Access Directory/
Scroll up
Select options
End call/
Cancel command
Redial last
number called/
Insert pause
Microphone
Switch to
hands-free mode
ii
Page 5

Base Unit
Welcome
Access mailboxes
Answering Machne
On/Off
Locate Handset(s)
In use LED
Charge LED
Volume controls
Repeat past message(s)/
Slow playback
Delete message
Speaker
LED display
Review features
Move to different
option/setting in
menu/clock mode
Announce current
time/set clock
Record out-going
message or a memo
Skip to next message/
Speed up playback
iii
Page 6

Stand Alone Charger
Welcome
Charge LED
iv
Page 7

Table of Contents
Welcome . . . . . . . . . . . . . . . . . . . . . . . . . . . . . . . . . . . . . i
Important Safety Instructions . . . . . . . . . . . . . . . . . . .vii
FCC Information . . . . . . . . . . . . . . . . . . . . . . . . . . . . . . . x
Getting Started . . . . . . . . . . . . . . . . . . . . . . . . . . . . . . . . 1
Battery Safety Instructions . . . . . . . . . . . . . . . . . . . . . . 1
Charging the Battery . . . . . . . . . . . . . . . . . . . . . . . . . . 2
Handset Display Overview . . . . . . . . . . . . . . . . . . . . . . 5
Installation. . . . . . . . . . . . . . . . . . . . . . . . . . . . . . . . . . . . 6
Setting Up . . . . . . . . . . . . . . . . . . . . . . . . . . . . . . . . . . . . 7
Personalizing Your Handset . . . . . . . . . . . . . . . . . . . . . 7
Selecting Ring Tones . . . . . . . . . . . . . . . . . . . . . . . . 7
Naming Your Handset . . . . . . . . . . . . . . . . . . . . . . . . 8
Selecting Language Preference . . . . . . . . . . . . . . . . 8
Setting Touch Tone or Pulse Dialing . . . . . . . . . . . . . 9
Turning the Key Beeps Off/On . . . . . . . . . . . . . . . . . 9
Using the Handset . . . . . . . . . . . . . . . . . . . . . . . . . . . . 10
Making a Call . . . . . . . . . . . . . . . . . . . . . . . . . . . . . . . 10
Answering/Ending a Call . . . . . . . . . . . . . . . . . . . . . . 11
Locating a Misplaced Handset . . . . . . . . . . . . . . . . . . 11
Adjusting the Ringer Volume . . . . . . . . . . . . . . . . . . . 11
Adjusting the Volume . . . . . . . . . . . . . . . . . . . . . . . 12
Using the Mute Feature . . . . . . . . . . . . . . . . . . . . . 12
Making Intercom Calls . . . . . . . . . . . . . . . . . . . . . . . . 12
Forwarding a Call . . . . . . . . . . . . . . . . . . . . . . . . . . . . 13
Using Call Transfer . . . . . . . . . . . . . . . . . . . . . . . . . . . 13
Using Conference Calling . . . . . . . . . . . . . . . . . . . . . .14
Storing Numbers in Memory . . . . . . . . . . . . . . . . . . . 14
Storing a New Entry . . . . . . . . . . . . . . . . . . . . . . . . 14
v
Page 8

Deleting a Phonebook Entry . . . . . . . . . . . . . . . . . 15
Dialing Phonebook Numbers . . . . . . . . . . . . . . . . . 15
Editing a Phonebook Entry . . . . . . . . . . . . . . . . . . 16
Using Caller ID Functions . . . . . . . . . . . . . . . . . . . . . 16
Storing a Caller ID Entry in Memory . . . . . . . . . . . 16
Dialing a Caller ID Listing . . . . . . . . . . . . . . . . . . . . 16
Reviewing Caller ID Lists . . . . . . . . . . . . . . . . . . . . 17
Deleting All Caller ID Listings . . . . . . . . . . . . . . . . . 17
Using the Answering Machine . . . . . . . . . . . . . . . . . . 18
Setting Up the Answering Machine . . . . . . . . . . . . . . 19
Setting the Date, Time, and Year . . . . . . . . . . . . . . 19
Setting Up Your Outgoing Message (OGM) . . . . . . . 19
Mailboxes and Announcements . . . . . . . . . . . . . . . 19
Announcement Options . . . . . . . . . . . . . . . . . . . . . 19
Recording Outgoing Message (OGM) . . . . . . . . . . 20
Reviewing an OGM . . . . . . . . . . . . . . . . . . . . . . . . 20
Deleting an OGM . . . . . . . . . . . . . . . . . . . . . . . . . . 20
Common Answering Machine Display Messages . . . 21
Setting the Answering Machine Features . . . . . . . . . 22
Access the Answering Machine Remotely . . . . . . . . 23
Motorola Limited Warranty . . . . . . . . . . . . . . . . . . . . . 24
vi
Page 9

Important Safety Instructions
Follow these safety precautions when using your
cordless phone to reduce the risk of fire, electric shock
and injury to persons or property:
To reduce the risk of fire and shock:
1. Keep all slits and openings of the phone unblocked.
Do not set the phone on a heating register or over a
radiator. Ensure that proper ventilation is provided
at the installation site.
2. Do not use while wet or while standing in water.
3. Do not use this product near water (for example,
near a bath tub, kitchen sink, or swimming pool).
4. Do not allow anything to rest on the power cord.
Place the power cord so that it will not be
walked on.
5. Never insert objects of any kind into the product
slits as that may result in fire or shock.
6. Unplug this product from the wall outlet before
cleaning. Do not use liquid cleaners or aerosol
cleaners. Use a damp cloth for cleaning.
7. Do not disassemble this product. If service or repair
work is required, contact the Motorola address
found in the back of this user guide.
8. Do not overload wall outlets and extension cords.
9. Avoid using during an electrical storm. Use a surge
protector to protect the equipment.
10. Do not use this cordless phone to report a gas leak,
especially if you are in the vicinity of the gas line.
Safety Info
Caution:
or larger UL listed or CSA Certified Telecommunication
Line Cord.
To reduce the risk of fire, use only No. 26 AWG
vii
Page 10

Unplug this cordless phone immediately from
an outlet if:
• The power cord or plug is damaged or frayed.
• Liquid has been spilled into the product.
• The product has been exposed to rain or water. Do not
retrieve the handset or base until after you have unplugged the power and phone from the wall. Then retrieve
the unit by the unplugged cords.
• The product has been dropped or the cabinet has
been damaged.
• The product exhibits a distinct change in performance.
Installation Guidelines
1. Read and understand all instructions and save
Safety Info
them for future reference.
2. Follow all warnings and instructions marked on
the product.
3. Do not install this product near a bath tub, sink,
or shower.
4. Operate this phone using only the power source
that is indicated on the marking label. If you are
unsure of the power supply to your home, consult
your dealer or local power company.
5. Do not place this product on an unstable cart,
stand, or table. This product may fall, causing
serious damage to the product.
6. Adjust only those controls that are covered by the
operating instructions. Improper adjustment of other
controls may result in damage and will often require
extensive work to restore the product to
normal operation.
7. Clean this product with a soft, damp cloth. Do not
use chemicals or cleaning agents.
viii
Page 11

8. Use only the power supply that came with this
unit. Using other power supplies may damage
the unit.
9. Because cordless phones operate on electricity,
you should have at least one phone in your home
that isn’t cordless, in case the power in your
home goes out.
10.To avoid interference to nearby appliances, do
not place the base of the cordless phone on or
near a TV, microwave oven, refrigerator, or VCR.
Caution:
exposure guidelines, place the base unit at least 20 cm
from nearby persons.
To maintain compliance with the FCC’s RF
Safety Info
ix
Page 12

FCC Information
This equipment complies with Parts 15 and 68 of the
FCC rules and the requirements adopted by the
Administrative Council for Terminal Attachments
(ACTA).
A plug and jack used to connect this equipment to the
premises wiring and telephone network must comply
with applicable FCC Part 68 rules and requirements
FCC Info
adopted by the ACTA. A compliant telephone cord and
modular plug is provided with this product. It is designed
to be connected to a compatible modular jack that is
also compliant. See installation instructions for details.
Notification of Local Telephone Company
On the bottom of this equipment is a label that contains,
among other information, a product identifier in the form
US:AAAEQ##TXXXX. You must, upon request, provide
this information to your telephone company.
The digits represented by ## in the product identifier
indicate the Ringer Equivalency Number (REN) for this
equipment. The REN is useful in determining the
number of devices you may connect to your telephone
line and still have all of these devices ring when your
telephone number is called. In most (but not all) areas,
the sum of the RENs of all devices connected to one line
should not exceed 5. To be certain of the number of
devices you may connect to your line as determined by
the REN, contact your local telephone company.
Note: This equipment may not be used on coin service
provided by the telephone company.
x
Page 13

Connection to party line service is subject to state tariffs.
Contact the state public utility commission, public
service commission or corporation commission for
information.
If your home has specially wired alarm equipment
connected to the telephone line, ensure the installation
of this cordless phone does not disable your alarm
equipment. If you have questions about what will
disable alarm equipment, consult your telephone
company or a qualified installer.
Notice must be given to the telephone company upon
permanent disconnection of your telephone from your
line. The FCC requires that you connect your cordless
telephone to the nationwide telephone network through
a modular telephone jack (USOC RJ11C/RJ11W or
RJ14C/RJ14W).
FCC Info
Rights of the Telephone Company
Should your equipment cause trouble on your line which
may harm the telephone network, the telephone
company shall, where practicable, notify you that
temporary discontinuance of service may be required.
Where prior notice is not practical and the
circumstances warrant such action, the telephone
company may temporarily disconnect service
immediately. In case of such temporary discontinuance,
the telephone company must:
• Promptly notify you of such temporary
discontinuance
• Afford you the opportunity to correct the situation
xi
Page 14

• Inform you of your right to bring a complaint to the
Commission pursuant to procedures set forth in
Subpart E of Part 68, FCC Rules and Regulations.
The telephone company may make changes in its
facilities, equipment, operations, or procedures that
could affect the operation of the equipment. If this
happens, the telephone company will provide advance
notice in order for you to make necessary modifications
to maintain uninterrupted service.
FCC Info
Interference Information
This device complies with Part 15 of the FCC Rules.
Operation is subject to the following two conditions:
• This device may not cause harmful interference.
• This device must accept any interference received,
including interference that may cause undesired
operation.
This equipment has been tested and found to comply
with the limits for a Class B digital device, pursuant to
Part 15 of the FCC Rules. These limits are designed to
provide reasonable protection against harmful
interference in a residential installation.
This equipment generates, uses, and can radiate radio
frequency energy and, if not installed and used in
accordance with the instructions, may cause harmful
interference to radio communications. However, there is
no guarantee that interference will not occur in a
particular installation.
xii
Page 15

If this equipment does cause harmful interference to
radio or television reception, which can be determined
by turning the equipment on and off, the user is
encouraged to try to correct the interference with one or
more of the following measures:
• Reorient or relocate the receiving antenna (that is,
the antenna for the radio or television that is
"receiving" the interference).
• Reorient or relocate and increase the separation
between the telecommunications equipment and
the receiving antenna.
• Connect the telecommunications equipment into
an outlet on a circuit different from that to which
the receiving antenna is connected.
If these measures do not eliminate the interference,
please consult your dealer or an experienced radio/
television technician for additional suggestions. Also,
the Federal Communications Commission has prepared
a helpful booklet, "How to Identify and Resolve Radio/
TV Interference Problems."
The FCC requires this product to be serviced only by
Motorola or its authorized service agents.
CAUTION / WARNING: Changes or modifications not
expressly approved by Motorola could void not only the
user's authority to operate the equipment, but also the
limited warranty.
FCC Info
Hearing Aid Compatibility
This telephone system meets the FCC standards for
hearing aid compatibility.
xiii
Page 16

Getting Started
Before you can use your new Motorola telephone to
make or receive calls, you must charge the batteries.
Battery Safety Instructions
•
Do not burn, disassemble, mutilate, or puncture the
battery. The battery contains toxic materials that could
be released, resulting in injury.
•
Caution:
the battery with an incorrect battery type. Use only the
battery that came with your phone or an authorized
replacement recommended by the manufacturer.
•
Keep batteries out of the reach of children.
•
Remove batteries if storing over 30 days.
•
Do not dispose of batteries in fire, which could result
in explosion.
•
The rechargeable batteries that power this
product must be disposed of properly and may
need to be recycled. Refer to your battery’s
label for battery type. Contact your local recycling
center for proper disposal methods.
There is a risk of explosion if you replace
Getting Started
1
Page 17

Charging the Battery
Your MD4160 series telephone comes with a Base Unit
with Answering Machine, and a Stand Alone Charger.
Use the Charger to charge one of your two Handsets.
See “Installation” on page 6 for step-by-step instructions
on installing the Base Unit. Note: For the initial charge,
please charge the battery for at least 12 hours.
1 Remove any stickers if present.
2 Press the indentation on the battery door and
slide downwards to remove.
3 Insert the battery (bottom edge first) into the
Getting Started
battery compartment.
2
Page 18

4 Replace the battery door.
5 Attach the Belt Clip (optional).
Getting Started
3
Page 19

6 Plug the power cord into the bottom of the
Charger and into an electrical outlet.
7 Place the Handset in the Charger.
Getting Started
Charge LED
8 Charge the battery for at least 12 hours before
using for the first time.
The glowing LED light
indicates that the Handset is charging.
4
Page 20

Handset Display Overview
Use the at-a-glance image below to familiarize yourself
with the 4160 Handset’s display screen. See
“Personalizing Your Handset” on page 7 for step-bystep instructions on setting preferences.
Main Display Screen
Muted
microphone
indicator
Speakerphone
indicator
New call
log entry
indicator
Caller ID date
and time
information
Notes: Caller ID information is supplied only if you
subscribe to the service with your local telephone
company.
• If you subscribe to Caller ID service, but INCOMING CALL
or No Data is displayed for all of your incoming calls,
contact your telephone company.
Name
and number
display area
Low battery/
charging
indicator
Muted
ringer
indicator
Getting Started
5
Page 21

Installation
1
Select a location convenient to both an electrical
outlet and a telephone jack.
2
Insert the telephone and power cords into the
bottom of the Base Unit.
3
Plug the telephone cord into the telephone
wall jack.
4
Plug the power cord into the electrical outlet.
Note: Install the Base Unit away from electronic
equipment, such as computers, televisions, or
microwave ovens. Avoid excessive heat, cold, dust,
or moisture.
Installation
Do not plug the telephone cord into the wall jack
until the Handset is fully charged (12 hours).
6
Page 22

Setting Up
After your Handsets are fully charged, you are ready to
set your personal preferences.
Personalizing Your Handset
You can personalize each Handset by selecting
distinguishing ring tones, selecting a language,
assigning names for easier identification (e.g.,
Kitchen(1)), or you can extend the time between
charges by turning off the ringer.
Note: The Handsets of your MD4160 Series telephone
share a common phonebook, call log, and dial settings.
Selecting Ring Tones
There are 10 available ring tones. You can set different
ring tones for intercom and outside calls. If you
subscribe to Caller ID service, see “Using Caller ID
Functions” starting on page 16 to set distinct ring tones
for programmed callers.
1
Press sel/menu.
2
Scroll to RING TONE.
3
Press sel/menu.
4
Scroll to OUTSIDE CALL or INTERCOM CALL. The
current ring tone plays.
5
Scroll through the list of ring tones to hear
samples of each.
6
Press sel/menu to choose your desired ring tone.
7
Scroll to another feature or press B to exit.
Setting Up
7
Page 23

Naming Your Handset
1
Press sel/menu.
2
Scroll to NAME HANDSET.
3
Setting Up
Press sel/menu.
4
Enter the name for the Handset. Use the MUTE/
DELETE, CIDy, and zPBK keys to make
corrections.
5
Press sel/menu to save and exit feature.
Selecting Language Preference
1
Press sel/menu.
2
Scroll to LANGUAGE.
3
Press sel/menu.
4
Scroll to your desired language.
5
Press sel/menu to save settings.
6
Press B to access another feature, or to exit.
8
Page 24

Setting Touch Tone or Pulse Dialing
Your telephone is preset for touch tone dialing. If your
telephone dial service is pulse (rotary) only, you must
change the setting.
1
Press sel/menu.
2
Scroll to TONE/PULSE.
3
Press sel/menu. The current setting blinks.
4
Scroll to PULSE or TONE.
5
Press sel/menu to save the setting.
6
Press B to access another feature, or to exit
Note: You can temporarily change to tone dialing
during a call by pressing *
TONE (asterisk/star key).
All keys pressed afterward will send touch tone
signals. Your telephone automatically returns to
pulse dial after the call is disconnected.
Turning the Key Beeps Off/On
1
Press sel/menu.
2
Scroll to KEY TONE ON/OFF.
3
Press sel/menu.
4
Scroll to desired setting.
5
Press sel/menu to save setting and exit feature.
Setting Up
9
Page 25

Using the Handset
Making a Call
Press A or v to use the handsfree feature. When you
hear the dial tone, enter the number.
OR
Enter the phone number, then press
see the phone number on the display before it is dialed.
OR
Press
Using the Handset
REDIAL to call a recently dialed number. The
display lists the last five numbers dialed. Scroll to the
desired number. Press
A or v.
A or v. You can
Notes:
audible notice of a second call. Press
waiting call.
•
•
10
Subscribers to Call Waiting service will hear an
Press flash at any time to switch back and forth
between calls.
Press the cancel or mute option to stop your phone
from ringing when you do not wish to answer
the call.
•
If you use DSL, please use the filtering devices
provided by your DSL service company to prevent
interference. If interference does occur, please
contact your DSL service provider.
A
to answer the
Page 26

Answering/Ending a Call
Press A or any key except B, INTERCOM, or REDIAL to
answer a call.
Press
B to end a call.
OR
Place Handset on the Base Unit or Charger to end call.
Locating a Misplaced Handset
Press PAGE on the Base Unit. Both handsets beep for
60 seconds.
Press
PAGE again to stop paging both handsets.
OR
B or any key except A HANDSET, INTERCOM, or
Press
REDIAL.
Adjusting the Ringer Volume
1
Press sel/menu.
2
Scroll to RING VOLUME.
3
Press sel/menu.
4
Scroll to the desired volume level (1 - 6, or Off).
5
Press sel/menu to save the setting.
Using the Handset
11
Page 27

Adjusting the Volume
During a call, use the audio volume up and down
(
VOLy VOLz) controls on the side of the handset to
adjust the volume during a call. A double beep
sounds when you reach the maximum or minimum
settings.
Audio volume up
Audio volume down
Using the Handset
Using the Mute Feature
1
Press MUTE during a call or intercom discussion.
The display reads,
2
Press MUTE again to return to normal
MICROPHONE MUTED.
conversation.
Making Intercom Calls
1
Press INTERCOM. The display reads, CALLING
OTHER HANDSET. The second Handset rings and
displays,
2
Press INTERCOM or v to answer. If the other
Handset is out of reach, the display reads,
UNABLE TO CALL TRY AGAIN.
Note: Pressing any key except the
to pick-up an incoming call and an intercom call.
3
Press B, INTERCOM or place the Handset on the
Base Unit or Charger to end the intercom call.
OTHER HANDSET IS CALLING.
B will allow you
12
Page 28

Forwarding a Call
You can immediately connect an external call to the
second Handset using the following steps:
1
Press and hold INTERCOM. CALLING OTHER
HANDSET displays in the Handset. The second
Handset rings and displays,
CALLING.
2
Press A on the second Handset to complete
OTHER HANDSET IS
forwarding the call.
Using Call Transfer
Use Call Transfer to discuss an external call before
transferring it to the second Handset (e.g., “Would you
like to speak with Bill Southers?”).
1
Press and hold INTERCOM. The external call is
automatically placed on hold.
2
Discuss the external call.
3
Press B to complete the transfer.
Note: If the second handset is not found or picked
up within 30 seconds, the call returns to the first
handset, rings for 30 seconds, and terminates
automatically if not answered.
Using the Handset
13
Page 29

Using Conference Calling
When one Handset is on an external call, and A is
pressed on the second Handset, a Conference Call is
established.
Storing Numbers in Memory
Enter numbers directly into the phonebook, or add them
from the caller ID, and redial lists. Enter up to 50 names
(16 characters) and numbers (32 digits).
Storing a New Entry
1
Press sel/menu.
Using the Handset
2
Scroll to PHONEBOOK.
3
Press sel/menu.
4
Scroll to STORE NEW ENTRY.
5
Press sel/menu. The display reads, ENTER NUMBER.
6
Enter the telephone number (up to 32 digits), or
press
REDIAL, scroll to desired number, and press
REDIAL again.
7
Press sel/menu. The display reads, ENTER NAME.
8
Enter the name (up to 16 characters).
9
Press B to exit, or to access another feature.
14
Page 30

The chart below shows how many times to press each
button on the handset to enter letters and special
characters. Use the
CIDy, zPBK, and DELETE/MUTE to
make corrections.
Press
sel/menu to save entries.
Button 1 2 3 4 5 6 7 8 9
Space
1
2 A B C 2 a b c
3 D E F 3 d e f
4 G H I 4 g h i
5 J K L 5 j k l
6 M N O 6 m n o
7 P Q R S 7 p q r s
8 T U V 8 t u v
9 W Y X Z 9 w x y z
Number of Presses
1
Repeat the process to add additional numbers. Press
to exit the directory.
Deleting a Phonebook Entry
1
Press zPBK.
2
Scroll to the desired entry.
3
Press MUTE/DELETE. There is a confirmation tone.
Dialing Phonebook Numbers
1
Press zPBK.
2
Scroll to the desired entry.
3
Press A, or v.
Using the Handset
B
15
Page 31

Editing a Phonebook Entry
1
Press zPBK.
2
Scroll to the desired entry.
3
Press sel/menu. The display reads, EDIT NUMBER.
4
Press MUTE/DELETE to edit the entry.
5
Press sel/menu. You will hear a confirmation beep.
Using Caller ID Functions
Your Caller ID locations hold up to 50 calls. The most
recent call is stored last on the list. When the location is
full, the oldest call is deleted to add room for new calls.
Using the Handset
Storing a Caller ID Entry in Memory
1
Press CIDy.
2
Scroll to the desired entry.
3
Press sel/menu.
4
Press # if you wish to change the dialing
sequence (7, 10, or 11-digit format) for the entry.
5
Press sel/menu.
6
Select Y or N for a distinctive ring. A “D” is
displayed next to the entry.
7
Press sel/menu to save the entry.
Dialing a Caller ID Listing
1
Press CIDy.
2
Scroll to the desired entry.
3
Press sel/menu.
16
Page 32

4
Press # if you wish to change the dialing
sequence (7, 10, or 11-digit format) for the entry.
5
Press sel/menu, and DIAL flashes.
6
Press sel/menu.
Reviewing Caller ID Lists
1
Press CIDy.
2
Scroll through the list of incoming calls.
3
Press B to exit list.
Deleting All Caller ID Listings
1
Press and hold DELETE with the Handset off. The
display reads
2
Scroll to YES.
3
Press sel/menu. You will hear a confirmation beep.
ERASE ALL NO YES.
Using the Handset
17
Page 33

Using the Answering Machine
Your new answering machine has audio prompts that
guide you through setting up and accessing the different
features.
The answering machine stores up to 15 minutes of
messages and/or memos.
18
Play Messages
Press to play messages in a mailbox.
Press again to stop playback.
Machine
Using the Answering
Adjust Playback Volume
Audible beeps at highest/
lowest setting.
Repeat/Slow Messages
Press to repeat message;
press twice to play previous
message; press and hold to
slow down playback.
E
Skip/Quick Messages
Skip to next message/
hold to speed up playback.
Delete Messages
Press during playback.
DELETE
Cannot delete messages until
reviewed; deleted messages
cannot be recovered.
Message
window
Page 34

Setting Up the Answering Machine
If you subscribe to Caller ID service with your telephone
company, the date and time automatically sets with the
first incoming call. (Caller ID service does not set the
year. You must set the year manually.) If you do not
subscribe to the service, set the clock manually.
Setting the Date, Time, and Year
1
Press TIME/SET. The system announces the
current setting.
2
Press TIME/SET.
3
Press CHANGE until you hear the correct setting.
4
Press TIME/SET to save change.
5
Repeat the steps to set the current day, hour,
minute, and year.
Note: To advance the minutes or years by
increments of 10, press and hold
CHANGE. You can
select up to the year 2040.
Setting Up Your Outgoing Message (OGM)
Mailboxes and Announcements
Your new answering system has three voice mailboxes
that you can assign to different people. Callers with
touch tone dialing can select from the boxes by pressing
1, 2, or 3. If a caller does not specify a mailbox, the
message is automatically recorded in mailbox 1.
Using the Answering
Machine
Announcement Options
You can record your own Outgoing Message (OGM) or
use the prerecorded OGM. A second OGM option
allows you to give an announcement without accepting
19
Page 35

messages. (e.g., “Thank you for calling, please try again
later.”) You can record a personal announcement or use
a prerecorded one.
Recording Outgoing Message (OGM)
1
Press MENU until you hear audible prompt,
“
CHANGE ANNOUNCEMENT.”
2
Press MEMO/REC. The system prompts, “NOW
RECORDING” followed by a beep.
3
Facing the Base Unit, record your message. You
have up to 90 seconds.
4
Press any mailbox button to stop recording.Your
message plays back automatically.
If you assign different boxes, remember to include that
information in your OGM. (e.g., “Sorry we missed your
call. To leave a message for Chip, press 1, for Ashley,
press 2, for Frank, press 3.”)
Machine
Reviewing an OGM
Using the Answering
1
Press MENU until you hear
”
CHANGE ANNOUNCEMENT.”
2
Press any mailbox button. The current
OGM plays.
Deleting an OGM
Press DELETE during the playback. The system uses
the prerecorded announcement until you record a
new one.
E
20
Page 36

Common Answering Machine Display Messages
0 No messages in any mailbox
1 – 99 Total number of messages in
0 – 99 F
Counting 1
to 99
99 Flashing Length of recording is more
1 – 8,
steady for
one second
40 – 99 Current Remote Access
ON or OFF Displays when system is
CL
Normal
Display
—, Flashing System is in programming
all mailboxes, or current
message number during
message playback
Memory is full, or total
number of messages is 99.
Duration of memo recording
than 99 seconds.
Indicates volume level
selected when VOL – or
Vol + is pressed
Code while setting
A Announce Only mode
turned on or off.
Clock must be set.
— System is answering a call or
is in remote operation.
mode or initializing.
Using the Answering
Machine
Notes:
Your system stores up to 99 messages
(approximately 15 minutes of recorded messages, memos
and announcements) until you delete them.
•
Incoming messages cannot exceed four minutes.
•
Mailboxes with new messages flash and glow. There
is no flashing when messages are played.
•
A Mailboxes with both old and new messages, will
play the new messages first. Press the mailbox
number again to hear all messages.
•
Prior to playing a message, the system always
announces the day and time it was received. The LED
displays the message’s number in the queue.
21
Page 37

Setting the Answering Machine Features
1
Turn the system on.
2
Press MENU until the desired feature
is announced.
3
Press CHANGE until the desired setting
is announced.
4
Press TIME/SET to save selection.
5
Press MENU to move to the next feature, or a
mailbox button to exit.
22
AUDIO FEATURE
PROMPTS
Set Security Code Allows remote access to
Machine
Using the Answering
Set Audible
Message Alert
Set Announce Only Plays announcement, but
Set Base Ringer Turn ringer for Base Unit on
Set Number of Rings
(2, 4, 6, Toll Saver)
FEATURE
system. Select any two-digit
code from 40 to 99. Default
E
code is 50.
Base Unit beeps every 10
seconds to announce new
messages. Default setting
is off.
does not take messages.
Default setting is off.
or off. Default setting is off.
Select number of rings
allowed before system
answers call. In Toll Saver
mode, system answers after 2
rings when there is a new
message, 4 when there are
no messages. Default setting
is 4 rings.
DESCRIPTIONS
Page 38

Access the Answering Machine Remotely
You can listen to your messages from anywhere using a
touch tone telephone.
1
Enter you 2 digit security code during the OGM.
The machine announces the number of
messages.
2
Press the required key(s) to access the available
commands.
Press # 1 to Play Mailbox 1
Press # 2 to Play Mailbox 2
Press # 3 to Play Mailbox 3
Press # 5 to Stop
Press # 4 to Repeat a message
Press # 4 # 4 to Repeat previous message
Press # 6 to Skip a message
Press # 7 to Review Announcement / OGM
Press * 7 to Record Announcement / OGM
Press * 8 to Record a voice memo
Press # 9 to Delete a message
Press # 0 to turn Machine on or off
Press * 5 for Help List of commands
Using the Answering
Machine
23
Page 39

Motorola Limited Warranty
Motorola Limited Warranty
for Consumer Products, Accessories, and Software
Purchased in the United States or Canada
What Does this Warranty Cover?
Subject to the exclusions contained below, Motorola, Inc.
warrants its cordless telephones ("Products"), Motorolabranded or certified accessories sold for use with these
Products ("Accessories"), and Motorola software contained
on CD-ROMs or other tangible media and sold for use with
these Products ("Software") to be free from defects in
materials and workmanship under normal consumer usage
for the period(s) outlined below. This limited warranty is a
consumer's exclusive remedy, and applies as follows to
new Motorola Products, Accessories and Software
purchased by consumers in the United States or Canada,
which are accompanied by this written warranty:
Products and Accessories as defined above, unless
otherwise provided for below. Length of coverage: one (1)
year from the date of purchase by the first consumer
purchaser of the product unless otherwise provided for
below.
• Decorative Accessories and Cases. Decorative
Warranty
covers, bezels, PhoneWrap® covers and cases. Length
of coverage: limited lifetime warranty for the lifetime of
ownership by the first consumer purchaser of the
product.
• Products and Accessories that are Repaired or
Replaced. Length of coverage: The balance of the
original warranty or for ninety (90) days from the date
returned to the consumer, whichever is longer.
• Software. Applies only to physical defects in the media
that embodies the copy of the software (e.g. CD-ROM,
or floppy disk). Length of coverage: ninety (90) days from
the date of purchase.
24
Page 40

Exclusions
Normal Wear and Tear. Periodic maintenance, repair and
replacement of parts due to normal wear and tear are
excluded from coverage.
Batteries. Only batteries whose fully charged capacity falls
below 80% of their rated capacity and batteries that leak
are covered by this limited warranty.
Abuse & Misuse. Defects or damage that result from: (a)
improper operation, storage, misuse or abuse, accident or
neglect, such as physical damage (cracks, scratches, etc.)
to the surface of the product resulting from misuse; (b)
contact with liquid, water, rain, extreme humidity or heavy
perspiration, sand, dirt or the like, extreme heat, or food; (c)
use of the Products or Accessories for commercial
purposes or subjecting the Product or Accessory to
abnormal usage or conditions; or (d) Acts of God or nature,
or other acts which are not the fault of Motorola, are
excluded from coverage.
Use of Non-Motorola Products and Accessories.
Defects or damage that result from the use of NonMotorola branded or certified Products, Accessories,
Software or other peripheral equipment are excluded
from coverage.
Unauthorized Service or Modification. Defects or
damages resulting from service, testing, adjustment,
installation, maintenance, alteration, or modification in any
way by someone other than Motorola, or its authorized
service centers, are excluded from coverage.
Altered Products. Products or Accessories with (a) serial
numbers or date tags that have been removed, altered, or
obliterated; (b) broken seals or that show evidence of
tampering; (c) mismatched board serial numbers; or (d)
nonconforming or non-Motorola housings, or parts, are
excluded from coverage.
Communication Services. Defects, damages, or the
failure of Products, Accessories or Software due to any
communication service or signal you may subscribe to or
use with the Products, Accessories or Software is excluded
from coverage.
Software Embodied in Physical Media. No warranty is
made that the software will meet your requirements or will
work in combination with any hardware or software
Warranty
25
Page 41

applications provided by third parties, that the operation of
the software products will be uninterrupted or error free, or
that all defects in the software products will be corrected.
Software NOT Embodied in Physical Media. Software
that is not embodied in physical media (e.g. software that is
downloaded from the internet), is provided "as is" and
without warranty.
Who is Covered
This warranty extends to the first end-user purchaser, only.
What will Motorola Do?
Motorola, at its option, will at no charge repair, or replace
any Products, Accessories or Software that does not
conform to this warranty. We may use functionally
equivalent reconditioned/refurbished/pre-owned or new
Products, Accessories or parts. No data, software or
applications added to your Product, Accessory or Software,
including but not limited to personal contacts, games and
ringer tones, will be reinstalled. To avoid losing such data,
software and applications please create a back up prior to
requesting service.
How to Get Warranty Service or Other
Information
In the USA, call: In Canada, call:
1-800-353-2729 1-800-461-4575
TTY 1-888-390-6456 TTY 1-888-390-6456
For accessories and software, please call the telephone
number designated above for the product with which they
Warranty
are used. You will receive instructions on how to ship the
Products, Accessories or Software, at your expense, to a
Motorola Authorized Repair Center. To obtain service, you
must include: (a) a copy of your receipt, bill of sale or other
comparable proof of purchase; (b) a written description of
the problem; (c) the name of your service provider, if
applicable; (d) the name and location of the installation
facility (if applicable), (e) your telephone number; and most
importantly, your return mailing address on the outside of
the returned unit.
26
Page 42

What Other Limitations Are There?
ANY IMPLIED WARRANTIES, INCLUDING WITHOUT
LIMITATION THE IMPLIED WARRANTIES OF
MERCHANTABILITY AND FITNESS FOR A PARTICULAR
PURPOSE, SHALL BE LIMITED TO THE DURATION OF
THIS LIMITED WARRANTY, OTHERWISE THE REPAIR,
OR REPLACEMENT AS PROVIDED UNDER THIS
EXPRESS LIMITED WARRANTY IS THE EXCLUSIVE
REMEDY OF THE CONSUMER, AND IS PROVIDED IN
LIEU OF ALL OTHER WARRANTIES, EXPRESS OF
IMPLIED. IN NO EVENT SHALL MOTOROLA BE LIABLE,
WHETHER IN CONTRACT OR TORT (INCLUDING
NEGLIGENCE) FOR DAMAGES IN EXCESS OF THE
PURCHASE PRICE OF THE PRODUCT, ACCESSORY
OR SOFTWARE, OR FOR ANY INDIRECT, INCIDENTAL,
SPECIAL OR CONSEQUENTIAL DAMAGES OF ANY
KIND, OR LOSS OF REVENUE OR PROFITS, LOSS OF
BUSINESS, LOSS OF INFORMATION OR DATA,
SOFTWARE OR APPLICATIONS OR OTHER FINANCIAL
LOSS ARISING OUT OF OR IN CONNECTION WITH
THE ABILITY OR INABILITY TO USE THE PRODUCTS,
ACCESSORIES OR SOFTWARE TO THE FULL EXTENT
THESE DAMAGES MAY BE DISCLAIMED BY LAW.
Some states and jurisdictions do not allow the limitation or
exclusion of incidental or consequential damages, or
limitation on the length of an implied warranty, so the above
limitations or exclusions may not apply to you. This
warranty gives you specific legal rights, and you may also
have other rights that vary from state to state or from one
jurisdiction to another.
Laws in the United States and other countries preserve for
Motorola certain exclusive rights for copyrighted Motorola
software such as the exclusive rights to reproduce and
distribute copies of the Motorola software. Motorola
software may only be copied into, used in, and redistributed
with, the Products associated with such Motorola software.
No other use, including without limitation disassembly of
such Motorola software or exercise of the exclusive rights
reserved for Motorola, is permitted.
Warranty
27
Page 43

Para obtener una copia impresa de la
versión extensa de esta guía, o para
preguntas relacionadas con los
productos, visítenos en línea:
www.motorola.com/cordless
o llámenos al:
1-800-353-2729 EE.UU.
1-800-461-4575 Canadá
1-888-390-6456 TTY (Teléfono de texto)
Motorola se reserva el derecho de revisar esta
publicación y realizar cambios en su contenido
oportunamente, sin obligación por su parte de notificar
dichas revisiones o cambios. Motorola brinda esta guía
sin garantía de ninguna naturaleza, ya sea implícita o
explícita, incluidas a modo de ejemplo las garantías
implícitas de comerciabilidad y aptitud para un fin
determinado. Motorola podrá realizar mejoras o
cambios en el(los) producto(s) descrito(s) en este
manual en cualquier momento.
MOTOROLA, Intelligence Everywhere y el logotipo con
la M estilizada están registrados en la Oficina de
Patentes y Marcas de los EE.UU. (US Patent and
Trademark Office). Todos los demás nombres de
productos o servicios son propiedad de sus respectivos
titulares.
Copyright © 2005 Motorola, Inc.
Todos los derechos reservados. Ninguna parte de esta
publicación puede ser reproducida de modo alguno ni
por ningún medio, ni puede ser utilizada para realizar
trabajos que se deriven de ella (traducción,
transformación o adaptación) sin autorización previa
por escrito de Motorola, Inc.
Page 44
Bienvenido
Felicitaciones por haber comprado el Teléfono
Inalámbrico Serie MD4160 con contestador
automático de Motorola. Tómese unos minutos para
asegurarse de que estén incluidos cada uno de los
elementos que se indican a continuación.
Bienvenido
P
U
Importante:
P
U
Guía del Usuario
Registrar el producto es un paso importante
para que pueda disfrutar de su nuevo producto de
Motorola. El registro de los productos nos ayuda a facilitar
el servicio en garantía y nos permite comunicarnos con
usted en caso de que su producto de Motorola requiera
una actualización u otro servicio. No se requiere el registro
del producto para la cobertura de la garantía. Para
registrar su producto en línea, visite:
https://broadbandregistration.motorola.com
Conserve su recibo de venta original con fecha para sus
registros. Para obtener servicio técnico en garantía de su
producto Motorola, deberá presentar una copia de su
recibo de venta con fecha para confirmar el estado de la
garantía.
i
Page 45

Microteléfono Serie MD4160
Indicador LED de llamada
Bienvenido
Control de volumen
Acceder al Identificador
Desplazarse hacia abajo
Hacer/Responder llamadas/
información de llamada
Llamar al segundo
de Llamadas/
Cambiar entre
llamadas activas
Cambiar entre
Pulsos (giratorio)
y Tonos
Silenciar/Borrar
microteléfono
Antena
Enchufe para auricular
Acceder al Directorio/
Desplazarse hacia arriba
Seleccionar opciones
Finalizar llamada/
Cancelar comando
Rellamar al último
número marcado /
Introducir pausa
Micrófono
Cambiar a modo
manos libres
ii
Page 46

Unidad base
Bienvenido
Acceder a buzones de correo
Contestador automático
encendido/apagado
Localizar microteléfono(s)
Indicador LED
de mircoteléfono en uso
Indicador LED de carga
Controles de volumen
Repetir mensaje(s) anterior(es) /
Ralentizar reproducción
Borrar mensaje
Altavoz
Pantalla del indicador LED
Repasar funciones
Pasar a una opción/configuración
diferente en el menú/modo reloj
Anunciar hora actual/
programar reloj
Grabar mensaje
saliente o memo
Saltar al siguiente mensaje /
Acelerar la reproducción.
iii
Page 47

Cargador independiente
Bienvenido
Indicador LED
Charge LED
de carga
iv
Page 48

Índice
Bienvenido. . . . . . . . . . . . . . . . . . . . . . . . . . . . . . . . . . . . i
Instrucciones de seguridad importantes . . . . . . . . . .vii
Información de la FCC . . . . . . . . . . . . . . . . . . . . . . . . . . x
Comienzo. . . . . . . . . . . . . . . . . . . . . . . . . . . . . . . . . . . . . 1
Instrucciones de seguridad de la batería . . . . . . . . . . . 1
Cargar la batería . . . . . . . . . . . . . . . . . . . . . . . . . . . . . 2
Generalidades sobre la pantalla del microteléfono . . .5
Instalación . . . . . . . . . . . . . . . . . . . . . . . . . . . . . . . . . . . .6
Configuración . . . . . . . . . . . . . . . . . . . . . . . . . . . . . . . . .7
Personalizar su microteléfono . . . . . . . . . . . . . . . . . . . 7
Seleccionar tonos de timbre . . . . . . . . . . . . . . . . . . . 7
Ponerle nombre a su microteléfono . . . . . . . . . . . . . 8
Seleccionar preferencia de idioma . . . . . . . . . . . . . . 8
Configurar marcación por tonos o por pulsos . . . . . . 9
Apagar/encender los tonos del teclado . . . . . . . . . . 9
Usar el microteléfono . . . . . . . . . . . . . . . . . . . . . . . . . . 10
Hacer una llamada . . . . . . . . . . . . . . . . . . . . . . . . . . . 10
Responder/Finalizar una llamada . . . . . . . . . . . . . . . . 11
Localizar un teléfono perdido . . . . . . . . . . . . . . . . . . . 11
Ajustar el volumen del timbre . . . . . . . . . . . . . . . . . . . 11
Ajustar el volumen . . . . . . . . . . . . . . . . . . . . . . . . . 12
Usar la función de silenciamiento . . . . . . . . . . . . . . 12
Realizar llamadas de intercomunicación . . . . . . . . . . 12
Desviar una llamada . . . . . . . . . . . . . . . . . . . . . . . . . . 13
Usar transferencia de llamadas . . . . . . . . . . . . . . . . . 13
Usar llamada en conferencia . . . . . . . . . . . . . . . . . . . 14
Almacenar números en la memoria . . . . . . . . . . . . . . 14
Almacenar una nueva entrada . . . . . . . . . . . . . . . . 14
v
Page 49

Borrar una entrada del directorio telefónico . . . . . . 15
Discar números del directorio telefónico . . . . . . . . 15
Editar una entrada del directorio telefónico . . . . . . 16
Usar las funciones del Identificador de Llamadas . . . 16
Almacenar una entrada del Identificador de
Llamadas en la memoria . . . . . . . . . . . . . . . . . . . . 16
Discar del listado del Identificador de
Llamadas . . . . . . . . . . . . . . . . . . . . . . . . . . . . . . . . 17
Revisar las listas del Identificador de
Llamadas . . . . . . . . . . . . . . . . . . . . . . . . . . . . . . . . 17
Borrar todos los listados del Identificador de
Llamadas . . . . . . . . . . . . . . . . . . . . . . . . . . . . . . . . 17
Usar el contestador automático . . . . . . . . . . . . . . . . . 18
Configurar el contestador automático . . . . . . . . . . . . 19
Configurar la fecha, la hora y el año . . . . . . . . . . . 19
Configurar el Mensaje Saliente (OGM) . . . . . . . . . . . 19
Buzones de correo y anuncios . . . . . . . . . . . . . . . . 19
Opciones de anuncios . . . . . . . . . . . . . . . . . . . . . . 20
Grabar el Mensaje Saliente (OGM) . . . . . . . . . . . . 20
Revisar un OGM . . . . . . . . . . . . . . . . . . . . . . . . . . 20
Borrar un OGM . . . . . . . . . . . . . . . . . . . . . . . . . . . 20
Mensajes comunes de la pantalla del contestador
automático . . . . . . . . . . . . . . . . . . . . . . . . . . . . . . . . . 21
Configurar las funciones del contestador
automático . . . . . . . . . . . . . . . . . . . . . . . . . . . . . . . . . 22
Acceder al contestador automático en forma
remota . . . . . . . . . . . . . . . . . . . . . . . . . . . . . . . . . . . . 23
Garantía limitada de Motorola. . . . . . . . . . . . . . . . . . . 24
vi
Page 50

Instrucciones de seguridad importantes
Siga estas precauciones de seguridad cuando use su
teléfono inalámbrico para reducir el riesgo de incendio,
descarga eléctrica y lesiones a personas o bienes.
Para reducir el riesgo de incendio y descargas:
1. Mantenga todas las rendijas y aberturas del
teléfono sin obstrucciones. No coloque el teléfono
sobre un regulador de calor ni un radiador.
Asegúrese de que haya una adecuada ventilación
en el sitio de instalación.
2. No use el equipo mientras usted esté mojado ni
cuando esté parado sobre agua.
3. No use este producto cerca del agua (por ejemplo,
cerca de la tina de baño, el fregadero de la cocina o
una alberca).
4. No deje que nada se apoye encima del cable de
alimentación. Coloque el cable de alimentación de
modo tal que evite que sea pisado.
5. Nunca inserte objetos de ningún tipo en las rendijas
del producto, dado que pueden ocasionar incendios
o descargas.
6. Desenchufe este producto de la toma de corriente
de la pared antes de realizar una limpieza. No
utilice limpiadores líquidos ni en aerosol. Utilice un
paño húmedo para la limpieza.
7. No desarme este producto. Si se requiere servicio o
reparación, comuníquese con Motorola a la
dirección que figura al final de esta guía.
8. No sobrecargue las tomas de corriente de la pared
ni los cables de extensión.
9. Evite usar este producto durante una tormenta
eléctrica. Use un nivelador de picos de tensión para
proteger el equipo.
Información de
seguridad
vii
Page 51

10. No use este teléfono inalámbrico para informar una
fuga de gas, en especial si está cerca del conducto
de gas.
Precaución: Para reducir el riesgo de incendio, use
únicamente un cable de telecomunicaciones de 26 awg
o más que figure en la Lista UL o cuente con
Certificación CSA.
Desenchufe este teléfono inalámbrico
inmediatamente de la toma de corriente si:
• El cable de alimentación o el enchufe se han dañado
o deshilachado.
• Se ha derramado líquido dentro del producto.
• El producto ha estado expuesto a la lluvia o al agua.
No tome el microteléfono ni la base hasta que haya
desenchufado la alimentación y el teléfono de la
pared. Luego tome la unidad por los cables
seguridad
Información de
desenchufados.
• El producto se ha caído o el gabinete se ha dañado.
• El producto muestra un claro cambio en su
funcionamiento.
Pautas para la instalación
1. Lea y comprenda todas las instrucciones y
guárdelas para usarlas como referencia en el
futuro.
2. Cumpla con todas las advertencias y las
instrucciones marcadas en el producto.
3. No instale este producto cerca de una tina de baño,
un fregadero ni una ducha.
4. Opere este teléfono usando únicamente la fuente
de alimentación indicada en la etiqueta de
identificación. Si no está seguro del tipo de
alimentación con que cuenta su hogar, consulte a
su distribuidor o a la compañía de energía local.
viii
Page 52

5. No coloque este producto sobre un mueble
rodante, soporte o mesa que sean inestables.
Puede caerse y ocasionar daños graves al
producto.
6. Ajuste únicamente los controles que se incluyen en
las instrucciones de operación. Si se ajustan otros
controles de manera incorrecta, se pueden producir
daños y se requerirá más trabajo para restablecer
el producto a su operación normal.
7. Limpie este producto con un paño suave y húmedo.
No use productos químicos ni de limpieza.
8. Use únicamente la fuente de alimentación provista
con esta unidad. El uso de otras fuentes de
alimentación puede dañar la unidad.
9. Dado que los teléfonos inalámbricos funcionan con
electricidad, debe tener por lo menos un teléfono
que no sea inalámbrico en su hogar, en caso de
que se corte la energía.
10.Para evitar interferencias en otros artefactos
cercanos, no coloque la base del teléfono
inalámbrico encima ni cerca de un televisor, horno
microondas, refrigerador o VCR.
Precaución: Para cumplir con las pautas de
exposición a radiofrecuencia de la FCC, coloque la
unidad base a una distancia de por lo menos 20 cm de
las personas que se encuentren cerca.
Información de
seguridad
ix
Page 53

Información de la FCC
Este equipo cumple con las Partes 15 y 68 de las
normas y requisitos de la Comisión Federal de
Comunicaciones (Federal Communications
Commission, FCC) adoptados por el Consejo
Administrativo para la Conexión de Terminales
(Administrative Council for Terminal Attachments,
ACTA).
FCC
El enchufe y el conector utilizados para conectar el
Información de la
equipo a la red de cableado y de teléfonos de las
instalaciones deben cumplir con las normas y los
requisitos aplicables de la Parte 68 de la FCC
adoptados por el ACTA. El producto incluye un cable de
teléfono y un enchufe modular certificados. El producto
está diseñado para conectarlo a un conector modular
compatible certificado. Consulte las instrucciones de
instalación para obtener más detalles.
Notificación de la compañía de teléfonos local
En la parte inferior de este equipo encontrará una
etiqueta que contiene, además de otra información, un
identificador del producto en formato
US:AAAEQ##TXXXX. A pedido de su compañía de
teléfonos, usted debe proporcionarle esta información.
Los dígitos representados por ## en el identificador del
producto indican el Número de Equivalencia de
Llamada (Ringer Equivalency Number, REN) para este
equipo. El REN sirve para determinar la cantidad de
dispositivos que puede conectar a su línea telefónica y
hacer que todos esos dispositivos suenen cuando
llaman a su número de teléfono. En la mayoría de las
x
Page 54

áreas (pero no en todas), la suma de los REN de todos
los dispositivos conectados a una línea no debe ser
superior a 5. Para estar seguro de la cantidad de
dispositivos que puede conectar a su línea, según lo
determine el REN, comuníquese con su compañía de
teléfonos local.
Nota: Este equipo no puede ser usado para el servicio
con monedas provisto por la compañía de teléfonos.
La conexión al servicio Party Line está sujeta a tarifas
estatales. Para obtener más información, comuníquese
con la comisión de servicios públicos del estado, la
comisión de servicios públicos o la comisión
corporativa.
Si su casa cuenta con equipo de alarma cableado de
forma especial y conectado a la línea telefónica,
asegúrese de que la instalación de este teléfono
inalámbrico no inhabilite su equipo de alarma. En caso
de tener alguna duda sobre qué puede inhabilitar su
equipo de alarma, consulte a su compañía de teléfonos
o a un instalador calificado.
Se debe notificar a la compañía de teléfonos en caso de
que su teléfono sea desconectado de su línea en forma
permanente. La FCC requiere que conecte su teléfono
inalámbrico a la red telefónica nacional a través de un
conector de teléfono modular (USOC RJ11C/RJ11W o
RJ14C/RJ14W).
Información de la
FCC
Derechos de la compañía de teléfonos
Si su equipo causa problemas en su línea, que puedan
dañar la red telefónica, la compañía de teléfonos,
siempre que sea posible, le notificará que quizás sea
necesario interrumpir temporalmente el servicio.
xi
Page 55

Si no es posible enviar una notificación anticipada y las
circunstancias justifican dicha acción, la compañía de
teléfonos podrá desconectar el servicio de inmediato en
forma temporal. En caso de que se interrumpa
temporalmente el servicio, la compañía de teléfonos
debe:
• Notificarlo de inmediato de dicha interrupción
temporal
• Darle la oportunidad de corregir la situación
• Informarle su derecho de iniciar una demanda ante
FCC
la Comisión, de conformidad con los
Información de la
procedimientos establecidos en la Subparte E de
la Parte 68 de las Normas y Reglamentaciones de
la FCC.
La compañía de teléfonos puede realizar cambios en
sus instalaciones, equipos, operaciones o
procedimientos que pueden afectar el funcionamiento
del equipo. Si esto sucede, la compañía de teléfonos le
notificará con anticipación a fin de que usted realice las
modificaciones pertinentes para mantener un servicio
ininterrumpido.
Información sobre interferencia
Este dispositivo cumple con la parte 15 de las Normas
de la FCC. La operación está sujeta a las dos
condiciones que se mencionan a continuación:
• Este dispositivo no puede causar interferencias
perjudiciales.
• Este dispositivo debe aceptar cualquier
interferencia recibida, incluso la interferencia que
pudiera ocasionar una operación no deseada.
xii
Page 56

Este equipo ha sido probado y cumple con los límites
establecidos para un dispositivo digital de Clase B,
según la parte 15 de las Normas de la FCC. Estos
límites han sido diseñados para brindar una protección
razonable contra interferencia perjudicial en una
instalación residencial.
Este equipo genera, usa y puede emitir energía de
radiofrecuencia y, si no se instala y utiliza de acuerdo
con las instrucciones, puede ocasionar interferencia
perjudicial para las comunicaciones de radio. Sin
embargo, no se garantiza que no se presente
interferencia en una instalación en particular.
Si este equipo provoca interferencia perjudicial para la
recepción de radio o televisión, la cual se puede
comprobar encendiendo y apagando el equipo, se
aconseja al usuario que intente corregir la interferencia
con una o más de las siguientes medidas:
• Reorientar o reubicar la antena de recepción (es
decir, la antena de la radio o televisión que está
"recibiendo" la interferencia).
• Reorientar o reubicar y aumentar la separación
entre el equipo de telecomunicaciones y la antena
de recepción.
• Conectar el equipo de telecomunicaciones a una
toma de corriente en un circuito distinto del circuito
donde está conectada la antena receptora.
Información de la
FCC
Si estas medidas no eliminan la interferencia, consulte
a su distribuidor o a un técnico experimentado
especializado en radio y televisión para que le sugiera
otras medidas. Asimismo, la Comisión Federal de
Comunicaciones ha creado un cuadernillo útil
xiii
Page 57

denominado "Cómo identificar y resolver problemas de
interferencia de radio/TV" (How to Identify and Resolve
Radio/TV Interference Problems).
La FCC requiere que el servicio técnico de este
producto sea realizado únicamente por Motorola o sus
agentes de servicio autorizados.
PRECAUCIÓN / ADVERTENCIA: Todo cambio o
modificación que no esté expresamente aprobado por
FCC
Motorola podría invalidar no sólo la autorización del
usuario para operar el equipo sino también la garantía
limitada.
Información de la
Compatibilidad con audífonos
Este sistema telefónico cumple con las normas de la
FCC sobre compatibilidad con audífonos.
xiv
Page 58

Comienzo
Antes de que pueda usar su nuevo teléfono Motorola
para hacer o recibir llamadas, debe cargar las baterías.
Instrucciones de seguridad de la batería
• No queme, desmantele, mutile ni perfore la batería.
La batería contiene materiales tóxicos que pueden
liberarse y provocar lesiones.
• Precaución: Existe riesgo de explosión si reemplaza
la batería por un tipo de batería incorrecto. Use
únicamente la batería provista con su teléfono o un
reemplazo autorizado recomendado por el fabricante.
• Mantenga las baterías fuera del alcance de los niños.
• Retire las baterías si almacenará el aparato durante
más de 30 días.
• No deseche las baterías en el fuego, dado que podría
provocar una explosión.
• Las baterías recargables que suministran
alimentación a este producto deben ser
desechadas adecuadamente y es posible que
deban reciclarse. Consulte la etiqueta de su
batería para conocer el tipo de batería. Comuníquese
con su centro de reciclaje local para conocer los
métodos adecuados de desecho.
Comienzo
1
Page 59

Cargar la batería
Su teléfono serie MD4160 viene con una Unidad Base
con Contestador Automático y un Cargador
Independiente. Use el cargador para cargar uno de los
dos microteléfonos. Consulte “Instalación” en la
página 6 para obtener instrucciones paso a paso sobre
cómo instalar la unidad base. Nota: Para la carga
inicial, cargue la batería durante por lo menos 12 horas.
1 Retire cualquier calcomanía que pueda tener.
2 Presione sobre la muesca de la tapa del
compartimiento de la batería y deslícela hacia abajo
para retirarla.
Comienzo
3 Introduzca la batería (el borde inferior primero) en el
compartimiento de la batería.
2
Page 60

4 Vuelva a colocar la tapa del compartimiento de
baterías.
5 Coloque el clip para cinturón (Opcional).
Comienzo
3
Page 61

6 Enchufe el cable de alimentación en la parte inferior
del cargador y en una toma de corriente.
7 Coloque el microteléfono en el cargador.
Comienzo
Indicador LED
Charge LED
de carga
8 Cargue la batería durante por lo menos 12 horas
antes de usar el aparato por primera vez. La luz
encendida del indicador LED indica que el
microteléfono se está cargando.
4
Page 62

Generalidades sobre la pantalla del microteléfono
Use la imagen representativa que aparece a
continuación para familiarizarse con la pantalla del visor
del microteléfono 4160. Consulte “Personalizar su
microteléfono” en la página 7 para obtener
instrucciones paso a paso sobre cómo configurar sus
preferencias.
Pantalla principal del visor
Indicador
de micrófono
silenciado
Indicador
de altavoz
Indicador de nueva
entrada en registro
de llamadas
Información de fecha
y hora del identificador
Notas: Se proporciona la información del
de llamadas
Área que
muestra
nombre y número
Indicador de
batería baja / carga
Indicador de
timbre silenciado
identificador de llamadas únicamente si se suscribe
al servicio de su compañía de teléfonos local.
• Si se suscribe al servicio de Identificador de
Llamadas, pero en todas sus llamadas entrantes se
exhibe INCOMING CALL (LLAMADA ENTRANTE) o No Data (Sin Datos),
comuníquese con su compañía de teléfonos.
Comienzo
5
Page 63

Instalación
1
Seleccione una ubicación conveniente para contar
con una toma de corriente y un conector de
teléfono.
2
Introduzca el cable de teléfono y el cable de
alimentación en la parte inferior de la Unidad Base.
3
Enchufe el cable de teléfono en el conector de
teléfono de la pared.
4
Enchufe el cable de alimentación en la toma de
corriente.
Nota: Instale la Unidad Base lejos de equipos
electrónicos, como computadoras, televisores u
hornos microondas. Evite condiciones excesivas de
calor, frío, polvo o humedad.
No enchufe el cable de teléfono en el conector de la
Instalación
pared hasta que el microteléfono esté totalmente
cargado (12 horas).
6
Page 64

Configuración
Una vez que sus microteléfonos estén totalmente
cargados, puede comenzar a configurar sus
preferencias personales.
Personalizar su microteléfono
Puede personalizar cada microteléfono seleccionando
tonos de timbre distintivos, seleccionando un idioma,
asignando nombres para facilitar la identificación (p. ej.,
Cocina (1)), o puede extender el tiempo entre cargas
apagando el timbre.
Nota: Los microteléfonos de su teléfono Serie MD4160
comparten un directorio telefónico, registro de llamadas
y configuraciones de discado en común.
Seleccionar tonos de timbre
Hay 10 tonos de timbre disponibles. Puede configurar
distintos tonos de timbre para llamadas de
intercomunicación y externas. Si se suscribe al servicio
de Identificador de Llamadas, consulte “Usar las
funciones del Identificador de Llamadas” que comienza
en la página 16 para establecer tonos de timbre
distintivos para números programados.
Configuración
1
Presione sel/menu (seleccionar/menú).
2
Desplácese hasta RING TONE (TONO DE TIMBRE).
3
Presione sel/menu (seleccionar/menú).
4
Desplácese hasta OUTSIDE CALL (LLAMADA
EXTERNA) o INTERCOM CALL (LLAMADA DE
INTERCOMUNICACIÓN). Se reproduce el tono de
timbre actual.
7
Page 65

5
Desplácese por la lista de tonos de timbre para
escuchar las muestras de cada uno.
6
Presione sel/menu (seleccionar/menú) para elegir el tono de
timbre que desea.
7
Desplácese hasta otra función o presione B para
Configuración
salir.
Ponerle nombre a su microteléfono
1
Presione sel/menu (seleccionar/menú).
2
Desplácese hasta NAME HANDSET (PONERLE NOMBRE
AL MICROTELÉFONO).
3
Presione sel/menu (seleccionar/menú).
4
Ingrese el nombre del microteléfono. Use las teclas
MUTE/DELETE (SILENCIAR/BORRAR), CIDy y zPBK
para hacer correcciones.
5
Presione sel/menu (seleccionar/menú) para guardar y salir
de la función.
Seleccionar preferencia de idioma
1
Presione sel/menu (seleccionar/menú).
2
Desplácese hasta LANGUAGE (IDIOMA).
3
Presione sel/menu (seleccionar/menú).
4
Desplácese hasta el idioma deseado.
5
Presione sel/menu (seleccionar/menú) para guardar las
configuraciones.
6
Presione B para acceder a otra función o para
salir.
8
Page 66

Configurar marcación por tonos o por pulsos
Su teléfono está predeterminado para marcación por
tonos. Si el servicio de marcación de su teléfono es
únicamente por pulsos (giratorio), debe cambiar la
configuración.
1
Presione sel/menu (seleccionar/menú).
2
Desplácese hasta TONE/PULSE (TONOS/PULSOS).
3
Presione sel/menu (seleccionar/menú). La configuración
actual parpadea.
4
Desplácese hasta PULSE (PULSOS) o TONE (TONOS).
5
Presione sel/menu (seleccionar/menú) para guardar la
configuración.
6
Presione B para acceder a otra función o para
salir.
Nota: Puede cambiar temporalmente a marcado por
tonos durante una llamada, presionando
TONOS) (tecla asterisco). Todas las teclas que
(*
*TONE
presione después del cambio enviarán señales de
tonos. Su teléfono vuelve automáticamente a
marcación por pulsos una vez desconectada la
llamada.
Apagar/encender los tonos del teclado
1
Presione sel/menu (seleccionar/menú).
2
Desplácese hasta KEY TONE ON/OFF (TONOS DEL
TECLADO ENCENDIDO/APAGADO).
3
Presione sel/menu (seleccionar/menú).
4
Desplácese hasta la configuración deseada.
5
Presione sel/menu (seleccionar/menú) para guardar la
configuración y salir de la función.
Configuración
9
Page 67

Usar el microteléfono
Hacer una llamada
Presione A o v para usar la función "manos libres".
Cuando escuche el tono, ingrese el número.
O BIEN
Ingrese el número de teléfono y luego presione
Puede ver el número de teléfono en la pantalla antes de
Usar el
que se realice la llamada.
microteléfono
O BIEN
Presione
marcado recientemente. La pantalla muestra los
últimos cinco números marcados. Desplácese hasta el
número deseado. Presione
Notas:
espera escucharán un aviso audible cuando haya una
segunda llamada. Presione
llamada en espera.
•
•
•
REDIAL (RELLAMADA) para llamar a un número
A o v.
Los suscriptores al servicio de llamada en
A para responder la
Presione flash en cualquier momento para pasar de
una llamada a la otra.
Presione la opción cancel (cancelar) o mute
(silenciar) para que su teléfono deje de sonar cuando
no desea responder la llamada.
Si usted usa DSL, utilice los dispositivos de filtrado
provistos por su compañía de servicio DSL para evitar
interferencias. Si se produce interferencia,
comuníquese con su proveedor de servicio DSL.
A o v.
10
Page 68

Responder/Finalizar una llamada
Presione A o cualquier tecla excepto B, INTERCOM
(
INTERCOMUNICADOR) o REDIAL (RELLAMADA) para
responder una llamada.
Presione
O BIEN
Coloque el microteléfono en la unidad base o en el
cargador para finalizar la llamada.
B para finalizar una llamada.
Localizar un teléfono perdido
Presione PAGE (BUSCAR) en la unidad base. Los dos
microteléfonos emiten un tono durante 60 segundos.
Presione nuevamente
buscar los microteléfonos.
O BIEN
Presione
MICROTELÉFONO), INTERCOM (INTERCOMUNICADOR) o
(
REDIAL (RELLAMADA).
B o cualquier tecla excepto A HANDSET
PAGE (BUSCAR) para dejar de
Ajustar el volumen del timbre
1
Presione sel/menu (seleccionar/menú).
2
Desplácese hasta RING VOLUME (VOLUMEN DE
TIMBRE).
3
Presione sel/menu (seleccionar/menú).
4
Desplácese hasta el nivel de volumen deseado
(1 - 6, o apagar).
5
Presione sel/menu (seleccionar/menú) para guardar la
configuración.
microteléfono
Usar el
11
Page 69

Ajustar el volumen
Durante una llamada, use los controles para subir y
bajar el volumen de audio (
VOLy VOLz) que están al
costado del microteléfono para ajustar el volumen
durante una llamada. Cuando llega a la
configuración máxima o mínima suena un tono
doble.
Subir el volumen de audio
Bajar el volumen de audio
Usar el
microteléfono
Usar la función de silenciamiento
1
Presione MUTE (SILENCIAR) durante una llamada o
conversación por intercomunicador. En la pantalla
aparece
SILENCIADO).
2
Presione nuevamente MUTE (SILENCIAR) para
MICROPHONE MUTED (MICRÓFONO
regresar a la conversación normal.
Realizar llamadas de intercomunicación
1
Presione INTERCOM (INTERCOMUNICADOR). En la
pantalla aparece
(
LLAMANDO AL OTRO MICROTELÉFONO). El segundo
microteléfono suena y en la pantalla aparece
HANDSET IS CALLING (LLAMADA DEL OTRO
MICROTELÉFONO).
2
Presione INTERCOM (INTERCOMUNICADOR) o v para
responder. Si el otro microteléfono está fuera del
alcance, en la pantalla aparece
AGAIN (NO SE PUEDE LLAMAR, INTENTAR DE NUEVO).
CALLING OTHER HANDSET
UNABLE TO CALL TRY
OTHER
12
Page 70

Nota: Presionar cualquier tecla excepto B le
permitirá atender una llamada entrante y una
llamada de intercomunicación.
3
Presione B, INTERCOM (INTERCOMUNICADOR) o
coloque el microteléfono en la unidad base o en el
cargador para finalizar la llamada de
intercomunicación.
Desviar una llamada
Puede conectar una llamada externa inmediatamente al
segundo microteléfono siguiendo estos pasos:
1
Presione y mantenga presionado INTERCOM
(
INTERCOMUNICADOR). En el microteléfono aparece
CALLING OTHER HANDSET (LLAMANDO AL OTRO
MICROTELÉFONO). El segundo microteléfono suena y
en la pantalla aparece
(
LLAMADA DEL OTRO MICROTELÉFONO).
2
Presione A en el segundo microteléfono para
OTHER HANDSET IS CALLING
completar el desvío de la llamada.
Usar transferencia de llamadas
Puede usar la transferencia de llamadas para consultar
sobre una llamada externa antes de transferirla al
segundo microteléfono. (P. ej., “¿Desea hablar con Bill
Southers?”)
1
Presione y mantenga presionado INTERCOM
INTERCOMUNICADOR). La llamada externa se coloca
(
automáticamente en espera.
2
Consulte sobre la llamada externa.
3
Presione B para completar la transferencia.
Nota: Si no se encuentra el segundo microteléfono o
nadie lo atiende en el plazo de 30 segundos, la
llamada regresa al primer microteléfono, suena
durante 30 segundos y finaliza automáticamente si
no es atendida.
microteléfono
Usar el
13
Page 71

Usar llamada en conferencia
Cuando un microteléfono tiene una llamada externa, y
se presiona
A en el segundo microteléfono, se
establece una Llamada en Conferencia.
Almacenar números en la memoria
Ingrese los números directamente en el directorio
telefónico o agréguelos desde las listas del Identificador
de Llamadas y de rellamadas. Ingrese hasta 50
nombres (16 caracteres) y números (32 dígitos).
Usar el
Almacenar una nueva entrada
microteléfono
1
Presione sel/menu (seleccionar/menú).
2
Desplácese hasta PHONEBOOK (DIRECTORIO
TELEFÓNICO).
3
Presione sel/menu (seleccionar/menú).
4
Desplácese hasta STORE NEW ENTRY (ALMACENAR
NUEVA ENTRADA).
5
Presione sel/menu (seleccionar/menú). En la pantalla
aparece ENTER NUMBER (INGRESAR N∨ MERO).
6
Ingrese el número de teléfono (hasta 32 dígitos), o
presione
número deseado y vuelva a presionar
(RELLAMADA).
7
Presione sel/menu (seleccionar/menú). En la pantalla
aparece
8
Ingrese el nombre (hasta 16 caracteres).
9
Presione B para salir o para acceder a otra
función.
REDIAL (RELLAMADA), desplácese hasta el
REDIAL
ENTER NAME (INGRESAR NOMBRE).
14
Page 72

El cuadro que figura a continuación muestra cuántas
veces debe presionar cada botón del microteléfono
para ingresar las letras y los caracteres especiales. Use
las
CIDy, zPBK y DELETE/MUTE (BORRAR/SILENCIAR)
para hacer correcciones.
Presione sel/menu (seleccionar/menú) para guardar las
entradas.
Cantidad de veces que debe presionar
Botón
1 2 3 4 5 6 7 8 9
1 Space 1
2ABC2abc
3DEF3def
4GHI4ghi
5 J KL5jkl
6MNO6mno
rs7PQRS7pq
8TUV8tuv
9WYXZ9wxyz
Repita el proceso para agregar más números. Presione
B para salir del directorio.
Borrar una entrada del directorio telefónico
1
Presione zPBK.
2
Desplácese hasta la entrada deseada.
3
Presione MUTE/DELETE (SILENCIAR/BORRAR). Se
escuchará un tono de confirmación.
microteléfono
Usar el
Discar números del directorio telefónico
1
Presione zPBK.
2
Desplácese hasta la entrada deseada.
3
Presione A o v.
15
Page 73

Editar una entrada del directorio telefónico
1
Presione zPBK.
2
Desplácese hasta la entrada deseada.
3
Presione sel/menu (seleccionar/menú). En la pantalla
aparece
4
Presione MUTE/DELETE (SILENCIAR/BORRAR) para
editar la entrada.
5
Presione sel/menu (seleccionar/menú). Escuchará un tono
de confirmación .
Usar las funciones del Identificador de Llamadas
Usar el
microteléfono
Las posiciones de su Identificador de Llamadas tienen
capacidad para 50 llamadas. La llamada más reciente
se almacena en último lugar en la lista. Cuando las
posiciones están llenas, la llamada más vieja se elimina
para dejar espacio para las nuevas llamadas.
EDIT NUMBER (EDITAR N∨ MERO).
Almacenar una entrada del Identificador de Llamadas en la memoria
1
Presione CIDy.
2
Desplácese hasta la entrada deseada.
3
Presione sel/menu (seleccionar/menú).
4
Presione # si desea cambiar la secuencia de
marcado (formato de 7, 10, u 11 dígitos) para la
entrada.
5
Presione sel/menu (seleccionar/menú).
6
Seleccione Y (SÍ) o N (NO) para un tono distintivo. Se
exhibe una “D” junto a la entrada.
7
Presione sel/menu (seleccionar/menú) para guardar la
entrada.
16
Page 74

Discar del listado del Identificador de Llamadas
1
Presione CIDy.
2
Desplácese hasta la entrada deseada.
3
Presione sel/menu (seleccionar/menú).
4
Presione # si desea cambiar la secuencia de
marcado (formato de 7, 10, u 11 dígitos) para la
entrada.
5
Presione sel/menu (seleccionar/menú), y comienza a
parpadear
6
Presione sel/menu (seleccionar/menú).
DIAL (MARCAR).
Revisar las listas del Identificador de Llamadas
1
Presione CIDy.
2
Desplácese por la lista de llamadas entrantes.
3
Presione B para salir de la lista.
Borrar todos los listados del Identificador de Llamadas
1
Presione y mantenga presionado DELETE (BORRAR)
con el microteléfono apagado. En la pantalla
aparece
2
Desplácese hasta YES (SÍ).
3
Presione sel/menu (seleccionar/menú). Escuchará un tono
ERASE ALL NO YES (BORRAR TODOS NO SÍ).
de confirmación .
microteléfono
Usar el
17
Page 75

Usar el contestador automático
Su nuevo contestador automático tiene indicaciones de
audio que lo guían para configurar y acceder a las
distintas funciones.
El contestador automático almacena hasta 15 minutos
de mensajes y/o memos.
18
automático
Usar el contestador
Ajustar volumen de reproducción
Tonos audibles en la configuración
Presionar para repetir mensaje; presionar dos
Repetir/Ralentizar mensajes
veces para reproducir un mensaje anterior;
presionar y mantener presionado
para ralentizar la reproducción.
Presionar para reproducir los mensajes en un buzón de correo.
Presionar nuevamente para detener la reproducción.
Reproducir mensajes
E
Saltar/Acelerar mensajes
más alta/más baja.
Saltar al siguiente mensaje/mantener
presionado para acelerar la reproducción.
Borrar mensajes
DELETE (BORRAR)Presione durante
la reproducción.
Los mensajes no se pueden borrar
hasta que sean revisados; los mensajes
borrados no se pueden recuperar.
Ventana
de mensajes
Page 76

Configurar el contestador automático
Si se suscribe al servicio de Identificador de Llamadas a
través de su compañía de teléfonos, la fecha y la hora
se configuran automáticamente con la primera llamada
entrante. (El servicio de Identificador de Llamadas no
configura el año. Usted debe configurarlo
manualmente). Si no se suscribe al servicio, configure
el reloj manualmente.
Configurar la fecha, la hora y el año
1
Presione TIME/SET (HORA/CONFIG.). El sistema
anuncia la configuración actual.
2
Presione TIME/SET (HORA/CONFIG.).
3
Presione CHANGE (CAMBIAR) hasta que escuche la
configuración correcta.
4
Presione TIME/SET (HORA/CONFIG.) para guardar el
cambio.
5
Repita los pasos para establecer el día, la hora, los
minutos y el año actuales.
Nota: Para avanzar los minutos o los años en
incrementos de 10, presione y mantenga presionado
CHANGE (CAMBIAR). Puede seleccionar hasta el año
2040.
Configurar el Mensaje Saliente (OGM)
Buzones de correo y anuncios
Su nuevo sistema de contestador tiene tres buzones de
correo de voz que usted puede asignar a distintas
personas. Las personas que llamen desde teléfonos de
marcación por tonos pueden seleccionar los buzones
presionando 1, 2 o 3. Si la persona que llama no
especifica un buzón de correo, el mensaje se graba
automáticamente en el buzón de correo 1.
Usar el contestador
automático
19
Page 77

Opciones de anuncios
Usted puede grabar su propio Mensaje Saliente
(Outgoing Message, OGM) o usar el OGM pregrabado.
Una segunda opción de OGM le permite dar un anuncio
sin aceptar los mensajes. (P. ej., “Gracias por llamar,
por favor vuelva a intentarlo más tarde”). También
puede grabar un anuncio personal o usar uno
pregrabado.
Grabar el Mensaje Saliente (OGM)
1
Presione MENU (MENú) hasta que escuche la
indicación audible “
(
CAMBIAR ANUNCIO).
2
Presione MEMO/REC (MEMO/GRABAR). El sistema
indica “
seguido de un tono.
3
Ubíquese de frente a la Unidad Base y grabe su
mensaje. Tiene hasta 90 segundos.
4
Presione cualquier botón de buzón de correo para
detener la grabación. Su mensaje se reproduce
automático
automáticamente.
Usar el contestador
Si usted asigna distintos buzones, recuerde incluir
dicha información en su OGM. (p. ej., “Lo siento, no
podemos atenderlo. Para dejar un mensaje para Chip,
presione 1, para Ashley, presione 2, para Frank,
presione 3”).
Revisar un OGM
1
Presione MENU (MENú) hasta que escuche
”
2
Presione cualquier botón de buzón de correo. Se
reproduce el OGM actual.
Borrar un OGM
Presione DELETE (BORRAR) durante la reproducción.
El sistema usa el anuncio pregrabado hasta que usted
grabe uno nuevo.
NOW RECORDING” (GRABANDO AHORA)
CHANGE ANNOUNCEMENT” (CAMBIAR ANUNCIO).
CHANGE ANNOUNCEMENT”
E
20
Page 78

Mensajes comunes de la pantalla del contestador automático
0 No hay mensajes en ningún buzón
1 – 99 Cantidad total de mensajes en todos
0 – 99 Ù F La memoria está llena o la cantidad
Conteo de
1 a 99
99
parpadeando
1 – 8,
constante por
un segundo
40 – 99 Código de acceso remoto actual
A Modo de anuncio únicamente.
ON u OFF Aparece cuando el sistema está
CL Ù Pantalla
normal
— El sistema está respondiendo una
—,
parpadeando
Notas:
Su sistema almacena hasta 99 mensajes
(aproximadamente 15 minutos de mensajes, memos y
anuncios grabados) hasta que usted los borre.
•
Los mensajes entrantes no pueden superar los cuatro
minutos.
•
Los buzones de correo que tienen mensajes nuevos
parpadean y destellan. No parpadean cuando se
reproducen los mensajes.
•
Los buzones de correo con mensajes nuevos y viejos
reproducirán primero los mensajes nuevos. Presione
nuevamente el número de buzón de correo para
escuchar todos los mensajes.
•
Antes de reproducir un mensaje, el sistema siempre
anuncia el día y la hora en que fue recibido. El indicador
LED exhibe el número que le corresponde al mensaje
en la cola.
de correo.
los buzones de correo, o número del
mensaje actual durante la
reproducción de mensajes.
total de mensajes es 99.
Duración de la grabación del memo.
La duración de la grabación supera
los 99 segundos.
Indica el nivel de volumen
seleccionado cuando se presiona
VOL – o VOL +.
durante la configuración.
encendido o apagado.
Se debe configurar el reloj.
llamada o está en funcionamiento
remoto.
El sistema está en modo de
programación o se está inicializando.
Usar el contestador
automático
21
Page 79

Configurar las funciones del contestador automático
1
Encienda el sistema.
2
Presione MENU (MENú) hasta que se anuncie la
función deseada.
3
Presione CHANGE (CAMBIAR) hasta que se anuncie
la configuración deseada.
4
Presione TIME/SET (HORA/CONFIG.) para guardar la
selección.
5
Presione MENU (MENú) para pasar a la función
siguiente o un botón de buzón de correo para salir.
Usar el contestador
automático
INDICACIONES DE LA
FUNCIÓN DE AUDIO
Set Security Code
(Configurar código de
seguridad)
Set Audible Message
Alert (Configurar alerta
de mensajes audible)
Set Announce Only
(Configurar anuncio
únicamente)
Set Base Ringer
(Configurar timbre de
la base)
DESCRIPCIONES
Permite el acceso remoto al
sistema. Seleccione cualquier
código de dos dígitos del 40 al
99. El código definido por
defecto es 50.
E
La Unidad Base emite un tono
cada 10 segundos para anunciar
mensajes nuevos. La
configuración definida por
defecto está desactivada.
Reproduce el anuncio, pero no
toma mensajes. La
configuración definida por
defecto está desactivada.
Enciende o apaga el timbre de la
Unidad Base. La configuración
definida por defecto está
desactivada.
DE LA FUNCIÓN
22
Page 80

Set Number of Rings
(2, 4, 6, Toll Saver)
(Configurar cantidad
de timbres - 2, 4, 6,
Ahorro de Costos)
Seleccione la cantidad de
timbres permitida antes de que
el sistema responda la llamada.
En el modo Ahorro de Costos, el
sistema responde después de 2
timbres cuando hay un mensaje
nuevo, y después de 4 cuando
no hay mensajes. La
configuración definida por
defecto es 4 timbres.
Acceder al contestador automático en forma remota
Usted puede escuchar sus mensajes desde cualquier
lugar usando un teléfono de tonos.
1
Ingrese su código de seguridad de 2 dígitos durante
el OGM. La máquina anuncia la cantidad de
mensajes.
2
Presione la(s) tecla(s) requerida(s) para acceder a
los comandos disponibles.
Presione # 1 para reproducir el buzón de correo 1
Presione # 2 para reproducir el buzón de correo 2
Presione # 3 para reproducir el buzón de correo 3
Presione # 5 para detener
Presione # 4 para repetir un mensaje
Presione # 4 # 4 para repetir un mensaje anterior
Presione # 6 para saltar un mensaje
Presione # 7 para revisar un anuncio / OGM
Presione * 7 para grabar un anuncio / OGM
Presione * 8 para grabar un memo de voz
Presione # 9 para borrar un mensaje
Presione # 0 para encender o apagar la máquina
Presione * 5 para la lista de ayuda de comandos
Usar el contestador
automático
23
Page 81

Garantía limitada de Motorola
Garantía limitada de Motorola
para Productos, Accesorios y Software para el consumidor
comprados en los Estados Unidos o Canadá.
¿Qué aspectos cubre esta garantía?
Sujeto a las exclusiones mencionadas a continuación,
Motorola, Inc. garantiza que sus teléfonos inalámbricos
("Productos"), los accesorios marca Motorola o certificados
por Motorola vendidos para ser usados con estos
Productos ("Accesorios"), y el software de Motorola
contenido en CD-ROM u otro medio tangible y vendido
para ser usado con estos Productos ("Software") no
contienen fallas en los materiales ni en la fabricación en
condiciones normales de uso por parte del consumidor
durante el/los período/s indicado/s a continuación. Esta
garantía limitada constituye un recurso exclusivo para el
consumidor y se aplica de la siguiente manera a los
nuevos Productos, Accesorios y Software de Motorola
comprados por consumidores en los Estados Unidos o
Canadá, y acompañados por esta garantía escrita:
Productos y Accesorios según lo definido anteriormente,
a menos que se especifique lo contrario a continuación.
Duración de la cobertura: un (1) año a partir de la fecha de
compra del primer consumidor comprador del producto, a
Garantía
menos que se especifique lo contrario a continuación.
• Fundas y accesorios decorativos. Cubiertas, biseles,
cubiertas PhoneWrap
de la cobertura: garantía de por vida limitada durante la
vigencia de la propiedad del primer consumidor
comprador del producto.
• Productos y Accesorios que sean reparados o
reemplazados. Duración de la cobertura: El resto de la
garantía original o noventa (90) días a partir de la fecha
de devolución al consumidor, el plazo que sea mayor.
• Software. Se aplica únicamente a los defectos físicos
del medio que contiene la copia del software (p. ej., CD-
®
y fundas decorativas. Duración
24
Page 82

ROM o disco flexible). Duración de la cobertura: noventa
(90) días a partir de la fecha de compra.
Exclusiones
Desgaste y deterioro normales. Se excluyen de la
cobertura el mantenimiento periódico, las reparaciones y
los reemplazos de piezas debido al desgaste y al deterioro
normales.
Baterías. Esta garantía limitada cubre únicamente las
baterías cuya capacidad de carga completa sea menor al
80% de su capacidad nominal y las baterías que tengan
fugas.
Abuso y uso incorrecto. Se excluyen de la cobertura los
defectos o daños producidos como consecuencia de: (a)
operación o almacenamiento inadecuados, uso incorrecto
o abuso, accidente o negligencia, tales como daños físicos
(rajaduras, rayones, etc.) a la superficie del producto
producidos como consecuencia del uso incorrecto; (b)
contacto con líquido, agua, lluvia, humedad extrema o
sudor excesivo, arena, suciedad o sustancias similares,
calor extremo o alimentos; (c) uso de los Productos o
Accesorios con fines comerciales, o sometimiento del
Producto o Accesorio a uso o condiciones anormales; o (d)
actos fortuitos o de la naturaleza, u otros actos que no
sean culpa de Motorola.
Uso de Productos y Accesorios que no sean de
Motorola. Se excluyen de la cobertura los defectos o
daños producidos como consecuencia del uso de
Productos, Accesorios, Software u otros equipos
periféricos que no sean de marca Motorola ni estén
certificados por Motorola.
Servicio técnico o modificación no autorizados. Se
excluyen de la cobertura los defectos o daños producidos
como consecuencia de servicio técnico, prueba, ajuste,
instalación, mantenimiento, alteración o modificación de
cualquier tipo realizados por personas distintas de
Motorola o sus centros de servicio técnico autorizados.
Productos alterados. Se excluyen de la cobertura los
Productos o Accesorios con (a) números de serie o
etiquetas con fecha que hayan sido quitados, alterados u
obliterados; (b) sellos rotos o con evidencia de que hayan
Garantía
25
Page 83

sido alterados; (c) números de serie de placas que no
coincidan; o (d) carcasas o piezas que no cumplan con las
especificaciones o que no sean de Motorola.
Servicios de comunicación. Se excluyen de la cobertura
los defectos, daños o fallas de los Productos, Accesorios o
Software debido a cualquier servicio de comunicación o
señal a los cuales usted se suscriba o con los cuales use
los Productos, Accesorios o Software.
Software contenido en medios físicos. No se otorga
ninguna garantía de que el software cumplirá con sus
requisitos ni que funcionará en combinación con cualquier
aplicación de hardware o software provista por terceros,
que los productos de software funcionarán de forma
ininterrumpida y sin errores, ni que se corregirán todos los
defectos de los productos de software.
Software NO contenido en medios físicos. El Software
que no está contenido en medios físicos (p. ej., software
descargado de internet), es proporcionado "en el estado
en que se encuentra" y carece de garantía.
Quién está cubierto
Esta garantía se extiende únicamente al primer comprador
usuario final.
¿Qué hará Motorola?
Motorola, a su entera discreción, reparará o reemplazará
sin cargo alguno cualquier Producto, Accesorio o Software
que no cumpla con esta garantía. Para tal fin, podremos
usar Productos, Accesorios o piezas reacondicionados/
reformados/de segunda mano o nuevos, que sean
funcionalmente equivalentes. No se reinstalarán datos,
Garantía
software ni aplicaciones que hubieran sido agregados a su
Producto, Accesorio o Software, incluidos, a modo de
ejemplo, contactos personales, juegos y tonos de timbre.
Para evitar la pérdida de dichos datos, software y
aplicaciones, usted deberá crear una copia de seguridad
antes de solicitar el servicio técnico.
26
Page 84

Cómo obtener servicio técnico en garantía u otra
información
En los EE.UU., llame al: En Canadá, llame al:
1-800-353-2729 1-800-461-4575
TTY 1-888-390-6456 TTY 1-888-390-6456
Para accesorios y software, llame al número de teléfono
indicado anteriormente para el producto con el cual se
usan. Recibirá instrucciones sobre cómo enviar Productos,
Accesorios o Software, a su cargo, a un Centro de
Reparación Autorizado de Motorola. Para obtener servicio
técnico, debe incluir: (a) una copia de su recibo, factura de
venta u otro comprobante de compra similar; (b) una
descripción del problema por escrito; (c) el nombre de su
proveedor de servicio, si corresponde; (d) el nombre y la
ubicación del centro de instalación (si corresponde), (e) su
número de teléfono; y lo más importante, su dirección
postal en el exterior de la unidad devuelta.
¿Qué otras limitaciones existen?
CUALQUIER GARANTÍA IMPLÍCITA, INCLUIDAS A
MODO DE EJEMPLO, LAS GARANTÍAS IMPLÍCITAS DE
COMERCIABILIDAD Y APTITUD PARA UN FIN
DETERMINADO, SE LIMITARÁN A LA DURACIÓN DE
ESTA GARANTÍA LIMITADA; DE LO CONTRARIO, LA
REPARACIÓN O EL REEMPLAZO SEGÚN LO
DISPUESTO EN ESTA GARANTÍA LIMITADA EXPRESA
ES EL RECURSO EXCLUSIVO DEL CONSUMIDOR, Y
SE PROPORCIONA EN REEMPLAZO DE TODAS LAS
DEMÁS GARANTÍAS, EXPRESAS O IMPLÍCITAS. EN
NINGÚN CASO MOTOROLA SERÁ RESPONSABLE,
TANTO EN OBLIGACIONES CONTRACTUALES COMO
EN ILÍCITOS CIVILES (INCLUIDA LA NEGLIGENCIA)
POR DAÑOS QUE SUPEREN EL PRECIO DE COMPRA
DEL PRODUCTO, ACCESORIO O SOFTWARE, NI POR
NINGÚN DAÑO INDIRECTO, INCIDENTAL, ESPECIAL O
CONSECUENTE, DE NINGÚN TIPO, NI POR PÉRDIDA
DE INGRESOS O GANANCIAS, PÉRDIDA DE
NEGOCIOS, PÉRDIDA DE INFORMACIÓN O DATOS,
SOFTWARE O APLICACIONES U OTRAS PÉRDIDAS
FINANCIERAS QUE SURJAN O SE RELACIONEN CON
Garantía
27
Page 85

LA CAPACIDAD O INCAPACIDAD DE USAR LOS
PRODUCTOS, ACCESORIOS O SOFTWARE, EN LA
MEDIDA EN QUE, POR LEY, SE PUEDA NEGAR LA
RESPONSABILIDAD POR DICHOS DAÑOS.
Algunos estados y jurisdicciones no permiten la limitación
o exclusión de daños incidentales o consecuentes, o la
limitación de la duración de una garantía implícita, por lo
que es posible que las limitaciones y exclusiones antes
indicadas no se apliquen en su caso. Esta garantía le
otorga derechos legales específicos, y también es posible
que tenga otros derechos que varían según el estado o la
jurisdicción.
Las leyes de los Estados Unidos y otros países resguardan
determinados derechos exclusivos para Motorola sobre el
software con derechos de autor de Motorola, tales como
los derechos exclusivos de reproducir y distribuir copias
del software de Motorola. El software de Motorola
únicamente podrá ser copiado, usado y redistribuido con
los Productos asociados con dicho software de Motorola.
No se permite ningún otro uso, incluidos a modo de
ejemplo, desarmar dicho software de Motorola o ejercer los
derechos exclusivos reservados para Motorola.
Garantía
28
Page 86

Visit our website at:
Visite nuestro sitio Web en:
www.motorola.com/cordless
519930-002
05/05
MGBI
 Loading...