

Page 1

MOTOROLA
USEN
DECT 6.0 Cordless Phones
L301/L302/L303/
L304 / L305
DECT 6.0 Cordless Phones
with Answering System
Quick Start Guide
^ Getting started
2 Using the phone
3 Heip
4 Generai Information
This quick start guide provides aii the information you need to get you started. If
you need more detaiied instructions, a fuii user's guide is avaiiabie to downioad
in PDF format from
www.motoroia.com.
Piease consider the environment before printing.
Page 2
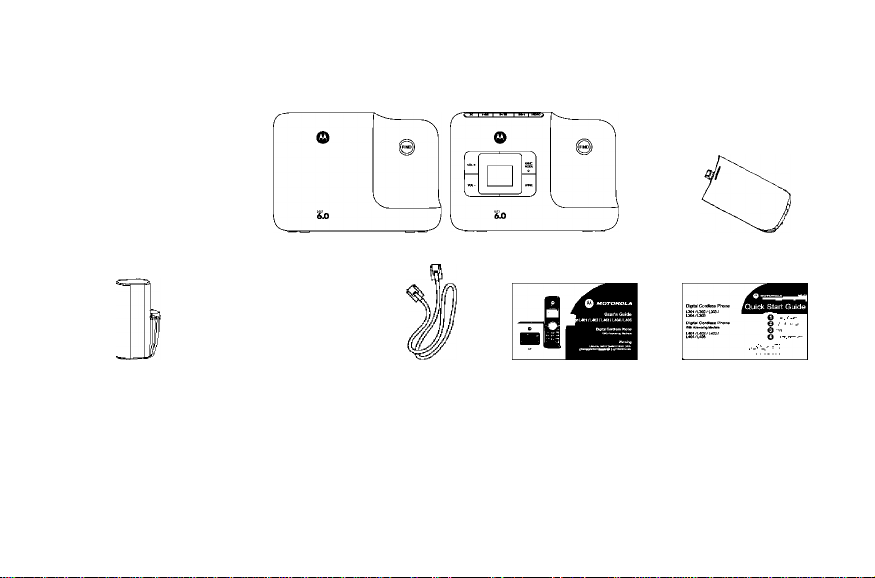
Box Contents
r®
L30x series / L40x series
handset
NiMH rechargeable
battery pack
Power adapter Telephone line
L30x series / L40x series base
cord
User’s guide
Battery door
Quick start guide
In multihandset packs, you will find one or more additional handsets, chargers with power adapter units,
additional rechargeable battery packs and battery doors.
IMPORTANT
Only use the telephone line cord supplied.
This equipment Is not designed for making emergency telephone calls when the power falls. Alternative arrangements should be made for access to
emergency services.
Page 3
Getting started
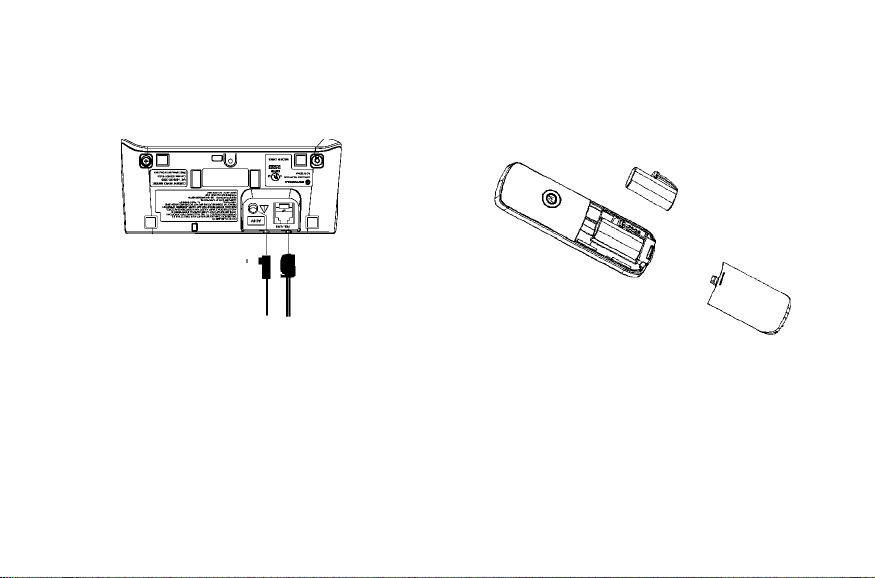
step 1. Connect the base
* Plug the power adapter with smaller pin plug & telephone line cord
into the base. Power adapter with bigger pin plug is for charger (for
multi-pack only).
* Plug the other end of the power adapter & telephone line cord into
the wall jack.
TIPS
Do not place your phone in the bathroom or other humid areas. Please
refer to the user’s guide for more cautions when you choose the location
of your phone.
IMPORTANT
Only use the power adapter and telephone line cord supplied with the
product.
step 2. Install and charge the handset
battery pack
* Slide out the battery compartment cover. Place the supplied
rechargeable battery pack in the battery compartment, with the
battery connector plugged in, as shown.
* Slide the battery compartment cover back.
* Put the handset on the base to charge for at least 24 hours. When
the handset is fully charged the will indicate that it is fully charged.
IMPORTANT
Use only the rechargeable battery pack provided.
Page 4

step 3. Setthe display language
* Press ^3 and to select SETUP HS.
* Press ^3 and toselect LANGUAGE.
* Press ^3 and to select the language.
* Press ^3 to save.
Step 4. Setdate and time
* Press ^3 to select DATE & TIME.
* Press ^3 and edittheyearand date.
You can press^^ to move between the Inputflelds YEAR and DATE.
* Press ^3 and edit the time In 12hrformat. Press ^p to toggle AM/PM
settings.
* Press ^3 to save the settings.
NOTE
If you have subscribed to your network’s Caller ID service, the date and
time Is set automatically for all handsets every time a call Is received.
Step 5. Yourphone Is now ready foruse.
Handset LCD Display
Display icons
On when the line is in use.
Flashes when there is an incoming call.
On when speakerphone is turned on.
dc
On when answering machine is turned on.
Flashes when new answering machine message is received.
(This icon is displayed for L40x series only.)
Indicates when new call is received.
Off when new call has been viewed.
On when ringer volume is turned off.
I
o r> On when there is new voice mail not yet listened to.
NEW Off when new voice mail has been listened to.
On when a call is muted.
Full battery power level.
2/3 battery power level.
1/3 battery power level.
Flashes when low battery level is detected, needs charging.
□ QSI
Animation in cycle. Battery is charging.
Page 5

Using the phone
Make a call ^
Enterthe phone number and press or ® to dial the phone number.
Answer a call ^
When the phone rings and V flashes in the display, press or press
a
to answer the call.
End a call ^
During a call, press or put the handset on the base cradle.
Adjust volume
During a call, press
Dial from the redial ¡1st
* Press and then to the entry you want to redial.
* Press or a
to dial the number.
Dlai from the caHs ¡1st
* Press and then to the entry you want to dial.
* Press or a to dial the number.
Add entryto phonebook
* Press and press ^3 to select ADD.
* Press ^3 and enterthe name.
* Press ^3 and enterthe number.
* Press ^3 and to select a melody.
* Press ^3 to save settings.
Dial from the phonebook
* Press then scroll to select the entry you want to dial.
* Press or a to dial the number.
Set the ringer tone
* Press ^3 and to select SETUP HS.
* Press ^3 to select RINGERTONE.
* Press ^3 and to select a ringer melody.
* Press ^3 to save.
Set the ringer volume
* Press ^3 and to select SETUP HS.
* Press ^ to select RINGERVOLUME.
* Press ^3 and to increase or decrease the volume level.
* Press ^3 to save.
Change the handsetname
* Press ^3 and to select SETUP HS.
* Press ^3 and to select HANDSET NAME.
* Press ^3 and enter your desired handset name.
* Press ^3 to save.
Page 6

Set the LCD contrast
* Press ^3 and to select SETUP HS.
* Press ^3 and to select LCD CONTRAST.
* Press ^3 and to adjustthe contrast level.
* Press ^3 to save.
Set auto talk on/off
* Press ^3 and to select SETUP HS.
* Press ^3 and to select AUTO TALK.
* Press ^3 and to turn on or off auto talk.
* Press ^3 to save.
Reset aH settings
* Press ^ and ® to select RESET SETTINGS.
* Press ^ and ® to select ALL SETTINGS.
* Press ^3 to select YES. Then all the personalized settings will be
reset to default.
NOTE
Phonebook entries, calls list and redial list will remain unchanged.
Paging/Find handset
* Press © on the base. All handsets registered to the base will ring.
* To stop the paging, press © again, or press on the
handset, or place the handset on the cradle.
For L40x series only
Switch the answering machine on / off
Press @ atthe base to step between answering machine modes. When
the base Is switched on the display shows 00 (or other number) when In
Announce and Record mode. An when In Announce Only mode, and -
when In Answer Off mode.
Listen to messages
Press the keys below on the base to perform the respective functions:
I : Press to stop playing messages or resume playback.
I Press once to replay current message from the beginning. Press
twice to playback the previous message.
I : Press to play the next message.
c X 1: Press to delete the current message.
0: Increase the loudspeaker volume by one level (0 to 8).
0: Decrease the loudspeaker volume by one level (0 to 8).
NOTE
Ringer will be off when the volume Is decreased to level 0.
Page 7

For more solutions, see the full Help section in the user’s guide.
The [S| icon is not scrolling when the handset is
placed on the base
♦ Bad battery contact - move the handset slightly
♦ Dirty contact - clean the battery contact with a cloth moistened with alcohol
♦ Battery is full - no need to charge
No dial tone
♦ No base power - check the connections. Reset the phone: unplug and plug
back in the electrical outlet.
♦ Handset batteries are empty - charge the battery pack for at least 24 hours.
♦ Handset may be too far from the base - move closer to the base.
♦ Wrong telephone line cord - use the telephone line cord provided.
Poor audio quality
♦ The base is too close to electrical appliances, reinforced concrete walls or
metal doorframes - move the base away from any electrical appliances.
No ring tone
♦ The ring tone is deactivated.
♦ Increase the volume.
Caller ID does not work
♦ Check your subscription with your network operator.
A Phonebook entry cannot be stored
♦ The Phonebook is full. Delete an entry to free memory.
No display
♦ Try recharging or replacing the battery pack.
♦ Reset the base. Unplug the unit's electrical power, then plug it back in.
♦ If LED is not lit up, then try to unplug the unit's electrical power, then plug it
back in.
When the handset lost its link with the base during
a call
♦ Check the power cord is connected properly into the base.
♦ Check the power adapter is connected properly into an electrical outlet.
♦ Move the handset closer to the base. It may be out of range.
♦ Reset the base by unplugging the unit's electrical power. Wait for around 15
seconds and plug it back in again. Allow up to one minute for the handset
and the base to synchronize.
Noise interference on yourradio or television
♦ Your base or charger may be too close. Move it as far away as possible.
Need more help?
For a full explanation of all features and instructions, please refer to the
user's guide.
Page 8

General information
Ifyour product is not working properiy...
1. Read this Quick Start Guide or the User's Guide.
2. Visit ourwebsite: www.motoroia.com
3. Contact Customer Service in the US and Canada at 1-888-331-3383.
To order a repiacement battery contact customer service or visit our website.
MOTOROLA
Q
Manufactured, distributed or sold by Binatone Electronics International LTD., official licensee for this product.
MOTOROLA and the Stylized M Logo, and other Motorola trademarks and trade dress are owned by Motorola,
Inc. and are used under license from Motorola, Inc. MOTOROLA and the Stylized M Logo are registered in the
US Patent & Trademark Office. All other product or service names are the property of their respective owners.
© Motorola, Inc. 2009. All rights reserved.
Printed in China
Version 2.0 J
 Loading...