

Page 1
A
USER’S GUIDE
TM
Page 2

Introduction
Introduction...................................1
Controls ........................................2
Getting Started
Turning the Pager On/Off .............3
Backlight.......................................4
Setting the Time and Date............5
Messages
Types of Messages ......................6
Choosing the Scroll Speed...........6
Receiving/Reading Messages......7
Duplicate Messages .....................9
Alerts
Choosing the Alert Mode..............9
Choosing a Pleasing Alert ..........11
Alarms
Setting Alarms ............................12
Message Features
Storing Messages.......................20
Deleting Messages.....................21
CONTENTS
Locking/Unlocking Messages..... 22
Information Services
Reading a Message................... 24
Turning the Alert On/Off............. 26
Deleting a Message ................... 26
Phone Directory
Entering an Entry ....................... 27
Adding a Received Message ..... 30
Deleting an Entry........................ 31
Optional Features
Travel Clock and Travel Alarm... 32
QuickNotes................................. 36
Other Features
Special Pager Displays.............. 38
Use and Care Information
Cleaning Your Pager.................. 39
Functionality and Use................. 39
Care and Maintenance............... 39
Battery
Battery Information..................... 40
Page 3

Introduction
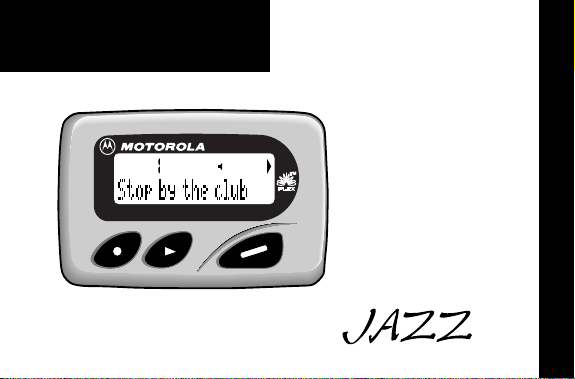
Congratulations on purchasing the Motorola® Jazz pager. The Jazz pager
incorporates the latest in paging technology. FLEX technology extends battery
life up to four times longer than ordinary pagers and improves the ability to
receive pages.
This compact pager combines messaging and time keeping functions in a
package that is convenient to carry. Full understanding of what this product
offers begins with reading this user’s guide. This user’s guide includes a
detachable Quick Reference Card on the back cover.
Effective Use of Your Pager
Your pager can help you keep in contact with everyone important to you. By
giving your pager number to your business associates, f amily, and friends, you
can be contacted when necessary.
If you have a cellular phone, give your pager number instead of your cellular
number. Then you can decide who to call back on your cellular phone without
paying for incoming calls.
Sending a Test Page to Yourself
After you have read this user’s guide and your pager has been activated by
your service provider, send yourself a test page.
INTRODUCTION
1
Page 4
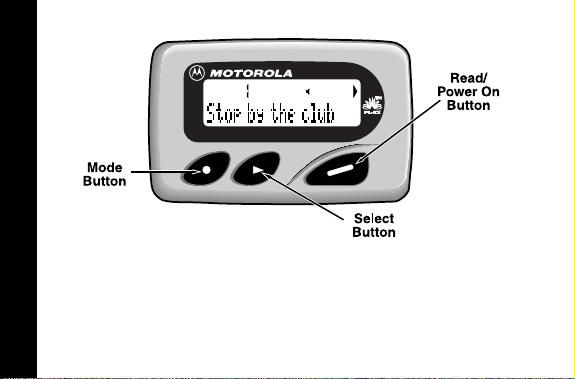
Controls
*
The Mode button can be pressed repeatedly, pressed and held to scroll
INTRODUCTION
through available choices, or to increment a value.
+
The Select button is used to select and confirm a value.
)
The Read/Power On button is used to read a message, to save a setting,
to turn on the pager, or to turn on the backlighting.
2
ON/OFF
Page 5

Turning the Pager On/Off
To T urn On
➊
•From the OFF mode, press ).
12:00 A 1/01
➋
HH
HH
MOTOROLA
➌
HH
HH
12:00 A 1/01
To T urn Off
•From the Standby screen, press and release *until
➊
Press + to enter the CONTROLS menu.
•This Startup screen displays momentarily
and the pager either alerts audibly or
vibrates.
Note:
The Startup alert can be skipped by
pressing ).
•The Standby screen displays the time, date
and the AUDIBLE alert iconH (or VIBRATE
alert icon G).
BACKLIGHT/ TIME DATE
CONTROLS?
displays.
GETTING STARTED
3
Page 6

➋
HH
HH
•Press + to set the pager to OFF mode.
OFF? d
➌
•The OFF screen displays without any alert
icon.
12:00 A 1/01
Backlight
•Press and hold ) for one second or more to activate the LCD screen
backlight. When you have finished reading your messages and the Standby
screen is displayed, the backlight remains on for four seconds before
automatically turning off.
GETTING STARTED
4
ALERTS
Page 7

Setting the Time and Date
•From the Standby screen, press and release *until
➊
Press + to enter the CONTROLS menu. Then press
TIME–DATE mode.
➋
12:00 A 1/01
•Press * to set the hour to the desired value.
•Move to the Minute, A.M./P.M., Date and
Month fields by pressing +, then press *
to set the value for each field.
Note:
To display a 24-hour clock, set the
AM/PM field to _.
•Press ) from any field to set and exit.
CONTROLS?
*+
displays.
to enter
GETTING STARTED
5
Page 8

Types of Messages
~
!
The message indicators define the type of message received and flash until
the message is read.
Message Type Unselected Selected
Personal
Phone Directory
Information services
when received
when selecting
when chirp is on
MESSAGES
Choosing the Scroll Speed
You can choose the speed at which your messages scroll, or read them line by
line.
•From the Standby screen, press and release *until
➊
Press + to enter the CONTROLS menu, then press
SCROLL SPEED menu.
6
§$
º&
j>
CONTROLS?
**+
displays.
to enter the
Page 9

➋
LINE BY LINE =
•Press * to choose the SCROLL SPEED
HH
HH
you desire.
•Press ) to set and exit.
Note:
There are four scroll speeds: LINE-BY-
LINE, SLOW, MEDIUM and FAST.
Receiving/Reading Messages
When a message is received, the pager either alerts audibly (AUDIBLE,
CHIRP, ESCALERT and all PLEASING modes except NO ALERT) or vibrates
(VIBRATE mode). If the NO ALERT mode is selected, no alert happens for
normal messages. The unread message indicator § (normal message)
flashes. The slot number of the latest message displays on top.
➊
44
44
§§§$
•Press ) to display the message status
HH
HH
screen. Press ) to read the latest
message.
Note:
The flashing unread message
indicator
§
selected. To read a different message,
press + to select the message slot
number, then press ).
changes to $ when it is
MESSAGES
7
Page 10

➋
44
44
DINNER AT 7:30PM
➌
44
44
MEET AT THE CLUB
MESSAGES
➍
8
44
44
3:51P 9/29
HHHHQQ
HHHHQQ
HH
HH
•The first screen of the message displays. If
QQ
the message is longer than one screen
display, a message continued indicator Q
appears on the top line until the last screen is
displayed.
•If the pager is set to scroll the message
QQ
automatically (SLOW, MEDIUM or FAST
scroll speeds) the remainder of the message
is displayed at that speed.
•If the scroll speed is set to LINE-BY-LINE,
the remaining screens will automatically
display one line at a time every few seconds.
Note:
To pause the message in any scroll
mode, press ). Press again to continue.
In LINE-BY-LINE mode, continue pressing
)
until the last screen is displayed.
•The last screen displays the time and date
the message was received. After an interval,
the pager returns to the standby screen.
Page 11

Note:
If a message is unread and audible alerts are chosen, the pager
gives a periodic alert until all unread messages are read. This alert will
continue for up to 30 minutes. A message is considered read if any part
of the message is displayed.
Duplicate Messages
➊
➋
44
44
§§§$
44
44
•If a duplicate personal message is received,
¶¶
HHHH¶¶
HHHH¶¶¶¶QQ
the Duplicate icon ¶ displays on top.
•Press ) to view the duplicate message.
•The word DUPLICATE displays before the
QQ
duplicate message is displayed.
DUPLICATE 1
Choosing the Alert Mode
You can choose one of four alert modes: AUDIBLE, VIBRATE, CHIRP, or
ESCALERT.
Note:
In ESCALERT mode, the alert grows increasingly louder. In A UDIBLE
mode you can set a PLEASING alert or NO ALERT.
ALERTS
9
Page 12

•From the Standby screen, press and release *until
➊
Press + to enter the ALERTS menu. Press + again to enter the ALERT
MODE menu.
➋
AUDIBLE? ww
➌
VIBRATE? xx
➍
9:05 P 9/28
ALERTS
HH
HH
ww
GG
GG
xx
GG
GG
•Press * until the desired alert mode
displays (e.g. VIBRATE).
•The pager gives off a sample of each
displayed alert. Press ) to set and exit.
•The Standby screen displays with either
HHHH (the audible alert icon) or
alert icon), depending on which alert mode
was chosen.
ALERTS?
10
displays.
GGGG (the vibrate
Page 13
Choosing a Pleasing Alert
If you select the AUDIBLE alert mode, you can choose the standard alert, NO
ALERT, or one of eight PLEASING alerts.
•From the Standby screen, press and release *until
➊
Press + to enter the ALERTS menu. Press
alert menu.
➋
➌
➍
HH
HH
STANDARD? hh
HH
HH
ARPEGGIO? TT
•Press * until the desired alert mode
hh
TT
HH
HH
displays (e.g. ARPEGGIO).
•The pager gives off a sample of each
displayed alert. Press ) to set and exit.
• The Standby screen displays with the Audible
alert icon H.
ALERTS?
*+
to enter the PLEASING
displays.
9:05 P 9/28
Note:
If you choose NO ALERT or VIBRATE, the pager gives off an audible
alert only if a priority alert is received. To stop an alert, press any button.
ALERTS
11
Page 14

Setting Alarms
There are three types of alarms: REMINDER, GENERAL and EVENT. If the
pager is in OFF mode when an alarm expires, it turns on, alerts according to
the alert mode, and remains on. If the pager is in NO ALERT mode, an alarm
causes an audible alert.
REMINDER Alarm
A single REMINDER alarm can be set to expire within 60 minutes or less.
•From the Standby screen, press and release *until ALARMS? displays.
➊
Press + to enter the ALARMS menu. Press + again to enter the
REMINDER menu.
➋
ALARMS
➌
REMIND OFF
HHHH II
HHHH JJ
II
JJ
•Press * to set the alert time. In this
example, the pager is set to alert 45 minutes
from the time the alarm is set.
Note:
When setting the alert time, the
value starts with OFF, then 1 through 60,
then OFF again.
•Press ) to set and exit.
REMIND 45 MIN
12
Page 15

➍
HHHH JJ
•The Standby screen displays with the Alarm
JJ
icon J.
9:00 P 9/28
➎
HHHH JJ
REMINDER s
➏
9:45 P 9/28
GENERAL Alarms
You can set one GENERAL alarm. This can be set to alert on a daily basis or
one-time only.
•From the Standby screen, press and release *until ALARMS? displays.
➊
Press + to enter the ALARMS menu. Press *+ to enter GENERAL
alarms mode.
•When a REMINDER alarm expires, this
JJ
HHHH JJ
displays and the pager alerts. Press any
button once to stop the alarm, and again to
clear the message.
•If the alarm is not stopped during activation,
JJ
the Alarm icon flashes. Press any button
once to read the message, and press again
to clear.
ALARMS
13
Page 16

➋
9:05 P 9/28
➌
,,
00001111 .... ,,
9:05 P 9/28
➍
10:00 A 9/30
ALARMS
➎
9:05 P 9/28
14
HHHH II
HHHH II
HHHH JJ
HHHH JJ
•Press +, then press * until . , (the enable
II
alarm icon) displays. Press + to move to
the next field.
•Press * until J (the enable alert icon)
II
displays. Press + to move to the next field.
•Press * to set the hour to the desired value,
JJ
then press + to move to the Minute field.
•Press * to set the minutes to the desired
value. Move to the A.M./P.M., Day and Month
fields by pressing +, then press * to set
the value for each field.
•Press ) in any field to set and exit.
Note:
T o alert on a daily basis set the Day
and Month to --/--.
•The Standby screen displays with J (the
JJ
enable alert icon).
TRAVEL CLOCK
Page 17

➏
HHHH JJ
GENERAL t 1
➐
HHHH JJ
10:00 A 9/30
Note:
You can temporarily disable a daily alert (for example, on a weekend).
To disable the alert, follow these steps.
1. From the Standby screen, press and release *until ALARMS? displays.
Press + to enter the ALARMS menu. Press *+ to enter GENERAL
alarms mode.
2. Press + + to move to the alert enable/disable field.
3. Press * until IIII (the disable alert icon) displays.
4. Press ) to set and exit. The
TRAVEL ALARMPHONE DIRECTORY
alert
won’t occur until it is re-enabled.
To re-enable the alert, follow these steps.
1. From the Standby screen, press and release *until ALARMS? displays.
• When a GENERAL alarm expires, this screen
JJ
displays and the pager alerts.
• Press any button once to stop the alarm, and
again to clear the message.
•If the GENERAL alarm is not stopped during
JJ
activation, the ALARM icon flashes.
•Press any button once to read the message,
and press again to clear.
alarm
remains set and enabled, but the
ALARMS
15
Page 18

Press + to enter the ALARMS menu. Press *+ to enter GENERAL
alarms mode.
2. Press + + to move to the alert enable/disable field. Press * until
JJJJ (the enable alert icon) displays.
3. Press ) to set and exit.
To disable (erase) the alarm settings, follow these steps.
1. From the Standby screen, press and release *until ALARMS? displays.
Press + to enter the ALARMS menu. Press *+ to enter GENERAL
alarms mode.
2. Press +, then press * until -- (the disable alarm icon) displays. Press
) to set and exit.
EVENT Alarms
ALARMS
You can set up to three EVENT alarms. Each EVENT alarm allows you to keep
a special reminder message that displays when the alarm is activated and the
pager alerts. These can be set to alert either on a daily basis or one-time only.
•From the Standby screen, press and release *until ALARMS? displays.
➊
Press + to enter the ALARMS menu. Press **+ to enter EVENT
alarm mode.
16
Page 19

➋
//
00001111//////
AAAAAAAAAAAAAA
➌
,,
00003333 .... ,,
AAAAAAAAAAAAAA
➍
,,
00003333 .... ,,
AAAAAAAAAAAAAA
➎
,,
00003333 .... ,,
P I C K U P W E N D Y £
•Press * to choose EVENT alarm 01, 02 or
II
HHHH II
HHHH II
HHHH JJ
HHHH JJ
03.
•Press +, then press * until . , (the enable
alarm icon) displays. Press + to move to
the next field.
•Press * until J (the enable alert icon)
II
displays and press + to move to the
Message field.
•Press * to scroll through the characters
JJ
available, then press + to move to the next.
Note:
You can enter up to 14 characters
(letters, numbers or spaces). If the
message is less than 14 characters long,
advance to the rubout character (®) and
press + to fill the remaining character
fields with blanks.
•At the last character field, press + to move
JJ
to the alarm Time-Date screen.
ALARMS
17
Page 20

➏
,,
00003333 .... ,,
9:00 A 9/29
➐
9:05 P 9/28
ALARMS
➑
P I C K U P W E N D Y
18
HHHH JJ
HHHH JJ
HHHH JJ
•Press * to set the hour to the desired value.
JJ
•Move to the Minute, AM/PM, Day and Month
fields by pressing +, then press * to set
the value for each field.
•Press ) in any field to set and exit.
Note:
Y ou ma y only set one EVENT alarm
at a time. You must press ) to save
each event alarm prior to setting the next
alarm.
Note:
T o alert on a daily basis set the Day
and Month to --/--.
•The Standby screen displays with J (the
JJ
enable alert icon).
• When an EVENT alarm expires, the message
JJ
displays and the pager alerts. Press any
button once to stop the alarm, and again to
clear the message.
Page 21

➒
HHHH JJ
9:00 A 9/29
Note:
You can temporarily disable a daily alert (for example, on a weekend).
To disable the alert, follow these steps.
1. From the Standby screen, press and release *until ALARMS? displays.
Press + to enter the ALARMS menu. Press **+ to enter EVENT
alarms mode.
2. Press * until the EVENT alert you want to disable displays. Press +
+ to move to the alert enable/disable field.
3. Press * until IIII (the disable alert icon) displays.
4. Press ) to set and exit. The
alert
won’t occur until it is re-enabled.
To re-enable the alert, follow these steps.
1. From the Standby screen, press and release *until ALARMS? displays.
PHONE DIRECTORY
•If the EVENT alarm is not stopped during
JJ
activation, the ALARM icon flashes.
•Press any button once to read the message,
and press again to clear.
alarm
remains set and enabled, but the
ALARMS
19
Page 22

Press + to enter the ALARMS menu. Press **+ to enter EVENT
alarms mode.
2. Press * until the EVENT alert you want to re-enable displays. Press +
+ to move to the alert enable/disable field.
3. Press * until JJJJ (the enable alert icon) displays.
4. Press ) to set and exit.
To disable (erase) the alarm settings, follow these steps.
1. From the Standby screen, press and release *until ALARMS? displays.
Press + to enter the ALARMS menu. Press **+ to enter EVENT
alarms mode.
2. Press * until the EVENT alarm you want to disable displays. Press +,
then press * until -- (the disable alarm icon) displays. Press ) to set
and exit.
Storing Messages
Your pager can store up to 16 personal messages. Each stored message is
assigned a number, which displays when the message is stored. The first
message received is 1, the second is 2, and so on.
MESSAGE FEATURES
20
Page 23

Deleting Messages One-at-a-Time
➊
11
11
•While reading a message, press * until
QQ
HHHHQQ
DELETE displays.
PICK ME UP AT 10PM
❷
HH
HH
•Press + to delete.
DELETE? @
Deleting all Messages at Once
The DELETE ALL command deletes all read and unlocked messages and
information services. Locked or unread messages are not deleted.
➊
DELETE ALL? g
•From the Standby screen press * until
HH
HH
DELETE ALL? displays, then press + to
delete all.
Automatic Message Deletion
If all message slots are full and a new message is received, the oldest
unlocked read message is automatically deleted.
MESSAGE FEATURES
21
Page 24

•When the message memory is full, MEMORY FULL displays.
•If all messages are unread, the oldest, unlocked message is deleted and
OVERFLOW displays.
Locking/Unlocking Messages
By locking messages, you can protect messages from being:
•Deleted with the DELETE ALL function.
•Replaced when the pager’s memory is full, as indicated by MEMORY FULL.
Messages can be locked only while reading them.
Locking Messages
➊
➋
11
11
$§§§
11
11
HH
HH
HHHHQQ
•Press ), then press + to select the
message to be locked. Press ) to read the
message.
•Press and release * until LOCK? ^
QQ
displays.
PICK ME UP AT 10PM
MESSAGE FEATURES
22
Page 25

➌
•Press +. The message is now locked.
HH
HH
LOCK? ^
➍
11
11
• When a locked message is selected or read,
LL
HHHHLL
the icon L displays on top.
$§§§
Note:
When you have locked 8 messages, LOCK FULL displays when
you try to lock the next message. To lock the next message, you must first
unlock one message.
Unlocking Messages
➊
➋
11
11
$§§§
11
11
•Press ), then press + to select the
LL
HHHHLL
HHHHLLLLQQ
message to be unlocked. Press ) to read
the message.
•Press * until UNLOCK? _ displays.
QQ
PICK ME UP AT 10PM
MESSAGE FEATURES
23
Page 26

❸
•Press + to unlock the message.
HH
HH
UNLOCK? _
❹
11
11
•The lock icon disappears.
HH
HH
$§§§
Reading Information Service Messages
Information service messages are usually sent by information service
providers. Inf ormation service messages are typically news or financial reports
which provide information that is important for a short time (a few hours). This
pager can store up to five information service messages.
➊
&§§§§
INFORMATION SERVICES
24
11
11
•When an information service message is
HH
HH
received, & flashes and the number of
unread information service messages
displays on the message status screen. If no
key is pressed for 12 seconds, the standby
screen displays. Press
message status screen.
)to return to the
Page 27

➋
22
22
-!
➌
22
22
GROUP 6
➍
22
22
INDEX ROSE 87 PTS
•Press + to move to the message you want
HH
HH
HHHHQQ
HHHHQQ
to read. The flashing unread message
indicator - changes to ! when it is
selected. Press ) to read the message.
•The first screen of the message displays. If
QQ
the message is longer than one screen
display, a message continued indicator Q
appears on the top line until the last screen is
displayed.
•If the pager is set to scroll the message
QQ
automatically (SLOW, MEDIUM or FAST
scroll speeds) the remainder of the message
is displayed at that speed.
•If the scroll speed is set to LINE-BY-LINE,
the remaining screens will automatically
display one line at a time every few seconds.
Note:
To pause the message in any scroll
mode, press ). Press again to continue .
In LINE-BY-LINE mode, continue pressing
) until the last screen is displayed.
25
INFORMATION SERVICES
Page 28

➎
44
44
HH
HH
3:51P 9/29
•The last screen displays the time and date
the message was received. After an interval,
the pager returns to the standby screen.
Turning the Information Service Alert On and Off
You can set the pager to alert when a information service message is received.
➊
22
22
INDEX ROSE 87 PTS
➋
22
22
HHHHQQ
HH
HH
•While reading an information service
QQ
message, press * until CHIRP ON? or
CHIRP OFF? displays .
•Press + to turn CHIRP ON or OFF.
CHIRP ON? y
Deleting an Information Service Message
An information service message can be deleted with the DELETE command.
➊
INDEX ROSE 87 PTS
INFORMATION SERVICES
26
66
66
HHHHQQ
•While reading an information service
QQ
message, press * until DELETE? displays .
Page 29

❷
HH
HH
•Press + to delete.
DELETE? @
Phone Directory
The PHONE-DIR is a reference for up to ten entries, each with a name,
associated phone number and special alert. Each name can be up to eight
characters long and each phone number must be from three to 13 digits long.
No spaces or hyphens may be entered. You can also set the pager to block
out pages from specific numbers in the PHONE-DIR. When a new numeric
message is received, it may be added to the phone directory while reading the
message.
Entering a Phone Directory Entry
•From the Standby screen, press and release *until DIRECTORY? displays.
➊
Press + to enter the DIRECTORY menu. Press + to enter PHONE-DIR
mode.
PHONE DIRECTORY
27
Page 30

➋
00001111 //// //
//
HH
HH
AAAAAAAA>
➌
00001111 .... ,,
,,
HH
HH
AAAAAAAA>
Note:
If the name is less than eight characters long, you can use the
rubout character ( ®) to fill the remaining slots with blanks. After entering
the last character of the name, move to the next character and press *
until the rubout character ( ®) displays. Press + until all remaining slots
are filled with blanks.
Hint:
When selecting characters, the order in which they are displayed
is A-Z, 0-9, a blank character, and then the rubout character f ollowed b y A
again. If you go past the character you want, press and hold * until the
character displays again.
➍
PHONE DIRECTORY
00001111 .... ,,
,,
HH
HH
•Press * to choose the desired PHONE-DIR
slot number ( 01 - 10 ), then press + to
move to the next field.
•Press * to enable (. ,) the entry, then press
+ to move to the Name field.
•Press * to select the first character, then
press + to move to the next.
• Repeat the above step until you have entered
the entire name.
• At the last character press + to move to the
Phone Number screen.
W E N D Y ®>
28
Page 31

➎
0000000000000>
➏
6530828 >
OTHER FEATURES
00
00
00
00
HH
HH
HH
HH
•Press * to select the first digit, then press
+ to move to the next.
• Repeat the above step until you have entered
the entire phone number.
Note:
If the telephone number is less than
13 digits, advance to the rubout character
( ® ) and press + to fill the remaining
slots with blanks. Spaces cannot be
entered in phone numbers.
• At the last digit press + to move to the Alert
field.
•Press * to select the desired Alert ( 0 - 9 ),
or “ - “ for page blocking.
Note:
The pager gives off a sample alert
each time * is pressed. The page
blocking feature prohibits pages from the
entered numbers.
•Press ) to set and exit.
PHONE DIRECTORY
29
Page 32

➐
11
11
HHHHQQ
WENDY 6530828>
Adding a Received Message to the Phone Directory
When you receive a message that contains only a phone number , you can add
that number to the phone directory.
Note:
Any dashes, parentheses or spaces in the number are deleted before
storing.
•While reading a message, press * until PHONE-DIR? displays and press
➊
+ to enter it. The phone number of the message being read is
automatically assigned the next available PHONE-DIR slot. The Name field
is then displayed.
➋
00002222 .... ,,
,,
HH
HH
AAAAAAAA>
PHONE DIRECTORY
•When a message is received that matches a
QQ
PHONE-DIR number, the associated
PHONE-DIR name (WENDY) displays before
it.
•Press * to select the first character of the
Name field, then press + to move to the
next field.
• Repeat the above step until you have entered
the entire name.
30
Page 33

➌
00002222 .... ,,
,,
HH
HH
JOHN >
Deleting an Entry
PHONE-DIR entries are deleted when disabled. You may also edit an entry
and erase the characters using the rubout characters.
•From the Standby screen, press and release *until DIRECTORY? displays.
➊
Press + to enter the DIRECTORY menu. Press + to enter PHONE-DIR
mode.
➋
00002222 .... ,,
,,
HH
HH
JOHN >
➌
USE AND CARE
00002222 //////
//
HH
HH
•At the last character, press + to set and
move to the Phone Number screen. Press
*
to select the desired Alert ( 0 - 9 ), or “ - “
for page blocking.
•Press ) to set and exit.
•Press * to select the PHONE-DIR entry
you want to delete (e.g. 02 JOHN), then
press + to move to the Enable/Disable field.
•Press * to disable ( // ) this entry, then
press ) to delete it and exit.
JOHN >
PHONE DIRECTORY
31
Page 34

Optional Features
The Travel Clock, Travel Alarm and QuickNotes are optional features that may
be available on your pager . If these features are not currently availab le and you
would like to take advantage of them, contact your paging service provider.
Setting the Travel Clock
The Travel Clock (when activated) allows you to display an additional 24-hour
clock in the upper left-hand portion of the display . This Travel Clock can also be
set to a different time from the main clock. This can be helpful when tra veling to
different time zones.
•From the Standby screen, press and release *until TRAVEL? displays.
➊
Press + to enter the TRAVEL menu, then press + to enter TRAVEL
TIME mode. The Forward Time/Backward Time field ( - ) flashes.
• T o set a tra vel time that is diff erent from the main cloc k, press * to choose
➋
between forward ( + ) or backward ( - ) time in relation to the current time.
OPTIONAL FEATURES
32
BATTERY
Page 35

➌
: :3333 0000
1111 0000::
- 0:00 OFF
➍
00
11111111::::3333 00
+ 1:00 ON
➎
: :3333 0000
1111 1111::
10:30 A 9/28
PATENT
❻
00
22222222::::3333 00
HH
HH
HH
HH
HH
HH
HH
HH
•Move to the Hour and Minute fields by
pressing +, then press * to set the value
for each field.
Note:
To display a 24-hour clock with the
same time as the main clock, set the Hour
and Minute fields to zero.
•Move to the ON/OFF field by pressing +,
then press * to choose ON or OFF. Press
) to set and exit.
•The Standby screen displays with the Travel
Clock time in the top left corner. This
example shows a 1 hour forward time.
• This example shows a 24-hour clock with the
same time as the main clock.
10:30 P 9/28
Note:
When messages are received the travel clock display alternates with
the number of unread messages until all the messages are read.
OPTIONAL FEATURES
33
Page 36

Setting the Travel Alarm
•From the Standby screen, press and release *until TRAVEL? displays.
➊
Press + to enter the TRAVEL menu. Press *+ to enter TRAVEL
ALARM mode.
Note:
A Travel Alarm is set on the Travel Clock time, not the main clock
time.
➋
11
11111111::::3333 11
HHHHII
11:31
➌
: :3333 1111
2222 3333::
HHHHJJ
•Press * until J (the enable alert icon)
II
displays. Press + to move to the next field.
•Press * to set the Hour field to the desired
value. Press + to move to the Minute field
and press * to set the minute to the
desired value.
•Press ) from any field to set and exit.
•The Standby screen displays with the J icon.
JJ
10:31 P 9/28
OPTIONAL FEATURES
34
NOTES
Page 37

➍
HHHHJJ
TRAVEL •
➎
: :3333 0000
0000 0000::
HHHHJJ
11:30 P 9/28
Note:
The Travel Clock and Travel alarm display in 24-hour time only.
Note:
You can temporarily disable the Travel alert (for example, on a
weekend). To disable the alert, follow these steps.
1. From the Standby screen, press and release *until TRAVEL? displays.
Press + to enter the TRAVEL menu. Press *+ to enter TRAVEL
ALARM mode.
2. Press * until IIII (the disable alert icon) displays.
3. Press ) to set and exit. The
alert
won’t occur until it is re-enabled.
•When a Travel alarm expires, this screen
JJ
displays and the pager alerts.
• Press any button once to stop the alarm, and
again to clear the message.
Note:
If the pager is off when an alarm
expires, it turns on, alerts and remains on.
•If the Travel alarm is not stopped during
JJ
activation, the ALARM icon flashes.
•Press any button to read the alarm
message, and again to clear the message.
alarm
remains set and enabled, but the
OPTIONAL FEATURES
35
Page 38

To re-enable the alert, follow these steps.
1. From the Standby screen, press and release *until TRAVEL? displays.
Press + to enter the TRAVEL menu. Press *+ to enter TRAVEL
ALARM mode.
2. Press * until JJJJ (the enable alert icon) displays.
3. Press ) to set and exit.
QuickNotes
QuickNotes are short messages that can be displayed when you are paged.
There are 10 QuickNotes permanently stored in the memory of the pager. The
person paging you activates these messages by entering a code number
instead of their phone number.
To send QuickNotes, the person paging you enters **, then the message code
number, and then **.
Example: Entering code **01** displays Running Late on the message
screen.
OPTIONAL FEATURES
36
Page 39

See the list of available codes below.
Note:
QuickNotes are subject to change. See your paging service provider
to verify the QuickNotes list.
When the person paging
you enters this code...
**01** Running late
**02** I’m on my way
**03** Pick me up
**04** I’m home
**05** Come home
**06** Call home
**07** Call office
**08** Call school
**09** I love you
**10** I miss you
this displays on the message
screen.
OPTIONAL FEATURES
37
Page 40

Special Pager Displays
Low Battery
Your pager warns you if the battery level is low. If the pager is on between
8:00am and 10:00pm, LOW CELL ( displays and an alert sounds.
Between10:00pm and 8:00am, only LOW CELL ( displays (no alert sounds). If
the pager is off, O displays. Change the battery within five days of receiving a
low-battery indication.
Note:
Turn the pager off before changing the battery to save messages.
Out of Range
If your pager is equipped with this optional feature, R displays if you are
outside your paging coverage area and the pager cannot receive messages.
The out-of-range indicator R no longer displays when you return to your paging
coverage area.
Special message icons
•If ® displays at the end of the message, there is an error in the message
received.
OTHER FEATURES
•If £ displays at the end of the message, either the message was too long, or
there was not enough memory to store the message.
38
Page 41

Cleaning Your Pager
To clean the pager housing, use a soft, non-abrasive cloth moistened in a mild
soap and water solution. Rinse the surface using a second cloth moistened in
clean water. Do not immerse the pager in water. Do not use alcohol or any
other cleaning solutions.
Functionality and Use of Your Pager
For questions pertaining to the functions and use of your Motorola pager
please visit our web site at www.motorola.com/pagers or in the U.S.
call 1-800-548-9954 or 1-800-793-7834 (TDD). For questions pertaining to
your paging service, contact your paging service provider.
Care and Maintenance
Jazz™ pagers are durable, reliable, and can provide years of dependable
service; however, they are precision electronic products. Water and moisture,
excessive heat, and extreme shock may damage the pager. Do not expose
your pager to these conditions. If repair is required, the Motorola Service
Organization, staffed with specially trained technicians, offers repair and
maintenance facilities throughout the world.
USE AND CARE
39
Page 42

You can protect your pager purchase with an optional extended warranty
covering parts and labor. For more information about warranties, please
contact either your paging service provider, retailer, or Motorola, Inc. at 1-800548-9954. For repairs, call Motorola, Inc. at 1-800-548-9954 in the U.S. or
1-800-323-9685 in Canada. In the U .S ., to contact Motorola, Inc. on your TDD,
call 1-800-793-7834.
Battery Information
BATTERY
Your Jazz™ pager operates with one AAA-size alkaline battery (carbon zinc
batteries are not recommended).
40
Page 43

Replacing the Battery
Note:
Turn the pager off before changing the battery to save messages.
Turn the pager off.
❶
To remove the old battery, slide the Lock/Unlock tab away from the battery
❷
door to unlock the door. Hold the pager in both hands and slide the door until
the locking tabs release and the Battery Door Alignment Dots align. Lift the
door until it is free of the housing.
Remove the battery.
❸
Align the new battery matching the illustration on the inside of the battery
❹
chamber. Insert the battery.
Replace the battery door by aligning the grooves on the door with the grooves
➎
on the housing. Slide the battery door until it is fully closed. Lock the battery
door by sliding the Lock/Unlock Tab on the housing toward the battery door.
BATTERY
41
Page 44

Patent Information
This Motorola product is manufactured under one or more Motorola U.S.
patents. A partial listing of these patents is provided on the inside surface of the
battery door. Other U.S. patents covering this product are pending.
t, Motorola, FLEX, f, Jazz and QuickNotes
are trademarks or registered trademarks of Motorola, Inc.
Paging Products Group 1500 Gateway Boulevard Boynton Beach, Florida 38426
© 1997 by Motorola, Inc. All Rights Reserved.
Printed in U.S.A. 8/97
@6881029B95@
6881029B95-O
RAD DEV FOR HAZ LOC INT SAFE:
R
1.5 AAA ALK T3C
I,ABCD:DIV2:II,FG
LISTED830H
Page 45

Jazz™ Quick Reference Card
Symbols
Power On Indicator
H
Set Power Off
d
Set Alert Mode
i
Set Audible Alert
w
Set Vibrate Alert
x
Set Chirp Alert
y
Set Chirp Off
;
Set Pleasing Alert
j
Set Pleasing Alerts 1-8 (T-[)
T
Set No Alert
\
Set Escalert
z
Set Alarm Mode/Set Travel Alarm
k
Expired General Alarm
t
Set Event Alarm
n
Set Time-Date
e
Phone Directory Message Indicator
~
Alarm Message Indicator
}
Message Indicator Unselected
§
Message Indicator Selected
$
Alerts
{
Lock Message
^
Unlock Message
_
Delete All Messages
g
Delete Selected Message
@
Set Slow Scrolling Speed
b
Set Medium Scrolling Speed
a
Page 46

Set Reminder Alarm
l
Expired Reminder Alarm
s
Set General Alarm
m
Memory Overflow
<
Memory Full
=
Silent Alert Mode Indicator
G
Audible Alert Mode Indicator
H
No Alarm Indicator
I
Alarm Indicator
J
Duplicate Lock Indicator
K
Lock Indicator
L
Low Cell Indicator
O
Message Continued Indicator
Q
Enable Entry
. ,
Set Fast Scrolling Speed
c
Set Line by Line Scrolling Speed
v
Set Directory
o
Set Phone Directory
p
Pager Disabled
¢
Information Service Indicator Unselected
-
Information Service Indicator Selected
!
Low Cell
(
Out of Range Indicator
R
Mailbox Unselected
&
Mailbox Selected
º
Disable Entry
//
Duplicate Message
¶
Page 47

Setting the Time and Date
Press and release * until CONTROLS? a displays.
❶
Press +. Press and release * until TIME-DATE? e displays.
❷
Press +. Press and release * repeatedly to set the hour.
❸
Move to the Minute, A.M./P.M., Day and Month fields by pressing +, then
❹
press * to set the value for each field.
Note:
Set A.M./P.M. to _ to display a 24-hour clock.
Press ) to save your changes. The Standby screen displays.
➎
Setting the Alarm
From the Standby screen, press and release *until ALARMS? displays.
❶
Press + to enter the ALARMS menu.
❷
Press *+ to enter GENERAL alarms mode.
❸
Press +, then press * until . , (the enable alarm icon) displays. Press + to
❹
move to the next field.
Press * until J (the enable alert icon) displays. Press + to move to the next
➎
field.
Press * to set the hour to the desired value, then press + to move to the
➏
Minute field.
Page 48

Move to the A.M./P.M., Day and Month fields by pressing +, then press * to
❼
set the value for each field.
Press ) to set and exit.
➑
QuickNotes
When the person paging
you enters this code...
**01** Running late
**02** I’m on my way
**03** Pick me up
**04** I’m home
**05** Come home
**06** Call home
**07** Call office
**08** Call school
**09** I love you
**10** I miss you
this displays on the message screen.
 Loading...