

Page 1

Contents
User’s Guide
68P81072C80-B
Digital SABER
Portable Radio
Models II and III
Introduction . . . . . . . . . . . . . . . . . . . . . . . . . . . . . . . . . . . . . . . . . . . . . . . . . . 1
Introduction. . . . . . . . . . . . . . . . . . . . . . . . . . . . . . . . . . . . . . . . . . . . . . . . . 1
Battery Installation and Removal . . . . . . . . . . . . . . . . . . . . . . . . . . . . . . . . 7
Belt-Clip Installation and Removal . . . . . . . . . . . . . . . . . . . . . . . . . . . . . . . 9
Accessory-Connector Cover Installation and Removal. . . . . . . . . . . . . . . 10
General Radio Operation . . . . . . . . . . . . . . . . . . . . . . . . . . . . . . . . . . . . . . . 11
Turning the Radio On and Off. . . . . . . . . . . . . . . . . . . . . . . . . . . . . . . . . . 11
Selecting a Zone and Channel. . . . . . . . . . . . . . . . . . . . . . . . . . . . . . . . . . 12
Receiving/Transmitting . . . . . . . . . . . . . . . . . . . . . . . . . . . . . . . . . . . . . . . 15
Using Lists . . . . . . . . . . . . . . . . . . . . . . . . . . . . . . . . . . . . . . . . . . . . . . . . . 16
General Radio Features. . . . . . . . . . . . . . . . . . . . . . . . . . . . . . . . . . . . . . . . 23
Common Radio Features . . . . . . . . . . . . . . . . . . . . . . . . . . . . . . . . . . . . . . . 29
Data Calls (Status Calls or Message Calls) . . . . . . . . . . . . . . . . . . . . . . . . . 29
Emergency . . . . . . . . . . . . . . . . . . . . . . . . . . . . . . . . . . . . . . . . . . . . . . . . . 31
Individual Calls . . . . . . . . . . . . . . . . . . . . . . . . . . . . . . . . . . . . . . . . . . . . . 34
PL Defeat . . . . . . . . . . . . . . . . . . . . . . . . . . . . . . . . . . . . . . . . . . . . . . . . . . 41
Repeater Access. . . . . . . . . . . . . . . . . . . . . . . . . . . . . . . . . . . . . . . . . . . . . . 41
Repeater/Direct. . . . . . . . . . . . . . . . . . . . . . . . . . . . . . . . . . . . . . . . . . . . . . 42
Scan . . . . . . . . . . . . . . . . . . . . . . . . . . . . . . . . . . . . . . . . . . . . . . . . . . . . . . 43
Selecting Squelch Operation . . . . . . . . . . . . . . . . . . . . . . . . . . . . . . . . . . . 49
Smart PTT. . . . . . . . . . . . . . . . . . . . . . . . . . . . . . . . . . . . . . . . . . . . . . . . . . 50
, Motorola, ASTRO, SABER, Private-Line, Digital Private-Line, Call Alert,
MDC-1200, DVP, DVP-XL, Private Conversation, Call Alert, SmartZone, and
Quik-Call are trademarks of Motorola, Inc.
© 1996 by Motorola, Inc. Radio Products Group
8000 W. Sunrise Blvd., Ft. Lauderdale, FL 33322
Printed in U.S.A. 4/96. All Rights Reserved.
Page 2

Contents
Special Radio Features. . . . . . . . . . . . . . . . . . . . . . . . . . . . . . . . . . . . . . . . . . 51
Dynamic Regrouping. . . . . . . . . . . . . . . . . . . . . . . . . . . . . . . . . . . . . . . . . 51
PTT-ID Receive . . . . . . . . . . . . . . . . . . . . . . . . . . . . . . . . . . . . . . . . . . . . . . 54
PTT-ID Transmit . . . . . . . . . . . . . . . . . . . . . . . . . . . . . . . . . . . . . . . . . . . . . 54
Secure Operation . . . . . . . . . . . . . . . . . . . . . . . . . . . . . . . . . . . . . . . . . . . . 55
Selectable Power-Level . . . . . . . . . . . . . . . . . . . . . . . . . . . . . . . . . . . . . . . . 60
Trunking System Controls . . . . . . . . . . . . . . . . . . . . . . . . . . . . . . . . . . . . . 61
Additional Information . . . . . . . . . . . . . . . . . . . . . . . . . . . . . . . . . . . . . . . . 65
Glossary . . . . . . . . . . . . . . . . . . . . . . . . . . . . . . . . . . . . . . . . . . . . . . . . . . . 65
Alert Tones . . . . . . . . . . . . . . . . . . . . . . . . . . . . . . . . . . . . . . . . . . . . . . . . . 67
Status Indicators. . . . . . . . . . . . . . . . . . . . . . . . . . . . . . . . . . . . . . . . . . . . . 69
Battery Charging and Disposal . . . . . . . . . . . . . . . . . . . . . . . . . . . . . . . . . 70
Helpful Tips . . . . . . . . . . . . . . . . . . . . . . . . . . . . . . . . . . . . . . . . . . . . . . . . 72
Radio Care . . . . . . . . . . . . . . . . . . . . . . . . . . . . . . . . . . . . . . . . . . . . . . . . . 73
Air Bag Safety Information. . . . . . . . . . . . . . . . . . . . . . . . . . . . . . . . . . . . . 74
Service . . . . . . . . . . . . . . . . . . . . . . . . . . . . . . . . . . . . . . . . . . . . . . . . . . . . 74
Index. . . . . . . . . . . . . . . . . . . . . . . . . . . . . . . . . . . . . . . . . . . . . . . . . . . . . . . 75
For information regarding Factory Mutual Approved models, options, and
accessories, refer to the Factory Mutual Approved Supplement for ASTRO
Digital SABER Radios (Motorola part number 68P81080C15).
Computer Software Copyrights
The Motorola equipment described in this manual may include copyrighted
Motorola computer programs stored in semiconductor memories or other
media. Laws in the United States and in other countries preserve for Motorola
certain exclusive rights for copyrighted computer programs, including the
exclusive right to copy or reproduce in any form the copyrighted computer
program. Accordingly, any copyrighted Motorola computer programs
contained in Motorola equipment described in this manual may not be copied
or reproduced in any manner without the express written permission of
Motorola. Furthermore, the purchase of Motorola equipment shall not be
deemed to grant either directly or by implication, estoppel, or otherwise, any
license under the copyrights, patents or patent applications of Motorola,
except for the normal nonexclusive, royalty free license to use that arises by
operation of law in the sales of a product.
Page 3

!
!
Preface
This manual describes how to operate an ASTRO Digital SABER Model III
Portable Radio.
Model III has a display, a 3 x 2 control teal-colored
keypad, and a 3 x 4 alphanumeric keypad.
This manual first introduces you to your new radio. Then it covers general
radio operation and commonly used radio features. Next, special radio features
available on an ASTRO Digital SABER radio are described. The back section of
this manual includes a glossary, alert tone and status indicator tables, helpful
tips, and an index.
Use this manual to become familiar with your ASTRO radio. But, before
operating your radio, please read and understand the “FCC Safety Standards”
on the inside back cover of this manual.
Notations Used in This Manual
Throughout the text in this publication, you will notice the use of W ARNINGS,
CAUTIONS, and Notes. These notations are used to emphasize that safety
hazards exist, and care must be taken or observed.
WARNING
CAUTION
Notes
You will also notice the following special notations used to identify
certain items:
Example
Light Button
“FIRE DISP NW” Information appearing on the radio’s display will be
Note: An opertaional procedure, practice, or condition, etc.,
which is essential to emphasize.
or Buttons and keys will be shown in bold print or as a
WARNING: An operational procedure, practice, or
condition, etc., which may result in injury or death if not
carefully observed.
CAUTION: An operational procedure, practice, or
condition, etc., which may result in damage to the
equipment if not carefully observed.
Description
key symbol.
shown within quotation marks.
Softkeys will be shown as they would appear on the
OR
radio’s display.
Signifies different steps with the same end result.
Signifies alternating radio display information.
Signifies different steps with a different end results.
Page 4

1
Introduction
Congratulations on your purchase of Motorola’s leading edge in two-way
radio communications; ASTRO, the digital solution.
Astro digital technology represents a revolution in two-way radio
communication. With its expanded benefits and increased flexibility, an
ASTRO digital system gives you an advanced new perspective on the way
you communicate.
Motorola is committed to leadership in two-way radio communications for
all types of private and public use. In addition to providing you with a wide
range of analog solutions, Motorola is the leader in developing new digital
solutions to serve you today and in the years ahead. ASTRO narrowband
technology is the world’s first digital two-way radio system. It offers many
highly-sophisticated features previously unavailable for users of privatelyowned systems, while maintaining compatibility with existing analog
systems. Y our ASTRO Digital SABER radio will provide you with many years
of dependable service, with the quality and reliability that you expect from
Motorola.
Inspection
Inspect the shipping carton for any signs of damage. A packaged model
includes all items as indicated in the accompanying illustration. Remove
and check the contents to be sure that all ordered items have been shipped.
Inspect all items thoroughly . If any items have been damaged during transit,
report the damage to the shipping company immediately.
1
Page 5

Introduction
Radio Controls
Programmable Switches and Buttons
Refer to Table 1 for the features that are programmable through radio
service software (RSS) to the ASTRO Digital SABER radio controls. Then
write, in the space provided below the appropriate switch or button on
this page, the features that apply to
your service technician).
your
radio’s programming (consult
B
A
Top Button
2-Position
Concentric Switch
Top Side Button
Side Button 1
2-Position
A/B Switch
1
1
9
3
5
7
A
HOME
DEF
3
ABC
2
1
5
GHI
4
8
RS
P
7
JKL
TUV
0
MNO
6
WXY
9
Side Button 2
2
Page 6

Table 1. Programmable Features
Introduction
Call Alert™ (pg. 34-41)
Call Response (pg. 40) Phone (pg. 34-41) Selective Call (pg. 34-41)
Channel (pg. 12-14) PL Defeat (pg. 41) Site Lock/Unlock (pg. 62)
Dynamic Priority (pg. 45) Private Call (pg. 34-41) Site Search (pg. 63)
Emergency (pg. 31-33) Repeater Access (pg. 41) Status (pg. 29)
Keypad Mute (pg. 27) Repeater/Direct (pg. 42) Tx Power-Level (pg. 60)
Light (pg. 73) Reprogram Request (pg.
Message (pg. 27) Scan On/Off (pg. 43-44) Zone (pg. 12)
Monitor (pg. 29) Secure/Clear (pg. 55)
(pg.XX) = Page Number of Feature Description
Nuisance-Delete (pg. 45) Select (pg. 18, 19, 23-25, 47)
Volume Set (pg. 15)
52)
3
Page 7

Introduction
Switches, Buttons, Knobs, and Indicators
16-Position Select Knob
Selects the operating system (zone)
and/or specific channel.
Bicolor LED
Indicates the radio’s operating status;
Red =Transmitting
Blinking Red = Channel Busy or Low Battery
Blinking Green = Receipt of Individual Call
On/Off/Volume Control Knob
Turns the radio on and off and
adjusts the volume level.
1
3
1
9
5
7
A
Push-To-Talk
(PTT) Switch
Puts the radio in the
transmit (send) mode.
HOME
Antenna
Radiates and receives
radio-frequency energy.
Liquid Crystal Display (LCD)
Provides visual information
(status indicator line, plus two display
lines with 14 characters maximum on
each display line).
Softkeys
(bottom display line of LCD)
Display of radio features
controlled by softkey buttons.
Arrow Keys
Used to scroll through
softkeys and lists.
Home Key
HOME
Returns you to the
home display.
Battery
Rechargeable, 7.5Vdc
power source.
Softkey Buttons
Selects “softkey” features.
DEF
3
ABC
2
MNO
1
GHI
4
RS
P
7
6
JKL
5
WXY
9
TUV
8
0
Speaker/Microphone
Accepts and emits audio.
3 x 4 Alphanumeric Keypad
(Model III Only)
Provides interface to your radio’s
features; arranged and functions
like a standard telephone
keypad.
4
Page 8

Introduction
N
G
S
H
d
Antenna Installation and Removal
Before installing the antenna, ensure that the match between your radio and
antenna is correct. Your radio’s model number is on a label attached to the
back of your radio. A typical model number might be H04UCC9PW5AN. The
fourth position of the model number (in this example “U”) identifies the
operating-frequency band of the radio. The following table lists all fourthposition alpha characters and corresponding frequency band.
Radio Operating-Frequency Table
Fourth-
Position
K
Operating
Frequency
136-
178MHz
Fourth-
Position
R
Operating
Frequency
403-
470MHz
Fourth-
Position
S
Operating
Frequency
450-
512MHz
Fourth
Position
U
Operating
Frequency
806-
870MHz
Antennas are frequency sensitive and are color coded according to the
frequency range of the antenna. The color code indicator is in the center of the
base of the antenna. The following illustrations and table will help identify the
antenna, antenna frequency range, and corresponding color code
DESCRIPTION
ASTRO Antenna I
VHF
Wide Band
Helical
800 MHz
Dipole
ILLUSTRATOR E
VHF
Helical
UHF
800 MHz
Whip
800 MHz
Stubby
DATE
EH 12/8/92
EDITOR C
DATE
PR 12/9/92
LETTERIN
REQUIRE
UHF
Helical
5
Page 9

Introduction
Antenna Identification Table
Antenna Type Approx. Length Insulator
Color Code
VHF Wide Band
in. mm
8.1 203 RED 136-174MHz NAD6563
Frequency
Range
Antenna
Kit No.
Helical
VHF Helical 7.8
7.3
6.9
UHF Helical 3.3
3.2
3.2
195
183
172
83
80
79
YELLOW
BLACK
BLUE
RED
GREEN
BLACK
136-151MHz
151-162MHz
162-174MHz
403-435˙MHz
435-470MHz
470-512MHz
NAD6566
NAD6567
NAD6568
NAE6546
NAE6547
NAE6548
UHF Wide Band Whip 5.2 130 GREY 403-512MHz NAE6549
800MHz Whip 7 175 RED 806-870MHz NAF5037
800MHz Dipole 8 200 RED 806-870MHz NAF5039
800MHz Stubby,
3.3 83 WHITE 806-870MHz NAF5042
Quarterwave
Attach the antenna to the radio by screwing the threaded end of the antenna
into the antenna receptacle on top of the radio. Rotate the antenna clockwise
until it fits firmly against the bushing. Remove the antenna by rotating it in a
counterclockwise direction until its threaded end unscrews from the radio
antenna receptacle.
6
3
5
7
A
1
9
1
Page 10

Introduction
!
!
Battery Installation and Removal
WARNING
To avoid a possible explosion:
DO NOT replace the battery in an area labeled “hazardous atmosphere.”
DO NOT discard batteries in a fire.
CAUTION
If your radio is programmed with volatile-key retention (consult your
service technician), encryption keys will be retained for approximately
30 seconds after battery removal.
1. Make sure your radio is
turned off.
BATTERY
Note
Removing the battery
while the radio is on will
no longer erase the
encryption keys.
BATTERY
LATCH
BASEPLATE
INSERTION
DIRECTION
REMOVAL
DIRECTION
2. Hold the radio in your hand
with the back of the radio facing
up and slide the battery latch toward the top of the radio with your
thumb.
3. While holding the battery latch, slide the battery pack away from you
until it clears the radio.
4. To replace the battery, hold the radio in one hand. With the other hand,
slide the battery onto the radio’s baseplate and toward the latch until it
“clicks” into place.
Note
Batteries are shipped uncharged; they must be charged before use.
Refer to the “Battery Charging and Disposal” section on page 71.
7
Page 11

Introduction
ASTRO/R Radio Battery Only
1. Make sure your radio is turned
off.
2. Simultaneously squeeze inward
on the spring-loaded batterylatch buttons and slide the Ushaped battery-latch away
from the radio as far as it will
go (about 1/2 inch).
3. Pull the battery down and
away from the radio.
4. T o replace the battery, position
the battery on the radio and
make sure that it is correctly
seated. Then, slide the Ushaped battery-latch slide
toward the radio unit it
“clicks” into place.
OPEN
LATCH
CLOSE
LATCH
INSTALL
BATTERY
REMOVE
BATTERY
BATTERY LATCH
(SQUEEZE INWARD
ON BUTTONS)
8
Page 12

Belt-Clip Installation and Removal
Introduction
Note
When installing or removing the belt clip, remove the battery
from the radio.
Installing the Belt Clip
HOOK T0P SLOT
1. Looking at the back of the radio, insert the
top (hooked) end of the belt-clip assembly
into the slot at the top of the radio. Make
sure that the clip’s hook is centered and
seated in the slot.
2. Align and center the bottom end of the belt
clip in the slot between the radio housing
and the baseplate.
BOTTOM
SLOT
3. Press the bottom of the belt clip into the slot until it “clicks” into place.
Pull outward on the bottom of the clip to ensure that it is secured to the
radio.
Removing the Belt Clip
1. Looking at the back of the radio, insert
a thin, flat-bladed screwdriver into the
belt-clip access hole in the baseplate (at
an angle of about 30°), and engage the
locking tab on the belt clip.
2. Push firmly inward and upward on the
locking tab until it is disengaged from
the access hole.
3. Continue pushing on the tab until it
can be seen between the radio housing and the baseplate. If necessary,
reposition the screwdriver and push on the tab again to free it from the
hole.
4. Lift the belt clip up and away from the radio.
BELT CLIP
ACCESS HOLE
9
Page 13

Introduction
!
SCREW
ACCESSORY-
CONNECTOR
COVER
Accessory-Connector Cover
Installation and Removal
Notes
The accessory-connector cover protects the accessory connector.
The cover should be installed whenever the radio is not being
used with an accessory.
Installing the Accessory-Connector Cover
1. Looking at the back of the radio,
insert the tab on the cover into
the slot just below the accessory
connector.
2. Pivot the cover toward the radio
until the connector is completely
covered and the cover’s Phillipshead screw mates with the
threaded hole on the radio.
3. Snugly tighten the screw (0.3 in.-lb.) to hold the cover in place.
COVER
SCREW
THREADED
HOLE
ACCESSORY
CONNECTOR
SLOT
CAUTION
Removing the Accessory-Connector Cover
1. Loosen the accessory-connector cover’s
Phillips-head screw.
2. Lift the cover up and away from the radio
and store it in a convenient place.
10
Do not overtighten the screw.
Page 14

2
General Radio Operation
After a fully-charged battery and an antenna have been connected to the
radio, operation may begin. If necessary , refer to page 2 to insure a complete
understanding of the radio’s controls and indicators. Also, for your
convenience, the “Additional Information” section (starting on page 65)
contains a glossary, alert tone and status indicator tables, helpful tips, and
an index.
Turning the Radio On and Off
• Radio On
1
3
1
9
5
7
A
Turn the radio on by rotating the
Control Knob clockwise
. The radio then goes through a
On/Off/Volume
power-up self test, and the display shows “Self Test.”
4
P
7
1
1
9
1
GHI
4
P
7
HOME
ABC
2
1
JKL
5
GHI
TUV
8
RS
0
MAEPF-23621-A
3
5
7
A
HOME
ABC
2
JKL
5
TUV
8
RS
0
DEF
3
MNO
6
WXY
9
If the radio fails the self test, the display shows “ERROR
XX/YY,” where XX/YY is an alphanumeric code. Turn the
radio off, check the battery, and turn the radio back on.
If the radio still does not pass its self test, record the
“ERROR XX/YY”code and contact your nearest authorized
service technician.
• Radio Off
Turn the radio off by rotating the
Control Knob counterclockwise
DEF
3
MNO
6
WXY
9
On/Off/Volume
until you hear a click.
11
Page 15

General Radio Operation
7
9
5
3
1
1
A
See page 2
for your
radio’s
featurecontrol
programming.
Selecting a Zone and Channel
A
zone
is a grouping of channels. A
such as transmit/receive frequency pairs. After you turn your radio on, select
the desired zone and channel.
• Zone Selection
channel
is a group of radio characteristics
1a. Press until the
softkey appears on the display.
(The exact location of softkeys
will vary based upon individual
radio programming
HOME
2. Press directly below .
1b. Place the
OR
Zone Switch
(if
programmed, see page 2) to
the desired position. Then go
to step 5a or 5b.
3. The display changes to show the current zone name (flashing) and the
channel name (on steady). In the example shown, “POLICE” = Zone;
“DISP NW” = Channel.
12
HOME
Zone = Flashing
Channel = On Steady
Page 16

General Radio Operation
7
9
5
3
1
1
A
1
4
GHI
7
P
RS
2
ABC
5
JKL
8
TUV
0
HOME
1
4GHI
7PRS 8TUV
0
2
ABC
5JKL
3DEF
6MNO
9WXY
4a. Press until the desired zone
name appears on the display.
HOME
Note
If the selected zone is unprogrammed, the display will show
“UNPROGRAMMED” until a valid programmed zone is selected.
This does not mean your radio is unprogrammed; only the zone
you selected is unprogrammed.
5a. To select the displayed zone/
channel combination, press
HOME
.
4b. Enter the number of the
desired zone.
OR
5b. To transmit on the displayed
zone/channel combination,
press the
PTT Switch
.
HOME
Note
If you would like a different channel within the selected zone
“Channel Selection” below.
• Channel Selection
(Consult your service technician to determine which one of the following
methods to use for channel selection.)
Method 1 Channel Selection — used when the
programmed for channel selection.
1. Once you have a desired zone displayed
(step 4 of zone selection),
Position Select Knob
The display changes to show the selected
channel.
OR
16-Position Select Knob
rotate
the
16-
to the desired channel.
, see
is
Select
Channel
13
Page 17

General Radio Operation
Method 2 Channel Selection
— used when a softkey is programmed for channel
selection.
1. Press until the softkey appears
on the display.
HOME
2. Press directly below.
HOME
3. The display changes to show the zone name (on steady) and the current
channel name (flashing). In the example shown, “FIRE” = Zone, “DISP
NW” = Channel.
4a. Press until the desired
channel name appears on the
display.
HOME
Note
If the selected channel is unprogrammed, the display will show
“UNPROGRAMMED” until a valid programmed channel is
selected. This does not mean your radio is unprogrammed; only
the channel you selected is unprogrammed.
Zone=On Steady
Channel=Flashing
4b. Enter the number of the
desired channel.
2
1
OR
4GHI
7PRS 8TUV
ABC
5JKL
0
3DEF
6MNO
9WXY
5a. When the displayed zone/channel
combination is acceptable, press
HOME
.
14
HOME
5b. To transmit on the displayed
zone/channel combination,
press the
OR
PTT
Switch
.
HOME
DEF
3
ABC
2
MNO
6
1
JKL
5
WXY
9
GHI
4
TUV
8
RS
P
Page 18

General Radio Operation
7
9
5
3
1
1
A
See page 2
for your
radio’s
featurecontrol
programming.
Receiving/Transmitting
After you have turned your radio on and selected the desired zone and
channel, you can receive (listen) or transmit (send) communications as
follows:
1a. Listen until
you hear a
transmission.
1b. Press the
Button
see page 2) to hear the
V olume Set
(if programmed,
volume set tone.
1
3
1
9
5
7
A
OR
See page 2
for your
radio’s
featurecontrol
programming.
2. Adjust the
comfortable listening level.
3. To transmit, press and hold the
PTT Switch
the microphone. The LED will
continuously light red while the
radio is transmitting. When you
have finished talking
(transmitting), release the
Switch
Volume Control Knob
and speak clearly into
PTT
to listen (receive).
1c. Press the
OR
for a
Transmit = Press &
Hold PTT switch
Receive = Release
PTT Switch
Monitor
Button
(if programmed,
see page 2) to listen for
activity . See notes below.
Adjust
Level
1
3
1
9
5
7
A
9
5
7
A
Microphone
1
GHI
4
RS
P
7
HOME
2
5
8
DEF
3
ABC
MNO
6
JKL
WXY
9
TUV
0
Notes
• If the channel on which you are transmitting is programmed to receive
Private-Line® (PL), ensure that the channel is not in use by momentarily
pressing the
radio in permanent monitor operation (squelch defeat), press and hold
the
Monitor Button
service software). To return the radio to its original squelch state, tap the
Monitor Button
• If you try to transmit on a channel that is programmed for receive only,
an invalid tone will sound until you release the
Monitor Button
(see page 2) to listen for activity . To put the
for five seconds (time programmable through radio
again or press the
PTT Switch
.
PTT Switch
.
15
Page 19

General Radio Operation
HOME
HOME
Using Lists
The “list” feature on your radio allows you to store commonly used numbers
with an identifiable name. For example, the telephone feature has an
associated list of names and telephone numbers.
The following general operations are available using lists:
• a preprogrammed list can be viewed
• a number in a list can be changed (reprogrammed)
• a specific member in a list can be selected
• Viewing a List
1. Press until the softkey appears on
the display. (The exact location of softkeys will
vary based upon individual radio
programming.)
2. Press directly below .
3. The display changes to show available lists
(example: , , ); use
or to see other available lists.
4. Press directly below the list you wish to
view. For example, to view the list of telephone
numbers stored in your radio, press
directly below .
5. The display will show the first member in the list
(name on the upper line, number on the lower
line). The status indicator will appear (on
steady), indicating you are in the view mode.
HOME
16
On Steady = View Mode
(See page 70 for a description
of all status indicators.)
Page 20

General Radio Operation
HOME
• Changing (Reprogramming) a List
Notes
• Only numbers can be changed (reprogrammed) in a list. To change
the names in a list, a qualified service center must reprogram your
radio using radio service software. A name can be a maximum of 14
characters.
• If you are using the scan feature, refer to page 46 for scan-list
reprogramming.
1. Press until the softkey appears on the
display. (The exact location of softkeys will vary
based upon individual radio programming.)
HOME
2. Press directly below .
3. The display changes to show the lists ( ,
, , etc.) that can be changed.
4. Press directly below the list you wish to
change. For example, to change a telephone
HOME
number, press directly below .
5. The display will show the first member in the list (name on the upper
line, number on the lower line). The status indicator will appear
(flashing), indicating you are in the programming mode.
Flashing = Programming Mode
First Member in the List
17
Page 21

General Radio Operation
To select a specific member from the list:
6a. Scroll through the list by pressing
or until you locate
the member’s number you wish to
change.
6b. Go directly to a specific
member in the list by
entering the number (1-19)
that corresponds to that
member’s placement in the
list.
Backward
FIRST
LIST
LAST
FIRST
LIST
LAST
Forward
OR
2
1
4GHI
7PRS 8TUV
ABC
5JKL
0
7. When you stop on a member in the list, the display will show:
the member’s name on the upper line;
the number (telephone or ID) on the lower line.
3DEF
6MNO
9WXY
8. Press the Select Button to enter the
“programming— number-edit” mode.
1
3
1
9
5
7
A
See page 2
for your
radio’s
featurecontrol
programming.
18
Page 22

General Radio Operation
.
9. You can now change numbers using any of the
numeric keys (0–9) and special function keys
( , ).
7PRS 8TUV
The blinking cursor indicates the position of the
next number to be added.
When the maximum number of digits has been entered, the cursor will
disappear:
16 numbers maximum for a telephone number or
8 numbers maximum for an ID number.
If you try to add any more digits, you will hear an invalid tone.
Notes
1
4GHI
2
ABC
5JKL
0
3DEF
6MNO
9WXY
• In the number-edit mode, will function as a backspace key.
Pressing this key will erase the previous digit, and the cursor will
move to the left. When the last digit on the display has been erased,
an additional press of , or pressing , will cause you to
leave the number-edit mode without making any changes and reenter the procedure at step 7.
• Pressing followed by will enter a pause in the number
(shown as a “P” on the display).
10a.To save the change, press the
Select Button again. This will also
return you to the list (step 7) to
make additional changes.
10b.To cancel the change, press
HOME
. This will also return
you to the home display and
out of the change (reprogram)
mode.
1
3
1
9
5
7
A
See page 2
for your
radio’s
featurecontrol
programming
HOME
19
Page 23

General Radio Operation
• Selecting From a List
1. Press until the feature you desire appears
as a softkey on the display.
For example, to select from the telephone list
stored in your radio, press until the
softkey appears on the display. (The exact
location of softkeys will vary based upon
individual radio programming.)
2. Press directly below the desired feature.
Using the same example in step 1, press
directly below .
HOME
HOME
3. The display changes to show the last telephone number dialed or the last
ID number transmitted/received. The softkey also appears.
Last Telephone Number Dialed
Last ID Number Transmitted/Received
20
Page 24

4a. To access the preprogrammed list,
press directly below .
Then go to step 4b or 4c.
General Radio Operation
HOME
OR
4b. Scroll through the preprogrammed
list by pressing or until
you locate the desired member’s
name/number.
4c. Go directly to a specific
member in the list by
entering the number
(1–19) that corresponds
to that member’s
placement in the list.
Backward
Note
FIRST
LIST
LAST
If you are using the telephone feature ( ), pressing the PTT
FIRST
LIST
LAST
Forward
OR
2
1
ABC
4GHI
5JKL
7PRS 8TUV
0
3DEF
6MNO
9WXY
Switch will transmit (send) the displayed number.
5. The display will alternate between the name and number (phone or ID)
of a member in the list.
21
Page 25

General Radio Operation
HOME
1
4GHI
7PRS 8TUV
0
2
ABC
5JKL
3DEF
6MNO
9WXY
Note
• Pressing 00, or directly below
softkey, will take you to the Last
telephone NUMber dialed or the Last ID
NUMber transmitted/received.
• Once the softkey is displayed, you
may go directly to any member in the
list by entering the number (1–19) that
corresponds directly to that member’s
placement within the list.
22
Page 26

General Radio Operation
General Radio Features
• Radio Lock (Non-Secure Radios)
The radio-lock feature enables you to select a unique numeric password. If
the feature is enabled (programmable through the radio service software),
you will see “RADIO LOCKED” on the display when the radio is turned on.
2
1
ABC
1. Enter your numeric password (1 to 8 characters).
2. As you enter the password digits, the radio will
display dashes.
4GHI
5JKL
7PRS 8TUV
0
3DEF
6MNO
9WXY
If a digit is mistakenly entered, will function as a backspace key.
3. Once the correct password is entered, the radio will unlock.
To Change Your Password:
1. Press until the softkey appears on the display.
2. Press directly below .
3. The display changes to show “OLD PASSWORD.”
4. Enter the correct old password.
5. If it is correct, the display will show “NEW
PASSWORD.”
6. You then must enter the new password and press the
Select Button.
1
3
1
9
5
7
A
See page 2
for your
radio’s
featurecontrol
programming.
Note
In the event you forget the numeric
password, you must have the radio’s
codeplug replaced by a qualified service
technician and a new password programmed at
that time through the radio service software.
23
Page 27

General Radio Operation
7
9
5
3
1
1
A
See page 2
for your
radio’s
featurecontrol
programming.
• Radio Lock (Secure Radios Only)
By definition, this feature changes your radio to a more robust security
system, which protects the use of the secure encryption keys. If this
feature is enabled (programmable through the radio service software), you
will see “RADIO LOCKED” on the display when the radio is turned on.
2
1
ABC
1. Enter your numeric password (8 characters
maximum; minimum determined through
radio service software).
4GHI
7PRS 8TUV
2. As you enter the password digits, the radio
will display dashes.
5JKL
0
3DEF
6MNO
9WXY
If a digit is mistakenly entered, will function as a backspace key.
3. Once you have entered all the digits, press
the Select Button.
24
Page 28

General Radio Operation
1
4GHI
7PRS 8TUV
0
2
ABC
5JKL
3DEF
6MNO
9WXY
4a. If the password is
correct, the radio
will unlock.
4b. If the password is incorrect , the radio will remain
locked. After you enter three incorrect
passwords, the radio will display “DEAD
LOCKED,” and you must turn the radio off and
then on in order to enter another password.
If you enter a total of 15 consecutive incorrect
passwords (turning the radio off and on does
not reset the number of incorrect tries), the
radio will automatically erase all of its
encryption keys and will display “RADIO
LOCKED.”
Note
In the event you forget the numeric
password, or enter in 15 or more
incorrect passwords, enter in eight
asterisks (“********”) and press the
Select Button (see page 2).
This action:
• unlocks your radio,
• erases all encryption keys, and
• the password will revert to the factory
default password of “01234567”.
To Change Your Password:
1. Press until the softkey appears on the display.
2. Press directly below .
3. The display changes to show “OLD PASSWORD.”
4. Enter the correct old password and press directly below .
5. If it is correct, the display will show “NEW PASSWORD.”
6. Enter the new password and press directly below .
25
Page 29

General Radio Operation
7. The display will then show “CONFIRM.”
8. Re-enter the new password and press directly below .
9a. If the two passwords match,
the radio will unlock.
9b. If the two passwords don't match, the
display will show “NEW
PASSWORD.” You then need to
repeat the previous steps.
Note
You cannot change your
password if you have
entered three incorrect old
passwords. The radio will
exit the radio-lock feature
and will not allow you to
press the softkeyrelated button again until
the radio is turned off and
on again.
• Radio-Lock Enable/Disable (Secure Radios Only)
This feature (programmable through radio service software) allows you to
enable/disable the radio-lock feature using the radio’s keypad.
To Enable or Disable the Radio-Lock Feature:
1. Press until the softkey appears on the display.
2. Press directly below .
3. The display changes to show the current selected state, “PASSWD
ENABLED” or “PASSWD DISABLD.”
OR
4a. To enable the radio-lock feature,
press directly below .
4b. To disable the radio-lock
feature, press directly
below .
26
Page 30

General Radio Operation
• Muting the Keypad Tones
The radio’s keypad tones, normally heard each time a keypad key is
pressed, can be turned off (muted) or on (unmuted) at your discretion.
Muting Keypad Tones Using the Keypad-Mute Switch:
Note
The Keypad-Mute Switch is programmable
through radio service software.
1
3
1
9
5
7
To turn the keypad tones off, put the Keypad-Mute
A
Switch in the “tones off” position.
See page 2
To turn the keypad tones on for normal operation,
put the Keypad-Mute Switch in the “tones on”
position.
for your
radio’s
featurecontrol
programming.
Muting Keypad Tones Using the Softkey Feature:
1. Press until the softkey appears on the
display.
2. Press directly below .
3. The display changes to show the current mute state: “TONES ON” =
tones unmuted; “TONES OFF” = tones muted.
OR
4. Press below the desired mute state ( or ).
Note
Pressing or the PTT Switch will exit this display menu
without changing the keypad tones muting selection.
HOME
27
Page 31

General Radio Operation
• Time-Out Timer
The new ASTRO portable radio is equipped with a programmable time-out
timer which, upon expiration, will turn off the transmitter. This timer is
programmable through radio service software and can be set from 0
seconds (off) to 7.75 minutes (465 seconds), at 15 second increments. The
ASTRO radios have been programmed at shipment for 60 seconds.
1. A time-out timer warning occurs approximately four seconds before the
allocated time-out timer expires. The warning is a short, low-pitched
tone.
2. If the PTT Switch is held down longer than the time-out timer’s allotted
time, a continuous, low-pitched tone will sound and the LED will stop
lighting red, indicating that your transmission has been cut off. This tone
will continue to sound until the PTT Switch is released.
3. Release the PTT Switch.
4. To transmit another message, press the PTT Switch.
• Low-Battery Indication
If the battery voltage falls below the low-voltage level, the status
indicator will appear (flashing).
Flashing = Low-Battery
Once a low-battery indication occurs replace the battery.
Additional programmable battery status options:
• When the PTT Switch is pressed, the bicolor LED will blink red to
indicate a low-battery condition.
• When the PTT Switch is released following a transmission, a short,
high-pitched tone (chirp) will sound to indicate a low-battery
condition.
• When the radio is in the standby mode and a low-battery condition
occurs, an alert tone will sound from 30 to 930 seconds
(programmable through radio service software) at 30 second
increments.
28
Page 32

3
7
9
5
3
1
1
A
See page 2
for your
radio’s
featurecontrol
programming.
Common Radio Features
Data Calls (Status Calls or Message Calls)
This feature allows you to send data calls (status calls or message calls) from
your radio to the dispatcher to indicate a predefined condition. Each
defined status or message can have a 14-character alias. You can have the
following maximum number of predefined conditions: 16 message
conditions; 16 status conditions for conventional; 8 status conditions for
trunking.
• Sending a Status Call or Message Call
1a. Press until the or
softkey appears on the
display.
HOME
2. Press directly below the
type of data call you wish to
make.
1b. Press the
Message Button
programmed, see page 2). This
will take you directly to step 3.
OR
Status Button
(if
or
HOME
for Status Call
for Message Call
29
Page 33

Common Radio Features
1
4
G
P
R
3. The last acknowledged status call or the first message in the message list
will be displayed.
Note
If no status has been acknowledged, the first status in the status
list will be displayed.
4a. Scroll through the list by pressing
or until you locate
the predefined condition you wish
to send.
4b. Go directly to a specific
predefined condition in the
list by entering the number
that corresponds to that
condition’s placement in the
Backward
FIRST
FIRST
LIST
LIST
LAST
LAST
Forward
OR
list.
2
1
ABC
4GHI
5JKL
7PRS 8TUV
0
3DEF
6MNO
9WXY
5. When you locate the condition you want to send,
press the
PTT Switch
.
6. Upon receipt of the data call, the dispatcher will
transmit an acknowledge to your radio. Your radio
will then beep four times, display “ACKNOWLEDGE,”
and then return to normal dispatch operation.
If the system does not acknowledge the data call, your radio will
alternately display “NO ACKNOWLEDGE” and the currently selected
predefined condition.
7. Press to exit the data-call feature and return to the home display.
HOME
Notes
• While the data-call feature is selected, you will not hear normal radio
communications.
• If the data-call feature ( or ) is selected and no activity occurs for
six seconds, an alert tone will sound to indicate to you that the data-call
feature is active. The alert tone will stop when or the
pressed.
HOME
PTT Switch
is
30
Page 34

Emergency
Common Radio Features
For radios programmed with the emergency feature, pressing the
Button
(if programmed, see page 2) will send out an emergency signal that
Emergency
takes precedence over any other signalling activity in progress on the selected
channel. There are two types of emergency signals:
•
Emergency Alarm
sends a data transmission to alert the dispatcher to an
emergency condition and identify the radio sending the emergency
signal.
•
Emergency Call
is a type of dispatch operation which gives your radio
priority access to channels (not available on conventional radios).
Note
“Emergency” signals a critical situation. It should never be used
for any other reason.
• Entering the Emergency State
1
3
1. Press and hold the
Emergency Button
(if
programmed, see page 2). The length of the
press-and-hold time required is programmable
through radio service software.
2. The display alternates between showing
“EMERGENCY” and the current zone/ channel
combination (except for silent-emergency alarm
- see step 3b).
1
9
5
7
A
See page 2
for your
radio’s
featurecontrol
programming.
31
Page 35

Common Radio Features
3a.
Emergency Alarm
3b. Silent-Emergency Alarm
3c. Emergency Call
During a non-silent
emergency alarm
state:
• the LED will
light,
• a short,
mediumpitched tone
will be heard,
• the display will
show
“EMERGENCY,”
• when the
emergency
alarm is
acknowledged
by the
dispatcher, the
radio sounds
four beeps and
the alarm ends.
OR
During a silentemergency state:
• the LED will not
light,
• tones will not be
heard,
• the display will not
change,
• the audio will be
muted (turned off)
and will remain so
until you exit the
emergency alarm
state.
The silent-emergency
state will continue until
you press the
Switch
.
PTT
OR
Press the
Switch
.
PTT
1
1
9
7
3
5
7
A
1
GHI
4
RS
P
Notes
•
For all types of emergency signals
emergency operation, the emergency alarm or call will be moved to, and
continue on, the new channel if the new channel is also programmed for
emergency operation. If the new channel is not programmed for emergency
operation, an invalid-mode tone will sound until the emergency state is
exited, or you change to a channel programmed for emergency operation.
•
For emergency-alarm with emergency-call signals
acknowledgment from the dispatcher, your radio will enter the
emergency-call state.
•
For emergency-call signals
— While your radio is in emergency-call state,
it operates in the usual dispatch manner . Or , if enabled in your radio, your
radio will return to one of the following operations:
Tactical/Non-Revert Operation
— you will talk on the channel you selected
before entering the emergency state.
Non-Tactical/Revert Operation
— you will talk on a preprogrammed
emergency channel, and the emergency alarm will also be sent to this
preprogrammed emergency channel.
— If you change channels while in
— After receiving the
32
Page 36

Common Radio Features
• Exiting the Emergency State
It is important that you exit the emergency state when you have finished.
There are four ways to exit the emergency state:
1. Press the
is programmable through radio service software); a medium-pitched,
emergency-exit tone sounds until the button is released and the
radio returns to normal operation.
2. Radios programmed with emergency alarm — the emergency alarm
state may be exited by pressing the
canceled (without an emergency-exit tone), and you may begin
transmitting your voice call.
3. On radios equipped with emergency alarm with call — pressing the
PTT Switch
place the radio in emergency-call operation.
4. Radios programmed with emergency alarm only — the emergency
state is automatically exited upon reception of an acknowledgment
from the dispatcher or if the alarms are exhausted when no
acknowledgment is received. This method applies to non-silent
emergency alarm radios.
Note
If you have a silent-emergency alarm radio, use method 1, 2, or 3
to exit the emergency alarm state.
Emergency Button
while the radio is in emergency-alarm operation will
for approximately 1 second (this time
PTT Switch
. The alarm will be
• Emergency Keep-Alive
When this feature is enabled, moving the
position will not turn your radio off if it is in an emergency state. Your
radio will continue normal emergency operation as if the power is on. The
radio will not turn power off until it exits the emergency state.
On/Off Control Knob
to the off
33
Page 37

Common Radio Features
Individual Calls
Individual calls are defined as follows:
•
Telephone Calls
your radio. These calls can be landline caller to radio, radio to landline
caller, or landline caller to radio talkgroup.
•
Private-Conversation™ II Calls
involving two specific radios in which the conversation will not be heard
by others in the current radio talkgroup.
•
Enhanced Private-Conversation Calls
as Private Conversation II calls except the radio automatically verifies that
the target radio is active on the system. The target-radio user can also view
the ID of the calling radio before answering.
— similar to standard telephone calls, except you use
(Private Calls) — one-on-one calls
(Enhanced Private Calls) — same
•
Selective Calls
an individual or group of radios. It is intended to provide privacy and to
eliminate the annoyance of you having to listen to conversations that are
of no interest to you.
•
Call-Alert™ Pages
pages provide a means to signal other radio users that you wish to get in
touch with them (even if they are away from their radio or in a noisy
environment). Call Alert pages also allow you to verify that a radio is
active on the system.
Notes
In the following procedures, any reference to PrivateConversation (Private Call) will represent both PrivateConversation II calls and Enhanced Private-Conversation calls,
unless otherwise specified.
(Conventional Channels Only) — used to selectively call
— your radio functions like a pager (beeper); Call Alert
34
Page 38

• Selecting the Feature
7
9
5
3
1
1
A
See page 2
for your
radio’s
featurecontrol
programming.
Common Radio Features
Note
On conventional channels, you must monitor the channel for
activity before making an individual call (see page 15 for details).
1a. Press until one of the
following softkeys appear on the
display:
Call
for a
for a
or a
for a
Telephone Call
Private-Conversation
Selective Call
Call-Alert Page
HOME
1b. If your radio has been
programmed for “quickaccess” to a feature (consult
your service technician), press
the designated button for
OR
either the
Call, Selective Call
Alert
Phone, Private
feature. This will take
you directly to step 3.
, or
Call
2. Press directly below the desired softkey feature. For example, to
3. The display changes to show the last telephone number dialed or the ID
make a telephone call, press directly below .
number of the last call/page transmitted/received.
OR
Last Telephone Number Dialed
Last ID Number Transmitted/Received
35
Page 39

Common Radio Features
HOME
• Using the Feature
1. Telephone Calls Only — Your radio may be programmed to automatically
access the telephone system (immediate access/auto access) or wait for
you to do something (manual access/delayed access); consult your service
technician to determine which way your radio was programmed.
• Immediate Access:
The display will show “PLEASE WAIT”
while your radio attempts to access the
telephone system.
If the access was successful, you will hear
a dial tone, and the display will again
show the last number dialed.
• Auto Access (Conventional Channels
Only):
The display will show “PLEASE WAIT”
while your radio attempts to access the
telephone system via a radio-to-landline
phone patch.
• Manual Access (Conventional Channels
Only):
Enter a special telephone system access
code using the keypad to access the
telephone system via a radio-to-landline
phone patch.
2
1
ABC
4GHI
7PRS 8TUV
5JKL
0
3DEF
6MNO
9WXY
• Delayed Access:
Enter a new phone
2
1
ABC
number or ID number
using any of the numeric
(0–9) keys; then press
the PTT Switch (see
4GHI
7PRS 8TUV
5JKL
0
3DEF
6MNO
9WXY
following notes).
If the display shows “NO PHONE” or you do not hear a dial tone in any
of the above situations, “hang up” (disconnect) by pressing or the
designated quick-access button (Phone, Private Call, Selective Call, or
Call Alert Button).
If the display shows “PHONE BUSY,” your call is placed in queue until a
line is available.
36
Page 40

Common Radio Features
1
4
GHI
7
P
RS
2
ABC
5
JKL
8
TUV
3
DEF
6
MNO
9
WXY
0
HOME
7
9
5
3
1
1
A
2. If the party you are calling answers,
converse in the normal manner. Press the
PTT Switch to talk; release the PTT
Switch to listen.
Notes
• After reaching the number you are calling,
you may need to dial an extension
number before you can reach your party.
• Motorola trunked radios generate a highpitched tone when the radio’s PTT Switch
is released. This is heard by the landline
party and is an indicator to begin talking.
3. When you have finished your conversation, or if the display shows “NO
PHONE” or “NO ACKNOWLEDGE, “hang up” (disconnect) by pressing
HOME
or the Phone Button.
Talk = Press & Hold
PTT Switch
Listen = Release PTT
Switch
If the display shows “PHONE BUSY,” your call is placed in queue until a
line is available.
The radio will return to the home display.
37
Page 41

Common Radio Features
• Calling the Last Number
Dialed or Last ID Number
Transmitted/Received
1
3
1
9
5
7
A
For Telephone Calls Only — Press the PTT
Switch. You will either hear ringing or a
busy tone. On a trunking system, if you
HOME
hear a busy tone, press the PTT Switch to
try again. Otherwise, press to exit
the Telephone Call feature.
For Private-Conversation Calls Only — Press
the PTT Switch. Begin talking.
HOME
DEF
3
ABC
2
MNO
1
GHI
4
RS
P
7
6
JKL
5
WXY
9
TUV
8
0
For Enhanced Private-Conversation Calls
Only — Press the PTT Switch. If the radio
you are calling is in service, you will hear
ringing and, if the target-radio user responds to the call, the individual’s
voice.
For Selective Calls — Press the PTT Switch. Begin talking.
For Call-Alert Pages Only — If the page was accepted, you will hear four
beeps, and the radio will return to the home display. If the page was not
accepted, no beeps will be heard; press the PTT Switch to try again or
press to exit the Call-Alert Page feature.
HOME
• Calling a Number From a List
Use the “list” feature to select a specific number from your radio’s memory list:
1a. Scroll through the list by pressing
or until you locate the
member’s number you wish to call.
Backward
FIRST
FIRST
LIST
LIST
LAST
LAST
Forward
1b. Go directly to a specific
member in the list by
entering the number (1
through 19) that corresponds
OR
to that member’s placement
within the list; then press the
PTT Switch.
2
1
ABC
3DEF
4GHI
5JKL
6MNO
7PRS 8TUV
9WXY
0
If the system does not acknowledge the call, your radio will alternately
display “NO ACKNOWLEDGE” and the currently selected number.
38
Page 42

Common Radio Features
• Calling a New Number
(if enabled through radio service
software)
Enter a new phone number or ID
number using any of the numeric
(0–9) keys; then press the PTT
Switch (see following note).
This action does not “program” a new number in your radio’s memory list;
this is a temporary number only.
The first digit of the new number will be shown, and a blinking cursor,
indicating the position of the next number to be added, is also displayed.
OR
2
1
ABC
4GHI
5JKL
7PRS 8TUV
0
3DEF
6MNO
9WXY
When the maximum number of digits (16 for a telephone number, 6 for a
trunking ID number, and 4 for a conventional MDC ID number) has been
entered, the cursor will disappear. If you try to add any more digits, you
will hear an invalid tone.
Note
T elephone Calls—Y our radio may be programmed with either live
dial or buffered dial; consult your service technician to determine
which way your radio was programmed.
• Live Dial:
Live dial will send out each digit as the key is pressed, in a
similar fashion to a regular desktop telephone.
• Buffered Dial:
Buffered dial will require that you enter all digits and then
press the PTT Switch. Pressing followed by will
enter a pause in the number (shown as a “P” on the display).
You may erase incorrectly entered digits by using ,
which acts as a backspace.
39
Page 43

Common Radio Features
7
9
5
3
1
1
A
See page 2
for your
radio’s
featurecontrol
programming.
• Answering an Individual Call
1. When an individual call is being received, you will hear and/or see:
• a telephone-type ringing if it is a telephone call;
• two alert tones if it is a Private-Conversation call or selective call;
• a continuous cycle of four tones if it is a Call-Alert page;
• the LED blinks green;
• the indicator flashing; and
• the display will show one of the following:
Telephone Call
2a. Telephone Calls
Only — Press the
Call Response
Button.
1
3
1
9
5
7
A
See page 2
for your
radio’s
featurecontrol
programming.
Private-Conversation Call
or Selective Call
2b. Private-Conversation
Calls and Call-Alert
Pages with PrivateConversation —
Within 20 seconds,
press the Call
Response Button.
OR
1
3
1
9
5
7
A
See page 2
for your
radio’s
featurecontrol
programming.
Call-Alert Page
2c. Call-Alert Pages Only
— To see the caller’s
ID, press the Select
Button.
OR
40
The display will show
the caller’s ID number.
Press the PTT Switch
to talk privately.
Selective Call —
The display will
remain active for 2
seconds and then the
speaker will unmute.
If you wish to
respond, press the
PTT Switch and your
conversation will be
heard by the entire
talkgroup.
Page 44

Common Radio Features
1
4
GHI
7
P
RS
2
ABC
5
JKL
8
TUV
3
DEF
6
MNO
9
WXY
0
HOME
7
9
5
3
1
1
A
3. Converse in the normal manner . Press the
PTT Switch to talk; release the
PTT Switch to listen.
Talk = Press & Hold
PTT Switch
Listen = Release PTT
Switch
4. When you have finished your
conversation, “hang up” (disconnect) by
pressing . The radio will return to
HOME
the home display.
PL Defeat
The PL defeat feature allows you to override any coded
squelch (DPL, PL, or network ID) that may be
programmed to a channel. To activate this feature,
place the PL Defeat Switch (if programmed, see page
2) in the PL defeat position. You will then be able to
hear any activity on the channel; if no activity is
present, the radio is muted.
1
3
1
9
5
7
A
See page 2
for your
radio’s
feature-
control
programming.
Repeater Access
Repeater access allows you, the user, to selectively
activate repeaters, which is especially useful in areas where repeaters are placed
close together to ensure total coverage. Repeater access can operate
automatically or manually and can be enable through radio service software
on a per channel basis. During automatic repeater access, a sidetone is
generated to indicate that the repeater access code is being transmitted to
discourage you from talking over the data transmission.
In radios programmed with manual repeater access,
you activate the repeater access code transmission by
1
3
1
9
pressing the Repeater Access Button (if programmed,
see page 2); no sidetone is generated. On radios with
MDC-1200™ signalling, when the repeater access is
acknowledged, the radio will emit an acknowledge
alert tone. This acknowledge alert tone can be
disabled through radio service software.
5
7
A
See page 2
for your
radio’s
feature-
control
programming.
41
Page 45

Common Radio Features
Repeater/Direct
The repeater/direct feature allows you to bypass the repeater and talk directly
to another radio. This is known as DIRECT operation or talkaround operation.
The transmit frequency is the same as the receive frequency.
In REPEATER operation, you talk through the repeater, which increases the
radio’s operating range. The transmit frequency is not the same as the receive
frequency.
• Selecting Repeater or Direct Operation
1a. Press until appears
on the display.
1b. Place the Repeater/Direct
Switch (if programmed, see
page 2) in the “repeater”
OR
position or the “direct”
position.
1
3
HOME
2. Press directly below .
HOME
1
9
5
7
A
See page 2
for your
radio’s
featurecontrol
programming.
3. The display will show the current operation for a few seconds and then
the two possible operations.
4. Press below the desired operation ( or ).
Notes
Pressing or the PTT Switch will exit this display menu
without changing the current operation
42
OR
HOME
Page 46

Common Radio Features
Scan
= Scan Feature Active
The scan feature allows you to monitor activity on different channels by
scanning a “scan list.” Each radio can have up to 20 different scan lists. The
channels to be scanned can be programmed with the radio service software or
manually by using the keypad.
Three types of scan lists are available (consult your service technician for
additional information):
• Trunking Priority Monitor — Comprises channels that are all from the
same trunking system (10 different channels maximum).
• Conventional — Comprises only conventional channels (10 different
channels maximum).
• Talkgroup Scan — Comprises conventional and trunked channels from
more than one trunking system (15 different channels maximum).
Priority operation is not available in this type of list.
There are also several types of scanning available:
• Priority-One Scanning — With priority-one
scanning enabled, one member of the scan list is
chosen as the priority-one member . Any activity
on the priority-one channel will be heard on the
speaker even if another channel in the scan list
has activity on it.
(Flashing Dot)
= Priority-One
Channel
• Priority-Two and Non-Priority Scanning — In
addition to the priority-one channel being the
number one priority, a second channel can be
assigned as a priority-two channel, if desired.
The remaining members in the scan list can be
programmed as non-priority members of the
scan list.
(Dot On Steady)
= Priority-Two
Channel
• Automatic Scanning (Autoscan) — With this feature, the radio begins
scanning whenever you select a channel to which a scan list is assigned
(strapped). The radio will continue auto scanning until you select a
channel that does not have autoscan enabled.
• Operator-Selectable Scan — Scan can be programmed to be selected by a
softkey related button or a Scan On/Off Switch (see page 2).
43
Page 47

Common Radio Features
7
9
5
3
1
1
A
See page 2
for your
radio’s
featurecontrol
programming.
• Turning Scan On and Off
1a. Press until appears
on the display.
1b. Place the Scan On/Off Switch
(if programmed, see page 2) in
the “scan on” position or the
“scan off” position.
OR
HOME
2. Press directly below .
HOME
3. The display will show the current scan state.
OR
4. Press below the desired scan state ( or ). When the
scan feature is on (active), the scan indicator ( ) is displayed.
Notes
Pressing or the PTT Switch will exit this display menu
without changing the scan activity state.
HOME
44
Page 48

Common Radio Features
• Deleting Nuisance Channels
When the radio scans to a channel that you do not
wish to hear (nuisance channel), you can
1
3
temporarily delete the channel from the scan list.
1. When the radio is locked onto the channel to be
deleted, press the Nuisance-Delete Button (if
programmed, see page 2). Repeat this step to delete
additional nuisance channels.
Notes
Priority channels and the selected channel
cannot be deleted using the nuisance-delete
feature.
2. The radio continues scanning the remaining channels in the list. To
resume scanning the deleted channel, you can change channels or leave
and re-enter scan operation.
1
9
5
7
A
See page 2
for your
radio’s
feature-
control
programming.
• Dynamic Priority Change (Conventional Operation Only)
While the radio is scanning, the dynamic priority change feature lets you
temporarily change any channel in a scan list (except the priority-one
channel) to the priority-two channel. The present priority-two channel
becomes a non-priority channel. This change remains in effect until scan
is turned off, then scanning reverts back to the preprogrammed state.
1. When the radio is locked onto the channel to be designated as prioritytwo, press the Dynamic Priority Button (if programmed, see page 2).
Notes
The priority-one channel cannot be changed to priority-two.
2. The radio continues scanning the remaining channels in the list. To
resume scanning the preprogrammed priority-two channel, you must
leave and re-enter scan operation.
• Viewing a Scan List
The “view scan list” feature allows you to view the members of the scan
list associated with the currently selected channel. Y ou view a scan list the
same way you view other lists (see “Viewing a List” on page 14).
45
Page 49

Common Radio Features
• Programming a Scan List
Notes
Priority channels and the selected channel cannot be deleted
using the nuisance-delete feature.
1. Press until the softkey appears
on the display.
HOME
2. Press directly below .
HOME
3. The display changes to show the lists ( , , , etc.) that
can be changed; use or to see other available lists.
4. Press directly below .
HOME
5. The display will show the first member in the list. The status
indicator will appear (flashing), indicating you are in the programming
mode.
Flashing = Programming Mode
46
Page 50

Common Radio Features
7
9
5
3
1
1
A
See page 2
for your
radio’s
featurecontrol
programming.
6a. Press below the desired
state ( or ).
= add currently displayed
channel to the scan list
= delete currently displayed
channel from the scan list
Notes
Each press of the softkey-related button, or the
programmed Select Button (see page 2), will cause one of the
following to occur:
6b. Press the Select Button to
change the scan-list status of
the currently displayed
channel.
OR
• The scan indicator ( ) will appear to indicate that this
channel has been added to the scan list.
• A “•” will be displayed next to the scan indicator ( ) to
indicate that this channel is the priority-two channel.
• The scan indicator will turn off to indicate that this channel
has been removed from the scan list.
47
Page 51

Common Radio Features
7
9
5
3
1
1
A
7a. Use or
to select additional
channels to be
added or deleted
from the scan list.
7b. Use the keypad to
go directly to a
channel number to
OR
be added or
deleted from the
7c. Rotate the 16-
OR
scan list.
HOME
8. Press to exit the scan list programming mode.
Notes
HOME
The following notes are dependent upon your radio’s
programming; consult you service technician.
Position Select
Knob to select
additional
channels to be
added or deleted
from the scan list.
• A maximum of 16 channels can be added to the scan list
(including the selected channel). If you try to add more than
16 channels to the scan list, the radio will sound an invalid
tone to indicate the scan list is full.
• Anytime a new priority-one channel is assigned, the radio
will automatically cancel the old priority-one channel
assignment (radio service software programmable).
• Anytime a new priority-two channel is assigned, the radio
will automatically cancel the old priority-two channel
assignment (radio service software programmable).
48
Page 52

Common Radio Features
Selecting Squelch Operation
Tone Private-Line® (PL), Digital Private-Line™ (DPL), network ID, and carrier
squelch operations are all available in the same radio on a per channel basis.
Notes
When in carrier squelch operation, all traffic on the channel is heard. When
in PL, DPL, or network ID operation, your radio responds to only those
messages intended for you. PL, DPL, network ID, and carrier squelch can be
programmed on a per channel basis.
Whenever the radio is operating in carrier squelch, the display will show the
status indicator.
Network ID is only available on ASTRO “digital” channels
(consult your service technician).
On Steady = Carrier-Squelch
Operation
49
Page 53

Common Radio Features
Smart PTT
Smart PTT is a per-channel, programmable feature used in conventional radio
systems to keep radio users from talking over other radio conversations. When
smart PTT is enabled in your radio, you will not be able to transmit on an
active channel. If you try to transmit (press the PTT Switch) on an active
smart-PTT channel, a continuous alert tone will be generated until you release
the PTT Switch, and the transmission will be inhibited. The LED will also
blink red to indicate that the channel is busy.
Three radio-wide variations of smart PTT are available:
• Transmit Inhibit on Busy Channel with Carrier — With this feature
enabled, you will be prevented from transmitting if any activity is
detected on the channel.
• Transmit Inhibit on Busy Channel with Wrong Squelch Code — With
this feature enabled, you will be prevented from transmitting on an active
channel with a squelch code or (if secure-equipped) encryption key other
than your own. If the PL code is the same as yours, the transmission will
not be prevented.
• Quick-Key Override — This feature can work in conjunction with either
of the two above variations. With this feature enabled, you will be able to
override the transmit-inhibit state by quick-keying the radio (two PTT
Switch presses within one second of each other).
50
Page 54

4
Special Radio Features
Dynamic Regrouping
The dynamic regrouping feature allows the dispatcher to temporarily
reassign selected radios to a single special channel so that they can
communicate with each other . This feature, enabled in each radio by means
of the radio service software, is typically used during special operations. Y ou
will not notice whether your radio has this feature enabled until a dynamic
regrouping command is sent by the dispatcher.
Note
1. When your radio has been dynamically regrouped, you will hear a
“gurgle” tone (unless you are already on the dynamic-regrouping
zone/channel), and your radio will be automatically switched to the
dynamic-regrouping channel. The display will show the name
assigned to the dynamic-regrouping channel.
Note
Exception to this Note
If you select the dynamic-regrouping zone/channel using
softkeys or other radio controls without being dynamically
regrouped, an invalid tone will be heard.
If you are using a radio control knob or switch (not softkeys) to
select the zone or channel — Until you select the correct
dynamic-regrouping position, you will not be able to select
scan, telephone call, or Private Conversation call feature, and
you will hear a gurgle tone each time you press the
This is a reminder to you that you are transmitting on the
dynamic-regrouping channel, not the zone or channel
indicated by the position of the radio control.
If your radio is programmed as a selectenabled radio —Once you select the correct dynamicregrouping position, you can change the radio’s zone or
channel knob/switch position, press the
will transmit on the dynamic-regrouping zone/channel, and
you will not hear the “gurgle” tone.
PTT Switch
PTT Switch
, which
.
51
Page 55

Special Radio Features
2. Talk and listen as usual.
3a.
For Radios Using
Zone
and
Channel Selection
When the dynamic
cancelled by the dispatcher, the
radio will automatically return to
the original
channel before the radio was
dynamically regrouped.
Only Softkeys
regrouping is
softkey zone and
for
—
3b.
OR
For Radios Using
Switches
Channel Selection
When the dynamic regrouping
is cancelled by the dispatcher,
the radio will automatically
return to the present knob/
switch zone and/or channel
position and the original softkey
zone or channel selection.
for Zone
Knobs
and/or
—
• Reprogram Request
This feature allows you to notify the dispatcher that you want a new
dynamic-regrouping assignment.
1a. Press until the softkey
appears on the display.
1b. Press the
Button
OR
to step 3.
Reprogram Request
(see page 2); then go
or
2. Press directly below .
3. The display changes to show “REPROGRAM RQST,” and the reprogram
request is automatically sent to the dispatcher.
4a. If you hear one beep, press the
PTT Switch to resend the
reprogram request again, or
pressto hang up and return to the
home display.
Note
If the dispatcher fails to
acknowledge the
reprogram request within
six seconds, a low-pitched
alert tone sounds and the
display changes to “NO
ACKNOWLEDGE.” Try
again or press.
4b. If you hear five beeps, the
reprogram request was
acknowledged by the
dispatcher, and your radio
will return to the home
display.
52
Page 56

Special Radio Features
• Select Enable/Disable
The dispatcher may classify regrouped radios into either of two categories:
select enabled or select disabled.
• Select-enabled radios are free to make channel changes to any
available channel, including the dynamic-regrouping channel.
• Select-disabled radios cannot change channels since the dispatcher
has specifically chosen to force the radio to remain on the dynamicregrouping channel.
Note
The scan, telephone call, or Private Conversation call feature
cannot be selected while your radio is select disabled.
53
Page 57

Special Radio Features
7
9
5
3
1
1
A
See page 2
for your
radio’s
featurecontrol
programming.
PTT-ID Receive
The PTT-ID receive feature allows you to see the radio ID number of the radio
you are currently receiving. This ID can be a maximum of eight characters and
can be viewed by both the receiving radio and the dispatcher. On trunking
radios, pressing or will replace the displayed ID with the
softkey menu selections; pressing will bring back the ID display.
HOME
PTT-ID Transmit
The PTT-ID transmit feature is a per channel feature where your radio’s ID
number is automatically sent every time the
upon how your radio was programmed, your radio’s ID can be transmitted at
the beginning of a transmission, at the end of a transmission, or at the
beginning and ending of a transmission. For digital voice transmissions, your
radio’s ID is sent during the voice message.
PTT Switch
is pressed. Depending
If your radio has MDC-1200™ signalling and the ID is sent before the voice
transmission, you will hear a tone until the ID transmission is completed; this
helps you avoid talking while the ID code is being transmitted.
To view your radio’s ID number:
1a. Press until the or
softkey appears on the display.
1b. Press the
Page Button
Call Button
(if
or
programmed, see page
2. Press directly below
or .
OR
2). Then go to step 3.
3. Press .
4. The display changes to show your
radio’s ID.
54
Page 58

Secure Operation
.
Special Radio Features
Note
Secure operation provides the highest level of commercially
available voice security on trunked or conventional channels.
Unlike other forms of security, Motorola digital encryption
provides signalling that makes it virtually impossible for others to
decode any part of an encrypted message.
• Selecting Secure or Clear Transmissions
The
Secure/Clear Switch
will set the transmit operation of the radio before the
PTT Switch
is pressed; the transmit operation cannot
be changed while the
If a channel is programmed for
secure-only operation
, and the
Secure/Clear Switch
clear ( ) position, when the
PTT Switch
is pressed, the
display will show “SECURE
TX ONLY,” an invalid-mode
tone will sound, and the radio
will not transmit until the
Secure/Clear Switch
the secure ( ) position.
(if programmed, see page 2)
PTT Switch
is pressed.
If a channel is programmed for
clear-only operation
is in the
Secure/Clear Switch
secure ( ) position, when the
PTT Switch
display will show “CLEAR TX
ONLY,” an invalid-mode tone
will sound, and the radio will not
transmit until the
is set to
Switch
position.
is set to the clear ( )
1
3
1
9
5
7
A
See page 2
for your
radio’s
featurecontrol
programming
, and the
is in the
is pressed, the
Secure/Clear
55
Page 59

Special Radio Features
• Managing Encryption
KEY Loading
1. Refer to the key-variable loader (KVL) manual for equipment connections
and setup.
2. When the KVL is attached to your radio, the display will show
“KEYLOADING,” and all other radio functions will be locked out.
3. Pressing the KVL’s PTT switch will load the encryption keys into your
radio. When the key has been loaded successfully, the radio will sound a
short tone for single-key radios; for multikey radios, an alternating tone
will be heard.
KEY Erasure (KEY Zeroization) — Method 1
1. Press until the softkey appears on the display.
2. Press directly below .
3. The display changes to show the last user-selected and stored encryption
key and the available softkey selections.
Note
4. Press directly below the desired softkey.
“ERASE ALL KEYS” and and for erase confirmation.
shows “ERASE SNGL KEY” and and for erase confirmation.
The scan, telephone call, or Private Conversation call feature
cannot be selected while your radio is select disabled.
= erases all the encryption keys in the radio. The display shows
= exits this menu and returns to the home display.
= selects the displayed encryption key to be erased. The display
Press or to scroll through the encryption keys or use the
keypad to enter the encryption-key’s placement in the list. The display
changes to show the new selection on the upper line.
5. Press , the
the
HOME
16-Position Select Knob
56
PTT Switch
, the softkey-related button, or turn
to exit this menu.
Page 60

KEY Erasure (All KEYS Erased) — Method 2
Special Radio Features
1. With the radio on, press and hold the
this button down, press the
Note
2. When all the encryption keys are erased, the display will show
“ERASED.”
MultiKEY
The multikey feature allows your radio to be equipped with as many as 16
different encryption keys and supports up to two different encryption
algorithms simultaneously (for example, DVP-XL™ and DES-XL, or
DVP™ and DVP-XL).
•
DO NOT press the
emergency situation; this would send an emergency alarm.
Multikey — The encryption keys can be tied (strapped), on a oneper-channel basis through radio service software. In addition, you
can have operator-selectable keys, operator-selectable indices, and
operator-selectable key erasure.
Emergency Button
Emergency Button
Top Side Button
.
first unless you are in an
; while holding
• Trunked Multikey — If you use your radio for both conventional
and trunked applications, you will have to strap your encryption keys
for trunking on a per- talkgroup or announcement-group basis. In
addition, you may strap a different key to other features for example,
dynamic regrouping, failsoft, emergency talkgroup, or emergencyannouncement group.
KEY Selection
1. Press until the softkey appears on the display.
2. Press directly below .
3. The display changes to show the last user-selected and stored encryption
key and the available softkey selections.
57
Page 61

Special Radio Features
4a. Press or to scroll
through the encryption keys.
Note
If an erased key is selected, the key name will be alternated with
OR
4b. Enter the number of the
desired index.
“ERASED KEY.”
5. Press directly below the desired softkey, or if you did step 4b,
press or to scroll through the menu selections.
or “PRESET” = selects the preset or default encryption key.
= saves the newly-selected key and returns to the home display.
6. Press , the PTT Switch, the softkey-related button, or turn
HOME
the 16-Position Select Knob to exit this menu. If the selected key is
erased, “KEY FAIL” will be displayed and a momentary keyfail tone will
be generated.
Index Selection
The select-an-index feature allows you to select one or more groups of
several encryption keys from among the available keys stored in the radio.
For example, you could have a group of three keys structured to one index,
and another group of three different keys structured to another index; by
changing indices, you would automatically switch from one set of keys to
the other . Every channel to which one of the original keys was tied to will
now have the equivalent new key instead. Indexing allows the keymanagement controller to remotely change the keys within the index,
that is not currently being used, without disrupting operation of the radio.
1. Press until the softkey appears on the display.
2. Press directly below .
3. The display changes to show the last user-selected and stored index and
the available index softkey selections.
58
Page 62

Special Radio Features
4a. Press directly below the
desired index.
OR
4b. Enter the number of the
desired index.
5. T o save the newly selected index, press below . The radio will
then exit index selection and return to the home display.
Note
Pressing or the PTT Switch or turning the 16-Position
HOME
Select Knob will exit this display menu without changing the
index selection.
59
Page 63
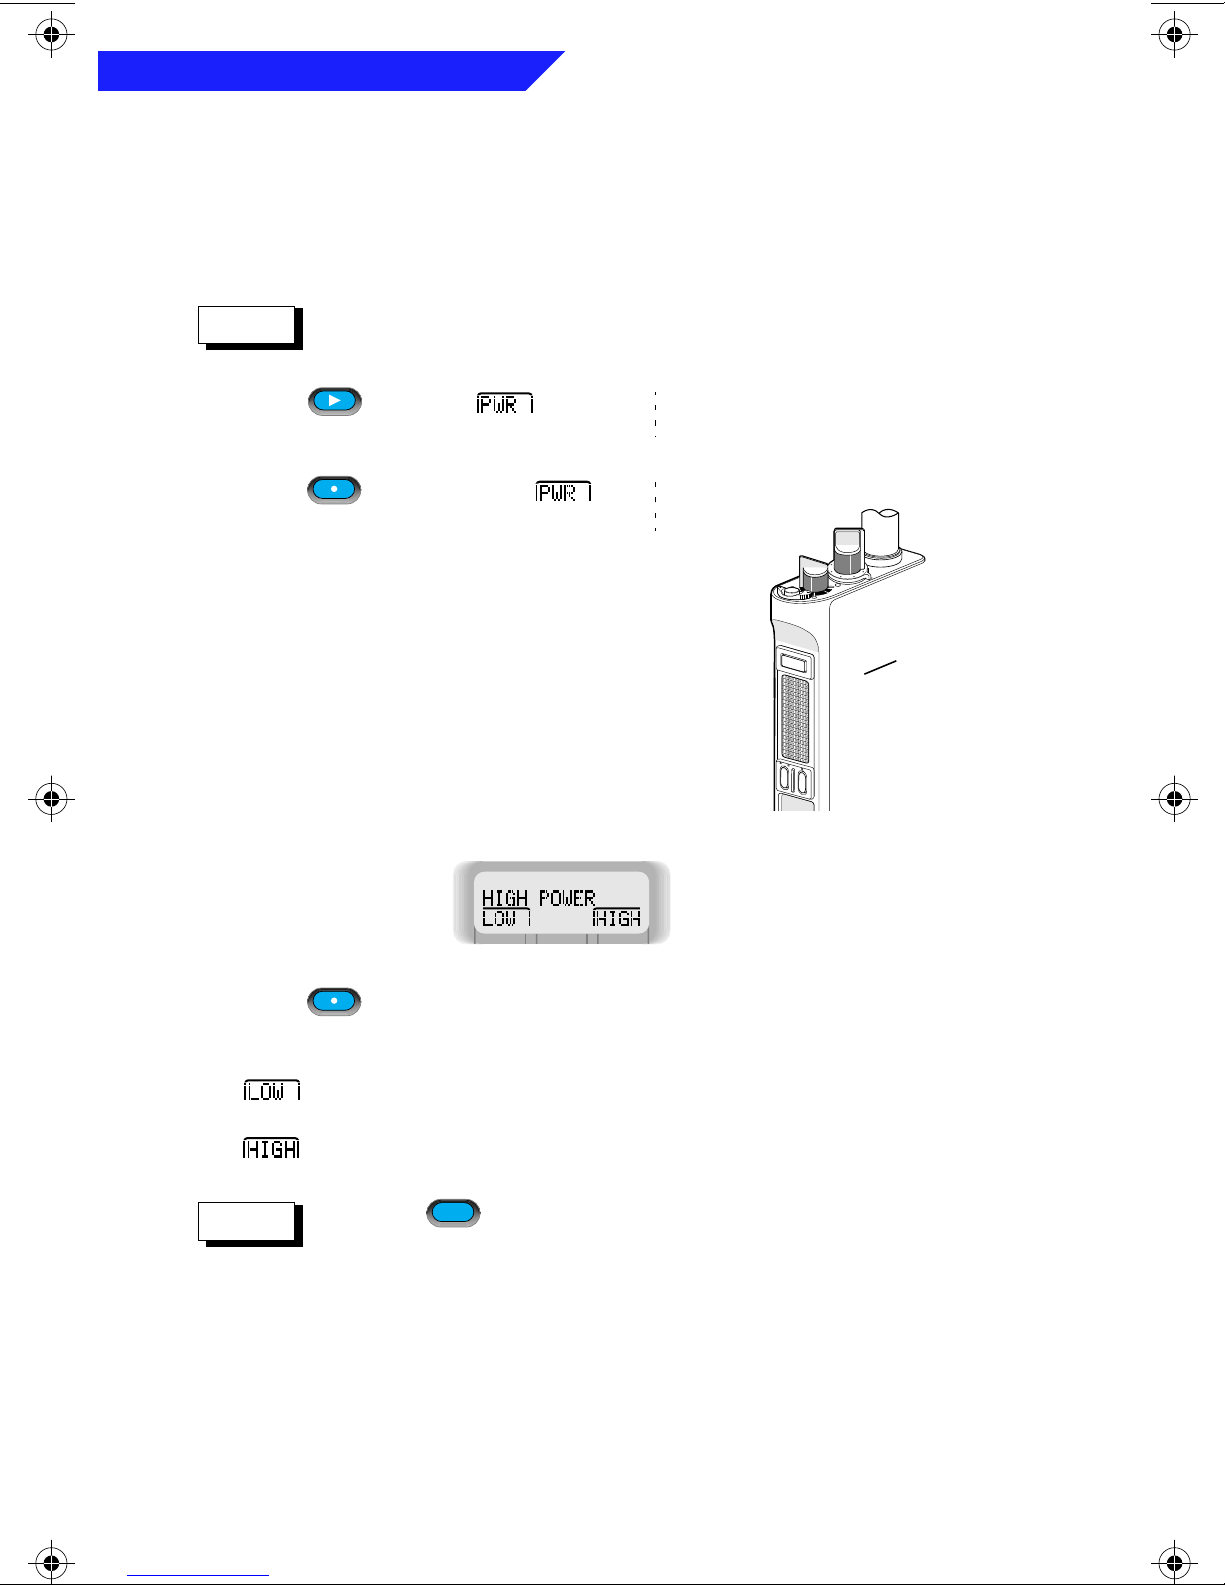
Special Radio Features
.
Selectable Power-Level
This feature allows you to select the power level at which your radio will
transmit messages.
Note
The radio will always turn on to the default setting as determined
through radio service software.
1a. Press until the softkey
appears on the display.
2. Press directly below .
1b. Press the TX Power-Level
Switch (if programmed, see
OR
page 2). This will take you
directly to step 3.
1
1
9
5
7
A
See page 2
for your
radio’s
featurecontrol
programming
3. The display changes to show the current power-level state.
3
4. Press directly below the desired condition. The new transmit
power-level is saved, and your radio returns to the home display.
= shorter transmitting distance; conserves battery life
= longer transmitting distance; lessens battery life
Note
Pressing or the PTT Switch will exit this display menu
without changing the power selection.
60
HOME
Page 64

Special Radio Features
Trunking System Controls
• Busy Override
When a talkgroup call is placed in a SmartZone™ system and the system is not
able to obtain voice channels at all necessary sites, a busy tone will be generated.
If so programmed in the zone manager and through the radio service software,
you may override this busy by performing the following steps:
1. Press the PTT Switch; a busy indication is received.
2. Release the PTT Switch.
3. Press and hold the PTT Switch a second time. The busy tones are heard
again. After a few seconds, a busy-override chirp will be generated (if so
programmed), and the radio will send in a busy-override request.
4. The talkgroup call will be placed at all sites that have voice channel
resources available. Other sites will be added to the call as channels
become available. Note: Realize that not all members of the talkgroup
will be able to hear a call when a busy override is requested.
• Dispatcher-Interrupt
The dispatcher-interrupt feature allows the dispatcher to interrupt your radio
and place you in a Private Conversation call with the dispatcher.
1. When your radio receives a dispatcher-interrupt call, you will hear a
repeating sequence of four, short, medium-pitched tones until you
answer the call. The display will show “DISP INTERRUPT” on the first
line and “PLEASE W AIT” on the second line. The green LED will also flash
to announce that a call is being received.
2. When the second line displays the ID
of the dispatcher that has initiated
the dispatcher-interrupt, press the
PTT Switch and converse in the
normal manner with the dispatcher.
3. When you are finished with your conversation, hang up by pressing .
The radio will return to the home display.
HOME
61
Page 65

Special Radio Features
• Failsoft
If a trunking system experiences a complete failure, the radio will revert to
failsoft operation and automatically switch to its failsoft channel. During
failsoft, the trunking repeaters will transmit a medium-pitched tone every 10
seconds. When the trunking system returns to normal operation, your radio
will automatically leave the failsoft operation and return to trunked operation.
• Out-of-Range
If you go out of range of the system and can no longer lock onto a control
channel, the display will alternately display “OUT OF RANGE” and the
currently selected zone/channel combination, and/or sound a low-pitched
tone. Your radio will remain in this out-of-range condition until it (1) locks
onto a control channel, (2) locks onto a failsoft channel, or (3) the radio is
turned off.
• Site Lock
This feature allows your radio to lock onto a specific site and not roam among
wide-area talkgroup sites. This is particularly useful when operating at the
fringe of a system’s coverage.
1a. Press until the
softkey appears on the display.
2. Press directly below .
3. The display changes to show the
current lock state.
4. Press directly below the desired condition ( or ). The
new site-lock state is saved, and your radio returns to the home display.
1b. Press the Site Lock/Unlock
Button (if programmed, see
OR
page 2).
• If the Site Lock/Unlock
Button is a side button, the
site-lock state will change,
and the new state will be
displayed momentarily.
• If the Site Lock/Unlock
Button is the top button,
go to step 3.
62
Page 66

Special Radio Features
• Site Trunking
If the zone dispatcher loses communication with any site, that site will revert
to what is known as “site trunking.” Your radio will alternately display “SITE
TRUNKING” and the currently selected zone/channel combination. When
this occurs, you will only be able to communicate with other radios within
your trunking site.
• Site View and Change
Viewing the Current Site
1. Momentarily press the Site Search Button (if programmed, see page 2).
2. The display will show the number of the current site, or if the radio is
scanning for a new site, the display will show “SCANNING SITE” until it
locks onto a new site, then it will show the number of the new site.
Changing the Current Site
1. Press and hold down the Site Search Button (if programmed, see page 2)
to manually force the change to a new site.
2. You will hear a tone, and the display will show “SCANNING SITE” while
the radio scans for a new site. Then, the radio automatically returns to
the home display.
63
Page 67

Special Radio Features
64
Page 68

Additional Information
Glossary
5
ACK
Channel
Control Channel
Conventional
Cursor
Dispatcher
Acknowledgement of communication
A group of characteristics such as transmit/receive
frequency pairs, radio parameters, and encryption
encoding
In a trunking system, one of the channels that is used
to provide a continuous, two-way/data
communications path between the central controller
and all radios on the system
Typically refers to radio-to-radio communications,
sometimes through a repeater; does not use a
trunking (controller) system (See Trunking)
A visual tracking marker (a blinking line) that
indicates a location on the display
An individual who has radio system management
duties
FCC
Hang Up
Home Display
Landline Caller
LCD
Page
Federal Communications Commission
Disconnect
The first display information after the radio
completes its self test
Someone communicating through the public
telephone system
Liquid Crystal Display
A one-way alert, with audio and/or display messages
65
Page 69

Additional Information
PTT
Radio-To-Landline
Repeater
RF
Softkeys
Squelch
Push-To-Talk - the PTT switch engages the transmitter
and puts the radio in transmit (send) operation when
pressed
Communicating from a portable/mobile radio through
the telephone system.
A conventional radio feature, where you talk through a
receive/transmit facility (repeater), that re-transmits
received signals in order to improve communications
range and coverage
Radio Frequency
Features shown on the display with a key-like outline -
selection of these features is controlled by
buttons
The muting of audio circuits when received signal levels
fall below a pre-determined threshold
Standby
Talkgroup
Trunking
Zone
An operating condition whereby the radio’s speaker is
muted but still continues to receive data
An organization of radio users who communicate with
each other
The automatic sharing of communications paths
between a large number of users (See Conventional)
A grouping of channels
66
Page 70

Alert Tones
Additional Information
Sound
Short,
Low-Pitched
Tone
Continuous,
Low-Pitched
Tone
Tone Name Occurs:
Invalid Key-Press when the wrong key is pressed
Radio Self-Test
Fail
No ACK Received
Reject
Time-Out Timer
Warning
Time-Out Timer
Timed Out
Talk Prohibit/
PTT Inhibit
Out-of-Range
when the radio fails its power-up self
test
when the radio fails to receive an
acknowledgement from the
dispatcher
when an unauthorized request is
made
four seconds before time out
after time out
when the PTT switch is pressed and
transmissions are not allowed
when the PTT switch is pressed and
the radio is out of range of the system
A Group of Low-
Pitched Tones
(Busy Tone)
Short,
Medium-Pitched
Tone
Invalid Mode
Individual Call
Warning Tone
Busy
Valid Key-Press when the correct key is pressed
Radio Self-Test
Pass
Clear Voice
Priority Channel
Received
Emergency Alarm
Entry
Central Echo
when the radio is on an
unprogrammed channel
when the radio is in an individual
call for greater than 6 seconds
without any activity
when interconnect channel, phone
line, or system is busy
when radio passes its power-up self
test
at the beginning of a non-coded
communication
upon reception of activity on a
priority channel
upon entering the emergency state
when the central controller has
received a request from a radio
67
Page 71

Additional Information
Sound
Continuous,
Medium-Pitched
Tone
A Group of
Medium-Pitched
Tones
Tone Name Occurs:
Volume Set
Emergency Exit upon exiting the emergency state
PTT Sidetone
Failsoft when system fails
Automatic Call
Back
Talk Permit
Dispatcher-
Interrupter
Keyfail
Console
Acknowledge
when volume changed on a quiet
channel
when data is sent by pressing the PTT
switch, but the user must wait to talk
when voice channel is available from
previous request
upon pressing the PTT switch;
verifying system accepting
transmissions
Upon receipt of a dispatcherinterrupt call
when an encryption key has been
lost
when a status, message, emergency
alarm, or reprogram request ACK is
received
Short,
High-Pitched
Tone
(Chirp)
Continuous,
High-Pitched
Tone
A Group of
High-Pitched
Tones
Ringing
Gurgle
Received
Individual Call
Call Alert Sent
Low-Battery
Chirp
Phone Dekey
Chirp
Quik-Call™
Group Call
Quik-Call
Individual Call
Phone Ringing when a phone call is received
Enhanced Call
Received
Dynamic
Regrouping/Over-
The-Air
Programming
when a Call Alert or Private
Conversation call is received
when a Call Alert is received by the
target radio
when battery is below preset
threshold value
from radio to phone line upon
releasing the PTT switch
when a Quik-Call group call is
received
when a Quik-Call individual call is
received
when originator receives ACK from
an enhanced private call
when a dynamic ID has been received
and the PTT switch is pressed and the
reprogrammed group has not been
selected and when the radio is
successfully re-keyed
68
Page 72

Status Indicators
Additional Information
Symbol
(Dot Flashing)
(Dot Steady)
Indicator
Name
Battery Status flashes when the battery is low
Carrier Squelch
Secure
Operation
Call Received
Scan
Priority-One
Channel Scan
Priority-Two
Channel Scan
View/
Programming
indicates the radio is operating in
the carrier-squelch mode
appears when your radio is in secure
operation; on = secure; off = clearoperation
flashes when an individual call is
received
indicates when the radio is in scan
operation
indicates when the radio is in
priority-one channel scan operation
indicates when the radio is in
priority-two channel scan operation
indicates when the radio is in the
view or programming mode; on
steady = view mode; flashing =
programming mode
Description
Direct
indicates whether you are talking
directly to another radio
(talkaround) or through a repeater;
on = direct; off = repeater
69
Page 73

Additional Information
!
!
Battery Charging and Disposal
• Charging Nickel-Cadmium Batteries
Charge the battery before use to ensure optimum capacity and performance.
The battery was designed specifically to be used with a Motorola charger.
Charging in non-Motorola equipment may lead to battery damage and void
the battery warranty.
Note
When charging a battery that is attached to the radio, turn the
radio off to ensure a full charge.
WARNING
Do not attempt to change or charge the battery in a
hazardous atmosphere.
The battery should be at about 77°F (room temperature) whenever possible.
Charging a cold battery (below 50° F) may result in leakage of electrolyte and
ultimately , in failure of the battery . Charging a hot battery (above 95°F) results
in reduced discharge capacity, affecting the performance of the radio.
Motorola rapid-rate battery chargers contain a temperature-sensing circuit to
ensure that the battery is charged within these temperature limits.
WARNING
Care should be taken to avoid external short circuiting of
the battery . A sustained high-rate discharge (for example,
a paper clip placed accidentally across the battery
contacts) may permanently damage the battery , void the
battery warranty , and create a burn or fire hazard.
• Recycling or Disposal of Batteries
This product is powered by a nickel-cadmium (Ni-Cd) rechargeable battery . At
the end of its useful life, the battery can be recycled. However, recycling
facilities may not be available in all areas. Under various state or local laws, the
battery must be recycled or disposed of properly and cannot be disposed of in
landfills or incinerators.
In addition, U.S. Environmental Protection Agency (EPA) regulations classify
used Ni-Cd batteries as hazardous waste, unless certain exemptions apply.
70
NiCd
Page 74

Additional Information
Motorola fully endorses and encourages the recycling of Ni-Cd batteries. If you
are located in the United States or Canada, you can ship, post paid, your used
Ni-Cd batteries to INMETCO, an EPA approved recycling facility, at the address
listed below. If you are not located in the United States or Canada, you may
ship your used Motorola Ni-Cd batteries to one of the nearest international
locations listed below . Should you have any questions, contact the facility first.
Consideration should be given to the methods of collecting, labeling, and
shipping used Ni-Cd batteries. Your federal, state or local EPA should be
consulted for specific legal requirements and for recycling options in your area.
Motorola, as a responsible corporate citizen, has always been concerned with
the protection of the environment. Please feel free to call the Motorola
Worldwide System and Aftermarket Products Division, Customer Service
Department, toll free, at
1-800-422-4210.
INMETCO, Bin #M1
P.O. Box 720
245 Portersville Road
Ellwood City, PA 16117
Phone: (412) 758-2800
Fax: (412) 758-9311
S.N.A.M.
Rue De La Gareene
Z.I. Chesnes-Tharabie
B.P. 733-38297 St. Quentin Fallavier Cedex
France
Phone: 033 74 94 59 85
Fax. 033 74 94 13 18
For additional information on batteries, write to: Motorola • Worldwide
Energy Products Division • Customer Care Department (Room 1107) • 8000
West Sunrise Boulevard • Plantation, FL 33322
HANIL METAL RECYCLE CO.,
LTD
24-4, Palryong-dong,
Changwon-Shi
Kyongsangnam-Do, Korea
Phone: 082 551 93 1911
Fax. 082 551 96 0050
NIPPON RECYCLE CTR. CORP.
6-13-19, Nishitama, Kita-KuZ.I.
Osaka, 530, Japan
Phone: 081 6 311 9071
Fax. 081 6 311 0949
71
Page 75

Additional Information
Helpful Tips
• If you suspect a radio problem, check the following items before
requesting service.
1. Radio Checks
• Be sure the radio is turned on and the
the proper position.
• Replace or recharge the battery. The first time a new battery is used,
it should charge a minimum of 16 hours.
• The antenna must be screwed on properly, with its base flush against
the top of the radio.
• Could your radio problem be caused by accessories improperly
connected?
• Try operating the radio from several different locations, especially
when using the radio inside buildings.
• Check the transmitter by transmitting to an alternate portable radio.
2. Operating Instructions
Review your operating instructions and ensure that you are using the
radio properly.
3. Problem Not Solved
16-Position Select Knob
is in
If, after following steps 1 and 2, your radio still has a problem, review your
service agreement and call the applicable Motorola service representative.
If you do not have a service agreement on your radio, contact your nearest
authorized Motorola service shop for guidance toward a prompt and
expedient evaluation and/or repair.
• If poor light conditions make the display difficult to read, turn on the
radio’s display backlight by pressing the
light will remain on for a preprogrammed time before it turns off
automatically, or you can turn it off immediately by pressing the
Button
for the
toggle switch is moved, the light will remain on for an additional time
period.
• Your radio’s squelch level can be reprogrammed at an authorized service
facility.
again. If, while the light is on, any key or button is pressed (except
Volume Knob
72
and the
Light Button
PTT Switch
(see page 2). This
Light
), any knob is turned, or any
Page 76

Additional Information
!
Radio Care
• Cleaning
Clean external surfaces of your radio with the following solution: one
teaspoon of mild dishwashing detergent to one gallon of water (0.5%
solution).
CAUTION
So not use solvents to clean your radio; spirits may be
harmful and permanently damage the radio housing.
Apply the detergent solution sparingly with a stiff, non-metallic, short-bristled
brush, being careful not to allow excess detergent to remain entrapped near
connectors and controls or in cracks and crevices. Do not submerse the radio
in the detergent solution. Dry the radio thoroughly with a soft, lint-free cloth.
Clean all battery contacts with a lint-free cloth to remove dirt, grease, or other
foreign material that may prevent good electrical connections.
• Handling
• Avoid physical abuse; do not pound, drop, or throw the radio
unnecessarily. Do not carry the radio by the antenna.
• Avoid subjecting the radio to an excess of liquids. Never allow the
radio to become submersed.
• Avoid subjecting the radio to corrosives, solvents, or spirits.
• Do not disassemble the radio in any way.
• Keep the accessory-connector cover in place until ready to use the
accessory connector. Replace the cover immediately after the
accessory has been disconnected.
73
Page 77

Additional Information
!
Air Bag Safety Information
WARNING
An air bag inflates with great force. DO NOT place
objects, including communications equipment, in the
area over the air bag or in the air bag deployment area
If the communication equipment is improperly installed
and the air bag inflates, this could cause serious injury.
• Installation of vehicle communication equipment should be performed
by a professional installer/technician qualified in the requirements for
such installations. An air bag’s size, shape, and deployment area can vary
by vehicle make, model, and front compartment configuration (for
example, bench seat vs. bucket seats).
• Contact the vehicle manufacturer’s corporate headquarters, if necessary,
for specific air bag information for the vehicle make, model, and front
compartment configuration involved in your communication equipment
installation
Service
Proper repair and maintenance procedures will assure efficient operation and
long life for this product. A Motorola maintenance agreement will provide
expert service to keep this and all other communication equipment in perfect
operating condition. A nationwide service organization is provided by
Motorola to support maintenance services. Through its maintenance and
installation program, Motorola makes available the finest service to those
desiring reliable, continuous communications on a contract basis. For a
contract service agreement, please contact your nearest Motorola service or
sales representative, or an authorized Motorola dealer.
Express Service Plus (ESP) is an optional extended service coverage plan, which
provides for the repair of this product for a period of three years from the date
of shipment from the factory, or the date of delivery if purchased from an
authorized Motorola two-way radio dealer. For more information about ESP,
contact the Motorola Factory Service Center at 1700 NW 65th Avenue,
Plantation, FL 33313 (954) 723-6408 FAX (954) 581-6074.
74
Page 78

FCC Safety Standards
!
!
The Federal Communications Commission (FCC), with its action in General
Docket 79-144, March 13, 1985, has adopted a safety standard for human
exposure to radio frequency electromagnetic energy emitted by FCC
regulated equipment. Motorola subscribes to the same safety standard for the
use of its products. Proper operation of this radio will result in user exposure
substantially below FCC recommended limits:
• Do not hold the radio with the antenna very close to, or touching,
exposed parts of the body, especially the face, ears, or eyes, while
transmitting. Hold the radio in a vertical position with the
microphone two to three inches away from the lips.
• Do not hold the transmit switch (PTT) on when
not actually desiring to transmit.
• Do not allow children to play with any radio
equipment containing a transmitter.
• Do not operate radio transmitters near explosive
blasting caps.The transmitted radio energy may
trigger a blasting cap and cause an explosion.
• Do not operate radio transmitters in an explosive atmosphere unless
it is a type especially qualified for such use. An explosion may result.
• Do not replace or charge batteries in a hazardous atmosphere.
Contact sparking may occur while installing or removing batteries
and cause an explosion.
• Turn radio off when removing or installing a battery.
Anyone intending to use a radio in a hazardous area is advised to become
familiar with the subject of intrinsic safety and with Section 70 of the
National Fire Code, which is commonly referred to as Article 500 of the
National Electric Code. Use of anything but factory supplied components
may affect the approval and safety of the radio. Likewise, it is advised that
servicing should be performed only by qualified personnel who adhere to the
following Factory Mutual (FM) required warning:
WARNING
Modification of FM approved intrinsically safe radios will negate
Factory Mutual Research Corporation (FMRC) approval.
Because this radio contains a transmitter, federal law prohibits unauthorized,
non-licensed personnel from adjusting or maintaining it. If any operational
difficulties should arise while using this product, report them to authorized
service personnel as soon as possible.
WARNING
Do not attempt any unauthorized modification to the radio.
Page 79

Index
A
Index
ABRT
Acceessory-Connector. . . . . . . . . . . . . . . . . . . . . . . . . . . . . . . . . . . . . . . . . . . .9
Alert Tones . . . . . . . . . . . . . . . . . . . . . . . . . . . . . . . . . . . . . . . . . . . . . . . . . . .67
ALL
Antenna . . . . . . . . . . . . . . . . . . . . . . . . . . . . . . . . . . . . . . . . . . . . . . . . . . . .4, 5
Arrow Keys . . . . . . . . . . . . . . . . . . . . . . . . . . . . . . . . . . . . . . . . . . . . . . . . . . . .4
Auto Access . . . . . . . . . . . . . . . . . . . . . . . . . . . . . . . . . . . . . . . . . . . . . . . . . . .36
softkey . . . . . . . . . . . . . . . . . . . . . . . . . . . . . . . . . . . . . . . . . . . . . . . . .56
sofkey . . . . . . . . . . . . . . . . . . . . . . . . . . . . . . . . . . . . . . . . . . . . . . . . . . .56
B
Battery. . . . . . . . . . . . . . . . . . . . . . . . . . . . . . . . . . . . . . . . . . . . . . . 4, 28, 69-72
Belt-Clip . . . . . . . . . . . . . . . . . . . . . . . . . . . . . . . . . . . . . . . . . . . . . . . . . . . . . .8
C
CALL
Call Alert Page. . . . . . . . . . . . . . . . . . . . . . . . . . . . . . . . . . . . . . . . . . . . . . 34-40
CHAN
Channel . . . . . . . . . . . . . . . . . . . . . . . . . . . . . . . . . . . . . . . . . . . . 12-14, 51, 65
softkey . . . . . . . . . . . . . . . . . . . . . . . . . . . . . . . . . . . . .16, 17, 35, 46, 54
softkey. . . . . . . . . . . . . . . . . . . . . . . . . . . . . . . . . . . . . . . . . . . . . . . . .14
Clear . . . . . . . . . . . . . . . . . . . . . . . . . . . . . . . . . . . . . . . . . . . . . . . . . . . . . . . .55
Computer Software Copyrights . . . . . . . . . . . . . . . . . . . . . . . . . . . . . . . . . . . .ii
D
Data Calls . . . . . . . . . . . . . . . . . . . . . . . . . . . . . . . . . . . . . . . . . . . . . . . . . . . .29
DEL
softkey. . . . . . . . . . . . . . . . . . . . . . . . . . . . . . . . . . . . . . . . . . . . . . . . . . .47
Delayed Access . . . . . . . . . . . . . . . . . . . . . . . . . . . . . . . . . . . . . . . . . . . . . . . .36
DIR
softkey . . . . . . . . . . . . . . . . . . . . . . . . . . . . . . . . . . . . . . . . . . . . . . . . . . .42
DSAB
Dynamic Regrouping . . . . . . . . . . . . . . . . . . . . . . . . . . . . . . . . . . . . . . . 51, 68
softkey . . . . . . . . . . . . . . . . . . . . . . . . . . . . . . . . . . . . . . . . . . . . . . . . .26
E
Emergency Alarm . . . . . . . . . . . . . . . . . . . . . . . . . . . . . . . . . . . . . 31-33, 57, 67
ENAB
Enhanced Private Conversation Call . . . . . . . . . . . . . . . . . . . . . . . . . . . . 34-40
ERAS
softkey . . . . . . . . . . . . . . . . . . . . . . . . . . . . . . . . . . . . . . . . . . . . . . . . .26
softkey. . . . . . . . . . . . . . . . . . . . . . . . . . . . . . . . . . . . . . . . . . . . . . . . . .56
F
Failsoft. . . . . . . . . . . . . . . . . . . . . . . . . . . . . . . . . . . . . . . . . . . . . . . . . . . .62, 68
Factory Mutual Approval . . . . . . . . . . . . . . . . . . . . . . . . . . . . . . . . . . . . . . . .
75
Page 80

Index
H
HIGH
Home Key . . . . . . . . . . . . . . . . . . . . . . . . . . . . . . . . . . . . . . . . . . . . . . . . . . . . .4
softkey . . . . . . . . . . . . . . . . . . . . . . . . . . . . . . . . . . . . . . . . . . . . . . . . .60
I
ID. . . . . . . . . . . . . . . . . . . . . . . . . . . . . . . . . . . . . . . . . . . . 35, 38-40, 49, 54, 68
Inmediate Access. . . . . . . . . . . . . . . . . . . . . . . . . . . . . . . . . . . . . . . . . . . . . . .36
Index. . . . . . . . . . . . . . . . . . . . . . . . . . . . . . . . . . . . . . . . . . . . . . . . . . . . . . . .75
Indicators . . . . . . . . . . . . . . . . . . . . . . . . . . . . . . . . . . . . . . . . . . . . . . . . . . . .69
Individual Call . . . . . . . . . . . . . . . . . . . . . . . . . . . . . . . . . . . . . . . . . . 34-40, 68
INDX
softkey . . . . . . . . . . . . . . . . . . . . . . . . . . . . . . . . . . . . . . . . . . . . . . . . .58
K
KEY
softkey. . . . . . . . . . . . . . . . . . . . . . . . . . . . . . . . . . . . . . . . . . . . . . . . . . .57
L
Light . . . . . . . . . . . . . . . . . . . . . . . . . . . . . . . . . . . . . . . . . . . . . . . . . . . . . . . .72
List. . . . . . . . . . . . . . . . . . . . . . . . . . . . . . . . . . . . . . . . . . . . . . . . . 16-21, 46-48
LIST
softkey . . . . . . . . . . . . . . . . . . . . . . . . . . . . . . . . . . . . . . . . . . . . . . .20, 21
LNUM
LOCK
LOGF
LOW
softkey. . . . . . . . . . . . . . . . . . . . . . . . . . . . . . . . . . . . . . . . . . . . . .21, 22
softkey . . . . . . . . . . . . . . . . . . . . . . . . . . . . . . . . . . . . . . . . . . . . . . . . .62
softkey . . . . . . . . . . . . . . . . . . . . . . . . . . . . . . . . . . . . . . . . . . . . . . . . .26
softkey. . . . . . . . . . . . . . . . . . . . . . . . . . . . . . . . . . . . . . . . . . . . . . . . . .60
M
Manual Access. . . . . . . . . . . . . . . . . . . . . . . . . . . . . . . . . . . . . . . . . . . . . . . . .36
Message. . . . . . . . . . . . . . . . . . . . . . . . . . . . . . . . . . . . . . . . . . . . . . . . . . .29, 30
Monitor. . . . . . . . . . . . . . . . . . . . . . . . . . . . . . . . . . . . . . . . . . . . . . . . . . . . . .15
MSG
softkey . . . . . . . . . . . . . . . . . . . . . . . . . . . . . . . . . . . . . . . . . . . . . . .29, 30
Multikey . . . . . . . . . . . . . . . . . . . . . . . . . . . . . . . . . . . . . . . . . . . . . . . . . . . . .57
MUTE
softkey . . . . . . . . . . . . . . . . . . . . . . . . . . . . . . . . . . . . . . . . . . . . . . . . .27
N
NO
softkey . . . . . . . . . . . . . . . . . . . . . . . . . . . . . . . . . . . . . . . . . . . . . . . . . . .56
O
ON
softkey . . . . . . . . . . . . . . . . . . . . . . . . . . . . . . . . . . . . . . . . . . . . . . . .27, 44
OFF
softkey . . . . . . . . . . . . . . . . . . . . . . . . . . . . . . . . . . . . . . . . . . . . . . . .27, 44
76
Page 81

Index
P
“P”. . . . . . . . . . . . . . . . . . . . . . . . . . . . . . . . . . . . . . . . . . . . . . . . . . . . . . . . . .19
PAGE
Password . . . . . . . . . . . . . . . . . . . . . . . . . . . . . . . . . . . . . . . . . . . . . . . . . . 23-25
PHON
PL . . . . . . . . . . . . . . . . . . . . . . . . . . . . . . . . . . . . . . . . . . . . . . . . . . . .15, 41, 49
Priority . . . . . . . . . . . . . . . . . . . . . . . . . . . . . . . . . . . . . . . . . . . . .16, 43, 45, 69
Private Call . . . . . . . . . . . . . . . . . . . . . . . . . . . . . . . . . . . . . . . . . . . . . . . . 34-40
Private Conversation Call. . . . . . . . . . . . . . . . . . . . . . . . . . . . . . . . . . . . . 34-40
Private Line . . . . . . . . . . . . . . . . . . . . . . . . . . . . . . . . . . . . . . . . . . . . . . . .15, 49
PROG
Program. . . . . . . . . . . . . . . . . . . . . . . . . . . . . . . . . . . . . . . . . . 17-19, 46-48, 69
PSET
PSWD
PWR
softkey. . . . . . . . . . . . . . . . . . . . . . . . . . . . . . . . . . . . . . . . .16, 17, 35, 54
softkey. . . . . . . . . . . . . . . . . . . . . . . . . . . . . . . . . .16, 17, 20, 21, 35, 46
softkey . . . . . . . . . . . . . . . . . . . . . . . . . . . . . . . . . . . . . . . . . . . . . .17, 46
softkey . . . . . . . . . . . . . . . . . . . . . . . . . . . . . . . . . . . . . . . . . . . . . . . . . .58
softkey . . . . . . . . . . . . . . . . . . . . . . . . . . . . . . . . . . . . . . . . . . . . . .23, 25
softkey . . . . . . . . . . . . . . . . . . . . . . . . . . . . . . . . . . . . . . . . . . . . . . . . . .60
R
Radio Lock. . . . . . . . . . . . . . . . . . . . . . . . . . . . . . . . . . . . . . . . . . . . . .23, 24, 26
Receive . . . . . . . . . . . . . . . . . . . . . . . . . . . . . . . . . . . . . . . . . . . . . . . . . . . . . .15
Reprogramming . . . . . . . . . . . . . . . . . . . . . . . . . . . . . . . . . . . 16-19, 46-48, 52
RPGM
RPTR
softkey. . . . . . . . . . . . . . . . . . . . . . . . . . . . . . . . . . . . . . . . . . . . . . . . .52
softkey. . . . . . . . . . . . . . . . . . . . . . . . . . . . . . . . . . . . . . . . . . . . . . . . . .42
S
SCAN
Secure . . . . . . . . . . . . . . . . . . . . . . . . . . . . . . . . . . . . . . . . . . . . . . . . . 23-26, 69
SEL
Selective Call. . . . . . . . . . . . . . . . . . . . . . . . . . . . . . . . . . . . . . . . . . . . . . . 34-40
SITE
SNGL
Smart PTT . . . . . . . . . . . . . . . . . . . . . . . . . . . . . . . . . . . . . . . . . . . . . . . . . . . .50
Softkeys. . . . . . . . . . . . . . . . . . . . . . . . . . . . . . . . . . . . . . . . . . . . . . . . . . . .4, 66
Status. . . . . . . . . . . . . . . . . . . . . . . . . . . . . . . . . . . . . . . . . . . . . . . . . . . . .29, 69
STS
softkey . . . . . . . . . . . . . . . . . . . . . . . . . . . . . . . . . . . . . . . . . . . . . .44, 46
softkey . . . . . . . . . . . . . . . . . . . . . . . . . . . . . . . . . . . . . . . . . .25, 47, 58, 59
softkey . . . . . . . . . . . . . . . . . . . . . . . . . . . . . . . . . . . . . . . . . . . . . . . . . .62
softkey . . . . . . . . . . . . . . . . . . . . . . . . . . . . . . . . . . . . . . . . . . . . . . . . .56
softkey . . . . . . . . . . . . . . . . . . . . . . . . . . . . . . . . . . . . . . . . . . . . . . . .29, 30
77
Page 82

Index
T
Talkaround . . . . . . . . . . . . . . . . . . . . . . . . . . . . . . . . . . . . . . . . . . . . . . . .42, 69
Telephone Call . . . . . . . . . . . . . . . . . . . . . . . . . . . . . . . . . . . . . . . . . . . . . 34-40
Time-Out Timer . . . . . . . . . . . . . . . . . . . . . . . . . . . . . . . . . . . . . . . . . . . .28, 67
Transmit . . . . . . . . . . . . . . . . . . . . . . . . . . . . . . . . . . . . . . . . . . . . . . . . . . . . .15
TX Power-Level. . . . . . . . . . . . . . . . . . . . . . . . . . . . . . . . . . . . . . . . . . . . . . . .60
U
UNLK
softkey . . . . . . . . . . . . . . . . . . . . . . . . . . . . . . . . . . . . . . . . . . . . . . . . .62
V
VIEW
Volume Set . . . . . . . . . . . . . . . . . . . . . . . . . . . . . . . . . . . . . . . . . . . . . . . .15, 67
softkey . . . . . . . . . . . . . . . . . . . . . . . . . . . . . . . . . . . . . . . . . . . . . . . . .16
Y
YES
softkey . . . . . . . . . . . . . . . . . . . . . . . . . . . . . . . . . . . . . . . . . . . . . . . . . . .56
Z
Zeroization . . . . . . . . . . . . . . . . . . . . . . . . . . . . . . . . . . . . . . . . . . . . . . . . . . .56
Zone . . . . . . . . . . . . . . . . . . . . . . . . . . . . . . . . . . . . . . . . . . . . . . . 12-14, 51, 66
ZONE
softkey . . . . . . . . . . . . . . . . . . . . . . . . . . . . . . . . . . . . . . . . . . . . . . . . .12
78
Page 83

QUESTIONNAIRE
We believe that reports from users provide valuable information for
producing quality operating instructions. Your comments and answers to
the following questions will aid us in preparing manuals that contain
accurate and complete information of maximum benefit to you.
In reference to Manual No.
68P81072C80-B
Digital SABER
1. Please check all the appropriate boxes:
Clear
Confusing
Controls and
Features
Operating
Procedures
Alert Tone Explanations
Battery Information
Options
Model Information
Accessories
General Care Information
Other (specify)
text
illustrations
text
illustrations
Too Detailed
Too Brief
Adequate
TM
Complete
Incomplete
Incorrect
Not Covered
in This Manual
2. For illustrating procedures, do you prefer:
photographs line drawings no preference
3. How would you rate the overall organization of this manual?
excellent very good good fair poor
4a. If this manual has a "quick reference card," do you use it?
yes no
4b. If yes, how useful is it to you?
extremely very somewhat not very
5. How do you rate this manual overall?
excellent very good good fair poor
6. Comments/Recommendations for improving operating instructions.
Page 84

IN THE
IF MAILED
NECESSARY
NO POSTAGE
UNITED STATES
PERMIT NO. 9040FIRST CLASS MAIL FT. LAUDERDALE, FL
POSTAGE WILL BE PAID BY ADDRESSEE
Radio Products Group
BUSINESS REPLY MAIL
Attn: Technical Publications
Room 2352
8000 W. SUNRISE BOULEVARD
FT. LAUDERDALE, FLORIDA 33322
From:
Page 85

.
.
COMMON RADIO FEATURE
Making an Individual Call:
1a. Press until one
of the following
softkeys appears:
for Telephone Call
for a Private-Conversation Call
for a Call-Alert Page
2. Press directly below the desired softkey.
3a. If you wish to call the last number dialed,
press the
PTT Switch
.
3b. Press or until you locate the
member’s number you wish to call.
3c. Enter the number that corresponds to that
member’s placement within the list and press
the
PTT Switch
.
3d. Enter a new number and press the
PTT
Switch
.
OR
4b. Rotate the
Zone/Channel
Select Knob
to
the desired
channel; then
go to step 7.
FOLD
1b. Press the
Phone
,
Call
, or
Page
Button
; then go
to step 3.
OR
Page 86

COMMON and
SPECIAL RADIO FEATURES
Most of your radio features can be accessed by
performing the following steps (for more detail,
refer to the feature description in your manual).
1a. Press until
the desired
softkey appears
(see softkey list
below).
2. Press
directly below
the desired
softkey.
3. In most cases, the display will change to show
the current state of the feature and the
available softkey choices.
4a. If you want to change the feature state, press
directly below the desired softkey choice.
OR
OR
1b. Press (or rotate)
the
Feature
Button/Switch
(if
programmed, see
front of card); this
takes your directly
to step 3.
Softkey Feature List
Softkey Feature
Individual Private-Conversation
Call or Selection Call
Channel Selection
Bypass Repeater (Talkaround) and
Talk Directly to Another Radio
Erasure (Zeroization) of
Encryption Key(s)
Radio Lock (Log Off)
Encyption Key(s) Index Grouping
Message-List Selection
Keypad Tones Muting
Call-Alert Page
Telephone Call
List Programming of Individual-
Call Numbers and Scan Channels
Program New Password
TX Power-Level Selection
New Dynamic-Regrouping Request
Scan Operation
Multiple Site Selection
Status-List Selection
List Viewing
Zone Selection
Softkey Feature
FOLD
FOLD
 Loading...