

Page 1

A
USER’S GUIDE
Page 2

Introduction
Control Buttons....................................... 2
Getting Started
Turning Your Pager On ........................... 3
Turning Your Pager Off ........................... 4
Using the Function Menu ....................... 5
Message-Status Screen......................... 6
Backlight................................................. 7
Receiving/Reading
Personal Messages.......................... 7
Display Zoom ......................................... 9
Time and Date
Setting the Time and Date.................... 10
Alerts
Setting the Incoming Message Alert .... 12
Locking/Unlocking Messages
Lock/Unlock a Message....................... 14
Deleting Messages
Delete a Single Message ..................... 15
Delete all Messages............................. 15
Contents
Pager Alarms
Set a One-Time Alarm ......................... 16
Set the Alarm to Alert Daily.................. 17
Message Alarms
Set a One-Time Message Alarm.......... 19
Set a Daily Message Alarm.................. 21
Private Time
Set Private Time................................... 22
Maildrop/Information Service Option
Maildrop Alerts ..................................... 24
Notebooks
Storing Personal and Maildrop
Messages in Your Notebooks ......... 28
Deleting Messages from
Your Notebooks ..................................
Features.................................................... 30
Care and Use............................................ 32
Battery Information.................................. 34
Installing/Replacing the Battery............ 34
Page 3

Congratulations on purchasing an Advisor Elite pager. Your new pager
provides exciting capabilities in messaging and can become a vital part of
your business and personal life . The pager’ s four-line display and
expanded functionality incorporates many of the most advanced electronic,
communications and wireless technologies available .
The Advisor Elite pager uses FLEX® technology . FLEX technology extends
battery life up to four times longer than ordinary pagers and improves the
ability to receive messages.
These compact pagers integrate messaging and time keeping functions in
a package that is convenient to carry. Full understanding of what this
product offers begins with reading this user’s guide . This user’s guide
includes a detachable quick reference card on the bac k cov er.
Sending a Test Page to Yourself
After you have read this guide and y our pager has been activated b y y our
service provider, send yourself a test page. Ref er to “Functionality and Use
of Your Pager” on page 32 for more information.
INTRODUCTION
1
Page 4
Effective Use of Your Pager
Your pager can help you keep in contact with everyone important to you. By
giving your pager number to your business associates , f amily, and friends,
you can be contacted whenever needed.
If you have a cellular phone, giv e y our pager number instead of y our
cellular number. Then you can decide who to call back on your cellular
phone without paying for incoming calls.
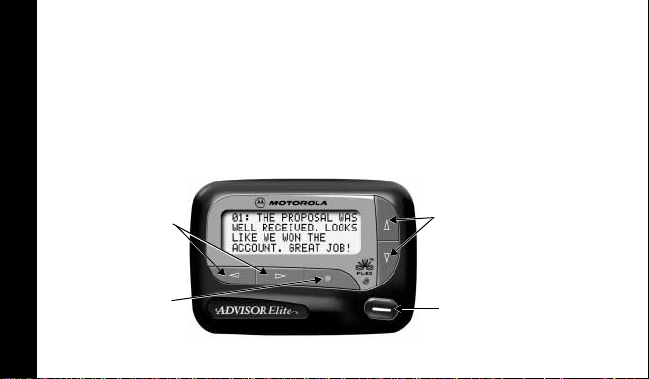
Control Buttons
Left/Right
Directional
Buttons
Up/Down
Directional Buttons
GETTING STARTED
2
Function/
Select Button
Read/Escape/
Power On Button
Page 5

H
I
Function/Select
K
J
F
G
Left/Right
Directional
Buttons
Button
Read/
Power On
Up/Down
Directional
Buttons
Used to navigate through the Function menu
and through your messages.
Used to display the Function menu, to select
a pager function, and to activate your
selection.
Used to turn the pager on and to read
messages.
Use to navigate through time, alarm, date
setting functions and to navigate through
messages.
Turning Your Pager On
Press J. A start-up screen is momentarily displayed and your pager
activates the currently selected alert.
Press any button to stop the alert.
Note:
GETTING STARTED
3
Page 6

Private Time
Power On
Audible
Alarm
_
N
P
Q
Example of the Standby Screen
When the pager is on and no activity is taking place, the Standby screen is
displayed. The Standb y screen displa ys the pow er-on indicator N and may
display other pager status indicators.
T urning Y our Pager Off
➊
Press K to display the Function menu.
➋
Press H to move the cursor to q.
➌
Press K.
GETTING STARTED
➍
Press K again to turn the pager off.
Your pager is now off and the screen is blank.
4
TURN PAGER OFF?
is displayed.
Page 7

Using the Function Menu
The Function menu provides access to the many features of y our pager
through the use of symbols and prompts.
Press K to display the Function menu. When the Function men u is
➊
initially displayed a flashes to indicate the location of the cursor.
mmmmmmomm u
VVjV
ESCAPE
v L 1 r q a A C g d u Z
l
Example of Fully Displayed Function Menu
➋
Press H or I to move the cursor within the Function menu.
As you move through the Function menu, the pager function symbols
flash to indicate the present location of the cursor. To exit from the
Function menu without making any changes press J.
Note:
Some symbols may not display on your pager, depending upon
your pager’s features and whether it has messages.
u
GETTING STARTED
5
Page 8

Message-Status Screen
The Message-status screen shows the current status of your messages.
For example, unread messages are indicated b y a flashing m symbol,
locked messages are indicated by g.
The Message-status screen also displays the time and date and any
activated pager settings. The Message-status screen can be accessed by
pressing H, I, G, or F from the Standby screen.
mgmmomm
VjV
(
P
Q 3:15PM 05/05/97
Example of the Message-Status Screen
GETTING STARTED
6
Page 9

Backlight
In low-light conditions, the pager’s bac klight automatically turns on
whenever a button is pressed. You can manually turn the backlight on or off
at any time by pressing and holding K for two seconds. The backlight
automatically turns off when the pager returns to the Standby screen.
Receiving/Reading Personal Messages
Your pager can receive up to 19 personal messages. When a message is
received, your pager alerts according to the current alert setting (audible,
vibrate, or no message alert). A new message is indicated by a flashing m
symbol. When a message is selected the symbol changes to o.
Reading an Incoming Message
➊ Press any button to stop the alert.
➋ Press J to display your message.
A flashing t in the right corner of the screen indicates the message is
continued on an additional screen(s).
➌ Press J to read the next screen.
GETTING STARTED
7
Page 10

Reading a Stored Message
➊ From the Message-status screen press H or I to mov e the cursor to
the message you want to read.
➋ Press J to read the message.
Message Reading Features
• Press G to read a message line by line.
• Press and hold J for automatic message scrolling, screen by screen.
• Press F to go back to the first screen of the message.
• Press H or I while reading a message to read the previous or next
message.
Note:
When an unread message exists, your pager gives a periodic
reminder alert until all unread messages are read, or for up to 30 minutes.
A flashing N on the Standby screen indicates that you have unread
messages.
GETTING STARTED
8
Page 11

Message Preview
This feature allows you to scan the first line of your messages .
➊ Press J .
➋ Use the H and I buttons to move the cursor through your
messages.
Note:
Previewing an unread message does not remove the unread
message status from the message.
Display Zoom
When this feature is enabled, the standard 4-line display is con v erted to a
2-line display. The characters are enlarged vertically, increasing message
readability .
T o Enable Display Zoom:
➊ From the Function menu, press H to mov e the cursor to 1.
➋ Press K. Displa y zoom is no w activ e.
All new and stored messages including notebook messages are displayed
in a 2-line format. Pager prompts are not enlarged in the z oom mode.
GETTING STARTED
9
Page 12

To Disable Display Zoom
➊ From the Function menu, press H to mov e the cursor to 4.
➋ Press K. Displa y zoom is no w disab led.
Setting the Time and Date
➊ From the Function menu, press H to move the cursor to v.
➋ Press K to display the Set-time-and-alarm screen.
➌ Press I to move the cursor to the hour digit.
➍ Press F or G to adjust the hour.
➎ Repeat steps 3 and 4 to adjust the minutes, AM/PM/24 hr., month, da y,
and year.
TIME AND DATE
10
Page 13

➏ Press K to activate the time and date setting.
zv 03:15PM 05/05/97z
c12:00AM --/--/--
SET TIME
Example of Set-Time Screen
If you move the cursor past the last symbol in the row (f ar right), it
automatically wraps around to the first symbol in the beginning of the same
row (far left).
Note:
To exit from any screen without making changes, press J .
11
TIME AND DATE
Page 14

Setting the Incoming Message Alert
You can set your pager’s incoming message alert to an audible alert, a
vibrating alert, a chirp (short beep) alert, a chirp alert with vibration, or no
message alert (completely silent).
Note:
Priority messages always have an audible alert.
Setting an Audible Alert
➊ From the Function menu, press H to mov e the cursor to s.
➋ Press K.
When P is displayed on the Standby screen, y our pager is in the audible
alert mode.
Setting the Alert Pattern
ALERTS
You can set your pager to alert audible with a standard alert (1), one of
seven pleasing alerts (2-8), a chirp alert (j), or a chirp and vibrate alert
(|). Y ou can also select no message alert (r).
Your pager must be in the audible alert mode (P displayed in the Standby
screen) to select an alert pattern.
12
Page 15

➊ From the Function menu, press H to mov e the cursor to l.
➋ Press K to display the Choose alert menu.
➌ Press H or I to move the cursor to the desired alert. The pager gives
a sample of each alert as you move through the selections.
➍ Press K to activate your selection. The pager gives a sample of the
alert to confirm your selection.
Setting a Silent (Vibrate) Alert
Note:
If P is not displayed in the Standby screen, your pager is already in
the silent alert mode.
➊ From the Function menu, press H to mov e the cursor to r.
➌ Press K to activate the silent alert. The pager vibrates to confirm your
selection. The P symbol is remov ed from the Standb y screen.
13
ALERTS
Page 16

Locking and Unlocking Messages
Up to 10 messages can be locked to prev ent them from being deleted or
from being replaced when memory is full.
When a message is locked, the m symbol is replaced by the g symbol
indicating the message is locked.
T o Lock or Unlock a Message
➊ From the Message-status screen, press H or I to select the message
you want to lock or unlock.
➋ Press K .
➌ Press I to move the cursor to g to lock the message, or h to unloc k
the message.
➍ Press K.
To lock or unlock a message while reading it, follow steps 2 through 4
above while the message is display ed.
LOCKING MESSAGES
14
Page 17

Deleting Messages
This feature allows you to delete unloc ked and un-alarmed messages.
T o Delete a Single Message
➊ From the Message-status screen, press H or I to select the message
you want to delete.
➋ Press K .
➌ Press I to move the cursor to A.
➍ Press K.
DELETE MESSAGE?
is displayed.
➎ Press K again to delete the message.
T o Delete a Message while Reading It
Follow steps 2 through 5 abov e while the message is displa yed.
T o Delete All Unlocked, Un-alarmed and Read Messages
➊ From the Function menu, press I to mov e the cursor to C.
➋ Press K.
DELETE ALL MESSAGES?
is displayed.
➌ Press K. All unlock ed, un-alarmed and read messages are deleted.
Note:
Notebook messages are not deleted with this feature.
15
DELETING MESSAGES
Page 18

Pager Alarm
Your pager has an alarm that can be set for a specific time and date, or a
specific time on a daily basis.
At the selected alarm time, your pager alerts. If the alarm times passes
without being acknowledged, Q flashes until any button is pressed.
T o Set a One-Time Alarm
➊ From the Function menu, press H to mov e the cursor to v.
➋ Press K. The Set-time-and-alarm screen is displa yed.
➌ Press G. The Set-alarm screen is displa yed.
zv 03:15PM 05/05/97z
zc15:30PM 05/05/97z
PAGER ALARMS
SET ALARM
Example of Set-Alarm Screen for a Specific Time and Date
16
Page 19

The alarm symbol shows the current alarm status. cis display ed if the
alarm is enabled, e is displayed if the alarm is disabled.
➍ Press I to move the cursor to the alarm symbol.
➎ Press F or G until c is displayed.
➏ Press I to move the cursor to the hour digits.
➐ Press F or G to adjust the hour digits.
➑ Repeat steps 6 and 7 to adjust the minutes, AM/PM/24 hr., and date .
➒ Press K to activate your selection. The Q symbol is displayed on the
Standby screen.
Note:
To exit from any screen without making changes, press J.
PAGER ALARMS
17
Page 20

To Set the Alarm to Alert Daily
➊ Follow steps 1 through 8 in “To Set a One-Time Alarm” to set the alarm
time.
➋ When setting the date in step 8, press G until you see double dashes for
the month, day, and year (--/--/--).
zv 03:15PM 05/05/97z
zc15:30PM --/--/--z
SET ALARM
Example of Set-Alarm Screen for a Daily Alert
➌ Press K to activate your selection. The alarm is now set to alert every
PAGER ALARMS
day at the specified time and Q is display ed on the Standby screen.
Note:
To exit from any screen without making changes, press J.
18
Page 21

Message Alarms
This feature allows you to set a one-time or daily alarm for a selected
personal message. Y ou can set an alarm for up to fiv e personal messages .
When a message alarm is set, b replaces m in the Message-status
screen. At the time the alarm sounds, m is again displa yed unless the
alarm is set to alert daily. Press J to displa y the message f or which the
alarm is set. If the alarm times passes without being acknowledged, b
flashes until the message is read.
T o Set a One-time Message Alarm
➊ From the Message-status screen, press H or I to select the message
you want to alarm.
➋ Press K.
➌ Press I to move the cursor to d.
19
MESSAGE ALARMS
Page 22

➍ Press K. The Set-message-alarm screen is display ed.
zv 03:15PM 05/05/7z
zc15:30PM 05/05/97z
SET ALARM
Example of Set-Message-Alarm Screen
The alarm symbol shows the current alarm status. c is display ed if the
message alarm is enabled, e is displayed if the message alarm is
disabled.
➎ Press F or G until c is displayed.
➏ Press I to move the cursor to the hour digits.
MESSAGE ALARMS
20
Page 23

➐ Press F or G to adjust the hour digits.
➑ Repeat steps 6 and 7 to adjust the minutes, AM/PM/24 hr., and date .
➒ Press K to activate your selection.
You can also set a message alarm while reading the message by follo wing
steps 2 through 9 above.
T o Set a Daily Message Alarm
➊ Follow steps 1 through 8 to set the message alarm time.
➋ When setting the date in step 8, press G until you see double dashes for
the month, day, and year (--/--/--).
➌ Press K to activate your selection. The alarm is now set to alert every
day at this specified time.
Note:
To exit from any screen without making changes, press J.
21
MESSAGE ALARMS
Page 24

Private Time
You can select a time period during which your pager is completely silent.
Your pager still receives messages but is does not alert. The pager alerts
only if an alarm expires or a priority message is received.
T o Set Private Time
➊ From the Function menu, press H to mov e the cursor to 3.
➋ Press K.
When the Private-time screen is first displayed, the cursor is at the flashing
symbol on the far left, 3 indicates private time is enabled, µindicates
private time is disabled.
ON OFF
PRIVATE TIME
3 3:15PM 5:00PM
Example of Set Private-Time Screen
22
Page 25

➌ Press and release G until 3 is displayed.
➍ Press I to move the cursor to the hour digit.
➎ Press F or G to adjust the hour digit.
➏ Repeat steps 4 and 5 to adjust the on and off time setting .
➐ Press K to activate your selection.
The symbol _ is displayed in the Standby screen when private time is
enabled.
Note:
If the on time is equal to the off time, private time is not enabled.
To Disable Private Time
➊ Press K.
➋ Press H to move the cursor to 3.
➌ Press K.
➍ Press and release G until µis displayed.
➎ Press K to disable private time.
Note:
To exit from any screen without making changes, press J.
PRIVATE TIME
23
Page 26

Maildrop/Information Service Option
Your pager is capable of receiving maildrop messages, also known as
information services. Maildrop messages are received and read the same
way as personal messages and the icon indicators are located on the
second row of the display.
mgmmomm
VjV
P (
Q 3:15PM 05/05/97
Example of Maildrop Indicators
Maildrop Alerts
When this option is enabled, you can set your pager to alert when maildrop
messages are received.
• A V in the maildrop message area indicates the alert is
INFORMATION SERVICES
maildrop. A j indicates the alert is
on
for that maildrop.
24
off
for that
Page 27

• If the pager’s incoming message alert is set to silent (vibrate), all
maildrops with the alert set to on (j), produce a 2-second vibration
when a maildrop message is received.
• If the pager’s incoming message alert is set to audible, the maildrop
alert can be set to either the standard alert, one of the seven pleasing
alerts, a chirp alert, a chirp and silent alert, or no message alert via the
Choose-alert menu. The length of the maildrop alert is 2 seconds.
• If the pager’s incoming message alert is set to no message alert,
maildrop alerts cannot be set and all maildrop symbols are automatically
displayed as V.
Turning Individual Maildrop Alerts On and Off
➊ From the Message-status screen, press H, I, or G to mov e the cursor
to the desired maildrop.
➋ Press K.
➌ Press I to move the cursor to j alert on or k alert off.
➍ Press K to turn the maildrop alert on or off.
25
INFORMATION SERVICES
Page 28

Selecting a Maildrop Alert
➊ From the Message-status screen, press H, I, or G to mov e the cursor
to the desired maildrop.
➋ Press K.
➌ Press I to move the cursor to j.
➍ Press K. The choose alerts menu is display ed.
➎ Press H or I to move the cursor to the desired alert.
➏ Press K to activate the alert. The pager giv es a sample of the alert,
unless no message alert is selected.
INFORMATION SERVICES
26
Page 29
Notebooks
Your pager has two notebook areas, a personal notebook for storing
personal messages, and a maildrop notebook for storing information
service messages. Notebook messages are indicated by u. Personal
messages are indicated on the first row of the display. Maildrop messages
are indicated on the second row of the display.
mmm u
VjVj u
3:15PM 05/05/97
Example of Notebook Locations
Personal Message
Notebook
Maildrop Message
Notebook
27
NOTEBOOKS
Page 30

Storing Personal and Maildrop Messages in Your Notebooks
➊ From the Message-status screen, press F , G, H, or I to move the
cursor to the personal or maildrop message you want to move into the
notebook.
➋ Press K.
➌ Press I to move the cursor to u.
➍ Press K. The message is no w in the notebook.
Deleting Messages from Your Notebooks
➊ From the Message-status screen press F , G, H, or I to move the cursor
to the notebook from where you want to delete a message.
➋ Press J to display a list of the notebook messages.
NOTEBOOKS
28
Page 31

➌ Press F or G to scroll through the list until Ku is display ed at the
beginning of the notebook message you want to delete.
zuTake children to school
Look at new stock rates
Congratulations on your
Example of Notebook Screen in Delete Mode
➍ Press K to display the Function menu.
➎ Press I to move the cursor to A.
➏ Press K.
DELETE MESSAGE?
is displayed.
➐ Press K to delete the message.
➑ Repeat steps 3 through 7 for each message you want to delete.
Note:
Notebook messages are deleted one at a time. If all messages are
deleted from a notebook, the u symbol is removed from the display.
NOTEBOOKS
29
Page 32

Message Storage
Your pager can store up to 19 personal messages in memory .
Note:
Stored messages differ from locked messages. They can be
deleted or overwritten when memory is full and a new message comes in.
Automatic Message Deletion
If all 19 message slots are full and a new message is received, the oldest,
unlocked, un-alarmed, and previously read message is automatically
deleted when a new message is received. When the message memory is
full, n is displayed.
Note:
To prevent specific messages from being deleted, lock them. Then
you can delete all other messages you no longer need to prevent the
overflow condition.
FEATURES
Out of Range
If your pager has this feature, and if you are outside y our paging co v erage
area, T is displayed. As long as T is displayed, y our pager cannot
receive messages.
30
Page 33

Key Click
If this feature is enabled, and the pager is in the audible mode, a “click” is
emitted when any of the pager’s b uttons are pressed. The click is not
emitted when the pager is in the silent mode.
Duplicate Message
If the same message is received more than once,
is displayed at the beginning of the new message . The new duplicate
message replaces the older duplicate message and contains the latest
time and date stamp.
DUPLICATE MESSAGE
Errored Data Indicator
The symbol 7 is displayed if a potentially errored character is receiv ed. The
indicator alternately flashes with a “best guess” of the errored character .
Alphanumeric and Long Numeric Missing Fragment Indicators
If part of a message has not been received @ or ? is displayed in
place of the missing characters.
31
FEATURES
Page 34

Battery Gauge
A battery gauge indicator keeps you informed of the battery level. The
indicators are listed on the card attached to the back cover .
Cleaning Your Pager
To clean smudges and grime from the exterior of your pager, use a soft,
non-abrasive cloth moistened in a mild soap and water solution. Use a
second cloth moistened in clean water to wipe the surface clean. Do not
immerse in water. Do not use alcohol or other cleaning solutions.
Functionality and Use of Your Pager
For questions pertaining to the functions and use of your Motorola pager,
please visit our web site at www.mot.com/pagers or in the U .S .,
call 1-800-548-9954 or 1-800-793-7834 (TDD). For questions pertaining to
your paging service, contact your paging service provider.
CARE AND USE
32
Page 35

Care and Maintenance
The Advisor Elite pagers are durable, reliable, and can pro vide y ears of
dependable service; howe v er, they are precision electronic products.
Water and moisture, e xcessive heat, and e xtreme shoc k ma y damage the
pager. Do not e xpose y our pager to these conditions . If repair is required,
the Motorola Service Organization, staffed with specially trained
technicians, offers repair and maintenance facilities throughout the world.
You can protect your pager purchase with an optional extended warranty
covering parts and labor. For more inf ormation about warranties , please
contact either your paging service provider, retailer , or Motorola, Inc. at
1-800-548-9954. For repairs, call Motorola, Inc. at 1-800-548-9954 in the
U.S. or 1-800-323-9685 in Canada. In the U.S., to contact Motorola, Inc. on
your TDD , call 1-800-793-7834.
33
CARE AND USE
Page 36

Battery Information
Your pager is designed to operate with a single AA-size alkaline battery (carbon
zinc batteries are not recommended). See the diagram on the f ollowing page
for the battery door location.
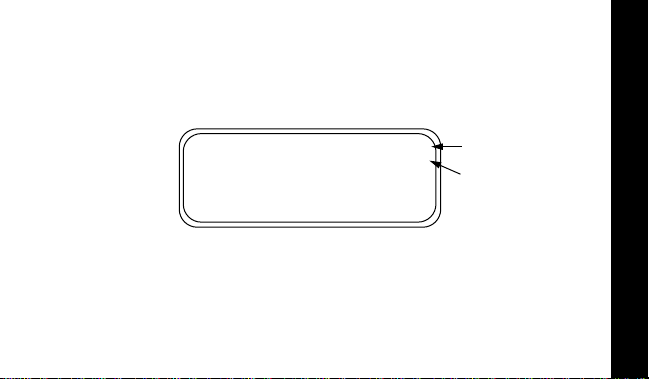
Installing/Replacing the Battery
To install or replace the battery , hold the pager f ace down and proceed as
follows:
➊ Unlock the battery door by sliding the door latch away from the battery
door.
➋ Slide the battery door in the direction of the arrow (toward the outer
edge).
BATTERY
➌ Lift the battery door away from the housing to remove it.
➍ Lift the battery out of the battery compartment, taking note of the
positive (+) and negative (-) markings on the battery and the pager
housing.
34
Page 37

➊
Ì
➋
Advisor Elite Pager
Battery Replacement (rear view)
To install a new battery, reverse this procedure, taking note of the positiv e
(+) and negative (-) markings.
➌
CAUTION
: Do not insert the battery backwards or all messages will be erased.
BATTERY
35
Page 38

NOTES
Page 39

NOTES
Page 40

Patent Information
This Motorola product is manufactured under one or more Motorola U.S .
patents. These patent numbers are listed inside the housing of this
product. Other U .S . patents for this product are pending.
t, Motorola, Advisor Elite, and F
are trademarks or registered trademarks of Motorola, Inc.
© 1997 by Motorola, Inc. All Rights Reserved.
1500 Gateway Blvd., Boynton Beach, FL 33426-8292
Paging Products Group
Printed in U.S.A. 9/97
BATTERY
@6881029B40@
6881029B40-A
Page 41

Advisor Elite™ Quick Reference Card
Turning Your Pager On
Press J.
Turning Your Pager Off
➊ From the Function Menu, press H to
move the cursor to
q.
➋ Press K twice.
Function Menu
Provides access to the features
described in this quick reference card and
in your user’s guide .
➊ Press K.
➋ Press H or I to move within the
Function menu.
Receiving/Reading Messages
➊ Press any button to stop the alert.
➋ Press J to display your message.
➌ Press J to view the next screen.
Locking and Unlocking Messages
➊ From the Message-status screen,
press
H or I to select the message
you want to unlock/unlock.
➋ Press K.
➌ Press I to move the cursor to g
lock or h unlock.
➍ Press K.
Deleting Messages
➊ From the Message-status screen,
press
H or I to select the message
you want to delete.
➋ Press K.
➌ Press I to move the cursor to A.
➍ Press K twice.
Page 42

Setting the Time and Date
➊ From the Function men u, press H to
move the cursor to
v.
➋ Press K.
➌ Press I to move the cursor to the hour
digit.
➍ Press F or G to adjust the hour.
➎ Repeat steps 3 and 4 to adjust the
minutes, AM/PM/24 hr., month, da y,
and year.
➏ Press K to activate the setting.
Setting Alarms
➊ From the Function men u, press H to
move the cursor to
v.
➋ Press K.
➌ Press G.
➍ Press I to move the cursor to the
alarm symbol.
➎ Press F or G until c is displayed.
➏ Follow steps 3 through 6 in
Date
to set the alarm time.
To disable the alarm, in step 5 above,
press
F or G until eis displayed.
To set a message alarm:
Time and
➊ With the message displayed, press K.
➋ Press I to move the cursor to d.
➌ Press F or G until c is displayed.
➍ Follow steps 3 through 6 in
Time and Date
Note:
To set a daily pager or message
alarm, press
displayed for the month, day, and year
(--/--/--).
.
G until double dashes are
Setting the
Page 43

Storing Messages in Your Notebooks
➊ From the message-status screen,
press
F , G, H, or I to move the cursor
to the message you want to move into
the notebook.
➋ Press K.
➌ Press I to move the cursor to u.
➍ Press K to store the message.
Private Time On
➊ From the Function menu, press H to
move the cursor to
3.
➋ Press K.
➌ Press and release G until 3 is
displayed.
➍ Follow steps 3 and 4 in
theTime and Date
times.
Setting
to set the on and off
➎ Press K to activate your selection.
To turn private time off, in step 4 above ,
press and release
G until µ is displayed.
To Enable/Disable Display Zoom
➊ From the Function menu, press H to
move the cursor to
disable.
1 enable or 4
➋ Press K.
Pager Symbols
N Power On
P Audible Alert Mode on
_ Private Time enab led
Q Alarm enabled
Page 44

Message Status Symbols
g Locked Message
j Maildrop Alert Enabled
V Maildrop Alert Disabled
m P ersonal Message
n Memory Full
b Alarmed Message
u Notebook
Function Menu Symbols
l Choose Alert
v Set Time and Alarm
3 Set Private Time
1 Display Zoom On
4 Display Zoom Off
r Set Silent Alert
s Set Audib le Alert
2 Turn Pager Off
a Escape (to Message-status screen)
A Delete Message
INTRODUCTION
C Delete All Messages
g Lock Message
h Unlock Message
j T urn Maildrop Alert On
k T urn Maildrop Alert Off
d Set Message Alarm
u Add to Notebook
Other Symbols
t Message Continuation
y 24 Hour Time
w AM Time
x PM Time
c Enable Alarm
e Disable Alarm
3 Private Time Enab led
µ Private Time Disab led
, Low Battery Indicator
+ 1/4 Battery Indicator
* 1/2 Battery Indicator
) 3/4 Battery Indicator
( Full Battery Indicator
D Out of Range
S Truncated Message
7 Errored Data Indicator
@ Alphanumeric Missing Fragment
Indicator
?Long Numeric Missing Fragment
Indicator
 Loading...