


DIGITAL WIRELESS
TELEPHONE
User's Guide >

Make and End a Call
Press
q
to open dial pad, enter phone number, press
To hang up, press
hold headset button (phone beeps).
Answer a Call
Press
Answer
flip. If using the headset, press headset button (phone beeps).
Extension/Voicemail Dialing
To display the dial pad while on a call, press .
Mute the Microphone During a Call
Press b
Change the Ringer Style for Incoming Phone Calls
Press in bottom left corner of main menu screen.
1.
2.
Select desired ring status and ring style.
3.
Increase/decrease ringer volume using + and -.
4.
Press OK.
Send a Text Message
1.
Press
2.
Make sure SMS mail icon is selected (not email icon ).
Currently selected icon is enclosed in [ ].
3.
Press
the right of
4.
After selecting from addressbook or entering number(s), press OK.
5.
Press
the right of
keyboard or handwriting recognition. To switch between keyboard
and handwriting, press
6.
If entering new message, press to insert picture, to insert
animation, or to insert melody into message.
7.
After entering or selecting message, press OK.
8.
From New Message screen, press
Read a New Message
Press Read
on the screen, or press the Confirm button, or open the
Mute
. To turn the sound back on, press
fK
To:
to select recipients from addressbook, or press space to
To:
Message:
Message:
when notified of new message, or press .
Motorola A388
Quick Reference Card
End
or close the flip. If using the headset, press and
Unmute
Compose
.
to enter phone number(s) using number pad.
to select predefined message, or press space to
to enter new message using on-screen
b
and select desired mode.
Send
.
Send
.
.

Store a Number on the SIM Card
1.
Press
fG
New
.
2.
Select
SIM Card
from
Catg:
pulldown list and press OK.
Speed dial number is automatically assigned in
3.
Press space to the right of
keyboard or handwriting recognition. To switch between keyboard
and handwriting, press
4.
After entering name, press OK.
5.
Press
6.
After entering phone number, press OK.
7.
From New Contact screen, press OK.
Call a Number Stored on the SIM Card
Press
1.
2.
Press location number followed by # sign.
3.
Press
Store a Number in Phone Addressbook
1.
Press
2.
Select category from
3.
Press space to the right of
keyboard or handwriting recognition. To switch between keyboard
and handwriting, press
4.
After entering name, press OK.
5.
For each number, press <number type>, enter phone number, and
press
6.
Scroll to see additional information fields.
7.
Enter other details for contact as desired, press OK after each entry.
8.
When complete, press OK to store on phone.
Call a Number Stored in Phone Addressbook
Press f G to open addressbook.
1.
2.
To locate phone number, press alphabetic tabs (e.g., to list names
beginning with M, press K-O tab 3 times), or press
to search addressbook for a name, number, or text string.
3.
Once the phone number you want to call is listed on the screen,
press the number to dial it.
<Number>
q
to open dial pad.
Send
.
fG
New
OK
.
Name:
to enter name using on-screen
b
and select desired mode.
and enter phone number.
.
Catg:
pulldown list and press OK.
Name:
to enter name using on-screen
b
and select desired mode.
Location:
field.
b Find Contact

Welcome
Welcome to the world of Motorola digital wireless
communication. We are pleased that you have chosen the
Motorola A388 wireless phone.
Your Motorola A388 phone delivers all the wireless
functionality you need in one smart package.
•
Easy to use touchscreen.
•
Virtual number pad for quick and easy dialing.
•
Store and call frequently used phone numbers in the
addressbook.
•
Screen calls even when your phone is closed through
the external caller ID display.
•
Send text messages or use your wireless Internet
connection to send email.
•
Add pizazz to your messages with graphics, animated
icons, and sounds.
•
Keep track of important business meetings, social
events, and other occasions using the datebook.
reminder alarms, and to-do lists.
•
Download applications, from business tools to games.
•
Sync up the data on your phone to your PC, PIM, or
PDA.
Welcome
•
Experience the “always on” connection for WAP
Internet sites, or use your phone as a wireless modem
for your PC.
1
Welcome
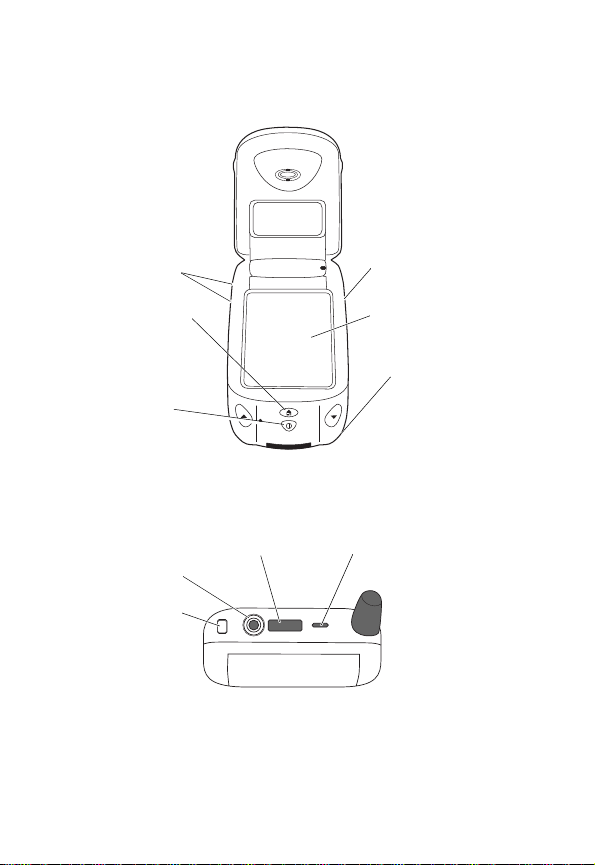
Adjust
volume
Home Button
Return to main
menu
Power Button
Turn phone
on and off
Confirm Button
Answer a call
Touchscreen
Stylus storage
compartment
Infrared Port
Headset Jack
Status Light
2
Ringer speaker

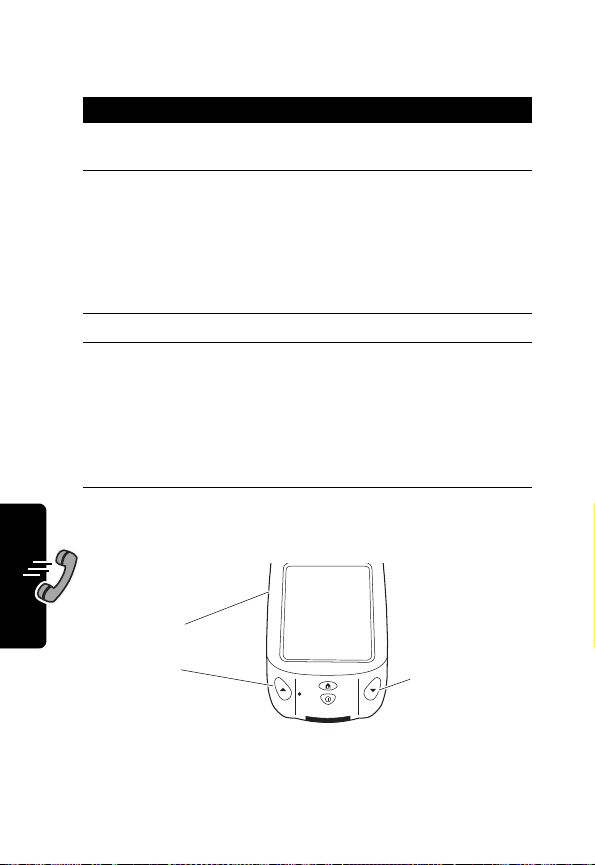
Make a Call
Press q (located in the middle of the
1
status bar at the top of the
touchscreen) to open the dial pad.
2
Enter the phone number.
If you make a mistake while entering
the number, press
1
to backspace
and erase one or more numbers.
3
Press
Send
on the touchscreen.
End a Call
Press
End
in the in-call screen, or simply
close the flip.
Answer a Call
Press
Answer
in the incoming call
message on the touchscreen, or press
the Confirm button.
If the Flip Answer option is on, you can
also answer a call by opening the flip.
See page 36.
MOTOROLA, the Stylized M Logo, and all other trademarks indicated as
such herein are trademarks of Motorola, Inc. ® Reg. U.S. Pat. & Tm. Off.
All other product or service names are the property of their respective
owners.
© 2002 Motorola, Inc. All rights reserved.
Personal Communications Sector
1500 Gateway Blvd., Boynton Beach, FL 33426-8292
Manual number: 6809448A89-O
Cover number: 8988485L49-O
Welcome
3

Contents
Safety Information
European Union Directives Conformance
Statement
Getting Started
What’s in the Box? . . . . . . . . . . . . . . . . . . . . . . . . . . . 15
About this Guide . . . . . . . . . . . . . . . . . . . . . . . . . . . . 15
Installing the SIM Card . . . . . . . . . . . . . . . . . . . . . . . 16
Charging the Battery . . . . . . . . . . . . . . . . . . . . . . . . . 17
Contents
Turning Your Phone On . . . . . . . . . . . . . . . . . . . . . . . 19
Entering Your PIN . . . . . . . . . . . . . . . . . . . . . . . . . . . 19
Entering Your Unlock Code . . . . . . . . . . . . . . . . . . . . 20
Registering with a Network . . . . . . . . . . . . . . . . . . . . 20
Calibrating the Screen . . . . . . . . . . . . . . . . . . . . . . . . 21
Changing Between PDA and Phone Mode . . . . . . . . 21
Learning to Use Your Phone
Touchscreen Controls and Status Indicators . . . . . . . 22
Using the Main Menus . . . . . . . . . . . . . . . . . . . . . . . . 24
Using Your Phone’s Buttons . . . . . . . . . . . . . . . . . . . 28
Entering Text . . . . . . . . . . . . . . . . . . . . . . . . . . . . . . . 30
Setting Up Your Phone
Storing Your Name and Number . . . . . . . . . . . . . . . . 34
Setting the Date and Time . . . . . . . . . . . . . . . . . . . . . 34
Setting a Ring Style . . . . . . . . . . . . . . . . . . . . . . . . . . 35
Setting Answer Options . . . . . . . . . . . . . . . . . . . . . . . 36
Setting Automatic Redial . . . . . . . . . . . . . . . . . . . . . . 36
Changing Your Startup Greeting . . . . . . . . . . . . . . . . 37
Conserving Battery Power . . . . . . . . . . . . . . . . . . . . . 37
Setting the Display Contrast . . . . . . . . . . . . . . . . . . . 38
. . . . . . . . . . . . . . . . . . . . . . . . . . . . . 8
. . . . . . . . . . . . . . . . . . . . . . . . . . . . . . . . . 14
. . . . . . . . . . . . . . . . . . . . . . . . . . . . . . . 15
. . . . . . . . . . . . . . . . . . . . 22
. . . . . . . . . . . . . . . . . . . . . . . . 34
4

Calling Features
Making a Call . . . . . . . . . . . . . . . . . . . . . . . . . . . . . . . 39
Ending a Call . . . . . . . . . . . . . . . . . . . . . . . . . . . . . . . 39
Answering a Call . . . . . . . . . . . . . . . . . . . . . . . . . . . . 40
Muting the Microphone During a Call . . . . . . . . . . . . . 40
Muting the Incoming Call Ringer or Vibrate Alert . . . .40
Redialing a Number . . . . . . . . . . . . . . . . . . . . . . . . . . 41
Returning an Unanswered Call . . . . . . . . . . . . . . . . . 41
Viewing Recent Calls . . . . . . . . . . . . . . . . . . . . . . . . . 41
Inserting Pauses Into a Phone Number . . . . . . . . . . . 43
Calling an Emergency Number . . . . . . . . . . . . . . . . . 43
Calling International Numbers . . . . . . . . . . . . . . . . . . 44
Calling with Speed Dial . . . . . . . . . . . . . . . . . . . . . . . 44
Using Caller ID . . . . . . . . . . . . . . . . . . . . . . . . . . . . . . 45
Voicemail . . . . . . . . . . . . . . . . . . . . . . . . . . . . . . . . . . 46
Using Call Waiting . . . . . . . . . . . . . . . . . . . . . . . . . . . 47
Putting a Call on Hold . . . . . . . . . . . . . . . . . . . . . . . . .48
Transferring a Call . . . . . . . . . . . . . . . . . . . . . . . . . . . 49
Changing the Active Line . . . . . . . . . . . . . . . . . . . . . . 49
Displaying Your Phone Number . . . . . . . . . . . . . . . . . 49
Messages and Email
Text Messaging . . . . . . . . . . . . . . . . . . . . . . . . . . . . . 50
Email . . . . . . . . . . . . . . . . . . . . . . . . . . . . . . . . . . . . . 60
Setting Up Your Addressbook
Fields in an Addressbook Entry . . . . . . . . . . . . . . . . . 68
Addressbook Categories . . . . . . . . . . . . . . . . . . . . . . 69
Creating an Addressbook Entry . . . . . . . . . . . . . . . . . 70
Locating Entries in Your Addressbook . . . . . . . . . . . . 71
Calling a Number from Your Addressbook . . . . . . . . . 72
Sending a Message from Your Addressbook . . . . . . . 73
Copying Addressbook Entries . . . . . . . . . . . . . . . . . . 74
. . . . . . . . . . . . . . . . . . . . . . . . . . . . . . 39
. . . . . . . . . . . . . . . . . . . . . . . . . . . 50
. . . . . . . . . . . . . . . . . . . 68
Contents
5

Deleting Addressbook Entries . . . . . . . . . . . . . . . . . . 74
Sending Addressbook Information . . . . . . . . . . . . . . 75
Receiving Addressbook Information . . . . . . . . . . . . . 75
Synchronizing with TrueSync Software . . . . . . . . . . . 76
Getting More Out of Your Phone
Making a Conference Call . . . . . . . . . . . . . . . . . . . . . 77
Forwarding Calls . . . . . . . . . . . . . . . . . . . . . . . . . . . . 79
Blocking Calls . . . . . . . . . . . . . . . . . . . . . . . . . . . . . . 80
Using Fixed Dialing . . . . . . . . . . . . . . . . . . . . . . . . . . 80
Monitoring Phone Use . . . . . . . . . . . . . . . . . . . . . . . . 81
Adjusting Network Settings . . . . . . . . . . . . . . . . . . . . 83
Contents
Personalizing Your Phone
Personalizing a Ring Style . . . . . . . . . . . . . . . . . . . . . 85
Creating Custom Ring Tones . . . . . . . . . . . . . . . . . . . 86
Creating Pictures, Animations, and Sounds . . . . . . . 89
Creating Personal Message Folders . . . . . . . . . . . . . 91
Creating Message Mailing Groups . . . . . . . . . . . . . . 92
Creating Categories for Addressbook Entries . . . . . . 93
Setting the Menu Language . . . . . . . . . . . . . . . . . . . 94
Resetting All Options . . . . . . . . . . . . . . . . . . . . . . . . . 94
Clearing All Stored Information . . . . . . . . . . . . . . . . . 95
Security
Personal Organizer Features
. . . . . . . . . . . . . . . . . . . . . . . . . . . . . . . . . . . . . 96
Locking the SIM Card . . . . . . . . . . . . . . . . . . . . . . . . 96
Locking and Unlocking Your Phone . . . . . . . . . . . . . . 98
Changing Your Codes . . . . . . . . . . . . . . . . . . . . . . . . 99
Datebook . . . . . . . . . . . . . . . . . . . . . . . . . . . . . . . . . 100
Alarm Clock . . . . . . . . . . . . . . . . . . . . . . . . . . . . . . . 104
Notepad . . . . . . . . . . . . . . . . . . . . . . . . . . . . . . . . . . 105
Voice Notes . . . . . . . . . . . . . . . . . . . . . . . . . . . . . . . 107
Tasks . . . . . . . . . . . . . . . . . . . . . . . . . . . . . . . . . . . . 109
. . . . . . . . . . . . . . . . . 77
. . . . . . . . . . . . . . . . . . . . . . 85
. . . . . . . . . . . . . . . . . . 100
6

Calculator . . . . . . . . . . . . . . . . . . . . . . . . . . . . . . . . . 111
Synchronizing with TrueSync Software . . . . . . . . . . 111
Printing Information Using Infrared . . . . . . . . . . . . . . 112
News and Entertainment
Mobile Internet . . . . . . . . . . . . . . . . . . . . . . . . . . . . .113
Downloading Java Applications . . . . . . . . . . . . . . . . 115
Using Your Phone as a Wireless Modem . . . . . . . . . 118
Transferring Data Using the Infrared Port . . . . . . . . . 120
Specific Absorption Rate (SAR) Data
Additional Health and Safety Information (FDA)
Warranty
Product Registration
Software Copyright Notice
Export Law Assurances
Index
Wireless Phone
Safety Tips
. . . . . . . . . . . . . . . . . . . . . . . . . . . . . . . . . . . 133
. . . . . . . . . . . . . . . . . . . . . . . . . . . . . . . . . . . . . . . 141
. . . . . . . . . . . . . . . . . . . . . . . . . . . . . . . 147
. . . . . . . . . . . . . . . . . . . . . . 113
. . . . . . . . . . . . 121
. . . 124
. . . . . . . . . . . . . . . . . . . . . . . . . 139
. . . . . . . . . . . . . . . . . . . . . 139
. . . . . . . . . . . . . . . . . . . . . . . 140
Contents
7

Safety Information
IMPORTANT INFORMATION ON SAFE AND EFFICIENT
OPERATION. READ THIS INFORMATION BEFORE
USING YOUR PHONE.
This device complies with Part 15 of the FCC Rules.
Operation is subject to the following two conditions: (1) this
device may not cause harmful interference, and (2) this
device must accept any interference received, including
interference that may cause undesired operation.
RF Operational Characteristics
Your phone contains a transmitter and a receiver. When it
is ON, it receives and transmits radio frequency (RF)
energy. The phone is capable of transmitting in the
frequency ranges of 890 MHz to 915 MHz, 1710 MHz to
Safety Information
1785 MHz, and 1850 MHz to 1910 MHz in digital mode.
When you communicate with your phone, the system
handling your call controls the power level at which your
phone transmits. The output power level typically may vary
over a range from 0.0 to 2.0 watts for the 900 MHz band,
0.0 watts to 1.0 watts for the 1800 MHz band, and
0.0 watts to 0.89 watts for the 1900 MHz band.
Exposure To Radio Frequency Energy
Your Motorola phone is designed to comply with the
following national and international standards and
guidelines regarding exposure of human beings to radio
frequency electromagnetic energy:
• United States Federal Communications Commission,
Code of Federal Regulations; 47 CFR part 2 sub-part J
• American National Standards Institute (ANSI)/Institute
of Electrical and Electronic Engineers (IEEE) C95. 11992
8

• Institute of Electrical and Electronic Engineers (IEEE)
C95.1-1999 Edition
• National Council on Radiation Protection and
Measurements (NCRP) of the United States, Report
86, 1986
• International Commission on Non-Ionizing Radiation
Protection (ICNIRP) 1998
• Ministry of Health (Canada) Safety Code 6. Limits of
Human Exposure to Radiofrequency Electromagnetic
Fields in the Frequency Range from 3 kHz to 300 GHz,
1999
• Australian Communications Authority
Radiocommunications (Electromagnetic Radiation Human Exposure) Standard 1999 (applicable to
wireless phones only)
To assure optimal phone performance and make sure
human exposure to radio frequency electromagnetic
energy is within the guidelines set forth in the above
standards, always adhere to the following procedures:
Portable Phone Operation and EME Exposure
Antenna Care
Use only the supplied or an approved replacement
antenna.
Unauthorized antennas, modifications, or
attachments could damage the phone and may violate
FCC regulations.
Do NOT hold the antenna when the
phone
is in use.
Holding the antenna affects call quality and may cause the
phone to operate at a higher power level than needed.
Phone Operation
When placing or receiving a phone call, hold your phone
as you would a wireline telephone.
Speak directly into
the microphone.
Safety Information
9

Body-worn Operation
To maintain compliance with FCC/Health Canada RF
exposure guidelines, if you wear a phone on your body
when transmitting, always place the phone in
a Motorola
supplied or approved clip, holder, holster, case, or body
harness for this product. Use of non-Motorola-approved
accessories may exceed FCC/Health Canada RF
exposure guidelines. If you do not use one of the Motorolasupplied or approved body-worn accessories, and are not
using the phone held in the normal use position,
the phone
and its antenna are at least one inch (2.5
centimeters) from your body when transmitting
Data Operation
When using any data feature of the phone, with or without
an accessory cable,
Safety Information
at least one inch (2.5 centimeters) from your body.
Approved Accessories
position the
phone
and its antenna
For a list of approved Motorola accessories visit our
website at www.mot.com.
Electromagnetic Interference/Compatibility
NOTE:
Nearly every electronic device is susceptible to
electromagnetic interference (EMI) if inadequately
shielded, designed or otherwise configured for
electromagnetic compatibility.
• FACILITIES
To avoid electromagnetic interference and/or
compatibility conflicts, turn off your phone in any facility
where posted notices instruct you to do so. Hospitals or
health care facilities may be using equipment that is
sensitive to external RF energy.
• AIRCRAFT
When instructed to do so, turn off your phone when on
board an aircraft. Any use of a phone must be in
ensure
.
10

accordance with applicable regulations per airline crew
instructions.
• MEDICAL DEVICES
Pacemakers
The Advanced Medical Technology Association
recommends that a minimum separation of 6 inches (15
centimeters) be maintained between a handheld
wireless phone and a pacemaker. These
recommendations are consistent with the independent
research by, and recommendations of, the United
States Food and Drug Administration.
Persons with pacemakers should:
• ALWAYS keep the phone more than six inches (15
centimeters) from their pacemaker when the
phone is turned ON.
• not carry the phone in the breast pocket.
• use the ear opposite the pacemaker to minimize
the potential for interference.
• turn the phone OFF immediately if you have any
reason to suspect that interference is taking place.
Hearing Aids
Some digital wireless phones may interfere with some
hearing aids. In the event of such interference, you may
want to consult your hearing aid manufacturer to
discuss alternatives.
Other Medical Devices
If you use any other personal medical device, consult
the manufacturer of your device to determine if it is
adequately shielded from RF energy. Your physician
may be able to assist you in obtaining this information.
Use While Driving
Check the laws and regulations on the use of phones in
Safety Information
11

the area where you drive. Always obey them.
When using your phone while driving, please:
• Give full attention to driving and to the road.
• Use hands-free operation, if available.
• Pull off the road and park before making or answering a
call if driving conditions so require.
OPERATIONAL WARNINGS
• FOR VEHICLES WITH AN AIR BAG
Do not place a portable phone in the area over an air
bag or in the air bag deployment area. Air bags inflate
with great force. If a portable phone is placed in the air
bag deployment area and the air bag inflates, the phone
may be propelled with great force and cause serious
injury to occupants of the vehicle.
Safety Information
• POTENTIALLY EXPLOSIVE ATMOSPHERES
Turn off you phone prior to entering any area with a
potentially explosive atmosphere, unless it is a phone
type especially qualified for use in such areas as
“Intrinsically Safe.” Do not remove, install, or charge
batteries in such areas. Sparks in a potentially explosive
atmosphere can cause an explosion or fire resulting in
bodily injury or even death.
NOTE: The areas with potentially explosive
atmospheres referred to above include fueling areas
such as below decks on boats, fuel or chemical transfer
or storage facilities, areas where the air contains
chemicals or particles, such as grain, dust or metal
powders, and any other area where you would normally
be advised to turn off your vehicle engine. Areas with
potentially explosive atmospheres are often but not
always posted.
12

• BLASTING CAPS AND AREAS
To avoid possible interference with blasting operations,
turn off your phone when you are near electrical blasting
caps, in a blasting area, or in areas posted: “Turn off
two-way radio”. Obey all signs and instructions.
OPERATIONAL CAUTIONS
• ANTENNAS
Do not use any portable phone that has a damaged
antenna.
your skin, a minor burn can result.
•BATTERIES
All batteries can cause property damage and/or bodily
injury such as burns if a conductive material such as
jewelry, keys, or beaded chains touch exposed
terminals. The conductive material may complete an
electrical circuit (short circuit) and become quite hot.
Exercise care in handling any charged battery,
particularly when placing it inside a pocket, purse, or
other container with metal objects.TC01-100
If a damaged antenna comes into contact with
Safety Information
13
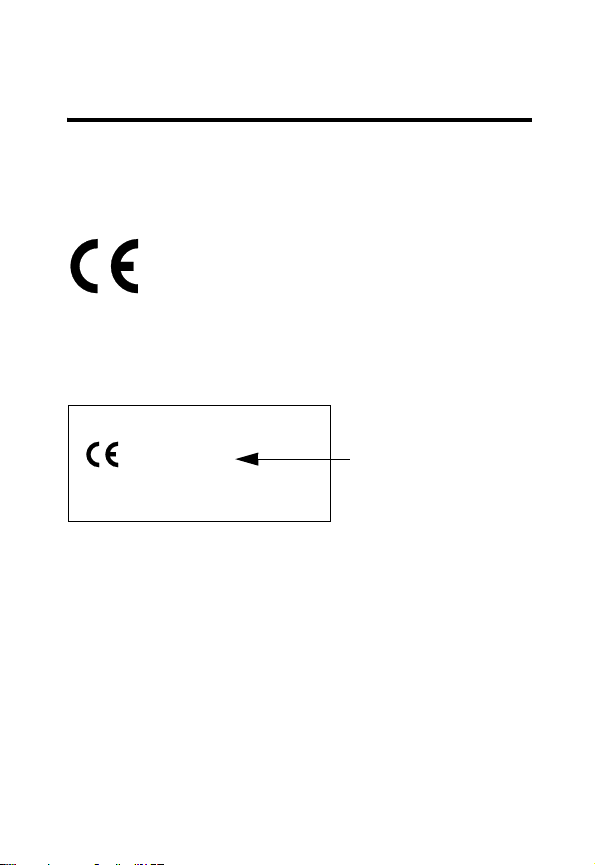
European Union Directives Conformance Statement
European Union Directives
Conformance Statement
Hereby, Motorola declares that this product
is in compliance with
• The essential requirements and other
relevant provisions of
Directive 1999/5/EC
• All other relevant EU Directives
IMEI: 350034/40/394721/9
0168
Type: MC2-41H14
The above gives an example of a typical Product
Approval Number.
You can view your product’s Declaration of
Conformity (DoC) to Directive 1999/5/EC (to R&TTE
Directive) at www.motorola.com/rtte. To find your
European Union Directives Conformance Statement
DoC, enter the product Approval Number from your
product’s label in the Search bar on the web site.
Product Approval
Number
14

Getting Started
What’s in the Box?
Your phone typically comes with a battery and a
charger. Other accessories can customize your phone for
maximum performance and portability.
To purchase Motorola Original
Motorola Customer Call Center at 1-800-221-6456 in the
United States or 1-800-461-4575 in Canada.
About this Guide
This user guide introduces you to your Motorola phone.
Optional Features
This label identifies an optional network,
SIM card, or subscription-dependent
feature that may not be offered by all
service providers in all geographical areas.
Contact your service provider for more
information.
™
accessories, contact the
Getting Started
Optional Accessories
This label identifies a feature that requires
an optional Motorola Original™ accessory.
15
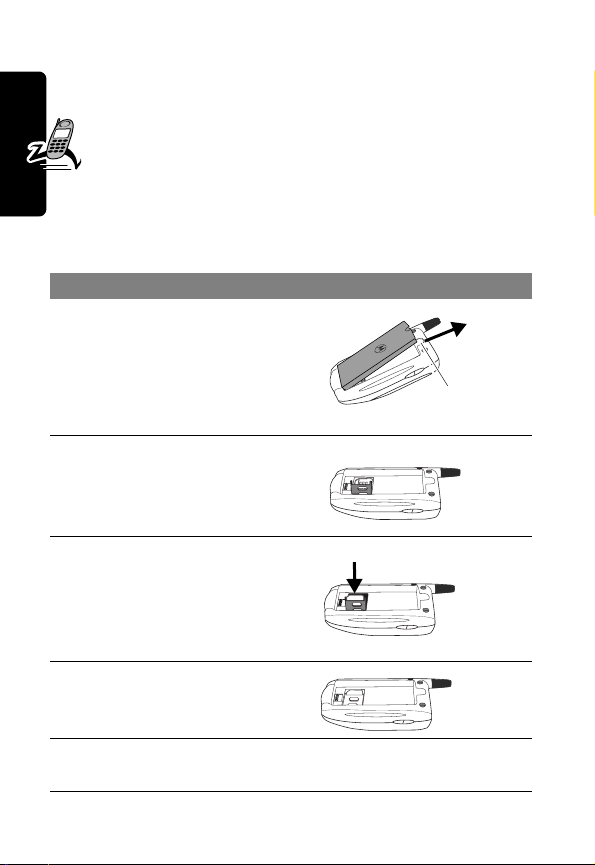
Installing the SIM Card
011694-O
Your SIM (Subscriber Identity Module) card contains your
phone number, service details, and memory for storing
phone numbers and messages.
Caution:
Do not bend or scratch the SIM card, and
avoid exposing it to static electricity, water, or dirt. Turn
your phone off before removing or installing the SIM card.
Failure to do so may damage the SIM card memory.
Do This
1
Push the release latch
up towards the top of
Getting Started
the phone and lift the
battery out.
2
Slide the SIM tray
towards you to unlock it
and lift the unhinged
end up.
3
Insert the SIM card into
the tray with the notch
in the upper left corner
and the gold contacts
facing down.
4
Lower the SIM tray and
slide forward to lock
into place.
5
Replace the battery by lining up the contacts and
pressing down on the battery until it clicks into place.
Release
latch
16
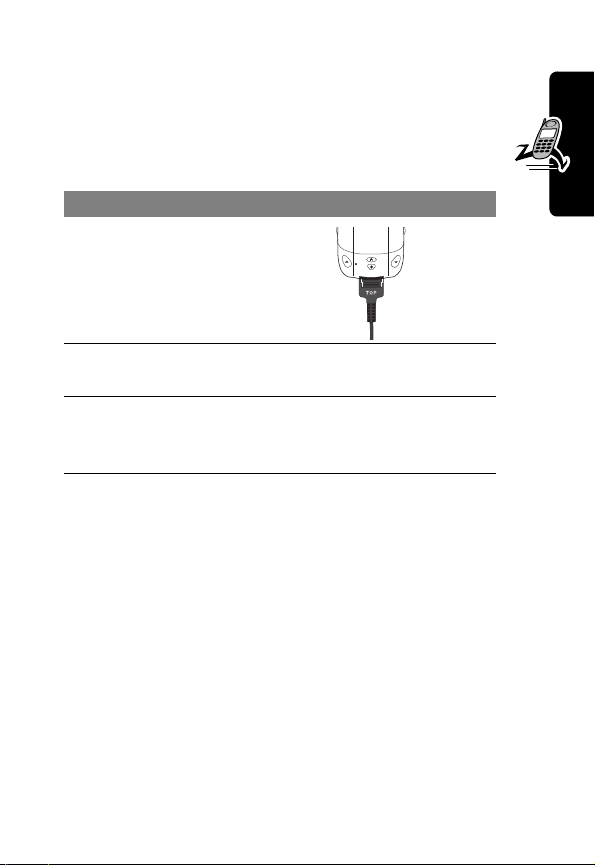
Charging the Battery
New batteries are shipped partially charged, so you must
charge the battery before you can use your phone.
Some batteries perform best after several full charge/
discharge cycles.
Do This
1
Plug the charger
into the charger
port.
2
Plug the other end of the charger into an
appropriate electrical outlet.
3
When your phone indicates the battery is fully
charged (
tab and remove the charger.
During charging, the battery level indicator in the upper
right corner of the touchscreen flashes and shows how
much of the charging process is complete. The battery
indicator stops flashing when the battery is fully charged.
Battery Use
Battery performance depends on many factors, including
your wireless carrier’s network configuration, signal
strength, the temperature at which you operate your
Charging Complete
), press the release
Getting Started
17

phone, the features and/or settings you select and use,
and your voice, data, and other application usage patterns.
Caution:
metal objects to contact or short-circuit the battery
terminals.
To maximize your battery’s performance:
•
Always use Motorola Original™ batteries and
chargers. The phone warranty does not cover damage
caused from using non-Motorola batteries and/or
battery chargers.
•
Maintain the battery at or near room temperature
Getting Started
when charging.
•
Do not expose batteries to temperatures below -10°C
(14°F) or above 45°C (113°F). Always take your
phone with you when you leave your vehicle.
•
When you do not intend to use a battery for a while,
store it uncharged in a cool, dark, dry place. Store
batteries in their protective cases when not in use.
•
New batteries or batteries that have not been used for
long periods of time may require a longer charge time.
Charge such batteries for at least 14 hours, but not
more than 24 hours.
•
Over extended periods of time, batteries gradually
wear down and require longer charging times. This is
normal. If you charge the battery regularly and notice
a decrease in talk time or an increase in charging
time, it is probably time to purchase a new battery.
To prevent injuries or burns, do not allow
18
Extending Battery Life
•
Turn on battery saving mode (see page 37).
•
Set the network search speed to slow or medium
(see page 84).
Activities that require intensive keystroke use (such as
playing games and composing messages) and using the
browser may also reduce your phone’s talk and standby
times.
Turning Your Phone On
Press power
button to turn
phone on or off
Your service provider may have programmed your phone
with a subsidy lock that prevents you from using a SIM
card other than the one that came with your phone. If you
try to use a different SIM card, you will be asked to enter
an unlock code to disable the subsidy lock. It is at the
discretion of your service provider to provide you with the
subsidy unlock code.
Entering Your PIN
If your phone is programmed with a PIN, you are prompted
to enter it after you turn your phone on. Press
previous numbers if you make a mistake while entering
your PIN.
If you enter an incorrect PIN 3 times in a row, your SIM
card is blocked. See page 96 for the unblocking procedure.
1
to erase
Getting Started
19

If the SIM card is locked, damaged, missing, or not
registered, you are prompted to choose one of the
following options:
•
Antenna Off
•
Antenna On
make emergency calls.
•
Power Off
to use the phone in PDA mode.
to use the phone’s PDA functions and
to turn the phone off.
Entering Your Unlock Code
If your phone is programmed with a lock code, you are
prompted to enter it. Press
you make a mistake while entering your unlock code.
Getting Started
If you enter an incorrect unlock code 3 times in a row, your
phone locks up. Contact your service provider for the
unlock code.
1
to erase previous numbers if
Registering with a Network
In most cases, your phone is set by your service provider
to automatically search for your service network. If your
phone is not programmed to search for a network, you will
be presented with a list of networks from which you can
select.
After the phone successfully registers with a network, the
main menu will appear and the process of turning your
phone on is complete.
20
Calibrating the Screen
After you turn your phone on for the first time, calibrate the
screen.
Press
1
hu
2
Display Setup
3
Calibrate Screen
Press the center of the target until it disappears. If you
want to calibrate the screen each time you turn the phone
on, check
Redo on Power Up
.
Changing Between PDA and Phone Mode
Your phone can operate in phone mode or PDA mode. In
phone mode, you can use all of your phone’s features. In
PDA mode, you cannot make phone calls or send
messages.
The antenna indicator in the status bar shows
phone mode or for PDA mode. To change the mode,
press the icon and select
mode, or
Cancel
Antenna Off
to keep the current mode.
Antenna On
to switch to PDA mode. Press
to switch to phone
T
for
Getting Started
21

Learning to Use Your Phone
Touchscreen Controls and Status Indicators
➍
12:28
Clock
R
➏
Owner
Information
➐
Service
Provider
➎
➌
➋
New
Notification
Indicator
➊
Antenna
Status
➑
Ringer
Status
Learning to Use Your Phone
Call
Status
T p
Service Provider
Battery
Level
22
➊
Antenna Status
Shows the strength of your phone’s
connection with the network. GPRS is displayed above if
you have the GPRS service and it is active.
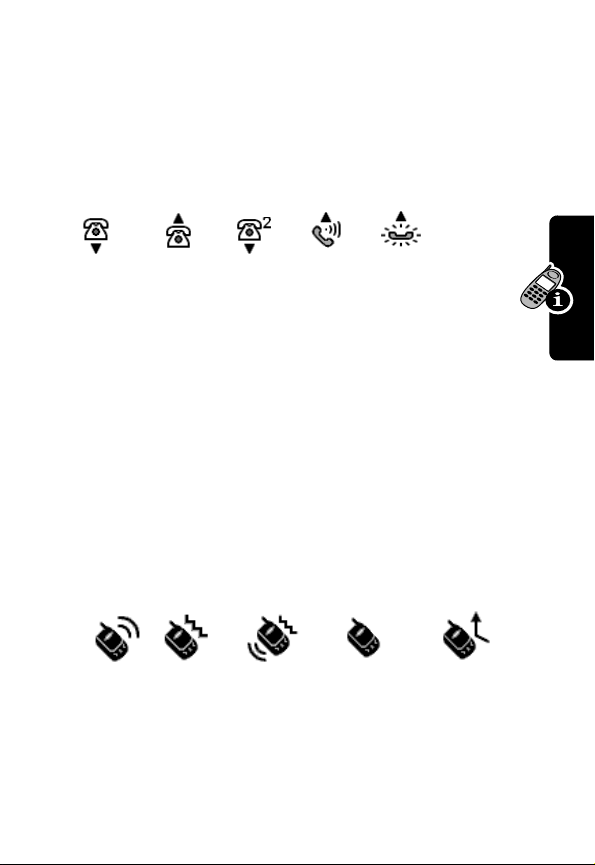
➋
New Notification Indicator
Flashes when you miss a
call or have a new message waiting
➌
Call Status
Phone line status:
On hook
➍
Clock
➎
Battery Level
battery:
➏
Owner Information
Off hook
Shows the current time
Shows the amount of charge left in the
RQPO
High
Line 2
Connected
Displays owner information that
On hold
Empty
you have entered into the phone’s memory
➐
Service Provider
name.
Antenna Off
mode, or
Emergency Call
Your wireless service provider’s
is displayed when the phone is in PDA
when the phone can only make
emergency calls.
➑
Ringer Status
Type of alert for incoming calls and
messages:
Ring
Vibrate
Ring & vibrate
Silent
Learning to Use Your Phone
Call divert on
23
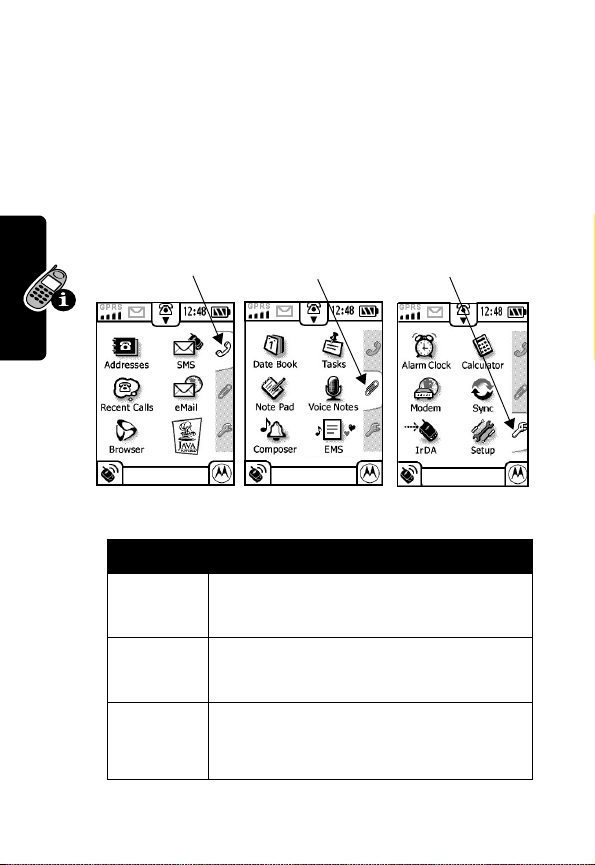
Using the Main Menus
The features of your phone are organized into three main
menus. Press one of the tabs on the right side of the
touchscreen to view each main menu, then press a feature
icon to access that feature.
Tip:
You can also use the page up (y) and page down (c)
buttons to cycle through the main menu tabs.
24
Communications
Applications
Setup
r
Provider Name
Icon Function
Learning to Use Your Phone
G
K
M
Record phone numbers, addresses,
and other contact information
Send, retrieve, check, and manage text
messages and voicemail
List the last 20 numbers dialed, last
20 calls missed, and last 20 calls
answered
Provider Name
Provider Name
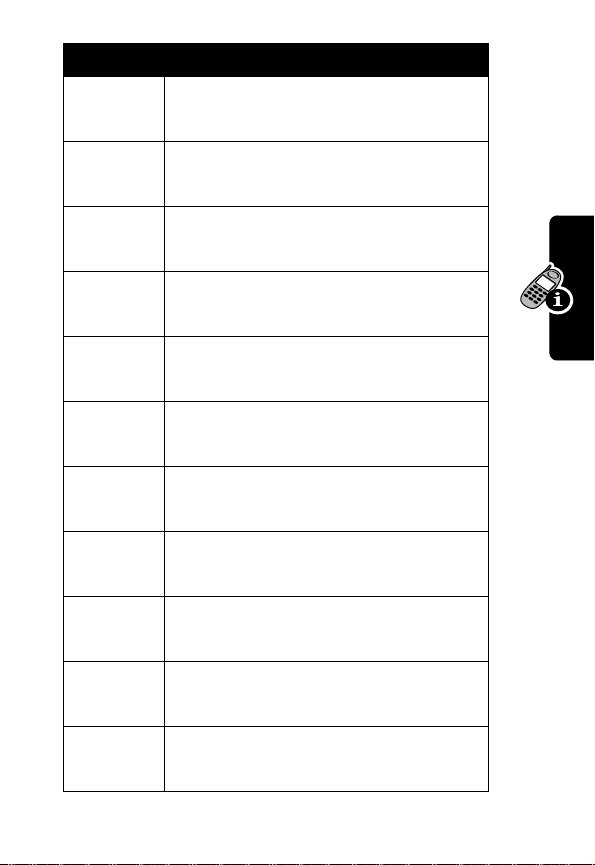
Icon Function
k
E
4
z
w
i
C
Y
3
Send and receive email
Connect to the Internet
Download and run J2ME applications
Schedule and organize daily activities
such as appointments and meetings
Create and prioritize to-do lists
Compose short notes
Record phone calls or personal
messages
Create custom ring tones and alerts
Create pictures, animations, and
sounds
Learning to Use Your Phone
I
W
Set reminder alarms
Calculator for performing simple
calculations
25
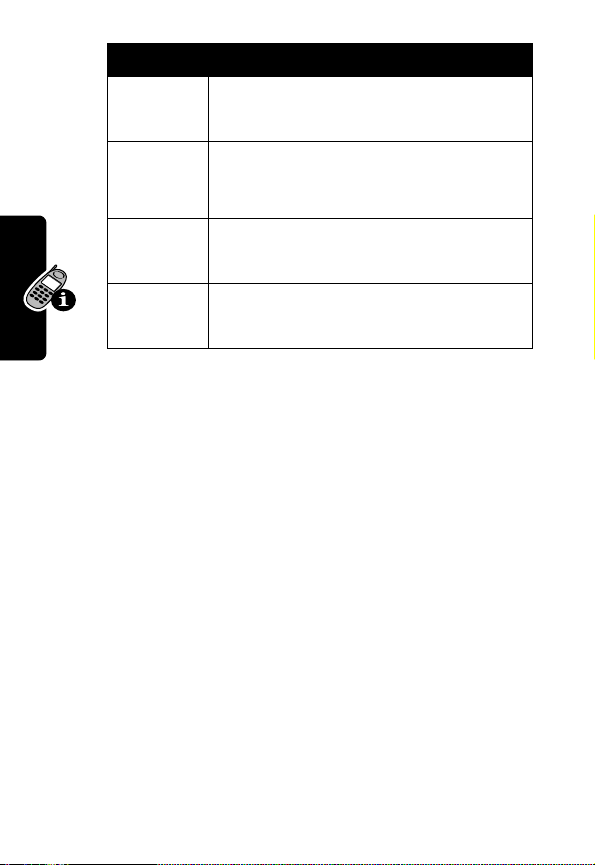
Icon Function
m
A
r
u
Learning to Use Your Phone
Transmit and receive information using
the phone as a wireless modem
Synchronize data between your phone
and your PC using Starfish Truesync
software
Send and receive information by
infrared transmission
Set up and customize your phone
®
26

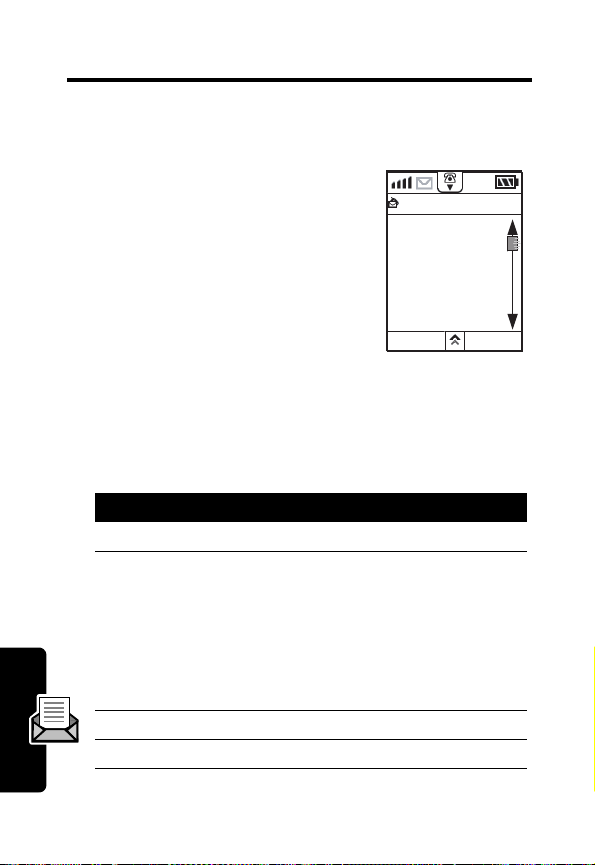
Using the Context Sensitive Menus
If the menu indicator b appears at the bottom of the
touchscreen, press it to list functions you can perform from
that screen. To close the menu without selecting anything,
press anywhere on the touchscreen outside of the menu
list.
12:00
Message Center
Inbox [2]4
SIM Card [0]3
Outbox 0
Voice Mail
Info Svc
Sent
Exit
Press to open menu
9
Compose
Learning to Use Your Phone
27

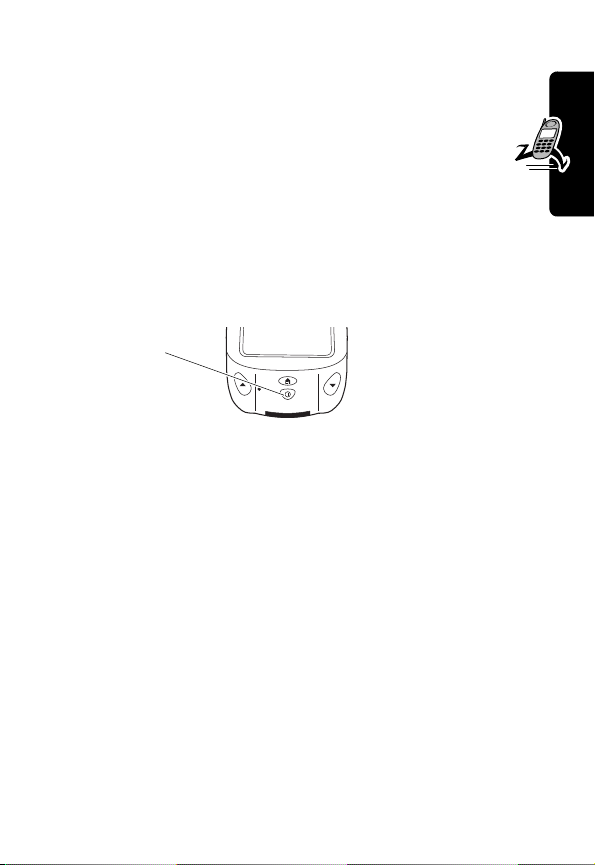
Using Your Phone’s Buttons
You can easily and quickly access your phone’s features
by pressing the touchscreen with the stylus. You can also
use the buttons on your phone to perform some functions.
Many buttons perform more than one function, depending
on what is currently displayed on the screen.
Volume
controls
Page up Page down
➎
➍
➌
Confirm
Home
➏
➊➋
Power button
Turns your phone on
020004-O
and off
Learning to Use Your Phone
28

➊ Page Up
•
When scroll bars are present, use to scroll back
•
When dial pad is displayed, list last 20 answered calls
•
When calling, open the dial pad
•
From the main menu, scroll through the 3 main menu
icons on the right side of the screen
➋ Page Down
•
When scroll bars are present, use to scroll forward
•
When dial pad displayed, list last 20 missed calls
•
When calling, open the dial pad
•
From the main menu, scroll through the 3 main menu
icons on the right side of the screen
➌ Home
•
Return to the main menu
➍ Confirm
•
Select a highlighted icon
•
Answer an incoming call
•
From the main menu, open the dial pad
•
Start/stop recording a phone call
•
Stop recording a voice note
➎ Volum e Up
•
Turn the volume up during a call
•
When dial pad displayed, enter the addressbook
•
From the main menu, scroll through icons
•
When flip is closed, press and hold button for
2 seconds to show time, missed calls, new messages
➏ Volum e Down
Turn the volume down during a call
•
•
When dial pad displayed, list last 20 numbers called
•
From the main menu, scroll through icons
•
When flip is closed, press and hold button for
2 seconds to show time, missed calls, new messages
•
Mute incoming call ring/vibrate
Learning to Use Your Phone
29

Entering Text
Your phone provides two ways to enter text and other
information:
•
Handwriting letters and numbers on the touchscreen
•
Selecting characters from a keyboard display
When you first enter a screen where text input is required
(for example, when composing a new message),
press
b
and select
Depending on your selection, either the handwriting
recognition or keyboard tool will be displayed.
Handwriting Recognition
Your phone uses the Motorola Quickprint Handwriting
Recognition technology to recognize handwritten
characters, numbers, and punctuation.
Similar Characters Panel
Handwriting
or
Keyboard
Handwriting Area
.
Backspace
Lowercase
Uppercase
Numbers
Learning to Use Your Phone
Punctuation
Press
ABC
or
123
for numbers. Using the stylus, write your characters
or numbers in the handwriting area. You can switch
between uppercase, lowercase, and numbers at any time.
30
abc
ABC
123
.@!
to write in uppercase text,
Space
abc
for lowercase text,
Return

When you have finished writing, or if you pause, your
phone recognizes the most similar character and places it
at the current cursor position. If the character is not the
one you want, you can change it by selecting one of the
characters in the Similar Characters Panel, or by using
to backspace and erase.
1
Keyboard
When using the keyboard tool:
•
To enter a single uppercase character, press
Shift
.
•
To enter multiple uppercase characters, press .
Press again to turn uppercase off.
•
To enter punctuation, select from the punctuation bar
at the bottom of the keyboard, or press to
display additional punctuation. Press to return to
the keyboard.
%#&
▼
Setting a Preferred Text Input Method
You can set a preferred text input method so each time a
screen that requires you to enter text opens, the
handwriting or keyboard tool will be displayed. You can still
use
b
to change input methods at any time.
Learning to Use Your Phone
Press To
1
h
2
Initial Setup
3
Text Input
u
open the Setup menu
display Initial Setup options
change text input preferences
31

Press To
4
slow, medium
fast
, or
select the handwriting
recognition speed. The
slower the speed, the better
the accuracy of the
recognition.
5
Watermark:on
or
Watermark:off
6
Handwriting
or
Keyboard
7
right
specify whether a character
category notice will be
displayed in the handwriting
area
select the preferred text input
method
specify your writing hand
or
left
8
checkbox next
select your language
to a language
9
OK
Text Input Fields
Learning to Use Your Phone
save text input settings
You can enter information into your phone using the
handwriting and keyboard tools or by selecting from a list.
To select text from a list, press directly on the text input
field name or label. To enter information into a field using
the handwriting or keyboard tools, press the blank input
area next to the field name or label.
32

Press here to
select address
from your
addressbook
Press here to
select a quick
text message
Press here to
select phone
number from
addressbook
Creating a Datebook Event
Composing a Message
12:00
New Message[ 00]
To:
Message:
Press here to enter
address
Press here to enter
your own message
Cancel Send
Creating Speed Dial List
12:00
Turbo Dialing
1
2
3
4
5
6
Cancel OK
Press here to enter
phone number
Learning to Use Your Phone
Press here to
select from
list of existing
titles,
locations,
notes
12:00
New Event
Title:
Location:
Note:
Date: 03-01-2002
set time
Start:11:00
Cancel OK
Press here to
enter new
title,
location,
note
33

Setting Up Your Phone
Storing Your Name and Number
Press To
1
h
u
2
Initial Setup
3
Owner Info
4
Name:
5
Cellular:
6
OK
After entering your name and number, press o in the
bottom right corner of the screen to view your owner
information.You can also enter your name and number
by creating a new addressbook entry under the Owner
category (see page 70).
Setting the Date and Time
Press To
1
h
u
enter your name
enter your phone number
save your owner information
2
Setting Up Your Phone
34
3
4
5
Initial Setup
Date and Time
Time
Date
set the time
set the date

Use the pulldown menus in the Date and Time screen to
turn daylight savings time on or off and to set the time and
date format and your current location.
Setting a Ring Style
You can choose the sound your phone makes when you
receive a call, message, or alert and when you press the
touchscreen.
Press To
1
h
u
2
Sounds & Alerts
3
Ring Tone
4
Speaker Volume
5
Touch Screen
6
Notifications
set the sound for incoming
calls
increase or decrease the
speaker volume
choose the sound your phone
makes when you press the
touchscreen
choose the sound your phone
makes when you receive a
text or information service
message, voice mail, or
datebook alarm
Setting Up Your Phone
35

Setting Answer Options
Flip Answer
To set your phone up so you can answer a call by opening
the flip:
Press
1
h
u
2
Phone Setup
3
Flip Answer:on
Autoanswer
If you are using a headset, you can set your phone to
automatically answer a call after 2 rings.
Press
1
h
u
2
Phone Setup
3
Auto Answer:on
Setting Automatic Redial
Your phone can automatically redial a call that did not
connect. When the call goes through, your phone rings or
vibrates one time, displays
connects the call.
Setting Up Your Phone
Press
1
h
u
Redial Successful
, and
36

Press
2
Phone Setup
3
Auto Redial:on
Changing Your Startup Greeting
The startup greeting is the message you see when you
turn your phone on.
Press
1
h
u
2
Initial Setup
3
Startup Greeting
Erase the current message and enter a new message.
See page 30 for information on how to enter text on
your phone.
Conserving Battery Power
The battery indicator in the top right corner of
the status bar shows the battery charge level.
Press the battery to view a detailed battery charge meter.
To turn battery saving mode on, press
the screen shows
You can also use this screen to automatically turn your
phone off at a specific time.
Battery Save:on
Battery Save:
.
until
Setting Up Your Phone
37

Setting the Display Contrast
Press To
1
h
u
2
Display Setup
3+ or
-
adjust the display contrast
Setting Up Your Phone
38

Calling Features
Making a Call
Press
1
q
1
2
phone number
3
Send
.
Press
the dial pad.
Dial pad
12:00
Clear Send
While on a call, the in-call screen is displayed. To return
to the dial pad, press (for example, to enter an
extension number, leave a numeric message, or enter
a PIN or voicemail password). Press
you can do while on a call.
to erase numbers in
In-call screen
Connected
John Wilson
00:20
HoldEnd
020347-O
b
to see other things
Calling Features
Ending a Call
Close the flip, or press
using a headset, press and hold the headset button (the
phone beeps).
End
in the in-call screen. If you are
39

Answering a Call
When you receive a call, your phone
rings and/or vibrates and displays an
incoming call message.
Press
Answer
to answer the call,
to reject it, or
You can also answer calls by:
•
Pressing the Confirm button (see page 2)
•
Opening the flip (if Flip Answer is on, see page 36)
•
Pressing the headset button (the phone beeps)
Busy
to reject it with a busy signal.
Drop
Incoming Call
John Wilson
Busy Drop Answer
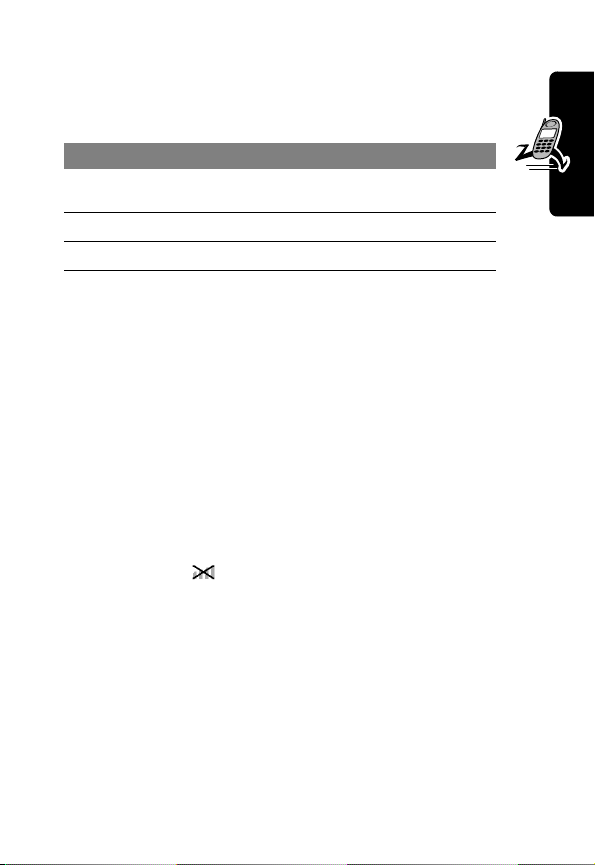
Muting the Microphone During a Call
During a call you can mute the microphone so the person
Calling Features
on the other end of the call cannot hear you. Press
the in-call screen and select
the microphone back on.
Mute
. Press
Unmute
to turn
Muting the Incoming Call Ringer or Vibrate Alert
While the phone is ringing or vibrating:
b
in
40
Press To
either volume key turn off the ring or vibrating
alert

Redialing a Number
Press
Redial
from the dial pad.
Redial
appears only if there is no number in the dial pad. If
there is a number in the dial pad, press
If you have the automatic redial option turned on and you
dial a number that does not connect, your phone
automatically redials the number. When the call goes
through, your phone rings or vibrates one time, displays
Redial Successful
Tip:
You can also redial a number from the recent calls list
(see below).
, and connects the call. See page 36.
Clear
, then
Redial
Returning an Unanswered Call
The new notification indicator at the top of the screen
flashes to indicate missed calls and new messages.
Press To
1
2
Missed Call(s)
3
a missed call see details of the call
4
Call
list all missed calls
return the call
.
Calling Features
Viewing Recent Calls
Your phone keeps a list of the last 20 calls you missed,
answered, and dialed. The newest calls are at the top of
41
the list. You can store a number in your addressbook or
redial a number from the recent calls list.
Press To
1
f
M
2
Last 20 Missed
or
Last 20 Answered
list missed calls, answered
calls, or calls made
or
Last 20 Called
3
a call in the list see details of the call
4
Call
(or
Redial
)
dial the number
or
b
store the number in your
addressbook or delete the
Calling Features
call from the list
When the dial pad is displayed on the screen, you can list
recent calls using the following buttons:
.
(Volume down
button)
Last 20
numbers called
Last 20
answered
calls
Last 20
missed calls
42

Inserting Pauses Into a Phone Number
Pauses are useful for calling extension numbers or going
into a voice mail system. Your phone will wait until the call
is connected before sending the numbers after the first
pause.
To insert a pause into a phone number, press
position where you want to insert the pause and select
Insert Pause
number display panel.
For example, 5556911p9999 would call 555-6911, wait for
the call to connect, then dial extension 9999.
. A “p” is inserted in that position in the
b
at the
Calling an Emergency Number
Your service provider may program one or more
emergency numbers into your phone. You can call
emergency numbers even if the SIM card is locked,
damaged, missing, or not registered, provided that you
selected Antenna On when you turned your phone on
(see page 19).
Calling Features
To make an emergency call, press
bar, enter the phone number, and press
Note:
Emergency numbers vary by country. Your phone’s
preprogrammed emergency numbers may not work in all
locations, and sometimes an emergency call cannot be
placed due to network, environmental, or interference
issues.
q
in the top status
Send
.
43

Calling International Numbers
If you subscribe to international calling service, you can
make a call from any country without knowing the local
international access code.
Simply add the international dialing prefix
number by pressing “0” for 3 to 4 seconds.
After
+
is displayed, enter the country code and phone
number you want to call, then press
Send
+
to your
.
Calling with Speed Dial
Each addressbook entry stored in SIM card memory is
automatically assigned a unique speed dial number. The
speed dial number is listed in the
addressbook entry. To speed dial a number stored in SIM
card memory:
Location:
field of the
Calling Features
44
Press
1
q
2
location number followed by the # sign
To speed dial a number that is not stored on the SIM
card, add the number to the Turbo Dialing list. Up to
9 numbers can be stored in the Turbo Dialing list.
Press To
1
h
u
2 Phone Setup
3 Turbo Dialing
open the Turbo Dialing list

Press To
4
speed dial
location number
or
blank field to
the right of the
location number
To replace a phone number in the Turbo Dialing list with
another number, use
the new number.
To clear the entire Turbo Dialing list, press
Clear All
To call a phone number in the Turbo Dialing list:
Press
1
2
If the location number does not have a phone number
assigned to it, you are prompted to add it to the Turbo
Dialing list.
.
q
location number for 3 seconds
select a phone number from
your addressbook
enter a phone number
1
to erase the old number and enter
b
and select
Calling Features
Using Caller ID
Caller ID lets you see who is calling before you
answer your phone.
45

Incoming Calls
The phone displays the caller’s name if it is stored in your
addressbook, or
is not available.
When your phone is closed, you can see the caller ID
information through the external display.
Incoming Call
when caller ID information
Outgoing Calls
To show or hide your caller ID when making a call, press
in the dial pad and select
Show ID
or
Hide ID
.
Voicemail
You can listen to your voicemail by calling the
voicemail phone number provided by your
service provider.
Note:
Calling Features
46
Voicemail messages are stored on the network, not
on your phone.
Storing Your Voicemail Number
Press
1
f
K
2
b
Setup
3
Voicemail
4
phone number of your voicemail system
5
OK
If you have a password, you can program it into the dialing
sequence by inserting a pause between the phone number
b

and password. When you call your voicemail, your phone
will wait for the call to connect to the voicemail system,
then send your password.
Press To
# * .
1
2
P
1 2 3
3
display the symbol pad
insert a pause
return to the dial pad
Listening to a Voicemail Message
When you miss a call or have a new message, the new
notification indicator flashes in the top status bar.
Press
Press
voicemail number already filled in. Press
voicemail number and retrieve your messages.
to list your missed calls and new messages.
New Voice Msg
to open the dial pad with your
OK
to call the
Using Call Waiting
If you subscribe to call waiting service, you can
put a call on hold to answer another call by
pressing
If you receive a new call when you already have a call
connected and a call on hold, you have to drop one of the
calls to answer the new call. The incoming call screen lets
you choose which call to drop. To reject the new call with a
busy signal, press
Hold
in the in-call screen.
Busy
.
Calling Features
47

Putting a Call on Hold
Press
Hold
in the in-call screen. The call status changes to
in the status bar at the top of the touchscreen.
Make a New Call with a Call on Hold
From the in-call screen:
Press
1
2
phone number
3
Send
If the new call is successful, you will have one active call
and one call on hold. Each call is listed in the in-call
screen. Press
Calling Features
Switch
Connect an Active Call to a Call on Hold
To connect the call on hold to your currently active call,
press
b
Transfer
While the call is being transferred,
Call on Hold
your call is disconnected.
is displayed. Once the call is transferred,
Tip:
Press to return to the
original call without dialing
the second number.
to switch between calls.
from the in-call screen.
Transferring Call to
48

Press
1 b
2
number to
transfer to
3
Send
Transferring a Call
From the in-call screen:
Transfer
Tip:
Press to return to the
original call without
transferring.
Changing the Active Line
Change the active phone line to make and
receive calls from your other phone number.
Note:
This feature is available only if your SIM card has
2 phone lines.
Press
1
h
u
2
Phone Setup
3
Phone:
pulldown list
4
Line 1
or
Line 2
Displaying Your Phone Number
From the in-call screen: press b>
From the main menu: press
q
b
My Number
>
My Number
.
.
Calling Features
49
Messages and Email
Text Messaging
The Message Center is where your
text and voicemail messages are
organized.
Press
K
to open the Message
Center.
Message Folders
Message Center
Inbox [2]4
SIM Card [0]3
Outbox 0
Voice Mail
Info Svc
Sent
Exit
The Message Center lists the default
folders that come with your phone, plus any personal
folders that you create. The number in brackets indicates
new, unread messages. The number outside the brackets
is the total number of messages in the folder.
Folder Name Contains
Inbox Incoming text messages
SIM card Messages stored in the
memory on the SIM card
Messages and Email
This is the default folder for
incoming messages unless
you change it in your
message inbox settings.
Outbox Messages waiting to be sent
Voice mail List of voicemail messages
12:00
9
Compose
50

Folder Name Contains
Info Svc Messages sent to your phone
by your service provider
(weather forecasts, stock
market information, etc.)
Sent Sent messages
Quick Text Short, predefined phrases
you can insert into your text
messages
Draft Messages you have written
but not sent
Trash Deleted messages
Opening a Message Folder
Press a folder name to list the messages in the folder, then
press a message title to read the message.
Setting Up Your Message Inbox
Note:
Your service provider may have programmed the
message inbox settings for you.
Press To
1
h
u
Messages and Email
2
Messaging Setup
3
Inbox
4
Service Ctr
Info
enter you service center
settings
51

Press To
5
Service Ctr
Numbr:
input
field
6
service center number
7
OK
8
Expire After:
pulldown list
9
Outgoing Msg
Type:
pulldown
list
10
OK
11
Incoming Msg:
pulldown list
12
View By:
pulldown list
13
Remove Based
On:
pulldown list
14
OK
Messages and Email
open the numeric editor
store the service center
number
enter the time limit for
message entry
select the outgoing message
type
store the service center
information
select the folder for new
messages
arrange incoming messages
by date, subject, or name
select the conditions for
deleting incoming messages
store the Inbox settings
52

Composing a New Message
See page 30 for information on how to enter text on your
phone.
Press To
1
f
K
2
3
4
Compose
or
Message:
or
Message:
field
label
input
open a new message screen
compose a message to send to a
mobile phone number
compose a message to send to an
email address
Note:
Email sent as a text
message may be subject to
certain limitations, such as
message length. Contact your
service provider.
select a quick text message
enter a message
Messages and Email
53

Sending a Message
Make sure the correct message type icon is selected at the
top of message.
Select for SMS text message Select for email message
Sending a Message to a Phone Number
Select the phone number from your addressbook by
pressing on the
pressing on the
press
Send
Sending a Message to an Email Address
Select the email address from your addressbook by
pressing on the
on the
To:
Note:
Your service provider’s gateway number must be
programmed in your phone to send email as an SMS text
message. If you are not able to send email as an SMS text
Messages and Email
message, do the following from the Message Center:
1
Press b and select
2
Press
3
Enter your service provider’s gateway number.
4
Press OK.
To:
label, or enter the phone number by
To:
input field. To send the message,
.
To:
label, or enter the address by pressing
input field. To send the message, press
Setup
.
SMS_Email
.
Send
.
54

Sending a Message at a Scheduled Time
After composing the message, pressb and select
Later
. You are prompted to select the time. The message
is stored in the Outbox folder of the Message Center until
the scheduled time, then placed in the Sent folder after it is
sent.
Note:
You must be within your service coverage area and
have your phone turned on at the scheduled time.
Send
Saving a Draft of a Message
To save a message without sending it, pressb and select
Save to Drafts
of the Message Center.
To edit or send the message:
. The message is saved in the Drafts folder
Press To
1
Drafts folder list your draft messages
2
message title display the message
3
Edit
4
Send
open the message for editing
send the message
Receiving and Reading Messages
If your phone is off when someone sends you a message,
the service center will send the message when you turn
your phone back on.
When you receive a new message, you are notified
with an alert and incoming message dialog box. Press
OK
to read the message, or
Message Center Inbox for future reading.
Dismiss
to store it in the
Messages and Email
55

If you dismiss the message or miss the incoming message
alert, the new notification indicator flashes in the status
bar. Press to list missed calls and retrieve new
messages.
While reading a message, press
b
to open the message
menu with the following options.
Select To
Return Call
call the sender’s phone
number
Move to Trash
move the message to the
Trash folder
Forward Message
Compose
Save Address
forward the message
compose a new message
save the sender’s phone
number in your addressbook
Move to Folder
move the message to a
personal folder
Storing or Calling Numbers in a Message
Use the stylus to highlight a phone number in the
message. You are prompted to
Messages and Email
in the addressbook. If you store the number, you can add it
to an existing entry in your addressbook or create a new
entry.
Dial
the number or
Store
it
Replying to a Message
While reading the message, press
message opens with the sender’s name in the
56
Reply
. A new
To:
field.

Note:
Depending on your service provider, you may be
able to receive email as an SMS text message. This type
of message has the network port number in the
and the sender’s email address as part of the message
text.
To:
field
Inserting Quick Text
Your phone comes with a number of Quick Text messages
that you can send or insert into your own messages.
Press To
1
Message:
2
a quick text
message
list quick text messages
insert the quick text at the
end of your message
Creating Your Own Quick Text
Press
1
Quick Text folder in the Message Center
2
New
Resetting the Default Quick Text List
To cancel all quick text changes and remove new quick text
messages you have added, select
Message Center, press
b
and select
Quick Text
Reset to Default
from the
.
Messages and Email
57

Inserting Pictures, Animations, and Sounds
While composing a message, use the following icons to
insert pictures, animations, and sounds into your
message. To create pictures, animations, and sounds, see
page 89.
a2de1
Insert picture
Insert animation Insert sound
Erase
Hide text input area
Deleting Messages
You can set your phone to automatically delete messages
from your message folders. Open the folder, press
select
Setup Folder
list to select the delete conditions (age, number, or do not
remove).
•
If you choose
Delete After: to enter the number of days to
keep messages. The maximum is 999 days.
•
If you choose
below
Keep Last: to enter the number of
messages to keep. The maximum is 999
Messages and Email
messages.
To delete messages individually, press b while the
message is open and select
moved to the Trash folder remain there until you empty
the Trash folder.
. Use the
Age
Number
Remove Based On:
,
press the numeric field below
,
press the numeric field
Move to Trash
pulldown
. Messages
b
, and
58

Emptying the Trash Folder
To delete all messages in the Trash folder, open the folder
and press
folder, select the message, press
Message
.
Empty
. To delete a specific message in the Trash
b
, and select
Delete
Receiving Information Service Messages
Information service messages (also known as
cell broadcasts) are messages sent by your service
provider. These messages can include news, weather,
sports, travel, entertainment, and more.
The channels that send information service messages are
numbered. Different channels send different types of
messages. Contact your service provider for a list of
channels and the information they provide.
Note:
Information service messages are deleted when you
turn your phone off.
Press To
1
h
u
2
Messaging Setup
3
Info Services
4
Receive:on
5
channel frequencies for the information you
want to receive
allow information service
messages. Set
to prevent these messages
from being sent to your
phone.
Receive:off
Messages and Email
59

The email application on your phone can be
used to send email to and receive email from
email systems that offer connectivity using POP3/IMAP
and SMTP standards. Many online email services use
these standards.
When sending email to another A388 phone, you can
attach notes from the notepad and contact information
from your addressbook.
Note:
Depending on your service provider, you may also
be able to send email through your phone’s SMS text
messaging feature. See page 54.
Setting Up Email
Before you can send or receive email, information about
your email account and service provider must be entered
into the phone. Your service provider may have set up your
email for you. If your email is not set up, enter the details of
your email account and the specific information provided
by your service provider into the Send Setup and Receive
Setup screens.
Messages and Email
60
Press To
1
h
u
2
Internet Setup
3
eMail Setup
4
a mailbox open the Mailbox Setup
screen

Press To
5
Send Setup
6
Receive Setup
You may also have to enter information about your data
service connection into the phone (subscription to data
service from your service provider is required to use
email). If this is not already set up on your phone, enter the
specific information provided by your service provider into
the Connection Setup screen.
Press
1
h
u
2
Internet Setup
3
Connection Setup
configure settings for sending
email
configure settings for
receiving email
Opening Your Email Mailbox
You can access your email in two different ways:
•
Online (while connected to the Internet)
When online, you can send and receive email
messages and manage all of your email.
Messages and Email
•
Offline (without connecting to the Internet)
If you work offline, you can only manage and read
existing emails stored on your phone.
61

When you access the email function, your phone detects
whether it is connected to the Internet. You can choose to
connect and work online, or work offline.
Press To
1
f
k
2 Now
or
Later
If you choose to work online and a connection is
established, your default email mailbox is displayed. The
list of folders in your mailbox depends on your service
provider and whether you have created any personal
folders, but the appearance of the mailbox screen is similar
to the Message Center where text and voicemail
messages are stored (see page 50).
Once connected, you can send and receive email.
Note:
If you do not have a default mailbox, a list of
mailboxes is displayed, and you can choose which mailbox
you want to log in to.
Messages and Email
Note:
You may be asked to enter your user name and
password before your mailbox is displayed, depending on
your service provider and whether your user name and
password are entered in the email setup.
work online
work offline
62

Setting Your Email Signature
Your email signature is text, such as your name and phone
number, that is added to the end of your outgoing email
messages.
Press
1
h
u
2
Internet Setup
3
eMail Setup
4
mailbox name
5
Signature Setup
6on option
7
signature input area
See page 30 for information on how to enter text on your
phone.
Note:
Turning the Signature option off does not erase your
signature text, but merely prevents it from being added to
the end of your email messages. To erase your signature
text, press
b
and select
Clear Signature
.
Composing a New Email
After your mailbox is displayed, press
To, Subject
information on how to enter text on your phone).
To insert a quick text message, press directly on the
Message:
label.
, and
Message
label instead of the input area next to the
fields. (see page 30 for
Compose
. Fill in the
Messages and Email
63

Sending Email Attachments
You can attach a note from the notepad or contact
information from your addressbook to an email message.
Press
1
b
Attach Text Note
or
b
Attach Contact
2
contact or note title
3
OK
Indicators at top right corner of the email identify the
attachment type:
Notepad attachment
Addressbook attachment
To read the attachment, press the icon. To remove the
attachment, press
Messages and Email
b
and select
Remove Attachment
.
64

Sending Email
Press
Send
after you compose your message.
If you are connected and working online, the message is
sent right away. If you are working offline, the message is
placed in your email Outbox and sent the next time you log
in to your mailbox using an Internet connection. Unsent
emails are prefixed with >>>.
Sent email is moved to the Sent folder. If sending fails or is
interrupted, is displayed next to the message title.
Receiving and Reading Email
Press
Send and Receive
email Inbox.
Note:
You must be connected to the Internet and logged
on to your email mailbox to receive new email (see
page 61).
Press the Inbox to list your messages. The following status
indicators are used:
New unread message
Message already read
To read a message, press the message title. When a
message is open, press
following functions:
. New emails are placed in your
b
to open a menu with the
Messages and Email
Select To
Forward Message
Compose Message
forward the email
open a new email
65

Select To
Save Address
save the sender’s email
address in your addressbook
Move to Folder
move the email to a personal
folder
Move to Trash
move the email to the Trash
folder
Replying to an Email
While reading the message, press
opens with the sender’s name in the
Reply
. A new email
To:
field.
Creating Email Folders
You can create up to 5 personal folders for storing and
organizing your email.
Press To
1
New Folder
2
Name:
Messages and Email
field
3
Routing:
or
4
Routing:
field
5
View By:
pulldown list
input
prompt
input
enter the folder name
select recipients from your
addressbook
enter email addresses
arrange messages in this
folder by date, subject, or
name
66

Press To
6
Remove Based
On:
pulldown list
select the conditions for
deleting messages from this
folder (by age, number, or do
not remove)
7
OK
save the folder settings
To change the settings for an email folder after it is already
created, press the folder name, press
Folder
.
b
, and select
Setup
Messages and Email
67

Setting Up Your
Addressbook
The addressbook stores important contact information
such as names, addresses, and phone numbers. You
can make calls and send messages from the addressbook.
Press
G
to open the addressbook.
Tip:
From the dial pad, press the Volume Up key.
Fields in an Addressbook Entry
Icons indicate each phone number type in an addressbook
entry. For each entry, you can also store a company name
and title, work and home addresses, birthday, anniversary,
web page, and notes.
Setting Up Your Addressbook
Work
Work2
Work Fax
Home
Home Fax
Mobile
Pager
Email address
68

Addressbook Categories
Categories help you organize and manage your
adddressbook. For example, you can put businessrelated contacts into a Business category, and friends
into a Personal category.
Your phone comes with the following categories.
•
Unfiled
The default category for creating new contacts.
•
Owner
This category is where you provide information about
yourself. Press
information.
•
SIM Card
Stores the entry in memory on the SIM card. Most
SIM cards allow you to store only one number per
name. Contacts stored on the SIM card are identified
by
in your addressbook.
Note:
Contact information stored in SIM card memory is
retained if you use your SIM card in another GSM phone.
All other categories, including those you create, are stored
in phone memory.
To quickly find an entry in your addressbook, select the
category where it is stored. The category All Contacts lists
all of the entries in your addressbook.
o
in the status bar to view your owner
Setting Up Your Addressbook
69

Creating an Addressbook Entry
Press To
1
G
2
New
3
Category:
pulldown list
4
Name:
5
phone number
type or other
input field
6
OK
Inserting a Pause in a Phone Number
Pauses are useful for dialing an extension number, going
into voice mail, or entering a password after a call is
Setting Up Your Addressbook
connected. At the first pause in the number, the phone
waits until the call is answered, then waits 3 seconds
before transmitting the next digits.
At the position where you want to insert a pause:
Press To
#*.
1
2
P
123
3
input field enter the contact name
open the addressbook
create a new entry
select a category
open the dial pad or text entry
tool
save the contact
change to the symbol keypad
insert a pause
return to the dial pad
70

Storing a Number After a Call
Within 5 seconds after ending a call:
Press To
1
Store
2
Add to Contact
or
Create Contact
3
phone number
type
4
OK
store the last dialed number
add the number to an existing
contact in your addressbook
create a new contact record
store the number
save the contact
Locating Entries in Your Addressbook
You can find an entry in your addressbook using either the
alphabetic tabs on the right side of the screen or the Find
Contact feature.
Setting Up Your Addressbook
Using the Alphabetic Tabs
The alphabetic tabs allow you to quickly go
to the first entry for a particular letter. For
example, to find Kate, press the K-O tab
once to take you to the K’s. To find Matt,
press the K tab 3 times. Use
scroll through the entries.
\
and | to
\
A - E
F - J
K - O
P - T
U - Z
ENG
|
71

Using the Find Contact Feature
The Find Contacts feature lets you search your
addressbook by name, number, or any text string.
Press To
1
b
Find Contact
2
name, number
text
3
name, number, or text string to search for
4
OK
, or
search for a name, number,
or text string
start the search
The screen will show the search results, or
Found
. If any matches are found, press a match to open the
addressbook record.
Calling a Number from Your Addressbook
Setting Up Your Addressbook
Press
1
contact name
2
number to dial
3
Send
To dial a number immediately without having to press
turn the Prepend option on:
Press
1
h
u
2
Phone Setup
72
No Match
Send
,

Press
3
Prepend:on
4
Done
Sending a Message from Your Addressbook
Press To
1
contact name
2
mobile number
or
email address
3
message area enter your message
4
Send
open a new text message
with the contact’s phone
number in the
open a new email with the
contact’s email address in the
To:
field
To:
field
Setting Up Your Addressbook
73

Copying Addressbook Entries
You can copy a number in your addressbook between SIM
card memory and phone memory.
Press
1
contact name
2
b
Copy to SIM
or
b
Copy to Phone
3
phone number to copy
4
OK
Deleting Addressbook Entries
Press
1
contact name
Setting Up Your Addressbook
2
b
Delete Contact
3
OK
T
o delete more than one contact:
Press
1
category containing contacts you want to delete
2
b
Delete Contacts
3
contacts to be deleted
4
OK
74
Note:
To stop the delete while it is in progress, press
Cancel
.

Sending Addressbook Information
You can send a phone number in your addressbook as a
text or email message. If the recipient is using an A388
phone, the number is saved in their addressbook. If the
recipient is using another type of GSM phone, they will
receive the contact information as a text message.
Press To
1
contact name
2
b
Send Text
or
b
Send Email
3
phone number
type
4
OK
5
To:
6
Send
Unable To Send Information Exceeding Length Limitation
is displayed if the contact information exceeds
160 characters.
send the number in an SMS
text message
send the number in an email
select the number to send
insert the number into the
message (displays as an
addressbook icon)
select message recipients
send the message
Receiving Addressbook Information
When you receive a message containing contact
information, your phone rings and/or vibrates and displays
an incoming message dialog box. Press
message now, or
Dismiss
to store it in the Inbox folder.
Read
to read the
Setting Up Your Addressbook
75

When you read the message, it opens as a new
addressbook entry. Fill out any remaining fields and press
Store
to save the entry in your addressbook.
Synchronizing with TrueSync Software
You can synchronize addressbook entries
between your phone and computer or hand-held
device with Starfish TrueSync
Motorola accessory product. See the TrueSync
user guide for more information.
Note:
TrueSync software is designed to synchronize with
basic features of many popular Personal Information
Management (PIM) software and hardware products.
Setting Up Your Addressbook
®
software, a
76

Getting More Out of Your Phone
Making a Conference Call
With conference calling, you can have a
conference with up to 5 other people. At any
time during the call, you can add, disconnect, or
separate individuals from the conference call.
Note:
You must subscribe to both Conference Calling
and Call Waiting in order to make conference calls from
your phone.
Starting a Conference Call
Do This
1
Dial the first party’s number
2
Press
Hold
3
Dial the next party’s number
4
Press b and select
An icon in the in-call screen shows the number of parties in
the conference call. For example, indicates
6 connected calls (5 plus yourself).
Link Call
to connect the calls
Getting More Out of Your Phone
77

Adding a New Call to the Conference Call
You can add new calls to the conference call by using the
dial pad to call a number or by answering a call waiting.
With either method, the conference call is put on hold while
the new call is connected.
After the new call is connected, press
Call
to connect the new call with the conference call.
b
and select
Separating a Member From a Conference Call
This allows you to have a private conversation with one
of the people on the conference call. The rest of the parties
on the call are put on hold.
Note:
You cannot separate a member from the conference
call if you already have any calls on hold.
Press
1
b
Split
2
phone number or name of the call to be
separated
3
OK
To rejoin all parties to the conference call, press
Getting More Out of Your Phone
select
Link Call
.
b
Link
and
Ending a Conference Call
Press
End
.
78

Forwarding Calls
You can forward your phone’s voice, fax, and/or
data calls directly to another phone number.
For voice call forwarding, you can select specific conditions
under which calls will be forwarded, for example, if your
phone is busy or if you do not answer. You can also set a
starting and ending time for forwarding calls.
Set Up or Cancel Call Forwarding
Press To
1
h
u
2
Phone Setup
3
Call Forward
4
Forward
Schedule
5
Voice Calls
6
Fax Calls
7
CSD Calls
8
Cancel All
Forward
forward calls starting and
ending at a specified time
forward voice calls
forward fax calls
forward data calls
cancel all call forwarding
Getting More Out of Your Phone
For each option, press to select the forwarding phone
number from your addressbook, or press the space to the
right of to enter a phone number.
79

Blocking Calls
Call blocking lets you restrict incoming and/or
outgoing calls. You can block all calls, calls to
international numbers, or calls while roaming.
Press
1
h
u
2
Security
3
Call Block
Using Fixed Dialing
When you turn on fixed dialing, you can only
call numbers stored in the fixed dial list. Use
this feature to limit outgoing calls to a predefined list of
numbers, country codes, area codes, or other prefixes.
Press To
1
h
u
2
Security
3
Fixed Dialing
4
your SIM PIN2 code
5
Getting More Out of Your Phone
Enter
6
on
or
off
turn fixed dialing on or off
80

Setting Up the Fixed Dial List
Press To
1
b
New Contact
add a number to the fixed dial
list
2b
Delete
Contact
3
entry name view or modify the name or
delete a number from the
fixed dial list
number of a fixed dial entry
Monitoring Phone Use
Your phone has an internal metering system that keeps
track of call times and costs.
Call cost information is available only if you receive the
advice of charge service.
Press
1
h
u
2
Phone Setup
3
Call Meters
Getting More Out of Your Phone
12:00
Call Meters
Audible Timer
Beep: off
Display Timer
time per call
Call Cost Setup
Available Credit
Cancel OK
12:00
Call Meters
Total Call Cost
0.00
Total Call Timer
00:00:00
Lifetime Timer
00:00:00
Cancel OK
81

View and Reset Call Timers
The
Total Call Timer
on all calls since the last reset. To reset this timer,
press
b
and select
The
Lifetime Timer
on your phone. You cannot reset this timer.
shows the amount of time you spent
Reset Call Timer
shows the total time of all calls made
.
Use Timers During a Call
You can set a timer to beep at selected intervals during
a call, and display different types of information during a
call.
Use the
Use the
cost per call, or total call cost information on your phone
during a call.
Beep:
pulldown list to set the audible timer.
Display Timer
pulldown list to display call duration,
View Call Cost Information
The
your chargeable calls since the last reset.
The
Call Cost Setup
Call Cost
Press To
Getting More Out of Your Phone
1
2
3
and to set up call cost information
Charge Limit
Charge Type
Reset Call
Costs
Total Call Cost
feature allows you to reset the
shows the total cost of all
.
specify a charge limit
display charge information as
phone time units or currency
reset the Total Call Cost timer
Total
82

View Credit Information
Press
Available Credit
available.
You will receive two warning messages when you are
approaching your credit limit, and another message when
you reach the limit.
Note:
No Charge Limit Set
a prepaid credit limit.
to view the amount of credit
is displayed if you do not have
Adjusting Network Settings
Your service provider registers your phone with a
network. You can view information about the current
network, change how your phone searches for a network,
list networks operating at your current location, and specify
your preferred networks.
Press
1
h
u
2
Phone Setup
3
Network Setup
Getting More Out of Your Phone
83

Change Your Phone’s Operating Band
The country where you purchased your phone determines
which operating bands are available. You must change to
the appropriate band if you travel abroad.
Press
1
h
u
2
Phone Setup
3
Network Setup
4
Search Setup
5
Band:
pulldown list
Change the Network Search Speed
The network search speed determines how long your
phone waits before attempting to re-register with a network
after a previous registration attempt fails. To conserve
battery power, set the network search speed to slow.
Press
1
h
u
2
Phone Setup
3
Getting More Out of Your Phone
Network Setup
4
Search Setup
5
Speed:
pulldown list
84

Personalizing Your Phone
Personalizing a Ring Style
To change the ring style for incoming calls:
Press To
1
h
u
2
Sounds & Alerts
3
Line 1 Ring
Tone
or
change the ring style for line 1
Line 2 Ring
Tone
4
ring style
5+
or
-
You can also change the alerts that notify you of missed
events, incoming text and information service messages,
and datebook alarms.
Press
1
h
u
2
Sounds & Alerts
3
Notifications
4
alert for each type of notification
change the ring style for line 2
adjust the ring volume
Personalizing Your Phone
85

Creating Custom Ring Tones
You can create and store custom ring tones on your
phone. The tones appear in the list of available ring styles
and event notifications.
Press To
1
g
Y
2
New
3
notes compose the tone (see
4
OK
5
Title:
input field enter the ring tone name
6
OK
7
V
8
b
Entering Notes
The ring tone composer has the
following features to assist you with
composing a ring tone.
•
Keyboard to enter notes and
rests into the stave (maximum of
70 musical notes per
composition).
Press
b
Personalizing Your Phone
to label the keyboard notes.
and select
open the ring tone composer
create a new ring tone
“Entering Notes” below)
save the ring tone
store the ring tone
play the ring tone
send or delete the ring tone
Edit Melody
.
.
1/32 1/16 1/4 1/2 11/8.
Cancel
View Labels
12:00
OK
H
M
L
86

•
Interval control buttons to determine where a note
falls. Press H, M, or L to select high, medium, or low
octave. Notes in the low octave appear on a separate
stave.
•
Note length buttons that you can assign on a note-bynote basis. Press the length before you enter the note.
•
A delete button (x) that deletes the last note on the
stave (short press) or all notes in the tone (press and
hold for several seconds).
•
Buttons similar to those on a tape player for navigating
through the composition:
Press to move the cursor to the beginning of the
ring tone.
Press to move the cursor to the end of the ring
tone.
Press to play the previous note.
Press to play the next note.
Press to play the ring tone.
You can also move the cursor to any point in the composition by pressing directly on the musical notes
staff.
•
A Change Tempo option to adjust the tempo to slow,
normal, fast, or faster (press
Tempo
).
•
A Clear All Notes option to clear all of the notes in the
ring tone at one time (press
Notes
).
b
and select
b
and select
Change
Clear All
Personalizing Your Phone
87

Playing a Ring Tone
To play a ring tone while you are composing it, press in
the ring tone composer.
To scroll through and play your list of custom ring tones:
Press To
1
g
Y
2
ring tone name open the ring tone
3
}
4
>> or << select the next or previous ring
list your custom ring tones
play the ring tone
tone
Editing a Ring Tone
You cannot edit the predefined ring tones included with
your phone. To edit a custom ring tone:
Press To
1
g
Y
2
ring tone name open the ring tone
3
anywhere on the
keyboard
list your custom ring tones
edit the ring tone
Personalizing Your Phone
88

Deleting a Ring Tone
You cannot delete the predefined ring tones included with
your phone. To delete a custom ring tone:
Press To
1
g
Y
2
b
Delete All
or
ring tone name
b
Delete Melody
list your custom ring tones
delete all custom ring tones
delete the ring tone
Creating Pictures, Animations, and Sounds
Your phone comes with pictures, animations, and
sounds that you can insert into messages. You can
also create your own pictures, animations, and sounds.
Press To
1
g
3
2
pulldown list at
top of screen
3
picture,
animation, or
melody title
or
New
open the EMS Editor
select the Picture Editor,
Animation Editor, or Melody
Editor
open the picture, animation,
or melody
create a picture, animation, or
melody
Personalizing Your Phone
89
Picture Editor
Select the grid size (16x16, 32x32, or 96x64) before you
start to create your picture. To select the drawing tool,
press . Using the stylus, press the editing area (grid) to
create your picture.
To erase, press
or more points on the grid. The drawing tool select button
changes to (an eraser). Press
Pencil
to go back to drawing mode.
b
, select
Switch to Eraser
b
and select
, and press one
Switch to
You can also use the
stroke, erase all points in the picture, invert the picture, and
delete the picture.
b
menu to undo or redo your last
Animation Editor
Select the grid size before you start creating the
animation. Using the stylus, press the editing area
(grid) to create your animation.
Each frame is represented by on the left side of the
screen. Press to display or edit the frame in the editing
area.
•
To cut or copy and paste a frame, press (copy)
or (cut), go to the destination frame, and
paste .
•
To play the animation, press . Press to stop
playing the animation.
Personalizing Your Phone
90

Melody Editor
When you first open the Melody Editor, a list of melody
titles is displayed. Press
title to play or edit the melody.
The composition tools for creating a melody are the same
as those used to create a ring tone (see page 86). When
you are finished composing, press
and enter the melody name in the
To play a melody, press the melody title and then use the
following controls.
Play melody
Go to previous
melody
New
System Melody
Title: Fanfare
<< >>
Back
to create a melody, or press a
OK
to save the melody
Title
field.
12:00
Go to next
melody
Creating Personal Message Folders
Your phone comes with a default set of folders for storing
text and voicemail messages. You can also create
personal folders for organizing your messages.
Note:
Text messages and a list of your voicemail
messages are stored in the Message Center.
Press To
1
f
K
2
b
New Folder
create a new folder
Personalizing Your Phone
91

Press To
3
Name:
input field enter the folder name
4
Remove Based
On:
pulldown list
5
OK
To edit the name or properties of a personal folder,
press
b
and select
or from your email mailbox.
To delete a personal folder, press
Folder
from the Message Center or from your email
mailbox.
specify conditions for deleting
messages from the folder. To
keep messages in the folder
indefinitely, select
Remove
.
store the folder
Edit Folder
from the Message Center
b
Do Not
and select
Delete
Creating Message Mailing Groups
Mailing groups allow you to send a message to a group of
people without selecting each person individually. For
example, a group could contain members of a club or
coworkers working on the same project. You can put up to
10 contacts in one group.
Press To
1
f
G
2
b
New Group
Personalizing Your Phone
92
open your addressbook
create a new group

Press To
3
Catg:
pulldown
list
4
Name:
input field enter a name for the group
5
Recipients:
input field
6
OK
Groups are preceded by in your addressbook. To
send a message to a group, select the group name as
the recipient in the message
select a category for the group
Tip:
Only contacts in the
selected category can be
added to the group. To pick
from your entire addressbook,
create the group under the All
Contacts category.
select the group members
save the group
To:
field.
Creating Categories for Addressbook Entries
You can customize your addressbook by organizing your
contacts into categories. Your phone comes with some
predefined categories (see page 69).
Personalizing Your Phone
Press
1
f
G
2
b
New Category
Note:
Category names cannot exceed 20 characters.
93

Setting the Menu Language
You can set the language in which menu features and
options are displayed.
Press
1
h
u
2
Initial Setup
3
Language
Resetting All Options
The Master Rest function resets all options back to their
original factory settings except for the unlock code,
security code, and lifetime timer.
Press
1
h
u
2
Initial Setup
3
Master Reset
Personalizing Your Phone
94

Clearing All Stored Information
The Master Clear function:
•
Resets all options back to their original factory
settings except for the unlock code, security code, and
lifetime timer
•
Erases all user-downloaded content
•
Clears all user settings and entries, including
addressbook and datebook entries, except for
information stored on the SIM card
Caution:
information cannot be recovered. Master Clear does not
delete any information stored on the SIM card.
Press
1
2
3
Once you do a Master Clear, the erased
h
u
Initial Setup
Master Clear
Personalizing Your Phone
95

Security
Locking the SIM Card
Your PIN (Personal Identification Number) code protects
the information stored on your SIM card. When the SIM
card is locked, you must enter your PIN code to unlock the
SIM card each time you turn on the phone or insert the
SIM card in the phone.
Press
1
h
u
2
Security
3
SIM Request:on
4
your SIM PIN code
5
Security
If you enter an incorrect PIN code three times in a row,
your SIM card is disabled and your phone displays
Blocked
which you can obtain from your service provider.
Caution:
10 times, the SIM card is permanently disabled and your
phone displays
Send
To turn the SIM card PIN feature off, use the above
procedure and set
SIM Request:off
.
Unblock the SIM Card PIN Code
. You must enter a PIN unblocking key (PUK) code,
If the unblocking attempt is tried unsuccessfully
SIM Disabled
.
SIM
96
 Loading...